

Page 1

Infoprint Color 1454 & 146 4
Setup Gui d e
S510-4059-00
Page 2

Page 3

Infoprint Color 1454 & 146 4
Setup Gui d e
S510-4059-00
Page 4

Edition: June 2004
Lexmark and MarkNet are trademarks of Lexmark International, Inc., registered in the
United States and/or other countries.
ImageQuick is a trademark of Lexmark International, Inc.
PostScript® is a registered trademark of Adobe Systems Incorporated. PostScript 3 is
Adobe Systems’ designation of a set of printer commands (language) and functions
included in its software products. This printer is intended to be compatible with the
PostScript 3 language. This means the printer recognizes PostScript 3 commands
used in various application programs, and the printer emulates the functions
corresponding to the commands.
Other trademarks are the property of their respective owners.
© 2004 Lexmark International, Inc.
All rights reserved.
UNITED STATES GOVERNMENT RIGHTS
This software and any accompanying documentation provided under this agreement
are commercial computer software and documentation developed exclusively at
private expense.
Federal Communications Commission (FCC) compliance
information statement
This printer complies with the limits for a Class B digital device (without a network
cable or high-capacity output finisher installed) and for a Class A digital device (with a
network cable or high-capacity output finisher installed), pursuant to Part 15 of the
FCC Rules. Operation is subject to the following two conditions:
(1) this device may not cause harmful interference, and
(2) this device must accept any interference received, including interference that may
cause undesired operation.
Any questions on this statement should be directed to:
Director of Lexmark Technology & Services
Lexmark International, Inc.
740 West New Circle Road
Lexington, KY 40550
(859) 232-3000
Refer to the online documentation for additional compliance information.
Safety information
• If your product is not marked with this symbol , it must be connected to
an electrical outlet that is properly grounded.
CAUTION: Do not set up this product or make any electrical or cabling
connections, such as the power cord or telephone, during a lightning storm.
• The power cord must be connected to an electrical outlet that is near the
product and easily accessible.
• Refer service or repairs, other than those described in the operating
instructions, to a professional service person.
• This product is designed, tested, and approved to meet strict global safety
standards with the use of specific Lexmark components. The safety features
of some parts may not always be obvious. Lexmark is not responsible for the
use of other replacement parts.
• Your product uses a laser.
CAUTION: Use of controls or adjustments or performance of procedures
other than those specified herein may result in hazardous radiation
exposure.
• Your product uses a printing process that heats the print media, and the heat
may cause the media to release emissions. You must understand the section
in your operating instructions that discusses the guidelines for selecting print
media to avoid the possibility of harmful emissions.
Conventions
Note: A note identifies something that could help you.
CAUTION: A caution identifies something that could cause you harm.
Warning: A warning identifies something that could damage your product hardware
or software.
Static sensitivity notice
Warning: This symbol identifies static-sensitive parts. Do not touch
in the areas near these symbols without first touching the metal
frame of the printer.
Page 5

Contents
Step 1: Choose your setup (local or network printer) . . . . . . . . . . . . . . . . . . . . . . . . 7
Local printer . . . . . . . . . . . . . . . . . . . . . . . . . . . . . . . . . . . . . . . . . . . . . . . . . . . . . . . . 7
Network printer . . . . . . . . . . . . . . . . . . . . . . . . . . . . . . . . . . . . . . . . . . . . . . . . . . . . . 7
Step 2: Install drivers for local printing . . . . . . . . . . . . . . . . . . . . . . . . . . . . . . . . . . . . 7
Windows . . . . . . . . . . . . . . . . . . . . . . . . . . . . . . . . . . . . . . . . . . . . . . . . . . . . . . . . . . 7
Macintosh . . . . . . . . . . . . . . . . . . . . . . . . . . . . . . . . . . . . . . . . . . . . . . . . . . . . . . . . . 8
UNIX/Linux . . . . . . . . . . . . . . . . . . . . . . . . . . . . . . . . . . . . . . . . . . . . . . . . . . . . . . . . 9
Step 3: Unpack the printer . . . . . . . . . . . . . . . . . . . . . . . . . . . . . . . . . . . . . . . . . . . . . . 9
Setting up a multifunction printer . . . . . . . . . . . . . . . . . . . . . . . . . . . . . . . . . . . . . . . . 9
Unpacking . . . . . . . . . . . . . . . . . . . . . . . . . . . . . . . . . . . . . . . . . . . . . . . . . . . . . . . . . 9
Step 4: Set up the printer and paper handling options . . . . . . . . . . . . . . . . . . . . . . 10
Printer models . . . . . . . . . . . . . . . . . . . . . . . . . . . . . . . . . . . . . . . . . . . . . . . . . . . . . 10
Printer setup . . . . . . . . . . . . . . . . . . . . . . . . . . . . . . . . . . . . . . . . . . . . . . . . . . . . . . 11
Installing a 2000-sheet drawer . . . . . . . . . . . . . . . . . . . . . . . . . . . . . . . . . . . . . . . . 11
Installing a 500-sheet drawer . . . . . . . . . . . . . . . . . . . . . . . . . . . . . . . . . . . . . . . . . 12
Installing a duplex unit . . . . . . . . . . . . . . . . . . . . . . . . . . . . . . . . . . . . . . . . . . . . . . . 13
Positioning the printer . . . . . . . . . . . . . . . . . . . . . . . . . . . . . . . . . . . . . . . . . . . . . . . 13
Installing an output expander . . . . . . . . . . . . . . . . . . . . . . . . . . . . . . . . . . . . . . . . . 14
Installing a 5-bin mailbox . . . . . . . . . . . . . . . . . . . . . . . . . . . . . . . . . . . . . . . . . . . . . 15
Step 5: Set up the print supplies . . . . . . . . . . . . . . . . . . . . . . . . . . . . . . . . . . . . . . . . 16
Setting up the print cartridges . . . . . . . . . . . . . . . . . . . . . . . . . . . . . . . . . . . . . . . . . 16
Attaching an operator panel overlay . . . . . . . . . . . . . . . . . . . . . . . . . . . . . . . . . . . . 19
Step 6: Install memory, firmware, or option cards . . . . . . . . . . . . . . . . . . . . . . . . . . 19
Removing the system board access cover . . . . . . . . . . . . . . . . . . . . . . . . . . . . . . . 20
Installing a memory card . . . . . . . . . . . . . . . . . . . . . . . . . . . . . . . . . . . . . . . . . . . . . 21
Installing a firmware card . . . . . . . . . . . . . . . . . . . . . . . . . . . . . . . . . . . . . . . . . . . . . 22
Installing a hard disk . . . . . . . . . . . . . . . . . . . . . . . . . . . . . . . . . . . . . . . . . . . . . . . . 23
Installing an option card . . . . . . . . . . . . . . . . . . . . . . . . . . . . . . . . . . . . . . . . . . . . . . 24
Replacing the system board access cover . . . . . . . . . . . . . . . . . . . . . . . . . . . . . . . 25
Applying the Option Added label . . . . . . . . . . . . . . . . . . . . . . . . . . . . . . . . . . . . . . . 25
Step 7: Load paper . . . . . . . . . . . . . . . . . . . . . . . . . . . . . . . . . . . . . . . . . . . . . . . . . . . 26
Loading the 500-sheet trays . . . . . . . . . . . . . . . . . . . . . . . . . . . . . . . . . . . . . . . . . . 26
Loading the 2000-sheet tray . . . . . . . . . . . . . . . . . . . . . . . . . . . . . . . . . . . . . . . . . . 27
Loading the multipurpose feeder . . . . . . . . . . . . . . . . . . . . . . . . . . . . . . . . . . . . . . . 29
Step 8: Attach cables and power cord . . . . . . . . . . . . . . . . . . . . . . . . . . . . . . . . . . . . 30
Cable types . . . . . . . . . . . . . . . . . . . . . . . . . . . . . . . . . . . . . . . . . . . . . . . . . . . . . . . 30
Attaching cables . . . . . . . . . . . . . . . . . . . . . . . . . . . . . . . . . . . . . . . . . . . . . . . . . . . 30
Step 9: Verify printer setup . . . . . . . . . . . . . . . . . . . . . . . . . . . . . . . . . . . . . . . . . . . . . 31
Printing a menu settings page . . . . . . . . . . . . . . . . . . . . . . . . . . . . . . . . . . . . . . . . . 31
Printing a network setup page . . . . . . . . . . . . . . . . . . . . . . . . . . . . . . . . . . . . . . . . . 32
Printing Help Menu pages . . . . . . . . . . . . . . . . . . . . . . . . . . . . . . . . . . . . . . . . . . . . 32
Step 10: Configure for TCP/IP . . . . . . . . . . . . . . . . . . . . . . . . . . . . . . . . . . . . . . . . . . 33
Assigning a printer IP address . . . . . . . . . . . . . . . . . . . . . . . . . . . . . . . . . . . . . . . . . 33
Verifying the IP settings . . . . . . . . . . . . . . . . . . . . . . . . . . . . . . . . . . . . . . . . . . . . . . 33
Configuring for Pull Printing . . . . . . . . . . . . . . . . . . . . . . . . . . . . . . . . . . . . . . . . . . . 33
Step 11: Install drivers for network printing . . . . . . . . . . . . . . . . . . . . . . . . . . . . . . . 34
Windows . . . . . . . . . . . . . . . . . . . . . . . . . . . . . . . . . . . . . . . . . . . . . . . . . . . . . . . . . 34
Macintosh . . . . . . . . . . . . . . . . . . . . . . . . . . . . . . . . . . . . . . . . . . . . . . . . . . . . . . . . 36
UNIX/Linux . . . . . . . . . . . . . . . . . . . . . . . . . . . . . . . . . . . . . . . . . . . . . . . . . . . . . . . 38
NetWare . . . . . . . . . . . . . . . . . . . . . . . . . . . . . . . . . . . . . . . . . . . . . . . . . . . . . . . . . 38
Contents
5
Page 6

Step 12: Other sources of information . . . . . . . . . . . . . . . . . . . . . . . . . . . . . . . . . . . 38
Viewing and using the publications CD . . . . . . . . . . . . . . . . . . . . . . . . . . . . . . . . . . 38
Contents
6
Page 7

Step 1: Choose your setup (local or network printer)
Local printer A local printer is a printer attached to your computer using a USB or parallel cable. The
local printer is intended to be used by the computer to which it is attached. If you are
attaching a local printer, you must install the printer driver on your computer before
setting up your printer.
Continue with Step 2: “Install drivers for local printing” on page 7.
Network printer A network printer is a printer attached to a network either by a network cable (such as
Ethernet) or through the use of a server. If you are attaching a network printer, you must
set up your printer on the network first, and then install the printer driver.
Continue with Step 3: “Unpack the printer” on page 9.
Step 2: Install drivers for local printing
The printer driver is software that lets your computer communicate with your printer.
The procedure to install drivers depends on the operating system you are using. Use
the following table to find driver installation instructions for your particular operating
system. If you need additional help, refer to the documentation that shipped with your
computer and your software.
Operating system Go to page...
Windows
Windows Server 2003, Windows 2000, Windows XP,
Windows 98 SE, Windows Me, Windows NT 4.x
Windows 95 and Windows 98 (first edition) 8
Serial printing 8
Macintosh 8
UNIX/Linux 9
7
Windows Some Windows operating systems may already include a printer driver that is
compatible with your printer. This may mean that installation will seem automatic in later
versions of Windows. System printer drivers work well for simple printing, but they
contain less functionality than our enhanced custom printer driver.
Note: Installing a custom driver will not
replace the system driver. A separate
printer object will be created and appear
in the Printers folder.
Using Windows Server 2003,
Windows 2000, Windows XP,
Windows98SE, WindowsMe,
and Windows NT
Note: USB support is not available for
Windows NT operating systems.
Use the drivers CD that shipped with your printer to install the custom printer driver and
obtain all the enhanced printer features and functionality.
1 Insert the drivers CD.
If the CD does not auto launch, click Start
D:\Setup.exe in the Run dialog box.
à Run, and then type
2 Click Install Software.
Choose your setup (local or network printer)
7
Page 8

Note: Some Windows operating
systems require that you have
administrative access to install printer
drivers on your computer.
3 Click Printer and Software. 4 Click Agree to accept the license agreement. 5 Select Suggested, and then click Next.
The Suggested option is the default installation for local and network-attached
setup. If you need to install utilities, change settings, or customize device drivers,
select Custom, and follow the instructions on your screen.
6 Select Local Attached, and then click Finish.
It may take some time for the drivers to load.
7 Close the drivers CD. 8 Go to “Unpack the printer” on page 9.
Using Windows 95 and Windows 98 (first edition)
Refer to the User’s Guide on the publications CD for information to install Windows 95
and Windows 98 (first edition) drivers.
Serial printing For information about serial printing, refer to the User’s Guide on the publications CD.
Macintosh Refer to the User’s Guide on the publications CD for information to install Macintosh
drivers and to create a desktop printer icon for Macintosh 8.6–9.x.
Creating a queue in Print Center
(Macintosh OS X)
Note: A PPD file provides detailed
information about the capabilities of a
printer to your Macintosh computer.
1 Install a printer PostScript Printer Description (PPD) file on your computer.
a Insert the drivers CD.
b Double-click the installer package for your printer.
c Click Continue on the Welcome screen and again after you view the
Readme file.
d Click Continue after you view the license agreement, and then click Agree
to accept the terms of the agreement.
e Select a Destination, and then click Continue.
f Enter your password, and then click OK.
g On the Easy Install screen, click Install. All the necessary software is
installed on your computer.
h Click Close when installation is complete.
2 Open Finder, click Applications, and then click Utilities.
3 Double-click Print Center or Printer Setup Utility.
4 Do one of the following:
If your USB-attached printer appears in the Printer List, you can quit Print Center
or Printer Setup Utility. A queue has been created for your printer.
If your USB-attached printer does not appear in the Printer List, make sure the
USB cable is properly connected and the printer is turned on. After the printer
appears in the Printer List, you can quit Print Center or Printer Setup Utility.
5 After you have installed the drivers on your computer, you are ready to set up
the printer. Go to “Unpack the printer” on page 9.
Install drivers for local printing
8
Page 9
UNIX/Linux Local printing is supported on many UNIX and Linux platforms, such as Sun Solaris and
Red Hat.
Note: If your drivers CD does not
contain any UNIX/Linux printer driver
packages, contact the place you
purchased your printer to see if your
printer is supported.
Some printer driver packages are available on the drivers CD. The User’s Guide in each
package gives detailed instructions for installing and using printers in UNIX and Linux
environments.
All the printer driver packages support local printing using a parallel connection. The
driver package for Sun Solaris supports USB connections to Sun Ray appliances and
Sun workstations.
After you have installed the drivers on your computer, you are ready to set up the printer.
Go to “Unpack the printer” on page 9.
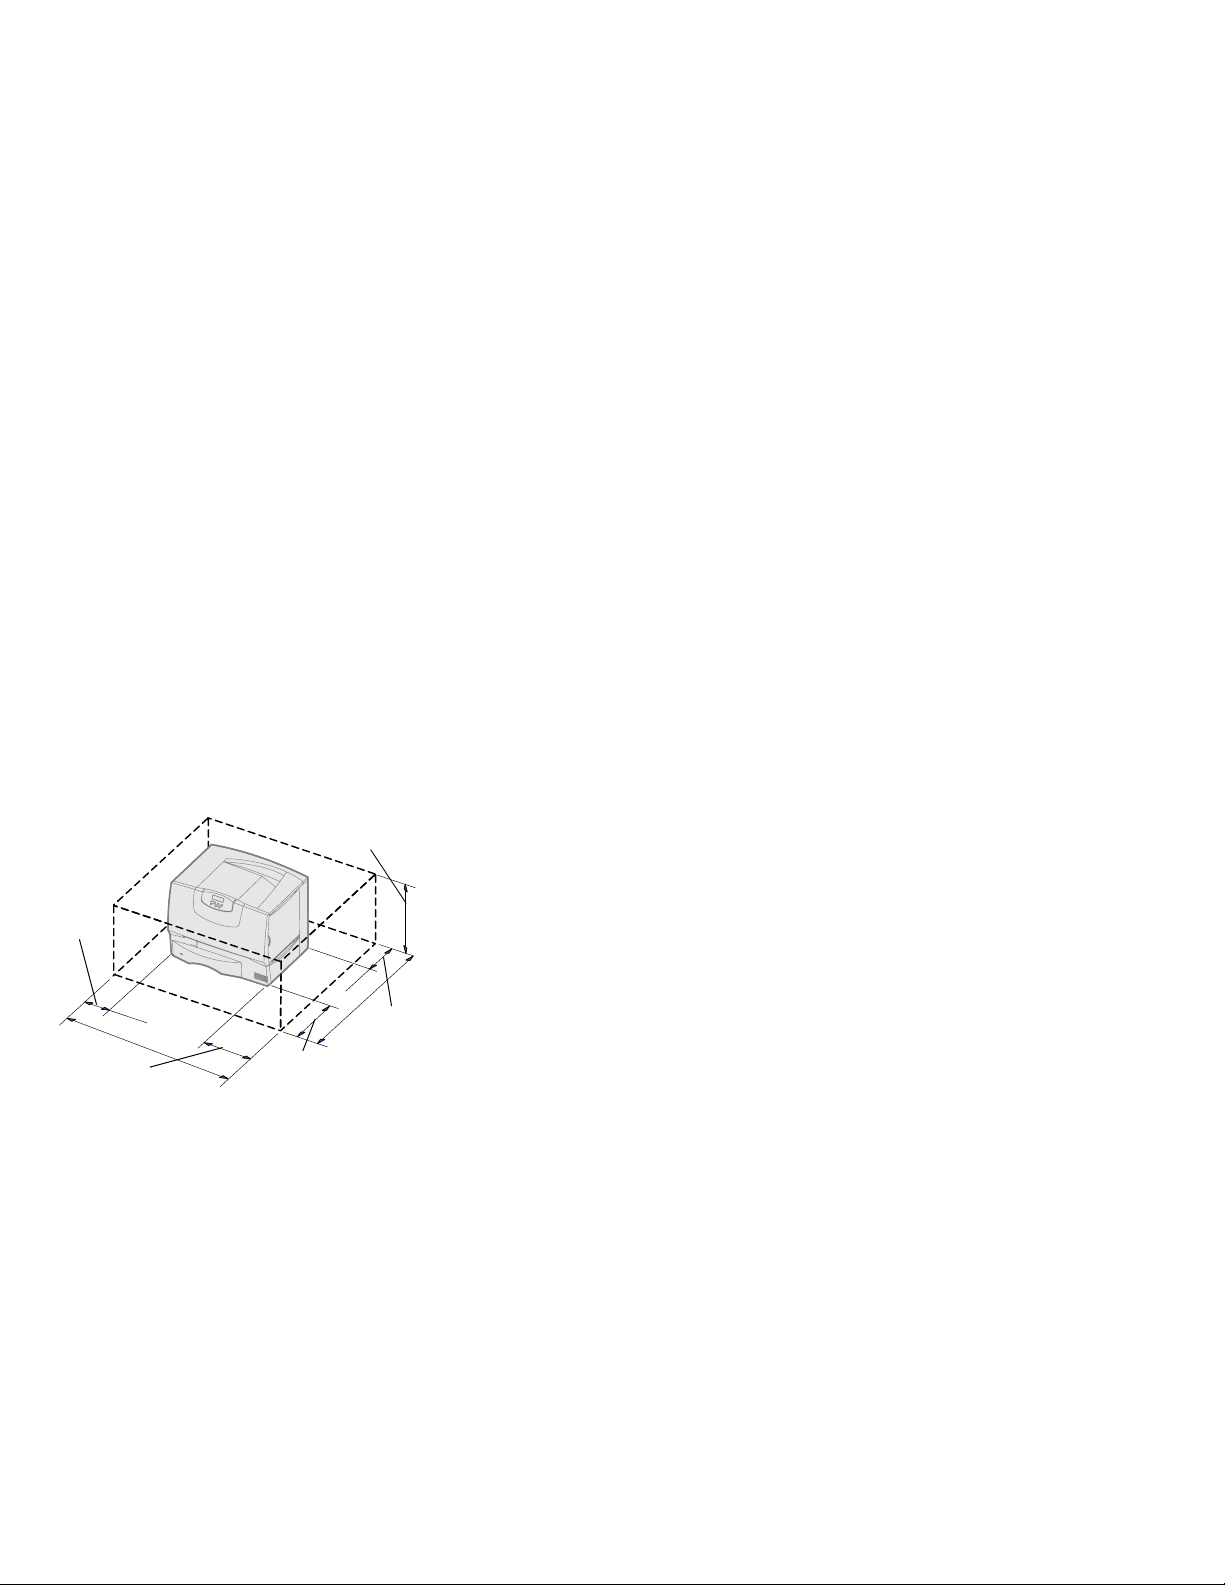
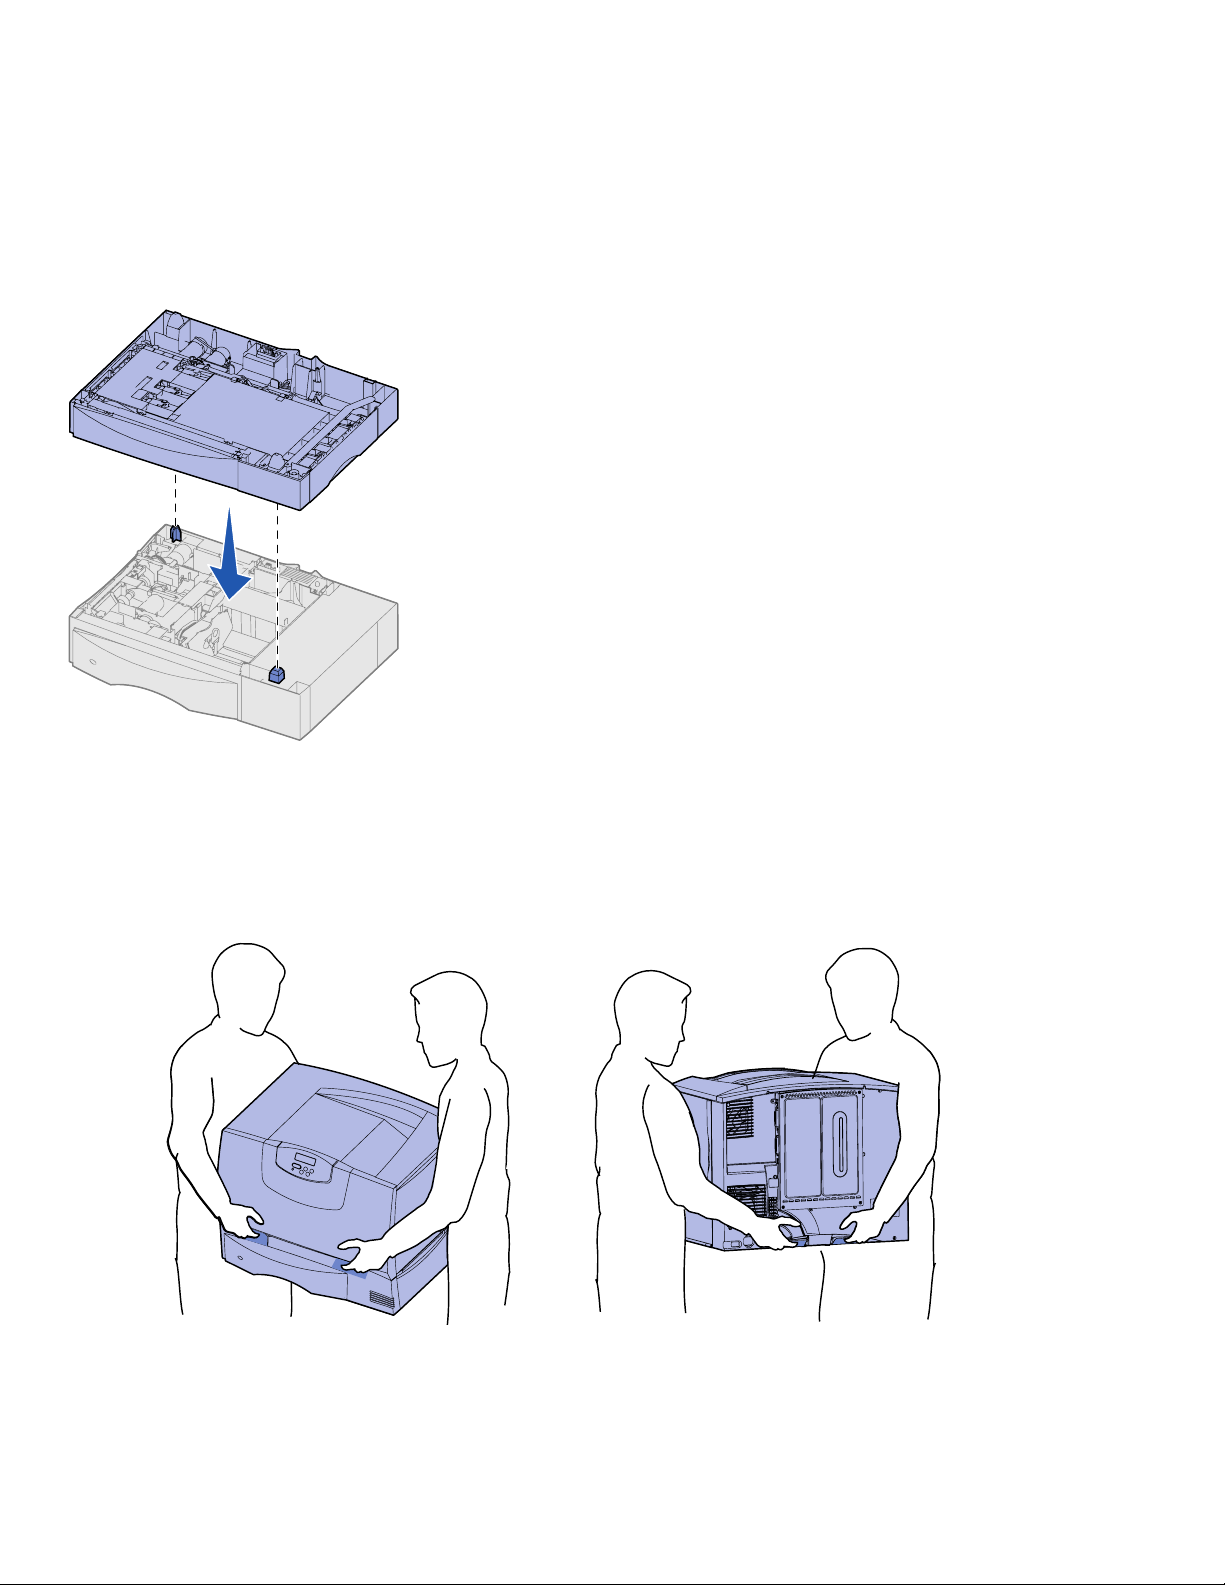
Step 3: Unpack the printer
Setting up a multifunction printer
Unpacking
CAUTION: The printer weighs 47.7 kg
(105 lb) and requires at least two people
to lift it safely.
160 cm
(63 in.)
38 cm
(15 in.)
30 cm
(12 in.)
61 cm
(24 in.)
51 cm
(20 in.)
If you purchased a multifunction printer (MFP) that copies, faxes, and scans, refer to the
documentation that came with the device to see if furniture or other hardware needs to
be set up first.
1 Select a location for your printer:
• Leave enough room to open the printer trays, covers, and doors; access
options; and allow for proper ventilation.
• Provide the proper environment:
– A firm, level surface
– Away from the direct airflow of air conditioners, heaters, or ventilators
– Free of temperature, sunlight, or humidity extremes or fluctuations
– Clean, dry, and free of dust
Unpack the printer
9
Page 10
Note: Leave the printer in the box until
you are ready to install it, then have
someone help you lift it using the
handholds (see “Positioning the printer”
on page 13).
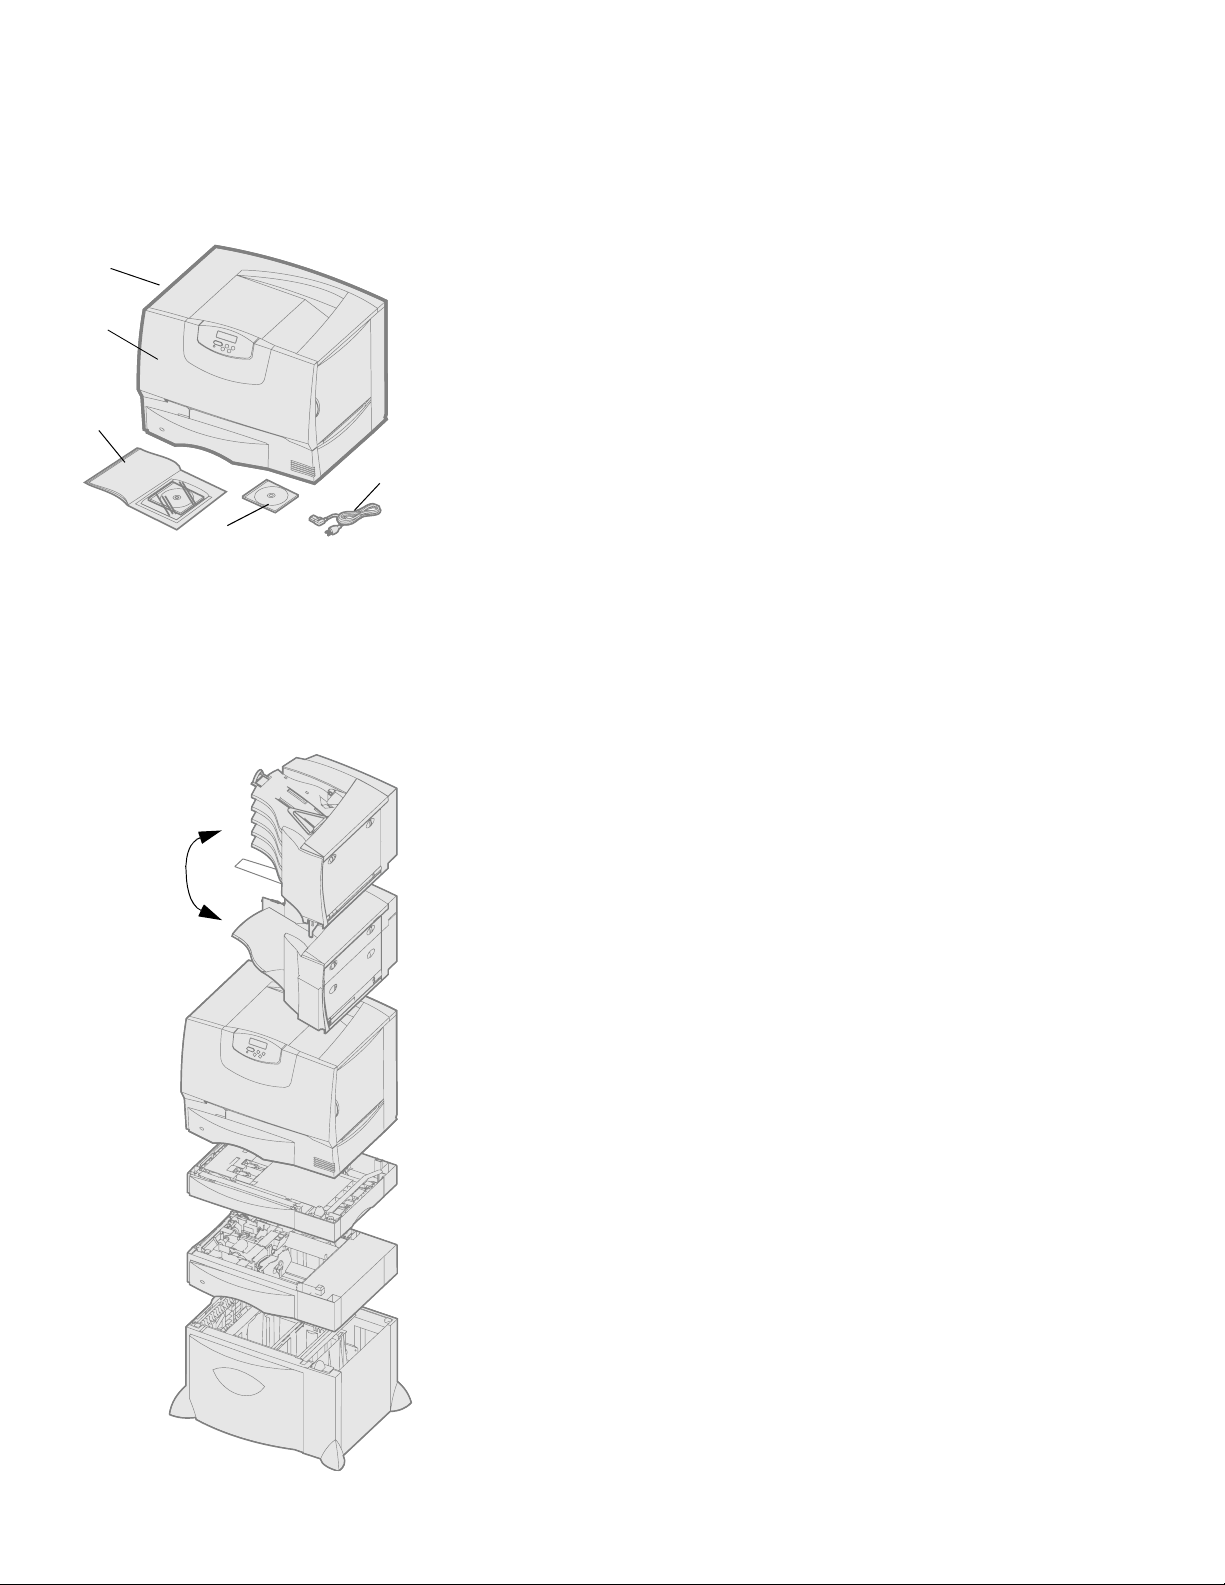
1
2
2 Remove all items except the printer from the box.
Make sure you have the following items:
(1) Printer with one 500-sheet tray
(2) Four print cartridges (preinstalled)
(3) Setup Guide with a publications CD
(4) Drivers CD
(5) Power cord
If any items are missing or damaged, contact the place you purchased your printer for
assistance.
3
Save the carton and packing materials in case you need to repack the printer.
5
4
Step 4: Set up the printer and paper handling options
Printer models
You can purchase several different options for your printer. Not all options are available
for all printers. Refer to the publications CD for more information.
If you purchased a multifunction printer (MFP) that copies, faxes, and scans, refer to the
5-bin
mailbox
(see page 15)
or
Output
expander
(see page 14)
documentation that came with the device to see if furniture or other hardware needs to
be set up first.If you purchased a finisher to go with your printer, refer to the
documentation that came with the finisher for information about setting it up with the
printer.
Printer
(see page 13)
Duplex unit
(see page 13)
500-sheet
drawer
(see page 12)
2000-sheet
drawer
(see page 11)
Set up the printer and paper handling options
10
Page 11
Printer setup If you only purchased a base printer with no options, follow the directions under
“Positioning the printer” on page 13.
Note: Be sure to set up the items in the
order listed in the table.
Top ic Go to page...
Installing a 2000-sheet drawer 11
Installing a 500-sheet drawer 12
Installing a duplex unit 13
Positioning the printer 13
Installing an output expander 14
Installing a 5-bin mailbox 15
Use the following table to locate the instructions you need to set up your printer and any
paper handling options you may have purchased.
Installing a 2000-sheet
drawer
Warning: If you have an optional
duplex unit and a 2000-sheet drawer, you
must install a 500-sheet drawer between
the duplex unit and the 2000-sheet
drawer.
Note: You will install the power cord for
the 2000-sheet drawer later.
Your printer supports one optional 2000-sheet drawer.
1 Unpack the 2000-sheet drawer and remove any packing material. 2 Place the drawer in the location you have chosen for your printer. 3 If you are installing a 500-sheet drawer on top of the 2000-sheet drawer, attach
the stabilizing bars:
a Place the two stabilizing bars on the ground, narrow side up.
b Lower the 2000-sheet drawer onto the bars, making sure you align the holes
in the drawer with the holes in the bars.
c Screw the bars into place using four screws (two screws for each bar). 4 Adjust the four leveling feet on the bottom of the drawer, if necessary. 5 Continue with “Installing a 500-sheet drawer” on page 12 or “Positioning the
printer” on page 13.
Leveling feet
Set up the printer and paper handling options
11
Page 12
Installing a 500-sheet
drawer
Your printer supports up to three additional 500-sheet drawers. However, if you install a
2000-sheet drawer, you can only add one additional 500-sheet drawer.
Warning: If you have an optional
duplex unit and a 2000-sheet drawer, you
must install a 500-sheet drawer between
the duplex unit and the 2000-sheet
drawer.
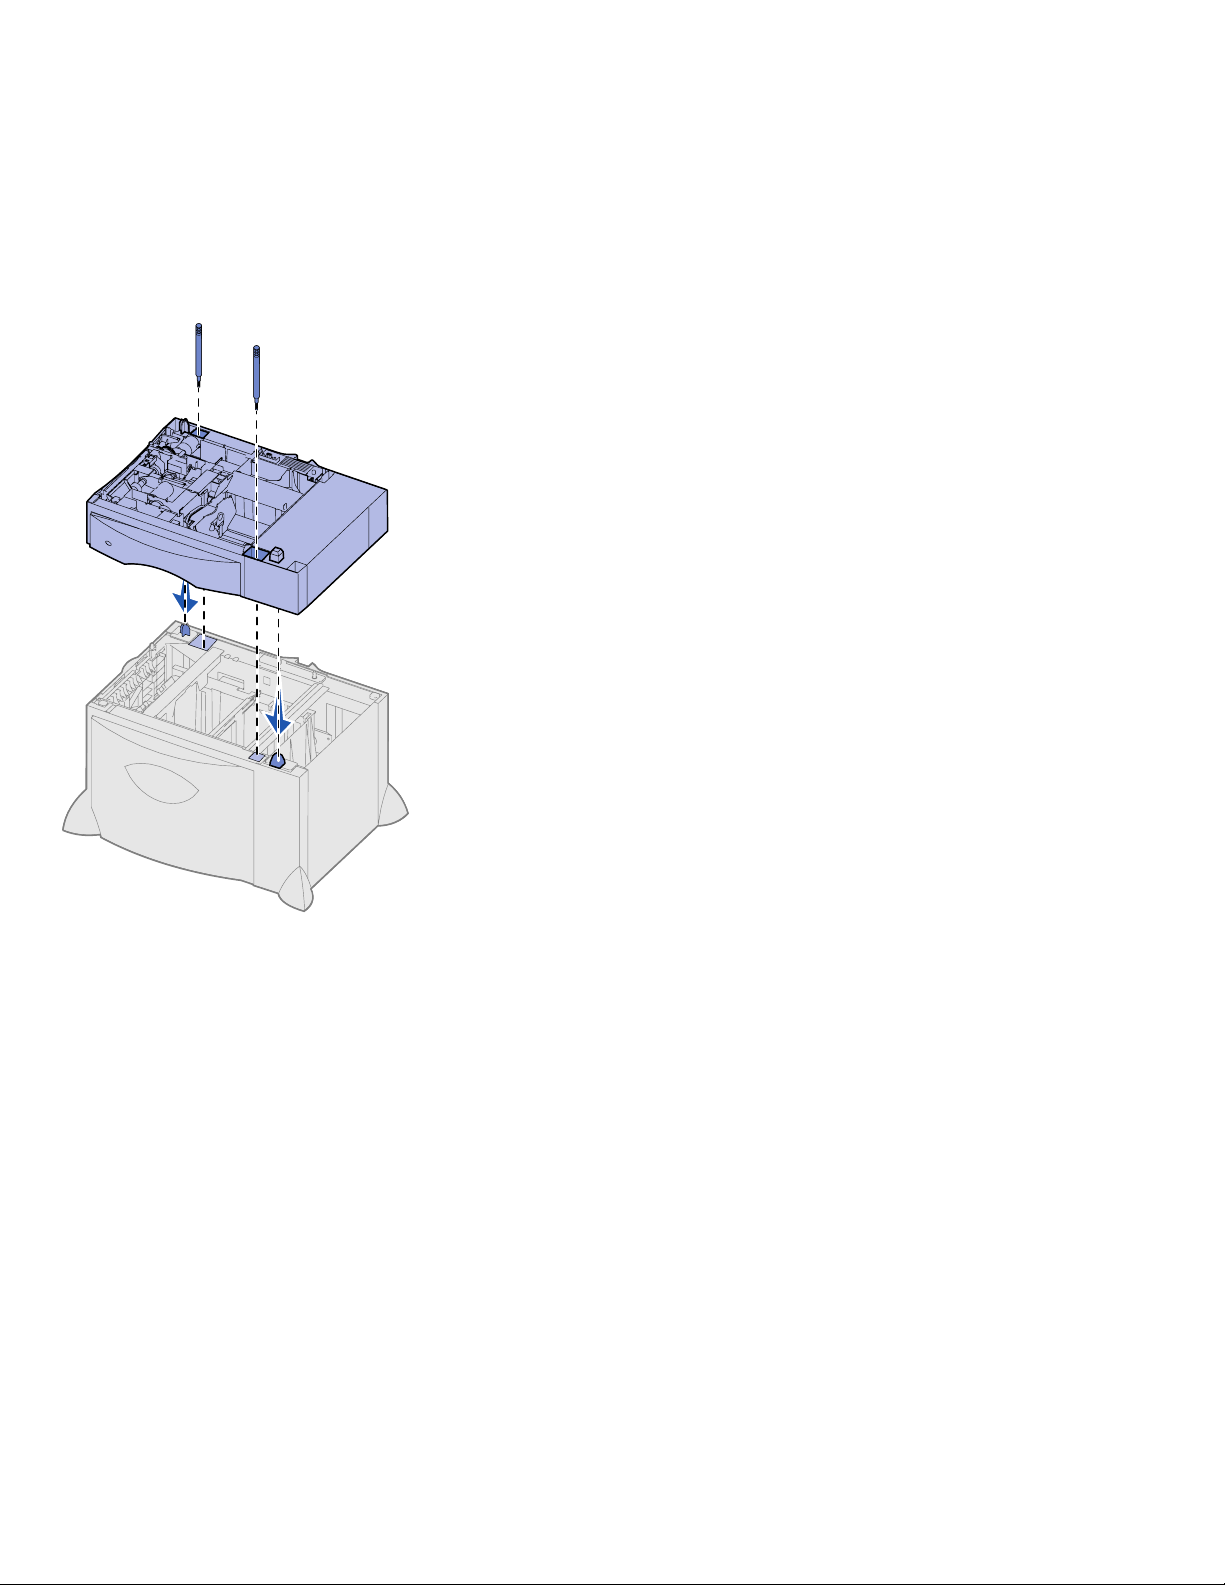
1 Unpack the 500-sheet drawer and remove any packing material.
2 Place the drawer in the location you have chosen for your printer or install it on
another drawer:
a Align the holes in the 500-sheet drawer with the positioning posts on the
lower drawer.
b Lower the 500-sheet drawer into place. Make sure it is seated securely on
the other drawer.
3 If you are installing a 500-sheet drawer on top of a 2000-sheet drawer, secure
them with stabilizing screws.
a Insert the screws through the holes next to the positioning posts on the
500-sheet drawer.
b Hand-tighten the screws.
Even when fully inserted, the screws allow some space between the
drawers.
4 Install another 500-sheet drawer, or continue with “Installing a duplex unit” on
page 13 or “Positioning the printer” on page 13.
Set up the printer and paper handling options
12
Page 13
Installing a duplex unit Your printer supports an optional duplex unit that lets you print on both sides of a sheet
of paper.
Warning: If you have an optional
duplex unit and a 2000-sheet drawer, you
must install a 500-sheet drawer between
the duplex unit and the 2000-sheet
drawer.
1 Unpack the duplex unit and remove any packing material.
2 Place the duplex unit in the location you have chosen for your printer or install it
on a 500-sheet drawer:
a Align the positioning posts on the drawer with the holes in the duplex unit.
b Lower the duplex unit into place. Make sure it is seated securely on the
drawer.
3 Continue with “Positioning the printer” on page 13.
Positioning the printer Once you have selected a location and set up any optional drawers or a duplex unit, you
are ready to position the printer.
CAUTION: The printer weighs 47.7 kg
(105 lb) and requires at least two people
to lift it safely.
1 Have someone help you lift the printer out of the box.
Use the handholds on the front and rear of the printer.
Set up the printer and paper handling options
13
Page 14
2 Have someone help you place the printer in the location you have chosen.
If you are installing the printer on an optional drawer or a duplex unit, align the
positioning posts on the option with the holes in the printer. Make sure the printer
is seated securely on the option.
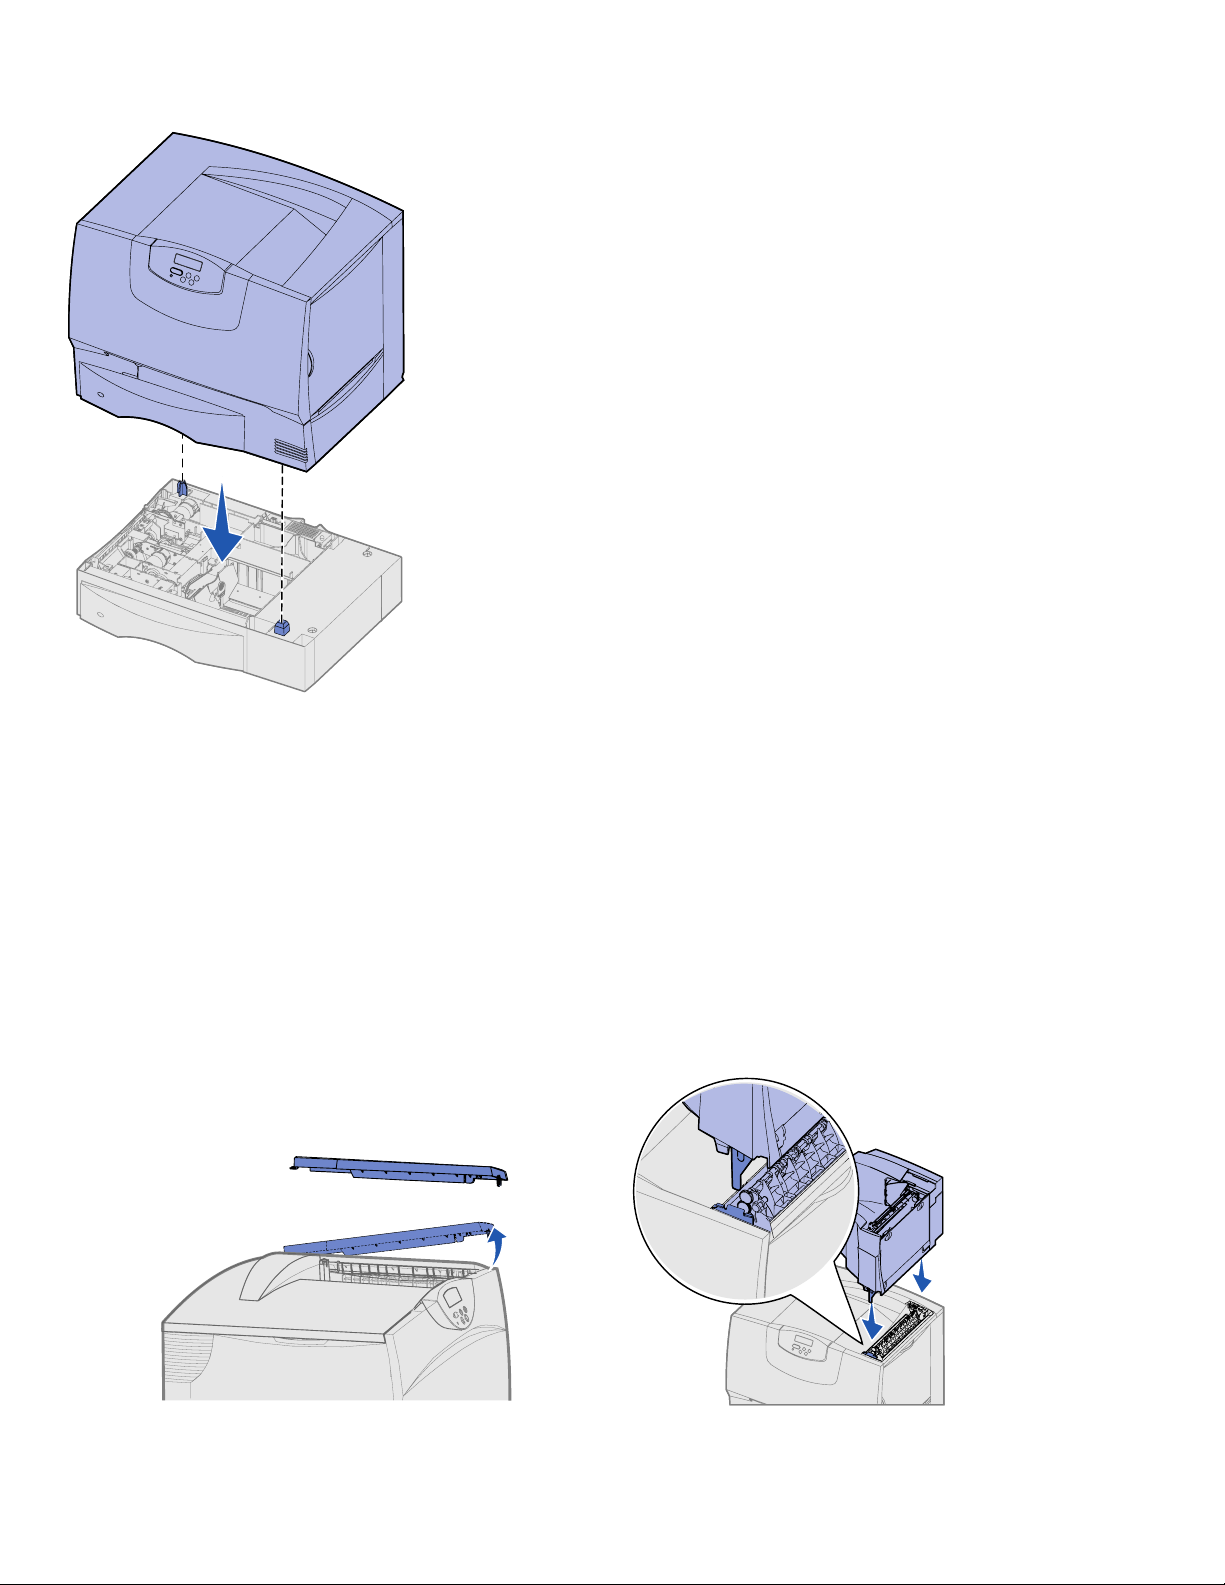
3 Remove any tape or packing material from the outside of the printer. 4 If you purchased an output expander or mailbox, continue with this chapter.
Otherwise, skip to Step 5: “Set up the print supplies” on page 16.
Installing an output expander
Note: After you unpack the output
expander, install it immediately.
Otherwise, the edges of the mounting
brackets could damage tabletops or
fabrics.
Warning: The output expander tray is
designed to hold the weight of print
material only. Do not use it as a shelf;
excess weight may cause it to disengage
from the output expander.
Your printer supports an optional output expander that lets you stack up to 650 sheets
of paper in one bin.
1 Unpack the output expander and remove any packing material. 2 Remove the printer top cover.
3 Align the mounting brackets on the bottom of the output expander with the slots
in the top of the printer.
4 Lower the output expander into place.
Set up the printer and paper handling options
14
Page 15

5 Attach the printer top cover to the output expander. 6 Attach the output expander paper bail to the top cover. 7 Go to Step 5: “Set up the print supplies” on page 16.
Installing a 5-bin mailbox Your printer supports a 5-bin mailbox that lets you collate and stack up to 500 sheets of
paper.
Note: After you unpack the mailbox,
install it immediately. Otherwise, the
edges of the mounting brackets could
damage tabletops or fabrics.
Warning: The mailbox is designed to
hold the weight of print material only. Do
not use it as a shelf; excess weight may
damage it.
1 Unpack the mailbox and remove any packing material. 2 Remove the printer top cover.
3 Align the mounting brackets on the bottom of the mailbox with the slots in the top
of the printer.
4 Lower the mailbox into place.
Set up the printer and paper handling options
15
Page 16

5 Attach the printer top cover to the mailbox. 6 Attach the mailbox paper bail to the top cover.
Step 5: Set up the print supplies
Warning: Be sure to remove all
packing materials or the printer may be
damaged.
Setting up the print cartridges
This step describes how to prepare the print cartridges and remove the packing
materials inside the printer.
1 Open the printer front cover. 2 Remove the packing material on top of the cartridges.
Set up the print supplies
16
Page 17

3 Remove the print cartridges. For each cartridge:
a Pull up on the handhold.
b Pull the cartridge straight out and use the handle to lift it off the guides.
c Set the cartridge on a firm, flat, clean surface in the upright position.
b
a
c
Warning: Do not touch the image
transfer unit belt with your fingers.
2
1
b
4 Remove the packing material from the image transfer unit belt:
a Grasp the detensioner located on the right side on the inside of the machine.
b Gently but firmly pull up on the detensioner and the attached sheet, then
remove both items from the printer.
Detensioner
1
5 Reinstall the print cartridges. For each cartridge:
a Turn the cartridge over so the handle is on the bottom.
b Remove the red plastic packing material from the photoconductor drum.
Discard the packing material.
a
Set up the print supplies
17
Page 18

Warning: Failure to remove the
packing material from the print cartridges
damages the printer.
Warning: Do not touch the
photoconductor drum on the bottom of
the print cartridge.
c
d
Warning: If the front cover does not
close completely, reopen the cover and
press in firmly on the cartridges to make
sure they are fully seated.
c Turn the cartridge so the handle is on the top.
d Rotate the cartridge in all directions to distribute the toner.
e Holding the cartridge by the handle, rest the spokes on the cartridge as
shown.
Be sure to match the cartridge color with the colored label in the printer.
e
f Slide the cartridge in as far as it will go.
The cartridge lowers into place.
6 Close the front cover.
Set up the print supplies
18
Page 19

Attaching an operator
t 3
Retu
Stop 6
panel overlay
1 Menu 2 Select 3 Return 4
Go 5 Stop 6
If English is not your preferred language and your printer shipped with an adhesive
operator panel overlay, attach the overlay that has the appropriately translated button
names:
1 Locate the overlay packaged with your printer. 2 Peel the protective backing off the overlay. 3 Align the holes in the overlay with the buttons on the operator panel, and then
press it into place.
4 Peel the protective covering away from the overlay.
Refer to the User’s Guide on the publications CD for instructions on changing the
language of the text displayed on the operator panel.
What do I do next?
Tas k Go to page…
Install memory, firmware, or option cards 19
Load paper 26
Step 6: Install memory, firmware, or option cards
If you do not have any memory, firmware, or option cards to install, skip this step and
go to Step 7: “Load paper” on page 26.
You can customize your printer memory capacity and connectivity by adding optional
cards.
Warning: If you are installing memory
or option cards sometime after setting up
the printer, turn the printer off and unplug
the power cord before continuing.
Note: You need a small Phillips
screwdriver to remove the system board
access cover and to install some of the
cards.
The instructions in this section help you install any of the following:
• Memory cards
– Printer memory
• Firmware cards
– Additional functionality
– Internet capabilities
– Flash memory
• Option cards
– Hard disk with adapter card
– MarkNet™ internal print servers (also called internal network adapters or
INAs)
– Serial Interface Card
– Parallel 1284-B Interface Card
Install memory, firmware, or option cards
19
Page 20

Removing the system board access cover
1 Locate the access cover on the back of the printer. 2 Remove the four access cover screws (two at top, two at bottom). 3 Remove the access cover. 4 Use the illustration to locate the connector for the card you want to install.
Option card
connector
Memory card
connector
Firmware and
flash memory
card connectors
Hard disk
connector
5 Use the following table to locate the instructions you need.
To install a... Go to page...
Memory card 21
Firmware card 22
Hard disk 23
Option card 24
Install memory, firmware, or option cards
20
Page 21

Installing a memory card Follow the instructions in this section to install a printer memory card. Memory cards
must have 168-pin connectors.
Note: Some memor y options offered for
other printers cannot be used with your
printer. Refer to the publications CD for
memory specifications.
Warning: Memory cards are easily
damaged by static electricity. Touch
something metal on the printer before
you touch a card.
Latch
Notch
Connection points
1 Remove the system board access cover (see page 20).
2 Unpack the memory card.
Avoid touching the connection points along the edge of the card. Save the
packaging.
3 Push open the latches on both ends of the memory connector. 4 Align the notches on the bottom of the card with the notches on the connector. 5 Push the memory card firmly into the connector until the latches on either end
of the connector snap into place.
It may require some force to fully seat the card.
6 Make sure each latch fits over the notch on the end of the card.
What do I do now?
Tas k Go to page…
Installing a firmware card 22
Installing a hard disk 23
Installing an option card 24
Replacing the system board access cover 25
Install memory, firmware, or option cards
21
Page 22

Installing a firmware card Follow the instructions in this section to install an optional firmware or flash memory
card.
Note: Firmware and flash memory
cards offered for other printers cannot be
used with your printer.
Warning: Firmware and flash memory
cards are easily damaged by static
electricity. Touch something metal on the
printer before you touch a card.
Only one of each type of card is supported.
1 Remove the system board access cover (see page 20). 2 Unpack the card.
Avoid touching the metal pins on the bottom of the card. Save the packaging.
3 Holding the card by its sides, align the pins on the card with the holes on the
system board.
4 Push the card firmly into place.
The entire length of the connector on the card must touch the system board.
Be careful not to damage the card connectors.
Pins
What do I do now?
Tas k Go to page…
Installing a hard disk 23
Installing an option card 24
Replacing the system board access cover 25
Install memory, firmware, or option cards
22
Page 23

Installing a hard disk Follow the instructions in this section to install an optional hard disk. You need a small
Phillips screwdriver to attach the hard disk to the mounting plate.
Warning: Hard disks are easily
damaged by static electricity. Touch
something metal on the printer before
you touch a disk.
If an option card has been installed, you may need to remove it before installing the hard
disk.
1 Remove the system board access cover (see page 20).
2 Remove the mounting plate, hard disk, ribbon cable, and attachment screws
from the package.
3 Align the ribbon cable connector with the connector pins on the hard disk. 4 Attach the ribbon cable to the hard disk. 5 Align the screw holes on the mounting plate with the holes in the hard disk. 6 Secure the mounting plate to the hard disk with the screws.
Hard disk
Ribbon cable
Mounting plate
7 Press the ribbon cable connector into the connector on the system board. 8 Flip the hard disk over, and then press the three posts on the mounting plate into
the holes on the system board. The hard disk snaps into place.
What do I do now?
Tas k Go to page…
Installing an option card 24
Replacing the system board access cover 25
Install memory, firmware, or option cards
23
Page 24

Installing an option card Your printer has one expansion card slot that supports a number of option cards. The
following table describes their function.
Card Function
MarkNet internal print server Adds an Ethernet or Token-Ring port so you can connect your printer to a network.
Parallel 1284-B Interface Card Adds a parallel port.
Serial Interface Card Adds a serial port.
Note: The network version of this
printer ships with an Ethernet print server
already installed.
Warning: Option cards are easily
damaged by static electricity. Touch
something metal on the printer before
you touch an option card.
You need a small Phillips screwdriver to install these options.
1 Remove the system board access cover (see page 20).
2 Remove the screw from the metal plate that covers the connector slot, and then
lift the plate off.
Save the screw.
3 Unpack the option card.
Save the packing materials.
4 Align the connector on the option card with the connector on the system board.
The cable connectors on the side of the option card must fit through the
connector slot.
5 Push the option card firmly into the option card connector. 6 Secure the card to the system board with the screw.
Connectors
Install memory, firmware, or option cards
24
Page 25

Replacing the system board access cover
After you have finished installing cards on the printer system board, you must replace
the system board access cover.
1 Align the slots at the top of the access cover with the screws near the top of the
printer.
2 Slide the cover up under the top cover lip as far as it will go, and then tighten the
screws at the top of the cover.
3 Insert and tighten the four screws to the bottom of the cover.
If you installed a firmware card in your printer, see the following section for information
about applying the Option Added label.
Applying the Option Added label
The Option Added label alerts service personnel that additional options have been
installed in your printer.
To apply the label:
1 Remove the backing from the label. 2 Place the label next to the printer model and serial number label.
Install memory, firmware, or option cards
25
Page 26

Step 7: Load paper
Note: When loading specialty media
such as transparencies or card stock,
refer to the User’s Guide on the
publications CD.
Source Paper sizes supported Paper types supported Capacity Go to page...
500-sheet trays Letter, A4, A5, Legal,
2000-sheet tray Letter, A4, A5, Legal,
Multipurpose
feeder
a
Supported as selected paper with tray size sensing turned off in the appropriate trays.
b
When selected, the page is formatted for 215.9 x 355.6 mm (8.5 x 14 in.) unless otherwise specified.
c
Load narrow media with the length in the feed direction (portrait).
d
If you print large quantities of labels or other glossy specialty media, you should purchase a web oiler field upgrade kit. Contact the
place where you bought your printer for more information.
e
Capacity varies with media weight and construction. Refer to the User’sGuide for more information.
f
Size can vary from 98.4 x 62 mm to 176 x 250 mm (3.87 x 6.38 in. to 6.93 x 9.84 in.).
Executive, JIS B5, Folioa,
Statement
Executive, JIS B5
Letter, A4, A5, Legal,
Executive, JIS B5, Folio,
Statement, Universal
7¾, 9, 10, DL, C5, B5, other
a
, Universal
b,c
b,c
The following table lists page numbers where you can find loading instructions for the
standard and optional trays, as well as for the multipurpose feeder.
Paper, transparencies,
labels, card stock
Paper • 2000 sheets of 20 lb paper
Paper, transparencies,
labels, card stock
f
Envelopes 10 envelopes
• 500 sheets of 20 lb paper
• 350 transparencies
• 200 sheets of labels or card stock
• 100 sheets of 20 lb paper
• 75 transparencies
• 40 sheets of labels or card stock
e
e
e
e
e
26
d,e
27
29
d,e
Loading the 500-sheet
trays
Warning: Never remove paper trays
while a print job is printing. It could
damage the tray or the printer.
Follow these instructions to load any of the 500-sheet trays.
1 Remove the tray from the printer and place it on a flat, level surface. 2 Squeeze the front guide lever and slide the guide to the front of the tray. 3 Squeeze the side guide lever and slide the guide to the correct position for the
size paper you are loading.
Icons along the back of the tray indicate paper sizes.
4 Flex the sheets back and forth to loosen them, and then fan them.
Do not fold or crease the paper. Straighten the edges of the stack on a level
surface.
Load paper
26
Page 27

Note: Do not exceed the maximum
stack height indicated on the front guide.
Overfilling the tray may cause jams.
5 Place the paper against the back left corner of the tray, print side down.
Do not load bent or wrinkled paper.
6 Squeeze the front guide lever and slide the guide until it firmly touches the stack
of paper.
7 Reinstall the tray.
Make sure the tray is pushed completely into the printer.
Maximum
height guide
Loading the 2000-sheet
tray
Follow these instructions to load a 2000-sheet tray. Do not load any print media other
than paper in the 2000-sheet tray. See the table on page 26 for paper type and size
information.
1 Pull open the tray. 2 Squeeze the side guide lever, lift the guide, and place it into the appropriate slot
for the size paper you are loading.
Load paper
27
Page 28

3 Squeeze the two front guide levers and slide the guide to the correct position for
the size paper you are loading.
4 Slide the bottom support toward the front of the tray until it touches the front
guide.
LT.LG
EX
A4
A5
B5
Note: Do not exceed the maximum
stack height. Overfilling the tray may
cause jams.
A5
LT.LG
EX
B5
A4
5 Flex the sheets back and forth to loosen them, and then fan them.
Do not fold or crease the paper. Straighten the edges of the stack on a level
surface.
6 Place the paper against the back left corner of the tray, print side down.
Do not load bent or wrinkled paper.
7 Close the tray.
Make sure the tray is pushed completely into the printer.
Load paper
28
Page 29

Loading the multipurpose feeder
You can use the multipurpose feeder one of two ways:
• Paper tray—As a paper tray, you can load paper in the feeder with the intention
of leaving it in the feeder.
• Manual bypass feeder—As a manual bypass feeder, you send a print job to the
feeder while specifying the type and size of media from your computer. The
printer then prompts you to load the appropriate paper or specialty media before
it prints.
Follow these instructions to load the multipurpose feeder.
1 Open the multipurpose feeder. 2 Squeeze the paper guide lever and slide the guide all the way toward the front
of the printer.
Note: Do not exceed the maximum
stack height. Overfilling the feeder may
cause jams.
3 Flex the sheets back and forth to loosen them, and then fan them.
Do not fold or crease the paper or specialty media. Straighten the edges of the
stack on a level surface.
4 Arrange the stack of paper or specialty media correctly for the size, type, and
print method you are using.
5 Place the paper or specialty media print side up along the left side of the
multipurpose feeder, and then push it in as far as it will easily go.
Do not force the paper or specialty media.
6 Squeeze the paper guide lever and slide the guide until it lightly touches the side
of the stack.
Load paper
29
Page 30

Step 8: Attach cables and power cord
CAUTION: Do not connect or
disconnect a communication port, a
teleport, or any other connector during a
lightning storm.
Cable types The printer can be attached to a network or directly to a computer to print locally.
Local Network
USB Parallel Serial Ethernet
A USB port is standard on all
models.
Windows 98 SE, Windows Me,
Windows 2000, Windows XP,
and Windows Server 2003
operating systems support USB
connections. Some UNIX,
Linux, and Macintosh
computers also support USB
connections. Refer to your
computer operating system
documentation to see if your
system supports USB.
A parallel port is standard on the
base model and is available on
an option card for network
models. See “Installing an
option card” on page 24 for
more information.
If you have installed an optional
Serial Interface Card, you can
locally attach the printer with a
serial cable. With serial printing,
data is transferred one bit at a
time. Although serial printing is
usually slower than parallel
printing, it is the preferred option
when there is a great deal of
distance between your printer
and computer or a parallel
interface is not available.
A 10BaseT/100BaseTX Fast
Ethernet port is standard on the
network model.
You can connect the printer to a
LAN drop or hub using standard
cabling that is compatible with
your network. The printer
automatically adjusts for the
network speed.
Fiber optic is a type of Ethernet, but uses different cables. Various fiber optic Ethernet ports are available on optional print server cards
that can be installed in your printer. If you purchased a fiber optic option card, see “Installing an option card” on page 24 for hardware
instructions.
802.11b wireless options:
This adapter is a piece of hardware that plugs into the Ethernet port on your printer. If you purchased this adapter for your printer, refer
to the documentation that shipped with the adapter for installation and configuration.
Your printer can be converted to wireless networking by using an optional 802.11b Wireless Print Adapter.
Attaching cables
1 Connect the printer to the computer using the appropriate cable for your
configuration.
Not all connections are available on your printer. Connection availability
depends on your printer model and options.
• Connect the printer to the computer using a USB cable.
• Connect the printer to the computer using a parallel cable.
• Connect the printer to the computer using an Ethernet cable.
A USB port requires a USB cable. Be sure to match the USB symbol on the
cable to the USB symbol on the printer.
Parallel connector
Ethernet connector
USB connector
Note: Not all connections are available
on your printer. Connection availability
depends on your printer model and
options.
Attach cables and power cord
30
Page 31

2 Plug one end of the printer power cord into the socket at the back of the printer
and the other end into a properly grounded outlet.
If you installed an optional 2000-sheet drawer, plug the printer power jumper
cord into the back of the drawer, and then plug the drawer power cord into a
properly grounded outlet.
3 Turn on your printer.
After the printer completes its internal tests, the Ready message indicates the
printer is ready to receive jobs.
If you see Setup Required Press Go instead of the Ready message,
make sure you have removed all the packing materials. See “Set up the print
supplies” on page 16 for detailed instructions. Press Go to clear the Setup
Required message.
If you see Remove Cartridge and ITU Packaging instead of the
Ready message, make sure you have removed all the packing materials.
See “Set up the print supplies” on page 16 for detailed instructions. Press Go
to clear the Setup Required message.
If you see a message other than Ready on the display, refer to the
User’s Guide on the publications CD for instructions on clearing the
message. Look for information about understanding printer messages.
4 Go to “Install drivers for local printing” on page 7.
If you have a serial cable attached, launch the drivers CD and click View
Documentation for instructions to set up for serial printing.
5 Turn on your computer and any other peripherals. 6 Continue with “Verify printer setup” on page 31.
Step 9: Verify printer setup
Note: This is also a good time to print
Help Menu pages and Clearing Jams
information. See “Printing Help Menu
pages” on page 32.
Printing a menu settings page
Note: For more information about using
the printer operator panel and changing
menu settings, refer to the User’s Guide
on the publications CD.
To verify printer setup, you should print the menu settings pages. The menu settings
pages list all the options you purchased or installed. If a feature or an option is not listed,
you may need to check your installation.
The network setup page provides information that is needed if you are attaching your
printer to a network.
Print a menu settings page to review the default printer settings and to verify that printer
options are installed correctly.
1 Make sure the printer is on. 2 Press Menu until you see Utilities Menu, and then press Select. 3 Press Menu until you see Print Menus, and then press Select to print the
page.
The message Printing Menus Settings appears on the display.
Verify printer setup
31
Page 32

Utilities Menu
4 Verify the options you installed are correctly listed under “Installed Features.”
If an option you installed is not listed, turn the printer off, unplug the power cord,
and reinstall the option.
5 Verify the amount of memory installed is correctly listed under “Printer
Information.”
6 Verify the paper trays are configured for the sizes and types of paper you loaded.
Printing a network setup page
Note: If an optional print server is
installed, you see Print Net1 Setup
on the display.
Printing Help Menu pages
If the printer is attached to a network, print a network setup page to verify the network
connection. This page also provides important information that helps you configure for
network printing.
1 Make sure the printer is on. 2 Press Menu until you see Utilities Menu, and then press Select. 3 Press Menu until you see Print Net Setup, and then press Select. The
network setup page prints and the printer returns to Ready status.
4 Check the first section on the network setup page and confirm that Status is
“Connected.”
If Status is “Not Connected,” your LAN drop may not be active, or your network
cable may be malfunctioning. Consult your network support person for a
solution, and then print another network setup page to verify that you are
connected to your network.
Information about using the printer and clearing jams is included on the publications CD
that shipped with your printer documentation. It is also stored in the printer memory.
We recommend you print this information and store it in a convenient location near the
printer.
To print Help Menu information stored on the CD:
1 Launch the CD. 2 Click Help Menu Pages. 3 Print the documents.
To print Help Menu pages stored in the printer:
1 Make sure the printer is on. 2 On the operator panel, press Menu until you see Help Menu, and then press
Select.
3 Press Menu until you see the topic you want to print, and then press Select.
Verify printer setup
32
Page 33

Step 10: Configure for TCP/IP
If you have TCP/IP available on your network, we recommend that you assign an IP
address to the printer.
Assigning a printer IP address
If your network is using DHCP, an IP address is automatically assigned after you
connect the network cable to the printer.
1 Look for the address under the “TCP/IP” heading on the network setup page
you printed in “Printing a network setup page” on page 32.
2 Go to “Verifying the IP settings” on page 33 and begin with step 2.
If your network is not using DHCP, then you must manually assign an IP address to the
printer.
One of the easiest ways is to use the operator panel:
1 Press Menu until you see Network Menu, and then press Select. 2 Press Menu until you see Standard Network, and then press Select.
Standard Network appears if you purchased a printer with a network port on
the printer system board. If you have a print server installed in the option card,
you see Network Option 1.
3 Press Menu until you see Std Net Setup (or Network 1 Setup), and then
press Select.
4 Press Menu until you see TCP/IP, and then press Select. 5 Press Menu until you see Set IP Address, and then press Select. 6 Change the address by pressing Menu to increase or decrease each number.
Press Select to move to the next segment. Press Select when you are finished.
The message Saved appears briefly.
7 Press Menu until you see Set IP Netmask, and then press Select. 8 Repeat step 6 to set the IP Netmask. 9 Press Menu until you see Set IP Gateway, and then press Select.
10 Repeat step 6 to set the IP Gateway. 11 When you are finished, press Go to return the printer to the Ready state.
Verifying the IP settings 1 Print another network setup page. Look under the “TCP/IP” heading and make
sure the IP address, netmask, and gateway are what you expected. See
“Printing a network setup page” on page 32 if you need help.
Note: On Windows computers, click
à Programs à Command
Start
prompt (or Accessories
prompt if using Windows 2000).
à Command
Configuring for
Pull Printing
2 Ping the printer and verify that it responds. For example, at a command prompt
on a network computer, type “ping” followed by the new printer IP address (for
example, 192.168.0.11).
If the printer is active on the network, you receive a reply.
If your printer has an optional ™ImageQuick™ firmware card installed, you can
configure for Pull Printing once an IP address is assigned to the printer.
For detailed configuration instructions, refer to the CD that shipped with the ImageQuick
card.
Configure for TCP/IP
33
Page 34

Step 11: Install drivers for network printing
After you have assigned and verified the TCP/IP settings, you are ready to install the
printer on each network computer.
Windows In Windows environments, network printers can be configured for direct printing or
shared printing. Both network printing methods require the installation of a printer driver
and the creation of a network printer port.
Supported printer drivers
• Windows system printer driver
• Custom printer driver
System drivers are built into Windows operating systems. Custom drivers are available
on the drivers CD.
Supported network printer ports
• Microsoft IP port—Windows NT 4.0, Windows 2000, Windows XP, and
Windows Server 2003
• Printer network ports—Windows 95/98/Me, Windows NT 4.0, Windows 2000,
Windows XP, and Windows Server 2003
For basic printer functionality, you can install a system printer driver and use a system
network printer port, such as an LPR or a Standard TCP/IP port. The system printer
driver and port let you maintain a consistent user interface for use with all the printers
on your network. However, using a custom printer driver and network port provides
enhanced functionality, such as printer status alerts.
Follow the steps for your printing configuration and operating system to configure your
network printer:
Printing configuration Operating system Go to page...
Direct
• Printer is connected directly to the network using a network cable, such as Ethernet.
• Printer drivers are typically installed on each network computer.
Shared
• Printer is connected to one of the computers on the network using a local cable, such
as USB.
• Printer drivers are installed on the computer attached to the printer.
• During driver installation, the printer is set up to be “shared” so that other network
computers can print to it.
Windows 98 SE,
Windows Me, Windows 2000,
Windows XP, or
Windows Server 2003
Windows 95,
Windows 98 (First Edition)
Windows NT 4.0
Windows NT 4.0,
Windows 2000, Windows XP,
or Windows Server 2003
35
35
35
Configure for TCP/IP
34
Page 35

Direct printing using
Windows 98 SE, Windows Me,
Windows NT 4.0, Windows 2000,
Windows XP, and
Windows Server 2003
Printer
Clients
Note: If you don’t know the IP address,
print a network setup page and look
under the TCP/IP heading. For help, see
“Printing a network setup page” on
page 32 and “Verifying the IP settings” on
page 33.
To install a custom printer driver and network port:
1 Launch the drivers CD. 2 Click Install Software. 3 Click Printer and Software. 4 Click Agree to accept the license agreement. 5 Select Suggested, and then click Next. 6 Select Network Attached, and then click Next. 7 Select your printer model from the list and then click Next. 8 Click Add Port. 9 Select TCP/IP Network Port and then enter the information to create the port.
a Enter a port name.
This can be any name that you associate with the printer, such as
Color1-lab4. After the port is created, this name appears in the list of
available ports.
b Enter the IP address in the text box.
If you don't know the IP address, print a network setup page and look under
the TCP/IP heading. For information on printing a network setup page, see
“Printing a network setup page” on page 32.
10 Click Finish to complete the installation. 11 Print a test page to verify printer installation.
Direct printing using Windows 95 and Windows 98 (first edition)
Shared printing from a server
using Windows NT 4.0,
Windows 2000, Windows XP, and
Windows Server 2003
Server
Clients
Printer
For information about Windows 95 and Windows 98 (first edition) direct printing, refer
to the User’s Guide on the publications CD.
After connecting your printer to a Windows NT 4.0, Windows 2000, Windows XP, or
Windows Server 2003 computer (which will act as a server), follow these steps to
configure your network printer for shared printing:
1 Install a custom printer driver.
a Launch the drivers CD.
b Click Install Software.
c Click Printer and Software.
d Click Agree to accept the license agreement.
e Select Suggested, and then click Next.
f Click Local Attached, then click Next.
A printer object is created in the printers folder of your computer. You will share the printer in step 2 “Share the printer on the network.”
g Click Finish to complete the installation.
h Print a test page to verify printer installation.
2 Share the printer on the network.
a Click Start à Settings à Printers.
b Select the printer you just created.
c Click File à Sharing.
d Check the Shared check box, and then enter a name in the Shared Name
text box.
e In the Alternate Drivers section, select the operating systems of all the
network clients that will print to the printer.
Configure for TCP/IP
35
Page 36

Note: If you are missing files, you may
be prompted to provide the server
operating system CD.
f Click OK.
g Check the following to make sure the printer was successfully shared.
• The printer object in the Printers folder now has a shared indicator. For
example, in Windows NT 4.0, a hand appears under the printer object.
• Browse Network Neighborhood. Find the host name of the server and
look for the shared name you assigned to the printer.
Install the printer driver (or subset) on network clients
Note: This method is usually the best
use of system resources. The server
handles driver modifications and the print
job processing. This lets network clients
return to applications much faster.
Note: If this is a new printer, you may be
prompted to install a printer driver. If no
system driver is available, then you will
need to provide a path to available
drivers.
Using the point and print method
With this method, a subset of driver information is copied from the server to the client
computer. This is just enough information to send a print job to the printer.
1 On the Windows desktop of the client computer, double-click Network
Neighborhood.
2 Locate the host name of the server computer, and then double-click the host
name.
3 Right-click the shared printer name, and then click Install. 4 Wait a few minutes for the driver information to be copied from the server
computer to the client computer, and for a new printer object to be added to the
Printers folder. The time this takes varies based on network traffic and other
factors.
5 Close Network Neighborhood. 6 Print a test page to verify printer installation.
Using the peer-to-peer method
With this method, the printer driver is fully installed on each client computer. Network
clients retain control of driver modifications. The client computer handles the print job
processing.
1 Click Start à Settings à Printers. 2 Click Add Printer to launch the Add Printer wizard. 3 Click Network Print Server. 4 Select the network printer from the Shared printers list. If the printer is not listed,
enter the path of the printer in the text box.
The path will look similar to the following:
\\<server host name>\<shared printer name>
The server host name is the name of the server computer that identifies it to the
network. The shared printer name is the name assigned during the server
installation process.
5 Click OK. 6 Select whether you want this printer to be the default printer for the client, and
then click Finish.
7 Print a test page to verify printer installation.
Macintosh
Note: A PostScript Printer Description
(PPD) file provides detailed information
about the capabilities of a printer to your
UNIX or Macintosh computers.
To print to a network printer, each Macintosh user must install a custom PostScript
Printer Description (PPD) file and either create a desktop printer on the computer (Mac
OS 8.6 to 9.x) or create a print queue in Print Center (Mac OS X).
Refer to the User’s Guide on the publications CD for information to install Macintosh
drivers and to create a desktop printer icon for Macintosh 8.6–9.x.
Configure for TCP/IP
36
Page 37

Mac OS X version 10.1.2 and later
Step 1: Install a custom PPD file 1 Insert the drivers CD.
2 Double-click the installer package for your printer.
Note: A PPD file provides detailed
information about the capabilities of
a printer to your Macintosh computer.
3 On the Authorization screen, choose Click the lock to make changes. 4 Enter your password, and then click OK. 5 Click Continue on the Welcome screen and again after you view the Readme
file.
6 Click Continue after you view the license agreement, and then click Agree to
accept the terms of the agreement.
7 Select a Destination, and then click Continue. 8 On the Easy Install screen, click Install. All the necessary software is installed
on your computer.
9 Click Close when installation is complete.
Step 2: Create a print queue in Print Center or Printer Setup Utility
1 Open Finder, click Applications, and then click Utilities. 2 Double-click Print Center or Printer Setup Utility. 3 Choose Add Printer from the Printers menu. 4 Choose AppleTalk from the pop-up menu.
Note: If you don’t know which zone
or printer to select, look on the
network setup page under the
AppleTalk heading.
5 Select the AppleTalk zone from the list. 6 Select the new printer from the list, and then click Add. 7 Verify printer installation:
a Open Finder, click Applications, and then click TextEdit.
b Choose Print from the File menu.
c Choose Summary from the Print Panel menu.
Note: If you don’t know which printer to
select, look on the Network Setup page
under the AppleTalk heading to find the
default name of the printer.
Using IP Printing Follow these steps to create a print queue using IP Printing. To create an AppleTalk print
queue, see “Step 2: Create a print queue in Print Center or Printer Setup Utility” on
page 37.
• If the PPD file displayed in the Summary window is correct for your
printer, then printer setup is complete.
• If the PPD file displayed in the Summary window is not correct for your
printer, delete the printer from the printer list in Print Center or Printer
Setup Utility and repeat “Step 1: Install a custom PPD file” on page 37.
1 Open Finder, click Applications, and then click Utilities. 2 Double-click Print Center or Printer Setup Utility. 3 Choose Add Printer from the Printers menu. 4 Choose IP Printing from the pop-up menu. 5 Enter the IP address or the printer DNS name in the Printer’s Address box. 6 Choose the printer manufacturer from the Printer Model pop-up menu. 7 Select the new printer from the list, and then click Add. 8 Verify printer installation:
a Open Finder, click Applications, and then click TextEdit.
b Choose Print from the File menu.
c Choose Summary from the Print Panel menu.
d Do one of the following:
Configure for TCP/IP
37
Page 38

• If the PPD file displayed in the Summary window is correct for your
printer, then printer setup is complete.
• If the PPD file displayed in the Summary window is not correct for your
printer, delete the printer from printer list in Print Center or Printer Setup
Utility and repeat “Step 1: Install a custom PPD file” on page 37.
UNIX/Linux Your printer supports both UNIX and Linux network environments.
For the latest information about installing a network printer in a UNIX or Linux
environment, click View Documentation on the drivers CD.
NetWare Your printer supports both Novell Distributed Print Services (NDPS) and regular queue-
based NetWare environments. For the latest information about installing a network
printer in a NetWare environment, launch the drivers CD and click View
Documentation.
Step 12: Other sources of information
If you need more information after you have completed setup, refer to the other printer
documentation.
Viewing and using the publications CD
Note: The publications CD is shipped
inside the Setup Guide.
On the publications CD, you will find the User’s Guide, Setup Guide, and copies of the
printer Help Menu pages.
The publications CD provides information about loading paper, clearing error
messages, ordering and replacing supplies, installing maintenance kits, and
troubleshooting. It also provides general information for administrators.
You can also give the publications CD to a system administrator or the Help desk, or you
can copy the entire contents of the CD (or just specific topics) to a shared network drive
or intranet site.
Help Menu pages Help Menu pages are stored inside the printer. They provide information about loading
print media, diagnosing and solving print problems, and clearing jams from the printer.
Note: We strongly recommend that you
print the Jam Clearance guide and keep
it by the printer.
You can print the Help Menu Pages and clearing jams information and store it near the
printer for easy access when needed. The following is a list of guides available from the
Help Menu:
• Printing Guide
• Color Quality
• Print Quality
To print these pages:
• Connection Guide
• Help Guide
• Media Guide
• Jam Clearance
• Print Defects
• Moving Guide
1 On the operator panel, press Menu until you see Help Menu, and then press
Select.
2 Press Menu until you see the topic you want to print, and then press Select.
Drivers CD The drivers CD contains all the necessary files to get your printer up and running. It may
also contain printer utilities, screen fonts, and additional documentation.
Other sources of information
38
Page 39

Congratulations! You are now ready to use your new printer. Save this book if you anticipate purchasing
printer options in the future.
Other sources of information
39
Page 40

Page 41

h
h No
Readers’ Comments — We’d Like to Hear from You
Infoprint Color 1454 & 1464
Setup Guide
Publication No. S510-4059-00
Overall, how satisfied are you with the information in this book?
Very Satisfied Satisfied Neutral Dissatisfied Very
Dissatisfied
Overall satisfaction hhhhh
How satisfied are you that the information in this book is:
Very Satisfied Satisfied Neutral Dissatisfied Very
Dissatisfied
Accurate hhhhh
Complete hhhhh
Easy to find hhhhh
Easy to understand hhhhh
Well organized hhhhh
Applicable to your tasks hhhhh
Please tell us how we can improve this book:
Thank you for your responses. May we contact you?
Yes
When you send comments to IBM, you grant IBM a nonexclusive right to use or distribute your comments in any
way it believes appropriate without incurring any obligation to you.
Name
Company or Organization
Phone No.
Address
Page 42

or
___________________________________________________________________________________________________
Readers’ Comments — We’d Like to Hear from You
S510-4059-00
Fold
_________________________________________________________________________________________
and Tape
Please do not staple
Fold and Tape
NO
POSTAGE
NECESSARY
MAILED IN THE
IF
UNITED
STATES
Cut or Fold
Line
Along
BUSINESS REPLY MAIL
FIRST-CLASS MAIL PERMIT NO. 40 ARMONK, NEW YORK
POSTAGE WILL BE PAID BY ADDRESSEE
IBM Corporation
Information Development IBM Printing Systems Depatment
H7FE
Building 004N PO Box 1900 Boulder, CO
80301-9817
_________________________________________________________________________________________
Fold
and Tape
Please do not staple
Fold and Tape
S510-4059-00
Cut
Along
Fold
Line
Page 43

Page 44

Part Number: 75P6542
Printed in USA
S510-4059-00
75P6542
P/N:
(1P)
 Loading...