

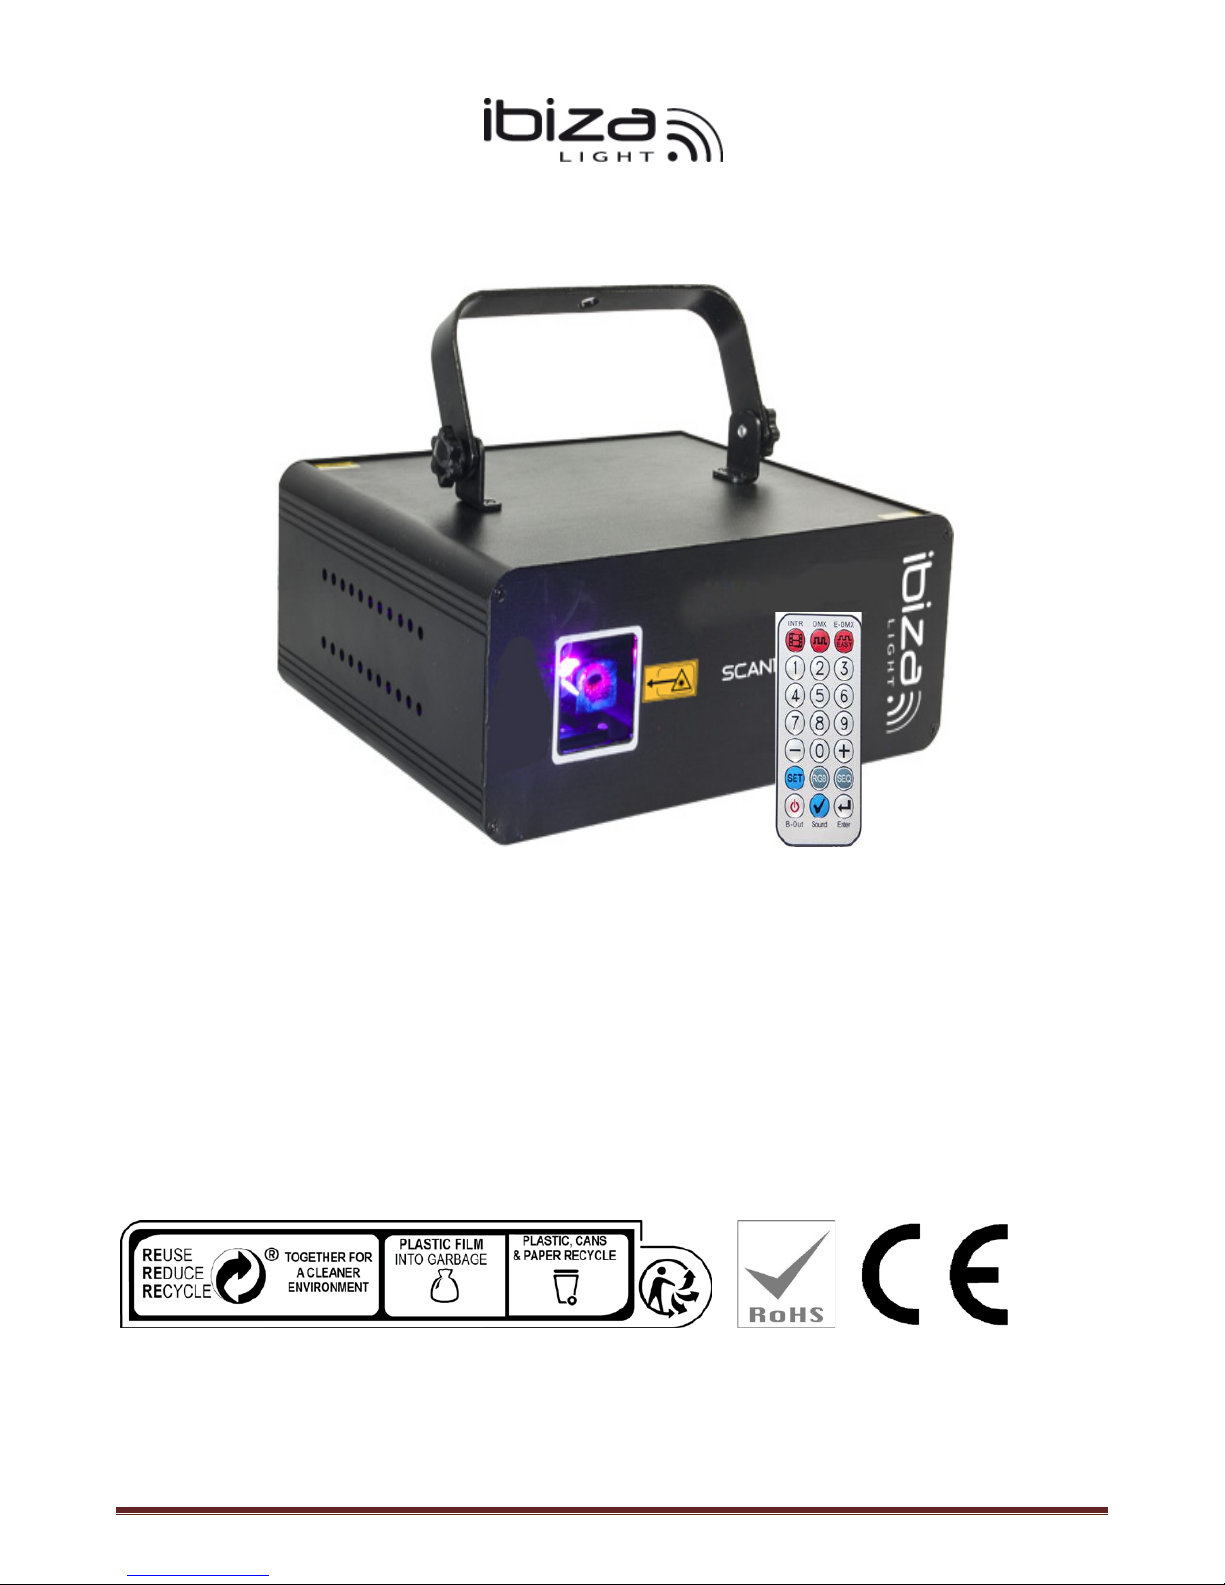
Ibiza SCAN500RGB, SCAN1100RGB, SCAN2000RGB, SCAN1100PINK User Manual
©Copyright Lotronic 2017 1
LLAASSEERR WWIITTHH DDMMXX//IILLDDAA
Ref.: SCAN500RGB/SCAN1100RGB/SCAN2000RGB/SCAN1100PINK
USER
MANUAL
MODE D’EMPLOI
Imported from China by
LOTRONIC SA – Avenue Zénobe Gramme 9 – 1480 Saintes - Belgium

©Copyright Lotronic 2017 2
LASER FOR PROFESSIONAL USE ONLY
This laser complies with the international standards EN60825-1:2014. It is
meant exclusively for professional use.
Its installation and use should only be carried out by a skilled technician
who is aware of the specific dangers of lasers.
REMINDER OF SAFETY INSTRUCTIONS
Lasers of class 3 and 4 are for outdoor use only.
Inside the public area, any laser shooting towards the audience is strictly forbidden except if a safety area of 5 m
radius is marked around the area to which the audience cannot get access.
The area called “public area” is defined by the space of 3m above the area occupied by the audience and a width of
2.5m around this area. The public area must be clearly identified by signs on the ground.
Inside the public area only a scanning movement is allowed within the terms and conditions defined by the
international technical laser safety report.
The laser unit must be installed out of reach of the audience and at a minimum of 3m above the ground where the
audience is present or protected by a safety perimeter of 5m radius.
The laser unit must be installed in such a way that it can’t be moved under the effect of disruptions such as crowd
movements, vibrations or gusts of wind.
Safety Instructions
Please read these instructions carefully, they include important information about the installation, usage and
maintenance of this product.
• Please keep this User Guide for future reference. If you sell the unit to another user, be sure that he also receives
this instruction booklet.
• Always make sure that you are connecting to the proper voltage, and that the line voltage you are connecting to is
not higher than that stated on the decal or rear panel of the fixture.
• This product is intended for indoor use only!
• To prevent risk of fire or shock, do not expose fixture to rain or moisture. Make sure there are no flammable
materials close to the unit while operating.
• The unit must be installed in a location with adequate ventilation, at least 20in (50cm) from adjacent surfaces. Be
sure that no ventilation slots are blocked.
• Always disconnect from power source before servicing or replacing fuse and be sure to replace with same fuse size
and type.
• Secure fixture to fastening device using a safety chain. Never carry the fixture solely by its head. Use its carrying
handles.
• Maximum ambient temperature (Ta) is 104° F (40°C). Do not operate the fixture at temperatures higher than this.
• In the event of a serious operating problem, stop using the unit immediately. Never try to repair the unit by
yourself. Repairs carried out by unskilled people can lead to damage or malfunction. Please contact the nearest
authorized technical assistance center. Always use the same type of spare parts.
• Don’t connect the device to a dimmer pack.
• Make sure the power cord is never crimped or damaged.
• Never disconnect the power cord by pulling or tugging on the cord.
• Avoid direct eye exposure to the light source while it is on.
DISCONNECT DEVICE: Where the MAINS plug or an appliance coupler is used as the disconnect device, the
disconnect device shall remain readily operable.
GB

©Copyright Lotronic 2017 3
LASER EMISSION DATA
* As measured under IEC measurement conditions for classification.
Laser Power :
SCAN500RGB : 100mW-G-532nm+200mW-R-650nm+200mW-B-445nm
SCAN1100RGB: 200mW-G-532nm+300mW-R-638nm+600mW-B-445nm
SCAN2000 RGB: 500mW-G-532nm+500mW-R-638nm+1000mW-B-445nm
SCAN1100PINK: 500mW-R-638nm+600mW-B-445nm
Specification:
Mains Input: ....................................................................................... AC100~240V, 50/60Hz, total 30W
Fuse: .................................................................................................... 250V 2A slow blow (20mm glass)
Menu mode: .............................................. Auto, music, DMX512, Master/slave, ILDA, Artnet RJ45, IRC
Laser Classification: ..................................................................................................................... Class 3B
Laser Safety Standard: ................................................................................................... EN60825-1:2014
Condition Temperature: .......................................................................................................... 10℃~40℃
DMX channels ................................................................................................................... 5 / 34 channels
Dimensions ................................................................................................................ 246 x 211 x 105mm
Weight: ............................................................................................................................................ 3.5kg
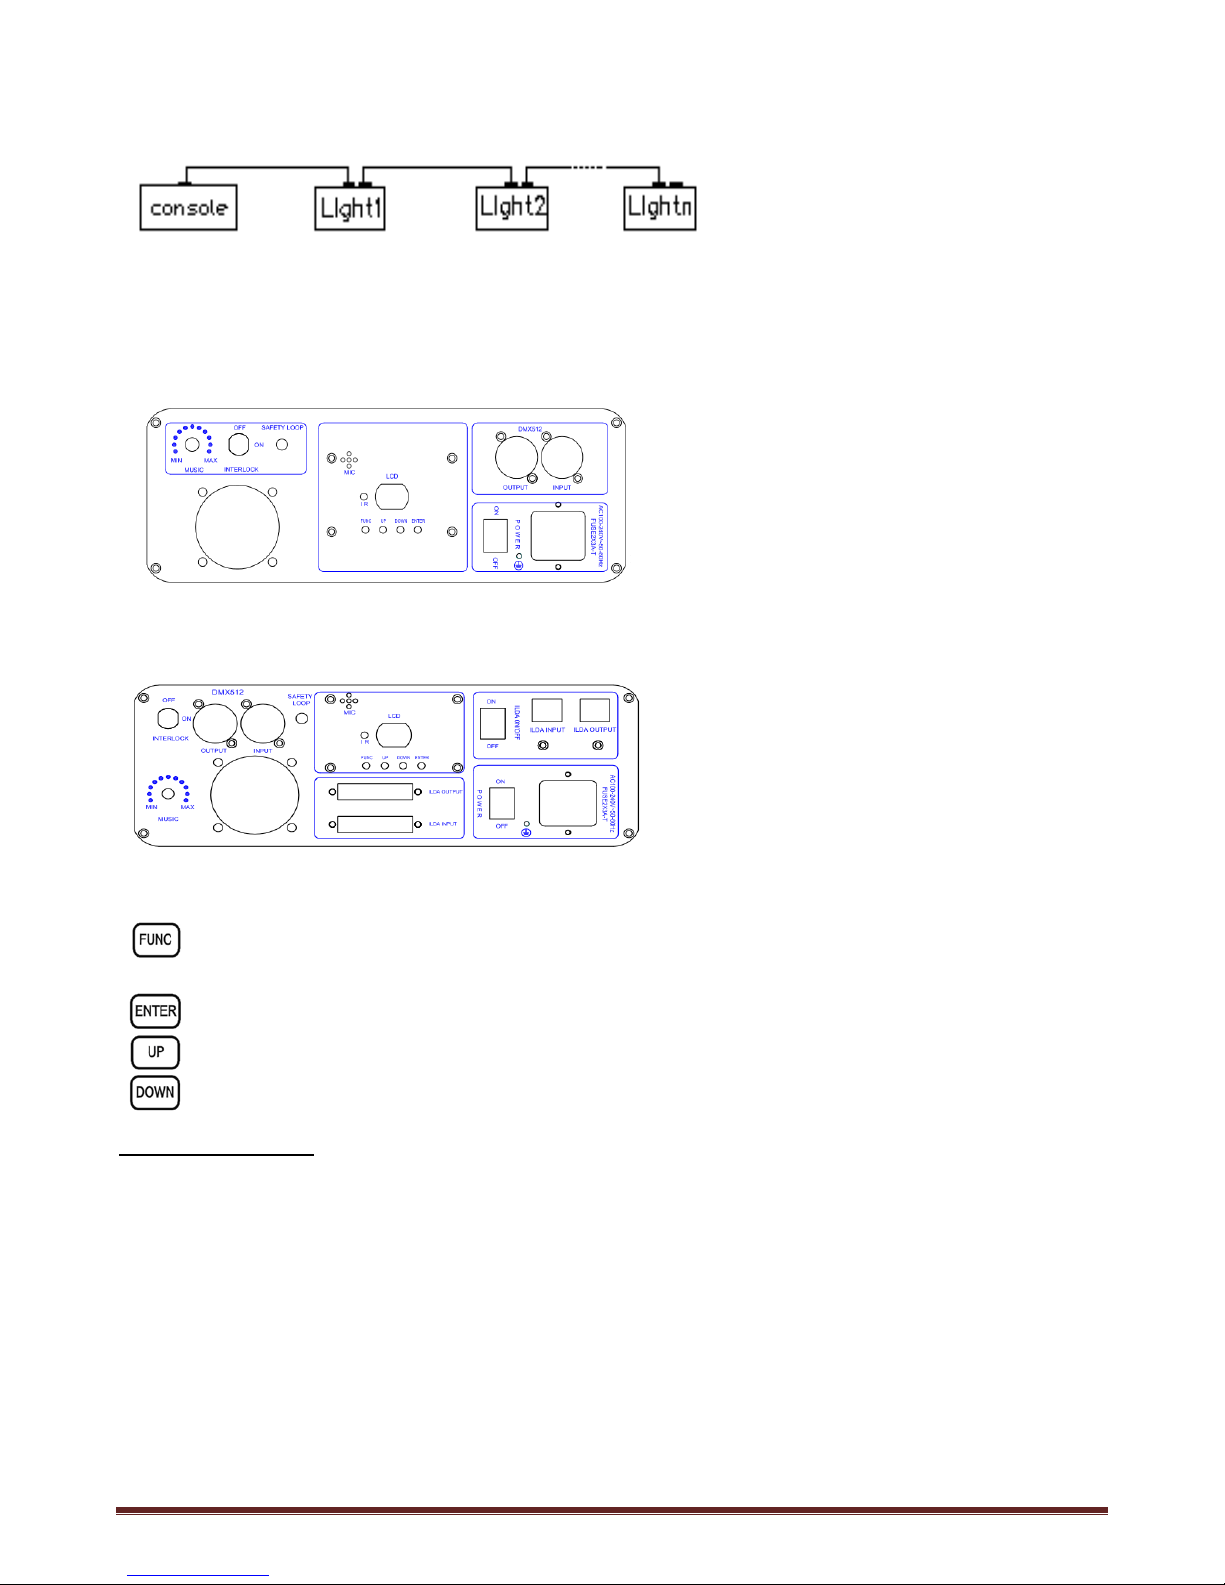
Installation
The unit should be mounted via its screw holes on the bracket. Always ensure that the unit is firmly fixed to avoid
vibration and slipping while operating. Always ensure that the structure to which you are attaching the unit is secure
and able to support a weight of 10 times of the unit’s weight. Also always use a safety cable that can hold 12 times
the weight of the unit when installing the fixture.
DMX512
1. Install the units in a suitable position (laying or appending).
2. Use standard XLR microphone cable chain your units together via the XLR connector on the rear of the units. For
longer cable runs we suggest a terminator at the last fixture.
3. Assign a DMX address to each the unit.
Laser Classification Class 3B
Green Laser Medium DPSS 532nm
Red Laser Medium LD GaAIAs 638nm,typical
Blue Laser Medium LD InGaN 445nm, typical
Beam Diameter <3mm at aperture
Divergence(each beam) <1.3 mrad
Divergence(total light) <1.3mrad
Transverse Beam Mode TEM00
Cooling TEC & Fan Cooling
Scanning High speed scanner 25kpps
©Copyright Lotronic 2017 4
4. Turn on all units' power, the units begins reset, then the unit begins working.
5. Use DMX console to control your units.
Operating introduction:
1. Built-in performance programs, AUTO, SOUND
2. DMX mode
3. Master/Slave
4. ILDA DB25 mode
5. Artnet RJ45 mode
Operation:
Mode/Function: Set the operating mode of laser.
Confirmation: Confirms all settings or changes of LED control panel.
UP/DOWN: Changes the operating mode, parameter or DMX address.
Operation description:
Set the function overview:
* [FUNCTION] key:
At every short press on the FUNC button, following actions are active :
- INDR - DMX (5-CH simplified DMX mode) + you can set the DMX address via the UP/DOWN buttons and
confirm with ENTER
- DMX (34-CH advanced DMX mode) + you can set the DMX address via the UP/DOWN buttons and confirm
with ENTER
- INDR SE (1 – 2 – 3) = 3 AUTO or sound-controlled mode. The ENTER button toggles between these 2 modes
(SND is displayed)
The SE 1 sequence (beam/tunnels, waves mode) – SE 2 (animation 1) – SE 3 is accessible via the sub-menu.
To access the sub menu keep the FUNC button pressed for at least 3 seconds. SET is displayed on the bottom right
©Copyright Lotronic 2017 5
side of the display. You are now in the setting menu.
Select the sequence by selecting SE and press ENTER.
This sub-menu also allows to (not recommended for beginners!)
• Configure motors X & Y via dr – X and dr – Y
• Invert motors (SWAP XY)
• Set the projection size (X-SIZ with values from 0 to 100 and Y-SIZE with values from 0 to 100)
• Activate/deactivate the remote control ( REMOTE – ON/OFF)
To leave the menu, keep FUNC pressed.
* Overview of playback modes:
There are multiple playback modes:
- Built-in Master mode: divided into three small playback modes.
>1: mixed playback: Drawing scenes from each sequence in taking turn playback (can be set by setting the
function).
>2: Sequence playback: only play a sequence. (This mode for the temporary mode, restart laser will not
automatically enter)
>3: Scene playback: only play a scene. This mode for the temporary mode, restart laser will not automatically
enter)
- Slave mode: divided into the following two slave modes:
>1: DMX slave mode: Through the DMX signal line to follow the Master to play.
>2: ILDA slave mode: Accept the ILDA signal control from the Master or laser console.
- DMX playback mode:
>1:Easy DMX mode: 5 channels
Note: Simple DMX mode takes the built-in scenes of the laser directly without any further settings.
CHANNEL
DMX
value
DESCRIPTION
CH 1
On/off power
0
OFF
1-255
ON
CH2 Act
auto/sound
0-127
AUTO
128-255
SOUND CONTROLLED
CH3
Gallery Menu
(scenes)
0-15
1 gallery (0)
16-31
2 gallery (16)
32-239
3 gallery (32)
240-255
40 gallery (240)
CH4
Scenes
0-255
Each value corresponds to a pattern, the value exceeds the number of patterns, the
system with the largest number instead
CH5
colors
0-31
RGB
32-63
red
64-95
yellow
96-127
green
128-159
blueviolet
160-191
blue
191-223
purple
224-255
white

©Copyright Lotronic 2017 6
>2:Professional DMX mode: 34 channels
Order 1: Professional DMX mode is available to the experienced lighting engineers, who are professional in DMX
control, as well as the laser pattern scanning principle , if not, pls use simple DMX mode 4 channels
Order 2: DQF6 (the Bluetooth number) is a double-pattern laser system, and two patterns can be scanned at the
same time. The following description is distinguished by pattern A and pattern B. For ease view, the following points
are shown in Table 1 and Table 2 respectively below.
Table 1 (PATTERN A):
Note:Table 1: CH1-Ch17,pattern A’s channel function, except for special instructions, only control the pattern A,
pattern B is not controlled by this 17 channels:
CHANNEL
DMX value
DESCRIPTION
CH 1
On/off power
0
OFF
1-99
ON
100-199
AUTO
200-254
retain
255
Pattern A closed light, pattern B output light
CH2
Out of bounds and pattern size
0-49
Out of bounds
50-99
Reentry
100-149
blanking
150-199
Blanking+ pattern enlarge
200-255
retain
CH3
Gallery Menu (sences)
0-15
1 gallery (0)
16-31
2 gallery (16)
32-239
3 gallery (32)
240-255
40 gallery (240)
CH4
Gallery choose
0-255
Each value corresponds to a pattern, when the value
exceeds the number of patterns, the system uses the
largest number
CH5
Patterns zooming
0
No zooming
1-31
Zooming 1
32-63
Zooming 2
64-95
Zooming3
96-127
Zooming4
128-159
Zooming 5
160-191
Zooming 6
192-223
Zooming 7
224-255
Zooming8
CH6
Patterns rotating
0-63
Manual rotating
64-95
Rotating 1
96-127
Rotating 2
128-159
Rotating 3
160-191
Rotating 4
192-223
Rotating 5
224-255
Rotating 6
CH7
Horizontal moving
0-63
Manual moving
64-95
Horizontal 1
96-127
Horizontal 2
 Loading...