

IBEA HY-704 User Manual [en, de, it, es, fr]
HY-704 / HY-706 / HY-708
I
F
E
S
MANUALE D’ISTRUZIONE
MANUEL D’INSTRUCTION
MANUAL DE INSTRUCCIONES
BRUKSANVISNING
GB
D
NL
OWNER’S MANUAL
GEBRAUCHSANWEISUNG
INSTRUCTIEHANDLEIDING

INTRODUZIONEI
Caro cliente, la ringraziamo vivamente per aver scelto un prodotto di qualità della ditta IBEA.
Per un corretto impiego della macchina e per evitare incidenti, non iniziate il lavoro senza aver letto questo manuale con
attenzione. Troverete su questo manuale le spiegazioni di funzionamento dei vari componenti e le istruzioni per i necessari controlli e per la manutenzione.
N.B. : La casa produttrice si riserva la possibilità di apportare eventuali modifiche in qualsiasi momento e senza
preavviso.
(INDICE PAG . 4)
GB
Dear customer, thank you very much for having chosen a quality product of the company IBEA.
For proper use of brush-saws and to avoid accidents, do not start work without having read the manual carefully. You’ll
find this guide on the explanations of operation of various components and instructions for the necessary inspections
and maintenance.
N.B. : The manufacturer reserves the right to make changes at any time without notice.
(CONTENTS PAG . 14)
F
Cher client, je vous remercie beaucoup d’avoir choisi un produit de qualité de la société IBEA.
Pour un bon usage de la brosse-scies et pour éviter les accidents, il ne faut pas commencer à travailler sans avoir lu le
manuel attentivement. Vous trouverez ce guide sur les explications du fonctionnement de divers composants et des
instructions pour les inspections nécessaires et de l’entretien.
N.B. : Le fabricant se réserve le droit d’apporter des changements à tout moment sans préavis.
(INDEX PAG . 24)
INTRODUCTION
INTRODUCTION
D
Geehrter Kunde, wir danken Ihnen, dass Sie ein Qualitätsprodukt der Firma IBEA gewählt haben.
Zur korrekten Verwendung der Heckenschere und zur Vermeidung von Unfällen muss vor dem Beginn der Arbeiten
diese Gebrauchsanweisung aufmerksam durchgelesen werden. In dieser Gebrauchsanweisung finden Sie die Erklärungen
für den Betrieb der verschiedenen Bauteile und die Anweisungen für die erforderlichen Kontrollen und Wartungsarbeiten.
ANMERKUNG: Der Hersteller behält sich das Rech vor, jederzeit und ohne Vorankündigungen irgendwelche
Änderungen vorzunehmen.
(INHALTSVERZEICHNIS S. 34)
EINLEITUNG
E
Estimado cliente, muchas gracias por haber elegido un producto de calidad de la empresa IBEA.
Para un buen uso de la brocha-y las sierras para evitar accidentes, no debemos empezar a trabajar sin haber leído el
manual cuidadosamente. Va a encontrar esta guía en las explicaciones de cómo los diversos componentes y las
instrucciones para el mantenimiento y las inspecciones necesarias.
N.B : El fabricante se reserva el derecho a realizar cambios en cualquier momento sin previo aviso.
(ÍNDICE. PAG. 44)
INTRODUCCIÓN
NL
Geachte klant, Dank u voor de keuze van een kwalitatief product van de onderneming IBEA is.
Voor het correcte gebruik van bosmaaier en voorkoming van ongevallen, begin er niet mee werken zonder lees deze
handleiding aandachtig door. U vindt deze handleiding op de uitleg van de werking van diverse onderdelen en instructies
voor de noodzakelijke inspecties en onderhoud.
N.B. : De fabrikant behoudt zich het recht voor om wijzigingen op elk moment zonder voorafgaande kennisgeving.
(INHOUD PAGINA 54)
S
Bäste Kund, tack för att Du har valt en kvalitetsprodukt från företaget IBEA.
För att kunna använda busktrimmern på ett korrekt sätt och förhindra olyckor är det viktigt att den inte tas i bruk förrän
du noggrant har läst igenom denna handbok. I handboken finns förklaringar till de olika komponenternas funktioner
och instruktionerna för de nödvändiga kontrollerna och för underhållet.
OBS! Tillverkaren förbehåller sig rätten att göra ändringar på produkten utan att från gång till gång anpassa innehållet i
handboken.
(INNEHÅLLSFÖRTECKNING SIDA. 64 )
INLEIDING
INLEDNING
I
ITALIANO
INDICE
1. Spiegazione simboli.......................................................................................................................................................................................Pag. 3
2. Per la vostra sicurezza............................................................................................................................................................................................3
3. Informazioni utili.....................................................................................................................................................................................................4
4. Descrizione delle parti............................................................................................................................................................................................5
5. Dati tecnici e Dichiarazione di conformità..........................................................................................................................................................6
6. Assemblaggio.........................................................................................................................................................................................................9
7. Manutenzione periodica......................................................................................................................................................................................10
8. Risoluzione dei problemi.....................................................................................................................................................................................11
9. Rimesaggio............................................................................................................................................................................................................12
10. Certificato di garanzia........................................................................................................................................................................................13
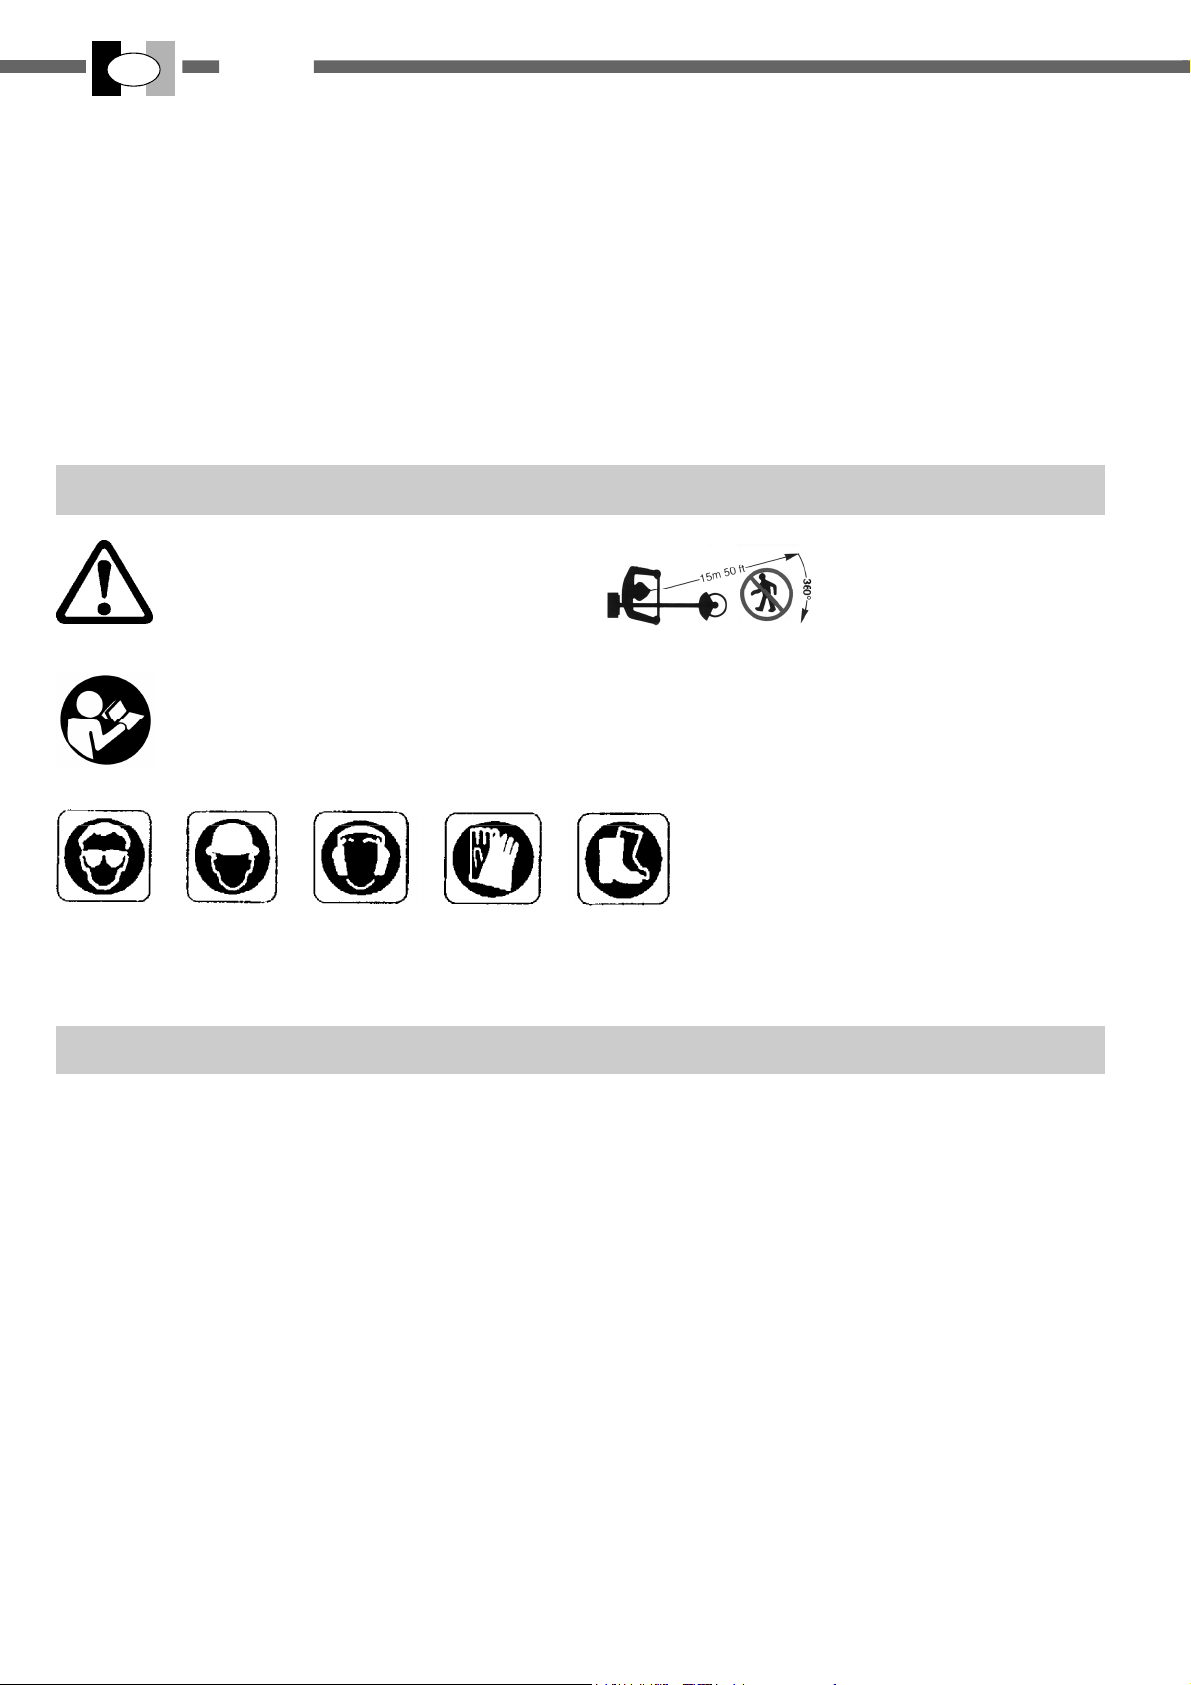
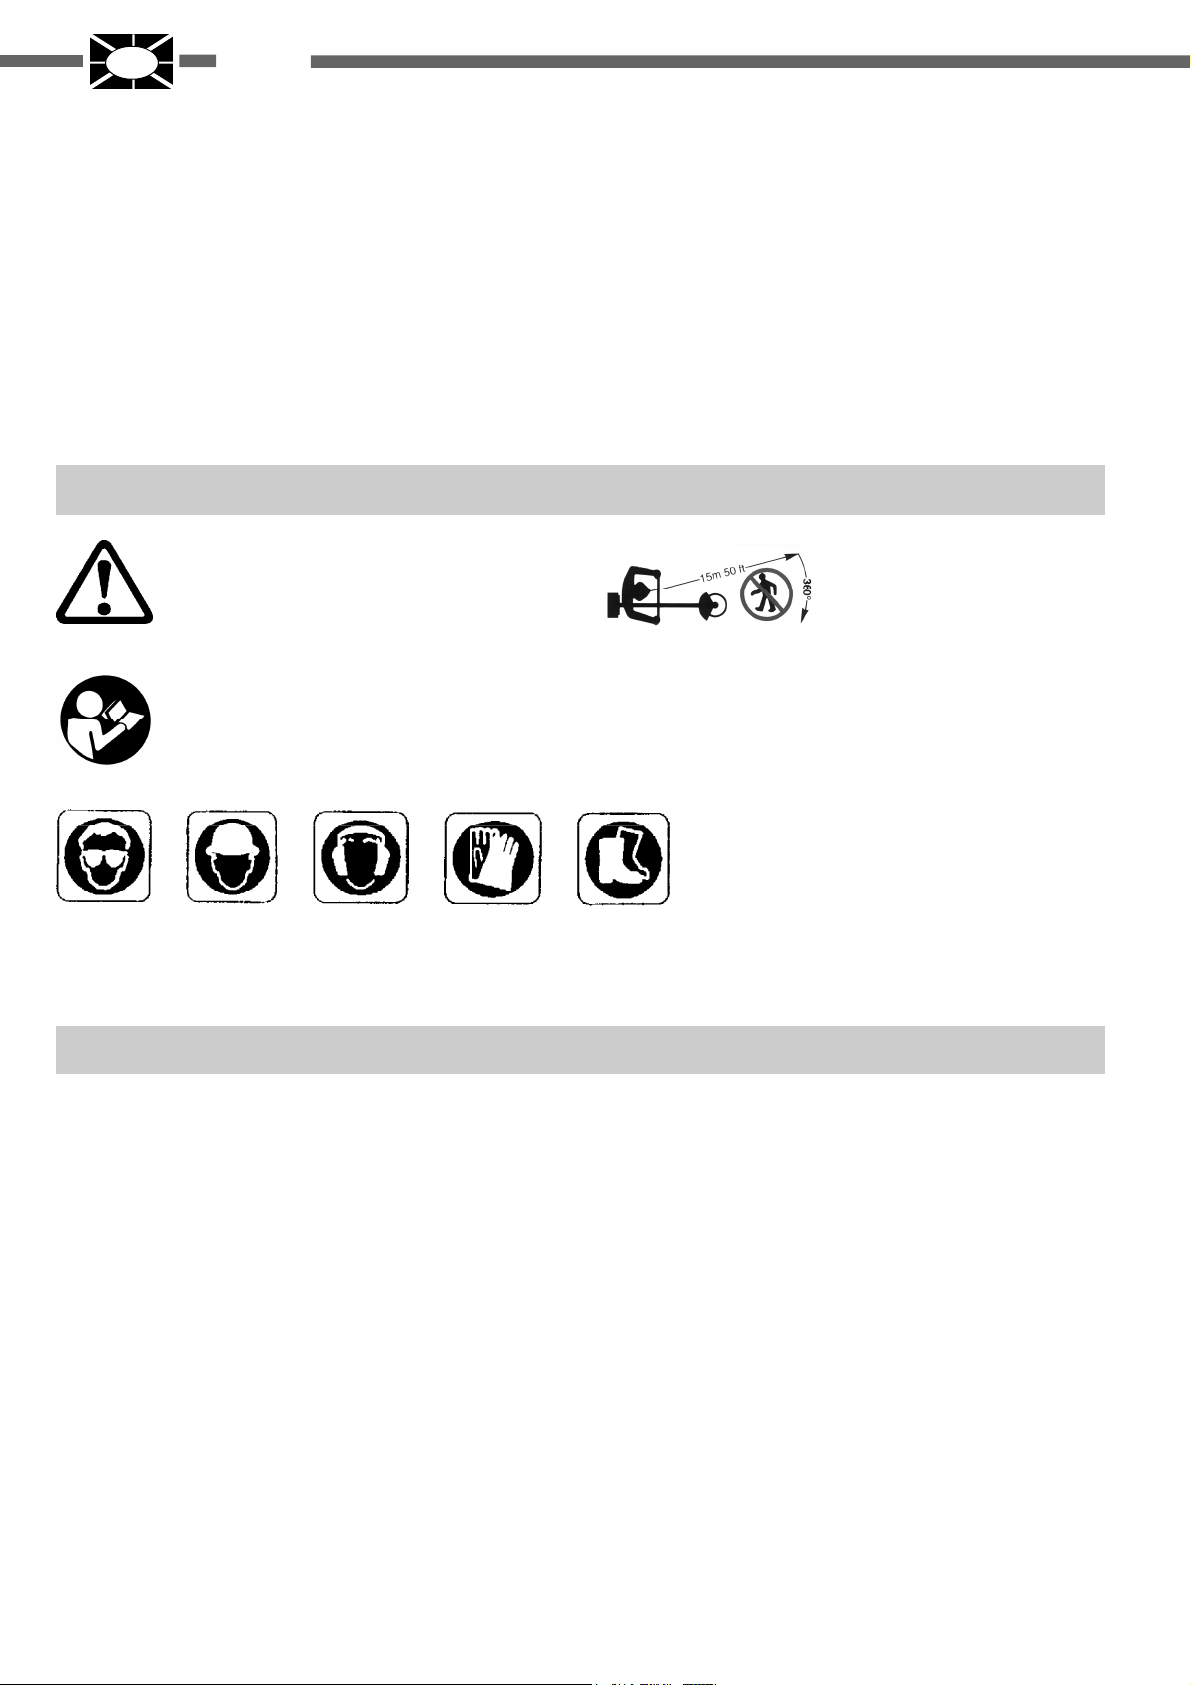
1. SPIEGAZIONE SIMBOLI
Avvertenza, pericolo ed attenzione.
Leggere il manuale di uso e manutenzione
prima di utilizzare questa macchina.
Indossare dispositivi di protezione durante il funzionamento di questa macchina.
2. PER LA VOSTRA SICUREZZA
Leggere attentamente queste istruzioni ed accertarsi di comprenderle prima di far funzionare I’unità. Attenersi a tutte le
avvertenze ed alle istruzioni di sicurezza.Conservare questo
manuale a titolo di futuro riferimento
Controlli prima dell’avviamento
1- Rimuovere sempre la batteria pèr evitare che la macchina
venga azionata per errore. Rimuovere sempre la batteria prima di procedere alla manutenzione della macchina.
2-Prima dell ‘uso del decespugliatore, liberare I’area da tosare da tutti gli oggetti: quali sassi, pezzi di vetro, filo metallico o corda ecc.,che possono venire scagliati o impigliarsi
nel dispositivo di taglio.
3- Usare solamente ricambi originali, pezzi di ricambio prodotti da altri fabbricanti potrebbero adattarsi male e causare
lesioni .
4- Indossare abiti adatti ed articoli di sicurezza quali:
stivali,pantaloni robusti, guanti, visiera oppure occhiali protettivi, cuffia e casco protettivo.
5- Ispezionare la macchina prima di ogni impiego. Controllare
che la leva acceleratore funzioni bene. Accertarsi che il disco
sia libero di girare e non sia a contatto con corpi estranei, che
i dispositivi di sicurezza non siano allentati ecc.. Sostituire le
parti danneggiate.
6- Accertarsi che la protezione del disco o della testina e gli
altri dispositivi siano montati correttamente e saldamente.
7- Non permettere ad altre persone,bambini o animali di restare nel raggio di 15 mt. durante I’uso del decespugliatore.
8- Mantenersi ben saldi ed in equilibrio. Mantenere il dispositivo di taglio al di sotto dell’altezza della cintura.
9-Non usare in alcun modo fili di metallo o corde rinforzate in
metallo,visto che potrebbero rompersi e formare proiettili
pericolosi.
Sicurezza personale
1- Non permettere ai ragazzi di usare un decespugliatore.
2- Non indossare articoli d'abbigliamento poco aderenti o slac-
ciati.
3- Non operare con il decespugliatore quando si è stanchi,
malati o sotto I’effetto di alcool, droghe o farmaci.
4- Trasportare il decespugliatore a motore fermo e con il copri disco montato.
5- Con il motore in moto non fare alcuna manutenzione e
non toccare il disco. Indossare i guanti per maneggiare o
effettuare la manutenzione delgi attrezzi da taglio.
6- Riporre il decespugliatore in modo da prevenire le lesioni
accidentali causate da oggetti taglienti, lontano da fonti di
calore e sollevato dal suolo.
Tenere le persone
lontane 15 mt.
4

ITALIANO
I
7- Onde evitare il rischio di lesioni,spegnere sempre il motore prima di rimuovere qualsiasi oggetto avvolto sia attorno
all’albero della testina o disco.
Uso e cura dell’attrezzo elettrico
1- Evitare gli ambienti pericolosi. Non utilizzare l’utensile in
luoghi bagnati o umidi, oppure esposti alla pioggia. Eventuali
infiltrazioni di acqua nell’utensile aumentano il rischio di scariche elettriche.
2- Effettuare la carica utilizzando solamente il caricabatterie
specificato dal produttore. Un caricabatterie adatto per uno
specifico tipo di batteria potrebbe provocare un pericolo di
incendio se utilizzato con un’altra batteria.
3- Utilizzare gli utensili elettrici solo con le batterie specifiche. L’uso di tipi diversi di batterie può provocare un pericolo
di infortuni e incendi. Quando la batteria non è in uso, evitare
di tenerla a contatto con oggetti metallici, quali graffette,
monete, chiavi, chiodi, viti o altri piccoli oggetti metallici
chepossano stabilire un contatto tra un terminale e l’altro.
Un cortocircuito dei terminali della batteria potrebbe causare
ustioni o incendi.
4- In condizioni precarie, potrebbe fuoriuscire del liquido dalla batteria, con cui è opportuno evitare il contatto. In caso di
contatto accidentale, sciacquare abbondantemente con acqua. In caso di contatto del liquido con gli occhi , rivolgersi a
un medico. Il liquido fuoriuscito dalla batteria può provocare
irritazioni o ustioni.
5- Si raccomanda l’utilizzo della catena da 1/4” quando viene utlizzato l’attrezzo potatore.
6- Non smontare la batteria.
7- Se il tempo di funzionamento è diventato eccessivamente
breve, non utilizzare l’utensile. Potrebbero verificarsi
surriscaldamenti, ustioni o esplosioni.
8- Non conservare l’utensile e la batteria a una temperatura
superiore a 50°C.
9- Non smaltire le batterie nel fuoco. La pila potrebbe esplodere. Fare riferimento alle normative locali per eventuali istruzioni speciali di smaltimento.
Suggerimenti per prolungare la durata della batteria
1- Se possibile, evitare di scaricare completamente la batte-
ria e ricaricarla spesso.
Se si nota una diminuzione di potenza dell’utensile, interrompere il lavoro e ricaricare la batteria.
2- Non hanno effetto di memoria quindi si possono caricare
in qualsiasi momento ma perdono la carica alle basse
temperture e soffrono molto il caldo.
3- L’immagazzinaggio in un posto freddo ritarda il processo
d’invecchiamento dello litio-ione e si suggerisce una temperature tra i 20°C e 25°C. Prima di caricare una batteria surriscaldata, lasciarla raffreddare.
3. INFORMAZIONI UTILI
Vantaggi E700:
1- La scheda elettronica che gestisce il motore è dotata di
un dispostivo che riconosce lo sforzo che l’attrezzo deve
sviluppare, modificando la potenza del motore, in modo da
ottenere un minor consumo dell’energia immagazzinata;
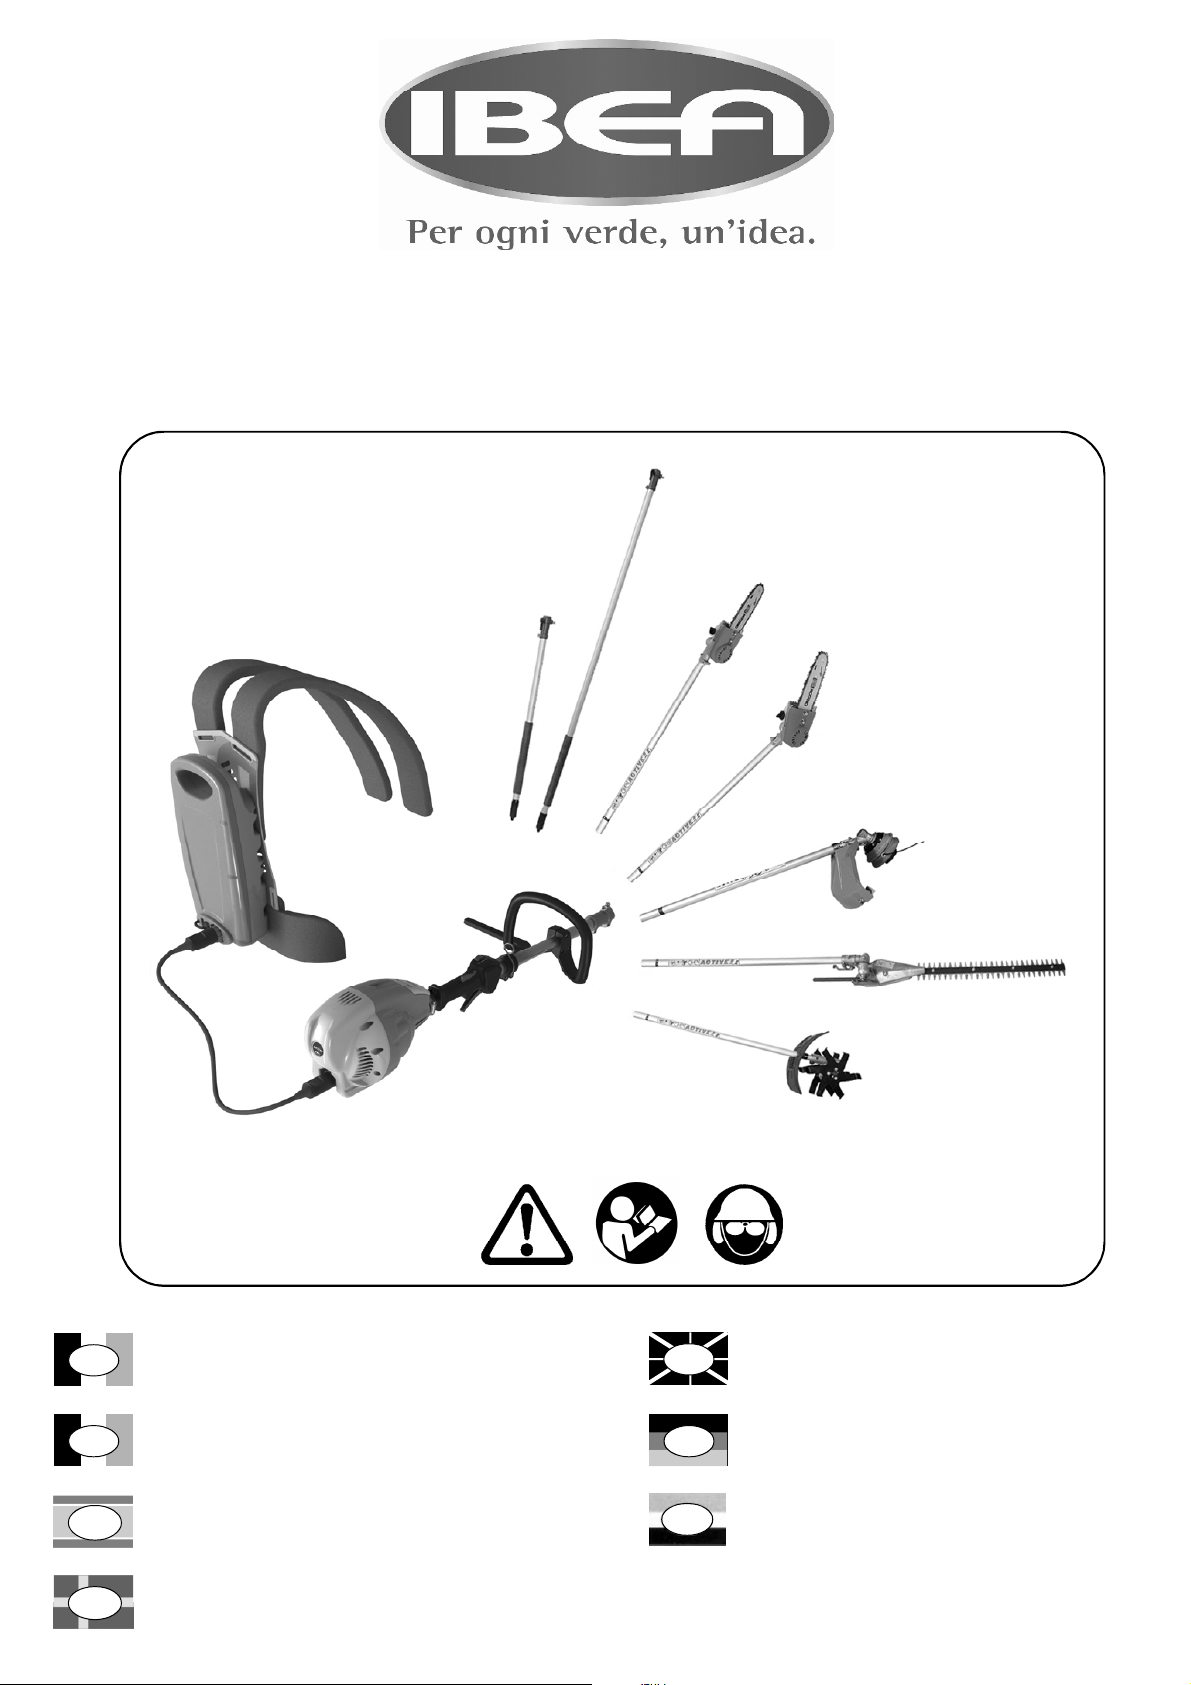
2- Tutti gli attrez zi ill ustrati in prima p a gina
(DECESPUGLIATO RE, TAGLIASIEPI, POTATORE,
SOFFIATORE, ZAPPETTA, OLIVATOR e PROLUNGHE) si
possono colleggare alla macchina e sono gli stessi impiegati nelle macchine evolution con motore a 2 tempi. In questo
modo è possibile usare la stessa unità motrice con tutti gli
attrezzi (SOLUZIONE CHE MASSIMIZZA L’INVESTIMEN-
TO);
3- L’evolution E700 ha la particolarità di avere, inoltre, il mo-
tore nella parte opposta all’attrezzo (e non il motore sulla
testa dell’attrezzo) permettendo un corretto bilanciamento e
un ergonomia tali da poter usare la macchina per lungo periodo limitando l’affaticamento;
4- L’E700 è particolarmente adatto per impego professionale
in orari o zone urbane, vicino a scuole, ospedali, all’interno
di aree chiuse (serre, etc), in cui non è consentito operare
con attrezzature rumorose ed inquinanti.
Caratteristiche Batterie:
Le batterie IBEA sono batterie agli ioni di Litio Polimero.
Dopo 1000 cicli di ricarica la batteria IBEA può essere
caricata all’80% della capacità che aveva inizialmente, senza però ridurre la potenza erogata dalla batteria durante il
lavoro. E’ preferibile scaricare parzialmente la batteria piuttosto che completamente.
Vantaggi:
1- Sono meno pericolose se vengono danneggiate perchè
contengono un componente solido (polimero) che non è infiammabile;
2- Non hanno effetto di memoria, quindi si possono caricare;
Svantaggi:
1- Possono perdere rapidamente la carica alle basse e alle
alte temperature;
Caratteristiche Motore:
I motori IBEA sono motori Bruschless (senza spazzole).
Non è quindi necessaria nessuna manutenzione e, non avendo un contatto strisciante, la vite del motore è teoricamente
infinita tranne che per i cuscinetti a sfere.
5
I
ITALIANO
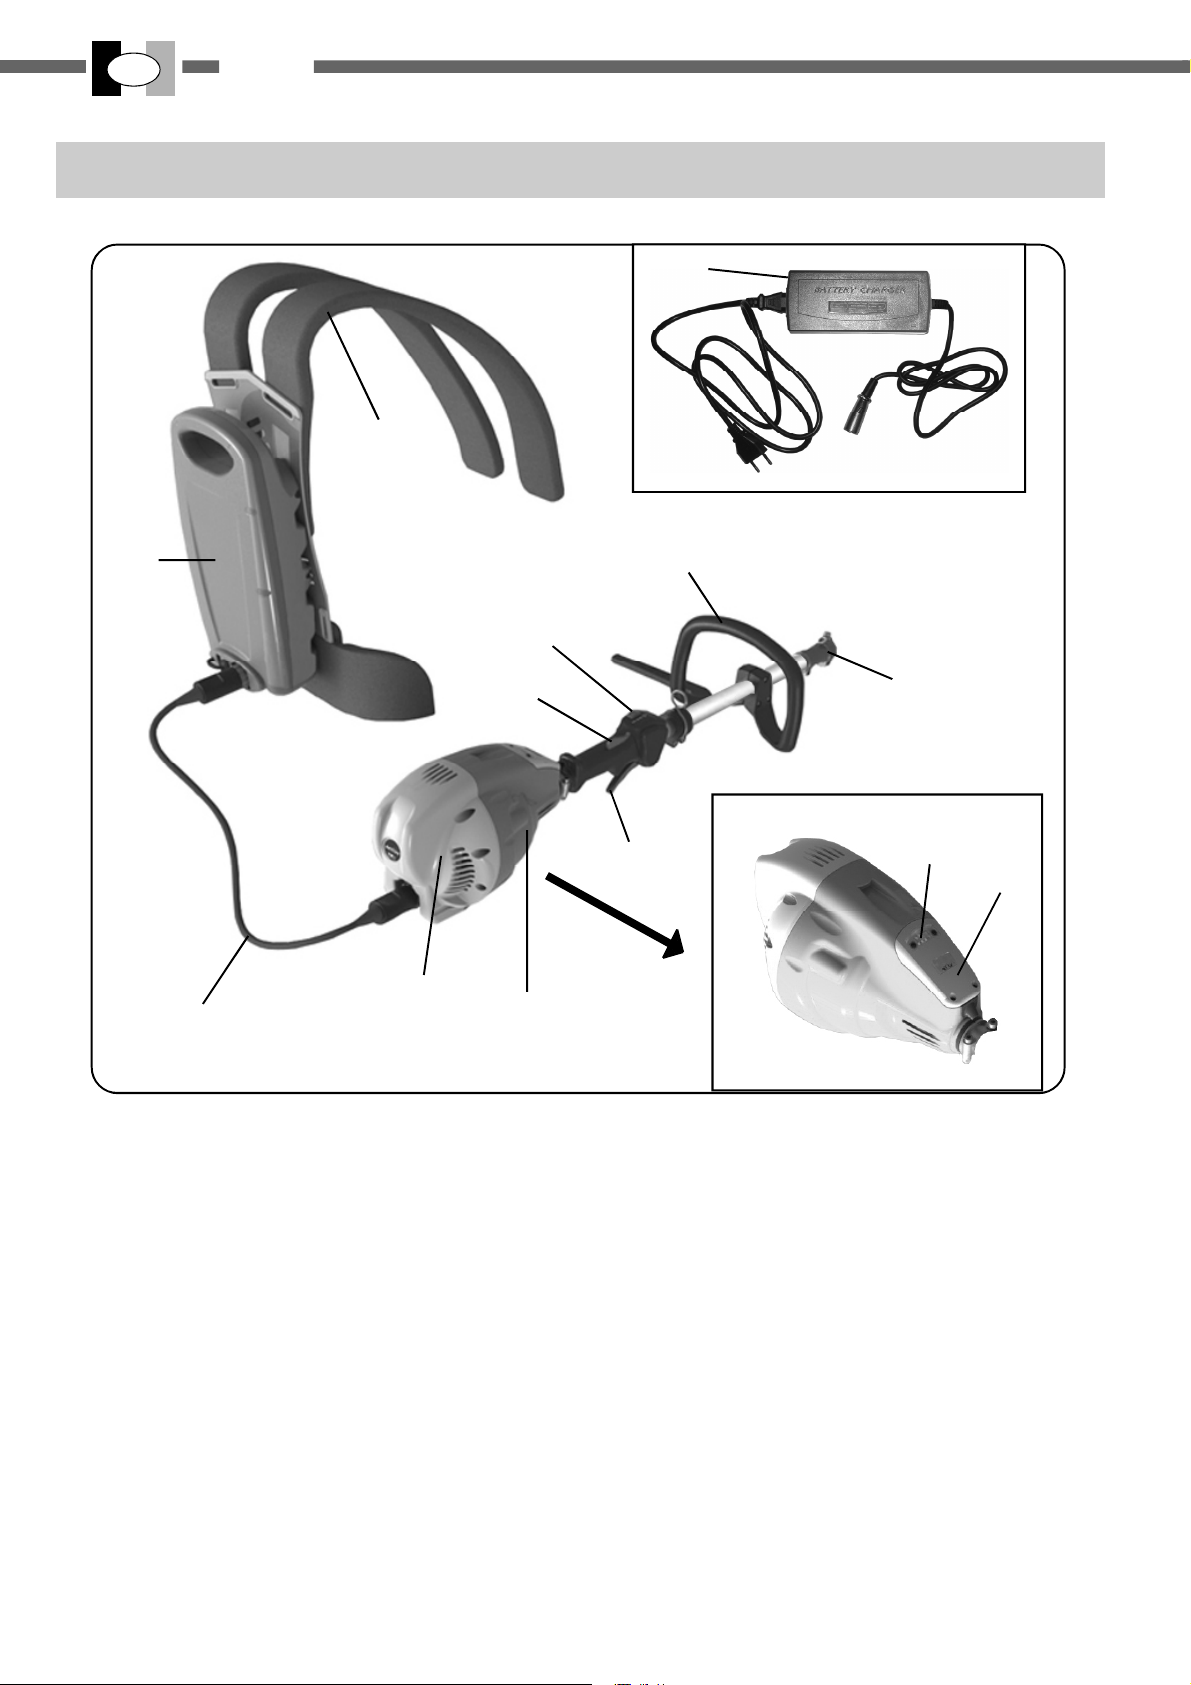
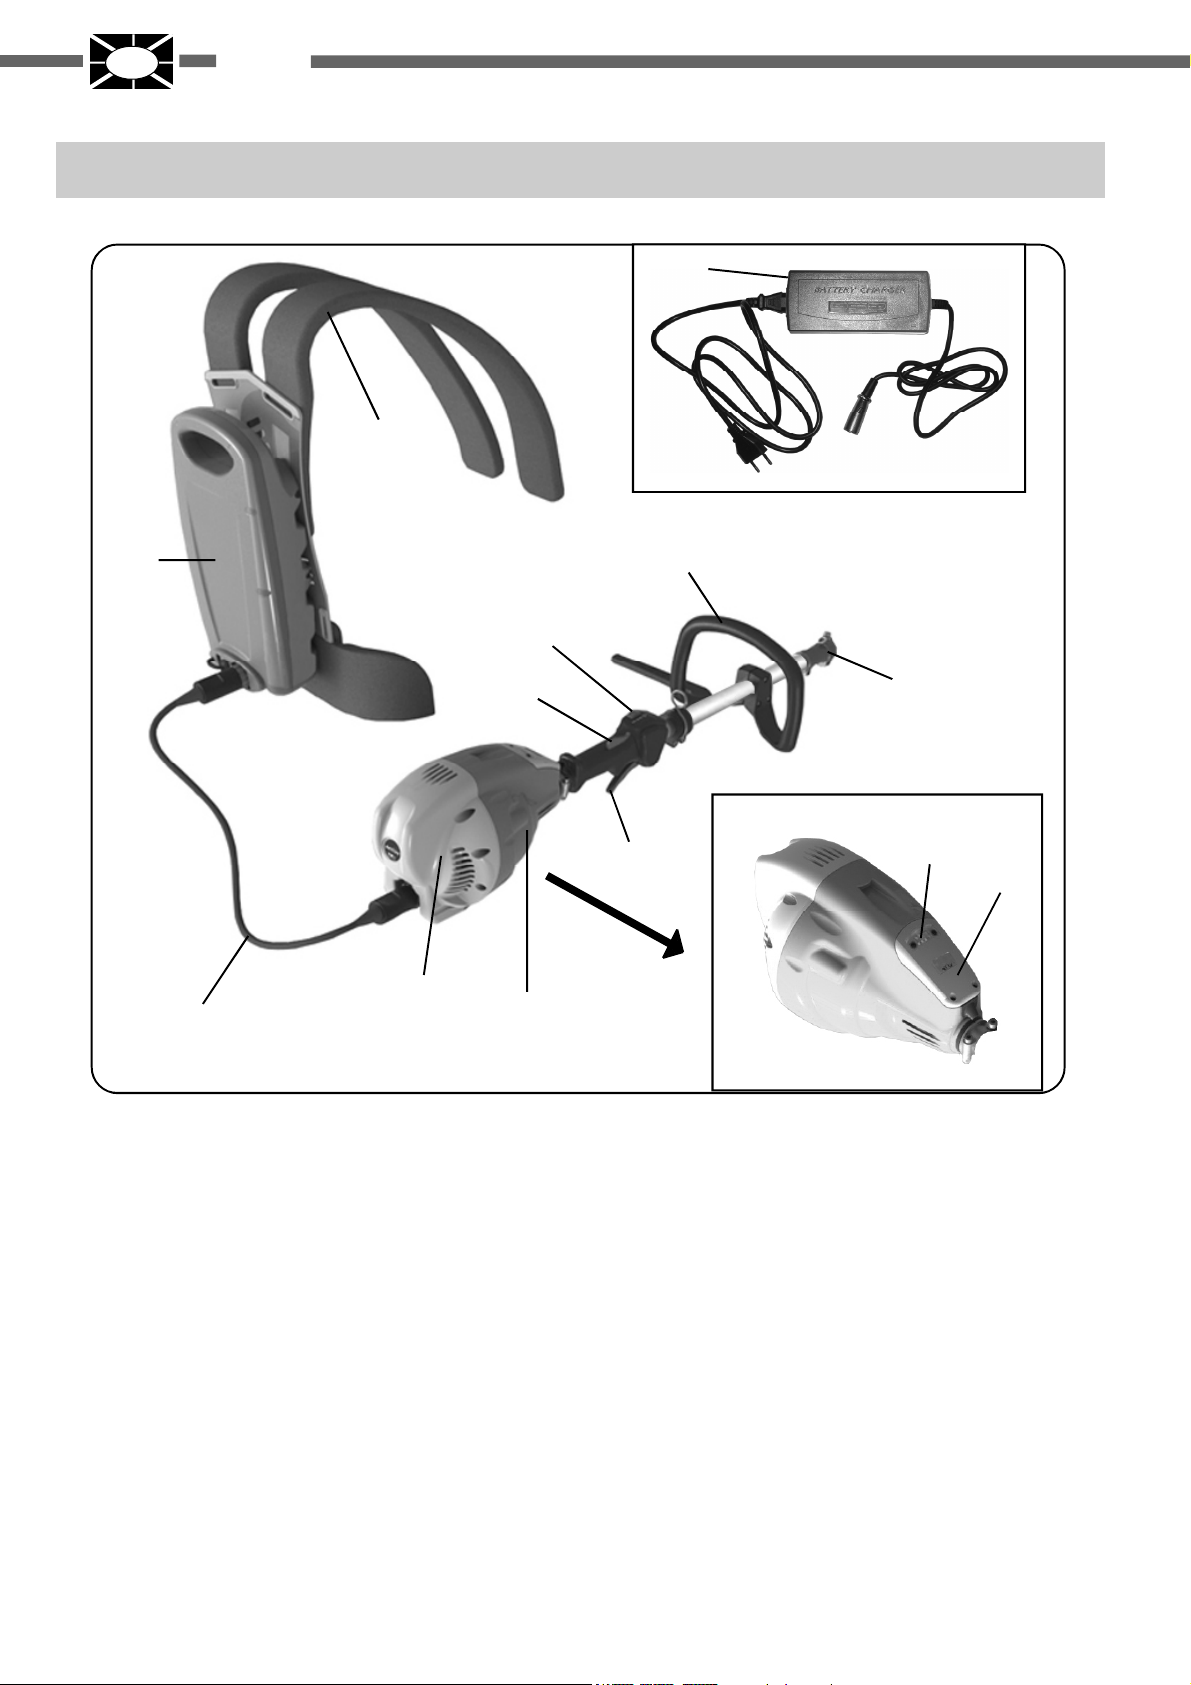
4. DESCRIZIONE DELLE PARTI
13
1
2
9
8
7
6
10
11
12
4
3
5
1. Cinghiaggio
2. Batteria
3. Cavo
4. Scheda elettronica
5. Motore elettrico
6. Leva acceleratore
7. Leva di sicurezza
8. Interruttore ON/OFF
9. Impugnatura
10. Manicotto
11. Spia luminosa
12. Collegamento cavo acceleratore - motore
13. Carica batteria
6
ITALIANO
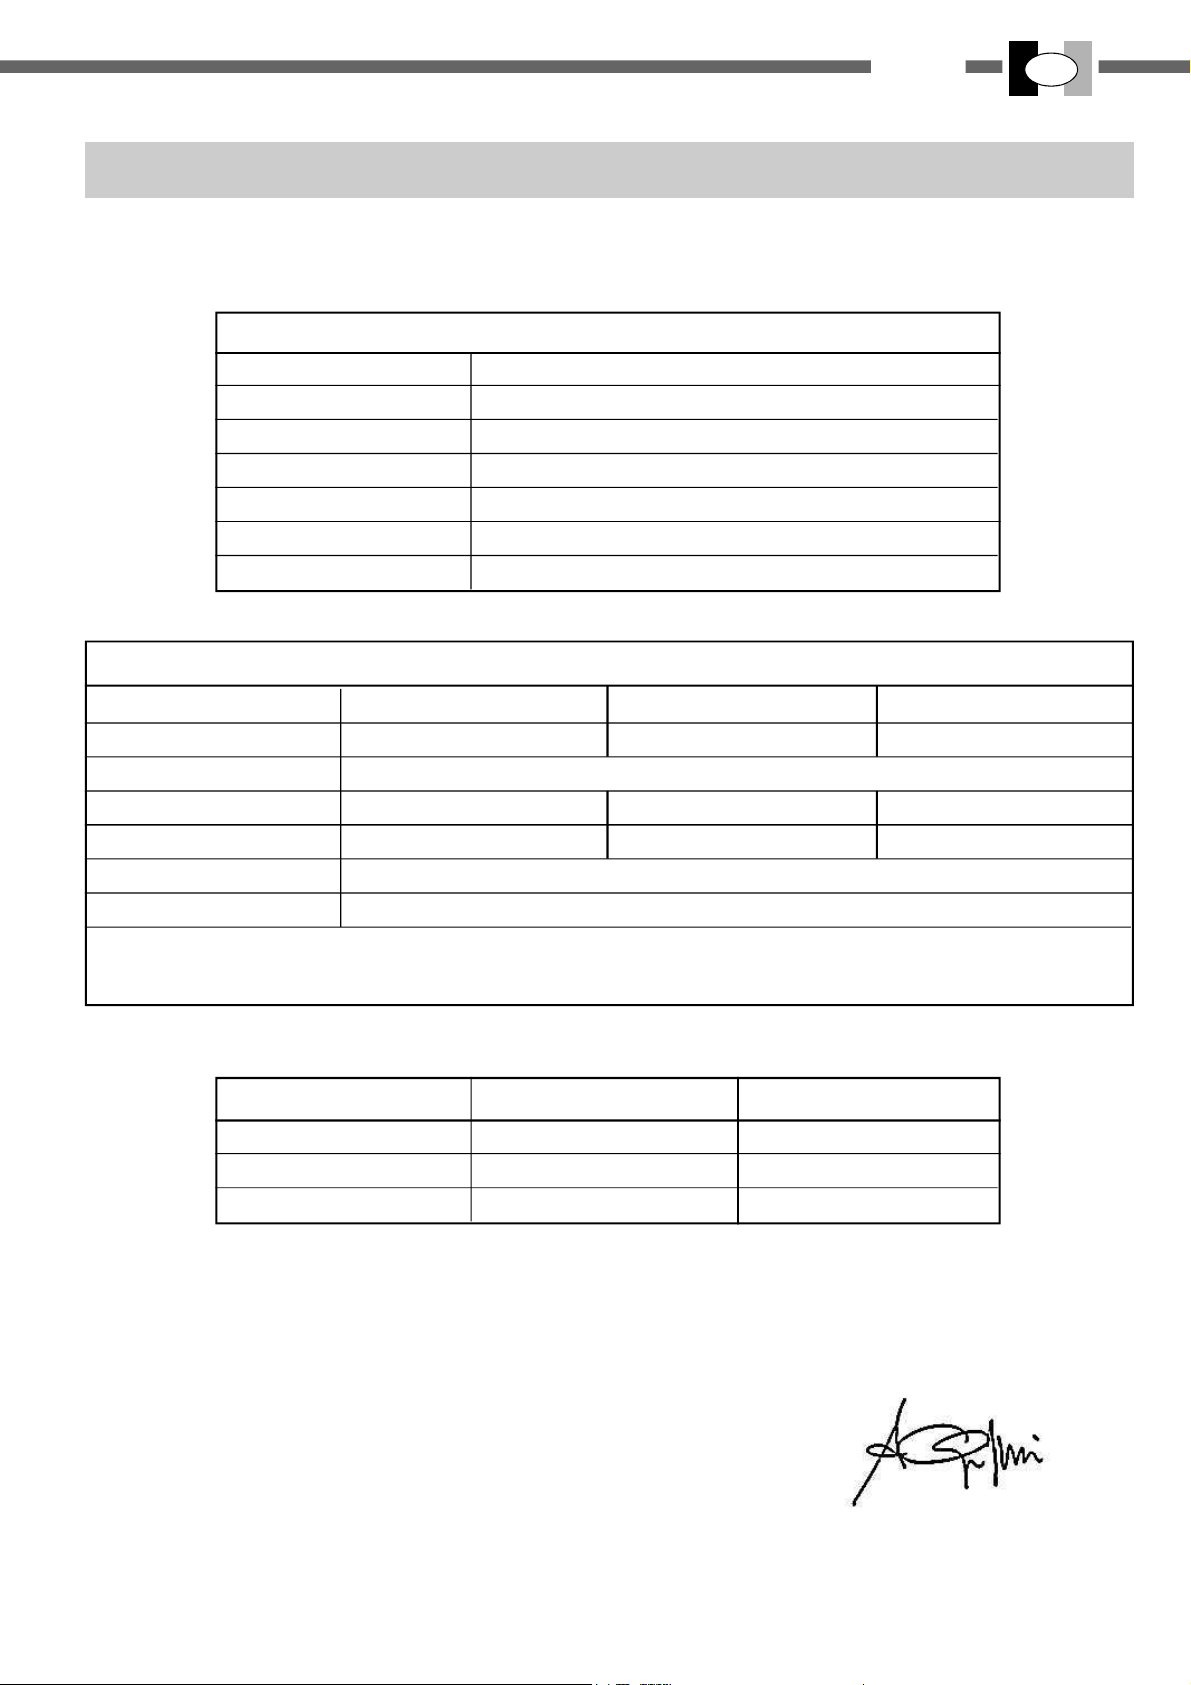
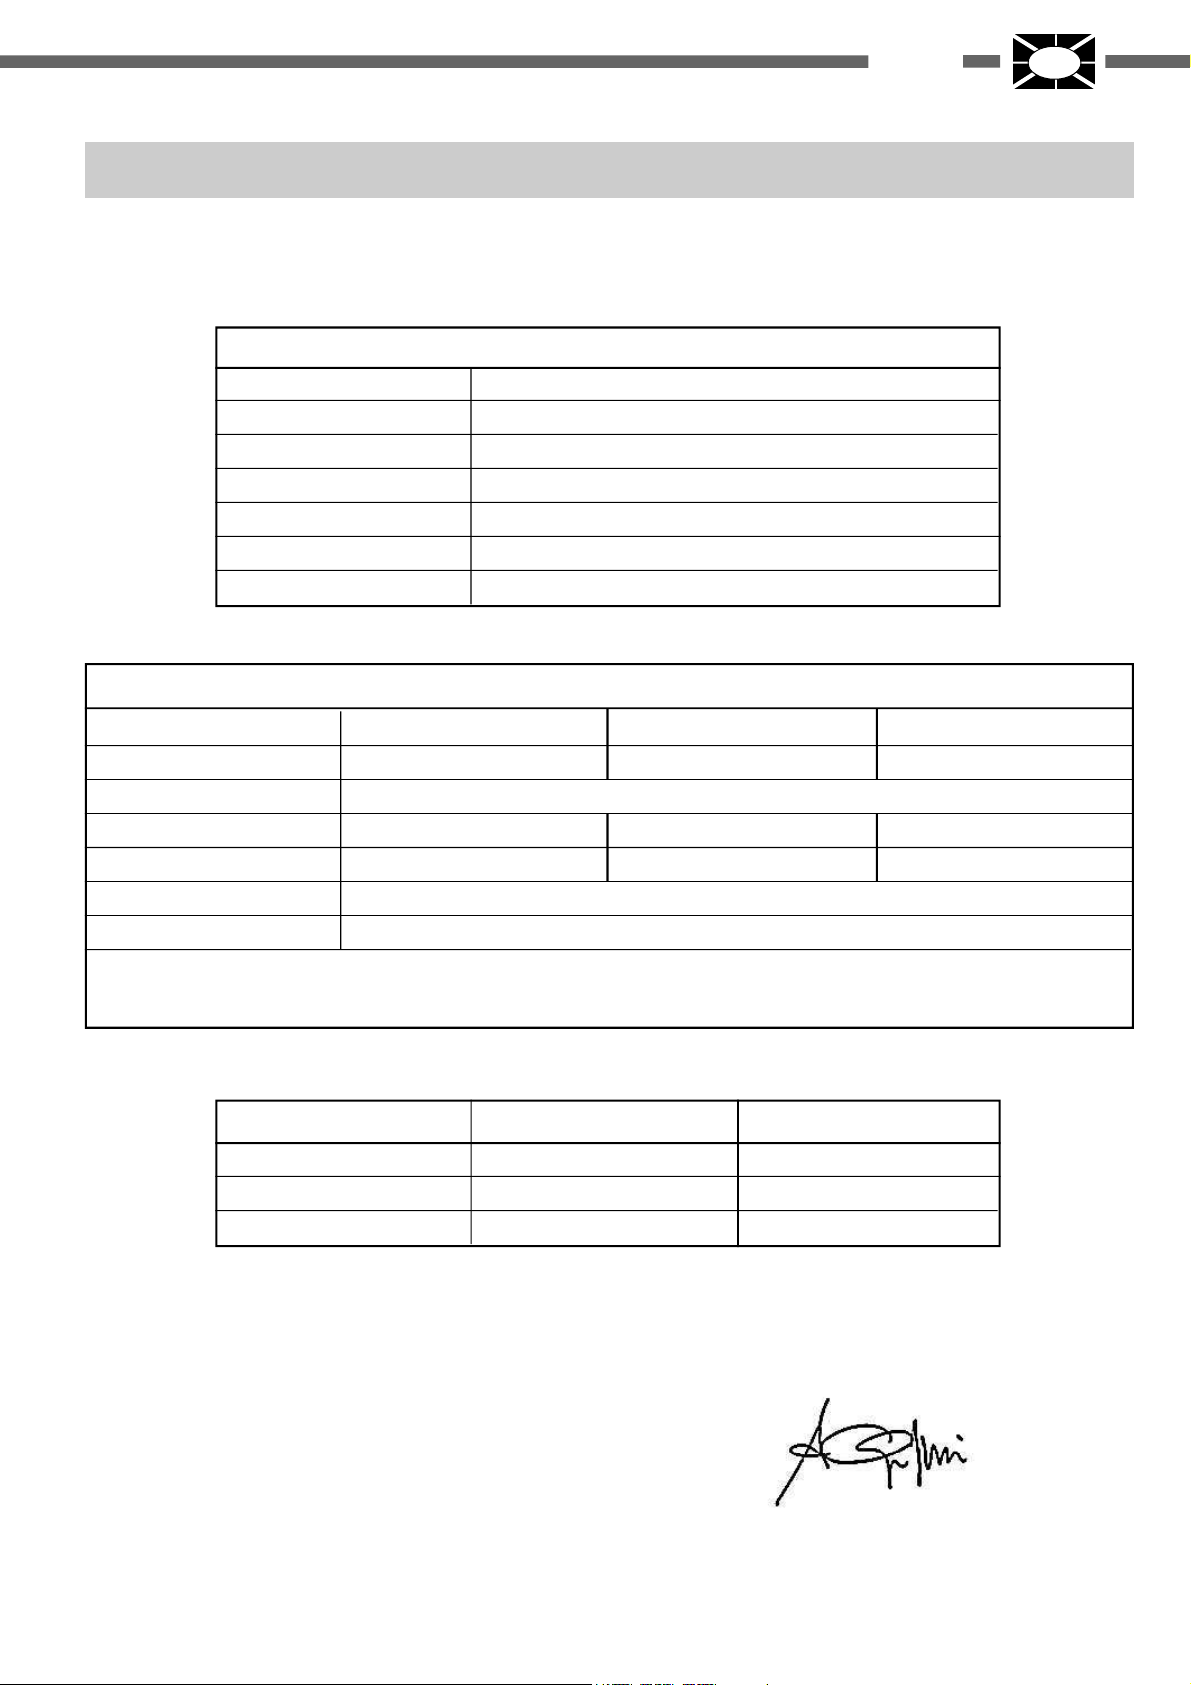
5. DATI TECNICI E DICHIARAZIONE DI CONFORMITA’
ACTIVE s.r.l. Via Delmoncello 12 - 26037 San Giovanni in Croce (CR)
dichiara sotto la propria responsabilità che la macchina con marchio IBEA:
GRUPPO MOTORE
I
MODELLO
MANUBRIO / IMPUGNATURA
Ø TUBO TRASMISSIONE
POTENZA
VELOCITA’
PESO (solo gruppo motore)
LUNGHEZZA CAVO
BATTERIA (Litio / Polimero)
PESO
TENSIONE
CAPACIT A’
ENERGIA ACCUMULATA
VITA UTILE MINIMA
TEMPO CARICA BATTERIA
IBEA HY-70
IMPUGNATURA
Ø 26
750 W in continuo
7000 giri/min
3,8 Kg
1,5 Mt
BATT E R I E
B4 B6
3,5 Kg 5 Kg
36 V
10 Ah 15 Ah
360 Wh 540 Wh
1000 CICLI
4 h
B8
6 Kg
20 Ah
720 Wh
La durata delle batterie è stata rilevata su tempi di lavoro effettivi, senza pausa e con taglio medio.
Questa può variare in base all’attrezzo che si usa e al lavoro che si sta facendo.
CARICABATTERIA
TENSIONE DI RETE
FREQUENZA
B4 / B6
SSLCO84V42
100 - 240 V
47 - 63 Hz
B8
ES-3604SL
90 - 264 V
47 - 63 Hz
è conforme alle prescrizioni delle direttive 2006/42/CE, 2000/14/CE, 2004/108/CE, 2002/44/CE
ALBERTO GRIFFINI
PRESIDENTE
ACTIVE S.r.l.
Via Delmoncello, 12
26037 San Giovanni in Croce (CR) - ITALY
11/03/2014
7
I
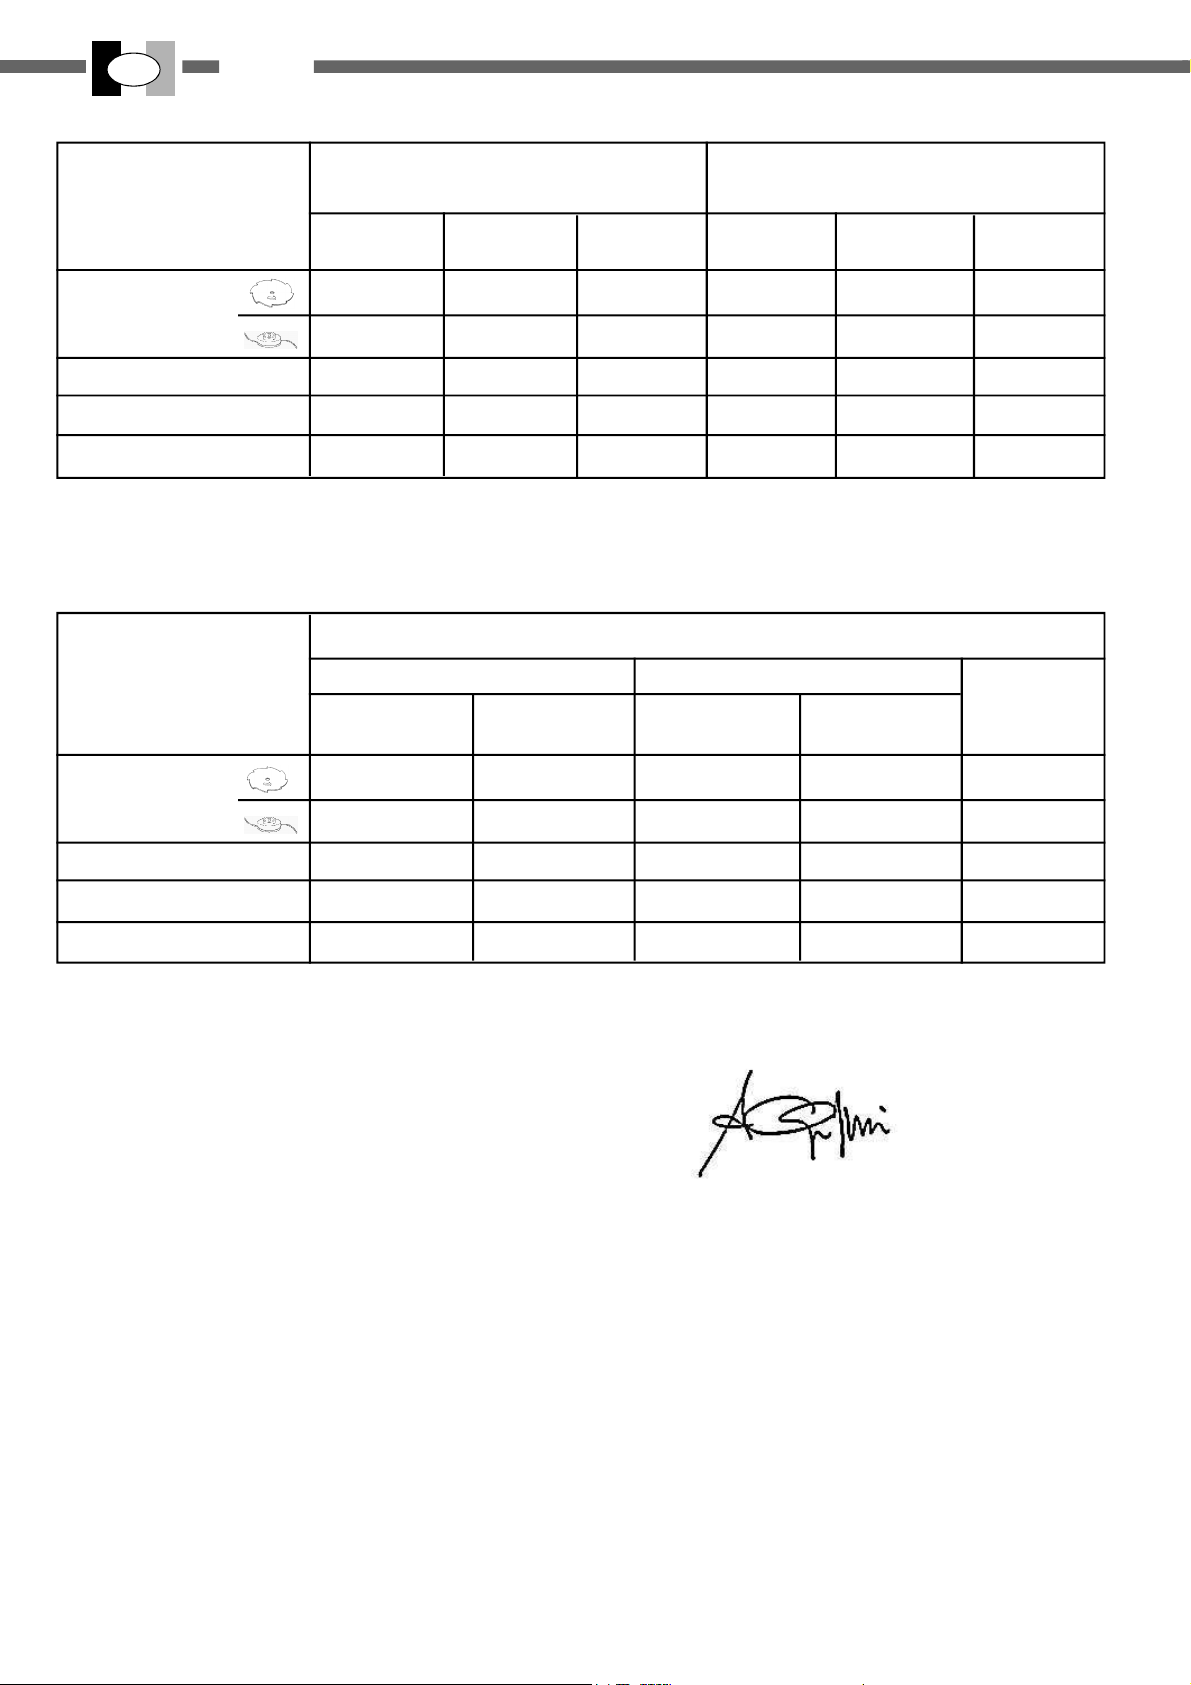
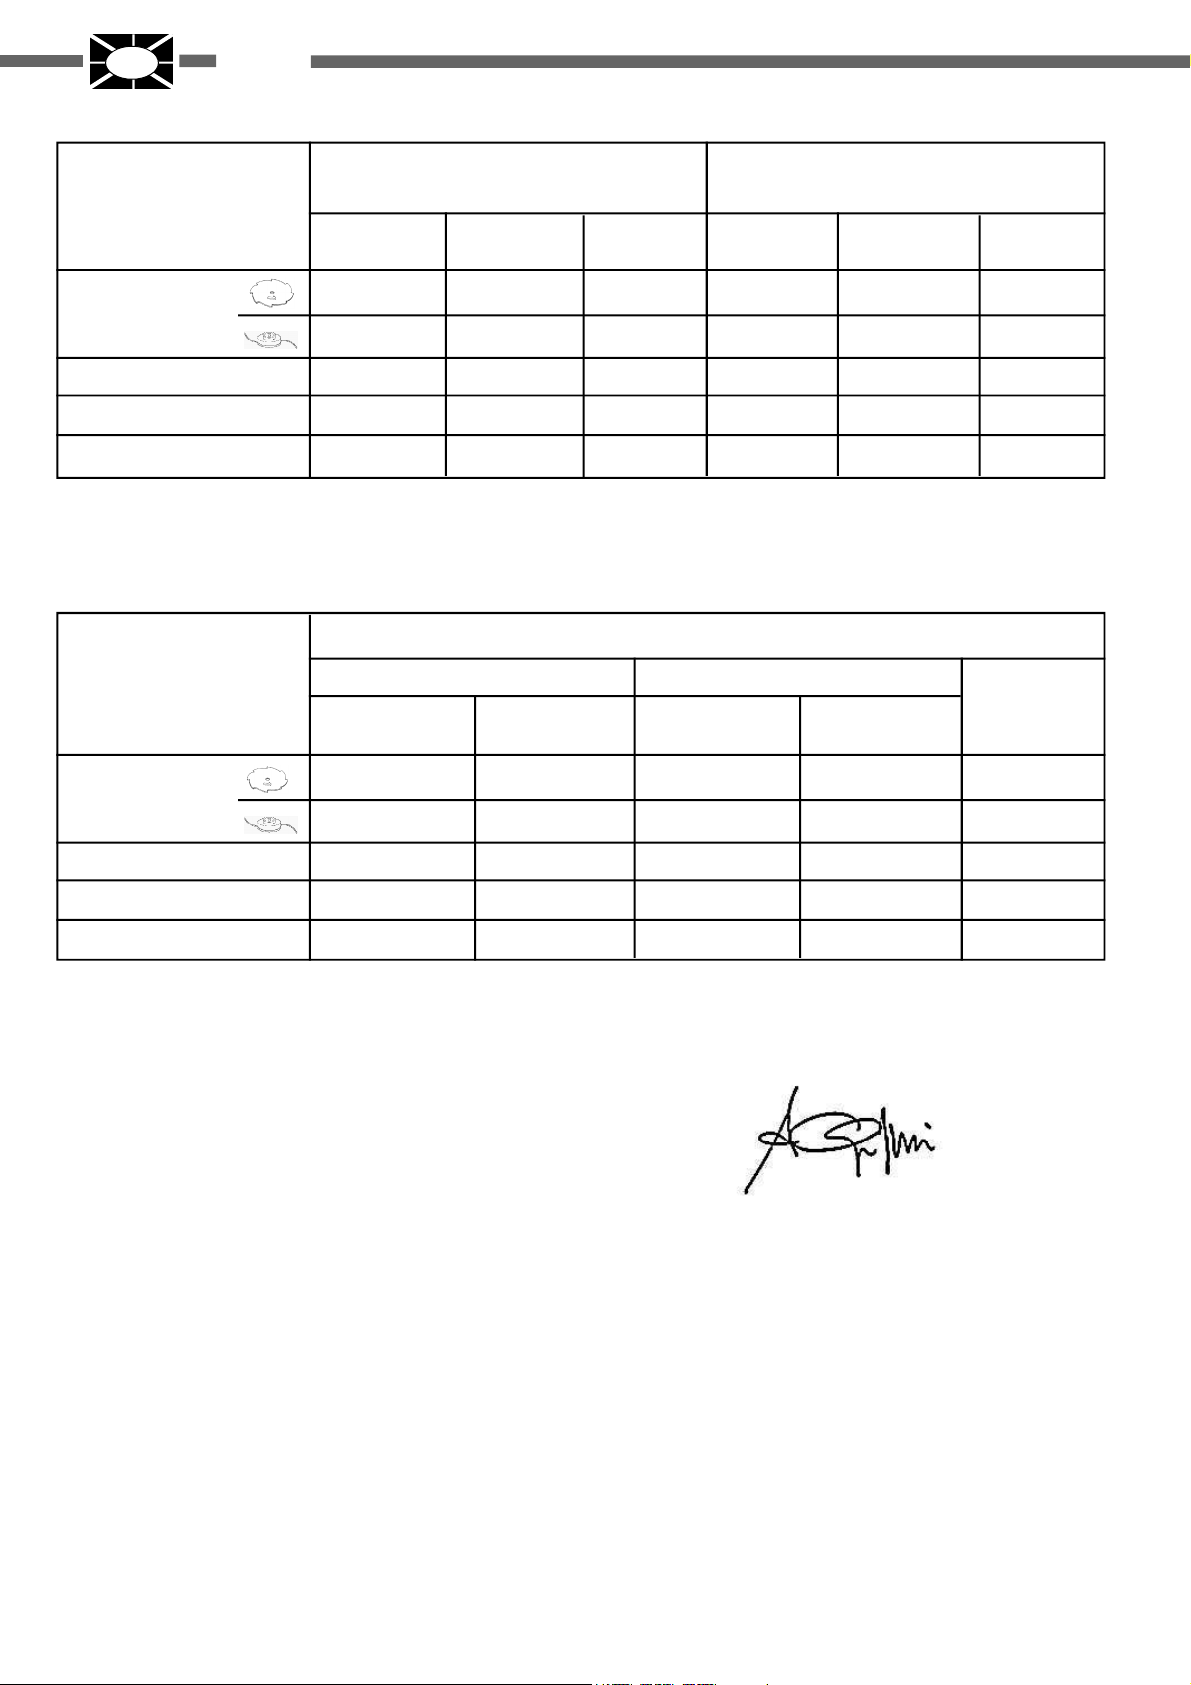
ITALIANO
ATTREZZO
DECESPUGLIATORE
TAGLIASIEPI
POTATORE
ZAPPETTA
ATTREZZO
PRESSIONE ACUSTICA L
(EN ISO 22868)
Valore garantitoValore rilevato
78
85
80
75
73
81
88
83
78
76
(dB (A))
p
POTENZA ACUSTICA L
(EN ISO 3744)
Incertezza (K) Incertezza (K)
2
2
2
2
2
Valore rilevato Valore garantito
90
103
93
93
96
93
106
96
96
99
LIVELLO VIBRAZIONI (EN ISO 5349)
- IMPUGNATURA ANTERIORE - - IMPUGNATURA POSTERIORE -
a
hv
(m/s²)
Incertezza (K)
(dB (A))
a
hv
(m/s²)
Incertezza (K)
(dB (A))
(dB (A))
W
2
2
2
2
2
Esposizione
giornaliera
A(8) m/s²
DECESPUGLIATORE
TAGLIASIEPI
POTATORE
ZAPPETTA
2,5
1,9
2,5
2,8
1,5
2
1,5
1,5
1,5
1,5
2,2
1,8
1,6
2,2
2,5
1,5
1,5
1,5
1,5
1,5
1,77
1,41
1,26
1,65
1,85
ALBERTO GRIFFINI
PRESIDENTE
ACTIVE S.r.l.
Via Delmoncello, 12
26037 San Giovanni in Croce (CR) - ITALY
11/03/2014
8

6. ASSEMBLAGGIO
ITALIANO
I
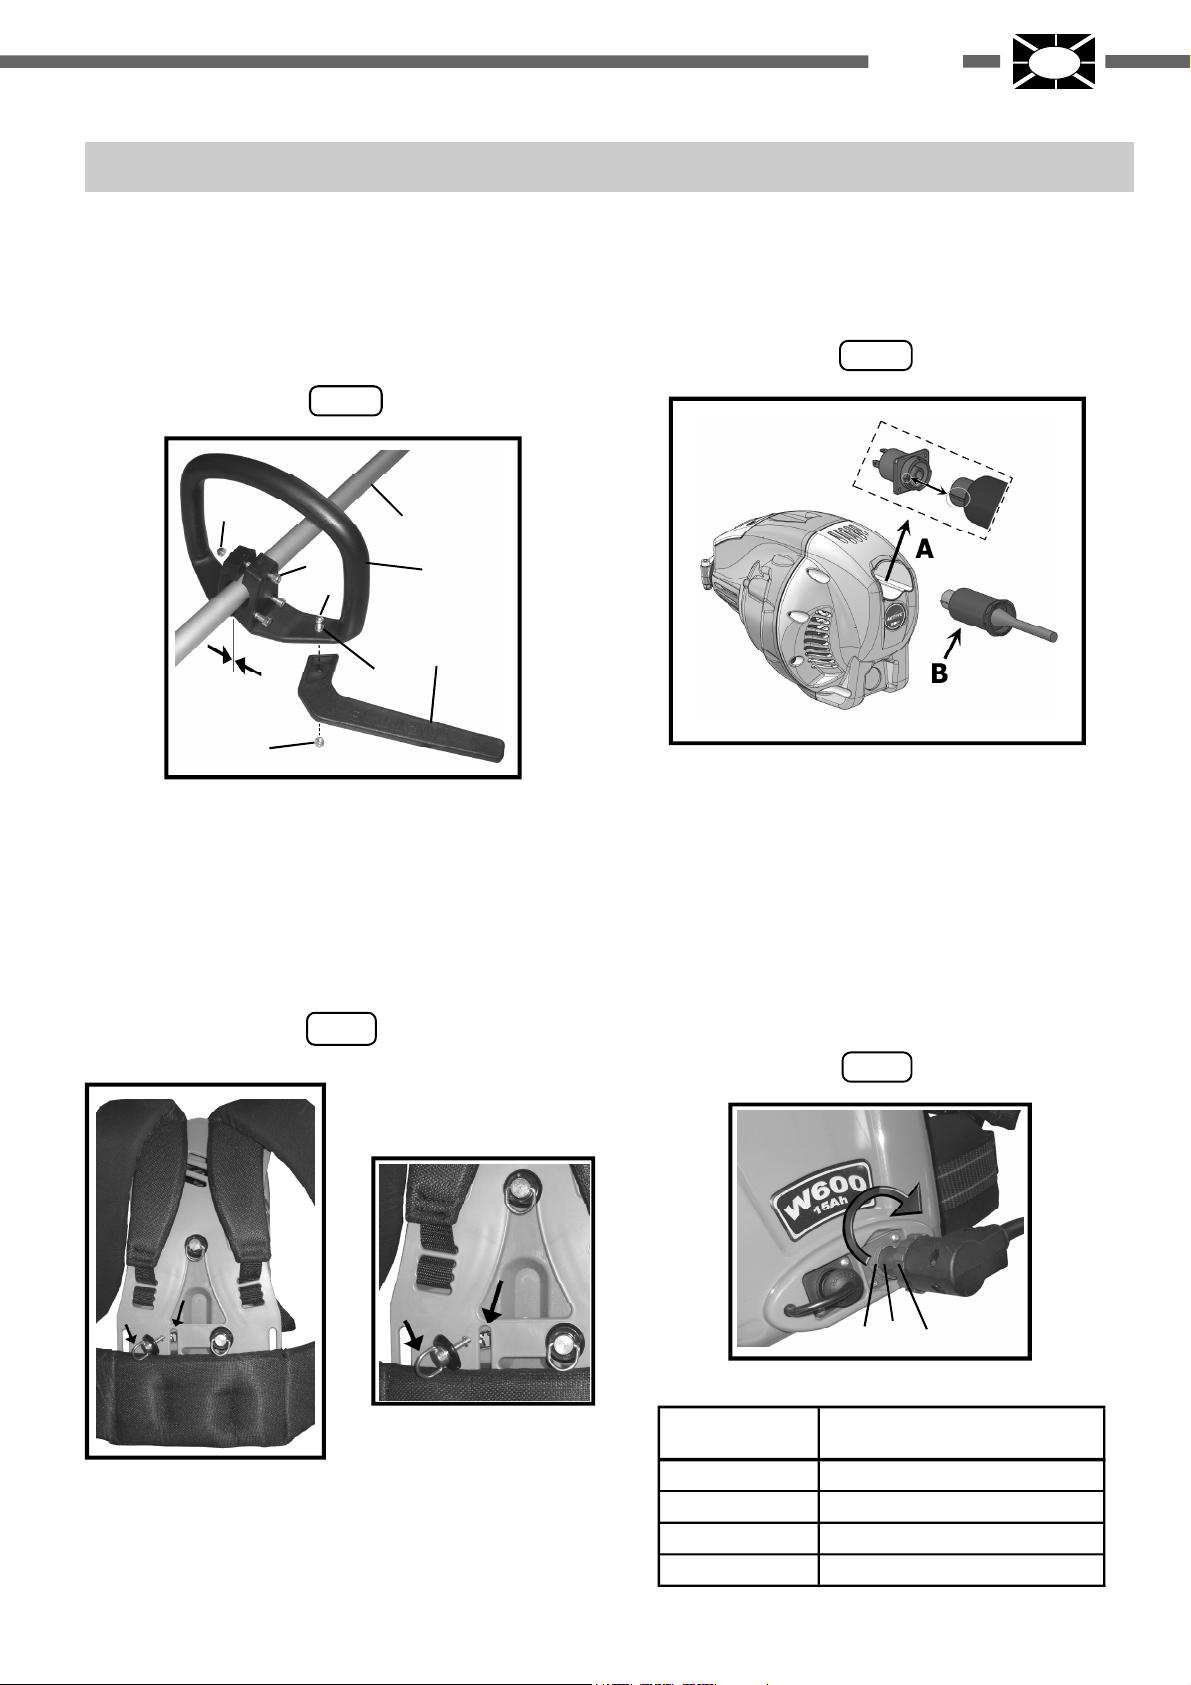
MONTAGGIO IMPUGNATURA (L) Fig 1
Togliere le viti (1) ed allargare l’impugnatura (2) per infilarla
nel tubo (3) e fissarla tramite le viti (1) e i dadi (4). Posizionare la barriera di sicurezza (5) nell’apposito alloggiamento e
fissarla tramite la vite (6), la rondella (8) e il dado (7).
La posizione dell'impugnatura è registrabile secondo le esigenze dell'operatore.
FIG . 1
4
1
6
7
COLLEGAMENTO DELLA BATTERIA AL CINGHIAGGIO
Fig. 2
Collegare la batteria al cinghiaggio tramite i 3 ganci rapidi
(B). Inserire il gancio (B) nella sua sede (A) e bloccarlo girandolo in senso orario di 90°.
3
2
5
8
COLLEGAMENTO DEL CAVO AL MOTORE Fig. 3
1) Ruotare in senso anti-orario il manicotto (B);
2) Inserire il manicotto (B) nella presa (A);
3) Ruotare in senso orario il manicotto (B) per bloccarlo;
FIG . 3
COLLEGAMENTO DELLA MACCHINA ALLA BATTERIA e
AVVIAMENTO Fig. 4-5
Assicurarsi di utlizzare solo batteria originali IBEA.
Collegare il cavo del motore (A) al connettore della batteria
(B) e bloccarlo girando di 90° in senso orario l’anello (C).
Portare I’interruttore sulla posizione (1) Fig. 5
Verificare che il led sul motore sia acceso e premere prima
le leva di sicrezza (4) e poi la leva acceleratore (2).
FIG . 2
FIG . 4
A
A
B
B
A
B
COLORE LED
SUL MOTORE
Verde Batteria carica dal 100% al 80%
Verde / Giallo Batteria carica dal 80% al 50%
Giallo / Rosso Batteria carica dal 50% al 20%
Rosso Batteria carica dal 20% allo 0%
STATO DELLA BATTERIA
C
9
I
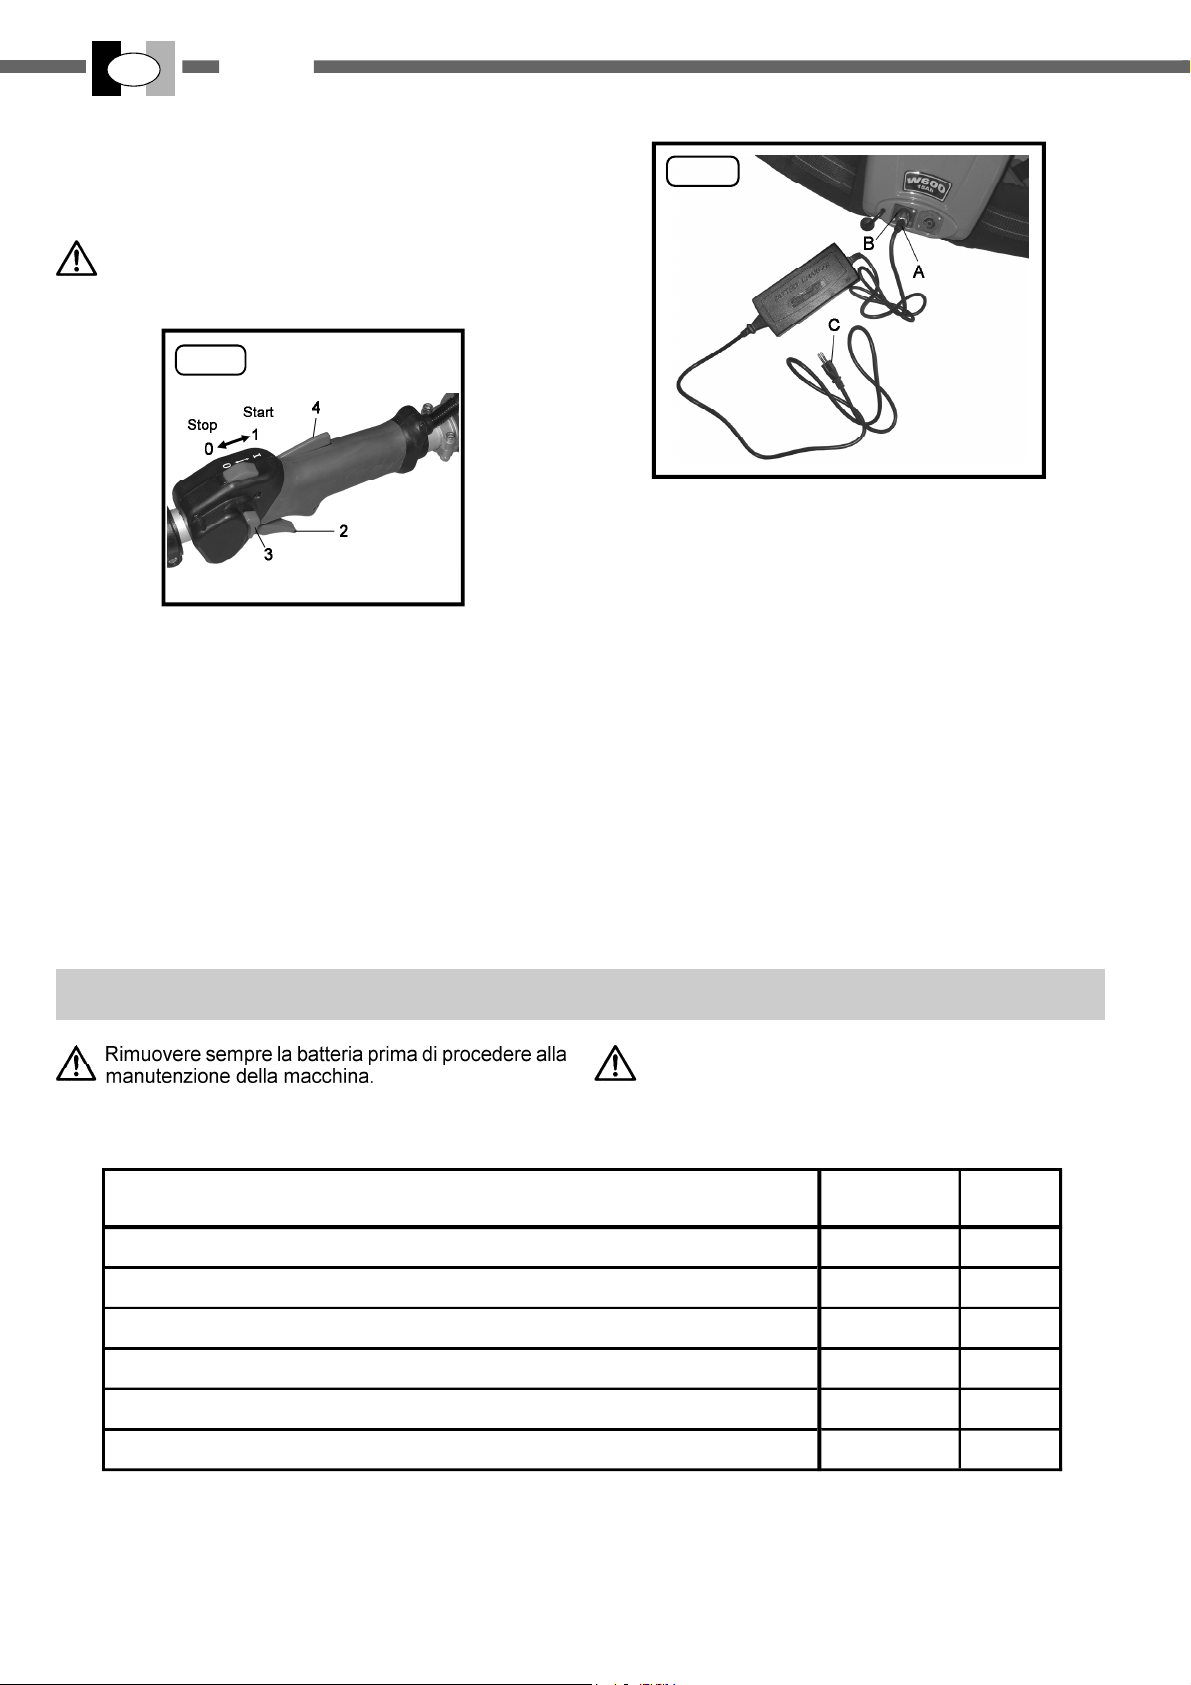
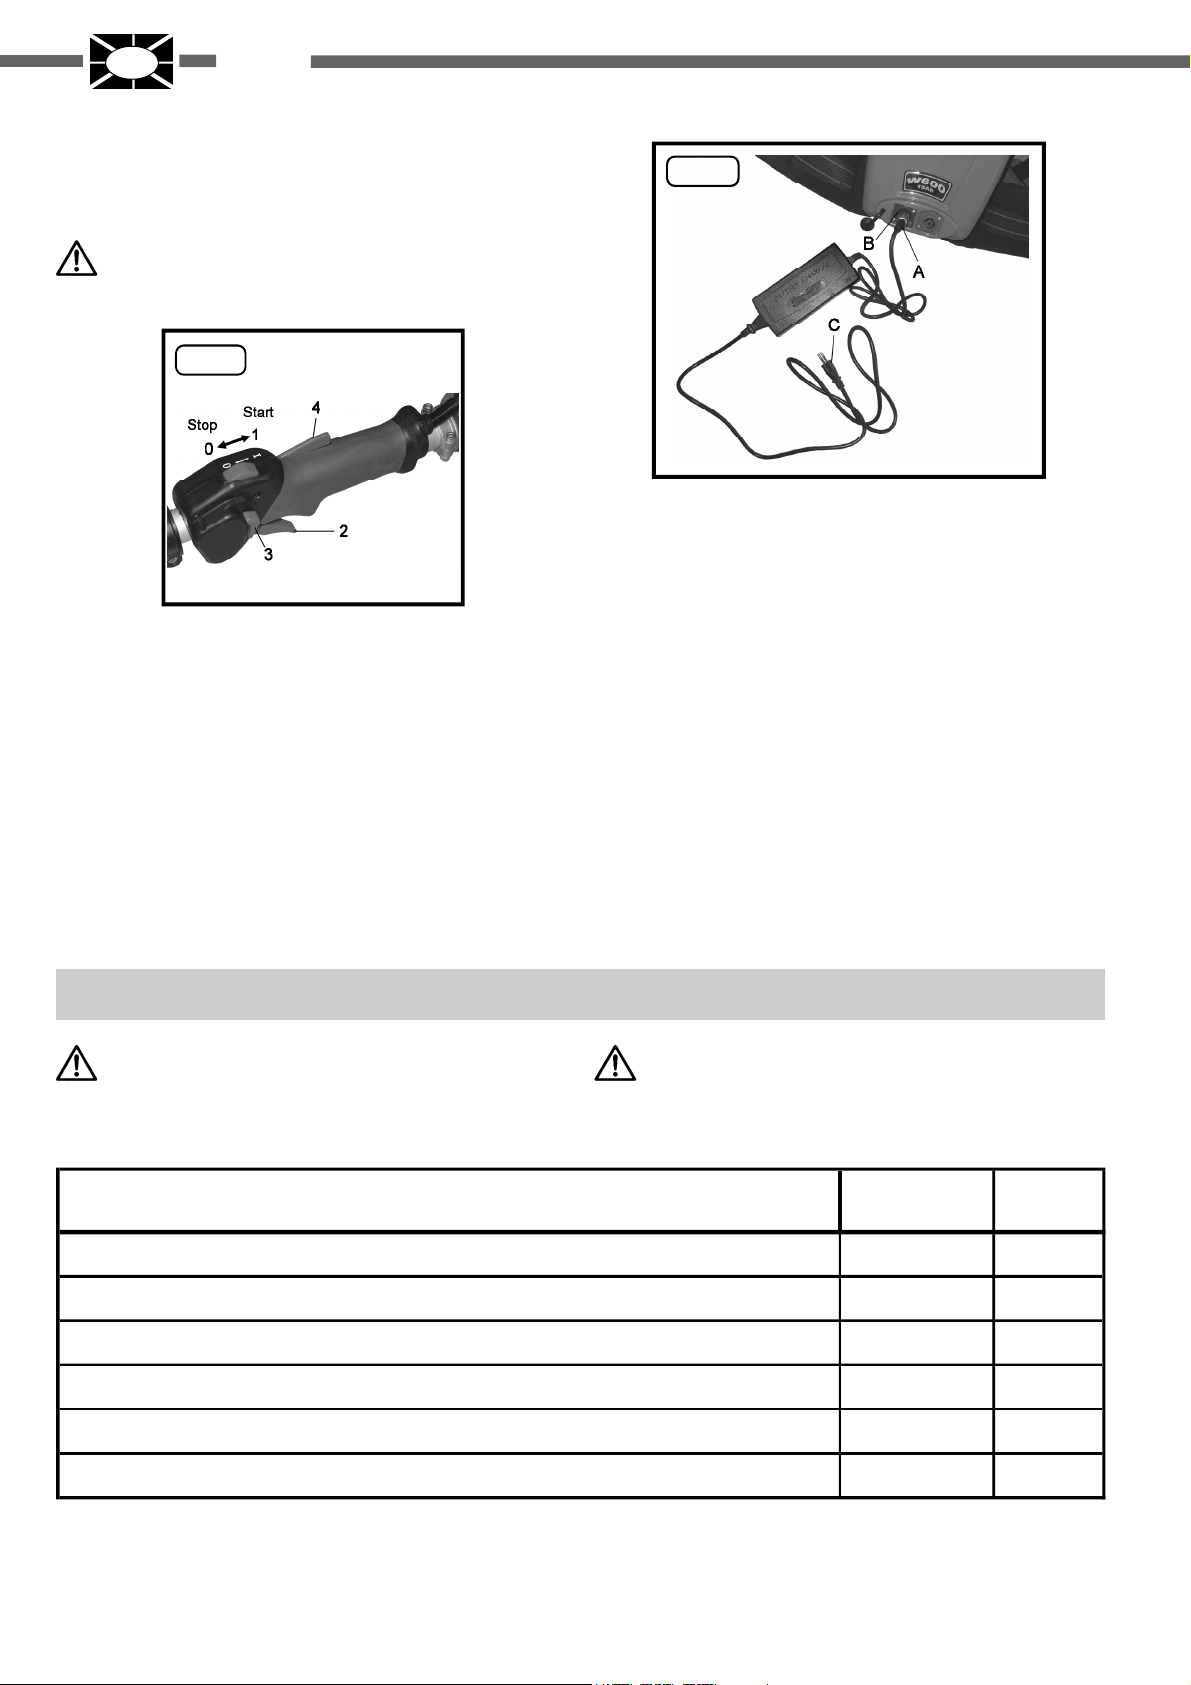
ARRESTO Fig. 5
Arrestare la macchina rilasciando la leva acceleratore (2) e
spegnerla spostando l’interruttore sulla posizione (0).
Staccare sempre il cavo dalla batteria per evitare che
la macchina venga azionata per errore.
COLLEGAMENTO DEL CARICABATTERIE E LIVELLO DI
CARICA Fig. 6
Collegare il cavo del caricabatterie (A) alla connettore della
batteria (B) e la spina elettrica (C) nella presa di rete.
Il led sul caricabatterie risulta subito rosso e poi diventa verde se la batteria è già completamente carica altrimenti resta
rosso se la batteria deve essere caricata.
Le batterie al litio non hanno effetto di memoria e quindi possono essere ricaricate qualunque sia il loro livello di carica e
il processo di ricarica può essere interrotto in qualsiasi momento. La batteria non viene danneggiata.
ITALIANO
FIG . 5
FIG . 6
SISTEMA DI PROTEZIONE DELLA BATTERIA
In generale le batterie al litio non devono mai essere scaricate completamete per evitare di danneggiarle e quindi doverle
sostituire.
Se possibile, evitare di scaricare completamente la batteria
e ricaricarla spesso.
SISTEMA DI PROTEZIONE DELLA SCHEDA ELETTRONICA
La scheda elettronica che gestisce il motore è dotata di un
dispositivo che riconosce lo sforzo che l’attrezzo deve sviluppare, modificando la potenza del motore in modo da ottenere un minor consumo dell’energia immagazzinata.
Tutte le altre funzioni di protezione possono essere identificate dai lampeggi dei led sul motore, vedi tabella pagina
seguente.
7. MANUTENZIONE PERIODICA
Non utilizzare mai acqua, benzine, diluenti,
alcol o sostanze simili per pulire la batteria e il
caricabatteria. Potrebbero verificarsi danni, scolorazioni,
deformazioni.
Prima di ogni
utilizzo
Rimuovere polvere e sporco dalle feritoie con un pennello o un panno asciutto. X
Controllare che tutti i comandi siano funzionanti. X
Verificare livello carica batteria. X
Controllare che dadi e viti siano ben serrati. X
Controllare che il caricabatteria sia funzionante. X
Procedere alla revisione totale della macchina. X
Annuale
10
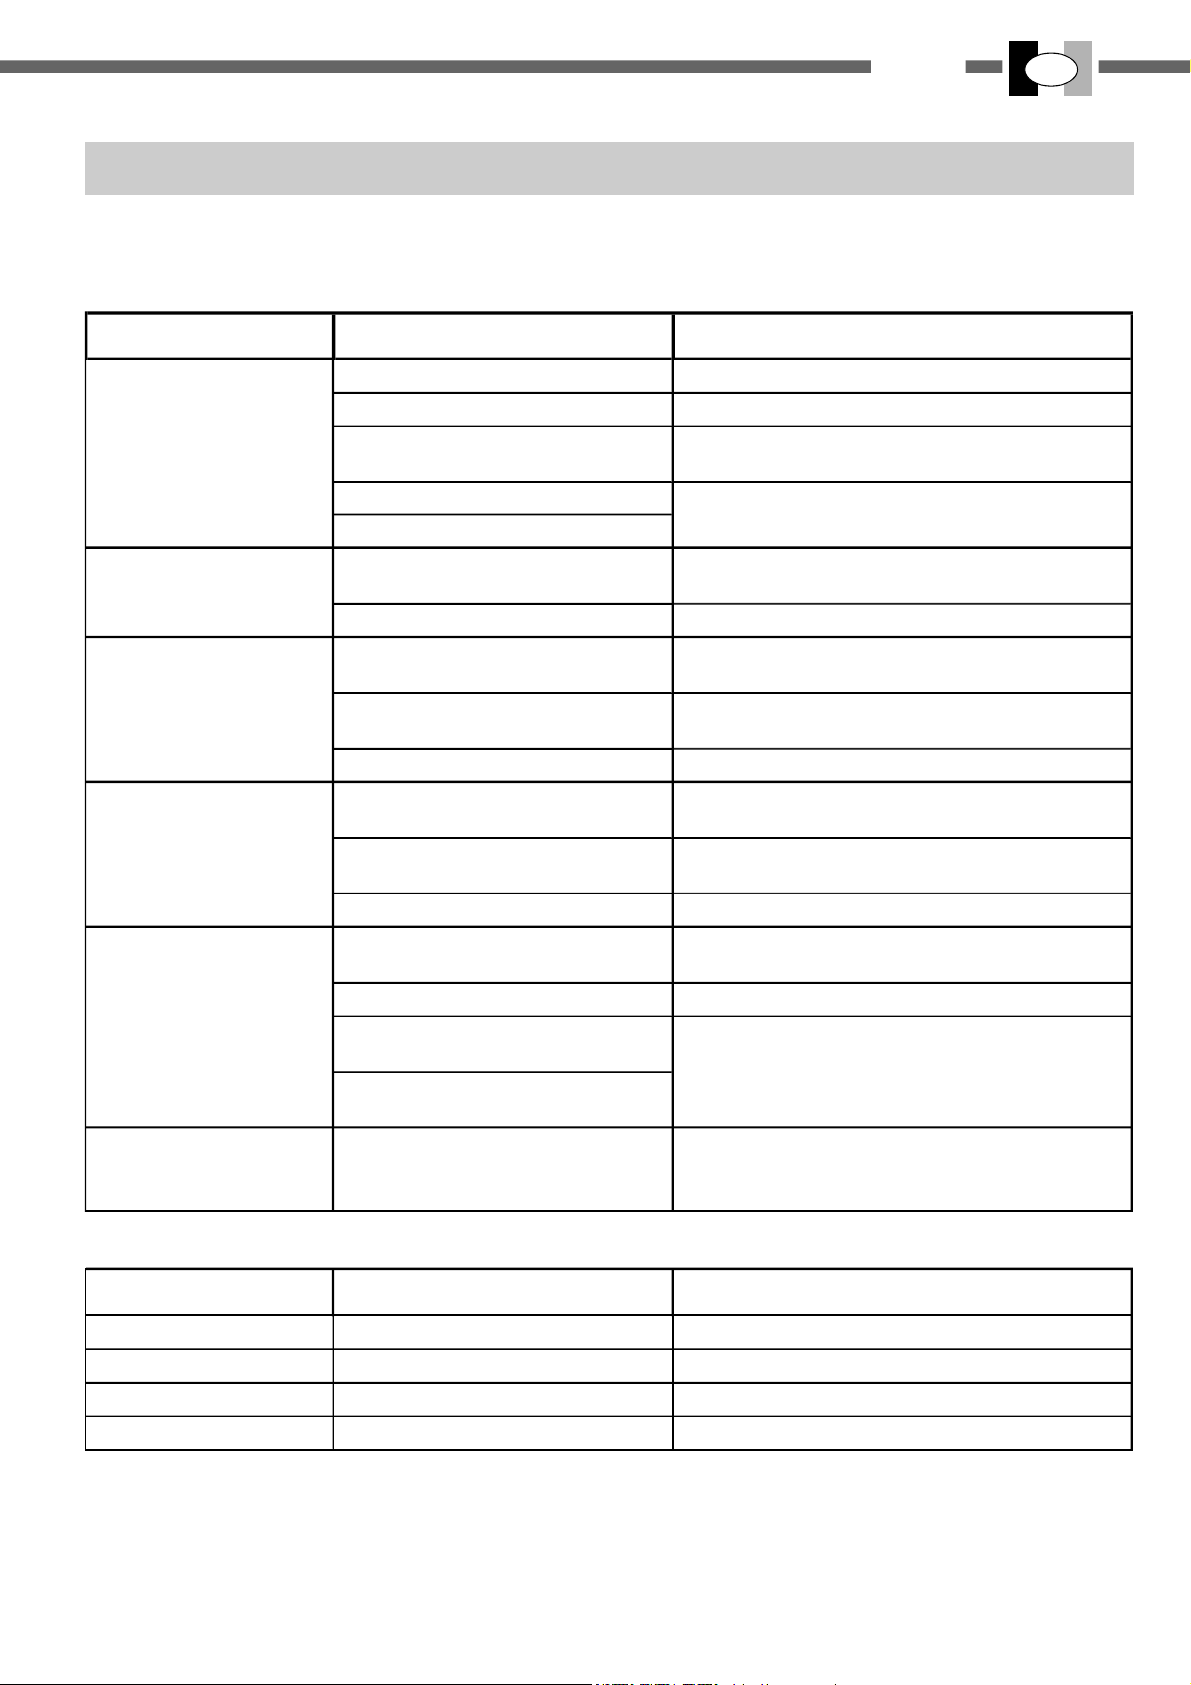
PROBLEMA CAUSA RISOLUZIONE
Il motore non parte.
Il motore si spegne dopo
poco tempo.
Il motore non raggiunge il
regime massimo.
L’utensile da taglio non ruota:
arrestare immediatamente
l’utensile!!
Vibrazione anomala:
arrestare immediatamente
l’utensile!!
ITALIANO
8. RISOLUZIONE DEI PROBLEMI
DIAGNOSTICA
La batteria non è collegata. Collegare la batteria.
Interuttore sullo zero. Spostare l'interruttore sull'1.
Problema della batteria (sottotensione).
Il cavo di alimentazione è tagliato.
Scheda elettrica guasta.
Il livello di carica della batteria è basso.
Surriscaldamento. Spegnere l’utensile e attendere che si raffreddi.
La batteria non è collegata in modo
corretto.
La batteria si sta esaurendo.
Scheda elettrica guasta. Rivolgersi ad un centro assistenza autorizzato
Il dado di serraggio della lama da taglio è
allentato.
L’asta di trasmissione non è inserita
correttamente.
Scheda elettrica guasta. Rivolgersi ad un centro assistenza autorizzato
Uno dei due fili di nylon si è rotto e la
testina non è più bilanciata.
La lama da taglio è piegata, incrinata. Sostituire la lama da taglio.
Il dado di serraggio della lama da taglio è
allentato.
La lama da taglio non è fissata
correttamente.
Ricaricare la batteria. Se la ricarica non è efficace,
sostituire la batteria.
Rivolgersi ad un centro assistenza autorizzato IBEA
Ricaricare la batteria. Se la ricarica non è efficace,
sostituire la batteria.
Scollegare e ricollegare la batteria in modo corretto.
Ricaricare la batteria. Se la ricarica non è efficace,
sostituire la batteria.
Stringere correttamente il dado seguendo le istruzioni
sul manuale.
Verificare innesti trasmissione.
Battere la testina da taglio in nylon sul terreno per
provocare la fuoriuscita del filo.
Stringere correttamente il dado seguendo le istruzioni
sul manuale.
I
.
IBEA.
IBEA.
L’utensile da taglio e il motore
non si arrestano: rimuovere
immediatamente la batteria!!
LAMPEGGI LED STATO INTERVENTO DA ESEGUIRE
Rosso Batteria scarica. Caricare la batteria.
Verde Motore in stallo, sovraccarico. L'attrezzo è bloccato, rilasciare l'acceleratore.
Giallo Motore o Controller in over temperature. Attendere che la macchina si raffreddi.
Rossi / Verde / Giallo Richiesta taratura acceleratore. Andare in un centro assistenza
Scheda elettrica guasta. Rivolgersi ad un centro assistenza autorizzato
11
IBEA.
IBEA.
I
ITALIANO
9. RIMESSAGGIO
Seguire tutte le norme di manutenzione precedentemente
descritte.
Pulire perfettamente la macchina e rimessarla in ambiente
sciutto.
L’immagazzinaggio in un posto freddo ritarda il processo di
invecchiamento dello litio-ione e si suggerisce una temperatura tra i 20°C e i 25°C. Le batterie agli ioni di litio andrebbero
caricate frequentemente (circa ogni 3 mesi). Tuttavia, se non
vengono utilizzate per un lungo periodo, andrebbero caricate
circa tra il 40% e il 60% (led verde/giallo).
L’invecchiamento è molto più rapido alle alte temperature.
Ad esempio le alte temperature all’interno delle automobili
provocano un degrado rapido delle batterie al Li-ion.
Perdita permanente di Capacità contro Condizioni d’immagazzinaggio
Temperatura di deposito
0°C (32° F)
25°C (77° F)
40% e 60% di carica
(led verde - giallo)
2% di perdita dopo 1 anno
4% di perdita dopo 1 anno
Immagazzinare una batteria agli ioni di litio a temperatura e
carica corrette permette di mantenere la propria capacità di
carica. La seguente tabella mostra la perdita di carica permanente in funzione di un immagazzinaggio ad un livello di
carica e una temperatura predeterminati.
Una batteria Li-ion immagazzinata tra il 40% e il 60% di
carica durerà molto più di una al 100%, particolarmente alle
alte temperature.
ATTENZIONE: tutte le operazioni di manutenzione non riportate sul presente manuale devono essere effettuate da una
officina autorizzata.
100% di carica
6% di perdita dopo 1 anno
20% di perdita dopo 1 anno
40°C (104° F)
60°C (140° F)
15% di perdita dopo 1 anno
22% di perdita dopo 1 anno
35% di perdita dopo 1 anno
40% di perdita dopo 3 mesi
12
ITALIANO
10. CERTIFICATO DI GARANZIA
Questa macchina è stata concepita e realizzata attraverso le più moderne tecniche produttive; IBEA garan-
tisce la parte motore per un periodo di 24 mesi dalla data di acquisto ad eccezione per servizio professionale continuo, adibiti a lavori per conto terzi, per i quali la garanzia è di 12 mesi dalla data di acquisto. Per
quanto riguarda la batteria la garanzia è di 12 mesi.
CONDIZIONI DI GARANZIA
1) La Ditta costruttrice sostituisce gratuitamente le parti difettose nel materiale, nelle lavorazioni, nella
produzione. La garanzia non contempla la sostituzione della macchina.
2) Il personale tecnico interverrà nei limiti di tempo concessi da esigenze organizzative e in ogni caso il più
presto possibile, e l'eventuale ritardo non potrà determinare richieste di risarcimento dei danni nè prolungamento del periodo di garanzia.
3) Per richiedere l'assistenza in garanzia è necessario esibire al personale autorizzato il certificato di
garanzia timbrato dal rivenditore, compilato in tutte le sue parti e corredato di fattura d'acquisto o scontrino
fiscale o altro documento reso fiscalmente obbligatorio comprovante la data di acquisto.
4) La garanzia decade in caso di:
- Assenza palese di manutenzione;
- Utilizzo non corretto del prodotto o manomissione;
- Utilizzo di parti di ricambio o accessori non originali;
- Interventi effettuati da personale non autorizzato.
I
5) La Ditta costruttrice esclude dalla garanzia le parti soggette ad un normale logorio di funzionamento:
attrezzi di taglio, dispositivi di sicurezza a taglio ecc.
6) Eventuali danni causati durante il trasporto, devono essere immediatamente segnalati al trasportatore
pena il decadere della garanzia.
7) Se guasti o rotture dovessero accadere nel periodo di garanzia o dopo di esso il cliente non ha diritto di
sospendere il pagamento nè ad alcuno sconto sul prezzo.
8) La ditta costruttrice non risponde di eventuali danni diretti od indiretti, causati a persone o cose da guasti
della macchina o conseguenti alla forzata sospensione prolungata nell'uso della stessa.
MOD. HY-70 4
S.N. n.°
...........................
RIVENDITORE:
ACQUISTATO DAL SIG.DATA:
HY-70 6 HY-708
13
GB
ENGLISH
INDEX
1. Explanation of symbols.................................................................................................................................................................................Pg. 14
2. For your safety......................................................................................................................................................................................................14
3. Information............................................................................................................................................................................................................15
4. Description of parts.............................................................................................................................................................................................16
5. Technical Data and Declaration Of Conformity...............................................................................................................................................17
6. Assembly...............................................................................................................................................................................................................19
7. Routine Maintenance..........................................................................................................................................................................................20
8. Troubleshooting...................................................................................................................................................................................................21
9. Garaging.................................................................................................................................................................................................................22
10. Certificate of warranty........................................................................................................................................................................................23
1. EXPLANATION OF SYMBOLS
Warnings, danger and caution.
Read the operation and maintenance
manual before using this machine.
Wear protective equipment when operating this machine.
2. FOR YOUR SAFETY
Read these instructions carefully and mak e sure you
understand them before operating the unit. Follow all warnings
and safety instructions. Store this book for future reference.
Checks prior to start-up
1- Always remove the battery to prevent the machine from
being operated by mistake. Always remove the battery before
performing any maintenance on the machine.
2- Before using the brushcutter, free the area to be mowed of
all objects, such as stones, pieces of glass, wire or rope
etc. that can be hurled or become entangled in the cutting
device.
3- Use original spare parts only; spare parts produced by
other manufacturers may fit improperly and cause injury.
4- Wear appropriate safety clothing and equipment such as:
boots, sturdy pants, gloves, face shield or protective goggles,
ear protection and safety helmet.
5- Inspect the machine before each use. Make sure that the
accelerator lever is working properly. Make sure that the disc
is free to turn and that it is not in contact with any foreign
bodies. Ensure that no safety devices have been loosened,
etc. Replace damaged parts.
Keep persons 15 m
away.
6- Make sure that the disc and head protection and other
devices have been assembled and tightened properly.
7- Do not allow other persons, children or pets to remain
within a 15 m radius while using the brushcutter.
8- Hold equipment tight and in balance. Keep the cutting
device below the height of the belt.
9- Never use metal wire or cord reinforced with metal, as
they may rupture and form dangerous projectiles.
Personal safety
1- Do not allow children to use the brushcutter.
2- Do not wear loose or undone clothing.
3- Do not operate the brushcutter when tired, ill or under the
influence of alcohol or drugs.
4- Carry the brushcutter with the engine off and with the disc
cover in place.
5- Do not perform any maintenance or touch the disc when
the motor is on. W ear gloves to manage or perform
maintenance on any cutting devices.
6- Store the brushcutter in such a way as to prevent accidental
injuries caused by sharp objects and away from heat and off
the ground.
14

ENGLISH
GB
7- To avoid the risk of injury, always turn off the engine before
removing any object wrapped around the head shaft or the
disc.
Use and care of electrical equipment
1- Avoid hazardous environments. Do not use the tool in damp
or wet locations or when exposed to rain. Water infiltration
into the tool increases the risk of electric shock.
2- Perform charging using only the charger specified by the
manufacturer. A charger that is suitable for a specific type of
battery pack can create a risk of fire when used with another
battery.
3- Use only specified batteries with power tools. The use of
different types of batteries can result in a risk of injury and
fire. When the battery is not in use, avoid keeping it in contact
with metal objects such as paper clips, coins, keys, nails,
screws or other small metal objects that can establish a
contact between terminals. A short-circuit of the battery
terminals can cause burns or a fire.
4- ln precarious conditions, battery fluid may leak. Do not
touch. In case of accidental contact, rinse thoroughly with
water. In the case of liquid contact with eyes, consult a
physician. Liquid ejected from the battery can cause irritation
or burns.
3. INFORMATION
5- We recommend the use of the chain from 1/4 “when it is
utilized pruner.
6- Do not disassemble the battery.
7- If operating time has become excessively shorter, stop
operating the tool. There may be overheating, burns or
explosions.
8- Do not store the tool or the battery at a temperature
exceeding 50°C.
9- Do not dispose of batteries in fire. The battery may explode.
Refer to local regulations regarding possible special disposal
instructions.
Tips for extending battery life
1-Charge the battery before completely discharging it. If a
decrease in power is noted, stop tool operation and charge
the battery.
2- They have no memory effect, so they can be charged at
any time but lose charge at low temperatures and suffer from
the heat.
3- Storage in a cool place delays the ageing process of the
Lithium-ion. Storage is suggested at a temperature between
20°C and 25° C. Before charging an overheated battery, allow
it to cool.
Advantages of the E700:
1- The circuit board that manages the motor is equipped with
a device able to recognise the force that the tool must develop,
modifying motor power in such a way to obtain a lower
consumption of energy stored.
2- All tools shown on the first page (BRUSHCUTTER, HEDGE
TRIMMER, PRUNER, BLOWER, HOE, OLIVE SHAKER and
EXTENSIONS) can be connected to the machine and are
the same tools used on the evolution machines with 2-stroke
motors. In this way, you can use the same motor with all the
tools (SOLUTION THAT MAXIMIZES YOUR INVESTMENT).
3- In addition, the evolution E700 has the distinction of having
its motor on the opposite side to the tool (and not on the tool
head), allowing for proper balancing and ergonomics for
machine use over a long period while limiting fatigue.
4- The E700 is especially suitable for professional use in
urban zones and areas, near schools and hospitals, inside
closed areas (greenhouses, etc.) where noisy equipment and
pollutants cannot be used.
Battery Characteristics:
IBEA batteries are Lithium-ion Polymer. After 1,000 charging
cycles, IBEA batteries can be charged to 80% of initial
capacity without, however, reducing the power delivered by
the battery during work.
It is preferable to partially drain the battery rather than fully.
Advantages:
1- They are less dangerous if they are damaged because
they contain a solid component (polymer) that is not
flammable.
2- They have no memory effect, so they can be charged at
any time without problems.
Disadvantages:
1- They can rapidly lose charge at low and high temperatures.
Motor Characteristics:
IBEA motors are Brushless (without brushes). Therefore, no
maintenance is required and, not having any rubbing contact,
the motor screw is theoretically infinite, with the exception of
the ball bearings.
15
GB
ENGLISH
4. DESCRIPTION OF PARTS
13
1
2
9
8
7
6
10
11
12
4
3
5
1. Harness
2. Battery
3. Cable
4. Circuit board
5. Electric motor
6. Accelerator lever
7. Safety lever
8. ON/OFF switch
9. Handle
10. Sleeve
11. Warning light
12. Accelerator - motor cable connection
13. Battery charger
16
ENGLISH
5. TECHNICAL DATA AND DECLARATION OF CONFORMITY
ACTIVE s.r.l. Via Delmoncello 12 - 26037 San Giovanni in Croce (CR)
declares under our sole responsibility that the machine brand IBEA:
MOTOR UNIT
GB
HANDLEBAR / HANDLE
Ø TRANSMISSION TUBE
WEIGHT (motor unit only)
CABLE LENGTH
BATTERY (Lithium / Polymer)
WEIGHT
VOLTAGE
CAPACITY
STORED ENERGY
MINIMUM OPERATING LIFE
BATTERY CHARGE TIME
MODEL
POWER
SPEED
IBEA HY-70
HANDLE
Ø 26
750 W continuous
7000 rpm/min
3,8 Kg
1,5 m
BATTER I E S
B4 B6
3,5 Kg 5 Kg
36 V
10 Ah 15 Ah
360 Wh 540 Wh
1000 CYCLES
4 h
B8
6 Kg
20 Ah
720 Wh
Battery life has been surveyed from actual working time without pause and with medium cut.
This may vary depending on the tool used and work to be performed.
B4 / B6 B8
BATTERY CHARGER
MAINS VOLTAGE
FREQUENCY
SSLCO84V42
100 - 240 V
47 - 63 Hz
ES-3604SL
90 - 264 V
47 - 63 Hz
in compliance with the requirements of Directives 2006/42/EC, 2000/14/EC, 2004/108/EC, 2002/44/EC
ALBERTO GRIFFINI
PRESIDENTE
ACTIVE S.r.l.
Via Delmoncello, 12
26037 San Giovanni in Croce (CR) - ITALY
11/03/2014
17
GB
ENGLISH
TOOL
BRUSHCUTTER
HEDGE TRIMMER
PRUNER
TILLER
TOOL
SOUND PRESSURE L
(dB (A))
p
(EN ISO 22868)
85
80
75
73
78
81
88
83
78
76
Uncertainty (K) Uncertainty (K)Guaranteed valueValue detected
2
2
2
2
2
Value detected Guaranteed value
90
103
93
93
96
LEVEL OF VIBRATIONS (EN ISO 5349)
- FRONT HANDLE - - REAR HANDLE -
a
hv
(m/s²)
Uncertainty (K)
(dB (A))
a
hv
(m/s²)
SOUND POWER L
(EN ISO 3744)
93
106
96
96
99
Uncertainty (K)
(dB (A))
(dB (A))
W
2
2
2
2
2
Daily exposure
A(8) m/s²
BRUSHCUTTER
HEDGE TRIMMER
PRUNER
TILLER
2,5
1,9
2,5
2,8
1,5
2
1,5
1,5
1,5
1,5
2,2
1,8
1,6
2,2
2,5
1,5
1,5
1,5
1,5
1,5
1,77
1,41
1,26
1,65
1,85
ALBERTO GRIFFINI
PRESIDENTE
ACTIVE S.r.l.
Via Delmoncello, 12
26037 San Giovanni in Croce (CR) - ITALY
11/03/2014
18
6. ASSEMBLY
ENGLISH
GB
HANDLE ASSEMBLY (L) Fig 1
Remove screws (1) and widen handle (2) to insert it into the
tube (3) and fasten it with screws (1) and nuts (4). Position
the safety bar (5) in its housing and fasten with the screw
(6), the washer (8) and the nut (7). The handle position is
adjustable for operator needs.
FIG . 1
4
1
6
7
CONNECTING THE BATTERY TO THE HARNESS Fig. 2
Connect the battery to the harness by means of the 3 hook
ends (B). Insert the hook (B) in its housing (A) and lock in,
turning it 90° clockwise.
3
2
5
8
CONNECTION CABLE TO MOTOR Fig. 3
1) Turn the sleeve counterclockwise (B);
2) Insert the sleeve (B) into (A);
3) Turn clockwise the sleeve (B) to lock it;
FIG . 3
CONNECTING THE MACHINE TO THE BATTERY AND
START-UP Fig. 4-5
Only use original IBEA batteries. Connect the motor cable
(A) to the battery connector (B) and lock in, turning the ring
(C) 90° clockwise. Turn the switch to position (1) Fig. 5 Make
sure that the LED on the motor is on and first press the
safety lever (4) and then the accelerator lever (2).
FIG . 2
FIG . 4
A
A
B
B
A
B
LED COLOUR ON
THE MOTOR
Green Battery charge from 100% to 80%
Green / Yellow Battery charge from 80% to 50%
Yellow / Red Battery charge from 50% to 20%
Red Battery charge from 20% to 0%
C
BATTERY STATUS
19
GB
SHUT-DOWN Fig. 5
Stop the machine by releasing the accelerator lever (2) and
then switch it off, moving the switch to position (0).
Always remove the battery cable to prevent the
machine from being operated by mistake.
ENGLISH
FIG . 5
FIG . 6
BATTERY PROTECTION SYSTEM
In general, to prevent damage and replacement, Lithium
batteries should never be fully discharged.
CONNECTING THE BATTERY CHARGER AND THE
CHARGING LEVEL Fig. 6
Connect the battery charger cable (A) to the battery
connector (B) and the plug (C) in the outlet. The LED on the
battery charger will immediately light up red and then it will
become green if the battery is already fully charged; otherwise,
it will remain red if the battery requires charging. Lithium
batteries do not have any memory effect and therefore can
be charged regardless of their level of charge, and the
recharging process can be interrupted at any time. Batteries
will not be damaged.
7. ROUTINE MAINTENANCE
Always remove the battery before performing any
maintenance on the machine.
CIRCUIT BOARD PROTECTION SYSTEM
The circuit board that manages the motor is equipped with a
device able to recognise the force that the tool must develop,
modifying motor power in such a way to obtain a lower
consumption of energy stored. All other protection functions
can be identified by the flashing LEDs on the motor, as shown
in the following table.
Never use water, benzene, thinner, alcohol or similar
substances to clean the battery and charger. Doing
so could caus e dam age, disc olouration, and
deformation.
Before each
use
Yearly
Remove dust and dirt from slots with a brush or dry cloth. X
Check that all controls are working. X
Verify battery level. X
Check that nuts and screws are properly tightened. X
Check that the battery charger is working. X
Proceed with a total review of the machine. X
20

PROBLEM CAUSE SOLUTION
The motor will not start.
The motor switches off after a
short time.
The motor does not reach
max rpm
The cutting tool does not turn:
immediately switch the tool
off!!
Abnormal vibrations:
immediately switch the tool
off!
ENGLISH
8. TROUBLESHOOTING
DIAGNOSTICA
The battery is not connected. Connect the battery.
Switch on zero. Turn switch to 1.
Battery problem (low voltage).
The power cord is cut. Contact an authorised
Circuit board damaged.
The recharging level of the battery is low.
Overheating. Switch off the tool and wait for it to cool down.
The battery has not been properly
connected.
The battery is dying.
Circuit board damaged. Contact an authorised
The tightening nut of the cutting blade is
loose.
The transmission rod has not been
inserted properly.
Circuit board damaged. Contact an authorised
One of the two nylon wires is broken and
the head is no longer balanced.
The cutting blade is bent, cracked. Replace the cutting blade.
The tightening nut of the cutting blade is
loose.
The cutting blade is not properly
fastened.
Recharge battery. If recharging is not efficient, replace
battery.
IBEA
Recharge battery. If recharging is not efficient, replace
battery.
Disconnect and re-connect the battery properly.
Recharge battery. If recharging is not efficient, replace
battery.
IBEA
Properly tighten the nut following manual instructions.
Check transmission connections.
IBEA
Hit the nylon cutting head on the ground to cause the
wire to come out.
Properly tighten the nut following manual instructions.
GB
service centre.
service centre.
service centre.
The cutting tool and the motor
will not switch off: immediately
remove the battery!!
LED FLASHES STATUS WHAT TO DO
Red Battery dead. Recharge battery.
Green Motor stalled, overloaded. The device is blocked, release the accelerator.
Yellow Motor or Controller over temperature. Wait for the machine to cool down.
Red / Green / Yellow Accelerator calibration request. Visit an
Circuit board damaged. Contact an authorised
21
IBEA
IBEA
service centre.
service centre.
GB
ENGLISH
9. STORAGE
Follow all previously described maintenance operations.
Thoroughly clean the machine and store in a dry place.
Storage in a cold place delays the ageing process of the
Lithium-ion. Storage is suggested at a temperature of
approximately between 20°C and 25°C. Lithium-ion batteries
should be charged frequently (about every 3 months).
However, if not used for a long period, batteries should be
charged between 40% and 60 % (led green - yellow) . Ageing
is much faster at higher temperatures. For example, the high
temperatures inside an automobile can cause rapid
degradation of Li-ion batteries.
Permanent loss of Capacity against Storage conditions
Deposit temperature
0°C (32° F)
25°C (77° F)
40°C (104° F)
40% and 60% of charge
(led green - yellow)
2% loss afer 1 year
4% loss afer 1 year
15% loss afer 1 year
Storing a Lithium-ion battery at the proper temperature and
charge allows you to maintain its charge capacity. The
following table shows the permanent loss of charge in relation
to storage at predetermined charge levels and temperatures.
A Li-ion battery stored between 40% and 60% charge will
last lon ger tha n one at 100% , parti c ularly at high
temperatures.
ATTENTION: any maintenance procedures not described in
this manual must be carried out by an authorised workshop.
100% of charge
6% loss afer 1 year
20% loss afer 1 year
35% loss afer 1 year
60°C (140° F)
22% loss afer 1 year
40% loss afer 3 months
22

ENGLISH
GB
This machine has been designed and produced with the most advanced technology. IBEA guarantees the
motor for 24 months from the date of purchase, with the exception for continuous professional service, used for
third parties witch are guaranteed for 12 months from the date of purchase. As for the battery warranty is 12
months.
LIMITED WARRANTY
1) Warranty starts on the date of purchase, the manufacturer will supply free of charge any part defective in
materials and workmanship. W arranty does not provide for the replacement of the machine.
2) Product failures will be scheduled and repaired according to the normal work flow; any possible delay cannot
lead to damages nor to an extension of the warranty period.
3) Claims under warranty will be accepted on submission to your Authorized Service Dealer of the completed
and duly stamped. Warranty Certificate together with the original purchase document stating the date of
purchase.
4) Warranty fails in case of:
- evident lack of maintenance;
- incorrect use of the machine or tampering;
- use of incorrect fuel and or lubricants;
- use of non-genuine parts;
- repairs made by unauthorized service people.
5) Parts subject to wear and tear such as cutting items, clutch or cutting safety devices filters etc., are not
covered by guarantee.
6) Claims for damages incurred during transportation have to be immediately reported to the carrier: failure to do
so will invalidate the warranty.
7) Should any failure occur during or after the warranty period, customer has not the right to interrupt payment
nor to a price discount.
8)The manufactorer is not responsible for any direct or indirect damage caused to persons or things by failures
of the machine or by a forced suspension in its use.
MOD. E700
DEALER :S.N. n.°
DATE:
BOUGHT BY Mr. :
23
 Loading...