

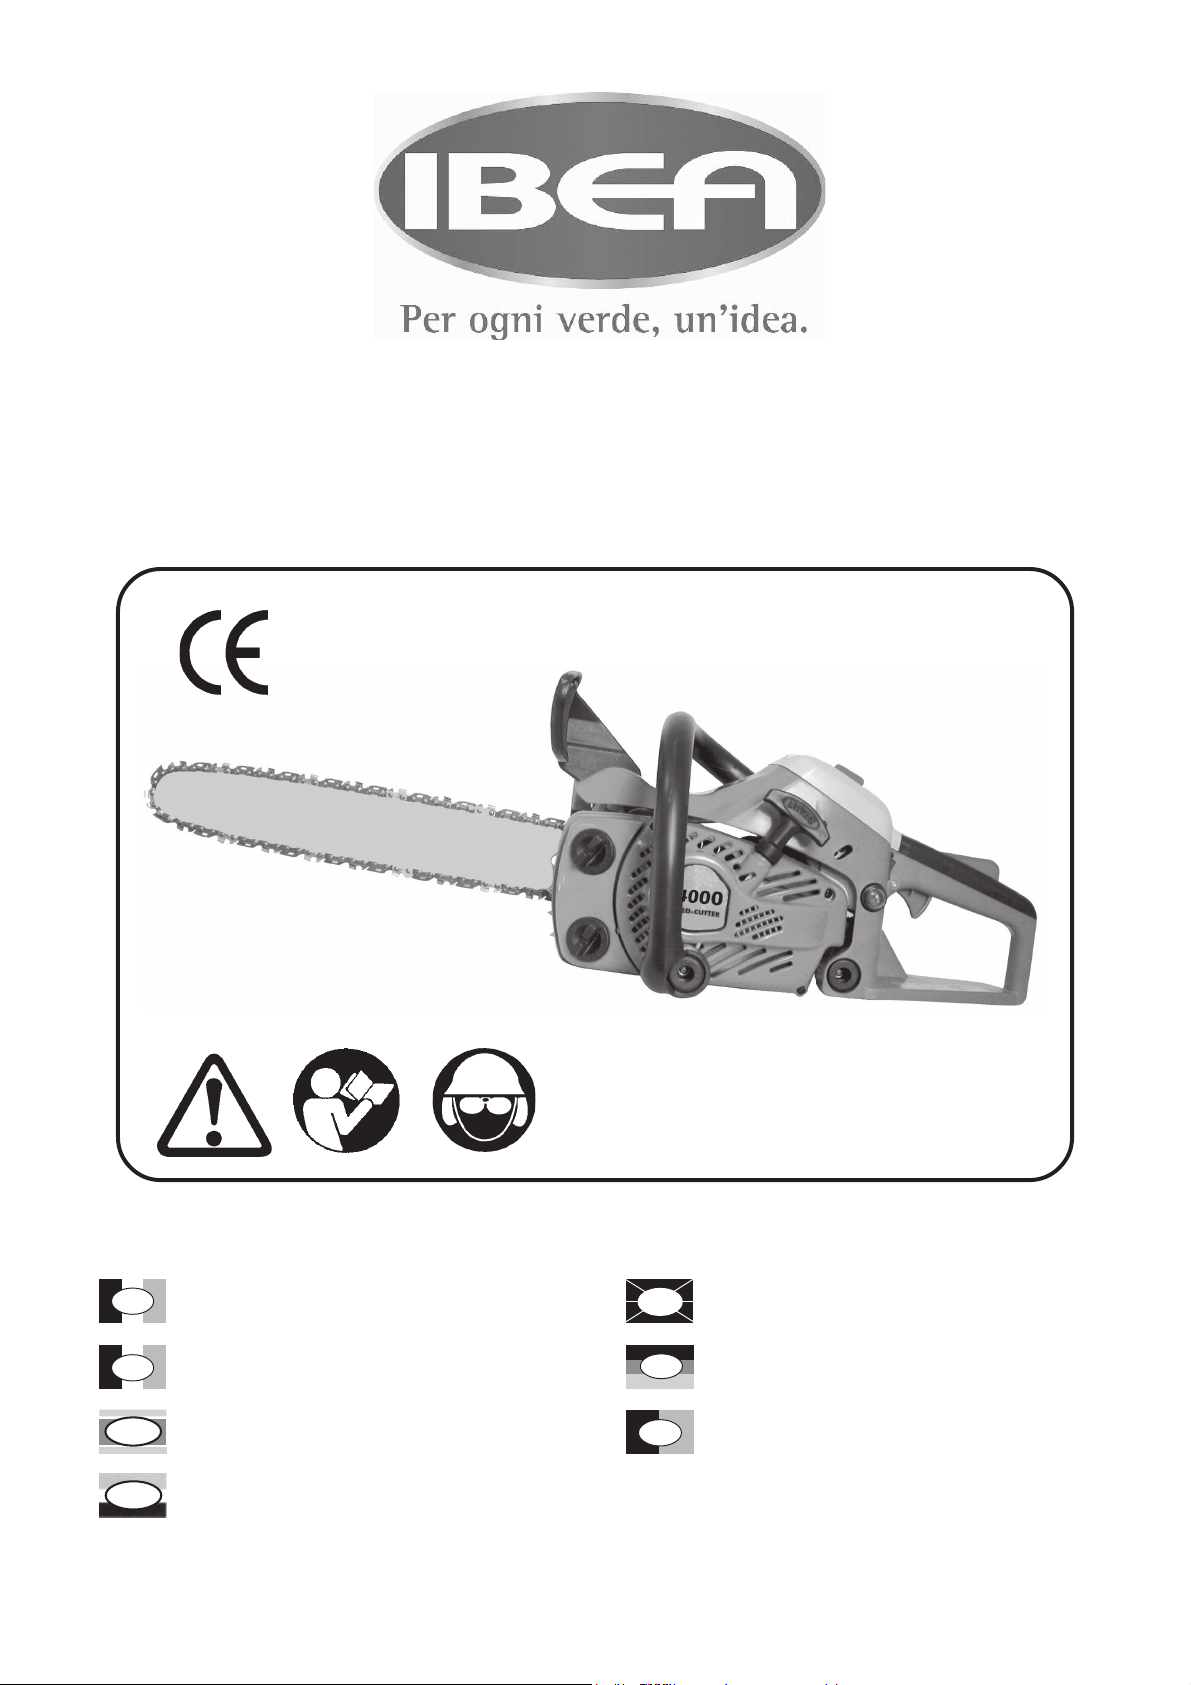
IBEA 4000 User Manual [en, it, fr, de, es]
MOD. 4000
MANUALE D’ISTRUZIONE
I
MANUEL D’UTILISATION
F
E
MANUAL DE USUARIO
NL
INSTRUCTIEHANDLEIDING
GB
D
P
OWNER’S MANUAL
BEDIENUNGSANLEITUNG
MANUAL DE INSTRUÇÕES

I
INTRODUZIONE
GB
INTRODUCTION
Caro cliente, la ringraziamo vivamente per aver scelto un prodotto di qualità della ditta IBEA.
Per un corretto impiego della motosega e per evitare incidenti,
non iniziate il lavoro senza aver letto questo manuale con attenzione. Troverete su questo manuale le spiegazioni di funzionamento dei vari componenti e le istruzioni per i necessari
controlli e per la manutenzione.
N.B. : La casa produttrice si riserva la possibilità di apportare
eventuali modifiche in qualsiasi momento e senza preavviso.
INDICE P AG . 3)
(
F
Cher client, je vous remercie beaucoup d’avoir choisi un produit
de qualité de la société IBEA.
Pour un bon usage de la tronconneuse et pour éviter les
accidents, il ne faut pas commencer à travailler sans avoir lu le
manuel attentivement. Vous trouverez ce guide sur les
explications du fonctionnement de divers composants et des
instructions pour les inspections nécessaires et de l’entretien.
N.B. : Le fabricant se réserve le droit d’apporter des
changements à tout moment sans préavis.
INDEX P AG . 35)
(
INTRODUCTION
Dear customer, thank you very much for having chosen a
quality product of the company IBEA.
For proper use of chain saw and to avoid accidents, do not
start work without having read the manual carefully. You’ll
find this guide on the explanations of operation of various
components and instructions for the necessary inspections
and maintenance.
N.B. : The manufacturer reserves the right to make changes at
any time without notice.
(
CONTENTS P AG . 19)
D
Geehrter Kunde, wir danken Ihnen, dass Sie ein
Qualitätsprodukt der Firma IBEA gewählt haben.
Zur korrekten V erwendung der motorsäge und zur V ermeidung
von Unfällen muss vor dem Beginn der Arbeiten diese
Gebrauchsanweisung aufmerksam durchgelesen werden. In
dieser Gebrauchsanweisung finden Sie die Erklärungen für den
Betrieb der verschiedenen Bauteile und die Anweisungen für
die erforderlichen Kontrollen und Wartungsarbeiten.
ANMERKUNG: Der Hersteller behält sich das Rech vor,
jederzeit und ohne Vorankündigungen irgendwelche
Änderungen vorzunehmen.
(INHALTSVERZEICHNIS S. 52 )
EINLEITUNG
E
Estimado cliente, muchas gracias por haber elegido un
producto de calidad de la empresa IBEA.
Para un buen uso de la motosierra las sierras para evitar
accidentes, no debemos empezar a trabajar sin haber leído el
manual cuidadosamente. Va a encontrar esta guía en las
explicaciones de cómo los diversos componentes y las
instrucciones para el mantenimiento y las inspecciones
necesarias.
N.B : El fabricante se reserva el derecho a realizar cambios en
cualquier momento sin previo aviso.
(ÍNDICE. P AG. 68 )
NL
Beste cliënt, we danken u dat u voor een IBEA
kwaliteitsproduct gekozen heeft.
V ang de werkzaamheden nooit aan voordat u deze handleiding
aandachtig doorgelezen heeft om een correcte gebruik van de
kettingzaag mogelijk te maken en ongevallen te vermijden.
Deze handleiding bevat informatie betreffende de functionering
van de verschillende componenten en aanwijzingen voor de
noodzakelijke controles en onderhoudswerkzaamheden.
N.B. : De producent behoudt zich het recht om zonder
mededeling op elk gewenst moment wijzigingen door te voeren.
(
INHOUDSOPGA VE PAG . 100 )
INTRODUCCIÓN
INLEIDING
P
Prezado cliente, agradeço especialmente por ter escolhido um
produto de qualidade, a empresa IBEA.
Para a utilização adequada do podão e evitar
acidentes, não para começar a trabalhar sem ter lido este manual
cuidadosamente. Neste manual você irá encontrar explicações
sobre o funcionamento dos vários componentes e as
instruções para o controlo e manutenção.
NB: A casa produtor se reserva o direito de fazer quaisquer
alterações a qualquer momento, sem aviso prévio.
(CONTEÚDO PÁGINA 84)
INTRODUÇÃO
ITALIANO
I
INDICE
1. Dichiarazione di conformità.......................................................................................................pag. 3
2. Descrizione delle parti.........................................................................................................................4
3. Spiegazione dei simboli......................................................................................................................5
4. Dati tecnici............................................................................................................................................5
5. Per la vostra sicurezza........................................................................................................................6
6. Montaggio della barra e della catena................................................................................................9
7. Carburante e olio per la catena........................................................................................................10
8. Uso del motore...................................................................................................................................10
9. Istruzioni per il taglio..........................................................................................................................13
10. Manutenzione...................................................................................................................................14
1 1. Rimessaggio....................................................................................................................................17
12. Garanzia...........................................................................................................................................18
A TTENZIONE!!!
RISCHIO DI DANNO UDITIVO
NELLE NORMALI CONDIZIONI DI UTILIZZO, QUEST A MACCHINA PUÒ COMPORT ARE PER
L’OPERA TORE ADDETTO, UN LIVELLO DI ESPOSIZIONE PERSONALE E GIORNALIERO A
RUMORE P ARI O SUPERIORE A
85 dB(A)
1. DICHIARAZIONE DI CONFORMIT A ’
DICHIARAZIONE DI CONFORMITÀ ALLA DIRETTIVA SUGLI APP ARECCHI
FABBRICANTE: ACTIVE s.r.l.
via Delmoncello,12
26037 S. Giovanni in Croce (CR)
ITALY
DICHIARA CHE LA MOTOSEGA DESCRITT A QUI SOTT O:
Modelli : IBEA 4000
Numero di serie : Mod.: 4000 = 40140001 e successivi
Marca : IBEA
È CONFORME AI REQUISITI DELLE DIRETTIVE 2006/42/CEE, 2002/44/CE, 2000/14/CE, 2004/108/CE,
1997/68/CE E ALLE NORME NAZIONALI RIGUARDANTE LA TRASPOSIZIONE DELLO STESSO ALL’ESTERO;
E CHE È STATO DAT A T O DI UN CERTIFICA T O “CE” MOD. 4000 = M.0303.15.5877
DALL’ I.C.E. (Organismo di certificazione notificato n°0303) P ALAZZO DEL VESCOVO - V . GARIBALDI,20
40011 ANZOLA DELL’EMILIA (BO) - IT AL Y,
Documentazione Tecnica depositata in Sede Amministartica: Direzione Tecnica
Firmato il 01.03.2014 a S. Giovanni in Croce, Italy
_______________
Alberto Griffini
Presidente
3
I
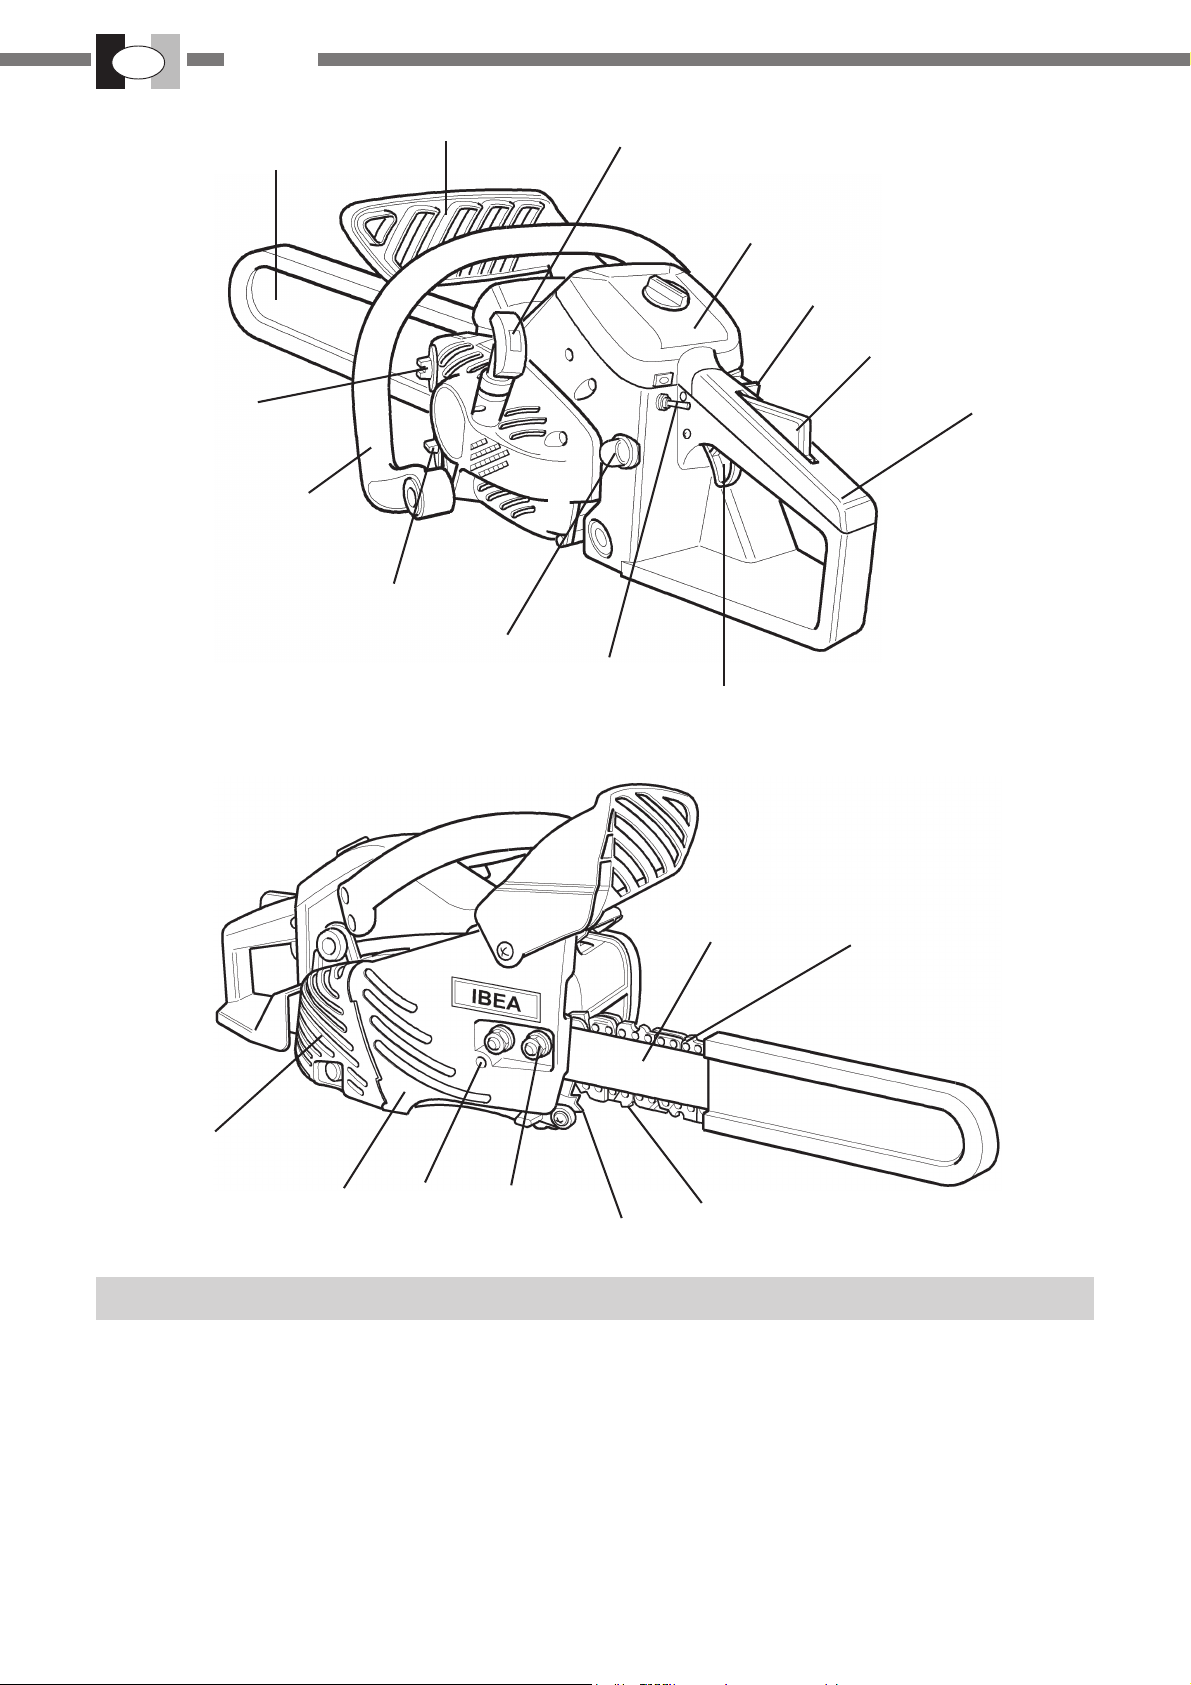
ITALIANO
11
5
21
6
18
3
9
4
7
8
19
20
10
17
16
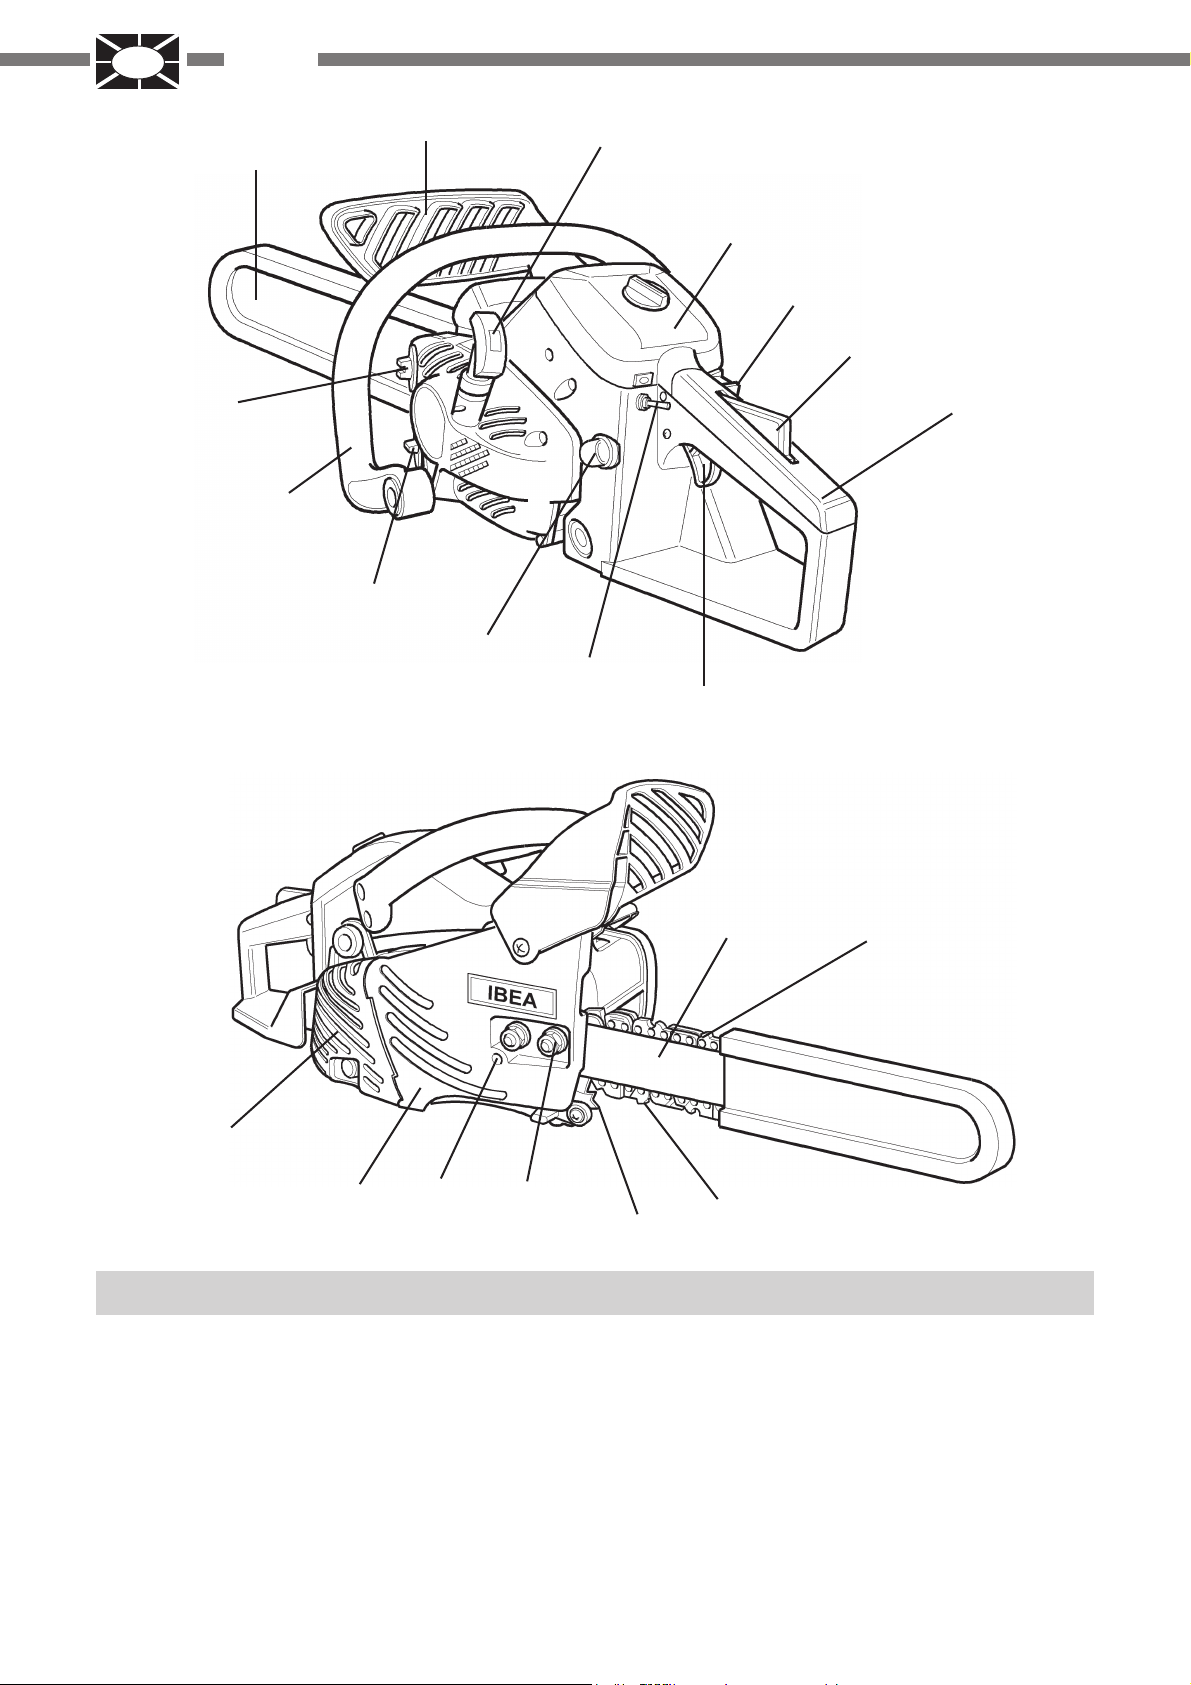
1. Catena
2. Barra
3. Sblocco acceleratore
4. Impugnatura
5. Impugnatura avviamento motore
6. Coperchio chiusura filtro aria
7. Impugnatura laterale
8. Tappo serbatoio olio
9. T appo serbatoio carburante
10. Grilletto acceleratore
11. Comando freno catena (sicurezza)
15
2. DESCRIZIONE DELLE P ARTI
12
2
13
12. Dado chiusura carter frizione/barra
13. Rampone
14. Sicurezza catena
15. Vite regolazione tensione catena
16. Carter chiusura frizione
17. Carter protezione marmitta
18. Comando posizione di avviamento a freddo
“ST ARTER”
19. Primer (spurgo del carburatore)
20. Interruttore
21. Protezione barra e catena
14
1
4
3. SPIEGAZIONE DEI SIMBOLI
Avvertenza, pericolo ed attenzione
Leggere il libretto uso e manutenzione
prima di utilizzare questa macchina
Indossare dispositivi di protezione acustica ed oculare
durante il funzionamento di questa macchina
Usare la motosega con due mani
ITALIANO
I
MODELLO
CILINDRA TA cm³
POTENZA Kw / CV
REGIME DEL MINIMO
REGIME MASSIMO AMMISSIBILE
CARBURAT ORE
ACCENSIONE
CAPACIT A SERBA TOIO MISCELA
CAPACIT A SERBA TOIO OLIO
SISTEMA DI LIBRIFICAZIONE
DIMENSIONI (L X P X H mm.)
PESO A SECCO (solo motore) KG .
DISPOSITIVO DI T AGLIO BARRA DA
DISPOSITIVO DI T AGLIOCATENA
Fare particolare attenzione al fenomeno del contraccolpo.
Può essere pericoloso
4. DA TI TECNICI
IBEA 4000
38.0
1.8 / 2.5
3000 giri/min.
13.500 giri/min.
A MENBRANA WALBRO PRIMER TYPE
DIGITALE
0.35 lt.
0.22 lt.
POMP A OLIO AUTOMA TICA CON REGISTRO
420 X 250 X 200
3.75
30 e 35 cm.
3/8”
MODELLO PRESSIONE ACUSTICA
LpA av - EN ISO 22868
4000
97 dB (A) 109 dB (A)
POTENZA ACUSTICA
LwA av - EN ISO 3744
LIVELLO VIBRAZIONI
EN ISO 5349 m/s²
Impugnatura
ANT.: 4,2 m/s²
POST. 5,0 m/s²
5
I
ITALIANO
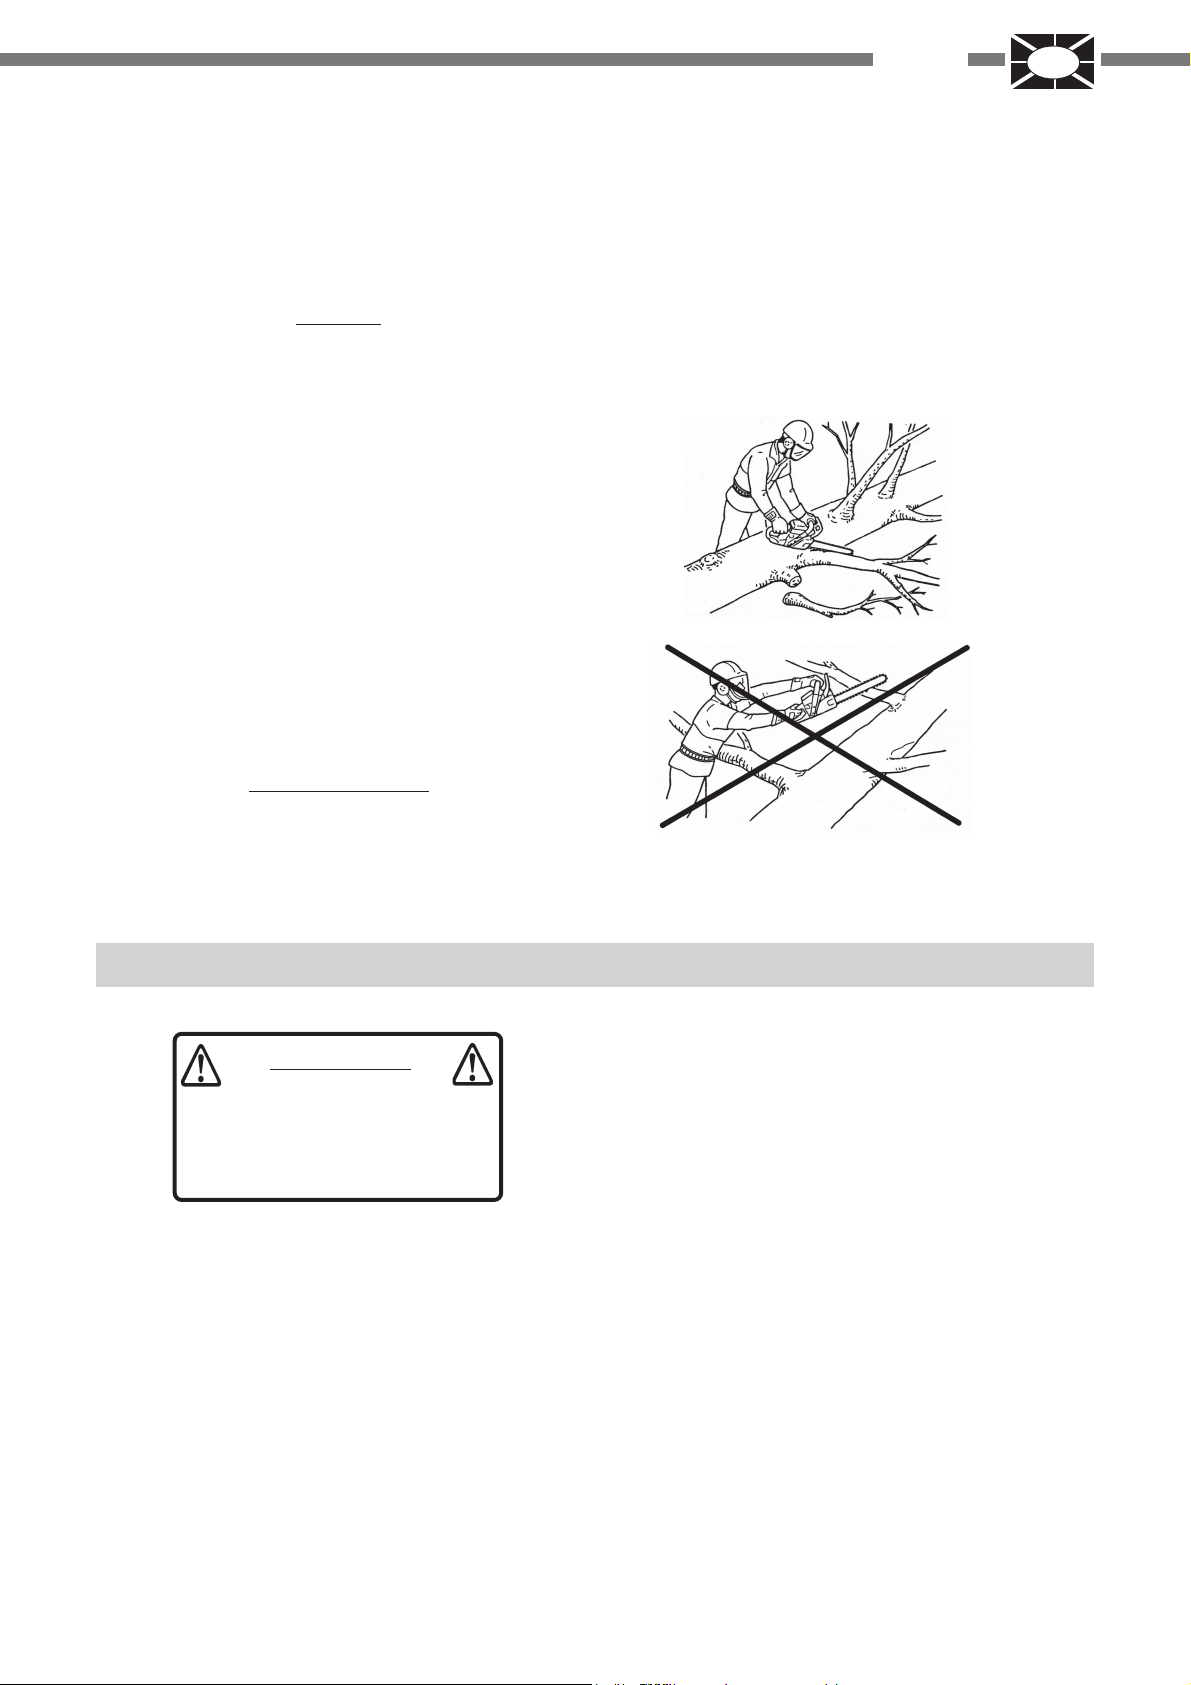
5. PER LA VOSTRA SICUREZZA
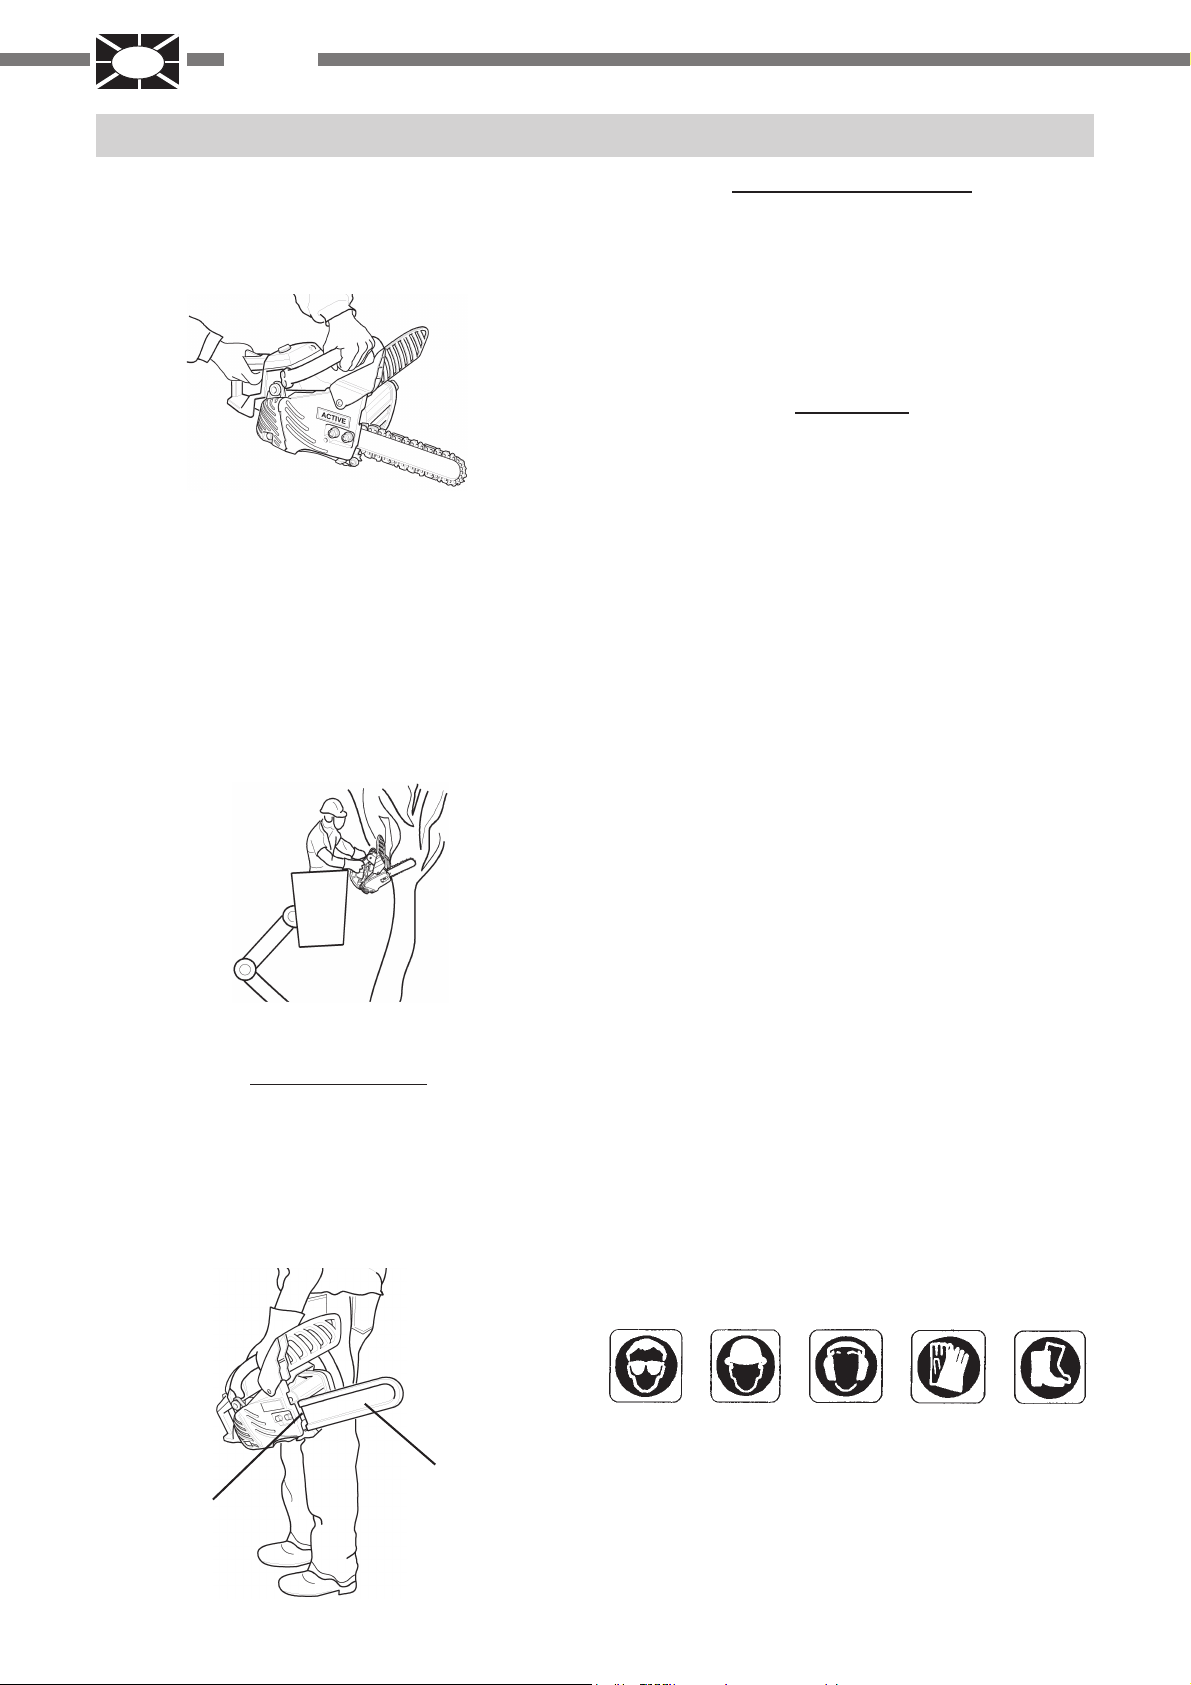
1. Questa motosega è stata progettata per la manutenzione degli alberi e perciò deve essere utilizzata solo
da personale addestrato tenendo presente che l’utilizzo della motosega con una sola mano può essere estremamente pericoloso fig.1.
1.
2. Attenzione al rischio di contraccolpo: mantenersi in
posizione di equilibrio per evitare di sbilanciarsi quando la macchina “salta” alla fine di un taglio.
3. Se il lavoro deve essere eseguito sull’albero, l’operatore deve essere addestrato in tecniche di
arrampicamento sicure e deve utilizzare tutti i dispositivi
di sicurezza raccomandati come imbrachi, lacci, corde e moschettoni per sè e per la motosega.
4. Quando sollevate la motosega usando una fune fissata all’anello, per tagliare su un albero, accertatevi che
la stessa sia spenta e che l’anello non venga sottoposto ad una tensione eccessiva fig.2.
2.
TRASPORTO fig.3
1. Quando trasportate la motosega usate il suo copri lama
(2).
2. Trasportate la motosega con il motore spento, la barra
(1) e la catena all’indietro, con la marmitta lontano dal
corpo.
CONDIZIONI DELLA MACCHINA
1. Non lavorate con una motosega danneggiata, regolata
impropriamente o non montata in modo completo e
sicuro.
2. Non usate la motosega con una marmitta non ben fissata o difettosa.
3. Assicuratevi che la catena abbia smesso di girare dopo
aver rilasciato il grilletto acceleratore.
EQUIP AGGIAMENTO
1. Indossate sempre occhiali approvati per proteggere i vostri occhi. Trucioli, polvere, pezzi di rami e altri detriti
possono essere scagliati dalla catena in faccia all’operatore. Gli occhiali possono offrire una protezione limitata nel caso la catena vada a colpire l’operatore proprio
negli occhi. Se le condizioni di lavoro richiedono l’uso di
una visiera traspirante, sotto di essa devono essere indossati occhiali protettivi.
2. IBEA raccomanda di indossare sempre protezioni per le
orecchie, altrimenti si può accusare la perdita dell’udito.
Dovreste ridurre il rischio di danni all’udito indossando
protezioni per le orecchie o cuffie approvate da un ente
autorizzato (non è consigliabile usare del cotone per le
orecchie).
3. Tutte le persone che trascorrono parte della loro vita lavorando con le motoseghe dovrebbero essere visitate periodicamente affinché non siano compromesse le loro
capacità uditive.
4. Indossate sempre un copricapo o un berretto quando
lavorate con una motosega. É consigliabile usare un elmetto di sicurezza in fase di abbattimento, o quando si
lavora sotto gli alberi, o quando qualcosa può cadervi
addosso.
5. Indossate guanti robusti e anti-sdrucciolo per una miglior presa, e anche per proteggervi dal freddo e dalle
vibrazioni.
6. Si dovrebbero indossare degli stivali con i puntali di sicurezza o stivali con la suola anti-sdrucciolo.
7. Non indossate mai indumenti larghi, giacche aperte,
maniche e polsi larghi, sciarpe, cinture, cravatte,
catename e gioielleria, ecc. che potrebbero impigliarsi
nella catena o nei cespugli.
8. Gli indumenti dovrebbero essere di materiale robusto e
protettivo e dovrebbero essere abbastanza aderenti da
non impigliarsi e nel contempo sufficientemente comodi
da lasciare libertà nei movimenti.
9. I gambali non dovrebbero essere troppo larghi nè con
risvolti, e dovrebbero essere portati dentro gli stivali oppure con l’orlo corto.
3.
2
1
6
ATTENZIONE
IL CARBURANTE È ESTREMAMENTE INFIAMMABILE .
A TTENZIONE CHE NON FUORIESCA VICINO A FONTI CHE POTREBBERO INFIAMMARLO CAUSANDO SERIO PERICOLO PER
L ’OPERA TORE. SI RICHIEDE QUINDI LA
MASSIMA ATTENZIONE NEL MANEGGIARE
IL CARBURANTE.
MISCELA
1. Utilizzare una tanica per carburante idonea.
2. Non fumare o avvicinare fiamme o scintille al rifornimento di
carburante.
3. Il serbatoio del carburante potrebbe essere sotto pressione.
Allentare sempre il tappo del carburante e prima di rimuoverlo attendere che la pressione compensi.
4. Se il tappo del serbatoio carburante (1) o del serbatoio olio
(2) è difficile da rimuovere con le dita, mettete la chiave (cacciavite) nell’incavo del tappo e girate in senso antiorario -fig.4
5. Riempire il serbatoio del carburante all’aperto su terreno
sgombro, e chiudere bene. Non fare rifornimento in luoghi
chiusi.
6. Asciugare il carburante versato sulla macchina.
7. Non fare rifornimento se il motore è caldo, né fare il pieno se
il motore è in moto.
8. Non conservare la motosega col carburante nel serbatoio,
in quanto una perdita di carburante potrebbe causare un
incendio.
9. Dopo il rifornimento, serrare bene il tappo dei serbatoio (1),
controllando con attenzione che non vi siano fuoriuscite di
carburante. In caso di perdite, sistemare prima di mettere in
funzione la macchina, per evitare il rischio di incendio.
ITALIANO
A VVIAMENT O MOT ORE
1. Tenete la motosega ad almeno 3 m di distanza dal
punto di rifornimento prima di avviare il motore.
2. Non fate stare estranei vicino alla motosega quando la
state usando per tagliare.
3. T enete persone ed animali lontano dall’area di lavoro.
Non fate tenere a nessuno la legna che vi accingete a
tagliare.
4. Non iniziate a tagliare finché l’area di lavoro non è sgombra, i piedi non sono in assetto stabile e non avete
trovato una via di “ritirata” dall’albero che state per abbattere.
5. Prima di avviare il motore accertatevi che la catena
non tocchi niente.
6. T enete le impugnature asciutte, pulite e senza olio o
miscela.
7. Utilizzare la macchina solo in luoghi ben ventilati. I gas
di scarico, o l’olio esausto (che deriva dalla lubrificazione
della catena) così come la polvere prodotta dalla stessa, possono nuocere gravemente alla salute.
8. Quando azionate la macchina, posatela su una superficie piana e libera da oggetti, tenendo l’impugnatura
frontale saldamente con la mano sinistra e bloccando
la parte finale dell’impugnatura posteriore con il ginocchio destro, tirando il cavetto di accensione con la destra.
I
ATTENZIONE
NON A VVIARLA IN MODO DIVERSO
DA QUELLO CHE È INDICATO,
POICHÈ UNA POSIZIONE INSICURA
DI A VVIAMENT O PUÒ TRADURSI IN
DANNI ALL ’OPERA TORE.
PRECAUZIONI PER EVIT ARE IL CONTRACCOLPO
4.
1
2
N.B.
Non forzate con il cacciavite, poichè il tappo è in plastica.
Premendo con forza, il tappo del serbatoio potrebbe danneggiarsi. Se il tappo del serbatoio è danneggiato, non
avviate il motore e fatelo sostituire da un rivenditore autorizzato IBEA.
1. Il contatto della punta della barra in alcuni casi può causare
una repentina reazione che porta la barra verso l’alto e poi
indietro verso l’operatore (questo è il cosiddetto contraccol-
po con rotazione).
2. Se la catena si inceppa sulla sommità della barra, quest’ultima a sua volta potrebbe saltare all’indietro verso l’operatore
(questo è il contraccolpo lineare).
3. Una delle reazioni suddette può farvi perdere il controllo della
motosega e farvi toccare la catena mentre gira, causando
gravi infortuni fisici.
4. Con una comprensione di base del contraccolpo sarete in
grado di ridurre o eliminare l’effetto “sorpresa”. E’ importante
capire che il contraccolpo con rotazione si può evitare facendo sì che la lama senza copri lama non vada a toccare
un oggetto o il terreno.
7
I
ITALIANO
5. Non lavorate con la motosega con una mano sola! L’uso
della motosega con una sola mano potrebbe ferire gravemente l’operatore o chi si trovi nelle vicinanze. Per un controllo adeguato lavorate sempre con tutte e due le mani, una
delle quali fa funzionare l’acceleratore. Se non lavorate con
entrambe le mani la motosega può “scivolare” o sfuggirvi,
con il rischio di ferimenti causati dalla perdita di controllo.
6. T enete saldamente la motosega con ambedue le mani, con
la mano destra sull’impugnatura superiorie e la sinistra su
quella laterale, quando la macchina è in moto. I pollici e le
altre dita devono avere una buona presa e afferrare bene le
impugnature. Se tenete bene la motosega ridurrete il rischio
di contraccolpi e manterrete il controllo della motosega.
7. Non sporgetevi, né tagliate al di sopra dell’altezza del vostro
torace.
8. Assicuratevi che non ci siano ostacoli nell’area nella quale
state lavorando, e che la punta della barra non vada a toccare ceppi o rami, o altri oggetti che potrebbero essere colpiti
mentre lavorate con la motosega.
9. Il taglio a regimi elevati può ridurre la probabilità di contraccolpi.
ATTENZIONE
IL CONTRACCOLPO PUÒ VERIFICARSI QUANDO LA PUNT A DELLA BARRA
V A A TOCCARE UN OGGETTO
10.Il taglio non a pieno acceleratore o a regimi bassi
può essere preferibile per controllare la motosega
quando lavorate in spazi angusti, riducendo cosi il
rischio di contraccolpi.
11.Seguite le istruzioni per la manutenzione e
l’affilatura specificate dal produttore per la catena.
12.Usate solo le barre e le catene specificate dal
costruttore, o accessori equivalenti di tali barre e
catene.
FRENO CA TENA
La funzione del freno catena è di arrestare la rotazione
della catena dopo un contraccolpo. Non evita, né riduce i
contraccolpi. Non fate affidamento quindi sul freno catena per proteggervi dai contraccolpi. Anche con un freno
catena la sicurezza dipende dal vostro buon senso e da
un metodo adeguato di taglio lavorando come se il freno
catena non ci fosse. Anche con un utilizzo normale, ed
una manutenzione adeguata il tempo di reazione del freno può aumentare. Ecco cosa può interferire con l’abilità
del freno di proteggere l’operatore.
1. La motosega è troppo vicina all’operatore. Il tempo di
reazione da contraccolpo può essere troppo veloce anche per un freno mantenuto perfettamente, perché entri in azione in tempo.
2. La mano dell’operatore potrebbe non essere in posizione di contatto con il paramano. Il freno non scatterà.
5.
3. L’assenza di una manutenzione adeguat a aumenta il
tempo di arresto del freno, rendendolo meno efficace.
4. Lo sporco, il grasso, l’olio, sporcizia che vanno a finire
nelle parti in movimento del meccanismo possono far
aumentare il tempo di arresto.
5. L’usura e la tensione continua della molla che attiva il
freno, ed il logorio del tamburo frizione e il freno, come
pure dei punti di articolazione, può aumentare il tempo
di frenata.
6. Se il paramano e la leva sono danneggiati possono
rendere il freno non operativo.
INFORTUNI
Si ritiene che una tensione eccessiva dei muscoli, come
pure dei tendini e delle dita possa causare dolori, gonfiore, intorpidimento e fitte acute alle parti del corpo
sopracitate. Per ridurre il rischio di infortuni dovuti a stress
ripetuto fate attenzione a quanto segue.
1. Evitate di tenere il polso troppo piegato o in tensione e
mantenete invece una posizione dritta. Inoltre quando
impugnate la macchina usate tutta la mano, non solo
il pollice e l’indice.
2. Fate delle pause periodicamente in modo da ridurre al
minimo l’affaticamento e far riposare le mani.
3. Riducete la velocità e la forza con le quali fate i movimenti ripetuti.
4. Esercitatevi a irrobustire la mano e i muscoli del braccio.
5. Andate da un dottore se avvertite formicolii, intorpidimento o dolore alle dita, le mani, i polsi o le braccia.
LE VIBRAZIONI E IL FREDDO
L’esposizione al freddo e alle vibrazioni può causare formicolio e infiammazioni seguite dalla perdita di colorito e
intorpidimento delle dita. Di conseguenza, la motosega
ha dei dispositivi anti-vibranti concepiti per ridurre l’intensità delle vibrazioni trasmesse attraverso le impugnature.
Vi raccomandiamo vivamente di seguire le precauzioni
8
ITALIANO
I
che seguono in quanto non si conosce l’esposizione minima che può provocare questa indisposizione.
1. State coperti, soprattutto sul capo e sul collo, nei piedi e le caviglie, come pure sulle mani e i polsi.
2. Mantenete una buona circolazione del sangue effettuando esercizi vigorosi con le braccia quando lavorate frequentemente, e non fumate.
3. Limitate il numero di ore di utilizzo della motosega.
Cercate di trascorrere la giornata lavorativa alternando l’uso della motosega ad altri lavori.
4. Se avvertite un senso di disagio, di rossore e gonfiore
delle dita, seguito da pallore e perdita di sensibilità
consultate il vostro medico prima di esporvi ulteriormente al freddo e alla vibrazione.
T AGLIO
1. Non usate una motosega per il taglio di alberi a meno
che non siate già esperti.
2. Il corpo deve star lontano dalla catena quando la
motosega è in moto.
3. State estremamente allerti quando tagliate cespugli
di dimensioni contenute e arbusti, in quanto i rami
flessuosi possono bloccare la catena e rimbalzare
contro
di voi o farvi perdere l’equilibrio.
4. Quando tagliate un ramo sotto tensione state attenti
che non rimbalzi all’indietro e vi colpisca, oppure che
vi cada addosso la motosega quando si riduce la tensione nelle fibre di legno.
5. Se tagliate stando su una scala correte un grave pericolo perché la scala può scivolare ed il vostro controllo sulla motosega è limitato.
6. Solo i professionisti potrebbero lavorare da soli.
7. Spegnete il motore prima di posare a terra la macchina.
PRATICA CON IL LEGNO
1. Se si vuole usare una motosega in modo sicuro è necessario che le condizioni di lavoro siano adeguate, che
l’operatore abbia buon senso e conoscenza dei sistemi
che dovrebbero essere applicati in ogni situazione di
taglio.
2. Nessuno deve usare la motosega a meno che non abbia letto bene questo manuale d’uso e abbia completamente capito le istruzioni.
3. Non fate toccare la motosega ai bambini.
4. Usate la motosega solo per tagliare il legno o prodotti in
legno. Non tagliate metallo solido, lamine in metallo,
plastica o altri materiali che non siano in legno.
5. State a monte quando t agliate i tronchi o i rami sui tronchi, che potrebbero rotolare quando vengono tagliati.
6. Poggiate bene sul terreno. Non lavorate sospesi.
6.
7.
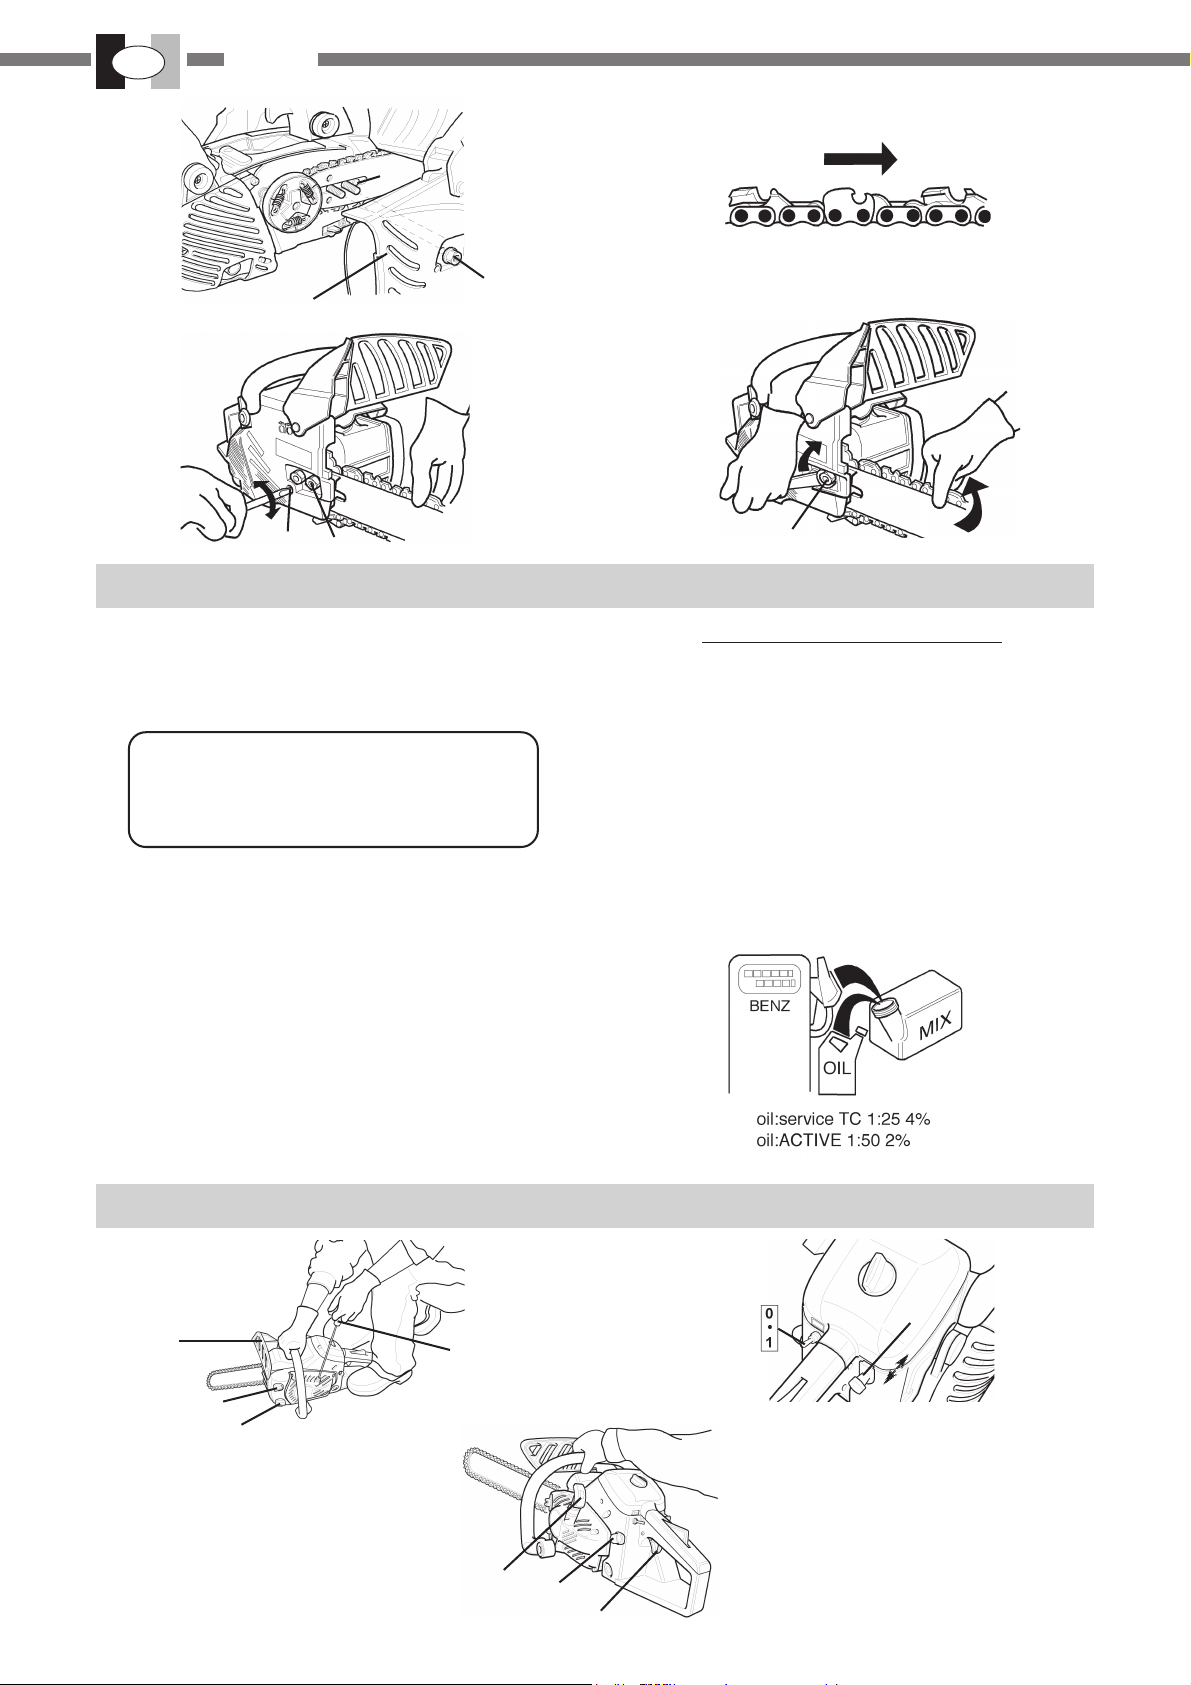
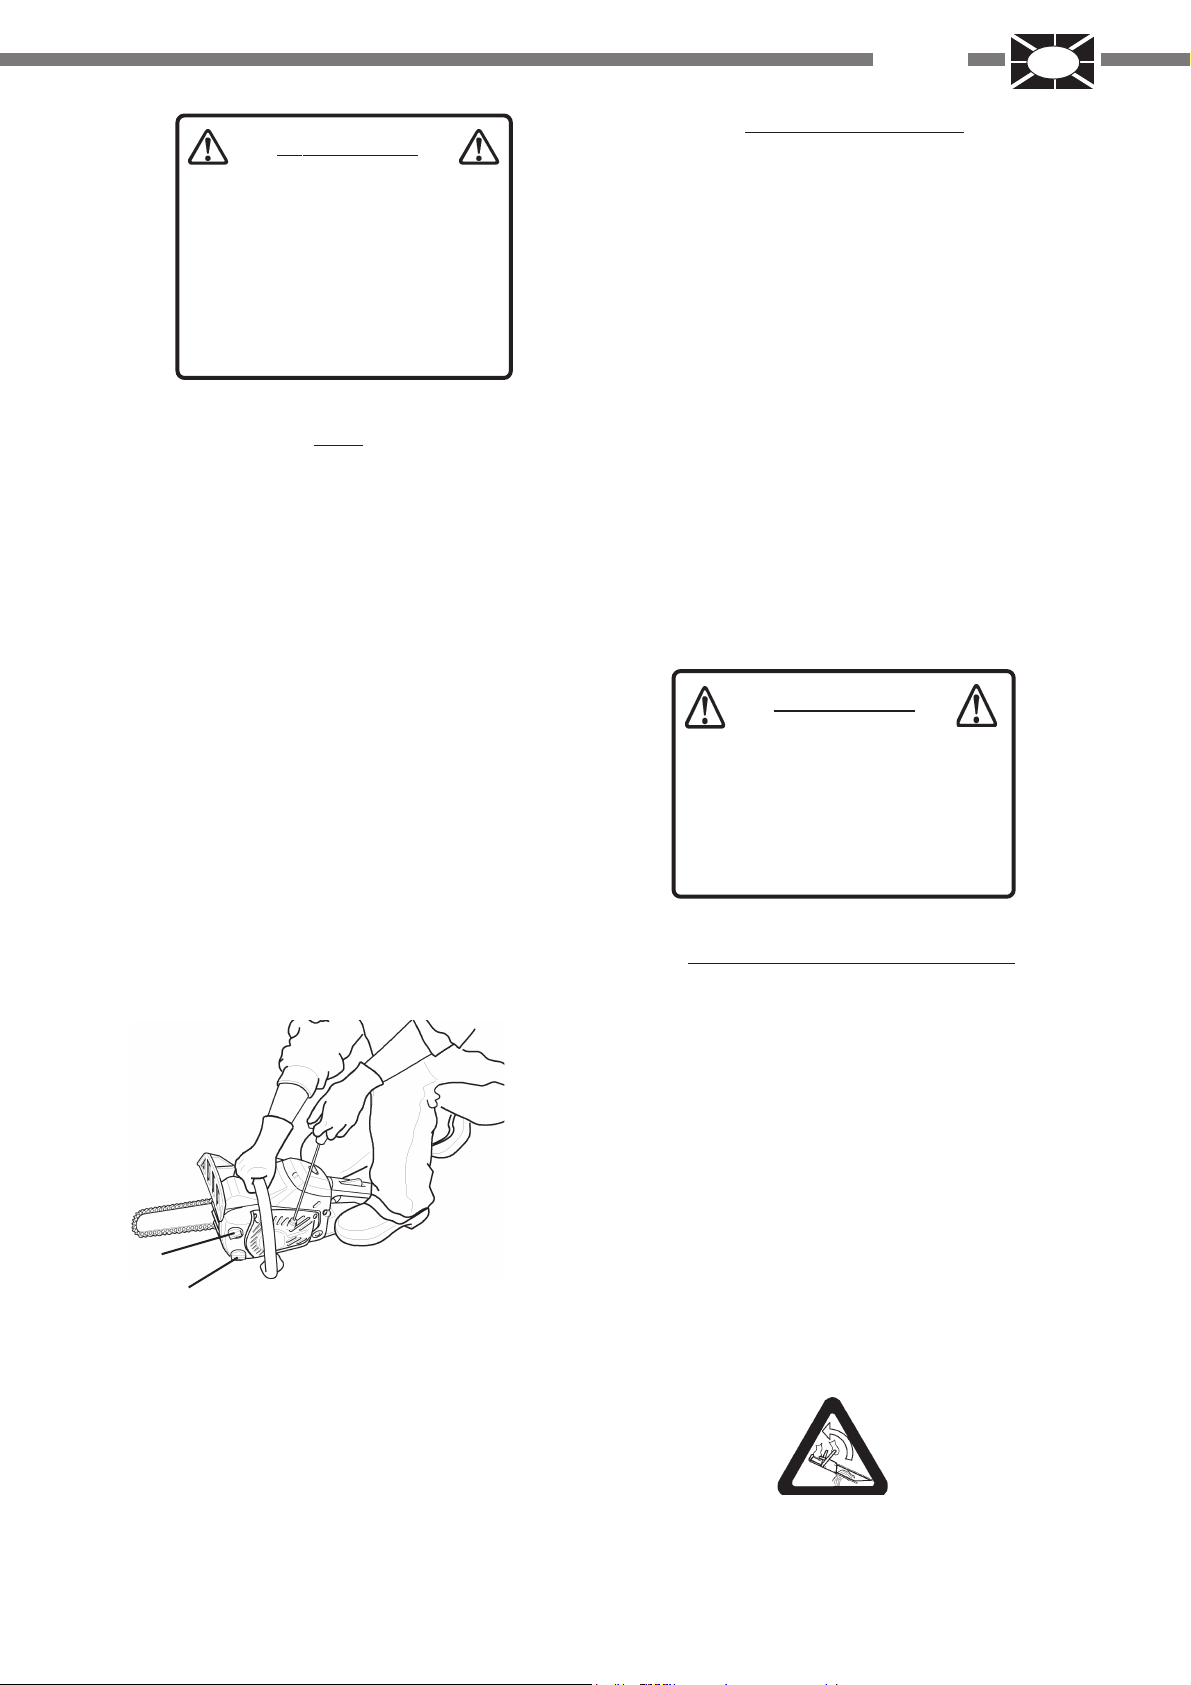
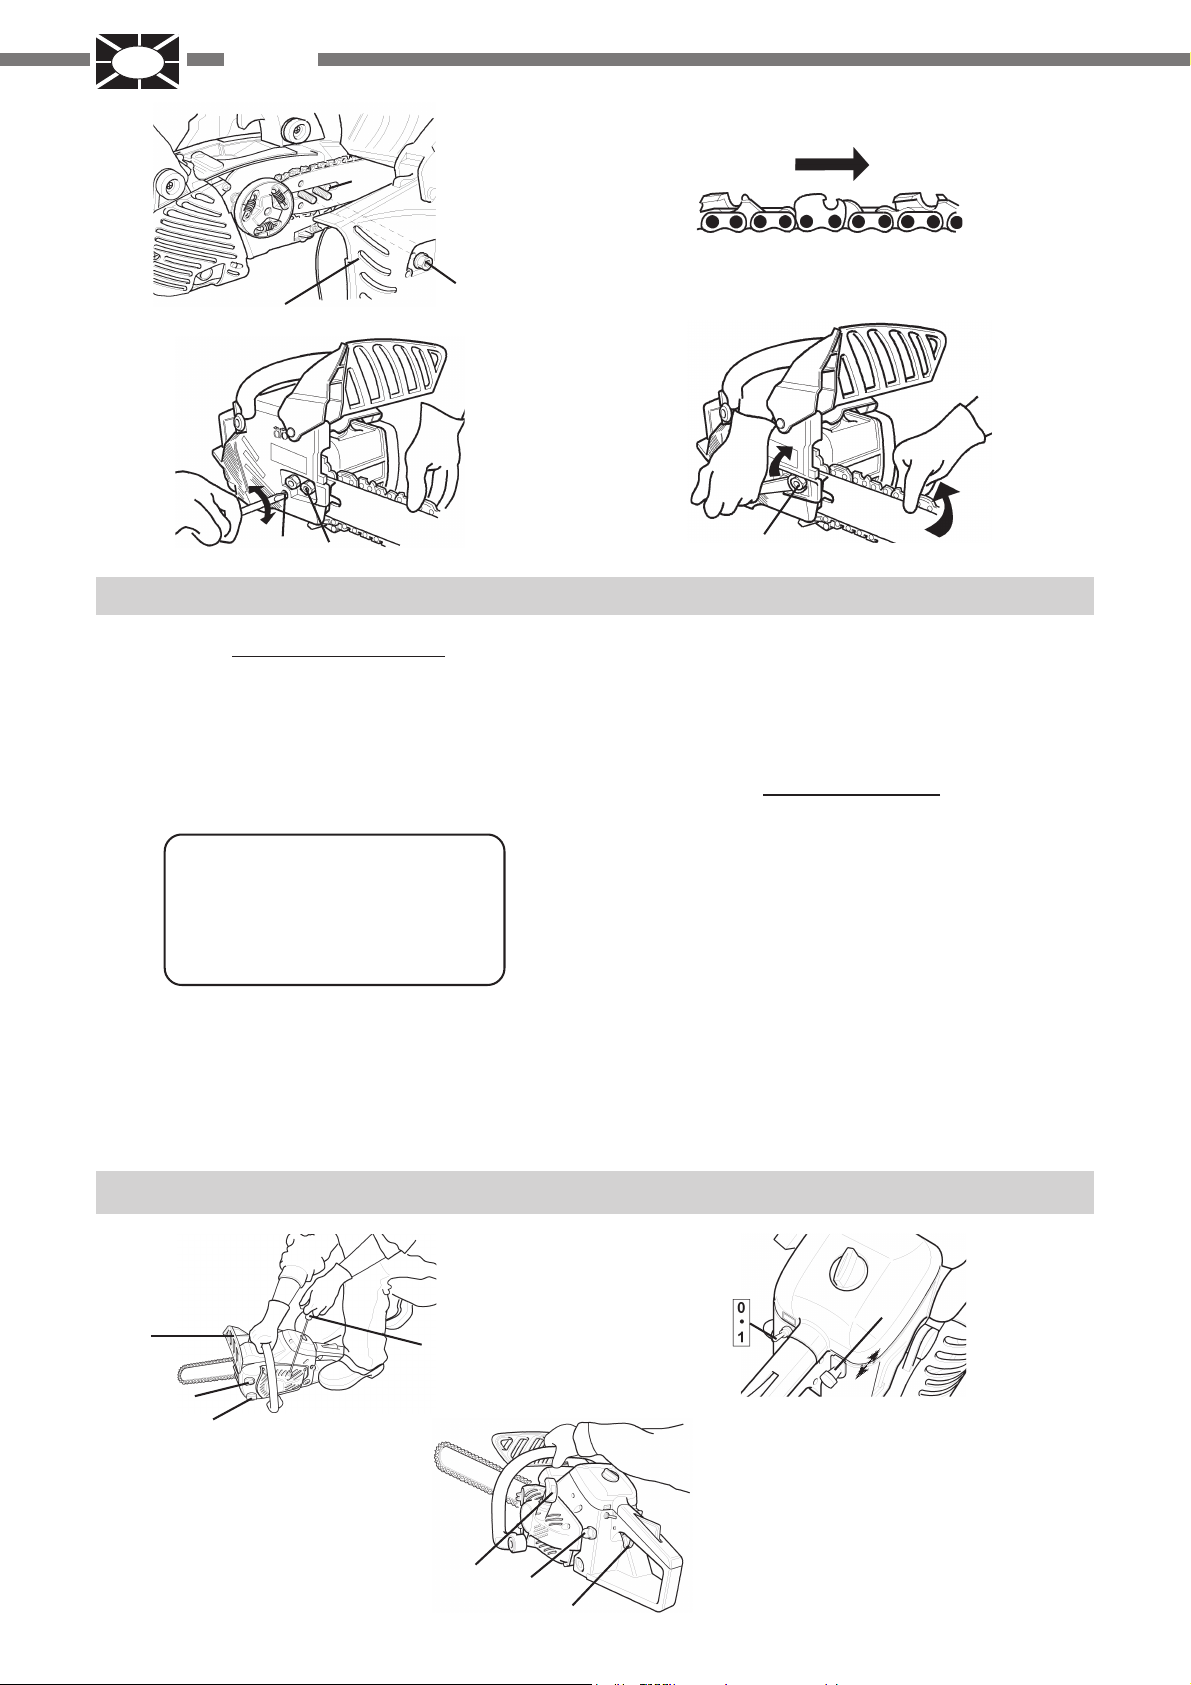
6. MONT AGGIO DELLA BARRA E DELLA CA TENA
ATTENZIONE
PER MOTIVI DI SICUREZZA, SPEGNERE SEMPRE IL MOTORE PRIMA
DI ESEGUIRE LE OPERAZIONI DESCRITTE DI SEGUITO
Questa macchina viene consegnata con la barra guida e
la catena separate. Installare la barra guida e la catena
nel modo seguente.
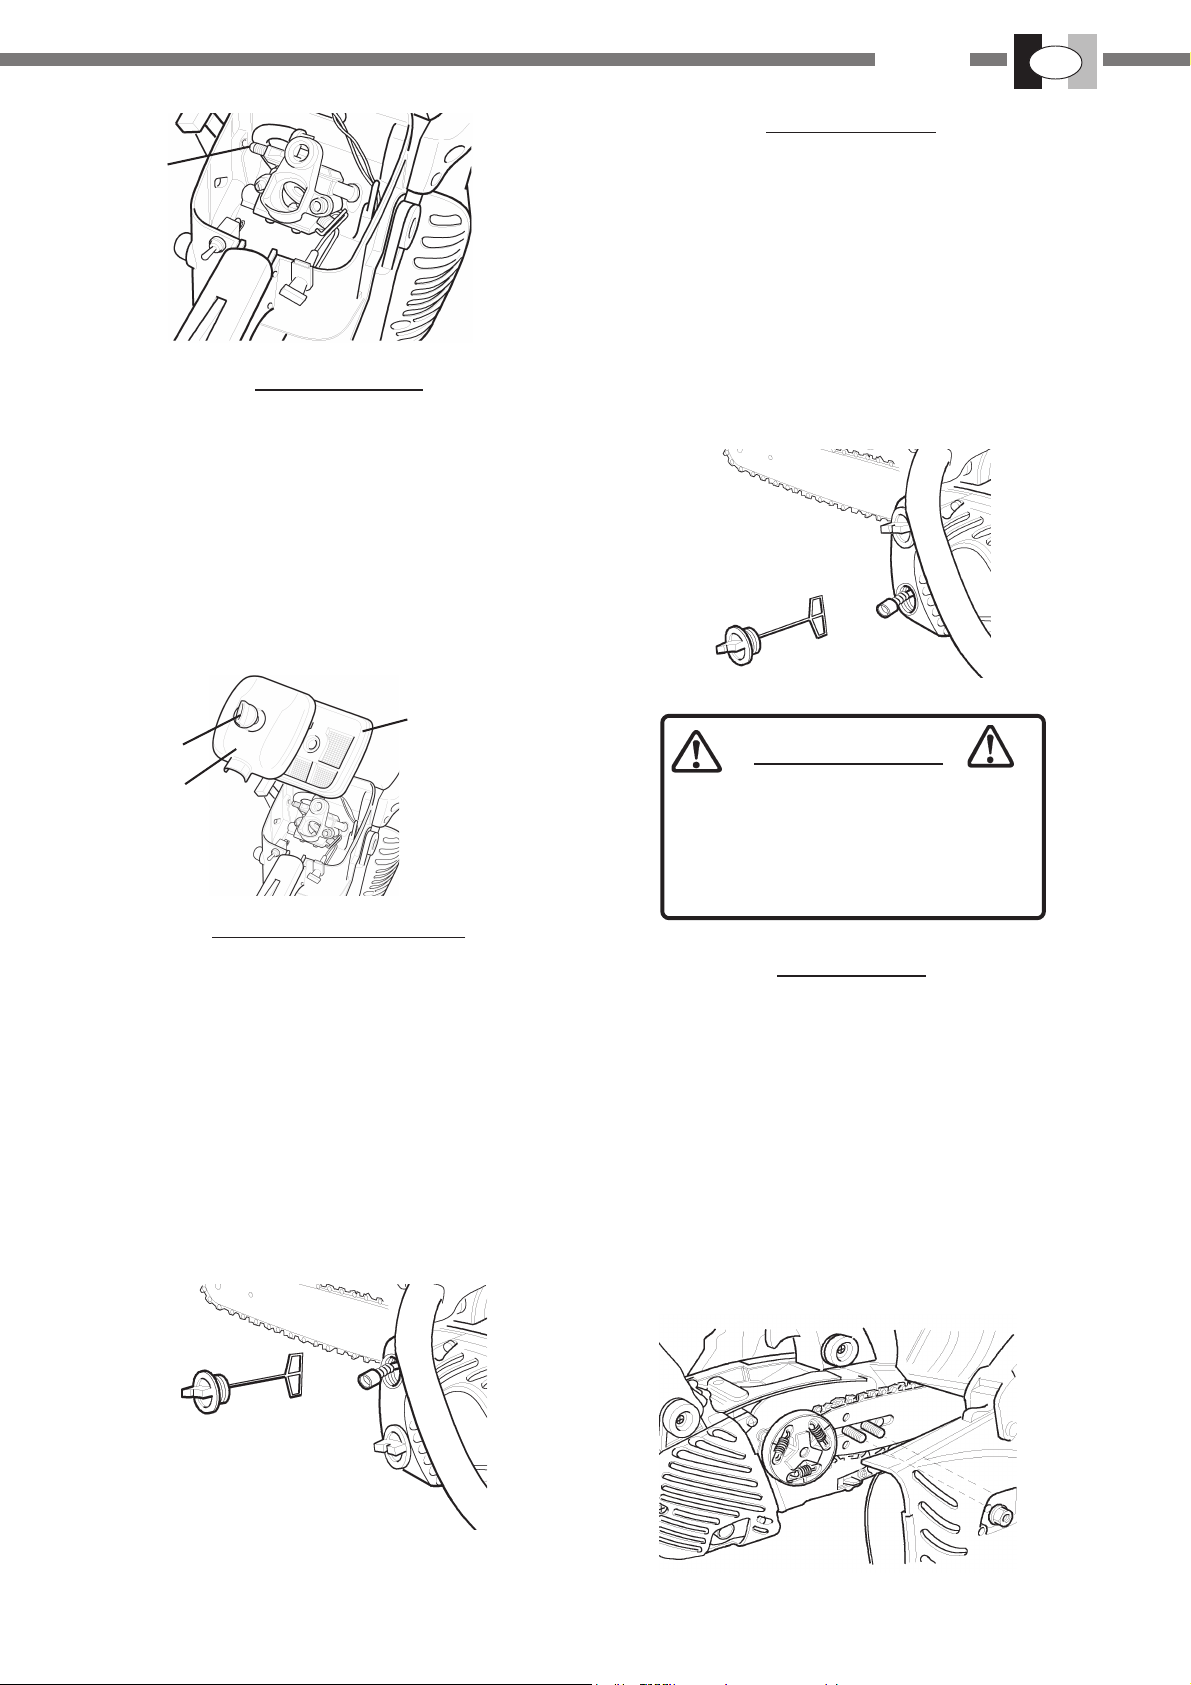
1.Allentare il dado (1) e allentare la catena tramite il tendi catena (5) fig.3
2.T ogliere il dado (1) e rimuovere il carter frizione (2) fig.1
3. Montare la barra e farla scorrere all’indietro verso la
frizione per facilitare l’installazione della catena fig.1
4. Installare la catena come mostrato (assicurarsi che i
denti di taglio siano rivolti nella direzione corretta) fig.2
5. Rimontare il carter frizione e fissare il dado con la
mano. Assicurarsi che il tendi-catena sia correttamente posizionato nel foro della barra (4) fig.1.
6. Tenere sollevato il puntale della barra verso l’alto e avvitare il tendi-catena (5) in senso orario in modo che la
catena aderisca completamente alla barra fig.3
7. T enere sollevato il puntale della barra e fissare il dado
(1) fig.4
8. Fare scorrere la catena intorno alla barra con la mano.
Allentate il tendi-catena se ci sono dei punti in cui non
scorre.
9. Avviare il motore e farlo girare a basso regime. Spegnerlo e regolare nuovamente la catena se necessario.
N.B.
- Tutte le regolazioni dovrebbero essere fatte a
freddo.
- Indossate sempre dei guanti quando si lavora
sulla catena.
- Non utilizzare la motosega con la catena allentata.
9
I
ITALIANO
4
1.
2.
2
1
3.
5
1
7. CARBURANTE E OLIO PER LA CA TENA
Il carburante è una miscela di benzina verde e olio per
motori a 2 tempi; se disponibile, usate un olio per motore
a 2 tempi raffreddato ad aria di marca preferibilmente
ACTIVE s.p. a 95 ottani.
Rapporto di miscelazione ISO-L-EGD
Standard (ISO/CD 13738), JASO FC e
ACTIVE MIX 2T 100% SINTETICO
(nostro cod. 20550) => 50:1 (2%)
1. Non miscelare direttamente nel serbatoio del carburante.
2. Evitare di versare benzina o olio. Il carburante fuonuscito
dovrebbe sempre essere ripulito.
3. Maneggiare la benzina con dovuta cura. È altamente
infiammabile.
4. Conservare sempre il carburante in un contenitore apposito.
4.
1
LUBRIFICANTE PER LA CA TENA
Una lubrificazione adeguata della catena durante il funzionamento riduce al minimo l’attrito tra la barra e la catena ed assicura una maggior durata. Usate solo olio speciale per catena di alta qualità, preferibilmente ACTIVE.
Non usate olio di scarto o rigenerato per evitare problemi
alla pompa olio e di natura ecologica.
Viscosità:
SAE 30.... d’estate
SAE 10.... d’inverno o albero resinoso
N.B.
Quando aprite il serbatoio carburante, svitate sempre lentamente il tappo ed aspettate che la pressione si compensi prima di togliere il tappo.
8. USO DEL MOTORE
1
D
E
3
3
1.
6
10
2
B
A
2.
3.
4

ITALIANO
I
A VVIAMENTO CON IL MOTORE FREDDO
1. Riempite il serbatoio del carburante (D) “miscela” e
quello dell’olio per la catena (E).fig.1
2. Spingere avanti il paramano (freno catena inserito) (1)
fig.1.
3. Tirare il pomolo (2) nella posizione “A” ST ARTER
Posizionare la leva dell’interrutore sull’1 “A VVIAMEN-
TO”
4. Premere il bulbo (6) 5 o 6 volte fig. 3.
N.B.
Non tirare al massimo la fune dell’avviamento. Non
lasciar andare violentemente l’impugnatura di
avviamento che potrebbe sbattere sul carter della
motosega.
5. Fig.1-Bloccare bene la motosega. Per l’avviamento del-
la macchina, posatela su una superficie piana e libera
da oggetti, tenendo l’impugnatura frontale saldamente
con la mano sinistra e bloccando la parte finale dell’impugnatura posteriore con il ginocchio destro, tirare
l’avviamento (3) con la mano destra fig.1.
6. Assicuratevi che la catena e la barra non siano in con-
tatto con qualcosa quando avviate la motosega.
7. Tirate l’avviamento (3) ed ai primi scoppi del motore
riportare la leva (2) nella posizione di avviamento a caldo “funzionamento” (B)
8. Tirate l’avviamento (3) fino a che il motore parte.
9. Premere la leva di accelerazione (4), per sbloccare il
blocco acceleratore e portare il motore al minimo.
ATTENZIONE
DOPO CHE LA LEVA DI COMANDO VIENE
SPOST AT A NELLA POSIZIONE A FREDDO
E POI RIPORT A T A IN POSIZIONE A CALDO, L’ACCELERATORE RIMANE
LEGGERMENTE APER TO
SE IL MOT ORE VIENE A VVIA TO IN QUESTA
CONDIZIONE, LA CA TENA COMINCIA A
GIRARE. NON AVVIA TE IL MOTORE PRIMA DI A TTIV ARE IL FRENO A CA TENA
N.B.
La frizione si innesta e la catena comincia a girare
quando il motore viene avviato con il grilletto acceleratore premuto.
Dopo che il motore è stato avviato rilasciate il grilletto
acceleratore al minimo.
- Dopo aver avviato il motore, premete leggermente
il grilletto acceleratore (4) fig.3 in modo da rilasciare il fermo e tirare subito il paramano anteriore (1) verso di voi (il freno catena è in posizione di rilascio).
- Non aumentate la velocità motore mentre il freno
catena è inserito.
- Usate il freno catena in situazioni di emergenza.
Non usatelo a meno che non sia assolutamente
necessario.
Quando usate il fermo acceleratore la catena inizia
a muoversi non appena il motore è stato avviato.
Non usate mai il fermo acceleratore per il taglio.
Usatelo solo quando avviate il motore.
MOTORE ACCESO
1. Dopo aver avviato il motore fatelo girare al minimo per
alcuni minuti.
2. Premete gradualmente il griletto acceleratore (4) per
aumentare il regime del motore.
3. La catena inizia a girare quando il motore raggiunge i
4.000 r/min circa.
4. Non fate girare il motore a regimi elevati se non è ne-
cessario.
5. Accertatevi che la catena si fermi non appena rilascia-
te il grilletto acceleratore.
ARRESTO DEL MOTORE
1. Rilasciate il grilletto acceleratore (4) e lasciate il moto-
re al minimo.
2. Spost ate la leva di comando (2) nella posizione di 0
“Stop”.
N.B.
Quando il motore non si spegne, posizionate la leva
di controllo su “avviamento a freddo” per spegnerlo.
Controllate ed eventualmente riparate l’interruttore
d’accensione prima di avviare nuovamente il motore.
AVVIAMENTO CON IL MOTORE A CALDO
1. Spingere avanti il paramano (freno catena (1) inserito
fig.1.
2. Spost ate la leva di comando (2) in posizione di avviamento a caldo (B) fig2.
3. Bloccate bene la motosega.
4. Tirate l’avviamento (3).
5. Lo starter (A) potrebbe essere usato se necessario,
ma solo dopo il primo scoppio del motore, premere un
po’ il grilletto acceleratore per rilasciare la leva e lo
starter(A). Dopo che la leva di comando viene spostata
in posizione di avviamento a freddo e poi fatta tornare
in posizione a caldo, il motore rimane un pò accelerato
(condizione di chiusura).
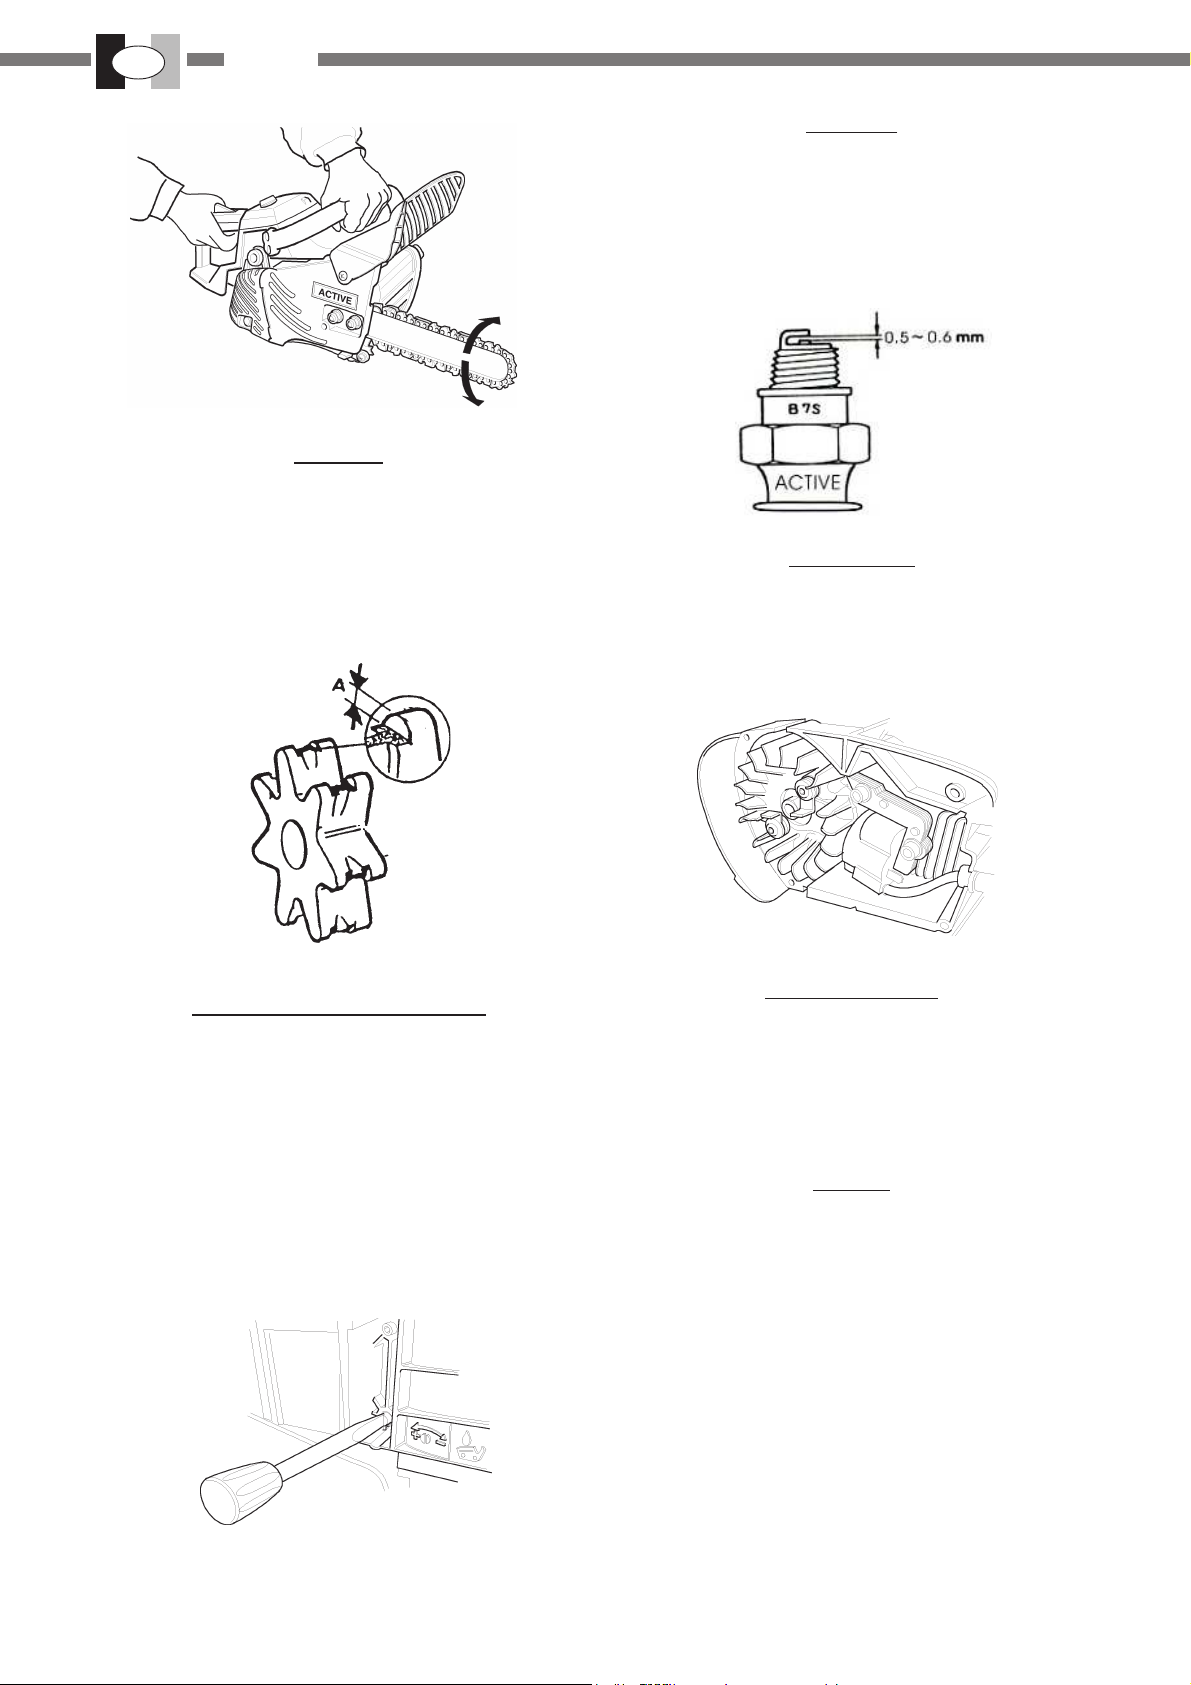
TENSIONE CA TENA
1. La tensione della catena dovrebbe essere controllata
frequentemente durante il lavoro e regolata, se necessario.
2. T endete la catena quanto più possibile, ma in modo
tale da poterla ancora tirare facilmente a mano lungo
la barra.
ATTENZIONE
ASSICURA TEVI CHE IL MOTORE SIA
SPENTO PRIMA DEL CONTROLLO
DELLA TENSIONE DELLA CA TENA.
11
I
ITALIANO
TEST DI LUBRIFICAZIONE DELLA CA TENA
Mettete la catena su una superficie asciutta e aprite l’acceleratore a mezza velocità per 30 secondi. Sulla superficie asciutta si dovrebbe vedere una scia sottile di olio
“fuoriuscito”.
1. Posate a terra la motosega.
2. T enete l’impugnatura con ambedue le mani e accelerate il motore a velocità elevata con il grilletto acceleratore.
3. Azionate il freno catena ruotando il vostro polso
sinistro contro il paramano anteriore durante la presa
sull’impugnatura anteriore. La catena si ferma subito,
posizione (A) Fig.2 .
4. Rilasciate il grilletto acceleratore.
Quando il paramano anteriore è tirato completamente
verso l’operatore, posizione (B) Fig. 2, il freno catena è
disinserito.
Se la catena non si ferma subito portate a riparare
la vostra motosega da un rivenditore IBEA.
(Fig. 1)
FRENO CA TENA
N.B.
ATTENZIONE
È MOL TO PERICOLOSO IL CONTRACCOLPO DELLA BARRA CHE SI VERIFICA
QUANDO LA PUNTA DELLA BARRA
TOCCA IL LEGNO O QUALCOS’AL TRO.
IL FRENO CA TENA RIDUCE LA POSSIBILITÀ DI INFORTUNARSI A CAUSA DEL
CONTRACCOLPO. CONTROLLATE
SEMPRE, PRIMA DELL ’USO, CHE IL FRENO CA TENA LA VORI ADEGUAT AMENTE
FRENO CA TENA AUTOMATICO
Il freno catena automatico è concepito in modo tale che
la reazione che si verifica all’estremità della lama guida a
seguito di un contraccolpo sia sufficiente a farlo entrare in
azione del tutto automaticamente, arrestando la rotazione della catena.
Per assicuravi che il freno catena automatico funzioni
correttamente, procedete come segue:
1. Spegnete il motore della motosega.
2. Afferrate l’impugnatura laterale con la mano sinistra e
quella superiore con la mano destra, senza stringere,
in modo da tenere la lama guida alla distanza di circa
40 cm da terra, come illustrato in Fig. 3
3. Allentate la presa della mano sinistra dall’impugnatura
anteriore, lasciando che il puntale della lama guida vada
a cadere contro la tavola in legno (o materiale simile),
in modo che la macchina riceva un colpo. In questa
fase l’impugnatura superiore deve essere tenuta leggermente con la mano destra, possibilmente nel lato
posteriore.
4. Il colpo viene trasmesso alla leva inerziale del freno,
che attiva il freno catena. Fig. 4
- Per esercitarvi mentre tagliate un albero piccolo,
spingete la leva in avanti per inserire il freno.
- Controllate ogni volta che il freno funzioni bene
prima di iniziare ogni lavoro.
- Se il freno catena è ostruito da trucioli di legno la
funzione del freno è compromessa. T enetelo quindi sempre pulito.
- Non aumentate la velocità del motore quando è
inserito il freno della catena.
- Usate il freno solo in caso di emergenza. Non usatelo a meno che non sia assolutamente necessario.
- Quando usate il fermo acceleratore in fase di avviamento, tenete il freno catena in posizione di
inserimento, e dopo aver avviato il motore
disinserite immediatamente il freno.
12
1.
3.
4.
2.
9. ISTRUZIONI PER IL T AGLIO
ITALIANO
I
Il modo corretto per tenere la motosega è di mettersi a
sinistra della motosega con la mano sinistra sull’impugnatura laterale e la mano destra su quella superiore, in
modo da poter azionare il grilletto acceleratore con l’indice della mano destra. Prima di cercare di abbattere un
albero tagliate dei tronchi piccoli e rami.
Acquisite una completa padronanza con i comandi e le
reazioni della motosega.
Avviate il motore ed accertatevi che funzioni adeguatamente.
Premete il grilletto fino a far aprire del tutto l’acceleratore
ed iniziate a tagliare. Se la catena è adeguatamente affilata, il taglio dovrebbe essere relativamente facile. Non è
necessario esercitare sulla motosega una forte pressione
perchè tagli.
Se si esercita troppa pressione il motore rallenterà ed il
taglio diventerà effettivamente più difficile.
Ci sono delle sostanze che possono rovinare il carter della vostra motosega.
(Ad esempio l’acido della palma, fertilizzanti, ecc.) Per
evitare il deterioramento del carter fate attenzione a togliere tutta la segatura che si è accumulata attorno alla
frizione e nella lama e lavate le parti con acqua.
mento fungerà da cerniera quando l’albero cade, guidan-
dolo nella direzione desiderata.
5. Quando l’albero inizia a cadere spegnete il motore,
posate la motosega a terra e allontanatevi lungo la via
di ritirata.
Per abbattere alberi di grandi dimensioni, con un diametro di due volte superiore alla lunghezza della barra, iniziate a praticare la dentellatura da un lato e muovete la
motosega fino all’altro lato della dentellatura. Cominciate
con il taglio di abbattimento su un lato della pianta, agganciandovi il rampone, e facendo perno con la barra fino
a formare la cerniera in legno desiderata. Quindi estrarre
la barra per il secondo taglio. Inserire la barra nel primo
taglio facendo attenzione ai contraccolpi.
Il taglio finale si effettua affondando la barra e procedendo
nel taglio fino al raggiungimento della cerniera.
ATTENZIONE
NON TOCCA TE NIENTE CON L ’ESTREMITÀ DELLA BARRA MENTRE IL MOTORE È IN FUNZIONE PER EVIT ARE IL CONTRACCOLPO.
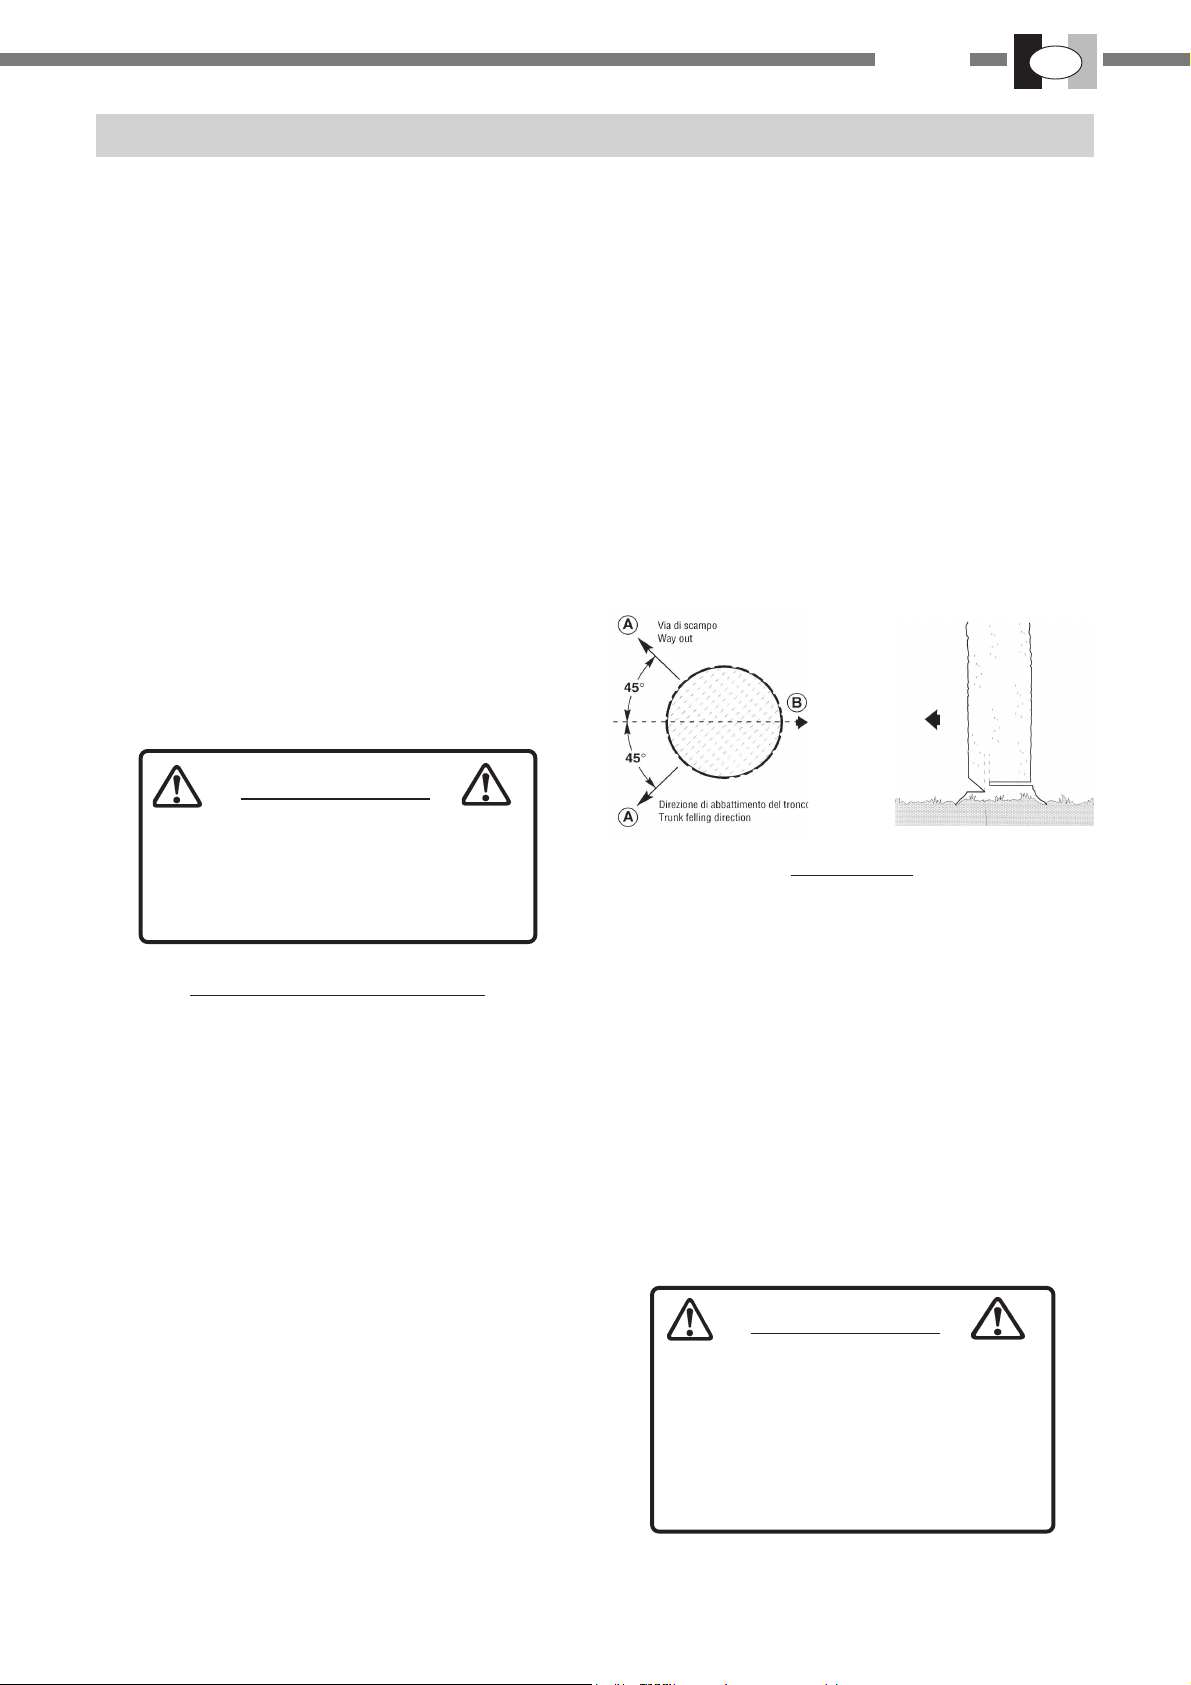
ABBA TTIMENT O DI UN ALBERO
Un albero abbattuto può danneggiare gravemente
qualsiasi cosa colpisca. Vi sono tuttavia modi per far
cadere un albero dove volete, quindi decidete prima la
posizione!
1. Prima di tagliare sgombrate l’area attorno all’albero.
Avrete bisogno di libertà di movimento mentre lavorate
con la motosega senza colpire nessun ostacolo.
2. Selezionate poi una via di “ritirata” (A). Quando l’albero
inizia a cadere dovreste allontanarvi dalla direzione di
caduta (B) ad un angolo di 45° per evitare il contraccolpo del tronco sul ceppo.
3. Iniziate a tagliare sul lato in cui volete che cada l’albero. Praticate una dentellatura di 1/3 del diametro dell’albero. La posizione della tacca è importante dal
momento che l’albero tenderà a cadere in direzione
della tacca stessa.
4. Il taglio di abbattimento varrà praticato sulla parte opposta del tronco. Effettuare il taglio di abbattimento
posizionando il rampone di 2,5 cm a 5 cm al di sopra
della parte inferiore della tacca, e interrompere il taglio
di circa 1/10 del diametro dalla parte più interna della
tacca, in modo da lasciare una cerniera di legno. Non
arrivare con il taglio di abbattimento fin dentro la tacca.
Il legno restante tra la dentellatura e il taglio di abbatti
SRAMA TURA
La sramatura di un albero abbattuto è molto simile al taglio del tronco in pezzi più piccoli.
1. Non effettuate mai la sramatura stando sopra l’albero.
2. Fate attenzione che la punta non tocchi altri rami.
3. Usate sempre tutte due le mani.
4. Non tagliate tenendo la motosega sopra la testa o la
barra in posizione verticale.
5. Se la motosega dovesse causare un contraccolpo si
potrebbe perdere il controllo sufficiente per evitare eventuali lesioni.
N.B.
Non tagliare al di sopra dell’altezza
ATTENZIONE
LA SRAMA TURA IN PROSSIMITÀ DI LINEE
ELETTRICHE PUÒ ESSERE CAUSA DL
SCOSSE. RICORDARSI SEMPRE DI
DISINSERIRE L ’ALIMENTAZIONE DEL MOTORE PRIMA DL COMINCIARE AD UTILIZZARE LA MACCHINA IN T ALI AREE.
13
I
ITALIANO
TAGLIO DEL TRONCO IN PEZZI PIÙ PICCOLI
Questa è la procedura da seguire per il taglio del tronco
in pezzi più piccoli.
1. Tenete entrambe le mani sulle impugnature.
2. Supportare i tronchi se necessano.
3. Quando si taglia su un pendio o sulle pendici di una
collina si deve sempre stare a monte.
1.
2.
N.B.
Se non avete calcolato bene gli effetti della tensione e della compressione, e se tagliate dal lato sbagliato, il legno comprimerà la barra e la catena, impigliandola.
Se fate andare il motore, e la catena è impigliata
nel legno, si brucerà la frizione.
Nel caso la catena si impigliasse e non si riuscisse a
togliere la motosega dal tronco, non esercitate pressione per toglierla.
Fermate la motosega, inserite un cuneo nel taglio
per aprirlo.
Non forzate mai sulla macchina quando è incastrata, ne spingete la lama nel taglio. Una catena non
affilata non è sicura e procurerà un logorio eccessivo agli accessori di taglio. Quando, invece dei trucioli, fuoriesce segatura, la catena è male affilata.
Non toccate le parti calde del carter cilindro e la
marmitta dopo aver usato la motosega
ATTENZIONE
NON USA TE MAI IL FERMO ACCELERATORE PER IL LA VORO DI T AGLIO
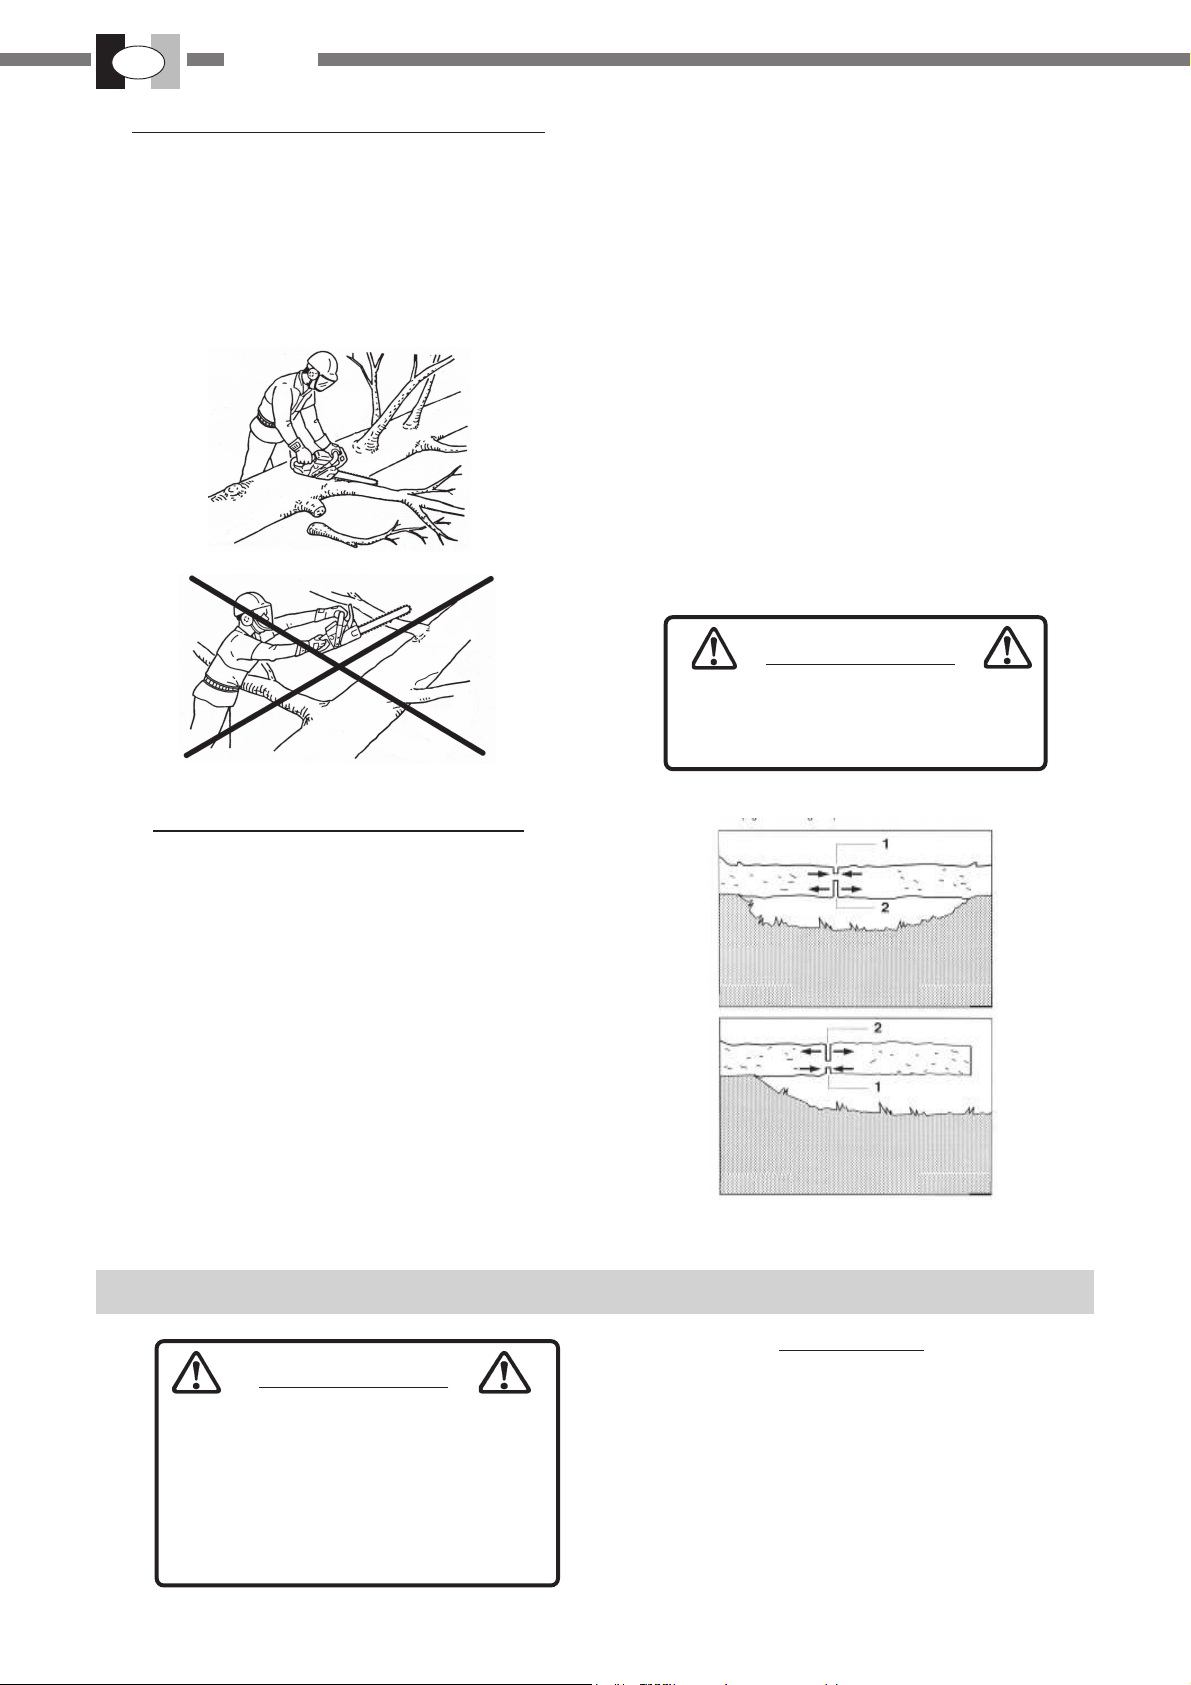
TENSIONE E COMPRESSIONE NEL LEGNO
Il legno, nella sua lunghezza, posato a terra sarà soggetto ad una tensione e compressione a seconda dei punto
in cui si trova il supporto maggiore.
Quando il legno è supportato alle estremità, il lato della
compressione è nella parte superiore, e quello della tensione nella parte inferiore.
Per tagliare tra questi punti di supporto, effettuate il primo
taglio verso il basso di circa 1/3 del diametro del tronco in
legno.
Il secondo taglio viene fatto verso l’alto e dovrebbe congiungersi con il primo taglio.
Quando il legno è supportato solo ad una estremità fate il
primo taglio verso l’alto di circa 1/3 del diametro del tronco.
Il secondo taglio viene fatto verso il basso e dovrebbe congiungersi con il primo taglio.
10. MANUTENZIONE
ATTENZIONE
TUTTE LE OPERAZIONI DI MANUTENZIONE CHE NON RIGUARDANO LE P ARTI
ELENCA TE NEL MANUALE DELL ’OPERATORE, V ANNO EFFETTUA TE DA UN TECNICO SPECIALIZZA TO ED ESPERT O IN
MOTOSEGHE.
CARBURA TORE
In base alle nuove normative la regolazione della
carburazione deve essere eseguita da un’officina autorizzata.
N.B.
Quando avviate il motore, la regolazione del minimo dovrebbe essere regolata in modo da non far
girare la catena.
Se la catena gira abbassate il regime di rotazione
del motore agendo sulla vite (1) fig.1.
14
ITALIANO
FILTRO OLIO fig.2
I
1
1.
FILTRO ARIA fig.2
Controllatelo sempre prima di iniziare a lavorare.
1. Ruotate la manopola di bloccaggio (1) del coperchio
filtro (2) in senso antiorario, togliete il coperchio e il
filtro dell’aria (3).
2. Spazzolate o soffiate via delicatamente la polvere, o
lavate il filtro in un solvente non infiammabile se necessario, o sostituite il filtro aria (non usate spazzole metalliche).
3. Asciugatelo completamente prima di montarlo.
4. Rimontare il filtro ed il coperchio.
3
1
2
2.
Effettuate un controllo periodico.
1. State attenti a non far entrare polvere nel serbatoio
dell’olio. Se il filtro olio è ostruito la lubrificazione sarà
compromessa.
2. Estraete il filtro dell’olio attraverso il foro di rifornimento
con un pezzo di filo in acciaio a forma di uncino o simi
le.
3. Se il filtro è sporco pulitelo con la benzina o sostituitelo.
4. Quando l’interno del serbatoio olio si sporca può essere pulito nsciacquandolo con la benzina.
2.
ATTENZIONE
IL CARBURANTE È ESTREMAMENTE
INFIAMMABILE.
F A TE MOL T A A TTENZIONE QUANDO
MANEGGIA TE CARBURANTE.
FIL TRO CARBURANTE fig.1
Effettuate un controllo periodico.
1. Non fate entrare la polvere nel serbatoio carburante.
Se il filtro è ostruito si fa fatica ad avviare il motore
oppure si possono accusare delle anomalie nelle prestazioni del motore.
2. Estraete il filtro del carburante attraverso il serbatoio
con un pezzo di filo d’acciaio a forma di uncino o qualcosa di simile.
3. Quando il filtro è sporco sostituitelo.
4. Quando la parte interna del serbatoio carburante è sporca può essere pulita risciacquandola con la benzina.
1.
BARRA fig. 3 - 4
1. Pulitela prima dell’uso.
2. Pulite la scanalatura della barra con, ad esempio, un
piccolo cacciavite.
3. Pulite i fori dell’olio con del filo.
4. Rovesciate la barra guida periodicamente.
5. Pulite il pignone, la frizione e la zona di supporto della
barra prima di montare la barra.Nel caso il pignone è
usurato sostituitelo.
N.B.
Quando sostituite la barra o la catena rivolgetevi al
vostro rivenditore IBEA.
3.
15
I
ITALIANO
4.
PIGNONE
1. Un pignone danneggiato causerà danni o usura alla
catena della motosega prima del tempo.
2. Sostituire il pignone della motosega quando si è logorato di 0,5 mm o più.
3. Controllate il pignone quando montate una nuova catena. Sostituitelo se logorato.
CANDELA
1. Effettuate un controllo periodico.
2. La distanza normale tra gli elettrodi è di 0,5 - 0,6 mm.
3. Regolate la distanza tra gli elettrodi se è più larga o più
stretta rispetto a quella standard.
4. Coppia di serraggio da 15 a 17 N-m (da 150 a 170 kgfcm).
7.
ACCENSIONE
1. La motosega è dotata di un magnete con accensione
digitale ad anticipo variabile e limitatore di giri.
2. Controllare che i collegamenti dei fili siano sicuri (ben
stretti).
8.
5.
LUBRIFICAZIONE AUTOMATICA
1. Il volume di scarico della pompa d’olio viene regolato a
7 mL/min circa a 7.000 r/min, prima di essere spedito
dalla fabbrica.
2. Per aumentare la portata della pompa girate la vite di
regolazione in senso antiorario. Quando la vite arriva a
fine corsa, si arresta e la posizione indica il massimo
volume di scarico (13 mL/min 7.000 r/min).
3. Non girare la vite di regolazione oltre il limite massimo
o minimo di regolazione della portata.
6.
16
ALETTE CILINDRO
1. Effettuate un controllo periodico.
2. Se le alette sono sporche il raffreddamento del motore
sarà scarso.
3. T ogliete la sporcizia e la polvere tra le alette in modo
da far passar facilmente l’aria di raffreddamento.
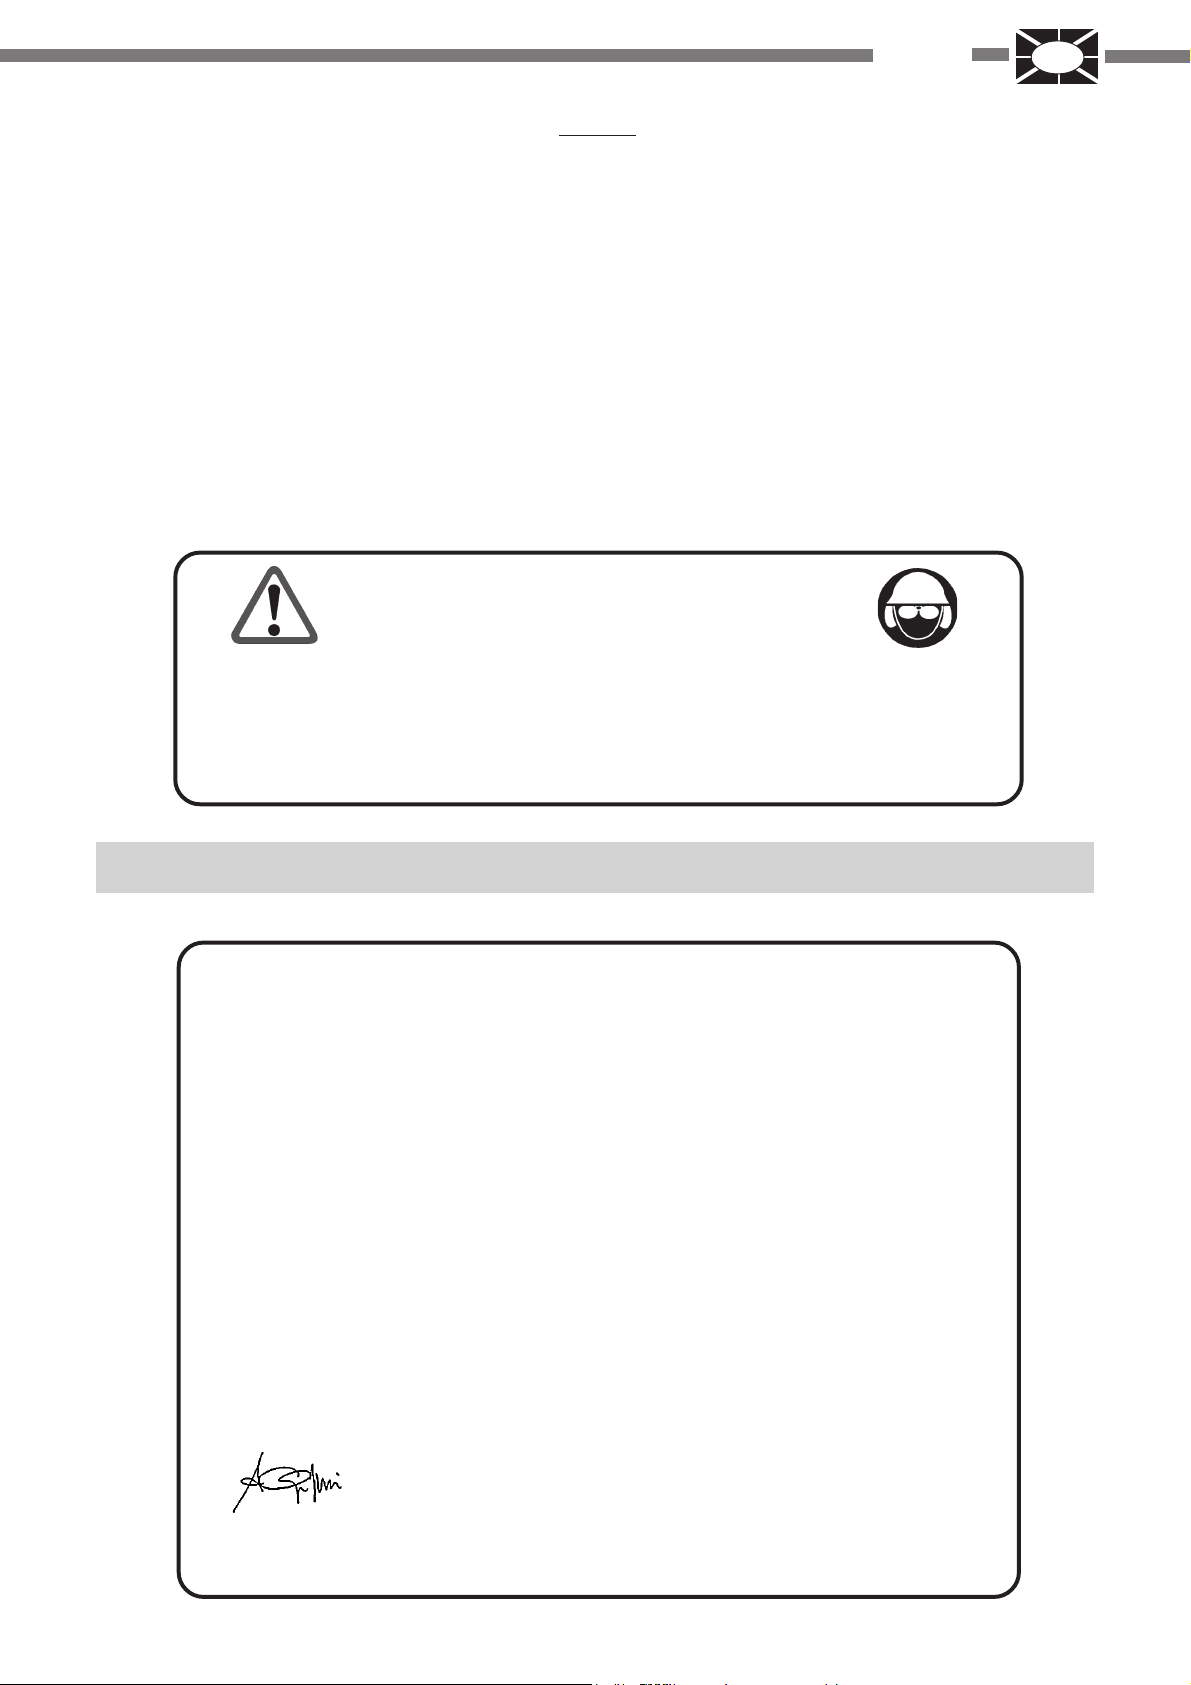
CA TENA
1. Non azionate mai la motosega se la catena è consumata o danneggiata. Se occorre esercitare una eccessiva pressione per tagliare o se viene prodotta polvere
di segatura invece che pezzi di legno, allora è necessario controllare lo stato della catena.
2. Quando affilate la catena dovete cercare di mantenere
gli stessi angoli e lo stesso profilo di quando era nuova. Ispezionate la catena ad ogni rifornimento. Quando
il tagliente si è consumato oltre i 4 mm dovete sostituire tutta la catena.
3. Per una corretta affilatura vi occorre un portalima, una
lima e una dima.
4. Usando la giusta misura della lima (tondino 4,0 mm) e
il portalima, otterrete un buon risultato.
5. Consultate il vostro Rivenditore IBEA sul corretto tipo
di lima da utilizzare.
ATTENZIONE
ITALIANO
19.Se la catena della motosega si sporca di resina, pulitela con kerosene e mettetela a bagno in olio.
I
SPEGNERE SEMPRE IL MOTORE PRIMA DI AFFILARE LA CA TENA.
INDOSSARE SEMPRE DEI GUANTI
QUANDO LA VORA TE SULLA CA TENA.
6. Bloccate la catena - spingete in avanti il paramano.
Per poter ruotare la catena tirate il paramano verso
l’impugnatura.
7. La catena possiede taglienti destri e sinistri. Affilate
sempre dall’interno verso l’esterno.
8. T enete il portalima parallelo alla linea della catena e
affilate il tagliente finché la zona danneggiata (spoglia
laterale e superiore) non è stata rimossa.
9. T enete la lima orizzontalmente.
10. Af filate prima il tagliente più danneggiato poi af filate
tutti gli altri alla stessa lunghezza.
11.Il delimitatore di profondità stabilisce lo spessore dei
residui di legno prodotti e deve essere mantenuto cor-
retto per tutta la durata della catena.
12.Quando il tagliente si consuma (si riduce la sua lunghezza), si altera l’altezza del delilimitatore ed essa
deve essere ridotta.
13.Usate la dima di profondità e limate la parte del
delimitatore che sporge.
14. Arrotondate ora la parte anteriore del deilimit atore.
N.B.
I seguenti fattori aumentano considerevolmente il
rischio di contraccolpo.
- Angolo spoglia superiore troppo largo
- Angolo spoglia laterale troppo piccolo
- Diametro lima troppo piccolo
- Delimitatore di profondità troppo largo.
Ecco i taglienti correttamente affilati:
A) angolo di spoglia superiore di 30°
B) angolo di spoglia laterale di 80°
C) angolo di taglio superiore di 60°
D) calibro di profondità di 0,64 mm
Gli angoli di cui sopra valgono per le catene OREGON
91VG e CARL TON N1C-BL.
Per affilare altre catene seguite le istruzioni del produttore della catena.
1/4” 3/8 LP
60°
85° 85°
60°
15.La maglia motrice serve a rimuovere la segatura dalla
scanalatura della barra. Mantenere quindi sempre affilata l’estremità inferiore della maglia motrice.
16.Quando avete completato l’affilatura della catena, met-
tetela a bagno nell’olio e togliete completamente la
limatura prima dell’uso.
17.Quando la catena è stata limata sulla barra applicatevi
una quantità sufficiente di olio, fate ruotare la catena
lentamente per togliere la limatura prima di usare di
nuovo la motosega.
18.Se la motosega viene usata con la limatura insediatasi
nella scanalatura, la catena e la barra verranno danneggiate prima del tempo.
11.RIMESSAGGIO
Non conservare la motosega per un periodo prolungato di
tempo (60 giorni ed oltre) senza effettuare la manutenzione protettiva prima di riporrla, osservando quanto segue.
1. Conservate la motosega in un luogo asciutto e privo di
polvere lontano dalla portata dei bambini e uomini maldestri.
2. Posizionate l’interruttore di accensione nella posizio-
ne STOP .
CA TENA - AFFILA TURA E MANUTENZIONE
LEGENDA
A - Angolo di affilatura
B - Angolo di t aglio verticale
C - 0,25”
D - Angolo d’att acco
E - Indice di angolatura
F - Diam. 4.0 mm 5/32”
3. T ogliere il grasso, l’olio, lo sporco e i detriti accumulatisi sulla parte esterna della macchina.
4. Lubrificate la motsega periodicamente ed eseguite tutte le operazioni di manutenzione richieste.
5. Serrate tutte le viti e i dadi.
6. Vuotare completamente il serbatoio del carburante e
tirate l’impugnatura dell’avviamento più volte per togliere il carburante dal carburatore.
17

I
ITALIANO
7.Conservare sempre il carburante in appositi contenitori
approvati e non oltre i 60 giorni.
8. T ogliere la candela e versare 1/2 cucchiaio di olio specifico per motori a due tempi nel cilindro, attraverso
il foro della candela, tirare l’impugnatura dell’avvia-
mento 2 o 3 volte per distriubuire l’olio all’interno del
motore; osservare la posizione del pistone attraverso il
foro della candela; tirare lentamente l’impugnatura dell’avviamento fino a quando il pistone non raggiunge la
parte superiore della sua corsa e lasciarlo in tale posizione).
9. Montare la candela (non collegare il cavo dell’accensione).
10.Coprire la catena e la barra con la protezione prima di
riporre la macchina.
ATTENZIONE
NON CONSERV ARE LA MOTOSEGA
IN LUOGHI CHIUSI DOVE I FUMI DEL
CARBURANTE POTREBBERO ACCUMULARSI E RAGGIUNGERE
FIAMME LIBERE O INCENDIARSI.
12. CERTIFICA TO DI GARANZIA
Questa macchina è stata concepita e realizzata attraverso le più moderne tecniche produttive; la Ditta
costruttrice garantisce i propri prodotti per un periodo di 24 mesi, salvo diversa legislazione,
acquisto ad eccezione dei prodotti per servizio professionale continuo, adibiti a lavori per conto terzi, per i
quali la garanzia è di 12 mesi dalla data di acquisto.
CONDIZIONI DI GARANZIA
1) La garanzia viene riconosciuta a partire dalla data di acquisto. La Ditta costruttrice sostituisce gratuita-
mente le parti difettose nel materiale, nelle lavorazioni, nella produzione. La garanzia non contempla la
sostituzione della macchina.
2) Il personale tecnico interverrà nei limiti di tempo concessi da esigenze organizzative e in ogni caso il più
presto possibile, e l'eventuale ritardo non potrà determinare richieste di risarcimento dei danni nè prolungamento del periodo di garanzia.
3) Per richiedere l'assistenza in garanzia è necessario esibire al personale autorizzato il certificato di
garanzia timbrato dal rivenditore, compilato in tutte le sue parti e corredato di fattura d'acquisto o scontrino
fiscale o altro documento reso fiscalmente obbligatorio comprovante la data di acquisto.
4) La garanzia decade in caso di:
- Assenza p alese di manutenzione
- Utilizzo non corretto del prodotto o manomissione
- Utilizzo dei lubrificanti o combustibili non adatti
- Utilizzo di parti di ricambio o accessori non originali.
- Interventi effettuati da personale non autorizzato
5) La Ditta costruttrice esclude dalla garanzia le parti soggette ad un normale logorio di funzionamento:
attrezzi di taglio, guarnizioni, candela, corda avviamento, dispositivi di sicurezza a taglio o a frizione, filtri
ecc.
6) Eventuali danni causati durante il trasporto, devono essere immediatamente segnalati al trasportatore
pena il decadere della garanzia.
7) Se guasti o rotture dovessero accadere nel periodo di garanzia o dopo di esso il cliente non ha diritto di
sospendere il pagamento nè ad alcuno sconto sul prezzo.
8) La ditta costruttrice non risponde di eventuali danni diretti od indiretti, causati a persone o cose da guasti
della macchina o conseguenti alla forzata sospensione prolungata nell'uso della stessa.
dalla data di
18
S.N. n.°
DA TA :
...........................
RIVENDITORE :
ACQUIST A TO DAL SIG. :
INDEX
INTRODUZIONE
ENGLISH
GB
1. Declaration of conformity ..........................................................................................................pag. 19
2. Chain saw components.....................................................................................................................20
3. Symbol interpretation........................................................................................................................21
4. Specifications.....................................................................................................................................21
5. For your precautions..........................................................................................................................22
6. Mounting guide bar and chain..........................................................................................................25
7. Fuel and chain oil...............................................................................................................................26
8. Operating the engine.........................................................................................................................26
9. Cutting instruction..............................................................................................................................29
10. Service..............................................................................................................................................30
1 1. Storage.............................................................................................................................................33
12. Limited warranty ...............................................................................................................................34
W ARNING!!!
RISK OF DAMAGING HEARING
IN NORMAL CONDITIONS OF USE, THIS MACHINE MA Y INVOL VE A DAILY LEVEL OF PER-
SONAL EXPOSURE T O NOISE FOR THE OPERA TOR EQUAL TO OR GREA TER THAN
85 dB(A)
1. DECLARA TION OF CONFORMITY
DECLARA TION OF CONFORMITY TO MACHINES DIRECTIVE
MANUFACTURER Active s.r.l.
via delmoncello,12
26037 San Giovanni in Croce (CR)
ITALY
DECLARES THA T THE DISIGN OF THE CHAIN SA W DESCRIBED BELOW:
Model : IBEA 4000
Serial nunber : Mod.: 4000 = 40140001 and up
Make : IBEA
CONFORMS TO THE REQUIREMENTS OF THE DIRECTIVE 2006/42/CEE, 2002/44/CE, 2000/14/CE,
2004/108/CE, 1997/68/CE AND TO THE NA TIONAL REGULA TIONS GOVERNING ITS TRANSPOSITION
ABROAD:
AND THA T IT HAS BEEN ISSUED WITH A “CE” CERTIFICA TES, NO. MOD. 4000 = M.0303.15.5877
BY THE I.C.E (Notified certification body No. 0303) P ALAZZO DEL VESCOVO - V . GARIBALDI,20 4001 1
ANZOLA DELL ’EMILIA (BO) - IT AL Y
T echnical Documentation deposited with Administrative headquarters: Technical Department
Signed in 01.03.2014 a San Giovanni in Croce, Italy
________________
Alberto Griffini
President
19
GB
ENGLISH
11
5
21
6
18
3
9
4
7
8
19
20
10
17
16
1. Chain
2. Guide bar
3. Throttle trigger lockout
4. Rear handle
5. Starter handle
6. Air cleaner cover
7. Front handle
8. Oil tank cap
9. Fuel tank cap
10. Throttle trigger
11. Chain brake control (safety)
2
15
2. CHAIN SA W COMPONENTS
12
13
14
12. Clutch housing/guide bar nut locking
13. Spiked bumper
14. Chain catcher
15. Chain tension adjuster
16. Clutch cover
17. Muffler guard cover
18. Control lever “ ST ARTER”
19. Primer (fuel air purge)
20. Ignition switch (STOP)
21. Fourreau de protection chaîne
1
20
3. SYMBOL INTERPRET ATION
Warning, danger and caution
Read operator’s instruction book before
operating this chain saw
Wear safety head, eye and ear protection
Use the chain saw with both hands
ENGLISH
GB
MODEL
DISPLACEMENT cm³
POWER Kw / CV
IDLER RPM
MAXIMUM RPM ALLOWED
CARBURETOR
IGNITION
FUEL T ANK CAP ACITY
OIL T ANK CAP ACITY
LUBRIFICATION OIL SYSTEM
DIMENSIONS (L X W X H mm.)
WEIGHT (only engine) KG .
BAR LENGTH
CHAIN TYPE
Warning! Kickback it’s danger
4. SPECIFICA TIONS
IBEA 4000
38.0
1.8 / 2.5
3000 giri/min.
13.500 giri/min.
DIAPHRAGM TYPE WALBRO “PRIMER TYPE”
DIGITAL
0.35 lt.
0.22 lt.
AUTOMA TIC OIL PUMP WITH FLOW SCREW ADJUSTMENT
420 X 250 X 200
3.75
30, e 35 cm.
3/8”
MODEL PRESSURE LEVEL POWER LEVEL VIBRATIONS LEVEL
EN ISO 5349 m/s²
Impugnatura
ANT.: 4,2 m/s²
POST. 5,0 m/s²
4000
LpA av - EN ISO 22868
97 dB (A) 109 dB (A)
LwA av - EN ISO 3744
21
GB
ENGLISH
5. FOR YOUR PRECAUTIONS
1. The saw is specially designed for tree service, i.e. for
off-ground working in trees, and when being used as
such should only be used by trained operators. One
handed operation of the saw can be dangerous fig.1.
1.
2. Be alert for the phenomena “skating” and “bouncing”and
the risk of kickback. Be cautious not to lose your
balance due to “drop” at the end of a cut.
3. If working off the ground the operator must be trained in
safe climbing techniques and use of all recommended
safety equipment such as harness, loops, strops, ropes
and karabiners for himself and for the saw.
4. When hoisting a chain saw using a rope tied to a lifting
hook for operation on a tree, ensure that the lifting hook
is not strained by excessive force fig.2.
2.
TRANSPORT ATION
1. When transporting your chain saw, use the appropriate
guide bar cover (2).
2. Carry the chain saw with the engine stopped, the guide bar (1) and saw chain to the rear, and the silencer
away from your body .
MACHINES SAFETY TIPS
1. Do not operate a chain saw that is damaged, improperly
adjusted, or not completely and securely assembled.
2. Do not operate the chain saw with a loose or defective
silencer.
3. Be sure that the saw chain stops moving when the
throttle control trigger is released.
EQUIPMENT
1. Always wear approved goggles to protect your eyes.
Wood chips, dust, snapping branches and other debris
can be tossed by the cutting chain into the operator’s
facial area. Goggles may also offer limited protection
in the event of the cutting chain hitting the operator in
the eye area. If conditions warrant that a ventilated face
shield be worn, goggles must be worn underneath it.
2. IBEA recommends wearing hearing protection at all
times. If not followed, hearing loss can occur. Y ou should
reduce the risk of hearing damage by wearing either
“headset” type protectors or ear plugs which are
approved by an authorized organization.
3. All persons who make part of their living using chain
saw should be tested periodically for hearing
deterioration.
4. Always wear a cap or hat when working with a chain
saw. A safety hard hat is highly recommended when
felling or working under trees, or when objects can fall
on you.
5. Wear heavy duty , non-slip gloves for improved grip, and
also for protection against cold and vibration.
6. Safety tip shoes or boots with non-slip soles should be
worn.
7. Never wear loose clothing, unbuttoned jackets, flared
sleeves and cuffs, scarfs, tie-strings. neckties, cords,
chains, jewelry, etc. which could snag the saw chain
or undergrowth.
8. Clothing should be of sturdy , protective material. It should
be snug-fitting to resist snagging, but roomy enough
for freedom of movement.
9. Trouser legs should not be flared or cuffed, and should
be either tucke into the boot tops or trimmed short.
22
3.
2
1
WARNING
PETROL AND FUEL ARE EXTREMELY
FLAMMABLE. IF SPILLED OR
IGNITION SOURCE, IT CAN CAUSE
FIRE AND SERIOUS INJURY OR
PROPERTY DAMAGE. EXTREME
CAUTION IS REQUIRED, WHEN
HANDLING PETROL OR FUEL.
FUEL
1. Use an appropriate type fuel container.
2. Do not smoke or bring flame or sparks near fuel
supplies.
3. The fuel tank may be under pressure. Always loosen
the fuel cap and wait for pressure to be equalized before
removing the cap.
4. When the fuel tank cap (1) or oil tank cap (2) is difficult
to remove by hand, put the attached socket wrench
into the groove of the cap and turn it anticlockwise.
5. Fill the fuel tank outdoors over bare ground and install
the fuel cap securely . Do not pour fuel indoors.
6. Wipe any spilled fuel off the unit.
7. Never refuel while the engine is still hot. or refuel a
running engine.
8. Do not store the unit with fuel in its tank, because a
fuel leak could start a fire.
9. Af ter refuelling tighten fuel cap firmly (1) and check for
leakage. In case of fuel leakage repair before starting
operation since there is a danger of fire.
ENGLISH
STARTING THE ENGINE
1. Move the chain saw at least 3 m from the fuelling point
before starting the engine.
2. Do not allow other persons to be near the chain saw
when you are starting or cutting with the chain saw .
3. Keep bystanders and animals out of the work area. Do
not let anyone hold wood for you to cut.
4. Do not start cutting until you have a clear work area,
secure footing, and a planned retreat path from the
falling tree.
5. Before you start the engine, make sure that the saw
chain is not contacting anything.
6. Keep the handles dry, clean, and free of oil or fuel
mixture.
7. Operate the chain saw only in welI-ventilated areas.
Exhaust gas, oil mist (from chain saw lubrication) or
saw dust saw is harmful to health.
8. When starting the chain saw place the unit on a flat
ground and hold the front handle with left hand and
hold firmly the rear end of rear handle with right knee
and pull starter handle with your right hand.
GB
WARNING
DO NOT DROP ST ART THE CHAIN
SA W , DROP ST ARTING THE CHAIN
SA W IN AN INSECURE POSITION
AND CAN RESUL T IN INJURY . ST ART
THE CHAIN SA W IN THE CORRECT
MANNER.
4.
1
2
NOTE
Do not use excessive force when tightening the tank
cap with the socket wrench as the tank cap is made
of plastic. If there is any damage to the tank cap do
not start the engine.
Ask your IBEA dealer for a replacement cap.
KICKBACK SAFETY PRECAUTIONS
1. Tip contact in some cases may cause a Iightning-fast
reverse reaction, kicking the guide bar up and back
toward the operator (this is called a rotational kickback).
2. Pinching the saw chain along the top of the guide bar
may push the guide bar rapidly back toward the operator
(this is called a linear kickback).
3. Either of these reactions may cause you to lose control
of the saw and come in contact with the moving chain,
which could result in serious personal injury .
4. With a basic understanding of kickback, you can reduce or eliminate the element of surprise. Sudden surprise
contributes to accidents. Understand that rotational
kickback is preventable by keeping an unshielded bar
nose from touching an object or the ground.
23

GB
ENGLISH
5. Do not operate a chain saw with one hand! Serious
injury to the operator, helpers or byst anders may result
from one-handed operation. For proper control, always
use two hands when operating a chain saw, one hand
which operates the trigger. This can result in the chain
saw “skating” or skidding, which can result in personal
injury due to loss of control.
6. Keep a good firm grip on the saw with both hands, with
the right hand on the rear handle and the left hand on
the front handle, when the engine is running. Use a
firm grip with thumbs and fingers encircling the chain
saw handles. A firm grip will help you reduce kickback
and maintain control of the saw. Two hands must be
used to control the saw at all times.
7. Do not overreach or cut above chest height.
8. Make sure that the area in which you are cutting is
free from obstructions. Do not let the bar nose contact
a log, branch, or any other obstruction which could be
hit while you are operating the saw.
9. Cutting at high engine speeds may reduce the likelihood
of kickback.
WARNING
1. Saw wrongly held too close to operator’s body. Kickback
time may be too fast even for a perfectly maintained
brake to work in time.
2. The operator’s hand may not be in position to contact
the hand guard. The brake will not be tripped.
5.
3. Lack of proper maintenance lengthens the brake’s
stopping time, making it less effective.
4. Dirt, grease, oil, pitch, etc. getting into the working
parts of the mechanism may lengthen the stopping time.
5. Wear and fatigue of the activating brake spring, and
wear of the brake/clutch drum and pivot points may
lengthen the brake’s stopping time.
6. A damaged hand guard and lever may render the brake
inoperative.
KICKBACK MA Y OCCUR WHEN
THE NOSE OR TRIP OF THE GUIDE
BAR TOUCHES AN OBJECT OR
WHEN THE WOOD CLOSES IN
AND PINCHES THE SA W CHAIN IN
THE CUT
10. But cutting at part-throttle or low engine speeds may
be preferable to control the chain saw in tight situations
and may also reduce the likelihood of kickback.
1 1. Follow manufacturer’s sharpening and maintenance
instructions for the saw chain.
12. Use only replacement guide bar and chains specified
by the manufacturer, or the accept able equivalents of
these guide bar and chains.
CHAIN BRAKE
The chain brake’s function is to stop chain rotation after a
kickback. It neither prevents nor reduces kickback. Do
not depend on the chain brake for protection against
kickback.
Even with a chain brake, depend on your own good sense
and proper cutting methods just as though there were no
chain brake.
Even with normal use and proper maintenance, the
response time of the brake may lengthen. The following
may interfere with the brake’s ability to protect the operator .
INJURIES
It is believed that overusing the muscles and tendons of
the fingers, hands, arms and shoulders may cause
soreness, swelling, numbness, weakness and extreme
pain to the areas just mentioned. To reduce the risk of
repetitive stress injury , do the following.
1. Avoid using your wrist in a bent, extended or twisted
position. Instead, try to maintain a straight wristposition.
Also, when grasping, use your whole hand, not just
the thumb and index finger.
2. T ake periodic breaks to minimize repetition and rest
your hands.
3. Reduce the speed and force in which you do the
repetitive movement.
4. Do exercises to strengthen the hand and arm muscles.
5. See a doctor if you feel tingling, numbness or pain in
the fingers, hands, wrists or arms.
VIBRA TION AND COLD
Exposure to cold and vibration may cause tingling and
buming followed by loss of color and numbness in the
fingers. We strongly recommend your taking the following
precautions because the minimum exposure which might
trigger the ailment is unknown.
1. Keep your body warm, especially the head and neck,
feet and ankles, and hands and wrists
2. Maintain good blood circulation by performing vigorous
arm exercises during frequent work breaks and also
by not smoking.
24
ENGLISH
GB
3. Limit the number of hours of chain saw operation. Try
to fill a part of each work day with jobs other than chain
sawing.
4. lf you experience discomfort, redness and swelling of
the fingers, followed by whitening and loss of feeling,
consult your physician before further exposing yourself
to cold and vibration.
CUTTING
1. Do not operate a chain saw in a tree unless you have
been specifically trained to do so.
2. Keep all parts of your body away from the saw chain
when the engine is running.
3. Use extreme caution when cutting small-size brush
and saplings because slender material may catch the
saw chain and be whipped toward you or pull you off
balance.
4. When cutting a limb that is under tension, be alert for
springback so that you will not be struck by the limb or
chain saw when the tension in the wood fibers is
released.
5. Cutting while on a ladder is extremely dangerous
because the ladder can slip and your control of the
chain saw is limited.
6. Working alone should be left to professionals.
7. Stop the engine before setting the chain saw down.
2. Do not let any person use your saw unless he has
read this operator’s manual and fully understands its
instructions.
3. Never let children operate the saw.
4. Use your saw only to cut wood or wood products. Do
not cut solid metal, sheet metal, plastics or any non
wood materials.
5. Stay on the uphill side when bucking or limbing logs
which might roll when cut.
6. Keep both feet on the ground. Do not work from off-the
ground positions.
6.
7.
WOOD PRACTICES
1. Operating a chain saw safety requires a chain saw in
proper working order, sound judgement, and knowledge
of the methods which should be applied in each cutting
situation.
6. MOUNTING GUIDE BAR AND CHAIN
WARNING
FOR YOUR OWN SAFETY , AL W A YS
STOP THE ENGINE BEFORE
PERFORMING ANY OF THE
FOLLOWING OPERA TIONS
The unit is delivererd with guide bar and saw chain
separately . Install guide bar and chain as follows.
1.Loosen the nut (1) and by the screw (5) loosen the chain
fig.3
2.Unscrew the nut (1) and remove clutch cover (2) fig.1
3. Mount bar and slide toward clutch to make saw chain
installation easier fig.1
4. Install saw chain as shown (ensure cutters are pointing
in the right direction) fig.2
5. Install the clutch cover tighten nuts finger tight. Ensure
that chain tension adjuster fits into bar hole (4) fig.1.
6. Hold the bar nose up and turn the adjuster clockwise
(5) until the chain fits snugly against the underside of
the bar fig.3
7. Tighten the nuts (1) with the bar nose held up fig.4
8. Pull the chain around the bar by hand. Loosen the
adjustment if you feel tight spots.
9. St art the engine and run at low speed. Stop and readjust
if necessary .
NOTE
- All adjustments should be made cold.
- Always wear gloves when working on chain.
- Do not operate with a loose chain.
25
GB
ENGLISH
4
1.
2.
2
1
3.
5
1
7. FUEL AND CHAIN OIL
FUEL AND LUBRICANT
Fuel is a mixture of regular grade petrol and an aircooled
2-stroke engine oil of reputable brand name. Minimum 89
Octane unieaded petrol is recommended. Do not use fuel
containing methyl alcohol or more than 10 % of ethyl
alcohol.
Recommended mixture ratio:
ISO-L-EGD Standard (ISO/CD
13738), JASO FC e ACTIVE MIX
2T 100% SYNTETIC (cod. 20550)
=> 50:1 (2%)
4.
1
NOTE
Whenever opening up the fuel tank, always loosen
the cap very slowly and wait for the tank pressure to
be equalized before removing the cap.
CHAIN LUBRICANT
Proper lubrication of the chain while in operation reduces
the friction between the chain and the guide bar to a
minimum and assures a longer life time. Use only special
chain oil of high quality for this purpose, preferably ACTIVE.
Do not use any waste or reclaimed oil in order to avoid
various problems with the oil pump.
1. Do not mix directly in engine fuel tank.
2. Avoid spilling petrol or oil. Spilled fuel should always
be wiped up.
3. Handle petrol with care, it is highly inflammable.
4. Always store fuel in approved container .
8. OPERA TING THE ENGINE
1
D
E
3
3
1.
6
26
SAE 30.... in summer
SAE 10.... in winter or for the cutting of wood with many
resin.
2
B
A
3.
4
2.
ENGLISH
GB
ST ARTING THE COLD ENGINE
1. Fill the fuel tank with fuel mixture (D) and fill the chain
oil tank with chain saw oil (E).
2. Press hand guard forward (chain brake activated
position (1) fig.1
3. Move the knob (2) to (A) position “CHOKE”. Move
ignition switch to (1) position “ST ARTER”.
4. Push primer bulb (6) repeatedly 5 to 6 times fig. 3
NOTE
Do not pull starter rope out to the maximum position.
Do not allow starter handle to snap back against the
casing.
5. Securely hold the chain saw. When st arting the chain
saw place the unit on flat ground and hold the front
handle with left hand and hold firmly the end of rear
handle with right knee and pull starter handle (3) with
starter handle fig.1.
6. Make sure the guide bar and saw chain are not touching
anything when starting the saw
7. Pull starter handle (3) until engine attempts to run then
move the lever (2) to “Warm start” position (B).
8. Pull starter handle until engine runs.
9. Pull throttle lever (4) and the throttle latch will be
released.
WARNING
AFTER THE CONTROL LEVER IS MOVED
TO “COLD POSITION” AND THEN
RETURNED TO “WARM POSITION”,
THROTTLE REMAINS A LITTLE OPEN
(LA TCH CONDITION).
IF ENGINE IS ST ARTED IN THIS LATCH
CONDITION, CHAIN ST ARTS TO TURN.
DO NOT ST ART ENGINE BEFORE CHAIN
BRAKE IS ACTIV A TED
ST ARTING THE W ARM ENGINE
- After starting the engine, squeeze throttle trigger
(4) fig.3 slightly to release throttle latch and pull
front hand guard towards (1) the operatore
immediately.
- Do not increase engine speed while chian brake
is engaged.
- Use the chain brake in an emergency . Do not use
it unless absolutely necessary .
When throttle latch is used, saw chain will go into
motion as soon as the engine starts.
Never use throttle latch for cutting. Use it only when
starting the engine.
RUNNING
1. After engine starts, allow it to idle for a few minutes.
2. Squeeze throttle trigger (4) gradually to increase engine
revolution.
3. The chain starts moving when the engine reaches 4.000
r/min approximately .
4. Do not run the engine at high speed unnecessarily .
5. Be sure that saw chain stops moving when throttle
trigger is released.
STOPPING THE ENGINE
1. Release throttle trigger and allow engine to idle.
2. Move the control lever to “STOP” posititon (0).
NOTE
If the engine does not stop , slide control lever to
“Cold start” position to stop engine. This indicates a
problem.
Check and repair ignition switch before starting the
engine again.
CHAIN TENSION
1. Chain tension should be checked frequently during work
and corrected if necessary .
2. T ension the chain as tight as possible, but so it can
still be pulled easily along the bar by hand.
1. Press hand guard forward (chain brake ACTIVATED
position).
2. Move the control lever to “Warm start” position.
3. Securely hold the chain saw.
4. Pull starter handle.
5. Choke may be used if necessary but after first firing
sound, pull throttle trigger a little to release throttle latch
and choke. After control lever is moved to “Cold st art”
position and then lever is retumed to “Warm start”
position, throttle remains a little open (latch condition).
NOTE
Clutch engages and chain will rotate when engine
is started with throttle trigger squeezed.
After engine starts release throttle trigger to idle
position.
WARNING
MAKE SURE THA T THE ENGINE IS
SHUT OFF WHEN CHECKING CHAIN
TENSION.
27
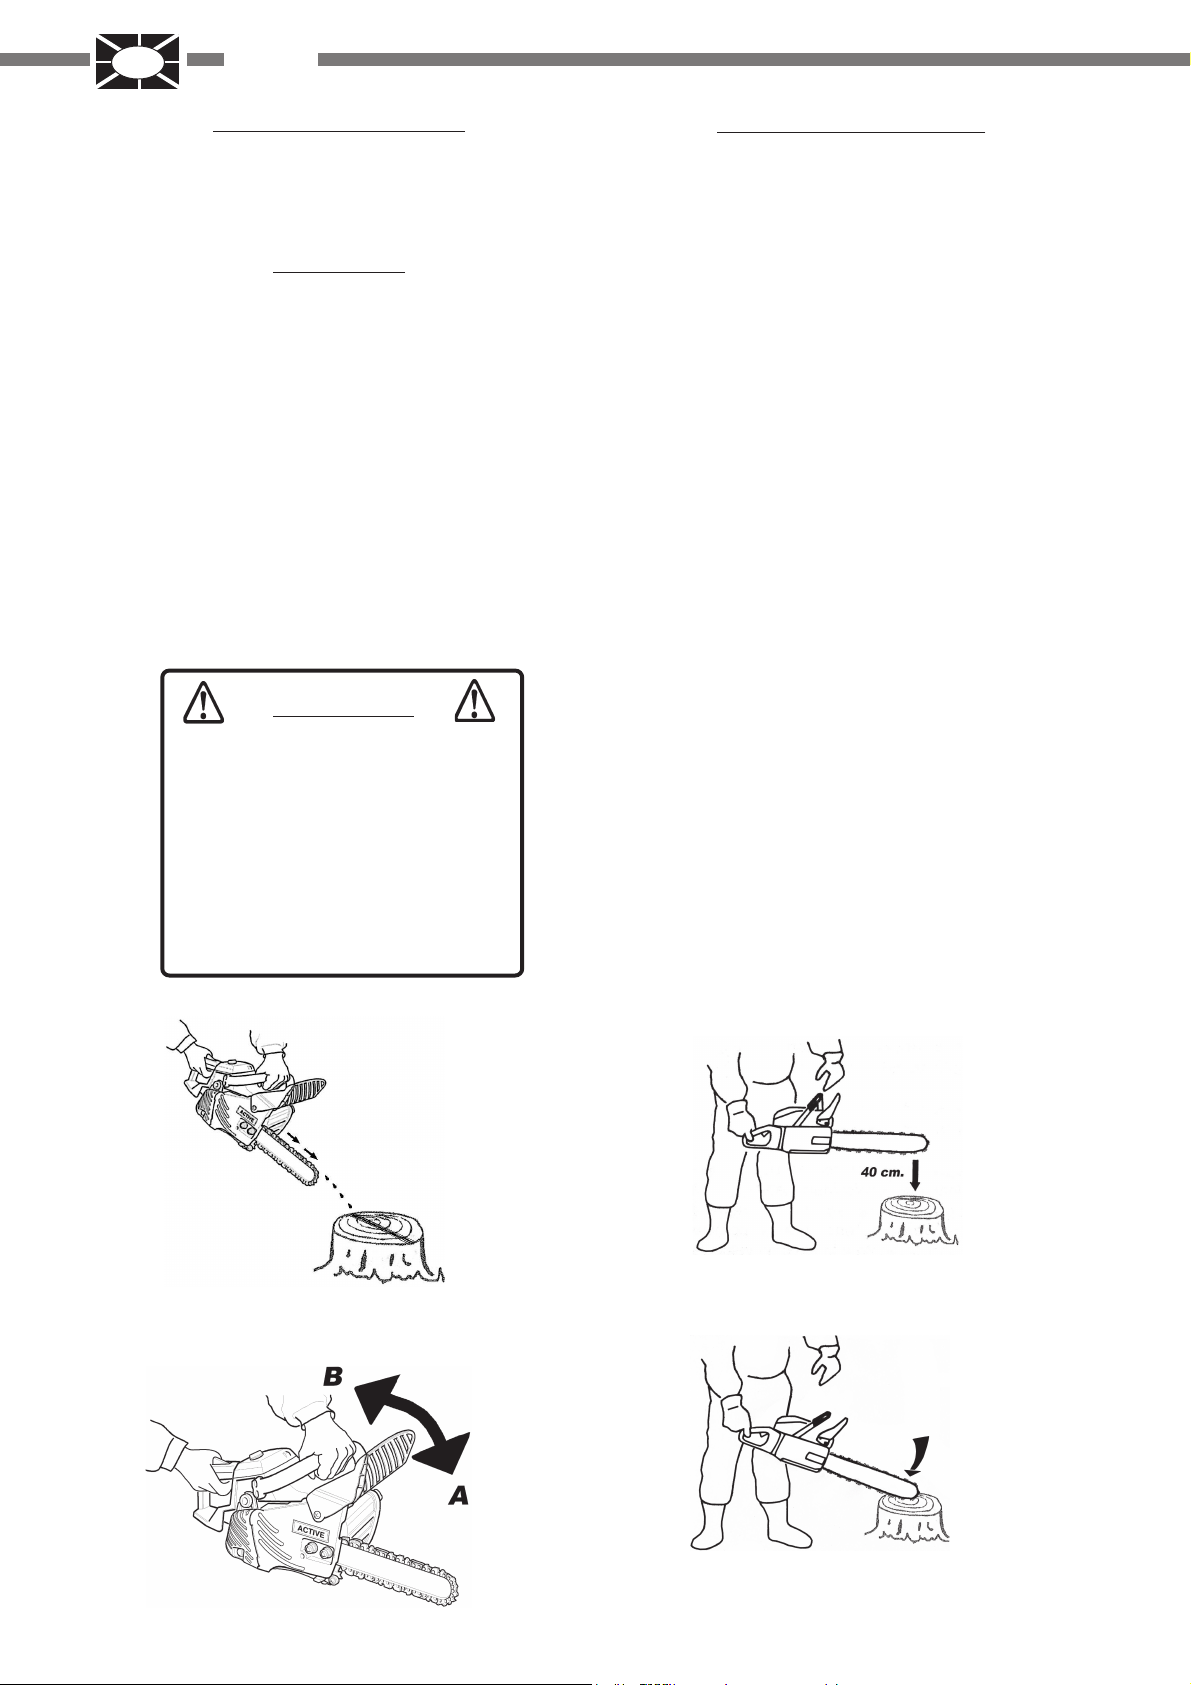
GB
ENGLISH
CHAIN LUBRICA TION TEST
Hold the chain just above a dry surface and open the
throttle to half speed for 30 seconds. A thinline of “thrown”
oil should be seen on the dry surface. (Fig. 1)
CHAIN BRAKE
1. Place the chain saw on the ground.
2. Hold the handle with both hands and accelerate the
engine to high speed by throttle trigger.
3. Operate the chain brake by turning your left wrist
against the front hand guard during your grip on the
front handle.The chain should stop immediately,
position (A), Fig. 2
4. Release the throttle trigger.
When the front hand guard is fully pulled towards the
operator, position (B) Fig. 2, chain brake is released.
NOTE
If the chain does not stop immediately , bring the saw
to your IBEA dealer to repair.
WARNING
THE MOST HAZARDOUS IS THE
KICKBACK MOTION OF THE GUIDE
BAR SUCH THA T, IN AN INST ANT THE
TIP OF THE BAR T OUCHES A WOOD
OR THE LIKE. CHAIN BRAKE REDUCES
THE POSSIBILITY OF INJURY DUE TO
KICKBACK. YOU ALWAYS CHECK
THAT THE CHAIN BRAKE WORKS
PROPERL Y BEFORE USE
NON-MANUAL CHAIN BRAKE
The non-manual chain brake stops the operation of the
saw chain in such a manner that kickback action produced
at the end of the guide bar non-manually actuates the
chain brake.
T o make sure that the non-manual chain brake operates
properly , proceed as follows:
1. Stop the engine of the chain saw .
2. Operate the front and rear handles with your hands
(grip them lightly), so that the guide bar may be placed
at the height of about 40 cm as shown in Fig. 3
3. Softly detach the left hand from the front handle, and
touch the end of the guide bar against the wood or the
like placed below so that the machine receives an
impact. At this time the rear handle should be gripped
lightly with right hand.
4. The impact is propagated to the brake lever, which
actuates the chain brake, Fig. 4
NOTE
- For practice, while cutting a small tree, push the
front guard forward to engage the brake.
- At all times, confirm whether the brake works
properly before each work.
- If the chain brake is clogged with wood chips,
function of the brake deteriores a little. Always
keep the device clean.
- Do not increase engine revolution while the chain
brake is engaged.
- Chain brake is used in emergencies. Do not use it
unless absolutely necessary .
- When using throttle latch at starting, keep the chain
brake position. And after starting the engine,
release the brake immediately.
28
3.
1.
4.
2.

9. CUTTING INSTRUCTION
ENGLISH
GB
The accepted way to hold the saw is to stand to the left of
the saw with your left hand on the side handle and with
your right hand on the top handle so you can operate the
throttle trigger with your right index finger. Before attempting
to fell a tree, cut some small logs or limbs.
Be thoroughly familiar with the control and the responses
of the saw.
Start the engine, see that it is running properly.
Squeeze the trigger to open the throttle wide open, then
start the cut. It is not necessary to press down hard to
make the saw cut. If the chain is properly sharpened, the
cutting should be relatively effortless.
Some material may adversely affect the housing of your
chain saw. (Example: palm tree acid, fertilizer, etc.) To
avoid housing deterioration carefully remove all packed
saw dust around clutch and guide bar area and wash with
water.
WARNING
DO NOT LET THE NOSE OR TIP OF
THE GUIDE BAR TOUCH ANYTHING
WHILE ENGINE IS RUNNING TO
A V OID KICKBACK.
side. Then remove the saw for the second cut. Insert the
saw in the first cut very carefully so as not to cause
kickback. The final cut is made by drawing the saw forward
in the cut to reach the hinge.
LIMBING
Limbing a fallen tree is much the same as bucking.
1. Never Iimb the tree that you are standing on.
2. Be careful of the tip touching other limbs.
3. Always use both hands.
4. Don’t cut with the saw overhead or the bar in a vertical
position.
5. If the saw should kickback, you may not have good
enough control to prevent possible injury .
1. Before cutting, clear the area around the tree. Y ou wiII
need good footing while working and you should be
able to work the saw without hitting any obstacles.
2. Next select a path of retreat.(A). When the tree begins
to fall you should retreat away from the direction of fall
(B) at a 45 degree angle to avoid the trunk kicking back
over the stump.
3. Begin the cut on the side to which the tree is to fall.Cut
a notch approximately 1/3 of the way into the tree. The
position of this notch is important since the tree wiiI try
to fall into the notch.
4. The felling cut is made on the side opposite the notch.
Make the felling cut placing spiked bumper 2.5 cm to 5
cm above the bottom of the notch and stop cutting at
approximately 1/10 of diameter to the inner edge of the
notch in order to leave the uncut portion of the wood as
a hinge. Do not try to cut through to the notch with the
felling cut. The remaining wood between the notch cut
and felling cut wilI act as a hinge when the tree falls,
guiding it in the desired direction.
5. When the tree starts to fall, kill the engine, place the
saw on the ground and make your retreat quickly .
NOTE
Don’t saw above chest height
WARNING
LIMBING IN THE PROXIMITY OF
POWER LINE CAN RESUL T IN
ELECTROCUTION. AL W A YS
SWITCH OFF POWER SUPPL Y
BEFORE ST ARTING OPERA TION.
T o fell big trees with a diameter exceeding twice the bar
length start the notching cuts from one side and draw the
saw through to the other side of the notch. Start the back
cut on one side of the tree with spiked bumper engaged,
pivoting the saw through to form the desired hinge on that
29
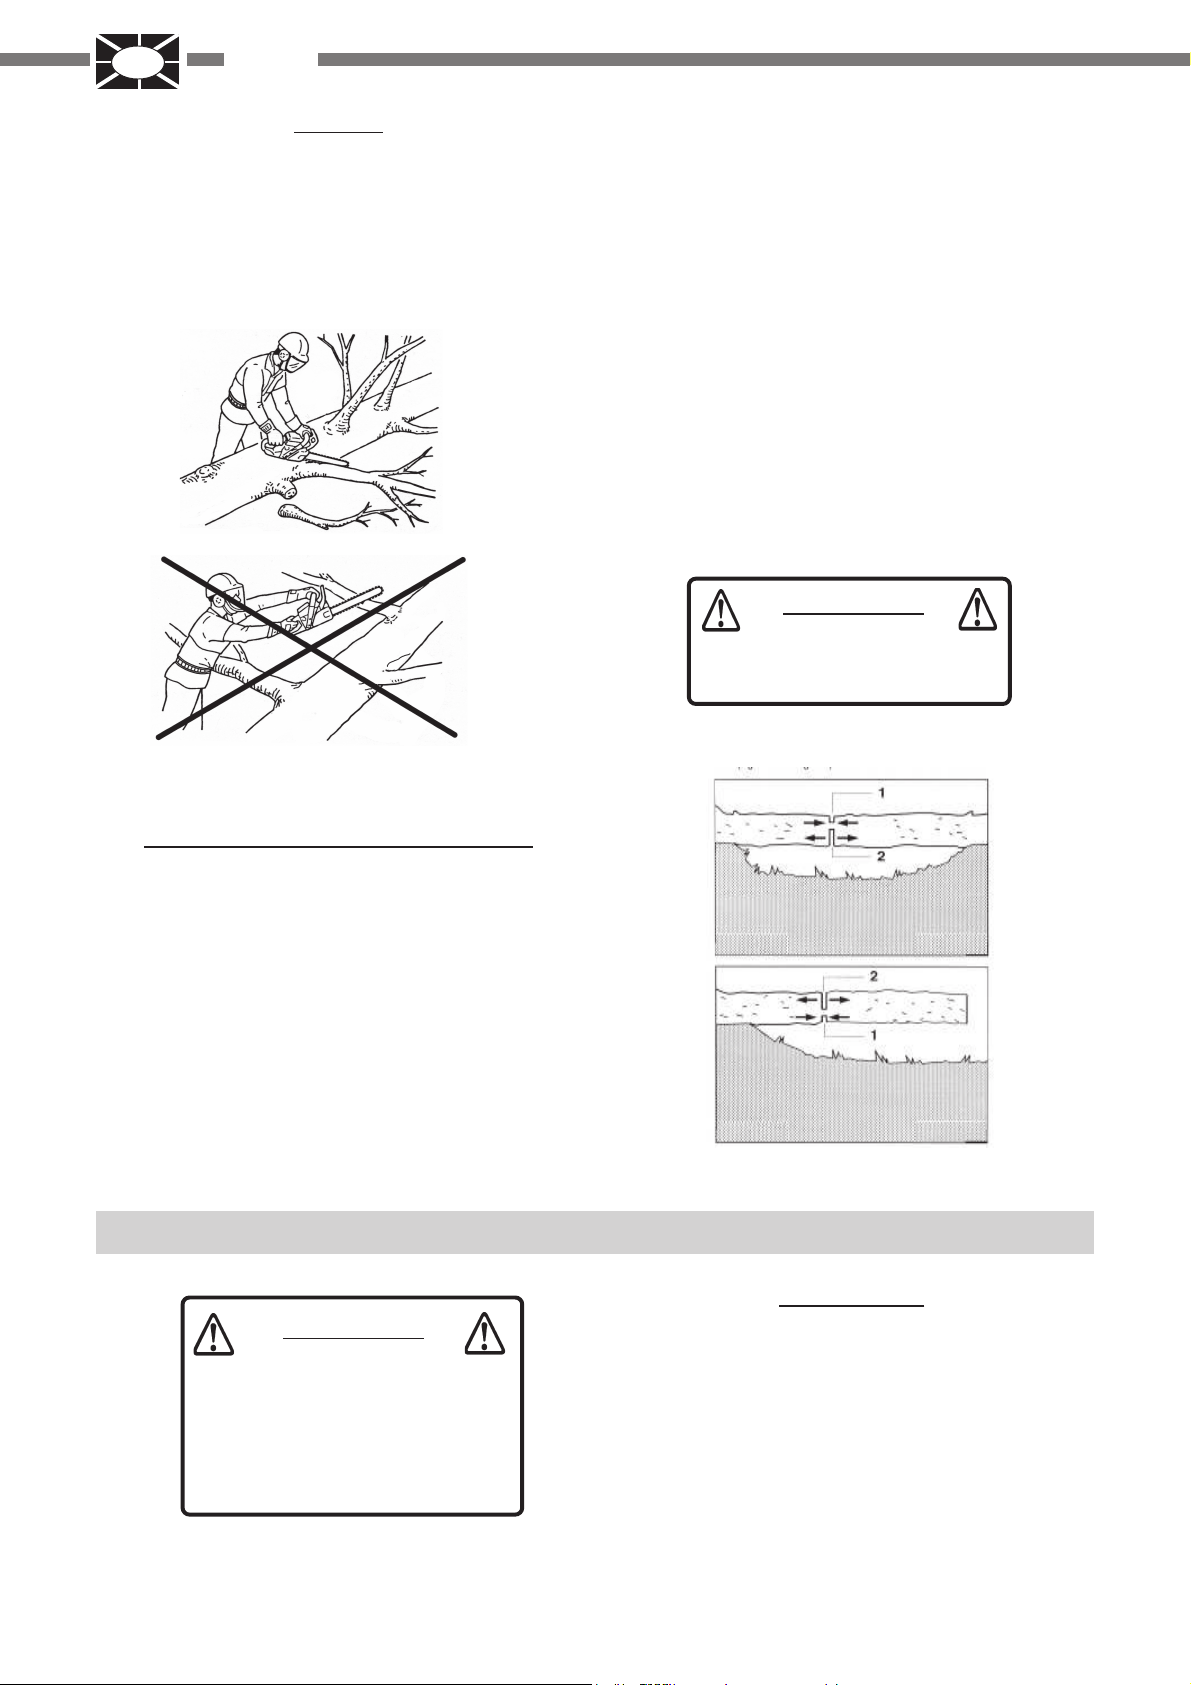
GB
ENGLISH
BUCKING
Bucking is the sawing of a log or fallen tree into smaller
pieces.
1. Keep both hands on the handles at all times.
2. Support logs if possible.
3. When cutting on a slope or hillside, always stand uphill.
1.
2.
NOTE
If you have misjudged the effects of tension and
compression, and cut from the wrong side, the timber
will pinch the guide bar and chain and trap in it.
Racing the engine with the chain jammed will burn
out your clutch.
If the chain should become jammed and the saw
can not be removed from the cut do not force it out.
Stop the saw, force a wedge into the cut to open it
up.
Never force the saw when it is jammed. Do not force
the saw into the cut. A dull chain is unsafe and will
cause excessive wear to the cutting attachments.
A good way to telt when the chain is dull is when
fine saw dust comes out instead of chips.
Do not touch hot surfaces of cylinder cover and
silencer, after you used the chain saw.
WARNING
NEVER USE THROTTLE LA TCH
FOR CUTTING JOB
TENSION AND COMPRESSION IN TIMBER
A length of timber lying on the ground will be subject to
tension and compression depending at which points the
major support is.
When timber is supported at its ends the compression
side is at the top and the tension side is at the bottom.
To cut between these support points make the first cut
downwards approximately 1/3rd the timber diameter.
The second cut is made upwards and should meet the
first cut.
When the timber is supported at one end only make the
first cut upwards approximately 1/3rd the timber diameter.
The second cut is made downwards and should meet the
first cut.
10. SERVICE
WARNING
ALL CHAIN SA W SERVICE, OTHER
THAN ITEMS LISTED IN THE
OPERA TOR’S MANUAL SHOULD
BE PERFORMED BY COMPETENT
SERVICE PERSONNEL.
CARBURETTOR
When there is some trouble with the carburettor, cont act
your authorized dealer
NOTE
When starting, idle speed adjuster should be adjusted
not to rotate the saw chain.
If the chain turns lower the of rotation of the engine
acting on the screw (1) fig.1.
30
 Loading...