

Page 1
1 2
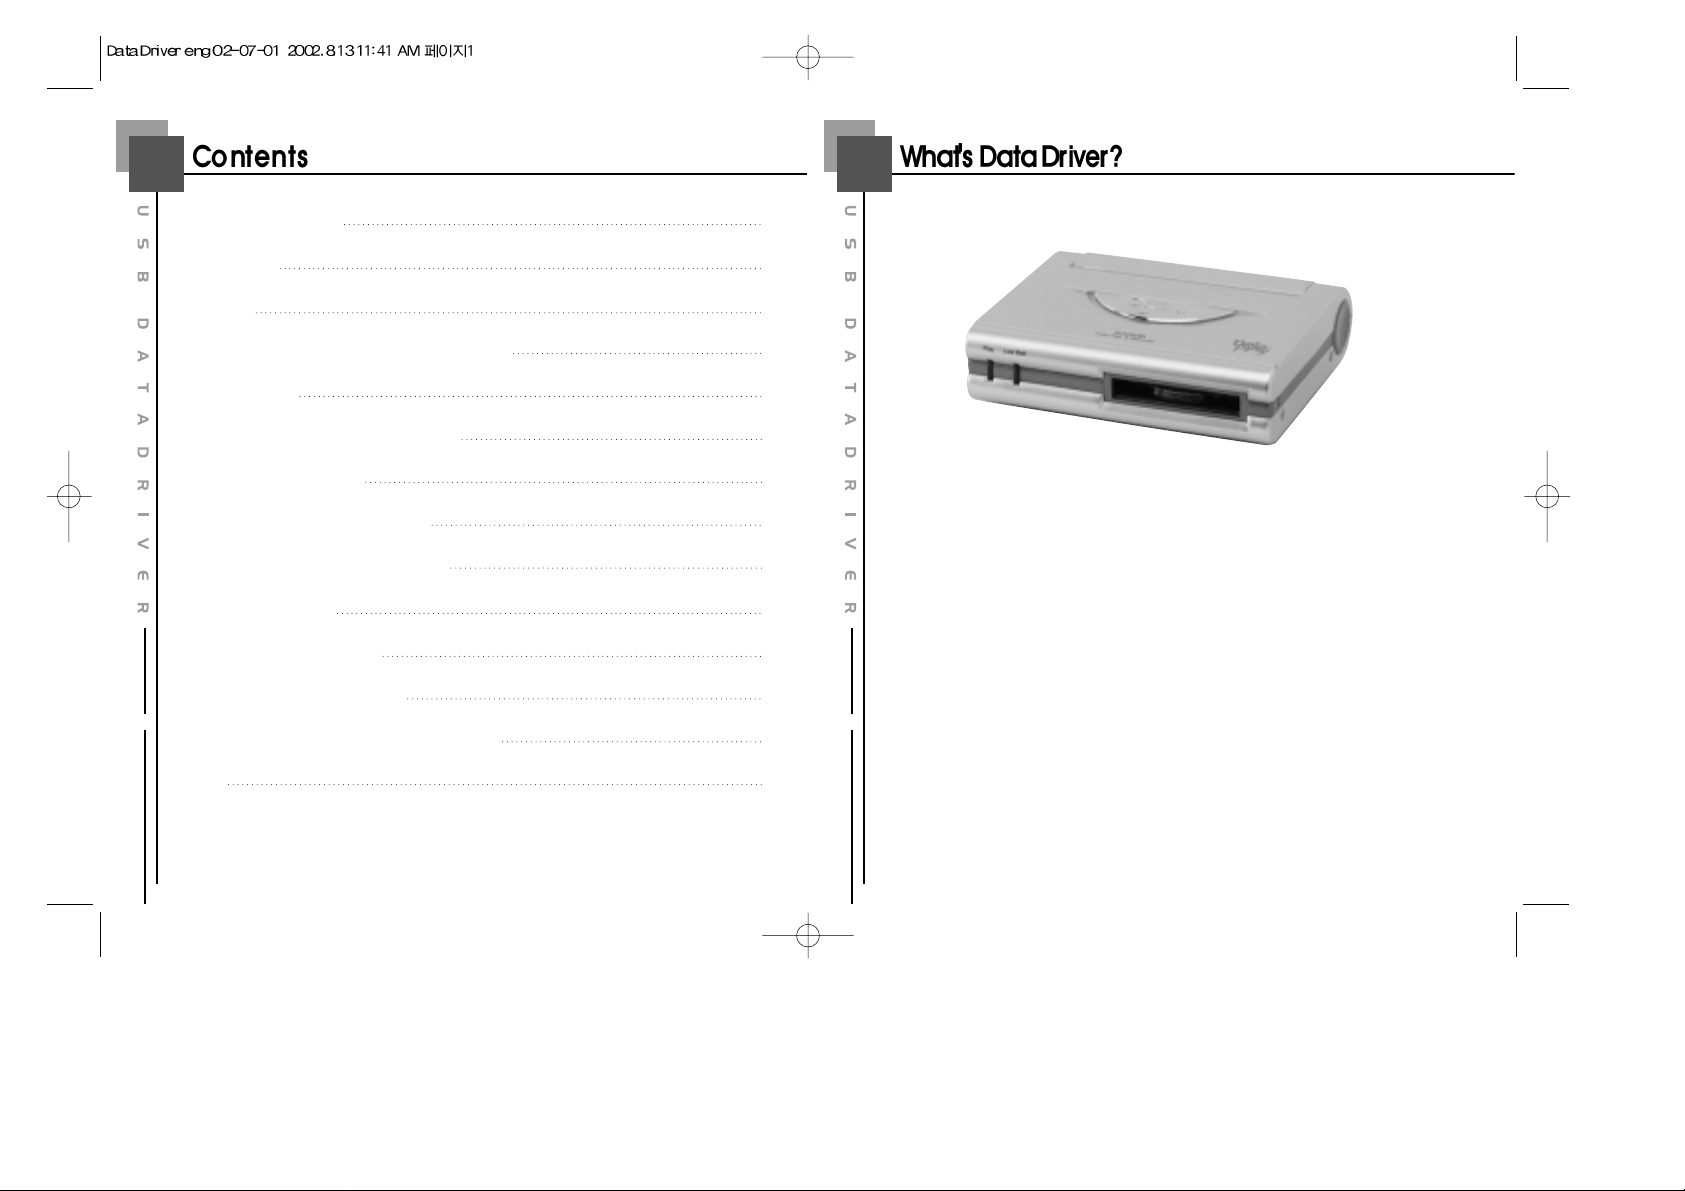
What's Data Driver?
Accessories
Hardware
Specifications and System requirements
Install program
Connect USB cable to USB Port
DataPlay Disk Insertion
How to use DataPlay Console
Recording files on DataPlay Disk
Eject DataPlay Disk
DataPlay Disk properties
About Data Driver Power
FCC RF INTERFERENCE STATEMENT
MEMO
2
3
4
5
6
12
13
14
15
21
23
24
25
26
Data Driver DPD-100 is a potable drive using DataPlay Engine and
USB port. With Using DataPlay Media Data Driver DPD-100 stores
upto 500Mb of Data, High Speed Data transfer with using USB cable,
Li-Ion Rechargeable battery enables you easy to Use.
Page 2
43
Data Driver DPD-100 contents are as below.
DataPlay Disk
Owner
s Manual
Software CD
USB Cable DC Charger Carrying Case
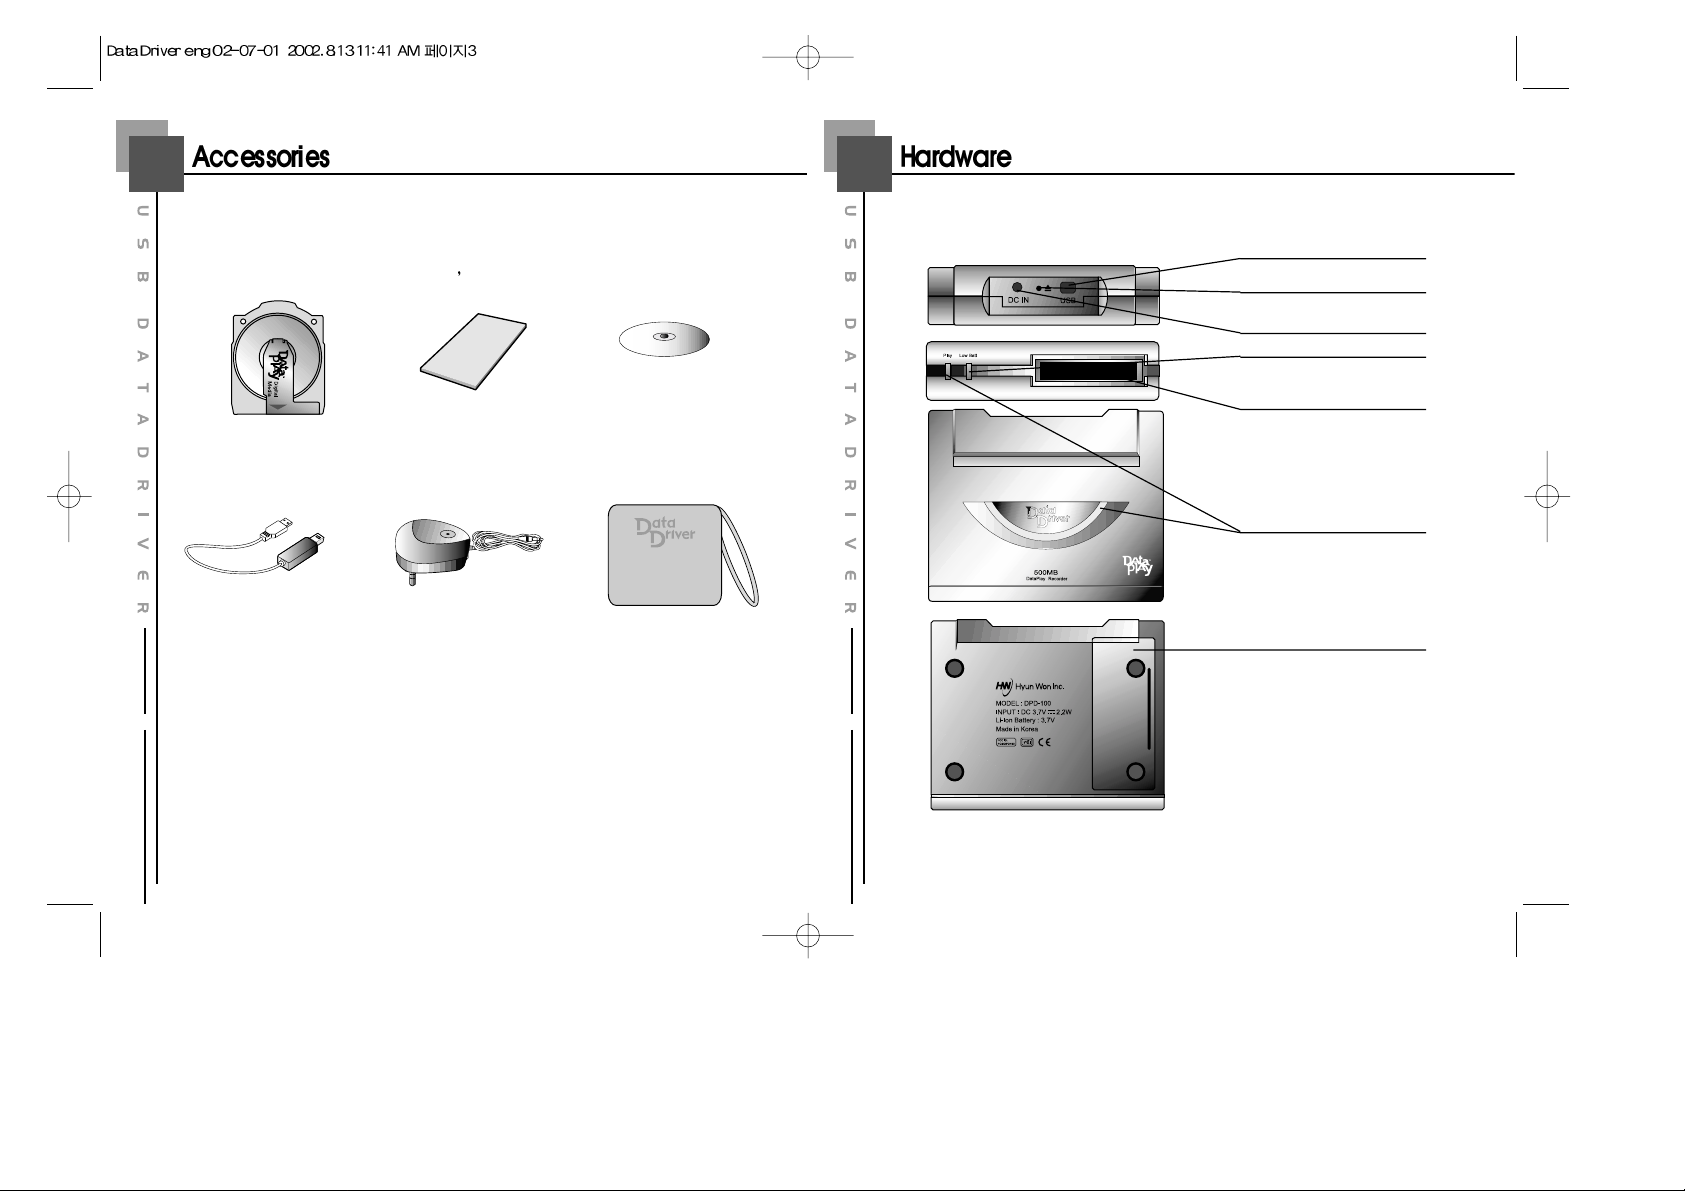
Each Part name of Data Driver DPD-100 is as below
USB Port
Eject Button
DC charger Port
PLAY LED
Low Battery LED
DataPlay Disk insert
Battery Cover
Page 3
65
Slim Potable Driver using DataPlay engine
Size : 84mm 68mm 21.5mm
Weight (W/O Battery) : 97g
Memory : DataPlay Disk 500MB
Power : Li-Ion 3.7V
Battery life : 20 hours
PC Interface : USB Port
USB transfer rate : 3~4Mbps
System Requirement
Microsoft OS(Windows 98SE, ME, 2000, XP)
CD-ROM Drive
Over Pentium 200MHz CPU
RAM 32MB (64Mb for windows ME or 2000)
250MB of spare hard disk
USB Port
Specifications
System Requirement
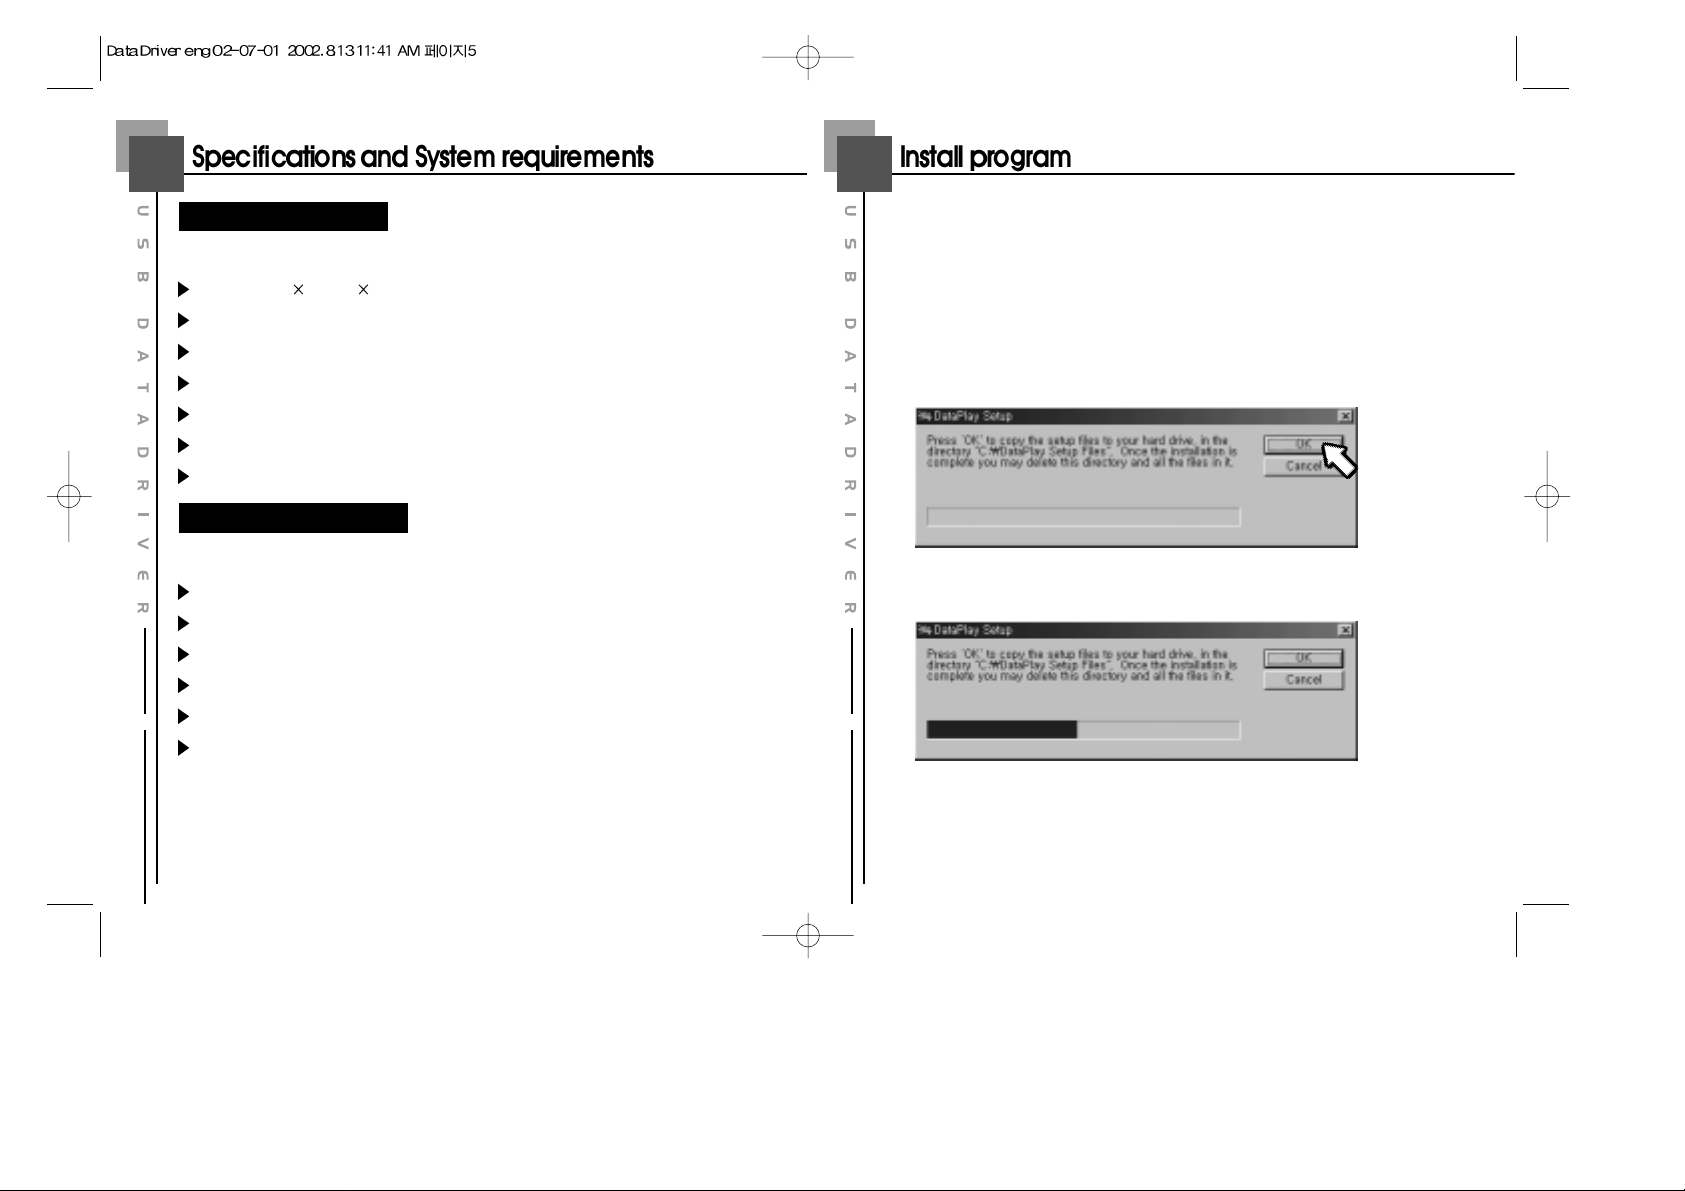
To connect Data Driver DPD-100 to PC and copy files, please install S/W
as following.
1
When Program CD is inserted screen below is show up. In case auto run is not
working open CD-Rom drive and run Setup.exe
Click
Click
Click
Click
Click
Click
Click
Click
Click
Click
Click
Click
Click
Click
Click
Click
Click
Click
Click
Click
Click
Click
Click
Click
Click
Click
Click
Click
Click
Click
Click
Click
Click
Click
Page 4
87
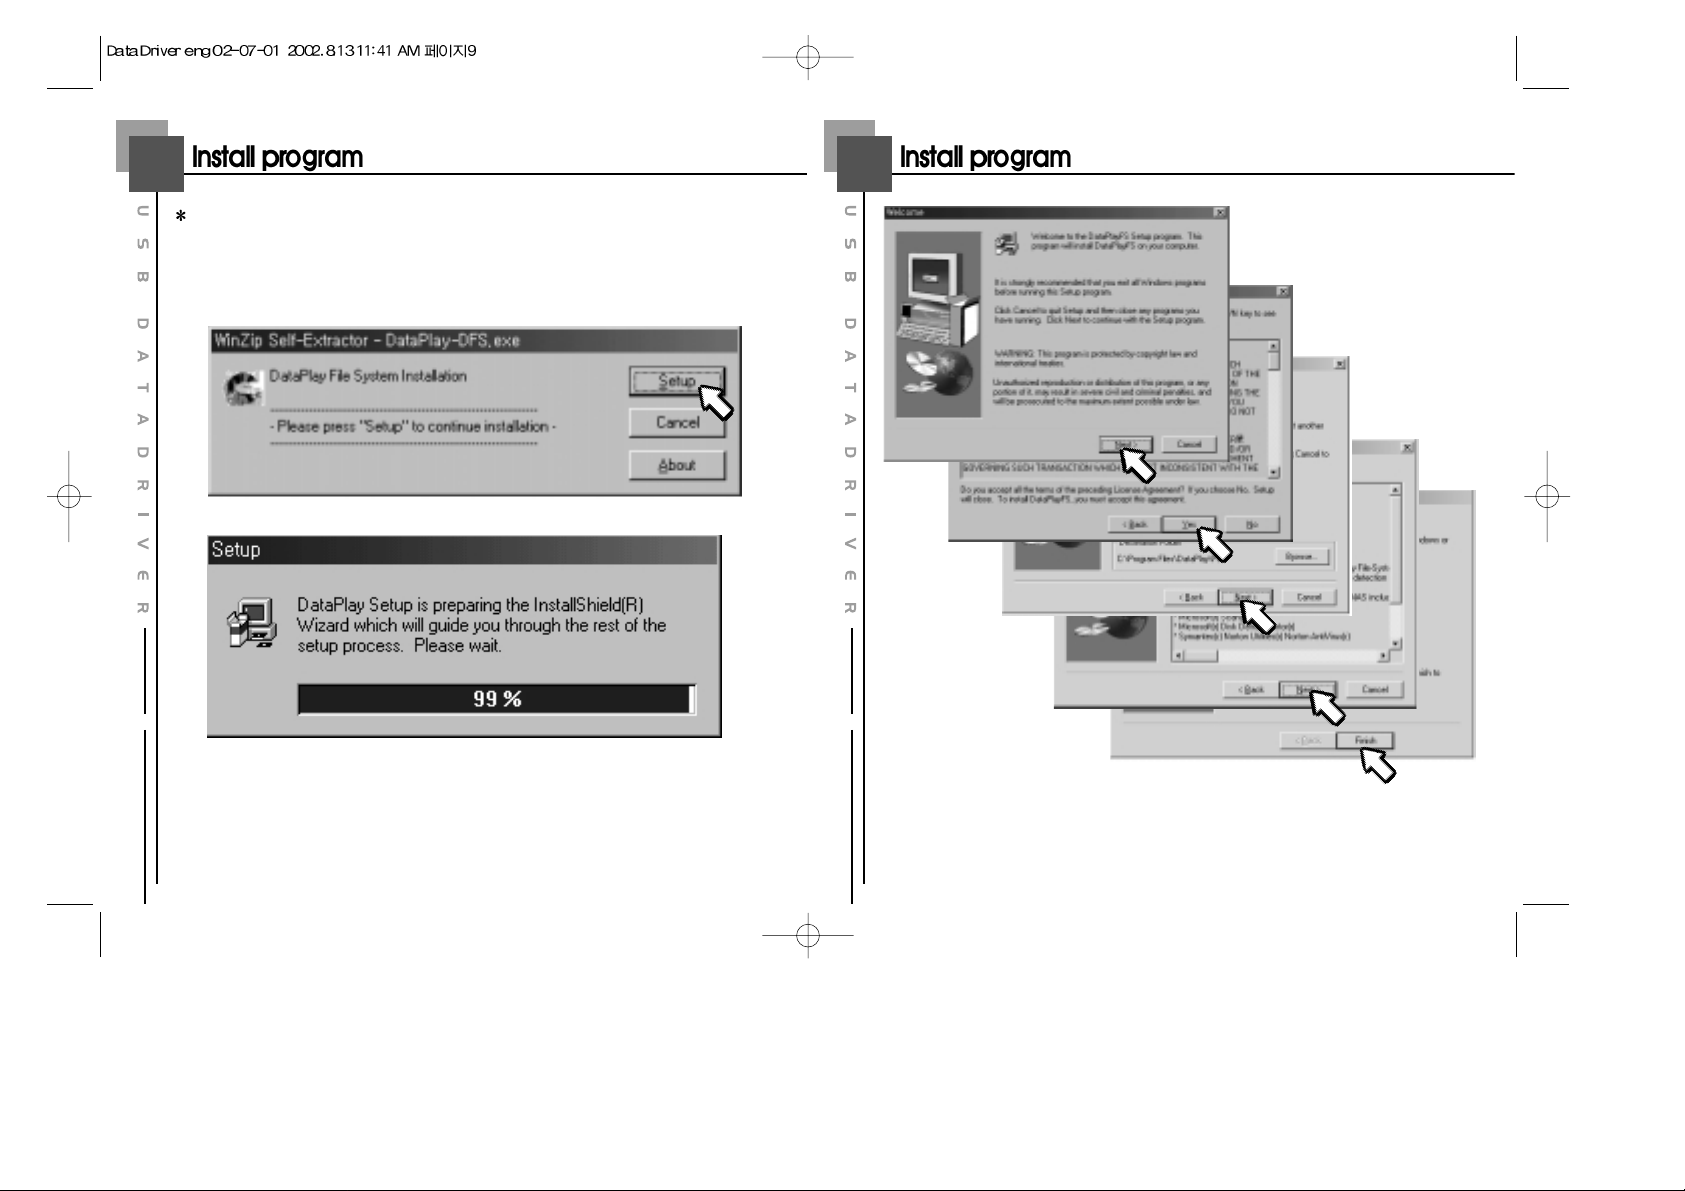
2
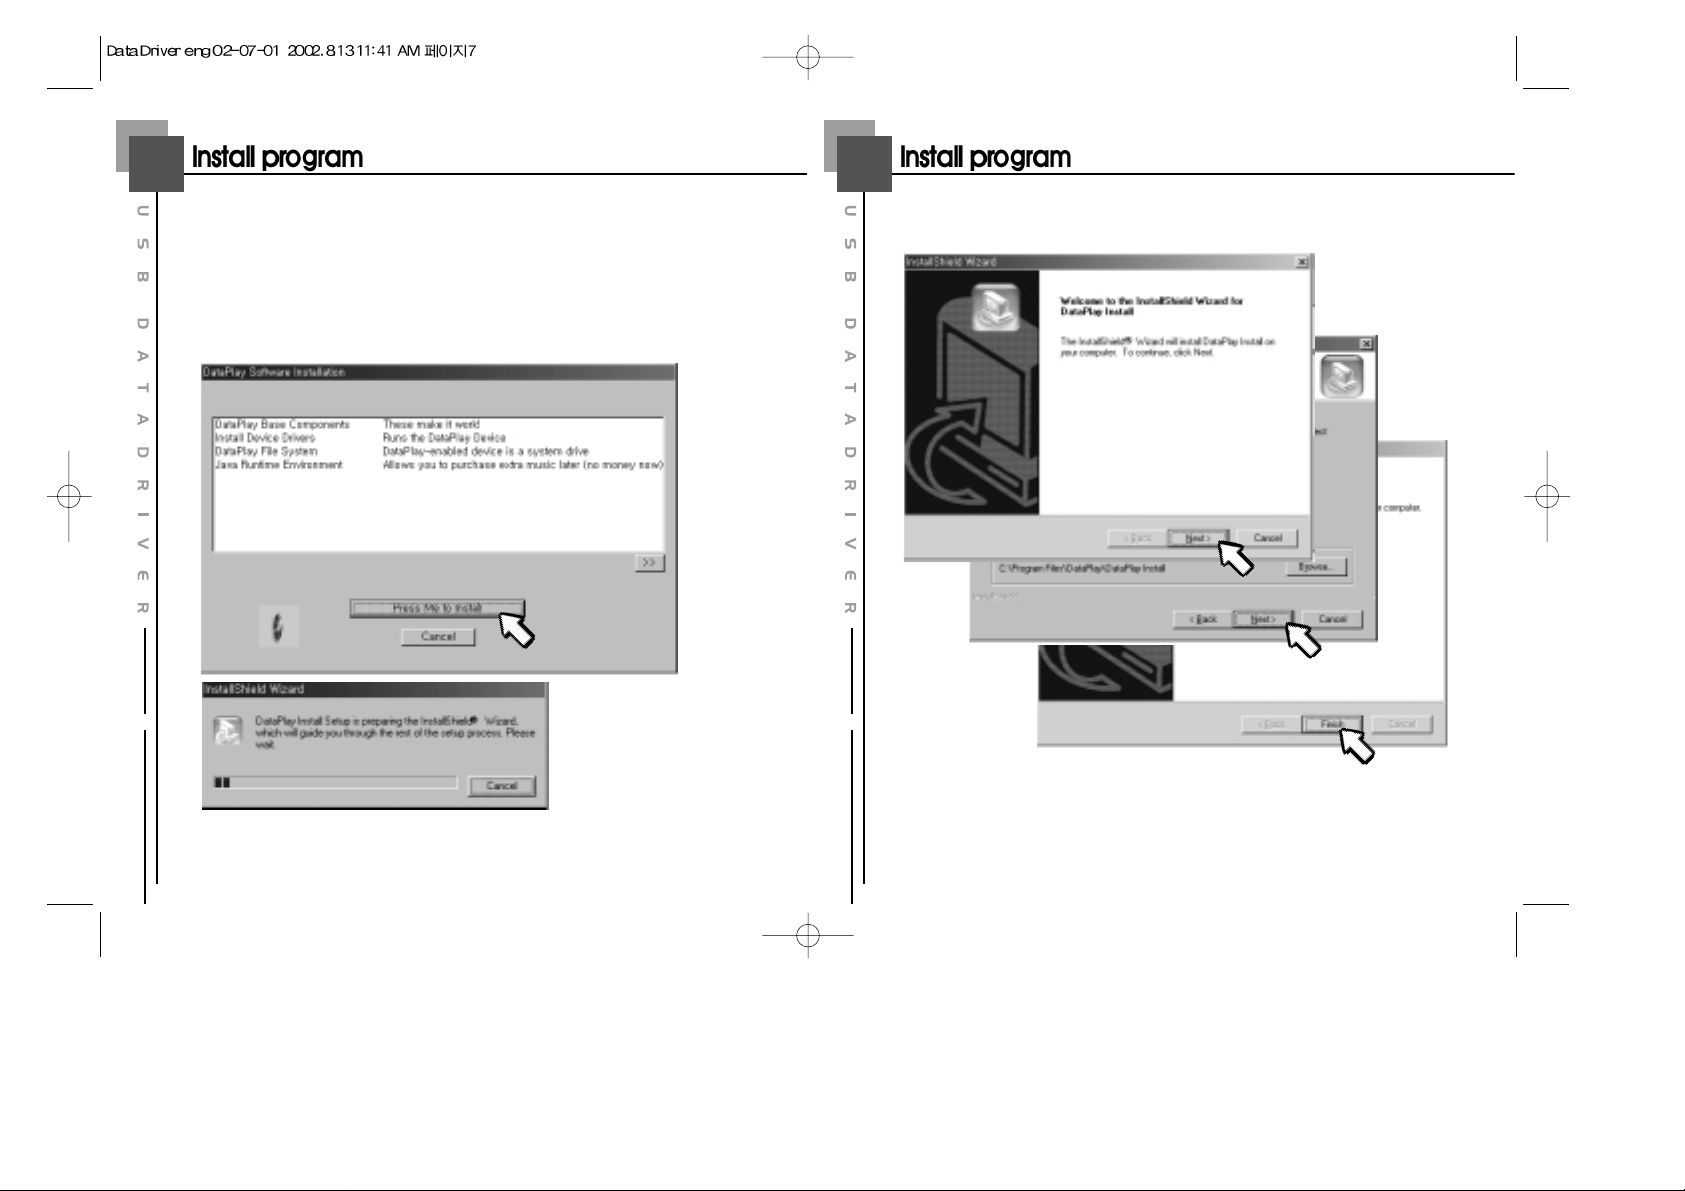
Click "Press Me to Install" then program will be installed as below
1. DataPlay Base Components
2. Install Device Drivers
3. DataPlay File System
4. Java Runtime Environment
Click
Click
Click
Click
Click
Click
Click
Click
Click
Click
Click
Click
Click
Click
Click
Click
Click
Click
Click
Click
Click
Click
Click
Click
Click
Click
Click
Click
Click
Click
Click
Click
Click
Click
3
Install DataPlay Base Components
Next
Next
Next
Next
Next
Next
Next
Next
Next
Next
Next
Next
Next
Next
Next
Next
Next
Next
Next
Next
Next
Next
Next
Next
Next
Next
Next
Next
Next
Next
Next
Next
Next
Next
Next
Next
Next
Next
Next
Next
Next
Next
Next
Next
Next
Next
Next
Next
Next
Next
Next
Next
Next
Next
Next
Next
Next
Next
Next
Next
Next
Next
Next
Next
Next
Next
Next
Next
Finish
Finish
Finish
Finish
Finish
Finish
Finish
Finish
Finish
Finish
Finish
Finish
Finish
Finish
Finish
Finish
Finish
Finish
Finish
Finish
Finish
Finish
Finish
Finish
Finish
Finish
Finish
Finish
Finish
Finish
Finish
Finish
Finish
Finish
Page 5
109
Install Device Driver contents are not shown up as graphic
4
Install DataPlay File System
Click
Click
Click
Click
Click
Click
Click
Click
Click
Click
Click
Click
Click
Click
Click
Click
Click
Click
Click
Click
Click
Click
Click
Click
Click
Click
Click
Click
Click
Click
Click
Click
Click
Click
Next
Next
Next
Next
Next
Next
Next
Next
Next
Next
Next
Next
Next
Next
Next
Next
Next
Next
Next
Next
Next
Next
Next
Next
Next
Next
Next
Next
Next
Next
Next
Next
Next
Next
Yes
Yes
Yes
Yes
Yes
Yes
Yes
Yes
Yes
Yes
Yes
Yes
Yes
Yes
Yes
Yes
Yes
Yes
Yes
Yes
Yes
Yes
Yes
Yes
Yes
Yes
Yes
Yes
Yes
Yes
Yes
Yes
Yes
Yes
Next
Next
Next
Next
Next
Next
Next
Next
Next
Next
Next
Next
Next
Next
Next
Next
Next
Next
Next
Next
Next
Next
Next
Next
Next
Next
Next
Next
Next
Next
Next
Next
Next
Next
Next
Next
Next
Next
Next
Next
Next
Next
Next
Next
Next
Next
Next
Next
Next
Next
Next
Next
Next
Next
Next
Next
Next
Next
Next
Next
Next
Next
Next
Next
Next
Next
Next
Next
Finish
Finish
Finish
Finish
Finish
Finish
Finish
Finish
Finish
Finish
Finish
Finish
Finish
Finish
Finish
Finish
Finish
Finish
Finish
Finish
Finish
Finish
Finish
Finish
Finish
Finish
Finish
Finish
Finish
Finish
Finish
Finish
Finish
Finish
Page 6
1211
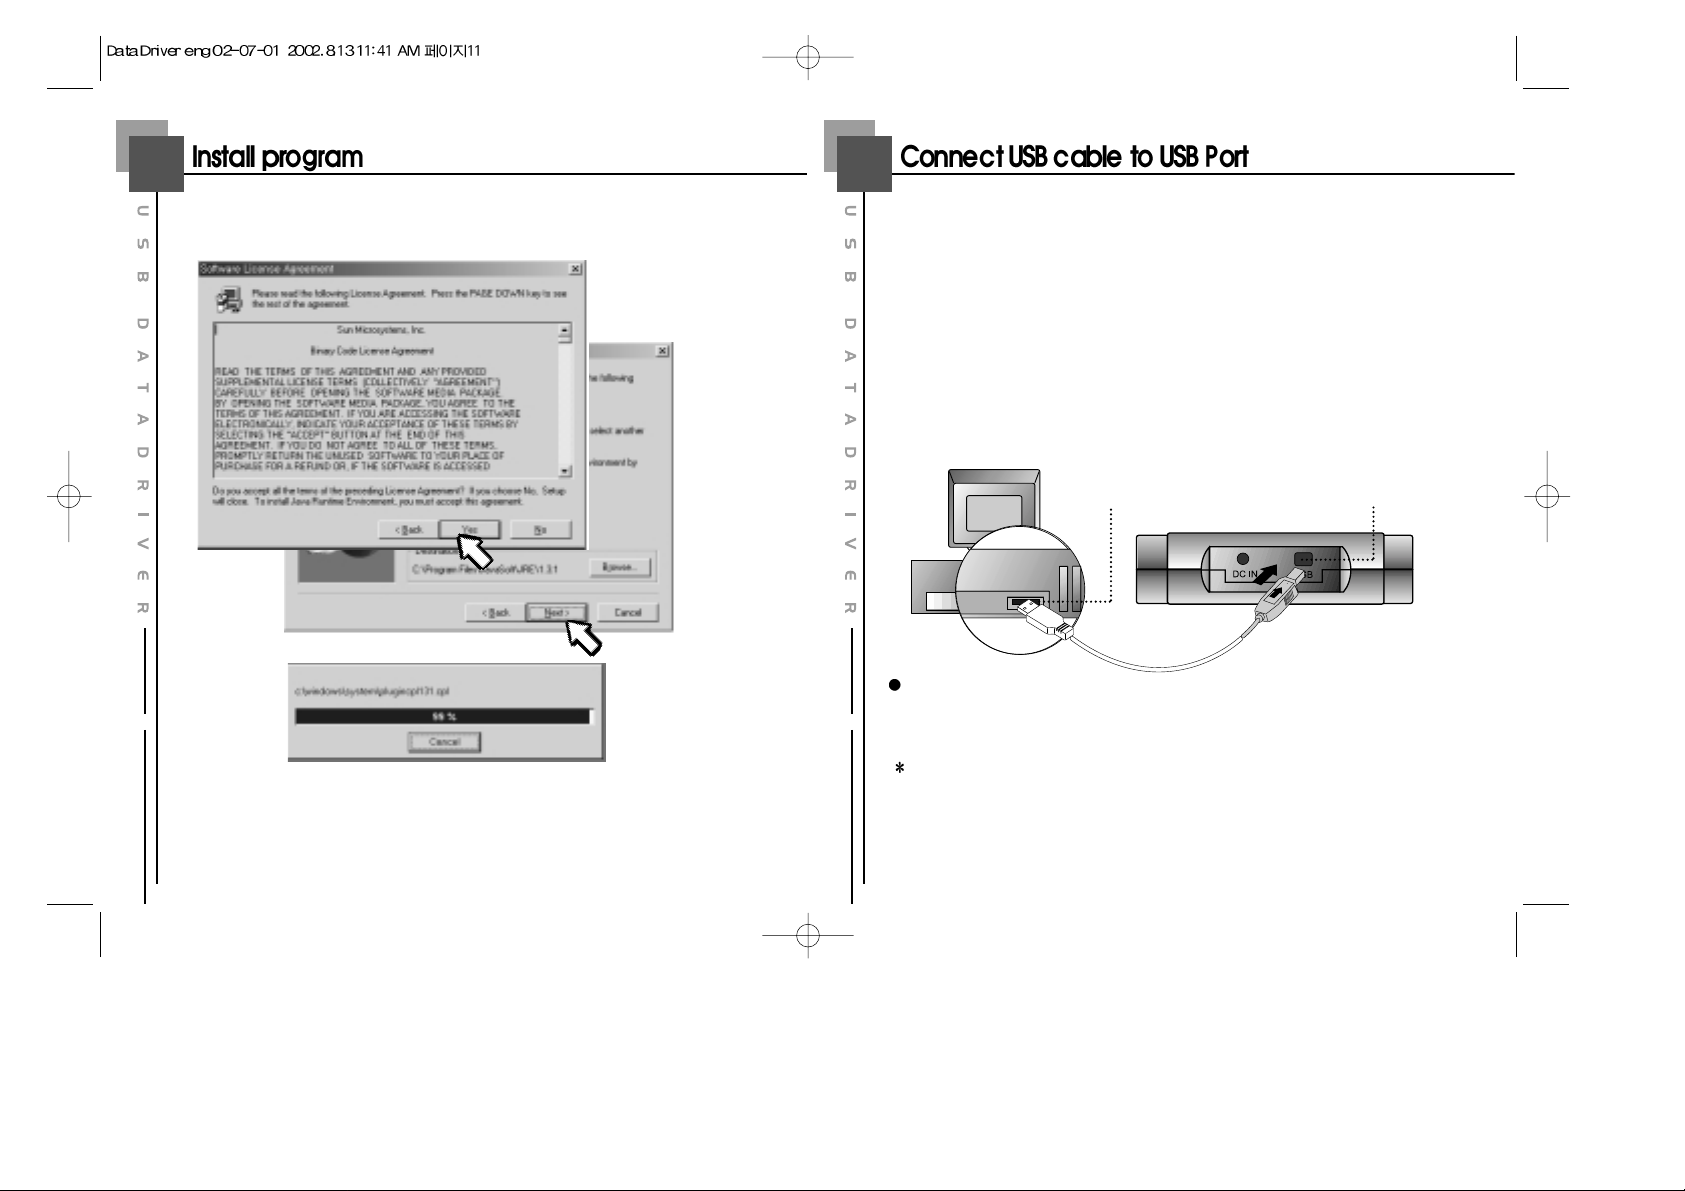
5
Install Java Runtime Environment
Yes
Yes
Yes
Yes
Yes
Yes
Yes
Yes
Yes
Yes
Yes
Yes
Yes
Yes
Yes
Yes
Yes
Yes
Yes
Yes
Yes
Yes
Yes
Yes
Yes
Yes
Yes
Yes
Yes
Yes
Yes
Yes
Yes
Yes
Next
Next
Next
Next
Next
Next
Next
Next
Next
Next
Next
Next
Next
Next
Next
Next
Next
Next
Next
Next
Next
Next
Next
Next
Next
Next
Next
Next
Next
Next
Next
Next
Next
Next
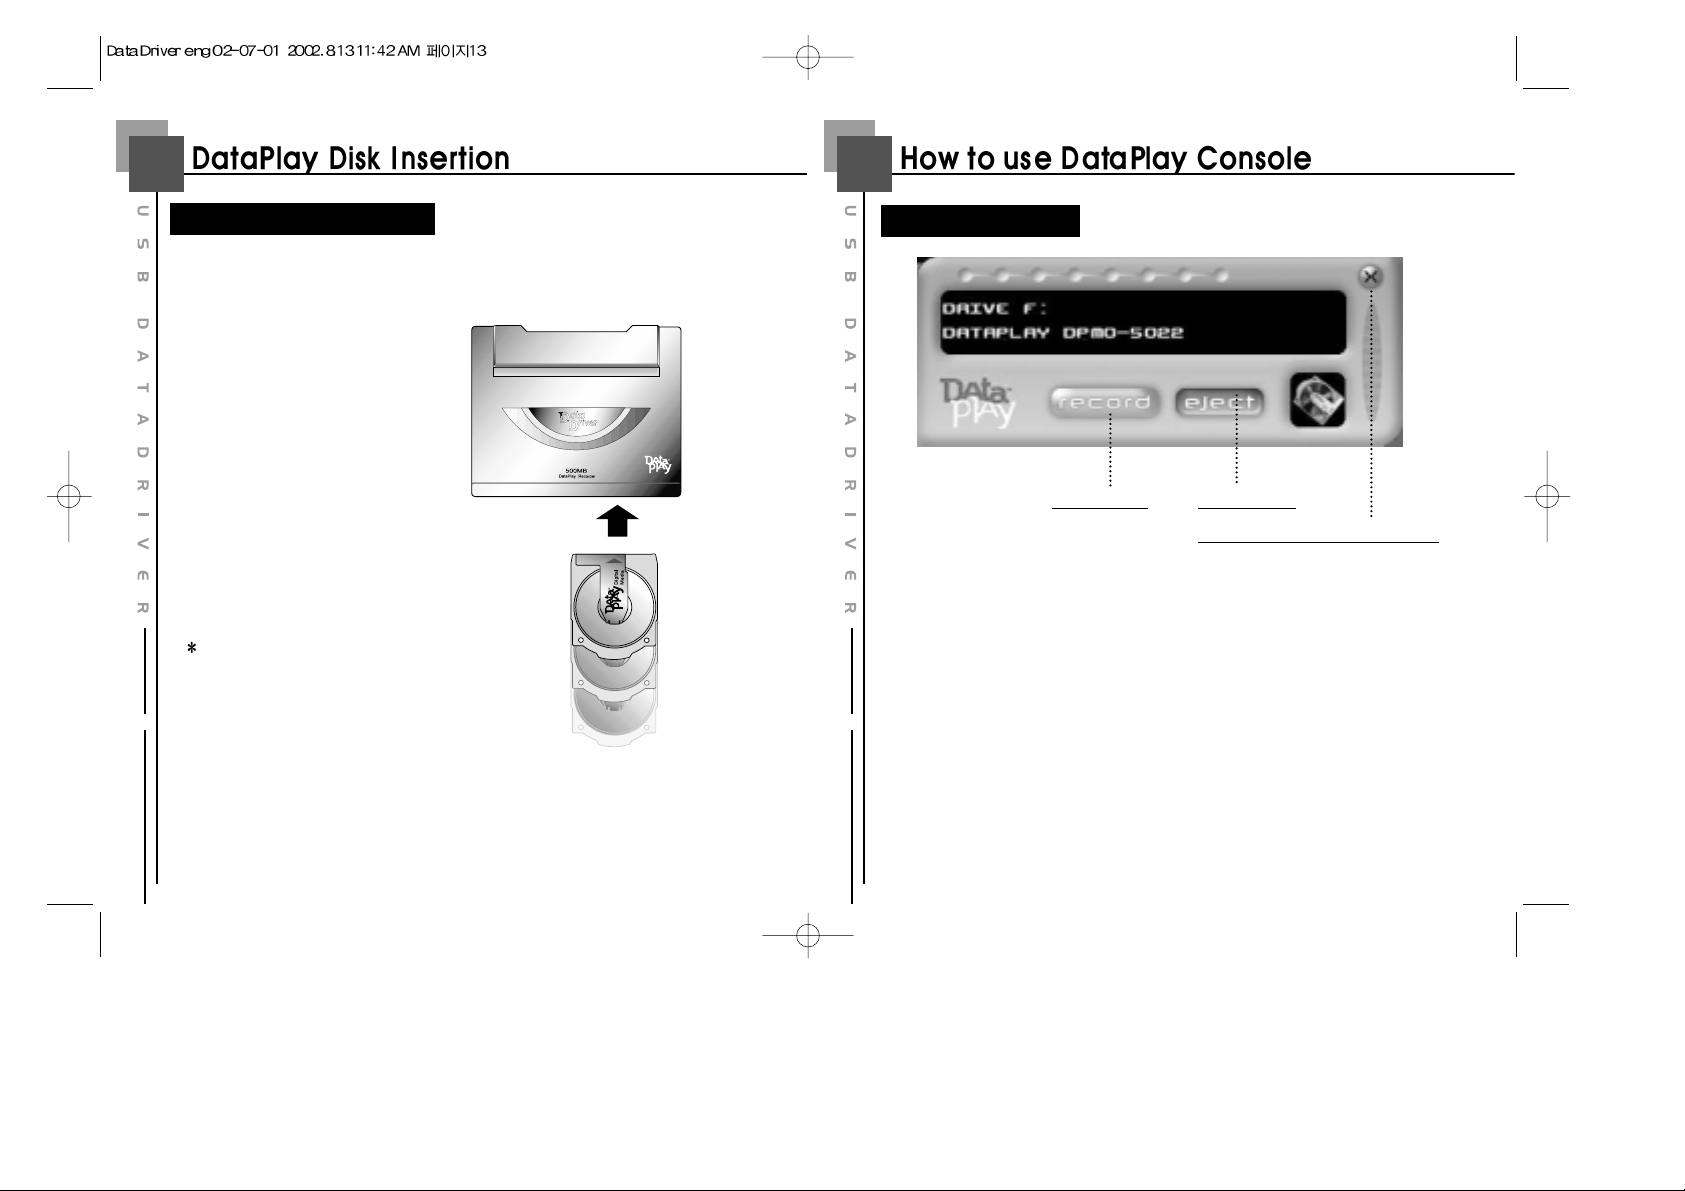
1
Connect the cable to USB port of your PC.
2
Connect the cable to USB port of Data Driver DPD-100.
To store data to DataPlay media Data Driver DPD-100 has to be connected with
PC by USB Cable
(If your PC doesn't have USB Port, Please purchase one near store.)
USB
USB means Universal Serial Bus connecting a device(hardware) to a PC.
Caution !
1. Do not use any USB cable except supplied one.
2. Place of the USB port of a PC maybe different based on PC brand.
PC USB Port
Data Driver DPD-100
USB Port
Page 7
1413
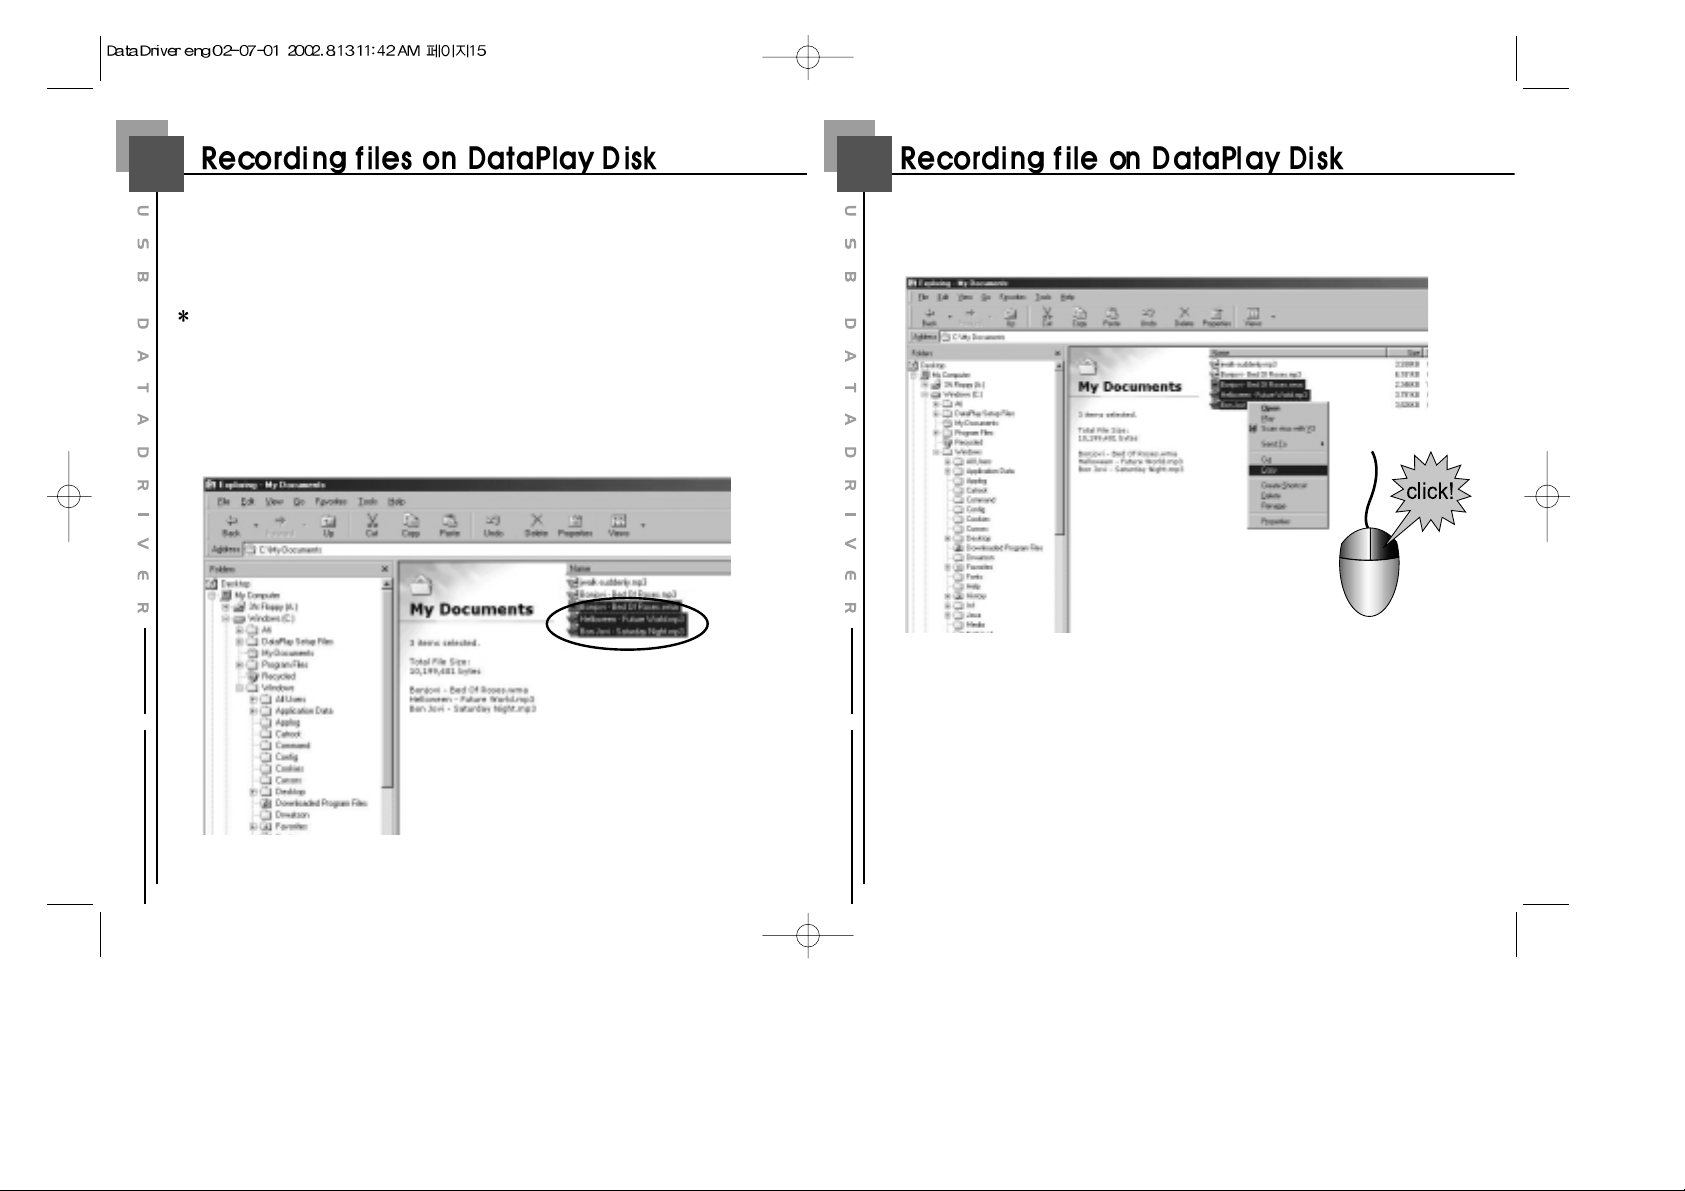
In order to write & store data on a Disk, users need to insert DataPlay Disk first.
Memory size of a DataPlay Disk is total
500MB(250MB on each side)
It's possible to write upto 250MB on each
side and delete the data. However, the
deleted space will not be recovered.
DataPlay Disk Insertion
REC Button
Eject Button
DataPlay Console close button
DataPlay Console
1
REC button : Write and storage data on DataPlay Disk
2
Eject button : Eject the DataPlay Disk
3
DataPlay Console close button : Close DataPlay Console
Page 8
1615
Data Driver DPD-100 is a storage device with USB port and cable upto 500MB.
Here's how to record and storage data on DataPlay Disk.
First, Data Driver DPD-100 and PC should be connected with the supplied USB
cable and a DataPlay Disk should be inserted in Data Driver DPD-100
1
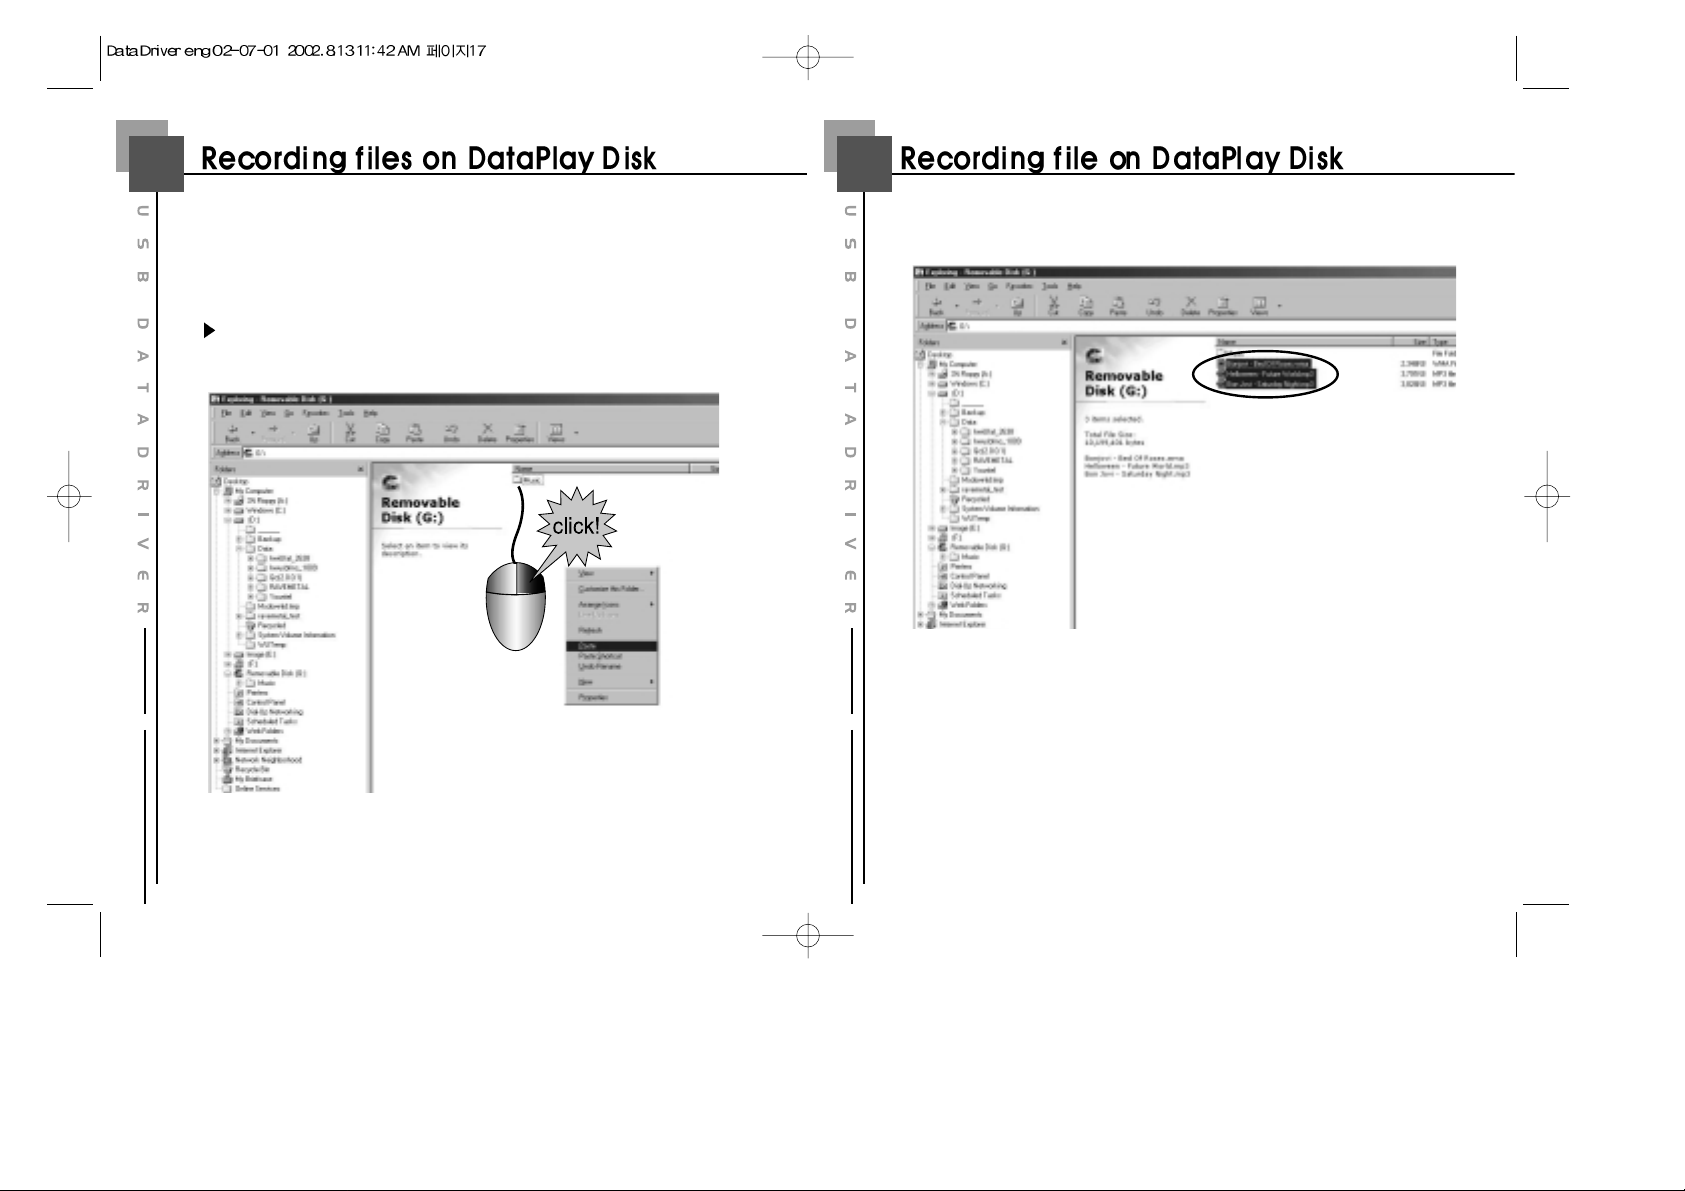
Select file(s) to be recorded in Windows Explorer or My Computer.
2
After selecting the file(s), click the right button of mouse and select "Copy".
Note : You can move the file(s) by Drag & Drop.
Page 9
1817
3
After copying the file(s), select "DataPlay drive(D: , F: , G: , ...) Then, click the
right button of mouse and select "Paste".
Note : Drive name of Data Driver DPD-100 will be subordinate drive to CD
Rom drive.
4
You can see the selected file(s) were moved to the targeted drive(folder).
Note :
1. Do not disconnect the cable while recording the file(s).
2. It is not completed to record the selected and moved file(s).
Page 10
2019
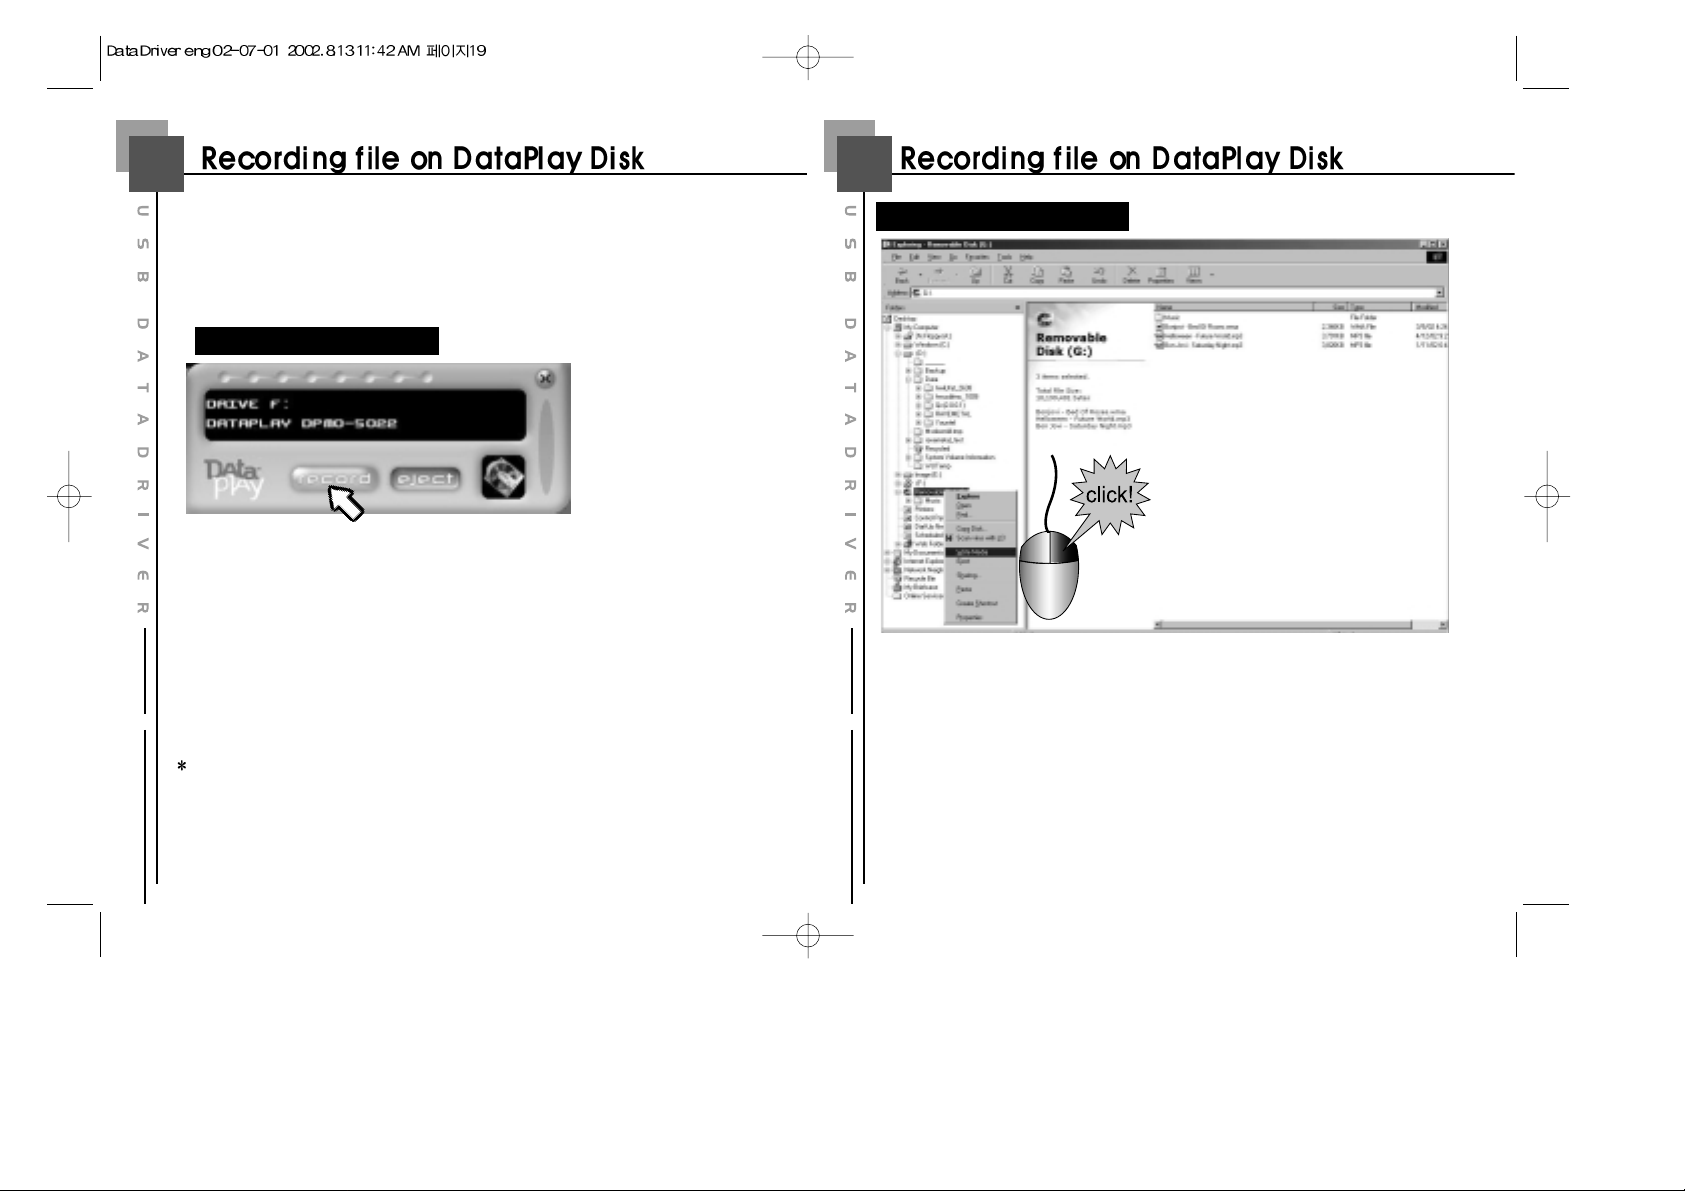
1) After moving(paste) the file(s), activate DataPlay Console by clicking the icon on
the screen bottom if it's not shown. Then click the "REC" button. The file(s) will be
transferred and saved on the DataPlay Disk with "PLAY LED" lamp. The lamp will
be turn off when copying is completed.
2) If you want to write another file on your PC to DataPlay Disk, follow the process
again.
One-side is 250MB. So, you need to record data not bigger than 250MB. You can use the other side.
Record with DataPlay Console
Click
Click
Click
Click
Click
Click
Click
Click
Click
Click
Click
Click
Click
Click
Click
Click
Click
Click
Click
Click
Click
Click
Click
Click
Click
Click
Click
Click
Click
Click
Click
Click
Click
Click
1) After moving(paste) the file(s), select DataPlay drive and click the right button of
mouse. Then, click "Write Media". The file(s) will be transferred and saved on the
DataPlay Disk with "PLAY LED" lamp. The lamp will be turn off when copying is
completed.
2) If you want to write another file on your PC to DataPlay Disk, follow the process
again.
Record with Windows Explorer
5
There are two ways to record the file(s). One is with DataPlay Console which was
installed and run automatically when the device was connected. The other is with
Windows Explorer.
Page 11
2221
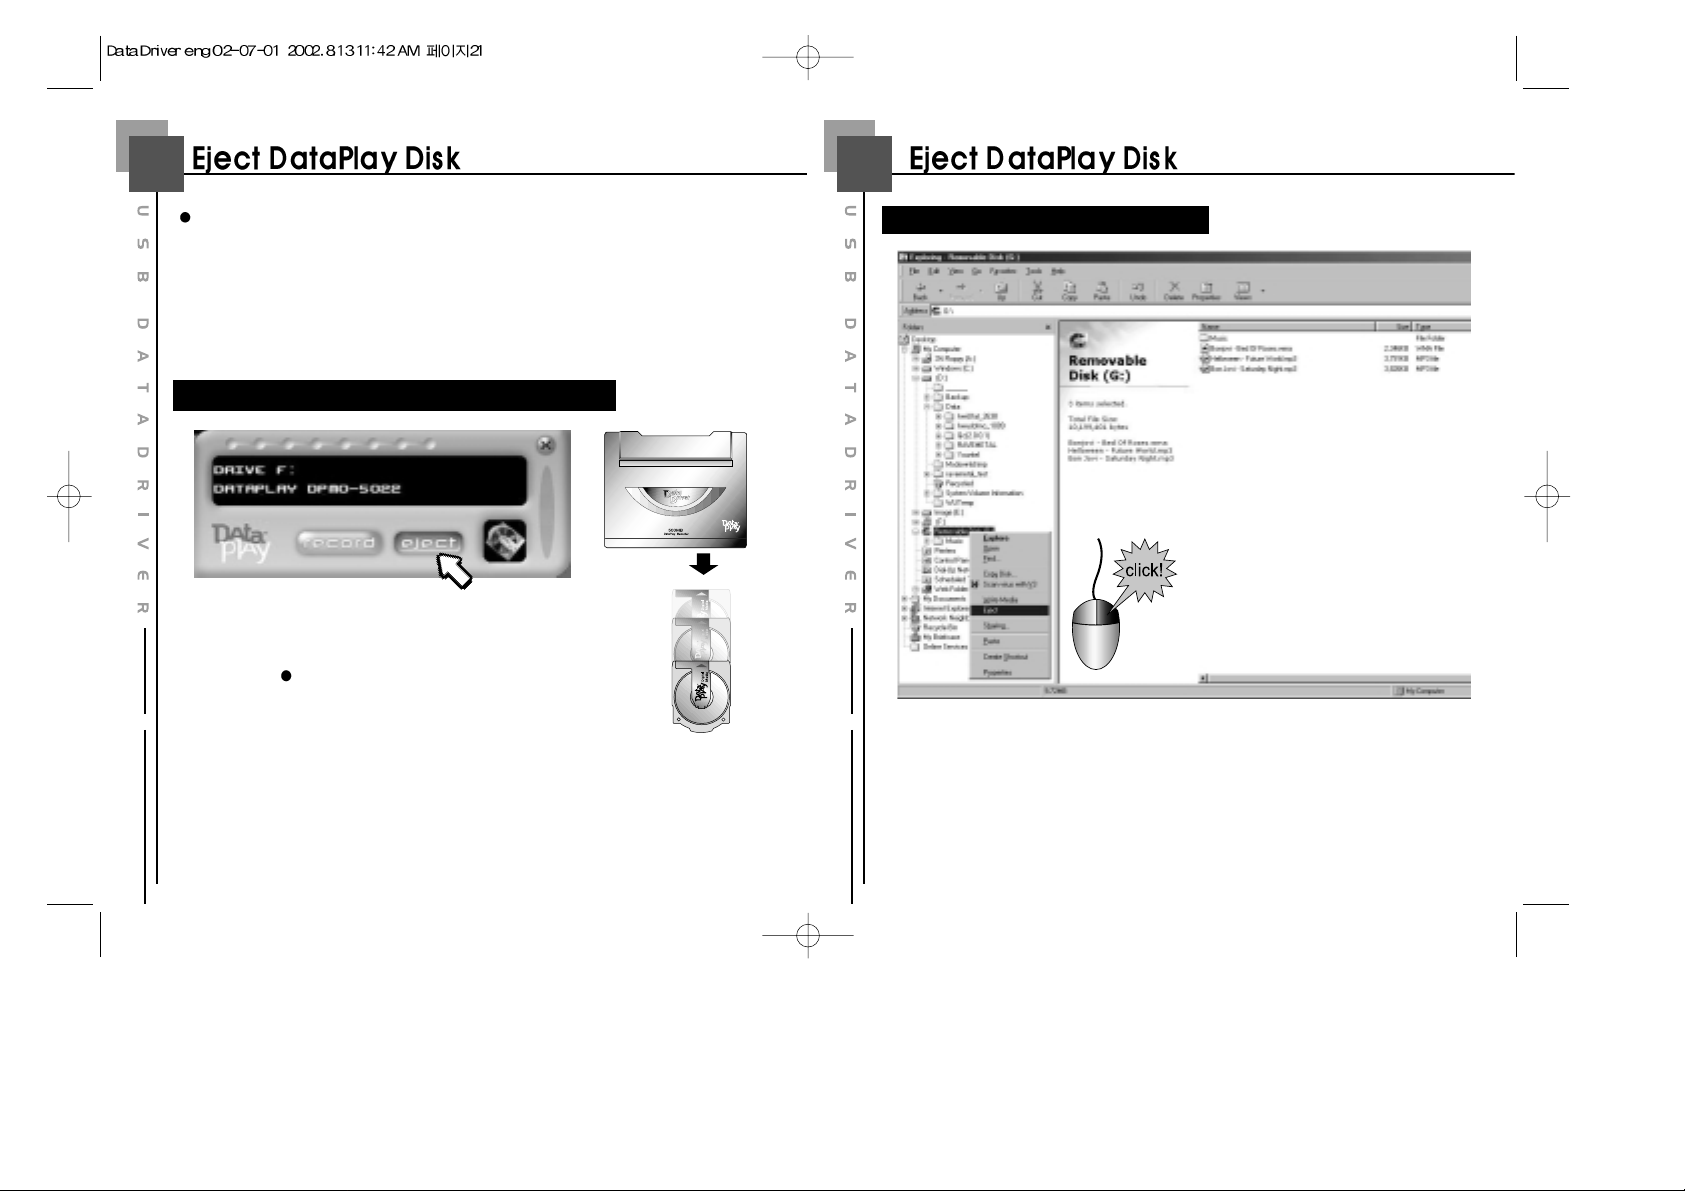
There are two ways to eject DataPlay Disk. One is with DataPlay Console which
was installed and run automatically when the device was connected. The other is
with Windows Explorer.
Click the "EJECT" button. Then, DataPlay Disk
will be ejected.
Note:
If you eject DataPlay Disk without completing the process of record file(s), DataPlay
Disk will be ejected after recording file(s) automatically.
Eject DataPlay Disk with DataPlay Console
Click
Click
Click
Click
Click
Click
Click
Click
Click
Click
Click
Click
Click
Click
Click
Click
Click
Click
Click
Click
Click
Click
Click
Click
Click
Click
Click
Click
Click
Click
Click
Click
Click
Click
Eject DataPlay Disk with Windows Explorer
As the above captured picture, select DataPlay drive and click the right
button of mouse and click "Eject". Then, DataPlay Disk will be ejected.
Page 12
2423
DataPlay Disk is to be used for only DataPlay Engine enabled products.
Properties of DataPlay Disk
- You can purchase DataPlay Disk optionally.
- Total 500MB. 250MB on each side
- File(s) can be deleted. However, cannot use the deleted
space anymore.
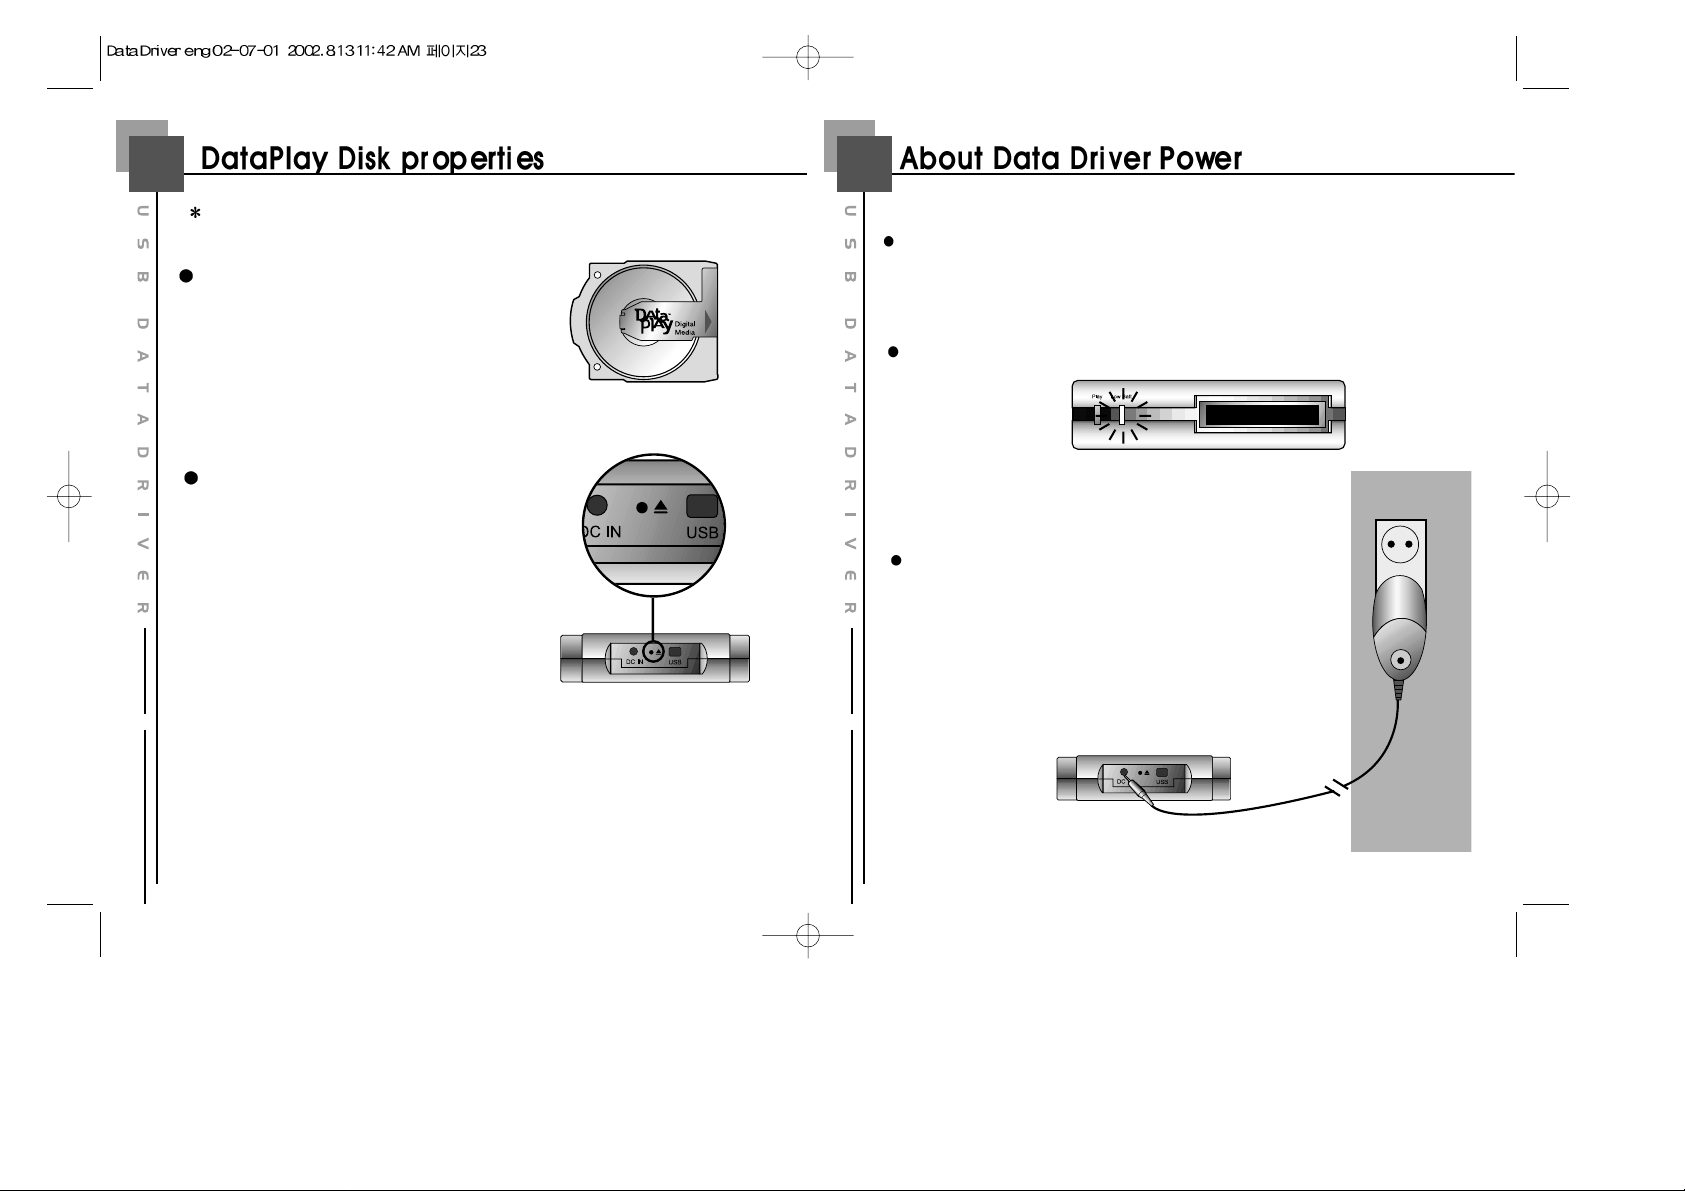
Intentionally Eject DataPlay Disk
You can eject DataPlay Disk by force when it does not
work to eject by program in PC.
As per the picture, press the eject button on back part
of the Data Driver DPD-100. Then DataPlay Disk will
be ejected.
However, please make sure the USB cable should be
connected and if the battery is out, DC charging cable
should be connected as well.
Note :
The selected and moved file(s) on DataPlay Disk will not be recorded by intentional ejection and it
may cause wrong operation in Data Driver DPD-100.
Power Supply of Data Driver DPD-100
Power is supplied by rechargeable Li-Ion 3.7V battery internally placed.
Using DC charger, you can recharge the battery easily.
If the battery is running out, Low Battery LED lamp will be turn on.
Please recharge the internal battery by connecting the
supplied DC charger.
Page 13
2625
NOTE :
This equipment has been tested and found to comply with the limits for a Class B
digital device, pursuant to Part 15 of the FCC Rules. These limits are designed to
provide reasonable protection against harmful interference in a residential installation.
This equipment generates, uses and can radiate radio frequency energy and, if not
installed and used in accordance with the instructions, may cause harmful interference
to radio communications. However, there is no guarantee that interference will not
occur in a particular installation.
If this equipment does cause harmful interference to radio or television reception
which can be determined by turning the equipment off and on, the user is encouraged
to try to correct the interference by one or more of the following measures.
- Reorient or relocate the receiving antenna.
- Increase the separation between the equipment and receiver.
- Connect the equipment into an outlet on a circuit different from that to which the
receiver is connected.
- Consult the dealer or an experienced radio, TV technical for help.
- Only shielded interface cable should be used.
Finally, any changes or modifications to the equipment by the user not expressly
approved by the grantee or manufacturer could void the users authority to operate such
equipment.
THIS DEVICE COMPLIES WITH PART 15 OF THE FCC RULES. OPERATION IS
SUBJECT TO THE FOLLOWING TWO CONDITIONS: (1) THIS DEVICE MAY NOT
CAUSE HARMFUL INTERFERENCE, AND (2) THIS DEVICE MUST ACCEPT ANY
INTERFERENCE RECEIVED INCLUDING INTERFERENCE THAT MAY CAUSE
UNDESIRED OPERATION.
Page 14
2827
Page 15
Phone
: 82-54-338-6000
Facsimile
: 82-54-337-3075
Homepage
: http://www.m-any.com
e-mail: [email protected]
333-1 Shindae-Ri, Kumho-Eup, Youngcheon-City, KyoungBuk 770-803,
South Korea
S/N : D01010710122
 Loading...