

Page 1

Test Report No.: GETEC-E3-04-051
FCC Class B Certification
APPENDIX H
: USER’S MANUAL
EUT Type: MP3 Player
FCC ID : PCMDHH100
Page 2
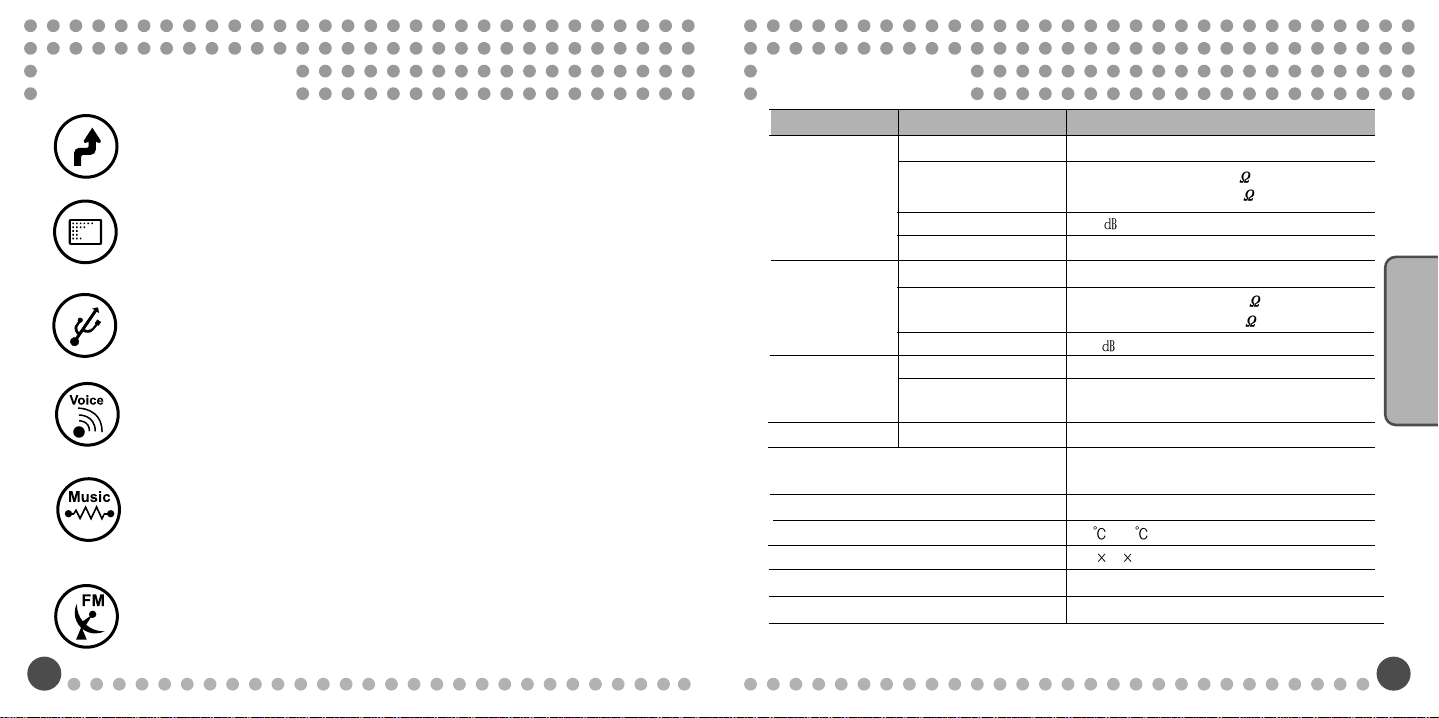
Product Features
Specifications
OS Firmware Upgradeable
By upgrading OS firmware, users will get the most recent OS updates through the
Internet, giving them additional functions and file format support.
User-Centered EQ
It provides 5 basic EQs (Normal, Rock, Jazz, Classic, and Pop) and 10 user defined EQ,
so that users can adjust high quality of music by setting the right preference of quality
users want.
Fast Transmission Speed
Thanks to the support of the USB 2.0 interface, the maximum speed of the file
transmission is 480Mbps.
Voice Recording
With a high-sensitive built-in microphone, it can be used as professional voice recorder
having versatile functions.
Music Recording
Without having to connect to any PCs, you can directly save and record data to the
player as digital files in real-time while enjoying FM Radio, CDs and music or contents in
an audiocassette tape, so this is a must-have for students and workmen who not only
want to enjoy music but also need a repeat function for studying TOEIC and TOEFL and
practicing Conversational Skills FM Radio Listening & Recording.
FM Radio Listening & Recording
You can enjoy FM radio programs as well as digital music such as MP3 and WMA. You
can even record a part of the music that you are listening to directly from the radio to the
player, which you can listen to repeatedly and save into your PC.
Classification Items Specifications
87.5MHz ~ 108.0MHz
Max. Volume .7mW (16
Max. Volume 500mW (8
50
Cord Antenna for Headphones/Earphones
20Hz ~ 20KHz
Max. Volume .15mW (16
Max. Volume 300mW (8
90
MP3, WMA
MP3:16~320Kbps,
WMA:32~160Kbps
360 Hours for 5 GB. Voice Recording with
Recording Mode of 32Kbps
Approximately 10 Hours
-5 ~70
80
56 22.4 (mm)
100g
4.2V Li-Polymer
FM TUNER
Audio
File Support
USB
Weight (including batteries)
FM Frequency
Output
S/N Ration
Antenna
Frequency Characteristics
Output
S/N Ratio
File Types
Bit Rate
Download speed 480Mbps
Recording
Time
Max. Playback Time
Operation Temperatures
Dimensions (W x L x H)
Batteries (Built-in)
) (Headphones)
) (Speakers)
) (Headphones)
) (Speakers)
On Products
Page 3
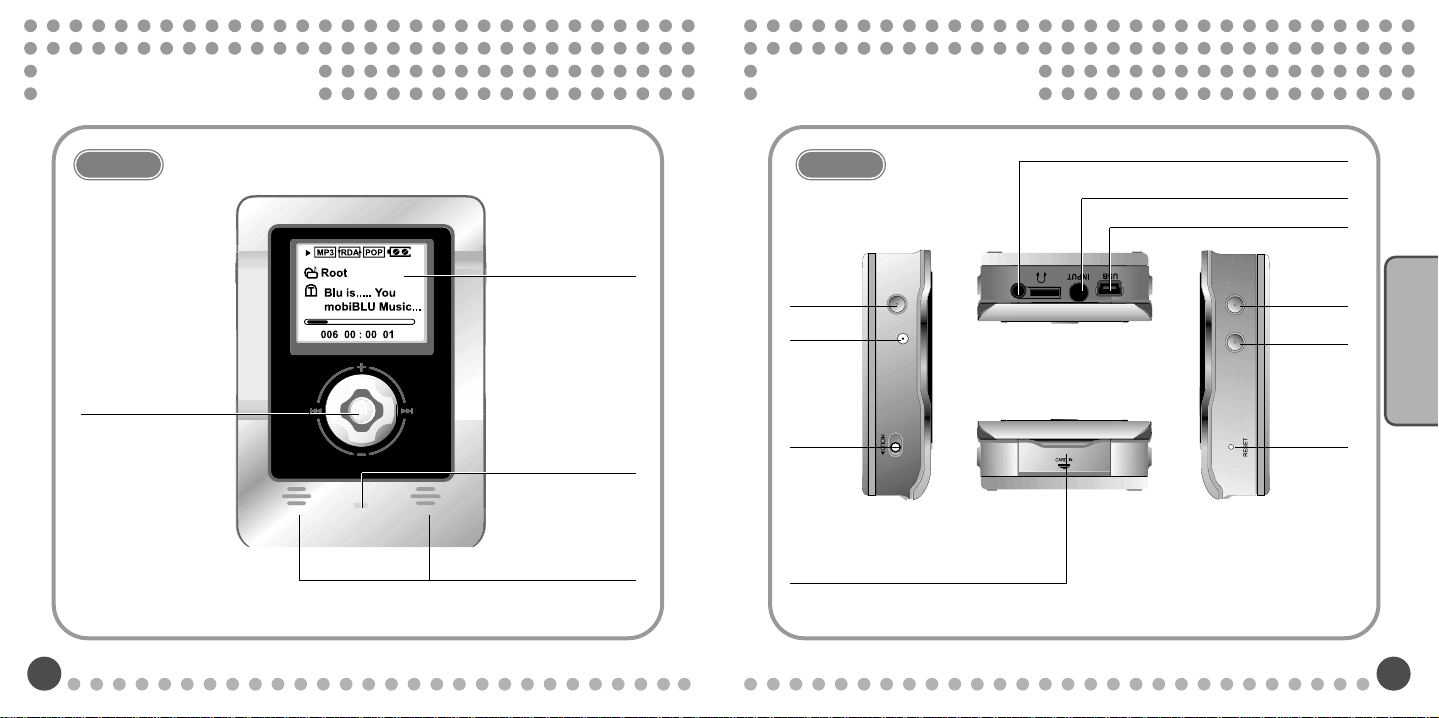
Names of Each Part
Names of Each Part
Front
Menu / Mode / FF / REW /
VOL+,- Button
LCD Display
High Sensitive
Voice Recording
Microphone
Built-in Stereo Speaker
Sides
EQ/
Navigation
Button
Jack for
DC IN
Hold Switch
SD Card Slot
Earphones Jack
Encoding Port
USB Port
Power
On/Power
Off/Play/Stop
Rec/A-B
Button
Reset Button
On Products
Page 4
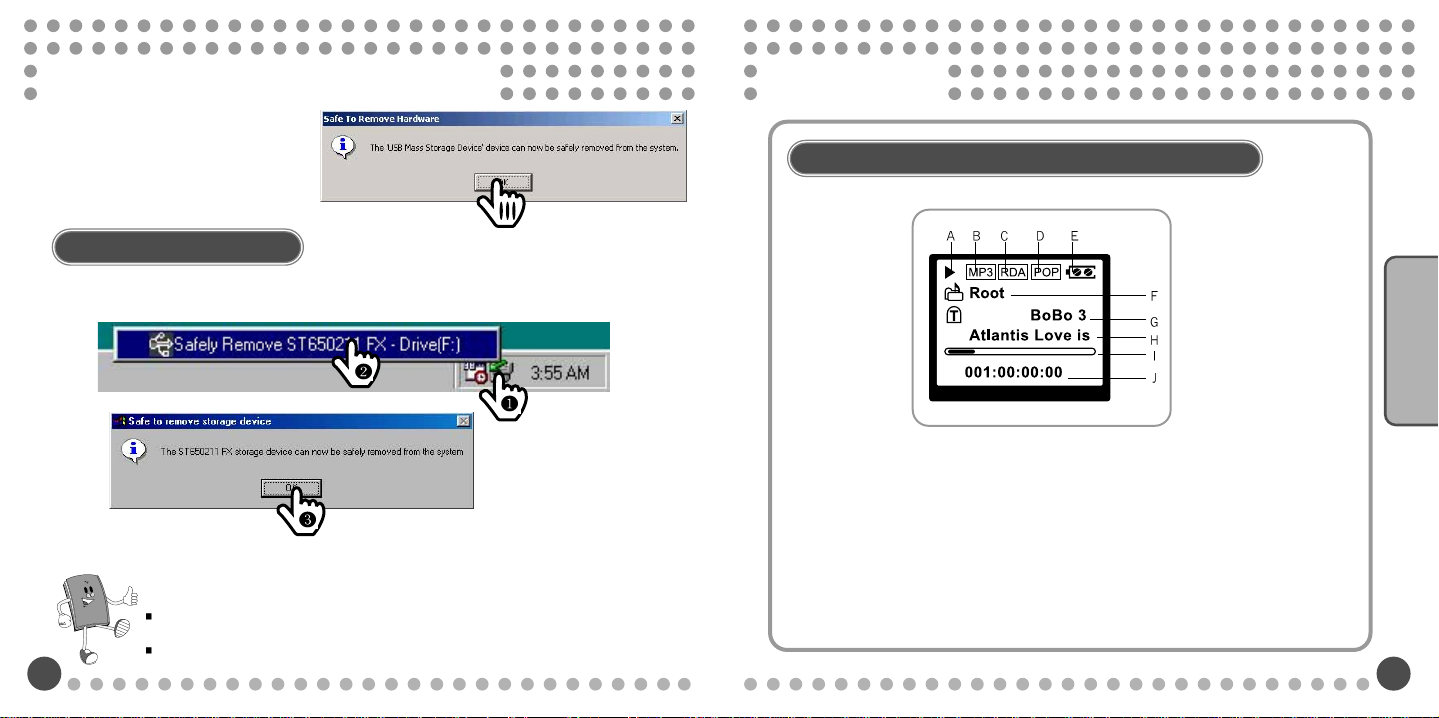
USB Connection & Disconnection
After you see the message
3
“Safely Remove Hardware” ,click
“OK” and remove the cable.
Click!
Click!
Click!
Click!
Click!
Click!
Click!
Click!
Click!
Click!
Click!
Click!
Click!
Click!
Click!
Click!
Click!
Click!
Click!
Click!
Click!
Click!
Click!
Click!
Click!
Click!
Click!
Click!
Click!
Click!
Click!
Click!
Click!
For Windows 98 Users
To disconnect the player from the USB cable, click the green arrow at the right bottom
right of your Windows screen.
Click!
Click!
Click!
Click!
Click!
Click!
Click!
Click!
Click!
Click!
Click!
Click!
Click!
Click!
Click!
Click!
Click!
Click!
Click!
Click!
Click!
Click!
Click!
Click!
Click!
Click!
Click!
Click!
Click!
Click!
Click!
Click!
Click!
Click!
Click!
Click!
Click!
Click!
Click!
Click!
Click!
Click!
Click!
Click!
Click!
Click!
Click!
Click!
Click!
Click!
Click!
Click!
Click!
Click!
Click!
Click!
Click!
Click!
Click!
Click!
Click!
Click!
Click!
Click!
Click!
Click!
Click!
Click!
Click!
Click!
Click!
Click!
Click!
Click!
Click!
Click!
Click!
Click!
Click!
Click!
Click!
Click!
Click!
Click!
Click!
Click!
Click!
Click!
Click!
Click!
Click!
Click!
Click!
Click!
Click!
Click!
Click!
Click!
Click!
Click!
Click!
Click!
Click!
For Your Reference!!
If you disconnect the cable without following the instructions above, you will see a warning
message and it may cause a serious failure to PC or the player.
Disconnecting a USB cable from PC while downloading, uploading, formatting, and OS updating
may cause a serious failure to PC or the player.
LCD Display
Connecting Player to PC By Using USB Cable
A: Status of Files (Play/Pause/Stop)
B: Format of the Playing Files
C: Playing Modes
D: Equalizer
E: Remaining Battery
F: Folder Name
G: ID 3 Tag
H: File Names
I: Play Position
J: Track Number, Elapsed Time
Basics of How to Operate
Page 5
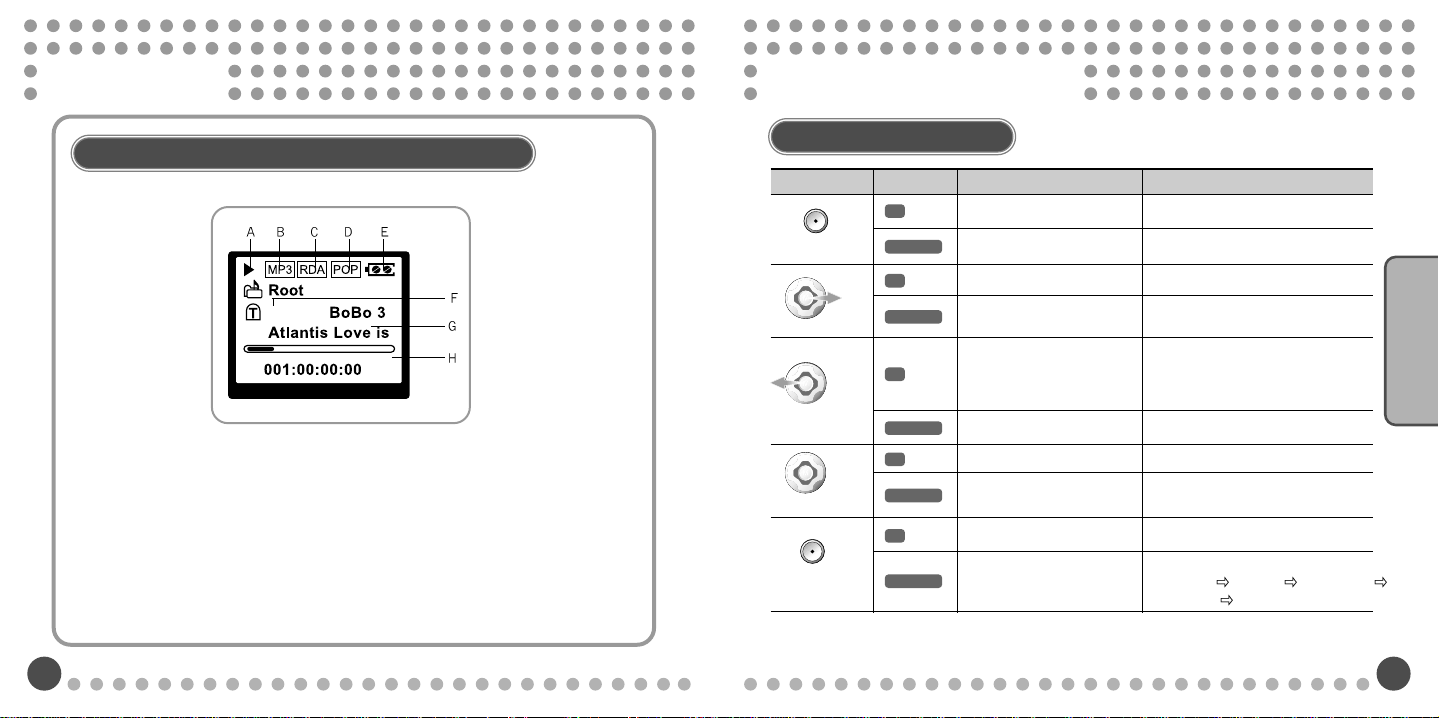
LCD Display
Simple Key Operations
Connecting Player to PC By Using USB Cable
A: Receive/Ready to receive
B: Auto/Manual
C: Preset Number (1~20)
D: Mono/Stereo
E: Remaining Battery
F: Preset Modes
G: Frequency
H: Frequency Bar
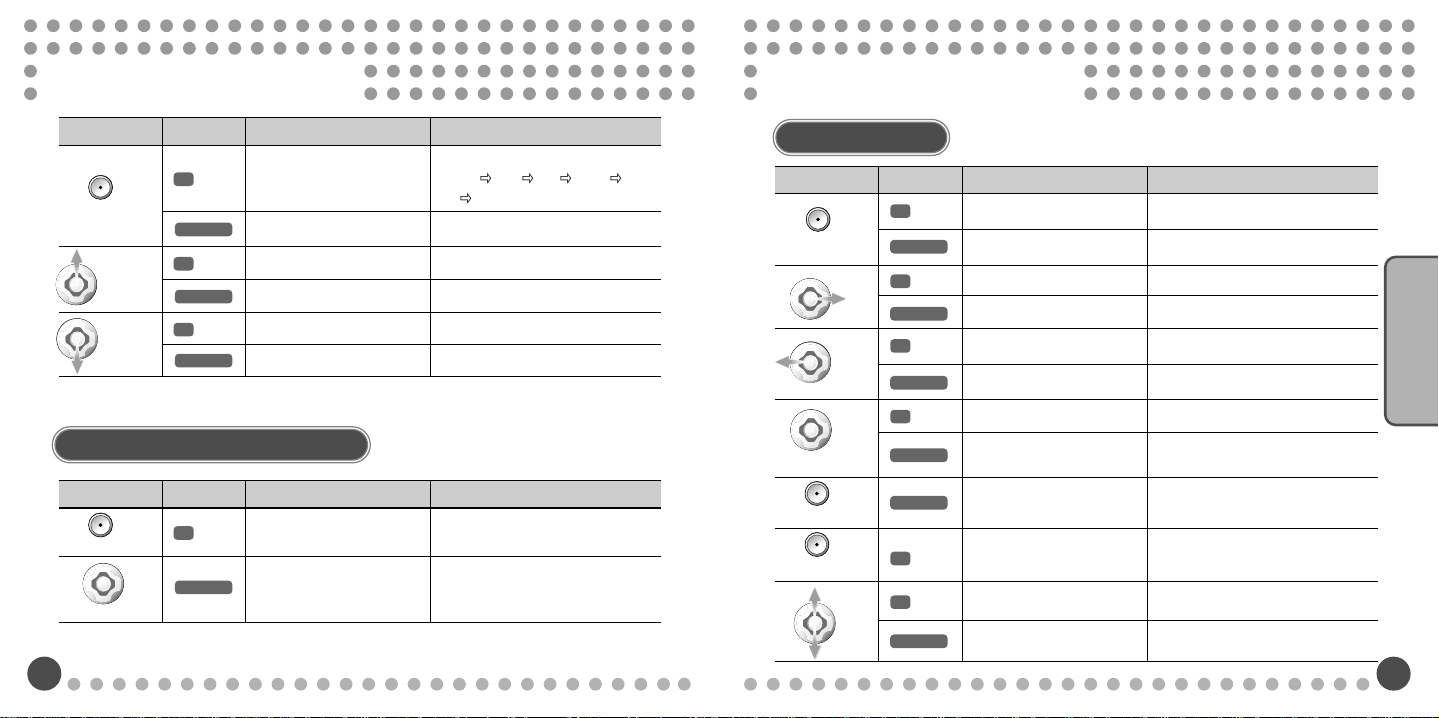
Music Playback Mode
Button
PLAY/PAUSE
MENU
REC/A-B
FF
REW
Time Pressed
Plays a current song.
Moves to the next track.
Successive forward track
Successive backward track search.
(MUSIC<->VOICE<-LINE<->FM)
Waits for voice/music
Stop State Play State
Power Off
search.
Moves back to the
previous track.
Selects menus.
Selects modes.
recording.
Pauses a current song.
Power Off
Moves to the next song.
Fast forward search from the
current position.
Within 5 sec. after play: Moves back
to the previous song.
5 sec. after play: Plays the song at
the beginning of it.
Fast backward search from the
current position.
Selects menus.
Selects modes.
(MUSIC<->VOICE<-LINE<->FM)
Section Repeat: A <-> B/Cancel.
Changes play modes.
(Normal
Random Random All)
Repeat Repeat All
Basics of How to Operate
Page 6
Simple Key Operations
Simple Key Operations
Button
EQ
VOL+
VOL-
Time Pressed
Volume up successively.
Volume down successively.
Stop State Play State
Executes navigation.
Volume 1 level up.
Volume 1 level down.
Music/V oice Recording Mode
Button
Rec
MENU
Time Pressed
REC Ready State Recording State
Voice Record/Music
Record starts.
Selects modes
(MUSIC<->VOICE<->LINE<-> FM)
Change of EQs
(Normal
Rock Jazz Classic
Pop User EQ1~10)
Executes navigation.
Turns the volume up 1 level.
Turns the volume up successively.
Turns the volume down 1 level.
Turns the volume down successively.
Voice Record/Music Record
stops.
FM Radio Mode
Button
PLAY/PAUSE
MENU
REC/A-B
EQ
Time Pressed
FF
REW
VOL
+/-
Ready to Receive State Preset Mode
Starts to receive/Waits for
receiving.
Power off
Increases frequency 1 level up.
Successively scans frequencies.
Decreases the frequency 1 level
Successively search previous
(MUSIC<->VOICE<->LINE<-> FM)
Enters the preset modes /
Cancel the preset modes
Volume 1 level up/down.
Volume up/down successively.
down.
frequencies.
Selects FM menus.
Selects modes.
Starts to receive/Waits for receiving.
Power off
Moves to the next preset.
Moves to the next presets
successively.
Moves 1 station back to the
previous presets.
Successively moves back to the
previous presets.
Selects FM menus.
Selects modes.
(MUSIC<->VOICE<->LINE<-> FM)
FM Radio records/stops.
Cancel the preset modes.
Turns the volume up/down 1 level.
Turns the volume up/down
successively.
Basics of How to Operate
Page 7
Listening to FM Radio
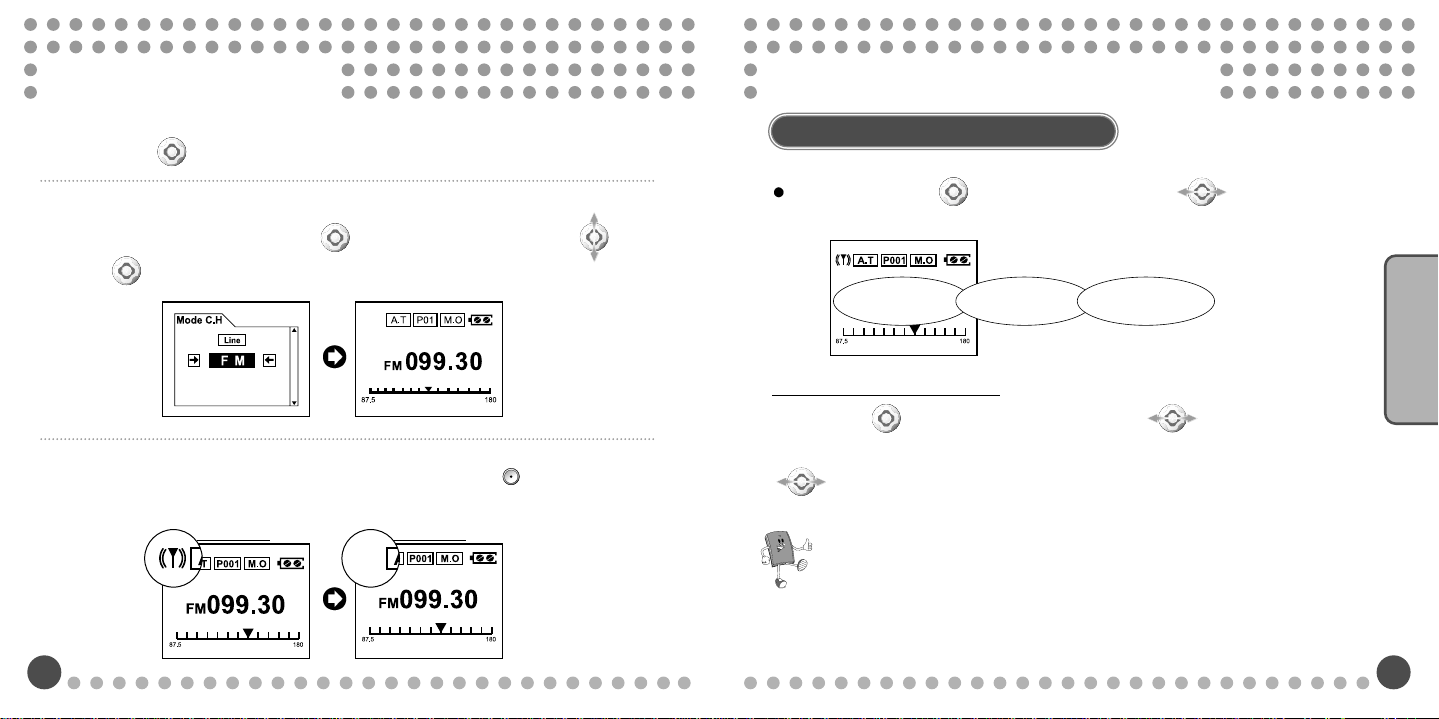
Scanning FM Radio Frequencies
Press the ( ) button on the front long.
1
After moving to “FM” by pushing the ( ) button on the front to VOL+/VOL- ( ), press
2
the ( ) button on the front to be ready for receiving the frequency of the FM Radio.
While receiving the FM Radio frequencies, pressing the Play ( ) button will let the
3
user to select the “Receiving/Ready for Receiving.”
Receiving
Ready
Scanning FM Radio Frequencies
In FM mode, push the ( ) button on the front to FF/REW ( ) to find desired
frequencies.
Listening FM Radio
099.30 099.35 099.40
Scanning Frequencies
If you push the ( ) button on the front briefly to FF/REW ( ), the frequencies will
be increased or decreased consecutively by 0.05MHz, and if you push it long to FF/REW
( ), the frequencies will be increased or decreased consecutively. During the
scanning, the most receivable frequencies will be received.
For Your Reference!!
Each FM Radio station uses a different range of frequencies and the range will
be subject to change according to the regions and countries.
Page 8
Listening Music
Selecting Music
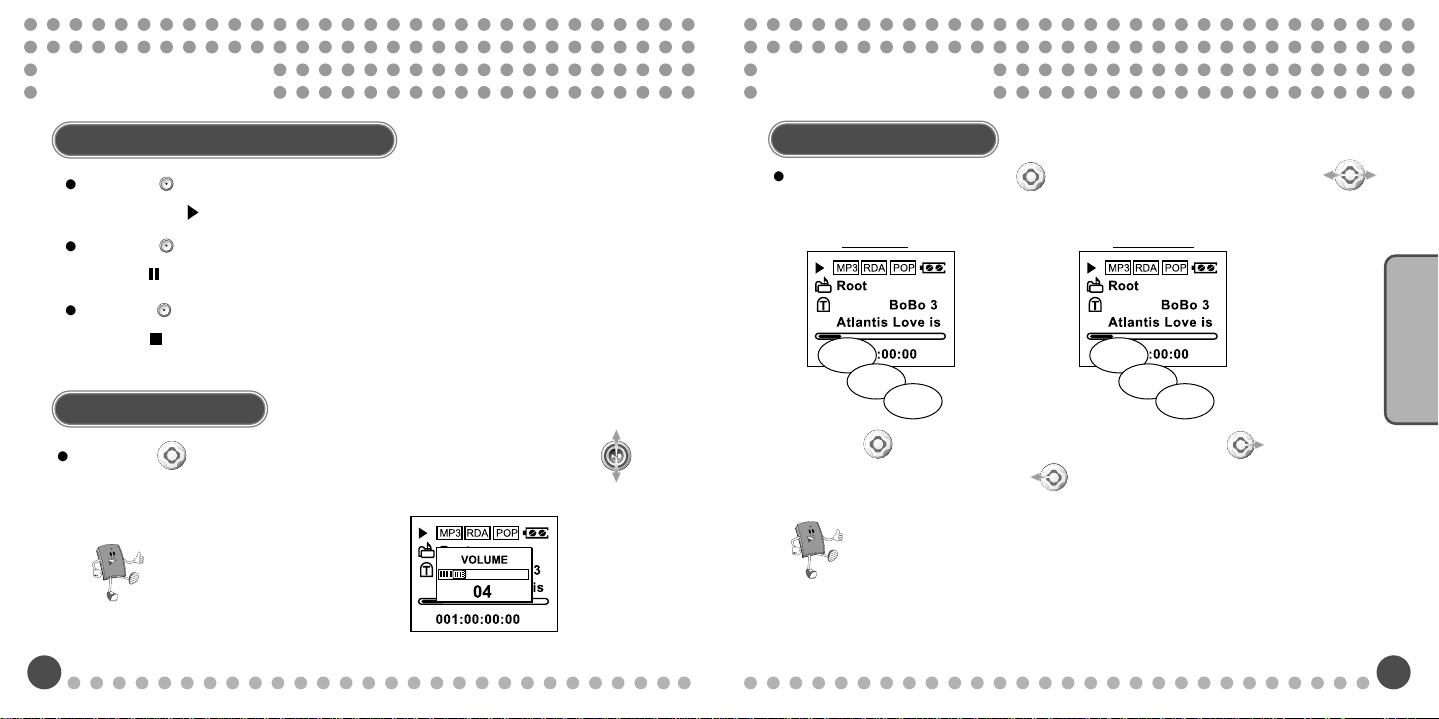
Playing/Pausing/Stopping Music
If the Play ( ) button of the player is pressed under the state of Stop or Pause, files will
be played with (
If the Play ( ) button of the player is pressed during the state of Play, files will be paused
showing ( ) on the LCD screen.
If the Play ( ) button of the player is pressed under the state of Pause, the player will stop
showing ( ) on the LCD screen.
) on the LCD screen.
Controlling V olume
Pushing the ( ) button on the front of the player to the direction of VOL+ / VOL- ( )
will adjust the volume with the following LCD display.
For Your Reference!!
The Volume display will disappear
after 2~3 seconds
Moving Playing Files
During the play mode, pushing the ( ) button on the front long to either FF/REW ( )
will let the player do a fast search the current song forward and backward.
FF
001
002
003
Pushing the ( ) button on the front briefly to the direction of FF ( ) will move
the player to the next track and REW ( ) will moves back to the previous track.
REW
Listening Music
003
002
001
For Your Reference!!
Pushing the buttons long under the state of Stop and Pause will lead to the fast
movement.
Page 9
Selecting Music
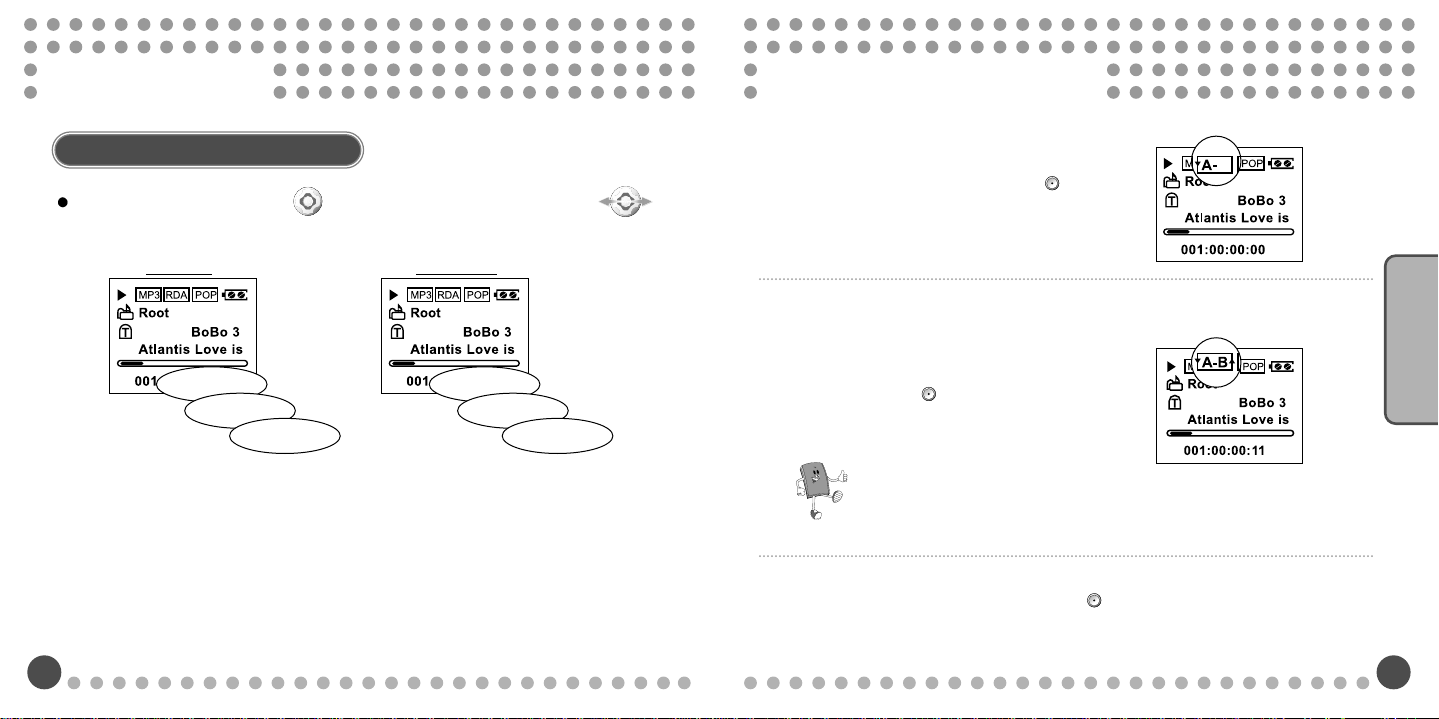
Setting Section Repeats
Navigation During Playback
lDuring the playback, pushing the ( ) button on the front long to either FF/REW ( )
will let the player do a fast search the current song forward and backward.
FF REW
00:00:01
00:00:02
00:00:03
00:00:03
00:00:02
00:00:01
REPEA T A
1
During the play mode, press the REC ( ) button
briefly at the starting point of the section repeat.
REPEA T B
2
Pressing the REC ( ) button once again briefly at the
end of the section repeat will activate the section repeat
and the interval will be repeatedly played.
For Your Reference!!
If you don’t specify the ending point of the section repeat, the end of the
file will be the ending point automatically.
To cancel the section repeat, press the REC ( ) button briefly.
3
Listening Music
Page 10
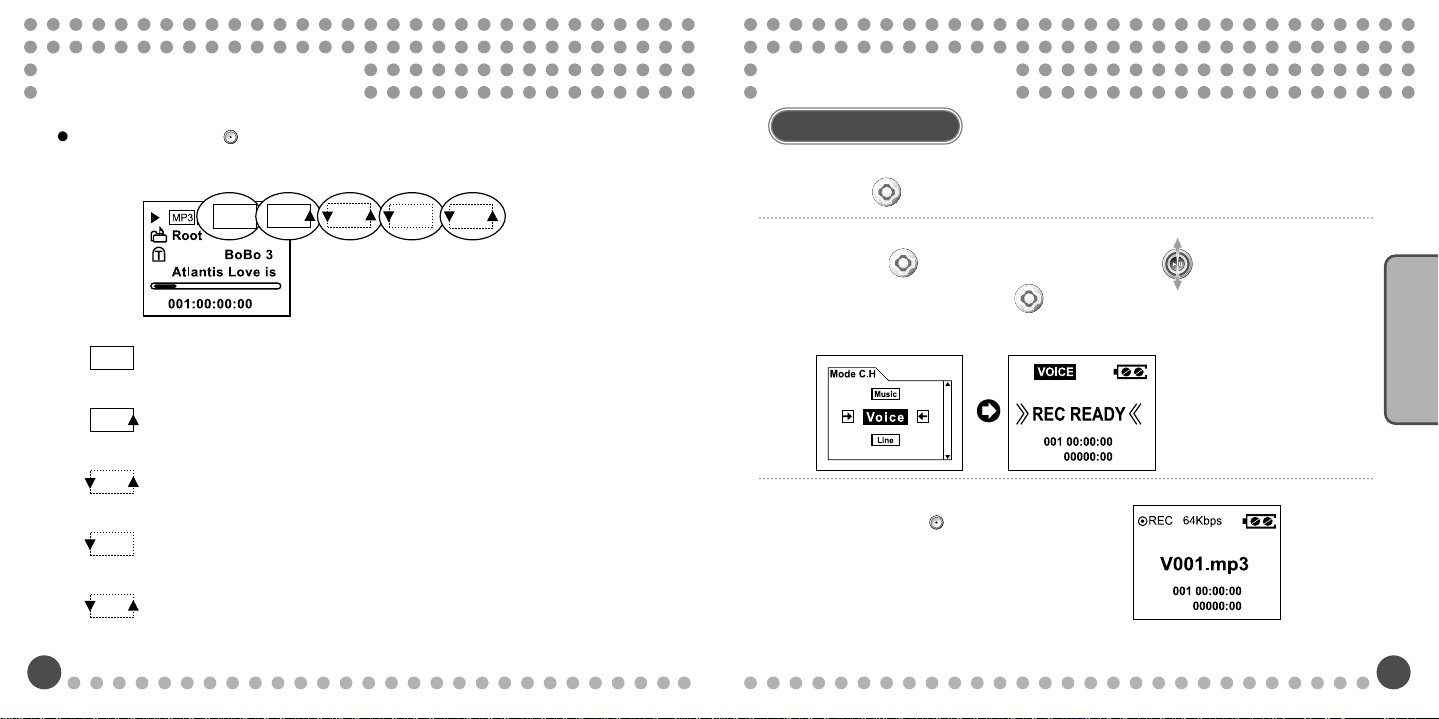
Changing Play Modes
NO
RP
RPA
RD
RAD
Voice Recording
If you press the REC ( ) button long during the playback, the modes change in the
order of Normal, Repeat, Repeat All, Random, and Random All.
Normal: Plays music files once in order.
NO
Repeat: Plays a specified song repeatedly.
RP
Repeat All: Plays all the files repeatedly in order.
RPA
Random: Regardless of the order of the songs, they will be played randomly and
RD
stop automatically after playing the entire songs once.
Random All: Like Random, files are played continuously without stop.
RAD
V oice Recording
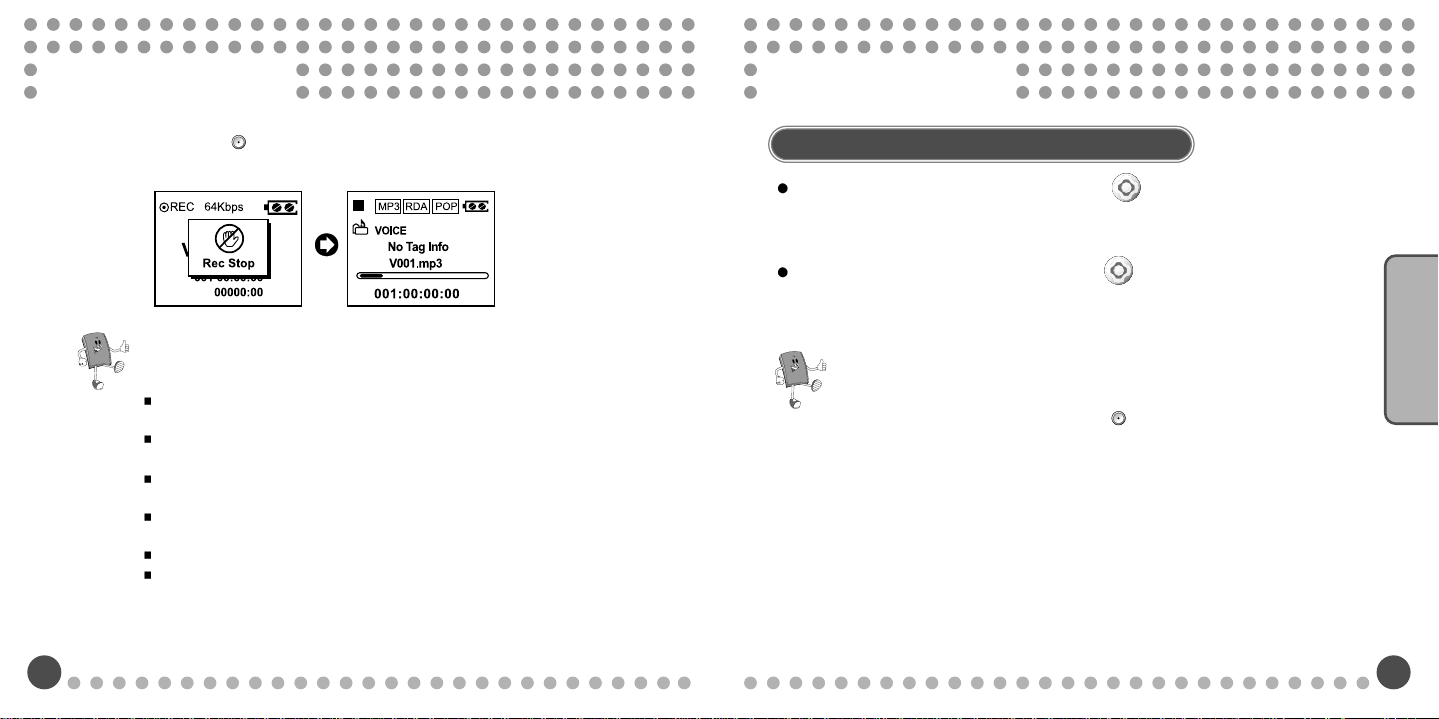
Press the ( ) button on the front long.
1
Pushing the ( ) button on the front to VOL+/VOL- ( ) will lead you to the
2
“VOICE” menu. Now press the ( ) button on the front to enter the “VOICE”
mode.
Pressing the REC ( ) button briefly under
3
“REC READY” will start the recording
Recording
Page 11
Voice Recording Voice Recording
If you press the REC ( ) button again, the recording will stop with the following LCD
4
display.
For Your Reference!!
After the voice recording, files will be saved as MP3 files into a Voice folder and will
be seen as VOO1.MP3.
During the VOICE recording, you can select the quality of the recording by adjusting
the bit rates.
If the voice recording reaches to the status of “Memory Full,” the recording will stop
automatically and only the files recorded just before the stop will be saved.
The quality of the recording will be subject to the sensitivity or distance of the sound
source.
If the power is low, recording will not be performed properly.
The player may make some sound due to the characteristics of the built-in hard disk
during the voice recording.
Playing & Stopping V oice Recorded Files
Under the state of Pause/Stop, press the Play ( ) button to play the voice
recorded file.
Under the state of play mode, press the Play ( ) button to pause the voice
recorded file.
For Your Reference!!
After voice recording, pressing the REC ( ) button long, under the state of
Stop, will make the player REC READY, enabling continuous voice
recording.
Recording
Page 12
File Upload & Download
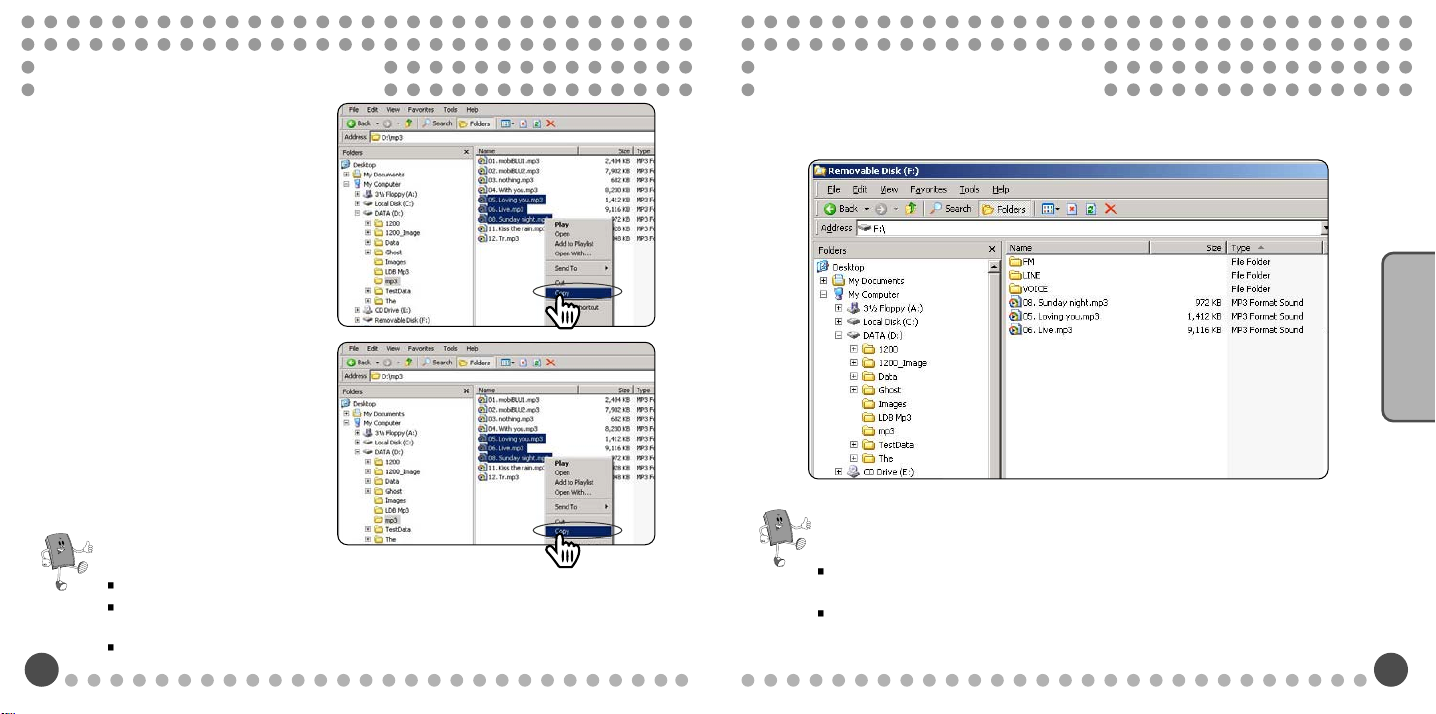
1
and select the file(s) to download to
the player from the PC by rightclicking “Copy” from the menu.
Connect the USB cable to the PC
File Upload & Download
Like the picture below, paste the
2
copied files to the Jukebox by
selecting “Paste” by right-clicking the
mouse.
For Your Reference!!
The player will be recognized as a “Jukebox” in the folder “My computer” under the main drive.
Don’t disconnect the USB cable during the transfer of files. Otherwise, it may cause a fatal error to
either your PC or the player.
Be sure to wind the core round the USB cable when transmitting data.
(This can block an electric wave emitted to the USB cable.
Click!
Click!
Click!
Click!
Click!
Click!
Click!
Click!
Click!
Click!
Click!
Click!
Click!
Click!
Click!
Click!
Click!
Click!
Click!
Click!
Click!
Click!
Click!
Click!
Click!
Click!
Click!
Click!
Click!
Click!
Click!
Click!
Click!
Click!
Click!
Click!
Click!
Click!
Click!
Click!
Click!
Click!
Click!
Click!
Click!
Click!
Click!
Click!
Click!
Click!
Click!
Click!
Click!
Click!
Click!
Click!
Click!
Click!
Click!
Click!
Click!
Click!
Click!
Click!
Click!
Click!
Click!
Click!
About Programs
Page 13
FCC RF INTERFERENCE STATEMENT
Note
This equipment has been tested and found to comply with the limits for a Class B digital device,
pursuant to Part 15 of the FCC Rules. These limits are designed to provide reasonable protection
against harmful interference in a residential installation.
This equipment generates, uses and can radiate radio frequency energy and, if not installed and used
in accordance with the instructions, may cause harmful interference to radio communications. However,
there is no guarantee that interference will not occur in a particular installation.
If this equipment does cause harmful interference to radio or television reception which can be
determined by turning the equipment off and on, the user is encouraged to try to correct the
interference by one or more of the following measures.
- Reorient or relocate the receiving antenna.
- Increase the separation between the equipment and receiver.
- Connect the equipment into an outlet on a circuit different from that to which the receiver is
connected.
- Consult the dealer or an experienced radio, TV technical for help.
- Only shielded interface cable should be used.
Finally, any changes or modifications to the equipment by the user not expressly approved by the
grantee or manufacturer could void the users authority to operate such equipment.
CAUTION
Changes or modifications not expressly approved by the party responsible for compliance
could void the user's authority to operate the equipment.
THIS DEVICE COMPLIES WITH PART 15 OF THE FCC RULES. OPERATION IS SUBJECT TO THE
FOLLOWING TWO CONDITIONS: (1) THIS DEVICE MAY NOT CAUSE HARMFUL INTERFERENCE, AND (2)
THIS DEVICE MUST ACCEPT ANY INTERFERENCE RECEIVED INCLUDING INTERFERENCE THAT MAY
CAUSE UNDESIRED OPERATION.
MEMO
Page 14
MEMO
WARRANTY FORM
Warranty Term: 1 year from the date of purchase Product
Model :
Date of Purchase : (month) (day) (year)
Name of purchaser : Phone Number :
Address :
Place Purchased : Phone Number :
Address :
Hyunwon Incorporated
You need to show this Warranty Certificate with the date of purchase when
requesting service, in order to receive satisfactory services. Please keep the
Warranty Certificate in a safe place.
1. The warranty service on this product is provided based on the information contained in the Warranty
Certificate.
2. The warranty service takes effect from the date of purchase, so please make sure you enter the date of
purchase on the Warranty Certificate at the time of purchase. (If the date of purchase cannot be verified, the
date 6 months from the date of manufacturing will be use instead.)
3. This Warranty Certificate is not reissued.
The exterior or dimensions are subject to change without prior notice to the customer in order to
improve the product quality.
 Loading...