

Page 1

Test Report No.: GETEC-E3-03-008
FCC Class B Certification
APPENDIX H
: USER’S MANUAL
EUT Type: MP3 Player
FCC ID : PCMDAH700
Page 2
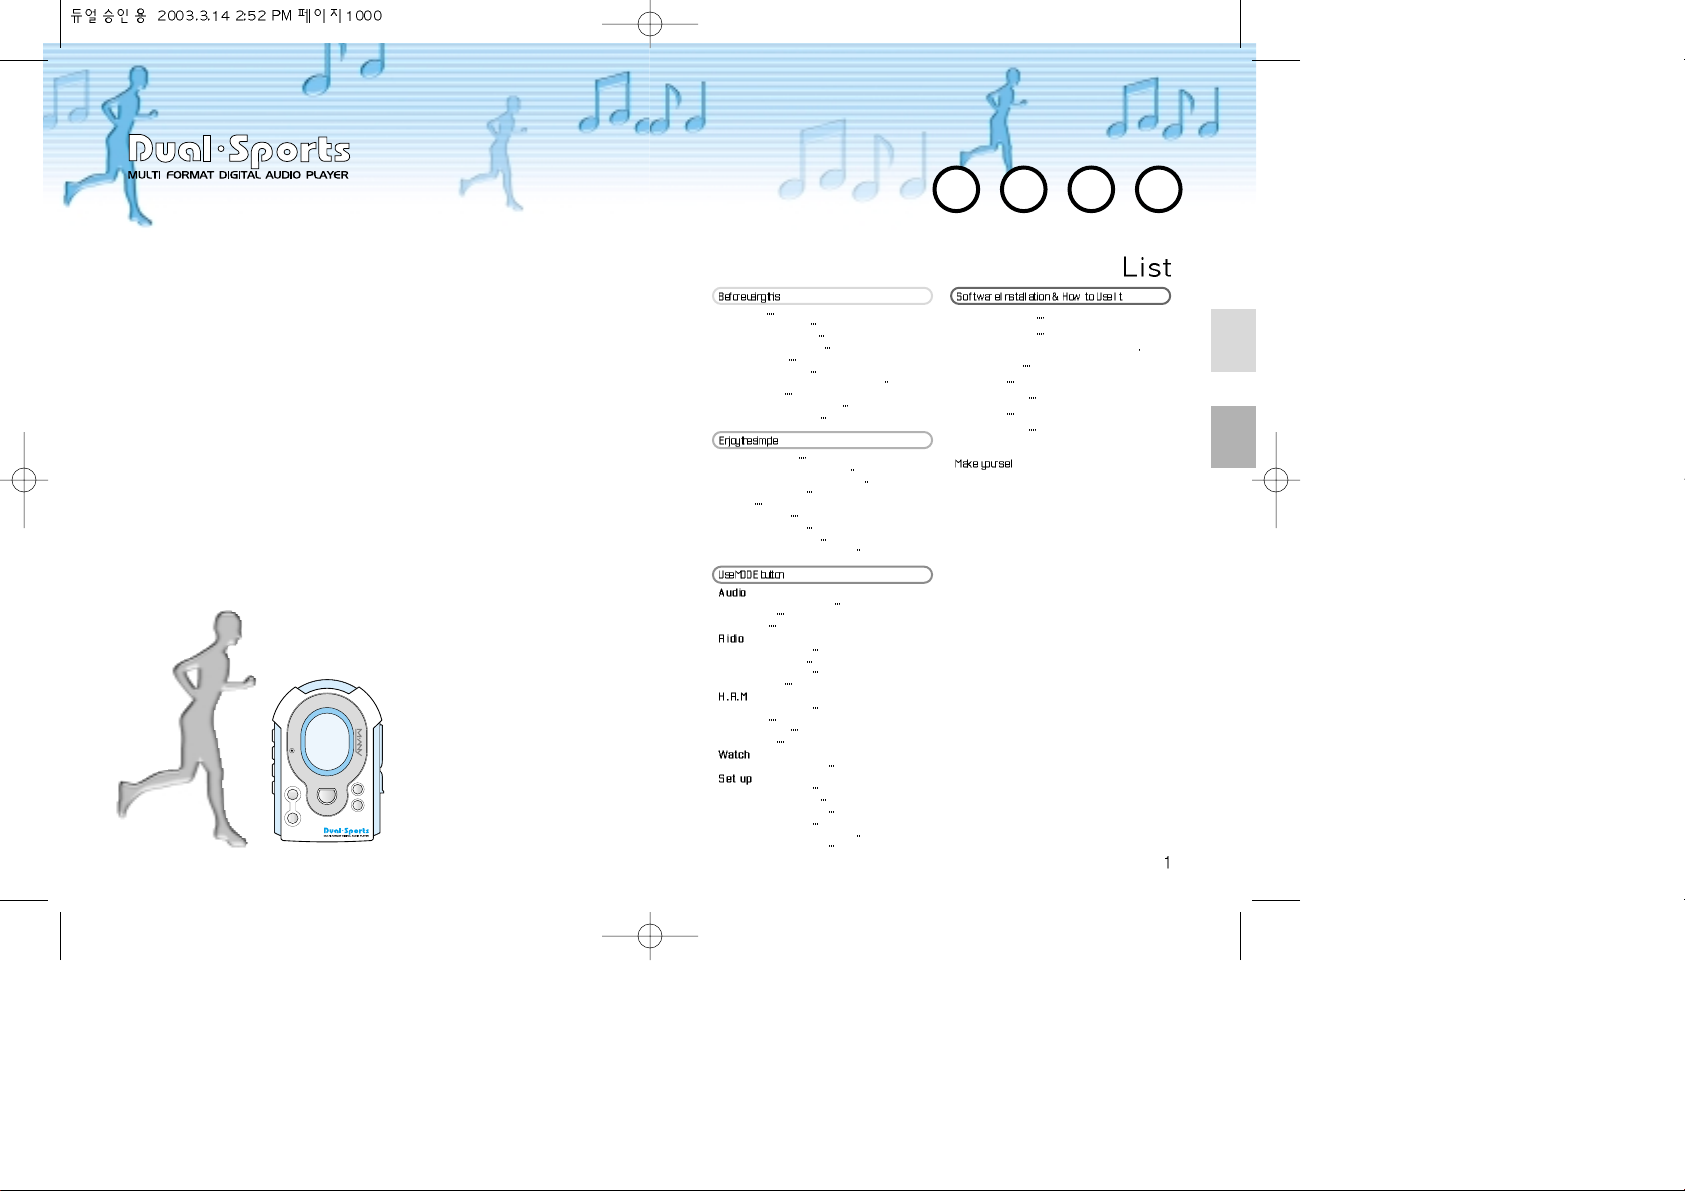
Installing Software 46
Connecting to PC
48
Use of M-ANY DUAL SPORTS MANAGER
49
File Download
52
File Upload
55
Memory Format
57
OS Update
58
Menu Download
WELCOME to the world of Duel Sports!
Thank you for using our advanced portable digital audio player
DUAL SPORTS.
This small player with simple design supports multi languages.
DUAL SPORTS is capable of supporting fresh memory from 16 to
256Mbite.
DUAL SPORTS enables to upgrade for newer audio format using
DSP (Digital Signal Processor), and also it is designed to be free
from the responsibility against any right of intellectual property.
The “Network OS Update” menu in “Manager” allows you to
upgrade for the latest version of OS without extra efforts.
HRM function enables you to simple check your current heart rate,
target heart rate, consumed calories and bio-rhythm on the basis of
the exercise data.
D
I
G
I
T
A
L
A
U
D
I
O
P
L
A
YER & H.R
.
M
&
F
M
R
A
D
I
O
- VOLUME +
MODE
PLAY STOP REW
MIC
FF
REC HOLD
CAUTION 2
Fittings & Accessories
4
What is MP3 or WMA?
5
PC System Requirement
6
Electrical Power
7
Battery Replacement
8
Installation for Memory Expansion Card
9
Terms of Parts
10
Description of LCD Windows
14
To Have Power On/OFF
15
Listening to Music 16
Searching and Selecting Songs
17
Selection for Voice Record or MP3
18
Equalizer Selections
19
Repeat
20
Voice Recording
22
To record the music
23
Radio Source Recording
25
How to set for Continuous Play?
26
Selection for Folder & Song 27
File Deleting
28
PLAY Area
29
Listening to FM Radio 30
Saving FM Channel
31
Deleting FM Channel
32
Starting H.R.M
33
How to set Time Gap? 34
Goal Point
35
User Information
36
DB Analysis
37
Setting for Clock and Date 38
Setting for Languages 39
Setting for LCD Contrast
40
Setting for Power-off Time
41
Setting for Back Light
42
Setting for Equalizer (User Mode)
43
Setting for Search Speed
44
Page 3
CAUTION
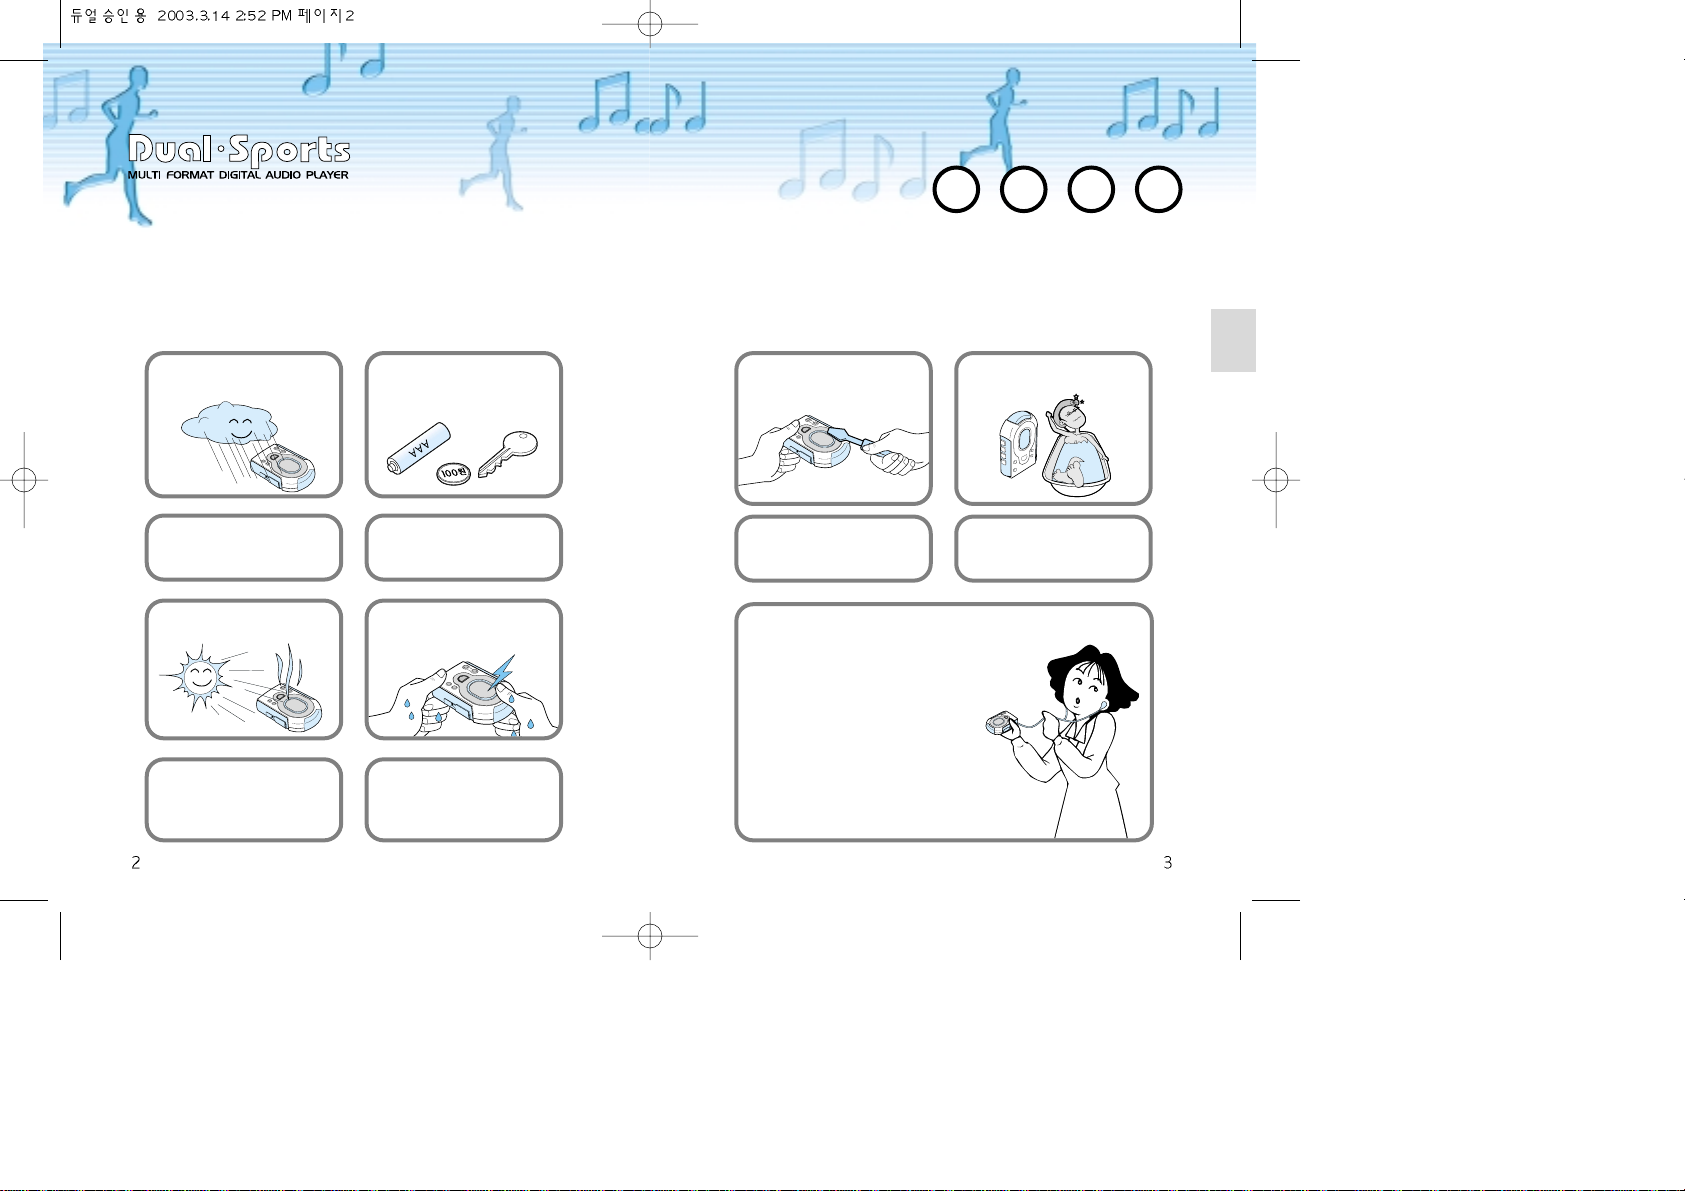
The followings are to avoid any unexpected hazard or physical loss
by using the product correctly, please be well aware of them.
Do not expose the product to any
humidity environment such as raining.
(It may cause a fire or electric shocks)
Do not leave the battery in a pocket
with any metallic substance such as
coins or keys.
(It may cause a fire from the contacts)
Keep the player free from any shock
which may caused by throwing or
dropping of the product.
The software contained in installing
CD-ROM can be used for personal
purposes only.
Keep the product away from any direct
ray with best cares. (It may have
damages from heat conduction)
Do not touch or connect the product
with wet hands. (There may be electric
shocks if it is connected to the power
supply)
The data loss from carelessness use
is free from our responsibilities. (Any
of valuable data should be stored to
your PC)
Please do not release or distribute the
music files formatted in WMA or MP3
from the product to the public.
(Against the law for Copyright)
Caution
The HRM function of this product may not be used for diagnosis, treatment
and improvement of rehabilitating patient as it is not medical instrument.
Do not ever disassemble to repair or
rebuild the product as it may cause
breakdowns.
Keep the product away from dusts and
humidity to prevent defects.
Input your gender, age, height and
weight from HRM menu.
Set current time from RTC menu.
Cautions when using a headset
• Auditory sense may be damaged when
listening to the music with high volume for
many hours.
• Using a headset while driving a car or riding
bicycle/motorcycle is not recommended.
• Using a headset while walking or jogging that
may have potential hazard requires best care of
you or temporary stoppage.
• Ear-in type headset should have a long wire to
be located on the back of the neck.
Page 4
What is MP3 or WMA?Fittings & Accessories
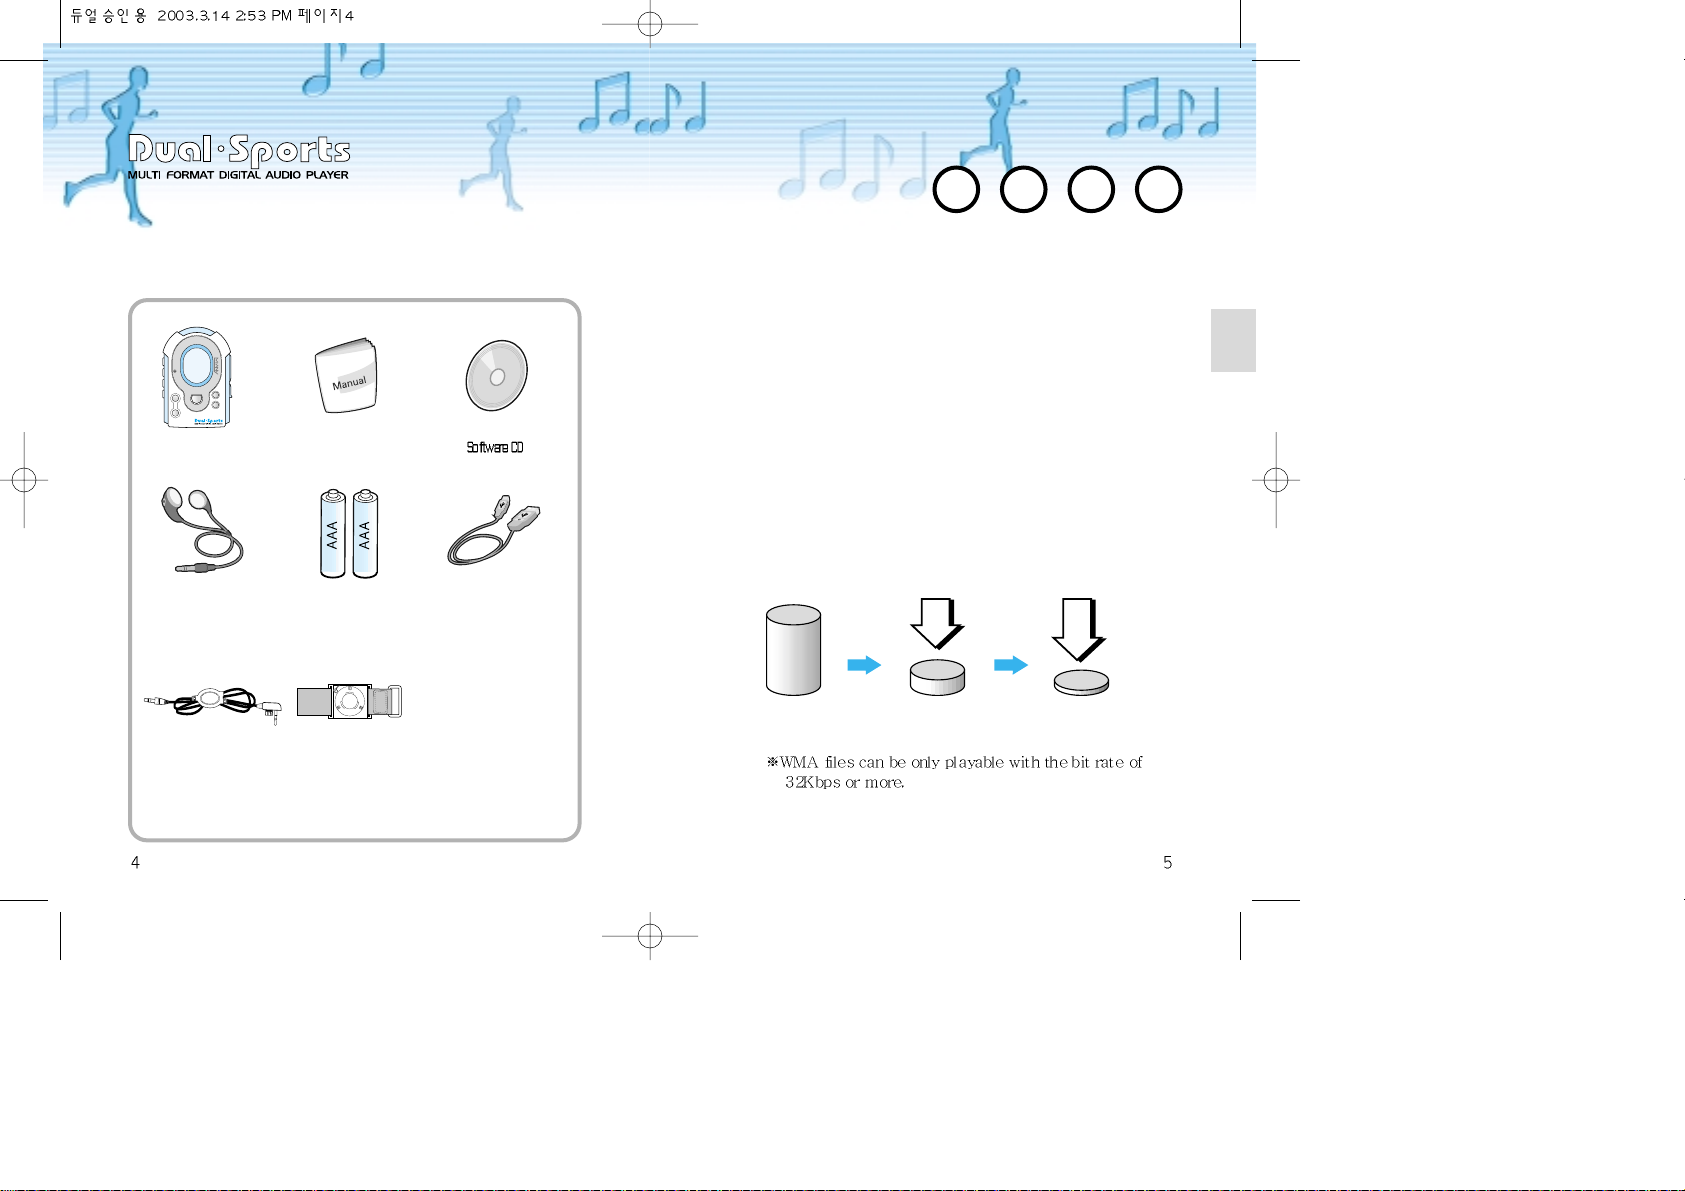
Body Part Manual
TOP
L
O
O
K
Ear set
Encoder Cable
Two AAA Battery
Arm belt
USB Cable
MP3?
MP3 is a compressed data format from CD music using
MPEG1-layer 3 and provides comparable sound quality from
PC as CD.
WMA?
WMA is also a compressed data format developed by
Microsoft ‘Window Media Technologies’ to only compress
music data providing comparable sound quality as 1285Kbps
MP3 format with use of low 64Kbps format.
Accordingly, it enables to provide the same sound quality
using only half memories of MP3’s.
CD Data MP3 Data WMA Data
D
I
G
I
T
A
L
A
U
D
I
O
P
L
PLAY STOP REW
A
YER &H.R
.
M
MIC
&
F
M
R
A
D
I
O
REC HOLD
FF
- VOLUME +
MODE
Page 5
Electrical PowerPC System Requirement
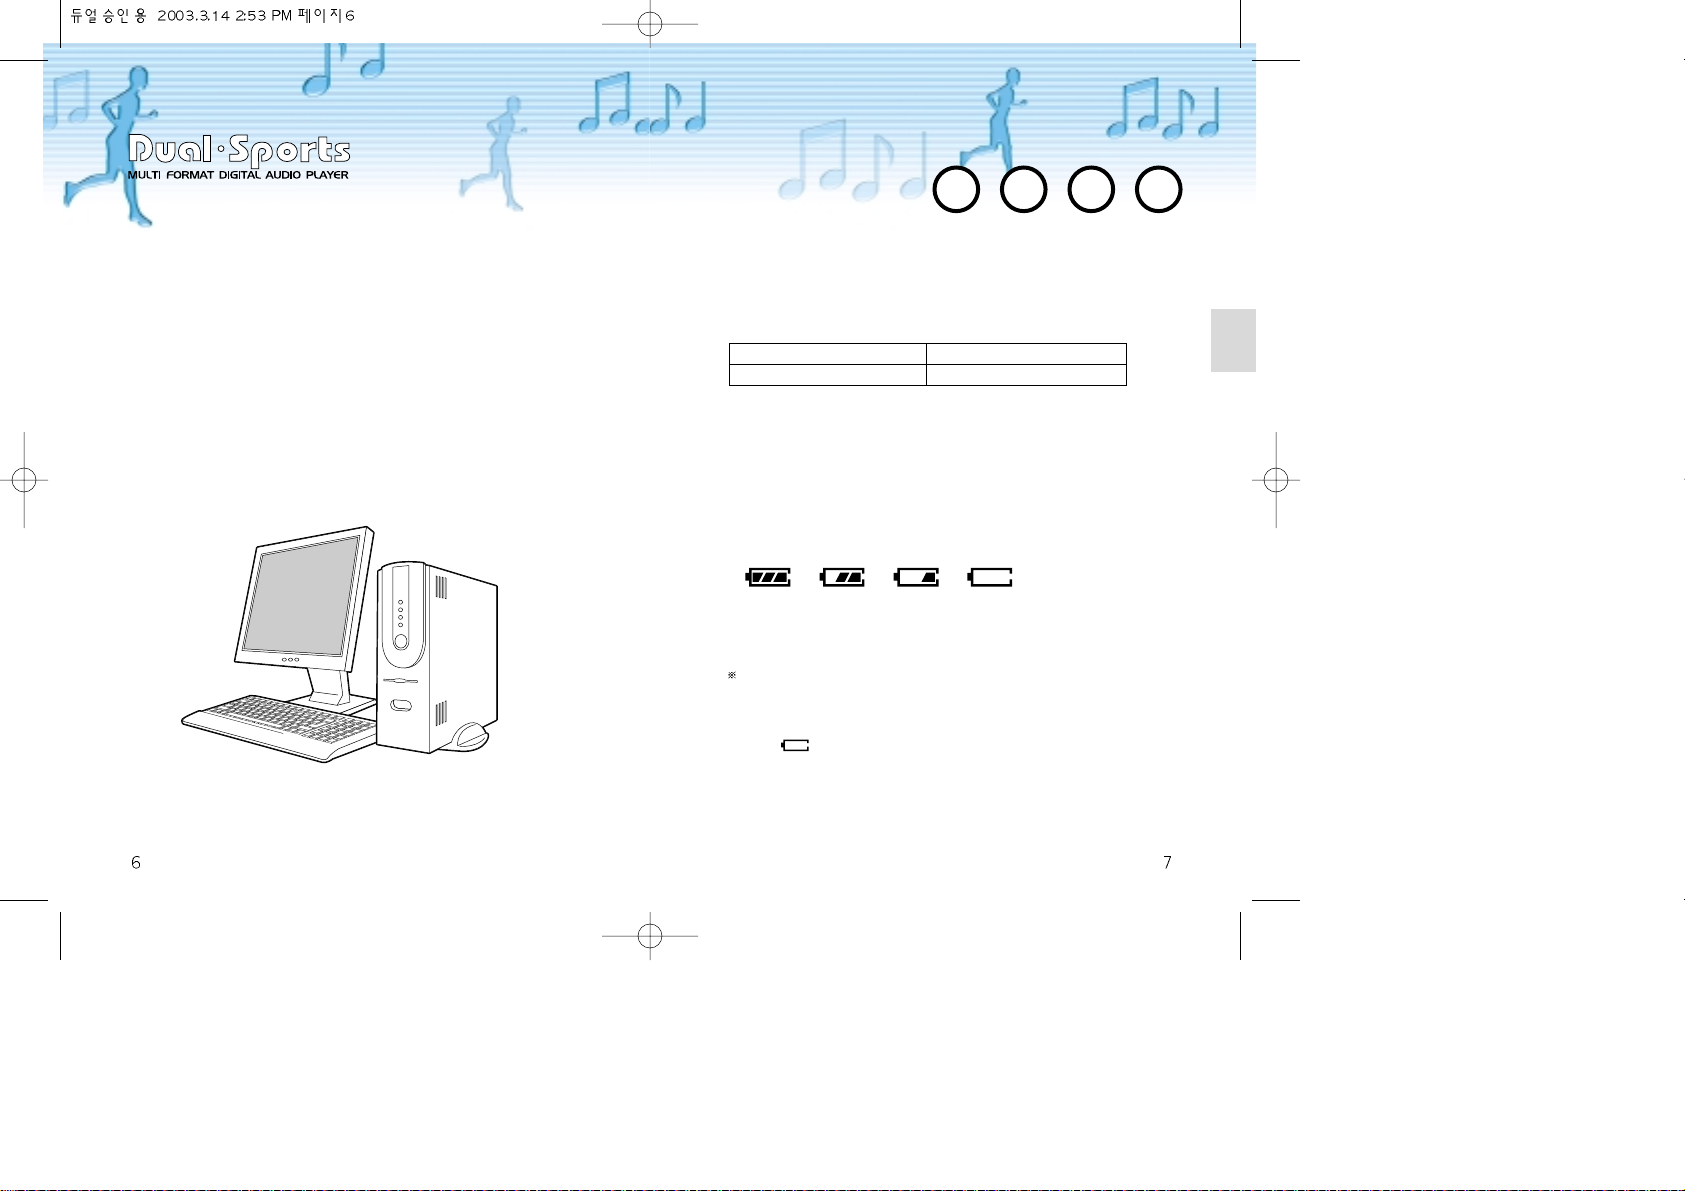
PC system requirements for the use of DUAL SPORTS are
as follows;
Microsoft (Windows 98, ME, 2000, XP)
CD-ROM Drive
Pentium 200MHz or more
RAM 32MB (64MB for Windows ME, 2000) or more
More than 128MB free space for Hard Disk (Further space
is required to save the music files)
USB Port Available
PC System Specification
• Output: 7mW(L) + 7mW(R)
• The battery capability may vary in accordance to types, manufactures
or using conditions of the batteries. Above result was derived from the
test conducted with conventional alkaline battery.
• The remainder display may vary for the first few second when power on.
It will show actual indication after 5 ~ 6 seconds.
When using general manganese batteries, the display may show higher
indication than it really remains due to the battery’s property.
Please replace the battery for the new in above case.
Alkaline battery lasts longer than manganese battery.
Battery Capability
Battery Remainder Display
• When blinks from the Battery Remainder Display.
• When it does not operate or stops right after the buttoning.
• When LCD page does not appear by buttoning from the product body.
Battery should be replaced in case of following;
Type MP3 Running Time
Alkaline Battery 15 Hours
Full Mid Short None
Page 6
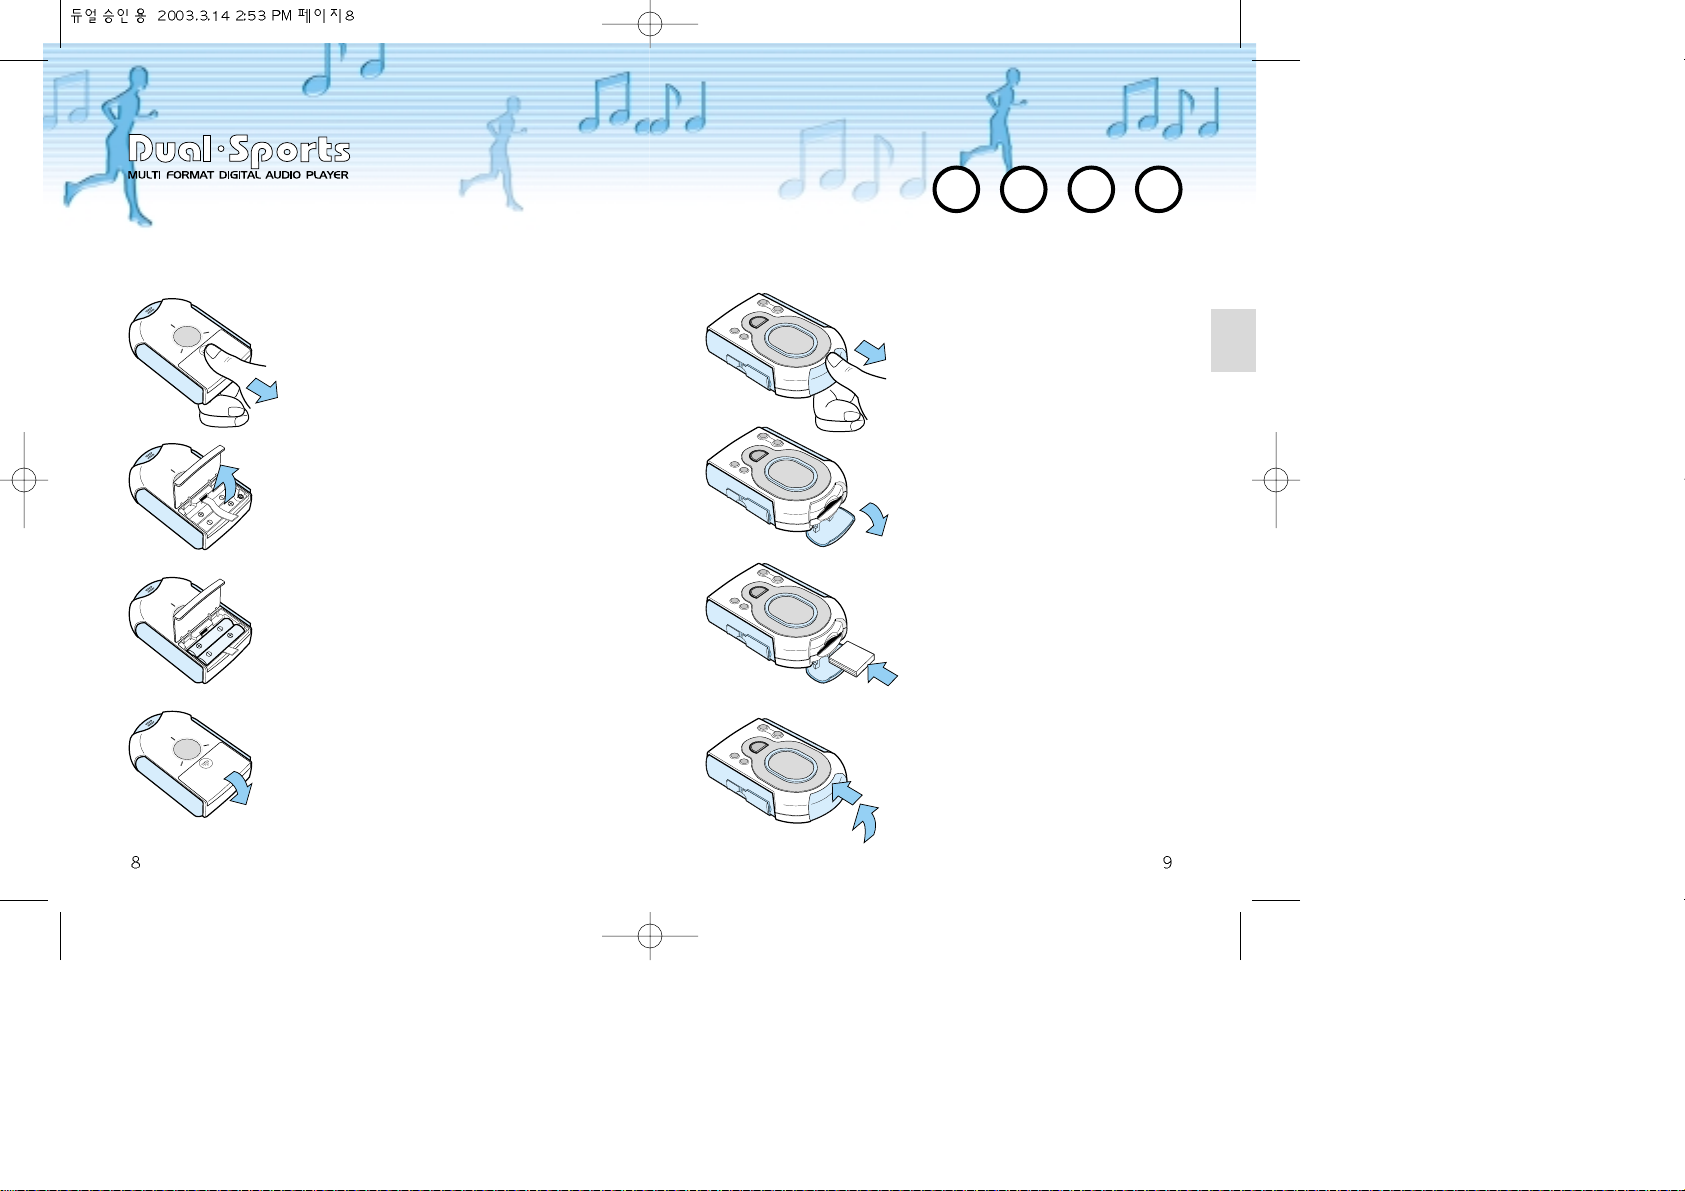
Installation for Memory Expansion Card
Battery Replacement
Pull down the batter cover from the back
of the product as shown on the figure.
• Lift the cover up after pulling it down
while pushing it lightly with the thumb.
Insert AAA type battery correctly to the
cage with assurance of both poles.
• The ribbon should be laid under the
battery to facilitate the battery to be
removed easily.
• Assure if both poles of the battery are
directed correctly as the products may
breakdown if they are reversed.
• Using different type of battery may cause
product breakdown.
Pull down the cover from upper surface of
the main body as shown on the figure.
•
Move down the cover after pulling it
forward gripping lightly with the thumb.
Insert the memory expansion card
when the cover opens.
•
Insert the card until it reaches to the end.
• Assure front/back surface if it is
correctly directed to avoid breakage of
the pins inside of the product.
• Use the memory card with only
standardized dimensions.
Place the cover to the position and
push it up to close.
• Push down the cover and move it upward
until it sounds “Click”.
Place the cover and push/move it
up to close
• Push down the cover and move it upward
until it sounds “Click”.
Page 7

Terms of Parts
Front
D
I
G
I
T
A
L
A
U
D
I
O
P
L
A
YER & H.R
.
M
&
F
M
R
A
D
I
O
- VOLUME +
MODE
PLAY STOP REW
MIC
FF
REC HOLD
Back
LCD
Displays indications and
operating states
MIC
Receives voice to record
Memory expansion cover
To be used when replacing
or adding memories
Battery Cover
Open this cover to
replace the battery
The arm belt is connected
from here with rubber
cover opened.
MODE Button
Menu & Mode Selection
buttons
REC Button
Records and sets functions
HOLD Button
Locks the current state of
operation
VOLUME
Controls volume and moves
for Menu button
Page 8
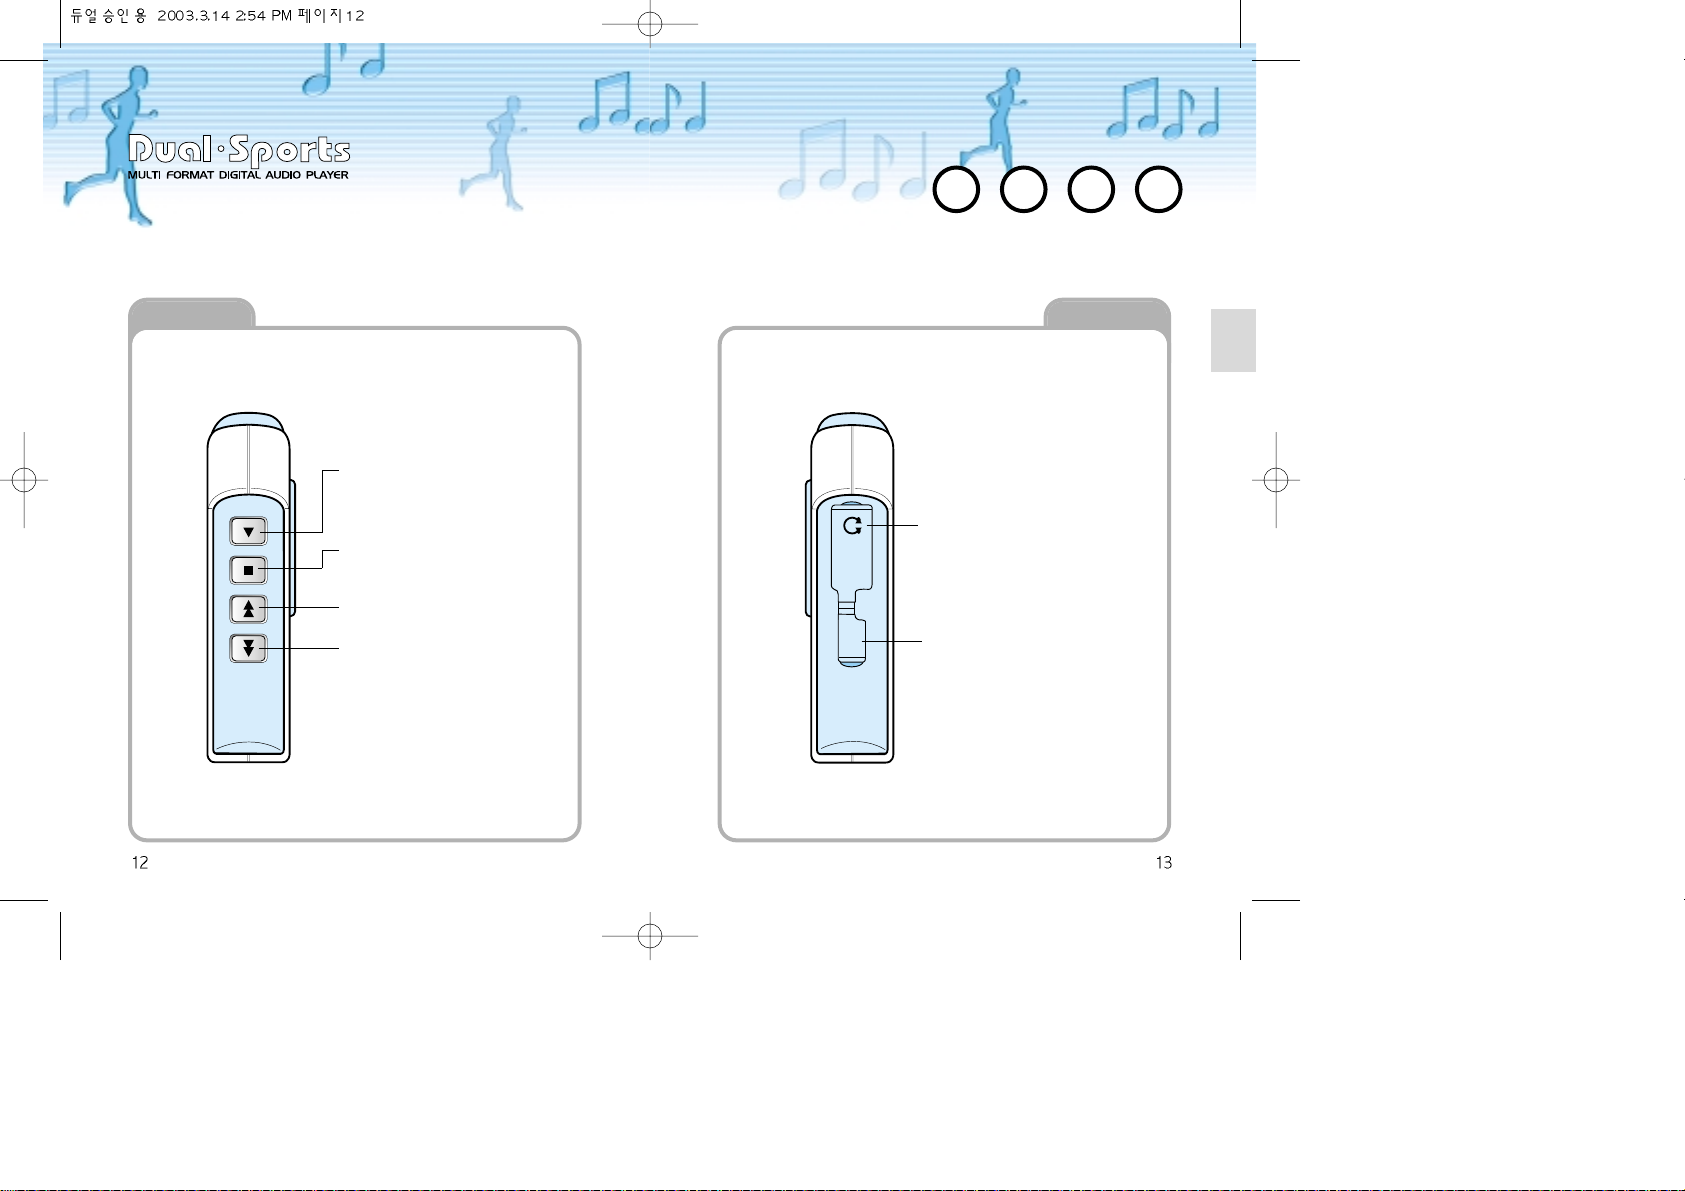
Side View 1
PLAY STOP REW FF
Side View 2
PLAY/ Power-On Button
Play & Pause
Power-on & Equalizer set
STOP/Power-Off Button
To be used for play-stop and power-off
REW Button
To be used for replay and fast rewind
FF Button
To be used for skip-play and fast forward
Earphone Jack
To be used when listening to
the music with a earphone
USB Port
To be used when downloading
music from the PC
EARPHONE
USB
Page 9
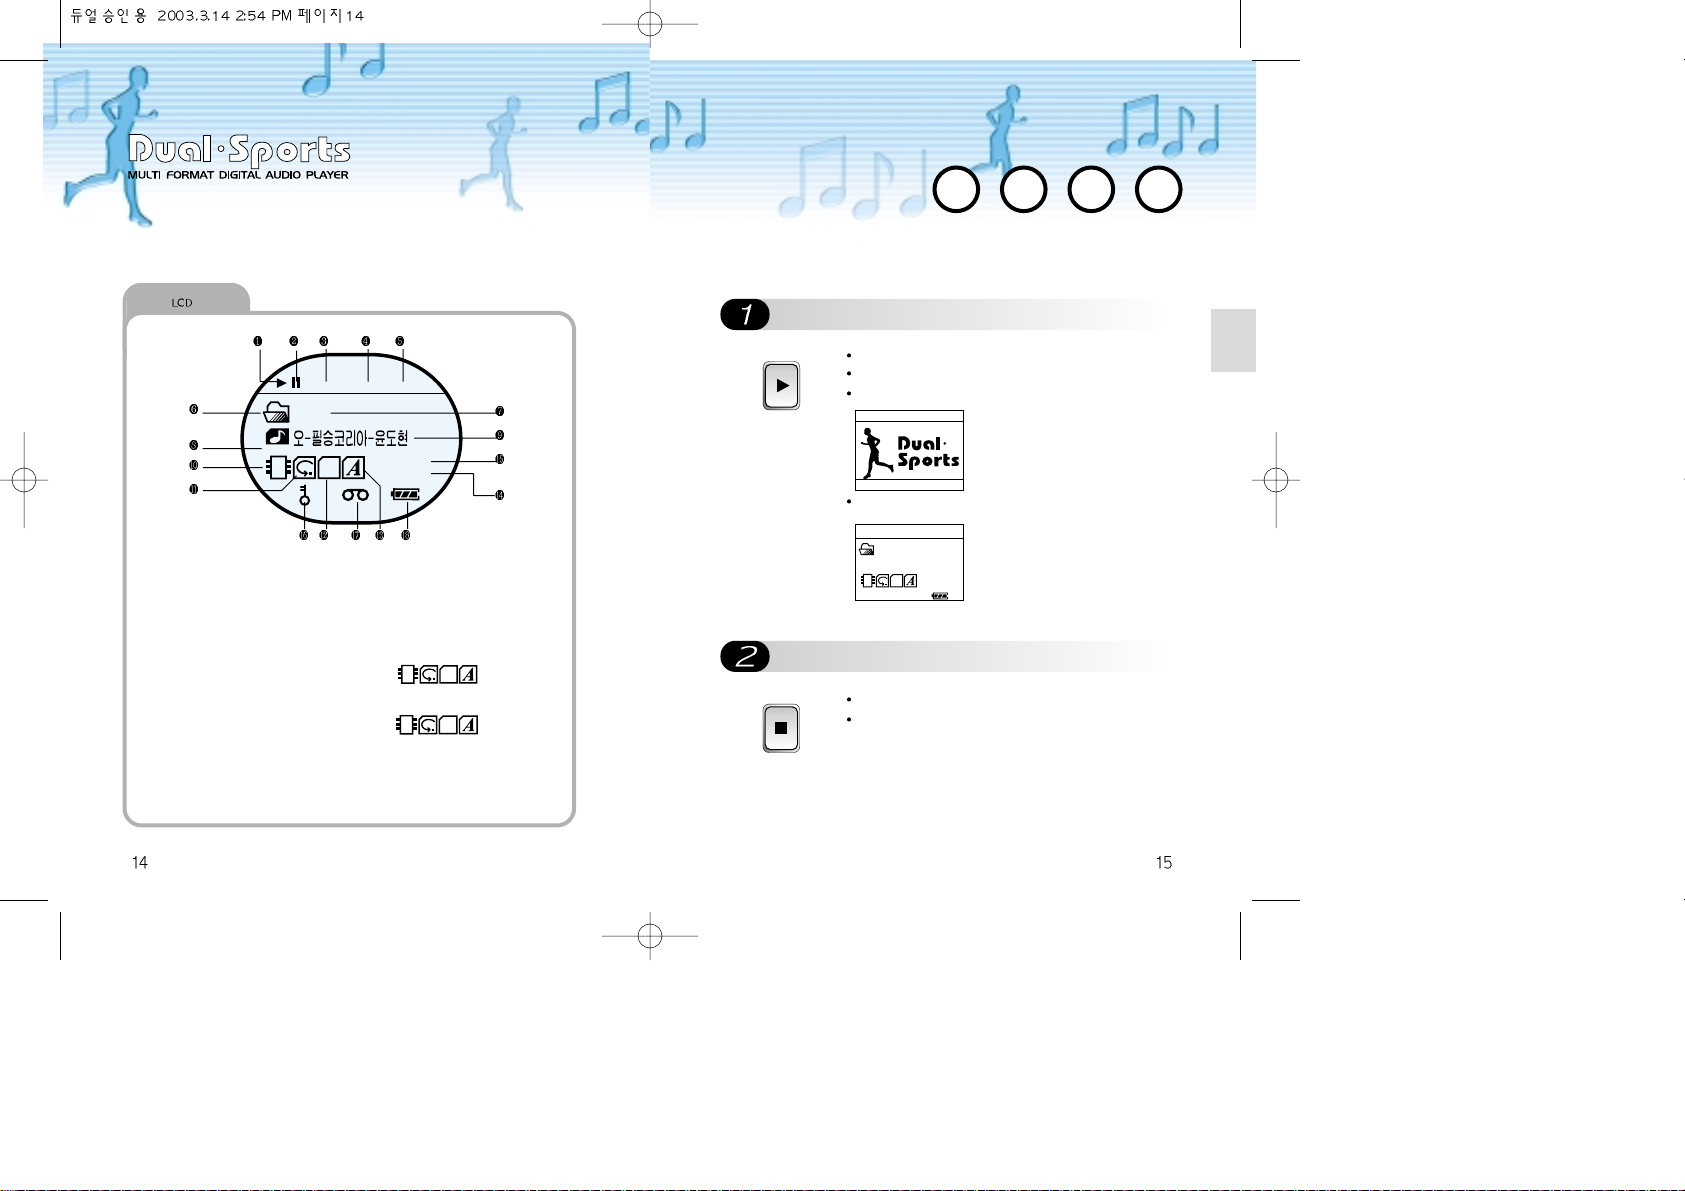
To Have Power On/OFF
To have power on
To have power off
PLAY
Push PLAY button for longer than 2 seconds.
Release the button with the LCD brightened.
The main page appears.
Once it is ready for PLAY the mode turns to STOP
mode.
STOP
Push STOP button for longer than 2 seconds.
Then the power gets off with the screen faded out.
Description of LCD Windows
00:15 22 001
SLIVE
ROOT
STOP
PM 01 : 36
1. Play Icon (Appears in Play)
2. Pause Icon (Appears in Pause)
3. Play Time appears here
4. Volume
5. No. of Track
6. Folder Icon
7. Name of Current Folder
8. File Format (MP3, WMA, ADP)
9. File Title appears here
10. Memory Icon (MMC icon opens
with MMC inserted)
11. Play mode ICON (Nomal,
Repeat, Repear all, Random,
Random all)
12. User Set EQ Icons (S_Live,
Rock, Jazz, Flat, User1, User2)
13. Play area Icon (Shows where
the current song is located)
14. Clock
1) In Stop
2) In Play
15. Shows Bit Rate of the Song
16. Hold Icon
17. Recording Icon
18. Battery
SLIVE
PM 01 : 36
SLIVE
128 KBPS
PM 01 : 36
00:15 22 001
ROOT
MP3
SLIVE
128 KBPS
PM 01 : 36
Page 10
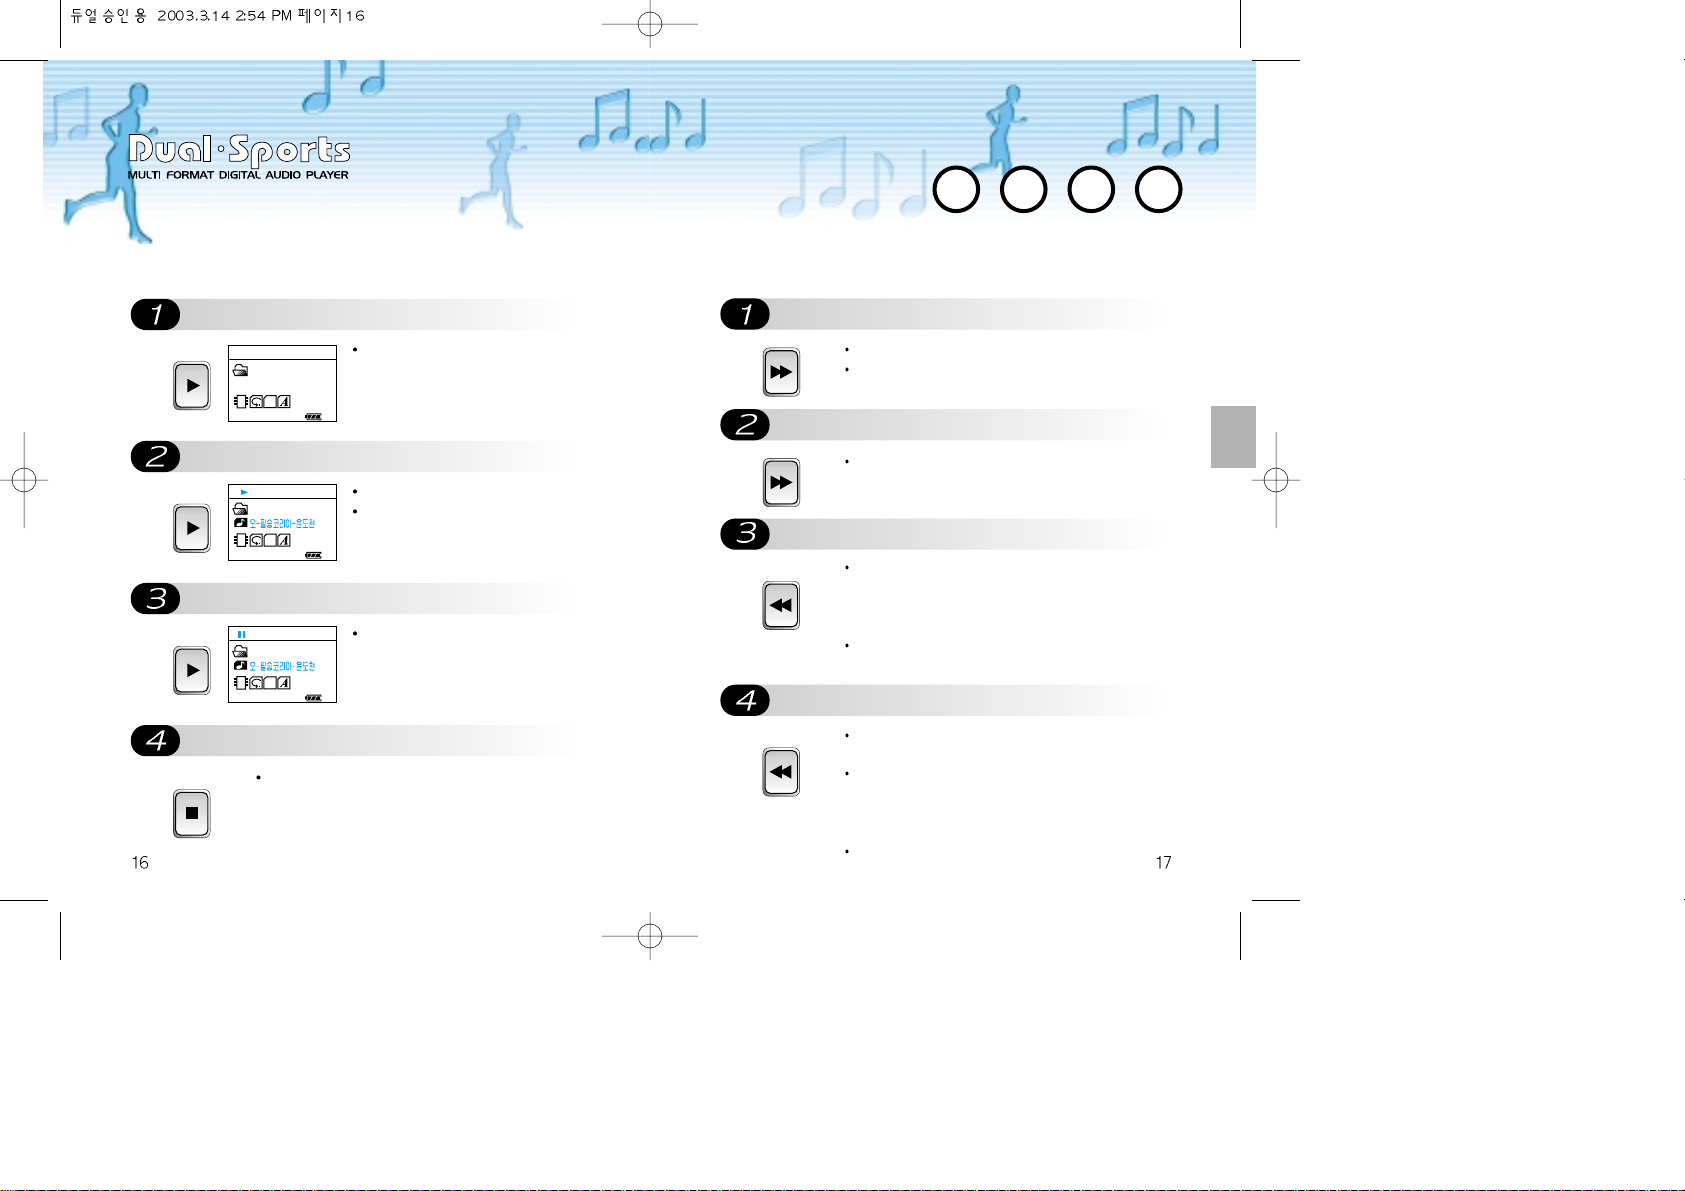
Searching and Selecting Songs
REW Button
FF Button
Searching with FF Button
REW
When pushing REW within 5 seconds after a song
begins, it plays the previous song. And it replays from
the initial part of the song when pushing REW 5
seconds after the song begins.
In STOP mode, REW enables to select the previous
song.
Searching with REW Button
REW
It searches songs backward when pushing REW for
longer than 2 seconds in PLAY mode.
When releasing REW while searching songs backward
having REW being pushed, it plays from the released
moment. It replays previous song only even if pushing
REW continuously.
It searches at preset speed.
FF
Push FF to skip to the next song while it plays.
In STOP mode, FF enables to select the next song.
FF
It searches songs forward at preset speed when
pushing FF for longer than 2 seconds in PLAY mode.
Push PLAY to make the power
Push PLAY once again for a
Pause
Stop
PLAY
The condition turns to STOP mode.
PLAY
Then it starts playing the music.
The current title appears on the LCD.
PLAY
Push PLAY for a second to pause the
current song. By pushing PLAY once
again it starts again from the paused
moment.
STOP
Push STOP to stop the current song.
Listening to Music
00:15 22 001
SLIVE
ROOT
STOP
PM 01 : 36
00:15 22 001
ROOT
MP3
128 KBPS
SLIVE
PM 01 : 36
00:15 22 001
ROOT
MP3
128 KBPS
SLIVE
PM 01 : 36
Page 11

To listen to Voice Records
To listen to MP3 while listening to
Selection for Voice Record or MP3
PLAY
It is only available in STOP mode.
Push PLAY for longer than 2 seconds.
Then recorded voice plays.
PLAY
Push PLAY for longer than 2 seconds
to listen to MP3 while listening to
recorded voice in STOP mode.
Equalizer Selections
Push PLAY for a while
Set the mode
PLAY
Push PLAY for a while in play state.
PLAY
SLIVE
JA
ZZ
RO
CK
FL
AT
US
ER 1
US
ER 2
The mode changes as; S-Live Jazz Rock
Flat User1 User2 when pushing PLAY for a
while in play state.
Sound quality may drop according to the song. The
equalizer can be used in the case to optimize the song
quality.
What’s Equalizer?
S-Live: For Heavy sound with a live feeling
Jazz: For Sweet and Delicate feeling
Rock: For Powerful and Massive feeling
Flat: For standard and natural feeling
User1: User Set
User2: User Set
Advanced way of compass
adjustment used for audio product.
BAND 2
VAL -02
00:15 22 001
SLIVE
ROOT
STOP
PM 01 : 36
00:15 22 001
ADP
VOO1
ADP
128 KBPS
SLIVE
PM 01 : 36
00:15 22 001
ROOT
MP3
128 KBPS
SLIVE
PM 01 : 36
00:15 22 001
ROOT
MP3
128 KBPS
SLIVE
PM 01 : 36
00:15 22 001
ROOT
MP3
128 KBPS
JA
ZZ
PM 01 : 36
Page 12
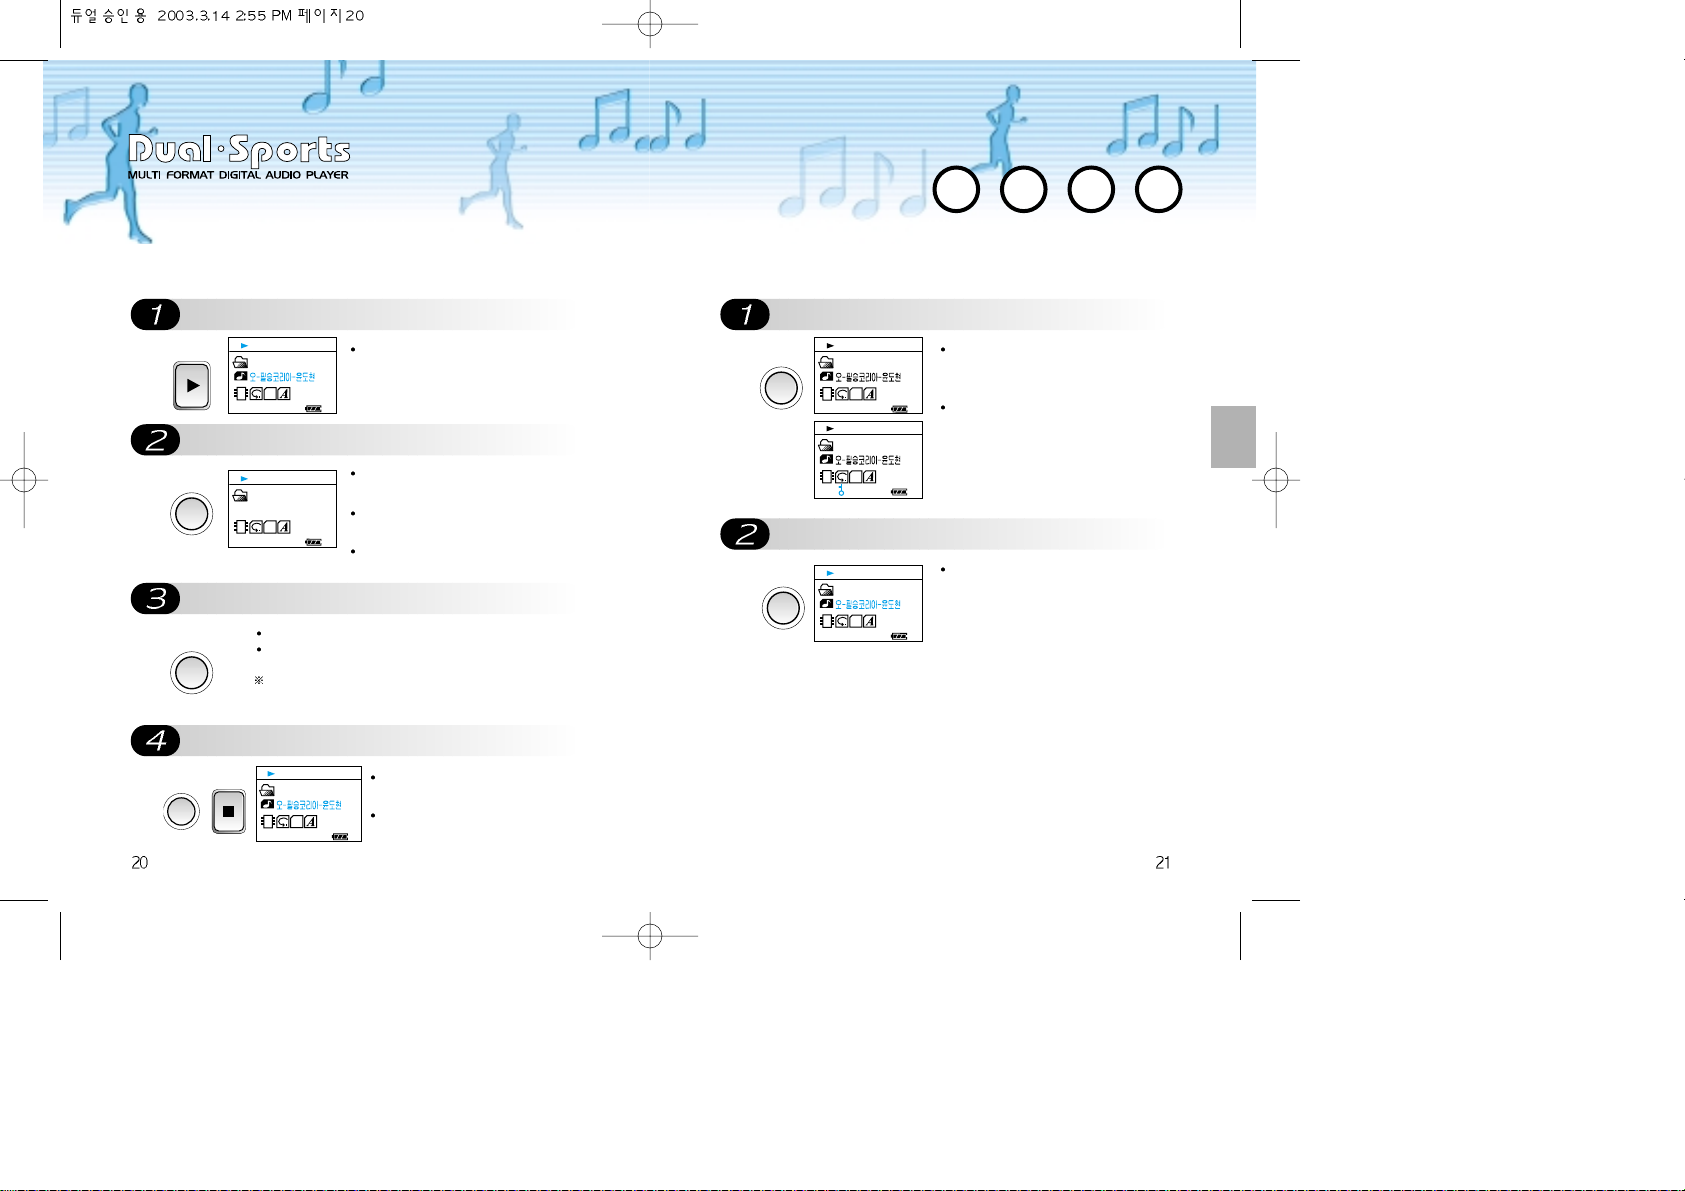
Repeat
Push PLAY button.
Push REC for a second.
It repeats the song in the range between
To revoke the Repeat
PLAY
It only works in play mode.
REC
Push REC button for a second at
desired moment while playing a song.
The message “Repeat A-” appears on
the screen.
Push REC once again to show
“Repeat A-B” on the LCD.
REC
It repeats the song in the range between A and B.
If the position B is not specified, the end of the song
will be specified as B point automatically.
The “Repeat” is not available when setting B whine
2 seconds after setting A or when A is set only within
3 seconds ahead from the end of the song.
STOP
Push REC or STOP for a second
to revoke the repeat.
The mode returns to PLAY.
HOLD
Push HOLD for longer than 2
To revoke the HOLD
HOLD
Push HOLD button for longer than 2
seconds. Then a Key icon appears on
the LCD.
Lock all the buttons as in function to
prevent malfunctions from
unexpected buttoning while the
player stays in a pocket or bag. .
HOLD
Push HOLD once again for longer
than 2 seconds to make all the buttons
to work and the Key icon disappears.
00:15 22 001
SLIVE
MP3
128 KBPS
PM 01 : 36
ROOT
01:15 22 001
ROOT
Repeat A – B
128 KBPS
S-
LIVE
PM 01 : 36
REC
00:15 22 001
ROOT
MP3
SLIVE
128 KBPS
PM 01 : 36
00:15 22 001
ROOT
MP3
00:15 22 001
ROOT
MP3
128 KBPS
SLIVE
PM 01 : 36
128 KBPS
SLIVE
PM 01 : 36
00:15 22 001
ROOT
MP3
128 KBPS
SLIVE
PM 01 : 36
Page 13
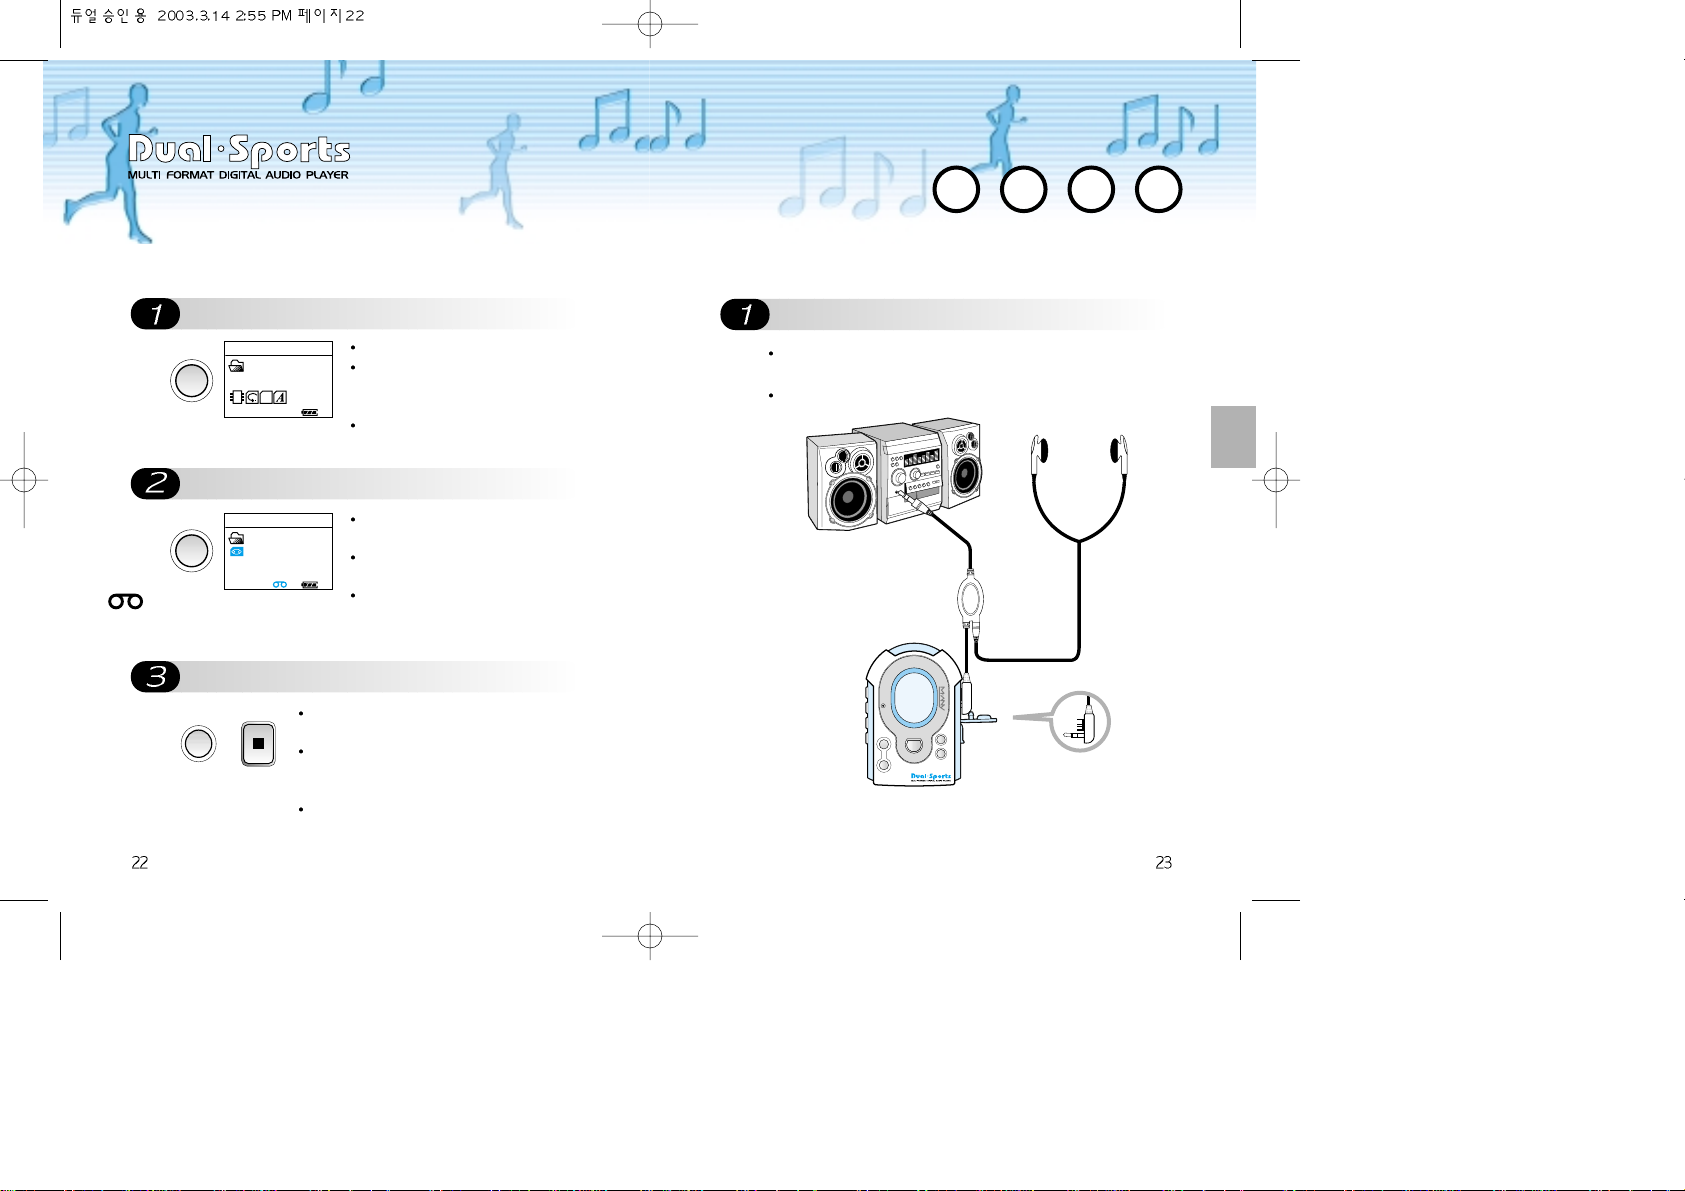
To record the music
Audio Connection
Push REC button for longer than 2
Push REC button once again for a
Push STOP to halt the recording.
Voice Recording
REC
It is only available in STOP mode.
Push REC button once for longer
than 2 seconds to show “VOICE
RECORD” on the LCD.
To cancel the recording, press STOP.
REC
Recording begins when pushing REC
button once again for a second.
Then the file name of being recorded
appears on the LCD while it records.
The LCD shows below icons.
STOP
Push STOP button to halt the recording while
it is recording.
Recorded files are saved in “ADP” folder with
the names of V001, V002, V003 etc. in
sequences.
Play the recorded file to check if it is properly
recorded.
D
I
G
I
T
A
L
A
U
D
I
O
P
L
A
Y
ER &H .R
.
M
&
F
M
R
A
D
I
O
- VOLUME +
MODE
PLAY STOP REW
MIC
FF
REC HOLD
D
I
G
I
T
A
L
A
U
D
I
O
P
L
A
Y
ER &H .R
.
M
&
F
M
R
A
D
I
O
- VOLUME +
MODE
PLAY STOP REW
MIC
FF
REC HOLD
Audio Device & CD PLAYER
Connect to Earphone Jack
Earphone
(Loop back)
What’s Loop back?
This function enables
you to listen to the
music you are recording
by connecting to
earphone jack.
(Some of noise may be
heard while loop back is
being performed but the
file being recorded will
not be interrupted)
Encoder Cable
Connect to the
Earphone Jack
Insert one end of the MP3 encoder cable to the earphone terminal
of normal audio device or portable cassette and connect the other
end of the cable into the earphone terminal of the player.
The music from cassette tape or CD can be directly saved in MPE
format.
Property of the MPE format: It has limited PLAY performance.
PLAY in the PC: Playable in PC using window media
PLAY in the Player: It is only playable when the MPE file is downloaded
to the player where it was made from.
00:00 22 001
SLIVE
ROOT
VOICE RECORD
PM 01 : 36
00:00 22 001
ADP
V001
ADP
SPACE : 012MB 032KBPS
TIME : 144MIN PM 00:26
REC
Page 14
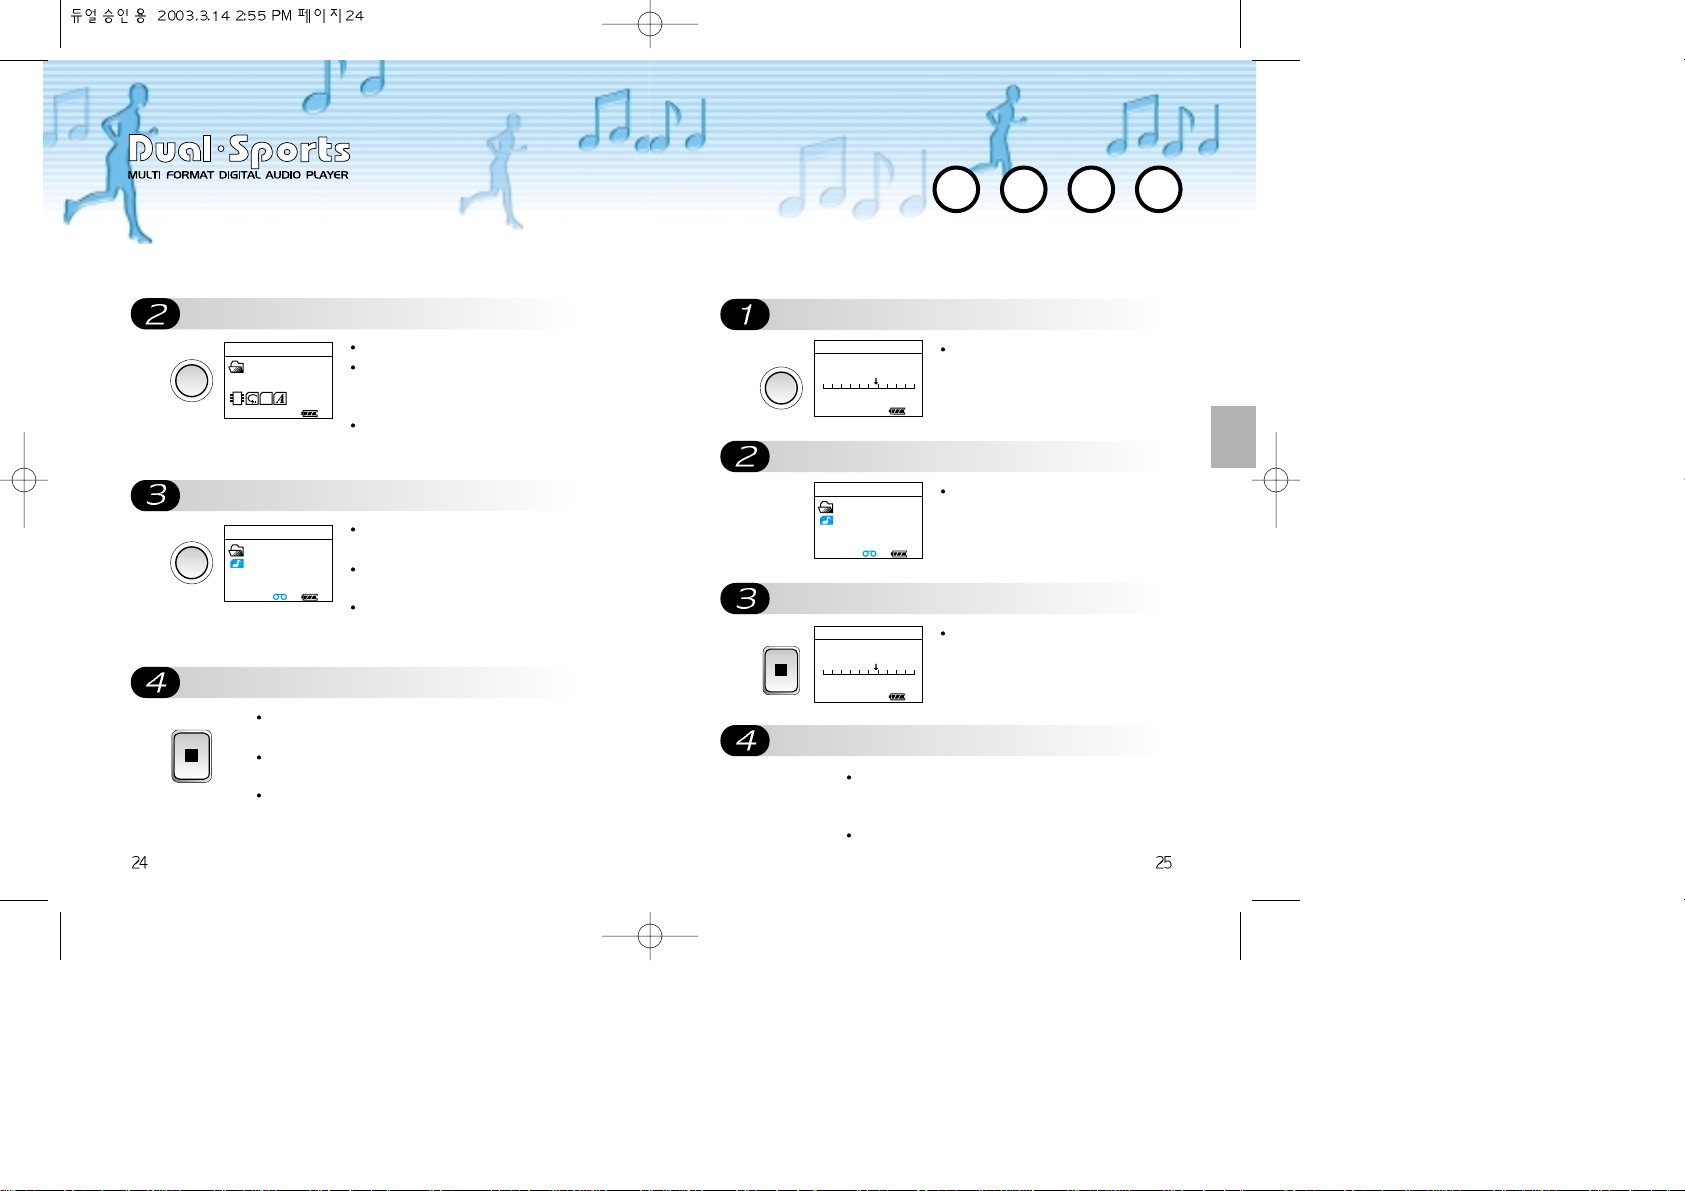
Push REC button for longer than 2
Push REC once again for a
Push STOP to halt the recording.
REC
Only available in STOP mode.
It appears “MUSIC RECORD” on
the LCD when pushing REC button
twice for longer than 2 seconds each.
To cancel the record, push STOP
button.
REC
Push REC button once again for a
second to start recording.
Then the file name appears on the
LCD while it records.
The LCD shows below icons.
STOP
Push STOP button to halt the recording while it is
recorded.
Recorded files are saved in “MPE” folder with the
names of E001, E002, E003 etc. in sequences.
Play the recorded file to check if it is properly
recorded.
Radio Source Recording
Push REC for a second
It starts recording.
Push STOP button
Listen to recorded file.
REC
Push REC for a second when you
want to record a certain source from
radio.
The LCD shows an icon which
indicates the recording with the name
of being recorded.
STOP
Push STOP button to halt the
recording.
It appears “MUSIC RECORD” on the LCD when
pushing REC button twice for longer than 2 seconds
each.
To cancel the record, push STOP button.
00:00 22 001
SLIVE
ROOT
MUSIC RECORD
PM 01 : 36
00:00 22 001
MPE
E001
MP3
SPACE : 012MB 032KBPS
TIME : 144MIN PM 00:26
VOL 22 MONO
FM 099.9
87.5 108
MHZ
00:00 22 001
MPE
E001
MP3
SPACE : 012MB 032KBPS
TIME : 144MIN PM 00:26
VOL 22 MONO
FM 099.9
87.5 108
MHZ
Page 15
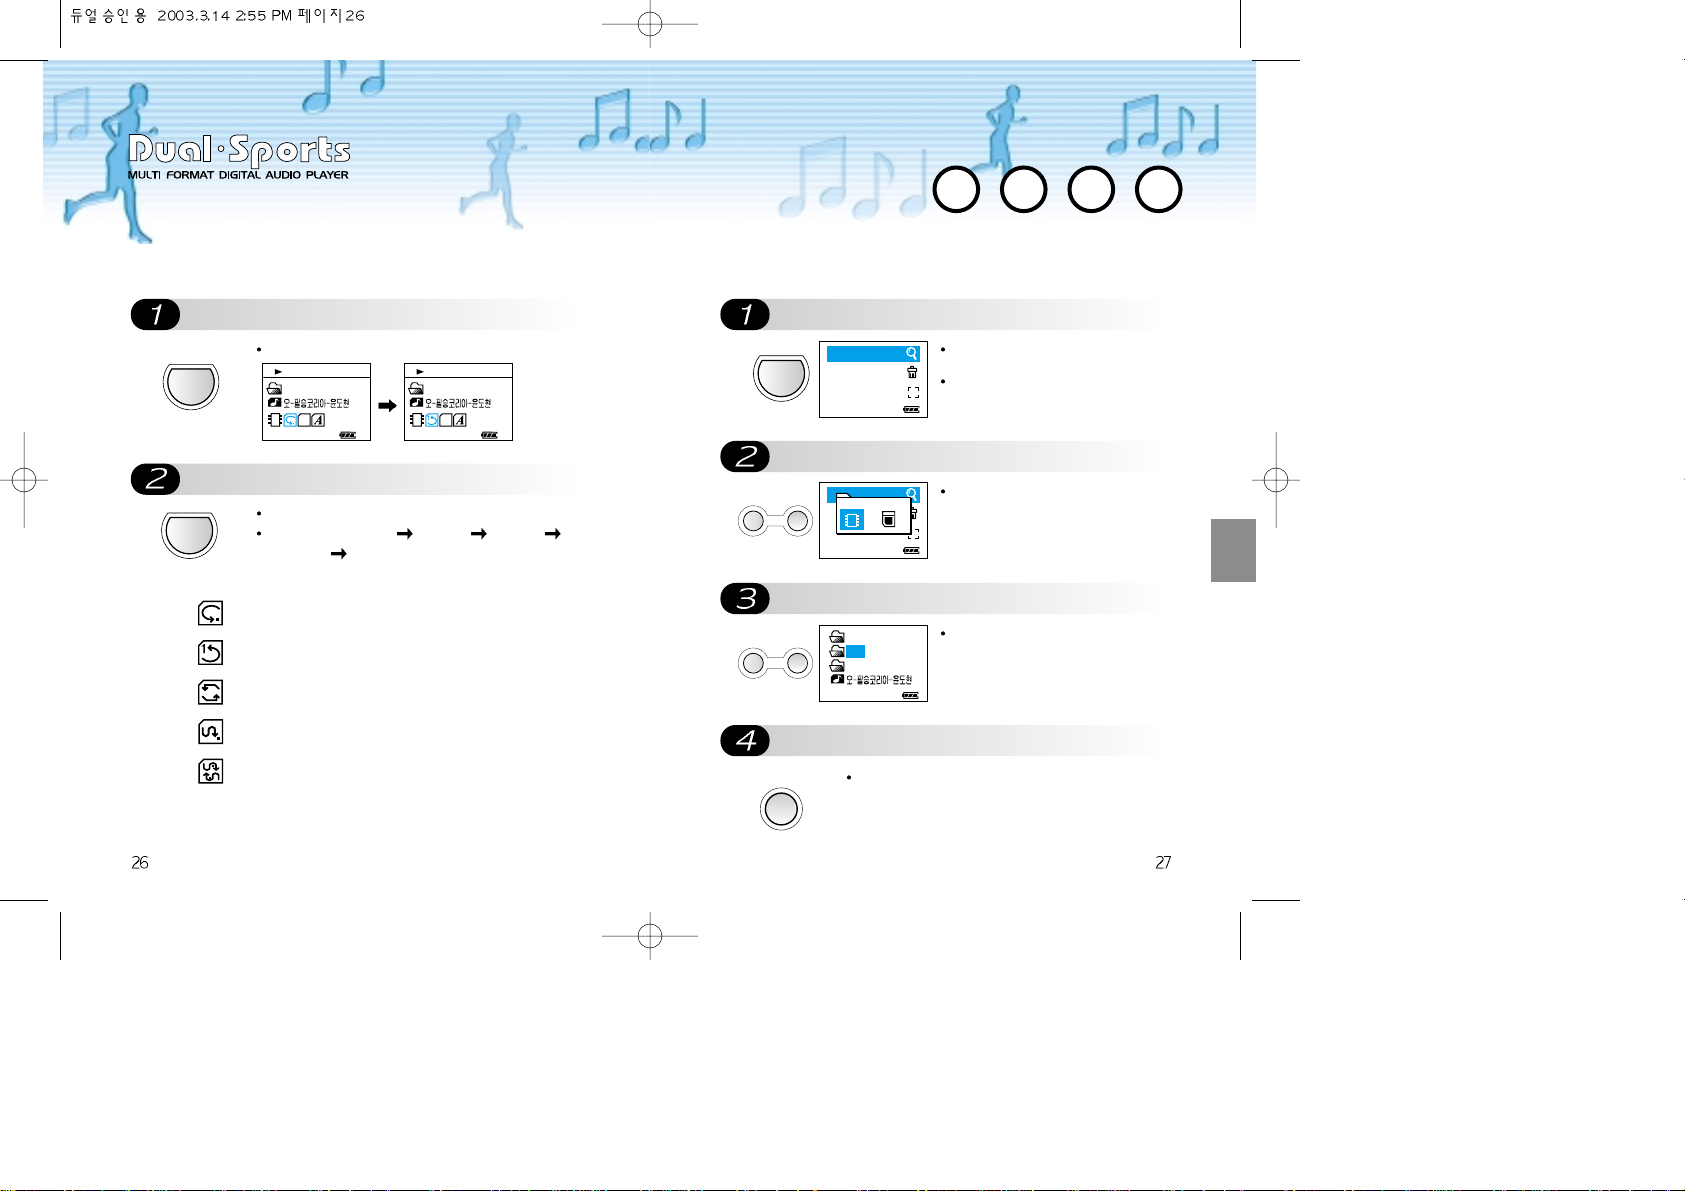
Selection for Folder & Song
Push MODE button.
Select the memory using VOLUME +/-
Select folders with VOLUME+/-
To move to higher-level folder
MODE
Push MODE button for longer than 2
seconds.
Push MODE button after selecting
“Audio” to choose “Search” and
again push MODE button after
selecting “Search”.
- VOLUME +
Select Flash (inner memory) or MMC
(outer memory) with VOLUME+/buttons and push MODE button
subsequently.
- VOLUME +
Select a folder or a song you want to
listen to with VOLUME +/- buttons
and push MODE button
subsequently.
REC
Press REC button.
Set from the PLAY mode.
Push MODE button for a second.
How to set for Continuous Play?
MODE
Set the mode while the player is playing.
MODE
Push MODE button while the player is in play.
It changes as; Normal Repeat 1 Repeat 2
Random 1 Random 2, in sequences.
Normal: For playing entire songs in selected folder
Repeat 1: For playing one selected song continuously
Repeat 2: For playing entire songs in selected folder
continuously
Random 1: For playing shuffled songs in selected
folder once
Random 2: For playing shuffled songs in selected
folder continuously
AA uu dd ii oo
00:15 22 001
SLIVE
MP3
128 KBPS
PM 01 : 36
ROOT
00:15 22 001
ROOT
MP3
128 KBPS
SLIVE
PM 01 : 36
Search
Delete
PLAY Area
Search
Flash MMC
Delete
PLAY Area
ROOT
MPE
ADP
MP3
P
P
Page 16
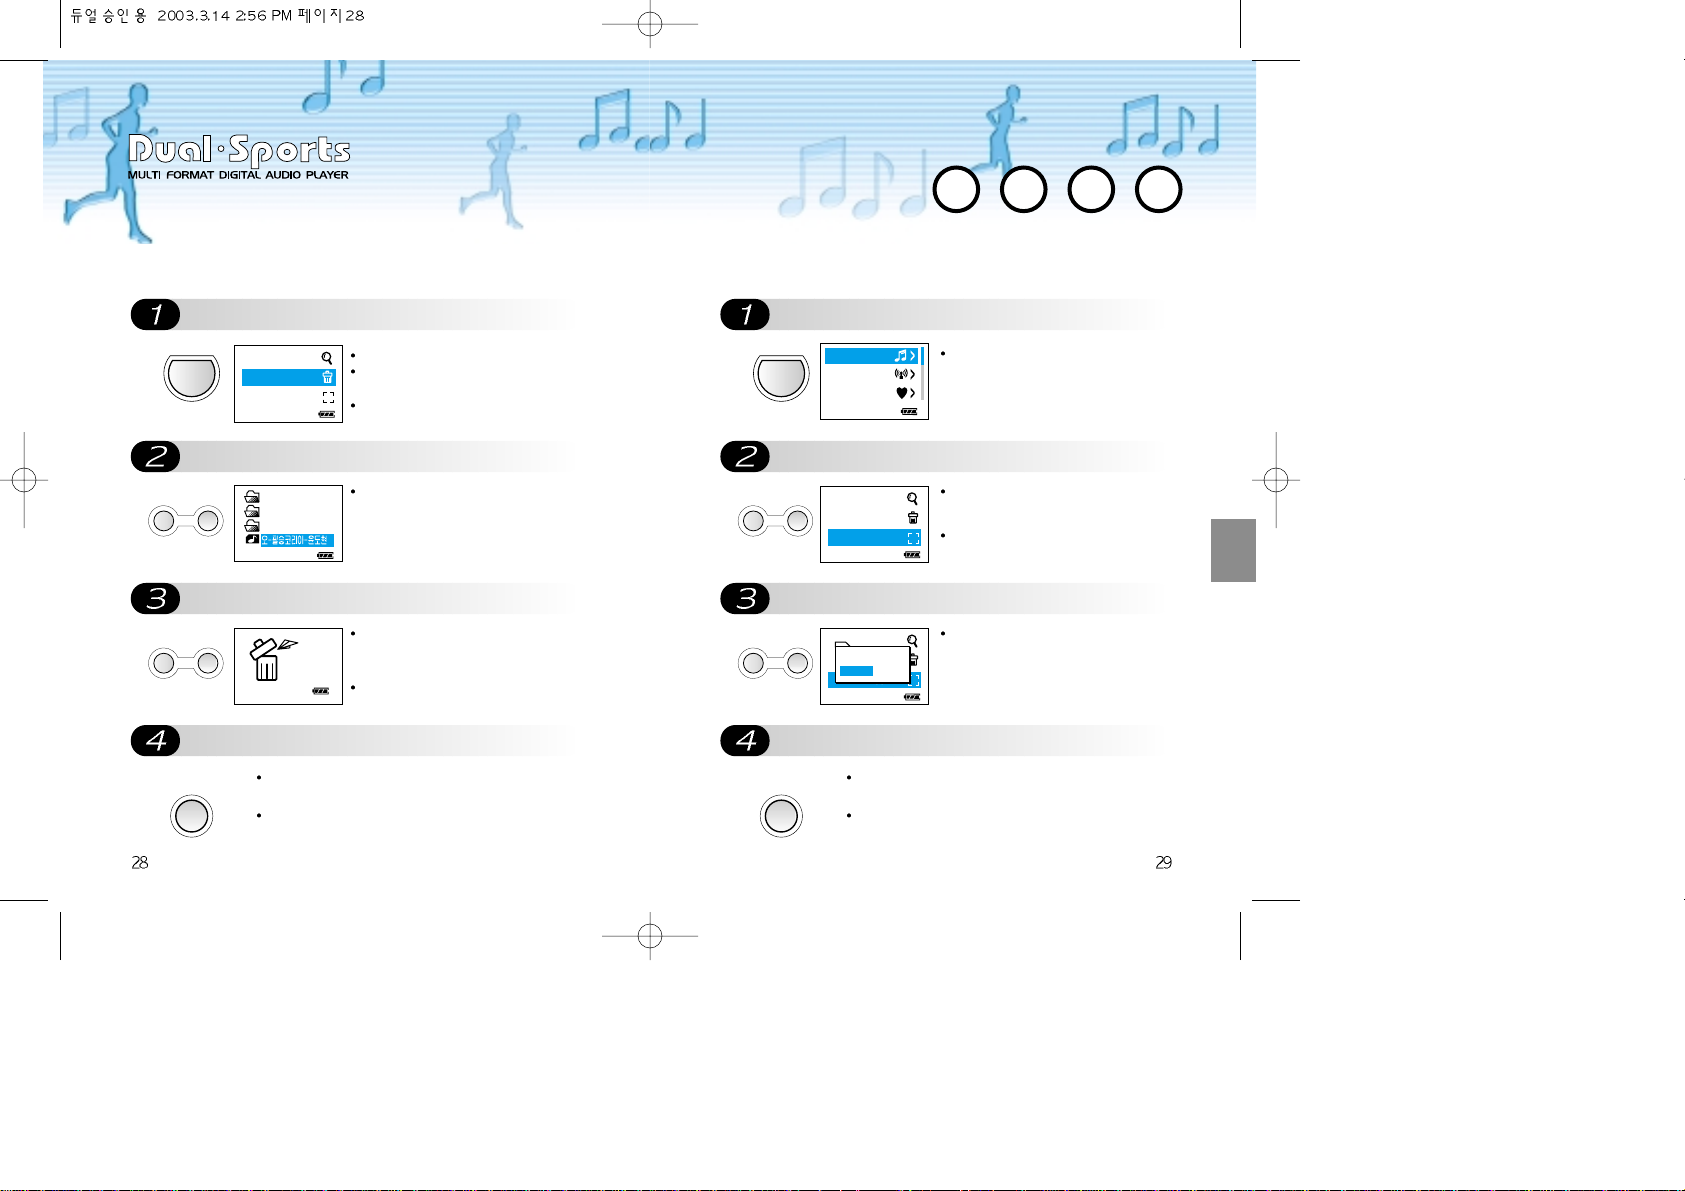
PLAY Area
Push MODE button.
Push VOLUME+/- buttons.
Push VOLUME+/- buttons.
Push REC button to move out from
MODE
Push MODE button for longer than 2
seconds.
- VOLUME +
Push VOLUME+/- buttons to select
“Audio” and push MODE button
subsequently.
Push VOLUME+/- buttons to select
“PLAY Area” and push MODE button
subsequently.
- VOLUME +
Push VOLUME+/- buttons to select
“current“ or “All” and push MODE
button subsequently.
REC
By pushing REC button each time, you can move to
the next upper level of the folders.
Push REC button over and over to move out from the
menus.
File Deleting
Push MODE button
Push VOLUME+/- buttons
Push MODE button for longer than 2
Push REC button to move out from
MODE
Push MODE button for longer than 2 seconds.
Push VOLUME+/- button to select Audio
and push MODE button subsequently.
Push VOLUME+/- button to select Delete
and push MODE button subsequently.
- VOLUME +
Select the file to be deleted with
VOLUME+/- button.
- VOLUME +
The file will be deleted when push
MODE button for longer than 2
seconds.
Repeat above procedures to delete
number of files.
REC
By pushing REC button once, you can move to the
next upper level of the folders.
Push REC button over and over to move out from the
menus.
Search
Delete
PLAY Area
P
ROOT
MPE
ADP
MP3
DELETE
DATA...
Audio
Radio
H.R.M
Search
Delete
PLAY Area
P
Search
Select play area
Delete
current All
PLAY Area
P
Page 17
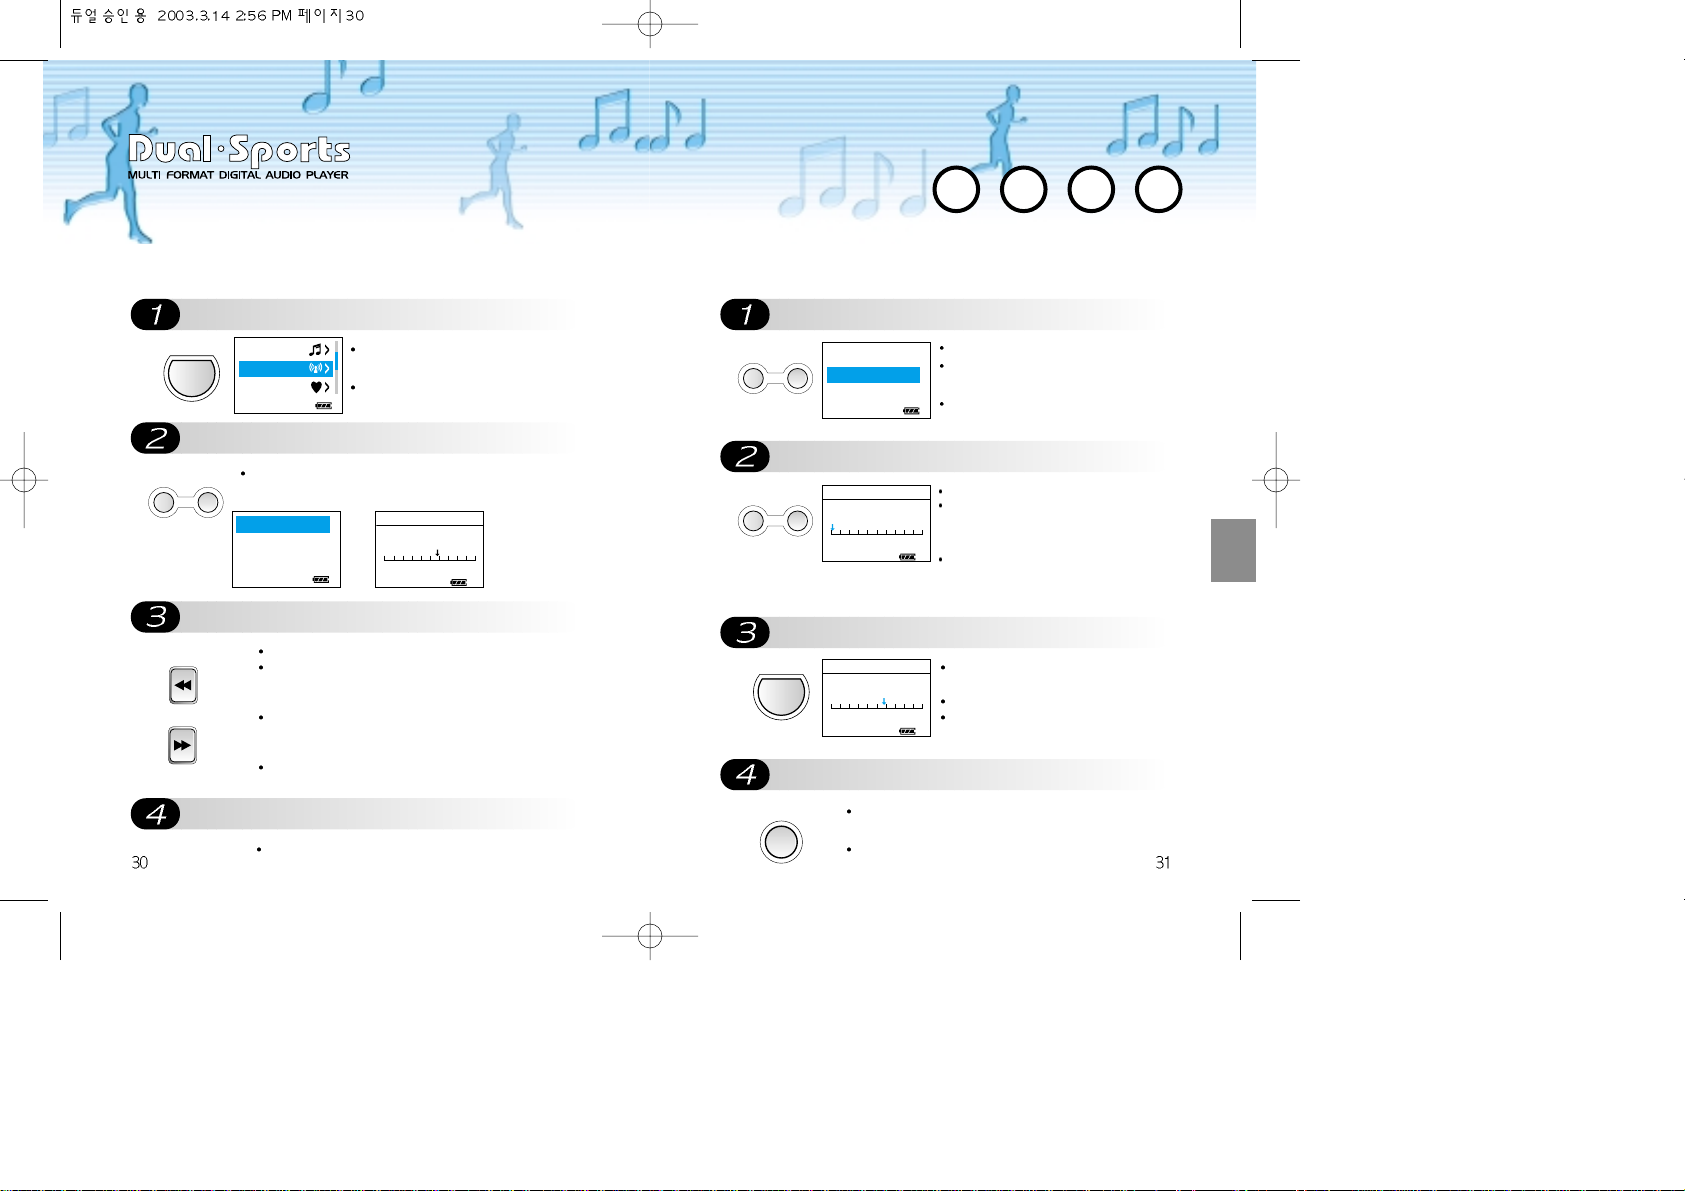
Push MODE button.
Select Radio menu.
Set the frequency you want.
To turn the Radio off
Listening to FM Radio Saving FM Channel
MODE
Push MODE button for longer than 2
seconds.
Push VOLUME+/- buttons to select “Radio”
and push MODE button subsequently.
- VOLUME +
Push VOLUME+/- buttons to select “FM Radio ON”
and push MODE button subsequently.
REW
FF
Push FF/REW buttons to select desired frequency.
FF: Enables to move forward by pushing FF for a second.
When pushing the button for longer than 2 seconds, it
automatically searches the channels.
REW: Enables to move backward by pushing REW for a
second. When pushing the button for longer than 2
seconds, it automatically searches the channels.
When no channel is stored, it move by 0.1Mhz by
buttoning FF/REW per time.
Push STOP button to turn the radio off.
Select the menu “Radio”
Search the channel.
Push MODE button.
Check the channel
- VOLUME +
Push MODE button for longer than 2 seconds.
Push VOLUME+/- buttons to select “Radio”
and push MODE button subsequently.
Push VOLUME+/- buttons to select “Frequency
Save” and push MODE button subsequently.
- VOLUME +
Search the channel with VOLUME+/- button.
VOL +: Enables to move forward by one scale by
one time pushing the button for a second. When
pushing the button for longer than 2 seconds, it
automatically searches the channels.
VOL -: Enables to move Backward by one scale
by one time pushing the button for a second.
When pushing the button for longer than 2
seconds, it automatically searches the channels.
MODE
It automatically stops when a channel is
detected.
To save the channel, push MODE button.
Then it is saved with a message saying
“Frequency Saving”.
REC
Assure if the channel has correct frequency from FM
Radio ON menu selected by pushing REC Button.
Push STOP button to leave from the menu.
RR aa dd ii oo
Audio
Radio
H.R.M
FM Radio ON
Frequency Save
Delete Frequency
VOL 22 MONO
FM 099.9
MHZ
87.5 108
FM Radio ON
Frequency Save
Delete Frequency
VOL 22 MONO
FM 087.5
87.5 108
MHZ
VOL 22 MONO
FM 099.9
87.5 108
MHZ
Page 18
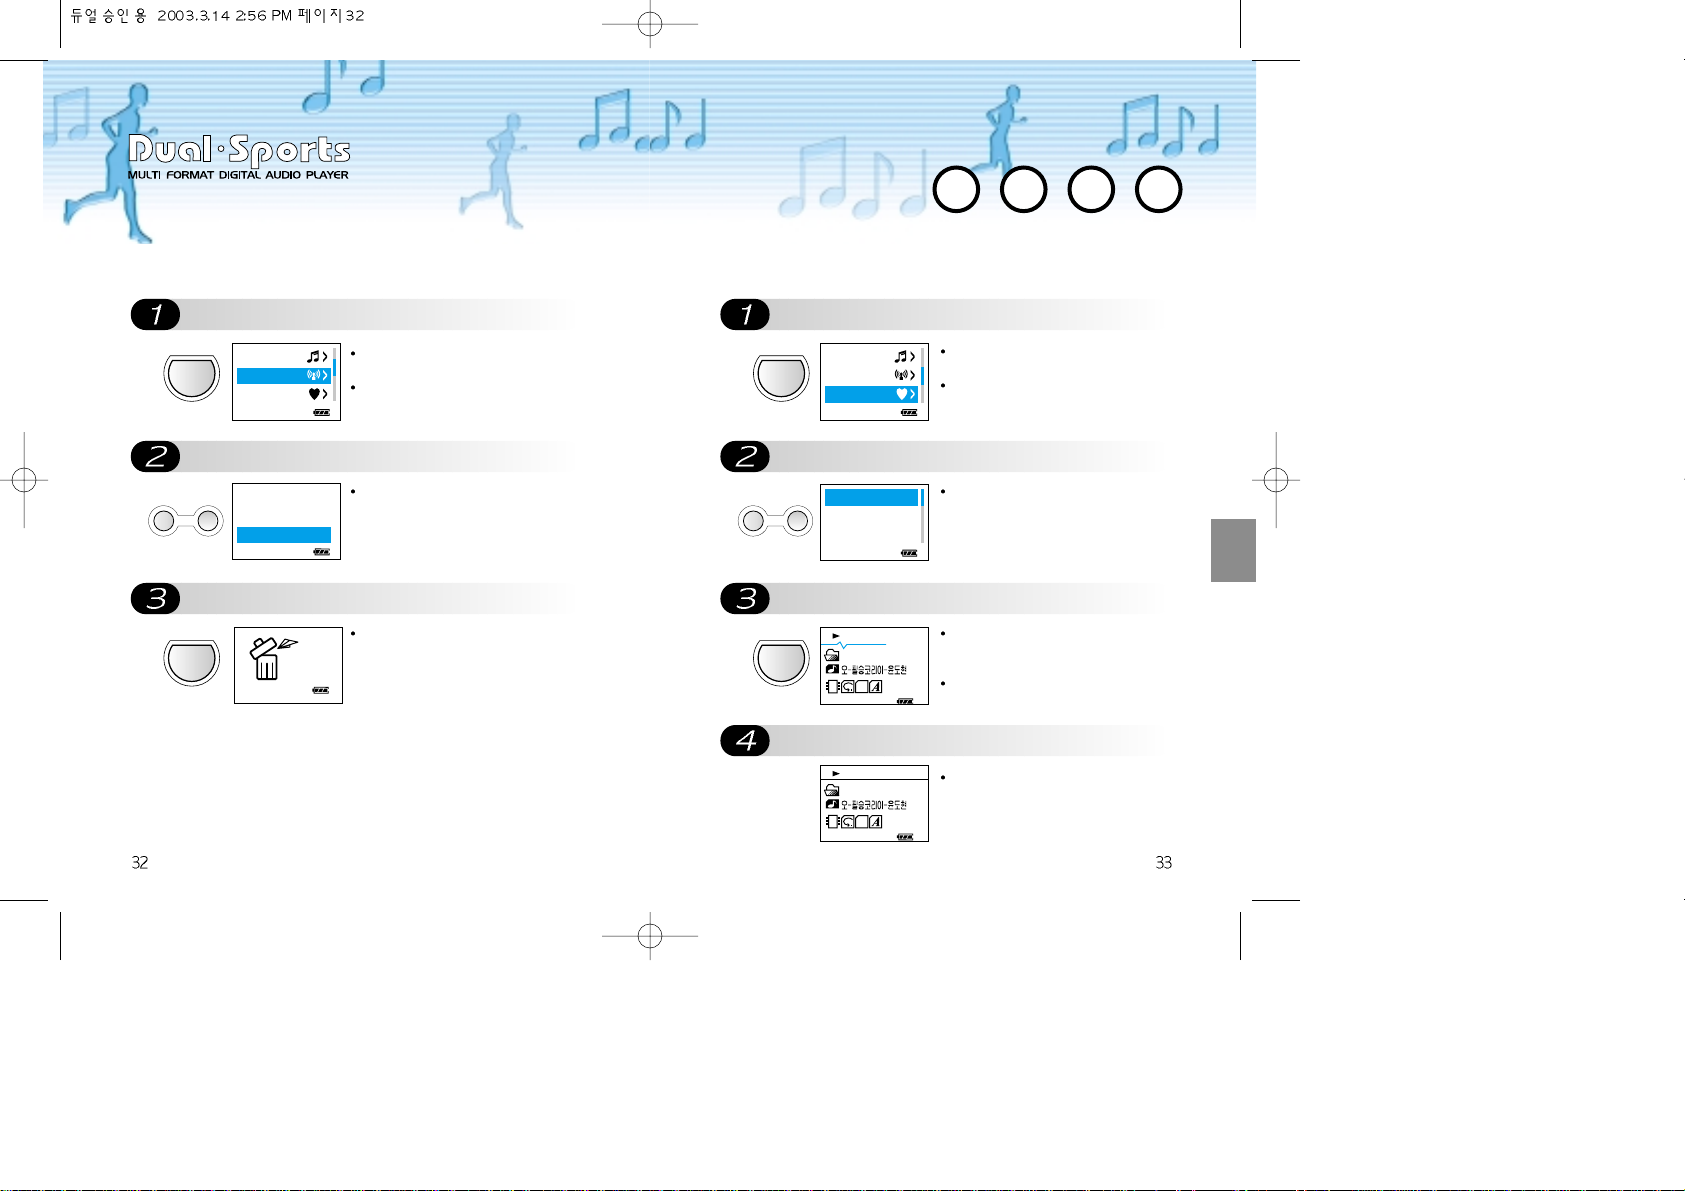
Push MODE button.
Push VOLUME+/- button.
Push MODE button.
Deleting FM Channel Starting H.R.M
MODE
Push MODE button for longer than 2
seconds.
Push VOLUME+/- button to select
“Radio” and push MODE button
subsequently.
- VOLUME +
Push VOLUME+/- button to select
“Delete Frequency” and push MODE
button subsequently.
MODE
All stored Channel (Frequency) is
deleted.
Push MODE button.
Push VOLUME+/- button.
Push MODE button.
To finish HRM
MODE
Push MODE button for longer than 2
seconds.
Push VOLUME+/- button to select
“H.R.M” and push MODE button
subsequently.
- VOLUME +
Push VOLUME+/- button to select
“HRM ON/OFF” and push MODE
button subsequently.
MODE
A message saying “Do you start
HRM?” appears on the LCD and HRM
starts by pushing the MODE button.
A graph of heart rate appears and
moves on upper side of the LCD.
A message saying “Do you finish
HRM?” appears on the screen when
above procedures are redone and HRM
is finished by pushing the MODE
button.
HH .. RR .. MM
Audio
Radio
H.R.M
FM Radio ON
Frequency Save
Delete Frequency
DELETE
DATA...
Audio
Radio
H.R.M
HRM ON/OFF
Time Gap
Goal Point
00:15 22 001
ROOT
MP3
128 KBPS
SLIVE
PM 01 : 36
133/122
00:15 22 001
ROOT
MP3
128 KBPS
SLIVE
PM 01 : 36
Page 19
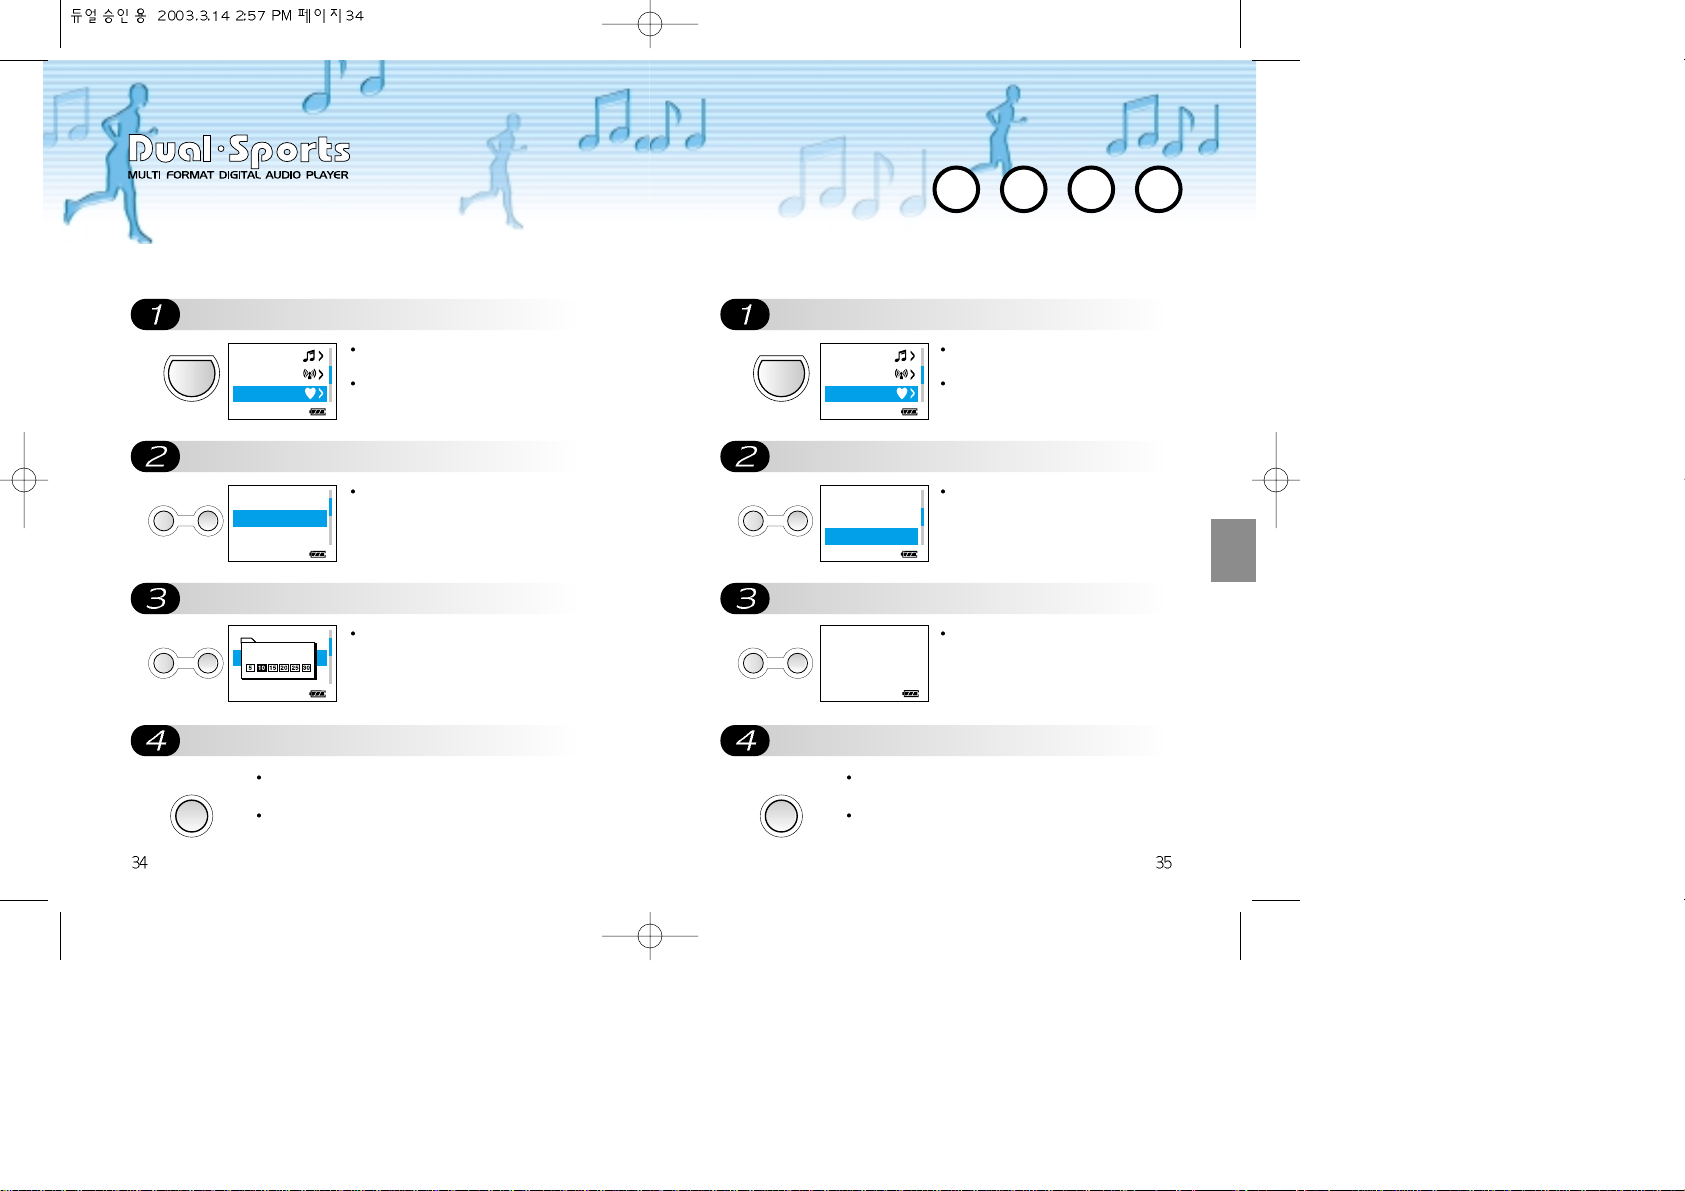
Push MODE button.
Push VOLUME+/- button.
Push VOLUME+/- button.
Push REC button to move out from the
How to set Time Gap? Goal Point
MODE
Push MODE button for longer than 2
seconds.
Push VOLUME+/- button to select
“H.R.M” and push MODE button
subsequently.
- VOLUME +
Push VOLUME+/- button to select
“Time Gap” and push MODE button
subsequently.
- VOLUME +
Push VOLUME+/- button to select
desired time gap and push MODE
button subsequently.
REC
By pushing REC button each time, you can move to
the next upper level of the folders.
Push REC button over and over to move out from the
menus.
Push MODE button.
Push VOLUME+/- button.
Push VOLUME+/- button.
Push REC button to move out from the
MODE
Push MODE button for longer than 2
seconds.
Push VOLUME+/- button to select
“H.R.M” and push MODE button
subsequently.
- VOLUME +
Push VOLUME+/- button to select
“Goal Point” and push MODE button
subsequently.
- VOLUME +
Push VOLUME+/- button to select
desired target rate and push MODE
button subsequently.
REC
By pushing REC button each time, you can move to
the next upper level of the folders.
Push REC button over and over to move out from the
menus.
Audio
Radio
H.R.M
HRM ON/OFF
Time Gap
Goal Point
HRM ON/OFF
Set check time gap(s)
Time Gap
Goal Point
Audio
Radio
H.R.M
HRM ON/OFF
Time Gap
Goal Point
Goal Point : 133
Goal Point Set
Page 20
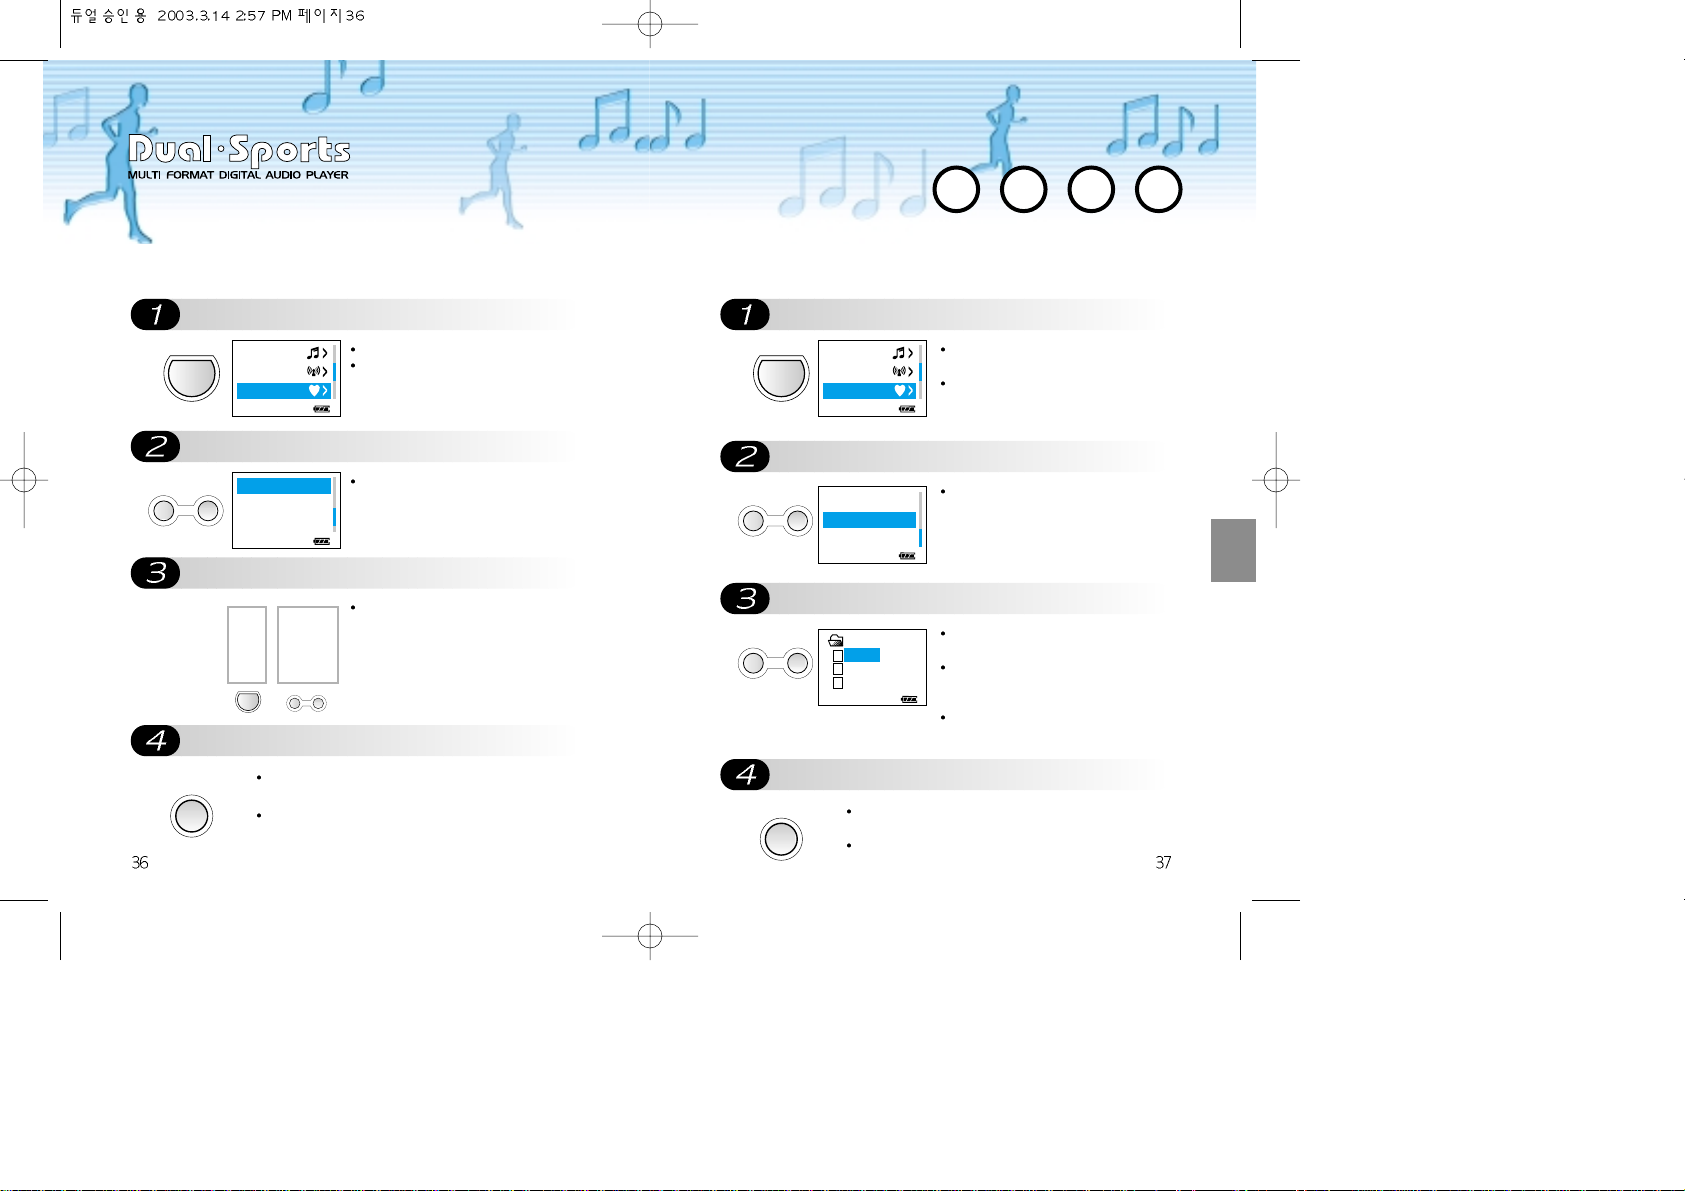
DB Analysis
Push MODE button.
Push VOLUME+/- button.
Push VOLUME+/- button.
Push REC button to move out from the
MODE
Push MODE button for longer than 2
seconds.
Push VOLUME+/- button to select
“H.R.M” and push MODE button
subsequently.
- VOLUME +
Push VOLUME+/- button to select
“Analysis” and push MODE button
subsequently.
- VOLUME +
Push VOLUME+/- button to select
desired file.
The values for maximum, minimum
and average rate appear on the LCD by
pushing MODE button.
Push VOLUME+/- button to select
other previous files.
REC
By pushing REC button each time, you can move to
the next upper level of the folders.
Push REC button over and over to move out from the
menus.
Push MODE button.
Push VOLUME+/- button.
Push VOLUME+/- button.
Push REC button to move out from the
User Information
MODE
Push MODE button for longer than 2 seconds.
Push VOLUME+/- button to select
“H.R.M” and push MODE button
subsequently.
- VOLUME +
Push VOLUME+/- button to select
“Information” and push MODE
button subsequently.
Push VOLUME+/- button to set your
information and push MODE button
subsequently.
REC
By pushing REC button each time, you can move to
the next upper level of the folders.
Push REC button over and over to move out from the
menus.
MODE
Age : 025
Sex :
MAN WOMAN
Weight : 060 KG
Tall : 180 CM
- VOLUME +
Audio
Radio
H.R.M
Information
DB Analysys
Audio
Radio
H.R.M
Information
DB Analysys
HRM
03010201
03010101
03010202
Page 21

Setting for Languages
Push MODE button.
Push VOLUME+ button.
MODE
Push MODE button for longer than 2 seconds.
Push MODE button after selecting
“Setup” with VOLUME+/- buttons
- VOLUME +
You may choose your language.
- VOLUME +
There are four languages available;
KOREAN, ENGLISH, CHINESE
and JAPANESE.
Push MODE button after selecting
“Language” with VOLUME+/buttons
SS ee tt uu pp
Push REC button to move out from the
By pushing REC button each time,
you can move to the next upper level
of the folders.
Push REC button over and over to
move out from the menus.
Push MODE button.
Push VOLUME+/- button.
To turn ON/OFF the clock
Setting for Clock and Date
MODE
MODE
Push MODE button for longer than 2 seconds.
Push VOLUME+/- button to select
“Watch” and push MODE button
subsequently.
- VOLUME +
Push VOLUME+/- button to select
“Time Setting” and push MODE
button subsequently.
Select “Watch ON/OFF” mode with
VOLUME+/- button and push MODE
button subsequently.
Push VOLUME+/- button to select ON
or OFF and push MODE button
subsequently.
Hour : 12
Minute : 60
Month : 12
Data : 31
Year : 03
AMPM : AM
- VOLUME +
WW aa tt cc hh
Watch
Setup
Time Setting
Watch On/OFF
Time Setting
Watch On/OFF
Time Setting
ON OFF
Watch On/OFF
Watch
Setup
Language
Contrast
Power off time
KOREA ENGLISH
CHINA JAPAN
Page 22
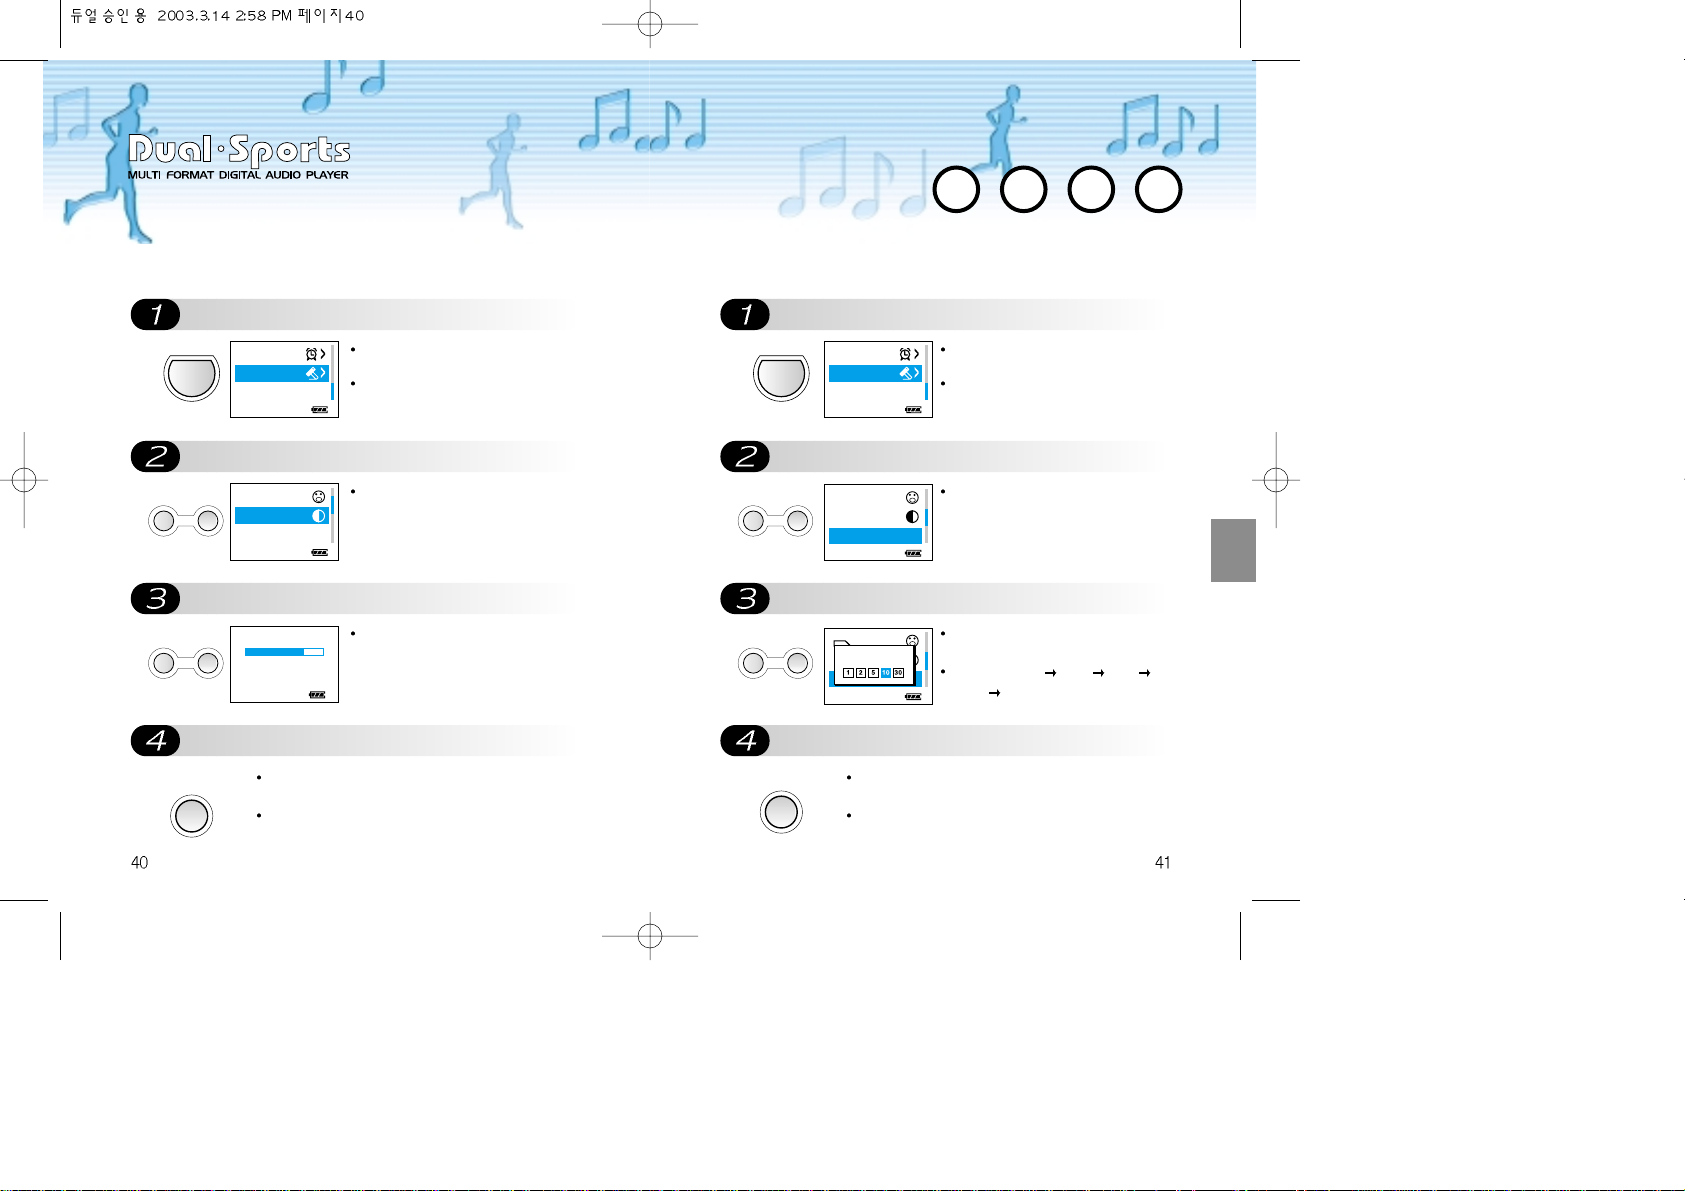
Push MODE button.
Push VOLUME+/- button.
Use VOLUME+/- buttons to control the
Push REC button to move out from the
Setting for LCD Contrast Setting for Power-off Time
MODE
Push MODE button for longer than 2
seconds.
Push VOLUME+/- button to select
“Setup” and push MODE button
subsequently.
- VOLUME +
Push VOLUME+/- button to select
“Contest” and push MODE button
subsequently.
- VOLUME +
Use VOLUME+/- buttons to control
the brightness of the LCD.
REC
By pushing REC button each time, you can move to
the next upper level of the folders.
Push REC button over and over to move out from the
menus.
Push MODE button.
Push VOLUME+/- button.
Use VOLUME+/- buttons to set the
Push REC button to move out from the
MODE
Push MODE button for longer than 2
seconds.
Push VOLUME+/- button to select
“Setup” and push MODE button
subsequently.
- VOLUME +
Push VOLUME+/- button to select
“Power off time” and push MODE
button subsequently.
- VOLUME +
Use VOLUME+/- buttons to set the time
for the auto power-off time you desire.
It moves as 1min. 2min. 5min.
10min. 30min. and etc. in sequence.
REC
By pushing REC button each time, you can move to
the next upper level of the folders.
Push REC button over and over to move out from the
menus.
Watch
Setup
Language
Contrast
Power off time
– 70% +
Contast Set
Watch
Setup
Language
Contrast
Power off time
Language
Power off time (min)
Contrast
Power off time
Page 23
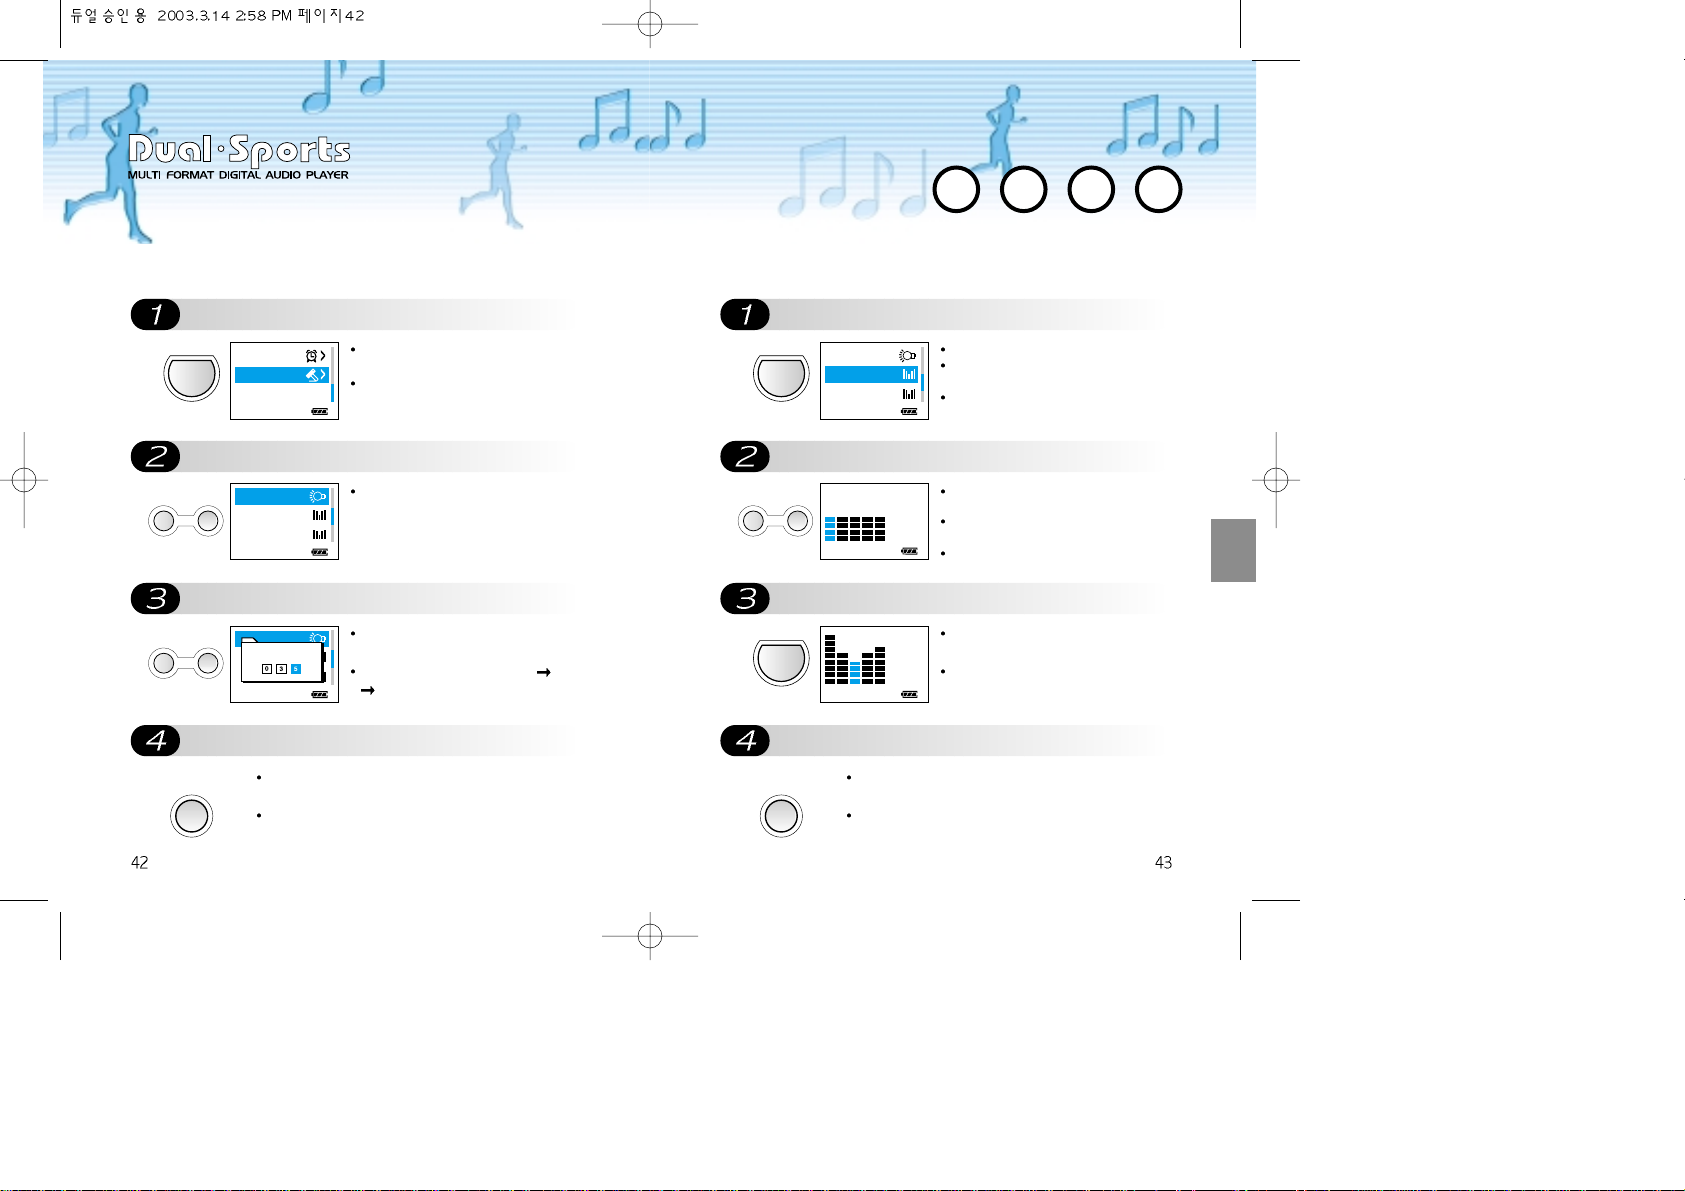
Push MODE button.
Push VOLUME+/- button.
Use VOLUME+/- buttons to set the
Push REC button to move out from the
Setting for Back Light
MODE
Push MODE button for longer than 2
seconds.
Push VOLUME+/- button to select
“Setup” and push MODE button
subsequently.
- VOLUME +
Push VOLUME+/- button to select
“Back Light” and push MODE
button subsequently.
- VOLUME +
Use VOLUME+/- buttons to set the
duration time you desire.
It moves in sequence as 1sec. 3sec.
5sec. and etc.
REC
By pushing REC button each time, you can move to
the next upper level of the folders.
Push REC button over and over to move out from the
menus.
Push MODE button.
Following pages are shown
Set other bars in the same way as
Push REC button to move out from
Setting for Equalizer (User Mode)
MODE
Push MODE button for longer than 2 seconds.
Push VOLUME+/- button to select “Setup”
and push MODE button subsequently.
Push VOLUME+/- button to select “User EQ
1” and push MODE button subsequently.
- VOLUME +
By buttoning on MODE, the cursor
moves to other bars.
Push MODE button to select the bar
you desire.
Push VOLUME+/- buttons until you
have the value you want.
MODE
Push MODE button to select the bar
you desire.
Push VOLUME+/- buttons until you
have the value you want.
REC
By pushing REC button each time, you can move to
the next upper level of the folders.
Push REC button over and over to move out from the
menus.
Watch
Setup
Back light
User EQ 1
User EQ 2
Back light
Back light off time (s)
User EQ 1
User EQ 2
Back light
User EQ 1
User EQ 2
BAND 0
VAL 00
BAND 2
VAL -02
Page 24
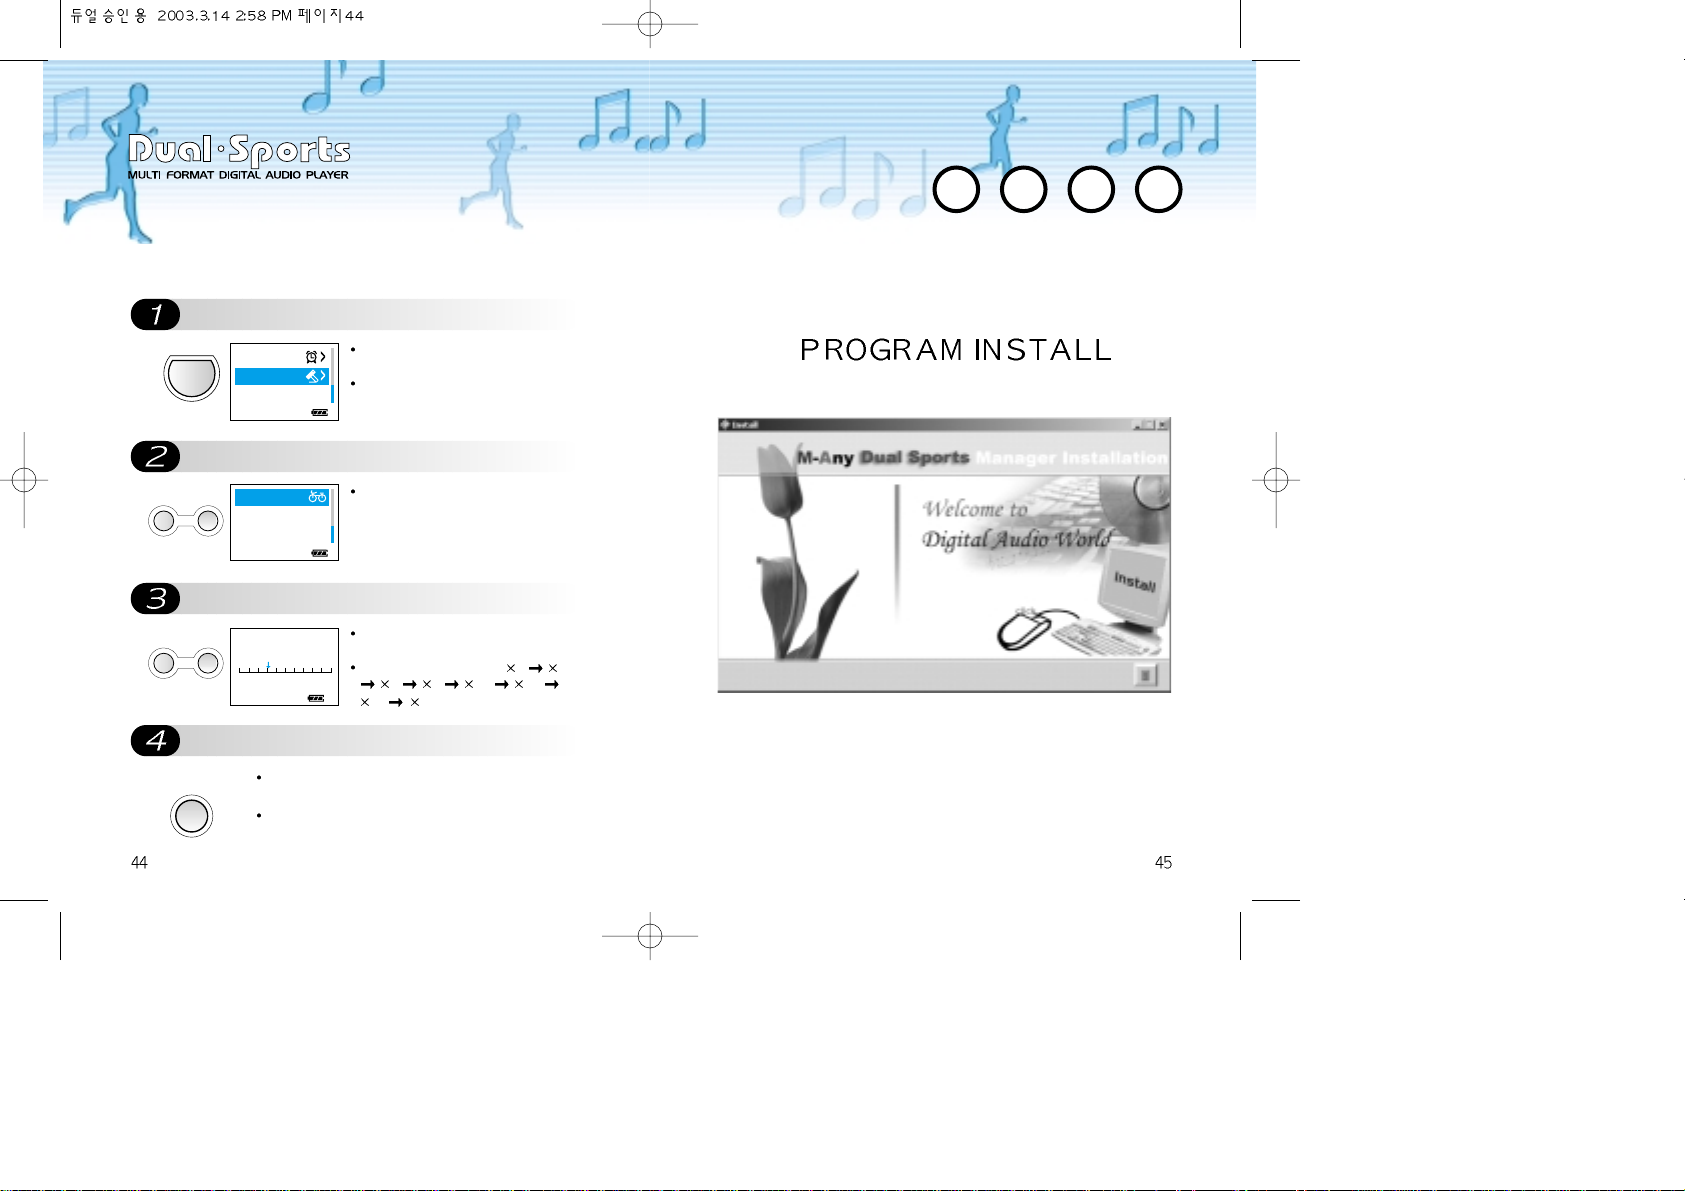
Push MODE button.
Push VOLUME+/- button.
Use VOLUME+/- buttons to set the
Push REC button to move out from
Setting for Search Speed
MODE
Push MODE button for longer than 2
seconds.
Push VOLUME+/- button to select
“Setup” and push MODE button
subsequently.
- VOLUME +
Push VOLUME+/- button to select
“Search Speed” and push MODE
button subsequently.
- VOLUME +
Use VOLUME+/- buttons to select
desired speed.
It moves in sequence as 1 2
4 8 16 32
64 128 and etc.
REC
By pushing REC button each time, you can move to
the next upper level of the folders.
Push REC button over and over to move out from the
menus.
Watch
Setup
Search Speed
X32 +
Search Speed
Page 25
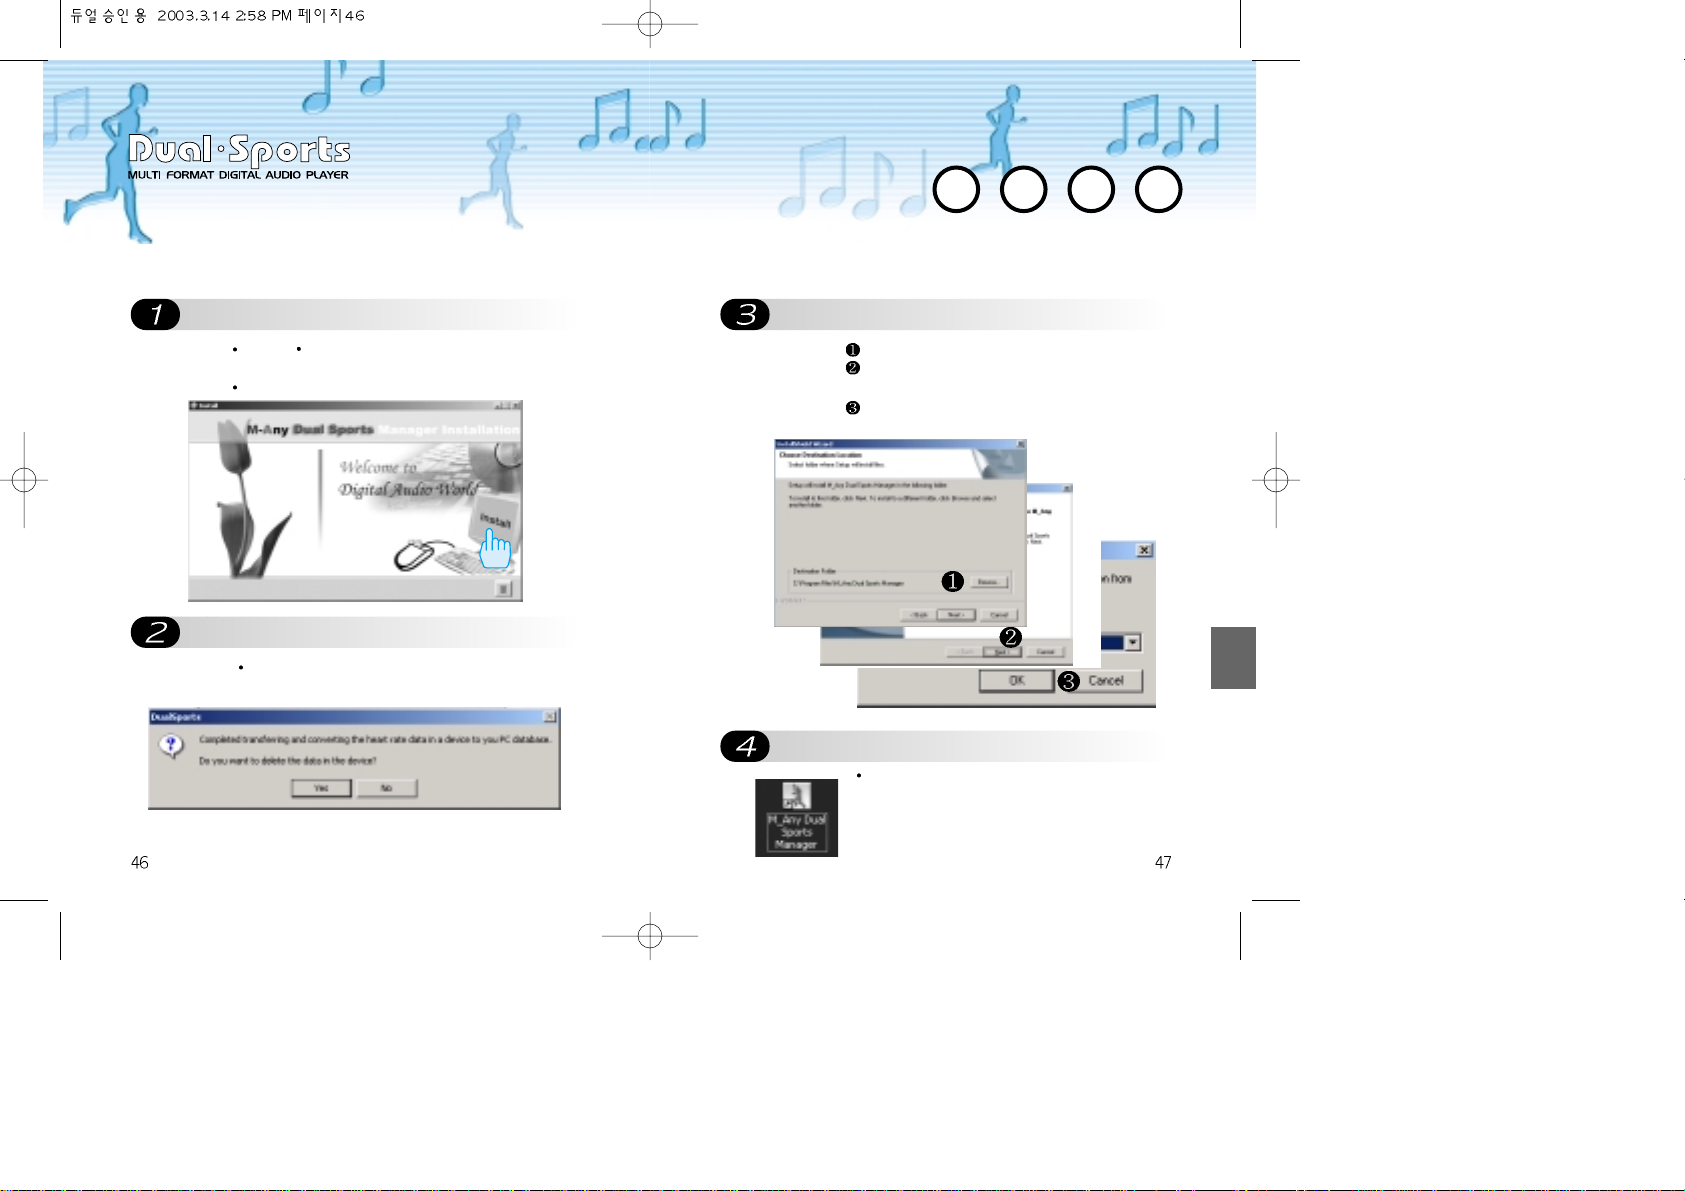
Click on “Next” button.
Insert M ANY Dual Sports MANAGER CD into the
CD-ROM of you computer.
Then click on [Install] button.
Insert Software CD Rom into the CD-
Installing Software
Choose the language for installation.
Select your language and click on “OK” button.
Click on “Next” to continue the installation.
Choose the folder where the program will be
installed. Click on “Next” to continue.
When the installation is finished, click on [Finish] to
finalize.
A shortcut appears on desktop.
Once the installation is finished, there appears a
shortcut on desktop.
Page 26
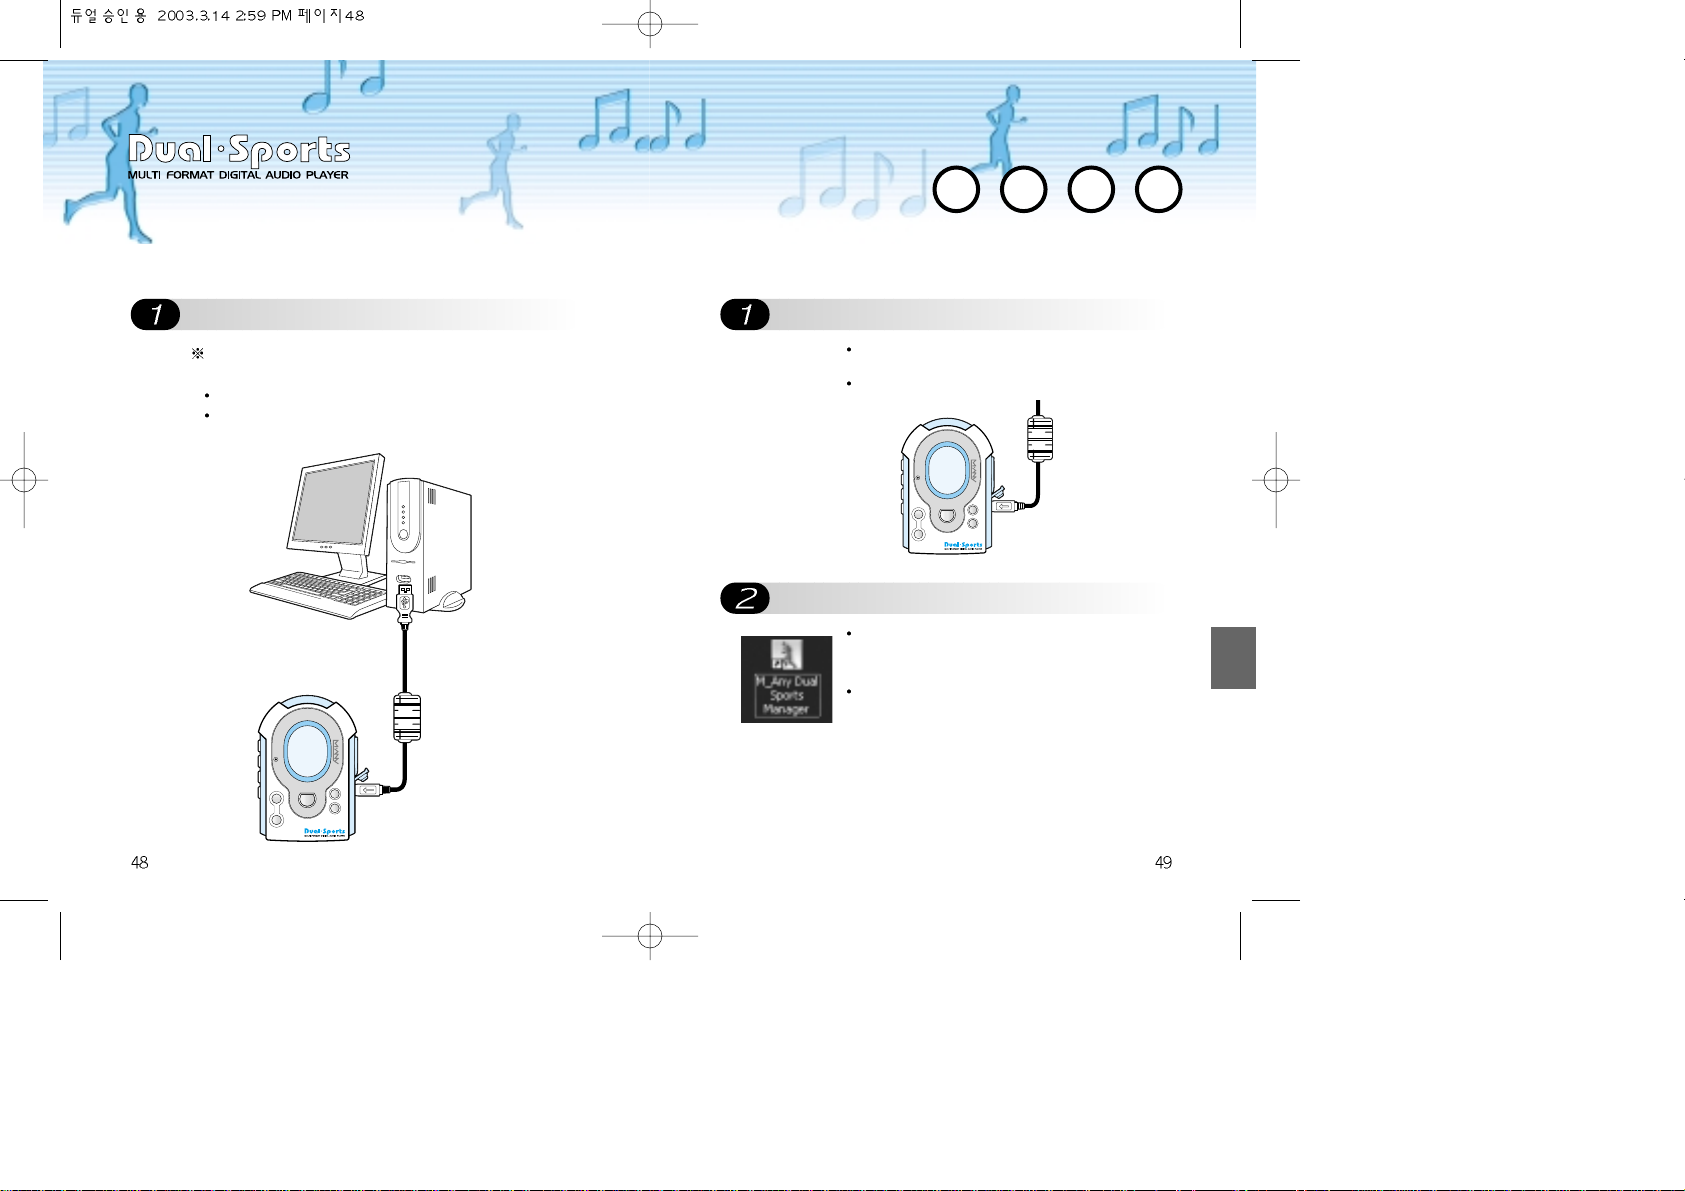
Use of M-ANY DUAL SPORTS MANAGER
Connect the USB cable to DUAL
Double click on the icon.
Connect the PC with DUAL SPORTS using the USB
cable.
The power of DUAL SPORTS goes out when it is
connected to USB port.
Click on M-Any Dual Sports Manager icon from the
desktop.
The player can be used as a portable driver
downloading and uploading normal files with M-Any
Dual Sports Manager (Image, Music and Word files
etc.).
Connect to USB port of your PC.
Connecting to PC
Connect the USB cable (Accessory).
The specified USB cable can be only used for this connection.
The power of the player goes out when it is
connected to USB port.
D
I
G
I
T
A
L
A
U
D
I
O
P
L
A
Y
ER &H .R
.
M
&
F
M
R
A
D
I
O
- VOLUME +
MODE
PLAY STOP REW
MIC
FF
REC HOLD
D
I
G
I
T
A
L
A
U
D
I
O
P
L
A
Y
ER &H .R
.
M
&
F
M
R
A
D
I
O
- VOLUME +
MODE
PLAY STOP REW
MIC
FF
REC HOLD
D
I
G
I
T
A
L
A
U
D
I
O
P
L
A
Y
ER &H .R
.
M
&
F
M
R
A
D
I
O
- VOLUME +
MODE
PLAY STOP REW
MIC
FF
REC HOLD
D
I
G
I
T
A
L
A
U
D
I
O
P
L
A
Y
ER &H .R
.
M
&
F
M
R
A
D
I
O
- VOLUME +
MODE
PLAY STOP REW
MIC
FF
REC HOLD
D
I
G
I
T
A
L
A
U
D
I
O
P
L
A
Y
ER &H.R
.
M
&
F
M
R
A
D
I
O
- VOLUME +
MODE
PLAY STOP REW
MIC
FF
REC HOLD
D
I
G
I
T
A
L
A
U
D
I
O
P
L
A
Y
ER &H.R
.
M
&
F
M
R
A
D
I
O
- VOLUME +
MODE
PLAY STOP REW
MIC
FF
REC HOLD
D
I
G
I
T
A
L
A
U
D
I
O
P
L
A
Y
ER &H.R
.
M
&
F
M
R
A
D
I
O
- VOLUME +
MODE
PLAY STOP REW
MIC
FF
REC HOLD
D
I
G
I
T
A
L
A
U
D
I
O
P
L
A
Y
ER &H.R
.
M
&
F
M
R
A
D
I
O
- VOLUME +
MODE
PLAY STOP REW
MIC
FF
REC HOLD
Page 27
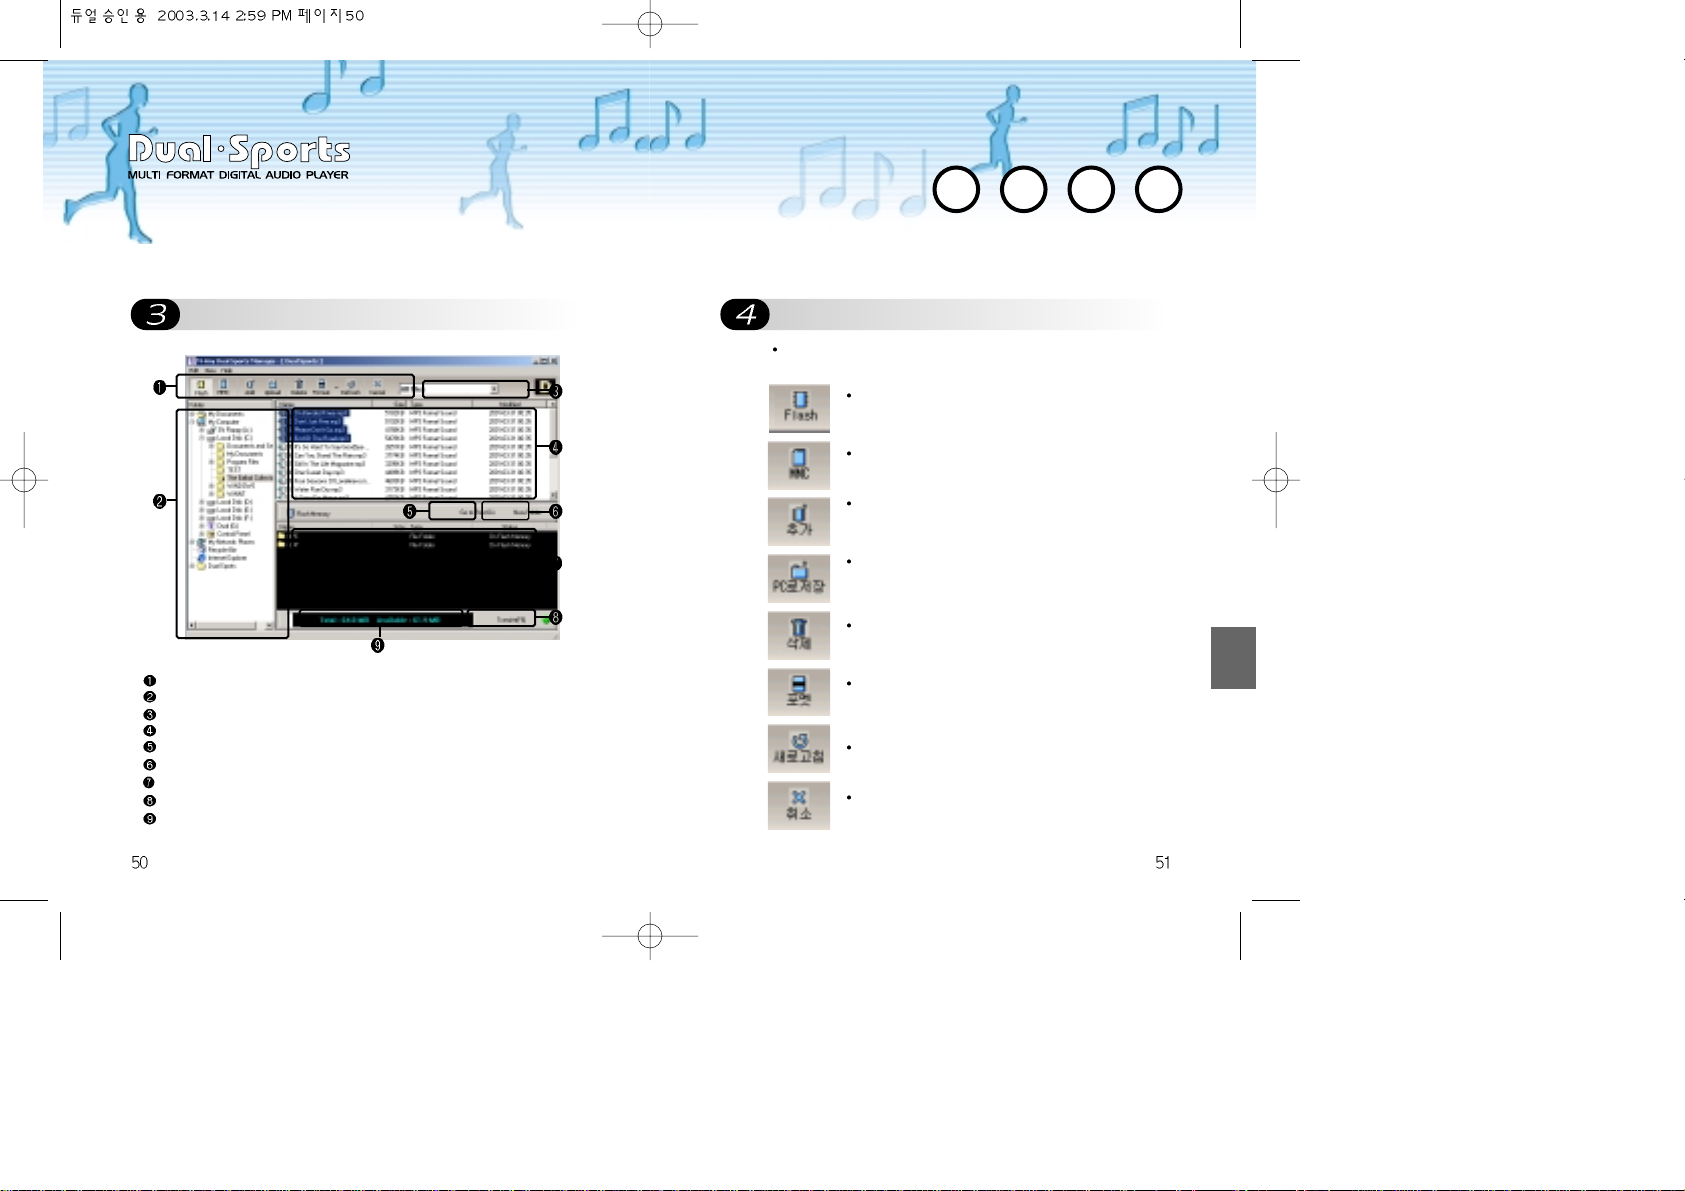
About MANAGER Icons
The buttons with the same names as names on the main menu do
the same functions.
Shortcut: used for facilitating operations
Folder Window: used to show folders in the PC.
File Type: shows files by types. (Audio, Document, Image and All Files)
File List Window: used to show files in selected folder.
Move to Root: used to move to the root folder in the memory.
Creating Folder: used to create new folders in the memory.
Memory Window: shows saved information in the memory.
Download: transfers selected file to the memory.
Memory State: displays currently remained and entire capacity of the
memory.
The main page of MANAGER appears on the
Selection button for Flash memory or DUAL
SPORTS.
Selection button for outer memory (MMC) for
memory expansion.
Add-on button to add selected files to the memory window.
The added files appear as “To be downloaded” state on
the memory window.
Upload button to upload files from the memory of
DUAL SPORTS to the PC.
But, excluding music files (MP3, WMA).
Delete button to remove selected files from the
memory.
The button formats the memory of DUAL SPORTS.
Every file in the memory will be deleted with this
button.
The button updates the contents in the memory.
The button stops file transferring between DUAL
SPORTS and the PC.
Page 28

Select files.
Select the file to download.
Select a folder where files are saved in your PC.
Select the file to download to the player.
Save files to your PC.
Connect DUAL SPORTS with the
Main MANAGER page appears.
File Download
Save any digital audio file gained from webpage or
internet sources to your PC.
Connect DUAL SPORTS with the PC using the USB
cable (See 00P).
Click on the shortcut on desktop.
A message “Can’t not read the Memory” will appear
when the connection is failed or not connected.
Page 29
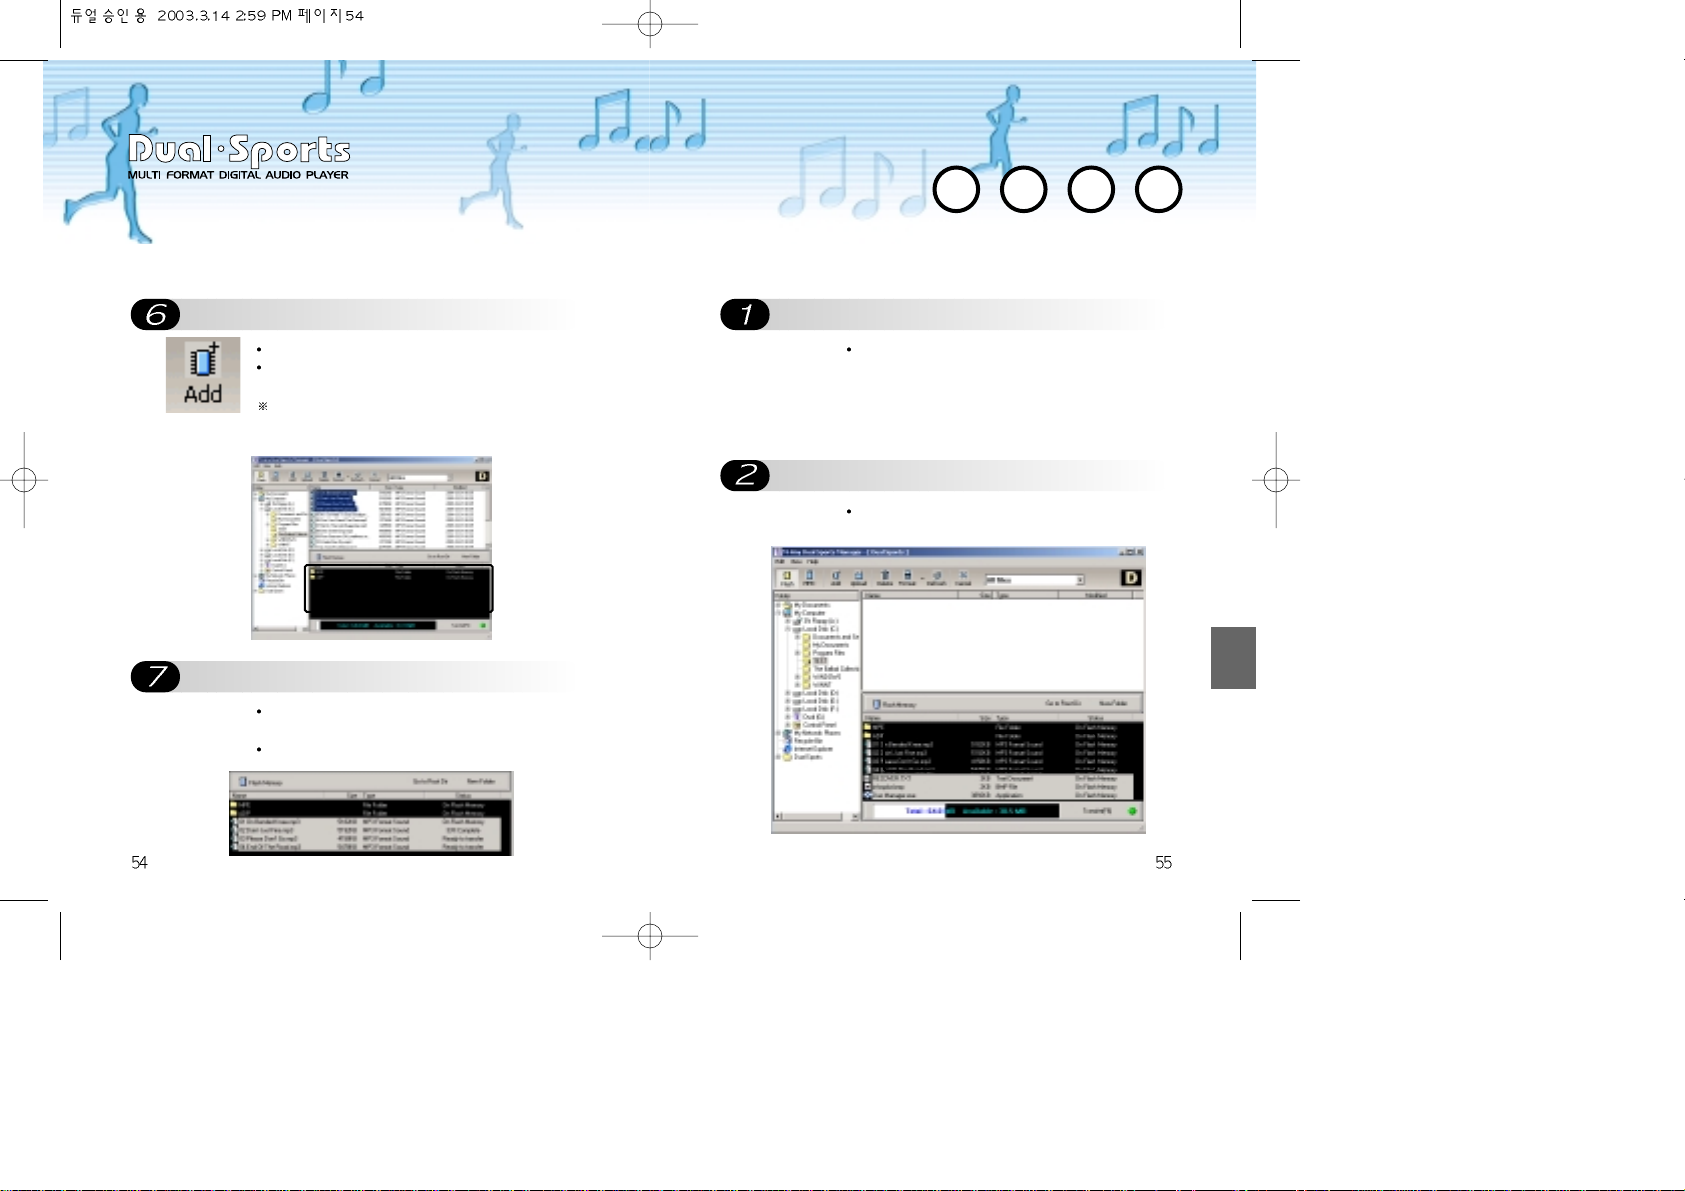
File Upload
Choose a folder where the files are
Choose files you are uploading.
Choose a folder in the PC to save the files.
But, MP3, WMA files can not be uploaded. It is
prohibited by the law.
Select the files you are uploading form the memory
window.
Click on Add-File button.
Click on “Download”.
Click on Add button after selecting the file.
Then the file is added to the memory window and the
message “To be downloaded” appears on the screen
You may also add files with “drag & drop” for the
files to be ready for download.
Selected file from the PC is downloaded to the memory
of the player.
To halt the downloading, click on “Cancel”.
Page 30
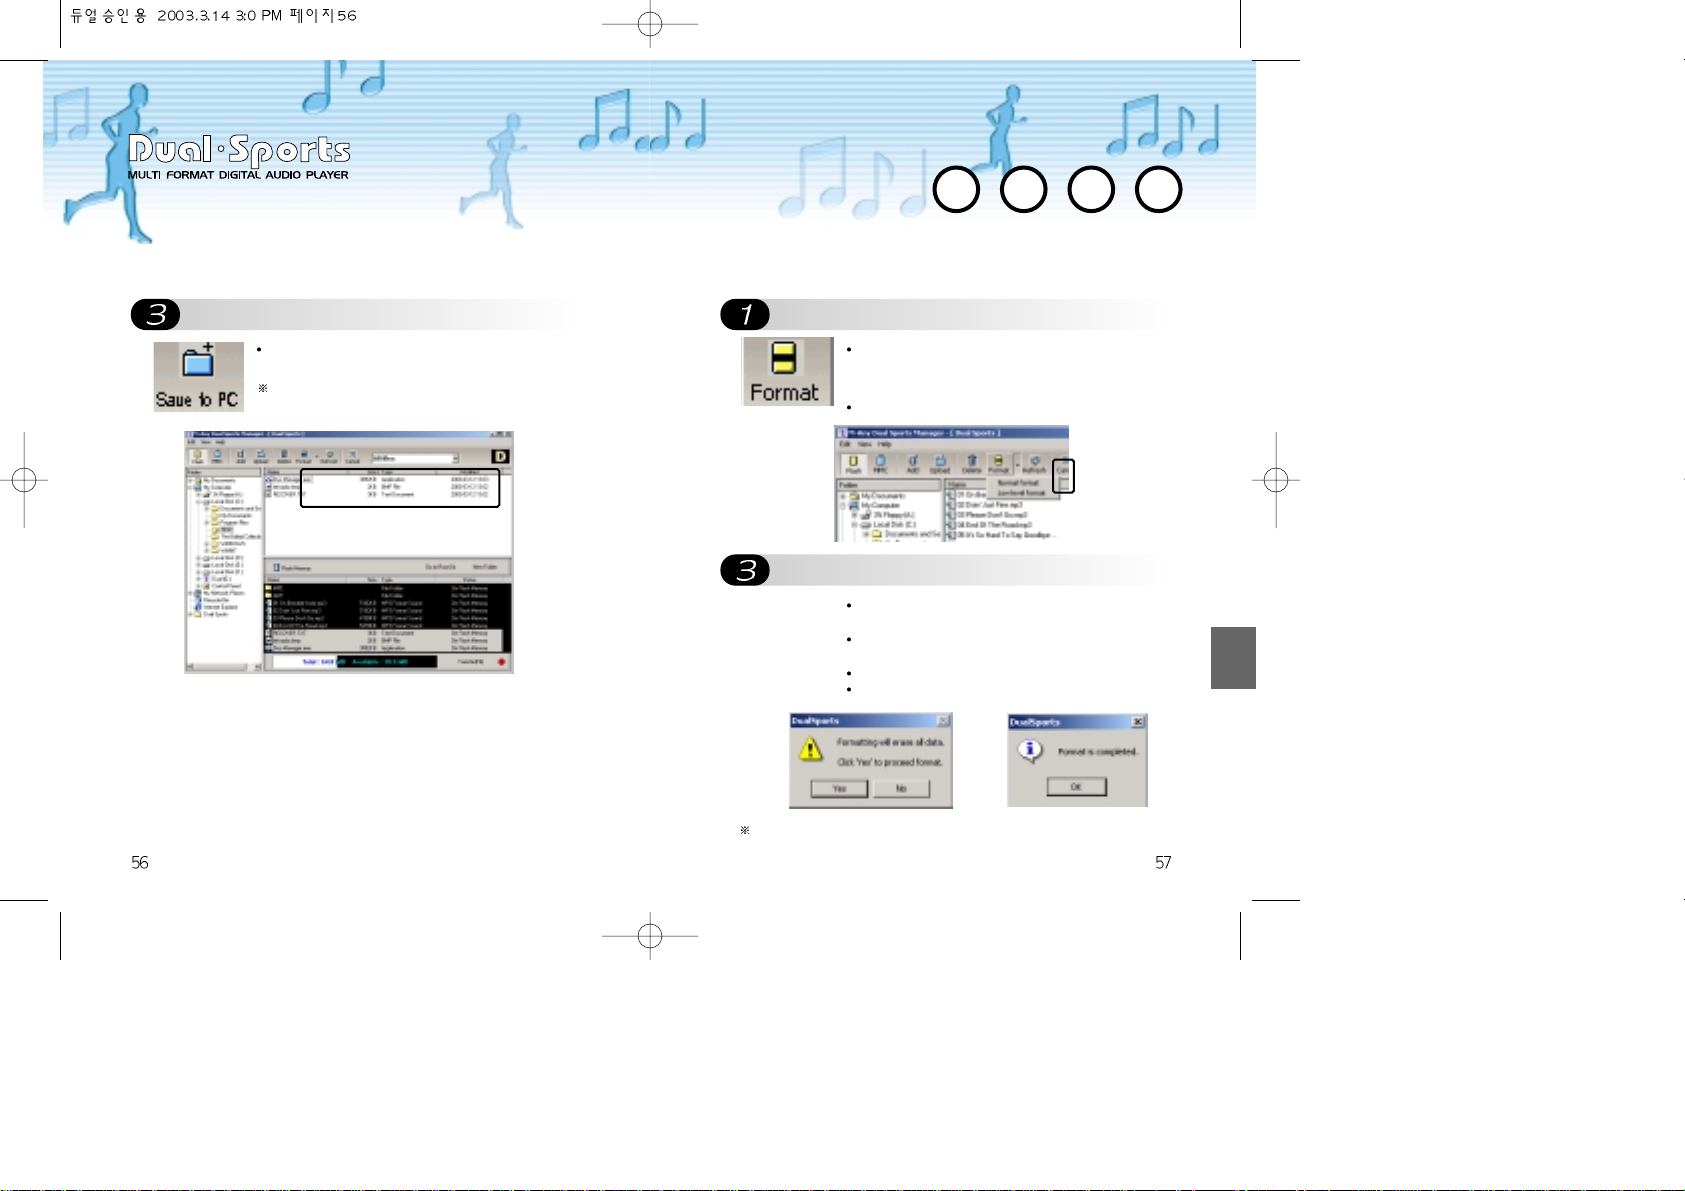
Memory Format
Click on “Format”.
Selecting Format Type
You can format the memory by clicking on “Format”
button as needed.
All the data in the memory will be deleted accordingly.
Select Fast Format or Entire Format.
Fast Format: only removes file information from the
memory speedily.
Entire Format: makes the memory as it was first
released and takes long time.
Click on “Y” to format.
Completion window pops up when it is finished.
Click on “Save to PC”
You may confirm uploaded files from file list
window when you click on “Save to PC”
You may also upload files with “drag & drop”.
DUAL SPORTS may not work if you abort the format while it is being
formatted. Please do not abort until it finishes.
Page 31
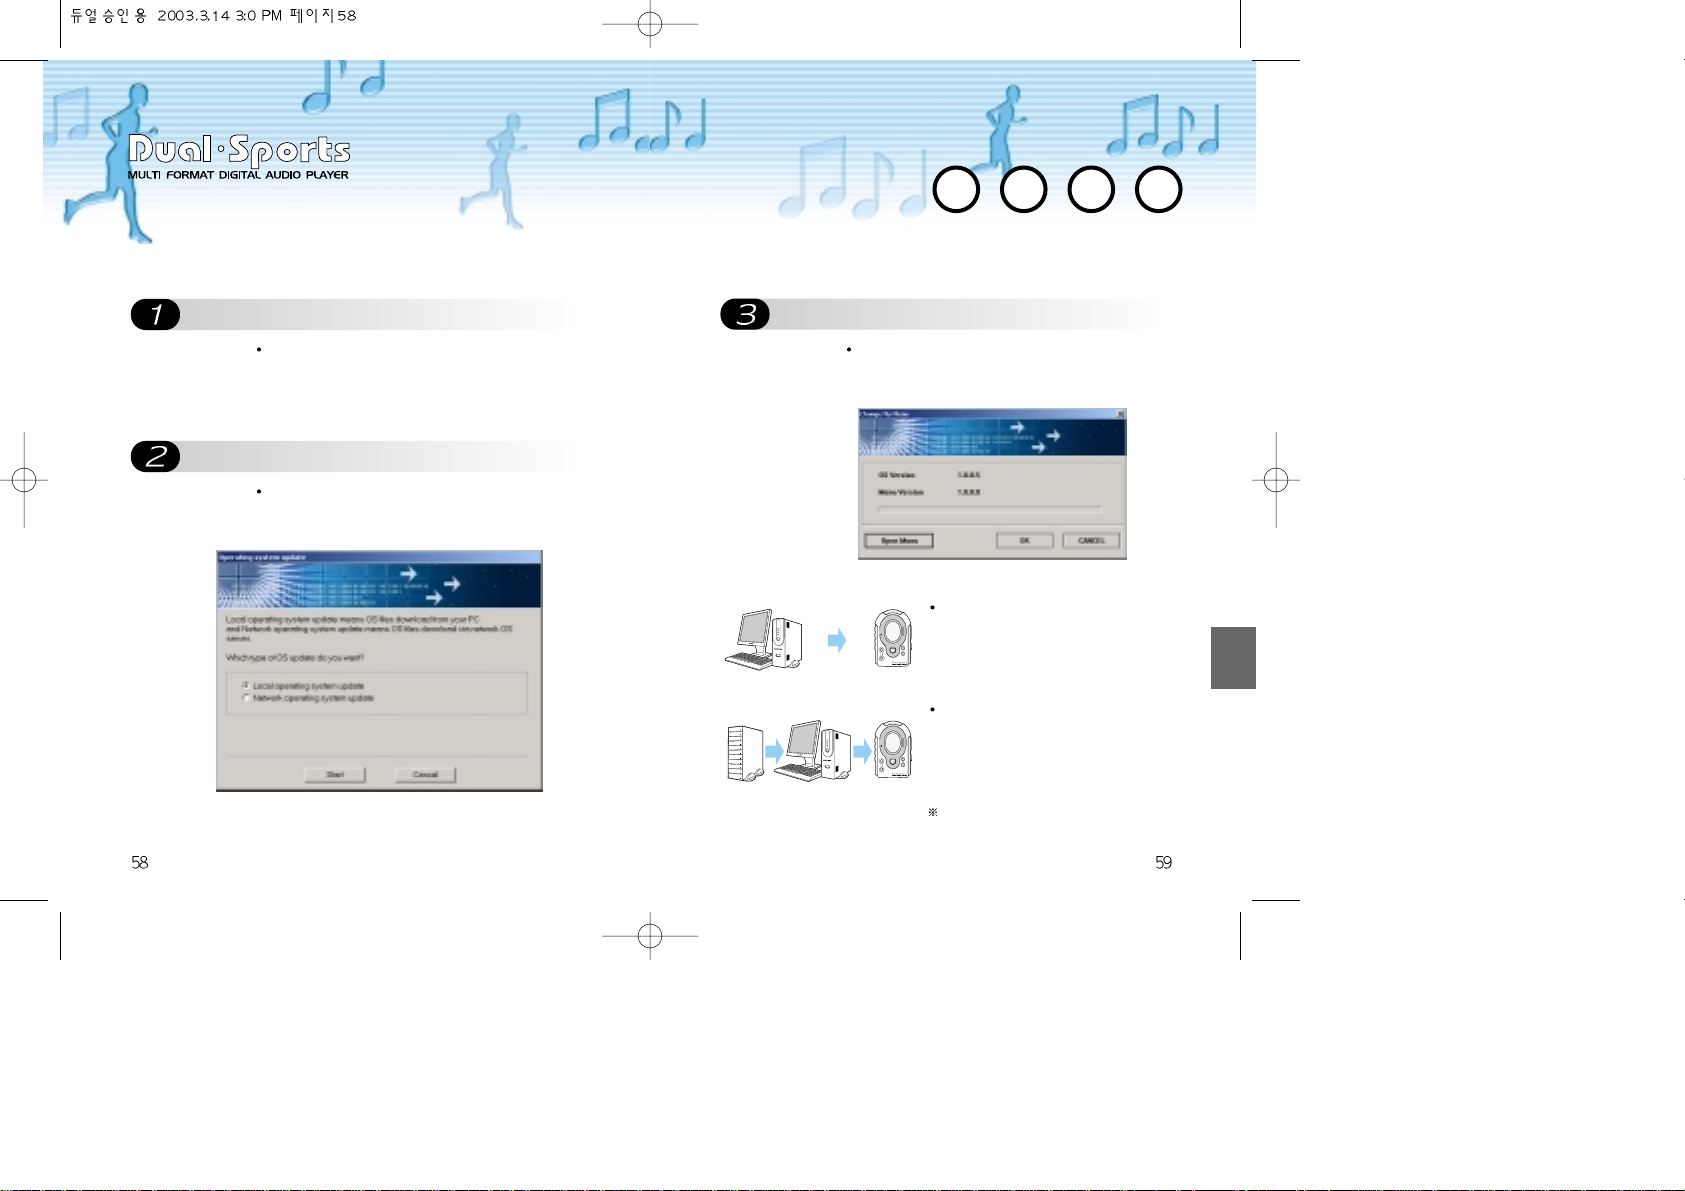
Execute M-ANY DUAL SPORTS MANAGER on
Choose “OS Update” menu.
Choosing OS Update type
OS Update
Execute
M-ANY DUAL SPORTS MANAGER
by double clicking on the icon form desktop with the
USB cable connected.
OS update A dialogue box for OS update by clicking
on “OS Update” after choosing “Edit” menu from the
menu bar.
PC
PCSERVER
DUAL SPORTS
DUAL SPORTS
PC OS Update
The OS originally contained in DUAL
SPORTS is downloaded to the MP3
player.
Network OS Update
The OS firstly is downloaded from the
network server to the PC and
subsequently to be downloaded from
the PC to MP3 player.
Note: The PC should be connected to
the internet for the update.
D
I
G
I
T
A
L
A
U
D
I
O
P
L
A
YER& H.R
.
M
&
F
M
R
A
D
I
O
- VOLUME +
MODE
PLAY STOP REW
MIC
FF
REC HOLD
D
I
G
I
T
A
L
A
U
D
I
O
P
L
A
YER& H.R
.
M
&
F
M
R
A
D
I
O
- VOLUME +
MODE
PLAY STOP REW
MIC
FF
REC HOLD
The OS of the MP3 player will be updated by clicking
on “Start” after choosing desired OS update type.
Page 32
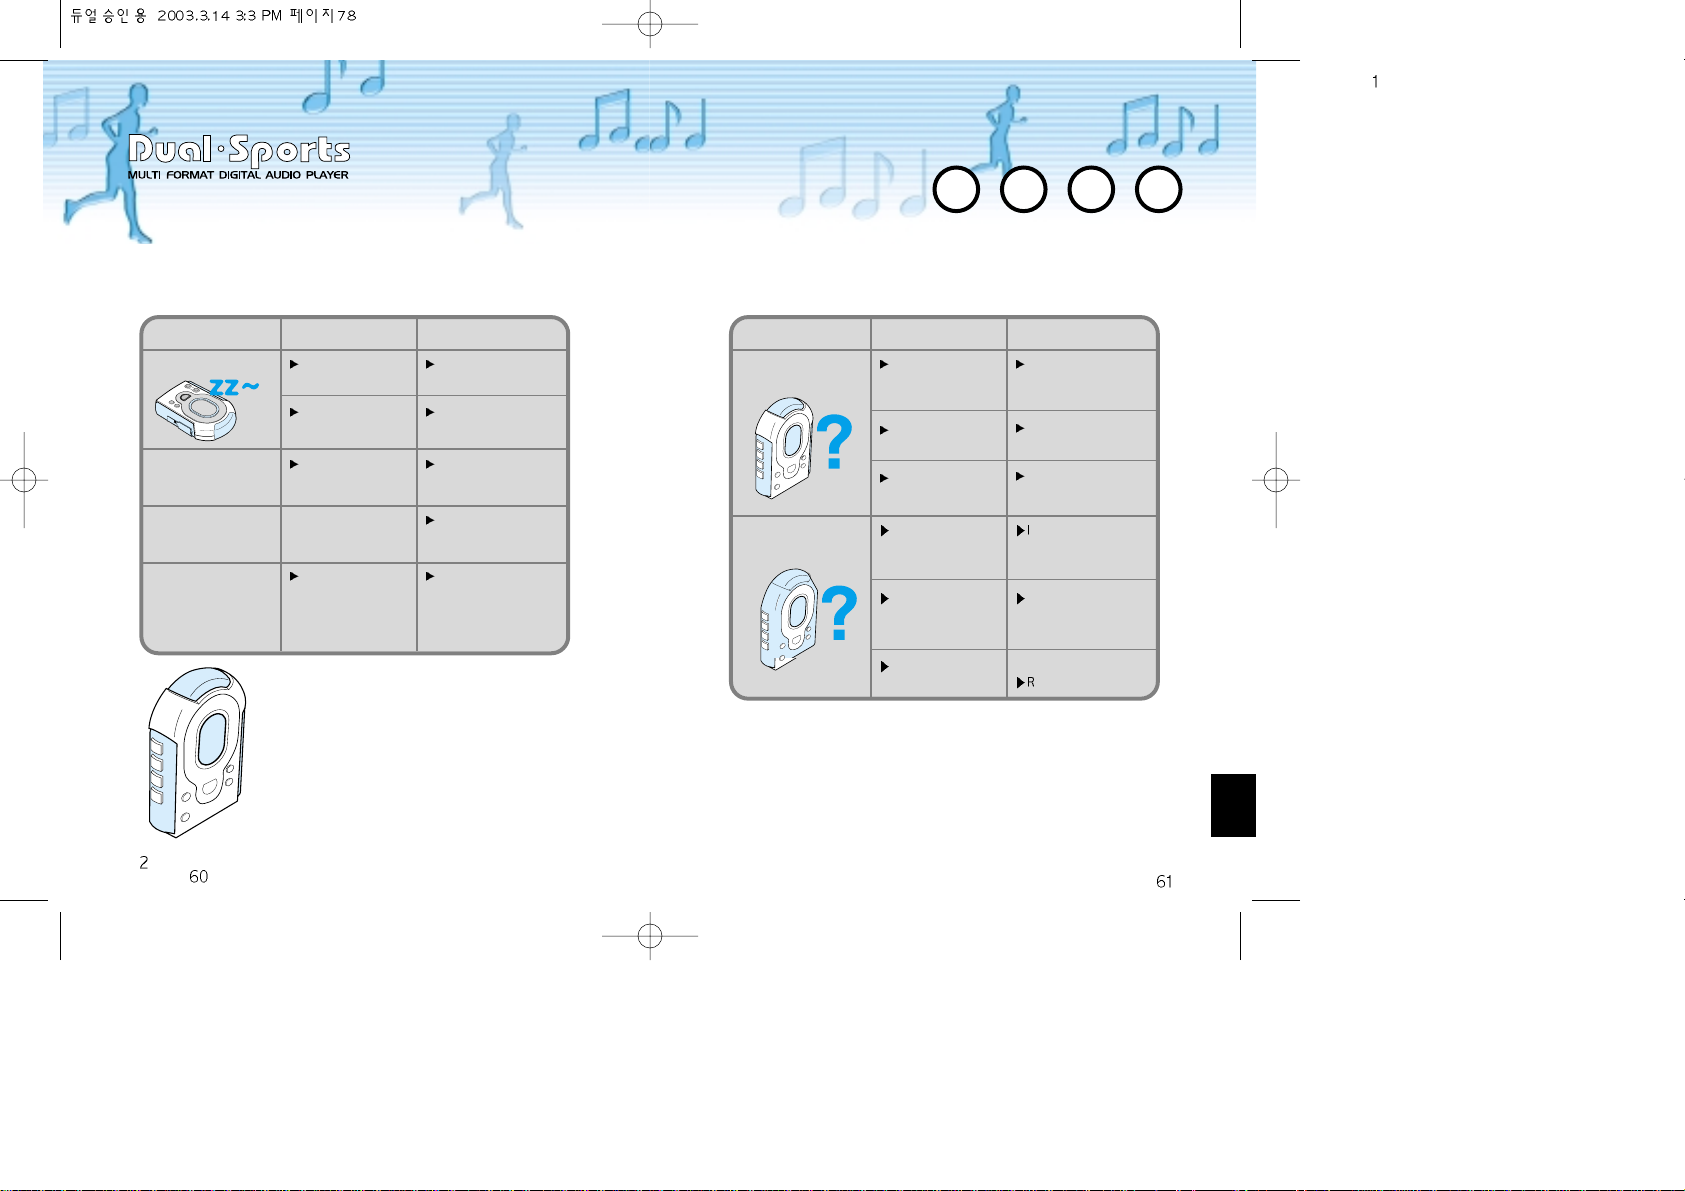
Please check the followings before you
ask for the services.
Please check the followings before you ask for the services.
* The player does not play the file with
security protection such as liquid audio.
Please care about this when you use the
player.
When Then check (if) And you may
You can not play MP3
There is any song in
the flash memory.
The battery ran out.
Download songs to
the fresh memory.
Replace or charge the
battery.
Uploading and
downloading MP3 is
not available
The USB cable is
correctly connected.
Assure cable
connection.
There is not enough
memory remained
Remain necessary
files only in the
memory.
There is a message
saying “Fault on the
Memory”
Which memory has
the fault.
Refer to “Help” from MANY T MANAGER
to
resolve the problems
you have with the
player.
When Then check (if) And you may
It does not work by
buttoning.
The battery is inserted
with wrong direction?
The battery should be
recharged?
The lock button is in
the lock position?
Re-insert the batter
with right direction.
Recharge the battery.
Move lock button to
unlock position.
Letters on the LCD are
not properly displayed.
The contact of the
battery is good?
The buttons get too
mush forces?
The battery ran out?
nsert the battery
correctly and close
the cover tightly.
Push the buttons
correctly when only
they are required to
do.
eplace the battery to
Page 33
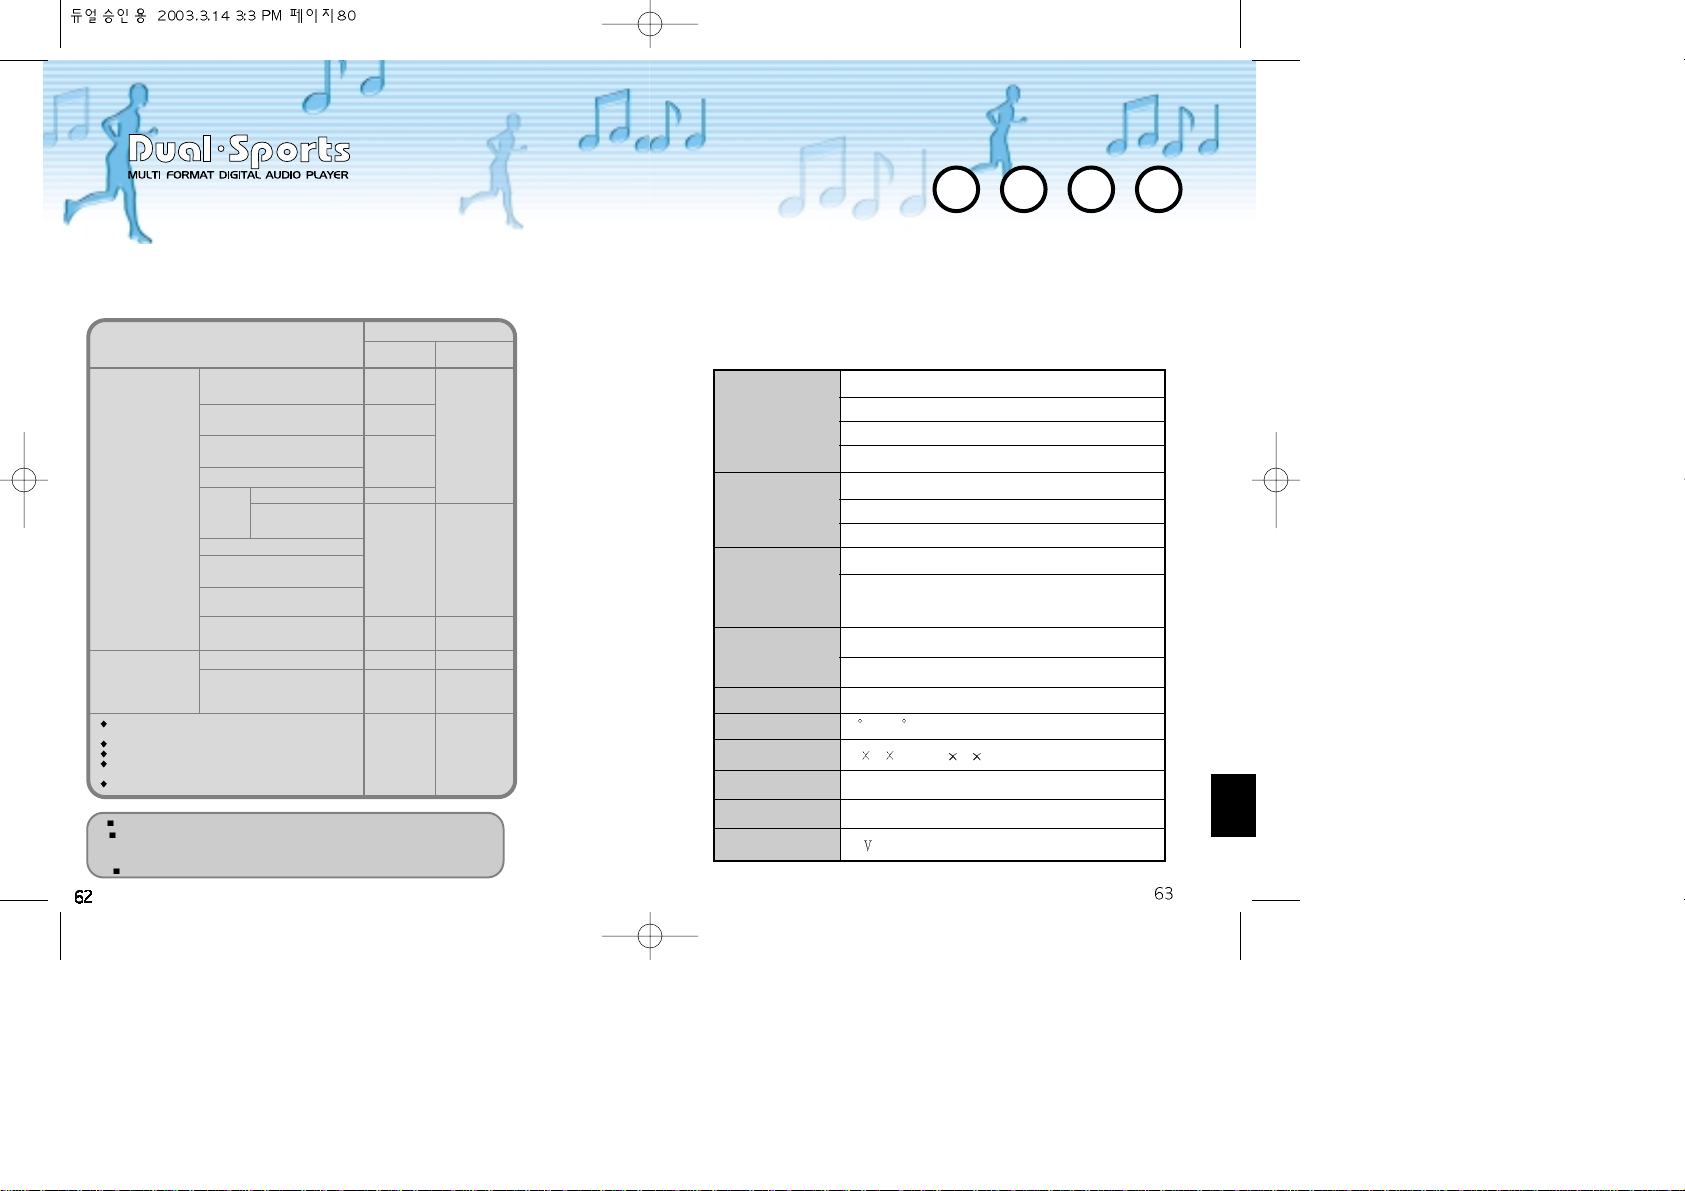
Damage Compensation Policy
Type of Damage
Compensation
Within Guaranteed After Guaranteed
Period Period
When problem
occurs with its’
performances or
functions in normal
condition of use.
(Within the period
of holding parts)
Problems with its’ performances
or functions from customer’s
faults regardless if they are
intentional or not.
When the faults occur from force majeure (including but not limited to fire, salt
flood, gas, earthquake, storm, flood and etc.)
When the faults occur from abnormal power supply or defects on access devices
When replacing normal consumable parts.
When problems occur from other outside factors without having any defect in the
product.
When the problem occurs from unauthorized service engineer.
Service for
Charge
Service for
Charge
When major parts are required to be served
within one month from the purchasing
When major parts are required to be served
within ten days from the purchasing
When exchanged products are required to be served
on major parts within one month from the purchasing
When it is not exchangeable
When it is When it has defects
repairable When the same repair
has been performed
for four times
When it is not repairable
When it is not repairable by lack of
parts’ stock
When the service person lost the
product
When the damages occur from
transportation or installation
When it is repairable
When it is not repairable
Product Exchange
or Refund
Product
Exchange
Refund
Service for Free
Product
Exchange or
Refund
Product
Exchange
Service for Charge
Product Exchange by
Payment which is
comparable to
“Service for Charge”
Service for
Charge
Refund by
adding 10% of
depreciated
amount
Service for Charge
To be complied with
the separate policy of
the manufacturer
The manufacture is not responsible for any data loss when it is caused by users’ fault.
Any other matters that are not specified herein should comply with “Regulation of
Customer Protection”
Service Call Center: +82-54-334-6003~4, 080-201-6789(Domestic)
FAX: +82-54- 337-3075
Frequency range
87.5 MHz~108.0 MHz
Radio(FM)
Output
7mw (L)+7 mw(R)
Signal-to-Noise Ratio
50 dB
Antenna Headset/Earphone Code Antenna
Frequency Characteristics
20 Hz~20 KHz
Audio
Output
7mw (L)+7 mw(R)
Signal-to-Noise Ratio
50 dB
File Type
MP3, WMA, ADP
File Support Bite Rate 8Kbps or more (MP3), 32Kbps
or more (WMA)
Recording
Voice Recording for 1040 minutes (256MB)
Capacity
Music Recording for 240 minutes (256MB)
Maximum Play Hours
More than 15 hours (at highest volume, 128Kbps, MP3)
Temperature Conditioned
-5 C ~ 70 C
Product Size
90 60 20mm
(W L H)
Weight
55 g
(without battery)
LCD
Graphic LCD
Battery
1.5 AAA size X 2
Product Specification
Page 34
LETTER OF GUARANTEE
Product
Model
Date of Purchase
Customer Name
Address
Seller’s Name
Address
(Y) ( ) ( )
:
:
:
:
:
:
:
Contact No.
Contact No.
:
:
• Please keep this letter of guarantee to have sufficient services and the
letter should be submitted with the date of purchase marked therein.
1. The guarantee for the product is subject and limited to the provision listed on the letter.
2. Please make sure that the date of purchase is provided on the letter as the guarantee
period is calculated from the date.(When it is not specified, the purchase date is
considered as the first date after 6 months from manufacture.)
3. This letter of guarantee may not be reissued.
The appearance and specification of the product may be subject to
changing without any prior notice to customers.
FCC Compliance Statement
This device complies with part 15 of the FCC rules. Operation is subject to
the following two conditions: (1) This device may cause harmful
interference, and
(2) This device must accept any interference received including interference
that may cause undesired operation.
This equipment has been tested and found to comply with the limits for a
Class B digital device, pursuant to Part 15 of the FCC Rules. These limits are
designed to provide reasonable protection against harmful interference in a
residential installation. This equipment generates, uses, and can radiate radio
frequency energy, and if not installed and used in accordance with the
instructions may cause harmful interference in radio communication.
However, there is no guarantee that interference will not occur in a particular
installation. If this equipment does cause harmful interference to radio or
television reception, which can be determined by turning the equipment off
and on, the user is encouraged to try to correct the interference by one or
more of the following measures:
• Reorient or relocate the receiving antenna.
• Increase the separation between the equipment and the receiver.
• Connect the equipment to an outlet on a circuit different from that to
which the receiver is connected.
• Consult the dealer or an experienced radio or TV technical for help.
Caution
Changes or modifications not expressly approved by the party responsible
for compliance could void the user's authority to operate the equipment.
 Loading...