

Page 1

Page 2

User’s Manual
( Model Name : DAH-300 Brand Name : Hyun Won )
FCC RF INTERFERENCE STATEMENT
NOTE :
This equipment has been tested and found to comply with the limits for a Class B digital device, pursuant
to Part 15 of the FCC Rules. These limits are designed to provide reasonable protection against harmful
interference in a residential installation.
This equipment generates, uses and can radiate radio frequency energy and, if not installed and used in
accordance with the instructions, may cause harmful interference to radio communications. However,
there is no guarantee that interference will not occur in a particular installation.
If this equipment does cause harmful interference to radio or television reception which can be
determined by turning the equipment off and on, the user is encouraged to try to correct the interference
by one or more of the following measures.
- Reorient or relocate the receiving antenna.
- Increase the separation between the equipment and receiver.
- Connect the equipment into an outlet on a circuit different from
that to which the receiver is connected.
- Consult the dealer or an experienced radio, TV technical for help.
- Only shielded interface cable should be used.
Finally, any changes or modifications to the equipment by the user not expressly approved by the grantee
or manufacturer could void the users authority to operate such equipment.
--------------------------------------------------------------------
Contents
Welcome to the MPgod Experience
Included with your MPgod
PC System Requirements
Getting Started with MPgod
Installing Software(MPgod Explorer)
Using the Software(MPgod Explorer)
How to download files to MPgod
LCD Window
Button Control
How to use the voice recording function
How to upgrade Operating System
Handling and Storing Instruction
Trouble Shooting Problems
Installing the USB Driver
Warranty Service
Warranty Card
Specifications
--------------------------------------------------------------------
Page 3
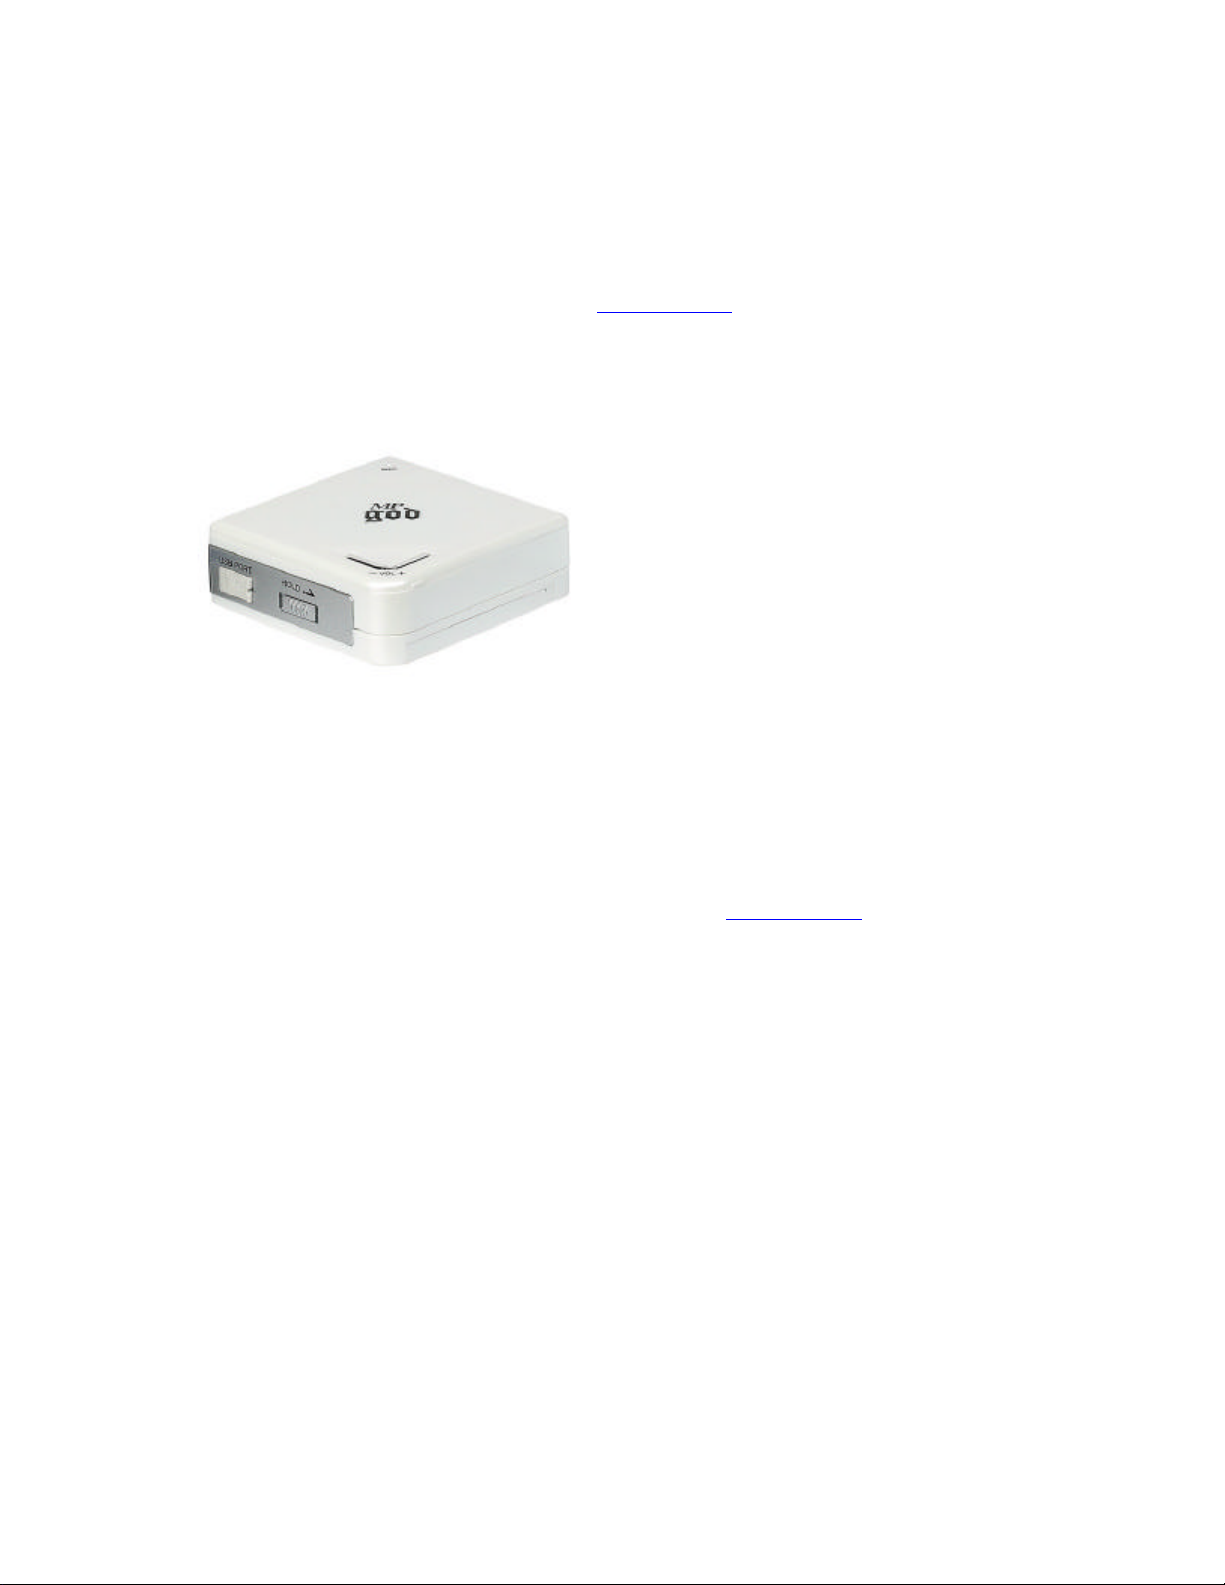
Welcome to the MPgod Experience
Congratulations on your purchase of the MPgod portable digital player - the flip type player with high
fidelity sound. The MPgod contains 64MB of on-board memory that is easily expandable via the
MultiMediaCardTM(MMC) flash memory slot. The MPgod also was designed with a programmable,
upgradeable Digital Signal Processor (DSP) to support new audio formats and digital rights management
systems. Please check the Hyun Won website at www.m-any.com for the latest software upgrades and
accessories. You are now ready to enjoy the world of digital audio with the most versatile digital audio
player on the market today.
--------------------------------------------------------------------Included with your MPgod
A. 1 AAA Battery
B. Software CD
C. USB Connection Cable
D. Earphones
E. User’s Manual
F. Necklace
Note :
Accessories and optional items are subject to change. Please check www.m-any.com
for the latest in MPgod accessories and software upgrades.
--------------------------------------------------------------------
PC System Requirements
The following PC specifications are required for MPgod compatibility:
Microsoft Windows98, ME or 2000 Operating System
CD-ROM Drive with digital audio extraction support
Pentium (or compatible) 200MHz or higher processor
32MB RAM (64MB for Windows ME or 2000) or greater
32MB free Hard Disk Space (more for digital audio file storage)
Sound card
USB port capability
-------------------------------------------------------Getting Started With MPgod
Complete the following steps to get started with your MPgod:
1. Insert a fully charged battery into your MPgod.
2. Launch the MPgod Explorer.
3. Connect the USB port cable to the MPgod and then to the PC USB port.
Page 4
4. Using the included software, download music to your computer from the Internet (or convert it to
digital audio format from an existing CD). Using the MPgod Explorer, navigate to the folder that contains
your music files. Select the files you wish to transfer and drag them to the bottom portion of the window.
Click on the transfer button located in the bottom right hand corner of the window. The files will transfer
individually and the progress will be displayed in the Memory Contents Window.
5. Disconnect the MPgod from the USB cable.
6. Turn on the MPgod by Press Play button more than 2 sec. and play with headphones inserted by
pressing Play button briefly.
Note :
Please do not attempt to use any other USB peripheral, such as a digital camera or scanner simultaneously
with MPgod, MPgod Explorer as communication errors may result.
------------------------------------------------------Installing Software(MPgod Explorer)
In order for the MPgod and your PC to communicate and transfer digital files, you must first install the
MPgod Explorer by completing the following steps:
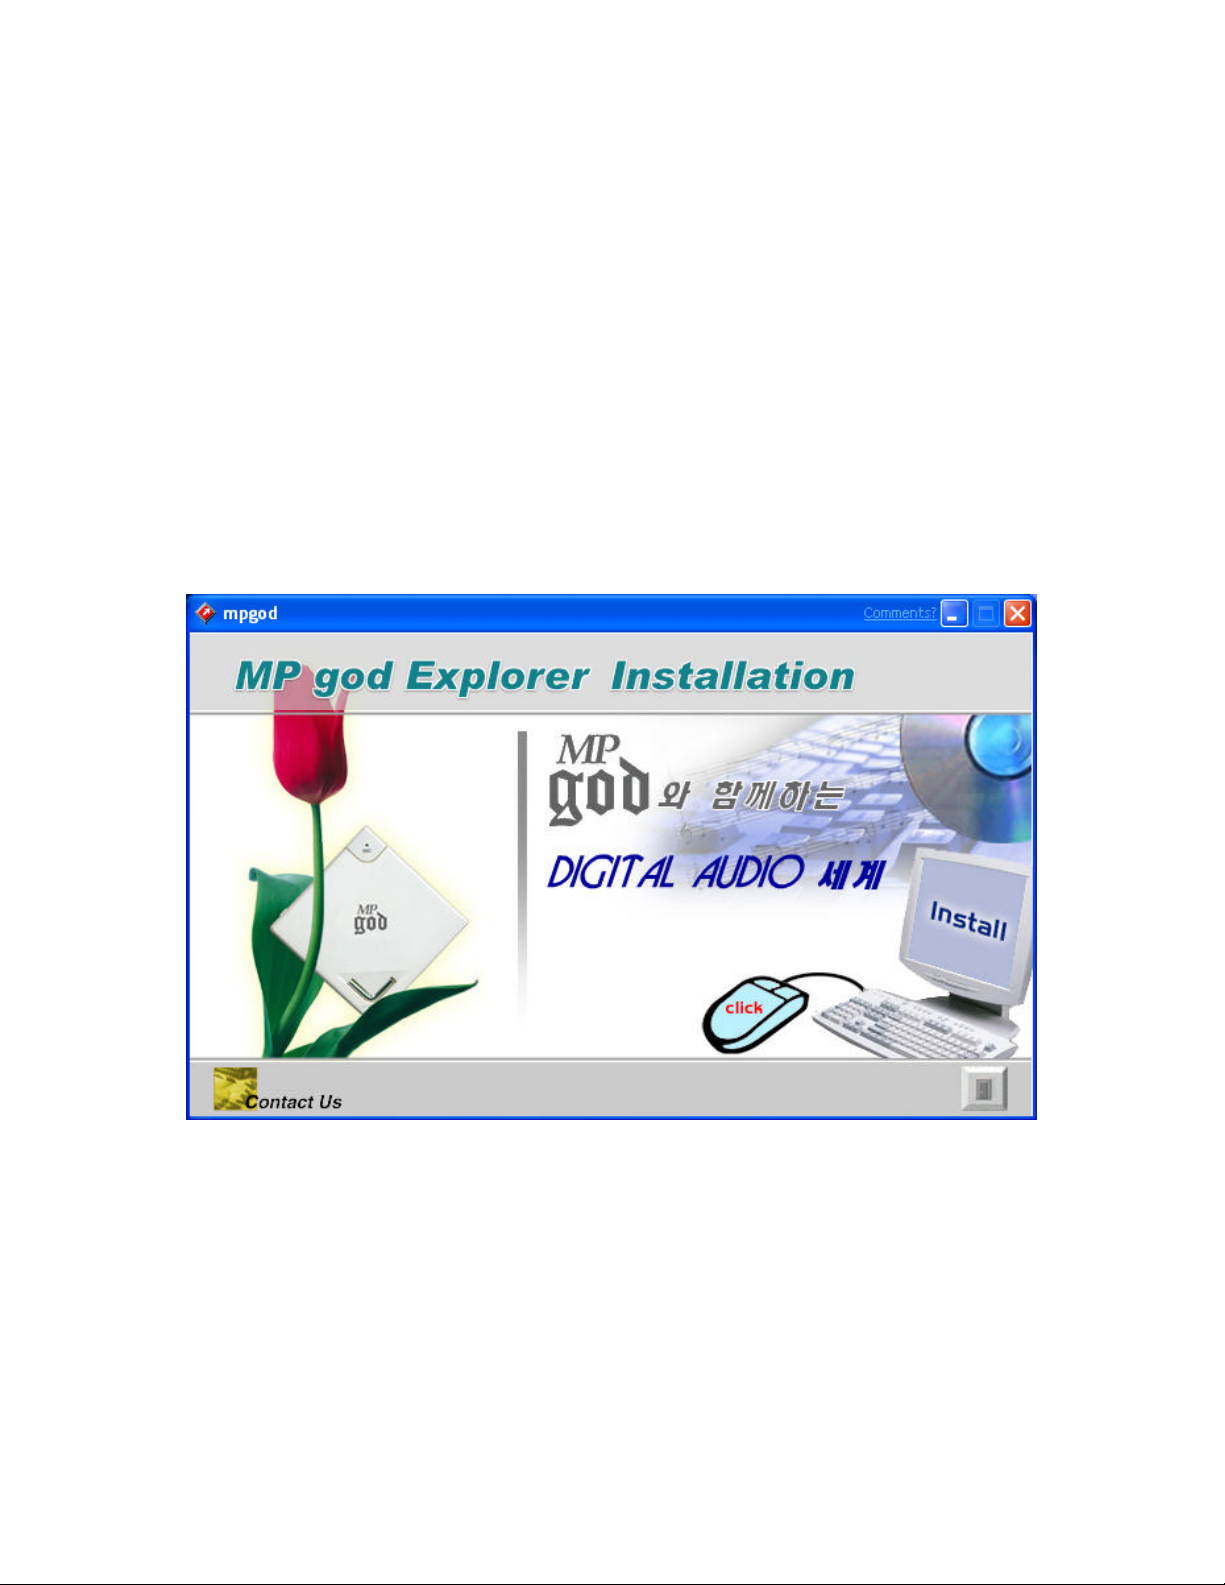
Insert the Mpgod Explorer CD into the CD-ROM drive. The following screen should display:
Note:
If the setup file is executed automatically, follow the install program instructions. If the setup file is not
executed automatically, browse the installation CD and double click on the instal.exe file on the CDROM file directory. (Example “D:\\mpgod.exe”, where D: is your CD-ROM drive) You can locate these
files by going to your Windows Start menu, and then Run.
1) Click on Install button. The following page will display
Page 5
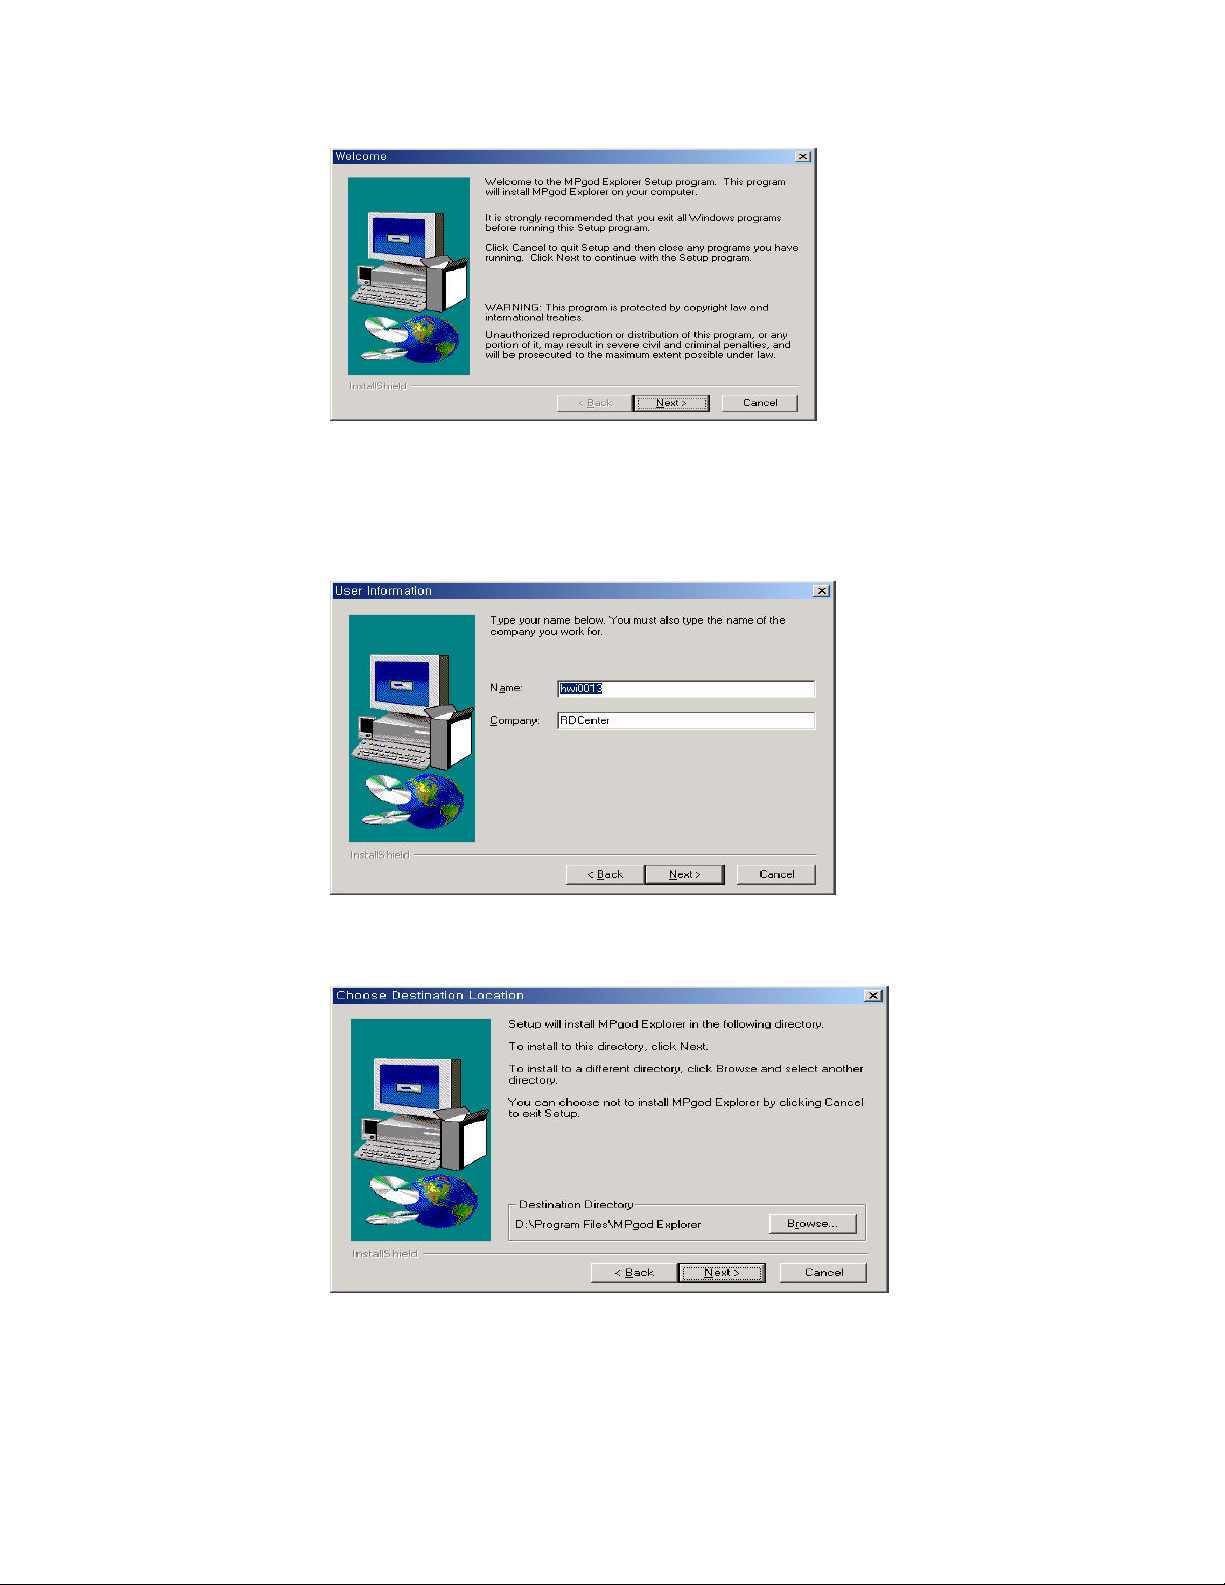
2) Click on the Next button. The following page will display
3) Enter your Name and the Company name and click on the Next button. The following page will
display
4) Choose the directory for the MPgod Explorer and click on the Next button. The following page
will display
Page 6
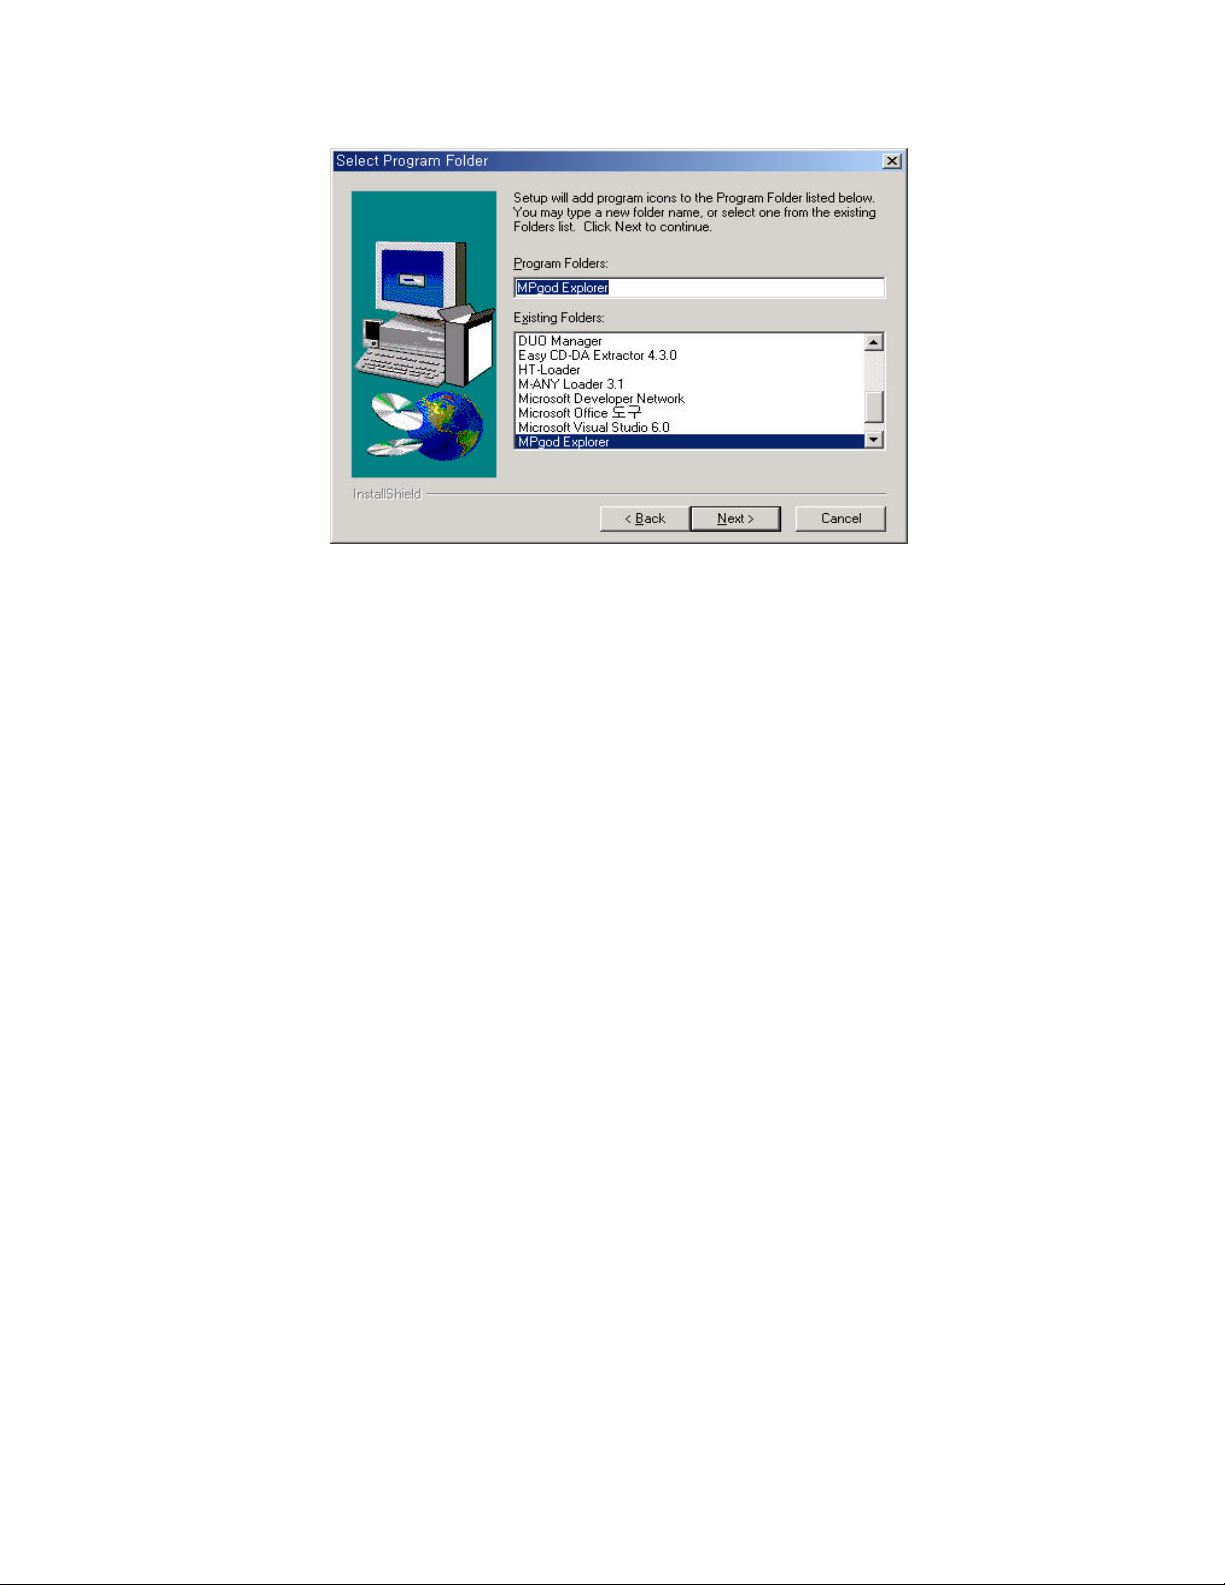
5) Select the program folder and click on the next button
6) Verify the Setup details and click on the next button. Once you have done these steps, it will
complete the installation and bring you back to the main page displayed.
7) Once the installation of the MPgod Explorer finishes, click the shortcut icon on the desktop or
click on the Windows Start menu, then Programs, then the shortcut to run the MPgod Explorer.
Note: If a rebooting message displays during setup, install again after rebooting the computer.
--------------------------------------------------------------------
Using the Software(MPgod Explorer)
Important Notice
Install program PRIOR TO connecting device with PC.
In case the device is connected without installing program, the device will not be recognized because the
device driver could not be found.
The main screen of the MPgod Explorer controls music file downloading and uploading.
Page 7
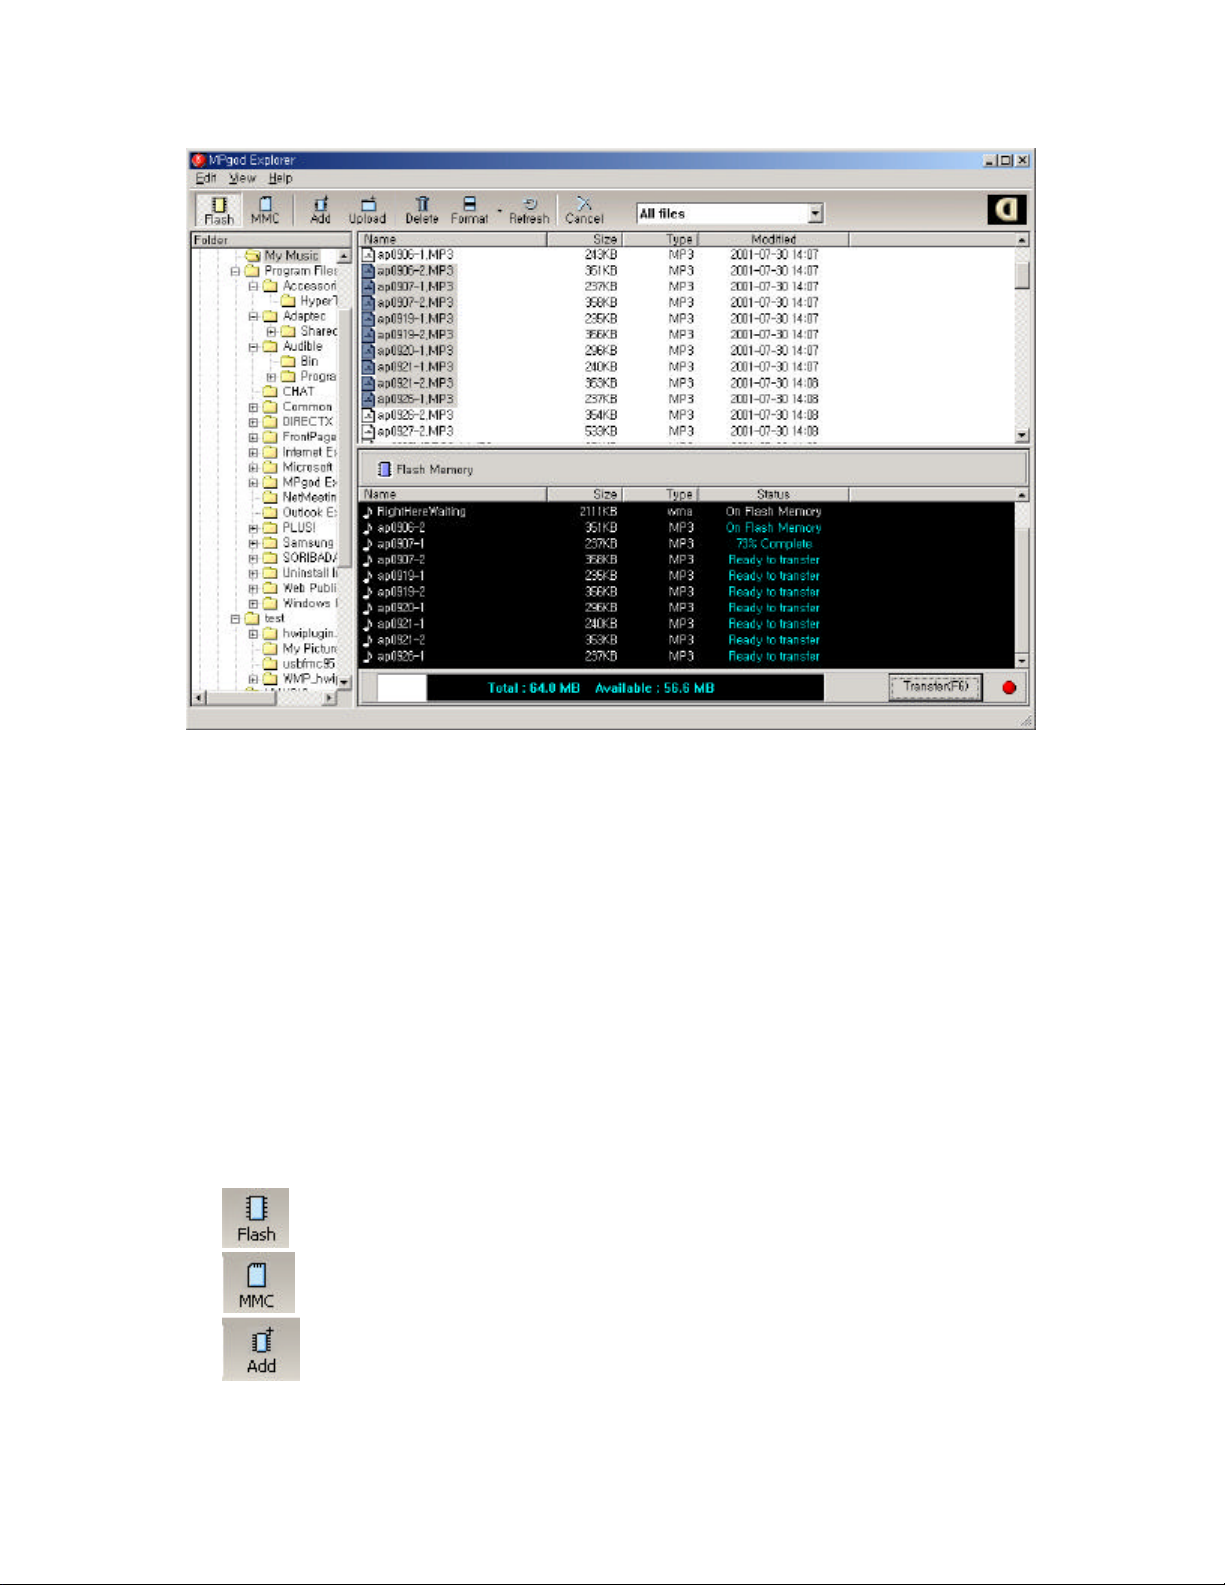
A. File Selector: This enables you to view files by type.
B. File List Window: This window displays the files contained in the given folder enabling you to
selectively download files to flash memory and/or MMC memory.
C. Memory Contents Window: This window enables you to check the file title, size, type and download
status of the MMC and on-board flash memories.
File order change
1) Select a file to be moved.
2) Drag & Drop the selected file to the desired position.
Note: File order can only be change by moving 1 file at a time.
D. Transfer Files Button: This button begins transferring selected audio files to the player.
E. Memory Status: This indicates the amount of memory available, the amount of total memory and
memory connection status. This window may indicate "No Memory Found" in the following cases:
- The MPgod is not connected or the power is switched off.
- MMC memory is selected when a MMC memory card is not inserted into the player.
F. Folder Window: This window enables you to select audio files more easily by allowing you to
browse specific folders. The selected folder contents are displayed in the File List Window to
the right.
G. Functional Icons:
Selects the on-board memory (flash memory) to display
Selects the removable memory (MMC memory) to display
Adds the selected files to the selected memory. Selected files are placed in “Ready to
Transfer” status in the memory contents window.
Page 8
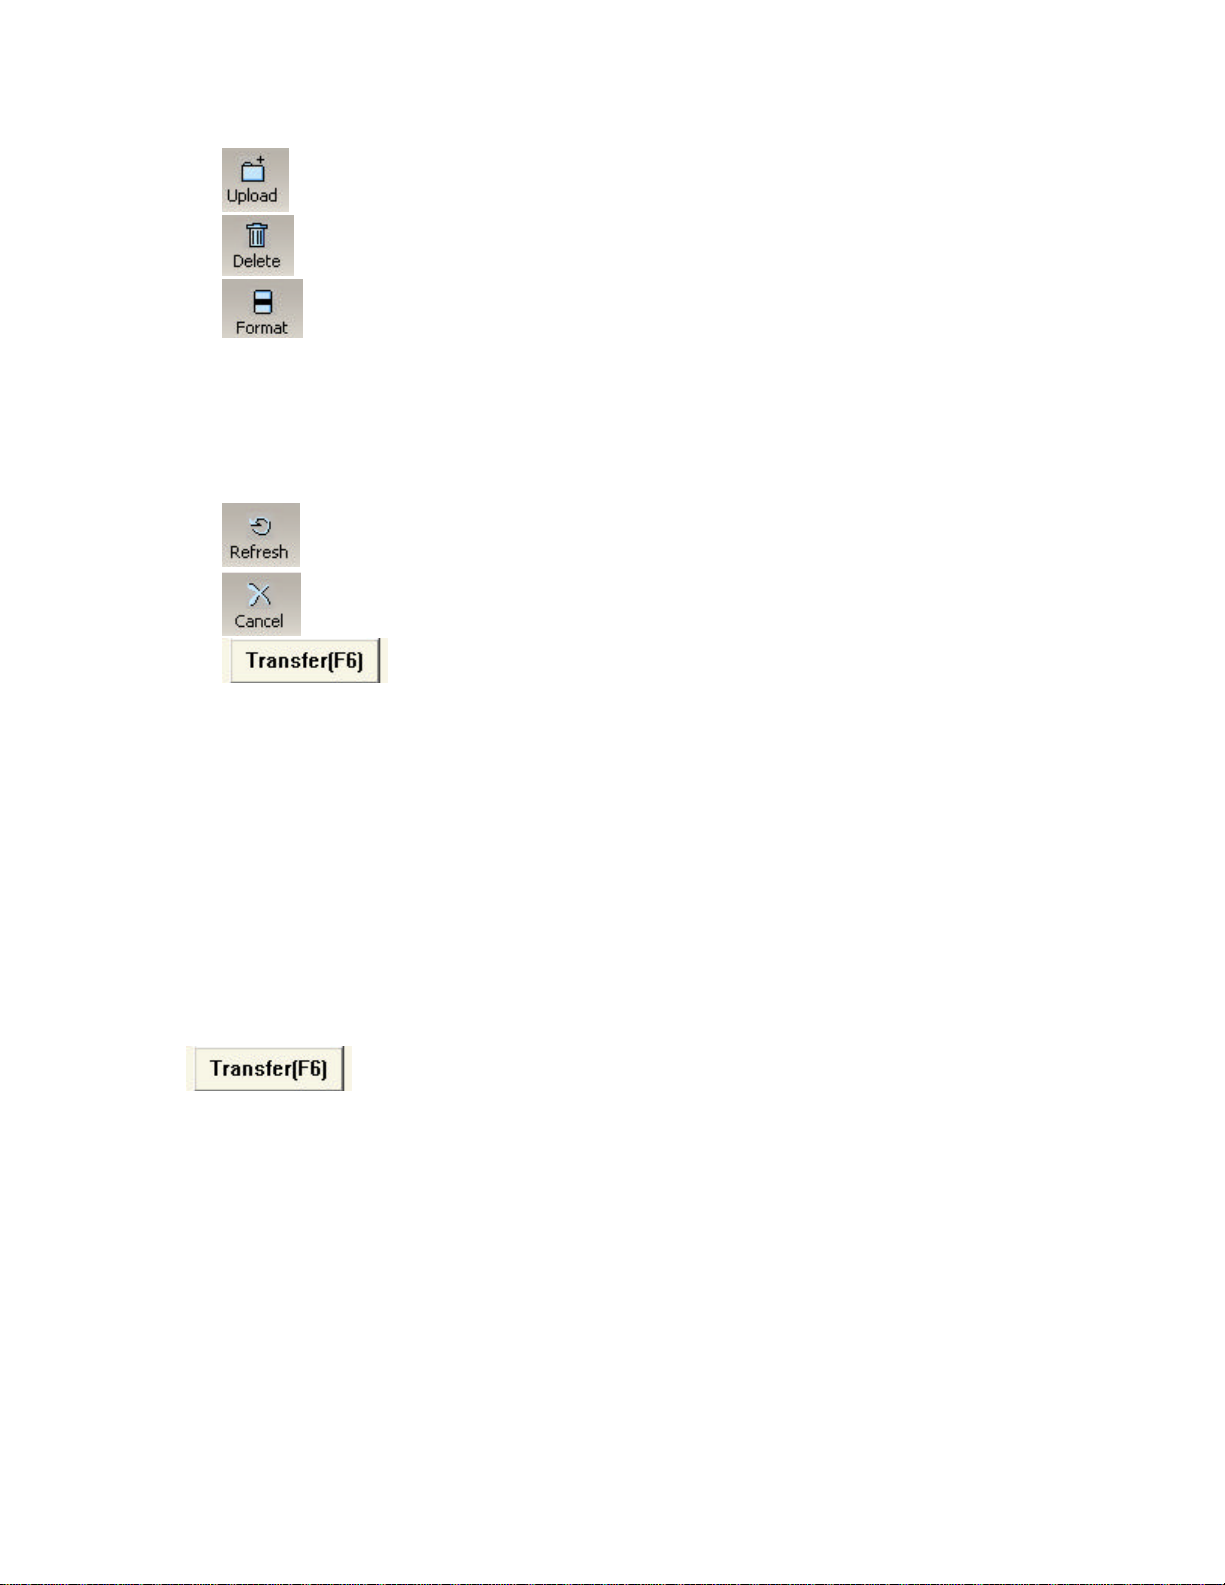
Uploads of the selected files on the player memory to the selected PC folder
Deletes selected files on the selected memory
Formats selected memory Note: This will erase all files on the selected memory.
a. Normal Format: The "Normal Format" is, in essence, a quick 'clearing' of all the data
on the memory card. It accomplishes the same thing as selecting all songs and deleting
them
b. Low-level Format: A "Low Level Format" is a longer procedure as it checks the disk
sector by sector for any problems and repairs them if it finds them. This is somewhat
similar to the 'Scandisk' program and requires that no other applications are opened
during the formatting procedure.
Refreshes view of selected memory
Cancels file transfer between player and PC
Transfers files from the memory contents window onto the player.
-------------------------------------------------------How to download files to MPgod
When downloading to player using the MPgod Explorer:
1. Select the player memory to download and store audio files onto (either on-board Flash memory or
MMC when using removable MMC flash memory cards).
2. Highlight files to be downloaded in the File List Window using the Folder Window to browse for PC
folders containing audio. You may select files one of 3 ways:
a. You may drag & drop individual files from the File List window to the Memory Contents Window
b. You may select multiple audio files by holding down the CTRL key while clicking the left-mouse
button on each file you wish to download to the player then drag and drop the selection of files as above
c. You may press the "F5" key or "Add" icon after highlighting each file.
The selected files will appear in the Memory Contents Window with "Ready to transfer" listed under the
status column.
3. Click the "Transfer" icon to start downloading selected files to player memory.
4. To cancel a download in progress click the "Cancel" icon.
5. Close the MPgod Explorer before disconnecting the USB cable.
Note : If there is no audio output after disconnecting the USB cable, open the battery door briefly to
expose the battery, then close the battery door and press Play with the power switch on. Doing this will
fully "reboot" the DSP and restore normal operation.
The MPgod Explorer and the Audible Manager can not be open at the same time, a communication error
will result. If this occurs, close both software managers unplug the device. Re-initialize the device by
turning it off then on again, re-connect the device via the USB cable and select ONE of the software
managers to run.
The Windows Media Player and Audible Manager software included with the MPgod
have online instruction manuals that may be printed out once they are installed.
--------------------------------------------------------------------
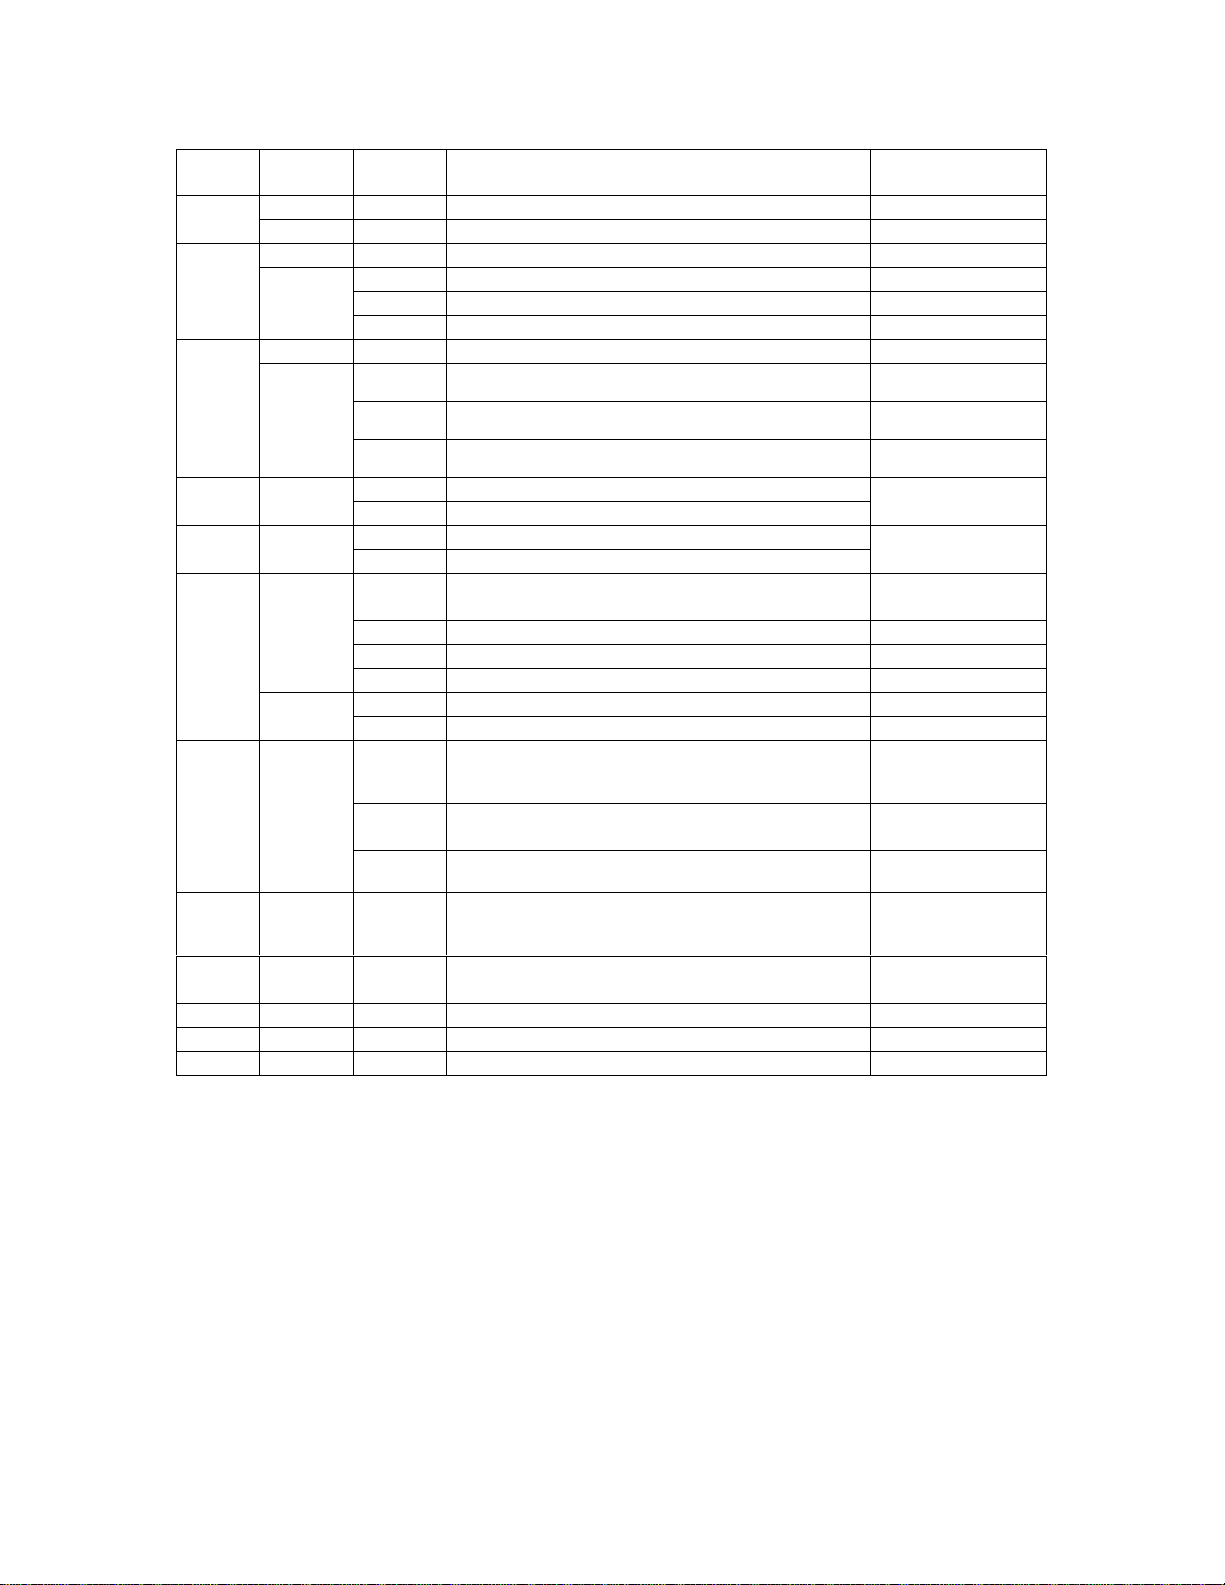
Button Control
Page 9
Button
Current
Mode
Buttons Operation to be expected Remark
Stop Press power offSTOP
Play Click entering into Stop mode
FF
Stop Click selecting next track
Play
Click selecting next track
Press search along tracks at 2X speed
Press entering into Stop mode
REW
Stop Click selecting previous track
Play
Click going to starting point of played track
Press selecting previous track
Press search along tracks at 2X speed
Click increasing volume by one stepVOL+ Play
Press increasing volume successively(4 steps/sec)
Click decreasing volume by one stepVOL- Play
Press decreasing volume successively(4 steps/sec)
REC
Stop
Press entering into Voice Recording mode Record mode
Click starting voice recording In Record mode
Click starting erase of ADPCM file In Erase mode
Click erasing files
Play
Press setting and deleting bookmark
Click calling for bookmark
MODE Play
Press
selecting Play mode è
Normal – RPT1 – RPTALL- Random – Random ALL
Click selecting Equalizer mode è
Flat – Dance – Latin – Jazz – Rock - User
Entering into user Equalizer mode è
Band 1 – Band 2 – Band 3 – Band 5 – Band 5
HOLD Play or
Press
- Disabling or enabling button control
Stop
PLAY Power
off
Press turning on the device and entering into
Stop mode
Stop Click Starting play back
Play Click
Press
Stopping play back(entering into Pause mode)
Selecting played filesè ADPCM – MP3/WMA
* Press : Pressing and holding more than 2 sec
* Click : Pressing briefly
display on LCD
display on LCD
from last track
display on LCD
in case of play
less than 5 sec
in case of play
less than 5 sec
in case of play
more than 5 sec
30 steps of volume
(16th step default)
30 steps of volume
(16th step default)
or Erase mode
Setting play
back position
(Normal default)
User
(band 1~5)
Selecting by
clicking VOL+/PLAY button only
for power on
works in Hold.
“This is ..”
displays on LCD.
Note :
(Position of play back) : When power is off automatically in Stop or Pause mode play restarts from last
played position whereas. If the device is turned off by user or battery is removed, play starts from the first
track.
--------------------------------------------------------------------
LCD Window Display
Page 10
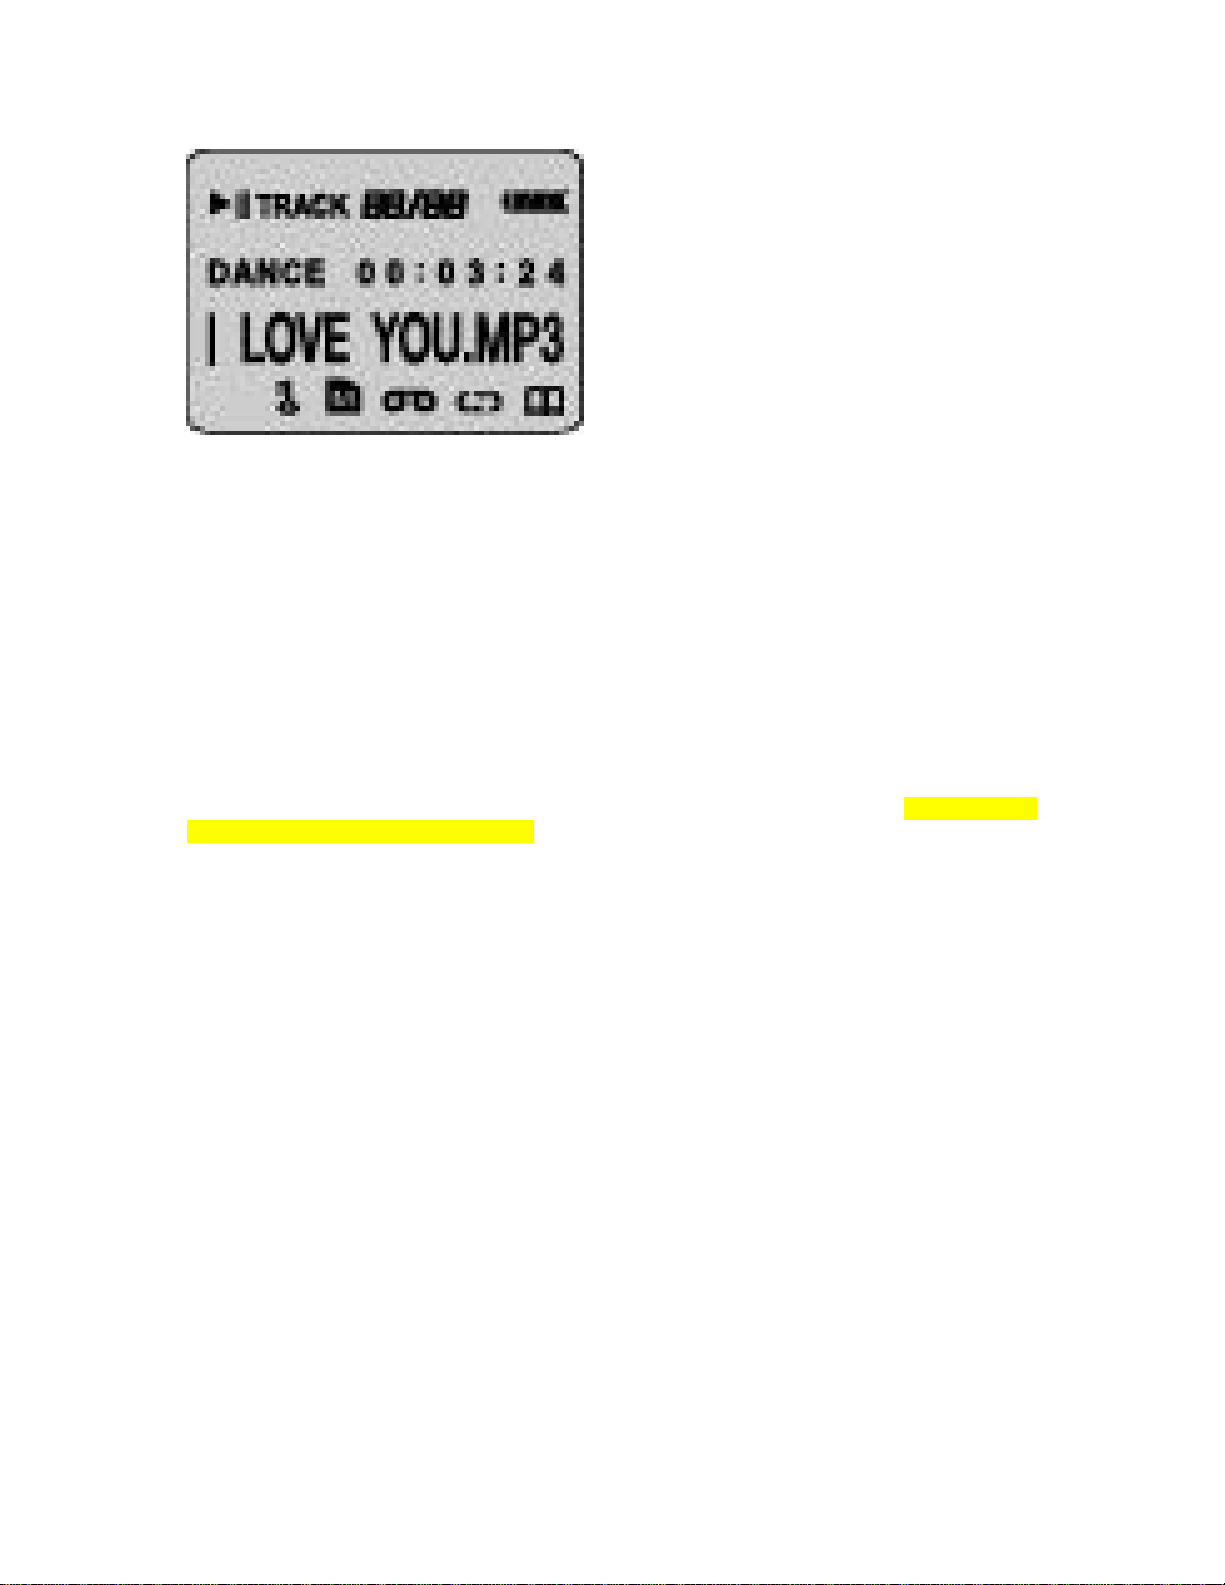
1. Total title # / Current title order
2. Currently set Equalizer Mode
3. Hold Status
4. Indication of MMC titles play
5. Title name, current Mode(Play, Pause, Stop, FF, REW)
6. Indication of Voice Recording
7. Played time of current title
8. Repeat Play Status(on-repeat of 1 title or all in order or all in random
off-stop after playing all title in order or random)
9. Battery Charge Status
10 Bookmark Function
-------------------------------------------------------How to use the voice recording function
The MPgod features a built-in omni directional microphone for digital voice recording. The microphone
is located on the front side of the player. The MPgod records in ADPCM format and will play back
recordings. Typical voice recording capacity is approximately 4.3 minutes per 1 MB of free flash
memory.
ADPCM voice-recorded files are stored only on the on-board flash memory, and not on the MMC
memory. The voice-recording feature will record continuously when activated, and will use all available
flash memory. When all available flash memory has been filled, voice recording will stop automatically.
1. RECORDING
Press REC button more than 1 sec. to select Voice mode in Stop mode(Voice and Erase mode toggle when
REC button is pressed more than 1 sec. in Stop mode), which is set by turning Switch on or pressing Stop
button.
Press REC button briefly to start voice recording in Voice mode, then Voice Recording will activate.
Press the “STOP" button to stop recording.
2. REPLAY
Press Play button more than 1 sec. to select ADPCM play back mode in Stop Mode(ADPCM and
MP3/WMA play back modes toggle whenever Play button is pressed more than 1 sec. in Stop mode).
Press Play button briefly to start play back of the recorded ADPCM files.
Press Stop button to stop play back of ADPCM files.
3. DELETING (directly from the device)
Press REC button more than 1 sec. to select Erase mode in Stop mode(Voice and Erase mode toggle
whenever REC button is pressed more than 1 sec. in Stop mode), which is set by turning Switch on or
pressing Stop button.
Press REC button briefly to enter into Erase mode.
Search the ADPCM file to be deleted by pressing FF or REW button. When the target file is displayed
Page 11
press REC button briefly, then the selected file will be played for 10 sec..
Press REC button briefly again while playing, the selected file will be erased. If the REC
Button is not pressed or a button other than REC button is pressed while playing, the
played file is not erased and mode changes to Stop automatically.
NOTE:
Only ADPCM files are deleted by the above-described method.
4. File Conversion (ADPCM to .wav file)
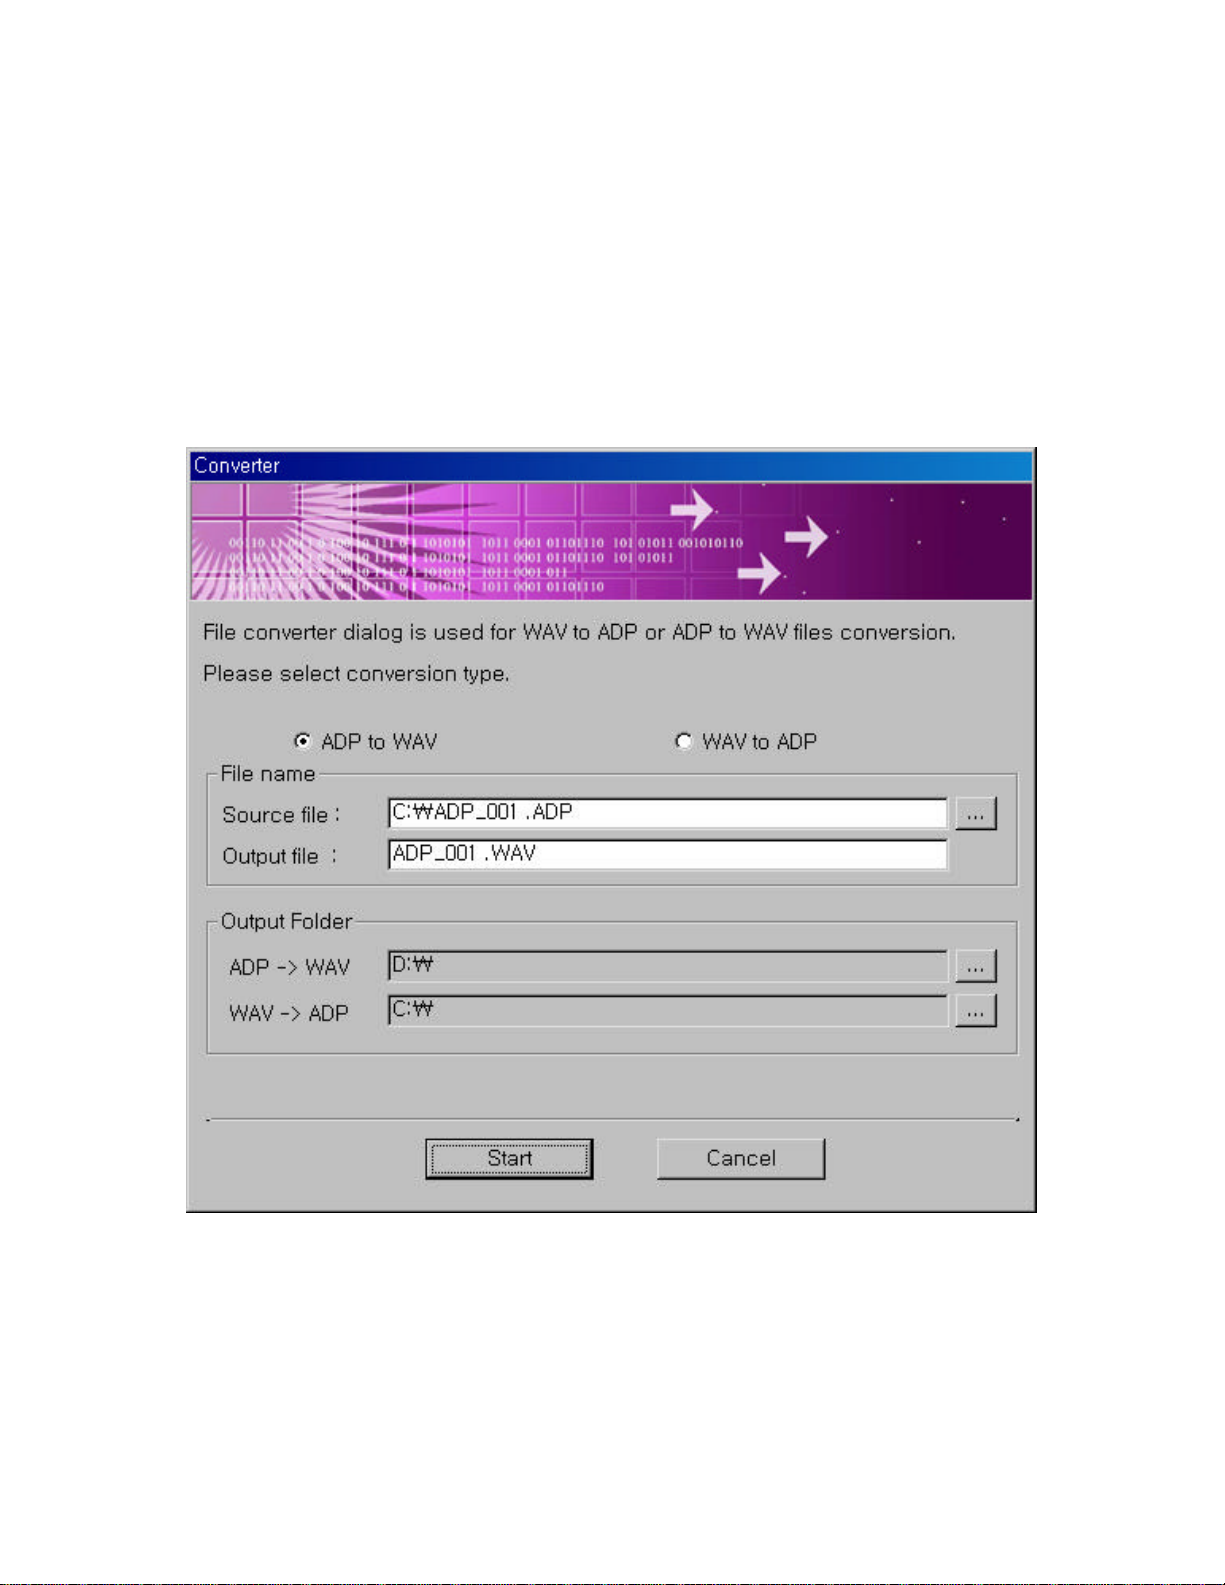
Voice files recorded by the device can be converted from ADP to WAV format or reverse by selecting
“Converter” from the View menu. If the voice recording files have been downloaded to the computer
using the MPgod Explorer, then the dialog window below can be used when the device is not connected.
Page 12
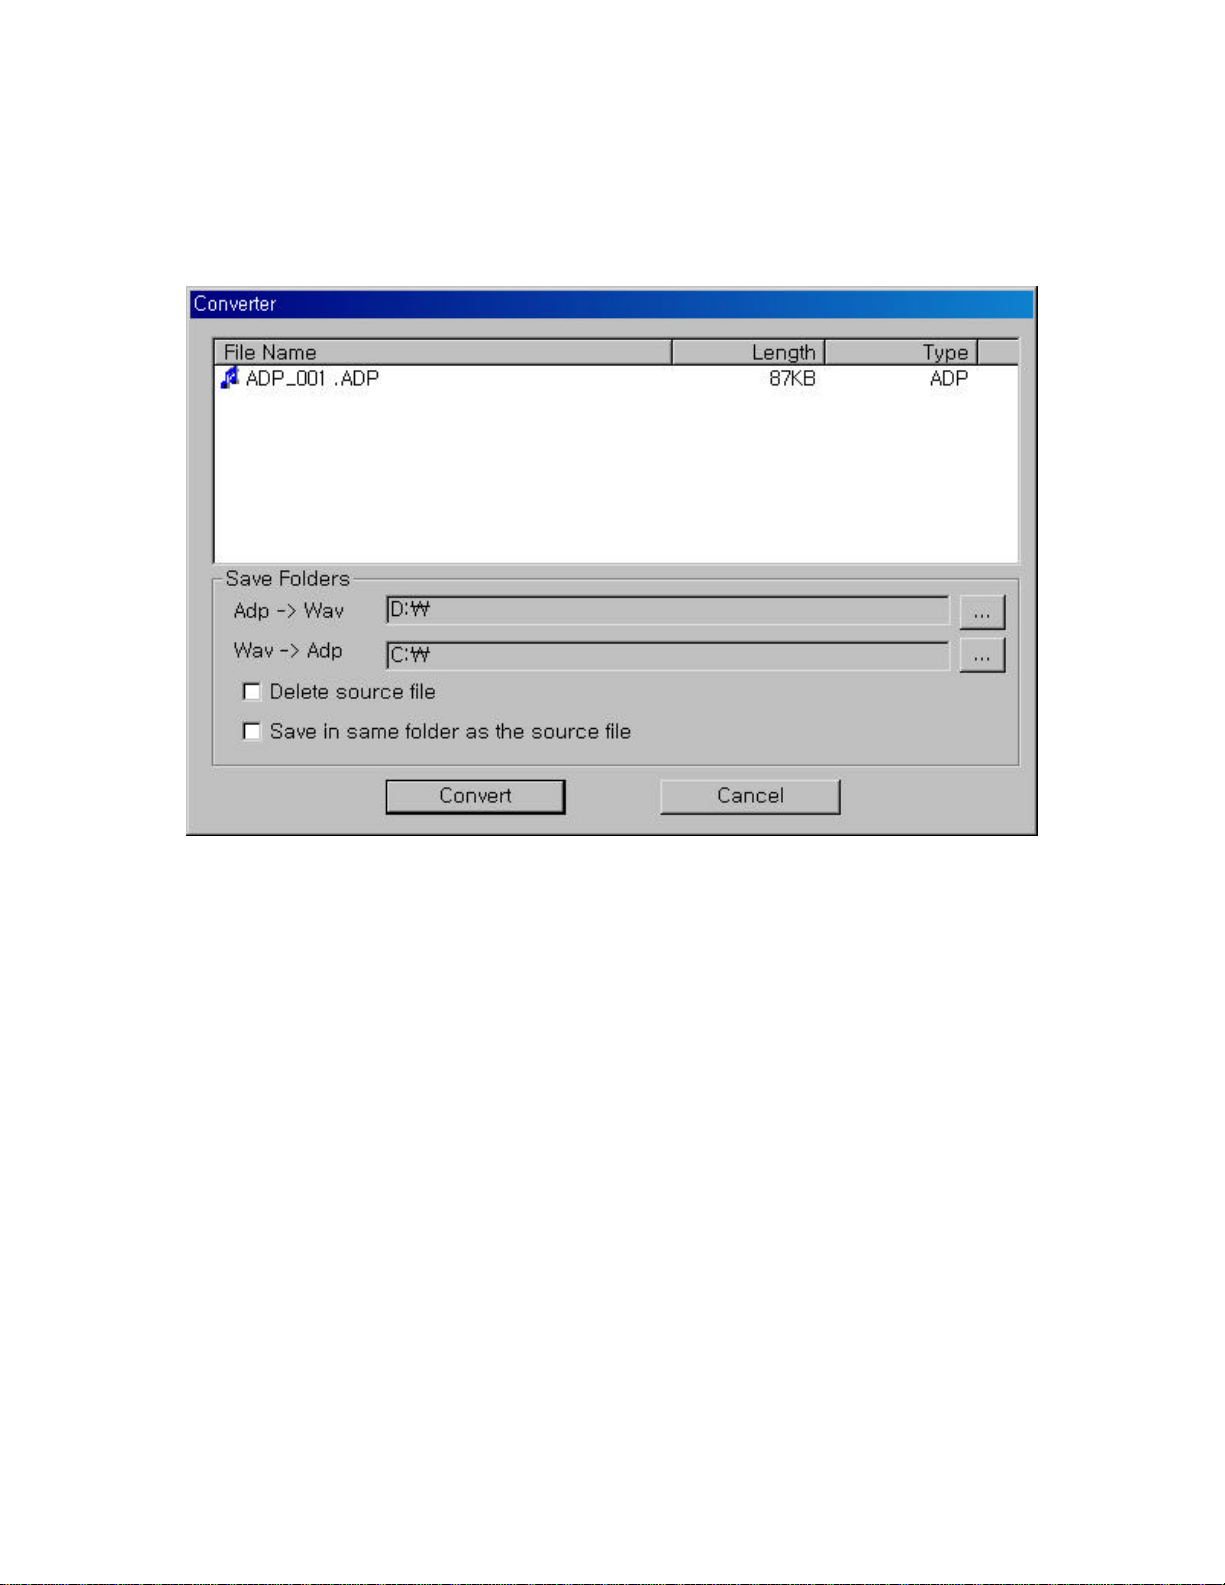
You can also convert WAV to ADP files during downloading or uploading when device is connected. You
can also convert ADP to WAV files directly when uploading ADP files from the on-board memory to the
PC using the dialog window below. Select the ADP file on the player to be uploaded and the folder the
file to be uploaded into. Begin uploading the ADP file and the dialog window below will open
automatically. After selecting your file conversion options and converting the file, you may choose to
rename the file.
--------------------------------------------------------------------
How to upgrade Operating System
You can update the Operating system of the device.
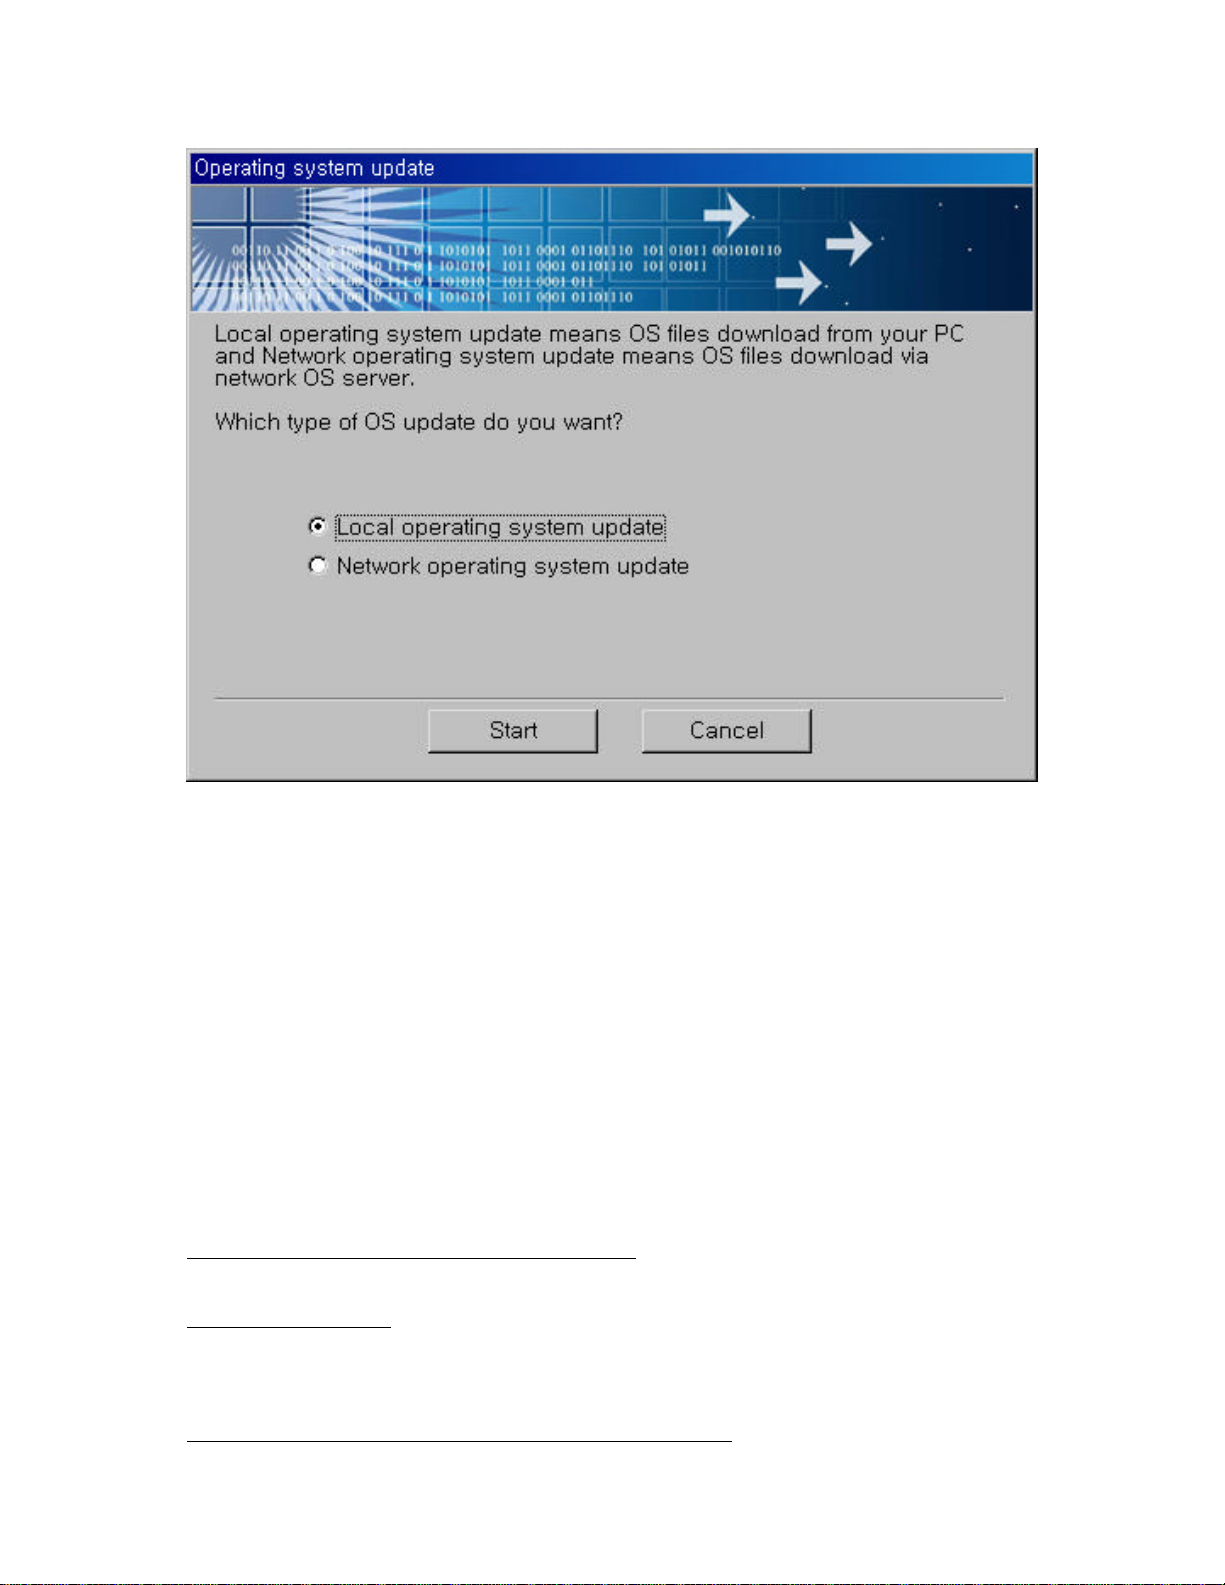
Local operating system update means OS update of device by installed program.
Network operating system update means OS update of device by the latest version of
OS from the Server Computer.
If Network operating system update is done, the OS saved in program is automatically
Updated.
Open MPgod Explorer and connect MPgod to your PC. Click “Edit” menu and select “OS update”, then
you can perform Local OS update or Nework OS update following the instruction of below dialogue
window.
Page 13
-------------------------------------------------------Handling and Storing Instruction
Please note the following information when using the MPgod :
Unit may be damaged if struck or crushed.
Keep out of direct sunlight.
Keep away from dust and dirt.
Clean with a dry, soft cloth.
Store in a cool dry place.
Do not store your MPgod around a television set due to the magnetic field interference that may result
with the TV.
Do not squeeze the MPgod body. Excessive pressure on the body could cause damage to the internal parts
and cause malfunctions.
Do not touch or handle the tape simulator belt in the bottom of the unit, doing so may cause malfunctions
when used in a cassette deck.
Do not expose the MPgod to extreme temperatures, such as leaving it in a car in hot weather.
--------------------------------------------------------------------
Trouble Shooting Problems
The MPgod will not download digital files from the PC.
Check the cable connection to the USB port.
The MPgod will not play.
Verify that the battery has been inserted correctly.
Check to see if the battery charge is enough.
Verify that the MMC card is inserted properly, if applicable.
The Mpgod Explorer does NOT recognize the hardware connection.
Page 14

Check the cable connection to the USB port.
You may need to re-install the software.
1) If “No memory found” is shown again;
- Check if the USB cable is connected to device and the PC properly.
- Connect the USB cable to another USB port.
- Check if there is “USB Flash Memory Controller Driver” in My computer -> Control Panel ->
System -> Device Manager.)
If there is “(or?) USB Driver” or “(or?) Untitled Device”, USB driver was not installed correctly or is not
properly recognized. In this case it is necessary to re-install the USB driver. To install of USB drivers,
please refer to “The inability to get access to Memory” in Help menu of program.
- If there are no contents related to USB in My computer -> Control Panel -> System-> Device
Manager, you may have to check if your computer is compatible with USB driver.
Check if there is conflict between hardware in My computer -> Control panel -> System -> Device
Manager. (Hardware conflicted with other hardware shows “!” or “?” mark in front of the device name.)
If you can find conflict between hardware, Delete the conflicted hardware and reboot computer.
Please visit the Hyun Won website at www.m-any.com for the latest updates and software upgrades for
the MPgod
--------------------------------------------------------------------
Installing the USB Driver
If a USB driver to control MPgod already exists in PC, there is no need to install a new driver.
Insert Software CD into CD-ROM Drive (Do not execute the installation program.)
Connect the DMPgod to PC with USB cable.
(If there is no USB driver to communicate between the MPgod and the PC, the "New Hardware Wizard"
will appear on the screen.)
Proceed the installation following the on-screen instructions.
When the location of the drive is asked, select the folder of your CD-ROM.
(When the installation finishes once, The New Hardware Wizard will appear on screen again.)
Follow the on-screen instructions to complete the installation of the USB driver.
Important Note:
When connecting the cable with MPgod player, ensure the correct orientation of the connector end, and
do not force the connector. Improper connection with the USB cable can cause damage to the computer
and/or the MPgod.
--------------------------------------------------------------------
Warranty Service
Customers are entitled to warranty service for a period of one (1) year from the date of purchase.
Warranty service does not apply to defects resulting from customer fault or acts of God.
Non-warranty service shall apply to defects resulting from:
1. Infiltration of foreign matter, such as water, liquid, or sand.
2. Breakage due to dropping or severe impact.
3. Damage to or deformation of the outer case caused by organic solvents, such as benzene.
4. Use of parts other than those certified by the manufacturer.
5. Loss or breakage of any parts or components caused by unauthorized disassembly.
6. Repair or modification done by any persons other than manufacturer authorized personnel.
7. Acts of God, such as lightning, storm or flood.
Please visit Hyun Won website at www.m-any.com for more information.
--------------------------------------------------------------------
Warranty Card
Page 15

--------------------------------------------------------
Specifications
Necklace and Flip type Digital Audio Player
- Size (WxHxD) : 56x56x20mm
- Weight (w/o battery) : 50 g
- Memory(on-board) : 64 MB
- Memory Expansible with MMC Card
- Power Supply : 1 x AAA Battery
- Earphone Output : 7 mW max.
- S/N Ratio : 90 dB
- Frequency Response : 20Hz ~ 20 KHz
- PC Interface : USB Port
- Required PC OS : Windows 98, ME, 2000
 Loading...