

Page 1
BOXON
User s Manual
SRS is a registered trademark of SRS Labs.
WOW Technology is an intellectual property of SRSLabs.
Page 2

View Index
1 - Special Features
3 - Technical Specifications
4 - Accessories
5 - Part Specifications
7 - Buttons
8 - Recharging
9 - Connecting to a PC
10 - Disconnecting
12 - Power ON/OFF
13 - Play Menu
14 - Play/ Pause
15 - Music Selection
16 - Voice Recording
18 - FM Radio Function
FCC RF INTERFERENCE STATEMENT
Warranty Card
Page 3
Special Features
World s smallest Mp3 Player
Super Slim size. A fully featured MP3/audio player that fits in the palm of you hand!
COLOR Display
COLOR Display combined with blue letters brings new beauty to the unit. COLOR
Display provides superior sharpness, brilliance and easy to read display.
Five Preset EQ modes plus one User-set EQ mode
Features equalization modes and you can also customize equalization to suit your
sound.
File Navigation System and Unlimited Folder Capacity
The player can play MP3 files saved in multiple folders. Those files and folders can be
selected and played as if in a Windows environment.
Easy & Convenient Clock
Built in clock keeps you on time.
1
Page 4
Special Features
PC Peripheral Device
By connecting the product to PC, the Windows system automatically recognizes it
as a removable disk. No additional software needed. It can also be used as
storage for other types of files.
FM Radio receptor and recorder
Enjoy FM radio listening as well as digital music files (MP3/WMA). It can also
record your FM programming which allows you to listen to it over and over or to
save it on your PC.
Voice Recorder
Built in high quality microphone allows you to record your voice.
Built-in Lithium-Polymer Battery
No extra battery or recharger is required. This advanced battery system is easily
recharged by connecting into the USB port on your PC.
Resume Function in Second Unit
Settings are automatically restored when the unit is powered ON in case of
sudden power down.
2
Page 5
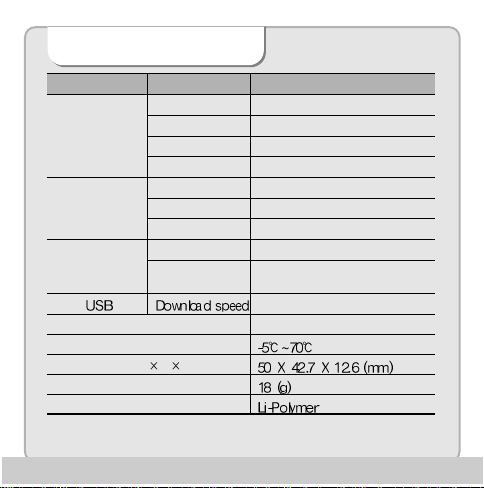
Technical Specifications
Functions
FM Tuner
Audio
Supporting Files
Recording Time
Operating Temperature
Size (W
Weight
Battery (Built-in)
Items Specifications
FM Frequency Range
Headset Output
S/N Ratio
Antenna
Frequency
Characteristics
Headset Output
S/N ratio
File format
Bit Rate
87.5 MHz~108.0MHz/ 76.0MHz~108.0MHz
Max. 7mW (16 ) Max Volume
50dB
Headset/earphone antenna
20Hz ~ 20KHz
Max. 12mW (16 ) Max Volume
90dB
MP3, WMA, WMA DRM
MP3 : 8~320Kbps,
WMA : 32~192Kbps OGG ~ Q10
25Mbps (USB Ver 2.0)
Max 10 Hr
H D)
3
Page 6
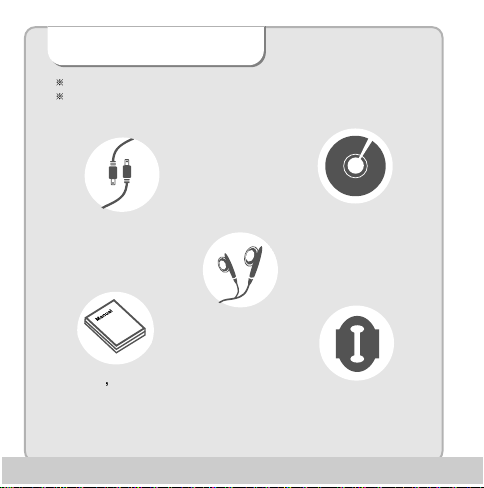
Accessories
Illustrations may be different from the actual product.
Accessories shown below may be different from purchased products to improve
quality of the unit.
USB / Charging
Cable
User
s Manual
Program CD
Earphone
Protective Case
4
Page 7
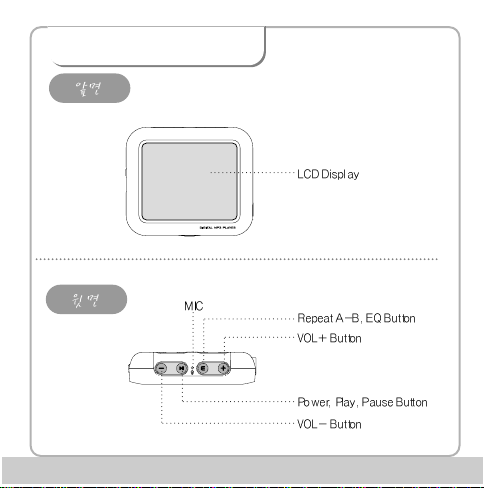
Part Specifications
55
Page 8
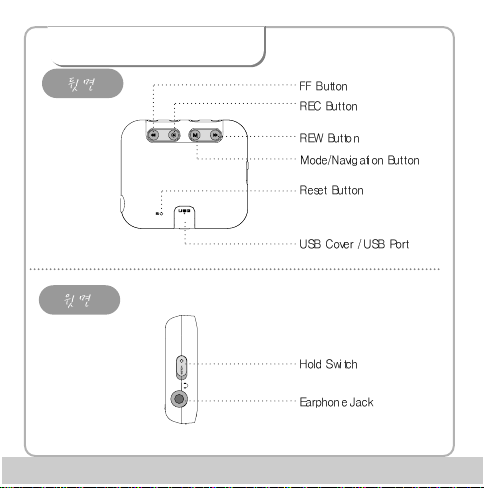
Part Specifications
6
Page 9
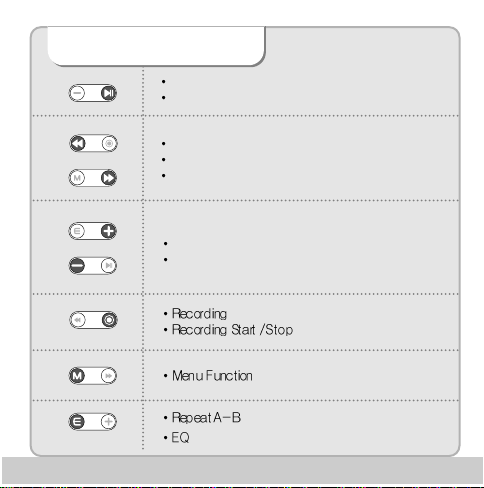
Buttons
Power ON/OFF
File Play/ Pause
Searching Previous/Next File
Move to Left/Right Menu
Move to Navigation sub/preceding Folder
Volume Up/Down
Move to Navigation sub/preceding folder or file
7
Page 10
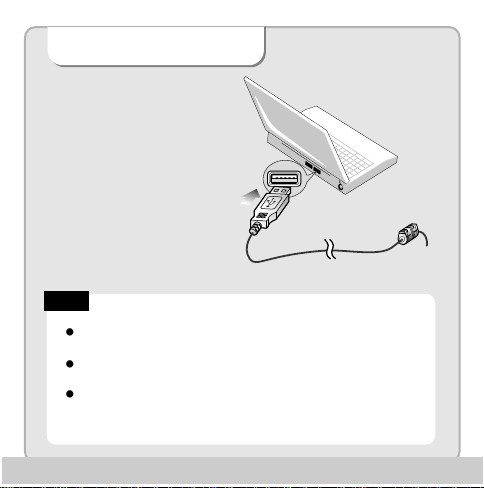
Recharging
To recharge the battery use the
USB cable to connect the unit to
the PC.
Note!
It takes approx 3 hours to completely recharge a fully discharged
battery.
Recharging is not interrupted while downloading/uploading files
from/to PC.
Recharge the product using USB cable when LCD screen is not
activated.
8
Page 11
Connecting to a PC
Note!
What is USB (Universal Serial Bus)? This is a new connection system between
PC and peripheral devices.
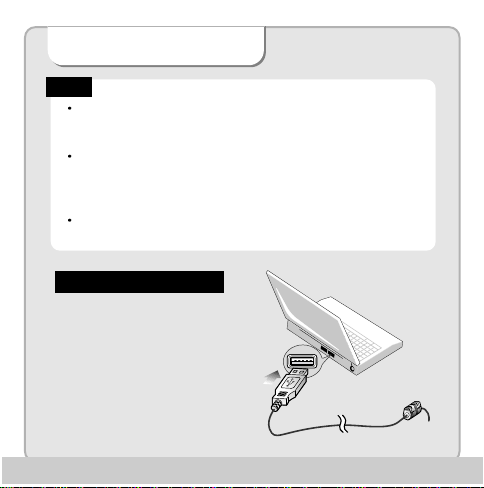
Connect the USB cable supplied with the product into a USB port in PC.
Any unexpected error can happen when connecting to the USB port in front of
PC or USB hub.
Windows version 98SE or lower will not detect the DAH-1500i as a peripheral
device. To have your PC detect the player Install the Program CD supplied.
USB Cable Connection
Connect one end of the cable into
a USB port on the back of your PC
and the other end to the earphone
jack of the DAH-1500i.
9
Page 12
Disconnecting
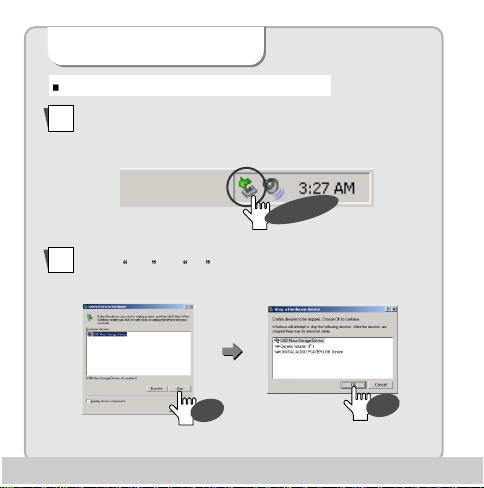
Windows ME, 2000 and XP Operating Systems
1
Double click on the green arrow on the right-bottom part of the initial
Window screen.
Double Click
2
Click on Stop and OK after selecting USB High Capacity Storage
Device
Click
Click
10
Page 13
Disconnecting
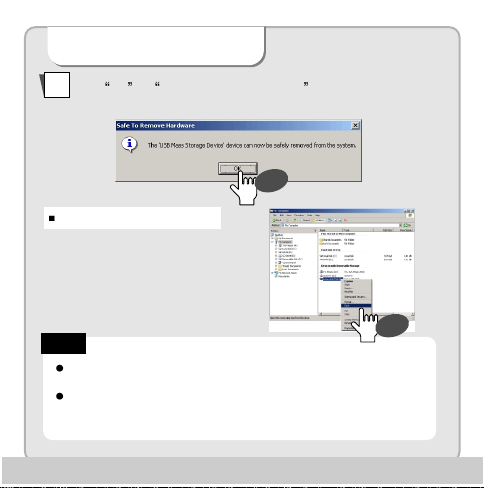
3
Click OK on Safe To Remove Hardware window and remove the
cable.
Click
Disconnecting with Windows 98SE
Open “My Computer” or Windows
“Search”. Select “Removable Disk”.
Using the right mouse button select
“Remove”. Remove the USB cable.
Note!
Removing the cable without following the instructions above will display a
warning message and may cause a fatal error in PC or the product.
Removing the cable while downloading or uploading files, or while formatting
files may cause a fatal error in PC or the product.
11
Click
Page 14
Power ON/OFF
Turn Power ON
Press and hold the play/pause button to turn the power on.
Note!
When the battery needs recharging the LCD will display the Battery
Low icon.
Recharge the battery when LCD is not activated.
Turning Power OFF
Press and hold the play/pause button to turn the unit off.
Note!
When no button manipulation in pause condition is done after the set period of
time for “Auto Power Off,” it automatically turns off the power.
When you try to play a file after the restarting of the product, it completely recovers
all previous setting. All track numbers, equalizer and other settings are recovered.
(Resume function in second unit)
12
Page 15
Play Menu
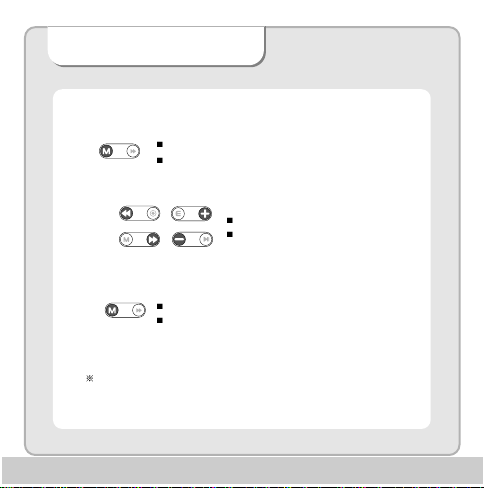
Activates/Disables menu function
Returns to submenu/ main menu
Moves right/left menu
Control setting
Activates submenu/ setting menu
Saves current setting
To access detailed explanation about menus see.
13
Page 16
Play/ Pause
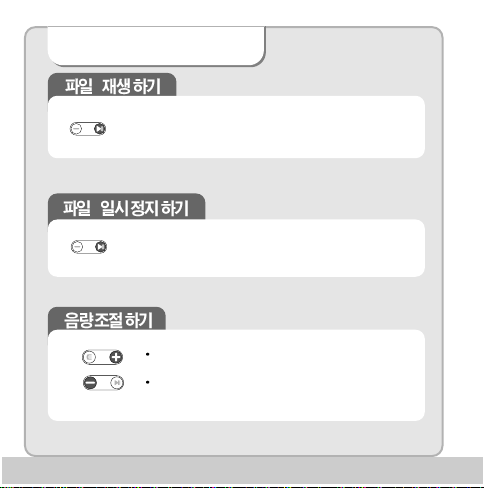
Press the play/pause button once to play a selected file.
Press the play/ pause button once more to stop play.
Press “+” or “-“ to increase or decrease the volume
incrementally.
Press and hold “+” or “-“ to increase or decrease the
volume continuously.
14
Page 17
Music Selection
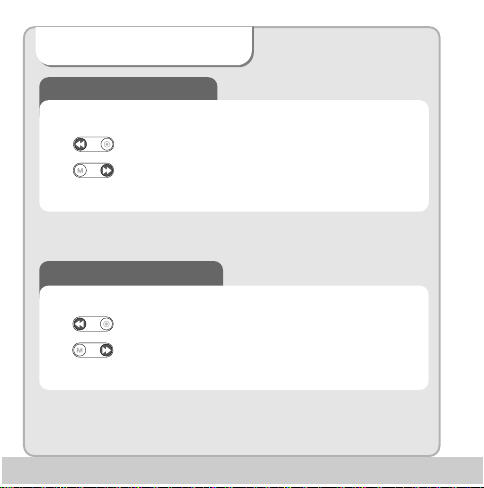
When music is paused
Press the file selection buttons to skip to the next
/previous file without playing the file.
While playing music file
Press the file selection buttons once to skip to the next or
previous file and the file will play.
15
Page 18
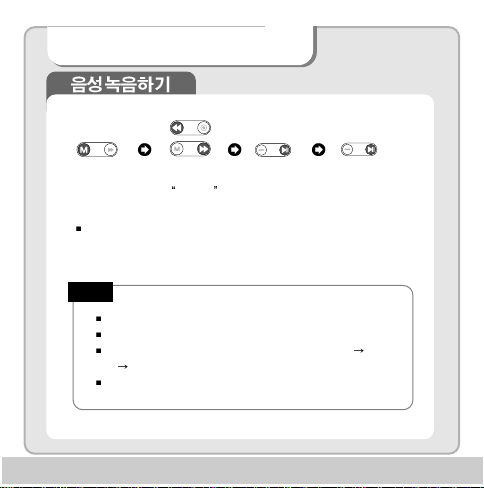
V oice & Music Recording
Press and
Hold
Recording is paused by pressing play button while recording. To
continue recording press play button again.
Move to
Recoding
Press
Start
“Recording “
Press
Stop
“Recording ”
Note!
You can play back your recorded voice at listen mode
Voice recording is automatically stopped and saved when memory becomes full.
The volume of recorded voice can be controlled by pressing Setting Record
Set Record Gain
Voice recording may not work properly when battery is low.
16
Page 19
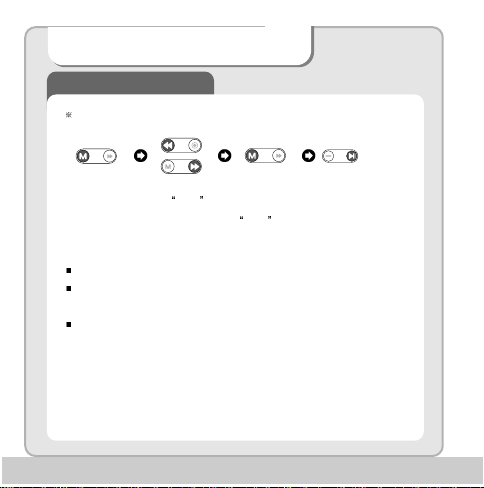
V oice & Music Recording
Play Back
Recorded voice and FM Radio Program can be played on Listen Mode.
Press and
Hold
Use FF/REW button to search for recorded files
Voice recorded files are shown as V001.mp3, V002.mp3, while Radio recordings
are shown as F001.mp3, F002.mp3, etc
Listen Mode only plays recorded voice or FM files Moving Vxxx.mp3, or Fxxx.mp3
files to other folder disables Listen Mode to play them back.
Move to
Listen
Press
change to
Listen mode
Press
to play
recorded file
17
Page 20
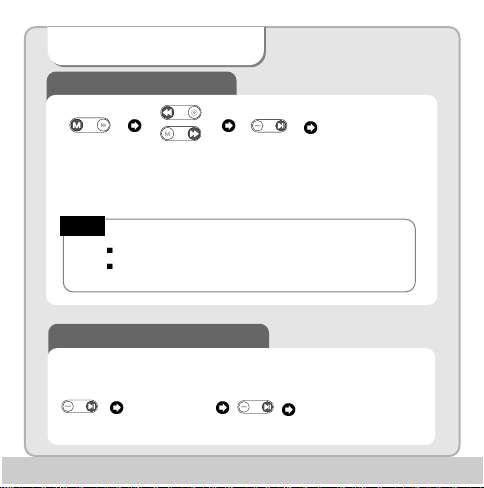
FM Radio Function
Listening to the FM Radio
Press and
hold
Display
changes to FM
Radio
Note!
The earphone also acts as the radio antenna.
Local frequency ranges vary globally.
Reception/ Reception Standby
Press
Listen to Radio
Press
Standby status
Reception
Press
18
Page 21
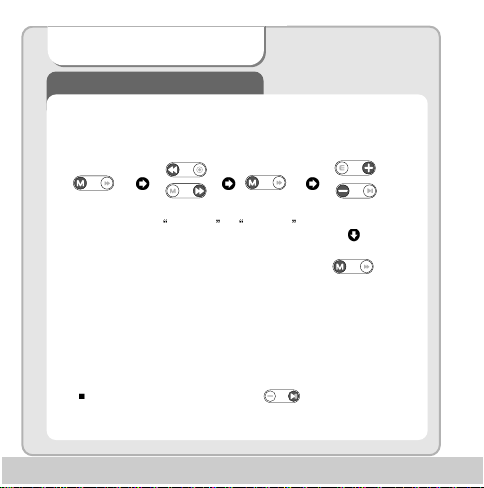
FM Radio Function
Region Select
This allows to search for FM frequency range for different regions, since the
frequency is variable according to different countries.
Press
Standard : Search for 87.5-108.0MHz by 100 KHz increments.
Europe : Search for 87.5-108.0MHz by 50KHz increments.
Japan : Search for 76.0-108.0MHz by 50KHz increments.
After saving exit Settings by pressing
Move to
Region Sel
Press
Region Sel
Select the country
Press
19
save
Page 22
FCC RF INTERFERENCE STATEMENT
Note
This equipment has been tested and found to comply with the limits for a Class B digital device,
pursuant to Part 15 of the FCC Rules. These limits are designed to provide reasonable protection
against harmful interference in a residential installation.
This equipment generates, uses and can radiate radio frequency energy and, if not installed and
used in accordance with the instructions, may cause harmful interference to radio
communications. However, there is no guarantee that interference will not occur in a particular
installation.
If this equipment does cause harmful interference to radio or television reception which can be
determined by turning the equipment off and on, the user is encouraged to try to correct the
interference by one or more of the following measures.
- Reorient or relocate the receiving antenna.
- Increase the separation between the equipment and receiver.
- Connect the equipment into an outlet on a circuit different from that to which the receiver is
connected.
- Consult the dealer or an experienced radio, TV technician for help.
- Only a shielded interface cable should be used.
Finally, any changes or modifications to the equipment by the user not expressly approved by the
guarantee or manufacturer could void the warranty the users authority to operate such equipment.
CAUTION
Changes or modifications not expressly approved by the manufacturer
could void the warranty.
THIS DEVICE COMPLIES WITH PART 15 OF THE FCC RULES. OPERATION IS SUBJECT
TO THE FOLLOWING TWO CONDITIONS: (1) THIS DEVICE MAY NOT CAUSE HARMFUL
INTERFERENCE, AND (2) THIS DEVICE MUST ACCEPT ANY INTERFERENCE
RECEIVED INCLUDING INTERFERENCE THAT MAY CAUSE UNDESIRED OPERATION.
Page 23
Warranty Card
Product Name:
Model:
Date of Purchase: (m) (d) (y)
Name of Customer Telephone Number:
Address:
Name of Agent: Telephone Number:
Address:
You need to present this Warranty Card with the date of purchase written thereon when required in
order to receive satisfactory services. Please keep this card in a secure place.
1. The warranty service for the product shall be provided based on the information contained in this Warranty
Card.
2. The warranty service is available effective from the date of purchase, so please put the date of purchase on
this Warranty Card. (If the date of purchase is not identified in the card, the effective warranty period will start
from the date 6 months from the date of manufacture.)
3. This Warranty Card can not be reissued
The design and size of the product are subject to change without prior notice in order to improve product quality.
1 year from the
date of purchase
Page 24

 Loading...