

Page 1

Page 2
Page 2 ............................. Welcome to the DUO-Aria Experience
Page 3 ............................... Included with Your DUO-Aria Player
Page 4 ................................................. PC System Requirements
Page 5 .............................. DUO-Aria Player Hardware Overview
Page 8 ...................................................... Software CD Contents
Page 9 .................................... Installing the DUO-Aria Manager
Page 11 ...................................... Getting Started with DUO-Aria
Page 12 ........................................ Using the DUO-Aria Manager
Page 14 ................... How to download files to DUO-Aria player
Page 15 .. Operating the DUO-Aria Player (Stand-alone with headphones)
Page 16 ...... Inserting the DUO-Aria Player into a Cassette Deck
Page 17 ............................... DUO-Aria Cassette Deck Operation
Page 18 .................................... Audible.com Content Operation
Page 20 ................................ Handling and Storing Instructions
Page 21 ........... Battery and Charger(AC and DC charger) Usage
1
CONTENTS
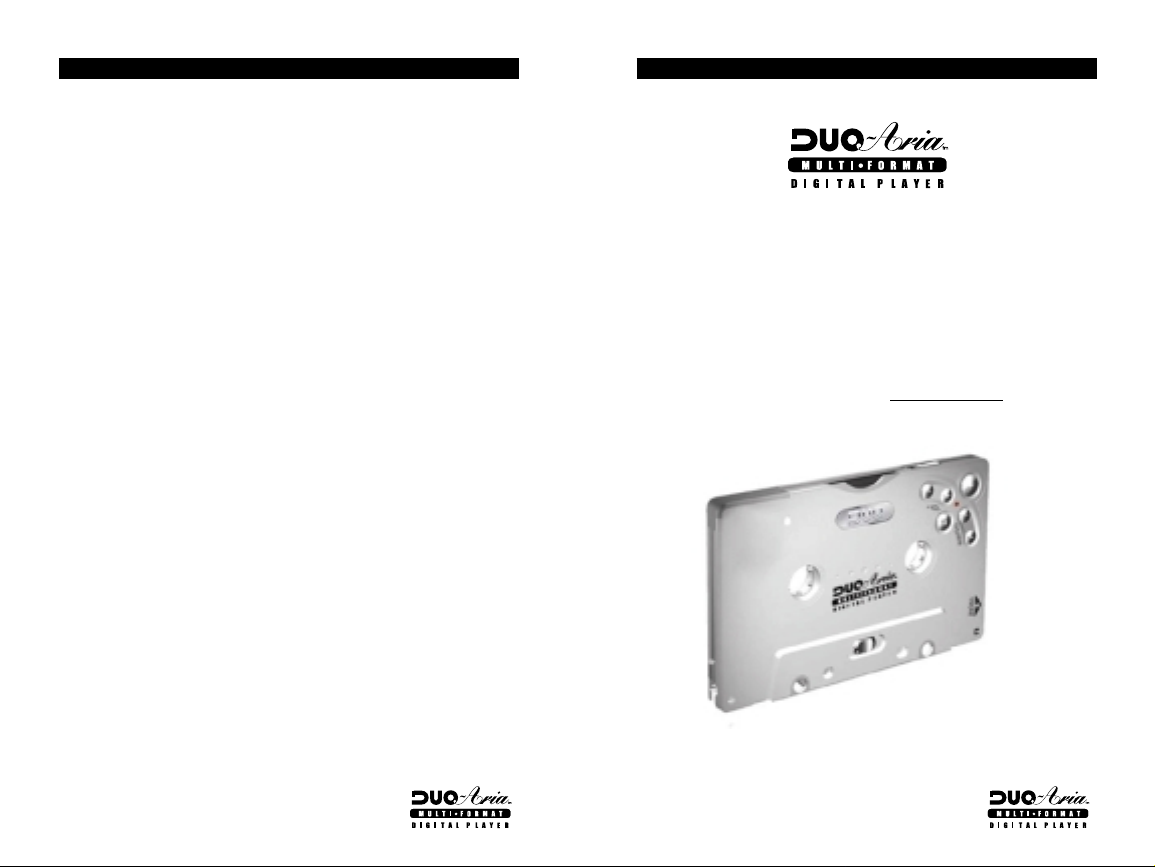
WELCOME TO THE DUO-Aria EXPERIENCE
Congratulations on your purchase of the DUO-Aria portable digital player the only MP3 player on the market specifically designed to play digital music
on any standard analog cassette deck with high fidelity sound and without
the need for cumbersome and inconvenient adapters. The DUO-Aria player
contains 32MB of on-board memory that is easily expandable to 96 MB via
the MultimediaMemoryCard
TM
(MMC) flash memory slot. The DUO-Aria also
was designed with a programmable, upgradable Digital Signal Processor
(DSP) to support new audio formats and digital rights management systems.
Please check the Digisette website at www
.digisette.com for the latest
software upgrades and accessories. You are now ready to enjoy the world of
digital audio with the most versatile digital audio player on the market today.
2
Page 23 ........................................... Trouble shooting Problems
Page 24 .......................................................... Setting USB Drive
Page 25 ........................................................... Warranty Service
Page 3
INCLUDED WITH YOUR DUO-Aria PLA
YER
3
PC SYSTEM REQUIREMENTS
4
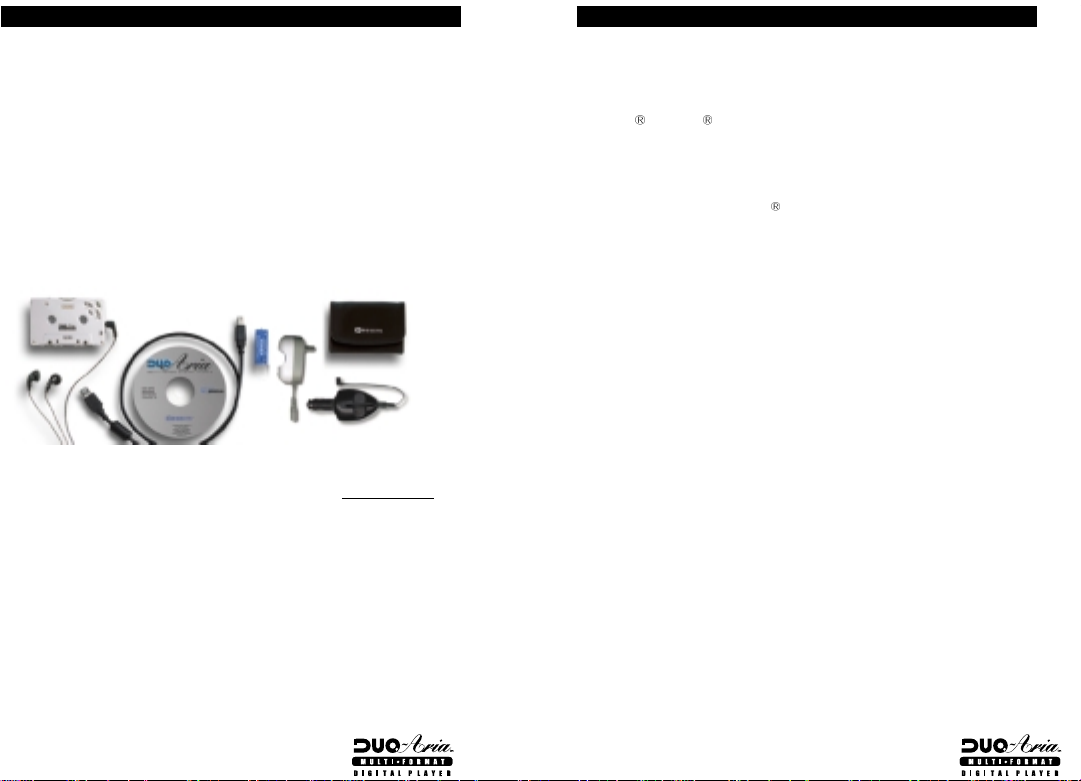
The following components are included with your DUO-Aria player:
A. AC Battery Charger
B. DC Car Power Adapter / Battery Charger (AR-200, AR-300)
C. Ni-MH Rechargeable Battery
D. Software CD
E. USB Connection Cable
F. Carrying Case (AR-200, AR-300)
G. Earphones
H. User's Manual
I. Charger Connection Cable (AR - 200, AR-300)
Note :
Accessories and optional items are subject to change. Please check www.digisette.comfor
the latest in DUO-Aria accessories and software upgrades.
The following PC specifications are required for DUO-Aria usage:
Microsoft
Windows 98, ME or 2000 Operating System
CD-ROM Drive with digital Audio extraction support
Pentium(or compatible) 200MHz or higher processor
32MB RAM(64MB for Windows
ME or 2000) or greater
32MB free Hard Disk Space(more for digital audio file storage)
Sound card
USB port capability
Page 4
DUO-Aria PLAYER HARDWARE OVERVIEW
5 6
DUO-Aria PLAYER HARDWARE OVERVIEW
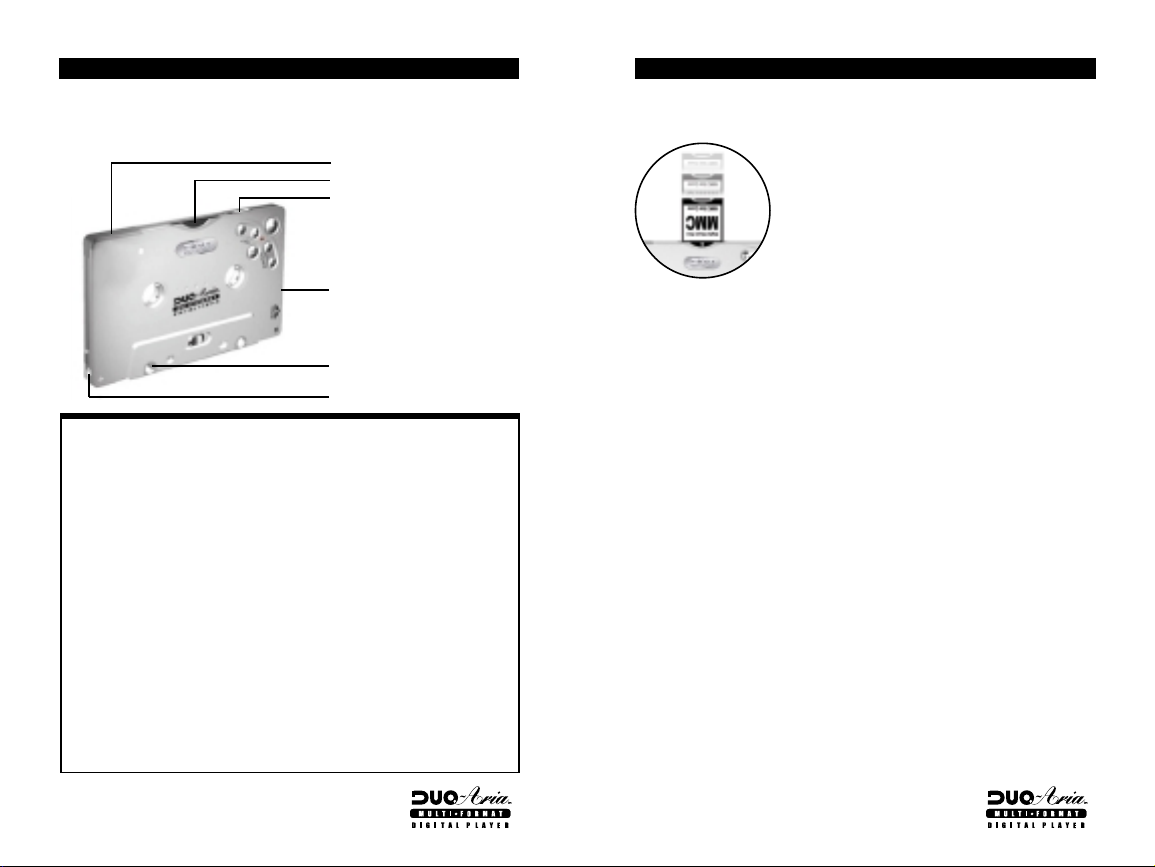
Your DUO-Aria player has the following hardware features :
Top and side panel
A. Battery Cover
B. Memory Card
Slot
C. Power Switch(hold/on/off)
D. Earphones Audio Output
E. USB Port Connector
F. Charger Connector
Top and Side Panel
A. Battery Cover : Slide the cover on top of the unit away from the
control buttons to open, and then open to insert your rechargeable
DUO-Aria battery.
B. Memory Card Slot : A removable MultiMediaCard
TM
(MMC) flash
memory card (sold separately) enables your DUO-Aria to expand
its memory capacity and store more audio files. MMC memory
cards are inserted completely into the unit with the gold contacts
facing downward and positioned facing the back of the player.
C. Power Switch : Powers your DUO-Aria player on and off as well
as enabling the Hold feature.
D. Earphones Audio Output : Connects your earphones for stereo
output.
E. USB Port Connector : Connects your DUO-Aria player to your
computer for fast, efficient file transfers at speeds up to 1.5 Mbps.
F. Charger Connector : The DC car charger and cable allow the
DUO-Aria to be powered while simultaneously charging the battery
when used in a vehicle.
Removable Memory Card
The DUO-Aria is compatible with MultiMediaCard( (MMC) removable
flash memory (sold separately), which enables your DUO-Aria to expand
its memory capacity and store more audio content. When inserting or
removing a MMC card, make sure the DUO-MP3 is OFF or the memory
card may be damaged. MMC flash memory cards are inserted completely
into the unit with the gold contacts facing downward and positioned facing
the back of the player
Note :
When an MMC card is not used, the MMC cover that comes with the unit must be
used and fully inserted into the player to prevent damage to the internal MMC slot.
Page 5
DUO-Aria PLAYER HARDWARE OVERVIEW
7
SOFTWARE CD CONTENTS
8
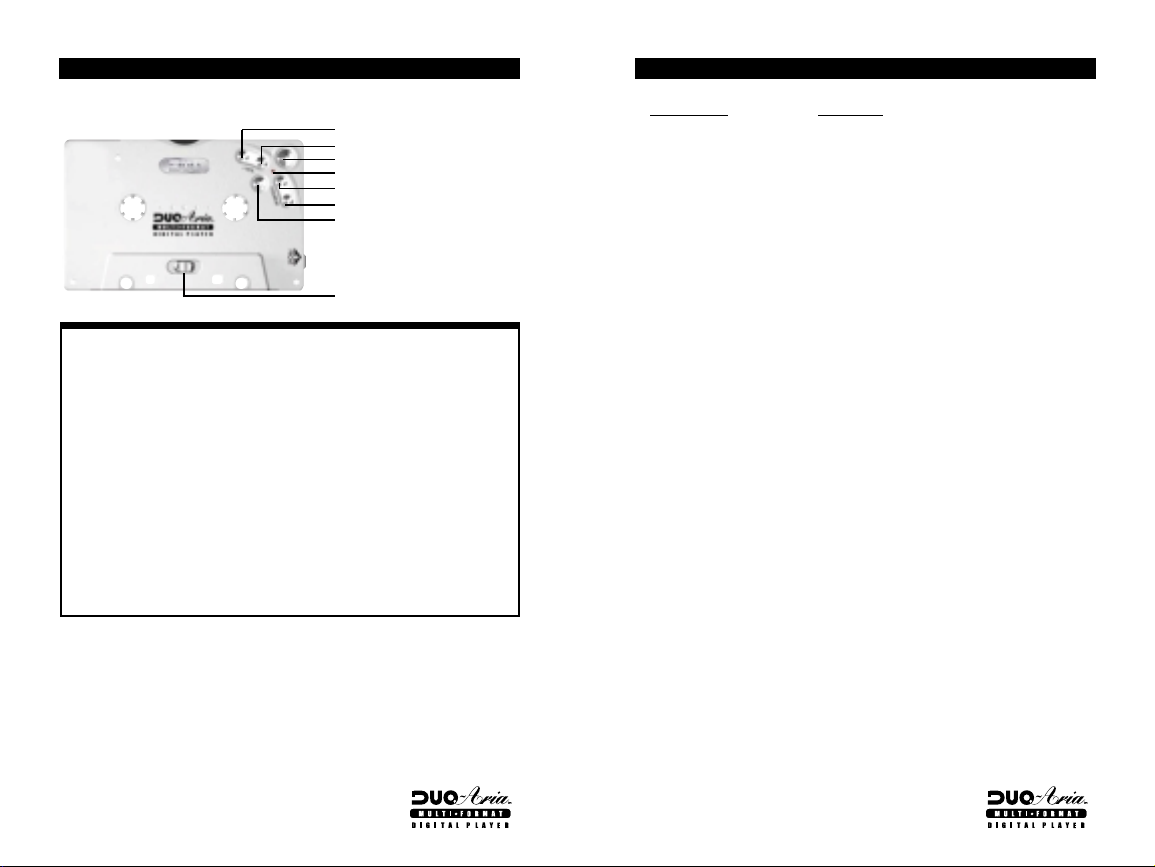
Front Panel
G. Vol + Button
H. Vol - Button
I. Play/EQ Setting Button
J. LED Indicator
K. Rew Button
L. F.F. Button
M. Stop Button
N. Head Control
Front Panel
G. Volume + Button : Press to increase Play Volume.
H. Volume - Button : Press to decrease Play Volume.
I. Play/ EQ Setting Button : Press to start Play. Press again to
change EQ setting when playing.
J. LED Indicator : When LED is flashing green, this indicates unit in
playing. Green and Amber colors flashing in turn indicates initial
booting or in USB communication.
K. Rew Button : Press to select previous file or Search.
L. F.F. Button : Press to select next file or Search.
M. Stop Button : Press to Stop, Pause Play or Power Save Mode.
N. Head Control : Slide control to adjust tape head alignment for
optimal sound quality and compatibility in cassette decks.
Application Function
DUO-Aria Manager Transfer digital audio files to/from DUO-
Aria
RealJukebox Manage audio files and link to DUO-Aria*
Audible Manager Download, playback of and transfer of
Audible.com content to DUO-Aria**
Note :
* You can use RealJukebox to transfer audio files to DUO-Aria player.
For this you need to install a software "plug-in" downloaded from the
Internet. Follow these directions to install the latest "plug-in":
1. After installing and starting RealJukebox, connect to the Internet and
then click on the "Tools" menu near the top of the screen.
2. From the "Tools" pull-down menu select "Preferences".
3. From the "Preferences" menu select the "Devices / Storage" tab.
4. From the "Devices / Storage" tab select "Add".
5. In the "Add Devices / Storage" box select "Update List".
6. When RealJukebox has completed updating the list of devices, scroll
through the list and click on "DUO-Aria".
This should now be highlighted.
7. Then in the "Add Devices / Storage" box click "OK".
8. Once back in the "Preferences" box click on "OK".
9. You are now ready to use RealJukebox to transfer audio files to the
DUO-Aria. RealJukebox online help will guide you through learning to
transfer files to the DUO-Aria.
** Requires latest version Audible Manager software downloaded via
included software CD and Internet download. Connect to the Internet,
insert the Software CD, then select "Audible Manager" from the software
installation menu.
Page 6
ALLING THE DUO-Aria MANAGER
INST
9
INSTALLING THE DUO-Aria MANAGER
10
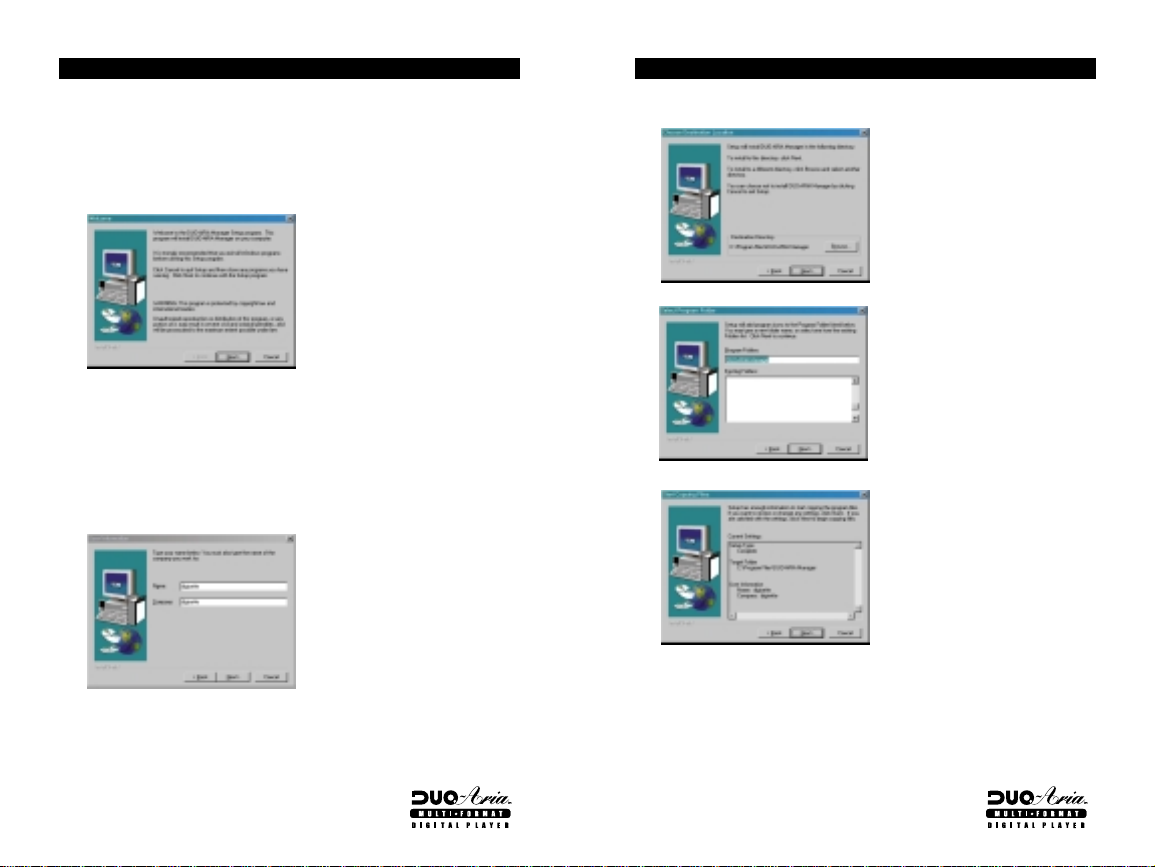
In order for the DUO-Aria player and your PC to communicate and
transfer digital files, you must first install the DUO-Aria Manager CD by
completing the following steps:
1. Load the CD into the CD ROM drive. The following screen will display.
2. If the setup file is executed automatically, follow the install program
instructions. If the setup file is not executed automatically, browse the
installation CD and double- click on the Setup.exe file on the CD ROM
file directory. (Example “D:/DUOARIAMANAGER/setup.exe”, where D: is
your CD-ROM drive)
3. Enter your information and click Next on the following screen.
4. Choose the directory for the DUO-Aria Manager and click Next.
5. Select program folder and click Next.
6. Verify the setup details and click Next.
7. Once the installation of the DUO-Aria Manager finishes, click the
shortcut icon on the desktop or click on the Windows Start menu, then
Programs, then the menu to run the DUO-Aria Manager.
Note :
If a rebooting message displays during setup, install again after rebooting the
.
computer
Page 7
GETTING ST
ARTED WITH DU0-ARIA
Complete the following steps to get started with your DUO-Aria player:
1. Make sure the battery is fully charged and insert it into your DUO-Aria
player.
2. Connect the USB port cable to your computer, and then to your DUOAria player.
3. Turn your DUO-Aria player on. Then, open the DUO-Aria Manager on
your computer.
4. Using the software, download music to your computer from the Internet
or convert it from an existing CD. Then, save it to your DUO-Aria player.
5. Disconnect the DUO-Aria player from the USB cable, insert your
earphones and turn the unit off, then on again BEFORE pressing Play.
(This is necessary for resetting the on-board processor.)
6. Enjoy digital music on your DUO-Aria player.
Note :
Please do not attempt to use any other USB peripheral, such as a digital camera
or scanner simultaneously with the DUO-Aria and RealJukebox, Audible Manager
or DUO-Aria Manager software as communication errors may result.
11
USING THE DUO-Aria MANAGER
Main Screen
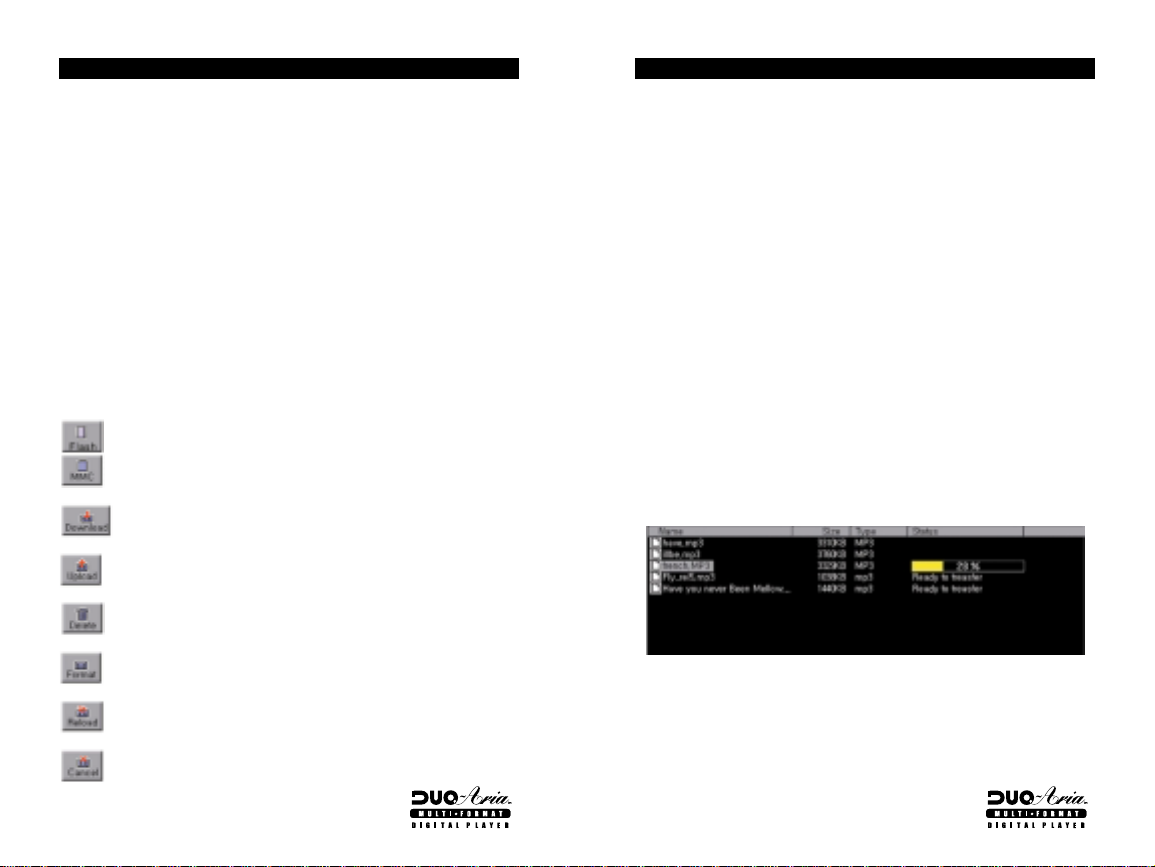
The main screen of the DUO-Aria Manager controls music file
downloading and uploading.
A. File Selector
B. Files List Window
C. Memory Contents
Window
D. Transfer Files Button
E. Memory Status Window
F. Folder Window
A. File Selector
6. This enables you to find the files selectively by type
B. Files List Window
2. This window displays the files contained in the given folder enabling you
to selectively download files to flash memory and/or MMC memory.
C. Memory Contents Window
5. This window enables you to check the file title, size, type and download
status of the MMC and on-board flash memories.
D. Transfer Files Button
3. This button begins transferring selected audio files to the player.
12
Page 8
USING THE DUO-Aria MANAGER
13
HOW TO DOWNLOAD FILES TO DUO-Aria PLAYER
14
E. Memory Status
4. This indicates the amount of memory used, the amount of total memory
and memory connection status. This window may indicate "No Memory
Found" in the following cases:
4. - The DUO-Aria is not connected or the power is switched off.
4. - MMC memory is selected when a MMC memory card is not inserted
into the player.
F. Folder Window
1. This window enables you to select audio files more easily by allowing
you to browse specific folders. It enables you produce, delete and
rename folders on your PC. The selected folder contents are displayed
in the File List Window to the right.
G. Functional Icons
Selects the on-board memory (Flash) to view.
Selects the removable memory (MMC) to view.
Adds the selected files to the selected memory, selected files are
placed in “Ready to transfer” status in the Memory Contents Window.
Uploads of the selected files on the DUO-Aria Memory to the
selected PC folder.
Deletes selected files on selected memory.
Formats selected memory. Note: This will erase all files on the
selected memory.
Refreshes view of selected memory.
Cancels file transfer between DUO-Aria and PC.
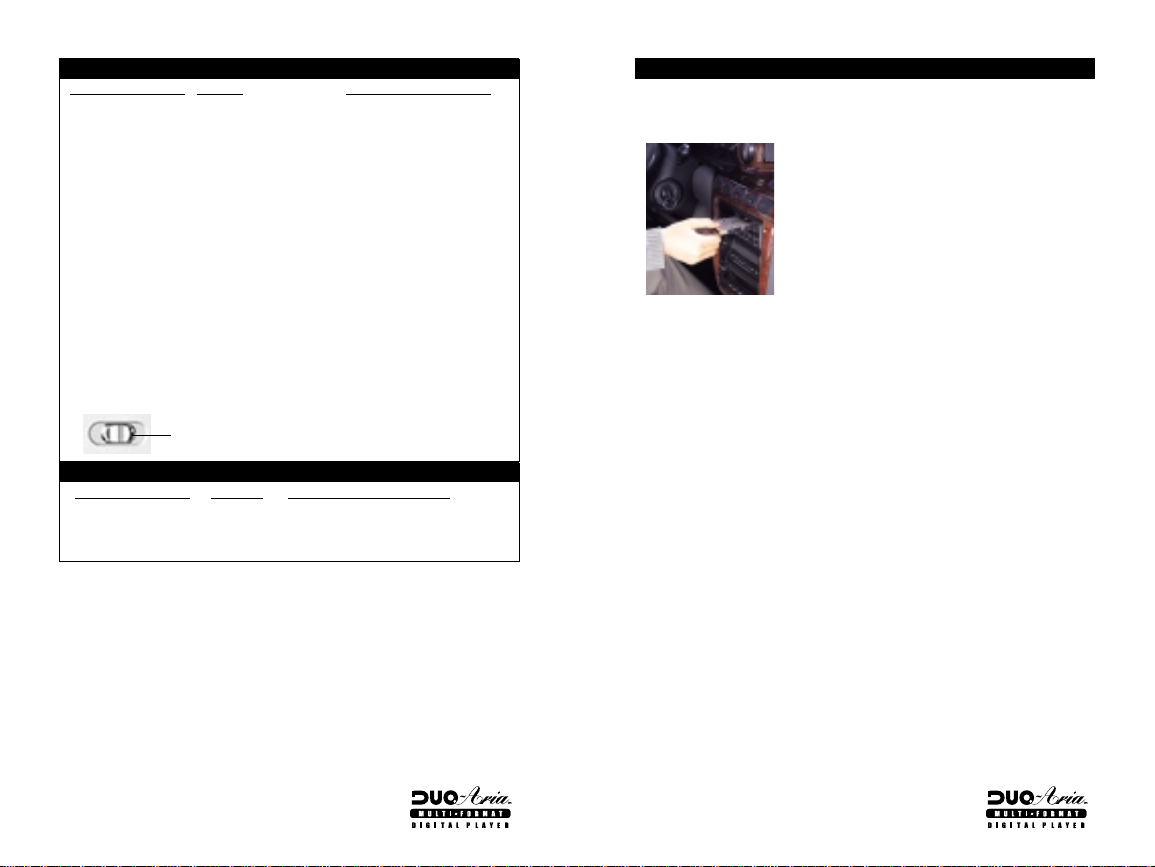
When downloading to player using the DUO-Aria Manager:
1. Select player memory to download and store audio files. (either onboard Flash memory or MMC when using removable MMC flash
memory cards)
2. Highlight files to be downloaded in the File List Window using the
Folder Window to browse for PC folders containing audio. You may
select files one of 3 ways:
1) You may drag & drop individual files from the File List window to the
Memory Contents Window or
2) You may select multiple audio files by holding down the CTRL key
while clicking the left-mouse button on each song you wish to
download to the player then drag and drop the selection of files as
above or
3) you may press the "F5" key or "Add" icon after highlighting each file.
2. The selected files will appear in the Memory Contents Window with
"Ready to transfer" listed under the status column.
3. Click the "Transfer" icon to start downloading selected files to player
memory.
4. To cancel a download in progress click the "Cancel" icon.
Note :
The RealJukeboxTMand Audible ManagerTMsoftware included with the DUO-Aria
have online instruction manuals that may be printed out once they are installed.
Page 9
OPERATING THE DUO-Aria PLAYER (Stand-alone with headphones)
Desired Operation Buttons Function When Pressed
Turn power on Slide power switch to on Powers the Player on.
Turn power off Slide power switch to off Powers the player off.
Play audio file Press Play Begins to Play audio/Restarts
from Pause.
Pause audio file
Stop (press <for 1 second)
Pauses audio playback.
Increase Volume Vol + Increases the audio Volume.
Decrease Volume Vol - Decreases the audio Volume.
Previous Track Rew Plays previous audio file.
Next Track F.F. Plays next audio file.
Rewind audio
Rew (hold Rew for > 1 sec)
Advances audio at 2X speed as
long as the button is
depressed.
Fast Forward Audio F.F. (hold F.F. for > 1 sec)
Advances audio at 2X speed as
long as the button is
depressed.
Key Lock
Slide power switch to hold
Locks the button functions
when power is on.
Slide On/Off switch on top of unit to "On" position.
FOR EQUALIZER FUNCTIONS (while audio is playing)
Desired Operation
Change Equalizer Play/EQ
Buttons Function When Pressed
Toggles equalizer mode while audio
Mode is playing. (Jazz, Pop, Classical,
Normal)
The DUO-Aria functions can also be controlled by a remote control with
an LCD display.(optional item)
Pause/Power Save Mode
The DUO-Aria features a Power Save mode that allows the player to automatically
conserve its battery power when not in use. When the player presses the Stop
button for less than 5 seconds, and/or if the player senses it is not used for 10
minutes, it will automatically enter Power Save mode. To resume play if the power
switch is left in the "On" position, press the Play button twice.
Note : The DUO-Aria will resume play from the exact point in the audio track
that it was last stopped after stop button pressed. The volume setting is
also memorized, but the EQ setting is not memorized and will default to
the Normal EQ mode when first resuming play.
15
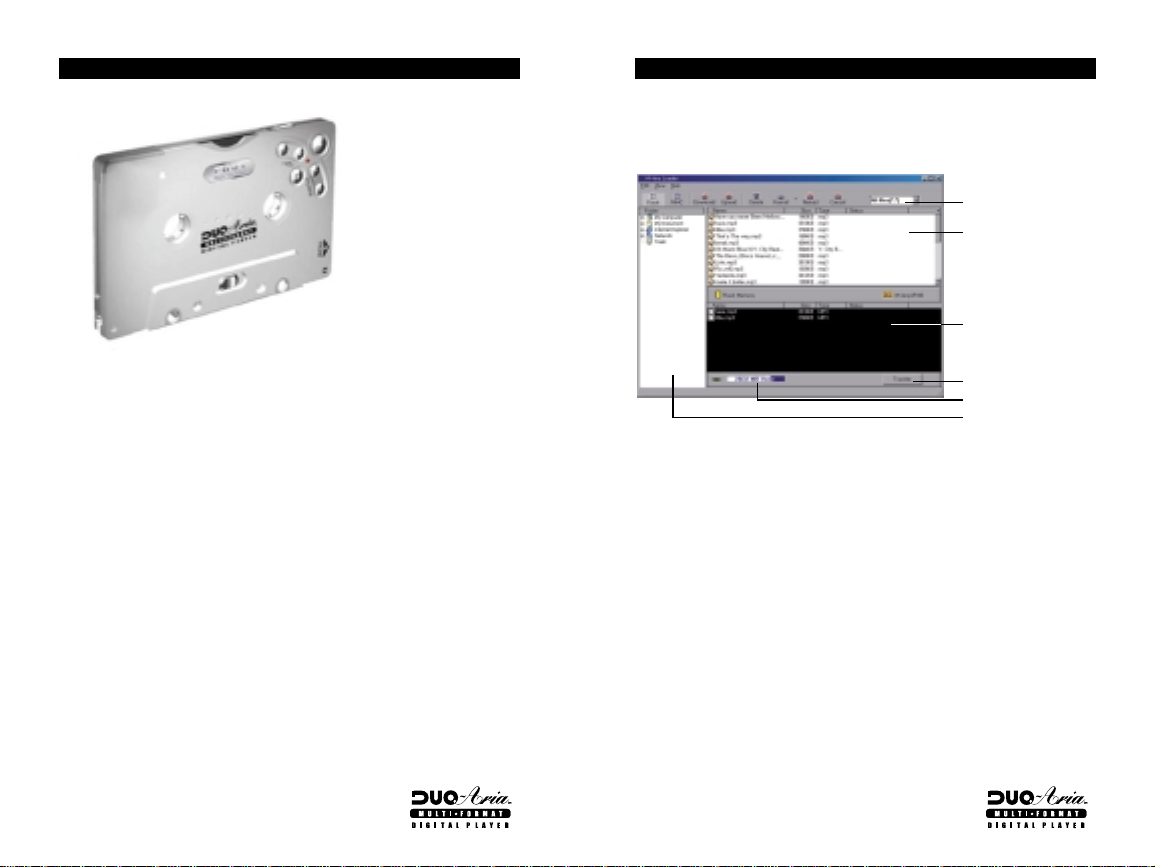
INSERTING THE DUO-Aria PLAYER INTO A CASSETTE DECK
The following is the correct way to insert the DUO-Aria player into a
cassette deck.
1. Turn the DUO-Aria Player by moving the power switch on top of the unit
to the "On' position.
2. Due to potential variances in the volume of encoded audio files, the
cassette audio output of the DUO-Aria is adjustable. When the unit is
first turned on, the volume is set to a medium level of output. You may
adjust the output to a cassette deck by pressing Play (note that the
indicator lamp should be illuminated), then adjusting the volume either
up (+) or down (-) to suit the desired output to the cassette deck.
Note :
It is possible to adjust the output volume high enough to cause distortion during
cassette audio playback on some cassette decks. Avoid distorted output by
matching the volume of the DUO-Aria playback with the FM tuner volume.
3. Insert the DUO-Aria into the cassette deck, making sure the side
marked Front (the side with the operating buttons) is inserted upward
or forward.
4. You may adjust head control switch to ensure optimal tape head
alignment. Typical indications of improper tape head alignment is audio
playing only on one side, significantly reduced volume, or much
extraneous noise coming from player.
5. If no sound is played from the cassette deck or if adjusting tape head
control does not improve audio quality significantly, change the play
direction with the auto-reverse button (if applicable) and flip the DUOAria cassette so it is facing down.
16
Page 10
DUO-Aria CASSETTE DECK OPERA
Desired Operation
Turn power on
Buttons Function When Pressed
Slide power switch to on
Powers On the Player,
enabling it to be inserted
for use in a cassette deck.
Play Music
Pause Music
Stop
Increase Volume
Decrease Volume
Next Track
Previous Track
Rewind audio
Use cassette deck Play control
Use cassette deck Pause control
Use cassette deck Stop control
Use cassette deck Volume control
Use cassette deck Volume control
Press cassette deck F.F. for
less than 1 second
Press cassette deck Rew for
less than 1 second
Press and hold Rew for
more than 1 second
Begins audio playback.
Pauses audio playback.
Stops audio playback.
Increases audio volume.
Decreases audio volume.
Skips forward to the next
track.
Begins audio playback of
previous track.
Advances audio at 2X
speed as long as
depressed.
Fast Forward audio
Press and hold F.F. for
more than 1 second
Advances audio at 2X
speed as long as button is
depressed.
Power Save Mode in Cassette Deck Playback
The DUO-Aria features a Power Save mode that allows the player to automatically
conserve its battery power when not in use. When the player senses it is not use for
10 minutes, it enters a Power Save mode. To resume play when in a cassette deck,
eject the DUO-Aria from the deck and press the play button. Re-insert the DUO-Aria
into the deck and the unit will resume play from the exact point in the audio track
that it was last stopped. This will also occur if the battery is replaced during play.
Note: The EQ setting and tape head output volume is not memorized and will default
to Normal EQ mode and standard tape head output volume when resuming play in a
cassette deck.
TION
AUDIBLE.COM CONTENT OPERATION
The DUO-Aria is AudibleReadyTM, enabling you to enjoy a world of spoken
audio content available from Audible.com. The Audible Manager,
contained on the DUO-Aria software CD, must be installed on your PC to
download Audible.com content and transfer it to the player.
If you have not installed the Audible Manager and wish to access
Audible.com content, please insert the software installation CD, follow the
on-screen instructions to install the Audible Manager software, or click on
the Start menu of the Windows Taskbar, then click Run. In the dialogue
box that appears, type D:/Audible Manager/setup.exe (where D: is the CDROM drive). Follow the onscreen instructions to complete the installation.
1. Stand-alone DUO-Aria Player Operation
Desired Operation
Buttons Function When Pressed
Skip to next/previous Press F.F./Rew Once Skips a track.
Track
Skip to next/previous Press and Hold Skips a section within
Section F.F./Rew for 1~2 sec the current track.
Search Through Press and Hold Searches within a section
a Track F.F./Rew > 3 sec at 2X normal play speed as
long as the button is
depressed.
1817
Page 11
AUDIBLE.COM CONTENT OPERATION
19
HANDLING AND STORING INSTRUCTIONS
20
2. Cassette Deck DUO-Aria Player Operation
Desired Operation
Buttons Function When Pressed
Skip to next/previous Press and hold Skips a track.
track F.F./Rew > 1 sec
then resume Play
Skip to next/previous Press and hold Skips a section within a
section F.F./Rew 1-2 sec track.
then resume Play
Search forward Press and hold Searches within a through a
/backward F.F./Rew > 3 sec section section at 2X Speed
then resume Play for as long as F.F./Rew button
is depressed.
Note :
The above Power Save operation instructions also apply when playing back
Audible.com content
.
3. Bookmark Function
Depending upon the content being listened to, there may be a need to stop
the unit and resume play at the point where the player was stopped. T
o
accomplish this with the DUO-Aria there are three options:
1) While listening to audio, press the Stop button once quickly to enter
Pause/Power Save mode with the unit still on. To resume play at the
exact point the audio was stopped, press the Play button once.
While listening to audio, press the Stop button for more than 3 seconds
2)
to completely power down the unit. To resume play at the exact point
the audio was stopped, briefly slide the Power Switch to the “Off”
position and then back to the “On” position, then press the Play button.
3) Slide the Power Switch to the “Off” position. To resume play at the
exact point the audio was stopped, slide the Power Switch to the “On”
position and press the Play button.
The DUO-Aria was designed for everyday use with its aluminum casing and its solidstate design provides for skip-free audio playback under most active situations. Please
bear in mind the following information when using the DUO-Aria.
Unit may be damaged if struck or crushed.
Use a carrying case when carrying and using your DUO-Aria.
Keep out of direct sunlight.
Keep away from dust and dirt.
Clean with a dry, soft cloth.
Store in a cool dry place.
Do not store your DUO-Aria around a television set due to the magnetic field
interference that may result with the TV.
Do not press the DUO-Aria player body. The excessive pressure on the body could
cause the damage of inside mechanism sensitive to the external damage.
Do not touch the belt. It may cause bad effect on the tape simulation function.
Do not leave the DUO-Aria player inside a car in summer under direct sunlight.
Page 12
BATTER
21
BATTERY AND CHARGER(AC AND DC CHARGER) USAGE
22
Normal playing time is about six hours when playing the DUO-Aria as a stand-alone
player and
8 hours for Audible content playback. Playing time may vary depending on usage
conditions. Due to extra sensors used during cassette deck playback, playtime when
used in a cassette deck only is slightly reduced.
1. Charging battery only(AC or DC charger)
1. Charge battery for two or three hours until the charge lamp is off. It is
recommended to charge the battery for 4 hours before first use. When the battery is
fully charged, the charger lamp goes out immediately. Unplug the charger when it is
not in use.
2. Charging the battery when it is inside the DUO-Aria (AC or DC charger)
1. Connect the DUO-Aria (with the battery inserted) and Charger with the connection
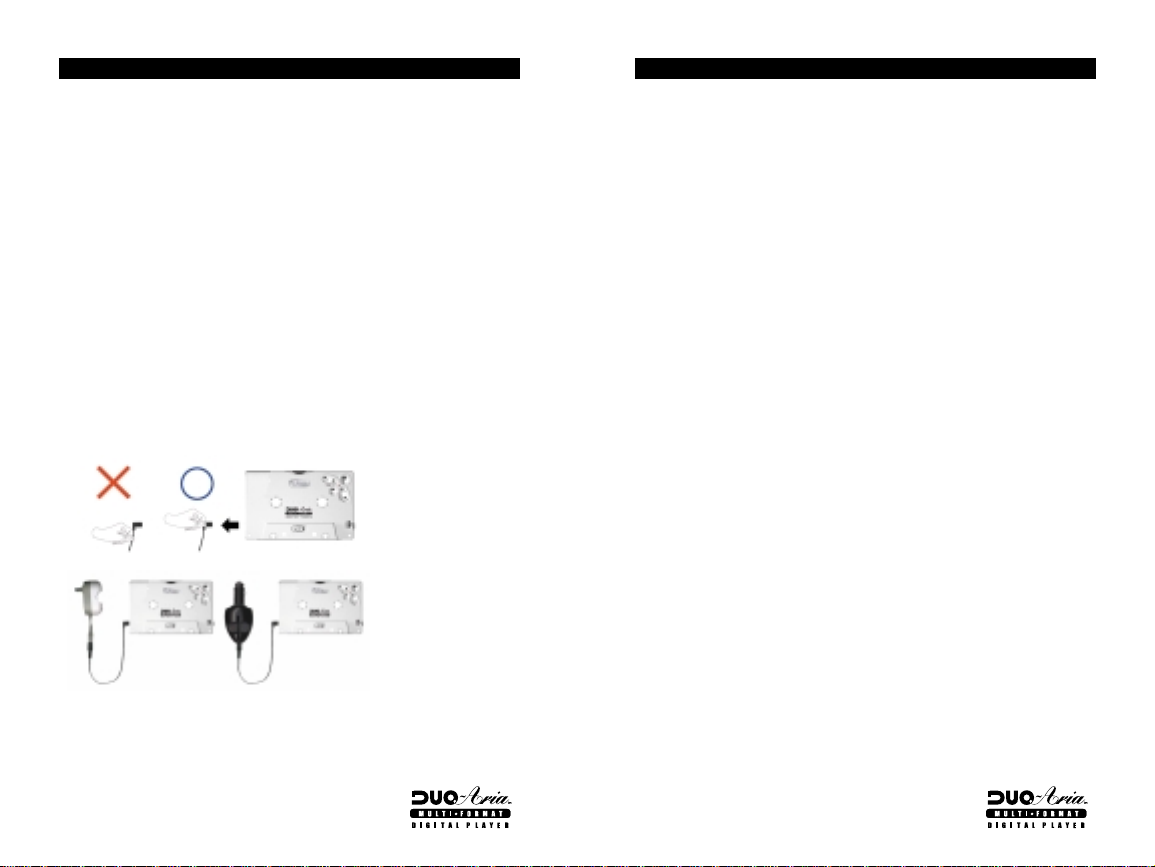
cable provided. It is VERY IMPORTANT when using the charger cable with the DUOAria to insert it AND remove it from the on-board power jack by holding the
connector end. Pulling only on the cord to remove it from the jack or inserting it in
an improper manner can result in permanent damage to the jack. When the battery
is fully charged, the charger light goes out immediately. Unplug the charger when it
is not in use.
Y AND CHARGER(AC AND DC CHARGER) USAGE
Note :
1. When you play DUO-Aria player in a car deck during battery charging ensure
that the battery is inserted and the charger cable is connected properly.
2. If the battery is not used for a week or longer, it may lose its part or all of its
charge.
3. If the battery is repeatedly recharged before being discharged completely, its
total playing time may be shortened.
4. If the battery playing time is significantly shorter than when you purchased the
unit, you may need to purchase a new battery.
5. You may charge the battery for an additional 30 minutes after the charge lamp
has turned
off to ensure a full charge.
6. When the battery reaches approximately 5 minutes of remaining run
time, an intermittent beeping will sound in either stand-alone or
cassette deck play until the unit automatically shuts off.
7. Due to the variance among cassette deck manufacturers, there may be
some cases where it is not possible to use the DC charging cable to
power the DUO-Aria when used inside of cassette mechanism.
1. When initially charging the battery, it is recommended to leave the battery in the
charger for more than 2 hours, even if the charger LED stops illuminating. Under
certain conditions, the charger LED may falsely stop illuminating before the battery
is fully charged. Leaving the battery for at least 2.5 hours will ensure a full charge.
Page 13
TROUBLE SHOOTING PROBLEMS
23
SETTING USB DRIVE
24
The DUO-Aria player will not download digital files from the PC.
Verify that the unit is switched "On".
Check to see if the battery is fully charged.
Check the cable connection to the USB port.
Verify that the battery has been inserted correctly.
The DUO-Aria player will not play.
Verify that the unit is switched "On".
Verify that the battery has been inserted correctly.
Check to see if the battery is fully charged.
Verify that the player is inserted correctly into the tape deck.
If used in a cassette deck, check tape player direction (DUO-Aria will only play
properly in one tape direction)
Verify that the MMC card is inserted properly, if applicable
The DUO-Aria sound is not clear in a cassette deck, or sound comes only from the
left or right speakers.
Verify that the unit is on.
Adjust the tape head control position for optimal alignment with the tape deck head.
Reposition the DUO-Aria with the front side down and press auto-reverse to
play bottom side.
The DUO-Aria Manager does NOT recognize the hardware connection.
Verify that the unit is switched "On".
erify that the battery has been inserted correctly.
V
Check to see if the battery is fully charged.
Check the cable connection to the USB port.
You may need to re-install the software.
The DUO-Aria player does not respond to cassette deck controls (Play, FF and/or
Rew) when first used in a cassette deck.
Rotate the DUO-Aria cassette wheels manually using a finger in a clockwise and
counter clockwise motion 4~5 times. Re-insert DUO-Aria player into the
cassette deck.
Please visit the Digisette website at www
software upgrades for the DUO-Aria.
.digisette.com for the latest updates and
If a USB driver to control DUO-Aria already exists in PC, there is no need to install
a new driver.
Insert Software CD into CD-ROM Drive (Do not execute the installation
program.)
Connect the DUO-Aria Player to PC with USB cable.
(If there is no USB driver to communicate between the DUO-Aria and the PC,
the "New Hardware Wizard" will appear on the screen.)
Proceed the installation following the on-screen instructions.
When the location of the drive is asked, select the folder of your CD-ROM.
(When the installation finishes once, The New Hardware Wizard will appear on
screen again.)
Follow the on-screen instructions to complete the installation of the USB driver.
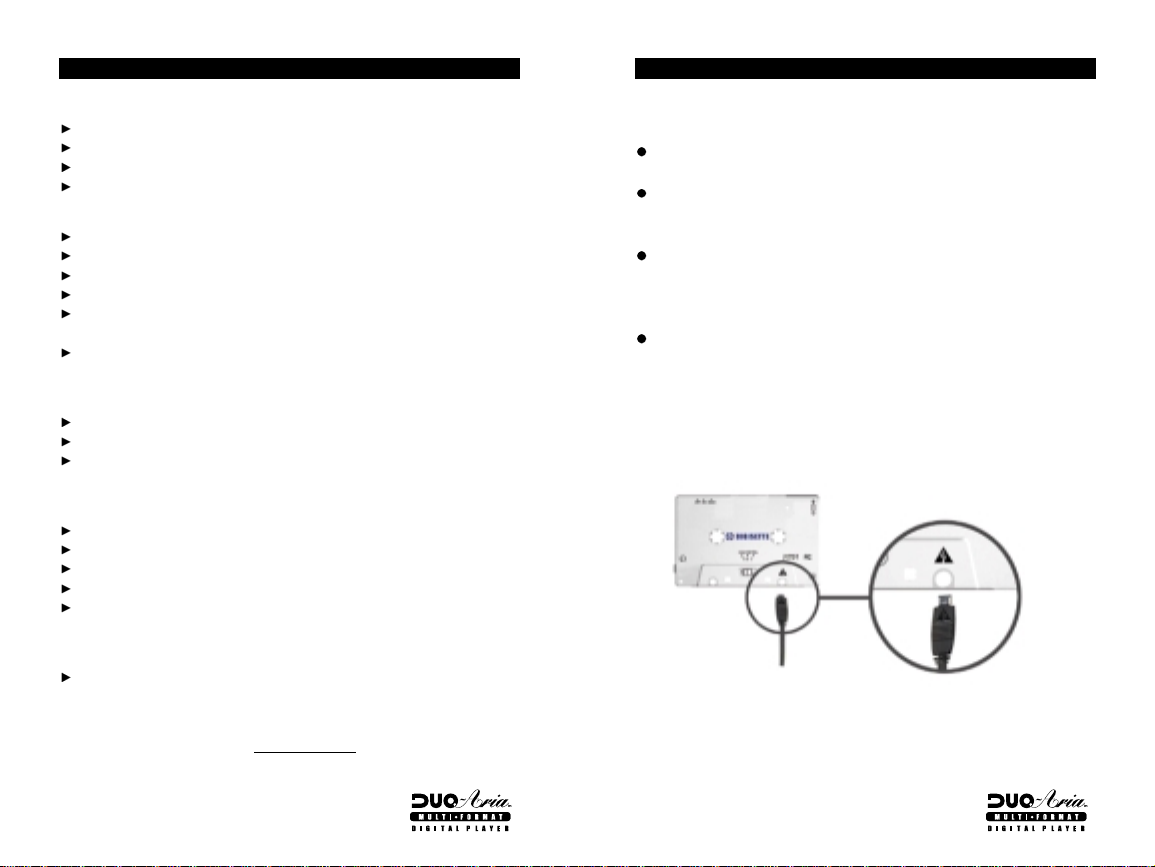
IMPORTANT NOTE :
When connecting the cable with DUO-Aria player, ensure the correct orientation of
the connector end, and do not force the connector. Improper connection with the
USB cable can cause damage to the computer and/or the DUO-Aria player.
Page 14
WARRANTY SER
Customers are entitled to warranty service for a period of one (1) year from the
date of purchase. Warranty service does not apply to defects resulting from
customer fault or acts of God.
Non-warranty service shall apply to defects resulting from:
1. Infiltration of foreign matter, such as water, liquid, or sand.
2. Breakage due to dropping or severe impact.
3. Damage to or deformation of the outer case caused by organic solvents, such
as benzene.
4. Use of parts other than those certified by the manufacturer.
5. Loss or breakage of any parts or components caused by unauthorized
disassembly.
6. Repair or modification done by any persons other than manufacturer
authorized personnel.
7. Acts of God, such lightning, storms or floods.
25
For more warranty information and service options, please see the Digisette
Limited Warranty and How To Receive Service cards enclosed in the DUO-Aria
package. You may also visit the Digisette web site at http//:wwww
more information.
.digisette.com for
VICE
 Loading...