


DIGITAL CAR AVN SYSTEM | User's Manual
Model: ATC41GKAN

[ The functions and services described in this guide are subject to change without prior notice for performance improvement. If the
system software is updated, the screenshots in this guide may appear different than the actual images on the system.
[ The functions and services described in this guide may differ from those provided in your vehicle. For precise information related to
your vehicle, refer to the owner's manual or catalog of your vehicle.
[ The design and specification of the system may change without prior notice for performance improvement.
[ This multimedia system contains open source software, including without limitation, software distributed and/or modified under the
GNU General Public license, Version 2, June 1991, and the GNU lesser General Public License, Version 2.1, February 1999.
For additional information and to obtain related materials including without limitation, the previous referred to licenses and software,
please contact us at MOBIS_OSSrequest@mobis.co.kr
All Map Database cannot be copied without permission. Important Notice: This is protected by U.S. copyright laws.
All rights not expressly granted are reserved. You may not otherwise reproduce, modify and distribute the content
without HYUNDAI MnSoft, Inc’s prior written consent.
1

Available information for users
Car Multimedia System
User's Manual
Car Multimedia System
Quick Reference Guide
Quick Guide This guide is the help built into the system. You can access basic information on
This guide introduces your system's functions and explains how to use them. To
use your system correctly and safely, read this guide before using the system.
This guide combines key information into a quick reference. Use this guide to
refer to descriptions and instructions more quickly and easily.
how to control the system and a brief description of major functions directly on
the system screen.
• How to access the guide: On the Home screen, touch All Menus > Quick
Guide.
For safety, this quick guide will not be displayed while the vehicle is moving.
Park your vehicle in a safe location before accessing the quick guide.
2

Symbols used in this guide
Indicates important information related to user safety. Failure to follow warnings may
Warning
Caution
Note
result in death or serious personal injury.
Indicates important information related to user safety. Failure to follow cautions may result
in personal injury, or damage or malfunction your vehicle.
Indicates helpful information for convenient use.
*if equipped
Indicates descriptions for optional features.
This guide covers all specifications, including all trim models and optional specifications. It
may include descriptions for features that are not equipped in your vehicle.
3

Safety warnings
For safety, follow the instructions below. Failure to do so may
increase the risk of a traffic accident, which may result in death
or personal injury.
Ü About driving
Do not operate the system while driving.
• Driving while distracted may result in a loss of vehicle control, potentially
leading to an accident, severe personal injury, or death. The driver’s
primary responsibility is the safe and legal operation of a vehicle, and any
handheld devices, equipment, or vehicle systems which divert the driver’s
attention from this responsibility should never be used during operation
of the vehicle.
Follow traffic regulations while driving.
• Driving only with the guidance of the navigation system may cause
violation of traffic regulations, which may lead to a traffic accident.
Depend on your vehicle's speedometer when checking your
driving speed.
• The speed displayed in the navigation screen may differ from your actual
speed.
Avoid watching the screen while driving.
• Driving while distracted may lead to a traffic accident.
• Stop your vehicle in a safe location before using functions that require
multiple operations.
Stop your vehicle first before using your mobile phone.
• Using a mobile phone while driving may lead to a traffic accident.
• If necessary, use the Bluetooth Handsfree feature to make calls and keep
the call as short as possible.
Keep the volume low enough to hear external sounds.
• Driving without the ability to hear external sounds may lead to a traffic
accident.
• Listening to a loud volume for a long time may cause hearing damage.
When looking for emergency services, such as hospitals
or fire stations, do not depend solely on the navigation
system.
• Some emergency services may not be included in the navigation map.
Locate nearby emergency services in advance so you can take the proper
action quickly in an emergency situation.
4

Ü About handling the system
Û Note
Do not disassemble or modify the system.
• Doing so may result in an accident, fire, or electric shock.
Do not allow liquids or foreign substances to enter the
system.
• Liquids or foreign substances may cause noxious fumes, a fire, or a
system malfunction.
Stop using the system if it malfunctions, such as no audio
output or display.
• If you continue using the system when it is malfunctioning, it may lead to
a fire, electric shock, or system failure.
If you experience any problems with the system, contact your
place of purchase or dealer.
5

Safety cautions
For safety, follow the instructions below. Failure to do so may
result in personal injury or damage to the system.
Ý About operating the system
Use the system with the engine running.
• Using the system for a long time when the engine is stopped may
discharge the battery.
Do not install unapproved products.
• Using unapproved products may cause an error while using the system.
• System errors caused by installing unapproved products are not covered
under the warranty.
Ý About handling the system
Do not apply excessive force to the system.
• Excessive pressure on the screen may damage the LCD panel or the
touch panel.
When cleaning the screen or button panel, make sure to
stop the engine and use a soft, dry cloth.
• Wiping the screen or buttons with a rough cloth or using solvents
(alcohol, benzene, paint thinner, etc.) may scratch or chemically damage
the surface.
If you attach a liquid-type air freshener to the fan louver,
the surface of the louver may become deformed due to the
flowing air.
Û Note
If you experience any problems with the system, contact your
place of purchase or dealer.
6

Cautions when using an SD card
Ý Caution
The SD card installed in the system contains map data and software necessary for navigation. Be careful
not to damage the SD card.
• Remove the SD card only when you update the system.
• Stop the engine before removing or re-inserting the SD card. Removing or re-inserting the SD card while the
system is operating may cause an error or damage the SD card or the system.
• The SD card is intended for storing map data and update files only. Do not add or delete files on the SD card.
• Do not format the SD card arbitrarily.
7

HYUNDAI VEHICLE OWNER PRIVACY POLICY
Your Hyundai vehicle may be equipped with technologies and
services that use information collected, generated, recorded
or stored by the vehicle. Hyundai has created a Vehicle Owner
Privacy Policy to explain how these technologies and services
collect use and share this information.
You may read our Vehicle Owner Privacy Policy on the
Hyundaiusa.com website at:
https://www.hyundaiusa.com/owner-privacy-policy.aspx
If you would like to receive a hard copy of our Vehicle Owner
Privacy Policy, please contact our Customer Connect Center at:
Hyundai Customer Care
P.O. Box 20850
Fountain Valley, CA 92728
800-633-5151
consumeraffairs@hmausa.com
Hyundai’s Customer Connect Center representatives are
available Monday through Friday, between the hours of 5:00
AM and 7:00 PM PST and Saturday and Sunday between 6:30
AM and 3:00 PM PST (English).
For Customer Connect Center assistance in Spanish or Korean,
representatives are available Monday through Friday between
6:30 AM and 3:00 PM PST.
8

System overview
Component names and functions
Turning the system on or off
Controlling the touch screen
Getting to know the Home screen
Getting to know the rear view screen
Using the climate control system (*if equipped)
1
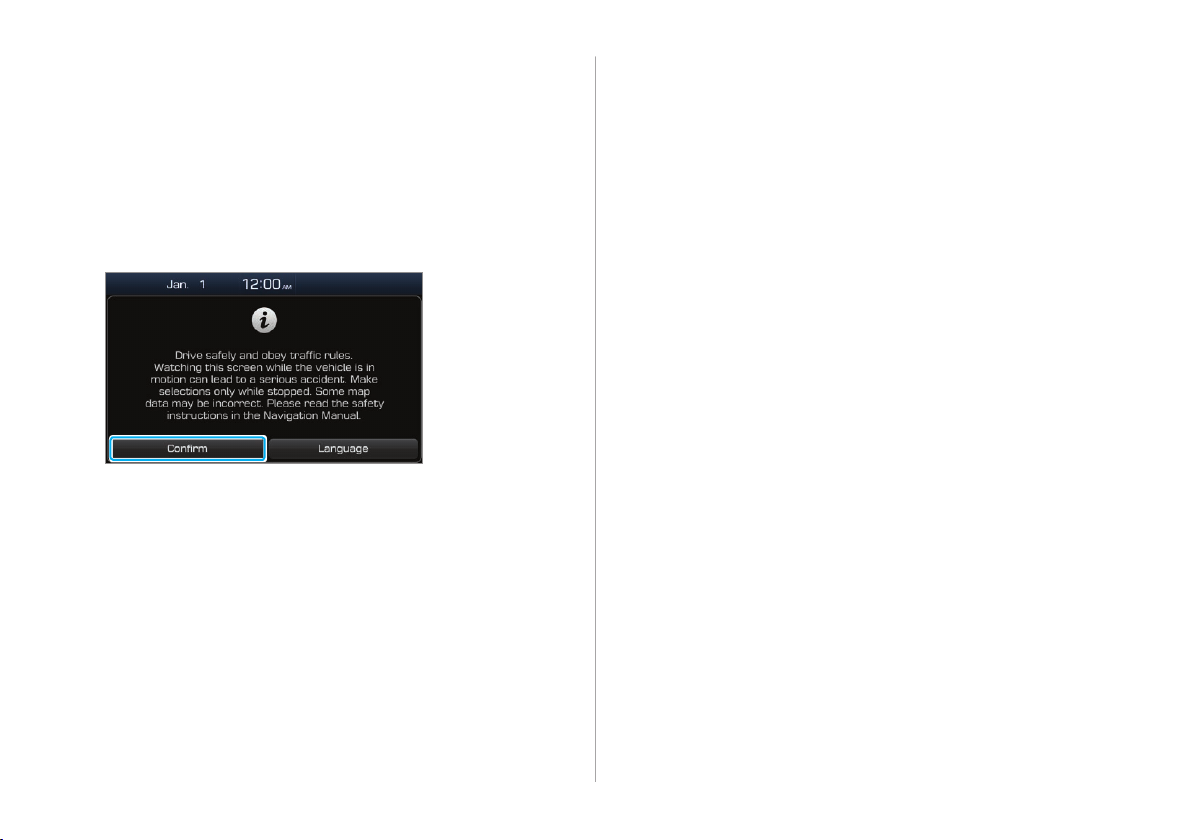
Turning the system on or off
To turn on the system, start the engine.
1
When the safety warning appears, read it and
2
touch Confirm.
• To change the display language, touch Language.
• If you do not want to use the system while driving, you
can turn off the screen and the sound by pressing and
holding the [POWER] button on the control panel. To use
the system again, press the [POWER] button.
1-5
The system turns off when you stop the engine (ACC Off).
• When you turn back on the system, the previous mode and
settings will remain intact.
Ü Warning
• Some functions may be disabled for safety reasons while
the vehicle is moving. They work only when the vehicle
stops. Park your vehicle in a safe location before using any
of them.
• Stop using the system if it malfunctions, such as no audio
output or display. If you continue using the system when
it is malfunctioning, it may lead to a fire, electric shock, or
system failure.
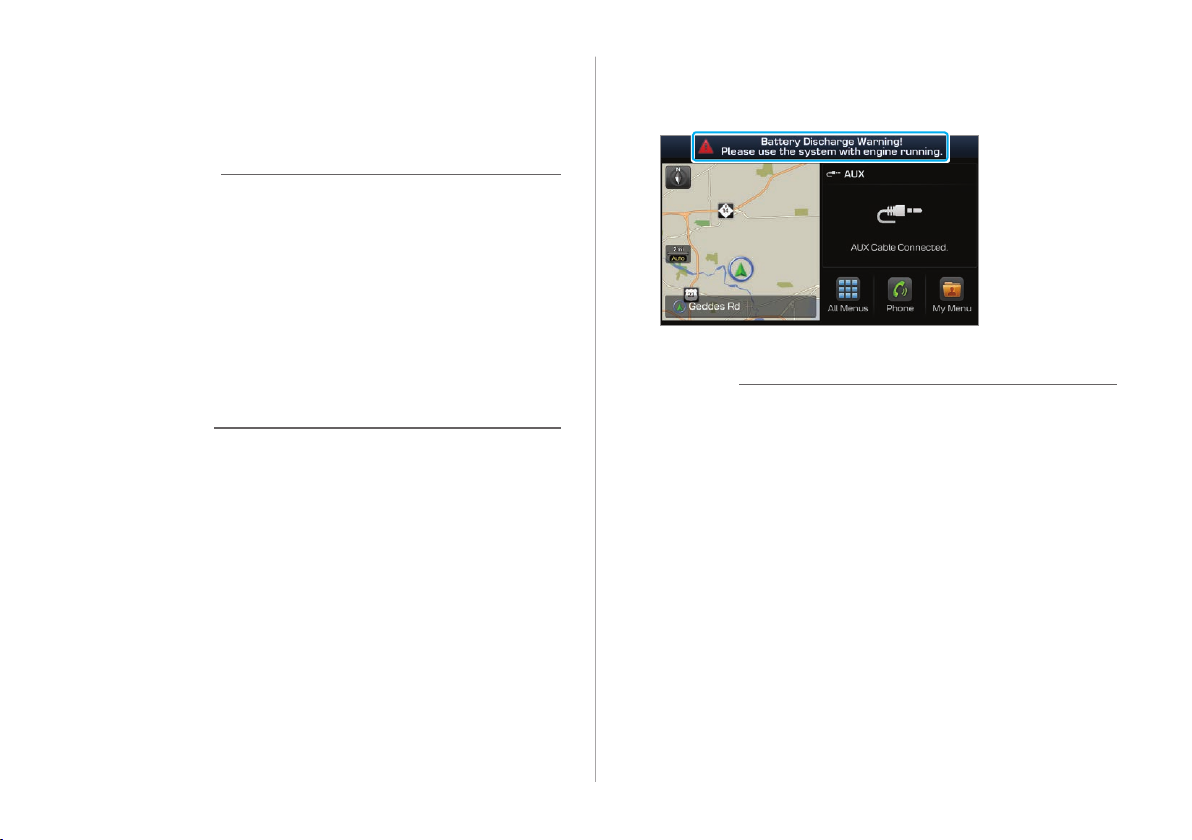
• If you turn on your system without starting the engine, a
battery warning will appear. Once the engine starts, the
battery warning will disappear.
Û Note
Ý Caution
• You can turn on the system when the key ignition switch is
placed in the "ACC" or "ON" position. Using the system for
an extended period without the engine running drains the
battery. If you plan on using the system for a long time,
start the engine.
1-6
To avoid having audio play at an excessive volume when you
start the engine, adjust the volume level before stopping the
engine. You can also set the system to decrease the volume
level automatically. On the Home screen, touch All Menus >
Setup > Sound > Priority and activate the Start-up Volume
Limit option.
Controlling the touch screen
Your system is equipped with a touch screen. You can perform
various functions via touch inputs.
Ý Caution
• Do not apply excessive pressure to the touch screen or
touch it with a pointed object. Doing so may damage the
touch screen.
• Do not let any electrically conductive material contact the
touch screen. A shock from static electricity may cause the
system or the touch screen to malfunction.
Û Note
If you wear regular gloves, you will not be able to control the
touch screen. Remove your gloves or wear gloves designed for
use with a touch screen.
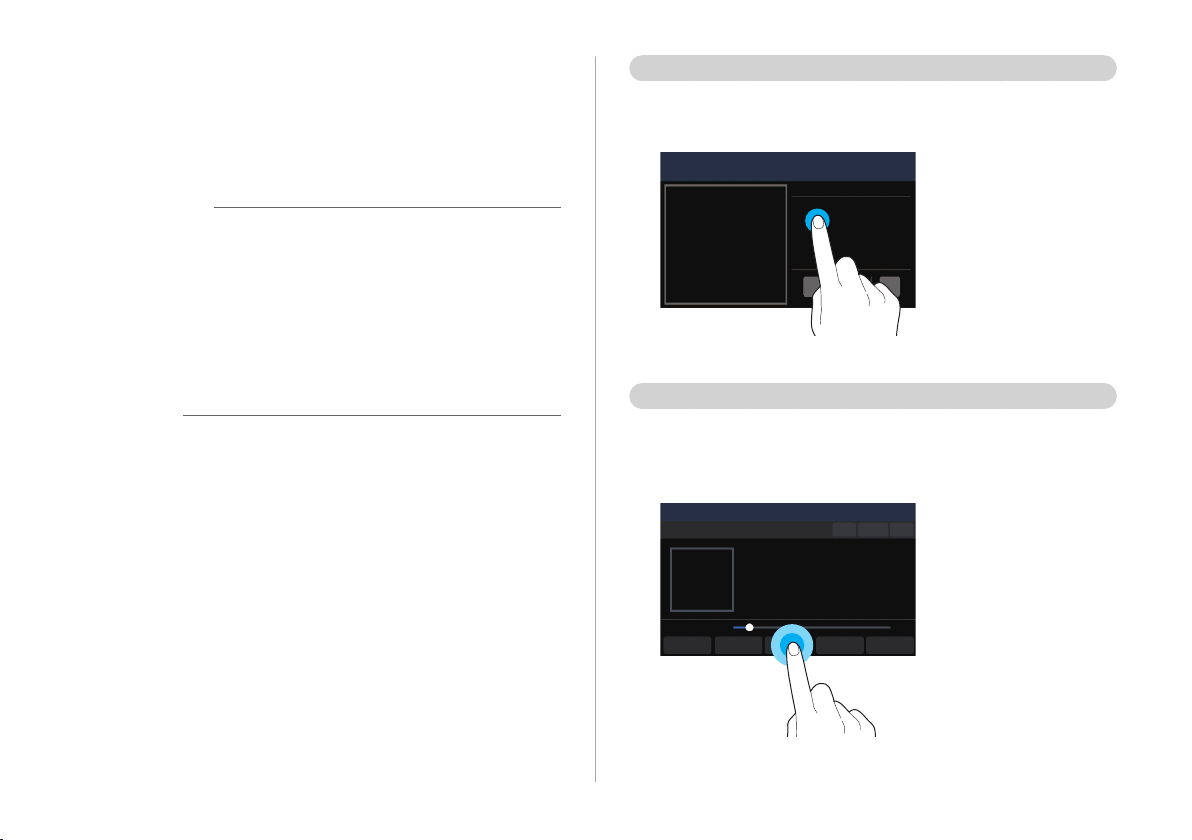
Touch
Touch an object lightly and lift your finger. You can perform
a function or select an option.
Touch and hold
Touch an object and hold it for at least one second without
lifting your finger. You can rewind or fast forward media by
touching and holding an appropriate button.
1-7
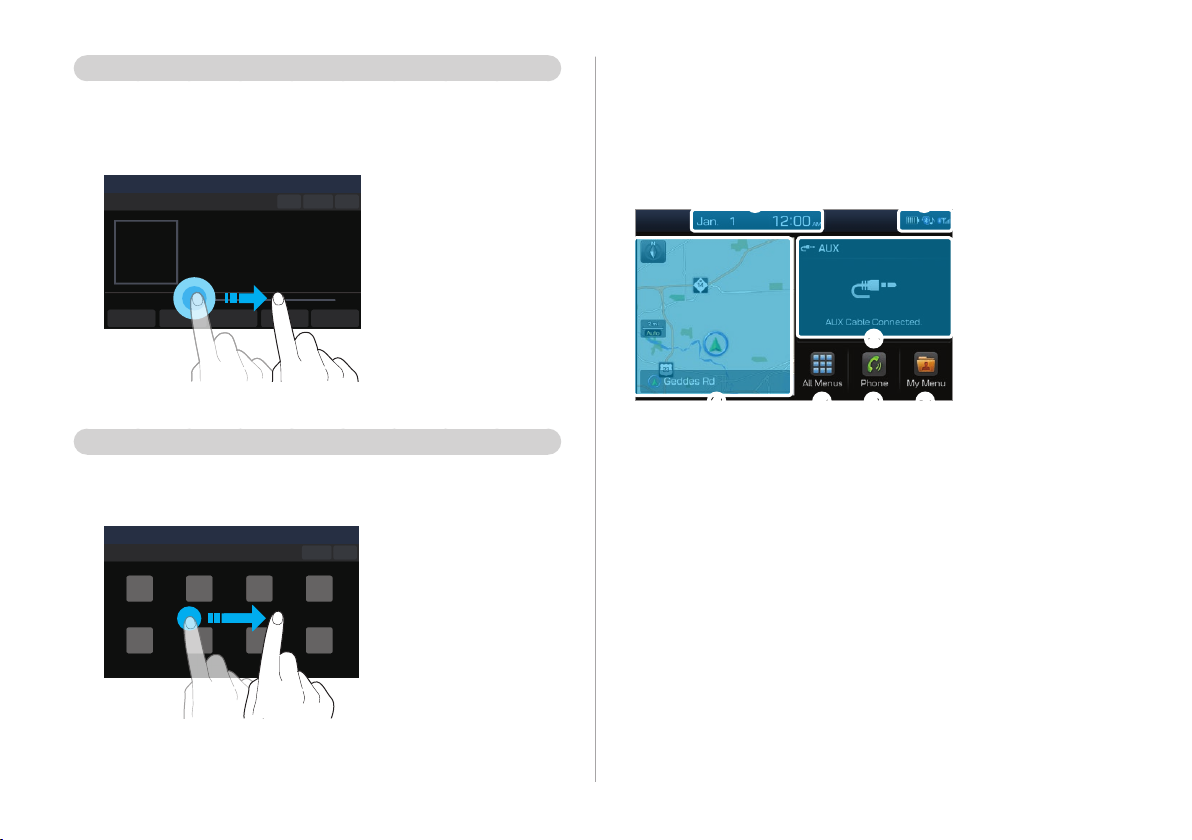
Drag
Touch and hold an object, drag it, and then drop it on a
new location. You can move the selected object to another
location or skip ahead or replay part of a song.
Getting to know the Home
screen
From the Home screen, you can access various functions.
Swipe
Swipe the screen lightly in an appropriate direction. This is
an easy way to scroll through a menu or list quickly.
a
d e f g
a Current time and date
b System status icons >See p.11-2 "System status icons."
c AV information. Touch to activate the corresponding AV
mode in full screen.
d Map. Touch to view in full screen.
e Access the All Menus screen.
f Access the Bluetooth phone screen. >See p.6-8 "Making a
call."
g Access the My Menu screen. >See p.2-2 "Setting up My
Menu."
b
c
1-8
Û Note
• To move to the Home screen from another screen, touch
.
• If an SD card is not inserted into your system, the map will
not be displayed on the Home screen.
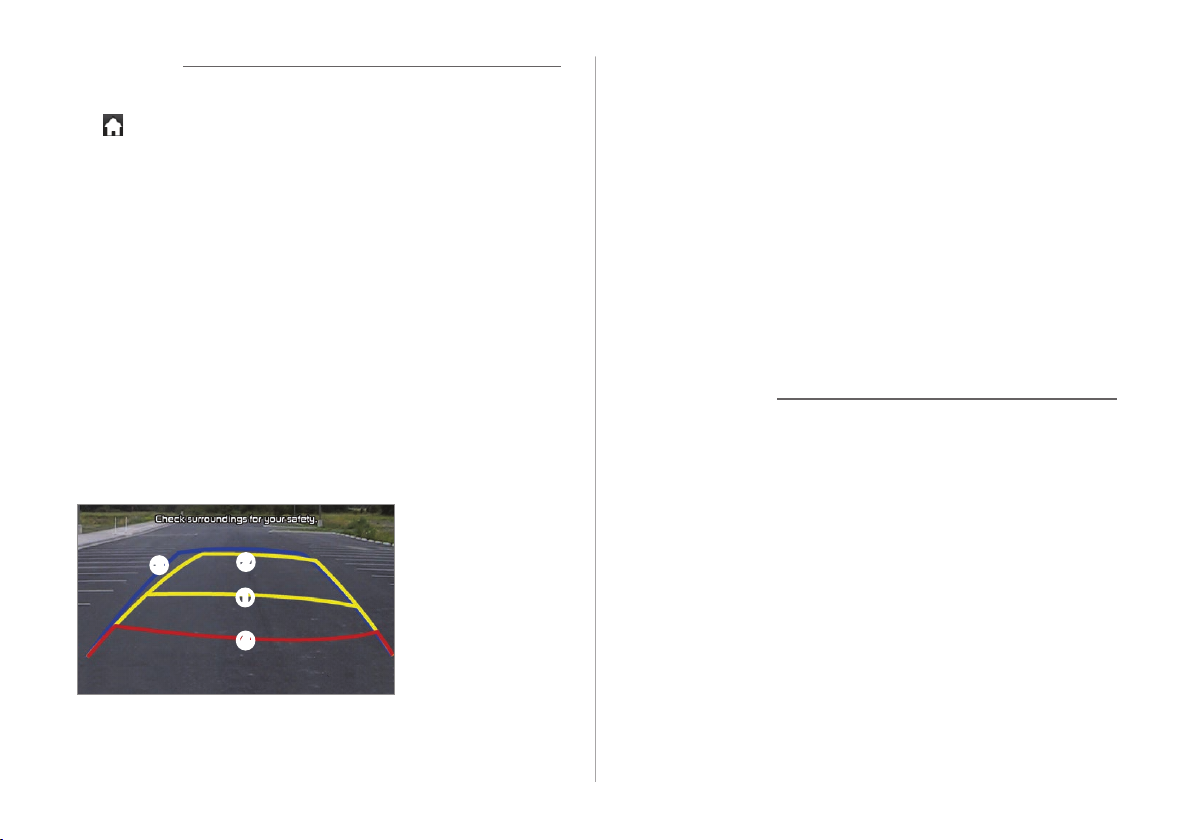
Getting to know the rear view
screen
When you put the transmission shift lever in the "R" (Reverse)
position while the engine is running, the system screen will
automatically display what is behind you.
The rear view and the parking guides provide a safer
experience when you park your vehicle.
c
b
a
d
• Driving direction lines (yellow) ab
These lines show the directions of the vehicle according to
the steering angle.
• Neutral direction lines (blue) c
These lines indicate your vehicle's expected path with
the steering wheel in the neutral position. It can help you
determine whether the vehicle is in the correct position in
a parking space and prevent you from parking too close to
the next vehicle.
• Crash warning lines (red) d
These lines are to prevent a collision.
Ü Warning
When backing up, make sure to follow the guidelines below:
• Before entering your vehicle, always check the area behind
your vehicle.
• Do not solely rely on the rear view camera when backing
up. Always ensure that it is safe to back up by checking
behind you and looking in the rearview mirrors.
• Always back up slowly and stop immediately if you suspect
that a person, especially a child, might be behind you.
1-9
Ý Caution
The distance shown in the rear view screen may differ from the
actual distance. For safety, be sure to visually check the rear,
left, and right sides of your vehicle.
Û Note
• The rear view screen remains active while you are backing
up. When you move the transmission shift lever to any
position other than the "R" (Reverse) position after backing
up, the rear view screen will be deactivated and the system
will display the previous screen automatically.
• As you steer your vehicle, the parking guides change
accordingly to indicate your vehicle's path.
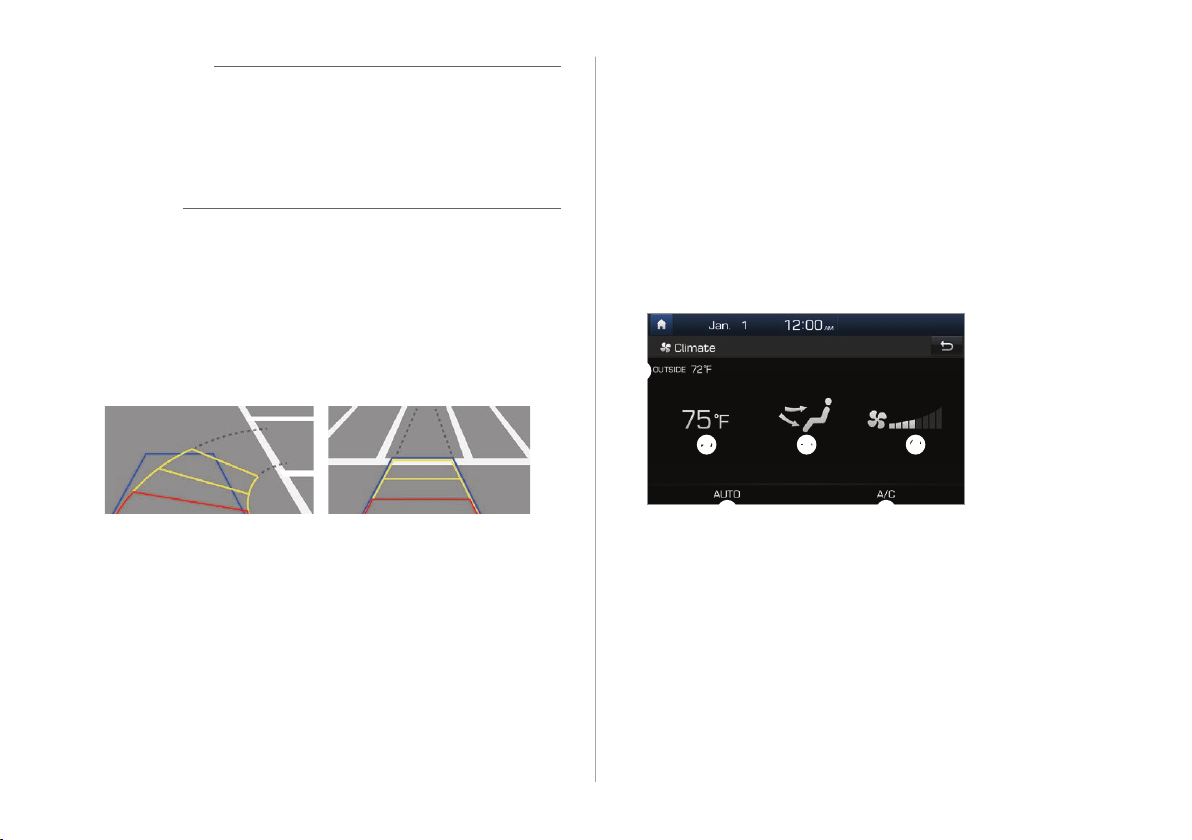
Using the climate control
system
You can check the current status of the climate control system
via the system screen.
On your vehicle, press the [CLIMATE] button.
• For more information on how to use the climate control
system, refer to the owner's manual of your vehicle.
a
(*if equipped)
• Depending on vehicle models, the steering-interactive
parking guides may not be supported.
• If an object comes too close to your vehicle as you are
backing up, a warning beep will sound. To prevent an
accident that might result if you do not hear the beep, you
can set the system to decrease the volume level of any
media playing automatically when the vehicle is in reverse.
On the Home screen, touch All Menus > Setup > Sound >
Priority > Back-up Warning Priority.
1-10
b
e
a Exterior temperature
b Interior temperature
c Air direction
d Air volume
e AUTO mode activated
f Air conditioner turned on
c
d
f

If you operate the climate control system while using your
system, the climate control settings are displayed at the top of
the screen.
b e c f d
Û Note
• The interior temperature is displayed in units of 1 °F.
• The AUTO mode will be deactivated automatically in the
following situations:
- When you adjust the air volume or direction
- When you turn on or off the air conditioner
- When you activate the front windshield defroster
• Depending on vehicle models or specifications, some
functions may not be supported.
1-11


Useful features
Setting up My Menu
Using Voice Memo
Using phone projection
Using data services
2

Setting up My Menu
Add your frequently used functions or favorites to My Menu to
access them quickly from the Home screen. You can add up to
24 items to My Menu.
On the Home screen, touch My Menu > Add to
1
My Menu.
• If you have already added items, on the My Menu
screen, touch Menu > Add.
You can delete the items added to My Menu.
On the Home screen, touch My Menu > Menu
1
> Delete.
Select items to delete and touch Delete > Yes.
2
Using Voice Memo
Select items to add and touch Add > Yes.
2
Editing My Menu
You can rearrange the items added to My Menu.
On the Home screen, touch My Menu > Menu
1
> Rearrange.
Drag an item to a desired location.
2
2-2
You can record voice memos using the microphone installed in
your vehicle and play voice memos on your system.
On the Home screen, touch All Menus > Voice
Memo.
a
b c d

a Display the options list.
• Delete: Delete voice memos.
• Save to USB Device: Save voice memos to a USB storage
device. This option is available only for USB storage
devices formatted in FAT16/32 formats.
• Storage Info: View information on the storage space
used for your voice memos.
b List of your voice memos. Touch a voice memo to play it.
c Record/Pause button
• Touch to start recording.
• Touch to pause recording.
d Stop button
• Touch to stop recording. The recorded memo is
added to the voice memos list on the left of the screen.
• You can also press the [ ] button on the steering
wheel.
Û Note
• Voice memo recording mutes the function in operation or
pauses media playback.
• If you make or answer a call while recording a voice memo,
the recording pauses. If an emergency call or Auto Crash
Notification (ACN) call is connected, the recording will stop
and the recorded voice memo will be saved automatically.
Using phone projection
Phone projection enables you to connect your Android
smartphone or iPhone to your system and use their functions
via the system. You can perform and control your smartphone
applications by using the larger screen and enhance your use
of the system.
Ý Caution
• Use only applications that are compatible with phone
projection. Using incompatible applications may cause
problems for your system or smartphone.
• Only compatible applications will be displayed on the
phone projection screen. You can also check compatible
applications by visiting the following websites:
- Apple CarPlay: https://www.apple.com/ios/carplay
- Android Auto: https://www.android.com/auto
2-3
Connecting your iPhone via Apple
CarPlay
Before using Apple CarPlay, be sure to check the following:
Apple CarPlay support on your iPhone
Visit the Apple homepage (https://www.apple.com/ios/
carplay) and check the iPhone models that support Apple
CarPlay.
Apple CarPlay activated or updated on your
iPhone
On your iPhone, ensure that Apple CarPlay is activated.
If your iPhone does not have the function, update the
iPhone's operating system to the latest version.
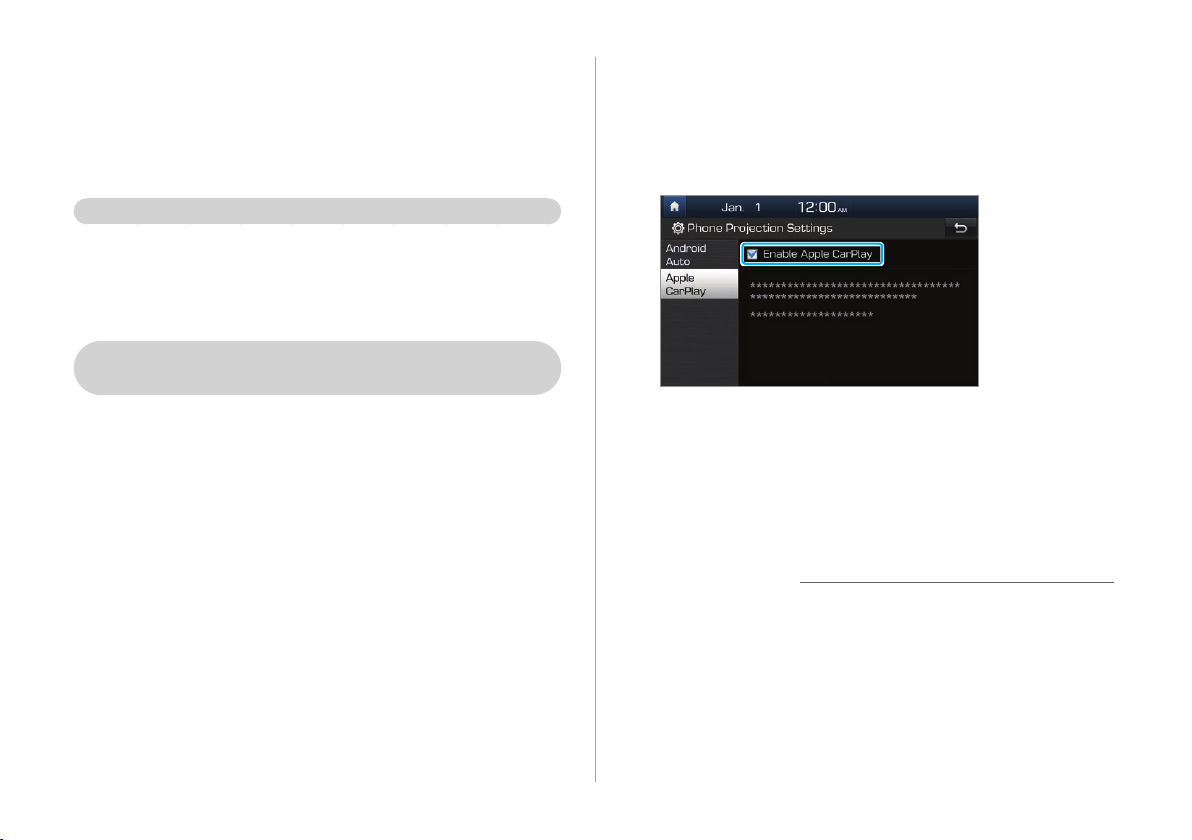
Start Apple CarPlay by following the steps below:
On the Home screen, touch All Menus > Setup
1
> Phone Projection > Apple CarPlay > Enable
Apple CarPlay.
Connect your iPhone to the USB port in your
2
vehicle via the cable supplied with the iPhone.
• If you are connecting the device for phone projection for
the first time, read the message on the notification popup window and touch OK.
Ý Caution
Do not connect and disconnect a USB connector
repeatedly in a short time. Doing so may cause an error in
the device or a system malfunction.
2-4
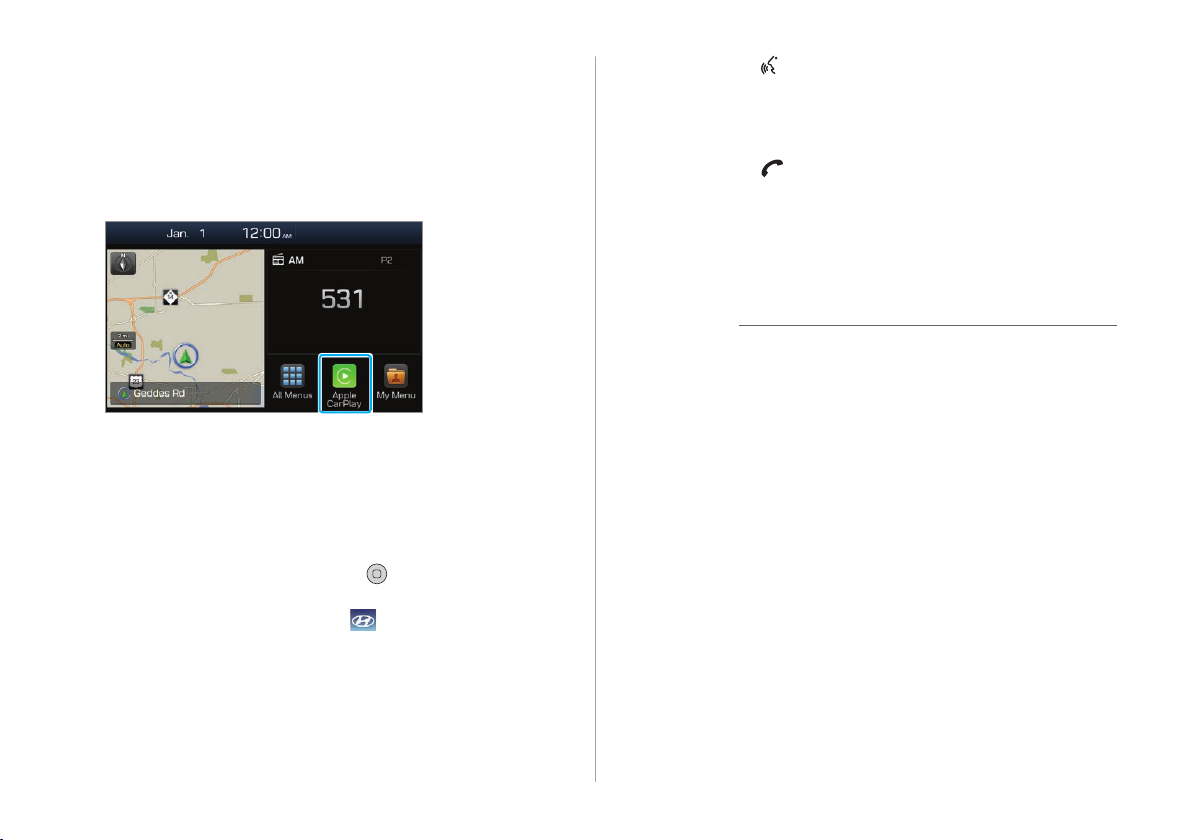
If your iPhone is locked, unlock it and agree to
3
use phone projection.
• When the iPhone is recognized successfully, Apple
CarPlay appears on the Home screen.
On the Home screen, touch Apple CarPlay.
4
Use your iPhone's functions, such as calling and
5
messaging, on your system.
• Touch an icon on the screen to run an application or
perform a function.
- Touch the Apple home icon ( ) to move to the main
screen of Apple CarPlay.
- Touch the HYUNDAI icon ( ) to move to the Home
screen of your system.
• Press the [ ] button on the steering wheel to start Siri.
• Press the [MODE] button on the steering wheel to select
and start a media player installed on your smartphone,
in addition to the system's AV modes.
• Press the [ ] button on the steering wheel to answer
an incoming call.
To end Apple CarPlay, remove the USB cable
6
from your system.
Û Note
• When a USB cable is connected to your system, you cannot
change the phone projection settings.
• Depending on Apple's policies, applications or functions
that are compatible with Apple CarPlay, such as navigation
apps or media players, may change. To check compatible
applications, visit the Apple homepage (https://www.apple.
com/ios/carplay).
• To use phone projection in optimized environments, update
your smartphone's operating system to the latest version.
• Depending on the connected device's hardware, firmware,
and operating system versions, the recognition time may
vary.
2-5

• Using phone projection may result in mobile
communication charges.
• Depending on the network signal status, some functions
may not work correctly.
• Avoid controlling your smartphone while phone projection
is in use.
• While you are using Apple CarPlay, the following functions
are unavailable:
- Bluetooth
- Blue Link calls
- System's voice recognition (iPhone's voice recognition is
available.)
- USB and iPod modes
- Volume control (depending on the connected device)
- Searches using the [TUNE/FILE] knob
- Android Auto
Connecting your Android smartphone
via Android Auto
Before using Android Auto, be sure to check the following:
Android Auto support on your smartphone
Visit the Google homepage (https://www.android.com/
auto) and check the regions, device types, and models that
support Android Auto.
Android Auto installed on your smartphone
Download and install the Android Auto application from
Google Play. If you are in a region where Android Auto is
not supported, you cannot install the application.
2-6
Start Android Auto by following the steps below:
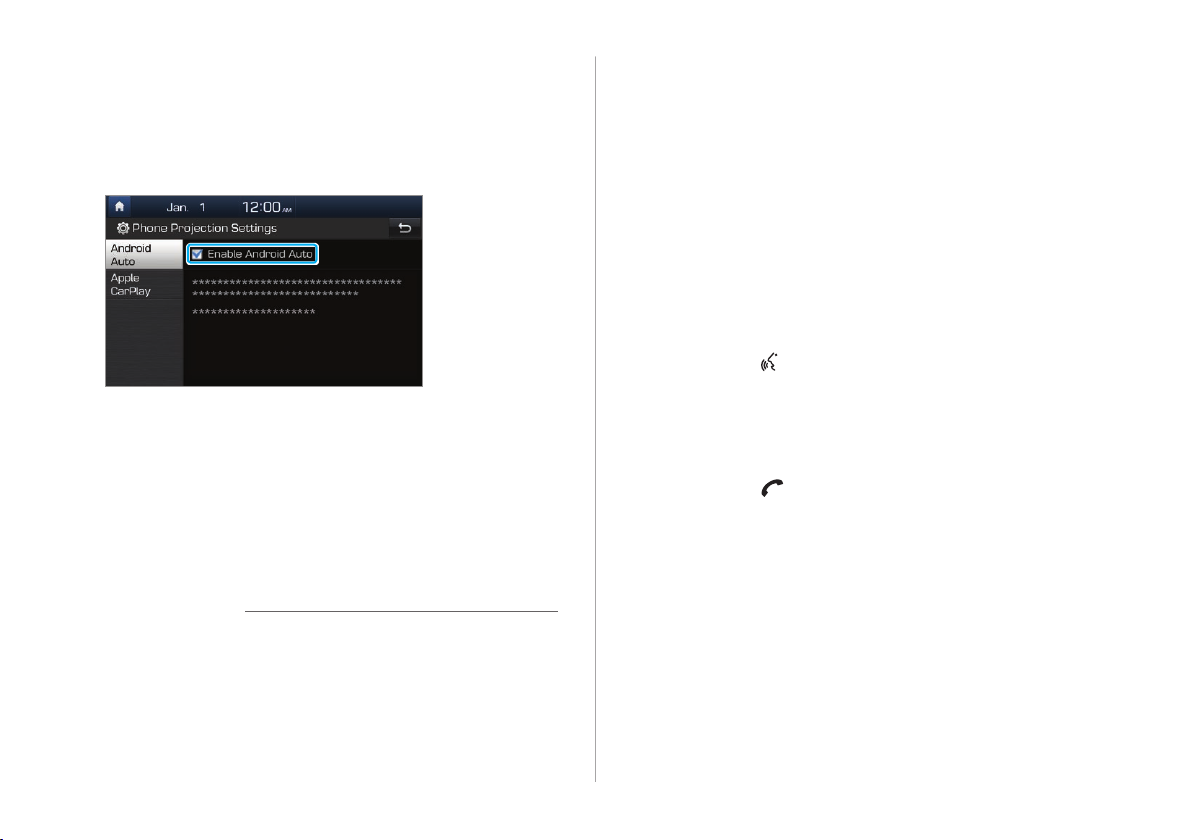
On the Home screen, touch All Menus > Setup
1
> Phone Projection > Android Auto > Enable
Android Auto.
Connect your smartphone to the USB port in
2
your vehicle via the cable supplied with the
smartphone.
• If you are connecting the device for phone projection for
the first time, read the message on the notification popup window and touch OK.
Ý Caution
If your smartphone is locked, unlock it and
3
agree to use phone projection.
• When the smartphone is recognized successfully,
Android Auto appears on the Home screen.
On the Home screen, touch Android Auto.
4
Use your smartphone's functions, such as
5
calling and messaging, on your system.
• Touch an icon on the screen to run an application or
perform a function.
• Press the [ ] button on the steering wheel to start
Google voice recognition.
• Press the [MODE] button on the steering wheel to select
and start a media player installed on your smartphone,
in addition to the system's AV modes.
• Press the [ ] button on the steering wheel to start
using Bluetooth call functions.
Do not connect and disconnect a USB connector
repeatedly in a short time. Doing so may cause an error in
the device or a system malfunction.
2-7

To end Android Auto, remove the USB cable
6
from your system.
Û Note
• When a USB cable is connected to your system, you cannot
change the phone projection settings.
• Depending on Google's policies, the icons on the main
screen of Android Auto may change.
• Depending on Google's policies, applications or functions
that are compatible with Android Auto may change. To
check compatible applications, visit the Android homepage
(https://www.android.com/auto).
• To use phone projection in optimized environments, update
your smartphone's operating system to the latest version.
• Depending on the connected device's hardware, firmware,
and operating system versions, the recognition time may
vary.
• Using phone projection may result in mobile
communication charges.
• Depending on the network signal status, some functions
may not work correctly.
• Avoid controlling your smartphone while phone projection
is in use.
• While you are using Android Auto, the following functions
are unavailable:
- Bluetooth audio
- Blue Link calls
- System's voice recognition (smartphone's voice
recognition is available.)
- USB and iPod modes
- Searches using the [TUNE/FILE] knob
- Apple CarPlay
2-8
Using data services
You can access an array of information with data services, such
as HD Radio™ or SiriusXM™.
Û Note
• HD Radio data services are only available in metropolitan
areas.
• SiriusXM is a paid satellite radio service.
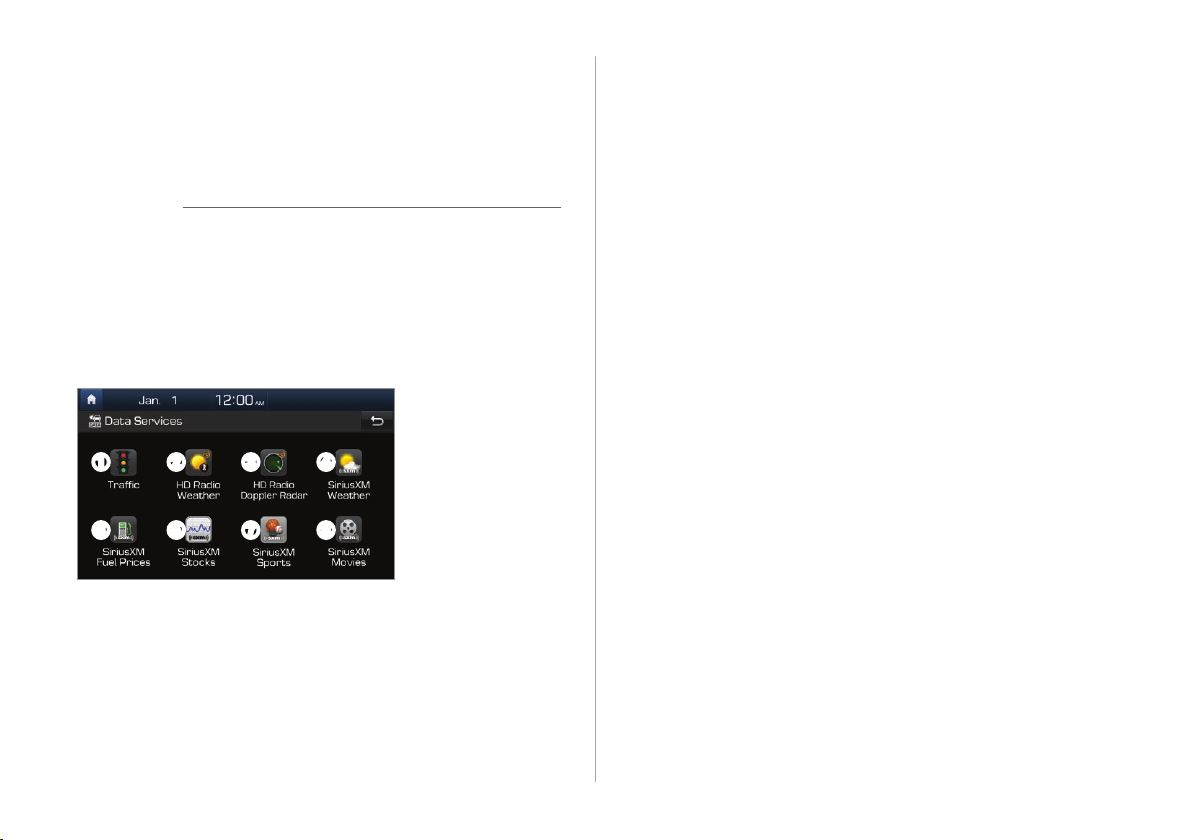
On the Home screen, touch All Menus > Data
Services.
b View weather information via HD Radio. >See p.2-10
"Viewing weather information via HD Radio."
c View details of current weather conditions, if you are in
an HD Radio coverage area.
information in HD Radio Doppler Radar."
d View weather information via SiriusXM. >See p.2-11 "Viewing
weather information via SiriusXM."
e View fuel price information and search for a nearby service
station.
f Stay on top of current stock values and trends in the stock
market.
g View sports information. >See p.2-14 "Viewing sports
information via SiriusXM."
h See what is playing now and search for a nearby theater.
>See p.2-15 "Viewing the latest movie information via SiriusXM."
>See p.2-12 "Viewing fuel price information via SiriusXM."
>See p.2-13 "Viewing stock information via SiriusXM."
>See p.2-11 "Viewing weather
a
e
a View traffic information. >See p.2-9 "Viewing traffic
information."
b
f
c
g
d
h
Viewing traffic information
On the Home screen, touch All Menus > Data
1
Services.
Touch Traffic.
2
2-9
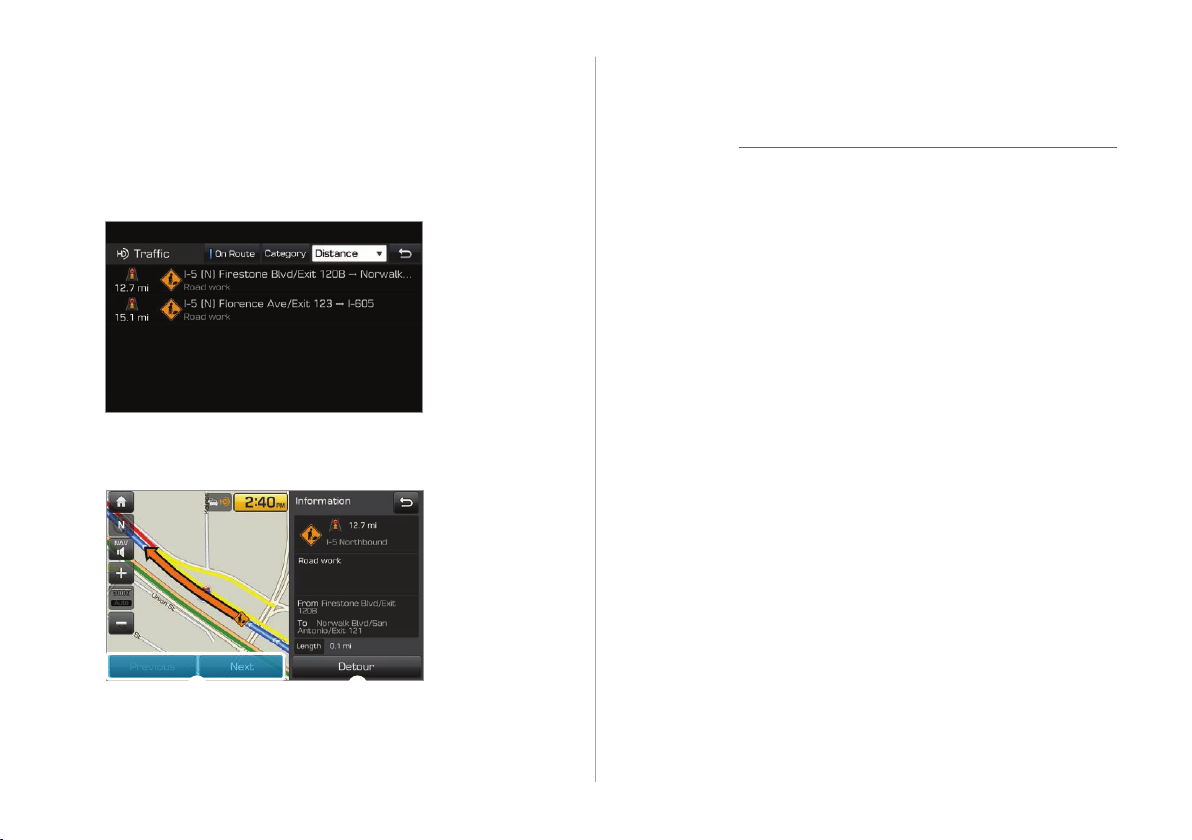
Select an item from the traffic information list to
3
view its details.
• To view traffic information along your current route or to
view all available traffic information, touch On Route.
• To select the types of traffic information you want to
view, touch Category.
View detailed traffic information.
4
a View the previous or next traffic information.
b Reflect traffic information to your current route.
Û Note
Traffic support for border crossings and speed limits set for
individual roads may not be accurate. Use the information at
your discretion.
Viewing weather information via HD
Radio
On the Home screen, touch All Menus > Data
1
Services.
Touch HD Radio Weather.
2
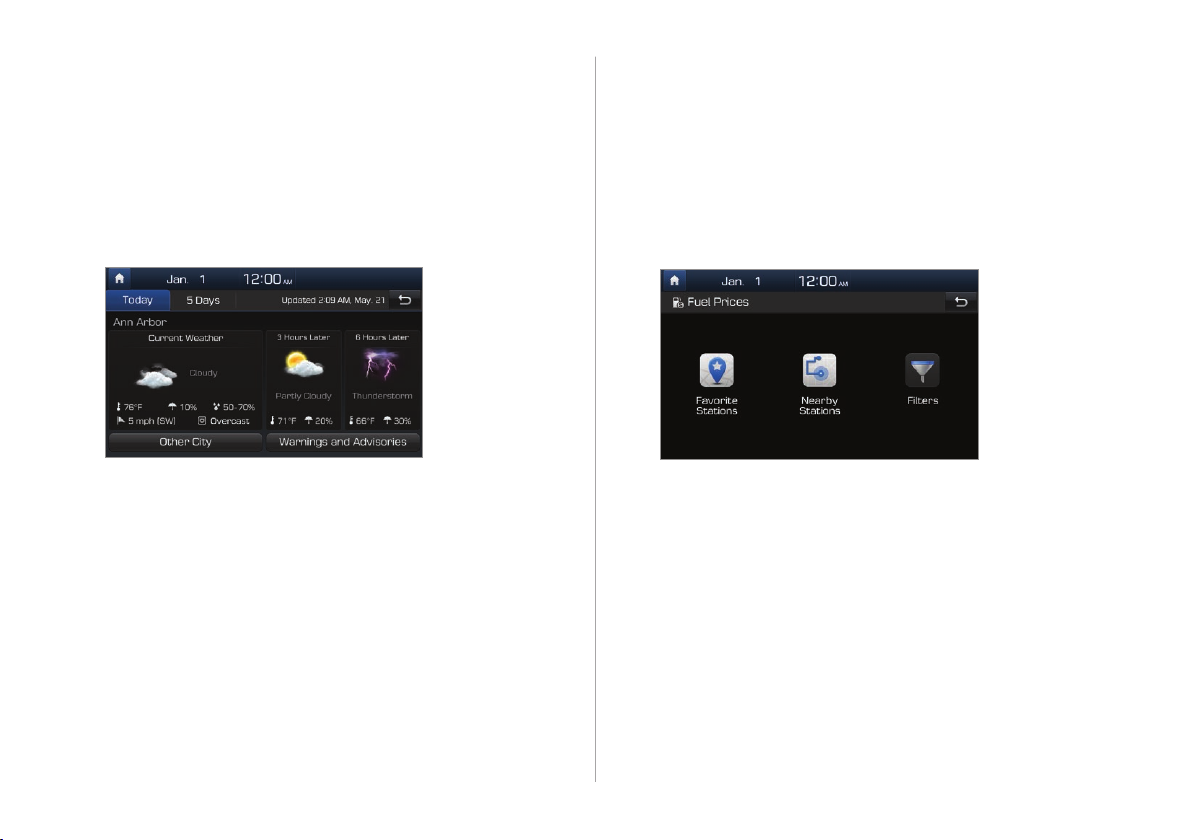
2-10
a b
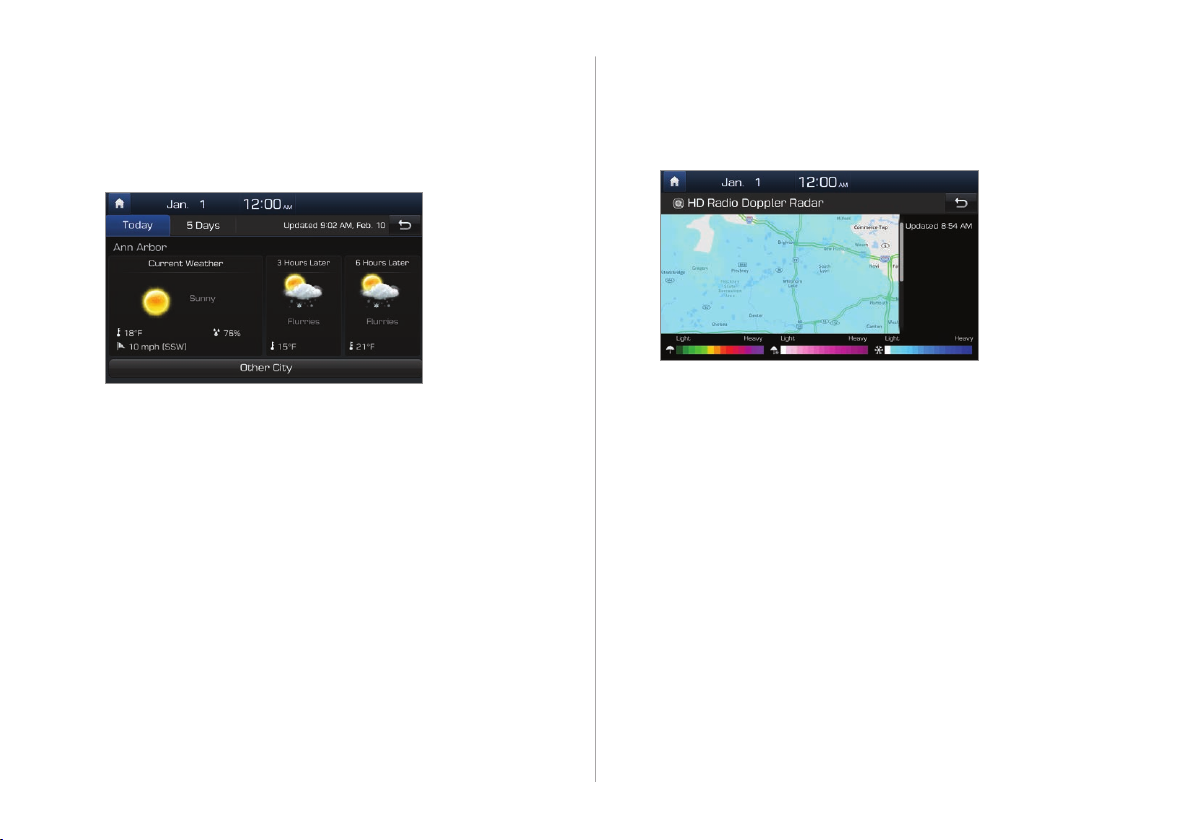
View today’s weather information in your city.
3
• To view weather forecasts for today and the next four
days, touch 5 Days.
• To view weather information of another area, touch
Other City.
Viewing weather information in HD
Radio Doppler Radar
On the Home screen, touch All Menus > Data
1
Services.
Touch HD Radio Doppler Radar.
2
View detailed weather conditions in the HD
3
Radio coverage area.
Viewing weather information via
SiriusXM
On the Home screen, touch All Menus > Data
1
Services.
Touch SiriusXM Weather.
2
2-11
View today’s weather information in your city.
3
• To view weather forecasts for today and the next four
days, touch 5 Days.
• To view weather information of another area, touch
Other City.
• To view warnings and advisories for adverse weather
conditions, such as tornadoes, tropical storms, and
blizzards, touch Warnings and Advisories.
Viewing fuel price information via
SiriusXM
On the Home screen, touch All Menus > Data
1
Services.
Touch SiriusXM Fuel Prices > Nearby Stations.
2
2-12

Search for nearby gas stations and check or
3
compare fuel prices.
• To sort the search results, touch the option menu (^)
and select a sorting option.
• To set a service station as one of your favorites, touch
.
Û Note
To access your list of favorite gas stations, touch Favorite
Stations on the main screen.
[ Setting a filter for searching for gas stations
On the Home screen, touch All Menus > Data
1
Services.
Touch SiriusXM Fuel Prices > Filters.
2
Select the type of fuel your vehicle uses and
3
your favorite brands.
Viewing stock information via
SiriusXM
On the Home screen, touch All Menus > Data
1
Services.
Touch SiriusXM Stocks > Add.
2
2-13

Search for your favorite stock by entering a
3
stock symbol in the search bar and then touch
to add it to the list.
• Repeat this step to add more stock symbols.
Now you can check information on your stock every day by
touching All Menus > Data Services > SiriusXM Stocks.
Viewing sports information via
SiriusXM
On the Home screen, touch All Menus > Data
1
Services.
Touch SiriusXM Sports.
2
Select the sport that interests you.
3
• To set up a list of your favorite teams and check their
daily results and schedules, touch My Teams.
View real-time scores and schedules for major
4
events and games.
Û Note
To delete a stock symbol from your favorites list, touch .
2-14

[ Creating a list of your favorite teams
On the Home screen, touch All Menus > Data
1
Services.
Touch SiriusXM Sports > My Teams > Add.
2
Search for your favorite team by entering its
3
name in the search bar and then touch
add it to the list.
• Repeat this step to add more teams.
to
Now you can check your favorite team’s scores and schedules
every day.
Û Note
To delete a team from your favorites list, touch .
Viewing the latest movie information
via SiriusXM
On the Home screen, touch All Menus > Data
1
Services.
2-15

Touch SiriusXM Movies > Top Movies.
2
View information about the latest movies.
3
• To reorder the titles on the list, touch the option menu
(^) and select an option.
• To view detailed information about a movie, touch .
[ Searching for nearby theaters
On the Home screen, touch All Menus > Data
1
Services.
Touch SiriusXM Movies > Nearby Theaters.
2
Search for nearby theaters and view their
3
location information.
• To sort the search results, touch the option menu (^)
and select a sorting option.
• To view detailed information about a theater, touch .
• To set a theater as one of your favorites, touch .
2-16

[ Creating a list of your favorite theaters
On the Home screen, touch All Menus > Data
1
Services.
Touch SiriusXM Movies > Favorite Theaters >
2
Add.
Find your favorite theater from the list and
3
touch
• Repeat this step to add more theaters.
.
2-17


Radio
Turning on the radio
Changing the radio mode
Scanning for available radio stations
Searching for radio stations
Saving radio stations
Listening to saved radio stations
Listening to HD Radio™
Listening to SiriusXM™ radio
3

Turning on the radio
On the Home screen, touch All Menus > Radio.
a b
f Activate the HD Radio mode.
g Preview each radio station for five seconds and select the
station you want.
Changing the radio mode
d e f g
a Display the options list.
• Station List: Access the list of available radio stations.
• Info: Set to display text information received from the
current broadcasting station.
• Sound Settings: Customize the system sound settings.
> See p.9-2 "Setting the system sound."
b Move to the previous screen.
c Radio station information
d Preset list
e Select a radio mode.
3-2
c
On the radio screen, touch Band and select a
desired mode.
• Alternatively, press the [RADIO] button on the control panel
or the [MODE] button on the steering wheel. Each time you
press the button, the radio mode switches to FM > AM >
SiriusXM in order.

Scanning for available radio
stations
You can listen to each radio station for a few seconds and select
the one you want.
On the radio screen, touch Scan.
1
• The system provides a preview of each radio station on
the available stations list for five seconds.
When you find the radio station you want to
2
listen to, touch Scan to stop the scan.
• You can continue listening to the current radio station.
Searching for radio stations
To search for the previous or next available radio
station, press the [
on the control panel.
• To select a radio station from the available stations list,
touch Menu > Station List on the radio screen.
• You can also press and hold the [ SEEK] or [TRACK ]
button to search for frequencies quickly. When you release
the button, the next available radio station is selected
automatically.
SEEK] or [TRACK ] button
3-3

Saving radio stations
Listening to saved radio
You can save your favorite radio stations and listen to them by
selecting them from the preset list.
On the radio screen, touch and hold an empty slot
from the preset list.
• The radio station you are listening to will be added to the
selected slot.
Û Note
• You can save up to 40 radio stations.
• If the preset list is full, you can replace one of your favorite
stations with the station you are listening to. Touch and
hold the station you want to replace.
stations
Select one of the radio stations in the preset list.
• Alternatively, push the [ / ] lever on the steering wheel
to change the radio station.
Listening to HD Radio™
If you enable HD Radio reception by touching , you can
listen to HD Radio stations in areas where they are available.
When HD Radio signals are received, the radio will switch from
the analog mode to the HD mode.
3-4

In the HD mode, HD Radio station buttons are displayed at
the top of the radio screen. Touch a button to select one of the
available HD Radio stations.
Û Note
HD Radio is only available in metropolitan areas.
Program Info: Presents song
name, artist, station IDs, and
other relevant data streams.
Digital, CD-quality sound. HD
Radio™ Technology enables local
radio stations to broadcast a clean
digital signal. AM sounds like
today’s FM and FM sounds like a
CD.
FM stations can provide additional
digital-only audio programming
on HD2/HD3 Channels.
Real-Time Traffic reports, alerts,
and flow data displayed on screen
via interactive traffic maps and/
or data.
3-5

Listening to SiriusXM™ radio
You can listen to radio channels provided by SiriusXM, a
satellite radio service. Various kinds of channels, such as music,
sports, and news, are available via streaming or live broadcast.
Û Note
• SiriusXM service requires a subscription (sold separately)
after the three-month trial included with the vehicle
expires. If you decide to continue your SiriusXM service at
the end of your trial subscription, the plan you choose will
automatically renew and bill at then-current rates until you
call Sirius XM at 1-866-635-2349 to cancel. See Customer
Agreement for terms and conditions at www.siriusxm.com.
• Programming is subject to change.
• Sirius satellite service is available only to those at least 18
years of age and older in the Continental United States
(including Puerto Rico) with coverage limitations.
• Traffic information is not available for all markets. See
siriusxm.com/traffic for details.
On the radio screen, touch Band > SiriusXM.
a b c
d
fe g
h i j
a Access the list of available SiriusXM radio channels.
b Display the options list.
• What is on My Presets?: View broadcast schedule.
• Featured Favorites: Listen to groups of channels
provided by SiriusXM.
• Sound Settings: Customize the system sound settings.
>See p.9-2 "Setting the system sound."
c Move to the previous screen.
d Switch to the live broadcast mode. This button is activated
only when a live broadcast is available on the selected
channel.
e Move to the previous segment. Touch and hold to rewind
the broadcast by five second decrements.
3-6

f Pause or stop the broadcast.
g Move to the next segment. Touch and hold to fast forward
the broadcast by five second increments.
h Change the radio mode.
i Select a channel by entering its channel number.
j Scan through all available SiriusXM radio channels.
Û Note
The icon will be shown next to the first 10 SiriusXM
channels saved. Once preset channels are saved, broadcasts
from these channels will be buffered automatically for your
convenience each time you start your vehicle.
Searching for SiriusXM radio channels
You can select a channel from the available SiriusXM channels
list.
On the radio screen, touch Band > SiriusXM.
1
On the SiriusXM radio screen, touch Channel
2
List.
Select a category and a channel.
3
• To skip a channel when scanning with the [ SEEK] and
[TRACK
] buttons or [TUNE] knob, touch Skip.
3-7

Selecting channels by using channel
numbers
If you know the exact channel number, you can enter it to
select the channel directly.
On the radio screen, touch Band > SiriusXM.
1
On the SiriusXM radio screen, touch Direct
2
Tune.
Enter a channel number and touch OK.
3
Viewing the program schedule
You can view the program schedule and information for the
channels stored in your preset list.
On the radio screen, touch Band > SiriusXM.
1
On the SiriusXM radio screen, touch Menu >
2
What is on My Presets?.
Set a date and time on the top line of the screen.
3
• To select a date, touch the date display field at the top
left of the preset list and select a date and time zone.
• To select a time, touch or .
3-8

Select a channel and a program to view its
4
detailed information.
Û Note
If there is hidden information, an arrow will appear next to the
program. Touch the arrow to view the hidden information.
Listening to Featured Favorites
channels
You can listen to Featured Favorites channels on SiriusXM
radio. Multiple sets of channels can be broadcast and can be
changed by SiriusXM.
On the radio screen, touch Band > SiriusXM.
1
On the SiriusXM radio screen, touch Menu >
2
Featured Favorites.
Select a channel.
3
3-9


Media player
Using the media player
Using the USB mode
Using the iPod mode
Using the AUX mode
4

Using the media player
You can play music stored in various media storage devices,
such as USB storage devices, smartphones, and iPods.
Connect a device to the USB port or the AUX
1
port in your vehicle.
• Playback may start immediately depending on the
device that you connect to the system.
Touch the AV information area on the Home
2
screen or press the [MEDIA] button on the
control panel.
• If you have multiple media storage devices, press the
[MEDIA] button again and select a media mode from the
media selection window.
Û Note
• When you connect an Apple device, playback does not
start automatically and the AV information area remains in
the previous mode. You cannot touch the AV information
area to start playback. To start the media player in the iPod
mode, press the [MEDIA] button on the control panel.
• You can also change the mode by pressing the [MODE]
button repeatedly on the steering wheel.
• Depending on vehicle models and specifications, available
buttons or the appearance and layout of the USB/AUX ports
in your vehicle may vary.
4-2

Controlling the media player
Use the buttons at the bottom of the playback screen to control
the media player.
Pausing/Resuming playback
Touch to pause playback. Touch to resume playing
your music.
• You can also press the [ ] button on the steering wheel.
Û Note
The iPod mode does not support pausing or resuming
playback with the [
] button.
Rewinding/Fast forwarding
Touch and hold or to rewind or fast forward.
Alternatively, press and hold the [
button on the control panel.
• You can also push and hold the [ / ] lever on the
steering wheel.
SEEK] or [TRACK ]
Restarting the current playback
Touch to restart the song currently playing.
Alternatively, press the [
panel.
• You can also push the [ / ] lever downward on the
steering wheel.
SEEK] button on the control
4-3

Playing the previous or next song
Playing in random order
To play the previous song, touch twice or press the
SEEK] button twice on the control panel. To play the
[
next song, touch
control panel.
• You can also use the [ / ] lever on the steering wheel.
or press the [TRACK ] button on the
Û Note
• On the control panel, turn the [FILE] knob to find the
desired song and press the knob within five seconds to
play the file.
• If no control is detected within five seconds, the search
is canceled and the screen displays information about
the song currently playing.
Playing repeatedly
Touch Repeat to play a file on repeat. The repeat play mode
changes each time you touch it. The corresponding mode
icon will be displayed on the screen. Depending on the
current media or playlist, available repeat play modes may
vary.
Touch Shuffle to shuffle an album or playlist. The shuffle
play mode is activated or deactivated each time you touch
it. When you activate the shuffle mode, the corresponding
mode icon will be displayed on the screen. Depending on
the current media or playlist, available shuffle play modes
may vary.
Û Note
For specific descriptions of each media mode, refer to the
corresponding section. The description on the Bluetooth audio
mode is included in the "Bluetooth" chapter.
4-4

Using the USB mode
You can play media files stored in portable devices, such as
USB storage devices and MP3 players. Check compatible USB
storage devices and file specifications before using the USB
>See p.11-8 "USB mode."
mode.
g
d
e
a b c
f
Listening to music
Connect your USB device to the USB port in the
1
vehicle.
Touch the AV information area on the Home
2
screen or press the [MEDIA] button on the
control panel.
• The media player is displayed in full screen.
• If you have multiple media storage devices, press the
[MEDIA] button again and touch USB Music from the
media selection window.
a Access the files list.
b Display the options list.
• Hide Current File: Delete the file that is playing
currently from the system.
• Sound Settings: Customize the system sound
settings.
c Move to the previous screen.
d Information about the song currently playing
e Repeat play mode
f Current file number and total number of files
g Playback time and playback position
>See p.9-2 "Setting the system sound."
4-5

Û Note
Only USB storage devices formatted in FAT16/32 formats
support deleting files. You can find the deleted files in the
"Hidden_" folder.
Ý Caution
• Start the engine of your vehicle before connecting a USB
device to your system. Starting the engine with a USB
device connected to the system may damage the USB
device.
• Be careful of static electricity when connecting or
disconnecting a USB device. A static discharge may cause a
system malfunction.
• Be careful not to let your body or external objects contact
the USB port. Doing so may cause an accident or a system
malfunction.
• Do not connect and disconnect a USB connector repeatedly
in a short time. Doing so may cause an error in the device
or a system malfunction.
• Do not use a USB device for purposes other than playing
files. Using USB accessories for charging or heating may
cause poor performance or a system malfunction.
Û Note
• When connecting a USB storage device, do not use an
extension cable. Connect it directly to the USB port. If you
use a USB hub or an extension cable, the device may not be
recognized.
• Fully insert a USB connector into the USB port. Failure to do
so may cause a communication error.
• When you disconnect a USB device, a distorted noise may
occur.
• The system can play only files encoded in a standard
format.
• The following types of USB devices may not be recognized
or work correctly:
- Encrypted MP3 players
- USB devices not recognized as removable disks
• A USB device may not be recognized depending on its
condition.
• Some USB devices may be incompatible with your system.
• Depending on the USB device's type, capacity, or the format
of files, USB recognition time may be longer.
• Depending on the specification, some USB devices may not
support charging via a USB connection.
4-6

[ Searching for music files on a file list
Access a file list to search for and select a song.
On the music playback screen, touch List.
1
Touch the screen to open a folder, move to
2
another category, or play a music file.
b Move to the previous screen.
c Move up to another folder/category.
d Folder/Category name
e Search for a song based on categories.
f Scroll bar
ba
c d
e f
a Display the options list.
• Now Playing: Move to the location of the file
currently playing while searching for a music file
in another folder/category. This option is disabled
when a file in the current playlist is playing.
Using the iPod mode
You can listen to music stored on your Apple devices, such as
an iPod or an iPhone. Check compatible Apple devices and iOS
specifications before using the iPod mode.
mode."
Connect your Apple device to the USB port in
1
your vehicle using the cable supplied with the
Apple device.
• When connected, the device will begin charging. Music
playback will not start automatically.
>See p.11-10 "iPod
4-7

On the control panel, press the [MEDIA] button.
2
• If you have multiple media storage devices, press the
[MEDIA] button again and touch iPod from the media
selection window.
a b c
Ý Caution
Do not connect and disconnect a USB connector repeatedly in
a short time. Doing so may cause an error in the device or a
system malfunction.
d
g
a Access the files list.
b Display the options list.
• Sound Settings: Customize the system sound
settings.
c Move to the previous screen.
d Information about the song currently playing
e Repeat play mode
f Current file number and total number of files
g Playback time and playback position
e
>See p.9-2 "Setting the system sound."
f
[ Searching for music files on a file list
Access a file list to search for and select a song.
On the music playback screen, touch List.
1
Touch the screen to move to another category
2
or play a music file.
a
b c
d e
a Move to the previous screen.
b Move up to another category.
4-8

c Category name
d Search for a song based on categories.
e Scroll bar
Notes on connecting Apple devices
• Ensure that the iOS and firmware of your device is up-
to-date before connecting it to your system. Outdated
devices may cause a system error.
• If your device’s battery is low, the device may not be
recognized. Check the battery level and, if necessary,
charge the battery before connecting the device to your
system.
• Use an Apple-approved cable. Using an unapproved cable
may cause a distorted noise or an error during playback.
• Fully insert a USB connector into the USB port. Failure to
do so may cause a communication error.
• When your device is connected to the USB port and the
AUX port simultaneously, it is recognized in the AUX
mode. The device stays in the AUX mode even if the AUX
cable is not connected to the system. To play music in
iPod mode, disconnect the AUX cable from the device or
change audio output of the device to "Dock."
• If you connect your device to the system while playback
is in progress on the device, you may hear a high pitch
sound just after the connection. Connect the device after
stopping or pausing playback.
• Connecting your device during a download or
synchronizing with iTunes may cause an error. Connect
the device after the download or synchronization is
complete.
• If you connect an iPod nano (except for the 6th
generation) or an iPod classic, the brand logo will be
displayed on the device screen. For an iPhone and an
iPod touch, the logo will not be displayed.
Notes on playing Apple devices
• Depending on the model, your device may not be
recognized due to unsupported communication
protocols.
• The order of the songs displayed or played on the system
may differ from the order of the songs stored in your
device.
• Podcasts and audiobooks will play on your system if the
dedicated applications are not installed on your Apple
device. You can access those files in the Other category.
4-9

• Podcasts and audiobooks may not play or may not be
displayed on your system if your Apple device has iOS 6.0
or later installed.
• In an iPhone, the audio streaming function and iPod
mode control may conflict. If an error occurs, disconnect
and reconnect the USB cable.
• When using an iPhone or an iPod touch, do not control
the device while it is connected to your system. An error
may occur.
• If you make or receive a call during playback via an
iPhone, the music may remain paused after you end
the call. If you do not hear the music after ending a call,
check the device to see if the music is paused.
• Do not duplicate a song in multiple folders. One song
saved in multiple folders may cause an error with search
and playback functions.
• If you perform a media control function, such as stop or
repeat, just before a song ends, the song information
displayed on the screen may not match the song
currently playing. This is not a system error. Restart the
iPod mode on the system or pause and resume playback
on your device.
Using the AUX mode
You can listen to audio from your vehicle's speakers by
connecting external devices, such as smartphones and MP3
players.
Connect an external device to the AUX port in your
vehicle using an AUX cable.
• The AUX mode starts automatically and the sound is heard
via your vehicle’s speakers.
a b
a Display the options list.
• Sound Settings: Customize the system sound settings.
>See p.9-2 "Setting the system sound."
b Move to the previous screen.
4-10

Û Note
• Because the system works as an output device of the
connected external device in the AUX mode, you cannot use
controls other than the volume control. Use controls on the
external device to control playback.
• The sound volume for the AUX mode is adjusted separately
from the other modes.
• Depending on the device type, using an external device
with the power cable plugged into the power jack may
cause a distorted noise.
• If the AUX cable is plugged into the system without an
external device, a distorted noise may occur. Remove the
AUX cable from the AUX port when an external device is not
connected.
4-11


Navigation
Finding a route quickly
Finding a route with various search methods
Using helpful navigation options
Registering locations
Updating the map
Changing navigation settings
5

Finding a route quickly
You can find a route to your destination quickly and start the
navigation.
On the Home screen, touch the map area.
1
• Alternatively, if your system has the [MAP] button on the
control panel, press the [MAP] button.
On the map, touch Place or Address.
2
Û Note
The Place or Address field appears only when the
transmission shift lever is in the "P" (Park) position.
Enter location information, such as a place
3
name, an address, or coordinates, and touch
OK.
• : View the recent keywords list.
• MI: Narrow the search range to a desired region. Touch
to view the recent states list.
• : Switch to the uppercase mode.
• : Delete the entered characters.
• : Switch to the symbol input mode.
5-2

• : Switch to the alphabet input mode.
• : Switch to the accent input mode.
• : Enter a space.
• : Enter a punctuation mark.
• : Change the keyboard settings.
Select a location from the search result list.
4
• To filter the search results by region, touch Filter by City.
• To filter the search results by POI category, touch Filter
by Category.
Touch Start Guidance.
5
Û Note
• You can use various search methods available in the
navigation menu. On the Home screen, touch All Menus
> NAV Menu.
methods."
• If the HD Radio or SiriusXM service is available for traffic
information, the corresponding icon will appear at the top
of the navigation screen.
- HD Radio ( ): The system is using HD Radio data. HD
Radio is only available in metropolitan areas.
- SiriusXM ( ): The system is using SiriusXM data.
SiriusXM is only available when HD Radio is unavailable
because HD Radio data has higher priority than SiriusXM
data.
>See p.5-8 "Finding a route with various search
5-3

Ý Caution
Depending on the region you are driving in or the driving
conditions, information on the map may differ from the actual
road conditions.
• When converted to an electronic map, the road shape may
be altered. If the navigation guidance is different from the
actual road, use your judgment and take the appropriate
road.
• The navigation guidance may differ from the actual road
due to the time difference between the map production
and your driving. Drive according to the current road
conditions and traffic regulations. When you reach the
section of the route that matches the actual road, the
navigation will resume your route correctly.
Notes on navigation
• The location of your vehicle displayed on the screen
may temporarily differ from the actual location in the
following situations:
- When you are driving on a narrow Y-shaped or spiral
road
- When another road is located close to the current road
- When you are driving on a road with a lot of high
buildings nearby
- When you are driving on a road under construction or
a new road
- When your vehicle is transported by a car ferry or a
towing car
- When you are driving on a road on a steep mountain
or a road with a sharp curve
- When your vehicle enters a road after rotating on
a turn table of an underground parking lot or a
multistory parking lot
- When you start and stop repeatedly or drive slowly at
an intersection
- When you turn on your system just after charging or
replacing the discharged battery
- When you are driving in slippery conditions, such as in
heavy sand or snow
- When the tires have been replaced recently or when
studless tires or spare tires are used
- When improper-sized tires are used or the pressure of
each tire is different
- When the replacement tire is worn, especially studless
tires that have been used for more than two seasons
- When a roof carrier has been installed on your vehicle
- While a long distance route is being calculated on
a highway. In this circumstance, continued driving
will enable the system to conduct map matching or
use updated GPS information to provide the current
location information.
5-4

• The navigation guidance may be incorrect temporarily
depending on search conditions or your driving position:
- The navigation may instruct you to go straight when
you are driving on a straight road.
- The navigation guidance may stop while you are
driving an intersection or just after turning at an
intersection.
- The navigation may instruct you to take a U-turn at a
location where a U-turn is prohibited.
- The navigation may instruct you to take prohibited
roads, such as roads marked as no trespassing or
roads under construction.
- The navigation may instruct you to a distant location
from your destination when there is no road or where
only narrow roads to the destination exist.
- The navigation guidance may be incorrect when you
are off your route.
- The navigation estimate to your destination may
differ from the actual distance due to the difference
in the starting point of the road on a overpass or an
underpass.
- When you are driving at high speeds, route
recalculations may take longer.
Getting to know the navigation screen
You can use the following functions and information on the
navigation screen.
a
b
c
d
e
f
j
a Move to the Home screen.
b Change how the map is displayed.
• (North Up): North is always up.
• (Heading Up): The map rotates according to your
driving direction.
• (3D): A three-dimension effect is applied and the map
rotates according to your driving direction.
c Adjust the navigation sound volume.
d Zoom in.
e Set to fix the map scale or to set it to change automatically
according to driving conditions.
i
g h
k l m
5-5

f Zoom out.
g Information about this turn point
h Information about the next turn point
i Lane guidance
• Yellow: The recommended lane
• White: Lanes you can choose
• Gray: Lanes to avoid
j Display the quick menus you can use for navigation
guidance.
k View the distance to your destination and the estimated
arrival time. Touch to view detailed destination information.
l Stop the navigation guidance.
m Hide or display the split screen.
[ Viewing the split screen
The screen splits automatically when you need to take a turn or
change lane and displays detailed information.
• To hide or display the split screen, touch or .
On the split screen, you can view brief or detailed information
about each section of the route.
a
b
5-6

a Set to view additional information about highway exits or
rest areas on the split screen.
b Access information about POIs around the highway exit.
[ Changing the default map view settings
Adjusting the navigation sound
volume
You can adjust the sound volume of the navigation guidance
including GPS alert beeps.
You can change the default view mode of the map screen.
On the navigation screen, touch Menu > Map
Display and select a view mode or set to display
nearby buildings.
Û Note
To change the navigation settings other than the default map
view settings, touch Menu > Settings.
Touch on the navigation screen and touch or
or drag the adjustment bar to adjust the volume
level.
• To mute the voice guidance, touch . You can also set to
hear the voice guidance prior to the AV audio.
5-7

Û Note
You can set to use the [VOL] knob or the [VOL +/VOL -] lever to
adjust the navigation sound volume while the voice guidance
is playing. On the Home screen, touch All Menus > Setup
> Sound > Navigation Volume and select Use Map Screen
Volume Buttons or Volume Knob.
On the Home screen, touch All Menus > NAV
Menu to access the navigation menu.
• Alternatively, if your system has the [NAV] button on the
control panel, press the [NAV] button.
a
Canceling the navigation
To stop the navigation guidance and cancel the set
destination, touch Cancel Route > Yes.
• The destination mark at the bottom of the screen
disappears.
Finding a route with various
search methods
You can search for a location by various ways, such as entering
location information, selecting among categorized locations or
the recently selected locations in the navigation menu.
5-8
b
f
j
c
g
d
h
e
i

a Search for a location by entering various kinds of keywords,
such as a place name or an address.
for locations by keyword."
b Search for a location by entering an address. >See p.5-11
"Searching for locations by address."
c Select one of the destinations you entered previously. >See
p.5-16 "Selecting a location from previous destinations."
d If you are subscribed to the Blue Link service, search for a
location based on the online map database.
"Searching for locations via the online server."
e Search for a location by using the point of interest (POI)
category.
f Search for a gas station. >See p.5-13 "Searching for gas
stations."
g Search for a restaurant by type. >See p.5-14 "Searching for
restaurants."
h Search for a nearby emergency service. >See p.5-14
"Searching for emergency services."
i Select one of locations stored in your address book. >See
p.5-26 "Using the saved locations."
j Search for a location by entering coordinates. >See p.5-15
"Searching for locations by coordinates."
>See p.5-11 "Searching for locations by POI category."
>See p.5-9 "Searching
>See p.5-16
Searching for locations by keyword
You can find a location by entering various keywords, such as
a place name, an address, or a phone number and select a
location from the search results to set it as your destination.
On the navigation menu screen, touch Place or
1
Address.
5-9

Enter location information, such as a place
2
name, an address, or coordinates, and touch
OK.
• If there are any entries in your search history that match
your input, they will appear above the keyboard.
Select a location from the search result list.
3
• To filter the search results by region, touch Filter by City.
• To filter the search results by POI category, touch Filter
by Category.
View the location on the map and touch Start
4
Guidance.
• If the destination is active, touch Yes to change the
destination.
a b c d
a Select another route or access route-related options.
• Route Options: Set the route options and find
another route.
• Route Info.: View the detailed information about the
selected route.
• Edit Route: Edit the detailed path of the selected
route.
b Add a waypoint to your current route.
c Save the currently selected location to your address
book.
d Access the POI category list to view or search for
nearby POIs.
5-10

Searching for locations by address
On the navigation menu screen, touch Address.
1
Enter the address of your destination and touch
2
OK.
Select a location from the search result list.
3
View the location on the map and touch Start
4
Guidance.
• If the destination is active, touch Yes to change the
destination.
Searching for locations by POI
category
You can find a location by using the POI categories or names.
On the navigation menu screen, touch POI
1
Categories.
Select a POI category.
2
• To select one from the recent search list, touch History.
• To search for a POI by entering a POI category, touch
Search.
5-11

Select a sub-category by following the on-screen
3
instructions.
Select a location from the search result list.
4
• To filter the search results, select a filtering option from
the left side of the screen.
• To sort the search results, touch the option menu (^)
and select a sorting option.
View the location on the map and touch Start
5
Guidance.
• If the destination is active, touch Yes to change the
destination.
Û Note
To search for nearby points of interest during the navigation
guidance, touch Menu > POI > All POI Categories. You can
also select a category from the POI category list.
5-12

[ Displaying POIs on the map
You can set to display nearby POIs on the map.
On the navigation screen, touch Menu > POI and
touch the check boxes next to items to display on
the map.
• To edit the POI category list in the quick menu, touch Menu
> POI > Edit.
Searching for gas stations
On the navigation menu screen, touch Gas
1
Stations.
Select a location from the search result list.
2
• To filter the search results, select a filtering option from
the left side of the screen.
• To sort the search results, touch the option menu (^)
and select a sorting option.
View the location on the map and touch Start
3
Guidance.
• If the destination is active, touch Yes to change the
destination.
5-13

Searching for restaurants
Searching for emergency services
On the navigation menu screen, touch
1
Restaurants.
Select a location from the search result list.
2
• To filter the search results, select a filtering option from
the left side of the screen.
• To sort the search results, touch the option menu (^)
and select a sorting option.
View the location on the map and touch Start
3
Guidance.
• If the destination is active, touch Yes to change the
destination.
On the navigation menu screen, touch
1
Emergency.
Select an emergency service type.
2
• If applicable, use the location displayed at the bottom of
the screen when contacting an emergency service.
5-14

Select a location from the search result list.
3
View the location on the map and touch Start
4
Guidance.
• If the destination is active, touch Yes to change the
destination.
Searching for locations by coordinates
On the navigation menu screen, touch
1
Coordinates.
Enter the latitude and longitude of the location
2
you want and touch OK.
• You can enter coordinates in either the DMS (degrees,
minutes, seconds) format or the decimal degree format.
When you enter a decimal point or degree symbol, the
format will change automatically.
View the location on the map and touch Start
3
Guidance.
• If the destination is active, touch Yes to change the
destination.
5-15

Selecting a location from previous
destinations
You can select a location from the list of locations you have
previously entered.
View the location on the map and touch Start
3
Guidance.
• If the destination is active, touch Yes to change the
destination.
5-16
On the navigation menu screen, touch Previous
1
Destinations.
Select a location type and a location.
2
• To sort the search results, touch the option menu (^)
and select a sorting option.
• To delete the locations from a list, touch Delete Items.
You can select and delete locations, or delete all
locations at a time.
Searching for locations via the online
server
You can search for locations in the online map database. To use
this feature, you must subscribe to the Blue Link service.
On the navigation menu screen, touch Online
1
Search.
Enter a keyword in the input field and touch OK.
2

Select a location from the search result list.
3
View the location on the map and touch Start
4
Guidance.
• If the destination is active, touch Yes to change the
destination.
Using helpful navigation
options
Finding another route
You can change the route options to search for a route again.
On the navigation screen, touch Menu > Route
1
> Route Options.
Set the route options and touch Recalculate.
2
5-17

Touch Start Guidance.
3
Û Note
Depending on vehicle models or specifications, available
options may vary.
Making a detour
You can search for a detour from the current route.
On the navigation screen, touch Menu > Route
1
> Detour.
Select a detour by distance.
2
• The navigation system searches for a new route
according to the selected distance.
Select a new route and touch Start Guidance.
3
5-18

Avoiding specific roads
You can search for a new route that avoids specific roads, such
as congested roads and roads under construction.
On the Home screen, touch All Menus > NAV
1
Menu to access the navigation menu.
• Alternatively, if your system has the [NAV] button on the
control panel, press the [NAV] button.
Touch Route > Avoid Street.
2
Select the roads you want to avoid and touch
3
Done.
Select a new route and touch Start Guidance.
4
Û Note
When there is a nearby road under construction, a notification
pop-up window appears to ask you whether to avoid the
section. To avoid the section, touch Yes. The navigation system
will search for a new route.
5-19

Adding waypoints
You can add waypoints to the current route to your destination.
You can add up to two waypoints to your route.
[ Searching for and adding waypoints
You can search for a location and add it as a waypoint.
Search for a waypoint by various search
1
methods.
methods."
>See p.5-8 "Finding a route with various search
Touch Done.
3
Select a new route and touch Start Guidance.
4
5-20
View the location and information on the map
2
and touch Add Waypoint.
[ Editing your route
You can edit your route by adding waypoints or rearranging
the locations in the route.
On the navigation screen, touch Menu > Route
1
> Edit Route.

On the route editing screen, touch Add
2
Waypoint.
Select a search method and search for a location
3
to add it as a waypoint.
various search methods."
>See p.5-8 "Finding a route with
Edit the route, if necessary.
4
• To rearrange the locations, select a location and touch
or .
• To delete a waypoint, select the location you want and
touch
When editing your route is complete, touch
5
.
Done.
Select a new route and touch Start Guidance.
6
5-21

Viewing information
During navigation, you can view useful information, such as
traffic conditions.
[ Viewing traffic information
You can view real-time traffic information including any
ongoing road work or accidents.
On the navigation screen, touch Menu >
1
Traffic.
Select an item from the traffic information list to
2
view its details.
• To view traffic information along your current route or to
view all available traffic information, touch On Route.
• To select the types of traffic information you want to
view, touch Category.
View detailed traffic information.
3
5-22
a b

a View the previous or next traffic information.
b Reflect traffic information to your current route.
Û Note
Traffic support for border crossings and speed limits set for
individual roads may not be accurate. Use the information at
your discretion.
[ Viewing satellite information
You can view GPS satellite status and the coordinates of your
current location. Use this information if you need to know your
accurate location, such as in an emergency situation.
a Current status of satellite signal reception
• Receiving: The system is receiving satellite signals and
the current location is recognized.
• Searching: The system is searching for satellite signals.
b Information about your current location
Registering locations
You can register your current location or desired locations
to your address book and select them quickly when setting a
destination.
On the navigation screen, touch Menu > Settings
> Display > GPS Information.
a
b
Saving your current location
You can save your current location quickly.
5-23

On the navigation screen, touch Menu > Save.
1
Edit the location information, if necessary, and
2
touch Save.
Searching for and saving locations
You can search for a location and save it to your address book.
On the Home screen, touch All Menus > NAV
1
Menu to access the navigation menu.
• Alternatively, if your system has the [NAV] button on the
control panel, press the [NAV] button.
Touch Address Book > My Places.
2
5-24

Touch Add from the address book.
3
Touch Places and enter a keyword to search for
4
a location.
• You can use other search methods to find a location.
>See p.5-8 "Finding a route with various search methods."
View the location and information on the map
5
and touch Done.
Edit the information, if necessary, and touch
6
Save.
Saving your favorite locations
You can save your favorite locations, such as your home and
workplace, to use navigation guidance more quickly.
On the Home screen, touch All Menus > NAV
1
Menu to access the navigation menu.
• Alternatively, if your system has the [NAV] button on the
control panel, press the [NAV] button.
Touch a shortcut button with .
2
Touch Yes.
3
5-25

Touch Places and enter a keyword to search for
4
a location.
• You can use other search methods to find a location.
>See p.5-8 "Finding a route with various search methods."
View the location and information on the map
5
and touch Done.
Using the saved locations
On the Home screen, touch All Menus > NAV
1
Menu to access the navigation menu.
• Alternatively, if your system has the [NAV] button on the
control panel, press the [NAV] button.
Select a location from the address book.
3
View the location on the map and touch Start
4
Guidance.
• If the destination is active, touch Yes to change the
destination.
5-26
Touch Address Book > My Places.
2
Using your favorite locations
If you have set up a list of your favorite locations, you can select
one of them directly at the bottom of the screen to set it as
your destination.

On the Home screen, touch All Menus > NAV
1
Menu to access the navigation menu.
• Alternatively, if your system has the [NAV] button on the
control panel, press the [NAV] button.
Touch a shortcut button where a desired
2
location has been saved.
• If the destination is active, touch Yes to change the
destination.
Select a route and touch Start Guidance.
3
Editing saved locations
You can edit information, such as the name and phone
number, or change the attributes of the information.
On the Home screen, touch All Menus > NAV
1
Menu to access the navigation menu.
• Alternatively, if your system has the [NAV] button on the
control panel, press the [NAV] button.
Touch Address Book.
2
Select a group including the location
3
information you want to change on the left side
of the screen.
5-27

Touch Edit next to the location name from the
4
address book.
Edit the information and touch Save.
5
Deleting saved locations
You can delete saved location information.
On the Home screen, touch All Menus > NAV
1
Menu to access the navigation menu.
• Alternatively, if your system has the [NAV] button on the
control panel, press the [NAV] button.
Touch Address Book.
2
Select a group that includes the location you
3
want to delete and touch Delete Items.
Select the location you want to delete and touch
4
Delete > Yes.
Updating the map
Your vehicle comes with three years of complimentary map
updates to your navigation system. To find out if a new update
is available, please refer to the following options:
• Visit your Hyundai owners website (http://www.myhyundai.
com).
• Call or visit your local Hyundai dealership.
5-28

Changing navigation settings
You can customize various settings for navigation, such as map
view and guidance settings.
On the Home screen, touch All Menus > Setup >
Navigation.
Display • Unit: Select a unit of measure for the
distance display on the map.
• Show Previous Destinations after
navigation Start-Up: Set whether to
view previous destinations when the
navigation starts up.
• Automatic return after scrolling:
Set whether to return to your current
location automatically 10 seconds
after you move to another location by
swiping on the map.
• Save Previous Destinations: Set
whether to save your previous
destinations, searches, and starting
points automatically. If you activate
this option, the list of your previous
destinations will appear when you
access the map for the first time after
your system is turned on.
• Route Indicator Line: Select a color to
indicate your current route.
• Show Traffic Information: Set whether
to view traffic information on the map.
• GPS Information: View GPS satellite
status and the coordinates of your
current location.
Guidance
Import/Export
Default Reset your navigation settings to the
• Number of Guidance Prompts:
Set whether to hear more or fewer
voice guidance prompts before each
maneuver.
• Speed Limit: Set whether to display the
speed limit.
• Traffic-based Rerouting: Set to search
the route on a regular basis and to
accept guidance reflecting the latest
traffic conditions.
• Import Address Book from USB:
Import address book data from a USB
storage device.
• Export Address Book to USB: Export
your address book data to a USB
storage device.
default values.
5-29

Û Note
• For importing and exporting address book data, use only
USB storage devices formatted in FAT12/16/32 formats.
• If you import data that uses different coordinates, the
locations of the imported places may be altered.
END USER LICENSE
AGREEMENT
PLEASE READ THIS END USER LICENSE AGREEMENT (“EULA”)
CAREFULLY BEFORE USING THE NAVIGATION SYSTEM.
This is a license agreement between you and Hyundai MnSoft,
INC. including its affiliates (“COMPANY”) regarding a copy of the
COMPANY navigable map database together with associated
software, media and explanatory printed documentation
published by COMPANY (jointly the “Product”). The Product is
provided for your personal, internal use only and not for resale.
It is protected by copyright and is subject to the following terms
which are agreed to by you, on the one hand, and COMPANY
and its licensors (and their licensors and suppliers) (collectively,
“Licensors”) on the other hand.
By using the Product, you accept and agree to all terms and
conditions in this End User License Agreement (“EULA”). IF
YOU DO NOT AGREE TO THE TERMS OF THIS EULA, YOU
MUST PROMPTLY EXIT THE PRODUCT OPERATION PROGRAM
AND DO NOT USE OR ACCESS TO THE PRODUCT. YOU AGREE
THAT YOUR RIGHTS UNDER THIS EULA MAY BE TERMINATED
AUTOMATICALLY WITHOUT NOTICE IF YOU FAIL TO COMPLY
WITH ANY TERM(S) OF THIS EULA.
5-30

Terms and Conditions
Personal Use Only. You agree to use this Product together
with COMPANY’s authorized application for the solely personal,
non-commercial purposes for which you were licensed, and
not for service bureau, time-sharing or other similar purposes.
Accordingly, but subject to the restrictions set forth in the
following paragraphs, you agree not to otherwise reproduce,
copy, modify, decompile, disassemble, create any derivative
works of, or reverse engineer any portion of this Data, and
may not transfer or distribute it in any form, for any purpose,
except to the extent permitted by mandatory laws. You may not
assign this EULA or any of the rights or licenses granted under
this EULA, except when installed in the system for which it was
created.
Restrictions. Except where you have been specifically licensed
to do so by COMPANY, and without limiting the preceding
paragraph, you may not use the Product (i) with any products,
systems, or applications installed or otherwise connected
to or in communication with vehicles, capable of vehicle
navigation, positioning, dispatch, real time route guidance,
fleet management or similar applications; or (ii) with or in
communication with any positioning devices or any mobile or
wireless-connected electronic or computer devices, including
without limitation cellular phones, palmtop and handheld
computers, pagers, and personal digital assistants or PDAs.
COPYING OR USE OF THE PRODUCT EXCEPT AS PERMITTED
BY THIS EULA IS UNAUTHORIZED AND IS COPYRIGHT
INFRINGEMENT UNDER THE LAWS OF YOUR COUNTRY. IF
YOU COPY OR USE THE PRODUCT WITHOUT COMPANY’S
PERMISSION, EXCEPT AS PERMITTED BY THIS EULA, YOU
ARE VIOLATING THE LAW AND LIABLE TO COMPANY AND ITS
LICENSORS FOR DAMAGES, AND YOU MAY BE SUBJECT TO
CRIMINAL PENALTIES.
THE PRODUCT MAY INCLUDE ENFORCEMENT TECHNOLOGY
DESIGNED TO PREVENT (i) UNAUTHORIZED COPYING OF
THE PRODUCT ONTO PHYSICAL STORAGE MEDIA OR VIA
TRANSFER OVER THE INTERNET OR OTHER ELECTRONIC
COMMUNICATION MEANS AND/OR (ii) ILLEGAL USAGE OF
THE PRODUCT OTHER THAN BY A SPECIFICALLY AHTORIZED
DEVICE. YOU AGREE THAT COMPANY MAY USE THESE
MEASURES TO PROTECT COMPANY AND THE LICENSORS
AGAINST COPYRIGHT INFRINGEMENT.
Uploads. The Product may provide functionality through
which you are able to upload certain information about your
use of the Product (collectively, “Uploads”) to COMPANY’s
servers or receive other services from COMPANY (collectively,
the “Services”). If you use such functionality, you authorize
COMPANY to retain your Uploads on its servers. COMPANY will
have no obligation to provide any Services, may change the
form and nature of any Services at any time with or without
notice to you, will have no liability whatsoever to you for any
failure of the Product or Services to transmit your Uploads to
or from COMPANY’s servers, may cease providing any Services
at any time with or without notice to you, and will have no
obligation to retain your Uploads (or any other materials
5-31

you may provide to COMPANY) on its servers or return your
Uploads (or any other materials you may provide to COMPANY)
to you before deleting them from its servers.
Storage. The Product may provide functionality through which
you are able to store information (such as images) on the
device on which you are using the Product. COMPANY will have
no liability whatsoever to you or any third party for any failure
of the Product to store any such information on such device.
Personal Information. By using the Product, you agree to
the collection, retention and processing of your personal data
(including the location of your mobile device) by COMPANY and
to the storage and processing of such personal information on
computers located outside of the country in which you reside.
Even though COMPANY has taken steps intended to protect
your personal information from being intercepted, accessed,
used, or disclosed by unauthorized persons, COMPANY cannot
fully eliminate security risks associated with your personal
information and cannot guarantee that its systems will not
be breached. See [*] for additional information regarding
COMPANY’s use of your personal information.
WARNING. THE PRODUCT REFLECTS REALITY AS EXISTING
BEFORE YOU RECEIVED THE PRODUCT AND IT COMPRISES
DATA AND INFORMATION FROM GOVERNMENT OTHER
SOURCES. ACCORDINGLY, THE PRODUCT MAY CONTAIN
INACCURATE OR INCOMPLETE INFORMATION DUE TO THE
PASSAGE OF TIME, CHANGING CIRCUMSTANCES, SOURCES
USED AND THE NATURE OF COLLECTING COMPREHENSIVE
GEOGRAPHIC PRODUCT, ANY OF WHICH MAY LEAD TO
INCORRECT RESULTS. THE PRODUCT AND SERVICES MAY
NOT TO BE USED FOR SAFETY OF LIFE APPLICATIONS, OR
5-32
FOR ANY OTHER APPLICATION IN WHICH THE ACCURACY OR
RELIABILITY OF THE PRODUCT OR SERVICES COULD CREATE A
SITUATION WHERE PERSONAL INJURY OR DEATH MAY OCCUR.
DO NOT ATTEMPT TO CONFIGURE THE PRODUCT OR INPUT
INFORMATION WHILE DRIVING. FAILURE TO PAY FULL
ATTENTION TO THE OPERATION OF YOUR VEHICLE COULD
RESULT IN DEATH, SERIOUS INJURY, OR PROPERTY DAMAGE.
BY USING THE PRODUCT, YOU ASSUME ALL RESPONSIBILITY
AND RISK.
Disclaimer of Warranty. The Product is provided to you “as
is,” and you agree to use it at your own risk. SUBJECT TO THE
APPLICABLE LAWS, COMPANY AND THE LICENSORS MAKE
NO GUARANTEES, REPRESENTATIONS OR WARRANTIES
OF ANY KIND, EXPRESS OR IMPLIED, ARISING BY LAW OR
OTHERWISE, INCLUDING BUT NOT LIMITED TO, CONTENT,
QUALITY, ACCURACY, COMPLETENESS, EFFECTIVENESS,
RELIABILITY, PERFORMANCE, MERCHANTABILITY, FITNESS FOR
A PARTICULAR PURPOSE, NON-INFRINGEMENT, USEFULNESS,
USE OR RESULTS TO BE OBTAINED FROM THE PRODUCT, OR
THAT THE PRODUCT OR SERVER WILL BE UNINTERRUPTED
OR ERROR-FREE, OR THAT ERRORS IN THE PRODUCT OR
NONCONFORMITY TO ITS DOCUMENTATION CAN OR WILL
BE CORRECTED. YOU ACKNOWLEDGE THAT THE PROVISIONS
OF THIS SECTION ARE A MATERIAL INDUCEMENT AND
CONSIDERATION TO COMPANY AND THE LICENSORS TO
GRANT THE LICENSE CONTAINED IN THIS EULA AND TO
PROVIDE YOU WITH ACCESS TO THE SERVICES.

Limitation of Liability: TO THE MAXIMUM EXTENT
PERMITTED UNDER THE APPLICABLE LAWS, COMPANY AND
THE LICENSORS SHALL NOT BE LIABLE TO YOU: IN RESPECT
OF ANY CLAIM, DEMAND OR ACTION, IRRESPECTIVE OF THE
NATURE OF THE CAUSE OF THE CLAIM, DEMAND OR ACTION
ALLEGING ANY LOSS, INJURY OR DAMAGES, DIRECT OR
INDIRECT, INCURRED BY YOU OR ANY THIRD PARTY WHICH
MAY ARISE IN CONNECTION WITH OR RESULT FROM THE USE
OR POSSESSION OF THE PRODUCT; OR FOR ANY LOSS OF
DATA, PROFIT, REVENUE, CONTRACTS OR SAVINGS, OR OTHER
DIRECT, INDIRECT, INCIDENTAL, SPECIAL OR CONSEQUENTIAL
DAMAGES ARISING OUT OF YOUR USE OF OR INABILITY TO USE
THE PRODUCT, ANY DEFECT IN THE PRODUCT, OR THE BREACH
OF THESE TERMS OR CONDITIONS, WHETHER IN AN ACTION
IN CONTRACT OR TORT OR BASED ON A WARRANTY, EVEN IF
COMPANY OR THE LICENSORS HAVE BEEN ADVISED OF THE
POSSIBILITY OF SUCH DAMAGES AND NOTWITHSTANDING THE
FAILURE OF ANY LIMITED REMEDY PROVIDED HEREIN.
Exclusions. Some jurisdictions do not allow certain warranty
exclusions or the limitation or exclusion of liability, so to that
extent the above exclusion may not apply to you. To the extent
that COMPANY may not, as a matter of applicable law, disclaim
any implied warranty or limit its liabilities, the scope and
duration of such warranty and the extent of COMPANY’s liability
shall be the minimum permitted under such applicable law. The
disclaimer of warranty and limitation of liability set forth in this
EULA does not affect or prejudice your statutory rights where
you have acquired the Product otherwise than in the course of
business.
Third-Party Copyright Notices. The third-party sourced data
has been incorporated into or made a part of the Product and
is being sublicensed to you subject to the terms and conditions
of this EULA. In this regard, you shall not remove or tamper
with any intellectual property rights notice attached or used in
relation to data supplied by the Licensors.
Entire Agreement. This EULA is the entire agreement between
COMPANY (and the Licensors) and you pertaining to the
subject matter hereof, and supersedes in their entirety any
and all previous written or oral communications or documents
(including, if you are obtaining an update, any agreement that
may have been included with an earlier version of the Product)
with respect to such subject matter.
Governing Law. This EULA shall be governed by the laws of
the jurisdiction in which you reside at the date of acquisition
of the Product. Should you at that moment reside outside the
European Union or Switzerland, the law of the jurisdiction
within the European Union or Switzerland where you acquired
the Product shall apply. In all other cases, or if the jurisdiction
where you acquired the Product cannot be defined, the
laws of the Republic of Korea shall apply. This EULA will not
be governed by the U.N. Convention on Contracts for the
International Sale of Goods. The courts competent at your
place of residence at the time you acquired the Product shall
have jurisdiction over any dispute arising out of, or relating
to this EULA, without prejudice to COMPANY’s right to bring
claims at your then current place of residence.
5-33

Export Control. You agree not to export or re-export from
anywhere any part of the Product in any form except in
compliance with applicable export laws, rules and regulations,
including but not limited to the laws, rules and regulations
administered by the Office of Foreign Assets Control of the
U.S. Department of Commerce and the Bureau of Industry and
Security of the U.S. Department of Commerce.
Miscellaneous. If any provision of this EULA is found to be
invalid or unenforceable, it will be enforced to the extent
permissible and the remainder of this EULA will remain in full
force and effect. Failure by COMPANY to prosecute any right
with respect to a default hereunder will not constitute a waiver
by COMPANY of the right to enforce rights with respect to the
same or any other breach. No refunds or replacements will be
permitted on damaged Product.
U.S. Government End Users. If the Product is being acquired
by or on behalf of the United States Government or any other
entity seeking or applying rights similar to those customarily
claimed by the United States Government, this Product and
related documentation are “Commercial Items” as that term
is defined at 48 C.F.R. (“FAR”) 2.101. This Product and related
documentation are licensed to the United States Government
end users (a) only as “Commercial Items” and (b) with only
those rights as are granted to all other end users in accordance
with this EULA, and each copy of Product delivered or otherwise
furnished shall be marked and embedded as appropriate
with the following “Notice of Use,” and shall be treated in
accordance with such Notice:
NOTICE OF USE
CONTRACTOR (MANUFACTURER/ SUPPLIER) NAME: Hyundai
MnSoft, Inc.
CONTRACTOR (MANUFACTURER/SUPPLIER) ADDRESS: 74
Wonhyo-ro, Yongsan-gu, Seoul 140-711, Republic of Korea
This Product and related documentation are commercial items
as defined in FAR 2.101 and is subject to this EULA under
which this Product is provided.
© 2013 Hyundai MnSoft. All rights reserved
If the Contracting Officer, federal government agency, or any
federal official refuses to use the legend provided herein, the
Contracting Officer, federal government agency, or any federal
official must notify COMPANY prior to seeking additional or
alternative rights in the Product.
End-User Terms Required by HERE. The Product utilizes map
data that COMPANY licenses from HERE and the following
copyright notices apply to such map data (the “HERE Data”): ©
2013 HERE. All rights reserved.
The HERE Data for areas of Canada includes information
taken with permission from Canadian authorities, including:
© Her Majesty the Queen in Right of Canada, © Queen’s
Printer for Ontario, © Canada Post Corporation, GeoBase ®, ©
Department of Natural Resources Canada. All rights reserved.
HERE holds a non-exclusive license from the United States
Postal Service® to publish and sell ZIP+4® information.
5-34

©United States Postal Service® 2010. Prices are not
established, controlled or approved by the United States Postal
Service®.
The following trademarks and registrations are owned by the
USPS: United States Postal Service, USPS, and ZIP+4.
The HERE Data for Mexico includes certain data from Instituto
Nacional de Estadística y Geografía.
Austria: © Bundesamt für Eich- und Vermessungswesen
Croatia, Cyprus, Estonia, Latvia, Lithuania, Moldova, Poland,
Slovenia and/or Ukraine: © EuroGeographics
France: source: © IGN 2009 – BD TOPO ®
Germany: Die Grundlagendaten wurden mit Genehmigung der
zustaendigen Behoerden entnommen
Great Britain: Contains Ordinance Survey data © Crown
copyright and database right 2010, and Royal Mail data © Royal
Mail copyright and database right 2010.
Greece: Copyright Geomatics Ltd.
Italy: La Banca Dati Italiana è stata prodotta usando quale
riferimento anche cartografia numerica ed al tratto prodotta e
fornita dalla Regione Toscana.
Norway: Copyright © 2000; Norwegian Mapping Authority
Portugal: Source: IgeoE – Portugal
Spain: Información geográfica propiedad del CNIG
Sweden: Based upon electronic data Ó National Land Survey
Sweden
Switzerland: Topografische Grundlage: Ó Bundesamt für
Landestopographie
United Kingdom: Contains public sector information licensed
under the Open Government Licence v1.0 (see for the license
http://www.nationalarchives.gov.uk/doc/open-governmentlicence/) and is adapted from data from the office for National
Statistics licensed under the Open Government Licence v.1.0.
Israel: © Survey of Israel data source
Jordan: © Royal Jordanian Geographic Centre. The foregoing
notice requirement for Jordan Data is a material term of the
Agreement. If Client or any of its permitted sublicensees (if
any) fail to meet such requirement, HERE shall have the right to
terminate Client’s license with respect to the Jordan Data.
Mozambique: Certain Data for Mozambique provided by
Cenacarta © 20XX by Cenacarta
Réunion: source: © IGN 2009 - BD TOPO ®
End-User Terms Required by ZENRIN. The Product utilizes
map data that COMPANY licenses from ZENRIN and the
following copyright notices apply to such map data (the
“ZENRIN Data”):
Europe: Junction View Data provided by ZENRIN CO., LTD.
Copyright © 20XX, All Rights Reserved.
Europe: Junction View Data and Exit View Data provided by
ZENRIN CO., LTD. Copyright © 20XX, All Rights Reserved.
North America: Junction View Data provided by ZENRIN USA,
INC. Copyright © 20XX, All Rights Reserved; Junction View Data
fourni par ZENRIN USA, INC. Copyright © 20XX. Tous droits
réservés; Las imágenes de las rutas alternas son proveídas
por ZENRIN USA, INC. Copyright © 20XX. Todos los derechos
reservados.
© 2013 Hyundai MnSoft. All rights reserved.
5-35

Copyright for Brand Icon
The marks of companies displayed by this product to indicate
business locations are the marks of their respective owners.
The use of such marks in this product does not imply any
sponsorship, approval, or endorsement by such companies of
this product.
Copyright for Junction View
Junction View Data provided by ZENRIN USA, INC. Copyright(C)
20XX, All rights Reserved.
5-36

Bluetooth
Connecting Bluetooth devices
Using a Bluetooth audio device
Using a Bluetooth phone
6

Connecting Bluetooth devices
Pairing devices with your system
Bluetooth is a short-range wireless networking technology. Via
Bluetooth, you can connect nearby mobile devices wirelessly to
send and receive data between connected devices. This enables
you to use your devices effectively.
To use Bluetooth, you must first connect a Bluetooth-enabled
device to your system, such as a mobile phone or an MP3
player. Ensure that the device you want to connect supports
Bluetooth.
Ü Warning
Park your vehicle in a safe location before connecting Bluetooth
devices. Distracted driving can cause a traffic accident and lead
to personal injury or death.
Û Note
• On your system, you can use only Bluetooth Handsfree and
Audio features. Connect a mobile device that supports the
Bluetooth Handsfree or Audio feature.
• For more information on Bluetooth-enabled devices and
their functional compatibility, visit the HYUNDAI Motor
America website (https://www.hyundaiusa.com/bluetooth).
For Bluetooth connections, first pair your device with your
system to add it to the system's list of Bluetooth devices. You
can register up to five devices.
On the Home screen, touch All Menus > Setup
1
> Bluetooth > Bluetooth Connection > Add
New.
• If you are pairing a device with your system for the first
time, you can also press the [
wheel. Alternatively, on the Home screen, touch All
Menus > Phone.
On the Bluetooth device you want to connect,
2
] button on the steering
activate Bluetooth, search for your vehicle's
system, and then select it.
• Check the system's Bluetooth name, which is displayed
in the new registration pop-up window on the system
screen.
6-2

Ensure that the Bluetooth passkeys displayed
3
on the Bluetooth device screen and the system
screen are the same and confirm the connection
from the device.
Choose whether or not to connect the Bluetooth
4
device to your system prior to other devices.
• If you grant priority to the Bluetooth device, it will be
connected automatically to the system when you turn on
the system.
If you are connecting a mobile phone, permit
5
the system to access and download your data
from the device.
• Downloading data is only for Bluetooth call functions.
Permission is not required if you are connecting an
audio device.
Û Note
• It may take a while for the system to connect with the
device after you permit the system to access the device.
When a connection is made, the Bluetooth status icon
appears at the top of the screen.
• You can change the permission settings via the mobile
phone's Bluetooth settings menu. For more information,
refer to your mobile phone's user guide.
• To register a new device, repeat steps 1 to 5.
• When a device is connected to the system via Bluetooth,
you cannot pair another device.
• If you do not want the system to connect with the device
automatically, deactivate Bluetooth on your device.
6-3

Connecting a paired device
To use a Bluetooth device on your system, connect the paired
device to the system. Your system can connect with only one
device at a time.
On the Home screen, touch All Menus > Setup
1
> Bluetooth > Bluetooth Connection.
Touch Connect next to the device you want to
2
connect.
• If another device is already connected to your system,
disconnect it. Touch Disconnect next to the device.
a
b
c
d e
a View Bluetooth help.
b Connect the device.
c Disconnect the device.
d Pair a new device with your system.
e Delete paired devices. Downloaded data from devices
will also be deleted.
Û Note
• If a connection ends because a device is out of the
connection range or a device error occurs, the connection
will be restored automatically when the device enters the
connection range or when the error is cleared.
• If a connection is unstable due to a communication
error, reset Bluetooth by touching All Menus > Setup >
Bluetooth > Default Factory Settings, and then re-connect
the device.
6-4

Disconnecting a device
Deleting paired devices
If you want to stop using a Bluetooth device or connect another
device, disconnect your currently connected device.
On the Home screen, touch All Menus > Setup
1
> Bluetooth > Bluetooth Connection.
Touch Disconnect next to the device.
2
Touch Yes.
3
If you no longer want a Bluetooth device paired or if you want
to connect a new device when the Bluetooth device list is full,
delete paired devices.
On the Home screen, touch All Menus > Setup
1
> Bluetooth > Bluetooth Connection > Delete
Devices.
Select the devices you want to delete and touch
2
Delete.
• To delete all paired devices, touch Mark All > Delete.
Touch Yes.
3
6-5

Using a Bluetooth audio device
You can listen to music stored in the connected Bluetooth
audio device via your vehicle's speakers.
On the control panel, press the [MEDIA] button.
• If you have multiple media storage devices, press the
[MEDIA] button again and touch Bluetooth Audio from the
media selection window.
a b
c
d e
f g h i j
a Display the options list.
• Connections: Customize the Bluetooth connection
settings.
• Sound Settings: Customize the system sound settings.
>See p.9-2 "Setting the system sound."
b Move to the previous screen.
c Information about the song currently playing
d Repeat play mode
e Shuffle play mode
f Restart the current playback. Touch twice to play the
previous file. You can also press the [
the control panel or use the [
wheel.
g Pause or resume playback.
h Play the next file. You can also press the [TRACK ]
button on the control panel or use the [
steering wheel.
i Change the repeat play mode.
j Activate or deactivate the shuffle play mode.
>See p.6-2 "Connecting Bluetooth devices."
SEEK] button on
/ ] lever on the steering
/ ] lever on the
6-6
 Loading...