


G3EUH03
(영어 | 미국) 표준5세대
DIGITAL CAR AVN SYSTEM | User’s Manual

Thank you for purchasing this multimedia
system.
This user's manual explains how to use
the HYUNDAI Motor multimedia system.
Before using the product, read the contents of this user's manual carefully and
use this product safely.
•
The screens shown in this manual may
differ with the actual screens of the
product.
•
The design and specification of this
product may change without prior notification for product improvement.
•
When transferring the vehicle to another
individual, include this user's manual so
that the next driver can continue its use.
All Map Database cannot be copied without permission.
Important Notice: This is protected by U.S. copyright laws. All rights not expressly granted are reserved.
You may not otherwise reproduce, modify and distribute the content without HYUNDAI MnSoft, Inc’s prior written consent.
Precaution for safe usage
•
Driving while distracted can result in a
loss of vehicle control, that may lead to
an accident, severe personal injury, and
death. The driver’s primary responsibility is in the safe and legal operation of a
vehicle, and use of any handheld devices,
other equipment, or vehicle systems which
take the driver’s eyes, attention and focus
away from the safe operation of a vehicle
or which are not permissible by law should
never be used during operation of the
vehicle.
•
Do not operate the
while driving.
•
Do not disassemble, assemble, or modify
the
multimedia system
•
Do not watch the screen for prolonged
periods of time while driving.
•
Set the volume to a level which allows the
driver to be aware of external conditions.
multimedia system
.
•
Do not operate the
multimedia system
prolonged periods of time with the vehicle
ignition in ACC. Such operations may lead
to battery discharge.
•
Be cautious not to spill water or introduce
foreign objects into the device.
•
Do not cause severe shock to the device.
Direct pressure onto the front side of the
monitor may cause damage to the LCD or
touch panel.
•
In case of product malfunction, please
contact your place of purchase or service
center.
•
When cleaning the touch screen, make
sure to turn off the device and use a dry
and smooth cloth. Never use tough materials, chemical cloths, or solvents (alcohol,
ammonia, benzene, thinners, etc.) as such
materials may damage the device panel or
cause color and quality deterioration.
for
•
SiriusXM service requires a subscription, sold separately, after 3-month trial
included with vehicle purchase. If you
decide to continue your SiriusXM service at the end of your trial subscription,
the plan you choose will automatically
renew and bill at then-current rates until
you call Sirius XM at 1-866-635-2349 to
cancel. See our Customer Agreement
for complete terms at www.siriusxm.
com. Programming subject to change.
Sirius satellite service is available only
to those at least 18 and older in the 48
contiguous USA, D.C., and PR (with
coverage limitations). Traffic information not available in all markets. See
siriusxm.com/traffic for details. Sirius,
XM and all related marks and logos are
trademarks of Sirius XM Radio Inc.
WARNING
• Driving while distracted can result in a
loss of vehicle control that may lead to
an accident, severe personal injury, and
death. The driver’s primary responsibility is in the safe and legal operation
of a vehicle, and use of any handheld
devices, other equipment, or vehicle
systems which take the driver’s eyes,
attention and focus away from the safe
operation of a vehicle or which are not
permissible by law should never be used
during operation of the vehicle.

Read the following safety precautions for your
safety
Notations used within this User’s Manual
Before using the product, read the contents of this user’s manual
carefully and use this product safely.
※
The design and specifications of this product may change without prior
notification for product and service improvement.
The actual features in the vehicle may differ from the illustrations.
For more accurate information about the vehicle, please refer to the
catalogue.
※
This Audio system contains open source software, including without
limitation, software distributed and/or modified under the GNU General
Public license, Version 2, June 1991, and the GNU lesser General
Public License, Version 2.1, February 1999.
For additional information and to obtain related materials including
without limitation, the previous referred to licenses and software, please
contact us at MOBIS_OSSrequest@mobis.co.kr
WARNING
• Failure to observe the instructions within this category could result in
death or serious injury or damage to the vehicle.
CAUTION
• Information on matters that could potentially lead to injury or vehicle
damage/malfunction Information that could lead to higher user safety
Information
• Information and tips that provide additional user convenience in using the
product
NOTICE
• Information on specific features that facilitate proper product use and
functional understanding
• Information on terminology used within this manual

HYUNDAI VEHICLE OWNER PRIVACY POLICY
Your Hyundai vehicle may be equipped with technologies and services that use information collected,
generated, recorded or stored by the vehicle. Hyundai has created a Vehicle Owner Privacy Policy to explain
how these technologies and services collect use and share this information.
You may read our Vehicle Owner Privacy Policy on the Hyundaiusa.com website at:
https://www.hyundaiusa.com/owner-privacy-policy.aspx
If you would like to receive a hard copy of our Vehicle Owner Privacy Policy, please contact our Customer
Connect Center at:
Hyundai Customer Care
P.O. Box 20850
Fountain Valley, CA 92728
800-633-5151
consumeraffairs@hmausa.com
’
Hyundai
between the hours of 5:00 AM and 7:00 PM PST and Saturday and Sunday between 6:30 AM and 3:00 PM PST
(English).
For Customer Connect Center assistance in Spanish or Korean, representatives are available Monday
through Friday between 6:30 AM and 3:00 PM PST.
s Customer Connect Center representatives are available Monday through Friday,

Table of Contents
1. Basic
Warnings and Cautions .........................1-2
Key Product Features
Component Names and Functions
Head Unit ……………………………… 1-5
Steering Wheel Controls ……………… 1-7
Starting the System for
the First Time ..........................................1-9
Turning the System On/Off …………… 1-9
System Reset ………………………… 1-9
Battery Warning Message ……………1-10
Restrictions on Features for Safety
Measures ………………………………1-10
Home Screen ………………………… 1-11
On-Screen Touch Controls ……………1-13
...........................1-4
...... 1-5
2. Radio/Media
FM/AM ..................................................... 2-2
HD Radio™ Technology
HD Radio™ …………………………… 2-5
SiriusXM™ ............................................... 2-6
Selecting through Channel/
Category List ………………………… 2-8
Direct Tune …………………………… 2-8
Viewing Menu ………………………… 2-8
USB ..........................................................2-11
Before Playing a USB MP3 ……………2-11
Supported USB MP3 music
specifications ………………………… 2-13
USB Music ……………………………2-14
iPod .........................................................2-17
Using iPod Devices …………………… 2-17
iPod
…………………………………… 2-21
AUX .........................................................2-24
Connecting an External Device ………2-24
Bluetooth® Audio ..................................2-25
Bluetooth Connection Settings ……… 2-26
........................ 2-4
3. Bluetooth
Before Using the Bluetooth®
Handsfree ................................................3-2
What is
Bluetooth®
Technology? …………………………… 3-2
Precautions for Safe Driving ………… 3-2
CAUTIONS upon Connecting Bluetooth®
Phone ………………………………… 3-3
Bluetooth Connection ............................ 3-4
Pairing a New Device ………………… 3-4
Connecting Bluetooth Devices ……… 3-4
Disconnecting Bluetooth Devices …… 3-5
Deleting Bluetooth Devices …………… 3-5
Bluetooth Phone ....................................3-6
Phone Status Icons …………………… 3-6
Dial
…………………………………… 3-7
Accept/Reject Call …………………… 3-7
Using the Menu During a Phone Call … 3-8
Call History …………………………… 3-9
Contacts
Favorites
……………………………… 3-10
………………………………3-11
Wireless
00
Table of Contents I 3

4. Blue Link® Control
Rear View Mirror Switch ......................4-2
Blue Link Voice Local Search
What is Blue Link Voice Local Search?
Starting Blue Link Voice Local Search
Auto Crash Notification ……………… 4-4
SOS
…………………………………… 4-4
Stolen Vehicle Recovery ……………… 4-4
Before Use ...............................................4-5
What Is Blue Link? …………………… 4-5
What Is Telematics? ………………… 4-5
About Transmission and Reception
of Radio Waves ……………………… 4-5
Getting Started with Blue Link ............4-6
Connecting with the Blue Link Center 4-6
Driving Info …………………………… 4-7
Send to Car with Google ……………… 4-7
Vehicle Diagnostics …………………… 4-8
Blue Link Settings …………………… 4-8
..............4-3
… 4-3
… 4-3
5. Navigation
Basic Features ........................................5-2
Operating Navigation Screen ………… 5-2
Places
………………………………… 5-3
Changing Map View ………………… 5-3
Navigation Volume …………………… 5-3
Zoom In/Zoom Out …………………… 5-4
Map Scale …………………………… 5-4
Quick Menu .............................................5-5
Route ………………………………… 5-5
Edit Route …………………………… 5-6
Map Display ………………………… 5-6
Nearby POIs ………………………… 5-6
Traffic
………………………………… 5-9
Save
…………………………………… 5-12
Search .....................................................5-13
Places ………………………………… 5-13
Address
……………………………… 5-14
Previous Destinations ………………… 5-15
Local Search ………………………… 5-16
POI Categories ………………………5-17
Gas Stations ………………………… 5-18
Restaurants
Emergency
Address Book ………………………… 5-19
Coordinates
Favorite places ………………………… 5-20
Route Setting …………………………5-22
Route Guidance ……………………… 5-24
Route .......................................................5-26
Canceling Route ………………………5-26
Route Options …………………………5-26
Editing Route ………………………… 5-26
Display Route Information ……………5-27
Route Overview ………………………5-28
Avoid Street …………………………… 5-29
Navigation Settings ..............................5-29
Display …………………………………5-29
Guidance
Import/ Export ………………………… 5-31
Default
Troubleshooting .................................... 5-32
……………………………5-18
…………………………… 5-18
……………………………5-20
………………………………5-30
…………………………………5-31
4 I Table of Contents

6. Voice Recognition
What is Voice Recognition? ................. 6-2
Precautions Required for Successful
Voice Recognition
Starting/Ending and Setting Voice
Recognition
Starting Voice Recognition …………… 6-3
Ending Voice Recognition …………… 6-3
Combining Voice Recognition with
On-Screen Commands ……………… 6-3
Extending the Listening Time ………… 6-4
Skipping Prompt Messages ………… 6-5
Adjusting Voice Recognition Volume … 6-5
Voice Recognition Screen Overview .. 6-6
Help Display …………………………… 6-6
Instructions for Using Voice Recognition 6-7
Voice Commands ....................................6-8
Types of Commands ………………… 6-8
Call Commands ……………………… 6-8
Navigation Commands ……………… 6-9
Radio Commands ……………………6-11
Media Commands …………………… 6-12
..................................6-2
..............................................6-3
Other Commands List
(Commands used in List/Help) ……… 6-14
“Find <Category>” List ………………… 6-15
Siri Eyes Free ........................................6-21
How to start Siri ……………………… 6-21
How to use Siri …………………………6-21
7. Data Services
HD Radio™ Data .....................................7-2
About HD Radio™ Data Services …… 7-2
Accessing HD Radio™ Data ………… 7-2
HD Radio Weather Information Mode 7-2
HD Radio™ Doppler Radar ………… 7-3
SiriusXM™ Data .....................................7-4
About SiriusXM™ Data Service ……… 7-4
Accessing SiriusXM™ Data ………… 7-4
SiriusXM™ Weather Announcement … 7-4
SiriusXM™ Fuel Price Information …… 7-5
SiriusXM™ Stock Information ………… 7-7
SiriusXM™ Sports Information ……… 7-8
SiriusXM™ Movie Information ……… 7-9
8. Other Features
Camera ...................................................... 8-2
Steering-linked camera ……………… 8-2
9. Setup
Setup ......................................................... 9-2
Navigation Settings
Sound Settings ........................................ 9-2
Display Settings
Bluetooth Settings
Bluetooth Connection Settings ……… 9-4
Auto Connection Priority ……………… 9-5
Bluetooth System Information………… 9-5
Blue Link Settings ..................................9-5
Service Activation …………………… 9-6
Modem Information …………………… 9-6
Phone projection Settings .................... 9-6
Custom Button Settings
Voice Recognition Settings
Date/Time Settings
................................ 9-2
...................................... 9-3
.................................9-3
........................9-7
..................9-7
................................ 9-7
00
Table of Contents I 5

Language Settings .................................9-8
Keyboard Settings ..................................9-8
Screen Saver Settings
Advanced Settings
System Info
............................................9-10
........................... 9-9
.................................9-9
System Update ……………………… 9-10
10. Appendix
Product Specification ..........................10-2
Troubleshooting
.........................................................10-7
FAQ
About Pairing Mobile Phones …………10-7
About Making/Answering Phone Calls 10-8
About
Bluetooth
Head Unit Use Environment …………10-8
....................................10-4
®
Wireless Technology/
6 I Table of Contents

CAUTIONS Upon Using SD Cards
Ejecting and Inserting SD Cards
•
•
Ejecting and inserting SD cards while the multimedia system is operating may result in
SD Card or System errors. To eject or insert the SD card, first turn off the multimedia
system and the vehicle ignition.
•
Eject/insert SD cards only to update the multimedia system with a new version.
Usage of SD Cards
•
•
The SD Card is formatted to include only Map and new system update files.
•
The SD Card cannot be used to save and play Music.
•
Do not add, delete, or format files within the SD Card.

®
iPod
iPod® is a registered trademark of Apple Inc.
Bluetooth®
The
Bluetooth
Wireless Technology
®
word mark and logos are registered trademarks owned
by Bluetooth SIG, Inc. and any use of such marks by HYUNDAI is under
license. Other trademarks and trade names are those of their respective
owners.
®
A
Bluetooth
Bluetooth
Wireless Technology enabled cell phone is required to use
®
Wireless Technology.
Bluetooth
®
Wireless Technology phone
compatibility can be checked by visiting https://www.hyundaiusa.com/
bluetooth.
HD Radio™ Technology
HD Radio Technology manufactured under license from iBiquity Digital
Corporation. U.S. and Foreign Patents.
For patents see http://patents.dts.com/. HD Radio and the HD, HD Radio,
and “ARC” logos are registered trademarks or trademarks of iBiquity
Digital Corporation in the United States and/or other countries.

part.1
Component Names and Functions
Starting the System for the First Time
Basic
Warnings and Cautions
Key Product Features

Basic
Safety Warnings
• Even when receiving route guidance
from the Navigation system, please
abide by actual traffic and road regulations. Following only the Navigation
route guidance may lead to violations of
actual traffic and road regulations and
lead to traffic accidents.
• Do not stare at the screen while driv-
ing. Staring at the screen for prolonged
periods of time could lead to traffic accidents.
• Do not operate the Navigation system
while driving, such as entering POIs or
conducting route searches. Such acts
could lead to accidents, fire, or electric
shock. Park the vehicle before operating
the device.
• Do not disassemble, assemble, or mod-
ify the Multimedia system. Such acts
could result in accidents, fire, or electric
shock.
• Heed caution not to spill water or introduce foreign objects into the device.
Such acts could lead to smoke, fire, or
product malfunction.
• If you use phone related functions while
driving, you will find it difficult to concentrate on operating the vehicle and the
current traffic conditions, so the possibility of an accident may increase. Please
use phone related functions only when
parked.
• Please refrain from use if the screen
is blank or no sound can be heard as
these signs may indicate product malfunction. Continued use in such conditions could lead to accidents (fires,
electric shock) or product malfunctions.
• Do not touch the antenna during thunder or lightening as such acts may lead
to lightning induced electric shock.
• Do not stop or park in parking-restricted
areas to operate the product. Such acts
could lead to traffic accidents.
• For most Audio and multimedia modes,
the display will not operate when the
vehicle is in motion. For your safety, first
park the vehicle to watch or view the
screen.(The screen will only operate
when the parking brake is ON for manual transmission vehicles and when the
parking brake is ON or the gearshift is in
the P (PARK) position for automatic.)
• Some functions other than the one
mentioned above cannot be used while
driving. These functions operate only
when the vehicle is parked.
1-2 I Basic

Safety Cautions
Pay attention to traffic conditions while
driving.
• In some instances, the navigation may
provide guidance through restricted
areas.
• Operating the device while driving could
lead to accidents due to a lack of attention to external surroundings. First park
the vehicle before operating the device.
In addition, the touch screen may not
work for some functions when the vehicle is in motion. The touch screen feature will be supported once the vehicle
has stopped.
• Adjust the volume to levels that allow
the driver to hear sounds from outside
of the vehicle. Driving in a state where
external sounds cannot be heard may
lead to accidents.
• Pay attention to the volume setting when
turning the device on. A sudden output
of extreme volume upon turning the
device on could lead to hearing impairment. (Adjust the volume to a suitable
levels before turning off the device.)
• Turn on the car ignition before using this
device. Do not operate the Multimedia
system for long periods of time with the
ignition turned off as such operations
may lead to battery discharge.
• Upon using the Multimedia system
for more than 10 minutes with the car
engine turned off, the following warning
will be displayed. After 10 minutes, the
warning will be displayed for 5 seconds
every 1 minute.
• Do not subject the device to severe
shock or impact. Direct pressure onto
the front side of the monitor may cause
damage to the LCD or touch screen.
• When cleaning the device, make sure
to turn off the device and use a dry and
smooth cloth. Never use tough materials, chemical cloths, or solvents(alcohol,
benzene, thinners, etc.) as such materials may damage the device panel or
cause color/quality deterioration. When
experiencing product concerns, inquire
with your place of purchase or service
maintenance center.
• Prevent caustic solutions such as perfume and cosmetic oil from contacting
the dashboard because they may cause
damage or discoloration.
01
Warnings and Cautions I 1-3

Key Product Features
This device is a Multimedia system equipped with a multifunctional
player that supports Radio (FM, AM), HD Radio™, SiriusXM™,
USB, iPod, AUX and Bluetooth Audio features. The WIDE VGA
LCD provides a high quality resolution while the powerful and rich
sound system adds to the driving enjoyment.
Wide TFT-LCD Display
Display
Radio
Multimedia
Player
• Provides high quality video through a Wide
TFT-LCD Display using an LED Back Light.
• Touch screen for maximum user convenience.
Digital Tuner Feature
• Digital Tuner using PLL method that supports
memory of 40 broadcast stations.
Radio broadcast station name
• Displays broadcast station names.
Support for various Media Formats
• Support for various media formats, including
Radio, USB, iPod, AUX and Bluetooth
®
Audio
Streaming modes
Navigation
Miscellaneous
Voice Guidance
• Voice route guidance to safely and conveniently reach set destinations
• Various map scales that enable drivers to
accurately view map and surrounding areas
Automatic Correction for Current Location
• Automatically corrects current position using
map matching and GPS information.
Bluetooth
• Convenient use of Bluetooth
®
Wireless Technology
®
Handsfree by
using buttons within the steering wheel control
Digital Screen Control Features
• Easy control of features through touch screen
options
Steering Wheel Control
• Control over audio features, voice recognition
and Bluetooth
®
through the steering wheel
control for maximum convenience
1-4 I Basic
Component Names and Functions
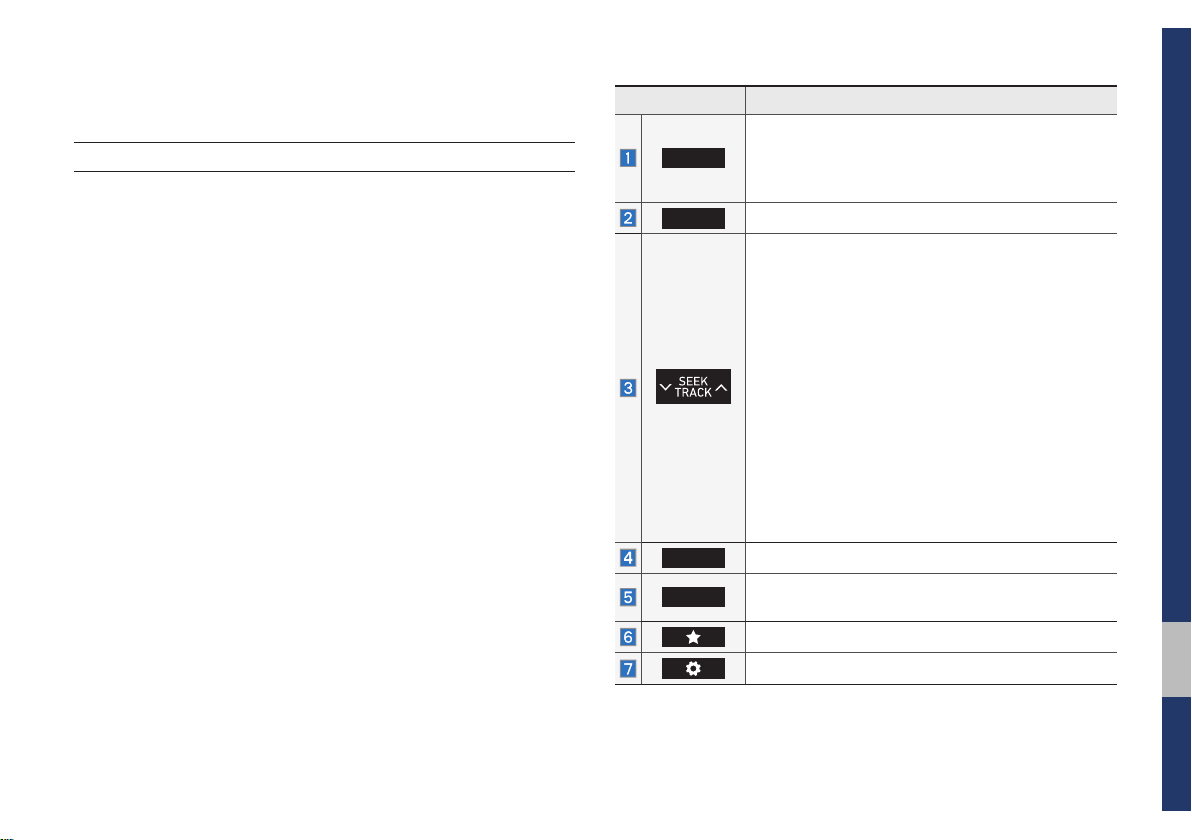
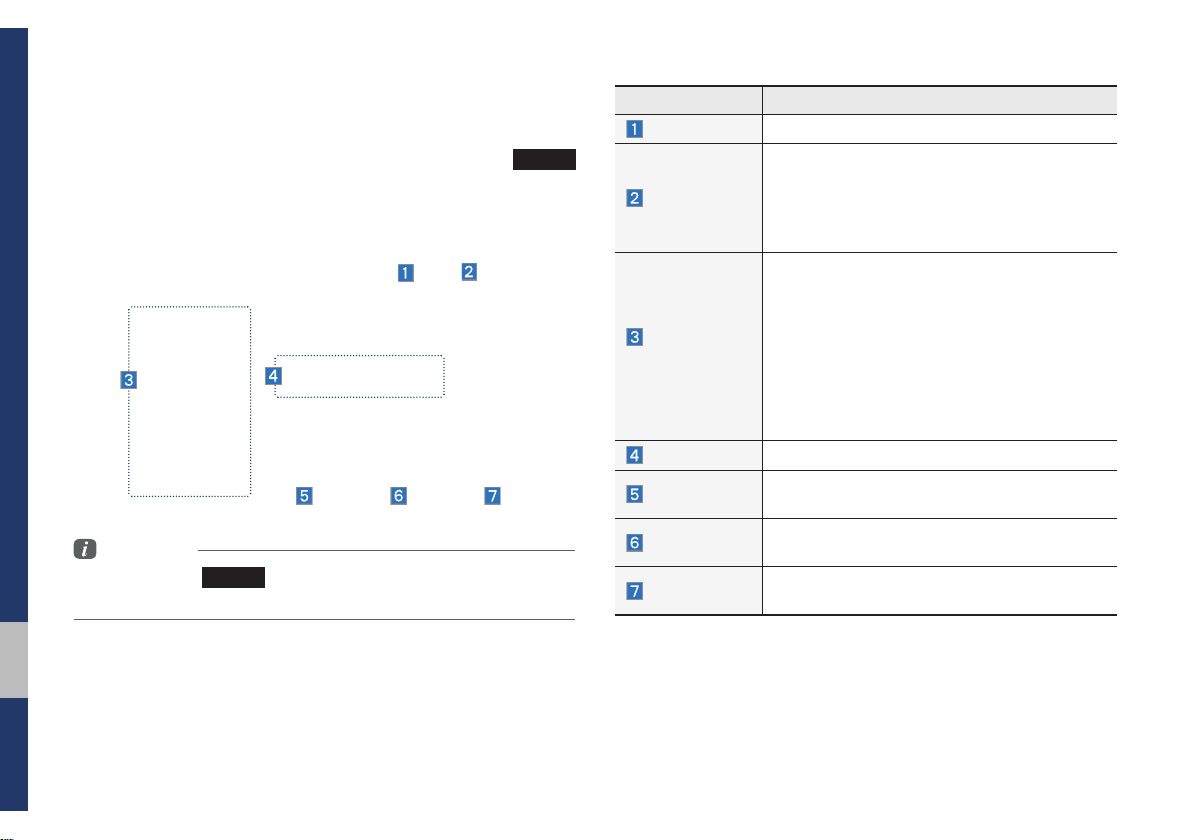
Head Unit
Name Description
Selects FM/AM/SiriusXM™ mode.
RADIO
• Each time this is pressed, the mode is changed
in the following order: FM → AM → SiriusXM™
FM.
MEDIA
Selects MEDIA mode.
When pressed quickly (less than 0.8 seconds),
• FM/AM mode: Plays the previous/next frequency.
• SiriusXM™ mode: Changes the channel.
• MEDIA mode: Changes the track, file or title
(except for AUX).
When pressed and held down (more than 0.8 seconds),
• FM/AM mode: Moves quickly through all of the
frequencies. The moment that you release the
button, the system seeks the next available frequency.
• MEDIA mode: Rewinds or fast forwards the
track or file (except for Bluetooth Audio and
AUX).
MAP
NAV
Displays the map for the current position
Takes you to the menu screen where you can find
your destination and set the route.
Moves to the function set by the user.
Moves to the Setup screen.
→
01
Component Names and Functions I 1-5
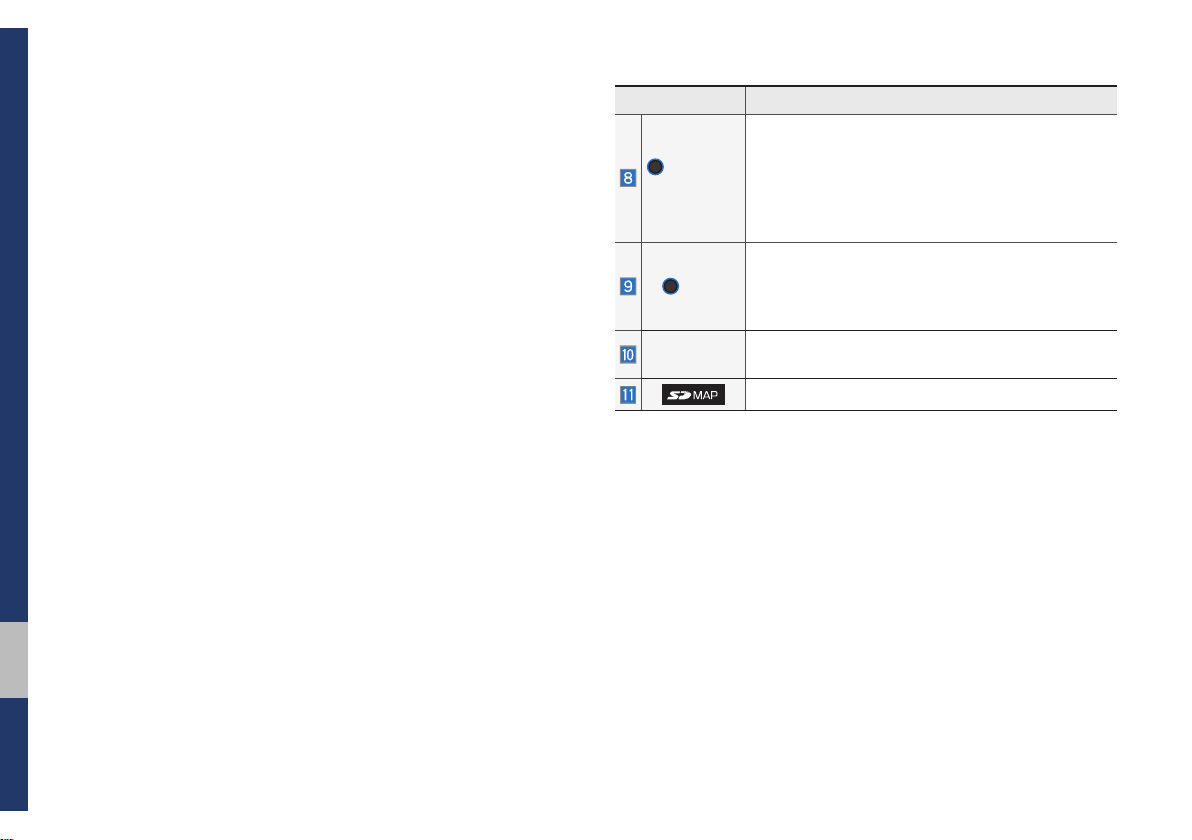
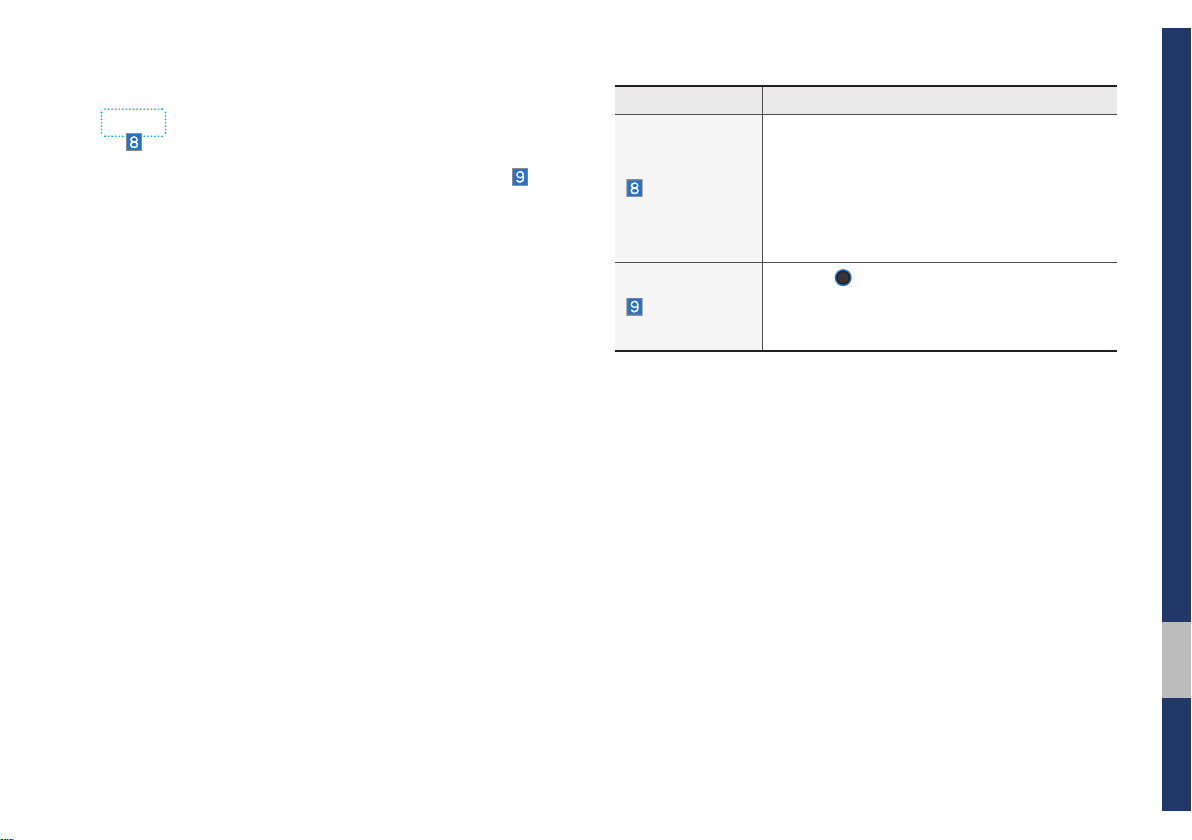
Name Description
• When power is off, press to turn power on.
POWER/
VOL
TUNE
RESET
※
The actual image in the vehicle may differ from the illustration
• When power is on, press and hold (more than
0.8 seconds) to turn the power off.
• When power is on, press quickly (less than
0.8 seconds) to turn Audio off.
• Turn left/right to adjust the volume.
• FM/AM mode: Changes the frequency.
• SiriusXM™ mode: Changes the channel.
• MEDIA mode: Changes the track, file or title
(except for Bluetooth Audio and AUX).
Resets the system settings. (Preset radio channels
and other data will not be deleted)
SD card insert slot
1-6 I Basic
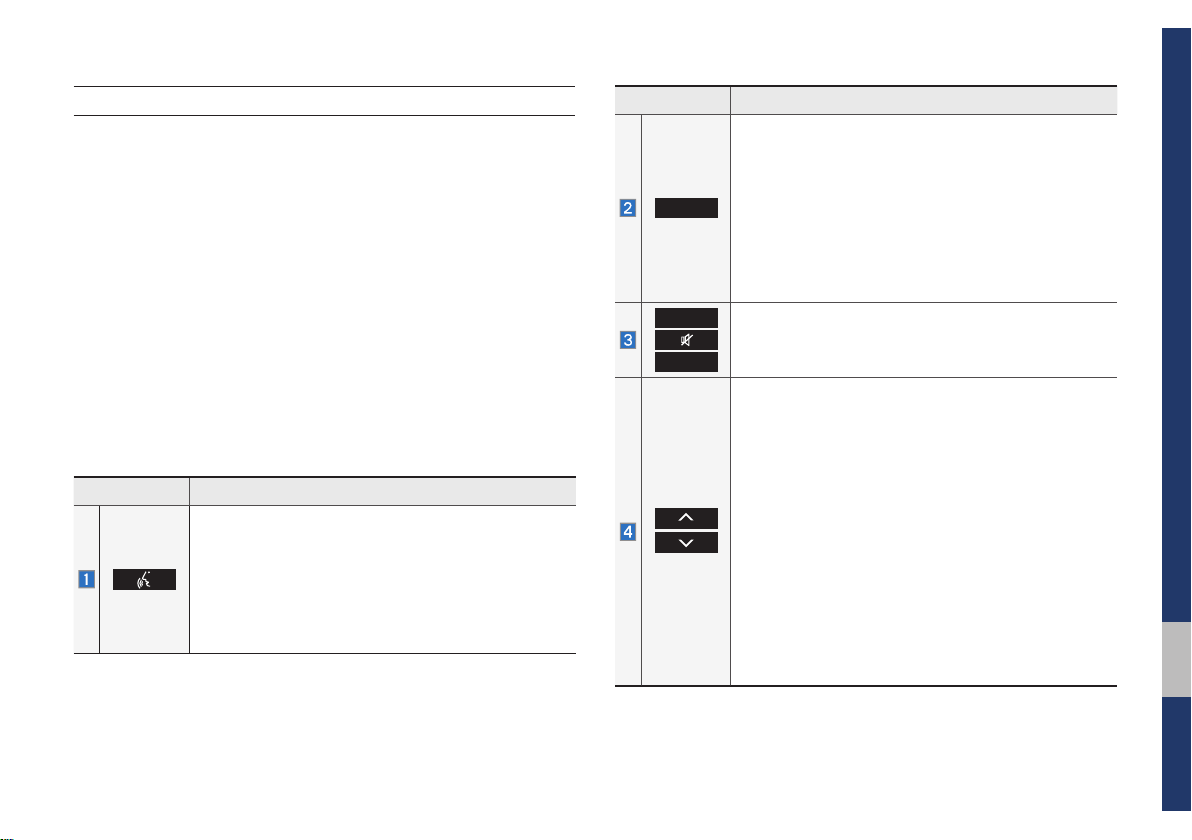
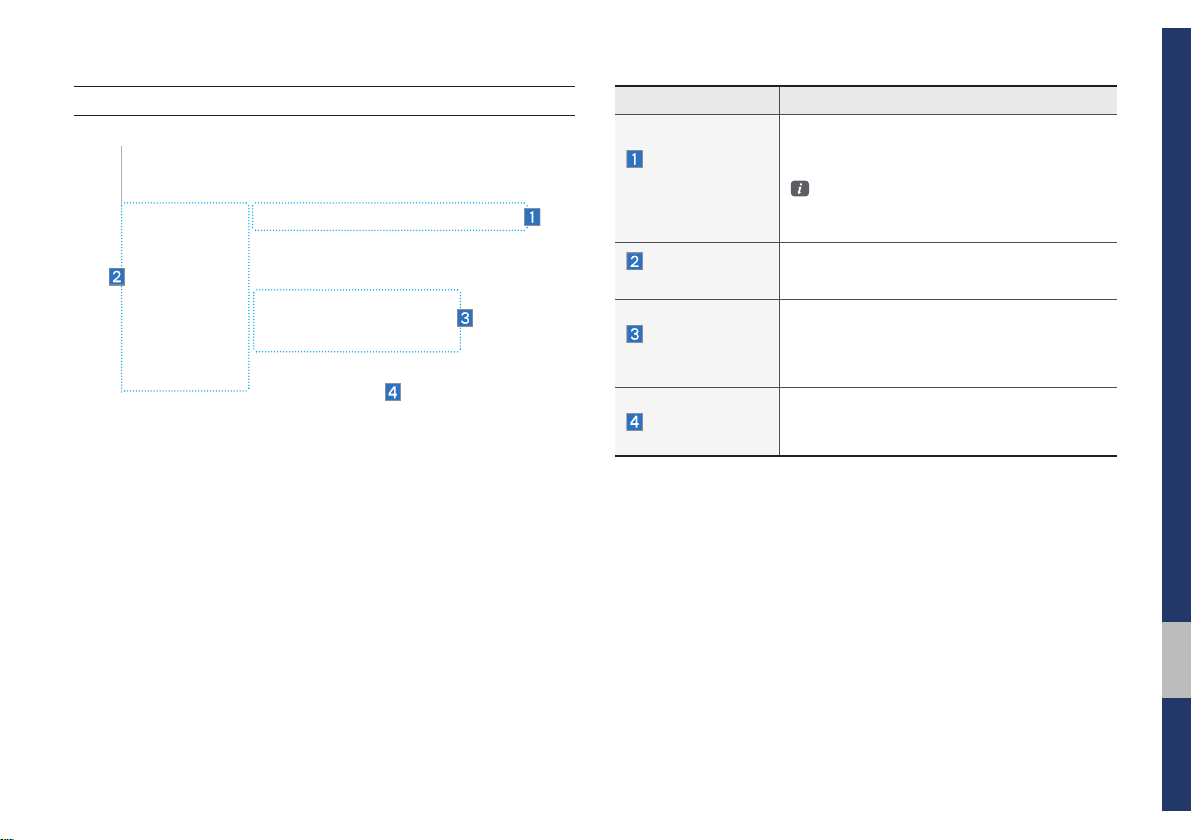
Steering Wheel Controls
Name Description
When pressed quickly (less than 0.8 seconds),
• Activates voice recognition
When pressed and held down (more than 0.8 seconds),
• Ends voice recognition
• If iOS device is connected through Bluetooth,
activates or ends Siri Eyes Free
Name Description
• Each time this is pressed, the mode is changed
in the following order: FM → AM → SiriusXM
USB or iPod → AUX → Bluetooth Audio → FM
• If the media is not connected, the corresponding
MODE
modes will be disabled
• Press and hold (more than 0.8 seconds) to turn
the Audio system on/off
• When power is off, press button to turn power
back on
VOL +
Controls the volume
VOL -
When pressed quickly (less than 0.8 seconds),
• FM/AM mode: searches broadcast frequencies
saved to Presets
• SiriusXM™ mode: searches broadcast channels
saved to Presets
• Media mode: changes the track, file or title
(except for AUX)
When pressed and held down (more than 0.8 seconds),
• FM/AM mode: automatically searches broadcast
frequencies
• SiriusXM™ mode: automatically searches broadcast channels
• Media mode: quickly looks up songs
(except for AUX and Bluetooth audio files)
→
01
Component Names and Functions I 1-7
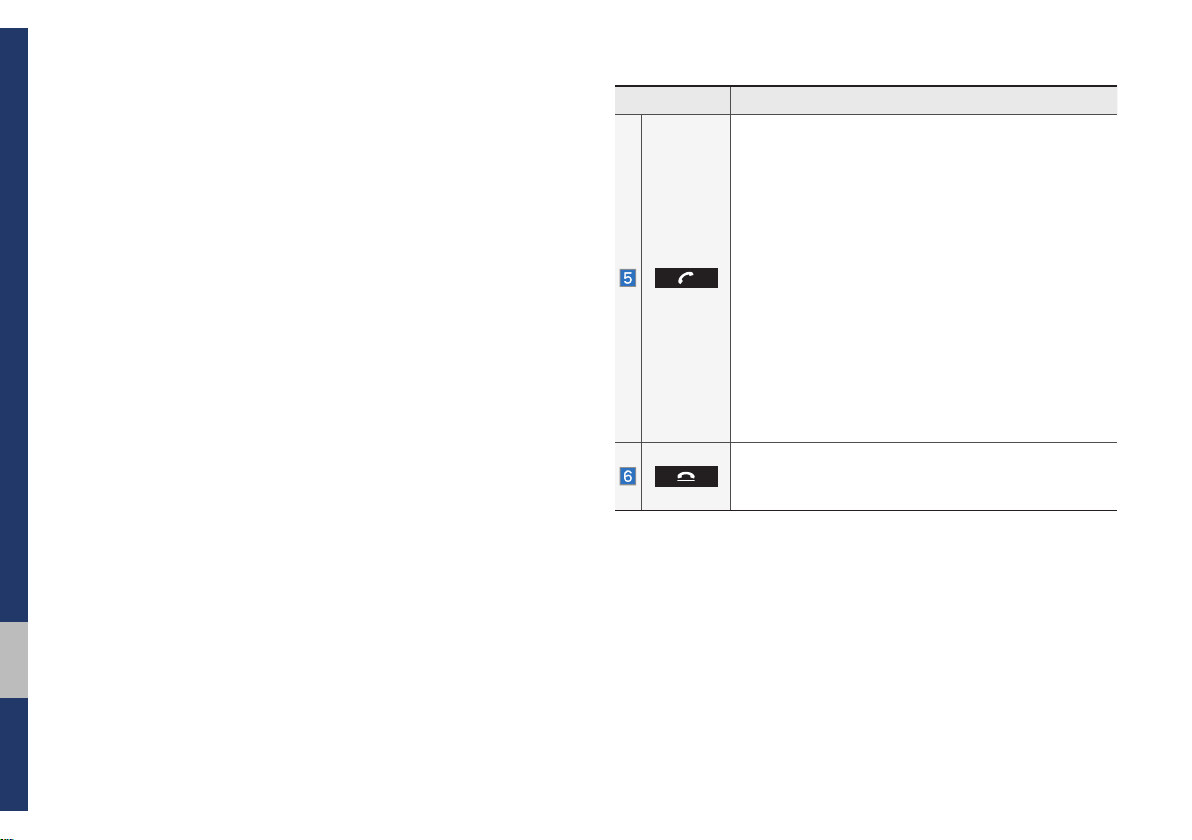
Name Description
When pressed quickly (less than 0.8 seconds),
• When pressed in the dial screen, makes a call
• When pressed in the incoming call screen,
answers the call
• When pressed during call waiting, switches to
waiting call (Call Waiting)
When pressed and held down (more than 0.8 seconds),
• When pressed in Bluetooth® Hands-free, redials
the last dialed call
• When pressed during a Bluetooth® Hands-free
call, switches call back to mobile phone (Private)
• When pressed while calling on the mobile phone,
switches call back to Bluetooth
(operates only when Bluetooth
®
Hands-free
®
Hands-free is
connected)
• When pressed during a call, ends the phone call
• When pressed in the incoming call screen, rejects
the call
※
The actual image in the vehicle may differ from the illustration.
1-8 I Basic
Starting the System for the
First Time
Turning the System On/Off
Press the engine start button or set the
ignition key to On or ACC. Each time you
turn on the system, a boot logo and safety
warning will appear.
Pressing the power key on the head unit
will display the safety guide. To change the
system language between English,
French, Spanish and Korean, select the
Language
button.
NOTICE
• You cannot operate the system while it is
booting up. It may take some time for all of
features of the system, particularly the voice
recognition system, to be ready for use.
Pressing and holding the power key on the
head unit will turn off the system.
Information
• If you turn off the system during a phone call
using the Hands-free feature, then the call will
automatically switch to your mobile phone.
NOTICE
• Check the volume when turning on the
system. Before turning on the system, adjust
the volume to a reasonable level.
System Reset
The System Reset function restores the
system when it is not operating correctly.
Press and hold the
ond or longer. (It is recommended that you
press the
a pin or a clip.)
RESET
RESET
key for a sec-
key using a tool, such as
01
Starting the System for the First Time I 1-9

Battery Warning Message
Always use the system while the car
engine is running. If you turn on the system while the engine is off, a battery warning message will appear. When the engine
starts, the message will disappear.
Restrictions on Features for
Safety Measures
Several features are limited while driving.
The restriction screen will disappear when
shifting gears into P or putting the parking
brake on.
WARNING
- Blank Screen
• Refrain from use if the screen is blank or
no sound can be heard as these signs may
indicate product malfunction. Continued use in
such conditions could lead to accidents (fires,
electric shock).
NOTICE
• If you use the system for a long time with
the engine off, the battery may become
completely discharged.
1-10 I Basic
WARNING
- T ouching the Antenna During A
Thunder Storm
• Do not touch the antenna during thunder or
lightning as such acts may lead to lightning
induced electric shock.
Home Screen
Controls Menu Configuration for the Home Screen
Tap the icon on any screen to display the Home Screen below.
Features Description
• Provides a brief view of the navigation map
Navigation
Widget
AV Widget
All Menus
Phone
My Menu
and the route screen.
• Touch any area on the screen to move to
the navigation screen.
• Shows brief information on the radio media
current playing.
• Touch the area to move to the mode for
what you are listening to.
Shows all of the items in the system menu.
Displays the Bluetooth phone mode.
Add your favorite menu items to have quick
and easy access to them.
Starting the System for the First Time I 1-11
01
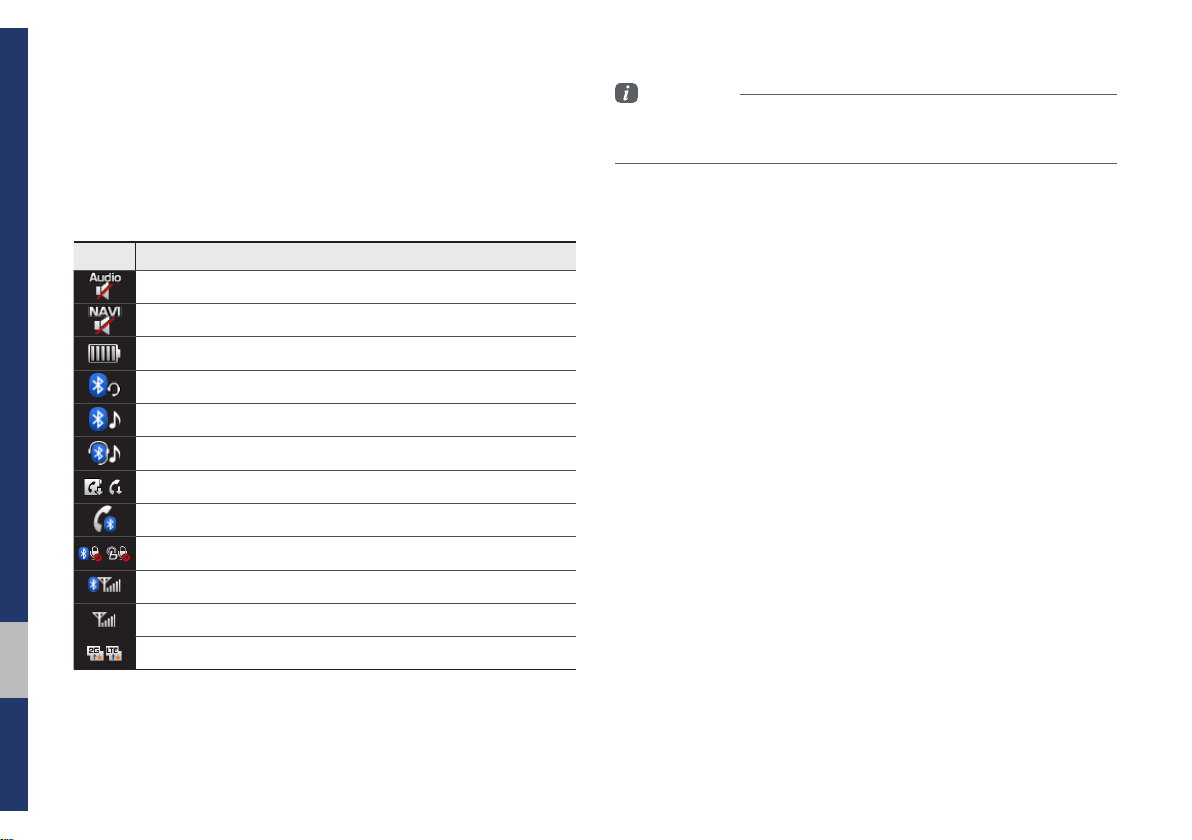
Information Display on the Status Bar
Displays the date and time, along with the system status shown by
the various icons to the right of the clock.
The icons in the following table indicate the various types of system status details and events.
Icon Description
Displayed when the audio is muted.
Displayed when the navigation sound is muted.
Displays the remaining battery of the Bluetooth phone.
Displayed when connected to Bluetooth for handsfree.
Displayed when connected to Bluetooth for streaming audio.
Displayed when connected to Bluetooth for streaming audio and handsfree.
Displayed when downloading contacts or recent calls from the Bluetooth phone.
Displayed while on a call with the Bluetooth phone.
Displayed when the microphone of the Bluetooth or Blue Link phone is muted.
Displays the signal strength of the Bluetooth phone.
Displays the signal strength of the Blue Link.
Displays when using 2G/LTE data.
Information
• Received signal strength indicator of Blue Link and 2G/LTE information are
displayed only in the devices that support the telematics system.
1-12 I Basic
Adding a Feature to My Menu
Select
add the most frequently used menus,
change the menu order, or delete menus.
My Menu
on the Home Screen to
Information
• Up to 24 items can be added to My Menu.
On-Screen Touch Controls
Learn how to touch the screen to operate
the system.
Select
Tap lightly on a menu or an item to select it.
NOTICE
• The system will not recognize your touch if
you wear a glove or other non-conductive
material. Touch the screen using your finger,
an electrostatic touch-screen glove, or a stylus
pen.
Drag & Drop
Select a menu or item you want, then drag
and drop it to where you want to place it.
Drag or touch the slider along the play bar
in the music screens to jump to the point
that you want to play from.
01
Starting the System for the First Time I 1-13

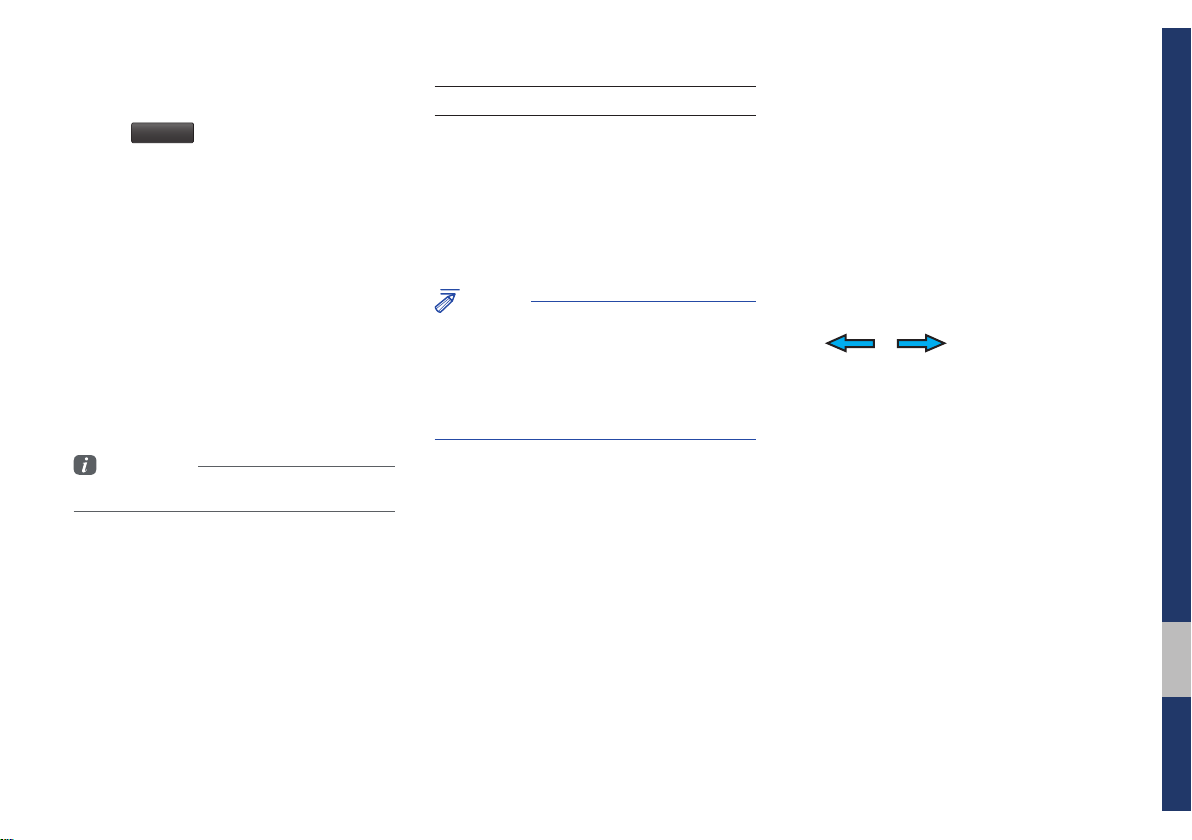
Flick (Quick Scrolling)
Quickly moves up and down in the list.
NOTICE
• Moving the list when there are many items will
display a handler on the right of the display.
You can easily move many items at a time
with the handler.
Press and Hold
Pressing the and buttons
in the music player will fast forward/rewind
the music.
1-14 I Basic

part.2
Radio/Media
FM/AM
HD Radio™ Technology
SiriusXM™
USB
iPod
AUX
Bluetooth
®
Audio
Radio/Media
FM/AM
You can access the radio player either by pressing the
key or by selecting the Radio menu from All Menus on the Home
screen.
Information
• If you press the
and a radio broadcast will be tuned from the current mode.
RADIO
key when power is off, the power will turn on
RADIO
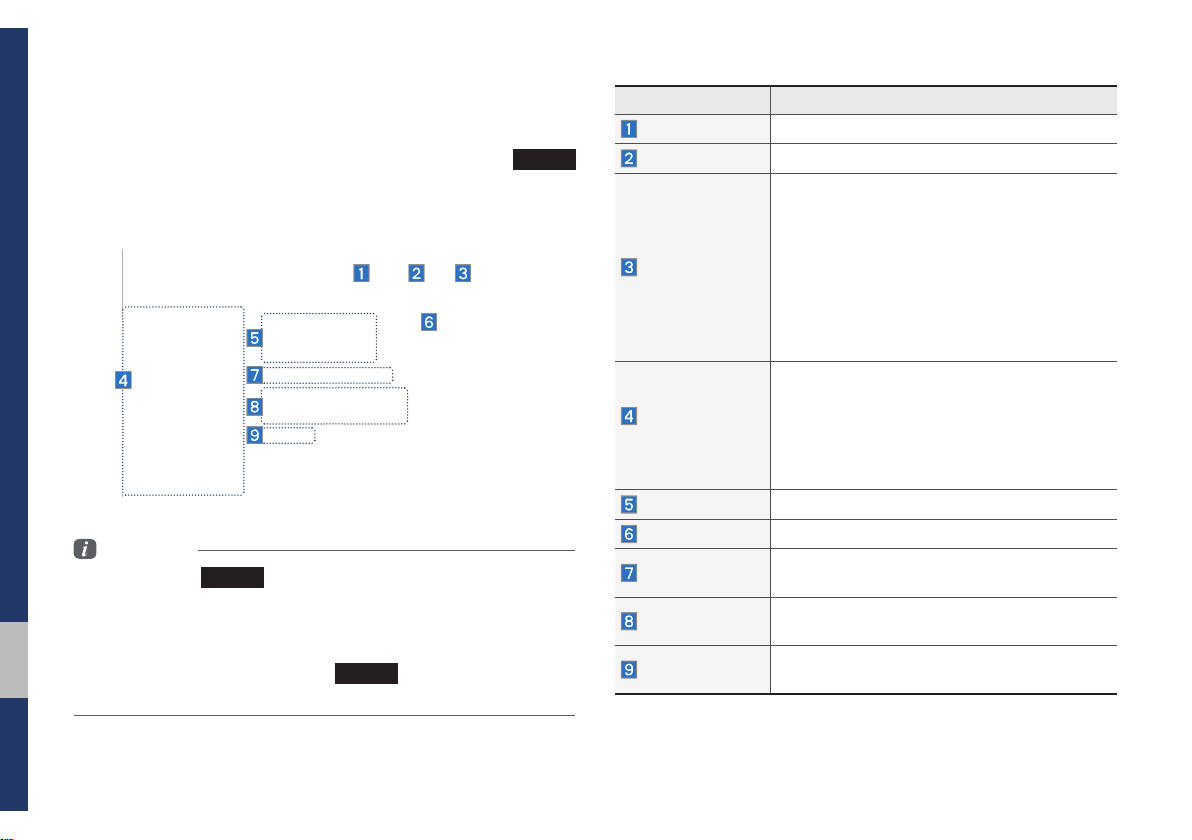
Features Description
Presets
Menu
Preset
Frequencies
Frequency
Band
HD Radio
Scan
Shows the stored presets for user selection.
• List: Moves to the frequency list.
• Info: Turns the Radio text information transmitted from the broadcasting station on and
off.
• Sound Settings: Moves to the Sound Settings.
• The stored preset frequencies are displayed
for user selection.
• After selecting frequency, press and hold
the preset button for more than 0.8 seconds.
A beep sound will be heard and the frequency is to be stored in the selected preset
button.
• Flick the preset frequencies up/down to scroll
quickly through presets.
Displays the current frequency.
Changes to the desired band from among FM,
AM, and SiriusXM.
Used to set whether to turn HD Radio™ recep-
tion On or Off.
Shortly plays the broadcasts for the frequencies
with superior reception for 10 seconds per item.
2-2 I Radio/Media
Features Description
• When pressed quickly (less than 0.8 seconds): Seeks the previous/next frequency.
• When pressed and held down (more than 0.8
SEEK/TRACK
seconds): Moves quickly through all of the
frequencies. The moment that you release
the button, the system seeks the next available frequency.
TUNE
knob to manually seek avail-
TUNE
Turn the
able frequencies.
• FM: Increment/decrement by 200 kHz
• AM: Increment/decrement by 10 kHz
FM/AM I 2-3
02

HD Radio™ Technology
Program Service Data: Presents song name, artist, station IDs, and other relevant data streams.
FM stations can provide additional digital-only audio programming on HD2/HD3 Channels.
Digital, CD-quality sound. HD Radio Technology enables
local radio stations to broadcast a clean digital signal. AM
sounds like today’s FM and FM sounds like a CD.
Real-Time Traffic reports, alerts, and flow data displayed
on screen via interactive traffic maps and/or data.
If an HD Radio™ broadcast is received,
the radio mode will switch from analog
broadcast to HD Radio™ broadcast.
Information
• The
HD Radio™
when a HD Radio™ broadcast is being
received
screen is displayed only
2-4 I Radio/Media
HD Radio™
Name Description
Displays main HD Radio™ channels and
HD Radio™
Reception &
Channel buttons
HD Channel
Number
HD Radio
Broadcast Info
HD Radio
used to directly select the current available
channels.
The HD Radio™ related icon display
becomes active within regions where an
HD Radio™ signal can be received.
Analog station and corresponding HD Radio
channel number saved in the preset list.
Displays detailed information about the current broadcast (the details of the information
shown are different depending on whether
the Info button is selected)
When the HD Radio soft button is ON (the
blue indicator on the HD Radio button is illuminated), HD Radio signals will be received.
HD Radio™ Technology I 2-5
02
SiriusXM™
You can access the radio player either by pressing the
key or by selecting the Radio menu option from All Menus on the
Home screen. Select the SiriusXM™ band from the radio player.
Information
• If you press the
on and a radio broadcast will be tuned from the current mode.
• If you are in the SiriusXM™ mode, select the SiriusXM™ radio widget
from the Home screen to access the radio player.
• When the power is off, pressing the
and play a SiriusXM™ Radio broadcast.
RADIO
key when the power is off, the power will turn
RADIO
key will turn the power on
RADIO
Features Description
Presets
List
Menu
Preset
Frequencies
Channel Logo
Play Live
Channel Info
Content Info
Category Info
Shows the stored presets for user selection.
Moves to the channel list.
• What is on My Presets?
The program schedule saved in my preset. (For
more details, see Section 2.8 Viewing Menu.)
• Featured Favorites
Theme channels recommended by SiriusXM™.
(For more details, see Section 2.8 Viewing
Menu.)
• Sound Settings: Moves to the Sound
Settings.
• Shows the stored presets for user selection.
• After selecting frequency, press and hold
the preset button for more than 0.8 seconds.
A beep sound will be heard and the frequency is to be stored in the selected preset
button.
Displays the current channel logo.
Switches to the live broadcast mode.
Displays the current channel number and
name.
Displays the artist, title and other information
about the current playing song.
Displays the category of the currently playing
song.
2-6 I Radio/Media

Features Description
Repeats the previously broadcasted program.
Skip Backward
Play/Pause
Skip Forward
Band
Direct Tune
Scan
SEEK/TRACK
TUNE
• Holding for less than 0.8 seconds: Moves to
the previous segment.
• Holding for more than 0.8 seconds: Moves
to the previous 5 seconds.
Pauses/plays the current broadcasting program.
Moves to the next segment.
Changes to the desired band from among FM,
AM, and SiriusXM.
Used to search for the desired channel by
entering the channel number.
Plays all receivable channels for 10 seconds
per item.
• When pressed quickly (less than 0.8 seconds): Plays the previous/next channel.
• When pressed and held down (more than 0.8
sec onds): Continuously changes the channel until the key is released and plays the
current channel.
Changes the channel.
SiriusXM™ I 2-7
02

Selecting through
Channel/Category List
List
Select the
egory and channel.
Select the desired category and the channel. Once selected, the previous screen
will be restored and the selected channel
will begin playing.
▶
Select the desired cat-
If you select the
Skip
button, you can
scan channels using the key or
TUNE
the
knob by skipping the chan-
nels that you chose to skip.
Direct Tune
Enter the number of the channel you want
to receive.
Viewing Menu
Using the
can view the program schedule and information about the Featured Favorites provided by SiriusXM™.
Menu
button on the right, you
2-8 I Radio/Media

What is on My Presets? (Program Schedule)
Name Description
By selecting this option, you can select a broadcasting date and time zone.
Broadcast information will be provided for one week
from the current date.
Change
Broadcast
Date
You can select Menu to see program information and the schedules of broadcast channels listed in the presets.
Preset
Broadcasting
Time
Program
Information
Shows saved presets for user selection
A total of 40 frequencies for SiriusXM™ modes
can be displayed.
You can select the time that you want.
Shows you the program titles to be broadcast at the
time that you have chosen.
Select a program to see more details.
If there is more information on the program you
selected, an arrow button will be displayed on
the right of the list. You can see more program
information by selecting the arrow button.
02
SiriusXM™ I 2-9

Featured Favorites
Featured Favorites feature allows
SiriusXM™ to broadcast additional presets.
• Example 1: “Martha’s Favorites” may
represent Martha Stuart’s favorites presets on her radio.
• Example 2: During holidays, “Holiday
Music” may represent all the SiriusXM™
channels that are playing the holiday
music for easy access by users.
Multiple sets Featured Favorites data
can be broadcast by SiriusXM™ and can
change from time to time.
2-10 I Radio/Media

USB
Before Playing a USB MP3
Connect the USB device after turning on the engine. The USB
device may become damaged if it is already connected when the
ignition is turned on.
• Files that are not standard format music/image files will not be
played.
• For MP3/WMA/OGG files, only music files with compression
rates between 8Kbps ~ 320Kbps can be played.
• Heed caution to static electricity when connecting/disconnecting
external USB devices.
• Encoded MP3 Players will not be recognized when connected
as an external device.
• When connecting an external USB device, the device may not
properly recognize the USB is in some states.
• Only products formatted with byte/sectors under 64Kbyte will be
recognized.
• USB devices, formatted to the FAT12, FAT16, or FAT32 file system are recommended. File systems other than FAT12, FAT16,
FAT32, exFAT, and NTFS are not supported.
• Some USB devices may not be supported due to compatibility
issues.
• Take caution so that the USB connector does not come in contact with body parts or objects.
• Repeated connecting/disconnecting of USB devices within short
periods of time may result in product malfunction.
• Make sure to connect/disconnect external USB devices with the
audio power turned off.
• The amount of time required to recognize the external USB
device may differ depending on the type, size, or file formats
stored on the USB.
• The use of USB devices for purposes other than playing music
and image files is prohibited.
• Do not use the USB I/F to charge batteries or USB accessories
that generate heat. Such acts may lead to worsened performance or damage to the device.
• The device may not recognize the USB device if separately
purchased USB hubs and extension cables are being used.
Connect the USB directly with the multimedia terminal of the
vehicle.
• When using mass storage USB devices with separate logical
drives, only files saved to the root drive can be played.
• When application programs are installed to specific USBs, files
may not properly play.
USB I 2-11
02
• The device may not operate normally if MP3 Players, cellular phones, digital cameras, or other electronic devices (USB
devices not recognized as portable disk drives) are connected
with the device.
• Charging through the USB may not work for some mobile
devices.
• The device may not support normal operation when using a
USB memory type besides Metal Cover Type USB Memory.
• The device may not support normal operation when using formats such as HDD Type, CF, or SD Memory.
• When playing iPods, please use a dedicated iPod car cable.
• Normal operation cannot be guaranteed when other cables are
being used.
• The device will not support files locked by DRM. (Digital Rights
Management)
• USB memory sticks used by connecting an Adaptor (SD Type or
CF Type) may not be properly recognized.
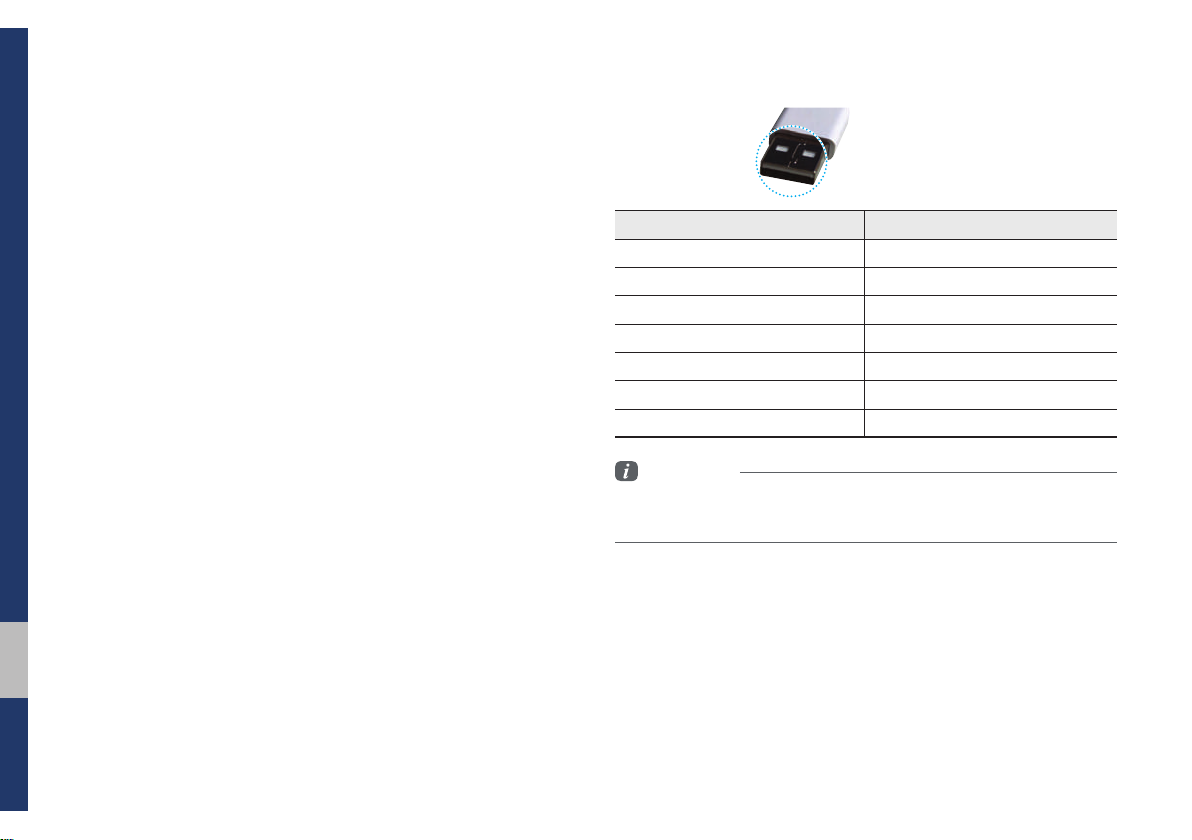
• Only use Plug type connector products, as shown in the figure
below.
• To play USB MP3, the USB device must be connected to the
USB port in the front multibox. The USB port in the center console storage (if equipped) is for charging only.
Plug Type Connector
Product Name Manufacturer
XTICK LG
BMK BMK Technology
SKY-DRV Sky Digital
TRANSCEND JetFlash Transcend
Sandisk Cruzer SanDisk
Micro ZyRUS ZyRUS
NEXTIK Digiworks
Information
• Problems that occur through use of USB devices not listed within the
above table are not covered by the product warranty.
2-12 I Radio/Media

Supported USB MP3 music specifications
Name Description
MP3 File
Specification
Recommended
Bit Rates and
Sampling
Frequency
ID3 Tag
Detailed
Specifications
Information
• The sound quality of MP3 files that use bitrates exceeding
192 Kbps cannot be guaranteed. When using files without fixed bit rates,
some features (FF/REW features) may not properly operate.
Specification: MPEG1 AUDIO LAYER 3
Acceptable sampling frequency: 32, 44.1, 48 (kHz)
Acceptable bit rate: 32, 40, 48, 56, 64, 80, 96, 112,
128, 160, 192, 224, 256, 320 (Kbps)
96, 128, 192 Kbps fixed bit rate/44.1 kHz
Supports ID3v1.0 and ID3v1.1, ID3v2.2, ID3v2.3,
ID3v2.4 ID3 tags
Maximum directory layers: 20 layers
Maximum length of folder name/file name: 255Bytes
Supported characters for folder name/file name:
Alphanumeric characters, Korean standard character
set 2,350 characters, Simplified Chinese 4888 characters
Maximum number of folders which can be stored
onto one USB: 2000 folders (including ROOT)
Maximum number of files which can be stored onto
one USB: 8000
02
USB I 2-13

USB Music
Features Description
Mode
File Index
Repeat/Shuffle
Play Time
Song Info
Displays the current operating mode
Shows the current file/total files within the USB
From Repeat/Shuffle, displays the current oper-
ating function
Displays the current play time/total play time
Displays the artist/song title/album info
Features Description
• If button is pressed (less than 0.8 seconds):
Moves to the previous file or play the current
file from the beginning (Depends on the play
time)
Previous File
- If play time is less than 3 seconds, moves to
previous file
- If play time is more than 3 seconds, play the
current file from the beginning
• If button is pressed (over than 0.8 seconds) it
rewinds the track
Play/Pause
Plays/pauses the current file
• If button is pressed (less than 0.8 seconds):
Next File
Moves to the next file
• If button is pressed (over than 0.8 seconds): It
fast-forwards the track
Repeats the current file
• If select the song in the file tab on the list
screen: Select the
between repeating one song, repeating folder,
Repeat
and turning repeat off
• If select the song in the other tabs on the list
screen: Select the
between repeating one song and turning
repeat off
Repeat
button to switch
Repeat
button to switch
2-14 I Radio/Media

Features Description
Plays files in random order
• If select the song in the file tab on the list
screen: Select the
between Shuffle Folder, Shuffle All, and turning
Shuffle
shuffle off
• If select the song in the other tabs on the list
screen: Select the
between Shuffle Category and turning shuffle
off
List
Moves to the list screen
• Hide Current File: a selected file can be
deleted. Deleted file can be found in the
Menu
‘Hidden_’ folder.
This function is only supported when USB
format is compatible with FAT16 or FAT32.
• Sound Settings: Moves to the Sound Settings
Back Button
Converts to basic mode screen
Turn the
TUNE
knob to search a desired
track. If the desired track is displayed, select the
TUNE
TUNE
knob to play the track.
If you do not anything with the
for 5 seconds of searching tracks, the track
info for the current track is restored.
Shuffle
button to switch
Shuffle
button to switch
TUNE
knob
USB I 2-15
02

Features Description
Folder/
Category Name
Current Song
Back Button
Upper Folder/
Category
Displays folder/category name in the list
Displays the current playing file name
Converts to basic mode screen
Moves to Upper Folder/ Category
Show current track: when moving to a different
Menu
list screen, moves to the list page where the
current file is located (Becomes disabled when
the current list includes the current file)
Search Menu
Search songs by the list type.
• If button is pressed (less than 0.8 seconds):
Plays previous/next track
SEEK/TRACK
• If button is pressed (over than 0.8 seconds):
Moves to play screen, and then it will rewind
or fast-forward the track.
TUNE
Turn the
the previous/next list. If the desired track is displayed, press
TUNE
knob to move the focus to
TUNE
knob to play the track.
2-16 I Radio/Media

iPod
Using iPod Devices
• iPod is a registered trademark of Apple Inc.
• iPod mode will not operate if the connected iPod cannot be recognized due
to operation of unsupported versions
that do not support related protocols,
iPod abnormalities, or iPod device
defects. Some iPods with unsupported
communication protocols may not properly operate with the Multimedia system.
• For fifth generation iPod Nano devices,
the iPod may not be recognized when
the battery level is low. Please charge
the iPod for use.
• Search/play orders shown within the
iPod device may differ with the orders
shown within the Multimedia system.
• If the iPod malfunctions due to an iPod
device defect, reset the iPod and try
again. (To learn more, refer to your iPod
manual)
• If repeatedly connect and disconnect
iPod/iPhone to the Multimedia system
with USB cable in a short time, it may
cause abnormal operation.
• The time for recognition of iPod/iPhone
may vary depending on device type,
firmware version and iOS version.
• For some iPod Touch and iPhone
devices, connecting Bluetooth
®
while the
iPod is operating may result in discontinued iPod sound. When such devices
with Bluetooth
®
support are connected,
this problem occurs as the sound source
is changed from the Dock Connector
(USB connector cable) to Bluetooth.
• To prevent this symptom, Bluetooth
Audio function in the Multimedia system
is limited if iPod/iPhone is connected
to the system through both cable and
Bluetooth. To listen to the iPod sound,
use either iPod menu with USB connection or Bluetooth Audio with Bluetooth
connection.
02
iPod I 2-17

• To listen to the iPod sound, reconnect
the USB cable or change the audio output settings in iPod/iPhone to Dock.
• In order to use the iPod while operating
the keys, you must use a dedicated iPod
cable. (the cable that is supplied when
purchasing iPod/iPhone products)
※
During ACC ON state, connecting the
iPod through the iPod cable (The cable
that is supplied when purchasing iPod/
iPhone product.) will charge the iPod
through the head unit.
※
The use of genuine iPod cables supplied by Apple is recommended. (The
use of other products may result in
noise or abnormal operation.)
※
To play iPod music through cable connection, the iPod/USB cable must be
connected to the USB port in the front
multibox. The USB port in the center
console storage (if equipped) is for
charging only.
• When connecting with the iPod cable,
make sure to fully insert the jack to prevent communication interference. If the
iPod is connected to the vehicle while it
is playing, a high pitch tone may sound
for about 1~2 seconds immediately after
connection. If possible, connect the iPod
to the vehicle with the iPod stopped/
paused.
• Within iPhones, streaming audio and
iPod control may occasionally conflict.
If problems persist, remove the iPhone
and connect again.
• When connecting to iPod Nano/Classic,
the HYUNDAI Motor logo appears on
the Apple device. For the iPod Nano 6
generation, however, the logo image
does not appear since it is not supported. Also, all iPhone and iPod Touch
products do not support this function.
• In Apple’s iOS 6.0 version or later,
Podcast and Audiobook media files
are designed to be played with the
Podcasts and iBooks applications specifically designed for Apple products. If
the Apple device does not provide the
Podcast and Audiobook lists, the playlist
may not be displayed and played in the
iPod mode.
• If the Apple Podcasts and iBooks apps
are not installed on the Apple device, but
the Apple device provides the Podcast
and Audiobook lists, you can play files in
other categories in iPod mode.
• The screen of multimedia system can
be different when you run other music
players (e.g. iHeartRadio) on your connected device.
2-18 I Radio/Media

Caution
• While using a connected iPhone/iPod
Touch device, it may not operate normally if the user changed some functions in the device.
• When calling with an iPhone connection, song may stop playing due to an
Apple device feature. If sound does
not resume after the call is terminated,
check the device status.
• If lots of songs have the same information, skipping may occur when previous/
next song is executed due to an Apple
device feature. Also problems may
occur depending on device type or iOS
version.
• If lots of songs have the same information, the song that plays may be different between the system and the Apple
device. Reset the device or delete the
same songs in the Apple device using
iTunes.
• If you control pause, repeat, shuffle, or
seek songs when the play time is less
than 3s before the song is finished playing, it may occur difference of playing
song between the Multimedia system
and Apple device. Access to iPod music
from another mode or pause a song and
then play a song again in Apple device.
• If the iPhone/iPod Touch supports
Bluetooth, the Apple device will not be
able to use the Bluetooth function if the
device is connected through both the
USB port and via Bluetooth. Disconnect
the USB connection then use Bluetooth
Audio.
• If iPod/iPhone connected to the
Multimedia system through both USB
and AUX. iPod/iPhone keeps output
sound via AUX, thus it may occur sound
will not output in iPod mode.
• If AUX cable connected to iPod/iPhone
but not connect to the Multimedia system, it may occur sound will not output
in iPod mode due to iPod/iPhone’s feature. Especially, if you use AUX cable
like pictures, this problem may occur.
• Disconnect AUX cable from iPod/iPhone
first, then connect to the Multimedia
system via USB. Or change settings to
“Dock” in iPod/iPhone.
• If connect to the Multimedia system
while podcast or iTunes music downloading to iPod/iPhone, it may occur
some problems when you select song
in the list. Reconnect iPod/iPhone to the
Multimedia system when downloading
is finished or the file deleted.
• If connect to the Multimedia system
while sync, it may occur some problems.
Try to use iPod/iPhone connection after
sync complete. (To learn more, refer to
your iPod manual)
02
iPod I 2-19

Caution
• We recommend that your Apple device
uses the latest firmware since some
• iPhone and iPod Touch devices are
guaranteed to work normally on iOS
9.3.2 or below. However, they may not
problems may occur due to an outdated
firmware or other software related
issues.
work normally on future iOS versions
as their operations have not yet been
tested.
Type 1G 2G 3G 4G 5G 6G 6.5G 7G
iPod Mini
iPod Shuffle
iPod Nano
iPod Touch
iPad
iPad Mini
iPod Classic Not Supported
Type 3G 3GS 4 4S 5 5C 5S 6 6+ 6S 6S+ SE 7 7+
iPhone
Not verified,
Normal operation
not guaranteed
◯ ◯ ◯ ◯ ◯ ◯
◯
(iOS 1.1 not supported)
◯ ◯ ◯ ◯ ◯ ◯ ◯ ◯ ◯ ◯ ◯ ◯ ◯
◯ ◯ ◯ ◯ ◯
◯
(Unable to charge, Not verified, Normal operation not guaranteed)
Not Supported
◯
(iPod with Video)
◯
(iPod Classic)
Not released
Not released
◯
(iPod Classic)
Not released
◯
2-20 I Radio/Media

iPod
Features Description
Mode
Song Index
Repeat/Shuffle
Play Time
Song Info
Displays the current operating mode
Shows the current song/total songs
From Repeat/Shuffle, displays the current oper-
ating function
Displays the current play time/total play time
Displays the artist/song title/album info
Features Description
• If button is pressed (less than 0.8 seconds):
Moves to the previous file or play the current
file from the beginning (Depends on the play
time)
Previous File
- If play time is less than 3 seconds, moves to
previous file
- If play time is more than 3 seconds, play the
current file from the beginning
• If button is pressed (over than 0.8 seconds) it
rewinds the track
Play/Pause
Plays/pauses the current file
• If button is pressed (less than 0.8 seconds):
Next File
Moves to the next file
• If button is pressed (more than 0.8 seconds):
It fast-forwards the track
Repeats the current file
Repeat
Select the
Repeat
button to switch between
repeating 1 track, and turning repeat off
Plays files in random order
Shuffle
Shuffle
When selecting the
shuffle category → deactivate shuffle then
repeat
• Shuffle Category: Shuffle song in the current
category
List
Menu
Back Button
Moves to the list screen
Sound Settings: Moves to the Sound Settings
Move to home/previous mode screen
button, it changes to
02
iPod I 2-21

Features Description
Turn the
TUNE
knob to search a desired
track. If the desired track is displayed, press
TUNE
the
TUNE
If you do not anything with the
knob to play the track.
for 5 seconds of searching tracks, the track
info for the current track is restored.
TUNE
knob
2-22 I Radio/Media

Features Description
Category Name
Category List
Back Button
Upper Category
Search Menu
SEEK/TRACK
TUNE
Displays the category name
Displays the contents of selected category
If there are many items in the list, items are
added in order and the scroll bar on the
right is adjusted accordingly.
Converts to basic mode screen
Moves to Upper Category
Search songs by the list type.
• If button is pressed (less than 0.8 seconds):
Plays previous/next track.
• If button is pressed (over than 0.8 seconds):
Moves to play screen, and then it will rewind
or fast-forward the track.
Turn the
track. If the desired track is displayed,
press the
If you do not anything with the knob for 5 seconds, the
nated.
TUNE
knob to search a desired
TUNE
knob to play the track.
TUNE
knob search will be termi-
iPod I 2-23
02

AUX
Connecting an External Device
If an external device connector is connected with the AUX terminal, then AUX
mode will automatically operate. Once the
connector is disconnected, the previous
mode will be restored.
• AUX mode can be used only when an
external audio player has been connected.
• The AUX volume can also be controlled
separately through the connected
device.
NOTICE
• If only a cable is connected to the AUX
without an external device, the mode will be
changed to AUX, but noise may occur. When
an external device is not being used, remove
the connector jack.
• When the external device power is connected
to the power jack, playing the external device
may output noise. In such cases, disconnect
the power connection before use.
※
The actual image in the vehicle may
differ from the illustration.
2-24 I Radio/Media

Bluetooth® Audio
Features Description
• If play time is less than 3 seconds, moves to
the previous file
Previous File
Play/Pause
Next File
Repeat
Shuffle
Menu
SEEK/TRACK
TUNE
• If play time is more than 3 seconds, plays the
current file from the beginning
This function may differ depending on the
model of mobile phone.
Plays/Pauses Bluetooth Audio
Moves to the next file
Repeats the current file.
This function may differ depending on the
model of mobile phone.
Plays files in random order.
This function may differ depending on the
model of mobile phone.
• Connections: Moves to the Bluetooth Settings
screen. You can pair a new device or change/
delete paired device(s).
• Sound Settings: Moves to the Sound Settings
Plays the previous/next file
TUNE
is not supported.
Features Description
Mode
Phone Name
Artist Info
Title
Displays the current operating mode
Displays name of connected phone
Name of current artist
Name of current song
Information
• Artist info and Title may not be supported by mobile phone.
• While in use of other functions after connecting your mobile phone
through a USB cable, the Bluetooth audio is disabled.
Bluetooth® Audio I 2-25
02

Bluetooth Connection Settings
Settings for pairing, connection and disconnection of a Bluetooth device.
• In Bluetooth Audio play screen, select
Menu
and then
Information
• If the music in the mobile phone is not played
after changing to audio streaming mode,
press the play button. Thus check if the
music is playing in the Bluetooth device after
changing to audio streaming mode. Audio
streaming may not be supported for some
mobile phones.
• Please check the Bluetooth compatibility in
below website: HYUNDAI Motor America
https://www.hyundaiusa.com/bluetooth
Connections
.
2-26 I Radio/Media

part.3
Before Using the Bluetooth® Handsfree
Bluetooth
Bluetooth Connection
Bluetooth Phone

Bluetooth
Before Using the Bluetooth®
Handsfree
What is
Wireless Technology?
•
Bluetooth
to a short-distance wireless networking technology which uses a 2.45GHz
frequency to connect various devices
within a certain distance.
• Supported within PCs, external devices,
Bluetooth
tronic devices, and automotive environments,
to be transmitted at high speeds without
having to use a connector cable.
• Bluetooth® Handsfree refers to a device
which allows the user to conveniently
make phone calls with Bluetooth
mobile phones through the Multimedia
system.
Bluetooth®
®
Wireless Technology refers
®
phones, PDAs, various elec-
Bluetooth
®
Wireless Technology
• The Bluetooth® Handsfree feature may
not be supported in some mobile phones.
For more information on mobile phone
compatibility, visit the HYUNDAI website
- HYUNDAI Motor America: https://www.
hyundaiusa.com/bluetooth
WARNING
- Distracted Driving
• Focus on the road while driving. The driver’s
primary responsibility is in the safe and legal
operation of the vehicle. Drivers should not
use any hand held devices or other equipment
or vehicle systems that distract the driver
during vehicle operation.
• Do not stare at the multimedia screen for long
periods of time while driving. Staring at the
screen for prolonged periods of time can lead
to traffic accidents and can result in personal
®
injuries.
Precautions for Safe Driving
• Bluetooth® is a feature that enables drivers to make handsfree calls. Connecting
the head unit with a Bluetooth
allows the user to conveniently make
calls, receive calls, and manage the
phonebook. Before using
Wireless Technology, carefully read the
contents of this user’s manual.
• Excessive use or operations while driving may lead to negligent driving practices and be the cause of accidents. Do
not operate the device excessively while
driving.
• Viewing the screen for prolonged periods of time is dangerous and may lead
to accidents. When driving, view the
screen only for short periods of time.
®
phone
Bluetooth
®
3-2 I Bluetooth

CAUTIONS upon Connecting
®
Bluetooth
• Before connecting the head unit with
the mobile phone, check to see that the
mobile phone supports Bluetooth
tures
• Even if the phone supports
Wireless Technology, the phone will
not be found during device searches if
the phone has been set to hidden state
or the Bluetooth
Disable the hidden state or turn on the
Bluetooth
connecting with the head unit.
• If Auto Connection is used, the
Bluetooth
nected when the ignition is turned on,
making it unnecessary to have to connect the phone with the head unit every
time.
Phone
®
fea-
Bluetooth
®
power is turned off.
®
power prior to searching/
®
phone is automatically con-
• If you do not want automatic connection
with your Bluetooth
Bluetooth
®
feature off of the Bluetooth®
®
device, turn the
device.
• Park the vehicle when connecting the
head unit with the mobile phone.
®
• Bluetooth® connection may become
intermittently disconnected in some
mobile phones. Follow these steps to try
again.
1. Turn the Bluetooth® function within
the mobile phone OFF/ON and try
again.
2. Turn the mobile phone power OFF/
ON and try again.
3. Completely remove the mobile
phone battery, reboot, and then
again.
4. Reboot the Multimedia System and
try again.
5. Delete all paired devices from both
of Phone and Head Unit sides and
then try again
• The Handsfree call volume and quality
may differ depending on the mobile
phone.
• Pairing Bluetooth® devices and use of
other Bluetooth
®
features are not supported when the vehicle is in motion. For
safety, please first park your vehicle.
• If you continue having issue downloading your contacts to your vehicle, contact your mobile phone provider.
03
Before Using the Bluetooth® Handsfree I 3-3

Bluetooth Connection
Pairing a New Device
Before you can use the Bluetooth feature,
you must first pair/connect your mobile
phone to your car.
Up to 5 Bluetooth devices can be paired.
Only one Bluetooth device can be connected at a time.
Pairing a New Device by Selecting
Phone/Call
Press the key in the steering
wheel control. ▶ Pair your car after your
mobile phone detects the Bluetooth
device. ▶ Enter the passkey or accept the
authorization popup. ▶ Connect Bluetooth.
Pairing a New Device Through the
Phone Settings
▶
.
Bluetooth
Select
▶
Press the key. ▶ Select
▶
Select
Add New
phone detects the Bluetooth device.
Enter the passkey or accept the authorization popup. ▶ Connect Bluetooth.
The default passkey is 0000.
The vehicle name above is an example.
Check the actual information on the product.
Bluetooth Connection
▶
.
Pair your car after your mobile
Connecting Bluetooth Devices
Connects the Bluetooth devices that you
.
add.
Connecting Devices by Selecting
Phone/Call
Press the key in the steering
wheel control. ▶ Select the name of the
device to connect. ▶ Connect Bluetooth.
3-4 I Bluetooth

Connecting Devices Through the
Phone Settings
Press the key. ▶ Select
Select
Bluetooth Connection
Bluetooth
▶
.
Select the
name of the device to connect. ▶ Connect
Bluetooth.
▶
.
Disconnecting
Bluetooth Devices
Disconnects Bluetooth devices that are
connected.
Press the
Select
Bluetooth Connection
name of the device to disconnect.
key. ▶ Select
▶
.
Select the
Bluetooth
Deleting Bluetooth Devices
Deletes the Bluetooth devices that you
added. Note that deleting a Bluetooth
device will delete all Call History and
Contact Info downloaded along with it.
▶
.
Press the
Select
Delete Devices
Bluetooth Connection
▶
.
Select the device name
to delete. ▶ Select
key. ▶ Select
.
Delete
.
Bluetooth
▶
▶
.
Select
03
Bluetooth Connection I 3-5

Bluetooth Phone
Phone Status Icons
Shows the current phone status in the
right top of the display.
Icons Description
You can use Bluetooth phones
when a Bluetooth Hands-free
connection is established.
You can use Bluetooth audio
features when a Bluetooth audio
connection is established.
You can use Bluetooth phones
and audio features when both
Bluetooth Hands-free and audio
connections are established.
Call signal strength indicator
Battery level of the Bluetooth
devices connected
Downloading Call History list
Downloading Contacts
In a Bluetooth phone call
Microphone muted
Information
• The battery level icon and the call signal
strength indicator may not be supported in
some Bluetooth devices.
• The battery level may differ from the actual
level remaining.
3-6 I Bluetooth

Dial
Dials a call after the Bluetooth devices are
connected.
All Menus
Select
Phone
▶
from Home screen display
Dial
▶
.
Name Description
Use the keypad to enter
the phone number that you
Keypad
Call
Settings
Delete
want to call. Press and hold
the last number of a speed
dial to dial a number that
you added to the Speed
Dial list in the phone
Makes a call after you dial
a number and select CALL.
If the number is listed in
Dialed Calls, you can select
the number and press
CALL to automatically dial
that number again.
Moves to a screen of
Phone Settings.
Deletes the numbers that
you entered.
Accept/Reject Call
If there is an incoming call after you made
a Bluetooth connection, a popup message
will appear.
Name Description
Accept
Reject
Answers the call.
Ignores the call.
Information
• Some types of mobile phones may not
support the Speed Dial function.
Information
• In some mobile phones, the caller’s number
may not be displayed, and the Reject feature
may not be supported.
03
Bluetooth Phone I 3-7

Using the Menu During
a Phone Call
When making a call, you can use the following menu items.
Name Description
Use Private
End
Contacts
Outgoing
Volume
Keypad
Switch
Switches a voice call
from the car Hands-free
to the mobile phone.
Ends a call.
Displays the Contacts
list.
Displays the Mic Volume
settings. You can adjust
the in-call volume that
the other party hears
(level 1 - 5).
Moves to a screen for
entering ARS numbers.
Switches to a call on
hold, if any. You can also
switch calls by selecting the number in the
Information Display. The
Switch function switches
the current call to a
waiting call in order to
answer a new incoming
call.
Information
• If the caller’s number is listed in Contacts, the
caller’s name will be displayed. Otherwise,
only the number will be displayed. In some
mobile phones, the phone number may not
be displayed.
• In some Bluetooth devices, the Use Private
feature may not be supported.
• In some Bluetooth devices, the Switch feature
may not be supported.
• During a phone call on a Bluetooth Hands-
free, you cannot access other modes, such as
Radio and Settings.
• Depending on handset types, the in-call
volume the other party hears may differ. If the
other party hears your voice too low or too
loud, adjust the mic volume.
3-8 I Bluetooth

Call History
All Menus
Select
Name Description
Phone
▶
▶
Call History
.
All
Dialed
Received
Missed
Call History
Download
Bluetooth
Settings
Lists the all call history.
Lists the calls that you
made.
Lists the calls that you
have received.
Lists the calls you
missed.
Displays all of your call
history. Select from the
list to dial the number.
Downloads the call history information from
your mobile phone.
Provides the Bluetooth
Connection/Auto
Connection Priority/
Bluetooth System
Information.
Information
• In some mobile phones, call records may not
be added to your Call History.
• Calls from restricted ID’s are not added to
your Call History Information.
• Up to 50 calls can be added in each Dialed
Calls/Received Calls/Missed Calls list.
• The durations of each dialed/received call are
not displayed in your car’s Call History list.
• While the call history download is in progress,
the status bar displays an icon (
• If the call history download is turned off on the
Bluetooth device, the call history download
will fail.
• Some devices require a device authentication
for downloading your call history. If download
fails, check if the Bluetooth settings or display
status are normal.
• Some devices do not support call history
download. Check if your Bluetooth device
supports download feature. For details
regarding Bluetooth-supported devices and
their functional compatibility, visit https://www.
hyundaiusa.com/bluetooth
).
03
Bluetooth Phone I 3-9

Contacts
All Menus
Select
Name Description
Contacts List
Download
Search
Bluetooth
Settings
Phone
▶
The list of Contacts.
Select from the list to dial
the number.
Downloads contacts from
your mobile phone.
Searches Contacts.
Provides the Bluetooth
Connection/Auto
Connection Priority/
Bluetooth System
Information.
▶
Contacts
Information
.
• Up to 5000 phone numbers can be
downloaded from a single, paired Bluetooth
device.
• You cannot edit or delete downloaded phone
numbers from your car.
• Contacts can be viewed only when the
Bluetooth device is connected.
• Even if the Bluetooth device is disconnected,
the downloaded data will remain.
(Note that deleting a paired phone will also
delete all downloaded Contacts and Call
History data)
• Downloaded phone numbers may be lost
depending on the condition of the head unit.
Keep your important data in a safe place.
• Contacts from both the SIM card and your
mobile phone are downloaded at the same
time by default.
• The status bar displays a ( ) while
downloading contacts.
• The download will not be available if the
contacts download function is turned off on
your Bluetooth device.
• Some devices require a device authentication
for downloading your contacts. If download
fails,check your phone screen and confirm the
download if necessary.
• Some devices do not support contacts
download feature. Check if your Bluetooth
device supports contacts download. For
Bluetooth supporting devices details and
compatibility, visit https://www.hyundaiusa.
com/bluetooth
3-10 I Bluetooth

Favorites
All Menus
Select
Name Description
Phone
▶
▶
Favorites
.
Favorites
Add New
Delete
Bluetooth
Settings
Lists the phone numbers saved as Favorites.
Select from the list to
dial the number.
Adds a new number to
Favorites.
Deletes all of the numbers from Favorites.
Provides the Bluetooth
Connection/Auto
Connection Priority/
Bluetooth System
Information.
Bluetooth Phone I 3-11
03

MEMO

part.4
Blue Link® Control
Rear View Mirror Switch
Blue Link Voice Local Search
Before Use
Getting Started with Blue Link

Blue Link® Control
Rear View Mirror Switch
Selecting the Rear View mirror switch
will allow you to make service required
inquiries, place search, and emergency
Service by connecting to the Blue Link
Center. Such features can be used only
after subscribing to the Blue Link service.
※
The actual image in the vehicle may differ from the illustration.
Instructions
Display
SOS
※
Refer to Blue Link service manual for
Contents
Blue Link
•
Starts or ends the Blue
Link call.
Blue Link Voice Local
Search
•
Request information
about places via
Blue Link Voice Local
Search.
SOS
•
Starts or ends the
SOS call.
more Blue Link features.
4-2 I Blue Link® Control

Blue Link Voice Local Search
What is Blue Link Voice
Local Search?
With Blue Link network service, you can
search for Google-provided place names
using voice commands.
This feature operates separately from the
voice recognition feature that activates
from the button on the steering wheel.
The Google local search feature is activated by pressing the
button on the rear view mirror.
The search is done through network services; it is only available when connected
to a communication network.
You must have a Blue Link subscription to
activate this feature.
,
Starting Blue Link
Voice Local Search
Press , key in the rearview mirror (less than 0.8 seconds) to start
Blue Link Voice Local Search.
Name Description
Example
command
Manual
search
switch button
End button
Shows an example to
ask for a place search.
Switches the Blue Link
Voice Local Search
screen to manual
search.
Ends Blue Link Voice
Local Search.
With Blue Link Voice
Local Search, press
the
key in the rear-view
mirror again to end
the service.
,
Blue Link Voice Local Search I 4-3
04

Auto Crash Notification
Provides immediate assistance when an
accident occurs and an airbag is deployed.
In this event, an ACN signal, containing customer and location information,
will automatically be transmitted to the
response center. Upon receipt of the signal, a response specialist will attempt to
establish voice communications with the
vehicle occupants and forward any pertinent information to Blue Link emergency
services.
4-4 I Blue Link® Control
SOS
Customers request emergency Blue Link
emergency services by pressing the dedicated
This action transmits vehicle information
and location to specially trained response
specialists, who assist in coordinating the
dispatch of appropriate emergency assistance to the customer.
The response specialist remains on the
line with the customer until emergency first
responder assistance has arrived.
, key in the vehicle.
SOS
Stolen Vehicle Recovery
In the event a customer’s vehicle is
reported stolen (and a stolen vehicle
report has been filed with the appropriate
police department), the response center
can provide assistance to the police in an
attempt to recover the vehicle.
Vehicle Slowdown
Used with Stolen Vehicle Recovery, this
enables law enforcement to gradually
reduce the engine power of the vehicle,
thus slowing it down to safe levels. A warning shall be transmitted to the driver prior
to the slowdown procedure.
Vehicle Immobilization
Used with Stolen Vehicle Recovery, this
enables law enforcement to send a signal
to the vehicle which immobilizes the engine
management system, thus preventing
startup. This capability is only valid when
the ignition is off, but can be saved for later
immobilization if the vehicle is on or in
motion at the time of signal transmission.

Before Use
What Is Blue Link?
This is a Hyundai telematics service based on our cutting-edge IT
system that makes your driving experience more convenient and
fun and features safety, security, vehicle diagnostics, remote control and even smartphone synchronization functions.
Enjoy a smarter driving style with Blue Link.
What Is Telematics?
The word “Telematics” stems from the combination of telecommunications and infomatics, and refers to an information system that
provides a variety of driving information through the built-in terminal by analyzing each symptom and driving state. This allows for a
much safer and more comfortable driving experience.
About Transmission and
Reception of Radio Waves
For radio wave transmission/reception status, refer to the status
displayed on the Blue Link screen.
Connection to the Blue Link Center or wireless data transmission
may be disrupted in the following places.
•
Inside tunnels
•
Mountainous areas or dense forest
•
Roads close to cliff edges
•
Densely built-up areas
•
On highways or roads underneath higher interchange roads
•
Inside buildings
04
Before Use I 4-5

Getting Started with
All Menus
Blue Link
Blue Link
Use Blue Link features such as Driving
Info and Vehicle Diagnostics. Blue Link
features can be used after activating the
service.
Information
• A separate fee may be charged for using Blue
Link, and features may differ according to your
service plan.
Select
from Home Screen dis-
play. ▶ Select
Name Description
Displays information such
Driving Info
Send to
Car with
Google
Vehicle
Diagnostics
Blue Link
Settings
as Driving Time/Idle Time,
Deceleration/Acceleration
Distribution, Driving Speed
and Driving Distance.
Displays information
about places received
via Blue Link Voice Local
Search.
Inspects vehicle malfunc
tions and provides diagnostics.
Activates the service or
displays modem informa
tion.
icon.
Connecting with the
Blue Link Center
Press the , key in the
rear-view mirror to connect with the Blue
Link center.
-
-
4-6 I Blue Link® Control

Driving Info
All Menus
Blue Link
All Menus
Blue Link
Select
▶
Select
icon.
This service can be used while your car is
stopped and the engine is on.
Select the
date driving information.
from Home Screen display
▶
.
Select
Update
button to receive up-to-
Driving Info
Send to Car with Google
Select
▶
Select
Send to Car with Google
from Home Screen display
icon.
icon.
▶
Select
Name Description
Place list
Delete
Items
Delete All
Dial
View Map
Previous/
Next
Displays the list of
received places
Deletes selected items
from the place list.
Deletes all items from
the place list.
Displays the phone
number of a selected
place. Press the number
to make a call.
Displays the address of
a selected place. Press
the address to view map
Displays the previous or
next place information.
You can check information about places
received via Blue Link Voice Local Search.
To use Send to Car with Google, first you
need to sign up to the Blue Link.
04
Getting Started with Blue Link I 4-7

Vehicle Diagnostics
All Menus
Blue Link
Select
display ▶ Select
Vehicle Diagnostics
You can have your vehicle inspected only
after stopping the vehicle because some
control units can’t be diagnosed while driving.
Vehicle Diagnostics will be canceled if you
switch to another screen while diagnosis
is in progress.
To receive result details, you need to first
sign up to the Blue Link.
from Home Screen
▶
.
Select
icon.
Blue Link Settings
For more details, refer to part 9. Setup >
Blue Link Settings.
4-8 I Blue Link® Control

part.5
Navigation
Basic Features
Quick Menu
Search
Route
Navigation Settings
Troubleshooting

Navigation
Start
Guidance
Routes
Add
Waypoint
Save
POI
Basic Features
Operating Navigation Screen
Basic features on the map screen.
Name Description
Go to the Place menu.
Move to the Home Screen
Change the map view mode.
Adjusts the volume.
Zoom in the map.
Set the zoom level automatically accord-
ing to the guidance.
Zoom out the map.
Quick Menu for destination selection and
options.
Touch to scroll the map.
Start the preferred navigation route to
selected location.
Choose the preferred navigation route to
selected location.
Set a waypoint to the current route.
Save frequently used address to address
book.
Find a POI(Point Of Interest) around the
current position.
View the vehicle’s current position on the
map screen.
5-2 I Navigation

Places
Changing Map View
Navigation Volume
You can use this menu when the vehicle
shift lever is in P (Park) and there is no
destination set.
Press the Search Icon (Place or Address)
to move to “Places”.
Please refer to “Places” in “Destination
Search” for more details.
Touch the compass arrow icon to toggle
between a map oriented to the North, oriented parallel to the vehicle’s heading and
3D View.
Select the button to adjust the navigation volume.
Basic Features I 5-3
05
05

Name Description
Navigation
Guidance
Priority
Set the volume to mute.
Turn the volume down.
Turn the volume up.
Slide to set the volume.
Lowers all other audio
volumes when Navigation
prompts are playing.
Zoom In/Zoom Out
Zoom the map view screen in and out.
Select or to set the zoom level.
Map Scale
Sets the zoom level automatically according to the type of road.
Name Description
Scale Fix
Auto Scale
Manually adjust the map
scale.
Change the map scale
automatically depending
on the type of road.
5-4 I Navigation

Quick Menu
Route
Route
Route Options
Detour
Edit Route
Recalculate
Detour
Route
Select the button on the bottom left of
the screen ▶ Select the
button.
Route Option
Detour
Select the
or
button to set
.
Select your preferred route and avoid
options. Then select the
to save your selection. These options will
become default for future routes.
,
button
The
button is active only when
there is an active route.
Selected distance is detoured from the
current location.
Menu I 5-5
05
05

Edit Route
Edit Route
POI
Press the
route. Refer to the Route >
section in the manual for more information.
(page 5-26).
button to change the
Editing Route
Map Display
Displays the direction of the map.
Press
, or .
Name Description
North Up (2D)
Heading Up
(2D)
(3D)
3D Buildings
Displays always has
north at the top of
screen.
Displays always
shows the vehicle’s
direction as proceeding towards the top of
the screen.
Shows the map in 3
dimentions.
Shows or hides buildings on the map.
Nearby POIs
Display nearby POIs on the map.
View Nearby POIs
Select the on the bottom of the left
screen ▶ Select the
Select the button to set whether to
show nearby POIs or not.
When categories are selected, they will
appear on the map. (ex. Gas Station)
button.
5-6 I Navigation

The lists of nearby gas station are dis-
Start
Guidance
Routes
Add
Waypoint
Save
POI
played.
•
Editing
The list can be sorted to display in order of
distance or name.
Name Description
Call to the selected location. (Phone needs to be
connected via Bluetooth)
Start the preferred navigation route to selected
location.
Choose the preferred navigation route to selected
location.
Set the location as a waypoint.
Save the location.
Search nearby POIs.
Change the shortcut POIs to display for
your shortcuts. (ex. Gas Stations)
Select the desired category to change. (ex.
Restaurants)
Menu I 5-7
05
05

Select new category to display. (ex.
Gas Stations
American
POI
POI Categories
Search
American)
•
Searching POI categories
Select the button on the bottom left of
▶
Select
▶
the screen. ▶ Select the
Select the
button.
button.
the desired item.
Select the item to search.
Select the
button to search the
POI category by name.
5-8 I Navigation
button is changed to
.
Select the desired POI to check the location and for detailed information.

Name Description
Traffic
Category
Search POI around the current
position.
Search POI around the destination.
Active only when a route’s
planned.
Search POI along route.
Active only when a route’s
planned.
Search POI around the current
cursor when the map scrolled.
Active only when the cursor
position is different from the
vehicle position.
Search POI around the city
selected.
Traffic
Select the button.
button.
Traffic List
▶
Select the
Name Description
Direction from the current location.
Distance from the current location. (mi or km)
Displays traffic info symbol based
on the type of event.
Description of traffic event.
Additional traffic information may be displayed upon clicking on the
button.
On the traffic list, the current traffic/road
event information is displayed in order of
distance
Menu I 5-9
05
05

Name
Traffic
Display ‘Road Construction’ information.
Display ‘Accident’ information.
Display ‘Slow Traffic’ information.
Display ‘Incident’ information.
Display ‘Hazardous Road Conditions’
information.
Display ‘Travel Information’ .
Description
When On Route is activated, only traffic
information on your route is displayed.
On the traffic list, the current basic traffic/road event information is displayed in
order of distance.
Select the combo box to change the
arrangement in order of distance/category.
Name Description
Select the combo box to arrange.
Arrangement by distance: Display
the traffic information in order
of distance closer to the current
location.
Arrangement by category: Display
traffic information arranged in
order of traffic information event
type.
Traffic detail
Select the button on the bottom left of
the screen. ▶ Select the
Select the traffic information on the traffic
list to display the detailed screen as shown
in the screen.
Display the symbol of traffic event and
arrow which indicates the road from start
to end of the traffic event. Detailed information is available on the right screen.
button.
5-10 I Navigation

Name Description
Traffic
Detour
Detour
Detour
Symbol of traffic event
Event name of traffic information
Road name / road number includ-
ing direction
Direction and distance from the
current location
Intersection where traffic event
starts
Intersection where traffic event
ends
Total distance of traffic event
Check the previous traffic infor-
mation (Enabled only when there
are two or more events on the On
Route)
Check the next traffic information
(Enabled only when there are two
or more events on the On Route)
Detour the route based on the
traffic information
Traffic detour
Select the button on the bottom left of
the screen. ▶ Select the
If there is traffic information on the route, it
is possible to detour the route using traffic
information and search other routes.
When the
button is enabled in the
View Traffic Detail, press the
to detour.
button.
button
on.
Select the desired section.
.
Check the information and press the
button.
Menu I 5-11
05
05

Select the
Start Guidance
Save
Icon&Name
Icon
None
Favorites
button to apply
the detoured sections and search other
routes.
Save
Select the button on the left bottom of
the screen. ▶ Select the
To store the location on the current map to
the address book.
.
Name Description
Change the name.
Enter the phone number.
Press
to display on the map
screen.
Designate to the
When the favorite is designated,
press the button on the bottom
of the Destination menu and
request the route guide immediately.
Save the setting.
,
o r
item.
5-12 I Navigation

Search
Destination
OK
Filter by City
Filter by Category
Places
You can enter POI Name, Address, or
Coordinates that you wish to search by.
Press the
search bar.
tab.
NAV
key. ▶ Select the
▶
Select the
Enter the POI Name, Address and
Coordinates of the location you want in
the input window above, and select the
button.
If you select a location from the search
result list, it will bring you to the point.
If you select the
button on the
search result screen, it will bring you to the
City search screen where you can filter the
search results by city names.
If you select the
button
from the search result screen, it will bring
you to the POI Categories screen where
you can filter the search results by POI
Categories.
Search I 5-13
05
05

Once the destination has been identified
Destination
Address
Skip
either by POI name, address, or coordinates, the map screen will be displayed.
From this screen you can set the destination or add a waypoint, or add the displayed destination to your address book.
Address
Set destination by address search.
NAV
Press the
tab.
How to Search Address
key. ▶ Select the
▶
Select the
icon.
Name Description
Select state to search.
Select a city before entering
the street name. Addresses are
searched only from the selected
city.
Enter house number. If you don’t
know the house number, select
button.
Enter the street name. Entering
exact street name is required.
The letters on the keyboard
are automatically enabled and
disabled based on the search
result, and words are automatically completed.
When same street names are
available in other cities, the lists
of city are displayed.
Search criteria can be entered in any
order. Example: [State] then [City] then
[Street] then [House No.]
5-14 I Navigation

Start
Guidance
Routes
Add
Waypoint
Save
POI
Previous Destinations
Destination
Previous Destinations
Select from previously inputted addresses
and POI’s.
Enter the address to check the location
information on the map.
Name Description
Start the preferred navigation route to selected
location.
Choose the preferred navigation route to selected
location.
Set the location as a waypoint.
Save the location.
Search nearby POIs.
Press the
NAV
tab. ▶ Select the
key. ▶ Select the
icon.
Arrange by all, latest destinations, latest
searched places and latest departing
places.
Arrange in order of date and name.
Name Description
Display all destinations, departing places, and searched places.
Display previous destination
places for route guidance.
Display previous departing
places for route guidance.
Display previously searched
places for route guidance.
But, not displayed when the
searched places are set as
destination.
05
05
Search I 5-15
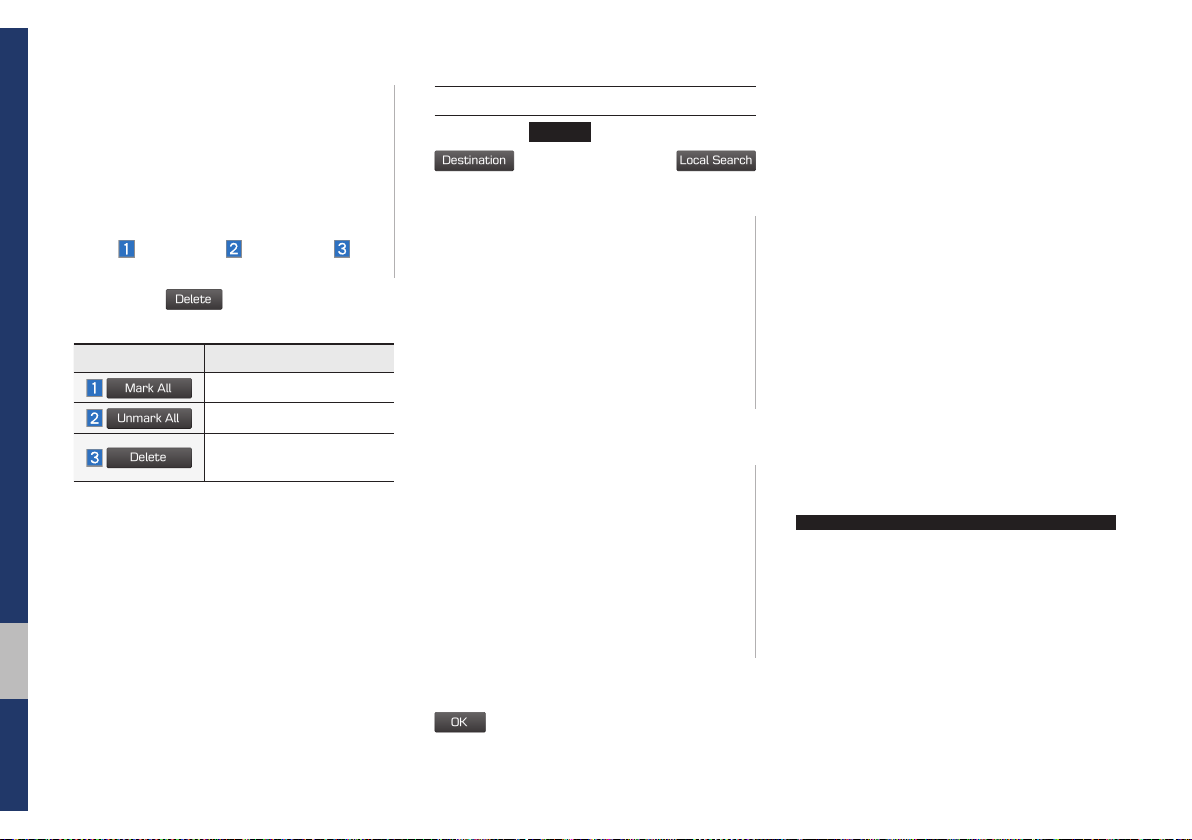
Delete
Mark All
Unmark All
Delete
Local Search
Destination
Local Search
OK
Press the
tab.
icon.
NAV
key. ▶ Select the
▶
Select the
Select the
information.
5-16 I Navigation
button to delete the
Name Description
Select all.
Deselect all.
Delete the selected
item(s).
Searching is in progress.
Runs Google Local Search.
If search successes, search results are
displayed. Select one of the search result.
Enter the desired keywords and select the
button.

Start Guidance
POI Categories
Destination
POI Categories
tab.
NAV
▶
Press the
icon.
key. ▶ Select the
Select the
Select the
button to start
guidance.
If search or guidance fails, the connection
error message is displayed as above.
Please try again.
Select the desired item.
Select the desired item in the sub-categories.
Name Description
Select the desired destination
among the searched items and
add it as a way point.
Arrange in order of Distance and
Name.
Arrange in order of Near Current
Position, Near Destination, Along
Route, Near Scroll Mark and Near
City Center.
Search I 5-17
05
05

Gas Stations
Destination
Gas Stations
Destination
Restaurants
Destination
Emergency
Search for gas stations.
Restaurants
Search restaurants.
Emergency
Search emergency facilities.
tab.
NAV
key. ▶ Select the
▶
Select the
icon.
Press the
Select the desired destination among the
searched items.
tab.
NAV
key. ▶ Select the
▶
Select the
icon.
Press the
Select the desired destination among the
searched items.
tab.
NAV
key. ▶ Select the
▶
Select the
icon.
Press the
Check the current location information
and select the desired item in the submenu(ex. Police Stations).
5-18 I Navigation

Select the desired destination among the
Destination
Address Book
Go Home
Office
searched items.
Address Book
Search the destination with the address
book.
tab.
NAV
key. ▶ Select the
▶
Select the
icon.
Press the
Select the desired group.
If you save addresses in the Favorites tab,
you can set destinations easily by pressing
the icons such as
and
at the bottom of the Destination menu.
Name Description
Select the desired destination
from the searched items.
Edit the destination.
Register a new destination.
Delete the desired item.
05
05
Search I 5-19

Coordinates
Coordinates
OK
Start Guidance
Destination
Press the
to search by coordinates.
NAV
key. ▶ Select the
There are two ways to search by coordinates (D.M.S or Decimal degrees). After
typing coordinates, select the
but-
ton to search.
Favorite places
Set the route using your favorite places.
tab.
NAV
key. ▶ Select the
▶
Select from favorite
Press the
places.
5-20 I Navigation
Select the
guidance.
button to start
On the button where locations are not registered, the
location is registered, the
icon is displayed. When a
button disappears and the buttons 1 to 3 are displayed
as your favorite places.

Go Home
Yes
Go Home
Select the
button then select the
button to set the Favorite ‘Go Home’.
Register
in various searching
methods. Office, Special 1, Special 2, and
Special 3 can also be set as a Favorite
using the same steps.
Pressing any of the Favorite Place buttons
will start the route guidance to the saved
Favorite address.
Search I 5-21
05
05

Route Setting
Start Guidance
Routes
Add Waypoint
Start Guidance
The route can be set after searching for a
destination.
Destination Setting
All Routes
While the destination is set, the buttons
,
, and
appear. Select the desired button to change
a destination or add a waypoint.
5-22 I Navigation
After searching the destination, select the
button to set the location
as a destination.
Three routing options are displayed based
on real time traffic information and traffic
pattern information and shorter distance.
•
Route 1: Select the best route based
on combine real-time traffic information
and traffic pattern data on the map.
•
Route 2: Select the best route based on
real-time traffic information.
•
Shorter Distance: Select short distance,
regardless of how fast or slow progress
will be calculated.
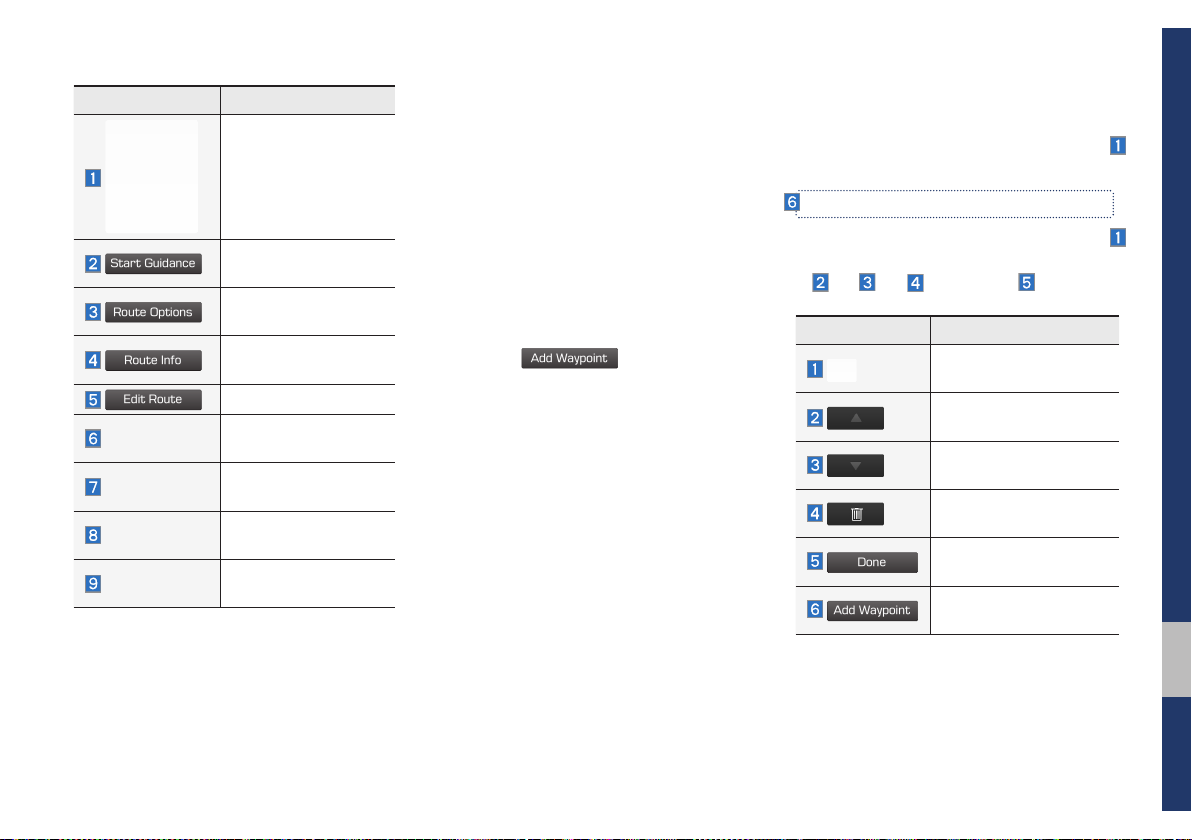
Name Description
Start Guidance
Route Options
Route Info
Edit Route
Add Waypoint
Done
Add Waypoint
Display total distance,
travel time. Select the
desired route.
Total
Freeway
Toll Road
Ferry
Start the guidance
with the route.
Change the route
option.
You can check route
information.
Edit the route.
Display total distance
of the route.
Display length of
freeway on the route.
Display length of toll
road on the route.
Display length of Ferry
route on the route.
Adding Waypoint
Select the
position as a waypoint and search the
route.
button to set the
Name Description
Display the selected
point on the map screen.
Move the selected item
up.
Move the selected item
down.
Delete the selected
item.
Select the button to finish editing.
Select the button to add
waypoint.
Search I 5-23
05
05

Registering Location
Save
Select
tion to register the location.
Enter the detailed information of the location to save.
button at the desired loca-
Route Guidance
Show route guidance detailed information.
Route Guidance Screen
Name Description
Displays the distance
and direction to the first
turn point.
Displays the distance
and direction to the second turn point.
Displays the lane information at the current
location. Display the
recommended direction in white, travelable
direction in white, and the
non-travelable direction
in grey.
Name Description
Displays the distance
to the destination and
the estimated time of
arrival. Press the button
to check the detailed
information. If no waypoint is set, you will see
the remaining distance
or estimated time of
arrival in turn each time
you click the button.
Cancel the route.
Displays the turn list.
5-24 I Navigation

Split Screen during Route Guidance
Details
Details
Approaching the turning point, the detailed
road and travel information is automatically
displayed on the right side of the screen.
Name Description
•
Turn Point: Display direction
and shape to turn shortly
•
Distance to turn: Display dis-
tance to next turn point
Road name to maneuver
Detail Distance Bar: Display dis-
tance to next turn point.
Touch the button to change display
view mode as below.
Name Description
Display the full map screen.
Junction View, Split screen.
(Active only when images are
available)
Display Turn-by-turn information
Additional info of Freeway exit or Rest area
can be displayed by selecting the
button.
Detailed information for POIs around freeway exit is listed by pressing POI symbols.
05
05
additional info can be displayed
on Freeway.
Search I 5-25

Route
Route
Cancel Route
Cancel Route
Yes
Route
Route Options
Route Options
Route
Edit Route
Edit Route
Canceling Route
Cancel the route.
Press the
tab.
NAV
▶
Select the
key. ▶ Select the
icon.
Route Options
Press the
tab.
NAV
▶
Select the
key. ▶ Select the
icon.
Editing Route
Edit the current route.
Press the
tab.
NAV
▶
Select the
key. ▶ Select the
icon.
Select the
Select the
5-26 I Navigation
icon.
button to cancel the route.
Select the
icon.
Determine the route options to guide the
route.
Select the
icon.

Name Description
Done
Add Waypoint
Route
Route Info.
Route Info.
Display the selected point
on the map screen.
Move the selected item
up.
Move the selected item
down.
Delete the selected item.
Press the button to finish
editing.
Press the button to add
an waypoint.
Add a waypoint through various searching
methods.
Display Route Information
Press the
tab.
Select the
NAV
▶
Select the
key. ▶ Select the
icon.
icon.
05
Route I 5-27

Check the information on the map. Select
Avoid Street
Done
Route
Route Overview
Route Overview
Route Options
Route Info.
Edit Route
the desired item to see the map information.
Avoiding road
Click the
street or road.
button to avoid the
Route Overview
Check the information on route including
the distance, estimated time, toll fees, etc.
Press the
tab.
icon.
NAV
key. ▶ Select the
▶
Select the
Name Description
Change the search
option.
You can check route
information.
Edit the current route.
Check the desired item and select the
button to finish.
5-28 I Navigation
Select the
icon.

Avoid Street
Route
Avoid Street
Avoid Street
Done
mile, km
Search new route by avoiding the selected
street(s).
Press the
tab.
NAV
▶
Select the
key. ▶ Select the
icon.
Navigation Settings
Display
Change general settings.
Name Description
Change the unit of
Select the button to change
the previous destination view setting when starting the navigation.
When button selected, navigation will automatically return
to current vehicle position after
scrolling through map display.
Change the route guidance line
colors.
Select the
traffic information on the map.
Check the GPS information.
button to display
.
Select the
Select the
icon.
button to plan new route
after selecting the street(s) that you want
to avoid.
05
Navigation Settings I 5-29

Select the
GPS Information
to display the
detail GPS satellites information.
Name Description
Receiving
Searching
Location
Elevation
Active when current position is being calculated.
Active when searching for
satellite signal.
Display current position of
the vehicle.
Display current elevation
of the vehicle.
Guidance
Change the guidance setting.
Name Description
Set the frequency of guidance.
Route guidance is given less fre-
quently.
Guidance will be provided fre-
quently.
Change whether to show speed
limit by pressing
Searching faster routes internally
using traffic information.
•
Auto: When set to Auto, during
route guidance, faster route
is automatically changed to
avoid traffic incident.
•
On: If set to On, faster route
pop-up option appears during
route guidance.
•
Off: If set to Off, no faster
routes are suggested to avoid
traffic incident during route
guidance.
.
5-30 I Navigation
 Loading...