

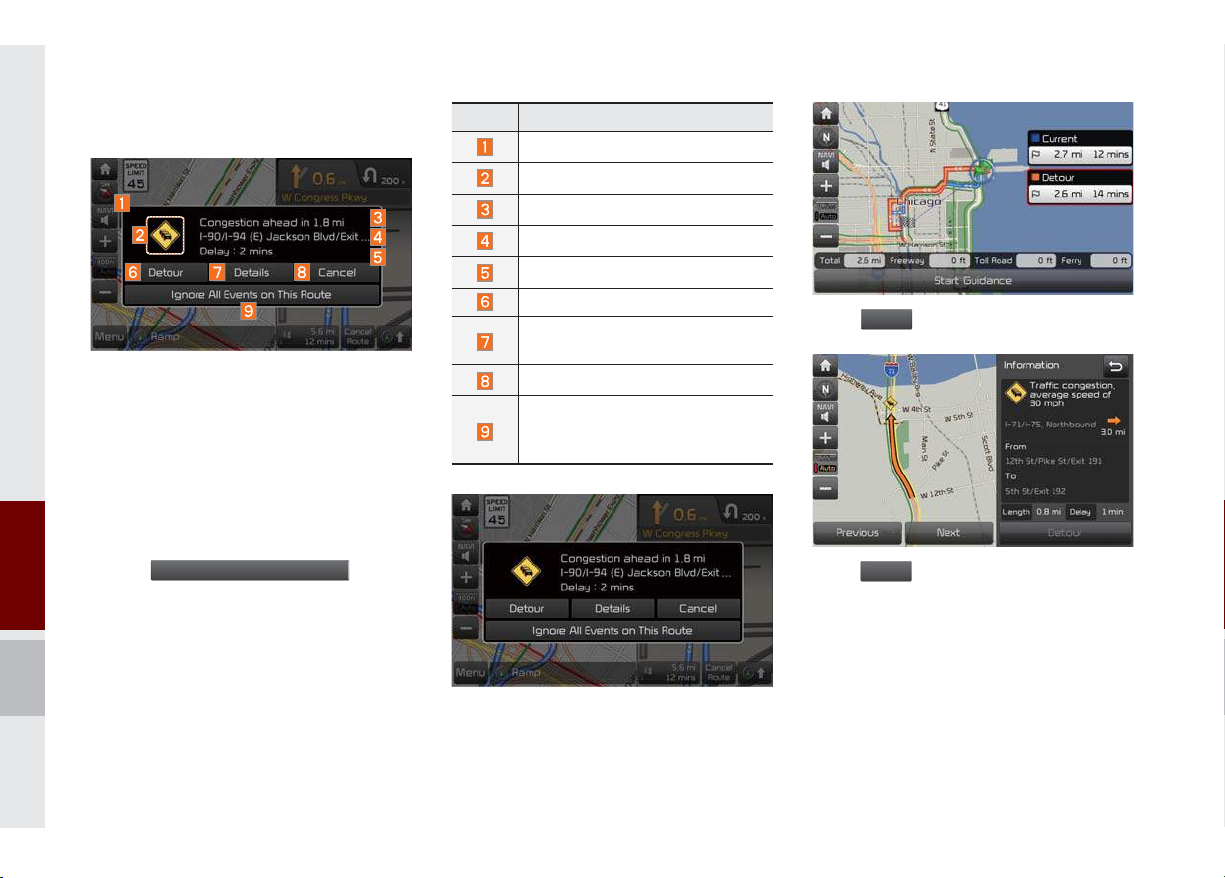
Traffi c Pop-up
D
s
If there is “red traffic flow” on the route, a
traffic information pop-up is displayed.
On the traffic information pop-up window,
brief information is displayed and Details
and Detour can be selected.
If you do not wish to see this pop-up displayed again during the current route,
select
on the display.
Ignore All Events on This Route
button
Name Description
Pop-up Icon
Symbol of traffic event
Road Name/Road Number
Distance from current location.
Estimated delay time.
Search detour route.
View the detailed information
regarding traffic event.
Close the pop-up message.
Set not to display pop-up on the
current route. (Maintained until
the destination is reset)
Press
Press
etour
to change the route.
Detail
for further information.
On the traffic information pop-up, select
detour or details to perform action.
6-12 I Navigation
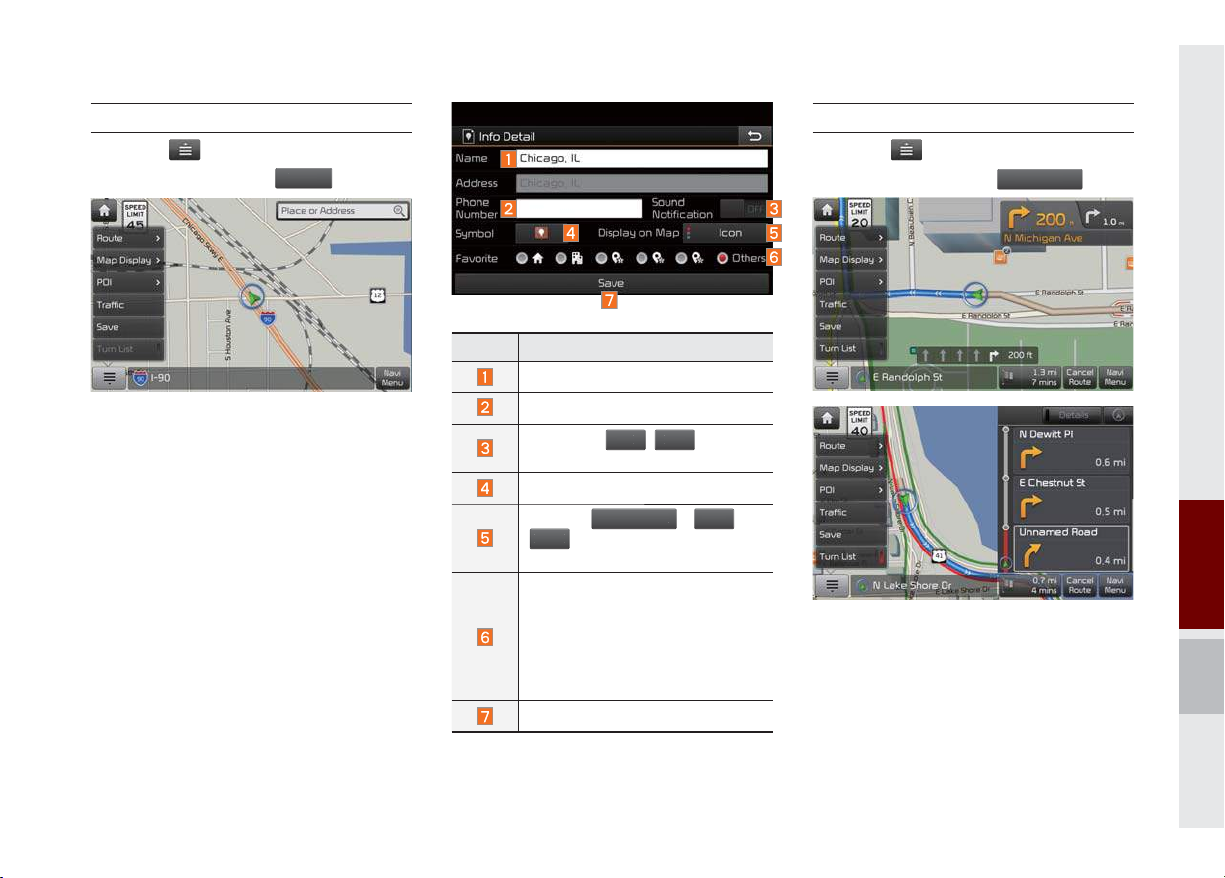
Save
S
N
OFF
e
I
No
t
Press the button on the bottom left of
the screen ▶ Select the
To store the location on the current map to
the address book.
ave
.
Name Description
Change the name.
Enter the phone number.
Select the
O
,
set the sound notification.
Possible to register Symbol.
Press
Icon&Nam
ne
to display on the map
screen.
Designate to the Favorite item.
When the favorite is designated,
press the button on the bottom
of the Destination menu and
request the route guide immediately.
Save the setting.
button to
con
,
or
Turn List
Press the button on the bottom left of
the screen ▶ Select the
Turn on or off the Turn List.
Turn Lis
.
06
Menu I 6-13
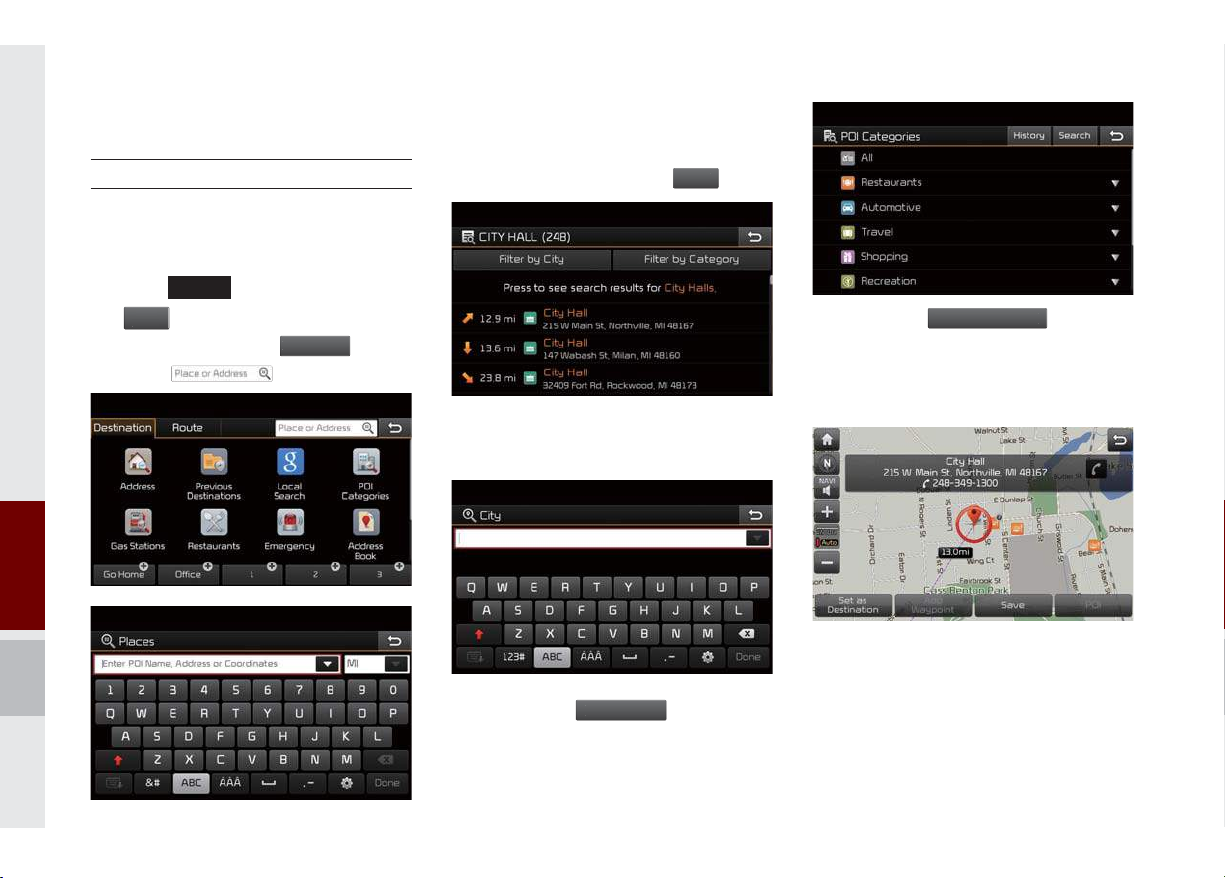
Destination Search
Navi
u
Destinati
Done
Filt
Cit
y
Places
You can enter POI Name, Address or
Coordinates that you wish to search by.
Enter the POI Name, Address and Coordinates of the location you want in the input
window above, and press the
button.
Press the
the
MAP
head unit key. ▶ Select
VOICE
in the bottom of right of the
Men
screen. ▶ Select the
Select the
6-14 I Navigation
on
Search Bar.
tab. ▶
If you select a location from the search
result list, it will bring you to the point.
er by
If you press the
y
button on the
search result screen, it will bring you to the
City search screen where you can filter the
search results by city names.
If you press the
Filter by Categor
button from
the search result screen, it will bring you to
the POI Categories screen where you can
filter the search results by POI Categories.
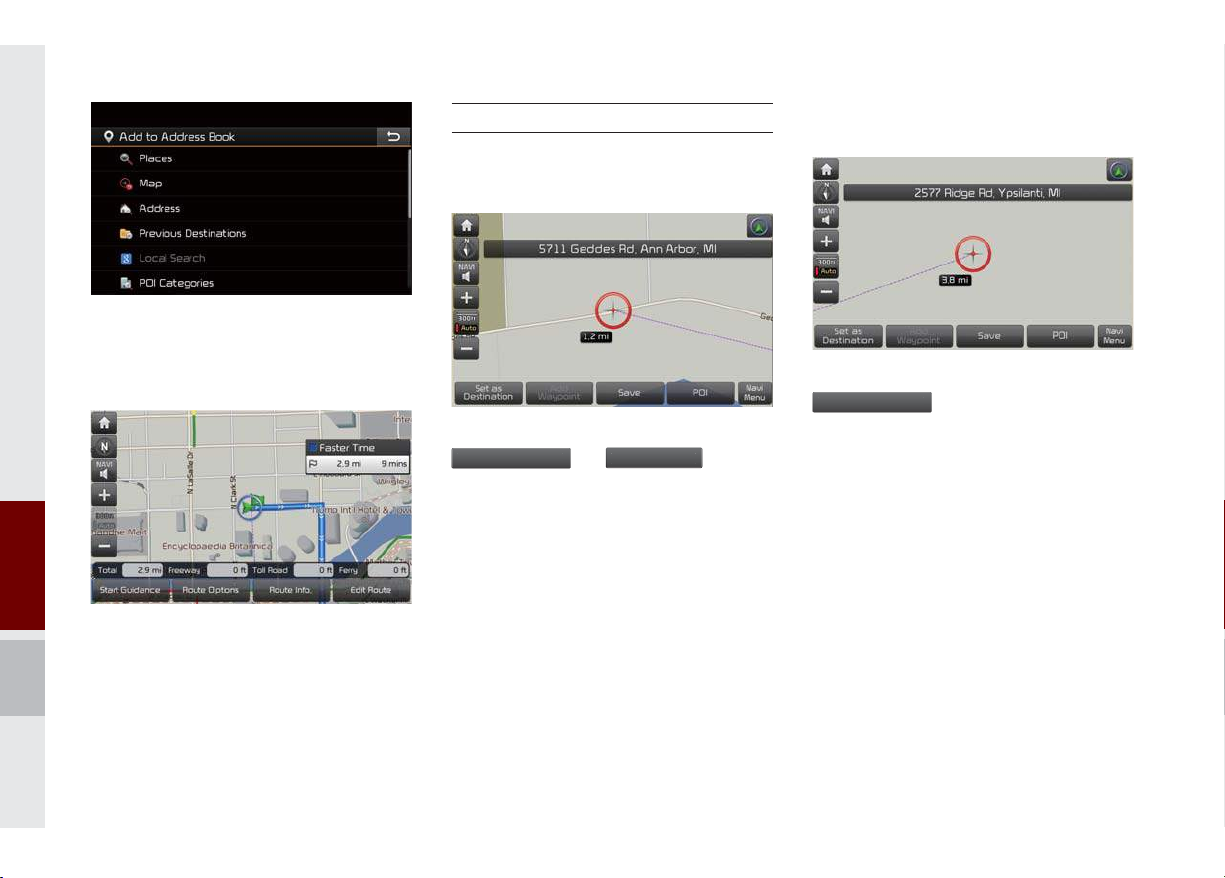
Once the destination has been identified
either by POI name, address, or coordinates, the map screen will be displayed.
From this screen you can set the destination or add a waypoint, or add the displayed destination to your address book.
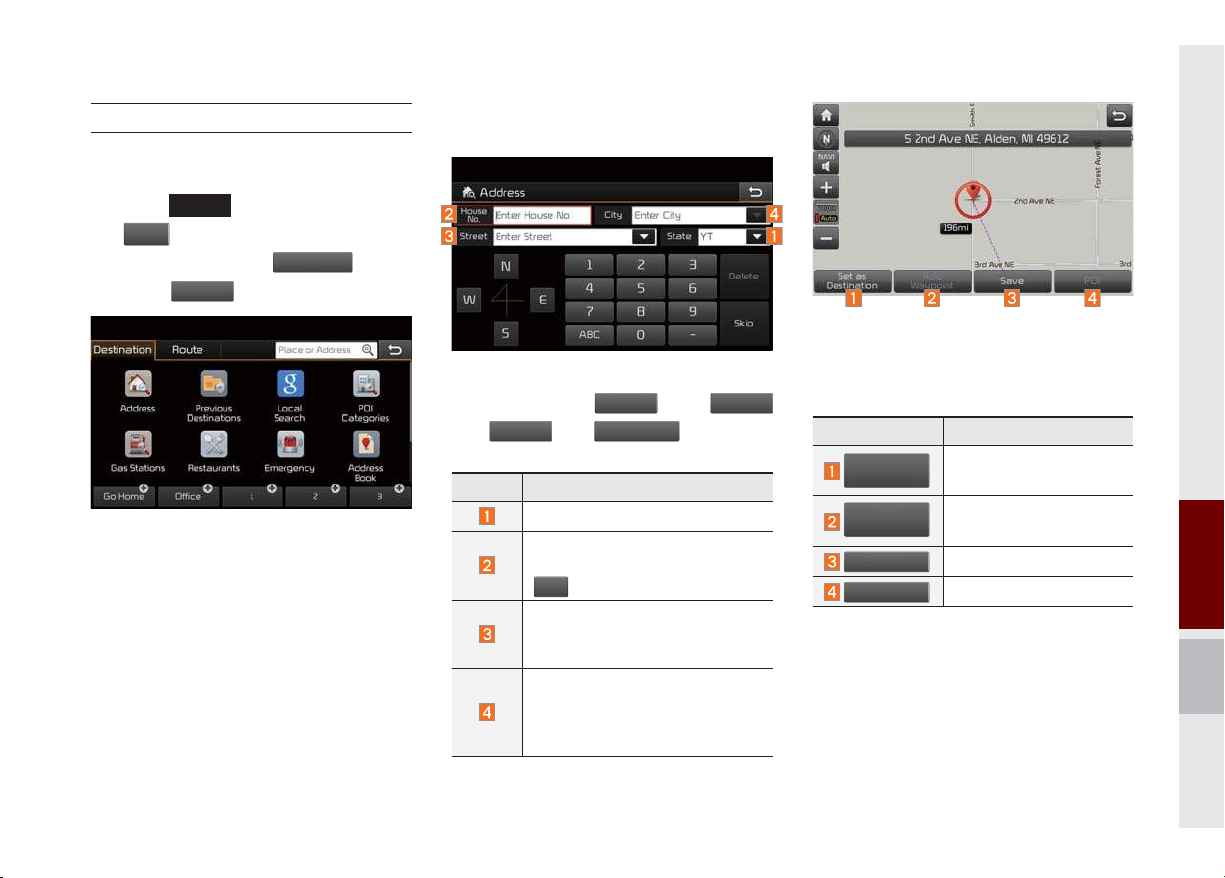
Address
i
u
e
y
S
.
Ski
D
Add
W
t
S
P
Set destination by address search.
How to Search Address
MAP
Press the
Nav
the
Men
in the bottom of right of the
VOICE
head unit key.
screen. ▶ Select the
Select the
Address
icon.
Destination
▶
Select
tab. ▶
Search criteria can be entered in any
then
Stat
House No
order. Example:
treet
then
Name Description
Select state to search.
Enter house number. If you don’t
know the house number, press
p
button.
Enter a street name. If same
street names exist in other cities,
the list of cities will be displayed.
Select a city before entering
the street name. Addresses are
searched only from the selected
city.
then
Cit
.
Enter the address to check the location
information on the map.
Name Description
estination
Set as
aypoin
ave
OI
Set the location as a
destination.
Set the location as a
waypoint.
Save the location.
Search nearby POIs.
06
Destination Search I 6-15
Previous Destinations
Navi
u
D
n
A
Destinations
S
s
Search
Delete
M
l
U
Delete
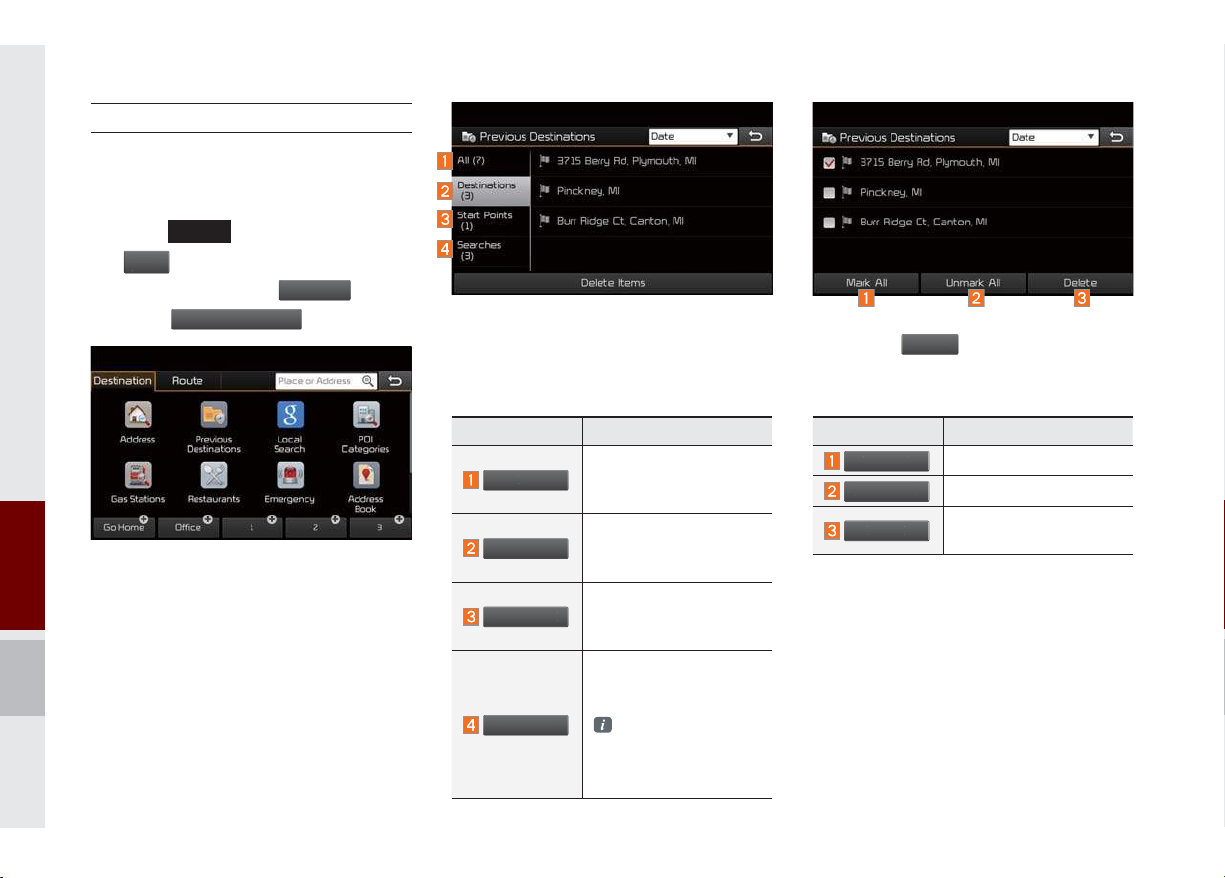
Select from previously inputted addresses
and POIs.
Press the
the
MAP
head unit key. ▶ Select
VOICE
in the bottom of right of the
Men
screen. ▶ Select the
Select the
Previous Destinations
estinatio
tab. ▶
icon. Arrange by all, latest destinations, latest
searched places and latest departing
places. Arrange in order of date and time.
Name Description
tart Point
ll
Display all destinations,
departing places, and
searched places.
Display previous destination places for route
guidance.
Display previous departing places for route
guidance.
Display previously
searched places for
route guidance.
es
But, not displayed
when the searched
places are set as
destination.
Press the
button to delete the
information.
Name Description
ark Al
nmark All
Select all.
Deselect all.
Delete the selected
item(s).
6-16 I Navigation
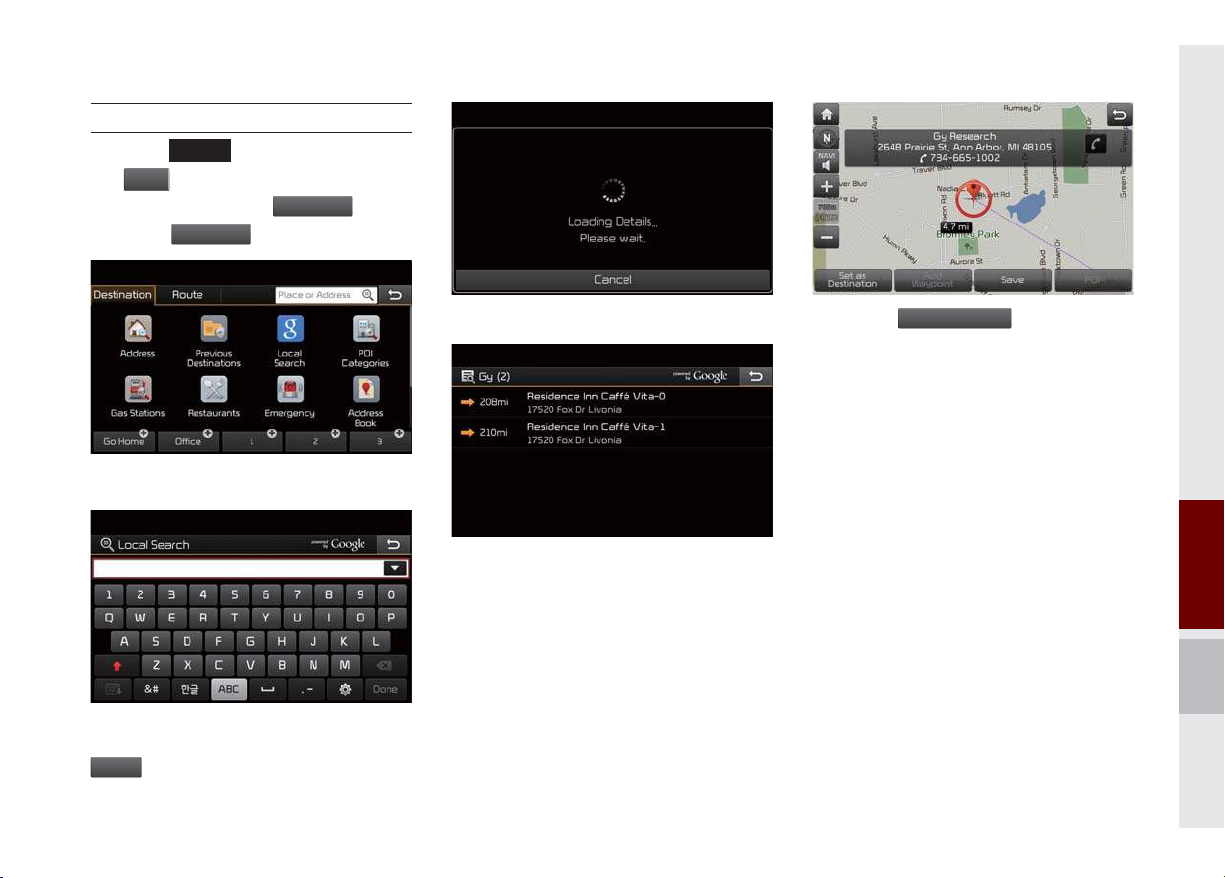
Local Search
Navi
Menu
Destinati
e
MAP
Press the
the
in the bottom of right of the
screen. ▶ Select the
Select the
VOICE
Local Search
head unit key.
icon.
▶
on
tab. ▶
Select
Runs Google Local Search.
Enter the desired keywords and press the
Don
button.
Searching is in progress.
If one or more results are found, the
search results are displayed. Select one of
the search result.
Press the
guidance.
Set as Destination
button to start
Destination Search I 6-17
06
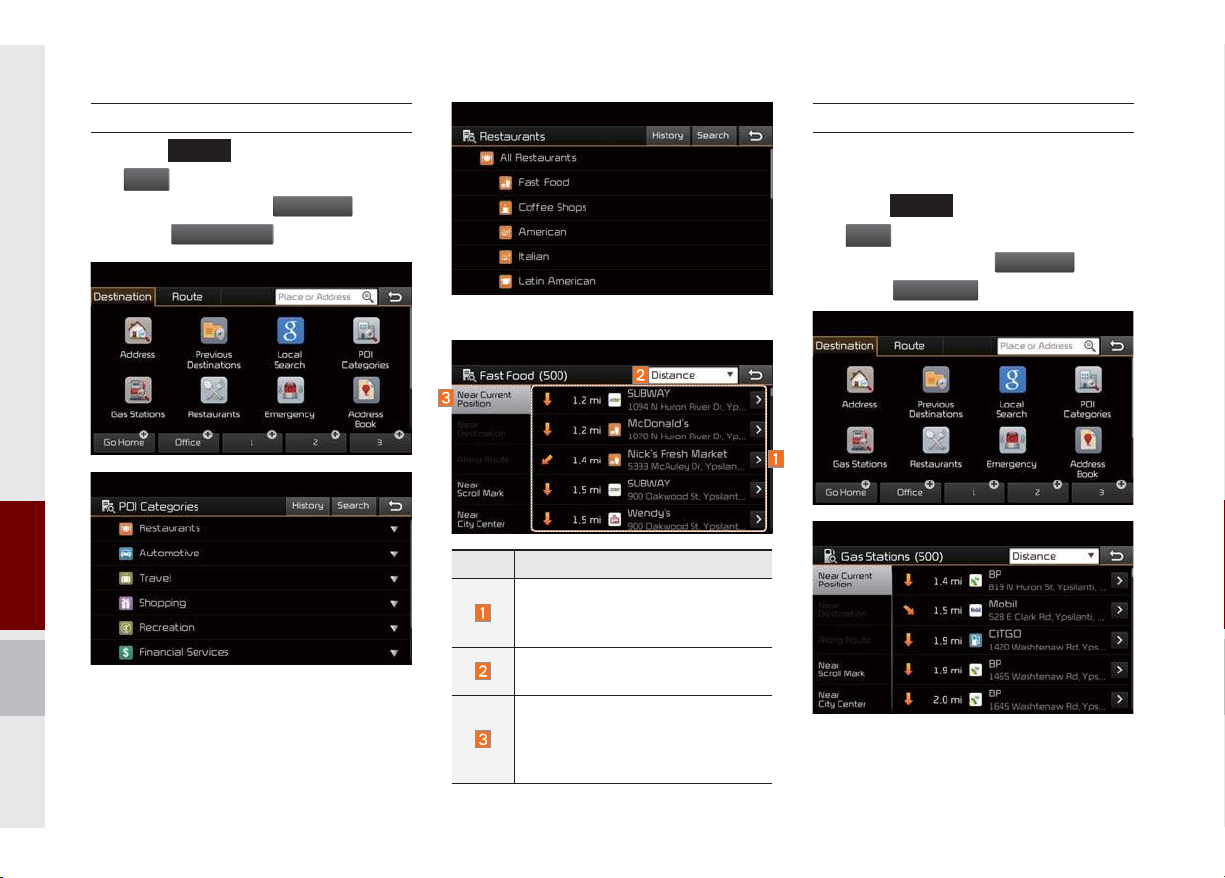
POI Categories
N
Menu
Destinati
i
Menu
n
s
MAP
Press the
avi
the
in the bottom of right of the
screen. ▶ Select the
Select the
Select the desired item.
head unit key. ▶ Select
VOICE
POI Categories
icon.
on
tab. ▶
Select the desired item in the sub-categories.
Name Description
Select the desired destination
among the searched items and
add it as a way point.
Arrange in order of Distance and
Name.
Arrange in order of Near Current
Position, Near Destination, Along
Route, Near Scroll Mark and Near
City Center.
Gas Stations
Search for gas stations.
MAP
Press the
Nav
the
in the bottom of right of the
screen. ▶ Select the
Select the
VOICE
Gas Station
head unit key.
Destinatio
icon.
Select the desired destinations among the
search items.
▶
Select
tab. ▶
6-18 I Navigation
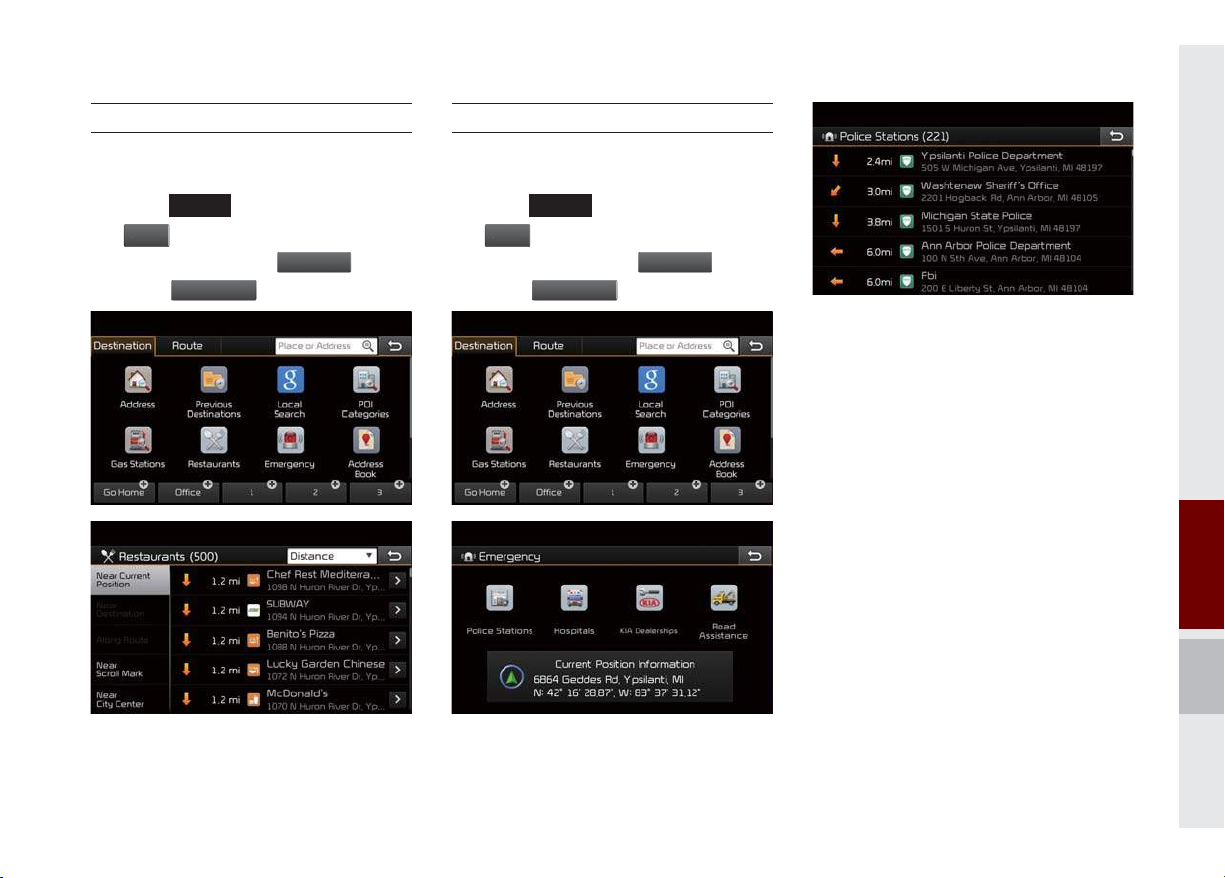
Restaurants
i
u
n
R
s
N
E
y
Search restaurants.
Emergency
Search emergency facilities.
MAP
Press the
Nav
the
Men
in the bottom of right of the
VOICE
head unit key.
screen. ▶ Select the
Select the
estaurant
icon.
Destinatio
▶
Select
tab. ▶
Select the desired destination among the
searched items.
MAP
Press the
avi
the
Menu
in the bottom of right of the
VOICE
head unit key.
screen. ▶ Select the
Select the
mergenc
icon.
Destination
▶
Select
tab. ▶
Check the current location information and
select the desired item in the sub menu (ex.
Police Stations)
Select the desired destination among the
searched items.
06
Destination Search I 6-19
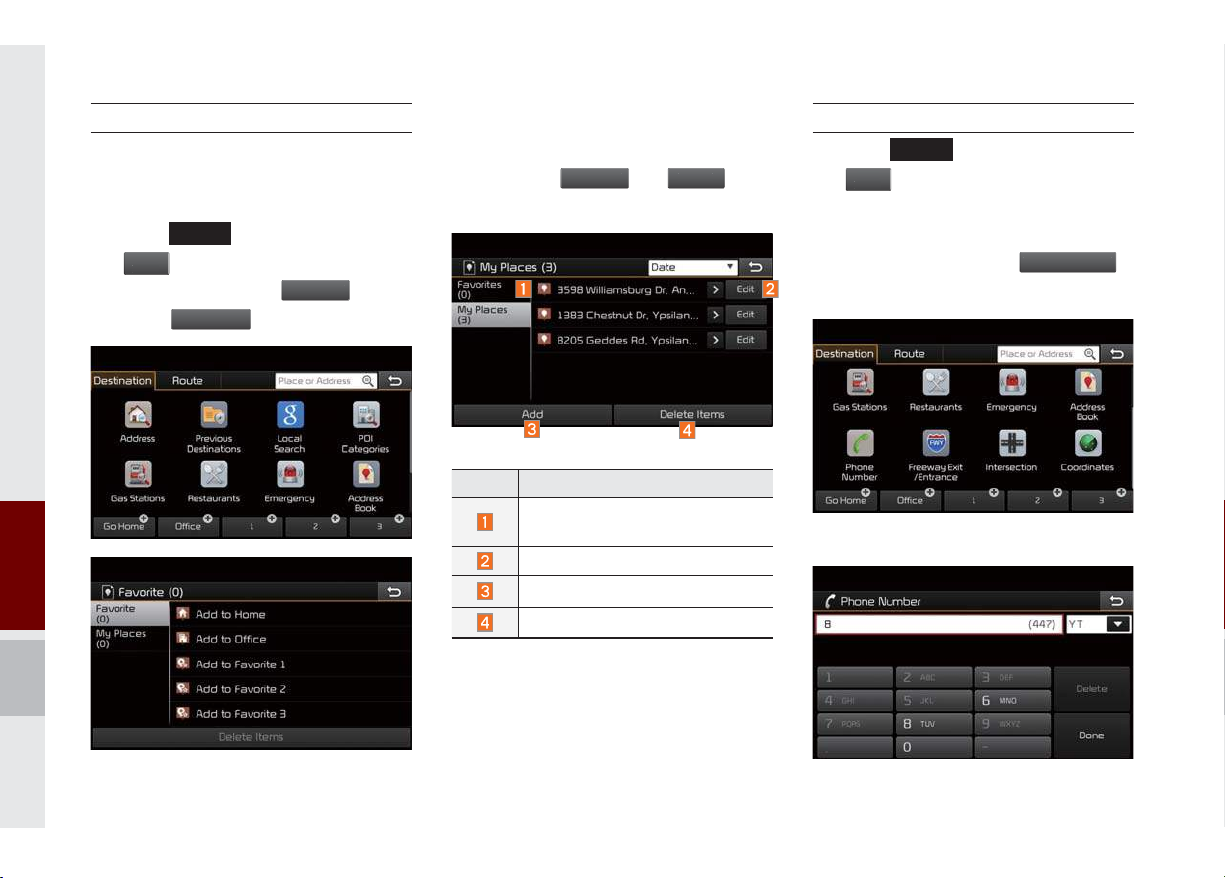
Address Book
u
D
A
k
Go Home
O
Navi
Menu
P
r
Search the destination with the address
book.
MAP
Press the
Navi
the
Men
in the bottom of right of the
VOICE
head unit key.
screen. ▶ Select the
Select the
ddress Boo
icon.
estination
▶
Select
tab. ▶
If you save address in the Favorites tab, you
can set destinations easily by pressing the
icons such as
and
at the
ffice
bottom of the Destination menu.
Name Description
Select the desired destination
from the searched items.
Edit the item.
Register a new Address.
Delete the desired item.
Phone Number
MAP
Press the
the
screen.
▶
in the bottom of right of the
Flick the screen in up direction to
VOICE
head unit key.
scroll to the bottom row of icons in the
Destination tab. ▶ Select the
search POI by phone.
Search destination by phone number.
▶
Select
hone Numbe
to
Select the desired group.
6-20 I Navigation
Type phone number to search. To search for
e
N
Menu
a list of numbers based on a partial phone
number entry, enter a few numbers and
Don
press
to narrow the search results.
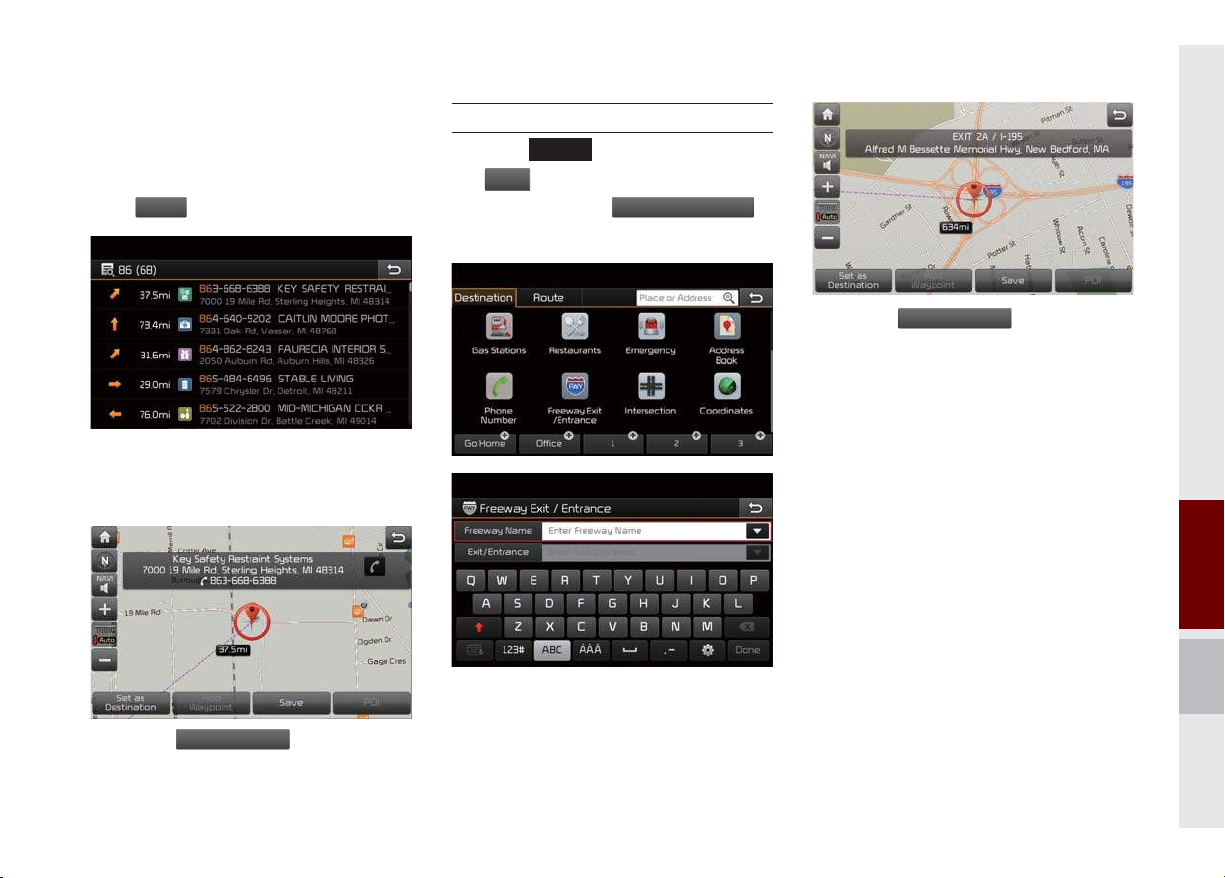
Freeway Exit/Entrance
MAP
Press the
avi
the
in the bottom of right of the
screen. ▶ Select the
search by freeway exit/entrance.
VOICE
head unit key.
Freeway Exit/Entrance
▶
Select
to
Press the
Set as Destination
button to start
guidance.
Select the desired destination among the
searched items.
Type freeway name and exit/entrance.
06
Press the
Set as Destination
button to start
guidance.
Destination Search I 6-21
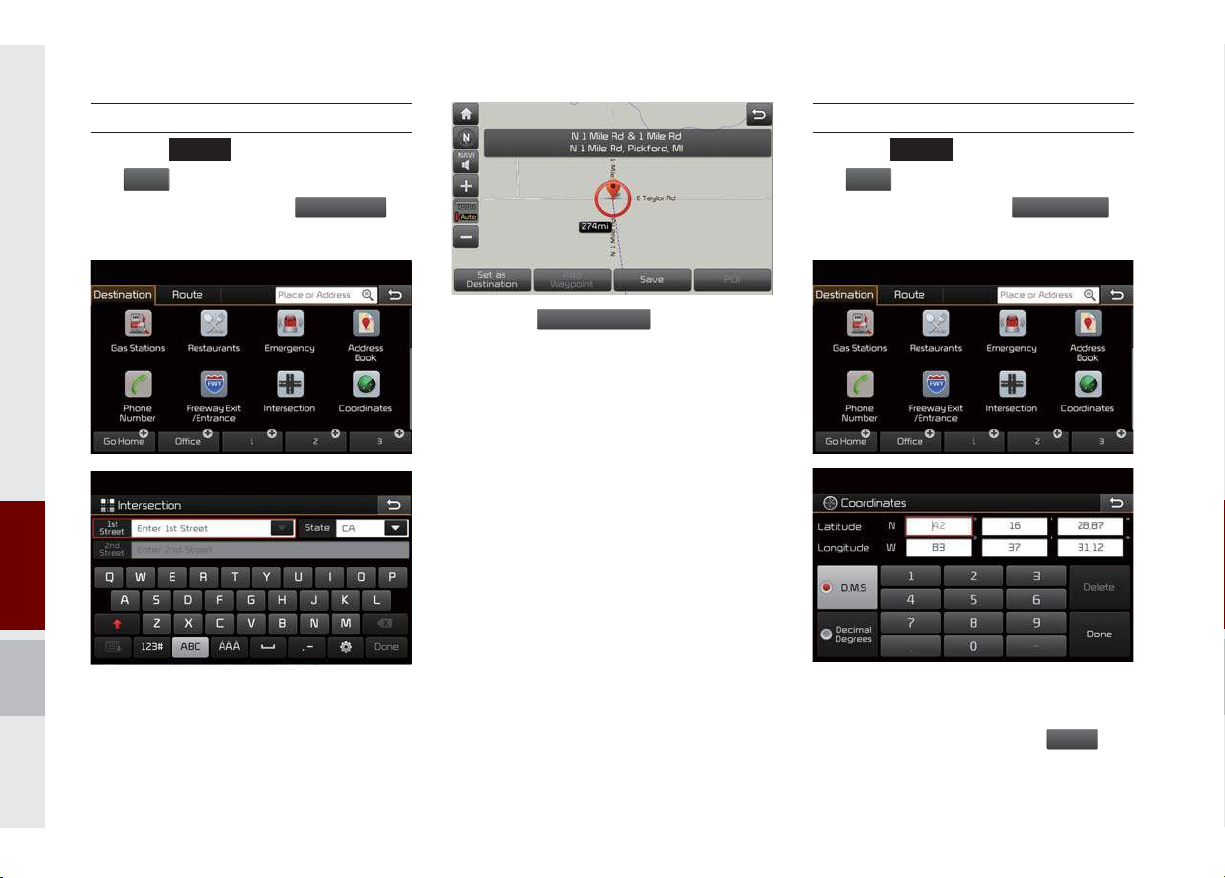
Intersection
N
Menu
I
n
Navi
Menu
e
MAP
Press the
avi
the
in the bottom of right of the
screen. ▶ Select the
search by intersection.
VOICE
head unit key.
▶
ntersectio
Select
to
Coordinates
MAP
Press the
the
in the bottom of right of the
screen. ▶ Select the
search by coordinates.
VOICE
head unit key.
▶
Coordinates
Select
to
Press the
Set as Destination
button to start
guidance.
Type 1st Street name, the State, 2nd
Street name.
There are two ways to search by coordinates (D.M.S or Decimal Degrees). After
typing coordinates, press the
Don
but-
ton to search.
6-22 I Navigation
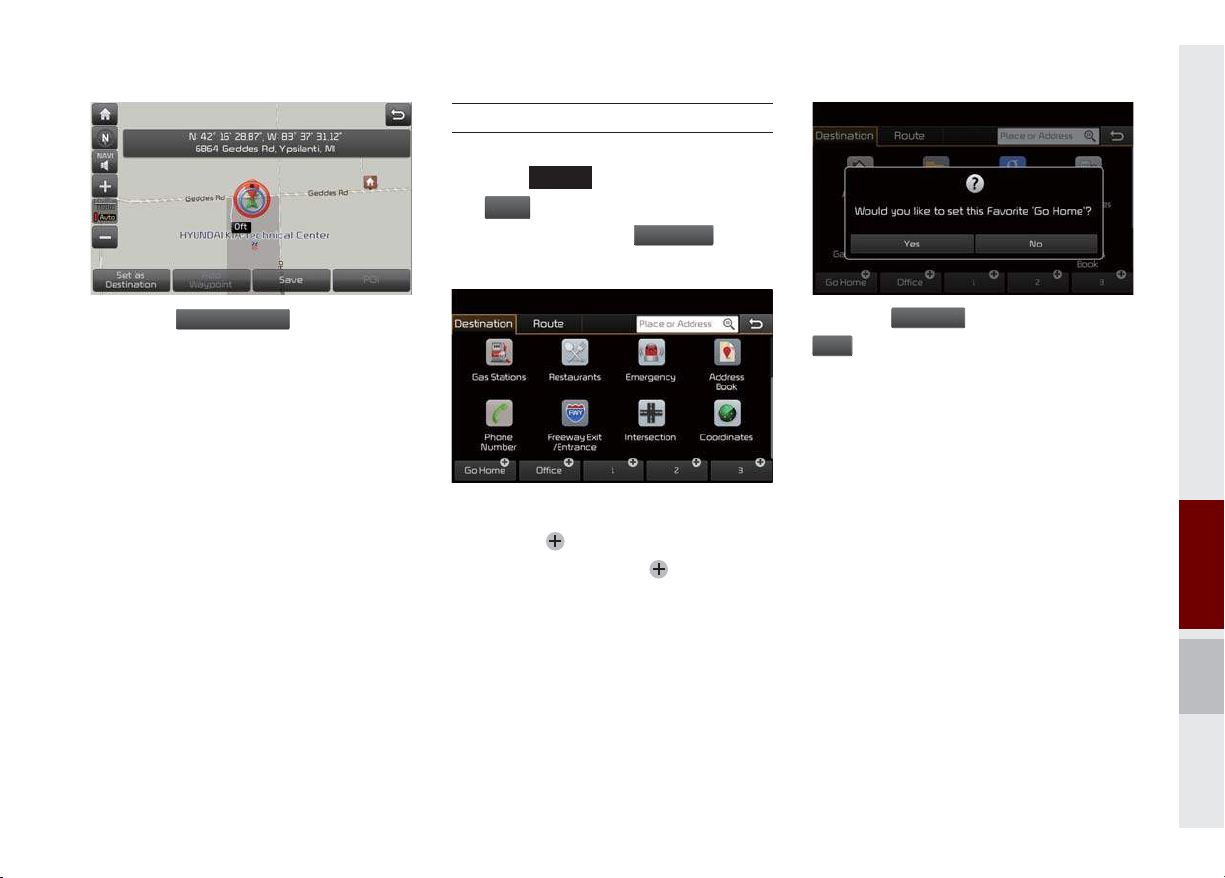
Favorite Places
N
Destinati
G
Set the route using your favorite places.
Press the
the
screen. ▶ Select the
Select from favorite places.
MAP
head unit key.
VOICE
avi
in the bottom of right of the
Menu
▶
on
tab. ▶
Select
Press the
guidance.
Set as Destination
button to start
On the button where locations are not registered, the
location is registered, the
icon is displayed. When a
button disappears and the buttons 1 to 3 are displayed
as your favorite places.
Press the
Yes
o Home
button then press the
button to set the Favorite ‘Go Home’.
Destination Search I 6-23
06
Office, Special 1, Special 2, and Special 3
S
can also be set as a Favorite using the same
steps.
Pressing any of the Favorite Place buttons
will start the route guidance to the saved
Favorite address.
Route Setting
The route can be set after searching for a
destination.
While the destination is set, the buttons
Set as Destination
Press the desired button to change a destination or add a waypoint.
and
Add Waypoint
appear.
Destination Setting
After searching the destination, press the
et as Destination
as a destination.
button to set the location
6-24 I Navigation
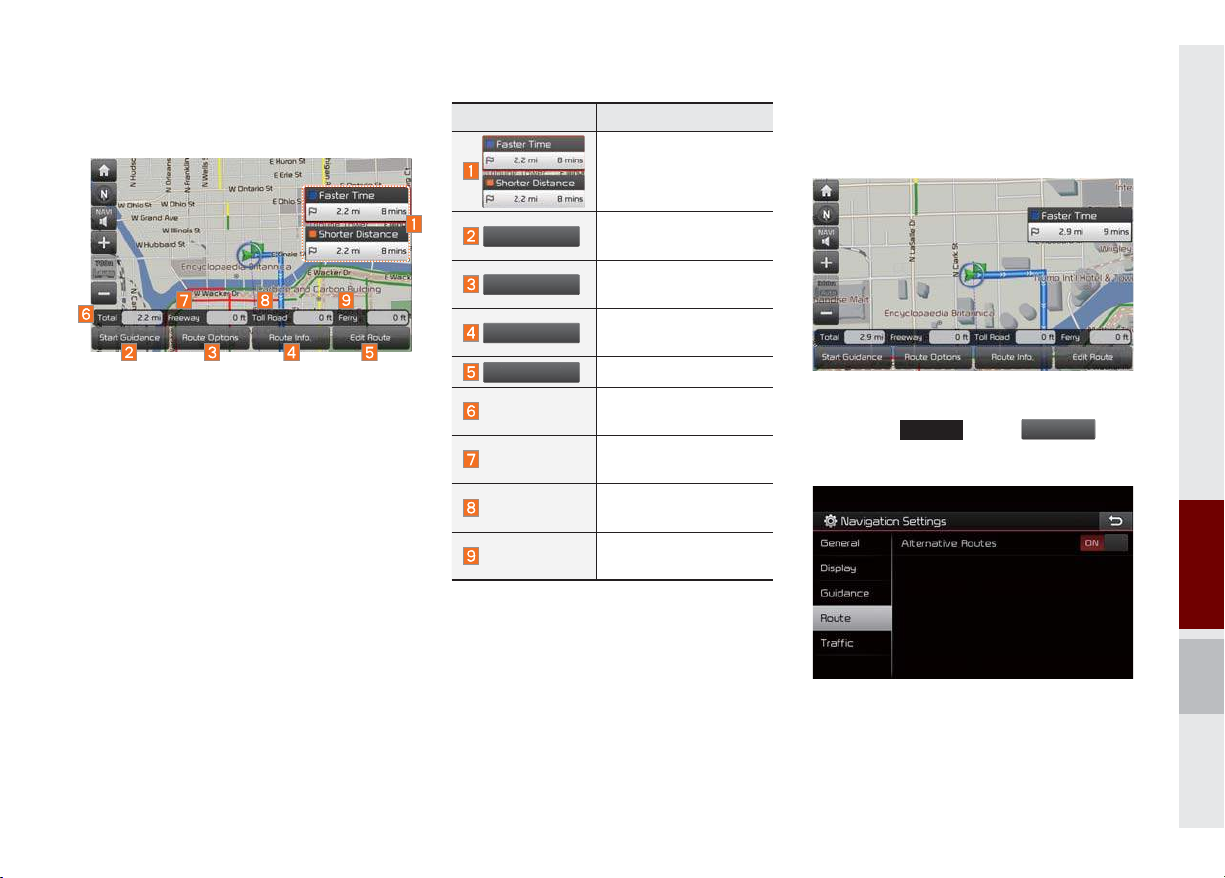
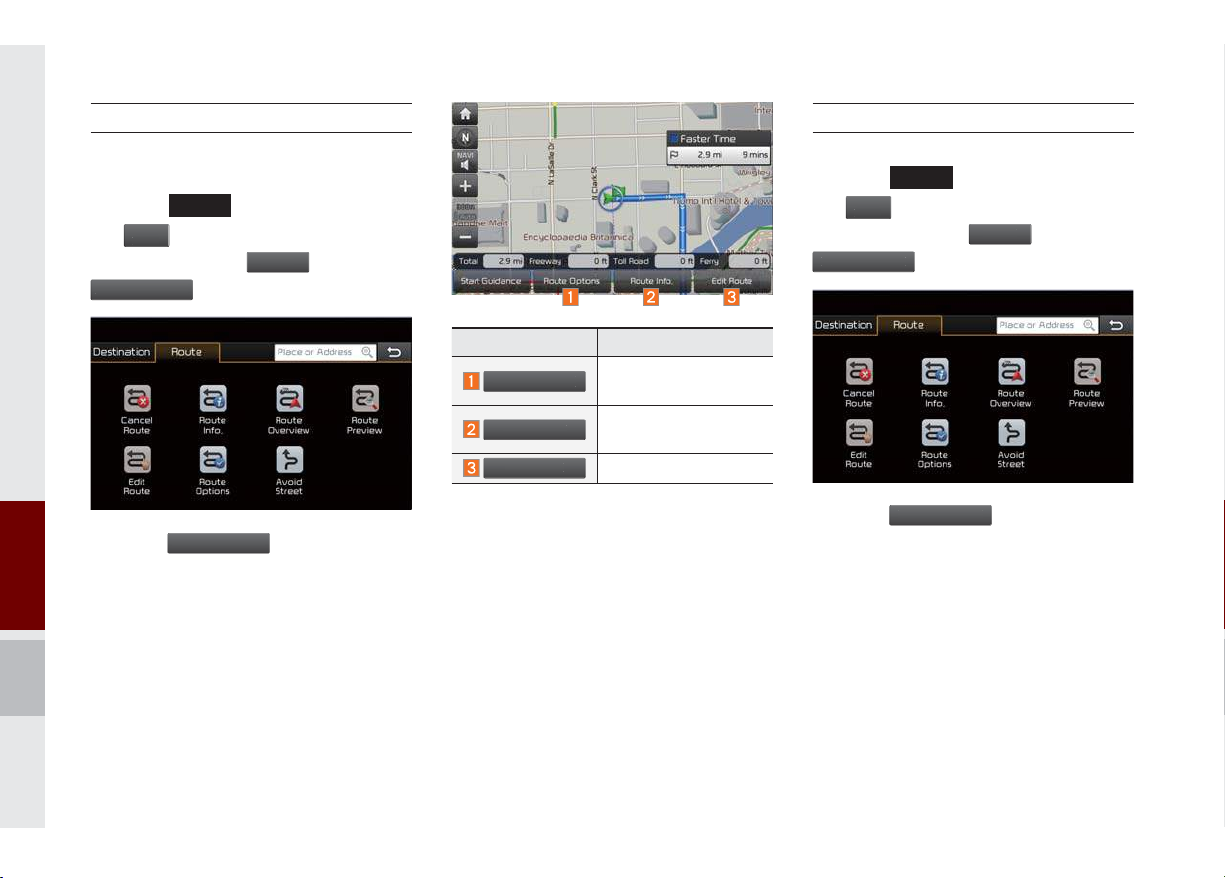
All Routes
Start Guid
N
Name Description
Display total distance,
travel time. Select the
desired route.
The route will be calculated using the
option “Faster Time” by default.
When the alternative routes option is
enabled in navigation setting, two routing
options are displayed based on faster time
and shorter distance.
• Faster Time: Select time-optimized
route, being the fastest roads.
• Shorter Distance: Select short distance,
irrespective of how fast or slow progress
will be calculated.
Route Options
Route Info.
Edit Route
Total
Freeway
Toll Road
Ferry
ance
Start the guidance
with the route.
Change the route
option.
You can check route
information.
Edit the route.
Display total distance
of the route.
Display length of
freeway on the route.
Display length of toll
road on the route.
Display length of Ferry
route on the route.
Alternative routes can be suggested if
necessary,
▶
Route ▶ Alternative: ON
SETUP
key
▶
avigation
Icon
06
Destination Search I 6-25
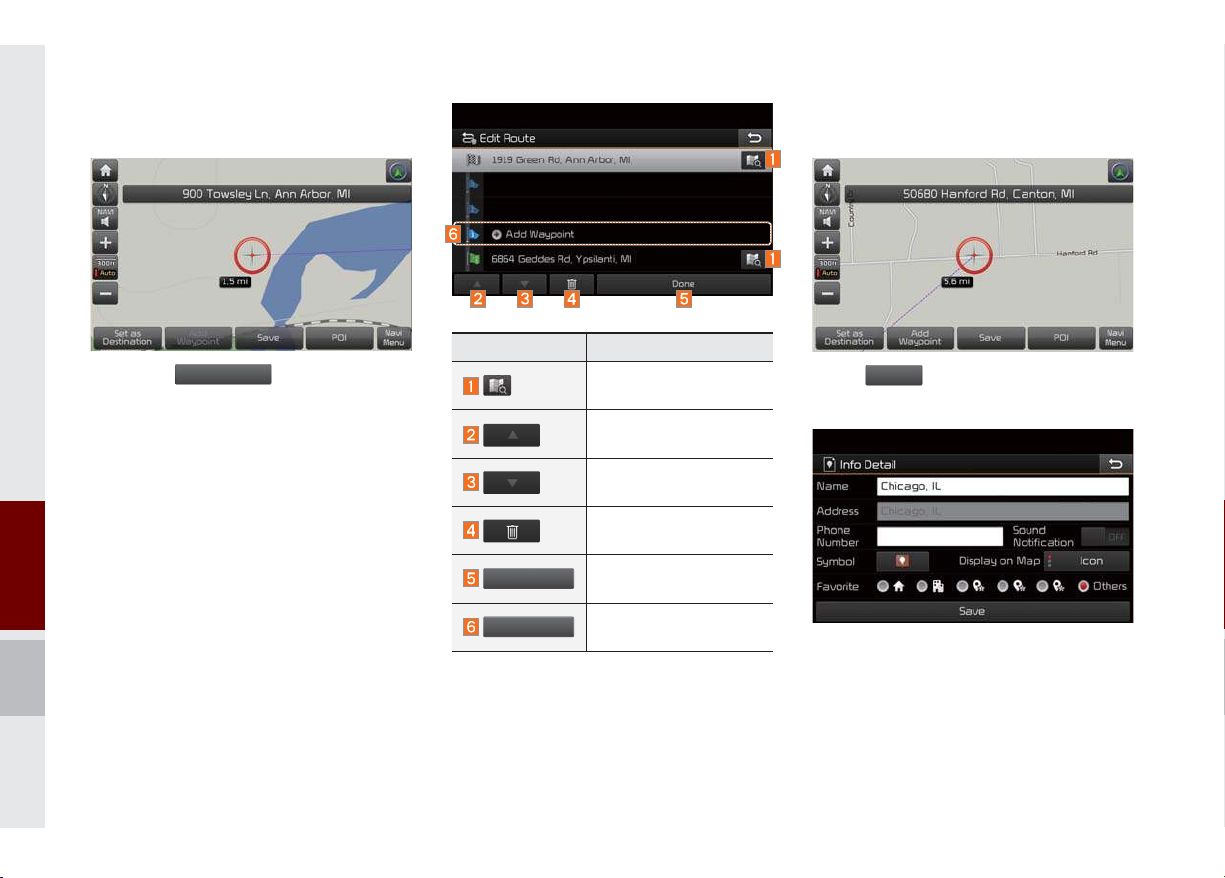
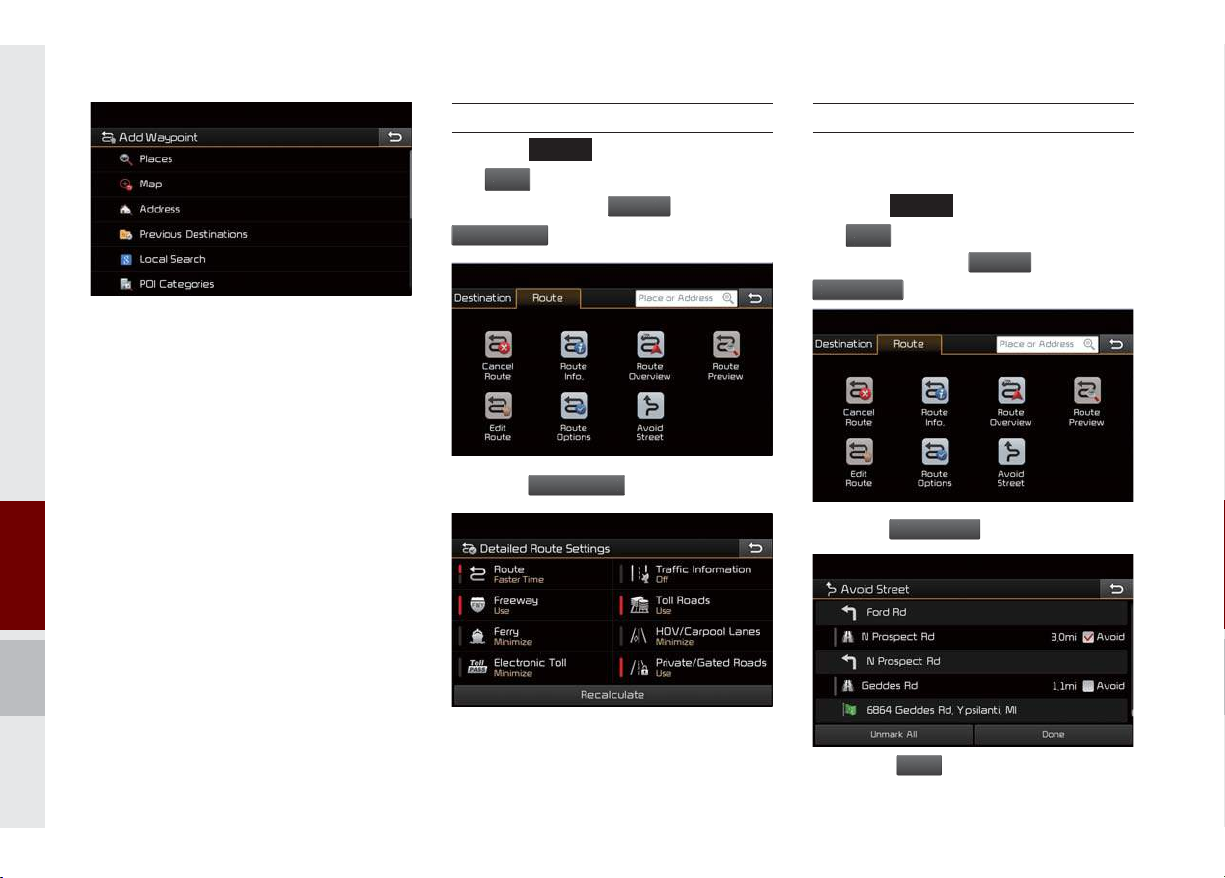
Adding Waypoint
A
Done
A
t
Sav
Press the
position as a waypoint and search the
route.
dd Waypoint
button to set the
Name Description
dd Waypoin
Display the selected
point on the map screen.
Move the selected item
up.
Move the selected item
down.
Delete the selected
item.
Press the button to finish editing.
Press the button to add
waypoint.
Registering Location
Press
register the location.
Enter the detailed information of the location to save.
e
at the desired location to
6-26 I Navigation
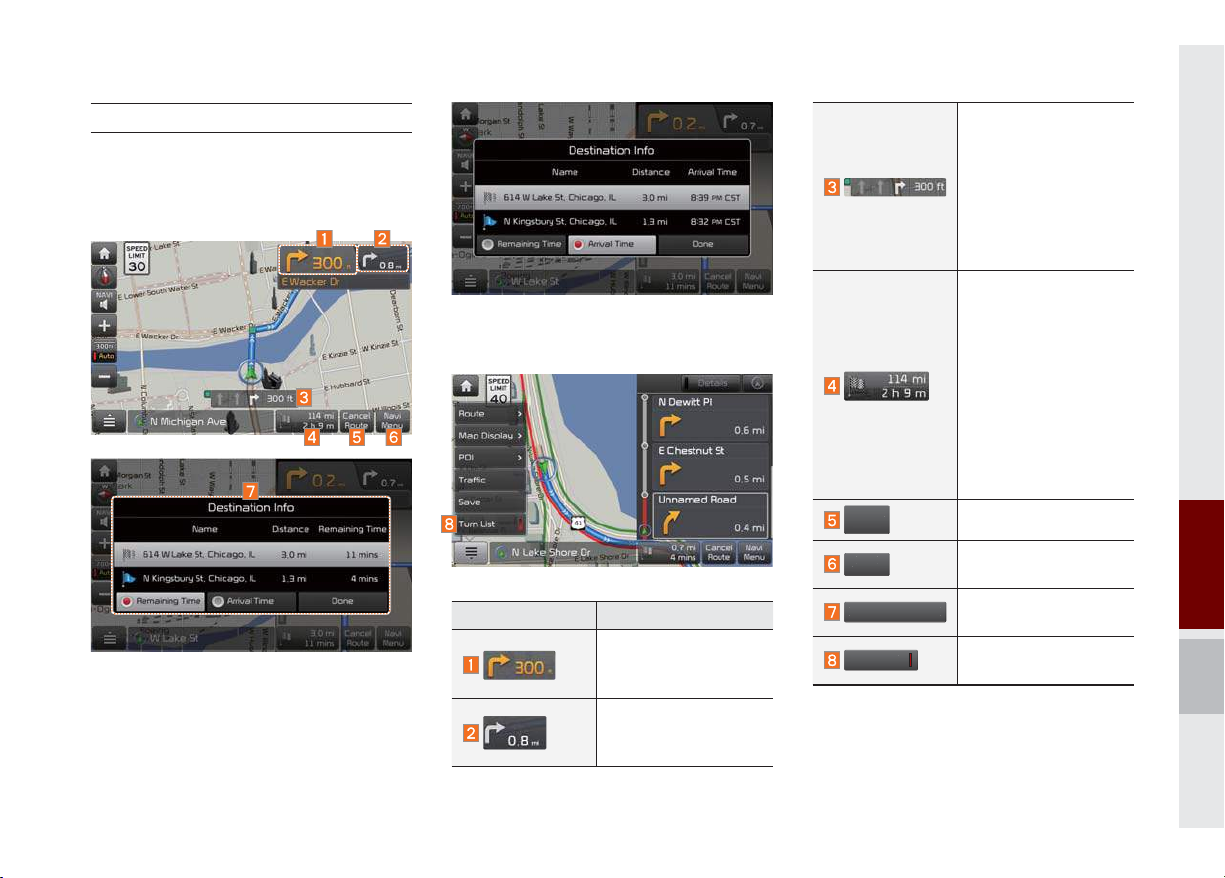
Route Guidance
Ca
Navi
Menu
T
t
Show route guidance detailed information.
Route Guidance Screen
Remaining Time: Display the time remaining until destination.
Arrival Time: Display the estimated time of
arrival.
Name Description
Displays the distance
and direction to the
first turn point.
Displays the distance
and direction to the
second turn point.
ncel
Route
Destination Info
urn Lis
Displays the lane information at the current
location. Display the
recommended direction in white, travelable
direction in white, and
the non-travelable
direction in grey.
Displays the distance
to the destination and
the estimated time of
arrival. Press the button
to check the detailed
information. If no waypoint is set, you will see
the remaining distance
or estimated time of
arrival in turn each time
you click the button.
Cancel the route.
Enter the navigation
menu screen.
Displays the destination information.
Turn on or off the Turn
List.
06
Destination Search I 6-27
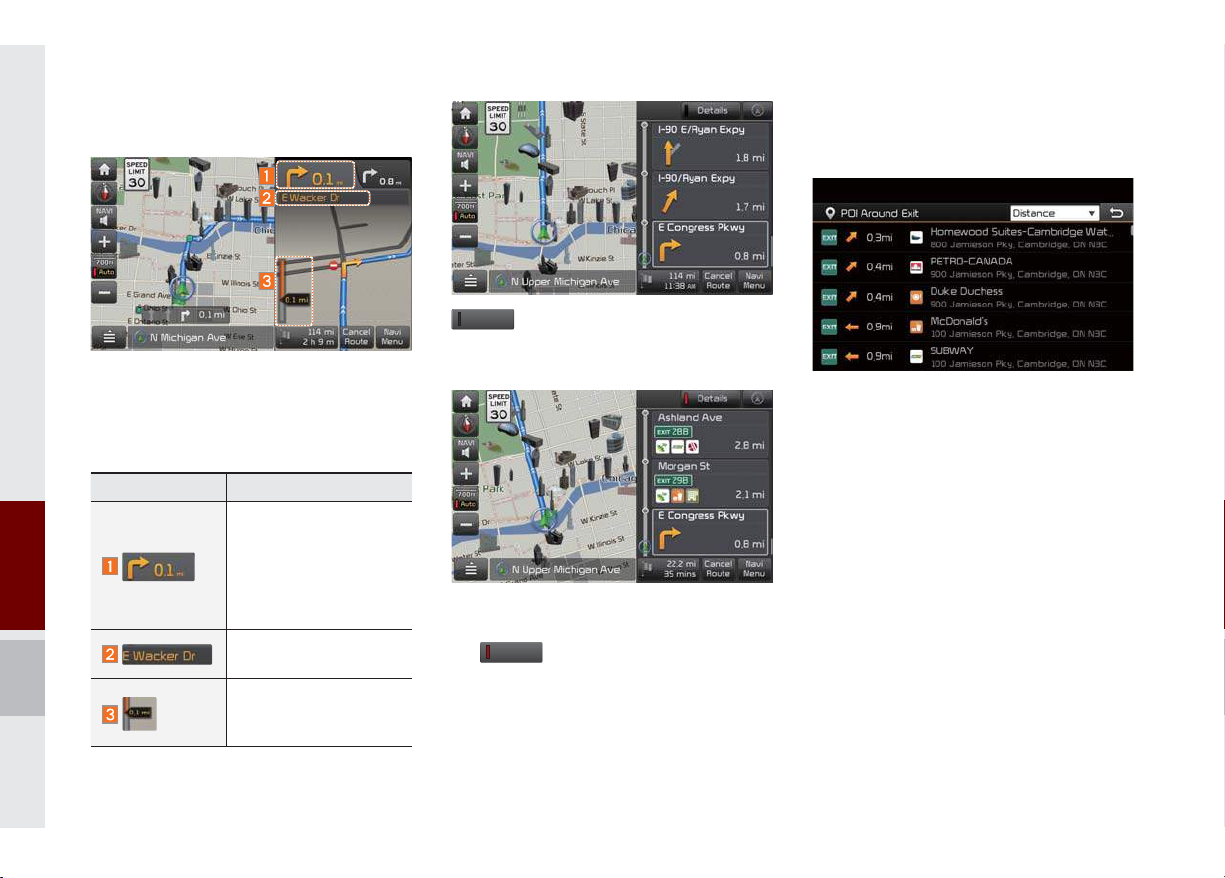
Split Screen during Route Guidance
s
s
Approaching the turning point, the detailed
road and travel information is automatically
displayed on the right side of the screen.
Name Description
• Turn Point: Displays
direction and shape
to turn shortly.
• Distance to turn:
Displays distance to
next turn point.
Road name to maneuver: Info of the road.
Detail Distance Bar:
Displays distance to next
turn point.
Detail
additional info can be displayed
on Freeway.
Additional info of Freeway exit or Rest
area can be displayed by pressing the but-
Detail
ton
.
Detailed information for POIs around freeway exit is listed by pressing POI symbols.
6-28 I Navigation
Route Search
i
u
R
e
Yes
N
Menu
Route
Route Info.
.
Av
e
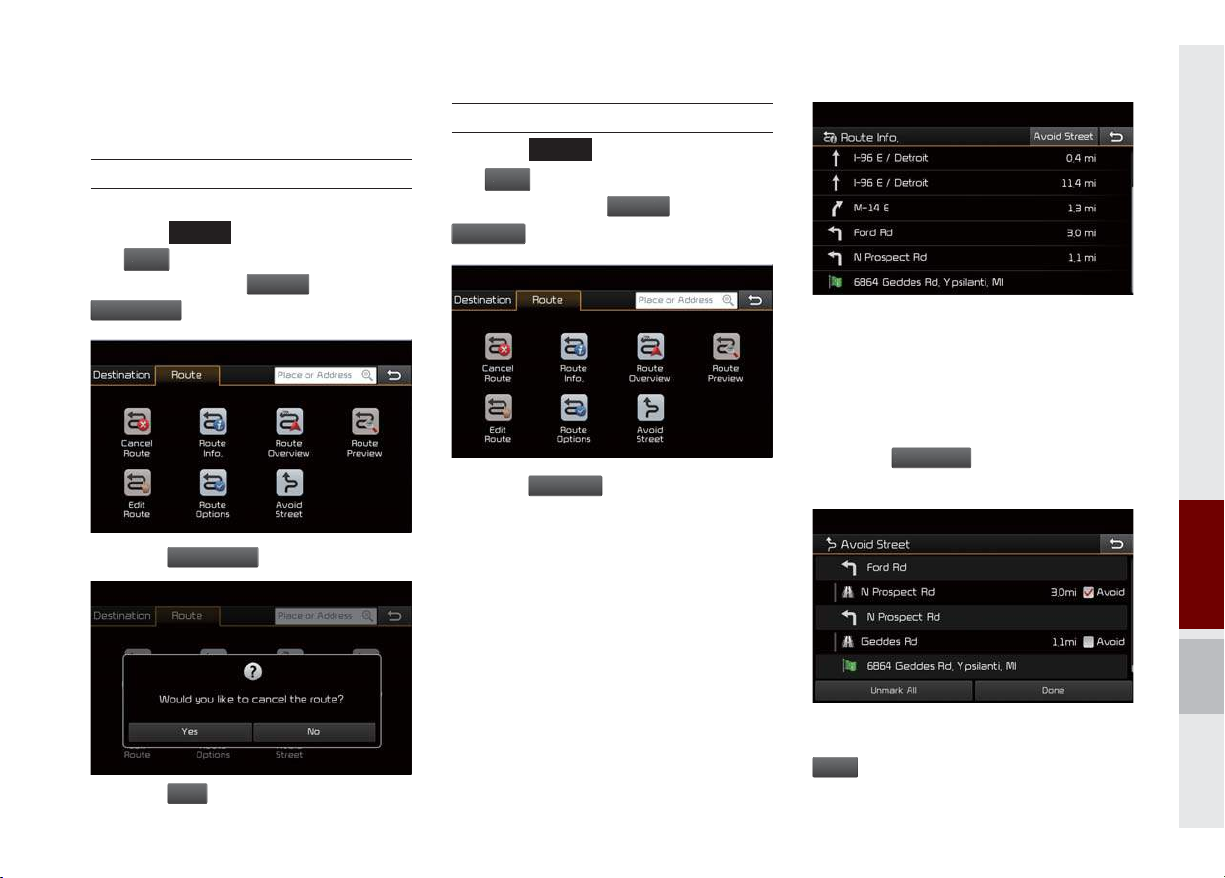
Canceling Route
Cancel the route.
Press the
the
screen. ▶ Press the
Cancel Rout
MAP
head unit key.
VOICE
Nav
in the bottom of right of the
Men
.
oute
▶
Select
tab. ▶ Select
Display Route Information
MAP
Press the
avi
the
▶
screen.
Press the
in the bottom of right of the
Press the
.
VOICE
Route Info
head unit key.
tab. ▶
icon.
▶
Select
Select
Check the information on the map. Select
the desired item to see the map information.
Avoiding a road
Click the
street or road.
oid Street
button to avoid the
Press the
Press the
Cancel Route
icon.
button to cancel the route.
Check the desired item and press the
Don
button to finish.
Route Search I 6-29
06
Route Overview
u
R
w
s
Route Inf
Edit Rout
i
u
w
Route P
Check the information on route including
the distance, estimated time, toll fees, etc.
Press the
the
screen. ▶ Press the
Route Overvie
MAP
head unit key.
VOICE
Navi
in the bottom of right of the
Men
oute
tab. ▶ Select
.
▶
Select
Name Description
Route Option
Change the search
option.
You can check route
o.
information.
e
Edit the current route.
Route Preview
Check the detailed turn-by-turn list.
Press the
the
screen.
Route Previe
MAP
head unit key.
VOICE
Nav
in the bottom of right of the
Men
▶
Press the
Route
tab. ▶ Select
.
▶
Select
Press the
6-30 I Navigation
Route Overview
icon.
Press the
review
icon.
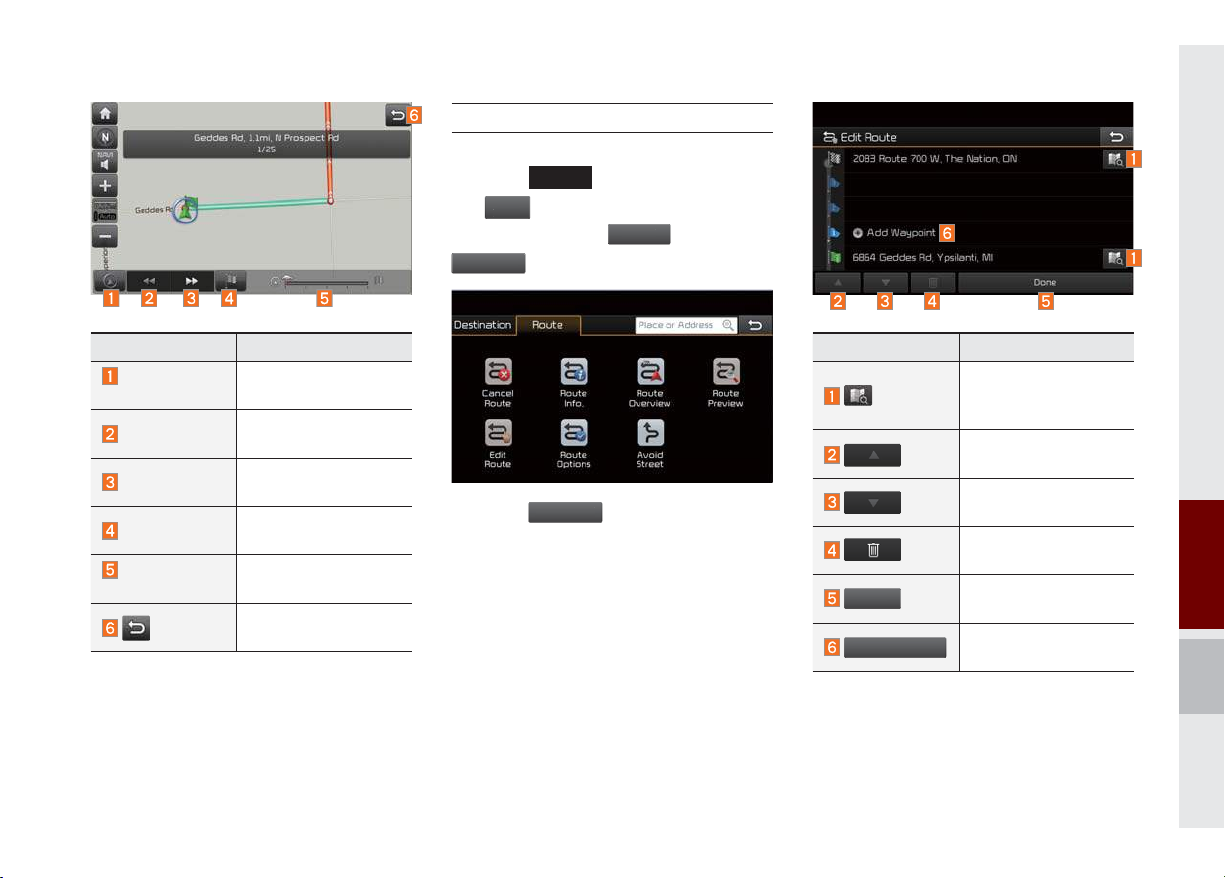
Editing Route
N
R
E
D
A
t
Edit the current route.
Press the
the
screen.
dit Route
MAP
head unit key.
VOICE
avi
in the bottom of right of the
Menu
▶
Press the
.
oute
▶
Select
tab. ▶ Select
Name Description
Departure
Place
Previous
Forward
Destination
Section
Displaying Bar
Move to the departure
location.
Move to the previous
maneuver.
Move to the next
maneuver.
Move to the destination location.
Touch bar to move to
the specific position.
Close the route preview.
Press the
Edit Route
icon.
Name Description
Display the selected
point on the map
screen.
one
dd Waypoin
Move the selected
item up.
Move the selected
item down.
Delete the selected
item.
Press the button to
finish editing.
Press the button to
add an waypoint.
06
Route Search I 6-31
Add the waypoint through various search-
N
Menu
Rout
R
s
s
i
Menu
R
e
A
Done
ing methods.
Route Options
Press the
the
screen.
oute Option
MAP
VOICE
avi
in the bottom of right of the
▶
Press the
.
head unit key.
e
tab. ▶ Select
▶
Select
Avoid Street
Search new route by avoiding the selected
street(s).
Press the
the
screen. ▶ Press the
Avoid Street
MAP
head unit key.
VOICE
Nav
in the bottom of right of the
out
tab. ▶ Select
.
▶
Select
Press the
Route Option
icon.
Press the
void Street
icon.
Determine the route options to guide the
route.
Press the
to plan new route after
selecting the street(s) that you want to avoid.
6-32 I Navigation
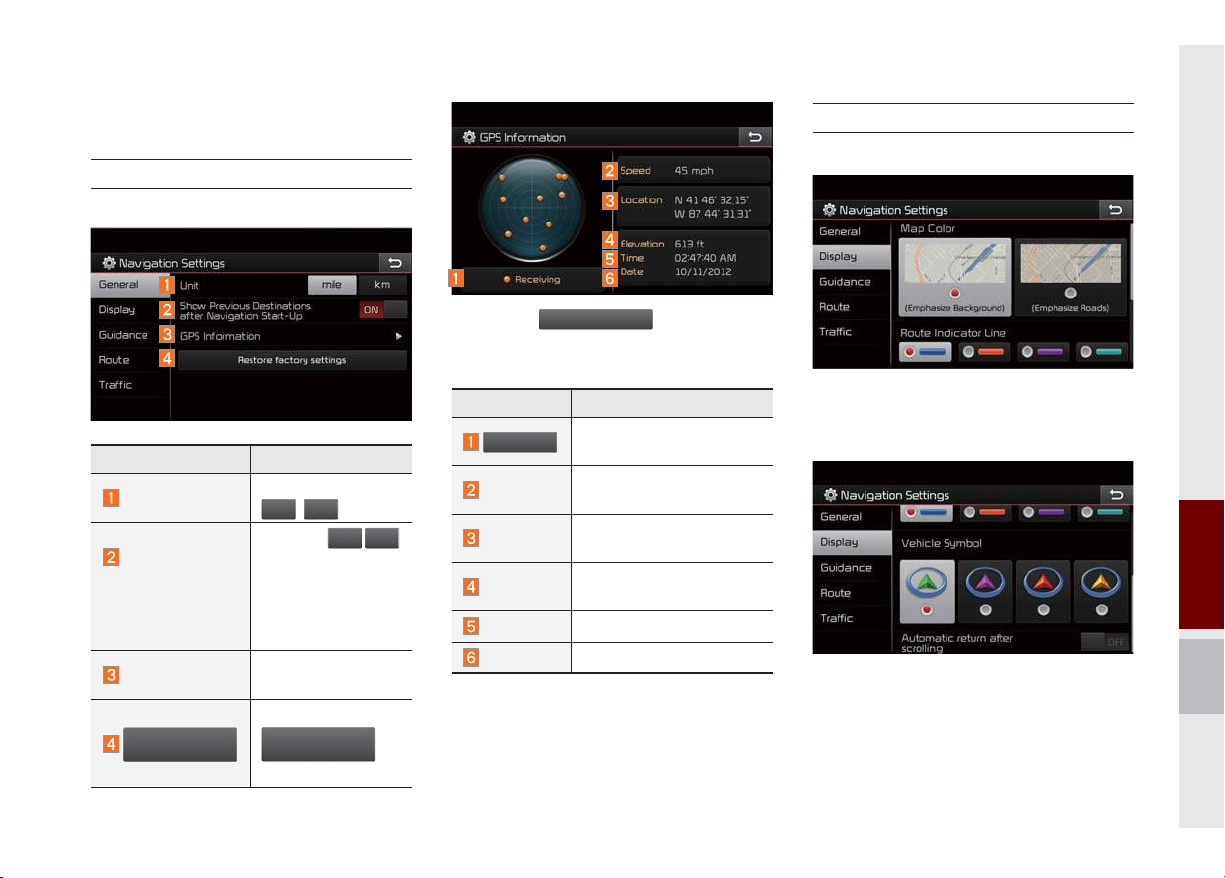
Navigation Settings
e
N
OFF
y
tti
Rest
s
G
n
R
g
General
Change general settings.
Display
Change the display map settings.
Press the
PS Informatio
to display the
detail GPS satellites information.
Name Description
Active when current position is being calculated.
Display current speed of
the vehicle.
Display current position of
the vehicle.
Display current elevation
of the vehicle.
Display time.
Display date.
Name Description
Unit
Change the unit of
mil
Press the
Show Previous
Destinations
after Navigation
Start-Up
button to change
the previous destination view setting
when starting the
navigation.
GPS Information
Check the GPS
information.
, km .
eceivin
Speed
O
,
Location
Elevation
Time
Date
Press the
Restore factor
se
ngs
ore factory
ettings
button to initialize.
Change the map colors and the route
guidance line colors.
Change the vehicle symbol.
06
Navigation Settings I 6-33
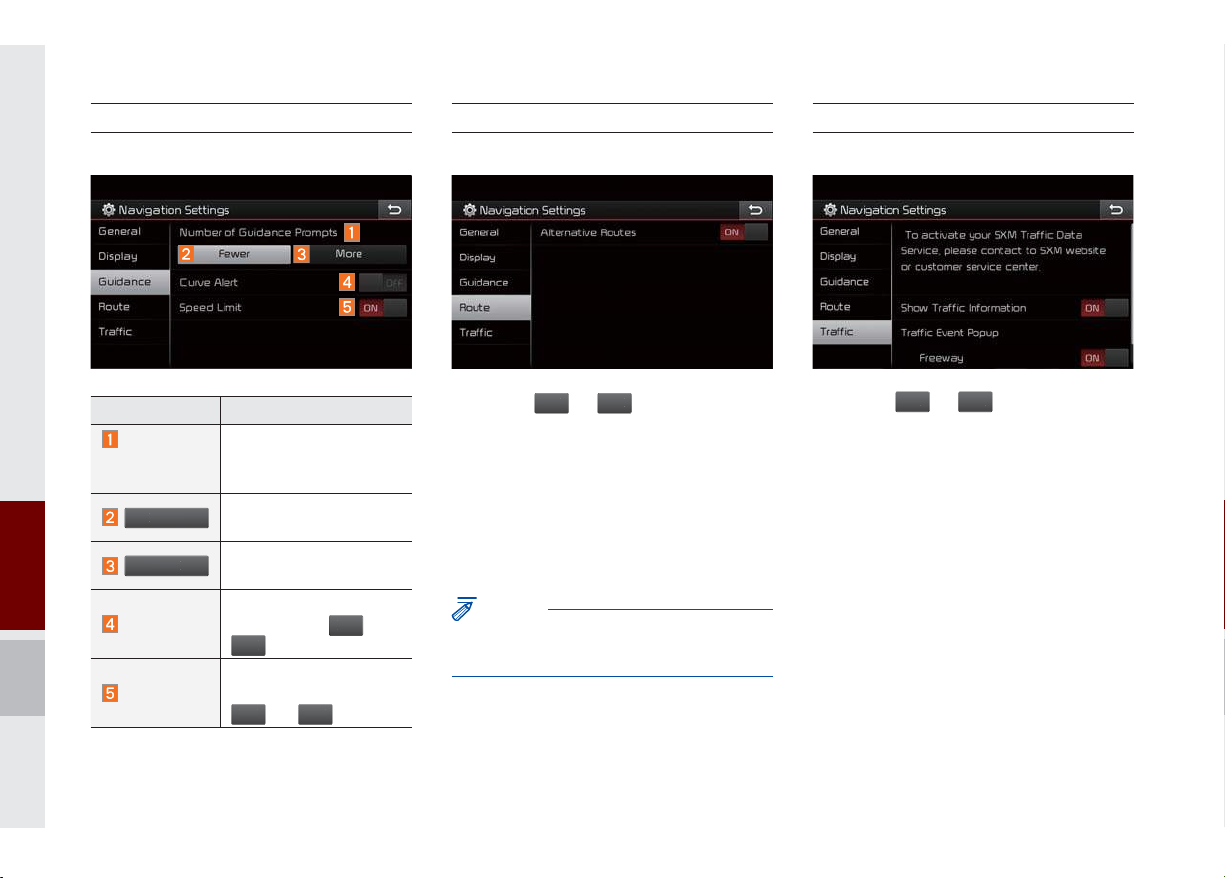
Guidance
F
r
M
O
OFF
O
O
O
O
Change the guidance setting.
Route
Change the route setting.
Traffi c
Change the traffic information setting.
Name Description
Number of
Guidance
Prompts
ewe
ore
Set the frequency of
guidance.
Route guidance is given
less frequently.
Guidance will be provided frequently.
Change whether to turn
Curve Alert
curve alert
.
Change whether to show
Speed Limit
speed limit by pressing
N
and
N
and
Press the ON or
FF
button to change
the Alternative Routes setting.
• Alternative on: Alternative routes will
be suggested (depending on the route
preference between “Faster time” and
“Shorter Distance”).
NOTICE
• Alternative routes can be shown only while
the vehicle is not moving.
Press the ON or
the settings.
• Show Traffic Information On/Off: Select
whether to display traffic information or
not.
• Traffic Event Pop-up Freeway On/Off:
Select whether to display Pop-up message for traffic information on freeway.
• Traffic Event Pop-up Surface Road On/
Off: Select whether to display Pop-up
FF
.
• Alternative off: No alternative routes will
be suggested. Guidance will start right
message for traffic information on surface road.
FF
button to change
after calculating with the route preference (Faster time or Shorter distance).
6-34 I Navigation

Troubleshooting
The current position as shown on the navigation may differ from
the actual position under the following conditions.
The following occurrences are not malfunctions :
• When driving on Y-shaped roads
with narrow angles the current
position may be displayed in the
opposite direction
• Within city streets, the current position may be displayed on the opposite side or on an off-road position
• When changing the zoom level
from maximum to a different level,
the current position may become
displayed on a different road
• If the vehicle is loaded onto a ferry
or a car transport vehicle, the current position may become stalled
on the last position prior to loading
• When driving on a spiral-shaped
road
• When driving in mountain regions
with sharp turns or sudden brakes
• When entering a road after passing
an underground parking structure,
building parking structure, or roads
with many rotations
• When driving in heavy traffic with
frequent starts and stops
• When driving under slippery conditions, such as heavy sand, snow, etc.
• When driving on spiral-shaped roads
• When the tires have recently been
replaced (Especially upon use of
spare or studless tires).
• When using tires of improper size
• When the tire pressure for the 4 tires
are different
• When the replacement tire is worn or
used (Especially studless tires having passed a second season).
• When driving near high-rise buildings
• When a roof carrier has been
installed
• When a long distance route is calculated while driving on an expressway
In such cases, continued driving will
automatically enable the system
to conduct map matching or use
updated GPS information to provide the current position (In such
cases, up to several minutes may be
required)
Correct route guidance may not occur due to search conditions or
driving position.
The following occurrences are not malfunctions :
• Guidance to go straight may be
given while driving on a straight
road
• Guidance may not be given even
when having turned at an intersection
• There are certain intersections in
which guidance may not occur
• A route guidance signaling for
a u-turn may occur in some No
u-turn intersections
• Route guidance signaling
entrance into a No-entry zone
may occur (No-entry zone, road
under construction, etc.)
• Guidance may be given to a position that is not the actual destination if roads to reach the actual
destination do not exist or are too
narrow
• Faulty voice guidance may be
given if the vehicle breaks away
from the designated route. (e.g. if
a turn is made at an intersection
while the navigation provided
guidance to go straight.)
These situations may occur after conducting route calculation.
The following occurrences are not malfunctions :
• Guidance may be given to a
position differing from the current
position when turning at an intersection
• When driving in high speeds,
route recalculation may take a
longer period of time
• Route guidance signaling for a
u-turn may occur in some No
u-turn intersections
• Route guidance signaling entrance
into No-entry zone may occur.
(No-entry zone, road under construction, etc.)
• Guidance may be given to a position
removed from the actual destination
if roads to reach the actual destination do not exist or are too narrow
• Faulty voice guidance may be given
if the vehicle breaks away from the
designated route (e.g. If a turn is
made at an intersection while the
navigation provided guidance to go
straight.)
Troubleshooting I 6-35
06

END USER LICENSE AGREEMENT
END USER LICENSE AGREEMENT
PLEASE READ THIS END USER LICENSE AGREEMENT (“EULA”) CAREFULLY BEFORE USING THE NAVIGATION SYSTEM.
PLEASE READ THIS END USER LICENSE AGREEMENT (“EULA”) CAREFULLY BEFORE USING THE NAVIGATION SYSTEM.
This is a license agreement between you and Hyundai MnSoft, INC. including its affiliates (“COMPANY”) regarding a copy of the
COMPANY navigable map database together with associated software, media and explanatory printed documentation published by
COMPANY(jointly the “Product”). The Product is provided for your personal, internal use only and not for resale. It is protected by copyright
and is subject to the following terms which are agreed to by you, on the one hand, and COMPANY and its licensors (and their licensors
and suppliers) (collectively, “Licensors”) on the other hand.
By using the Product, you accept and agree to all terms and conditions in this End User License Agreement (“EULA”). IF YOU DO NOT
AGREE TO THE TERMS OF THIS EULA, YOU MUST PROMPTLY EXIT THE PRODUCT OPERATION PROGRAM AND DO NOT USE
OR ACCESS TO THE PRODUCT. YOU AGREE THAT YOUR RIGHTS UNDER THIS EULA MAY BE TERMINATED AUTOMATICALLY
WITHOUT NOTICE IF YOU FAIL TO COMPLY WITH ANY TERM(S) OF THIS EULA.

Terms and Conditions
COPYING OR USE OF THE PRODUCT EXCEPT AS PERMITTED BY THIS EULA IS UNAUTHORIZED AND IS COPYRIGHT
INFRINGEMENT UNDER THE LAWS OF YOUR COUNTRY. IF YOU COPY OR USE THE PRODUCT WITHOUT COMPANY’S
PERMISSION, EXCEPT AS PERMITTED BY THIS EULA, YOU ARE VIOLATING THE LAW AND LIABLE TO COMPANY AND ITS
LICENSORS FOR DAMAGES, AND YOU MAY BE SUBJECT TO CRIMINAL PENALTIES.
Personal Use Only. You agree to use this Product together with COMPANY’s authorized application for the solely personal, non-commercial purposes for which you were licensed, and not for service bureau, time-sharing or other similar purposes. Accordingly, but subject to
the restrictions set forth in the following paragraphs, you agree not to otherwise reproduce, copy, modify, decompile, disassemble, create
any derivative works of, or reverse engineer any portion of this Data, and may not transfer or distribute it in any form, for any purpose,
except to the extent permitted by mandatory laws. You may not assign this EULA or any of the rights or licenses granted under this EULA,
except when installed in the system for which it was created.
Restrictions. Except where you have been specifically licensed to do so by COMPANY, and without limiting the preceding paragraph, you
may not use the Product (i) with any products, systems, or applications installed or otherwise connected to or in communication with vehicles, capable of vehicle navigation, positioning, dispatch, real time route guidance, fleet management or similar applications; or (ii) with or
in communication with any positioning devices or any mobile or wireless-connected electronic or computer devices, including without limitation cellular phones, palmtop and handheld computers, pagers, and personal digital assistants or PDAs.
COPYING OR USE OF THE PRODUCT EXCEPT AS PERMITTED BY THIS EULA IS UNAUTHORIZED AND IS COPYRIGHT
INFRINGEMENT UNDER THE LAWS OF YOUR COUNTRY. IF YOU COPY OR USE THE PRODUCT WITHOUT COMPANY’S
PERMISSION, EXCEPT AS PERMITTED BY THIS EULA, YOU ARE VIOLATING THE LAW AND LIABLE TO COMPANY AND ITS
LICENSORS FOR DAMAGES, AND YOU MAY BE SUBJECT TO CRIMINAL PENALTIES.

THE PRODUCT MAY INCLUDE ENFORCEMENT TECHNOLOGY DESIGNED TO PREVENT (i) UNAUTHORIZED COPYING OF
THE PRODUCT ONTO PHYSICAL STORAGE MEDIA OR VIA TRANSFER OVER THE INTERNET OR OTHER ELECTRONIC
COMMUNICATION MEANS AND/OR (ii) ILLEGAL USAGE OF THE PRODUCT OTHER THAN BY A SPECIFICALLY AHTORIZED
DEVICE. YOU AGREE THAT COMPANY MAY USE THESE MEASURES TO PROTECT COMPANY AND THE LICENSORS AGAINST
COPYRIGHT INFRINGEMENT.
Uploads. The Product may provide functionality through which you are able to upload certain information about your use of the Product
(collectively, “Uploads”) to COMPANY’s servers or receive other services from COMPANY (collectively, the “Services”). If you use such
functionality, you authorize COMPANY to retain your Uploads on its servers. COMPANY will have no obligation to provide any Services,
may change the form and nature of any Services at any time with or without notice to you, will have no liability whatsoever to you for any
failure of the Product or Services to transmit your Uploads to or from COMPANY’s servers, may cease providing any Services at any time
with or without notice to you, and will have no obligation to retain your Uploads (or any other materials you may provide to COMPANY) on
its servers or return your Uploads (or any other materials you may provide to COMPANY) to you before deleting them from its servers.
Storage. The Product may provide functionality through which you are able to store information (such as images) on the device on which
you are using the Product. COMPANY will have no liability whatsoever to you or any third party for any failure of the Product to store any
such information on such device.

Personal Information. By using the Product, you agree to the collection, retention and processing of your personal data (including the loca-
WARNING.
THE PRODUCT REFLECTS REALITY AS EXISTING BEFORE YOU RECEIVED THE PRODUCT AND IT COMPRISES
DATA AND INFORMATION FROM GOVERNMENT OTHER SOURCES. ACCORDINGLY, THE PRODUCT MAY CONTAIN INACCURATE
OR INCOMPLETE INFORMATION DUE TO THE PASSAGE OF TIME, CHANGING CIRCUMSTANCES, SOURCES USED AND
THE NATURE OF COLLECTING COMPREHENSIVE GEOGRAPHIC PRODUCT, ANY OF WHICH MAY LEAD TO INCORRECT
RESULTS. THE PRODUCT AND SERVICES MAY NOT TO BE USED FOR SAFETY OF LIFE APPLICATIONS, OR FOR ANY OTHER
APPLICATION IN WHICH THE ACCURACY OR RELIABILITY OF THE PRODUCT OR SERVICES COULD CREATE A SITUATION
WHERE PERSONAL INJURY OR DEATH MAY OCCUR. DO NOT ATTEMPT TO CONFIGURE THE PRODUCT OR INPUT
INFORMATION WHILE DRIVING. FAILURE TO PAY FULL ATTENTION TO THE OPERATION OF YOUR VEHICLE COULD RESULT IN
DEATH, SERIOUS INJURY, OR PROPERTY DAMAGE. BY USING THE PRODUCT, YOU ASSUME ALL RESPONSIBILITY AND RISK.
tion of your mobile device) by COMPANY and to the storage and processing of such personal information on computers located outside
of the country in which you reside. Even though COMPANY has taken steps intended to protect your personal information from being
intercepted, accessed, used, or disclosed by unauthorized persons, COMPANY cannot fully eliminate security risks associated with your
personal information and cannot guarantee that its systems will not be breached. See [*] for additional information regarding COMPANY’s
use of your personal information.
WARNING.
DATA AND INFORMATION FROM GOVERNMENT OTHER SOURCES. ACCORDINGLY, THE PRODUCT MAY CONTAIN INACCURATE
OR INCOMPLETE INFORMATION DUE TO THE PASSAGE OF TIME, CHANGING CIRCUMSTANCES, SOURCES USED AND
THE NATURE OF COLLECTING COMPREHENSIVE GEOGRAPHIC PRODUCT, ANY OF WHICH MAY LEAD TO INCORRECT
RESULTS. THE PRODUCT AND SERVICES MAY NOT TO BE USED FOR SAFETY OF LIFE APPLICATIONS, OR FOR ANY OTHER
APPLICATION IN WHICH THE ACCURACY OR RELIABILITY OF THE PRODUCT OR SERVICES COULD CREATE A SITUATION
WHERE PERSONAL INJURY OR DEATH MAY OCCUR. DO NOT ATTEMPT TO CONFIGURE THE PRODUCT OR INPUT
INFORMATION WHILE DRIVING. FAILURE TO PAY FULL ATTENTION TO THE OPERATION OF YOUR VEHICLE COULD RESULT IN
DEATH, SERIOUS INJURY, OR PROPERTY DAMAGE. BY USING THE PRODUCT, YOU ASSUME ALL RESPONSIBILITY AND RISK.
THE PRODUCT REFLECTS REALITY AS EXISTING BEFORE YOU RECEIVED THE PRODUCT AND IT COMPRISES

Disclaimer of Warranty. The Product is provided to you “as is,” and you agree to use it at your own risk. SUBJECT TO THE APPLICABLE
LAWS, COMPANY AND THE LICENSORS MAKE NO GUARANTEES, REPRESENTATIONS OR WARRANTIES OF ANY KIND,
EXPRESS OR IMPLIED, ARISING BY LAW OR OTHERWISE, INCLUDING BUT NOT LIMITED TO, CONTENT, QUALITY, ACCURACY,
COMPLETENESS, EFFECTIVENESS, RELIABILITY, PERFORMANCE, MERCHANTABILITY, FITNESS FOR A PARTICULAR
PURPOSE, NON-INFRINGEMENT, USEFULNESS, USE OR RESULTS TO BE OBTAINED FROM THE PRODUCT, OR THAT
THE PRODUCT OR SERVER WILL BE UNINTERRUPTED OR ERROR-FREE, OR THAT ERRORS IN THE PRODUCT OR
NONCONFORMITY TO ITS DOCUMENTATION CAN OR WILL BE CORRECTED. YOU ACKNOWLEDGE THAT THE PROVISIONS OF
THIS SECTION ARE A MATERIAL INDUCEMENT AND CONSIDERATION TO COMPANY AND THE LICENSORS TO GRANT THE
LICENSE CONTAINED IN THIS EULA AND TO PROVIDE YOU WITH ACCESS TO THE SERVICES.
Limitation of Liability: TO THE MAXIMUM EXTENT PERMITTED UNDER THE APPLICABLE LAWS, COMPANY AND THE LICENSORS
SHALL NOT BE LIABLE TO YOU: IN RESPECT OF ANY CLAIM, DEMAND OR ACTION, IRRESPECTIVE OF THE NATURE OF THE
CAUSE OF THE CLAIM, DEMAND OR ACTION ALLEGING ANY LOSS, INJURY OR DAMAGES, DIRECT OR INDIRECT, INCURRED
BY YOU OR ANY THIRD PARTY WHICH MAY ARISE IN CONNECTION WITH OR RESULT FROM THE USE OR POSSESSION OF
THE PRODUCT; OR FOR ANY LOSS OF DATA, PROFIT, REVENUE, CONTRACTS OR SAVINGS, OR OTHER DIRECT, INDIRECT,
INCIDENTAL, SPECIAL OR CONSEQUENTIAL DAMAGES ARISING OUT OF YOUR USE OF OR INABILITY TO USE THE PRODUCT,
ANY DEFECT IN THE PRODUCT, OR THE BREACH OF THESE TERMS OR CONDITIONS, WHETHER IN AN ACTION IN CONTRACT
OR TORT OR BASED ON A WARRANTY, EVEN IF COMPANY OR THE LICENSORS HAVE BEEN ADVISED OF THE POSSIBILITY OF
SUCH DAMAGES AND NOTWITHSTANDING THE FAILURE OF ANY LIMITED REMEDY PROVIDED HEREIN.

Exclusions. Some jurisdictions do not allow certain warranty exclusions or the limitation or exclusion of liability, so to that extent the above
exclusion may not apply to you. To the extent that COMPANY may not, as a matter of applicable law, disclaim any implied warranty or limit
its liabilities, the scope and duration of such warranty and the extent of COMPANY’s liability shall be the minimum permitted under such
applicable law. The disclaimer of warranty and limitation of liability set forth in this EULA does not affect or prejudice your statutory rights
where you have acquired the Product otherwise than in the course of business.
Third-Party Copyright Notices. The third-party sourced data has been incorporated into or made a part of the Product and is being sublicensed to you subject to the terms and conditions of this EULA. In this regard, you shall not remove or tamper with any intellectual property rights notice attached or used in relation to data supplied by the Licensors.
Entire Agreement. This EULA is the entire agreement between COMPANY (and the Licensors) and you pertaining to the subject matter
hereof, and supersedes in their entirety any and all previous written or oral communications or documents (including, if you are obtaining
an update, any agreement that may have been included with an earlier version of the Product) with respect to such subject matter.
Governing Law. This EULA shall be governed by the laws of the jurisdiction in which you reside at the date of acquisition of the Product.
Should you at that moment reside outside the European Union or Switzerland, the law of the jurisdiction within the European Union or
Switzerland where you acquired the Product shall apply. In all other cases, or if the jurisdiction where you acquired the Product cannot
be defined, the laws of the Republic of Korea shall apply. This EULA will not be governed by the U.N. Convention on Contracts for the
International Sale of Goods. The courts competent at your place of residence at the time you acquired the Product shall have jurisdiction
over any dispute arising out of, or relating to this EULA, without prejudice to COMPANY’s right to bring claims at your then current place of
residence.
Export Control. You agree not to export or re-export from anywhere any part of the Product in any form except in compliance with applicable export laws, rules and regulations, including but not limited to the laws, rules and regulations administered by the Office of Foreign
Assets Control of the U.S. Department of Commerce and the Bureau of Industry and Security of the U.S. Department of Commerce.

Miscellaneous. If any provision of this EULA is found to be invalid or unenforceable, it will be enforced to the extent permissible and the
NOTICE OF USE
remainder of this EULA will remain in full force and effect. Failure by COMPANY to prosecute any right with respect to a default hereunder will not constitute a waiver by COMPANY of the right to enforce rights with respect to the same or any other breach. No refunds or
replacements will be permitted on damaged Product.
U.S. Government End Users. If the Product is being acquired by or on behalf of the United States Government or any other entity seeking or applying rights similar to those customarily claimed by the United States Government, this Product and related documentation are
“Commercial Items” as that term is defined at 48 C.F.R. (“FAR”) 2.101. This Product and related documentation are licensed to the United
States Government end users (a) only as “Commercial Items” and (b) with only those rights as are granted to all other end users in accordance with this EULA, and each copy of Product delivered or otherwise furnished shall be marked and embedded as appropriate with the
following “Notice of Use,” and shall be treated in accordance with such Notice:
NOTICE OF USE
CONTRACTOR (MANUFACTURER/ SUPPLIER) NAME: Hyundai MnSoft, Inc.
CONTRACTOR (MANUFACTURER/SUPPLIER) ADDRESS: 74 Wonhyo-ro, Yongsan-gu,
Seoul 140-711, Republic of Korea
This Product and related documentation are commercial items as defined in FAR 2.101 and is
subject to this EULA under which this Product is provided.
© 2013 Hyundai MnSoft. All rights reserved.
If the Contracting Officer, federal government agency, or any federal official refuses to use the legend provided herein, the Contracting Officer, federal government agency, or any federal official must notify COMPANY prior to seeking additional or alternative rights in the Product.

End-User Terms Required by HERE. The Product utilizes map data that COMPANY licenses from HERE and the following copyright
notices apply to such map data (the “HERE Data”): © 2013 HERE. All rights reserved.
The HERE Data for areas of Canada includes information taken with permission from Canadian authorities, including: © Her Majesty the
Queen in Right of Canada, © Queen’s Printer for Ontario, © Canada Post Corporation, GeoBase ®, © Department of Natural Resources
Canada. All rights reserved.
HERE holds a non-exclusive license from the United States Postal Service® to publish and sell ZIP+4® information.
©United States Postal Service® 2010. Prices are not established, controlled or approved by the United States Postal Service®. The following trademarks and registrations are owned by the USPS: United States Postal Service, USPS, and ZIP+4.
The HERE Data for Mexico includes certain data from Instituto Nacional de Estadística y Geografía.
Austria: © Bundesamt für Eich- und Vermessungswesen
Croatia, Cyprus, Estonia, Latvia, Lithuania, Moldova, Poland, Slovenia and/or Ukraine: © EuroGeographics
France: source: © IGN 2009 – BD TOPO ®
Germany: Die Grundlagendaten wurden mit Genehmigung der zustaendigen Behoerden entnommen
Great Britain: Contains Ordinance Survey data © Crown copyright and database right 2010, and Royal Mail data © Royal Mail copyright
and database right 2010.
Greece: Copyright Geomatics Ltd.
Italy: La Banca Dati Italiana è stata prodotta usando quale riferimento anche cartografia numerica ed al tratto prodotta e fornita dalla
Regione Toscana.
Norway: Copyright © 2000; Norwegian Mapping Authority
Portugal : Source: IgeoE – Portugal
Spain: Información geográfica propiedad del CNIG
Sweden: Based upon electronic data Ó National Land Survey Sweden
Switzerland: Topografische Grundlage: Ó Bundesamt für Landestopographie

United Kingdom: Contains public sector information licensed under the Open Government Licence v1.0 (see for the license http://www.
nationalarchives.gov.uk/doc/open-government-licence/) and is adapted from data from the office for National Statistics licensed under the
Open Government Licence v.1.0.
Israel: © Survey of Israel data source
Jordan: © Royal Jordanian Geographic Centre. The foregoing notice requirement for Jordan Data is a material term of the Agreement. If
Client or any of its permitted sublicensees (if any) fail to meet such requirement, HERE shall have the right to terminate Client’s license
with respect to the Jordan Data.
Mozambique: Certain Data for Mozambique provided by Cenacarta © 20XX by Cenacarta
Réunion: source: © IGN 2009 - BD TOPO ®
End-User Terms Required by ZENRIN. The Product utilizes map data that COMPANY licenses from ZENRIN and the following copyright
notices apply to such map data (the “ZENRIN Data”):
Europe: Junction View Data provided by ZENRIN CO., LTD. Copyright © 20XX, All Rights Reserved.
Europe: Junction View Data and Exit View Data provided by ZENRIN CO., LTD. Copyright © 20XX, All Rights Reserved.
North America: Junction View Data provided by ZENRIN USA, INC. Copyright © 20XX, All Rights Reserved; Junction View Data fourni par
ZENRIN USA, INC. Copyright © 20XX. Tous droits réservés; Las imágenes de las rutas alternas son proveídas por ZENRIN USA, INC.
Copyright © 20XX. Todos los derechos reservados.
© 2013 Hyundai MnSoft. All rights reserved.

Copyright for Brand Icon
Copyright for Brand Icon
Copyright for Junction View
The marks of companies displayed by this product to indicate business locations are the marks of their respective owners. The use of
such marks in this product does not imply any sponsorship, approval, or endorsement by such companies of this product.
Copyright for Junction View
Junction View Data provided by ZENRIN USA, INC. Copyright(C) 20XX, All rights Reserved.

About Map Updates
About Map Updates
Information
CAUTION
• You can contact your KIA dealer or call at 1-888-757-0010.
Information
• This product requires regular updates for software corrections, new functions and map updates. Updating may require up to 1 hour
depending on the data size.
• Turning off the power or ejecting the SD card during the update process may result in data loss. Make sure to keep the ignition on and
wait until updating is complete.
CAUTION
• Please use only the SD card that was included with the vehicle purchase.
• The use of a separately purchased SD card may result in damage due to heat related deformation.
• Product malfunctions caused by the use of separately purchased SD cards shall not be covered within the product warranty.
• Repeatedly connecting/disconnecting the SD card in a short period of time may cause damage to the device.

part.6
Voice Recognition
What is Voice Recognition?
Precautions Required for Successful Voice Recognition
Starting/Ending and Setting Voice Recognition
Voice Recognition Screen Overview
Voice Commands
Siri Eyes Free

Voice Recognition
What is Voice Recognition?
The voice recognition feature operates the
multimedia system by recognizing voice
commands and enables hands-free operation of the system while you are driving
your car.
Not all possible voice commands are recognized by the system due to technological
limitations. To make up for these limitations,
the system displays the voice commands
that are available for you to use.
There are errors in communication between
people. Likewise, voice recognition sometimes misunderstands your voice command
in some circumstances. If this happens,
either check the screen for the available
options and say the command again, or
manually select and press the button for the
corresponding command on the screen.
Precautions Required
for Successful Voice
Recognition
1. Voice recognition supports only the
commands that are displayed on the
screen and written in the User's Guide.
2. To ensure the correct recognition and
execution of your command, say your
command when you hear the beep after
a voice prompt.
3. Voice recognition automatically ends if:
1) A call is incoming or outgoing
2) A media device (USB or iPod, etc.) is
connected or disconnected
3) The rear view camera is operated
4) The car engine starts or stops
RADIO
5) A system key, such as
MEDIA
or
key is selected
key
4. The microphone used for the voice
recognition system is located in the
headliner directly above the driver's
head. To make your commands better
understood, keep your body straight
in the driver's seat when speaking the
command.
5. Speaking naturally and clearly will
ensure better recognition of your voice
commands.
6. In the following cases voice recognition
will be affected by ambient noise.
1) The sound of the wind if any window
or the sun roof is open.
2) High speed blower from the air vents.
Set climate control to blow lower than
level 3.
3) Vibrations from passing through a
tunnel.
4) Vibrations from driving on an uneven
road.
5) Storms and heavy rain.
5-2 I Voice Recognition

Starting/Ending
and Setting Voice
Recognition
Starting Voice Recognition
Press the key briefly (less than 0.8
seconds) on the steering wheel control to
activate voice recognition.
Ending Voice Recognition
1. Select “Exit” to the left of the bottom to
end voice recognition.
2. Press and hold (more than 0.8 seconds) the
wheel control to end voice recognition.
key on the steering
Combining Voice Recognition
with On-Screen Commands
After pressing the key, say a command after the beep. The voice recognition
system will execute the desired operation
after understanding the command.
Alternatively, you may touch any of the
corresponding Commands on the screen
while the Voice Recognition system is in
operation.
Combining voice recognition with available
on-screen commands is useful when the
system is taking longer than expected or
the voice command did not execute as
desired.
Starting/Ending and Setting Voice Recognition I 5-3
05

Extending the Listening Time
When the system is waiting for your command, after the voice prompt and beep
have been heard, if you press the
key (less than 0.8 seconds), then the beep
will sound again and standby mode will
restart.
When activated, voice recognition waits for
your command for 5 seconds. If you say
nothing for 5 seconds, a voice prompt will
ask for your command again.
5-4 I Voice Recognition

Skipping Prompt Messages
When you hear the prompt message,
press the
wheel control to skip the message and go
directly to listening mode to say your command.
This results in faster operation when
you feel the message is too long or you
already know the command to use.
i
Information
• Refer to Part 8 for instructions on how to
change the Voice Recognition Settings.
key on the steering
Adjusting Voice
Recognition Volume
During voice recognition, rotate the volume knob to adjust the message volume.
05
Starting/Ending and Setting Voice Recognition I 5-5

Voice Recognition
Screen Overview
Start Screen
Name Description
Representative
Commands
Not available
command
Displays the representative commands.
Displays commands
that are not available
due to a failure in
meeting the conditions
for using them and
thus need additional
settings. The conditions
required for using them
will be described briefly
under each command.
Name Description
Voice
recognition
status icons
Recognized
results
User's
speaking
volume being
recognized
Help
Exit
Standby
Voice guidance
Voice command
process
Displays the voice recognition result.
Displays the voice
command volume in
real time.
Displays all available
help commands in a
tree format.
Ends the voice recognition.
Help Display
Name Description
• Shows the available
Command
list
How to
use for
selected
item
How to use
in general
commands.
• Select or say a command
to display additional commands in detail.
This section shows how to
use voice recognition for
the selected item.
This section displays how
to use voice recognition in
general.
5-6 I Voice Recognition

Instructions for Using
Voice Recognition
Name Description
Detail
instruction
Close
button
This section describes
how to use voice recognition in detail.
Closes the screen and
restarts voice recognition.
i
Information
• In the instructions screen, no voice is
recognized, so you must manually issue
commands. Because the instructions screen
displays a lot of content, you cannot view it
while driving for safety precautions.
Voice Recognition Screen Overview I 5-7
05

Voice Commands
Types of Commands
Voice recognition commands are classified as “Global Commands”
and “Local Commands”.
1. Global Commands (
ately after activating voice recognition.
2. Local Commands (
multimedia or Bluetooth function is running, or displayed on the
screen, after activating voice recognition.
Call Commands
* Check the following before using call commands:
1. Voice commands related to phone calls can be used after connecting a Bluetooth device.
2. To call a person, for example “Call <John Smith>” whose name
is listed in Contacts, you must first download the Contacts list.
For details on downloading contacts, see “Part 3. Bluetooth >
Chapter 3. Bluetooth Phone > 3.10 Contacts”.
3. After downloading the Bluetooth contacts, it will take some time
to convert the Contacts into voice data during which time you
cannot make a call by name yet. The time it takes to convert
voice data may vary depending on the number of Contacts
downloaded on the phone.
): Commands that can be used immedi-
●
): Commands that can be used when a
○
Command Operation
●
Call
●
Call <Name>
Call <Name>
●
on Mobile
Call <Name>
●
at Work
Call <Name>
●
at Home
Call <Name>
●
on Other
●
Dial Number
●
Dial <Phone #>
●
Redial
●
Call History
Displays downloaded Contacts, after this
you can make a call by saying the name.
You can directly call a person by <Name> in
the downloaded Contacts.
You can call a person <name> directly to
the number that is saved as “Mobile” in the
downloaded Contacts.
e.g.) Call “John Smith” on Mobile
You can call a person <name> directly to the
number that is saved as “Work” in the downloaded Contacts.
e.g.) Call “John Smith” at Work
You can call a person <name> directly to
the number that is saved as “Home” in the
downloaded Contacts.
e.g.) Call “John Smith” at Home
You can call a person <name> directly to the
number that is saved as “Other” than “Mobile,
Home, or Work” in the downloaded Contacts.
e.g.) Call “John Smith” on Other
Displays a screen where you can say a
phone number to dial.
You can directly say the number to call.
e.g.) Dial 111 555 1234
Directly calls at the number that you last
dialed.
Displays your Call History, where you can
say the list number to make a call.
5-8 I Voice Recognition

Radio Commands
Command Operation
●
Radio
●
FM Plays FM radio.
FM
●
<87.5~107.9>
●
SiriusXM Plays SiriusXM™ radio.
SiriusXM
●
<0~999>
●
AM Plays AM radio.
●
AM <530~1710>
○
Preset <1~40> Tunes to your preset stations (1 to 40).
Channel
○
<0~999>
Plays the most recent radio channels
from FM, AM, and SiriusXM™.
Tunes to FM <Frequency> according to
what you say.
e.g.) FM 87.5: FM eighty seven point five
Tunes to SiriusXM™ Channel <Channel
Number> according to what you say.
e.g.) SiriusXM 23: SiriusXM Twenty three
Tunes to AM <Frequency> according to
what you say.
e.g.) AM 530: AM Five thirty
In SiriusXM™ Radio mode, turns on the
<Channel Number> that you say.
05
Voice Commands I 5-9

Media Commands
* Check the following before you use media commands.
1. If no media is connected or if no playable files exist at the time
when you use these commands, a voice message will tell you
that this is not available.
2. If you say the name of the media that is currently playing again,
then that media will continue playing.
e.g.) Saying “USB” while USB content is playing.
Command Operation
●
Music Continues the last media you played.
Plays the iPod currently connected. This
●
iPod
●
USB
●
Bluetooth Audio
●
AUX
●
My Music Plays My Music files stored in the system.
will work the same when an iPhone is connected. If a USB is connected, then it will
be played instead of the iPod.
Plays the music on the USB currently connected.
If an iPod is connected, then the iPod will
be played instead of the USB.
Plays the music on the Bluetooth phone
currently connected.
This may not be supported depending on
the Bluetooth connection status.
Plays external devices that are currently
connected.
5-10 I Voice Recognition

1. USB Music/iPod/My Music Command
Command Operation
○
○
○
○
○
○
Play
Pause
Shuffle
Shuffle Off
Repeat
Repeat Off
Plays a selected file.
Maintains the current settings during playback.
Pauses a file that is playing.
Maintains current settings while paused during
playback.
Plays tracks or files randomly.
Maintains current settings during shuffled
playback.
Cancels Shuffle and plays tracks sequentially.
Maintains current settings during sequential
playback.
Plays the current track or file repeatedly.
Maintains the current settings during repeat playback.
Cancels Repeat and plays multiple tracks or files.
Maintains current settings during multiple track
playback.
2. Bluetooth audio/AUX Command
For Bluetooth audio and external devices (AUX), local commands
are unavailable, including Play, Pause, Repeat and Shuffle.
05
Voice Commands I 5-11

UVO eServices Commands List
Command Operation
●
Roadside Assist Connect with a Roadside Assist agent.
Vehicle
●
Diagnostics
●
eService Guide
Informs you if diagnostic issues are found
in your vehicle
Provides guidance on how to use UVO
eServices
Other Commands List
(Commands used in List/Help)
Command Operation
●
Help
Line 1~4
○
(One~Four)
○
Yes/No
○
Previous/Next
○
Manual Input
○
Go Back Moves to the previous screen.
●
Exit Ends the voice recognition.
Moves to the voice recognition help screen.
All available commands can then be identified and used.
When you cannot select a certain name,
such as in Call History, you can select it
using numbers.
Simple numbers can be recognized, such
as “One” or “Two”.
When voice recognition is activated, this
command is used when an answer is
requested for a confirmation question.
When four or more searched items are
listed, you can move to the previous or
next page using a voice command.
When Dial entry results are displayed,
this command is used to search manually,
rather than to search with a voice command.
Voice recognition stops after this command
is used.
5-12 I Voice Recognition

Siri Eyes Free
How to start Siri
If you want to use Siri, you have to connect your iOS device to the Multimedia
system through Bluetooth.
(Please check whether your iOS device
supports Siri and turning Siri On)
Then you can use Siri while pressing and
holding
key on the steering wheel.
How to use Siri
When you access the Siri screen while
pressing and holding
steering wheel, you select the
ton and then you can speak what you
want. Note that the Multimedia system
only supports “Phone” related functions.
Other functions will be performed in your
iOS device. If you press voice key quickly,
Siri would re-start. If you hold down voice
key, Siri would be terminated and the
screen would go back to the previous
screen. Eyes-Free mode would be activated automatically while you are driving.
When shifting gears into P or putting the
Parking brake on, Eyes-Free mode would
be deactivated automatically.
key on the
Speak
but-
i
Information
• Functions and feedbacks from voice
commands via Siri are executed in the iOS
device. If the iOS version is changed, the
functions and response may be different
according to the iOS device and the latest
version.
Siri Eyes Free I 5-13
05

MEMO

part.7
Apps/Info
SiriusXM™ Data

Apps/Info
SiriusXM™ Data
About SiriusXM™ Data Service
The SiriusXM™ Data Service is a paid membership satellite radio
service that provides users with information such as Weather,
Sports, Stocks, Fuel Prices and Movies.
However, weather information is not supported for vehicles purchased in Canada.
Accessing SiriusXM™ Data
Select the
APPS/
SiriusXM Data
key to enter the SiriusXM™ Data mode.
icon after selecting All Menus or the
6-2 I Apps/Info

SiriusXM™ Weather
r
O
Announcement
At the “SiriusXM Data” screen, select
Weathe
the
Announcement mode.
icon to enter the Weather
Weather Forecast
This service provides current weather
information and weather forecasts for the
next five days in your region. To change
ther City
the region, select the
select the desired region.
button and
Warnings and Advisories
This service provides weather warnings
and advisories, such as tornado, storm,
flood, etc.
06
SiriusXM™ Data I 6-3

SiriusXM™ Sports Information
S
Add
Add
Select the
Sports mode.
This service provides real-time updated
information on scores and schedules for
major sports, such as NFL, NBA, NCAA
football, NCAA basketball, NHL, MLB,
NASCAR and more.
ports
icon to enter the
My Teams
You can save teams which you are interested in as part of My teams to easily view
related scores and schedules.
Select the My Teams menu and then
select the
register your favorite teams.
Search for your favorite teams and select
button on the right to add it to the
the
“My Teams” list.
button to search for and
You can always check the list of teams
that you added in the “My Teams” menu.
Select the
button on the right side of
the team name to delete the team from
“My Teams” or select the
button to
add other teams.
6-4 I Apps/Info

Select the team name to check daily
S
s
results and recent schedules for that team.
SiriusXM™ Stock Information
In the “SiriusXM Data” screen, select the
tock
icon to enter the Stocks mode.
Stocks is a feature that shows the current
value and change of stocks.
For symbols which you are interested in,
select the icon to save the symbol as a
part of the “Saved” symbols which can be
viewed from the “My Favorites” button on
the Stocks Main screen.
06
SiriusXM™ Data I 6-5

My Favorites
dd
My Favorites shows a list of stocks added
by the user. When entering the Stocks
menu for the first time, a screen is displayed for you to add your favorite stock
A
information. Select the
move to the stock search screen.
button to
Stock Search
Use the Stock Search menu to search for
specific stocks.
Select the
your favorite stocks to save them in “My
Favorites”.
button after searching for
In the My Favorites screen, you can find
the selected stock information that you
registered.
6-6 I Apps/Info

SiriusXM™ Fuel Price
s
Information
At the “SiriusXM Data” screen, select the
Fuel Price
Information mode.
icon to enter the Fuel Prices
Search for Nearby Stations, and
Register Key Locations as Favorite
Stations.
Search for nearby stations with the “Nearby
Stations” menu.
It shows station locations, starting from the
nearest one, and select “Nearest” menu
on the top right side to further sort them
by price or brand name.
Select the button to the right of the list
to register key locations as a Favorite
Station so that you can go there again with
the “Favorite Stations” menu.
06
SiriusXM™ Data I 6-7

My Fuel Type Settings
M
With the “Filters” menu, you can select fuel
types and favorite brands.
When searching for Nearby Stations, the
results will reflect selected fuel types and
brand information.
SiriusXM™ Movie Information
ovies
Select the
Movie mode.
You can check recent movies and nearby
theaters, and also register your favorite
theater locations.
icon to enter the
Search for Nearby Theaters, and
Register Any Key Locations as Favorite
Theaters.
In the “Nearby Theaters” menu, you can
search for any nearby theaters.
It shows theaters, starting from the nearest
one, and selecting the “Nearest” menu at
the top right side will sort them by name.
6-8 I Apps/Info

Select the button to the right of the list
to register your favorite theater so that you
can always check it again using the
“Favorite Theaters” menu and selecting
button to view the current movie
the
information for that theater.
In the “Top Movies” menu, you can check
for any movies that are currently popular.
Select the
button to the right of a
movie title to view the plot summary and
any other detailed information.
06
SiriusXM™ Data I 6-9

MEMO

part.8
Other Features
Climate Mode
Camera

Other Features
Climate Mode
Operating Climate Mode
Press the
mation in the full screen display.
While multimedia or navigation is in use, the climate system information will be displayed over top when you control the temperature (TEMP) or turn on the air conditioner (A/C).
Basic Mode Screen
CLIMATE
key for the climate system to see status infor-
Name Description
Displays the configured temperature settings for the driver's seat and the passenger
seats. Cooling or heating will continue until
Set the temperature
of the driver's seat
and passenger
seats
Air direction
Air volume Displays the configured air volume settings
Cooling/heating
control status
(AUTO)
Air conditioning
control status
the temperature matches the configured
temperature settings.
The internal temperaure can be con-
trolled in incrments of 1°F within a range
of 63°F to 89°F.
LOW is displayed when the temperature
is set to anything below 63°F, and HIGH
is displayed when it is set to anything
above 89°F.
Displays the configured air direction settings.
AUTO
Displayed when the
and cooling/heating operates automatically
according to the configured temperature
settings.
AUTO will be turned off when you try to
do the following with AUTO on:
- Control the air volume
- Control the air direction
- Turn the air conditioning (A/C) on/off
- Turn on the moisture removal function
for the windshield
Displayed when the
and the air conditioning starts cooling/heating.
key is pressed
A/C
key is pressed
7-2 I Other Features

Name Description
Simultaneous tem-
perature settings for
the driver's seat and
the passenger seats
(SYNC)
Displayed when the
and the temperatures of the driver's seat
and the passenger seats can be configured at the same time.
SYNC
key is pressed
Climate Mode I 7-3
07

Camera
WARNING
- Backing Up & Using Camera
• Never rely solely on the rear view camera
when backing up. Prior to entering your
vehicle always do a visual check of the area
behind your vehicle, and before backing up be
aware of your surroundings and supplement
the rear view camera by looking over your
shoulders and checking your rear view mirrors. Due to the difficulty of ensuring that the
area behind you remains clear, always back
up slowly and stop immediately if you even
suspect that a person, and especially a child,
might be behind you.
i
Information
• A separate chipset is used for the camera
screen while booting up, so it may be different
after booting up.
Steering-linked camera
• This device is connected to a rear
detection camera to see behind the car
for safe reversing.
• The Rear View Camera turns on automatically if you shift the gear to R when
the power is on or the engine has
started.
• While the device boots up, shift the gear to
"R" to activate the rear detection cameras.
Shift the gear to another position to deactivate the rear detection camera.
NOTICE
• A wide-angle lens is installed as the rear
detection camera to get a wider view, so
there may be some difference between the
actual distance and the distance that appears.
on-screen. For safety, make sure to view
the back, right, and left sides of the car for
yourself.
• The color of the parking guidelines displayed
in the picture may differ from the actual
screen.
• When booted up, blinking may occur when
you switch to a UI screen.
Name Description
Red Line
Yellow Line 1
Yellow Line 2
Yellow Line 3
Yellow Line 4
Blue Line
About 0.5 m from the
rear bumper
About 1 m from the
rear bumper
About 3 m from the
rear bumper
Trajectory of the wheel
on the driver’s side
Trajectory of the wheel
on the passenger side
Neutral steering trajectory
As you reverse your car and monitor the
area behind your car, the steering-linked
driving trajectory and the neutral driving
trajectory are both displayed.
7-4 I Other Features

part.9
Voice Recognition Settings
Setup
Setup
Sound Settings
Display Settings
Bluetooth Settings
UVO eServices Settings
Home Screen Settings
Wi-Fi Settings
Clock Settings
Language Settings
Keyboard Settings
Screen Saver Settings
System Info

Setup
S
Setup
Setup is the screen to control Audio system settings.
To enter the screen, press the
etup
key or the
icon in All Menus.
SETUP
Features Description
Provides the sound con-
Sound
Display
Bluetooth
UVO
eServices
Phone
projection
Home
Screen
8-2 I Setup
trol options for Position,
Bass, Mid, Treble, Volume
and Advanced settings.
Provides the Mode/
Illumination settings.
Provides the Bluetooth
Connection/Auto
Connection Priority/
Bluetooth System
Information settings.
Provides the 911
Connect/Parking Minder/
My Car Zone/Scheduled
Diagnostics/Trip Info
Sync Reminder Settings.
For more details, refer to
Phone projection guide.
Provides the function
to customize the three
menu items at the bottom
of the Home Screen.
Features Description
Wi-Fi
Clock
Voice
Recognition
Language
Keyboard
Screen
Saver
System Info
Display Off
Provides the Wi-Fi
On and Network
Connection settings.
Provides the Time and
View settings.
Provides the Guidance
and Priority settings.
Provides the Change
Language settings.
Provides settings to
switch keyboard layouts.
Provides the Clock/
None settings.
Provides software and
storage space information.
Provides the Display Off
(touch activation) function.

Sound Settings
Cente
Cente
Default
Adjusts the sound effects for the whole
system.
Features Description
Select the Up/Down/Left/
Right button to control
Position
Tone
sound positioning.
Select
trate the sound on the
center of vehicle.
Drag the slide bar to
control bass/mid/treble
settings.
Select
the settings.
r
to concen-
r
to initialize
Features Description
Select additional audio
options such as “Speed
Advanced
Default
Beep
i
Information
• Advanced sound settings may differ according
to selected AMP option.
• The seat shape may differ according to
vehicle model.
Dependent Volume
Control” that automatically
controls Audio volume
according to vehicle speed
as well as “Variable EQ”.
Resets the sound to factory default settings.
Select to activate a beep
when pressing buttons.
Display Settings
Adjusts the level of illumination for the
entire system.
Features Description
Select any of LCD illumi-
Mode
Illumination
Default
Display Off
nation change modes:
Automatic (changes
the level automatically),
Daylight, and Night.
Set the levels of illumination for day and night.
Select
the settings.
Resets the display to factory default settings
Provides the Display Off
(touch activation) function.
to initialize
08
Setup I 8-3

Bluetooth Settings
Bluetooth C
Changes Bluetooth phone settings.
Bluetooth Settings
Press the
icon.
SETUP
key ▶ Select
Bluetooth
Bluetooth Connection Settings
SETUP
onnection
key ▶ Select
.
Press the
▶
Select
Bluetooth
Features Description
Paired Device
List
Bluetooth
Audio
Connection
Status
Bluetooth
Hands-Free
Connection
Status
Add New
Delete Devices
Help
Displays the paired
Bluetooth device list.
When selecting from
the list, the device is
connected or disconnected.
An icon appears when
you make a Bluetooth
Audio connection.
An icon appears when
you make a Bluetooth
Hands-free connection.
Register a new
Bluetooth device.
Select and delete a
paired device.
Switches to the
Bluetooth Connection
Help screen.
8-4 I Setup

i
Default Fact
ttings
y
Bluetooth Syst
Information
• Up to 5 Bluetooth devices can be paired.
• Only one Bluetooth device can be connected
at a time.
• During a Bluetooth device connection, another
device cannot be paired.
• When you delete a paired device, the Call
History and Contacts stored in the head unit
are also deleted.
• Bluetooth Hands-free and Bluetooth Audio
functions are supported.
• Hands-free and audio-supported devices,
such as a Bluetooth smartphone or audio, will
function normally.
• When a Bluetooth device is connected, if
the Bluetooth connection is unexpectedly
disconnected, due to being out of
communication range, the device powering
off, or a Bluetooth communication error, the
Bluetooth device automatically searches for
and connects to nearby Bluetooth devices.
• If the system is not stable, due to a vehicle-
Bluetooth device communication error, restore
the Default Factory Settings.
• For Default Factory Settings, the bluetooth
settings are reset to factory settings.
• Press the
▶
Select
SETUP
key ▶ Select
ory Se
.
Bluetooth
Auto Connection Priority
Press the
▶
Select
SETUP
key ▶ Select
Auto Connection Priorit
When the engine is running, the selected
Bluetooth device is automatically connected. If you fail to connect the selected
device, the previously-connected device is
automatically connected, and if it also fails,
then it tries to connect all paired devices
sequentially.
Depending on auto connection priority,
connection to a device may take time.
.
Bluetooth
Bluetooth System Information
Press the
▶
Select
SETUP
key ▶ Select
em Info
Features Description
Vehicle
Name
You can change the
Bluetooth device name of
the vehicle.
You can change the pass-
Passkey
key used for Bluetooth
device authentication. the
initial passkey is 0000.
i
Information
• The vehicle name above is an example.
Check the actual information on the product.
Bluetooth
.
08
Setup I 8-5

Default Factory Settings
You can delete all paired devices and
restore the Default Bluetooth Settings. For
Default Factory Settings, all paired devices
are deleted, and the system is reset to
factory settings.
UVO eServices Settings
Within the eServices Settings screen,
UVO eServices related features can be set,
such as activating 911 Connect, Parking
Minder and setting the My Car Zone.
For safety reasons, My Car Zone Settings
cannot be adjusted while driving. Park
the vehicle before making any changes to
your settings.
911 Connect
This feature is used to turn on or off the
911 Connect feature.
8-6 I Setup
Press the
SETUP
key ▶
UVO eServices

When enabing this feature, you must first
agree to the 911 Connect tems of use.
After reading the tems of use, press the
Agree
button on the touch screen to
accept.
Parking Minder
If you want to send vehicle location to your
smartphone automatically when you turn
the ignition off, turn the Parking Minder
feature On.
My Car Zone
This feature is used to set My Car Zone
(Curfew Limit, Speed) alert conditions.
My Car Zone Settings is unavailable when
UVO eServices has not been activated.
Press the
My Car Zone
SETUP
.
key ▶
UVO eServices
▶
The PIN must be entered to use My Car
Zone Settings.
Setup I 8-7
08

This screen is used to set Curfew Limit
and Speed Alert features.
Set the alert conditions On ▶
Settings
.
Curfew Limit Alert Settings
Within Curfew Limit Alert Settings, you can
set the Curfew Limit Alert Start and End
Time. You can also set the Alert Interval of
alerts upon Curfew Limit.
Speed Alert Settings
Within Speed Alert Settings, you can set
the vehicle speed limit and Alert Interval of
alerts upon overspeeding.
PIN
This feature is used to change the PIN to
enter My Car Zone Settings.
NOTICE
• Before pressing
smartphone is connected to UVO eServices
system via USB cable.
Done
, ensure your
8-8 I Setup

Press the
Done
button to transmit the new
PIN to your My UVO com account.
Restore Factory Settings
This feature is used to restore all My Car
Zone alert history and settings back to
default state.
Scheduled Diagnostics
This feature is for setting when scheduled
diagnostics alerts display.
Press
SETUP
key ▶
the Scheduled Diagnostics On ▶
NOTICE
• For months without the corresponding day,
the last day of the month will automatically be
set as the scheduled diagnostics date.
UVO eServices
▶ Set
Settings
Setup I 8-9
08

Trip Info Sync Reminder
D
t
Trip Info is a feature used to set whether
system displays alert when trip info(Driving Distance, Driving Speed, Driving Time,
etc). reaches 90% of memory.
Home Screen Settings
You can customize the three menu items
at the bottom right of the Home Screen
into the ones you want.
Wi-Fi Settings
You can share a digital-device network
with the vehicle device through Wi-Fi.
UVO eServices must be activated to use
this feature.
On the Home Screen Settings screen,
drag the menu items on the right to the
area marked in red in the screen below.
Press
SETUP
key ▶
UVO eServices
▶
Set Trip Info Sync Reminder On
Features Description
Wi-Fi
MAC
Address
Refresh
i
Information
• You can select the
to the factory default settings.
8-10 I Setup
efaul
button to reset
Network
Name
Add Wi-Fi
Network
Help
Turn on/off Wi-Fi.
Displays the MAC address.
Searches available networks near the vehicle.
Displays available network
AP (Access Point) names.
Enter the network ID/
password to connect to
a hidden network AP
(Access Point).
Shows the Wi-Fi setup
guide.

How to Connect to a Network
1. In the Wi-Fi settings of a digital device,
activate Internet sharing (Hotspot).
2. In the vehicle network list, select the
desired device to connect to. Enter
the password to connect, if any.
Clock Settings
Configure the settings for time and date.
Using the arrow buttons, you can change
the values. Clock settings do not automatically change when crossing into different
time zones. The time must be changed
manually on this screen.
Features Description
Daylight
Saving Time
24 Hours
Direct entry
The daylight saving
time (DST) is applied.
The time display is set
in 24-hour format.
If you tap any value,
you can directly enter
the number in the following screen.
Voice Recognition
Settings
Configure how to make a call with
Voice Recognition Guidance and Voice
Recognition.
Features Description
Beginner
Normal
For beginners, the voice
recognition system provides voice prompts.
For normal users, the
voice recognition system
provides simple and short
voice guidances.
08
Setup I 8-11

Language Settings
Keyboard Settings
Screen Saver Settings
You can configure the displayed system
language.
When the language is changed, the system language is automatically changed.
Unique data including MP3 file name is
not changed and voice recognition does
not support some languages.
You can configure the keyboard layout for
each language.
You can configure ABCD or QWERTY
keyboards for the system.
i
Information
• Configured keyboard layouts are applied
to all input modes.
You can select any of the following screen
formats to be displayed when the screen
or power is turned off (Press and hold the
Power button).
• Digital clock and date
• Analog clock and date
• None
8-12 I Setup

System Info
Updat
U
At the System Info screen, software version information, updates, and storage
status details are available.
System Update
At the System Info screen, insert the USB
memory with the latest file downloaded,
pdate
and then select the
updating. The system will then reboot
automatically.
i
Information
• This product needs supplemented software
updates and additional functions, which
collectively may take some time to complete,
depending on the amount of data.
button to begin
Features Description
System version information and update details
SW Info
Storage
are available.
Select the
to update the system.
After update is complete,
the system will reboot
automatically.
Displays the memory
space available for media
storage.
e
button
CAUTION
• If the power is disconnected or the USB is
removed during an update, the data might be
damaged. Please do not turn off the vehicle
while an update is in progress.
08
Setup I 8-13

MEMO

p
art.10
Appendix
Product Specification
Troubleshooting
FAQ

Appendix
Product Specification
TFT-LCD
Screen Size 7 inch(152.4 X 91.44 mm)
Resolution 384000 pixels (Resolution: 800 x 480)
Operating
Method
Viewing Angle Left/Right, Top/Bottom: ALL 89°
Internal Lighting LED
Radio
Channels
Sensitivity FM: Under 10 dBu/AM: Under 35 dBu
Distortion Factor Within 2 %
TFT(Thin Film Transistor) Active Matrix
FM: 87.5 MHz ~ 107.9 MHz(Step: 200 kHz)
AM: 530 kHz ~ 1710 kHz(Step: 10 kHz)
Common
Name Car TFT LCD Display Audio Unit
Power Supply DC 14.4 V
Current
Consumption
Operating
Temperature
Dimensions 178 X 140.2 X 60 mm (Main BOX)
Weight 1.940 kg
2.5 A
-20 ~ +70 °C
(-4 ~ +158 °F)
Operating
Power
Sleep
Current
Storage
Temperature
DC 9 V ~ DC 16 V
1 mA
(Head Unit Only)
-30 ~ +80 °C
(-22 ~ +176 °F)
9-2 I Appendix

Wi-Fi Details
Frequency
Specification IEEE802.11 a/b/g/n/ac
Operating
Temperature
Supported
Bandwidth
2412 ~ 2462 MHz,
5180 ~ 5825 MHz
-20 ~ +70 °C (-4 ~ +158 °F)
20/40/80 MHz
Bluetooth
Frequency
Range
Supported
Profile
®
Wireless Technology
2402 ~ 2480 MHz
Supported
Bluetooth
®
Specification
Handsfree(1.6), A2DP(1.2), AVRCP(1.4), PBAP(1.0)
3.0
Output -6~4 dBm (Power Class2, Conducted)
Number of
Channels
79 channels
CAUTION
• The producer and installer cannot provide services related to life safety
as the concerned radio equipment is liable to radio interference.
Appendix I 9-3
09

Troubleshooting
1. Errors which occur during the operation or installation of the
device may be mistaken as a malfunction of the actual device.
2. If you are having problems with the device, try the suggestions
listed below.
3. If the problems persist, contact your Kia dealer.
Problem Possible Cause
There are small red,
blue, or green dots on
the screen
The sound or image is
not working
The screen is being
displayed but sound is
not working
When the power is
turned on, the corners
of the screen are dark
Sound is working from
only one speaker
• Because the LCD is manufactured with
technology requiring high point density,
a pixel or lighting deficiency may occur
within 0.01% of total pixels
• Has the Switch for the vehicle been
turned to [ACC] or [ON]?
• Has the SYSTEM been turned OFF?
• Has the volume been set to a low level?
• Has the volume been muted?
• The display appearing somewhat dark
after prolonged periods of use is normal
with LCD panels. It is not a malfunction
• If the screen is very dark, contact your
nearest Kia dealer for assistance
• Are the positions of Fader or Balance
sound controls adjusted to only one
side?
Problem Possible Cause
Sound does not work in
AUX mode
The external device is
not working
Upon turning power on,
the most recent mode
screen is not displayed
• Are the audio connector jacks fully
inserted into the AUX terminal?
• Is the external device connected with a
standard connector cable?
Within modes that play files by reading
external sources, such as USB, iPod, or
Bluetooth
recently played mode screen prior to turning off power may not properly load
• If the corresponding device is not con-
• If the previous mode still cannot be
®
streaming mode, the most
nected, the mode operated prior to the
most recent mode will operate
properly played, the mode operated
prior to that will operate
9-4 I Appendix

Problem Possible Cause Countermeasure
• Replace with a suitable fuse
• If the fuse is disconnected
again, please contact your
point of purchase or Kia
dealer
• Check to see that the
device has been properly
connected
• Charge the battery If the
problem persists, contact
your point of purchase or
Kia dealer
The power
does not
turn on
The system
does not
play
The fuse is disconnected
Device is not properly
connected
The vehicle battery is
low
Problem Possible Cause Countermeasure
The image
color/tone
quality is
low
Sound does
not work
The sound
or image
quality is
low
• The brightness,
saturation, hue,
and contrast levels
are not set properly
• The volume level
is set to the lowest
level
• The connection is
not proper
• The device is
currently fast-forwarding, rewinding,
scanning, or playing in slow mode
• Vibration is occurring from where
the conversion
switch has been
installed
• Image color/tone
quality is low
• Properly adjust the brightness, saturation, hue, and
contrast levels through
Display Setup
• Adjust the volume level
• Check to see that the
device has been properly
connected
• The sound will not work
when the device is fast-forwarding, rewinding, scanning, or playing in slow
mode
• The sound may be
short-circuited and the
image distorted if the
device vibrates
• The device will return to
normal once vibrations stop
Appendix I 9-5
09

Problem Possible Cause Countermeasure
The USB
does not
work
• USB memory is
damaged
• USB memory has
been contaminated
• A separately purchased USB HUB
is being used
• A USB extension
cable is being
used
• A USB which is
not a Metal Cover
Type USB Memory
is being used
• An HDD type, CF,
SD Memory is
being used
• There are no
music files which
can be played
• Please use the USB after
formatting it.
• Remove any foreign substances on the contact
surface of the USB memory
and multimedia terminal
• Directly connect the USB
memory with the multimedia terminal on the vehicle
• Directly connect the USB
memory with the multimedia terminal on the vehicle
• Use standard USB
Memory
• Use standard USB
Memory
• Only MP3, WMA file
formats are supported.
Please use only the supported music file formats
Problem Possible Cause Countermeasure
• There are no titles
which can be
The iPod is
not recognized even
though it
has been
connected
Bluetooth
does not
work or
its limited
functions are
available
i
Information
• While operating the device, if an abnormality occurs that cannot be
corrected with the above described measures, press the
reset the system.
• Press and hold the
will turn off and the system will reset.
played
• The iPod firmware
version has not
been properly
updated
• The iPod device
does not recognize downloads
• Bluetooth on your
mobile phone is
set to OFF
• The Bluetooth
connection is not
made
key (more than 1 second). The device power
RESET
• Use iTunes to download
and save MP3 files into the
iPod
• Use iTunes to update
the firmware version and
reconnect the iPod with the
device
• Reset the iPod and reconnect with the device
• Set it to ON
• Make the connection
active
key to
RESET
9-6 I Appendix

FAQ
h
B
P
y
About Pairing Mobile Phones
Q I cannot pair my mobile phone. What is the cause?
A Check to see that the mobile phone supports Bluetooth® func-
tion. Verify if Bluetooth on the cell phone is set to OFF. If so, set
it to ON. If the cell phone still can’t be registered, try again after
turning Bluetooth off and on, or delete the device registration on
the multimedia system and cell phone and then register the cell
phone again.
Q What is the difference between pairing a mobile phone and con-
necting a mobile phone?
A Pairing occurs through authenticating the head unit and mobile
phone. Mobile phones paired to the head unit can be connected
and disconnected until the paired mobile phone is deleted from
®
the system. Bluetooth
Handsfree features, such as making/
answering calls or managing contacts, are supported only in
mobile phones connected with the head unit.
Q What is a Passkey?
A A passkey is the password used to authenticate the connection
between the head unit and mobile phone. The passkey only
needs to be entered once when pairing the mobile phone for
the first time.
SETUP
The initial passkey is 0000. You can change it with
Bluetoot
luetooth System Info
▶
▶
asske
menu options.
▶
09
Appendix I 9-7

About Making/Answering Phone Calls
A
t
U
te
Q How can I answer a call?
A When there is an incoming call, a notification pop-up will
become displa
ccep
ing
wheel control
To reject the call, select the
press the
Q What should I do if I am talking on the Handsfree but want to
witch the call to the mobile phone?
s
A While on a call, press and hold (more than 0.8 seconds)
the
se Priva
the call to your mobile phone.
yed. To answer the incoming call, select the
button on the screen or the
key on the steer-
.
Reject
button on the screen or
key on the steering wheel control.
key on the steering
button at the bottom of the Phone screen to switch
wheel control
or select the
About
Bluetooth
®
Wireless Technology/
Head Unit Use Environment
Q What is the range of my wireless connection?
A The wireless connection can be used within 15 y
Q How many mobile phones can be paired?
A It is possible to pair up to five mobile phones.
Q Why is call quality sometimes poor?
A
Check the reception sensitivity of the mobile phone when call
quality becomes worsened. The call quality may deteriorate when
the signal strength is low. Call quality may also worsen if metal
objects, such as beverage cans, are placed near the mobile
phone. Check to see if there are metal objects in the vicinity of
the mobile phone. The call sound and quality may differ depending on the type of mobile phone.
ards.
9-8 I Appendix

Important Information
Before using your Multimedia system, read and follow all instructions and safety information provided in this end user manual ("User's
Guide"). Not following precautions found in this User's Guide can lead to an accident or other serious consequences.
Keep User's Guide in Vehicle
When kept in the vehicle, the User's Guide will be a ready reference for you and other users unfamiliar with the Multimedia system. Please
make certain that before using the system for the first time, all persons have access to the User's Guide and read its instructions and
safety information carefully.
Warning
Operating certain parts of this system while driving can distract your attention away from the road, and possibly cause an accident or other
serious consequences. Do not change system settings or enter data non-verbally (using your hands) while driving. Stop the vehicle in a
safe and legal manner before attempting these operations. This is important since while setting up or changing some functions as you may
to distract your attention away from the road and remove your hands from the wheel.
09

General Operation
Voice Command Control
Functions within the Multimedia system may be accomplished using only voice commands. Using voice commands while driving allows
you to operate the system without removing your hands from the wheel.
Prolonged Views of Screen
Do not access any function requiring a prolonged view of the screen while you are driving. Pull over in a safe and legal manner before
attempting to access a function of the system requiring prolonged attention. Even occasional short scans to the screen may be hazardous
if your attention has been diverted away from your driving task at a critical time.
Volume Setting
Do not raise the volume excessively. Keep the volume at a level where you can still hear outside traffic and emergency signals while
driving. Driving while unable to hear these sounds could cause an accident.
Use of Speech Recognition Functions
Speech recognition software is inherently a statistical process which is subject to errors. It is your responsibility to monitor any
speech recognition functions included in the system and address any errors.

FCC Warning
This equipment has been tested and found to comply with the limits for a digital device, pursuant to part 15 of the FCC Rules. These
limits are designed to provide reasonable protection against harmful interference in a residential installation.
This equipment generates, uses and can radiate radio frequency energy and, if not installed and used in accordance with the instructions,
may cause harmful interference to radio communications. However, there is no guarantee that interference will not occur in a particular
installation. If this equipment does cause harmful interference to radio or television reception, which can be determined by turning the
equipment off and on, the user is encouraged to try to correct the interference by one or more of the following measures:
• Reorient or relocate the receiving antenna.
• Increase the separation between the equipment and receiver.
• Connect the equipment into an outlet on a circuit different from that to which the receiver is connected.
• Consult the dealer or an experienced radio/TV technician for help
Caution: Any changes or modifications to this device not explicitly approved by manufacturer could void your authority to operate this
equipment.
This device complies with part 15 of the FCC Rules. Operation is subject to the following two conditions:
(1) This device may not cause harmful interference, and (2) this device must accept any interference received, including interference that
may cause undesired operation.
This equipment complies with FCC radiation exposure limits set forth for an uncontrolled environment.
This equipment should be installed and operated with minimum 20 cm between the radiator and your body.
09
 Loading...