

Page 1

AA
b
c d e f
a g
The download may not work in some phone models. For
more information about compatibility, visit the company
website at http://www.kia.com.
AA
You can download up to 50 call records for each list.
AA
Call durations do not appear on the system screen.
AA
You cannot download call records when the download is
prohibited by the phone. Some phone models may require
approval for a download. When a successful download is not
made, check the phone screen or its settings.
AA
When call records are newly downloaded, the previous
records are removed.
AA
Learn more about receiving calls while using Bluetooth
connection. > see “Accepting an incoming call over Bluetooth.”
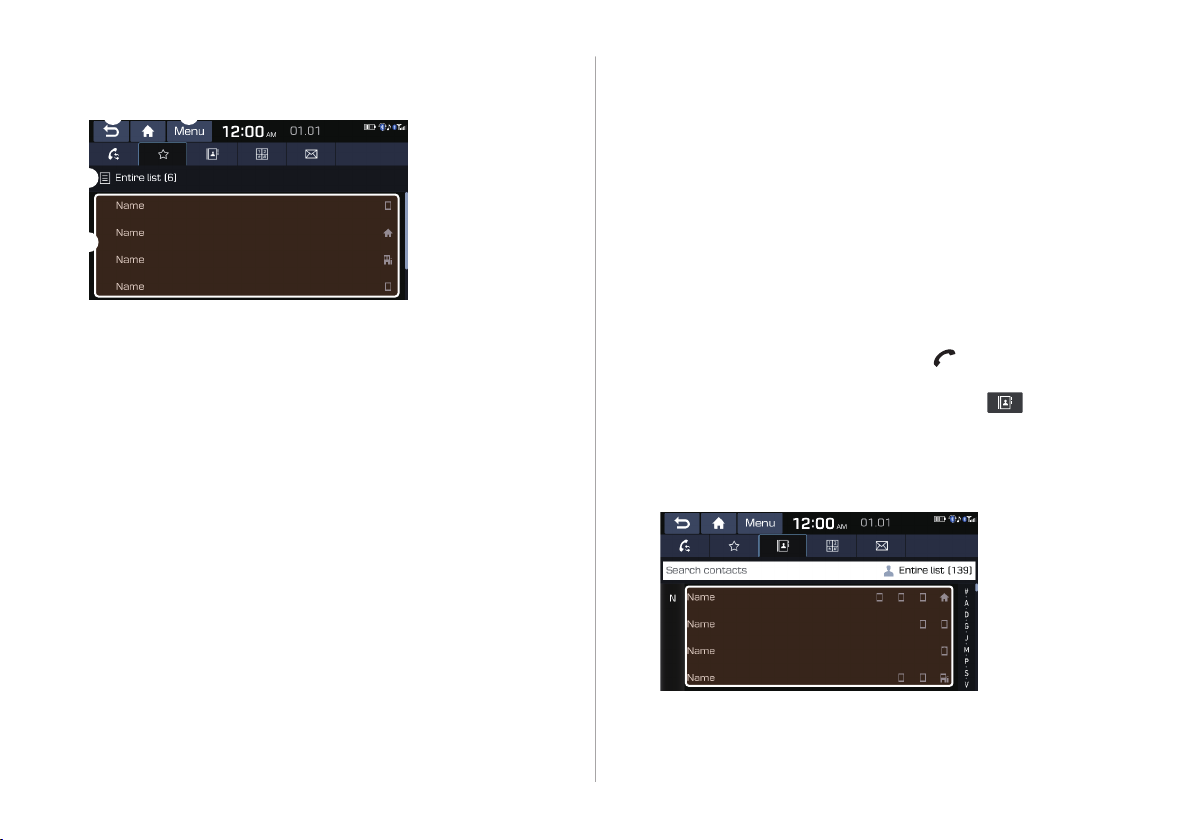
Recent calls list screen
Used to return to the previous screen.
a
View a list of recent calls downloaded to the system from the
b
device.
View all recent calls.
c
View only dialed calls in the list.
d
View only received calls in the list.
e
View only missed calls in the list.
f
The list of menu items appears.
g
Download: Download the list of recent calls from the
•
connected mobile device.
Bluetooth settings: Can change the Bluetooth settings.
•
6-7
Page 2

Dialing from the favourites list
Make a list of frequently used phone numbers to call them quickly
in the future.
When you connect your mobile device and system over Bluetooth,
your contacts stored on the device will be downloaded to the
system, and you can add frequently used phone numbers to the
favourites list. Call your favourite contacts quickly and easily by
selecting them from the list.
Perform any of the following options:
1
On the All menus screen, touch Phone.
•
On the steering wheel, press the [ ] button.
•
On the Bluetooth Call screen, touch .
2
On the favourites screen, touch Add new and
3
select a name from the displayed list.
AA
If you already have contacts on your favourites list, touch
Menu > Edit on the favourites screen.
To set a phone number as a favourite, touch the
4
button next to it.
The phone number is now added to your favourites list.
Choose a contact from the list.
5
The system dials the selected contact.
AA
You can add up to 10 favourite contacts for each device.
AA
In the favourite contacts list, the default emergency phone
number is set for use upon emergency.
AA
When another mobile phone is connected, the screen does
not display the contacts from the previous phone but they are
kept in the system until the phone is deleted from the list.
AA
Learn more about receiving calls while using Bluetooth
connection. > see “Accepting an incoming call over Bluetooth.”
6-8
Page 3
Favourites screen
a d
b
c
Used to return to the previous screen.
a
The emergency call list allows you to quickly dial the police,
b
national intelligence service, and other agencies.
View a list of favourite contacts.
c
The list of menu items appears.
d
Add new/edit: Add a new contact or edit the favourites
•
list from downloaded contacts.
Delete: Delete a contact from the favourites list.
•
Bluetooth settings: Can change the Bluetooth settings.
•
Dialing from the contacts
You can use contacts from the connected mobile device on the
system.
When you connect your mobile device with the system via
Bluetooth, contacts from the device are downloaded to the
system, and you can choose to call them from the system screen.
The system has a built-in microphone and speaker that allows
using phone safely and easily.
Perform any of the following options:
1
On the All menus screen, touch Phone.
•
On the steering wheel, press the [ ] button.
•
On the Bluetooth Call screen, touch .
2
Select a contact from the list.
3
The system dials the selected contact.
6-9
Page 4
c
AA
You can download only the contacts that can be displayed on
the connected Bluetooth device. The contacts may not appear
in some applications.
AA
You can download up to 5,000 contacts for each device.
AA
The download may not work in some phone models. For
more information about compatibility, visit the company
website at http://www.kia.com.
AA
The downloaded contacts may be lost depending on the
system specications.
AA
Contacts from both the mobile device and its SIM card are
downloaded at the same time. The system may not be able to
download SIM card contacts from all phone models.
AA
When speed dial numbers are set to contacts on the phone,
press and hold a speed dial number on the dial pad to make
a call easily. Some mobile phone models may not support the
speed dial function.
AA
You cannot download contacts when the download is
prohibited by the phone. Some phone models may require
approval for a download. When a successful download is not
made, check the phone screen or its settings.
AA
Depending on the phone model or operation status,
downloading may take longer than usual.
AA
When a new contacts list is downloaded, the previous records
are removed.
AA
The downloaded contacts cannot be edited or deleted from
the system.
AA
When another mobile phone is connected, the screen does
not display the contacts downloaded from the previous phone
but they are kept in the system until the phone is deleted
from the list.
AA
Learn more about receiving calls while using Bluetooth
connection. > see “Accepting an incoming call over Bluetooth.”
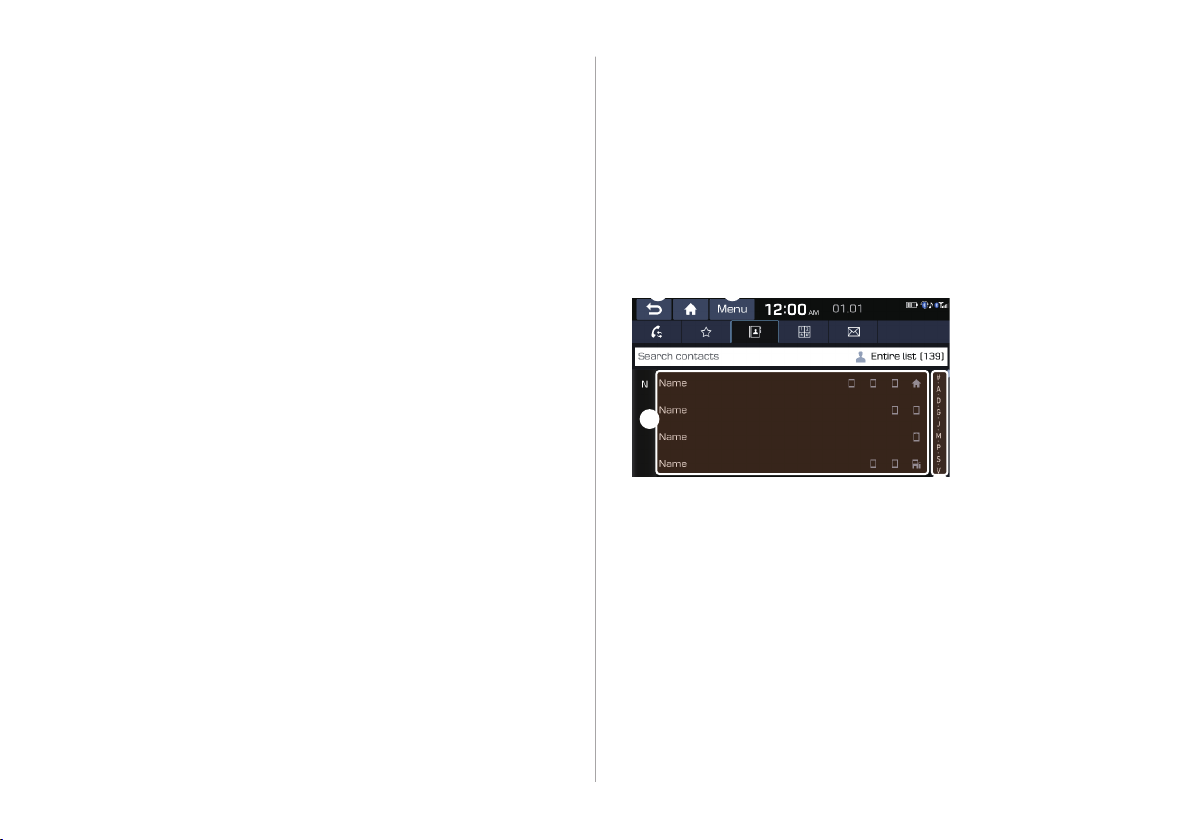
Contacts list screen
a d
b
Used to return to the previous screen.
a
View a list of contacts downloaded to the system from the
b
device.
Use the index to quickly nd the contact you are looking for.
c
6-10
Page 5

The list of menu items appears.
d
Download: Download the list of contacts from the
•
connected mobile device.
Search: Search contacts by entering a name or a phone
•
number.
Bluetooth settings: Can change the Bluetooth settings.
•
Using the dial pad
Enter a phone number using the dial pad to make a call.
When you connect your mobile device to the system via
Bluetooth, you can enter and dial a phone number from the
system screen, without interacting with the device. The system
has a built-in microphone and speaker that allows using phone
safely and easily.
Warning
Ý
Do not manually dial a call while driving. Distraction by the use
of a mobile phone may cause you not to recognise trac ow
around and not to cope with unexpected situations. As a result, a
trac accident may occur.
Perform any of the following options:
1
On the All menus screen, touch Phone.
•
On the steering wheel, press the [ ] button.
•
On the Bluetooth Call screen, touch .
2
6-11
Page 6
c d e
a f
3
AA
After entering a phone number, touch .
A call is connected to the entered phone number.
AA
When contacts are on the system, search for the desired
contact by entering the initial letters or number on the dial
pad. (e.g. John Doe > JD).
Learn more about receiving calls while using Bluetooth
connection.
> see “Accepting an incoming call over Bluetooth.”
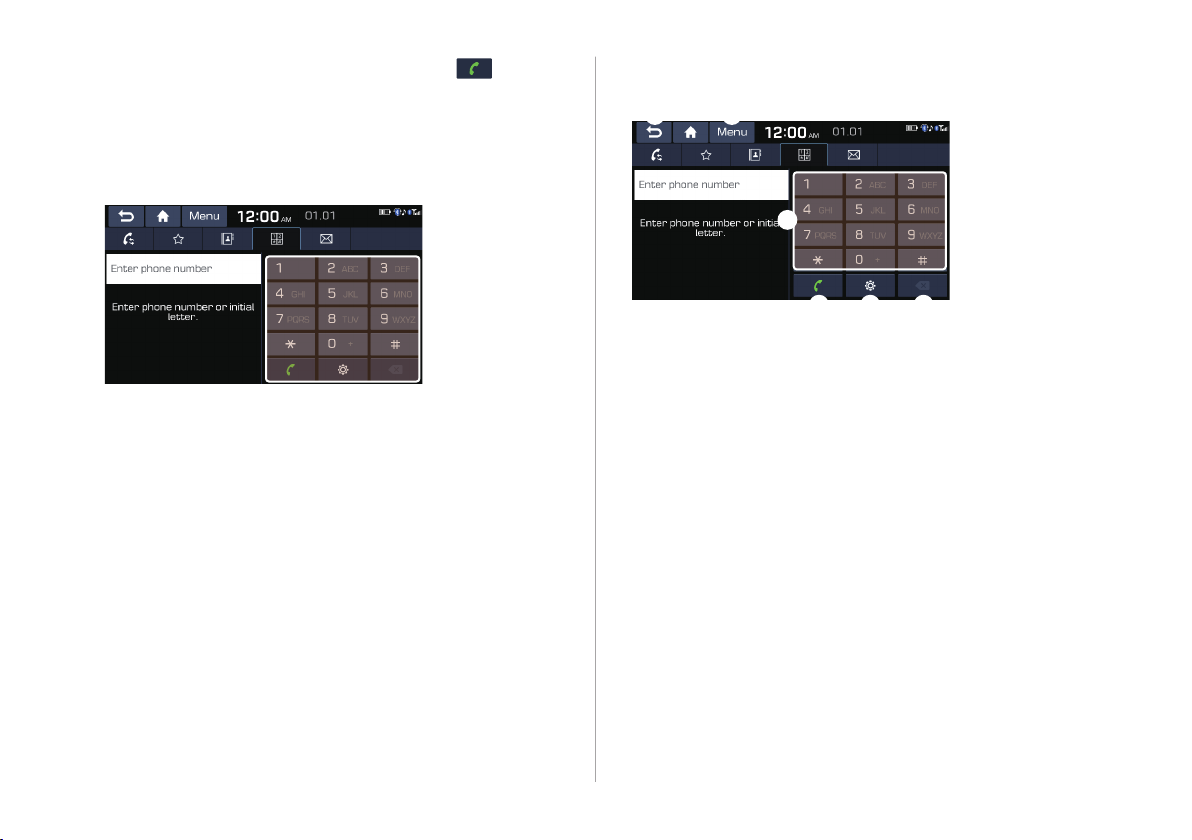
Dial pad screen
b
Used to return to the previous screen.
a
Use the dial pad to enter phone numbers.
b
Touch to dial the number you entered.
c
AA
If you have recent calls stored on your system, you
can use the following feature before entering a phone
number.
AA
Touching this button will display the most recently dialed
numbers in the eld.
AA
Touch and hold this button to automatically call the most
recently dialed number.
Can congure the Bluetooth connection settings.
d
Delete an entered number.
e
6-12
Page 7
The list of menu items appears.
f
Bluetooth settings: Can change the Bluetooth settings.
•
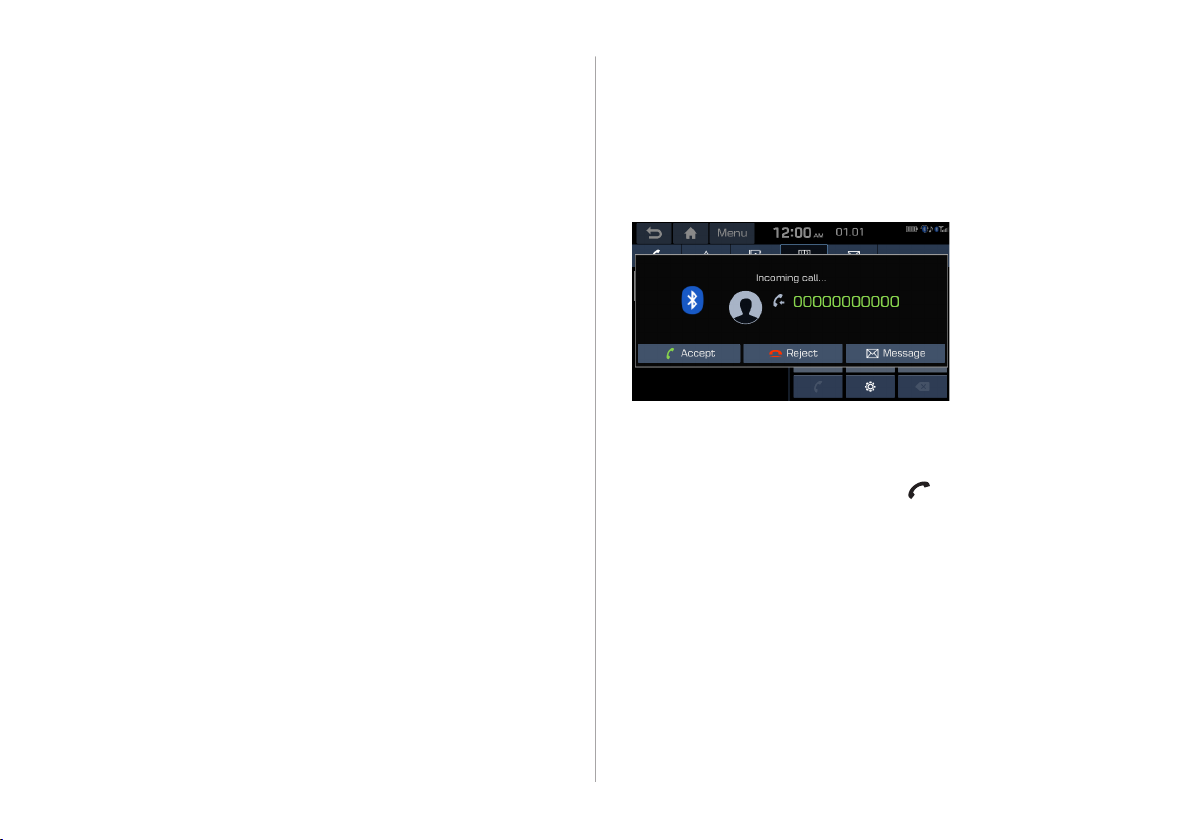
Accepting an incoming call
over Bluetooth
The system screen alerts you when you receive a call while
connected using Bluetooth.
Perform any of the following options:
Touch Accept on the screen.
•
On the steering wheel, press the [ ] button.
•
6-13
Page 8

Warning
Ý
Pull over the vehicle at a safe place before connecting
•
your mobile phone. When a trac accident occurs while
attempting connection, it may cause severe or fatal injury.
Do not talk on your mobile device while driving. Distraction
•
by the use of a mobile phone may cause you not to recognise
trac ow around and not to cope with unexpected
situations. As a result, a trac accident may occur. If
necessary, use the Bluetooth hands-free function and make
the call as short as possible.
AA
When a mobile phone is connected to the system, the
vehicle’s speaker may be used to output a call tone even
after you leave the vehicle. To disconnect the call, disable the
Bluetooth connection on the system or turn o the Bluetooth
function on the mobile phone.
Rejecting a call
Perform any of the following options:
Touch Reject on the screen.
•
On the steering wheel, press the [
•
AA
To reject by sending a call-reject message, touch Message.
From the list, select the call-reject message and touch Send.
AA
The call-reject or auto reply message may not be supported in
some phone models.
AA
You can set to automatically reject an incoming call and send
the auto reply message to the caller.
] button.
6-14
Page 9
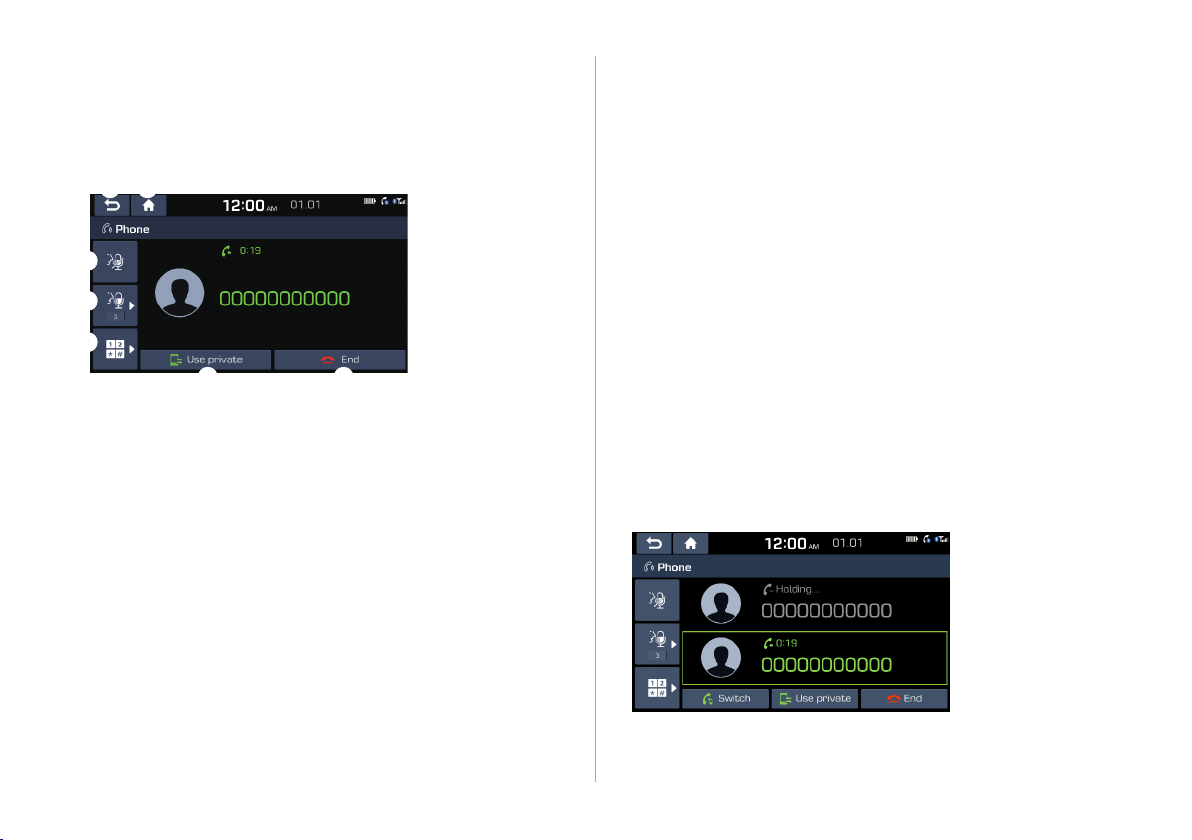
Using functions during a call
e f
a g
During a call, the following screen appears.
Touch to use the available options.
b
c
d
Used to return to the previous screen.
a
Can turn o the microphone so that the other party cannot
b
hear you.
Can adjust the microphone volume.
c
Displays the dial pad.
d
Used to switch the call to the mobile phone. This option may
e
not be available in some phone models.
Used to end a call.
f
The list of menu items appears.
g
Split screen: Can turn on or o the split screen mode.
•
AA
When a caller is in the contact list, the caller’s name and
phone number appear. Otherwise, only the phone number
appears.
AA
During a call with a Bluetooth connection, you cannot switch
to another screen such as AV mode.
AA
Depending on the phone model, the call volume of the other
party may dier.
AA
Depending on the phone model, the telephone number may
not appear.
Switching to another call
You can receive another incoming call while in a call. This option
is available only when the connected mobile phone supports the
call hold function. The previous call is put on hold.
To switch between two calls, use either option.
Touch Switch.
•
Touch a displayed phone number.
•
AA
This option may not be available in some phone models.
6-15
Page 10
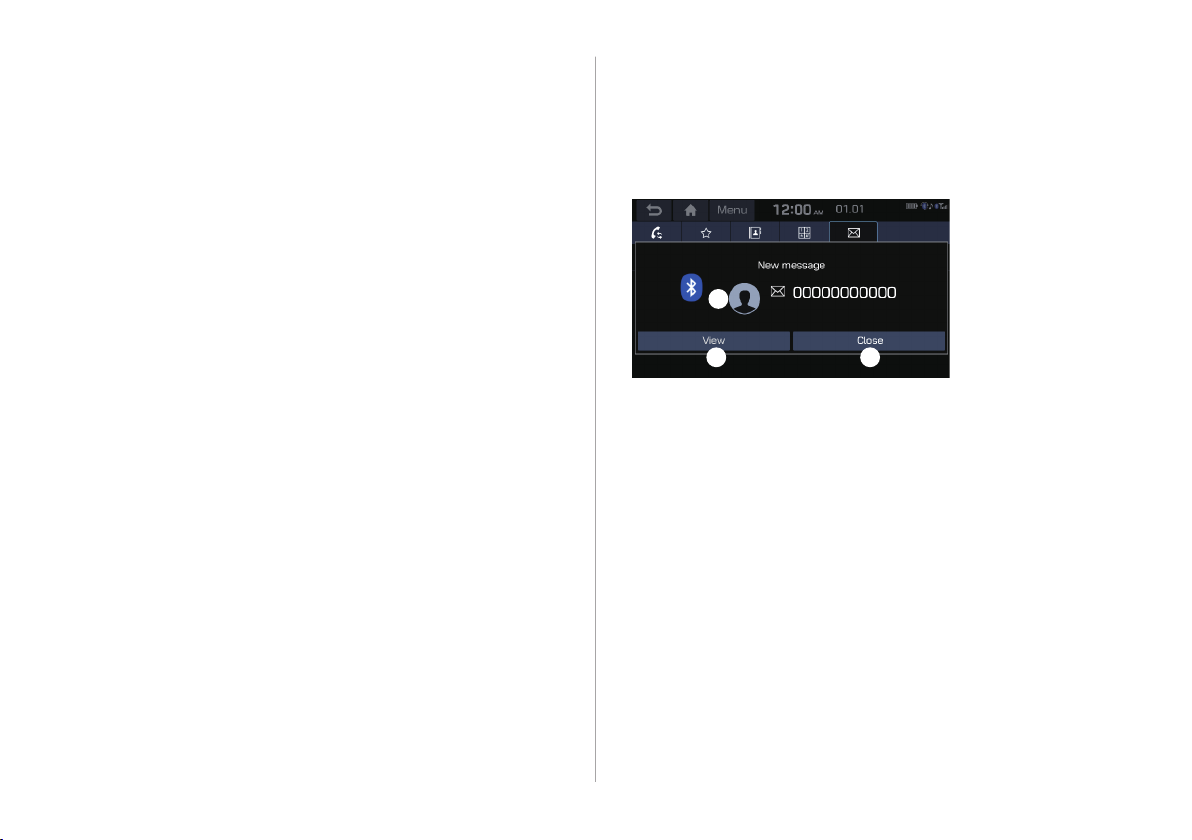
Checking a new message over
Bluetooth
Checking a new message
When a message is received, the new message notication
window appears.
After connecting a mobile phone via Bluetooth, you can check the
received messages through the system screen converted from
the text messages. This option is available when a mobile phone
is connected via Bluetooth. You can also send the brief reply
message registered in the system.
To check the message, touch View.
a
b c
View caller details.
a
Can see the message details.
b
Used to close the notication window.
c
AA
The message notication window does not appear when the
privacy mode is enabled or the message notication is turned
o.
6-16
Page 11
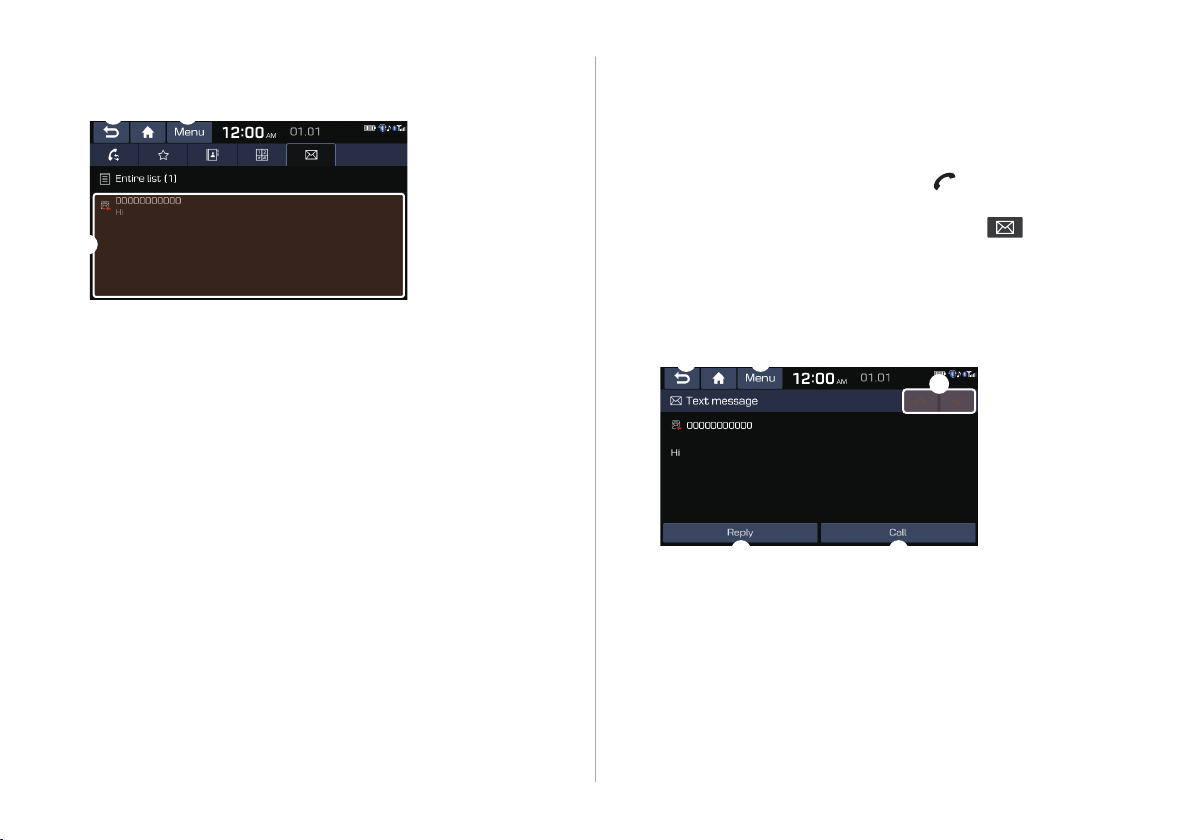
Bluetooth message screen
a c
b
Checking a new message from the list
Perform any of the following options:
1
On the All menus screen, touch Phone.
•
On the steering wheel, press the [ ] button.
•
On the Bluetooth Call screen, touch .
2
Select a message from the list.
3
Used to return to the previous screen.
a
View the list of received messages.
b
The list of menu items appears.
c
Message settings: Displays the message settings screen.
•
Bluetooth settings: Can change the Bluetooth settings.
•
Check the message.
4
a c
d
b c
Used to return to the previous screen.
a
Used to select a message registered in the system for
b
sending a brief reply message.
Used to make a call to a message sender.
c
Used to move to the previous or next message.
d
6-17
Page 12

The list of menu items appears.
e
Message settings: Displays the message settings
•
screen.
Bluetooth settings:Can change the Bluetooth
•
settings.
6-18
Page 13

08
Settings
Configuring the advanced system settings
Configuring the sound settings
Device connection settings
Configuring the general system settings
Configuring the display settings Updating
the system software and map
Page 14

Conguring the sound settings
Turning on/o the screen touch sound
You can change the sound settings such as speaker volume and
sound eects.
AA
Available settings may dier depending on the vehicle model
and specications.
AA
Some functions may not be available depending on the
multimedia system and amplier specications in the vehicle.
On the All menus screen, touch Settings
1
>
Sound.
The sound settings screen appears.
Congure the settings required:
2
To turn on or o the touch sound on the screen,
touch Beep at the top of the screen.
Position
You can select a position where sound is more audible in the
vehicle. By touching the desired point on the seat image or
touching the arrow buttons, you can nely adjust the position. To
concentrate the sound to the centre of the vehicle, touch
.
8-8
Page 15

Volume levels
Equaliser
You can adjust the volume for each system function including
phone projection.
System sound
You can adjust the volume for each system function and return all
volume settings to defaults, if necessary.
AA
To return all system sound settings to defaults, touch Default.
Phone projection
You can adjust the volume of the phone projection and return all
volume settings to defaults, if necessary.
AA
To return the volume of the desired phone projection to the
default, touch Default next to the function name.
You can adjust the sound by adjusting the strengths (output
levels) for each audio band: Bass, Midrange, and Treble. You can
also return the output levels for all audio bands to defaults, if
necessary.
AA
To return the output levels for all audio bands to the defaults,
touch Centre.
8-9
Page 16

Volume ratio
You can congure the settings so that a specic sound is more
audible over other sounds.
• Proximity Warning: When warning sound is generated
while parking, the audio volume is decreased to make the
sound audible.
• Start-up Volume Limit: Can set to automatically decrease
the audio volume to an adequate level when turning on the
vehicle.
8-10
Page 17

Advanced
Default
You can change the system sound settings and apply various
sound eects.
AA
Available sound eects may dier depending on the
specications of the amplier.
Speed dependent volume control
You can set the system to automatically increase the audio
volume when the vehicle speed increases.
You can reset all sound settings to defaults.
8-11
Page 18

Device connection settings
You can manage Bluetooth devices or congure their operation
settings. You can also activate the phone projection so that you
can control the smartphone applications on the system screen
after connecting the smartphone to the system.
Bluetooth
You can register or delete a Bluetooth device for the system and
connect or disconnect a registered device. You can also congure
operation settings such as notications, messages, and other
settings for Bluetooth devices.
8-12
On the All menus screen, touch Settings
1
Device Connection.
The device connection settings screen appears.
Congure the settings required:
2
>
Page 19

AA
For more information on how to use the Bluetooth functions:
> see “Connecting a Bluetooth device.”
AA
Some setting options appear when a smartphone is
connected to the system.
AA
The auto-reply messaging may not be available depending on
the smartphone model.
AA
To edit or delete a message, pull over the vehicle at a
safe place and access the messaging function on your
smartphone. You cannot edit or delete a message from the
system.
AA
When an iPhone is connected to the system, there are some
restrictions when receiving messages as follows:
Only the sender name appears when the sender
-
information is saved.
Otherwise, only the phone number appears.
-
You cannot use the auto-reply message function.
-
When the incoming message notication or lock-screen
-
view option is o, messages cannot be received.
AA
The message reader function may not be supported
depending on the system language.
Connection settings
You can register or delete a Bluetooth device from the system
and connect or disconnect a registered device.
AA
You can add one Bluetooth hands-free kit or up to two
Bluetooth audio devices.
Message settings
Predened Messages: You can edit the auto-reply message
that is automatically sent out after receiving a text message or
receiving a phone call.
AA
This option may not be available in some phone models.
Bluetooth system info
You can see and edit the Bluetooth information of the system.
Factory settings
You can delete all Bluetooth devices registered on the system and
return them to default settings. All data for Bluetooth devices are
also deleted.
8-13
Page 20

Android Auto
You can activate the Android Auto function to pair your Android
smartphone with the system.
Conguring the general
system settings
You can congure general settings for date, time, language, and
the like. You can also check information of the system.
Apple CarPlay
You can activate the Apple CarPlay function to pair your iPhone
with the system.
8-14
On the All menus screen, touch Settings
1
General.
The general settings screen appears.
Congure the settings required:
2
>
Page 21

Date/Time
Language
You can set the system date and time automatically or manually.
You can also set the time display mode.
GPS Time: After receiving the time from GPS, it sets the
•
system date and time automatically.
AA
To manually set the date and time, uncheck GPS Time,
touch the current date and time below GPS Time, and
then set the date and time.
24-hour format: The system time is displayed in the 24-hour
•
format.
Daylight savings time: Displays the system time in the
•
format of Daylight Saving Time.
You can set the system display language.
AA
Once the language has been changed, it takes a while to
apply the new language to the system. The notication pop-
up window appears as soon as the new language is applied to
the system. When you wait a while or touch anywhere outside
the pop-up window, the window automatically disappears.
AA
When you change the system language, it does not aect the
display of other unique data such as MP3 music le name.
AA
Depending on the system language, the Bluetooth phone
message view may not be supported.
8-15
Page 22

Keyboard
Screen Saver
You can change the keyboard type for each language to use when
entering the text.
Keyboard type - Arabic: Select a default keyboard type for
•
Arabic.
Latin keyboard: Can select the keyboard type to use when
•
entering the English text.
Default keyboard: Can select the keyboard type to use when
•
entering the English text.
You can select the items to display on the screen saver in standby
mode.
Digital: Displays the digital clock and date on the system
•
screen saver.
Analogue: Displays the analogue clock and date on the
•
system screen saver.
None: Displays nothing on the system screen saver.
•
8-16
Page 23

System info
Memory
You can check the system software version and storage space.
You can also update the system software, use your smartphone
to access the online user’s manual of the system, or reset all
system settings to default values.
Version info/Update
You can see the versions of system components. You can also
update the system to the latest version.
AA
For details on how to update the system software: > see
“Updating the system software and map.”
You can check the storage space of the system memory where
voice memos can be saved.
Manual
You can access the online user’s manual of the system by
scanning the QR code with your smartphone.
Default
You can return all system settings including general settings and
navigation settings, to default values.
Caution
Ü
As soon as reset is performed, all system settings are changed
to default values. At the same time, all user data in the system
including the location data in the navigation system is deleted.
8-17
Page 24

Conguring the display
settings
You can change the system display settings such as display
brightness and video aspect ratio.
Dimming
You can set the system to automatically adjust the display
brightness depending on the ambient light intensity. You can also
set the system to keep the display bright or dark all the time.
8-18
On the All menus screen, touch Settings
1
Display.
The display settings screen appears.
Congure the settings required:
2
>
Auto-illumination: The display brightness is automatically
•
adjusted based on the surrounding environment.
Daylight: It can be activated when Automatic is turned o. It
•
keeps the display always bright regardless of the surrounding
environment.
Night: It can be activated when Automatic is turned o. It
•
keeps the display always dark regardless of the surrounding
environment.
Page 25

Brightness
Adjust
You can set the system to automatically adjust the display
brightness depending on the cluster illumination. You can also
set the level of display brightness to use while using the daytime
or night mode.
Use cluster knob: The display brightness is automatically
•
adjusted based on the cluster illumination.
Daylight: Sets the display brightness when Daylight is
•
selected under Dimming. Uncheck User cluster knob and
then set to the desired brightness.
Night: Sets the display brightness when Night is selected
•
under Dimming. Uncheck Use cluster and then set to the
desired brightness.
You can adjust the video display brightness, contrast, or chroma.
AA
This function is enabled only when playing video.
AA
To return the settings for video display brightness, contrast,
and chrome to default values, touch Centre.
Ratio
You can set the system to display video in the original aspect ratio
or in full screen.
AA
This function is enabled only when playing video.
8-19
Page 26

Default
You can return all display settings such as display aspect ratio
during video playback and the display brightness, to default
values.
Updating the system software
and map
You can update your multimedia system. Please visit your local
dealership to update your system.
A
The regular map update schedule diers depending on the
location and model. Be sure to contact the dealership for
more information.
AA
Any changes after an update may not be reected on the
map. As a result, certain roads, buildings, and speed limits on
the map may not be up to date.
AA
Depending on the total data amount, an update may take
several minutes.
AA
Do not turn o the system or remove the storage device while
the update is in progress. When power supply is cut o or the
storage device is removed from the system, it may damage
the data or cause a system malfunction.
8-20
Page 27

8-21
Page 28

Page 29

09
Troubleshooting guide
Solutions for each symptom
Page 30

Solutions for each symptom
When you encounter a system trouble, see the following table to check and resolve the issue.
When the trouble persists even after taking the suggested actions, contact the company’s service centre or service agency.
Sound and video issues
Symptom Possible cause Solution
A blank screen appears and
sound is not audible.
Sound is audible from only one
side of the speakers.
The sound is cut o or noise is
heard.
9-2
The system is turned o.
Sound volume is too low. On the control panel, turn the [VOL] knob to adjust the volume.
Sound is muted. On the steering wheel, press the [ ] button to make the sound
Sound is imbalanced. On the All menus screen, touch Settings > Sound > Position and
Vibration occurs in the system. When the system vibrates, the sound may be cut o or noise may
Check that the start switch is in “ACC” or “ON.”
•
Press the [PWR] button to turn on the system.
•
audible.
adjust the sound outputs for the left and right speakers.
occur. This is not a system failure. The system is restored as soon as
the vibration stops.
Page 31

Symptom Possible cause Solution
The image quality is poor. Screen adjustment is required.
Vibration occurs in the system. The images may get distorted when vibration occurs in the system.
The display is aged or the system
performance is degraded.
Small red, blue, and green dots
are shown on the screen.
On the All menus screen, touch Settings > Display >
•
Brightness, and then adjust the brightness.
On the All menus screen, touch Settings > Display > Adjust,
•
and then change the colour settings.
This is not a system failure. The system is restored as soon as the
vibration stops.
When the symptom persists, contact KIA Motors Company’s service
centre or service agency.
LCD has very high-density pixels. For this reason, there may be dead
pixels (that are always o) or lit pixels (that are always on) within 0.01
percent of the total pixels.
9-3
Page 32

USB playback-related issues
Symptom Possible cause Solution
Files in a USB device cannot be
played.
There are no compatible les for
playback
Poor connection is found. Remove the USB device from the multimedia USB port and then
The USB device is infected by a
virus or other malware.
A USB hub
or extension
cable is used.
The USB device is non-standard. Use a USB device that is compatible with the system. > see “USB
The USB device is damaged. Use your computer to format the USB device and then connect the
Copy the les that can be played by the system to the USB device
and connect the device again. > see “USB mode.”
reconnect it properly.
Remove foreign materials from the surface that contacts the USB
device and multimedia USB port.
Connect the USB device directly to the multimedia USB port.
mode.”
device again. Format the device in FAT16/32 format.
9-4
Page 33

Bluetooth connection-related issues
Symptom Possible cause Solution
The system is not detected by a
Bluetooth device.
The Bluetooth device is not
connected.
Registration mode needs to be
run.
The Bluetooth function should
be activated.
Any error occurs while using the
Bluetooth function.
On the All menus screen, touch Settings > Device Connection >
Bluetooth > Connection settings > Add new to run the registration
mode and perform search again from the Bluetooth device.
Activate the Bluetooth function on the Bluetooth device to connect.
Turn the Bluetooth function o and on on the Bluetooth device
•
and then connect the device again.
Turn the Bluetooth device o and on and then connect the device
•
again.
Remove the battery from the Bluetooth device and attach it back,
•
turn on the device, and then connect the device again.
Delete the system and Bluetooth device from the registration lists
•
respectively and then connect the device again.
9-5
Page 34

Phone projection-related issues
Symptom Possible cause Solution
The phone projection function
is not performed when a
smartphone is connected using
a USB cable.
A black screen appears when
the phone projection is
activated or in use.
Phone projection is not
supported.
The function is inactive.
Smartphone is encountered with
poor operation or malfunction.
The smartphone malfunctions.
Visit the website to check whether your smartphone supports the
phone projection.
KIA Motors Company website: www.kia.com
•
Android Auto: https://support.google.com/androidauto
•
Apple CarPlay: http://www.apple.com/ios/carplay
•
On the All menus screen, touch Settings > Device Connection,
•
select the function to use, and then turn on the phone projection
option.
Make sure that the phone projection is not disabled in the
•
application settings or block-out settings on your smartphone.
Check that the smartphone battery level is not too low.
•
Recognition may not work properly when the battery level is too
low.
The phone projection may not work properly when the signal
•
strength is weak.
When the smartphone is locked, rst unlock it.
•
Reset the smartphone and connect the device again.
•
Remove the USB cable from the smartphone and connect the
•
device again.
Reset the smartphone and connect the device again.
•
9-6
Page 35

System operation-related issues
Symptom Possible cause Solution
The previous media mode does
not appear when the system is
turned o and on.
The system slows down or does
not operate at all.
The system is not turned on. Fuse-related issues
It is encountered with poor
media connection or playback
error.
An internal error occurs in the
system.
When the media source is not connected or played normally, the
previous mode appears. Connect the media source again or play it
again.
Reset the system by pressing the reset button with a sharp
•
object such as pen or clip.
Update the system software to the latest version. > see “Updating
•
the system software and map.”
When the symptom persists, contact KIA Motors Company’s
•
service centre or service agency.
Visit an auto service shop and replace the fuse with a new one of
•
appropriate capacity.
When the symptom persists, contact KIA Motors Company’s
•
service centre or service agency.
9-7
Page 36

9-8
Page 37

10
Appendix
System status indicator icons
FAQ
Product specications
Important information
Page 38

System status indicator icons
Bluetooth/call
You can see the system status by checking the status indicator
icons at the top right of the system screen.
Dierent status indicator icons appear when each function is
performed. The meanings of the icons are as follows:
Mute/memo recording
AV sound muted
All sound outputs muted
Battery level of the connected Bluetooth device
Connecting a phone via Bluetooth
Connecting an audio device via Bluetooth
Connecting a phone and an audio device via Bluetooth
Making a call via a Bluetooth phone
Bluetooth phone’s microphone o
Downloading the list of recent calls from the connected
Bluetooth phone
Downloading the contact list from the connected
Bluetooth phone
10-2
Page 39

Signal strength
Bluetooth phone’s signal strength
FAQ
Bluetooth
Which functions can I use via Bluetooth?
Q
You can use the hands-free call function with a mobile
A
phone connected. You can also play music after
connecting an audio device such as MP3 player or mobile
phone.
> See“Making a call via Bluetooth.“, “Listening to music
via Bluetooth”
How can I register a Bluetooth device?
Q
On the All menus screen, touch Settings > Device
A
Connection > Bluetooth > Connection settings > Add
new. From the Bluetooth device to be connected, search
for the vehicle system and register it. Use the Bluetooth
device to enter or approve the authentication number
displayed on the system. Then the device is added to the
list of Bluetooth devices in the system and automatically
connected to the system.
device.”
> see “Connecting a Bluetooth
10-3
Page 40

I bought a new mobile phone and want to replace my old
Q
phone with the new one to connect the system. How can
I register the new phone to the system?
An additional device can be registered in the same way
A
as in registration of a new device. You can register up
to 6 devices in the list of Bluetooth devices. To delete a
previously registered device, touch Delete devices from
the list of Bluetooth devices, select the device to delete,
and then touch Delete. > see “Connecting a registered
device.”
How can I access the list of contacts while using a
Q
Bluetooth phone?
Approve access to the contacts when connecting your
A
mobile phone to the system via Bluetooth. The list of
contacts on the phone is downloaded to the system.
To see the downloaded list of contacts, press the [ ]
button on the steering wheel and touch on the call
screen. You can search for a contact and make a call to
the contact, or add the contact to the favourites. > see
“Dialing from the contacts.”
Broadcast reception
I turned on the radio while driving but I hear no sound
Q
but noise.
Depending on the location, obstacles may cause
A
reception to deteriorate.
Radio reception rate may also drop when an on-glass
antenna is mounted on the rear window and the window
is tinted with metallic window lms.
Self-inspection method upon failure
The system does not operate properly. What shall I do?
Q
Inspect the system after referring to Troubleshooting
A
Guide. > see “Solutions for each symptom.”
When the system failure persists after inspection, press
and hold the Reset button to reset the system.
When the symptom persists, contact KIA Motors
Company’s service centre or service agency.
10-5
Page 41

Product specications
Media player
USB mode
Music les
[
Item Specications
File format MPEG-1/2 Layer3, OGG (Vorbis), FLAC,
WMA (Standard/Professional), WAV
Bit-rate and sampling
frequency
MP3 8–320 kbps (CBR/VBR), up to
48 kHz
(ID3 tag version: Ver. 1.0, Ver.
1.1, Ver. 2.2, Ver. 2.3, Ver. 2.4)
OGG Q1 to Q10, up to 48 kHz
FLAC 8/16/24-bit, up to 48 kHz
WMA Standard (0x161): up to L3
Prole, up to 385 kbps, up to
48 kHz
Professional (0x162): up to
M0b, up to 192 kbps, up to 48
kHz
Item Specications
Specication details Max. number of directory layers: 20
layers
Max. folder/le name length: 255 Bytes
Valid characters that can be used in a
folder/le name: 2,350 Alphanumeric
characters/4,888 Chinese characters
Max. number of folders: 2,000
(including the root)
Max. number of les: 8,000 Channels
Video les
[
Item Specications
File format AVI, MPEG, WMV
File extension avi, divx, mpg, mpeg, mp4, wmv, asf
Resolution 1280 x 720
Video codec DivX3/4/5/6, XviD, MPEG-1/4, H264,
WMV9
Audio codec MP3, OGG, WMA
Subtitle SMI, SRT
10-6
WAV 8/16 to bit, up to 48 kHz
Page 42

AA
The following les are not played.
Modied les (format-changed les)
-
Variant les (e.g. MP3 les encoded by WMA audio codec)
-
DRM (Digital Rights Management)-protected les
-
Files with no index
-
AA
The display specications, playback specications, and other
specications of the DivX le comply with the authentication
standards of DivX.
AA
Sound quality is not guaranteed in case of music les that use
the bit-rate exceeding 192 kbps.
AA
With the les that do not use the xed bit rate, some functions
may not work properly or the playback time may not appear
accurately.
AA
When a trouble occurs while playing or you want to play an
incompatible format le, use the latest encoder software to
change the format before using the le.
USB storage devices
[
Item Specications
Byte/Sector 64 KB or less
Format system FAT16/32 (recommended), exFAT, NTFS
AA
With the USB storage devices that are not equipped with a
plug-type connector (metal cover type), proper operation is
not guaranteed.
USB storage devices with a plastic plug may not be
-
recognised.
USB memory cards (e.g. CF cards, SD cards) may not be
-
recognised.
AA
Problems that are caused by using USB storage devices (not
specied in the following list), are not covered by the warranty.
Product name Manufacturer
XTICK LG
BMK BMK Technology
SKY-DRV Sky Digital
TRANSCEND JetFlash TranScend
Sandisk Cruzer SanDisk
Micro ZyRUS ZyRUS
NEXTIK DIGI Works
AA
USB hard drives may not be recognised.
AA
When using a USB mass storage device divided into logical
drives, only the les saved in the rst drive can be played.
AA
When a USB storage device has some applications, media
les may not be played.
10-7
Page 43

Common specications
Display
Item Specications
Power supply DC 14.4 V
Operating
voltage
Dark current Below 1 mA in average within 45 days
Operating
temperature
range
DC 9-16 V
-20 to +70 ℃
Item Specications
Display size AV body unit - 8 inch (176.64 x 99.36 mm)
Number of
pixels
Drive system TFT (Thin Film Transistor) active matrix system
Viewing angle AV unit - Horizontal/vertical: 89°
Internal
lighting
AV unit - 921600 pixels (resolution: 1280 x 720)
LED
Radio
Item Specications
Available
channels
Sensitivity FM: Within 10 dBuV
Distortion
factor
FM: 87.5–108.0 MHz (step: 100 kHz)
AM: 531–1602 kHz (step: 9 kHz)
AM: Within 40 dBuEMF
Within 2 %
10-8
Page 44

Bluetooth
Item Specications
Frequency
range
Supported
Bluetooth
version
Supported
proles
Bluetooth
Power Class 2
Number of
channels
2402-2480 MHz
3.0
Hands-free (1.7), A2DP (1.3), AVRCP (1.6),
PBAP (1.1), MAP (1.2)
-6 to 4 dBm
79
10-9
Page 45

Registered trademarks
FCC Certification
The “Bluetooth®” trademark and logo
•
are registered trademarks owned by
Bluetooth SIG, Inc. The Hyundai-Kia
Group uses this trademark under a
licensing agreement.
To use the Bluetooth® radio technology,
•
make sure your mobile phone supports
the Bluetooth® communication.
Google, Android, Android Auto, and Google Play are
•
registered trademarks of Google Inc.
Apple®, Apple CarPlay™, iPad®, iPad mini™, iPhone®, iPod®,
•
iPod classic®, iPod nano®, iPod touch®, and iTunes® are
registered trademarks of Apple Inc.
This equipment has been tested and found to comply with the
limits for a Class B digital device, pursuant to part 15 of the FCC
Rules.
These limits are designed to provide reasonable protection
against harmful interference in a residential installation.
This equipment generates, uses and can radiate radio
frequency energy and, if not installed and used in accordance
with the instructions, may cause harmful interference to
radio communications. However, there is no guarantee
that interference will not occur in a particular installation. If
this equipment does cause harmful interference to radio or
television reception, which can be determined by turning the
equipment off and on, the user is encouraged to try to correct
the interference by one or more of the following measures:
• Reorient or relocate the receiving antenna.
• Increase the separation between the equipment and
receiver.
• Connect the equipment into an outlet on a circuit different
from that to which the receiver is connected.
• Consult the dealer or an experienced radio/TV technician
for help.
This device complies with part 15 of the FCC Rules. Operation is
subject to the following two conditions: (1) This device may not
cause harmful interference, and (2) this device must accept any
interference received, including interference that may cause
undesired operation.
Page 46

Caution: Any changes or modifications to this device not
expressly approved by the party responsible for compliance
could void your authority to operate the equipment.
This equipment complies w
forth for an uncontrolled environment.
This equipment should be installed and operated with minimum
20 cm between the radiator and your body. This transmitter
must not be collocated or operating in conjunction with any
other antenna or transmitter unless authorized to do so by the
FCC.
ith FCC radiation exposure limits set
 Loading...