

Hyundai LAC1420IWFS, LAC1430EWFS Owner's Manual

Car Navigation System
LAC1420IWFS / LAC1430EWFS (Family)
OWNER’S MANUAL
Veloster
Please read this manual carefully before operating your set and retain it for future reference.
Designs and specifications are subject to change without prior notice.
ENGLISH

Table of contents
General information 7
Safety notes . . . . . . . . . . . . . . . . . . . . . . . . . . . . . . . . . . . . . . . . . . . . . . . . . . . . . . . 7
Types of Playable Discs . . . . . . . . . . . . . . . . . . . . . . . . . . . . . . . . . . . . . . . . . . . . . .9
Precautions of handling discs and player . . . . . . . . . . . . . . . . . . . . . . . . . . . . . . . .9
NOTES ON COPYRIGHTS . . . . . . . . . . . . . . . . . . . . . . . . . . . . . . . . . . . . . . . . . . . 10
Disposal of your old appliance . . . . . . . . . . . . . . . . . . . . . . . . . . . . . . . . . . . . . . . 10
Name of each component 11
Control Panel . . . . . . . . . . . . . . . . . . . . . . . . . . . . . . . . . . . . . . . . . . . . . . . . . . . . . 11
Steering wheel remote control . . . . . . . . . . . . . . . . . . . . . . . . . . . . . . . . . . . . . . . 13
HVAC (heating, ventilating, and air conditioning) Automatic Control System . . 14
Basic operation 15
Start-up screen . . . . . . . . . . . . . . . . . . . . . . . . . . . . . . . . . . . . . . . . . . . . . . . . . . . 15
Turning the unit on . . . . . . . . . . . . . . . . . . . . . . . . . . . . . . . . . . . . . . . . . . . . . . . . . 15
Turning the unit off . . . . . . . . . . . . . . . . . . . . . . . . . . . . . . . . . . . . . . . . . . . . . . . . 15
Inserting a disc . . . . . . . . . . . . . . . . . . . . . . . . . . . . . . . . . . . . . . . . . . . . . . . . . . . . 15
Adjusting the volume . . . . . . . . . . . . . . . . . . . . . . . . . . . . . . . . . . . . . . . . . . . . . . . 15
Ejecting a disc . . . . . . . . . . . . . . . . . . . . . . . . . . . . . . . . . . . . . . . . . . . . . . . . . . . . 15
Displaying the clock . . . . . . . . . . . . . . . . . . . . . . . . . . . . . . . . . . . . . . . . . . . . . . . . 15
Selecting a source . . . . . . . . . . . . . . . . . . . . . . . . . . . . . . . . . . . . . . . . . . . . . . . . . 16
Rear view camera (Optional) . . . . . . . . . . . . . . . . . . . . . . . . . . . . . . . . . . . . . . . . . 16
INFO/SETUP 17
General operations of INFO/SETUP menu . . . . . . . . . . . . . . . . . . . . . . . . . . . . . 17
Setup..................................................................................................................................17
Info 19
2

Table of contents
Getting started with navigation 20
What is GPS? . . . . . . . . . . . . . . . . . . . . . . . . . . . . . . . . . . . . . . . . . . . . . . . . . . . . 20
About satellite signals . . . . . . . . . . . . . . . . . . . . . . . . . . . . . . . . . . . . . . . . . . . . . 20
Acquiring satellite signals . . . . . . . . . . . . . . . . . . . . . . . . . . . . . . . . . . . . . . . . . . 20
Initial navigation screen . . . . . . . . . . . . . . . . . . . . . . . . . . . . . . . . . . . . . . . . . . . . 20
Indicators of the map screen . . . . . . . . . . . . . . . . . . . . . . . . . . . . . . . . . . . . . . . 20
How to view a map screen .........................................................................................20
Changing the scale of a map .................................................................................... 21
Adjusting the navigation volume . . . . . . . . . . . . . . . . . . . . . . . . . . . . . . . . . . . . . . 21
Destination input menu 22
Destination menu overview . . . . . . . . . . . . . . . . . . . . . . . . . . . . . . . . . . . . . . . . . 22
Name Search . . . . . . . . . . . . . . . . . . . . . . . . . . . . . . . . . . . . . . . . . . . . . . . . . . . . 22
Previous Destinations . . . . . . . . . . . . . . . . . . . . . . . . . . . . . . . . . . . . . . . . . . . . . . 23
Address . . . . . . . . . . . . . . . . . . . . . . . . . . . . . . . . . . . . . . . . . . . . . . . . . . . . . . . . . 23
Address Book . . . . . . . . . . . . . . . . . . . . . . . . . . . . . . . . . . . . . . . . . . . . . . . . . . . . 24
Phone . . . . . . . . . . . . . . . . . . . . . . . . . . . . . . . . . . . . . . . . . . . . . . . . . . . . . . . . . . 24
Previous Map . . . . . . . . . . . . . . . . . . . . . . . . . . . . . . . . . . . . . . . . . . . . . . . . . . . . 25
Facilities . . . . . . . . . . . . . . . . . . . . . . . . . . . . . . . . . . . . . . . . . . . . . . . . . . . . . . . . . 25
Intersection . . . . . . . . . . . . . . . . . . . . . . . . . . . . . . . . . . . . . . . . . . . . . . . . . . . . . . 26
Home/Office/User 1 ~ 4 . . . . . . . . . . . . . . . . . . . . . . . . . . . . . . . . . . . . . . . . . . . 26
3

Table of contents
Using the map menu 27
Route menu overview . . . . . . . . . . . . . . . . . . . . . . . . . . . . . . . . . . . . . . . . . . . . . . .27
Continue Guidance/ Stop Guidance . . . . . . . . . . . . . . . . . . . . . . . . . . . . . . . . . . .27
Route Overview . . . . . . . . . . . . . . . . . . . . . . . . . . . . . . . . . . . . . . . . . . . . . . . . . . . .27
Route Info . . . . . . . . . . . . . . . . . . . . . . . . . . . . . . . . . . . . . . . . . . . . . . . . . . . . . . . 28
Route Options . . . . . . . . . . . . . . . . . . . . . . . . . . . . . . . . . . . . . . . . . . . . . . . . . . . 28
Detour . . . . . . . . . . . . . . . . . . . . . . . . . . . . . . . . . . . . . . . . . . . . . . . . . . . . . . . . . . 28
Avoid Streets . . . . . . . . . . . . . . . . . . . . . . . . . . . . . . . . . . . . . . . . . . . . . . . . . . . . 29
Edit Waypoints . . . . . . . . . . . . . . . . . . . . . . . . . . . . . . . . . . . . . . . . . . . . . . . . . . . 29
Demo . . . . . . . . . . . . . . . . . . . . . . . . . . . . . . . . . . . . . . . . . . . . . . . . . . . . . . . . . . 30
My places . . . . . . . . . . . . . . . . . . . . . . . . . . . . . . . . . . . . . . . . . . . . . . . . . . . . . . . 30
Address Book ................................................................................................................ 30
Bluetooth wireless technology 31
Understanding Bluetooth wireless technology . . . . . . . . . . . . . . . . . . . . . . . . . . . 31
Connecting your unit and bluetooth phone . . . . . . . . . . . . . . . . . . . . . . . . . . . . . 31
Viewing the connected bluetooth phone . . . . . . . . . . . . . . . . . . . . . . . . . . . . . . 33
Disconnecting/Connecting again the bluetooth phone . . . . . . . . . . . . . . . . . . 33
Deleting a connected phone . . . . . . . . . . . . . . . . . . . . . . . . . . . . . . . . . . . . . . . . 33
Changing the passkey . . . . . . . . . . . . . . . . . . . . . . . . . . . . . . . . . . . . . . . . . . . . . 34
Making a call by entering phone number. . . . . . . . . . . . . . . . . . . . . . . . . . . . . . 34
Switching the sound path during a call . . . . . . . . . . . . . . . . . . . . . . . . . . . . . . . 34
Switching the microphone on/off . . . . . . . . . . . . . . . . . . . . . . . . . . . . . . . . . . . . 34
Answering calls . . . . . . . . . . . . . . . . . . . . . . . . . . . . . . . . . . . . . . . . . . . . . . . . . . . 35
Using your Phone Book . . . . . . . . . . . . . . . . . . . . . . . . . . . . . . . . . . . . . . . . . . . . 35
Using your Calling list . . . . . . . . . . . . . . . . . . . . . . . . . . . . . . . . . . . . . . . . . . . . . 36
Making a call with speed dial numbers . . . . . . . . . . . . . . . . . . . . . . . . . . . . . . . .37
Activating the audio streaming mode . . . . . . . . . . . . . . . . . . . . . . . . . . . . . . . . 38
4

Table of contents
CD/MP3/WMA/USB/iPod operation 39
Playing an audio CD and MP3/ WMA/ USB/ iPod files . . . . . . . . . . . . . . . . . . 39
Skip to the next track/file .......................................................................................... 39
Skip to the previous track/file ................................................................................... 39
Return to the beginning of the current track/file................................................ 39
Search .............................................................................................................................. 39
Intro scan ........................................................................................................................ 40
Repeat ............................................................................................................................. 40
Random............................................................................................................................ 41
Playing files by classifying into folder/ Album/ Artist . . . . . . . . . . . . . . . . . . . . 41
Locating a folder/file using the list . . . . . . . . . . . . . . . . . . . . . . . . . . . . . . . . . . . 42
Searching music . . . . . . . . . . . . . . . . . . . . . . . . . . . . . . . . . . . . . . . . . . . . . . . . . . 42
Setting audio book play speed . . . . . . . . . . . . . . . . . . . . . . . . . . . . . . . . . . . . . . 43
Radio operation 45
Listening to the radio stations . . . . . . . . . . . . . . . . . . . . . . . . . . . . . . . . . . . . . . . 45
Storing and recalling stations . . . . . . . . . . . . . . . . . . . . . . . . . . . . . . . . . . . . . . . 45
AS (Autostore) . . . . . . . . . . . . . . . . . . . . . . . . . . . . . . . . . . . . . . . . . . . . . . . . . . . 46
To scan broadcast frequencies . . . . . . . . . . . . . . . . . . . . . . . . . . . . . . . . . . . . . . 46
To scan broadcast frequencies stored in preset buttons . . . . . . . . . . . . . . . . . . 46
Using an AUX source . . . . . . . . . . . . . . . . . . . . . . . . . . . . . . . . . . . . . . . . . . . . . .47
Auxiliary device operation 47
Adjusting the video screen (Default : Center) . . . . . . . . . . . . . . . . . . . . . . . . . . 48
5

Table of contents
Voice recognition system 49
Voice recognition . . . . . . . . . . . . . . . . . . . . . . . . . . . . . . . . . . . . . . . . . . . . . . . . . 49
Giving voice commands . . . . . . . . . . . . . . . . . . . . . . . . . . . . . . . . . . . . . . . . . . . . 49
How to say numbers . . . . . . . . . . . . . . . . . . . . . . . . . . . . . . . . . . . . . . . . . . . . . . 49
Voice command examples . . . . . . . . . . . . . . . . . . . . . . . . . . . . . . . . . . . . . . . . . 50
Help command . . . . . . . . . . . . . . . . . . . . . . . . . . . . . . . . . . . . . . . . . . . . . . . . . . . . 51
Voice commands . . . . . . . . . . . . . . . . . . . . . . . . . . . . . . . . . . . . . . . . . . . . . . . . . 52
Troubleshooting 54
Index 56
Symbols for the display of traffic problems 57
6
General information
Safety notes
CAUTION
RISK OF ELECTRIC SHOCK
DO NOT OPEN
CAUTION : TO REDUCE THE RISK OF
ELECTRIC SHOCK, DO NOT REMOVE
THE COVER (OR BACK). NO USER
SERVICEABLE PARTS INSIDE. REFER
SERVICING TO QUALIFIED SERVICE
PERSONNEL.
The lightning flash with the arrowhead
symbol, within an equilateral triangle
is intended to alert the user about the
presence of uninsulated dangerous
voltage within the product’s enclosure
that may be of sufficient magnitude to
constitute a risk of electric shock.
The exclamation point within an equilateral triangle is intended to alert the user
to the presence of important operating
and maintenance (servicing) instructions in the literature accompanying the
appliance.
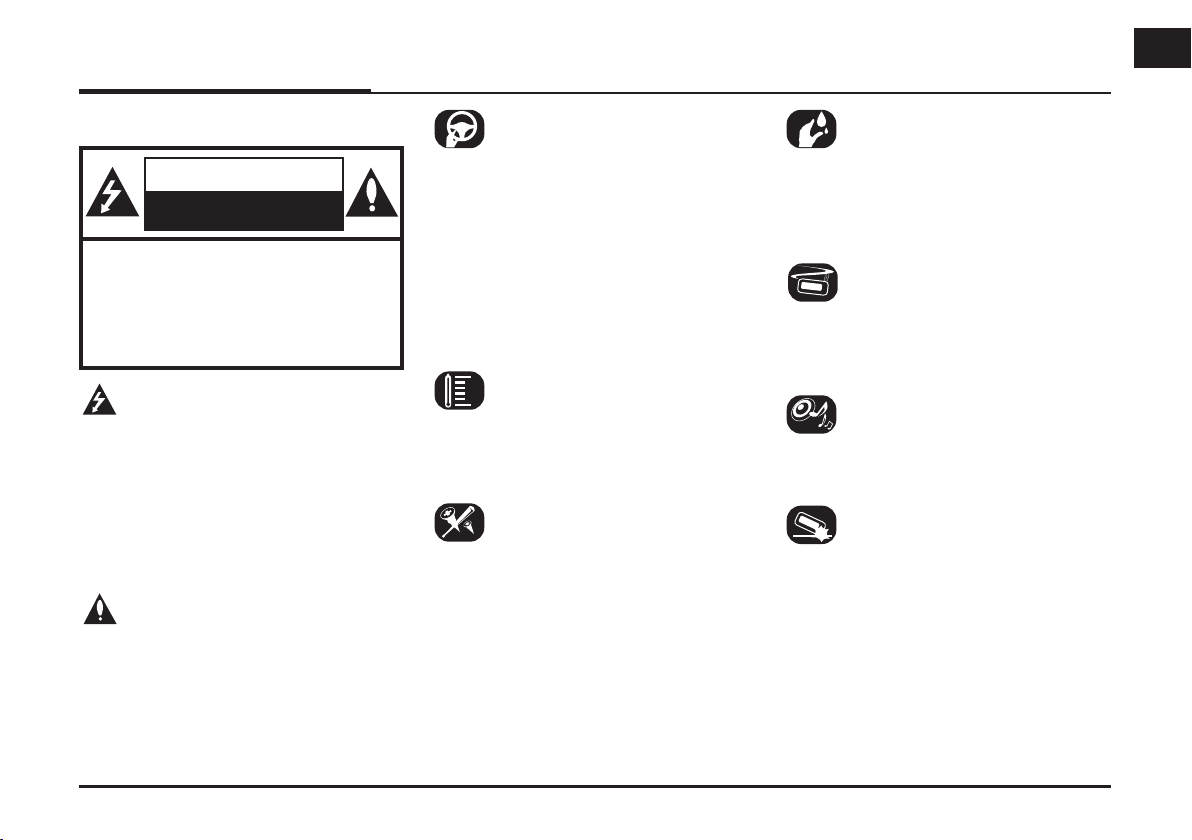
Always operate the vehicle in a safe
manner. Do not become distracted by
the vehicle while driving, and always be
fully aware of all driving conditions. Do
not change settings, or any functions.
Pull over in a safe and legal manner
before attempting such operations.
To promote safety, certain functions are
disabled unless the hand break is on.
Do not use for many hours at extremely
low or high temperature.
(-10 °C to 60 °C)
To reduce the risk of electric shock, do
not remove the cover or back of this
product. There are no user-serviceable
parts inside. Refer servicing to qualified
service personnel.
To reduce the risk of fire or electric
shock, do not expose this product to
dripping or splashing water, rain, or
moisture.
The temperature of unit’s outside can
be extremely high, please use the unit
after proper installation in your vehicle.
While driving, keep the sound volume at
a proper level.
Do not drop it and avoid heavy impacts
at anytime.
7
General information
The driver must not watch the monitor while driving. If the driver watches
the monitor while driving, it may lead to
carelessness and cause an accident.
This unit is for vehicles with a 12 V
battery and negative grounding. Before
installing it in a recreational vehicle, lorry
or bus, check the battery voltage. To
avoid shorts in the electrical system, be
sure to disconnect the E battery cable
before beginning the installation.
CAUTION :
This product uses a Laser System.
To ensure proper use of this product,
please read this owner’s manual carefully and retain it for future reference.
Should the unit require maintenance,
contact an authorized service center.
Performing controls, adjustments, or
carrying out procedures other than
those specified herein may result in
hazardous radiation exposure.
To prevent direct exposure to laser
beam, do not try to open the enclosure.
Visible laser radiation when open. DO
NOT STARE INTO BEAM.
CAUTION :
CLASS 1M VISIBLE AND INVISIBLE
LASER RADIATION WHEN OPEN DO
NOT VIEW DIRECTLY WITH OPTICAL
INSTRUMENTS.
CAUTION :
• Do not keep the navigation system
running with the engine stopped.
Doing so may discharge the vehicle
battery. When you use the navigation
system, always keep the engine running.
• When the driver wants to operate
the navigation system, first park the
vehicle in a safe location and set the
parking brake. Operating the system
while driving can distract the driver
and may result in a serious accident.
• Do not disassemble or modify this
system. If you do, it may result in
accidents, fire or electrical shock.
• Some country may have laws limiting
the use of video screens while driving.
Use the system only where it is legal
to do so.
• Don't use your phone when you are
driving. You must stop at a safe place
to use your phone.
• When driving your vehicle, be sure
to keep the volume of the unit low
enough to allow you to hear sounds
coming from the outside.
8

General information
Types of Playable Discs
This unit plays CD-R or CD-RW containing audio titles, MP3 or WMA files.
• Depending on the conditions of the
recording equipment or the CD-R/
RW disc itself, some CD-R/RW discs
cannot be played on the unit.
• Do not attach any seal or label to
either side (the labeled side or the
recorded side) of a disc.
•
Do not use irregularly shaped CDs
(e.g., heart-shaped
may result in malfunctions.
or octagonal). It
Precautions of handling discs and player
• A defective or soiled disc
inserted into the unit can
cause sound to drop during
playback.
• Handle the disc by holding
its innerouter edges.
• Do not touch the surface of
the unlabeled side of the
disc.
Do not stick paper or tape
etc. on the surface.
Do not expose the disc to
direct sunlight or excessive
heat.
This unit cannot play 8 cm
disc (use 12 cm disc only).
• Clean the disc
before playback.
Wipe the disc from
the center outward
with a cleaning cloth.
• Never use solvents
such as benzine or
alcohol to clean the
disc.
9
General information
NOTES ON COPYRIGHTS
It is forbidden by law to copy, broadcast,
show, broadcast via cable, play in public, or rent copyrighted material without
permission.
This product features the copy protection function developed by Macrovision.
Copy protection signals are recorded on
some discs. When playing the pictures
of these discs on a unit, picture noise
will appear. This product incorporates
copyright protection technology that
is protected by method claims of certain U.S. patents and other intellectual
property rights owned by Macrovision
Corporation and other rights owners. Use of this copyright protection
technology must be authorized by
Macrovision Corporation, and is intended for home and other limited viewing
uses only unless otherwise authorized
by Macrovision Corporation. Reverse
engineering or disassembly is prohibited.
Disposal of your old appliance
1. When this crossed-out wheeled bin
symbol is attached to a product, it
means the product is covered by the
European Directive 2002/96/EC.
2. All electrical and electronic products
should be disposed of separately
from the municipal waste stream
via designated collection facilities
appointed by the government or the
local authorities.
3. The correct disposal of your old
appliance will help prevent potential
negative consequences for the environment and human health.
4. For more detailed information about
disposal of your old appliance, please
contact your city office, waste disposal service or the shop where you
purchased the product.
iPod is a trademark of Apple Inc., registered in the U.S. and other countries.
“Made for iPod” means that an electronic accessory has been designed to
connect specifically to iPod and has
been certified by the developer to meet
Apple performance standards.
“Works with iPhone” means that an
electronic accessory has been designed
to connect specifically to iPhone and
has been certified by the developer to
meet Apple performance standards.
Apple is not responsible for the operation of this device or its compliance with
safety and regulatory standards.
iPhone is a trademark of Apple Inc.
“The Bluetooth word mark and logos
are owned by the Bluetooth SIG, Inc.
and any use of such marks by LG
Electronics is under license. Other
trademarks and trade names are those
of their respective owners.”
10

Name of each component
Control Panel
1
2
3
4
5
6
7
8
9
1. Disc slot
2. Eject (Z)
Press to eject a disc from the unit.
17
16
15
14
13
12
1110
3. RESET hole
You can reset the unit when it
doesn't operate normally. Press the
RESET hole with a sharp object.
4. MEDIA
Selects a source: CD, USB, iPod, BT,
AUX.
5. FM
Press to select the FM band.
6. AM
Press to select the AM band.
7. LCD
8. Left rotary (POWER/VOLUME)
- Press: Power on/off
- Turn: Volume control
11

Name of each component
9. PHONE
Use to enable Bluetooth Hands-Free
Phone.
10. ASEEK/TRACKD
• Press this button.
- Automatic tuning:
- Track up/down:
RADIO
USB CD
BT
iPod
• Press and hold this button.
- Search (FF/REW):
USB CD
iPod BT
11. INFO/SETUP
Press to access the [INFO/SETUP]
menu screen.
12. Right rotary (TUNE)
Rotate it clockwise/counterclockwise.
• Searches the previous or next radio
frequency.
- Manual tuning
• Skips a track/file up/down in all list
screen.
13. DEST
Press to enter a destination menu.
Various methods for entering a destination are available.
14. ROUTE
Press to access the [ROUTE] menu
screen.
15. CD indicator light (DISC-IN)
When a disc is inserted, the indicator
is illuminated.
16. MAP/VOICE
Press to display the current location
map screen.
17. CLOCK
• Press to display the digital clock
and outside temperature in power
on/off status.
• Press and hold to move to the
[Clock Settings] menu.
12
Name of each component
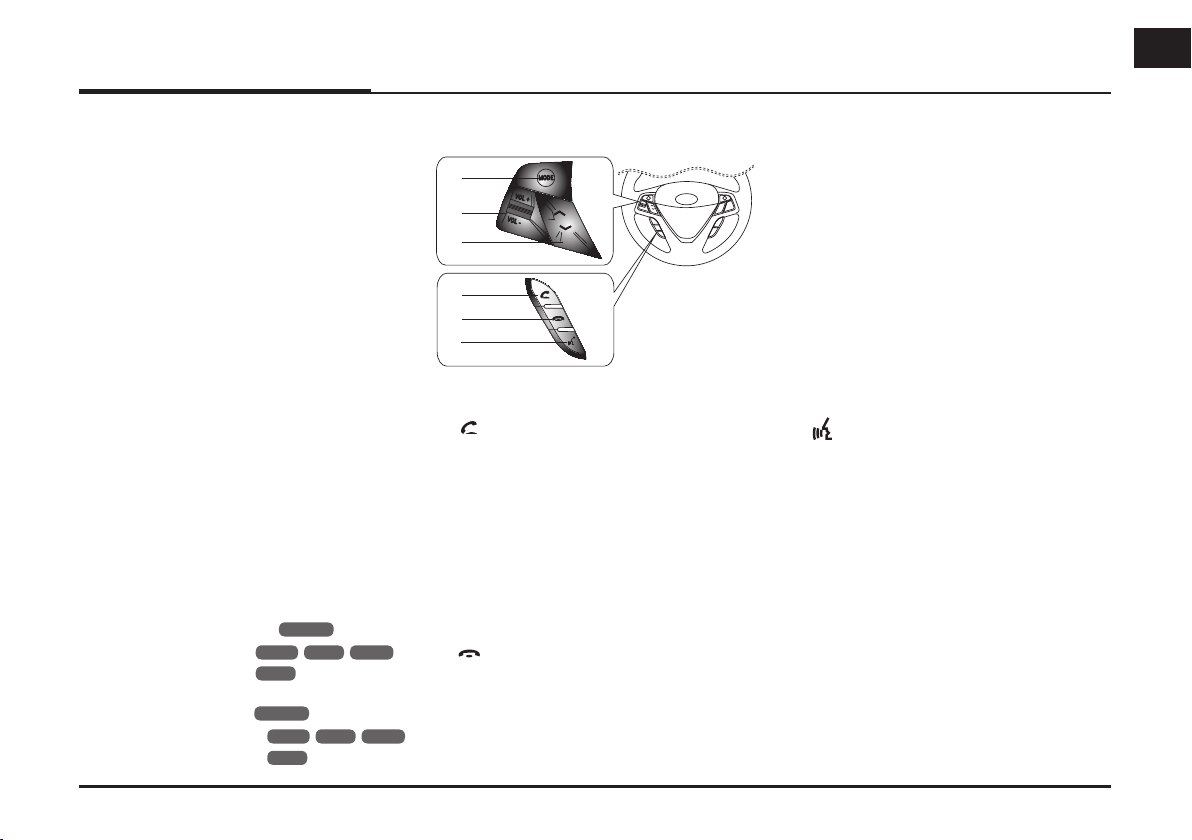
Steering wheel remote control
1. MODE
Selects a source.
FM t AM t CD t USB (or iPod)
t BT t AUX t FM...
2. Volume (VOL+/VOL-)
Increases or decreases the volume level.
3. U / u
• Press this button.
- Automatic tuning:
- Track up/down:
RADIO
USB CD
BT
iPod
• Press and hold this button.
- Manual tuning:
- Search (FF/REW):
RADIO
USB CD
BT
iPod
1
2
MODE
VOL +
VOL -
3
4
5
6
4.
Enables Bluetooth Hands-Free
Phone.
• Press this button briefly to take a
call when there is an incoming call.
• Press this button briefly to make a
call from last calls.
• Press this button lengthy to switch
the sound path during a call.
(Hands free y phone)
5.
Press this button briefly to reject a
call during a call.
6.
•
Press this button to start the voice
recognition mode.
•
Press the button one more to cancel voice commands while the voice
recognition is active.
13
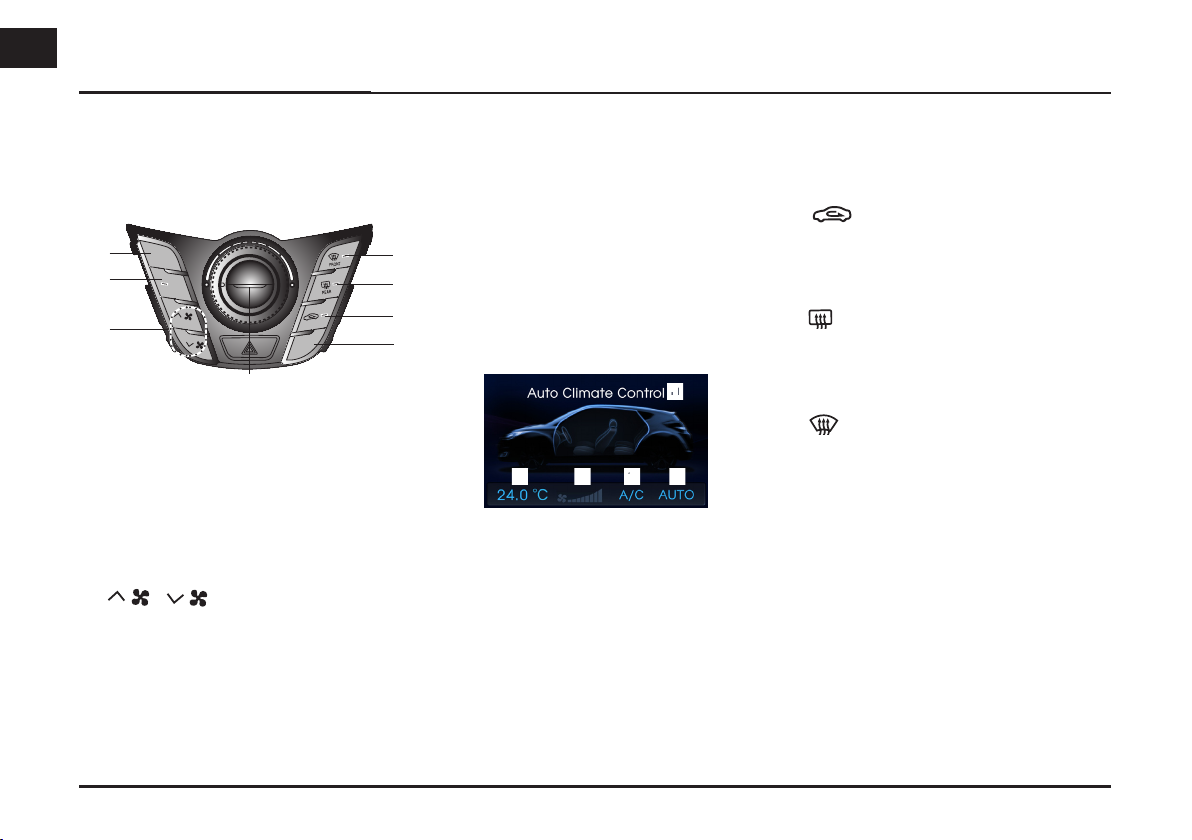
Name of each component
HVAC (heating, ventilating, and air conditioning)
Automatic Control System
1
2
3
MODE
A/C
AUTO
OFF
CLIMATE
4
1. MODE
Press to set the wind blows.
2. A/C
Press to set the air conditioner to on/
off.
3. /
Press to set the airflow.
4. AUTO
Press to set automatically the air
conditioning and heating mode.
OFF
Press to turn the HVAC Automatic
Control System off.
8
7
5. CLIMATE
6
Press to display total information of
the HVAC Automatic Control System.
5
B C D E
A
Auto Climate Control:
Displays the current HVAC
Automatic Control mode.
B
Temperature:
Displays the temperature you
set.
C
Airflow: Displays the airflow
settings you set.
D
Air conditioner: Displays the
status of air conditioner you
set.
E
AUTO: Displays the HVAC
Automatic Control System you
set.
6.
Press to switch the indoor/outdoor air
mode.
7. REAR
Press to set the heat rays of the rear
window to on/off.
A
8. FRONT
Press to remove the moisture or frost
of the front window.
14

Basic operation
Start-up screen
The unit starts when the ignition switch
is placed in the ACC or ON position.
- Then the radio mode is displayed
on the screen.
Note
• The unit memorizes the last mode
that is played lastly. The last mode
is saved in the memory even if the
ignition switch is placed in the OFF
position. When the ignition switch is
placed in the ACC or ON position,
the mode is automatically recalled.
• It may take long time (about 20 sec-
onds) for the unit to be rebooted.
Turning the unit on
Press POWER on the control panel in
power off status.
Note
When you insert the disc in the disc
slot, the unit is turned on automatically.
Turning the unit off
Press POWER on the control panel in
power on status.
Inserting a disc
Insert a disc in the disc slot and playback starts automatically.
Adjusting the volume
Rotate the
the control panel.
Note
When you turn the unit off, the current
volume level is automatically memorized. Whenever you turn the unit back
on, it operates at the memorized
volume level.
If you turn the unit off/on below volume
level 5, the volume level is changed
into 5. If you turn the unit off/on above
volume level 20, the volume level is
changed into 20.
volume knob (VOLUME) on
Ejecting a disc
Press Z on the control panel.
The disc is ejected from the loading
slot.
15
Note
If the ejected disc is not removed in
approximately 10 seconds, the disc is
automatically inserted again into the
loading slot.
Displaying the clock
Press [CLOCK] on the control panel in
power on status.
Press [CLOCK] on the control panel in
power off status.
Note
When the satellite signal is not received,
the “Synchronizing GPS time. Please
wait!” pop-up appears on the screen.
When the satellite signal is received, the
GPS time is displayed on the screen. To
receive the satellite signal, move to an
area free from tall obstructions.

Basic operation
Selecting a source
1. Press "MEDIA" on the control panel.
The [MEDIA] menu appears on the
screen.
2. Select the desired source.
Note
If a source is not connected to the unit,
the source is not recognized.
Rear view camera (Optional)
With a rear view camera, automatic
switching to video from a rear view
camera is possible when the gearshift is
moved to REVERSE (R) position.
Rear view mode also allows you to check
what is behind you while driving.
When the unit is booted completely, the
guide line is displayed on the screen.
Note
• The rear view camera function is to
use this product as an aid to keep an
eye on trailers, or backing into a tight
parking spot. Do not use this function
for entertainment purposes.
• The object in rear view may appear
closer or more distant than in reality.
• Please note that the edges of the rear
view camera images may differ slightly
according to whether full screen images are displayed when backing.
16
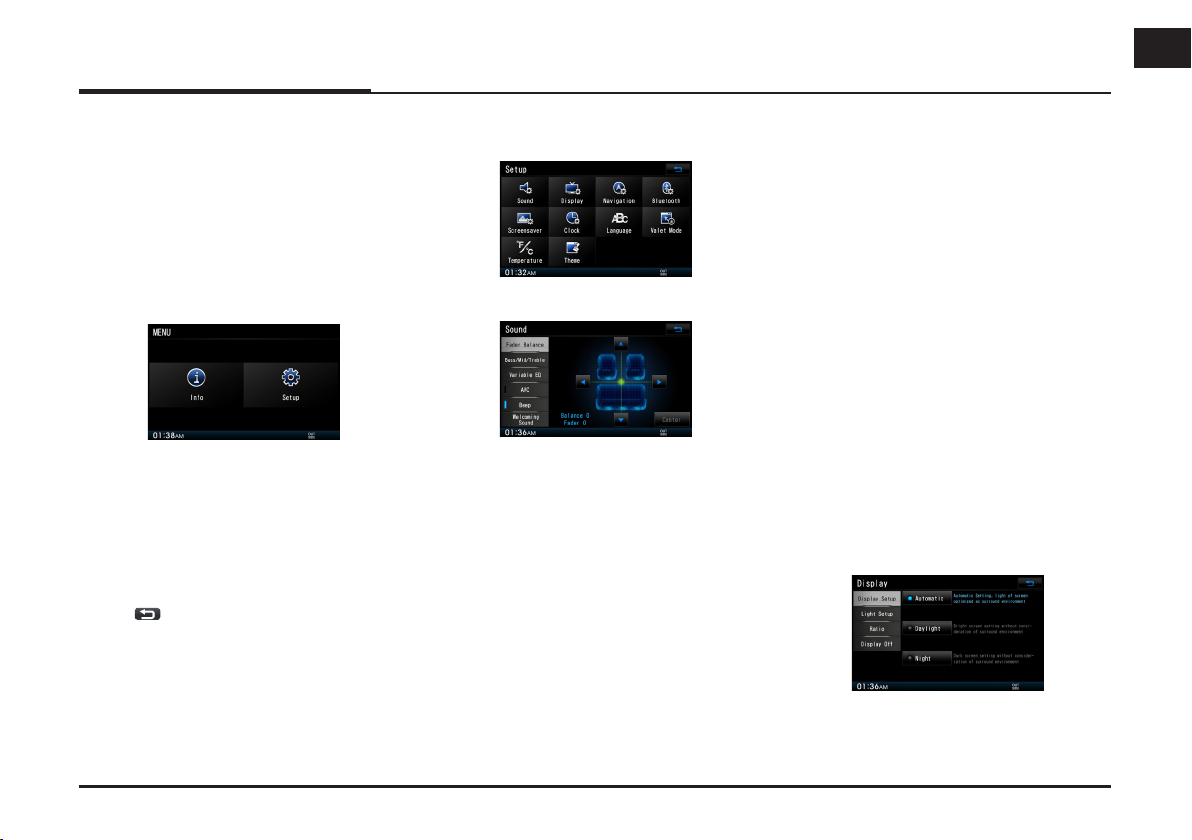
INFO/SETUP
General operations of INFO/ SETUP menu
The navigation system can be customized to make it easier for you to use:
1. Turn the unit on.
2. Press [INFO/SETUP] on the control
panel.
3. Touch the desired option.
4. Touch
Note
Touch to return to the previous
screen. Press [MAP/VOICE] to return to
the current location map screen.
the desired settings then
t
ouch [Done]
tion.
to confirm your selec-
Setup
There are ten kinds of screen menus.
Sound
• Fader Balance (Default : Center)
Touch b or B to adjust the sound the
left and right speakers.
Touch v or V to adjust the sound of the
front and rear speakers.
• Bass, Mid (Middle), Treble (Default :
Center)
Touch b or B to adjust the Bass, Mid
(Middle) or Treble.
• Variable EQ
- Normal: Natural sound. Quality
optimized for driver.
- Dynamic: Strong sound with
enhanced bass and stereo.
- Concert: Surround sound with concert hall.
• AVC (Auto Volume Control)
When the speed of your vehicle is more
than 40 km/h, the volume level outputs
higher than original volume level.
• Beep
You can set the touchscreen sound to
On/Off.
• Welcoming Sound
You can set the welcoming sound.
Display
• Display Setup
You can set the Display Setup to
[Automatic], [Daylight], [Night].
17
INFO/SETUP
• Light Setup
You can set the Display Light.
• Ratio
You can set the Ratio to [FULL], [Ratio],
[Display Off].
• Display Off
You can set the Display to On/Off.
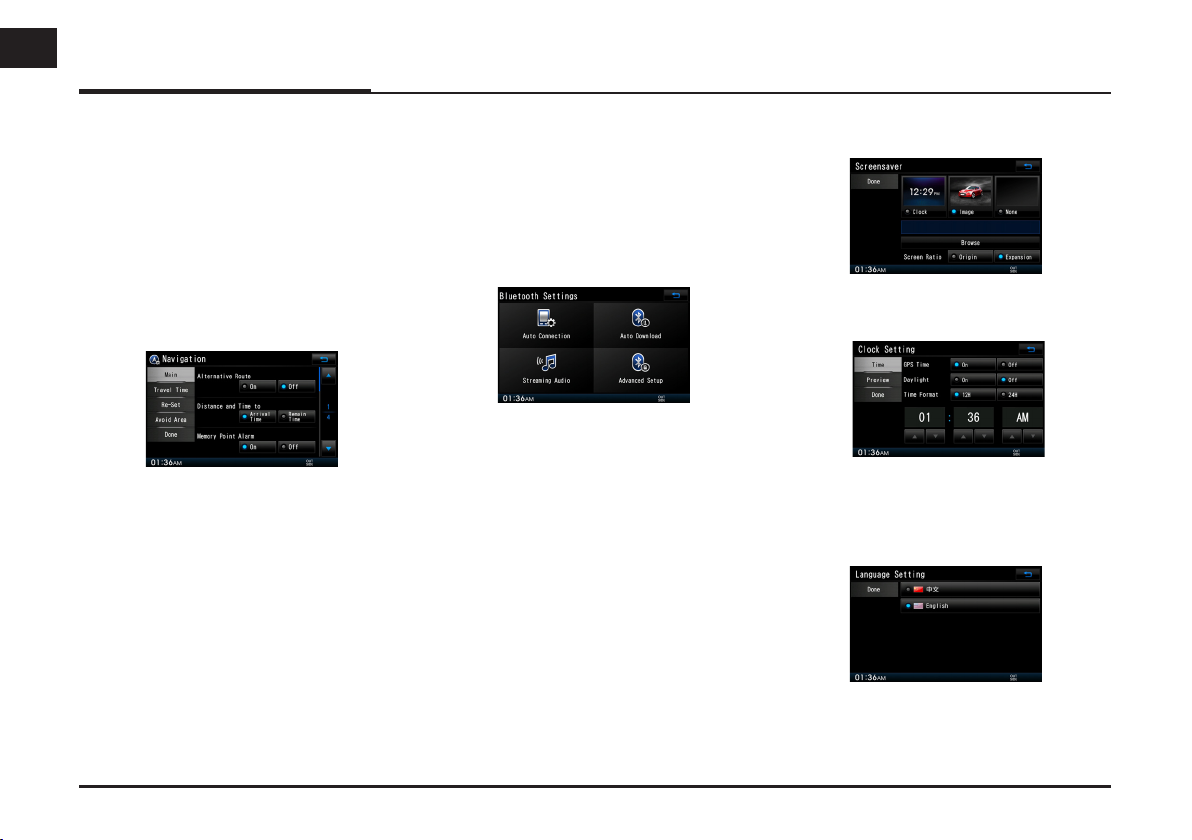
Navigation
• Main
You can set the desired navigation
options.
• Travel Time
You can set the Travel Time.
• Re-Set
You can initializes all the settings to the
default settings.
• Avoid Area
If you want to make a detour due to
traffic conditions, you can use the
detour function to calculate an alternative route from the vehicle location to
the destination.
Bluetooth
• Auto Connection
You can set the Auto Connection.
• Auto Download
You can transmit phonebook and recent
call list automatically when connecting Bluetooth. This function may not be
supportted in some mobile phone.
• Streaming Audio
You can enable car audio system to play
Phone Music through Bluetooth streaming. This function may not be supportted in some mobile phone.
Screensaver
You can set the desired screensaver.
Clock
You can set the clock.
.
Language
This allows you to change the language
used in the system.
• Advanced Setup
You can set the advanced options.
18
 Loading...