


OOWWNNEERR''SS MMAANNUUAALL
OOppeerraattiioonn
MMaaiinntteennaannccee
SSppeecciiffiiccaattiioonnss
All information in this Owner's Manual is current at the time of publication. However, HYUNDAI reserves the right to make changes at
any time so that our policy of continual product impr ovement ma y be
carried out.
This manual applies to all HYUNDAI models and includes descriptions and explanations of optional as well as standard equipment.
As a result, you may find material in this manual that does not apply
to your specific vehicle.

F2
Your HYUNDAI should not be modified in any way.
Such modifications may adversely affect the performance, safety or durability of your HYUNDAI
and may, in addition, violate conditions of the limited warranties covering the vehicle. Certain modifications may also be in violation of regulations
established by the U.S. Department of
Transportation and other federal or state agencies.
Your vehicle is equipped with electronic fuel injection and other electronic components. It is possible
for an improperly installed/adjusted two-way radio
or cellular telephone to adversely affect electronic
systems. For this reason, we recommend that you
carefully follow the radio manuf acturer's instructions
or consult your HYUNDAI dealer for precautionary
measures or special instructions if you choose to
install one of these devices.
CAUTION: MODIFICA TIONS TO
YOUR HYUNDAI
TWO-WAY RADIO OR CELLULAR
TELEPHONE INSTALLATION
This manual includes information titled as DANGER, WARNING, CAUTION and NOTICE.
These titles indicate the following:
SAFETY AND VEHICLE DAMAGE
WARNING
DANGER indicates a hazardous situation
which, if not avoided, will result in death or
serious injury.
DANGER
WARNING indicates a hazardous situation
which, if not avoided, could result in death
or serious injury.
CAUTION indicates a hazardous situation
which, if not av oided,could result in minor or
moderate injury.
CAUTION
NOTICE indicates a situation which, if not
avoided, could result in vehicle damage.
NOTICE
WARNING

F3
Your Hyundai vehicle may be equipped with technologies and services that use information collected,
generated, recorded or stored by the vehicle. Hyundai has created a Vehicle Owner Privacy Policy to explain
how these technologies and services collect use and share this information.
You may read our Vehicle Owner Privacy Policy on the Hyundaiusa.com website at:
https://www.hyundaiusa.com/owner-privacy-policy.aspx
If you would like to receive a hard copy of our Vehicle Owner Privacy Policy, please contact our Customer
Connect Center at:
Hyundai Customer Care
P.O.Box 20850
Fountain Valley, CA 92728
800-633-5151
consumeraffairs@hmausa.com
Hyundai's Customer Connect Center representatives are available Monday through Friday,
between the hours of 5:00 AM and 7:00 PM PST and Saturday and Sunda y between 6:30 AM and 3:00 PM PST
(English).
For Customer Connect Center assistance in Spanish or Korean, representatives are available Monday
through Friday between 6:30 AM and 3:00 PM PST.
HYUNDAI VEHICLE OWNER PRIVACY POLICY

F4
INTRODUCTION
Congratulations, and thank you for choosing HYUNDAI.We are pleased to welcome you to the growing number of distinguished people who drive HYUNDAIS. We are very proud of the advanced engineering and high-quality construction of each HYUNDAI we build.
Your Owner’s Manual will introduce you to the features and operation of your new HYUNDAI.To become familiar with
your new HYUNDAI, so that you can fully enjoy it, read this Owner’s Manual carefully before driving your new vehicle.
This manual contains important safety information and instructions intended to familiarize you with your vehicle’s controls and safety features so you can safely operate your vehicle.
This manual also contains information on maintenance designed to enhance safe operation of the vehicle. It is recommended that all service and maintenance on your car be performed by an authorized HYUNDAI dealer .HYUNDAI dealers are prepared to provide high-quality service, maintenance and any other assistance that may be required.
This Owner’s Manual should be considered a permanent part of your vehicle, and should be kept in the vehicle so you
can refer to it at any time.The manual should stay with the vehicle if you sell it to provide the next owner with important operating, safety and maintenance information.
HYUNDAI MOTOR AMERICA
Copyright 2017 HYUNDAI Motor America. All rights reserved. No part of this publication may be reproduced, stored
in any retrieval system or transmitted in any form or by any means without the prior written permission of HYUNDAI
Motor America.
Severe engine and transmission damage may result from the use of poor quality fuels and lubricants that
do not meet HYUNDAI specifications.You must always use high quality fuels and lubricants that meet the
specifications listed on Page 8-7 in the Vehicle Specifications section of the Owner's Manual.
CAUTION

F5
1.What are HYUNDAI Genuine
Parts?
HYUNDAI Genuine Parts are the
same parts used by HYUNDAI
Motor Company to manufacture
vehicles. They are designed and
tested for the optimum saf ety, performance, and reliability for our
customers.
2.Why should you use genuine
parts?
HYUNDAI Genuine Parts are
engineered and built to meet rigid
manufacturing requirements.
Damage caused by using imitation, counterfeit or used salvage
parts is not covered under the
HYUNDAI New Vehicle Limited
Warranty or any other HYUNDAI
warranty.
In addition, any damage to or failure of HYUNDAI Genuine Parts
caused by the installation or failure of an imitation, counterfeit or
used salvage part is not covered
by any HYUNDAI Warranty.
3. How can you tell if you are purchasing HYUNDAI Genuine
Parts?
Look for the HYUNDAI Genuine
Parts Logo on the package (see
below).
HYUNDAI Genuine Parts exported to the U.S. are packaged with
labels written only in English.
HYUNDAI Genuine Parts are only
sold through authorized
HYUNDAI Dealerships.
GUIDE TO HYUNDAI GENUINE PARTS

F6
Introduction
We want to help you get the greatest
possible driving pleasure from your
vehicle. Your Owner's Manual can
assist you in many ways. To gain an
overview of the contents of your
Owner's Manual, use the Table of
Contents in the front of the manual.
The first page of each Chapter
includes a detailed Table of Contents
of the topics in that Chapter.
To quickly locate information about
your vehicle, use the Index in the
back of the manual.It is an alphabetical list of what is in this manual and
the page number where it can be
found.
For your convenience, we have
incorporated tabs on the right-hand
page edges. These tabs are coded
with the Chapter titles to assist you
with navigating through the manual.
Your safety, and the safety of others,
is very important. This Owner's
Manual provides you with many saf ety precautions and operating procedures. This information alerts you to
potential hazards that may hurt you
or others, as well as damage to your
vehicle.
Safety messages found on vehicle
labels and in this manual describe
these hazards and what to do to
avoid or reduce the risks.
Warnings and instructions contained
in this manual are for your safety.
Failure to follow safety warnings and
instructions can lead to serious injury
or death.
Throughout this manual DANGER,
WARNING, CAUTION, NOTICE and
the SAFETY ALERT SYMBOL will
be used.
This is the safety alert symbol. It is used to alert you to
potential physical injury hazards. Obey all safety messages that follow this symbol
to avoid possible injury or
death. The safety alert symbol precedes the signal words
DANGER, WARNING and
CAUTION.
HHOOWW TTOO UUSSEE TTHHIISS MMAANNUUAALL
DANGER indicates a hazardous
situation which, if not avoided,
will result in death or serious
injury .
DANGER
WARNING indicates a hazardous
situation which, if not avoided,
could result in death or serious
injury .
WARNING
SSAAFFEETTYY MMEESSSSAAGGEESS

F7
Introduction
FFUUEELL RREEQQUUIIRREEMMEENNTTSS
NOTICE indicates a situation
which, if not avoided, could result
in vehicle damage.
Your new vehicle is designed to
obtain maximum performance with
UNLEADED FUEL, as well as minimize exhaust emissions and spark
plug fouling.
Your new vehicle is designed to use
only unleaded fuel having an octane
number ((R+M)/2) of 87 (Research
Octane Number 91) or higher.(Do not
use methanol blended fuels)
To prevent damage to the engine
and engine components, never
add any fuel system cleaning
agents to the fuel tank other than
what has been specified.
Consult an authorized HYUNDAI
dealer for additional information.
Gasoline containing alcohol or
methanol
Gasohol, a mixture of gasoline and
ethanol (also known as grain alcohol) are being marketed along with or
instead of leaded or unleaded gasoline. For example, "E15" is a gasohol
comprised of 15% ethanol and 85%
gasoline.
Do not use gasohol containing more
than 15% ethanol, and do not use
gasoline or gasohol containing any
methanol. Either of these fuels may
cause drivability problems and damage to the fuel system, engine control system and emission control system.
Discontinue using gasohol of any
kind if drivability problems occur.
NOTICE
NOTICE
CAUTION indicates a hazardous
situation which, if not avoided,
could result in minor or moderate injury.
CAUTION
• Do not "top off" after the noz-
zle automatically shuts off
when refueling.
• Always check that the fuel cap
is installed securely to prevent fuel spillage in the event
of an accident.
WARNING

F8
Introduction
"E85" fuel is an alternative fuel comprised of 85 percent ethanol and 15
percent gasoline, and is manufactured exclusively for use in Flexible
Fuel Vehicles. "E85" is not compatible with your vehicle. Use of "E85"
may result in poor engine performance and damage to your vehicle's
engine and fuel system. HYUNDAI
recommends that customers do not
use fuel with an ethanol content
exceeding 15 percent.
T o prevent damage to y our vehicle’ s
engine and fuel system:
• Never use gasohol which contains methanol.
• Never use gasohol containing
more than 15% ethanol.
• Never use leaded fuel or leaded
gasohol.
• Never use "E85" fuel.
Your New Vehicle Limited
Warranty does not cover damage
to the fuel system or any performance problems caused by the use
of "E85" fuel.
Using Fuel Additives (except
Detergent Fuel Additives)
Using fuel additives such as:
- Silicone fuel additive
- Ferrocene (iron-based) fuel additive
- Other metallic-based fuel additives
may result in cylinder misfire, poor
acceleration, engine stalling, damage to the catalyst, or abnormal corrosion, and may cause damage to
the engine resulting in a reduction in
the overall life of the powertrain.
- The Malfunction Indicator Lamp
(MIL) may illuminate.
Damage to the fuel system or performance problem caused by the
use of these fuels or fuel additives
may not be covered by your New
Vehicle Limited Warranty.
Gasoline containing MMT
Some gasoline contains harmful
manganese-based fuel additives
such as
MMT (
Methylcyclopentadienyl
Manganese Tricarbonyl).
HYUNDAI does not recommend the
use of gasoline containing MMT.
This type of fuel can reduce vehicle
performance and affect your emission control system.
The malfunction indicator lamp on
the cluster may come on.
Detergent Fuel Additives
HYUNDAI recommends that you use
good quality gasolines treated with
detergent additives such as T OP TIER
Detergent Gasoline, which help prevent deposit formation in the engine.
These gasolines will help the engine
run cleaner and enhance performance
of the Emission Control System. For
more information on TOP TIER
Detergent Gasoline, please go to the
website (www.toptiergas.com).
NOTICE
NOTICE

F9
Introduction
For customers who do not use TOP
Tier Detergent Gasoline regularly,
and have problems starting or the
engine does not run smoothly, detergent-based fuel additives that you
can purchase separately may be
added to the gasoline. If TOP TIER
Detergent Gasoline is not available,
one bottle of additive added to the
fuel tank at every 7,500 miles or 12
months is recommended.
Additives are available from your
authorized HYUNDAI dealer along
with information on how to use them.
Do not mix other additives.
Operation in foreign countries
If you are going to drive your vehicle
in another country, be sure to:
• Observe all regulations regarding
registration and insurance.
• Determine that acceptable fuel is
available.
• This vehicle should not be modified. Modification of your vehicle
could affect its performance, safety
or durability and may even violate
governmental safety and emissions regulations.
In addition, damage or performance problems resulting from any
modification may not be covered
under warranty.
• If you use unauthorized electronic
devices, it ma y cause the vehicle to
operate abnormally, wire damage,
battery discharge and fire. For y our
safety, do not use unauthorized
electronic devices.
By following a f e w simple precautions
for the first 600 miles (1,000 km) you
may add to the performance, economy and life of your vehicle.
• Do not race the engine.
• While driving, keep your engine
speed (rpm, or revolutions per
minute) between 2,000 rpm and
4,000 rpm.
• Do not maintain a single speed for
long periods of time, either fast or
slow .V arying engine speed is needed to properly break-in the engine.
• Avoid hard stops, except in emergencies, to allow the brakes to seat
properly.
VVEEHHIICCLLEE BBRREEAAKK--IINN PPRROOCCEESSSS
VVEEHHIICCLLEE MMOODDIIFFIICCAATTIIOONNSS
F10
Introduction
This vehicle is equipped with an
event data recorder (EDR). The
main purpose of an EDR is to
record, in certain crash or near
crash-like situations, such as an
air bag deployment or hitting a
road obstacle, data that will assist
in understanding how a vehicle’s
systems performed. The EDR is
designed to record data related to
vehicle dynamics and safety systems for a short period of time,
typically 30 seconds or less. The
EDR in this vehicle is designed to
record such data as:
• How various systems in your
vehicle were operating;
• Whether or not the driver and
passenger safety belts were
buckled/fastened;
• How far (if at all) the driver was
depressing the accelerator
and/or brake pedal; and,
• How fast the vehicle was traveling.
These data can help provide a better understanding of the circumstances in which crashes and
injuries occur. NOTE: EDR data
are recorded by your vehicle only
if a non-trivial crash situation
occurs; no data are recorded by
the EDR under normal driving
conditions and no personal data
(e.g., name, g ender, age, and
crash location) are recorded.
However, other parties, such as
law enforcement, could combine
the EDR data with the type of personally identifying data routinely
acquired during a crash investigation.
To read data recorded by an EDR,
special equipment is required, and
access to the vehicle or the EDR is
needed. In addition to the vehicle
manufacturer, other parties, such
as law enforcement, that have the
special equipment, can read the
information if they have access to
the vehicle or the EDR.
VVEEHHIICCLLEE DDAATTAA CCOOLLLLEECCTTIIOONN AANNDD EEVVEENNTT DDAATTAA RREECCOORRDDEERRSS
CALIFORNIA PROPOSITION 65
WARNING
Items contained in motor vehicles or emitted from them are
known to the State of California
to cause cancer and birth
defects or reproductive harm.
These include:
• Gasoline and its vapors
• Engine exhaust
• Used engine oil
• Interior passenger compart-
ment components and materials
• Component parts which are
subject to heat and wear
In addition, battery posts, terminals and related accessories
contain lead, lead compounds
and other chemicals known to
the State of California to cause
cancer and reproductive harm.
WARNING

1
2
3
4
5
6
7
8
I
Your vehicle at a glance
Safety system of your vehicle
Convenient features of your vehicle
Multimedia System
Driving your vehicle
What to do in an emergency
Maintenance
Specifications, Consumer information and
Reporting safety defects
Index
TABLE OF CONTENTS

Your vehicle at a glance
1
Your vehicle at a glance
HHyybbrriidd VVeehhiiccllee
Exterior Overview..................................................1-2
Interior Overview ...................................................1-4
Instrument Panel Overview ..................................1-5
Engine Compartment .............................................1-6
PPlluugg--iinn HHyybbrriidd VVeehhiiccllee
Exterior Overview..................................................1-7
Interior Overview ...................................................1-9
Instrument Panel Overview ................................1-10
Engine Compartment ...........................................1-11
1

1-2
EEXXTTEERRIIOORR OOVVEERRVVIIEEWW -- HHYYBBRRIIDD VVEEHHIICCLLEE
Your vehicle at a glance
1. Hood......................................................3-45
2.Windows................................................3-37
3. Sunroof..................................................3-41
4.Wiper blade ..........................................7-28
5.Tires and wheels............................7-34, 8-5
6. Headlamp..............................................7-55
7. Outer side view mirror ..........................3-33
8. Daytime running light (DRL) ......3-115, 7-60
OAE016001N
■■
Front view
The actual shape may differ from the illustration.

1-3
Your vehicle at a glance
1
1. Door lock ................................................3-9
2. Fuel filler door ......................................3-48
3. Antenna ..................................................4-2
4. Rear combination lamp ........................7-61
5. High mounted stop lamp ......................7-64
6. Liftgate ..................................................3-46
7. Rearview camera ................................3-125
8. Rear parking assist system ................3-126
9.Towing hook ..........................................6-41
OAE016002
■■
Rear view
The actual shape may differ from the illustration.

1-4
Your vehicle at a glance
IINNTTEERRIIOORR OOVVEERRVVIIEEWW -- HHYYBBRRIIDD VVEEHHIICCLLEE
1. Door lock/unlock button ........................3-10
2. Driver position memory system ............3-14
3. Side view mirror control switch..............3-35
4. Central door lock switch ........................3-11
5. Power window switches ........................3-37
6. Power window lock switch......................3-40
7. Instrument panel illumination control
switch ....................................................3-56
8. Blind Spot Detection (BSD) System ......5-34
9. Lane Keeping Assist System (LKAS) ....5-56
10. ESC (Electronic Stability Control)
OFF button ..........................................5-28
11. Fuel filler door open switch..................3-48
12. 12V battery reset switch ........................6-5
13. Fuse panel ..........................................7-50
14. Steering wheel ....................................3-16
15. Steering wheel tilt/telescope lever ......3-16
16. Seat........................................................2-4
17. Hood release lever ..............................3-45
OAE017003N
The actual shape may differ from the illustration.

IINNSSTTRRUUMMEENNTT PPAANNEELL OOVVEERRVVIIEEWW -- HHYYBBRRIIDD VVEEHHIICCLLEE
The actual shape may differ from the illustration.
1-5
Your vehicle at a glance
1
1. Steering wheel audio controls/ ............4-3
Bluetooth
®
wireless technology
hands-free controls ..............................4-4
2. Instrument cluster ..............................3-54
3. Horn....................................................3-17
4. Driver’s front air bag ..........................2-49
5. Cruise controls/ ..................................5-64
Smart cruise controls ..........................5-69
6. Engine Start/Stop button ......................5-6
7. Light control/Turn signals..................3-115
8.Wiper/Washer ..................................3-123
9. Dual clutch transmission ....................5-12
10
. Hazard warning flasher button ..............6-2
11
. Climate control system ..................3-129
12. Seat warmer ....................................2-20
13.Wireless cellular phone charging
system ............................................3-151
14. Passenger’s front air bag..................2-49
15. Glove box........................................3-146
16. Power outlet ....................................3-149
17. AUX, USB and iPod
®
port ..................4-2
OAE016004N

1-6
Your vehicle at a glance
EENNGGIINNEE CCOOMMPPAARRTTMMEENNTT -- HHYYBBRRIIDD VVEEHHIICCLLEE
1. Engine oil filler cap ...........................7-16
2. Engine oil dipstick.............................7-16
3. Engine coolant cap...........................7-19
4. Engine coolant reservoir...................7-18
5. Inverter coolant reservoir..................7-18
6. Brake fluid reservoir ..........................7-22
7. Air cleaner.........................................7-24
8.Windshield washer fluid reser voir.....7-23
9. Fuse box...........................................7-51
OAE076001
The actual engine compartment in the vehicle may differ from the illustration.

1-7
Your vehicle at a glance
1
EEXXTTEERRIIOORR OOVVEERRVVIIEEWW -- PPLLUUGG--IINN HHYYBBRRIIDD VVEEHHIICCLLEE
1. Hood......................................................3-45
2.Windows................................................3-37
3. Sunroof..................................................3-41
4.Wiper blade ..........................................7-28
5.Tires and wheels............................7-34, 8-5
6. Headlamp..............................................7-55
7. Outer side view mirror ..........................3-33
8. Daytime running light (DRL) ......3-115, 7-60
9. Charging door..........................................H4
OAEPH017001N
■■
Front view
The actual shape may differ from the illustration.

1-8
Your vehicle at a glance
1. Door lock ................................................3-9
2. Fuel filler door ......................................3-51
3. Antenna ..................................................4-2
4. Rear combination lamp ........................7-61
5. High mounted stop lamp ......................7-64
6. Liftgate ..................................................3-46
7. Rearview camera ................................3-125
8. Rear parking assist system ................3-126
9.Towing hook ..........................................6-41
OAEPH016002
■■
Rear view
The actual shape may differ from the illustration.

1-9
Your vehicle at a glance
1
IINNTTEERRIIOORR OOVVEERRVVIIEEWW -- PPLLUUGG--IINN HHYYBBRRIIDD VVEEHHIICCLLEE
1. Door lock/unlock button ........................3-10
2. Driver position memory system ............3-14
3. Side view mirror control switch..............3-35
4. Central door lock switch ........................3-11
5. Power window switches ........................3-37
6. Power window lock switch......................3-40
7. Instrument panel illumination control
switch ....................................................3-56
8. Blind Spot Detection (BSD) System ......5-34
9. Lane Keeping Assist System (LKAS) ....5-56
10. ESC (Electronic Stability Control)
OFF button ..........................................5-28
11. Fuel filler door open switch..................3-51
12. AUTO/LOCK mode selection button ......H6
13. Scheduled charging deactivation
button......................................................H7
14. Fuse panel ..........................................7-50
15. Steering wheel ....................................3-16
16. Steering wheel tilt/telescope lever ......3-16
17. Seat........................................................2-4
18. Hood release lever ..............................3-45
OAEPH017003N
The actual shape may differ from the illustration.

1-10
Your vehicle at a glance
IINNSSTTRRUUMMEENNTT PPAANNEELL OOVVEERRVVIIEEWW -- PPLLUUGG--IINN HHYYBBRRIIDD VVEEHHIICCLLEE
The actual shape may differ from the illustration.
1. Steering wheel audio controls/ ............4-3
Bluetooth
®
wireless technology
hands-free controls ..............................4-4
2. Instrument cluster ..............................3-55
3. Horn....................................................3-17
4. Driver’s front air bag ..........................2-49
5. Cruise controls/ ..................................5-64
Smart cruise controls ..........................5-69
6. Engine Start/Stop button ......................5-6
7. Light control/Turn signals..................3-115
8.Wiper/Washer ..................................3-123
9. Dual clutch transmission ....................5-12
10
. Hazard warning flasher button ..............6-2
11
. Climate control system ..................3-129
12. Seat warmer ....................................2-20
13. EV/HEV button..................................H29
14.Wireless cellular phone charging
system ............................................3-151
15. Passenger’s front air bag..................2-49
16. Glove box........................................3-146
17. Power outlet ....................................3-149
18. AUX, USB and iPod
®
port ..................4-2
OAE016004C

1-11
Your vehicle at a glance
1
EENNGGIINNEE CCOOMMPPAARRTTMMEENNTT -- PPLLUUGG--IINN HHYYBBRRIIDD VVEEHHIICCLLEE
1. Engine oil filler cap ...........................7-16
2. Engine oil dipstick.............................7-16
3. Engine coolant cap...........................7-19
4. Engine coolant reservoir...................7-18
5. Inverter coolant reservoir..................7-18
6. Brake fluid reservoir ..........................7-22
7. Air cleaner.........................................7-24
8.Windshield washer fluid reser voir.....7-23
9. Fuse box...........................................7-51
❈ The 12 volt battery is located in the lug-
gage compartment.
OAEPH076001
The actual engine compartment in the vehicle may differ from the illustration.

Safety system of your vehicle
Important safety precautions...............................2-2
Always Wear Your Seat Belt ..........................................2-2
Restrain All Children.........................................................2-2
Air Bag Hazards.................................................................2-2
Driver Distraction ..............................................................2-2
Control Your Speed ...........................................................2-3
Keep Your Vehicle in Safe Condition............................2-3
Seats ........................................................................2-4
Safety Precautions ...........................................................2-5
Front Seats .........................................................................2-6
Rear Seats.........................................................................2-12
Head Restraints ...............................................................2-16
Seat warmers ...................................................................2-20
Seat belts ..............................................................2-23
Seat Belt Safety Precautions.......................................2-23
Seat Belt Warning Light ................................................2-24
Seat Belt Restraint System...........................................2-25
Additional Seat Belt Safety Precautions...................2-32
Care of Seat Belts...........................................................2-35
Child restraint system (CRS) ..............................2-36
Children Always in the Rear.........................................2-36
Selecting a Child Restraint System (CRS) .................2-37
Installing a Child Restraint System (CRS)..................2-39
Air bag
- Advanced supplemental restraint system.....2-47
Where Are the Air Bags?..............................................2-49
How Does the Air Bag System Operate?..................2-52
What to Expect After an Air Bag Inflates................2-57
Occupant Classification System (OCS).......................2-58
Why Didn't My Air Bag Go Off in a Collision?........2-63
SRS Care............................................................................2-68
Additional Safety Precautions.....................................2-69
Air Bag Warning Labels.................................................2-70
This chapter provides you with important information about how to protect yourself and your passengers.
It explains how to properly use your seats and seat belts, and how your air bags work.
Additionally, this chapter explains how to properly restrain infants and children in your vehicle.
2

2-2
You will find many safety precautions
and recommendations throughout
this section, and throughout this manual.The safety precautions in this section are among the most important.
Always Wear Your Seat Belt
A seat belt is your best protection in
all types of accidents. Air bags are
designed to supplement seat belts,
not replace them. So even though
your vehicle is equipped with air bags,
ALWAYS make sure you and your
passengers wear your seat belts, and
wear them properly.
Restrain All Children
All children under age 13 should ride
in your vehicle properly restrained in
a rear seat, not the front seat.Infants
and small children should be
restrained in an appropriate child
restraint. Larger children should use
a booster seat with the lap/shoulder
belt until they can use the seat belt
properly without a booster seat.
Air Bag Hazards
While air bags can save lives, they
can also cause serious or fatal
injuries to occupants who sit too
close to them, or who are not properly restrained. Infants, young children, and shorter adults are at the
greatest risk of being injured by an
inflating air bag. Follow all instructions and warnings in this manual.
Driver Distraction
Driver distraction presents a serious
and potentially deadly danger, especially for inexperienced drivers .Safety
should be the first concern when
behind the wheel and drivers need to
be aware of the wide arra y of potential
distractions, such as drowsiness,
reaching for objects, eating, personal
grooming, other passengers, and
using cellular phones.
Drivers can become distracted when
they take their eyes and attention off
the road or their hands off the wheel
to focus on activities other than driving.To reduce your risk of distraction
or getting into an accident:
IIMMPPOORRTTAANNTT SSAAFFEETTYY PPRREECCAAUUTTIIOONNSS
Safety system of your vehicle

2-3
Safety system of your vehicle
• ALWAYS set up your mobile devices
(i.e., MP3 players, phones, navigation units, etc.) when your vehicle is
parked or safely stopped.
• ONLY use your mobile device when
allowed by laws and when conditions
permit safe use. NEVER text or
email while driving. Most states have
laws prohibiting drivers from texting.
Some states and cities also prohibit
drivers from using handheld phones.
• NEVER let the use of a mobile
device distract you from driving.You
have a responsibility to your passengers and others on the road to
always drive safely, with your hands
on the wheel as well as your eyes
and attention on the road.
Control Y our Speed
Excessive speed is a major factor in
crash injuries and deaths. Generally,
the higher the speed, the greater the
risk, but serious injuries can also
occur at lower speeds. Never drive
faster than is safe for current conditions, regardless of the maximum
speed posted.
Keep Your Vehicle in Safe
Condition
Having a tire blowout or a mechanical
failure can be extremely hazardous.
To reduce the possibility of such
problems, check your tire pressures
and condition frequently, and perform
all regularly scheduled maintenance.
2

2-4
SSEEAATTSS
Safety system of your vehicle
OAE036001N
Front seats
(1) Forward and backward
(2) Seatback angle
(3) Seat cushion height
(4) Lumbar support (Driver's seat)*
(5) Seat warmer*
(6) Headrest
Rear seats
(7) Seat warmer*
(8) Armrest*
(9) Headrest
(10) Seatback folding
* : if equipped
■ Manual seat
■ Power seat

Safety Precautions
Adjusting the seats so that you are sitting in a safe, comfortable position
plays an important role in driver and
passenger safety together with the
seat belts and air bags in an accident.
Air bags
You can take steps to reduce the risk
of being injured by an inflating air
bag. Sitting too close to an air bag
greatly increases the risk of injury in
the event the air bag inflates.
The National Highway Traffic Safety
Administration (NHTSA) recommends
that drivers allow at least 10 inches
(25 cm) between the center of the
steering wheel and their chest.
Do not use a cushion that
reduces friction between the seat
and the passenger. The passenger's hips may slide under the
lap portion of the seat belt during
an accident or a sudden stop.
Serious or fatal internal injuries
could result because the seat
belt cannot operate properly.
WARNING
To reduce the risk of serious
injury or death from an inflating
air bag, take the following precautions:
• Adjust the driver's seat as far to
the rear as possible while maintaining the ability to maintain
full control of the vehicle.
• Adjust the front passenger seat
as far to the rear as possible.
• Hold the steering wheel by the
rim with hands at the 9 o'clock
and 3 o'clock positions to minimize the risk of injuries to your
hands and arms.
• NEVER place anything or any-
one between the steering wheel
and the air bag.
• Do not allow the front passen-
ger to place feet or legs on the
dashboard to minimize the risk
of leg injuries.
WARNING
2-5
Safety system of your vehicle
2

2-6
Safety system of your vehicle
Seat belts
Always fasten your seat belt before
starting any trip.
At all times, passengers should sit
upright and be properly restrained.
Infants and small children must be
restrained in appropriate child restraint
systems. Adults and children who
have outgro wn a booster seat must be
restrained using the seat belts.
Front Seats
Take the following precautions
when adjusting your seat belt:
• NEVER use one seat belt for
more than one occupant.
• Always position the seatback
upright with the lap portion of
the seat belt snug and low
across the hips.
• NEVER allow children or small
infants to ride on a passenger's lap.
• Do not route the seat belt
across your neck,across sharp
edges, or reroute the shoulder
strap away from your body.
• Do not allow the seat belt to
become caught or jammed.
WARNING
Take the following precautions
when adjusting your seat:
• NEVER attempt to adjust the
seat while the vehicle is moving. The seat could respond
with unexpected movement
and may cause loss of vehicle
control resulting in an accident.
• Do not place anything under
the front seats. Loose objects
in the driver's foot area could
interfere with the operation of
the foot pedals, causing an
accident.
• Do not allow anything to inter-
fere with the normal position
and proper locking of the seatback.
• Do not place a cigarette lighter
on the floor or seat. When you
operate the seat, gas may exit
out of the lighter causing a fire.
(Continued)
WARNING
2-7
Safety system of your vehicle
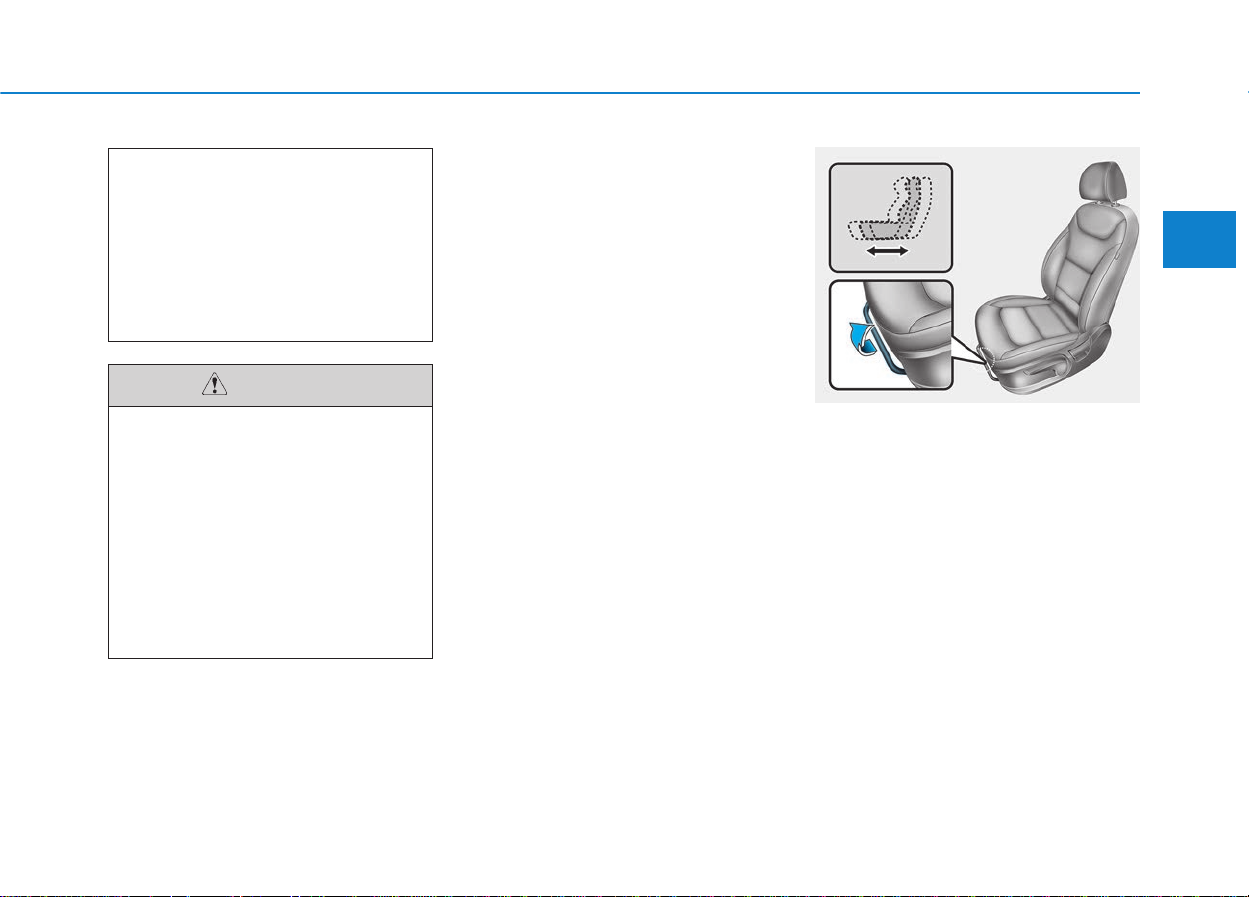
Manual adjustment (if equipped)
The front seat can be adjusted by
using the levers located on the outside of the seat cushion. Before driving, adjust the seat to the proper
position so that you can easily control the steering wheel, foot pedals
and controls on the instrument
panel.
Forward and rearward adjustment
To move the seat forward or rearward:
1. Pull up the seat slide adjustment
lever and hold it.
2. Slide the seat to the position you
desire.
3. Release the lever and make sure
the seat is locked in place. Move
forward and rearward without
using the lever. If the seat moves,
it is not locked properly.
2
To prevent injury:
• Do not adjust your seat while
wearing your seat belt.
Moving the seat cushion forward may cause strong pressure on your abdomen.
• Do not allow your hands or
fingers to get caught in the
seat mechanisms while the
seat is moving.
CAUTION
(Continued)
• Use extreme caution when
picking up small objects
trapped under the seats or
between the seat and the center console.Your hands might
be cut or injured by the sharp
edges of the seat mechanism.
OAE036002

2-8
Seatback angle
To recline the seatback:
1. Lean forward slightly and lift up
the seatback lever.
2. Carefully lean back on the seat
and adjust the seatback to the
position you desire.
3. Release the lever and make sure
the seatback is locked in place.
(The lever MUST return to its original position for the seatback to
lock.)
Reclining seatback
Sitting in a reclined position when
the vehicle is in motion can be dangerous. Even when buckled up, the
protection of your restraint system
(seat belts and air bags) is greatly
reduced by reclining your seatback.
Seat belts must be snug against your
hips and chest to work properly.
When the seatback is reclined, the
shoulder belt cannot do its job
because it will not be snug against
your chest. Instead, it will be in front
of you.During an accident, you could
be thrown into the seat belt, causing
neck or other injuries.
The more the seatback is reclined,
the greater chance the passenger's
hips will slide under the lap belt or
the passenger's neck will strike the
shoulder belt.
Safety system of your vehicle
NEVER ride with a reclined
seatback when the vehicle is
moving.
Riding with a reclined seatback
increases your chance of serious or fatal injuries in the event
of a collision or sudden stop.
Drivers and passengers should
ALWAYS sit well back in their
seats, properly belted, and with
the seatbacks upright.
WARNING
OAE036003

2-9
Safety system of your vehicle
2
Seat cushion height
To change the height of the seat
cushion:
• Push down on the lever several
times, to lower the seat cushion.
• Pull up on the lever several times,
to raise the seat cushion.
Power adjustment
(for driver's seat, if equipped)
The front seat can be adjusted by
using the control switches located on
the outside of the seat cushion.Before
driving, adjust the seat to the proper
position so that you can easily control
the steering wheel, foot pedals and
controls on the instrument panel.
To prevent damage to the seats:
• Always stop adjusting the seats
when the seat has moved as far
forward or rearward as possible.
• Do not adjust the seats for
longer than necessary when the
vehicle is turned off. This may
result in unnecessary battery
drain.
• Do not operate two or more
seats at the same time.This may
result in an electrical malfunction.
NOTICE
NEVER allow children in the
vehicle unattended. The power
seats are operable when the
vehicle is turned off.
WARNING
OAE036004

2-10
Forward and rearward adjustment
To move the seat forward or rearward:
1. Push the control s witch f orward or
rearward.
2. Release the switch once the seat
reaches the desired position.
Seatback angle
To adjust the seatback:
1. Rotate the top of control switch
forward or rearward.
2. Release the switch once the seatback reaches the desired position.
Reclining seatback
Sitting in a reclined position when
the vehicle is in motion can be dangerous. Even when buckled up, the
protections of your restraint system
(seat belts and air bags) is greatly
reduced by reclining your seatback.
Safety system of your vehicle
NEVER ride with a reclined seatback when the vehicle is moving.
Riding with a reclined seatback
increases your chance of serious
or fatal injuries in the event of a
collision or sudden stop.
Driver and passengers should
ALWAYS sit well back in their
seats, properly belted, and with
the seatbacks upright.
WARNING
OAE036007OAE036006

2-11
Safety system of your vehicle
2
Seat belts must be snug against your
hips and chest to work properly.
When the seatback is reclined, the
shoulder belt cannot do its job
because it will not be snug against
your chest. Instead, it will be in front
of you.During an accident, you could
be thrown into the seat belt, causing
neck or other injuries.
The more the seatback is reclined,
the greater chance the passenger’s
hips will slide under the lap belt or
the passenger's neck will strike the
shoulder belt.
Seat cushion height
To change the height of the seat
cushion:
1. • Push the front portion of the con-
trol switch up to raise or down to
lower the front part of the seat
cushion.
• Push the rear portion of the con-
trol switch up to raise or down to
lower the height of the seat cushion.
2. Release the switch once the seat
reaches the desired position.
Lumbar support
(for driver's seat, if equipped)
To adjust the lumbar suppor t:
1. Press the front portion of the
switch (1) to increase support or
the rear portion of the switch (2) to
decrease support.
2. Release the switch once it reaches the desired position.
OAE036008
OAE036005

2-12
Safety system of your vehicle
Seatback pocket
The seatback pocket is provided on
the back of the front passenger's
seatback.
Rear Seats
Folding the rear seat
The rear seatbacks can be folded to
facilitate carrying long items or to
increase the luggage capacity of the
vehicle.
To prevent the Occupant
Classification System from malfunctioning:
Do not hang onto the front passenger's seatback.
WARNING
• Never allow passengers to sit
on top of the folded down
seatback while the vehicle is
moving. This is not a proper
seating position and no seat
belts are available for use.
This could result in serious
injury or death in case of an
accident or sudden stop.
• Objects carried on the folded
down seatback should not
extend higher than the top of
the front seatbacks. This
could allow cargo to slide forward and cause injury or damage during sudden stops.
WARNING
Do not put heavy or sharp
objects in the seatback pockets.
In an accident they could come
loose from the pocket and
injure occupants.
CAUTION
OAD035017

2-13
Safety system of your vehicle
To fold down the rear seatback:
1. Set the front seatback to the
upright position and if necessary,
slide the front seat forward.
2. Lower the rear head restraints to
the lowest position by pushing and
holding the release button (1) and
pushing down on the headrest (2).
3. Insert the rear seat belt buckle in
the pocket between the rear seatback and cushion.
4. Locate the seatbelt toward the
outboard position before folding
down the seatback. If not, the
seatbelt system may be interfered
by the seatback.
5. Pull on the seatback folding lever
(1).
2
OAE036018
OAE036065L
OAE036019
OAE036020

When returning the rear seatback from a folded to an upright
position, hold the seatback and
return it slowly. Ensure that the
seatback is completely locked
into its upright position by
pushing on the top of the seatback. In an accident or sudden
stop, the unlocked seatback
could allow cargo to move forward with great force and enter
the passenger compartment,
which could result in serious
injury or death.
WARNING
2-14
6. Fold the seatback toward the front
of the vehicle.
7. To use the rear seat, lift and unfold
the seatback to the upright position. Push the seatback firmly until
it clicks into place. Make sure the
seatback is locked in place.
When you return the seatback to
its upright position, always be sure
it has locked into position by pushing on the top of the seatback.
Safety system of your vehicle
OAE036021 OAE036066L

2-15
Safety system of your vehicle
2
Armrest (if equipped)
The armrest is located in the center
of the rear seat. Use the strap in the
center of the armrest to pull it down.
Do not place objects in the rear
seats, since they cannot be
properly secured and may hit
vehicle occupants in a collision
causing serious injury or death.
WARNING
Make sure the vehicle is off, the
shift lever is in P (Park), and the
parking brake is securely applied
whenever loading or unloading
cargo.Failure to take these steps
may allow the vehicle to move if
the shift lever is inadvertently
moved to another position.
WARNING
OAE036022
• Be careful when loading
cargo through the rear passenger seats to prevent damage to the vehicle interior.
• When cargo is loaded through
the rear passenger seats,
ensure the cargo is properly
secured to prevent it from
moving while driving.
• Unsecured cargo in the pas-
senger compartment can
cause damage to the vehicle
or injury to it's occupants.
CAUTION

2-16
Safety system of your vehicle
Head Restraints
The vehicle's front and rear seats
have adjustable head restraints. The
head restraints provide comfort for
passengers, but more importantly
they are designed to help protect
passengers from whiplash and other
neck and spinal injuries during an
accident, especially in a rear impact
collision.
To prevent damage, NEVER hit or
pull on the head restraints.
NOTICE
To reduce the risk of serious
injury or death in an accident,
take the following precautions
when adjusting your head
restraints:
• Always properly adjust the
head restraints for all passengers BEFORE starting the
vehicle.
• NEVER let anyone ride in a
seat with the head restraints
removed.
(Continued)
(Continued)
•
Adjust the head restraints so
the middle of the head
restraint is at the same height
as the height of the top of the
eyes.
• NEVER adjust the head
restraint position of the driver's seat when the vehicle is
in motion.
• Adjust the head restraint as
close to the passenger's head
as possible. Do not use a seat
cushion that holds the body
away from the seatback.
• Make sure the head restraint
locks into position after adjusting it.
WARNING
OLF034072N

2-17
Safety system of your vehicle
2
Front seat head restraints
The vehicle's front and passenger's
seats are equipped with adjustable
head restraints for the passengers
safety and comfort.
Adjusting the height up and down
To raise the head restraint:
1. Pull it up to the desired position (1).
To lower the head restraint:
1. Push and hold the release button
(2) on the head restraint support.
2. Lower the head restraint to the
desired position (3).
If you recline the seatback to war ds
the front with the head restraint
and seat cushion raised, the head
restraint may come in contact with
the sunvisor or other parts of the
vehicle.
NOTICE
OPDE036068
OAE036010
OLF034015

2-18
Safety system of your vehicle
Removal/Reinstallation
To remove the head restraint:
1. Recline the seatback (2) rearward
using the seatback angle lever/
switch (1).
2. Raise the head restraint as far as
it can go.
3. Press the head restraint release
button (3) while pulling the head
restraint up (4).
To reinstall the head restraint:
1. Put the head restraint poles (2)
into the holes while pressing the
release button (1).
2. Adjust the head restraint to the
appropriate height.
3. Adjust the seatback (4) forward
using the seatback angle lever/
switch (3).
OAE036012
OAE036011
■ Type A
■ Type B
OAE036014
OAE036013
■ Type A
■ Type B

2-19
Safety system of your vehicle
2
Rear seat head restraints
The rear seats are equipped with
head restraints in all the seating
positions for the passenger's safety
and comfort.
Adjusting the height up and down
To raise the head restraint:
1. Pull it up to the desired position (1).
To lower the head restraint:
1. Push and hold the release button
(2) on the head restraint support.
2. Lower the head restraint to the
desired position (3).
Removal/Reinstallation
To remove the head restraint:
1. Raise the head restraint as far as
it can go.
2. Press the head restraint release
button (1) while pulling the head
restraint up (2).
To reinstall the head restraint:
1. Put the head restraint poles into
the holes (3) while pressing the
release button (1).
2. Adjust the head restraint to the
appropriate height.
OPDE036069
OAE036017 OAE036072L

2-20
Safety system of your vehicle
Seat warmers
Front seat warmers (if equipped)
Seat warmers are provided to warm
the seats during cold weather.
To prevent damage to the seat
warmers and seats:
• Never use a solvent such as
paint thinner, benzene, alcohol
or gasoline to clean the seats.
• Do not place heavy or sharp
objects on seats equipped with
seat warmers.
• Do not change the seat cover. It
may damage the seat warmer.
NOTICE
The seat warmers can cause a
SERIOUS BURN, even at low
temperatures and especially if
used for long periods of time.
Passengers must be able to feel
if the seat is becoming too warm
so they can turn it off, if needed.
(Continued)
(Continued)
People who cannot detect tem-
perature change or pain to the
skin should use extreme caution, especially the following
types of passengers:
• Infants, children, elderly or
disabled persons, or hospital
outpatients.
• People with sensitive skin or
who burn easily.
• Fatigued individuals.
• Intoxicated individuals.
• People taking medication that
can cause drowsiness or
sleepiness.
WARNING
NEVER place anything on the
seat that insulates against heat
when the seat warmer is in operation, such as a blanket or seat
cushion. This may cause the
seat warmer to overheat, causing a burn or damage to the seat.
WARNING

2-21
Safety system of your vehicle
2
While the vehicle is in the ready
( ) mode, push either of the
switches to warm the driver's seat or
front passenger's seat.
During mild weather or under conditions where the operation of the seat
warmer is not needed, keep the
switches in the OFF position.
• Each time you push the switch, the
temperature setting of the seat is
changed as follows :
• When pressing the switch for more
than 1.5 seconds with the seat
warmer operating, the seat warmer
will turn OFF.
• The seat warmer defaults to the
OFF position whenever the Engine
Start/Stop button is in the ON position.
Information
With the seat warmer switch in the
ON position, the heating system in the
seat turns off or on automatically
depending on the seat temperature.
Rear seat warmers (if equipped)
While the vehicle is in the ready
( ) mode, push either of the
switches to warm the rear seat.
During mild weather or under conditions where the operation of the seat
warmer is not needed, keep the
switches in the OFF position.
i
OAE036015N
OFF HIGH ( )
LOW ( ) MIDDLE ( )
→
→
→
→
OAE036023

2-22
Safety system of your vehicle
Each time you push the switch, the
temperature setting of the seat is
changed as follows :
The seat warmer defaults to the OFF
position whenever the Engine Start/
Stop button is placed in the ON position.
Information
With the seat warmer switch in the
ON position, the heating system in the
seat turns off or on automatically
depending on the seat temperature.
Battery cooling duct
The high voltage battery cooling duct
is located on the left side of the rear
seats. The cooling duct cools down
the high voltage battery.
When the high voltage battery cooling duct is blocked, the high voltage
battery may be overheated. Do not
obstruct the cooling duct with any
other objects.
i
OFF → HIGH ( ) → LOW ( )
→
OAE036024
■ Hybrid vehicle
OAEPH036024
■ Plug-in hybrid vehicle

2-23
Safety system of your vehicle
2
This section describes how to use the
seat belts properly. It also describes
some of the things not to do when
using seat belts.
Seat Belt Safety Precautions
Always fasten your seat belt and
make sure all passengers have fastened their seat belts before starting
any trip. Air bags are designed to
supplement the seat belt as an additional safety device , but the y are not a
substitute. Most states require all
occupants of a vehicle to wear seat
belts.
SSEEAATT BBEELLTTSS
Seat belts must be used by ALL
passengers whenever the vehicle is moving.Take the following
precautions when adjusting and
wearing seat belts:
• ALWAYS properly restrain
children under age 13 in the
rear seats.
(Continued)
WARNING
(Continued)
• NEVER allow children to ride
in the front passenger seat. If
a child age 13 or older must be
seated in the front seat, move
the seat as far back as possible and properly restrain them
in the seat.
• NEVER allow an infant or child
to be carried on an occupant’s
lap.
• NEVER ride with the seatback
reclined when the vehicle is
moving.
• Do not allow children to share
a seat or seat belt.
• Do not wear the shoulder belt
under your arm or behind your
back.
• Always wear both the shoul-
der portion and lap portion of
the lap/shoulder belt.
• Do not use the seat belt if it is
twisted. A twisted seat belt
will not protect you properly
in an accident.
(Continued)
(Continued)
• Do not use a seat belt if the
webbing or hardware is damaged.
• Do not latch the seat belt into
the buckles of other seats.
• NEVER unfasten the seat belt
while driving. This may cause
loss of vehicle control resulting in an accident.
• Make sure there is nothing in
the buckle interfering with the
seat belt latch mechanism.
This may prevent the seat belt
from fastening securely.
• No modifications or additions
should be made by the user
which will either prevent the
seat belt adjusting devices
from operating to remove
slack, or prevent the seat belt
assembly from being adjusted
to remove slack.

2-24
Safety system of your vehicle
Seat Belt Warning Light
Seat belt warning light
(for driver's seat)
As a reminder to the driver, the seat
belt warning light will illuminate and
warning chime will sound for approximately 6 seconds each time you
place the Engine Start/Stop button to
the ON position if the seat belt is
unfastened.
If you continue not to fasten the seat
belt and you drive over 6 mph
(9 km/h), the warning light will stay
illuminated.
If you continue not to fasten the seat
belt and you drive over 12 mph
(20 km/h) the seat belt warning chime
will sound for approximately 100 seconds and the corresponding warning
light will blink.
If you unfasten the seat belt while
driving under 12 mph (20 km/h), the
seat belt warning light will illuminate
until the seat belt is fastened.
If you unfasten the seat belt while
driving over 12 mph (20 km/h), the
seat belt warning chime will sound for
approximately 100 seconds and the
corresponding warning light will blink.
Damaged seat belts and seat
belt assemblies will not operate
properly. Always replace:
• Frayed, contaminated, or dam-
aged webbing
• Damaged hardware
• The entire seat belt assembly
after it has been worn in an
accident, even if damage to
webbing or assembly is not
apparent
WARNING
OLMB033022

2-25
Safety system of your vehicle
2
Seat belt warning light
(for front passenger's seat)
As a reminder to the front passenger,
the front passenger's seat belt warning lights will illuminate for approximately 6 seconds each time you
place the Engine Start/Stop button to
the ON position regardless of belt
fastening.
If you continue not to fasten the seat
belt and you drive over 6 mph
(9 km/h), the warning light will stay
illuminated.
If you continue not to fasten the seat
belt and you drive over 12 mph
(20 km/h) the seat belt warning chime
will sound for approximately 100 seconds and the corresponding warning
light will blink.
If you unfasten the seat belt while
driving under 12 mph (20 km/h) the
seat belt warning light will illuminate
until the seat belt is fastened.
If you unfasten the seat belt while
driving over 12 mph (20 km/h), the
seat belt warning chime will sound for
approximately 100 seconds and the
corresponding warning light will blink.
Seat Belt Restraint System
The front passenger's seat belt
warning light may not properly
operate if the front passenger
does not sit properly in the seat.
WARNING
OAEE036011N
Improperly positioned seat belts
may increase the risk of serious
injury in an accident.Take the following precautions when adjusting the seat belt:
• Position the lap portion of the
seat belt as low as possible
across your hips, not on your
waist, so that it fits snugly.
(Continued)
WARNING
OLMB033025

2-26
Safety system of your vehicle
Seat Belt-Driver's 3-point system with emergency locking
retractor
To fasten your seat belt:
Pull the seat belt out of the retractor
and insert the metal tab (1) into the
buckle (2). There will be an audible
"click" when the tab locks into the
buckle.
You should place the lap belt (1) portion across your hips and the shoulder belt (2) portion across your
chest.
The seat belt automatically adjusts to
the proper length after the lap belt
portion is adjusted manually so that it
fits snugly around your hips. If you
lean forward in a slow, easy motion,
the belt will extend and move with
you.
If there is a sudden stop or impact,
the belt will lock into position. It will
also lock if you try to lean forward too
quickly.
OLMB033087
(Continued)
• Position one arm under the
shoulder belt and the other over
the belt, as shown in the illustration.
• Always position the shoulder
belt anchor into the locked
position at the appropriate
height.
• Never position the shoulder
belt across your neck or face.
ODH033053

2-27
Safety system of your vehicle
2
If you are not able to smoothly pull
enough of the seat belt out from
the retractor, firmly pull the seat
belt out and release it. After
release, you will be able to pull the
belt out smoothly.
Height adjustment
You can adjust the height of the
shoulder belt anchor to one of the
three different positions for maximum
comfort and safety.The shoulder portion should be adjusted so it lies
across your chest and midway over
your shoulder nearest the door, not
over your neck.
To adjust the height of the seat belt
anchor, lower or raise the height
adjuster into an appropriate position.
To raise the height adjuster, pull it up
(1). To lower it, push it down (3) while
pressing the height adjuster button (2).
Release the button to lock the anchor
into position. Try sliding the height
adjuster to make sure that it has
locked into position.
To release your seat belt:
Press the release button (1) in the
locking buckle.
When it is released, the belt should
automatically draw back into the
retractor. If this does not happen,
check the belt to be sure it is not twisted, then try again.
NOTICE
OAD035027
ODH033057

2-28
Safety system of your vehicle
Rear Seat Belt – Passenger's 3point system with convertible
locking retractor
This type of seat belt combines the
features of both an emergency locking
retractor seat belt and an automatic
locking retractor seat belt. Convertible
retractor type seat belts are installed in
the rear seat positions to help accommodate the installation of child
restraint systems. Although a convertible retractor is also installed in the
front passenger seat position, NEVER
place any infant/child restraint system
in the front seat of the vehicle.
To fasten your seat belt:
Pull the seat belt out of the retractor
and insert the metal tab into the buckle. There will be an audible "click"
when the tab locks into the buckle.
When not securing a child restraint,
the seat belt operates in the same way
as the driver's seat belt (Emergency
Locking Retractor Type). It automatically adjusts to the proper length only
after the lap belt portion of the seat
belt is adjusted manually so that it fits
snugly across your hips.
When the seat belt is fully extended
from the retractor to allow the installation of a child restraint system, the
seat belt operation changes to allow
the belt to retract, but not to extend
(Automatic Locking Retractor Type).
Refer to the "Using a Child Restraint
System" section in this chapter.
Although the seat belt retractor
provides the same level of protection for seated passengers in
either emergency or automatic
locking modes, the emergency
locking mode allows seated passengers to move freely in their
seat while keeping some tension
on the belt. During a collision or
sudden stop, the retractor automatically locks the belt to help
restrain your body.
To deactivate the automatic locking mode, unbuckle the seat belt
and allow the belt to fully retract.
To release your seat belt:
Press the release button (1) in the
locking buckle.
When it is released, the belt should
automatically draw back into the
retractor. If this does not happen,
check the belt to be sure it is not twisted, then try again.
NOTICE
ODH033057

2-29
Safety system of your vehicle
2
Pre-tensioner seat belt
(Driver and front passenger)
Your vehicle is equipped with driver's
and front passenger's Pre-tensioner
Seat Belts (Retractor Pretensioner
and Emergency Fastening Device
System).The purpose of the pre-tensioner is to make sure the seat belts
fit tightly against the occupant's body
in certain frontal or side collision(s).
The Emergency Fastening Device
System may be activated in certain
crashes where the frontal or side collision(s) is severe enough, together
with the air bags.
When the vehicle stops suddenly, or
if the occupant tries to lean forward
too quickly, the seat belt retractor will
lock into position.In certain frontal or
side collision(s), the pre-tensioner
will activate and pull the seat belt into
tighter contact against the occupant's body.
(1) Retractor Pretensioner
The purpose of the retractor pre-
tensioner is to make sure that the
shoulder belts fit in tightly against
the occupant's upper body in certain frontal or side collision(s).
(2) Emergency Fastening Device
System
The purpose of the Emergency
Fastening Device System is to
make sure that the pelvis belts fit
in tightly against the occupant's
lower body in certain frontal or
side collision(s).
If the system senses excessive tension on the driver or passenger's
seat belt when the pre-tensioner system activates, the load limiter inside
the retractor pre-tensioner will
release some of the pressure on the
affected seat belt.
OTL035053
• Always wear your seat belt and
sit properly in your seat.
• Do not use the seat belt if it is
loose or twisted. A loose or
twisted seat belt will not protect you properly in an accident.
• Do not place anything near the
buckle. This may adversely
affect the buckle and cause it
to function improperly.
• Always replace your pre-ten-
sioners after activation or an
accident.
• NEVER inspect, service, repair
or replace the pre-tensioners
yourself.This must be done by
an authorized HYUNDAI dealer.
• Do not hit the seat belt assem-
blies.
WARNING

2-30
Safety system of your vehicle
The Pre-Tensioner Seat Belt System
consists mainly of the following components.Their locations are shown in
the illustration above:
1. SRS air bag warning light
2. Retractor pre-tensioner
3. SRS control module
4. Emergency Fastening Device
System
The sensor that activates the SRS
air bag is connected with the
pre–tensioner seat belts.The SRS
air bag warning light on the instrument panel will illuminate for
approximately 6 seconds after the
Engine Start/Stop button is in the
ON position, and then it should
turn off.
If the pre-tensioner is not working
properly, the warning light will illuminate even if the SRS air bag is
not malfunctioning. If the warning
light does not illuminate, stays
illuminated or illuminates when
the vehicle is being driven, have
an authorized HYUNDAI dealer
inspect the pre-tensioner seat
belts and SRS air bags as soon as
possible.
NOTICE
Do not touch the pre-tensioner
seat belt assemblies for several
minutes after they have been
activated. When the pre-tensioner seat belt mechanism
deploys during a collision, the
pre-tensioners become hot and
can burn you.
WARNING
OLMB033040/Q

2-31
Safety system of your vehicle
2
• Both the driver's and front passenger's pre-tensioner seat
belts may be activated in certain
frontal or side collisions or
rollovers.
• When the pre-tensioner seat
belts are activated, a loud noise
may be heard and fine dust,
which may appear to be smoke,
may be visible in the passenger
compartment. These are normal
operating conditions and are not
hazardous.
• Although it is non-toxic, the fine
dust may cause skin irritation
and should not be inhaled for
prolonged periods. Wash all
exposed skin areas thoroughly
after an accident in which the
pre-tensioner seat belts were
activated.
Rear center seatbelt
(3-point rear center seat belt)
1. Insert the tongue plate (A) into the
buckle (A’) until an audible "click"
is heard, indicating the latch is
locked. Make sure the belt is not
twisted.
NOTICE
• Fasten your seat belt while
sitting properly in an upright
position to maximize the
effectiveness of the pre-tensioner seat belt system.
• A pre-tensioner seat belt sys-
tem is designed to activate
only once. Replace the pretensioner seat belt system, if it
was activated in an accident.
WARNING
OAE036068L

2-32
Safety system of your vehicle
2. Pull the tongue plate (B) and
insert it into the buckle (B’) until an
audible "click" is heard, indicating
the latch is locked. Make sure the
belt is not twisted.
When using the rear center seat belt,
the buckle with the "CENTER" mark
must be used.
Additional Seat Belt Safety
Precautions
Seat belt use during pregnancy
The seat belt should always be used
during pregnancy. The best way to
protect your unborn child is to protect
yourself by always wearing the seat
belt.
Pregnant women should always wear
a lap-shoulder seat belt. Place the
shoulder belt across your chest, routed between your breasts and away
from your neck.Place the lap belt line
so that it fits snugly and as low as possible across the hips, not across the
abdomen.
• A pregnant woman or a
patient is more vulnerable to
any imapcts on the abdomen
during an abrupt stop or accident. If you are in an accident
while pregnant, we recommend you consult your doctor.
• To reduce the risk of serious
injury or death to an unborn
child during an accident,
pregnant women should
NEVER place the lap portion
of the seat belt above or over
the area of the abdomen
where the unborn child is
located.
WARNING
OAE036027

2-33
Safety system of your vehicle
2
Seat belt use and children
Infant and small children
All 50 states have child restraint la ws
which require children to travel in
approved child restraint devices,
including booster seats. The age at
which seat belts can be used instead
of child restraints differs among
states, so you should be aw are of the
specific requirements in your state,
and where you are travelling. Infant
and child restraints must be properly
placed and installed in a rear seat.
For more information refer to the
"Child Restraint Systems" section in
this chapter.
Small children are best protected
from injury in an accident when properly restrained in the rear seat by a
child restraint system that meets the
requirements of the Federal Motor
Vehicle Safety Standards. Before
buying any child restraint system,
make sure that it has a label certifying that it meets Federal Motor
Vehicle Safety Standard FMVSS
213. The restraint must be appropriate for your child's height and weight.
Check the label on the child restraint
for this information. Refer to the
"Child Restraint Systems" section in
this chapter.
AL WA YS pr operly restrain infants
and small children in a child
restraint appropriate for the
child's height and weight.
To reduce the risk of serious
injury or death to a child and
other passengers, NEVER hold a
child in your lap or arms when
the vehicle is moving.The violent
forces created during an accident will tear the child from your
arms and throw the child against
the interior of the vehicle.
WARNING

2-34
Safety system of your vehicle
Larger children
Children under age 13 and who are
too large for a booster seat must
always occupy the rear seat and use
the available lap/shoulder belts. A
seat belt should lie across the upper
thighs and be snug across the shoulder and chest to restrain the child
safely. Check belt fit periodically.
Children are afforded the most safety in the event of an accident when
they are restrained by a proper
restraint system and/or seat belts in
the rear seat. Always have the
LATCH system inspected by your
authorized HYUNDAI dealer after an
accident. An accident can damage
the LATCH system and may not
properly secure the child restraint.
If a larger child over age 13 must be
seated in the front seat, the child
must be securely restrained by the
available lap/shoulder belt and the
seat should be placed in the rearmost position.
If the shoulder belt portion slightly
touches the child's neck or face, try
placing the child closer to the center
of the vehicle.If the shoulder belt still
touches their face or neck they need
to be returned to an appropriate
booster seat in the rear seat.
Transporting an injured person
A seat belt should be used when an
injured person is being transported.
Consult a physician for specific recommendations.
One person per belt
Two people (including children) should
never attempt to use a single seat belt.
This could increase the severity of
injuries in case of an accident.
Do not lie down
Sitting in a reclined position when the
vehicle is in motion can be dangerous.
Even when buckled up, the protections of your restraint system (seat
belts and air bags) is greatly reduced
by reclining your seatback.
To reduce the chance of injuries in the
event of an accident and to achieve
the maximum effectiveness of the
restraint system, all passengers
should be sitting up and the front and
rear seats should be in an upright
position when the car is moving.
• Always make sure children
are wearing their seat belts
and that they are properly
adjusted before driving.
• NEVER allow the shoulder
belt to contact the child’s
neck or face.
• Do not allow more than one
child to use a single seat belt.
WARNING

2-35
Safety system of your vehicle
2
A seat belt cannot provide proper
protection if the person is lying down
in the rear seat or if the front or rear
seats are in a reclined position.
Care of Seat Belts
Seat belt systems should never be
disassembled or modified. In addition, care should be taken to assure
that seat belts and belt hardware are
not damaged by seat hinges, doors
or other abuse.
Periodic inspection
All seat belts should be inspected
periodically for wear or damage of
any kind. Any damaged par ts should
be replaced as soon as possible by
an authorized HYUNDAI dealer.
Keep belts clean and dry
Seat belts should be kept clean and
dry .If belts become dirty, they can be
cleaned by using a mild soap solution and warm water. Bleach, dye,
strong detergents or abrasives
should not be used because they
may damage and weaken the fabric.
When to replace seat belts
The entire seat belt assembly or
assemblies should be replaced if the
vehicle has been involved in an accident.This should be done even if no
damage is visible. Additional questions concerning seat belt operation
should be directed to an authorized
HYUNDAI dealer.
• NEVER ride with a reclined
seatback when the vehicle is
moving.
• Riding with a reclined seatback
increases your chance of serious or fatal injuries in the event
of a collision or sudden stop.
• Drivers and passengers should
always sit well back in their
seats, properly belted, and with
the seatbacks upright.
WARNING

2-36
Safety system of your vehicle
Children Always in the Rear
Children under age 13 must always
ride in the rear seats and must
always be properly restrained to minimize the risk of injury in an accident,
sudden stop or sudden maneuver.
According to accident statistics, children are safer when properly
restrained in the rear seats than in
the front seat. Even with air bags,
children can be seriously injured
or killed. Children too large for a
child restraint must use the seat belts
provided.
All 50 states have child restraint la ws
which require children to travel in
approved child restraint devices.The
laws governing the age or
height/weight restrictions at which
seat belts can be used instead of
child restraints differs among states,
so you should be aware of the specific requirements in your state, and
where you are travelling.
Child restraint systems must be properly placed and installed in the rear
seat. You must use a commercially
available child restraint system that
meets the requirements of the Federal
Motor Vehicle Safety Standards
(FMVSS 213).
Child restraint systems are generally
designed to be secured in a vehicle
seat by lap belt portion of a
lap/shoulder belt, or by a LATCH system in the rear seats of the vehicle.
CCHHIILLDD RREESSTTRRAAIINNTT SSYYSSTTEEMM ((CCRRSS))
Always properly restrain children in the rear seats of the
vehicle.
Children of all ages are safer
when restrained in the rear seat.
A child riding in the front passenger seat can be forcefully
struck by an inflating air bag
resulting in SERIOUS INJURY
or DEATH.
WARNING

2-37
Safety system of your vehicle
2
Child restraint system (CRS)
Infants and younger children must be
restrained in an appropriate rear-facing or forward-facing CRS that has
first been properly secured to the
rear seat of the vehicle. Read and
comply with the instructions for
installation and use provided by the
manufacturer of the child restraint.
Selecting a Child Restraint
System (CRS)
When selecting a CRS for your child,
always:
• Make sure the CRS has a label
certifying that it meets applicable
Federal Motor Vehicle Safety
Standards (FMVSS 213).
• Select a child restraint based on
your child’s height and weight. The
required label or the instructions
for use typically provide this information.
• Select a child restraint that fits the
vehicle seating position where it
will be used.
• Read and comply with the warnings and instructions for installation
and use provided with the child
restraint system.
(Continued)
• Always follow the child
restraint system manufacturer's instructions for installation and use.
• Always properly restrain your
child in the child restraint.
• If the vehicle head restraint
prevents proper installation of
a child seat (as described in
the child restraint system
manual), the head restraint of
the respective seating position shall be readjusted or
entirely removed.
• Do not use an infant carrier or
a child safety seat that
"hooks" over a seatback, it
may not provide adequate
protection in an accident.
• After an accident, have a
HYUNDAI dealer check the
child restraint system, seat
belts, tether anchors and
lower anchors.
An improperly secured child
restraint can increase the risk
of SERIOUS INJURY or DEATH
in an accident. Always take the
following precautions when
using a child restraint system:
• NEVER install a child or infant
restraint in the front passenger's seat.
• Always properly secure the
child restraint to a rear seat of
the vehicle.
(Continued)
WARNING

2-38
Safety system of your vehicle
Child restraint system types
There are three main types of child
restraint systems: rear-facing seats,
forward-facing seats, and booster
seats. They are classified according
to the child's age, height and weight.
Rearward-facing child seats
A rear-facing child seat provides
restraint with the seating surface
against the back of the child.The harness system holds the child in place,
and in an accident, acts to keep the
child positioned in the seat and
reduce the stress to the neck and
spinal cord.
All children under age one must
always ride in a rear-facing inf ant child
restraint.
Convertible and 3-in-1 child seats typically have higher height and weight
limits for the rear-facing position,
allowing you to keep your child rearfacing for a longer period of time.
Continue to use a rear-facing child
seat for as long as your child will fit
within the height and weight limits
allowed by the child seat manuf acturer. It's the best way to keep them
safe. Once your child has outgrown
the rear-facing child restraint, your
child is ready for a forward-facing
child restraint with a harness.
OAE036062
NEVER install a child or infant
restraint in the front passenger's seat.
Placing a rear-facing child
restraint in the front seat can
result in SERIOUS INJURY or
DEATH if the child restraint is
struck by an inflating air bag.
WARNING

2-39
Safety system of your vehicle
2
Forward-facing child restraints
A forward-facing child seat provides
restraint for the child's body with a
harness. Keep children in a forwardfacing child seat with a harness until
they reach the top height or weight
limit allowed by your child restraint’s
manufacturer.
Once your child outgrows the f orwardfacing child restraint, your child is
ready for a booster seat.
Booster seats
A booster seat is a restraint designed
to improve the fit of the vehicle's seat
belt system. A booster seat positions
the seat belt so that it fits properly
over the lap of your child.
Keep your child in a booster seat until
they are big enough to sit in the seat
without a booster and still have the
seat belt fit properly. For a seat belt to
fit properly, the lap belt must lie snugly across the upper thighs, not the
stomach.The shoulder belt should lie
snug across the shoulder and chest
and not across the neck or face.
Children under age 13 must always
ride in the rear seats and must always
be properly restrained to minimize the
risk of injury.
Installing a Child Restraint
System (CRS)
Before installing your child
restraint system always:
• Read and follow the instruc-
tions provided by the manufacturer of the child restraint.
• Read and follow the instruc-
tions regarding child restraint
systems in this manual.
Failure to follow all warnings
and instructions could increase
the risk of the SERIOUS INJURY
or DEATH if an accident occurs.
WARNING
If the vehicle headrest prevents
proper installation of a child
seat (as described in the child
seat system manual, the headrest of the respective seating
position shall be readjusted or
entirely removed.
WARNING
OAE036028

2-40
Safety system of your vehicle
After selecting a proper child seat for
your child, check to make sure it fits
properly in your vehicle. Follow the
instructions provided by the manufacturer when installing the child
seat. Note these general steps when
installing the seat to your vehicle:
•
Properly secure the child restraint
to the vehicle.
All child restraints
must be secured to the vehicle with
the lap part of a lap/shoulder belt or
with the LATCH system.
• Make sure the child restraint is
firmly secured. After installing a
child restraint to the vehicle, push
and pull the seat forward-and-back
and side-to-side to verify that it is
securely attached to the seat. A
child restraint secured with a seat
belt should be installed as firmly as
possible. However, some side-toside movement can be expected.
• Secure the child in the child
restraint. Make sure the child is
properly strapped in the child
restraint according to the manufacturer instructions.
Lower Anchors and Tether for
Children (LATCH System)
The LATCH system holds a child
restraint during driving and in an accident. This system is designed to
make installation of the child restraint
easier and reduce the possibility of
improperly installing your child
restraint. The LATCH system uses
anchors in the vehicle and attachments on the child restraint. The
LATCH system eliminates the need
to use seat belts to secure the child
restraint to the rear seats.
Lower anchors are metal bars built
into the vehicle. There are two lower
anchors for each LATCH seating
position that will accommodate a
child restraint with lower attachments.
To use the LATCH system in your
vehicle, you must have a child
restraint with LATCH attachments.
The child seat manufacturer will provide you with instructions on how to
use the child seat with its attachments
for the LATCH lower anchors.
A child restraint in a closed
vehicle can become very hot.To
prevent burns, check the seating surface and buckles before
placing your child in the child
restraint.
CAUTION

2-41
Safety system of your vehicle
2
LATCH anchors have been provided
in the left and right outboard rear
seating positions. Their locations are
shown in the illustration.There are no
LATCH anchors provided for the center rear seating position.
The lower anchor position indicator
symbols are located on the left and
right rear seat backs to identify the
position of the lower anchors in your
vehicle (see arrows in illustration).
The LATCH anchors are located
between the seatback and the seat
cushion of the rear seat left and right
outboard seating positions.
Do not attempt to install a child
restraint system using LATCH
anchors in the rear center seating position.There are no LA TCH
anchors provided for this seat.
Using the outboard seat anchors
can damage the anchors which
may break or fail in a collision
resulting in serious injury or
death.
WARNING
OAE036063
OAE036031
Lower Anchor
Position Indicator
Lower Anchor

2-42
Safety system of your vehicle
Securing a child restraint with
the LATCH anchors system
To install a LATCH-compatible child
restraint in either of the rear outboard
seating positions:
1. Move the seat belt buckle away
from the lower anchors.
2. Move any other objects away from
the anchors that could prevent a
secure connection between the
child restraint and the lower
anchors.
3. Place the child restraint on the
vehicle seat, then attach the seat
to the lower anchors according to
the instructions provided by the
child restraint manufacturer.
4. Follow the child restraint instruc-
tions for properly adjusting and
tightening the lower attachments
on the child restraint to the lower
anchors.
The recommended weight for the
LATCH system is under 65 lb (30
kg).
How to determine an appropriate
child restraint weight:
Child weight + Child restraint
weight < 65 lb (30kg)
NOTICE
Take the following precautions
when using the LATCH system:
• Read and follow all installation
instructions provided with
your child restraint system.
• To prevent the child from
reaching and taking hold of
unretracted seat belts, buckle
all unused rear seat belts and
retract the seat belt webbing
behind the child. Children can
be strangled if a shoulder belt
becomes wrapped around
their neck and the seat belt
tightens.
• NEVER attach more than one
child restraint to a single
anchor. This could cause the
anchor or attachment to come
loose or break.
• Always have the LATCH sys-
tem inspected by your authorized HYUNDAI dealer after an
accident. An accident can
damage the LATCH system
and may not properly secure
the child restraint.
WARNING

2-43
Safety system of your vehicle
2
Securing a child restraint seat
with "Tether Anchor" system
First secure the child restraint with
the LATCH lower anchors or the seat
belt. If the child restraint manufacturer recommends that the top tether
strap be attached, attach and tighten
the top tether strap to the top tether
strap anchor.
Child restraint hook holders are
located on the rear of the seatbacks.
To install the tether anchor :
1. Route the child restraint tether strap
over the child restraint seatback.
Route the tether strap under the
head restraint and between the
head restraint posts, or route the
tether strap over the top of the vehicle seatback.Make sure the strap is
not twisted.
2. Connect the tether strap hook to the
tether anchor, then tighten the tether strap according to the child seat
manufacturer's instructions to firmly
secure the child restraint to the seat.
3. Check that the child restraint is
securely attached to the seat by
pushing and pulling the seat forward-and-back and side-to-side.
Take the following precautions
when installing the tether strap:
• Read and follow all installation
instructions provided with
your child restraint system.
• NEVER attach more than one
child restraint to a single tether anchor. This could cause
the anchor or attachment to
come loose or break.
• Do not attach the tether strap
to anything other than the correct tether anchor. It may not
work properly if attached to
something else.
• Do not use the tether anchors
for adult seat belts or harnesses, or for attaching other items
or equipment to the vehicle.
WARNING
OAE036030
OAE036029N

2-44
Safety system of your vehicle
Securing a child restraint with
lap/shoulder belt
When not using the LATCH system,
all child restraints must be secured to
a vehicle rear seat with the lap part
of a lap/shoulder belt.
Automatic locking mode
Since all passenger seat belts move
freely under normal conditions and
only lock under extreme or emergency conditions (emergency locking
mode), you must manually pull the
seat belt all the way out to shift the
retractor to the "Automatic Locking"
mode to secure a child restraint.
The "Automatic Locking" mode will
help prevent the normal movement
of the child in the vehicle from causing the seat belt to loosen and compromise the child restraint system.To
secure a child restraint system, use
the following procedure.
To install a child restraint system on
the rear seats, do the following:
1. Place the child restraint system on
a rear seat and route the lap/
shoulder belt around or through
the child restraint, following the
restraint manufacturer's instructions.
Be sure the seat belt webbing is
not twisted.
When using the rear center seat
belt, you should also refer to the
"Rear Seat Belt – Passenger's 3point system" section in this
chapter.
NOTICE
ALWAYS place a rear-facing
child restraint in the rear seat of
the vehicle.
Placing a rear-facing child
restraint in the front seat can
result in serious injury or death
if the child restraint is struck by
an inflating air bag.
WARNING
OLMB033044

2-45
Safety system of your vehicle
2
2. Fasten the lap/shoulder belt latch
into the buckle. Listen for the distinct "click" sound.
Information
Position the release button so that it is
easy to access in case of an emergency.
3. Pull the shoulder portion of the seat
belt all the way out.When the shoulder portion of the seat belt is fully
extended, it will shift the retractor to
the "Automatic Locking" (child
restraint) mode.
4. Slowly allow the shoulder portion of
the seat belt to retract and listen for
an audible "clicking" or "ratcheting"
sound. This indicates that the
retractor is in the "Automatic
Locking" mode. If no distinct sound
is heard, repeat steps 3 and 4.
i
OLMB033045
OLMB033097 OLMB033098

2-46
Safety system of your vehicle
5. Remove as much slack from the
belt as possible by pushing down
on the child restraint system while
feeding the shoulder belt back into
the retractor.
6. Push and pull on the child restraint
system to confirm that the seat
belt is holding it firmly in place. If it
is not, release the seat belt and
repeat steps 2 through 6.
7. Double check that the retractor is
in the "Automatic Locking" mode
by attempting to pull more of the
seat belt out of the retractor.If you
cannot, the retractor is in the
"Automatic Locking" mode.
If your CRS manufacturer instructs or
recommends you to use a tether
anchor with the lap/shoulder belt,
refer to the previous pages for more
information.
When the seat belt is allowed to
retract to its fully stowed position,
the retractor will automatically
switch from the "Automatic
Locking" mode to the emergency
lock mode for normal adult usage.
To remove the child restraint, press
the release button on the buckle and
then pull the lap/shoulder belt out of
the restraint and allow the seat belt
to retract fully.
NOTICE
If the retractor is not in the
"Automatic Locking" mode, the
child restraint can move when
your vehicle turns or stops suddenly. A child can be seriously
injured or killed if the child
restraint is not properly anchored
in the car, including manually
pulling the seat belt all the way
out to shift the rectractor to the
"Automatic Locking" mode.
WARNING

2-47
Safety system of your vehicle
2
AAIIRR BBAAGG -- AADDVVAANNCCEEDD SSUUPPPPLLEEMMEENNTTAALL RREESSTTRRAAIINNTT SSYYSSTTEEMM
OAEE036035
The actual air bags in the vehicle may differ from the illustration.
1. Driver's front air bag
2. Passenger's front air bag
3. Side air bag
4. Cur tain air bag
5. Driver's knee air bag

2-48
Safety system of your vehicle
This vehicle is equipped with an
Advanced Supplemental Air Bag
System for the driver's seat and front
passenger's seats.
The front air bags are designed to
supplement the three-point seat
belts. For these air bags to provide
protection, the seat belts must be
worn at all times when driving.
You can be severely injured or killed
in an accident if you are not wearing
a seat belt. Air bags are designed to
supplement seat belts, but do not
replace them. Also, air bags are not
designed to deploy in every collision.
In some accidents, the seat belts are
the only restraint protecting you.
AIR BAG SAFETY PRECAUTIONS
ALWAYS use seat belts and child restraints - every trip, every time,
everyone! Even with air bags,you can be seriously injured or killed in
a collision if you are improperly belted or not wearing your seat belt
when the air bag inflates.
NEVER place a child in any child restraint or booster seat in the front
passenger seat. An inflating air bag could forcefully strike the infant
or child causing serious or fatal injuries.
ABC - Always Buckle Children under age 13 in the back seat. It is the
safest place for children of any age to ride. If a child age 13 or older
must be seated in the front seat, he or she must be properly belted
and the seat should be moved as far back as possible.
All occupants should sit upright with the seatback in an upright position, centered on the seat cushion with their seat belt on, legs comfortably extended and their feet on the floor until the vehic le is parked
and is turned off. If an occupant is out of position during an accident,
the rapidly deploying air bag may forcefully contact the occupant
causing serious or fatal injuries.
You and your passengers should never sit or lean unnecessarily
close to the air bags or lean against the door or center console.
Move your seat as far back as possible from front air bags, while still
maintaining control of the vehicle. The U.S. National Highway Traffic
Safety Administration (NHTSA) recommends that drivers allow at
least 10 inches (25 cm) between the center of the steering wheel and
the chest.
WARNING

2-49
Safety system of your vehicle
2
Where Are the Air Bags?
Driver's and passenger's front
air bags
Your vehicle is equipped with a
Advanced Supplemental Restraint
System (SRS) and lap/shoulder belts
at both the driver and passenger
seating positions.
The SRS consists of air bags which
are located in the center of the steering wheel, in the driver's side lower
crash pad below the steering wheel
column and the passenger's side
front panel pad above the glove box.
The air bags are labeled with the letters "AIR BAG" embossed on the
pad covers.
The purpose of the SRS is to provide
the vehicle's driver and front passengers with additional protection than
that offered by the seat belt system
alone. The advanced SRS offers the
ability to control the air bag inflation
within two levels. A first stage level is
provided for moderate-severity
impacts. A second stage level is provided for more severe impacts.
According to the impact severity, the
SRS Control Module (SRSCM) controls the air bag inflation. Failure to
properly wear seat belts can
increase the risk or severity of injury
in an accident.
OAE036032
OAE036033
OAE036036
■ Driver's knee air bag
■ Driver's front air bag
■ Passenger's front air bag

2-50
Safety system of your vehicle
Side air bags
Your vehicle is equipped with a side
air bag in each front seat. The purpose of the air bag is to provide the
vehicle's driver and the front passenger with additional protection than
that offered by the seat belt alone.
The side air bags are designed to
deploy only during certain side impact
collisions, depending on the crash
severity.
The side and curtain air bags on
both sides of the vehicle may deploy
if a rollover or possible rollover is
detected.
The side air bags are not designed to
deploy in all side impact or rollover
situations.
To reduce the risk of serious
injury or death from an inflating
front air bags,take the following
precautions:
• Seat belts must be worn at all
times to help keep occupants
positioned properly.
• Move your seat as far back as
possible from front air bags,
while still maintaining control
of the vehicle.
• Never lean against the door or
center console.
• Do not allow the front passen-
ger to place their feet or legs
on the dashboard.
• No objects (such as crash pad
cover, cellular phone holder,
cup holder,perfume or stickers)
should be placed over or near
the air bag modules on the
steering wheel, instrument
panel, windshield glass, and the
front passenger's panel above
the glove box. Such objects
could cause harm if the vehicle
is in a crash severe enough to
cause the air bags to deploy.
WARNING
OAE036037
OAE036038
To reduce the risk of serious
injury or death from an inflating
side air bag, take the following
precautions:
• Seat belts must be worn at all
times to help keep occupants
positioned properly.
(Continued)
WARNING

2-51
Safety system of your vehicle
2
Curtain air bags
Curtain air bags are located along
both sides of the roof rails above the
front and rear doors.
(Continued)
• Do not allow passengers to
lean their heads or bodies
onto doors, put their arms on
the doors, stretch their arms
out of the window, or place
objects between the doors
and seats.
• Hold the steering wheel at the
9 o'clock and 3 o'clock positions, to minimize the risk of
injuries to your hands and
arms.
• Do not use any accessory
seat covers.This could reduce
or prevent the effectiveness
of the system.
• Do not place any objects over
the air bag or between the air
bag and yourself. Also, do not
attach any objects around the
area the air bag inflates such
as the door, side door glass,
front and rear pillar.
(Continued)
(Continued)
• Do not place any objects
between the door and the
seat. They may become dangerous projectiles if the side
air bag inflates.
• Do not install any accessories
on the side or near the side air
bags.
• Do not put any objects
between the side airbag label
and seat cushion. It could
cause harm if the vehicle is in
a crash severe enough to
cause the air bags to deploy.
• Do not cause impact to the
doors when the Engine Start/
Stop button is in the ON position as this may cause the
side air bags to inflate.
• If the seat or seat cover is
damaged, have the vehicle
checked and repaired by an
authorized HYUNDAI dealer.
OAE036041
OAE036042

2-52
Safety system of your vehicle
They are designed to help protect the
heads of the front seat occupants
and the rear outboard seat occupants
in certain side impact collisions.
The curtain air bags are designed to
deploy only during certain side
impact collisions, depending on the
crash severity.
The side and curtain air bags on
both sides of the vehicle may deploy
if a rollover or possible rollover is
detected.
The curtain air bags are not designed
to deploy in all side impact or rollover
situations.
How Does the Air Bag System
Operate?
The SRS consists of the following
components:
1.Driver's front air bag module/
Driver's knee airbag module
2. Passenger's front air bag module
3.Side air bag modules/
Side impact sensors
4. Curtain air bag modules
5.Retractor pre-tensioner assemblies
6. Air bag war ning light
7. SRS control module (SRSCM)/
Rollover sensor
To reduce the risk of serious
injury or death from an inflating
curtain air bag, take the following precautions:
• All seat occupants must wear
seat belts at all times to help
keep occupants positioned
properly.
(Continued)
(Continued)
• Properly secure child
restraints as far away from the
door as possible.
• Do not place any objects over
the air bag. Also, do not attach
any objects around the area
the air bag inflates such as the
door, side door glass, front
and rear pillar, roof side rail.
• Do not hang other objects
except clothes, especially
hard or breakable objects. In
an accident, it may cause
vehicle damage or personal
injury.
• Do not allow passengers to
lean their heads or bodies onto
doors, put their arms on the
doors,stretch their arms out of
the window, or place objects
between the doors and seats.
• Do not open or repair the side
curtain air bags.
WARNING
OAEE036075N

2-53
Safety system of your vehicle
2
8. Front impact sensors
9. Side pressure sensors
10.Emergency Fastening Device
System
11. Occupant classification system
The SRSCM (Supplemental
Restraint System Control Module)
continually monitors all SRS components while the Engine Start/Stop
button is in the ON position to determine if a crash impact is severe
enough to require air bag deployment or pre-tensioner seat belt
deployment.
SRS warning light
The SRS (Supplement Restraint
System) air bag warning light on the
instrument panel displays the air bag
symbol depicted in the illustration.
The system checks the air bag electrical system for malfunctions. The
light indicates that there is a potential
malfunction with your air bag system,
which could include your side and
curtain air bags used for rollover protection.
If your SRS malfunctions, the air
bag may not inflate properly during an accident increasing the
risk of serious injury or death.
If any of the following conditions occur, your SRS is malfunctioning:
• The light does not turn on for
approximately six seconds
when the Engine Start/Stop
button is in the ON position.
• The light stays on after illumi-
nating for approximately six
seconds.
• The light comes on while the
vehicle is in motion.
• The light blinks when the
vehicle is in the ready ( )
mode.
Have an authorized HYUNDAI
dealer inspect the SRS as soon
as possible if any of these conditions occur.
WARNING

2-54
Safety system of your vehicle
During a frontal collision, sensors will
detect the vehicle's deceleration. If
the rate of deceleration is high
enough, the control unit will inflate
the front air bags.
The front air bags help protect the
driver and front passenger by
responding to frontal impacts in
which seat belts alone cannot provide adequate restraint. When needed, the side air bags help provide
protection in the event of a side
impact or rollover.
• Air bags are activated (able to
inflate if necessary) only when the
Engine Start/Stop button is in the
ON position.
• Air bags inflate in the event of cer-
tain frontal or side collisions to help
protect the occupants from serious
physical injury.
• Generally, air bags are designed to
inflate based upon the severity of a
collision, its direction, etc. These
two factors determine whether the
sensors produce an electronic
deployment/inflation signal.
• Air bag deployment depends on a
number of factors including vehicle
speed, angles of impact and the
density and stiffness of the vehicles
or objects which your vehicle
impacts during a collision. The
determining factors are not limited
to those mentioned above.
• The front air bags will completely
inflate and deflate in an instant. It is
virtually impossible for you to see
the air bags inflate during an accident. It is much more likely that you
will simply see the deflated air bags
hanging out of their storage compartments after the collision.
• In addition to inflating in certain
side collisions, vehicles equipped
with a rollover sensor, side and
curtain air bags will inflate if the
sensing system detects a rollover.
When a rollover is detected, side
and curtain air bags will remain
inflated longer to help provide protection from ejection, especially
when used in conjunction with the
seat belts.
• To help provide protection, the air
bags must inflate rapidly.The speed
of air bag inflation is a consequence
of extremely short time in which to
inflate the air bag between the
occupant and the vehicle structures
before the occupant impacts those
structures. This speed of inflation
reduces the risk of serious or lifethreatening injuries and is thus a
necessary par t of air bag design.
However, the rapid air bag inflation
can also cause injuries which can
include facial abrasions, bruises
and broken bones because the
inflation speed also causes the air
bags to expand with a great deal of
force.
• There are even circumstances
under which contact with the air
bag can cause fatal injuries, especially if the occupant is positioned
excessively close to the air bag.

2-55
Safety system of your vehicle
2
You can take steps to help reduce
the risk of being injured by an inflating air bag.The greatest risk is sitting
too close to the air bag. An air bag
needs about 10 inches (25 cm) of
space to inflate. NHTSA recommends that drivers allow at least 10
inches (25 cm) between the center of
the steering wheel and the chest.
When the SRSCM detects a sufficiently severe impact to the front of
the vehicle, it will automatically
deploy the front air bags.
OHM039102N
■ Driver’s front air bag (1)
To reduce the risk of serious
injury or death from an inflating
air bag, take the following precautions:
• NEVER place a child restraint
in the front passenger seat.
Always properly restrain chil-
dren under age 13 in the rear
seats of the vehicle.
• Adjust the front passenger's
and driver's seats as far to the
rear as possible while allowing you to maintain full control of the vehicle.
• Hold the steering wheel with
hands at the 9 o'clock and 3
o'clock positions.
• Never place anything or any-
one between the air bag and
the seat occupant.
• Do not allow the front passen-
ger to place their feet or legs
on the dashboard.
WARNING

2-56
Safety system of your vehicle
Upon deployment, tear seams molded directly into the pad covers will
separate under pressure from the
expansion of the air bags. Further
opening of the covers allows full
inflation of the air bags.
A fully inflated air bag, in combination with a properly worn seat belt,
slows the driver or the front passenger forward motion, reducing the risk
of head and chest injury.
After complete inflation, the air bag
immediately starts deflating, enabling
the driver to maintain forward visibility and the ability to steer or operate
other controls.
OHM039103N
■ Driver’s front air bag (2)
OHM039104N
■ Driver’s front air bag (3)
OLMB033057
■ Passenger’s front air bag
To prevent objects from becoming dangerous projectiles when
the passenger's air bag inflates:
• Do not install or place any
objects (drink holder, CD
holder, stickers, etc.) on the
front passenger's panel above
the glove box where the passenger's air bag is located.
• Do not install a container of
liquid air freshener near the
instrument cluster or on the
instrument panel surface.
WARNING

2-57
Safety system of your vehicle
2
What to Expect After an Air
Bag Inflates
After a frontal or side air bag inflates,
it will deflate very quickly. Air bag
inflation will not prevent the driver
from seeing out of the windshield or
being able to steer. Curtain air bags
may remain partially inflated for
some time after they deploy.
Noise and smoke from inflating
air bag
When the air bags inflate, they make
a loud noise and may produce
smoke and powder in the air inside of
the vehicle. This is normal and is a
result of the ignition of the air bag
inflator.After the air bag inflates, you
may feel substantial discomfort in
breathing because of the contact of
your chest with both the seat belt and
the air bag, as well as from breathing
the smoke and powder. The powder
may aggravate asthma for some
people. If you experience breathing
problems after an air bag deployment, seek medical attention immediately.
Though the smoke and powder are
nontoxic, they may cause irr itation to
the skin, eyes, nose, throat, etc. If
this is the case, wash and rinse with
cold water immediately and seek
medical attention if the symptoms
persist.
(Continued)
• Always wash exposed skin
areas thoroughly with cold
and mild soap.
• Always have an authorized
HYUNDAI dealer replace the
air bag immediately after
deployment. Air bags are
designed to be used only
once.
After an air bag inflates, take
the following precautions:
• Open your windows and doors
as soon as possible after
impact to reduce prolonged
exposure to the smoke and
powder released by the inflating air bag.
• Do not touch the air bag stor-
age area's internal components immediately after an air
bag has inflated. The parts
that come into contact with an
inflating air bag may be very
hot.
(Continued)
WARNING

2-58
Safety system of your vehicle
Occupant Classification
System (OCS)
Your vehicle is equipped with an
Occupant Classification System
(OCS) in the front passenger's seat.
Main components of the
Occupant Classification System
• A detection device located within
the front passenger seat cushion.
• Electronic system to determine
whether the passenger air bag
systems should be activated or
deactivated.
• An indicator light located on the
instrument panel which illuminates
the words "PASSENGER AIR BAG
OFF" indicating the front passenger air bag system is deactivated.
• The instrument panel air bag indicator light is interconnected with
the OCS.
The OCS is designed to help detect
the presence of a properly-seated
front passenger and determine if the
passenger's front air bag should be
enabled (may inflate) or not.
The purpose is to help reduce the
risk of injury or death from an inflating air bag to certain front passenger
seat occupants, such as children, by
requiring the air bag to be automatically turned OFF.
For example , if a child restr aint of the
type specified in the regulations is on
the seat, the occupant classification
sensor can detect it and cause the
air bag to turn OFF.
Front passenger seat adult occupants who are properly seated and
wearing the seat belt properly,
should not cause the passenger air
bag to be automatically turned OFF.
For small adults it may be turned
OFF, however, if the occupant does
not sit in the seat properly (for example, by not sitting upright, by sitting
on the edge of the seat, or by otherwise being out of position), this could
cause the sensor to turn the air bag
OFF.
You will find the "PASSENGER AIR
BAG OFF" indicator on the center
fascia panel.This system detects the
conditions 1-4 in the following table
and activates or deactivates the front
passenger air bag based on these
conditions.
OAEE036040N

2-59
Safety system of your vehicle
2
Always be sure that you and all vehicle occupants are seated properly
and wearing the seat belt properly for
the most effective protection by the
air bag and the seat belt.
The OCS may not function properly if
the passenger takes actions which
can affect the classification system.
These include:
• Failing to sit in an upright position.
• Leaning against the door or center
console.
• Sitting towards the sides of the
front of the seat.
• Putting their legs on the dashboard
or resting them on other locations
which reduce the passenger
weight on the front seat.
• Wearing the seat belt improperly.
• Reclining the seatback.
• Wearing a thick cloth like ski wear
or hip protection wear.
• Putting an additional thick cushion
on the seat.
• Putting electrical devices (e.g.
notebook, satellite radio) on the
seat with inverter charging.
Condition and operation in the front passenger Occupant Classification System
Condition detected by the
occupant classification system
Indicator/Warning light Devices
"PASSENGER
AIR BAG OFF"
indicator light
SRS
warning light
Front passenger
air bag
1. Adult *
1
Off Off Activated
2. Infant *2or child restraint
system with 12 months old *
3*4
On Off Deactivated
3. Unoccupied On Off Deactivated
4. Malfunction in the system Off On Activated
*1The system judges a person of adult size as an adult. When a smaller adult sits in the front
passenger seat, the system may recognize him/her as a child depending on his/her physique
and posture.
*
2
Do not allow children to ride in the front passenger seat. When a larger child who has outgrown a child restraint system sits in the front passenger seat, the system may recognize
him/her as an adult depending upon his/her physique or sitting position.
*
3
Never install a child restraint system on the front passenger seat.
*
4
The PASSENGER AIR BAG "OFF" indicator may turn on or off when a child above 12 months
to 12 years old (with or without child restraint system) sits in the front passenger seat.This is
a normal condition.

2-60
Safety system of your vehicle
Riding in an improper position or placing weight on the front passenger's seat when it is unoccupied by a
passenger adversely affects the OCS.To reduce the risk of serious injury or death:
WARNING
OVQ036013NB
OLMB033100
OLMB033101
OLMB033103
OLMB033102
OLMB033104
• NEVER put a heavy load in
the front seat or seatback
pocket, or hang any items
on the front passenger
seat.
• NEVER place your feet on
the front passenger seatback.
• NEVER sit with your hips
shifted towards the front
of the seat.
• NEVER ride with the seat-
back reclined when the
vehicle is moving.
• NEVER place your feet or
legs on the dashboard.
• NEVER lean on the door or
center console or sit on
one side of the front passenger seat.
(continued)

2-61
Safety system of your vehicle
2
ODH035900K
ODH035901K
ODH035902K
ODH035903K
• Do not sit on the passen-
ger seat wearing heavily
padded clothes such as
ski wear and hip protector .
• Do not use car seat
accessories such as thick
blankets and cushions
which cover up the car
seat surface.
• Do not place electronic
devices such as laptops,
DVD player, or conductive
materials such as water
bottles on the passenger
seat.
• Do not use electronic
devices such as laptops
and satellite radios which
use inverter chargers.
• If large quantity of liquid
has been spilled on the
passenger seat, the air
bag warning light may
illuminate or malfunction.
Therefore, make sure the
seat has been completely
dried before driving the
vehicle.
• Do not place sharp objects on the front passenger seat.These may damage the occupant detection sys-
tem, if they puncture the seat cushion.
• Do not place any items under the front passenger seat.
• When changing or replacing the seat or seat cover, use original items only.The OCS has been devel-
oped based on using original HYUNDAI car seats only. Altering or changing the authentic parts may
result in system malfunction and increase risk of injury when in collision. Any of the above could interfere with the proper operation of the OCS sensor thereby increasing the risk of an injury in an accident.
(continued)

2-62
Safety system of your vehicle
Proper seated position for OCS
If the "PASSENGER AIR BAG OFF"
indicator is on when an adult is seated in the front passenger seat, place
the Engine Start/Stop button in the
OFF position and ask the passenger
to sit properly (sitting upright with the
seat back in an upright position, centered on the seat cushion with their
seat belt on, legs comfortably
extended and their feet on the floor).
Restart the engine and have the person remain in that position. This will
allow the system to detect the person
and to enable the passenger air bag.
If the "PASSENGER AIR BAG OFF"
indicator is still on, ask the passenger to move to the rear seat.
The "PASSENGER AIR BAG OFF"
indicator illuminates for approximately 4 seconds after the Engine
Start/Stop button is in the ON
position or after the engine is
started. If the front passenger seat
is occupied, the OCS will then
classify the front passenger after
several more seconds.
Do Not Install a Child Restraint
in the Front Passenger's Seat
Even though your vehicle is equipped
with the OCS, never install a child
restraint in the front passenger's seat.
An inflating air bag can forcefully
strike a child or child restraint resulting in serious or fatal injury.
NOTICE
B990A01O
Never allow an adult passenger
to ride in the front passenger
seat when the "P ASSENGER AIR
BAG OFF" indicator is illuminated. During a collision, the air bag
will not inflate if the indicator is
illuminated. Have your passenger reposition himself in the
seat. If the "PASSENGER AIR
BA G OFF" indicator remains illuminated after the passenger
repositions himself properly and
the vehicle is restarted, have the
passenger move to the rear seat
because the air bag will not
inflate.
WARNING
1JBH3051

2-63
Safety system of your vehicle
2
Why Didn't My Air Bag Go Off
in a Collision?
Air bags are not designed to inflate in
every collision. There are certain
types of accidents in which the air bag
would not be expected to provide
additional protection. These include
rear impacts, second or third collisions in multiple impact accidents, as
well as low speed impacts. Damage
to the vehicle indicates a collision
energy absorption, and is not an indicator of whether or not an air bag
should have inflated.
Air bag collision sensors
• NEVER place a rear-facing or
front-facing child restraint in
the front passenger's seat of
the vehicle.
• An inflating frontal air bag
could forcefully strike a child
resulting in serious injury or
death.
• Always properly restrain chil-
dren in an appropriate child
restraint in the rear seat of the
vehicle.
WARNING
To reduce the risk of an air bag
deploying unexpectedly and
causing serious injury or death:
• Do not hit or allow any objects
to impact the locations where air
bags or sensors are installed.
(Continued)
WARNING
(Continued)
• Do not perform maintenance
on or around the air bag sensors.If the location or angle of
the sensors is altered, the air
bags may deploy when they
should not or may not deploy
when they should.
• Do not install bumper guards
or replace the bumper with a
non-genuine HYUNDAI parts.
This may adversely affect the
collision and air bag deployment performance.
• Place the Engine Start/Stop
button in the OFF or ACC
position when the vehicle is
being towed to prevent inadvertent air bag deployment.
• Have all air bag repairs conduct-
ed by an authorized HYUNDAI
dealer.

2-64
Safety system of your vehicle
1. SRS control module/Rollover sensor
2. Front impact sensor
3. Side pressure sensor
4. Side impact sensor
OAE036043N/OAE036044/OAE036045N/OAE036046/OAE036047

2-65
Safety system of your vehicle
2
Air bag inflation conditions
Front air bags
Front air bags and the driver's knee
air bag are designed to inflate in a
frontal collision depending on the the
severity of impact of the front collision.
Side and curtain air bags
Side and curtain air bags are
designed to inflate when an impact is
detected by side collision sensors
depending on the severity of impact
resulting from a side impact collision.
Although the driver's and front passenger's air bags are designed to
inflate only in frontal collisions, they
also may inflate in other types of collisions if the front impact sensors
detect a sufficient impact. Side and
curtain air bags are designed to
inflate only in side impact collisions
or rollover situations, but they may
inflate in other collisions if the side
impact sensors detect a sufficient
impact.
If the vehicle chassis is impacted by
bumps or objects on unimproved
roads, the air bags may deplo y.Drive
carefully on unimproved roads or on
surfaces not designed for vehicle
traffic to prevent unintended air bag
deployment.
OAE036049
OAE036050
OAE036048

2-66
Safety system of your vehicle
Air bag non-inflation conditions
In certain low-speed collisions the air
bags may not deploy. The air bags
are designed not to deploy in such
cases because they may not provide
benefits beyond the protection of the
seat belts.
Front air bags are not designed to
inflate in rear collisions, because
occupants are moved backward by
the force of the impact. In this case,
inflated air bags would not provide
any additional benefit.
Front air bags may not inflate in side
impact collisions, because occupants
move in the direction of the collision,
and thus in side impacts, front air bag
deployment would not provide additional occupant protection.
However, side and curtain air bags
may inflate depending on the severity of impact.
OAE036052
OAE036051
OAE036053

2-67
Safety system of your vehicle
2
In an angled collision, the force of
impact may direct the occupants in a
direction where the air bags would
not be able to provide any additional
benefit, and thus the sensors may
not deploy any air bags.
Just before impact, drivers often
brake heavily. Such heavy braking
lowers the front portion of the vehicle
causing it to "ride" under a vehicle
with a higher ground clearance. Air
bags may not inflate in this "underride" situation because deceleration
forces that are detected by sensors
may be significantly reduced by such
"underride" collisions.
Front air bags may not inflate in
rollover accidents because air bag
deployment could not provide protection to the occupants.
However, side and curtain air bags
may inflate when the vehicle is rolled
over by a side impact collision.
OAE036061 OAE036054 OAE036055

2-68
Safety system of your vehicle
Air bags may not inflate if the vehicle
collides with objects such as utility
poles or trees, where the point of
impact is concentrated and the collision energy is absorbed by the vehicle structure.
SRS Care
The SRS is virtually maintenancefree and there are no parts you can
safely service by yourself. If the SRS
air bag warning light does not illuminate when the Engine Start/Stop button is in the ON position, or continuously remains on, have your vehicle
immediately inspected by an authorized HYUNDAI dealer.
Any work on the SRS system, such
as removing, installing, repairing, or
any work on the steering wheel, the
front passenger's panel, front seats
and roof rails must be performed by
an authorized HYUNDAI dealer.
Improper handling of the SRS system
may result in serious personal injury.
To reduce the risk of serious
injury or death, take the following precautions:
• Do not attempt to modify or
disconnect the SRS components or wiring, including the
addition of any kind of badges
to the pad covers or modifications to the body structure.
• Do not place objects over or
near the air bag modules on
the steering wheel, instrument
panel, or the front passenger's panel above the glove
box.
• Clean the air bag pad covers
with a soft cloth moistened
with plain water. Solvents or
cleaners could adversely
affect the air bag covers and
proper deployment of the system.
• Always have inflated air bags
replaced by an authorized
HYUNDAI dealer.
(Continued)
WARNING
OAE036056

2-69
Safety system of your vehicle
2
Additional Safety Precautions
Passengers should not move out of
or change seats while the vehicle is
moving. A passenger who is not
wearing a seat belt during a crash or
emergency stop can be thrown
against the inside of the vehicle,
against other occupants, or be ejected
from the vehicle.
Do not use any accessories on seat
belts. Devices claiming to improve
occupant comfort or reposition the
seat belt can reduce the protection
provided by the seat belt and increase
the chance of serious injury in a crash.
Do not modify the front seats.
Modification of the front seats could
interfere with the operation of the supplemental restraint system sensing
components or side air bags.
Do not place items under the front
seats. Placing items under the front
seats could interfere with the operation of the supplemental restraint system sensing components and wiring
harnesses.
Do not cause impact to the doors.
Impact to the doors when the Engine
Start/Stop button is in the ON position
may cause the air bags to inflate.
Modifications to accommodate
disabilities. If you require modifica-
tion to your vehicle to accommodate
a disability, contact the HYUNDAI
Customer Connect Center at 1-877378-8727.
Adding equipment to or modifying your air bag equipped vehicle
If you modify your vehicle by changing your vehicle's frame , bumper system, front end or side sheet metal or
ride height, this may affect the operation of your vehicle's air bag system.
(Continued)
• If components of the air bag
system must be discarded,or if
the vehicle must be scrapped,
certain safety precautions
must be observed. Consult an
authorized HYUNDAI dealer for
the necessary information.
Failure to follow these precautions could increase the risk of
personal injury.

Air Bag Warning Labels
Air bag warning labels, required by
the U.S. National Highway Traffic
Safety Administration (NHTSA), are
attached to alert the driver and passengers of potential risks of the air
bag system.Be sure to read all of the
information about the air bags that
are installed on your vehicle in this
Owners Manual.
Safety system of your vehicle
2-70
OAD035053N

Convenient features of your vehicle
Accessing Your Vehicle.........................................3-3
Smart Key............................................................................3-3
Immobilizer System ...........................................................3-8
Door Locks..............................................................3-9
Operating Door Locks from Outside the Vehicle......3-9
Operating Door Locks from Inside the Vehicle .......3-10
Auto Door Lock/Unlock Features...............................3-12
Child-Protector Rear Door Locks...............................3-12
Theft-alarm System ............................................3-13
Driver Position Memory System........................3-14
Storing Positions into Memory....................................3-14
Recalling Positions from Memory...............................3-15
Easy Access Function ....................................................3-15
Steering Wheel.....................................................3-16
Electric Power Steering (EPS) .....................................3-16
Tilt Steering / Telescope Steering..............................3-16
Horn....................................................................................3-17
Heated Steering Wheel (for Canada).........................3-17
Mirrors...................................................................3-18
Inside Rearview Mirror ..................................................3-18
Side View Mirrors ...........................................................3-33
Reverse Parking Aid Function......................................3-36
Windows ................................................................3-37
Power Windows...............................................................3-38
Sunroof..................................................................3-41
Sunroof Opening and Closing......................................3-42
Sliding the Sunroof.........................................................3-42
Tilting the Sunroof .........................................................3-43
Sunshade...........................................................................3-43
Resetting the Sunroof ...................................................3-44
Exterior Features.................................................3-45
Hood ...................................................................................3-45
Liftgate ..............................................................................3-46
Fuel Filler Door (Hybrid vehicle) .................................3-48
Fuel Filler Door (Plug-in hybrid vehicle) ..................3-51
Instrument Cluster ...............................................3-54
Instrument Cluster Control............................................3-56
Gauges and Meters ........................................................3-56
Warning and Indicator Lights.......................................3-62
LCD Display Messages...................................................3-73
LCD Display ..........................................................3-88
LCD Display Control........................................................3-88
LCD Display Modes (for cluster type A)...................3-89
LCD Display Modes (for cluster type B) ...................3-97
3

Trip Computer (Hybrid Vehicle).......................3-104
Trip Computer (Plug-In Hybrid Vehicle).........3-109
Lighting................................................................3-115
Exterior Lights ...............................................................3-115
Interior Lights ................................................................3-120
Welcome System...........................................................3-122
Wipers and Washers..........................................3-123
Windshield Wipers ........................................................3-123
Windshield Washers.....................................................3-124
Driver Assist System .........................................3-125
Rear View Camera ........................................................3-125
Rear Parking Assist System .......................................3-126
Automatic Climate Control System..................3-129
Automatic Heating and Air Conditioning.................3-130
Manual Heating and Air Conditioning......................3-131
System Operation .........................................................3-138
System Maintenance....................................................3-139
Windshield Defrosting and Defogging............3-141
To Defog Inside Windshield........................................3-141
To Defrost Outside Windshield..................................3-142
Defogging Logic ............................................................3-142
Rear Window Defroster ..............................................3-142
Auto Defogging System ..............................................3-143
Climate Control Additional Features ...............3-145
Automatic Ventilation...................................................3-145
Storage Compartment .......................................3-146
Center Console Storage ..............................................3-146
Glove Box........................................................................3-146
Sunglass Holder.............................................................3-147
Multi Box.........................................................................3-147
Interior Features................................................3-148
Cup Holder ......................................................................3-148
Sunvisor...........................................................................3-149
Power Outlet ..................................................................3-149
USB Charger...................................................................3-150
Wireless Cellular Phone Charging System..............3-151
Clock.................................................................................3-152
Clothes Hanger ..............................................................3-153
Floor Mat Anchor(s).....................................................3-153
Cargo Security Screen.................................................3-154
3

3-3
Convenient features of your vehicle
Smart Key
Your HYUNDAI uses a Smart Key,
which you can use to lock or unlock
a door (and liftgate) and even start
the vehicle.
1. Door Lock
2. Door Unlock
3. Liftgate Unlock
4. Panic
Locking
To lock :
1. Close all doors, hood and liftgate.
2. Either press the door handle button or press the Door Lock button
(1) on the smart key.
3. The hazard warning lights will
blink and the chime will sound
once.
4. Make sure the doors are loc k ed by
checking the position of the door
lock button inside the vehicle.
Information
The door handle button will only
operate when the smart key is within
28~40 inches (0.7~1 m) from the outside door handle.
Even though you press the outside
door handle button, the doors will not
lock and the chime will sound for
three seconds if any of the following
occur:
• The Smar t Key is in the vehicle.
• The Engine Star t/Stop button is in
ACC or ON position.
• Any door except the liftgate is
open.
i
AACCCCEESSSSIINNGG YYOOUURR VVEEHHIICCLLEE
3
OAE046029 OAE046001
Do not leave the Smart Key in
your vehicle with unsupervised
children. Unattended children
could press the Engine Start/
Stop button and may operate
power windows or other controls, or even make the vehicle
move, which could result in
serious injury or death.
WARNING

3-4
Convenient features of your vehicle
Unlocking
To unlock:
1. Carry the Smart Key.
2. Either press the driver's outside
door handle button or press the
Door Unlock button (2) on the
smart key.
3. The driver's door will unlock. The
hazard warning lights will blink two
times.
If you press the driver's outside
door handle button or Door Unlock
button on the smart key again
within four seconds, then all the
doors will unlock.
Two press unlock setting:
Two press unlock setting can be
changed according to owner's
preference.
Select or deselect the 'Two Press
Unlock' menu in the User Settings
mode on the LCD display (User
Settings ➞ Door and select or
deselect Two Press Unlock).
Information
• The door handle button will only
operate when the smart key is within 28~40 inches (0.7~1 m) from the
outside door handle and other people can also open the doors.
• If you press the front passenger's
outside door handle, while carrying
the Smart Key, all doors will unlock.
• After unlocking the doors, the doors
will lock automatically after 30 seconds unless a door is opened.
• Either the driver or front passenger
door can be opened with the door
handle button when the smart key is
within this range.
i
OAE046001

3-5
Convenient features of your vehicle
Liftgate unlocking
To unlock:
1. Carry the smart key.
2. Either press the liftgate handle
button or press and hold the
Liftgate Unlock button (3) on the
smart key for more than one second.
3. The hazard warning lights will
blink two times.
Information
• The liftgate handle button will only
operate when the smart key is within
28 inches (0.7 m) from the liftgate
handle.
• The Liftgate Unlock button (3) will
only unlock the liftgate. It will not
release the latch and open the liftgate automatically. If the Liftgate
Unlock button is used, someone
must still press the liftgate handle
button to open the liftgate.
Panic button
Press and hold the Panic button (4)
for more than one second.The horn
sounds and hazard warning lights
blink for about 30 seconds.To cancel
the panic mode, press any button on
the Smart Key.
Start-up
You can start the vehicle without
inserting the key.
For more information, refer to the
"Engine Start/Stop Button" section in chapter 5.
T o prevent damaging the smart key:
• Keep the smart key away from
any liquid or fire. Internal circuits
may malfunction if the inside of
the smart key gets damp (from
liquids or moisture) or if it is heated. This can exclude the smart
key from warranty coverage.
• Avoid dropping or throwing the
smart key.
• Protect the smart key from
extreme temperatures.
NOTICE
i
3

3-6
Mechanical key
If the Smart Key does not operate normally, you can lock or unlock the driver’ s door by using the mechanical ke y.
Press and hold the release button (1)
and remove the mechanical key (2).
Insert the mechanical key into the
key hole on the door.
To reinstall the mechanical key, put
the key into the hole and push it until
a click sound is heard.
Loss of a smart key
A maximum of two Smart Keys can
be registered to a single vehicle. If
you happen to lose your smart key,
you should immediately take the
vehicle and remaining keys to your
authorized HYUNDAI dealer or tow
the vehicle, if necessary.
Smart key precautions
The smart key may not work if any of
the following occur:
• The smar t key is close to a radio
transmitter such as a radio station
or an airport which can interfere
with normal operation of the transmitter.
• The smart key is near a mobile tw o
way radio system or a cellular
phone.
• Another vehicle’s smart key is being
operated close to your vehicle.
If the smart key does not work correctly, open and close the door with
the mechanical key. If you have a
problem with the smart key, contact
an authorized HYUNDAI dealer.
If the smart key is in close proximity
to your mobile phone, the signal
could be blocked by your mobile
phone’s normal operational signals.
This is specifically relevant when the
phone is active such as making and
receiving calls, text messaging,
and/or sending/receiving emails.
Avoid placing the smart key and your
mobile phone in the same location
and always try to maintain an adequate distance between the two
devices.
Keep the smart key away from
electromagnetic materials that
blocks electromagnetic waves to
the key surface.
Always have the smart key with
you when leaving the vehicle. If
the smart key is left near the vehicle, the vehicle battery may be discharged.
NOTICE
NOTICE
Convenient features of your vehicle
OAEE046001

3-7
Convenient features of your vehicle
Information
This device complies with Part 15 of
the FCC rules.
Operation is subject to the following
three conditions:
1. This device may not cause harmful
interference, and
2. This device must accept any interference received, including interference that may cause undesired
operation.
3. Changes or modifications not
expressly approved by the party
responsible for compliance could
void the user's authority to operate
the device.
Battery replacement
If the Smart Key is not working properly, try replacing the battery with a
new one.
Battery Type: CR2032
To replace the batter y:
1. Pry open the rear cover of the
smart key.
2. Remove the old battery and inser t
the new battery.
3. Reinstall the rear cover of the
smart key.
If you suspect your smart key might
have sustained some damage, or
you feel your smart key is not working correctly, contact an authorized
HYUNDAI dealer.
Information
An inappropriately disposed
battery can be harmful to the
environment and human
health. Dispose of the battery
according to your local law(s)
or regulation(s).
i
i
3
OLF044008

3-8
Convenient features of your vehicle
Immobilizer System
The immobilizer system helps protects
your vehicle from theft.If an improperly coded key (or other device) is used,
the engine's fuel system is disabled.
When the Engine Start/Stop button is
placed in the ON position, the immobilizer system indicator should come
on briefly, then go off. If the indicator
starts to blink, the system does not
recognize the coding of the key.
Place the Engine Start/Stop button to
the OFF position, then place the
Engine Start/Stop button to the ON
position again.
The system may not recognize your
key's coding if another immobilizer
key or other metal object (i.e., key
chain) is near the key. The vehicle
may not start because the metal may
interrupt the transponder signal from
transmitting normally.
If the system repeatedly does not
recognize the coding of the key, it is
recommended that you contact your
HYUNDAI dealer.
Do not attempt to alter this system or
add other devices to it. Electrical
problems could result that may mak e
your vehicle inoperable.
The transponder in your key is an
important part of the immobilizer
system. It is designed to give
years of trouble-free service, however you should av oid e xposure to
moisture, static electricity and
rough handling. Immobilizer system malfunction could occur.
Information
This device complies with Part 15 of
the FCC rules.
Operation is subject to the following
three conditions:
1. This device may not cause harmful
interference, and
2. This device must accept any interference received, including interference
that may cause undesired operation.
3. Changes or modifications not
expressly approved by the party
responsible for compliance could
void the user's authority to operate
the device.
i
NOTICE
In order to prevent theft of your
vehicle, do not leave spare keys
anywhere in your vehicle. Your
immobilizer password is a customer unique password and
should be kept confidential.
WARNING
 Loading...