

Page 1
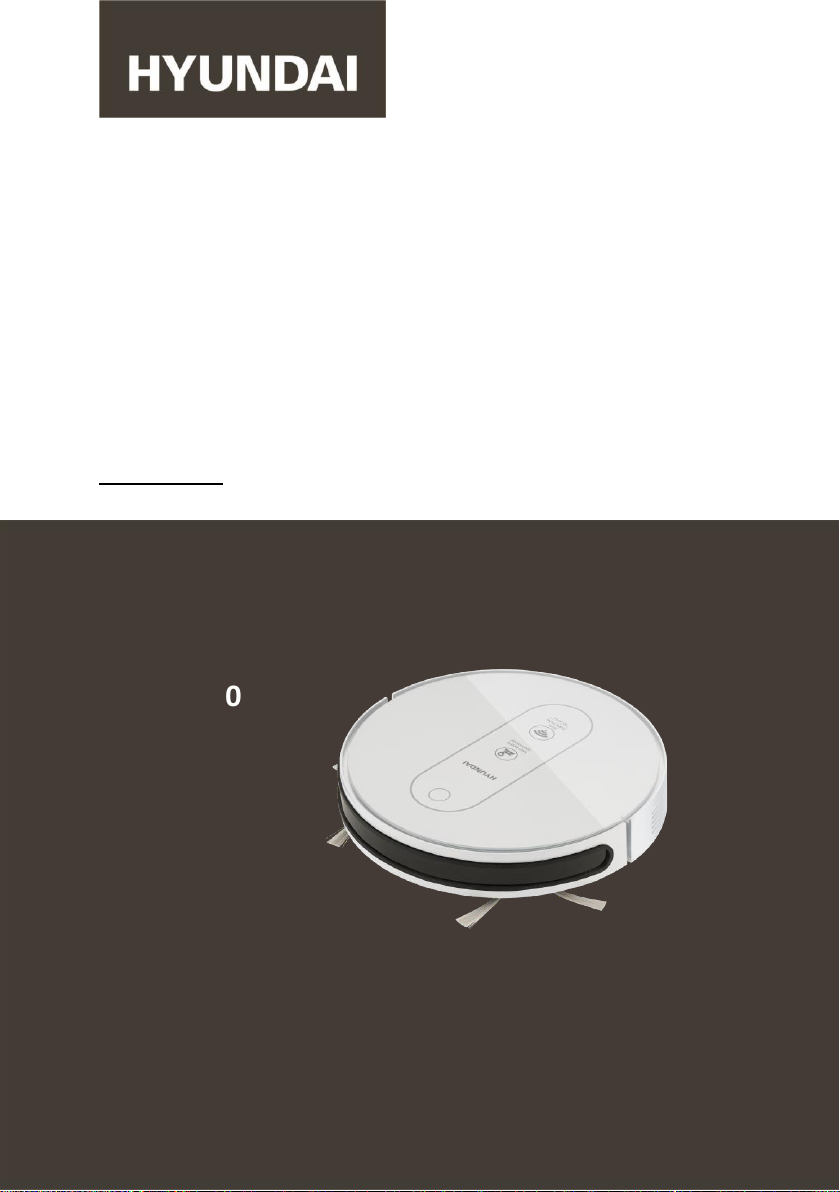
РОБОТ-ПЫЛЕСОС
РУКОВОДСТВО ПО ЭКСПЛУАТАЦИИ
ROBOT VACUUM CLEANER
INSTRUCTION MANUAL
ШАҢСОРҒЫШ РОБОТ
ПАЙДАЛАНУ ЖӨНІНДЕГІ НҰСҚАУЛЫҚ
H-VCRQ90
Page 2

2.
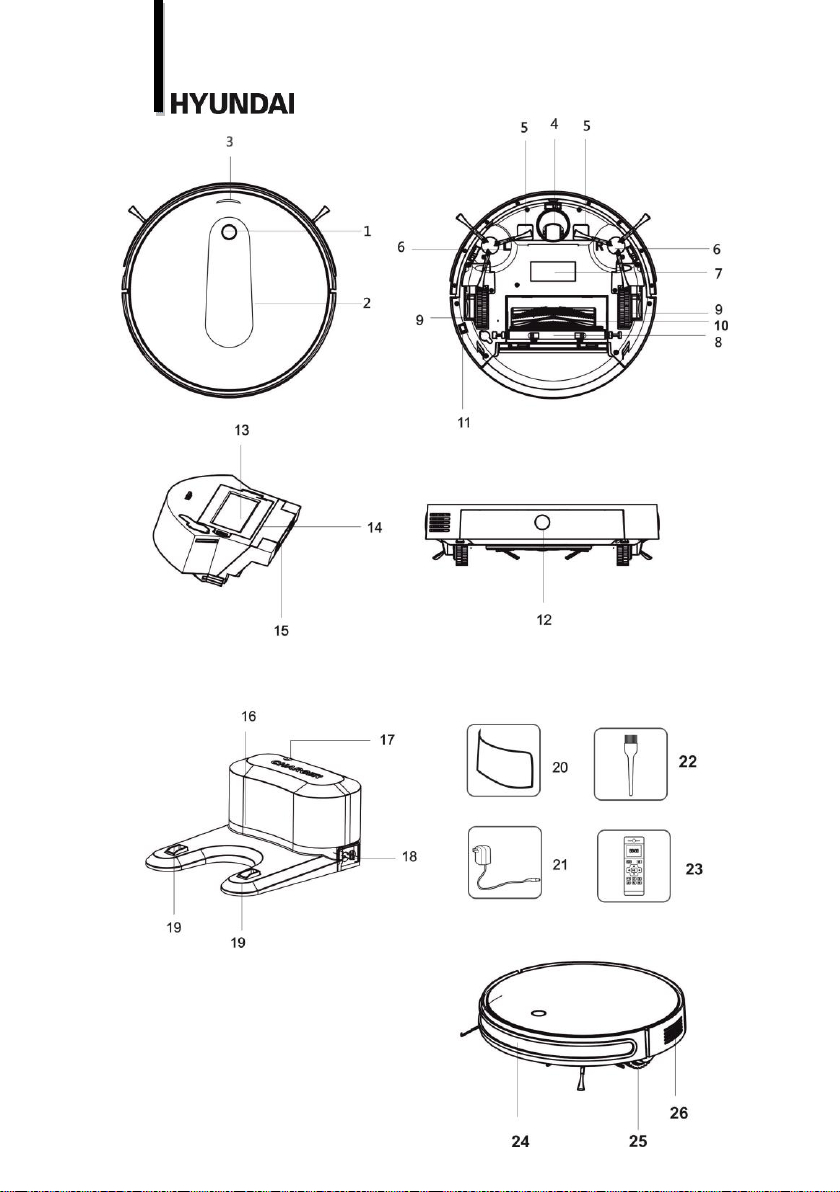
GB DESCRIPTION
1. Control button
2. Upper cover
3. Light indicator
4. Central wheel
5. Vacuum cleaner charging contacts
6. Side brushes
7. Battery cabinet
8. UV-lamp
9. Side wheels
10. Round brush
11. Switch
12. Dust bin release button
13. Dust container cover
14. Dust container
15. HEPA filter
16. Charging base
17. Charging light indicator
18. Charging station adaptor connector
19. Charging station charging contacts
20. Mopping cloth
21. Adaptor
22. Cleaning brush
23. Remote control
24. Infrared sensor
25. Anti-falling side sensors
26. Intake grate
RUS УСТРОЙСТВО ИЗДЕЛИЯ
1. Кнопка управления
2. Крышка
3. Световой индикатор
4. Центральное колесо
5. Зарядные контакты на пылесосе
6. Боковые щетки
7. Отсек для аккумулятора
8. Ультрафиолетовая лампа
9. Боковые колеса
10. Круглая щетка
11. Кнопка включения
12. Кнопка отсоединения контейнера
для сбора пыли
13. Крышка емкости для сбора пыли
14. Емкость для сбора пыли
15. Фильтр НЕРА
16. База
17. Световой индикатор зарядки
18. Разъем для адаптера на базе
19. Зарядные контакты на базе
20. Ткань для мытья пола с
липучками
21. Адаптер
22. Кисть для чистки
23. Пульт управления
24. Инфракрасный сенсор
25. Боковые сенсоры от падения
26. Решетка воздуховода
H-VCB01
Page 3
3.
KZ БҰЙЫМНЫҢ ҚҰРЫЛЫСЫ
1. Басқару батырмасы
2. Қақпақ
3. Жарық индикаторы
4. Орталық доңғалақ
5. Шаңсорғыштағы зарядттау
контактілері
6. Бүйір қылшақтар
7. Аккумуляторға арналған бөлік
8. Ультракүлгін шам
9. Бүйір доңғалақтар
10. Дөңгелек қылшақ
11. Ажыратып-қосқыш
12. Шаң жинауға арналған
контейнерді ажырату батырмасы
13. Шаң жинауға арналған ыдыстың
қақпағы
14. Шаң жинауға арналған ыдыс
15. НЕРА сүзгісі
16. Зарядтау станциясы
17. Зарядтаудың жарық индикаторы
18. Зарядтау станциясының
бейімдеуішіне арналған ағытпа
19. Базадағы зарядтау контактілері
20. Еденді жууға арналған мата
21. Бейімдеуіш
22. Тазалауға арналған қылқалам
23. Басқару пульті
24. Инфрақызыл сенсор
25. Құлаудан бүйір сенсорлар
26. Ауа өткізгіштің торы
Адаптер AC/DC
AC 100-240 V
~
50 Hz 0.5 A
DC 19 V 600 mA
Класс защиты II
Питания прибора 19 V 600 mA
Питание базы 19 V 600 mA
26 W
3.2 / 3.5 kg
mm
60
320
320
Page 4
4.
Page 5
5.
INSTRUCTION MANUAL
IMPORTANT SAFEGUARDS
Read this instruction manual carefully to prevent any unit damage or injure when using.
When using this appliance, basic precautions should always be followed:
Before the first use of the appliance check that the voltage indicated on the rating label
corresponds to the mains voltage in your home.
For home use only. Do not use for industrial purposes.
To reduce the risk of electric shock, do not use outdoors or on wet surfaces. Do not
immerse unit or cord in any liquids.
To avoid deforming of plastic components of the appliance or fire accident, never leave
the appliance exposed to direct sun light or near any heater.
This appliance is not intended for use by persons (including children) with reduced
physical, sensory or mental capabilities, or lack of experience and knowledge, unless
they have been given supervision or instruction concerning use of the appliances by a
person responsible for their safety.
Children should be supervised to ensure that they do not play with the appliance.
Never use the vacuum cleaner without filters.
Do not attempt to repair, adjust or replace parts in the appliance. Repair the
malfunctioning appliance in the nearest service center.
If the product has been exposed to temperatures below 0ºC for some time it should be
kept at room temperature for at least 2 hours before turning it on.
The manufacturer reserves the right to introduce minor changes into the product
design without prior notice, unless such changes influence significantly the product
safety, performance, and functions.
Date of production is indicated on the unit and/or on the packing materials and in
accompanying documents.
Use this product in temperature from 0℃ to 40℃
Do not sit on top of this product or attach an object on the top of it. Beware of children
or pets while the product is in operation.
Never use the product to clean up combustible or highly volatile liquids such as
gasoline.
While the product is in operation, make sure all doors leading outside are closed.
Charging adaptor is for indoors use only.
Do not recharge the product if the battery cord or plug is damaged.
Never touch the charger, plug or cable with damped hands.
Please take out the battery when it is not in use for a long time.
The battery is to be disposed of safety.
Proper use
This device is designed for vacuuming up normal house dust. It is only intended for
private indoor use and not suitable for commercial application.
GB
Page 6
6.
Before first use
Before you can use the device, you must:
unpack the product contents and remove all transport and packaging elements,
insert batteries in the remote control,
fi tting the side brushes,
set up the charging station,
charge the device’s rechargeable battery.
Baterries inserting to remote control
Push battery compartment cover on the back side of remote control to open the
battery compartment.
Insert the batteries to the compartment observing the polarity (AAA batteries excluding
from the set).
Push the battery cover back into the remote until it clicks.
Side brushes assembling
Place the device upside down on the floor or table
Insert the side brush with the letter R into the hole with the letter R
Insert the side brush with the letter L into the hole with the letter L
If the brushes are properly installed, a click should sound
Charging battery station
For battery charging, the device’s charge contacts and the charging station must always
be clean. Wipe them with soft dry cloth from time to time to achieve it.
Install the charging station on a clean, level floor, back to the wall near the power
socket.
There should be no obstacles on the way of device to the charging station. There
should be 1.5-2 meters of free space, without furniture and other items before the
charging station. There should be no reflective surfaces (e.g. mirrors) behind the
charging station.
Connect the adapter to the charging station, plug the adapter to the power socket.
Battery charging
Fully discharge and re-charge the battery every few months.
It takes about 12 hours to charge the battery before the device is turned on for the
first time, or if the device has not been used for a long time and 3-4hours for next
charging. The battery will be charged up to maximum level after 2-3 cycles of full
charge and discharge.
If the device is completely discharged and cannot return to the charging station itself,
put it on the charging station manually.
Charging from charging station
The device returns to the charging station when the battery charge almost run down,
where the battery will be recharged automatically. The charging station should be
connected with power socket to do it.
In case the device cannot find the charging station itself (e.g the room is very big of
there is some obstacle on its way), you should help it. Use the direction buttons on
Page 7
7.
remote control to direct the robot to the charging station or put it on the charging
station manually.
The light indicator is orange when the device is charging, and green when the device is
fully charged
Operation
Preparation
The device cannot be used for long-pile carpets
Remove all objects which may get inside the appliance or cause an obstruction from
the floor before work starting.
Check no wires, cables, curtain brushes, or bags are one the way of the device.
Remove all items that may be dropped by the appliance (e.g. vases, small table lamps,
decorative items)
The device can pass the way between two objects if the distance between them is at
least 40 cm.
The appliance may get stuck under pieces of furniture if they have a low fit. Block his
way with a pot of flower (for example) to avoid it.
Application setup
Make sure your smartphone or tablet is connected to 4G, Wi-Fi Internet.
Make sure your smartphone or tablet runs on iOS 8.0 (or higher) or Android 4.4 (or
higher).
Make sure your router's signal is within 2.4 GHz range.
Make sure your smartphone and robot vacuum cleaner have WLAN signal.
Make sure robot vacuum cleaner is fully charged and base is connected to the network.
Scan the below QR-code to download and install “Smart Life” application.
https://smartapp.tuya.com/smartlife
Open the application and sign in.
Add device by searching “Robot vacuum cleaner” icon.
Page 8
8.
While in standby mode, press and hold the start button on vacuum cleaner for 3
seconds. When the device sounds for 2 times, release it. The light indicator will flash
when enters network configuration mode.
After successful vacuum cleaner adding to application, you can control the device with
your smartphone.
If you have problems with application installing or device connecting to app, please
refer to the “Frequently asked questions” section in the app.
Device operation
The device has a "memory card" function, which helps to remember cleaned areas and
not to move over them again.
Press the switch on the back side of device, the device will click, turn on and go into
standby mode, light indicator becomes blue.
Press the control button on the top panel and the vacuum cleaner will start working in
standard mode.
Press the control button once again to pause the device
Press and hold control button on pause mode to return the vacuum cleaner to the
charging station.
Use the remote control for operating modes regulation and device control.
Page 9
9.
Remote control
Switch on button
The button is used to start the operation.
Smart cleaning button. The device moves on zig zag direction by default.
Return to auto charging button
Use this button to activate charging mode from the charging station.
Movement forward
This button starts the moving of the button forward. This button is also used for
adjusting the cleaning schedule or setting the current time
Movement back
This button rotates the machine 180 degrees, and then into standby mode.
This button is also used for adjusting the cleaning schedule or setting the current time
Movement to the right
This button starts the moving to the right. This button is also used to switch from hours
to minutes
Movement to the left
This button starts the moving to the left. This button is also used to switch from hours
to minutes
This button is used to pause and restart the device from the pause. Also this
button saves the preset settings
Suction power setting button
This button allows you to change the suction force: from normal suction to high
sunction level.
Clock setting button
Press the button to enter the Clock setting button with help of buttons to
set the time. Press button to confirm the setting.
Single room cleaning button
Close the door of single room, which you are going to clean and press the button.
Cleaning schedule setting button
Page 10
10.
Press the button when the device is on pause mode, enter to the cleaning start time
setting. Set the time using buttons for cleaning start time .
Edge cleaning button
Press the button to start edges cleaning.
This function is not available for the H-VCRQ90 model.
Mopping cloth use
Mopping cloth for wet floor cleaning is in a kit.
Attach wet mopping cloth with help of Velcro to device bottom
Follow all above described steps to turn on the device.
UV-lamp
UV-lamp for destroying pathogenic bacteria during cleaning is on the back of the
device.
NOTICE: If the UV-lamp is broken, turn off the device. Do not use the device with a
broken UV-lamp. Do not use a vacuum cleaner to clean the UV-lamp fragments. Put the
fragments in a plastic bag and dispose of them in accordance with the instructions of
the local authority. To replace the UV-lamp, contact an service center.
Disposal of the UV- lamp
Consult with your local authority for proper disposal and recycling of old UV-lamps.
UV-lamp contains mercury. Do not throw the lamps in the usual trash. Parts containing
mercury must be disposed of in accordance with the instructions of the local authority.
Cleaning and maintenance
ATTENTION!
The device must be disconnected to the mains and completely switched off for cleaning
and maintenance
Wipe the body with wet cloth if it is necessary.
Only the dust bin may be rinsed out. The device itself, the filters or the remote control
may not be immersed into the water or to other liquids. Make sure that all parts are
completely dry before you place the dust bin back to the device!
None of the parts of the robotic vacuum cleaner are suitable for cleaning in the
washing machine or dishwasher!
Do not use any corrosive or abrasive cleaners for the device cleaning. They can damage
the body’s surface.
Cleaning the side brushes
The debris or hair should be removed. It is highly recommended to clean the brushes
after 4-5 cleanings.
Dust container cleaning
Press dust container release button to separate is from body.
Open the container and empty it to the dust bin
Place the dust container back.
Do not in any case open the rechargeable battery pack!
Page 11

11.
To take the rechargeable battery out of the device, please follow the steps below:
Loosen the two screws, reach into the recess and fold the cover of the rechargeable
battery compartment up.
Pull the rechargeable battery pack up and disconnect the plugged connection by
pushing on the catch.
Dispose of the rechargeable battery in accordance with the legal regulation for battery
disposal.
If you would like to insert a new rechargeable battery in the device, connect the plugs
and place it in the rechargeable battery compartment. Close the cover of the
rechargeable.
Troubleshooting
Problem
Reason
Solution
Device is not working
The battery is low
Charge the device
Repeated backward
movement or constant
change of direction after
the device has started
working
Anti-falling sensors are
dirty
Wipe the bottom of the
appliance
Transparent part of
sensors are dirty
Wipe the bottom of the
appliance
The device does not work
effectively, there is a loud
noise
Side brushes are blocked
or dirty
Clean the brushes
The dust collection
container is full
Empty the dust collection
container
Filter blocked by debris /
dust
Clean the filter
The remote control does
not work
Batteries are inserted into
the remote control
without observing the
polarity, or the battery
charge has over
Reset the batteries, observing
the polarity, or replace the
batteries with new ones
The battery is low
Charge the device
The remote control is used
outside the specified limits
of the infrared signal
Come closer to the device
The device does not work
in the selected mode
Insufficient charge in the
battery of the device
causes it to automatically
return to charging
Charge the device before
using it
Anti-falling sensors are
Wipe the lower part of the
Page 12

12.
The device is falling
dirty
device
The work area has
reflective surfaces or
recesses less than 8 cm
Change the work area
The device cannot detect
the base
Obstacles on the way to
the base
Remove obstacles on the way
to the base
The base is not connected
to the power
Connect the base to an
electrical outlet
The adapter is damaged
Replace the adapter
The base is damaged
Replace the base
The battery is damaged
Replace the battery
The glow of the UV lamp is
not visible in the UV lamp
window
The UV lamp is broken
Contact an service center
The symbol on the unit, packing materials and/or documentations means used
electrical and electronic units should not be toss in the garbage with ordinary
household garbage. These units should be pass to special receiving point.
The symbol on the unit, packing materials and/or documentations means the
battery used in this product not be toss in the garbage with ordinary household
garbage.
For additional information about actual system of the garbage collection, address to
the local authority.
Valid utilization will help to save valuable resources and avoid negative work on the
public health and environment which happens with incorrect using garbage.
РУКОВОДСТВО ПО ЭКСПЛУАТАЦИИ
МЕРЫ БЕЗОПАСНОСТИ
Внимательно прочитайте данную инструкцию перед эксплуатацией прибора во
избежание поломок при использовании. Неправильное обращение может
привести к поломке изделия, нанести материальный ущерб или причинить вред
здоровью пользователя.
При эксплуатации прибора соблюдайте следующие меры предосторожности:
RU
Page 13

13.
Перед первоначальным включением проверьте, соответствуют ли технические
характеристики, указанные на изделии, параметрам электросети.
Использовать только в бытовых целях. Прибор не предназначен для
промышленного применения.
Не используйте прибор вне помещений и на влажных поверхностях.
Не располагайте прибор вблизи источников тепла (радиаторов, обогревателей и
др.) и не подвергайте его воздействию прямых солнечных лучей, так как это
может вызвать деформацию пластмассовых деталей.
Прибор не предназначен для использования лицами (включая детей) с
пониженными физическими, чувственными или умственными способностями или
при отсутствии у них опыта или знаний, если они не находятся под контролем или
не проинструктированы об использовании прибора лицом, ответственным за их
безопасность.
Дети должны находиться под контролем для недопущения игры с прибором.
Не включайте пылесос без фильтра.
Не пытайтесь самостоятельно ремонтировать прибор или заменять какие-либо
детали. При обнаружении неполадок обращайтесь в ближайший Сервисный
центр.
Если изделие некоторое время находилось при температуре ниже 0 ºC, перед
включением его следует выдержать в комнатных условиях не менее 2 часов.
Производитель оставляет за собой право без дополнительного уведомления
вносить незначительные изменения в конструкцию изделия, кардинально не
влияющие на его безопасность, работоспособность и функциональность.
Дата производства указана на изделии и/или на упаковке, а также в
сопроводительной документации, в формате XX.XXXX, где первые две цифры «XX»
– это месяц производства, следующие четыре цифры «XXXX» – это год
производства.
Данное устройство необходимо использовать в диапазоне температур от 0 °С до
40 °С.
Запрещается садиться или прикреплять какие-либо предметы на пылесос.
Не применяйте пылесос для уборки горючих или легковоспламеняющихся
жидкостей, таких как бензин.
Во время работы пылесоса все двери, ведущие на улицу, должны быть закрыты.
Адаптер для зарядки аккумулятора предназначен для использования только в
помещении.
Запрещается заряжать аккумулятор, если поврежден шнур адаптера или вилка.
Не прикасайтесь влажными руками к вилке или шнуру адаптера.
Если устройство не используется в течение длительного времени, извлеките из
него аккумулятор.
Аккумулятор необходимо утилизировать с соблюдением требований техники
безопасности.
Прибор следует использовать только с блоком питания, поставляемым с
прибором.
Page 14

14.
Прибор должен питаться только безопасным сверхнизким напряжением,
маркированным на приборе.
Применение прибора
Прибор предназначен для чистки помещений от домашней пыли.
Перед первым использованием
Распакуйте прибор и полностью освободите его от упаковочных материалов.
Вставьте батарейки в пульт управления.
Установите боковые щетки.
Включите базу.
Зарядите аккумулятор.
Вставка батареек в пульт управления
Откройте отсек для батареек на задней части пульта управления, для этого
нажмите на крышку отсека.
Соблюдая полярность, вставьте две батарейки в отсек (батарейки типа ААА, не
включены в комплект).
Установите крышку отсека для батареек обратно в пульт до щелчка.
Установка боковых щёток
Поместите прибор вверх ногами на полу или на столе.
Установите боковую щётку с буквой R в отверстие с буквой R.
Установите боковую щётку с буквой L в отверстие с буквой L.
При правильной установке щеток должен прозвучать щелчок.
Подключение базы
Зарядные контакты на приборе и база всегда должны быть чистыми, чтобы
аккумулятор мог заряжаться. Для этого периодически протирайте их сухой мягкой
тканью.
Установите базу на чистом ровном полу задней частью к стене, возле розетки. На
пути прибора к базе не должно быть препятствий. Перед базой должно быть 1.5-2
метра свободного пространства, без мебели и других предметов. Сзади базы не
должно быть отражающих поверхностей (например, зеркал).
Подключите адаптер к базе, вставьте вилку адаптера в электрическую сеть,
загорится световой индикатор базы.
Зарядка аккумулятора
Полностью разряжайте аккумулятор каждые несколько месяцев и заново
заряжайте.
Перед первым включением, или если прибор не использовался в течение
продолжительного времени, потребуется примерно 12 часов для зарядки
аккумулятора; в дальнейшем это будет занимать примерно от 3 до 4 часов.
Аккумулятор будет заряжаться на максимум после 2-3 циклов полной зарядки и
разрядки. Прибор работает без подзарядки до 120 минут.
Page 15

15.
Зарядка от базы
Как только заряд аккумулятора подойдет к концу, прибор самостоятельно
направится к базе, где аккумулятор подзарядится автоматически. Для этого база
должны быть подключена к электрической сети.
Если прибор не может самостоятельно обнаружить базу (например, если комната
слишком большая, или на его пути препятствие), воспользуйтесь кнопками
направления на пульте управления, чтобы направить прибор до базы или
поставьте его прямо на базу вручную.
Когда прибор заряжается, световой индикатор зарядки горит оранжевым светом,
когда прибор полностью заряжен – зеленым.
Подготовка
Прибор не подходит для чистки длинноворсовых ковров.
Перед началом работы уберите с пола все предметы, которые могут попасть
внутрь прибора или мешать его движению.
Убедитесь, что на пути прибора не встретятся провода, кабели, кисти занавесок,
пакеты.
Уберите все предметы, которые могут быть сбиты прибором (например, вазы,
небольшие настольные лампы, декоративные элементы)
Между двумя соседними объектами должно оставаться не менее 40 см
пространства, чтобы прибор смог пройти между ними.
Прибор может застрять под предметами мебели, если они имеют низкую
посадку. Заблокируйте ему путь, например, горшком с цветком.
Установка приложения
Убедитесь, что ваш смартфон или планшет подключены к интернету 4G или Wi-Fi.
Убедитесь, что ваш смартфон или планшет работают на операционной системе
версии iOS 8.0 (или выше) или Android 4.4 (или выше).
Убедитесь, что сигнал вашего роутера находится в диапазоне 2,4 ГГц.
Убедитесь, что у вашего смартфона и робота-пылесоса включен сигнал WLAN.
Убедитесь, что робот-пылесос полностью заряжен, база подключена к сети.
Сканируйте смартфоном данный QR code, чтобы скачать и установить приложение
“Smart Life”.
https://smartapp.tuya.com/smartlife
Откройте приложение и создайте в нем нового пользователя.
Page 16

16.
Добавьте устройство, для этого найдите иконку «Робот-пылесос».
Находясь в режиме ожидания, нажмите и удерживайте кнопку включения
пылесоса в течение 3 секунд. Когда 2 раза прозвучит звуковой сигнал, отпустите
кнопку. Световой индикатор будет мигать при входе в режим настройки сети.
Выберите вашу сеть WiFi и введите пароль.
Page 17

17.
После успешного добавления пылесоса в приложение, вы можете управлять
работой прибора с вашего смартфона.
Если у вас возникли проблемы с установкой приложения или подключением
прибора к приложению, обратитесь в раздел «Часто задаваемые вопросы» в
приложении.
Включение прибора
Прибор оснащен функцией «карта памяти», благодаря которой пылесос
запоминает убранные участки и не движется по ним повторно.
Нажмите переключатель на обратной стороне прибора, раздастся щелчок, прибор
включится и перейдет в режим ожидания, при этом будет гореть световой
индикатор работы голубым цветом.
Нажмите кнопку управления на верхней панели прибора, пылесос начнет работу в
стандартном режиме.
Чтобы поставить пылесос на паузу, нажмите кнопку управления еще раз.
Вы можете принудительно вернуть пылесос на базу, для этого в режиме паузы
нажмите и удерживайте кнопку управления в течение 3 секунд.
Для переключения режимов работы и управления пылесосом, используйте пульт
управления.
Пульт управления
Кнопка включения
Кнопка используется для начала работы прибора.
Кнопка режима движения по зигзагообразной траектории. По умолчанию
прибор будет двигаться по траектории «зигзаг».
Возвращение на подзарядку.
С помощью данной кнопки включается режим подзарядки от базы.
Движение вперед
Данной кнопкой запускается движение пылесоса вперед. Также данная кнопка
используется для настройки графика уборки или установки текущего времени.
Движение назад
Данной кнопкой можно развернуть пылесос на 180
0
и перевести прибор в режим
ожидания. Также данная кнопка используется для настройки графика уборки или
установки текущего времени.
Движение вправо
Данной кнопкой запускается движение пылесоса вправо. Также данная кнопка
используется для переключения с часов на минуты.
Движение влево
Данной кнопкой запускается движение пылесоса влево. Также данная кнопка
используется для переключения с часов на минуты.
Старт/Пауза
Page 18

18.
Данная кнопка используется для приостановки работы и снятия прибора с паузы.
Также эта кнопка сохраняет заданные настройки.
Мощность всасывания
Данная кнопка позволяет менять силу всасывания: нормальный уровень
всасывания и усиленный.
Часы
Нажмите кнопку, чтобы попасть в режим настройки текущего времени, с
помощью кнопок установите время. Для подтверждения настроек
нажмите кнопку .
Уборка отдельной комнаты
Закройте дверь отдельной комнаты, в которой планируете провести уборку,
нажмите данную кнопку.
Кнопка настройки времени начала уборки.
Нажмите данную кнопку в режиме паузы и войдите в настройки времени начала
уборки. С помощью кнопок установите время, в которое начнется
уборка. Для подтверждения настроек нажмите кнопку .
Кнопка уборки комнаты вдоль стены.
Нажмите данную кнопку, чтобы пылесос убирал комнату, двигаясь вдоль стены.
Данная функция не доступна для модели H-VCRQ90.
Использование ткани для мытья пола
В комплект пылесоса входит ткань, которая предназначена для влажной уборки
пола.
Прикрепите заранее смоченную ткань для мытья пола на липучки ко дну прибора.
Выполните все выше описанные действия для включения прибора.
Ультрафиолетовая лампа
На обратной стороне прибора расположена ультрафиолетовая лампа, которая
уничтожает болезнетворные бактерии во время уборки помещения. УФ – лампа
включается автоматически во время уборки и отключается при выключении
прибора.
ПРИМЕЧАНИЕ: Если УФ лампа сломалась, выключите прибор. Не используйте
прибор со сломанной УФ лампой. Не используйте пылесос для очистки от
осколков УФ лампы. Уберите осколки в пластиковый пакет и утилизируйте в
соответствии с указаниями местного органа власти. Для замены УФ лампы
обратитесь в авторизованный сервисный центр.
Page 19

19.
Утилизация уф-лампы
Проконсультируйтесь с представителем местного органа власти по поводу
правильной утилизации и переработки старых УФ ламп.
УФ лампа содержит ртуть. Не выбрасывайте лампы в обычный мусор. Утилизация
деталей, содержащих ртуть, должна осуществляться согласно указаниям местного
органа власти.
Очистка и уход
ВНИМАНИЕ! Любые действия по уходу можно производить только с
выключенным прибором, и отключенным от электрической сети!
При необходимости протрите корпус влажной тканью.
Промывать водой можно только ёмкость для сбора пыли. Сам прибор, фильтры,
пульт управления нельзя погружать в воду или любые другие жидкости. Перед
тем как поставить на место ёмкость для сбора пыли убедитесь, что все части
прибора сухие.
Никакие части и аксессуары пылесоса не подходят для мытья в стиральной или
посудомоечной машине!
При чистке прибора не используйте коррозийные или абразивные средства. Они
могут повредить поверхность.
Чистка щёток
Налипший на щётки мусор и намотавшиеся волосы необходимо время от
времени удалять. Рекомендуется чистить их после 4-5 циклов работы.
Выключите прибор. Бережно почистите вращающиеся щётки твёрдым концом
кисти для чистки, которая прилагается в комплекте.
Чистка ёмкости для сбора пыли
Нажмите кнопку отсоединения контейнера для сбора пыли, он выскочит из
корпуса.
Откройте контейнер и высыпьте содержимое в мусорное ведро.
Установите контейнер на место.
Замена аккумулятора
С помощью крестовой отвертки удалите болт с крышки отсека для аккумулятора,
снимите крышку, и, потянув на себя, выньте аккумулятор.
При установке нового аккумулятора соблюдайте обратную последовательность.
Page 20

20.
Перед утилизацией прибора, выньте аккумулятор.
Хранение
Храните прибор и его аксессуары в прохладном сухом месте, вне доступа прямых
солнечных лучей и вне доступа детей и животных.
Если вы не пользуетесь прибором в течение длительного времени, выньте
батарейки из пульта управления.
Решение проблем
Не пытайтесь самостоятельно ремонтировать прибор!
Описание проблемы
Причина
Решение
Прибор не включается
Аккумулятор разряжен
Зарядить прибор перед его
эксплуатацией
Повторяющееся
движение назад или
постоянная смена
направления движения
после того, как прибор
начал работу
Датчики от падения
загрязнены
Протрите нижнюю часть
прибора
Прозрачная часть
датчика, отвечающая за
избегание
столкновений,
загрязнена
Протрите нижнюю часть
прибора
Прибор работает
малоэффективно,
слышится громкий шум
Боковые щетки
заблокированы или
загрязнены
Почистите щётки и/или
устраните причину
повреждения
Ёмкость для сбора пыли
переполнена
Опустошите ёмкость для
сбора пыли
Фильтр заблокирован
мусором/пылью
Почистите фильтр
Пульт дистанционного
управления не работает
Батарейки вставлены в
пульт без соблюдения
полярности, либо заряд
в батарейках кончился
Переустановите батарейки,
соблюдая полярность, либо
замените батарейки на
новые
Аккумулятор разряжен
Зарядите прибор
Пульт используется за
пределами указанных
границ действия
инфракрасного сигнала
Подойдите ближе к
прибору
Прибор не работает на
выбранном режиме
Недостаточный заряд в
батарее прибора
приводит к тому, что он
автоматически
возвращается на
подзарядку
Зарядить прибор перед
эксплуатацией
Page 21

21.
Прибор падает
Датчики от падения
загрязнены
Протрите нижнюю часть
прибора
Рабочий участок имеет
отражающие
поверхности или
углубления меньше 8
см
Смените рабочий участок
Прибор не может
обнаружить базу
Наличие препятствий на
пути к базе
Удалите препятствия на
пути к базе
База не подключена к
электрической сети
Подсоедините базу к
розетке электрической сети
Поврежден адаптер
Замените адаптер
Повреждена база
Замените базу
Поврежден
аккумулятор прибора
либо отсутствует
Замените аккумулятор
прибора
Свечение УФ лампы не
видно в окне УФ лампы
УФ лампа сломана
Обратитесь в
авторизованный
сервисный центр
Данный символ на изделии, упаковке и/или сопроводительной
документации означает, что использованные электрические и электронные
изделия не должны выбрасываться вместе с обычными бытовыми отходами.
Их следует сдавать в специализированные пункты приема.
Данный символ на изделии, упаковке и/или сопроводительной
документации означает, что аккумулятор или батарейка, используемые в
данном изделии, нельзя выбрасывать по окончании срока службы вместе с
другими бытовыми отходами.
Для получения дополнительной информации о существующих системах сбора
отходов обратитесь к местным органам власти.
Правильная утилизация поможет сберечь ценные ресурсы и предотвратить
возможное негативное влияние на здоровье людей и состояние окружающей
среды, которое может возникнуть в результате неправильного обращения с
отходами.
Page 22

22.
ПАЙДАЛАНУ ЖӨНІНДЕГІ НҰСҚАУЛЫҚ
Құрметті сатып алушы! HYUNDAI сауда таңбасының өнімін сатып алғаныңыз
үшін және біздің компанияға сенім артқаныңыз үшін Сізге алғыс айтамыз. Іске
пайдалану нұсқаулығында суреттелген техникалық талаптар орындалған
жағдайда, HYUNDAI компаниясы өзінің өнімдерінің жоғары сапасы мен
сенімді жұмысына кепілдік береді.
HYUNDAI сауда таңбасының бұйымын тұрмыстық мұқтаждар шеңберінде
пайдаланған және іске пайдалану нұсқаулығында келтірілген пайдалану
ережелерін ұстанған кезде, бұйымның қызмет мерзімі бұйым тұтынушыға
табыс етілген күннен бастап 2 (екі) жылды құрайды. Аталған шарттар
орындалған жағдайда, бұйымның қызмет мерзімі өндіруші көрсеткен
мерзімнен айтарлықтай асуы мүмкін екеніне өндіруші тұтынушылардың
назарын аударады.
ҚАУІПСІЗДІК ШАРАЛАРЫ
Аспапты пайдаланған кезде бұзып алмас үшін, оны пайдаланар алдында осы
нұсқаулықты зейін салып оқып шығыңыз. Дұрыс қолданбау бұйымның бұзылуына
әкеліп соғуы, материалдық нұқсан келтіруі немесе пайдаланушының
денсаулығына зиян келтіруі мүмкін.
Аспапты іске пайдаланған кезде төмендегі сақтық шараларын ұстаныңыз:
Алғаш рет іске қосар алдында бұйымда көрсетілген техникалық
сипаттамаларының электр желісінің параметрлеріне сәйкес келетін-келмейтінін
тексеріңіз.
Тек тұрмыстық мақсаттарда ғана пайдалану керек. Құрылғы өнеркәсіптік мақсатта
қолдануға арналмаған.
Аспапты үй-жайдың сыртында және ылғал беткі қабаттарда пайдалануға
болмайды.
Аспапты жылу көздеріне (радиаторларға, жылытқыштарға және тс.с.) жақын
қоймаңыз және оны тура түскен күн сәулесінің астында ұзақ уақыт қалдырмаңыз,
себебі бұл оның пластмасса бөлшектерінің пішінінің бұзылуына әкелуі мүмкін.
Дене, жүйке не болмаса ақыл-ой кемістігі бар, немесе осы құрылғыны қауіпсіз
пайдалану үшін тәжірибесі мен білімі жеткіліксіз адамдардың (соның ішінде
балалардың) қауіпсіздігі үшін жауап беретін адам қадағаламаса немесе
құрылғыны пайдалану бойынша нұсқау бермесе, олардың бұл құрылғыны
қолдануына болмайды.
Балалар құрылғымен ойнамауы үшін оларды үнемі қадағалап отыру керек.
Сүзгісі орнатылмаған шаңсорғышты тоққа қоспаңыз.
KZ
Page 23

23.
Аспапты өз бетіңізбен жөндеуге немесе қандай да бір бөлшектерін ауыстыруға
әрекет жасамаңыз. Ақаулық анықталған жағдайда жақын жердегі Сервис
орталығына хабарласыңыз.
Егер бұйым біршама уақыт 0ºC-тан төмен температурада тұрған болса, оны тоққа
қосар алдында бөлме температурасында кем дегенде 2 сағат ұстау керек.
Өндіруші бұйымның қауіпсіздігіне, жұмыс өнімділігі мен жұмыс мүмкіндіктеріне
түбегейлі әсер етпейтін болмашы өзгерістерді оның құрылмасына қосымша
ескертпестен енгізу құқығын өзінде қалдырады.
Жасап шығарылған күні бұйымда және (немесе) қаптамасында, сондай-ақ ілеспе
құжаттамада көрсетілген.
Осы құрылғыны 0 °С және 40 °С аралығындағы температуралар аралығында
пайдалану қажет.
Шаңсорғыштың үстіне отыруға немесе қандай да бір заттарды қоюға тыйым
салынады.
Шаңсорғышты бензин сияқты жанғыш немесе тез тұтанатын сұйық заттарды
жинап алу үшін қолдануға болмайды.
Шаңсорғыш жұмыс істеп тұрғанда көшеге шығатын барлық есіктер жабық тұруы
керек.
Аккумуляторды зарядтауға арналған адаптер тек үй ішінде пайдалануға арналған.
Егер адаптердің бауы немесе ашасы бүлінген болса, аккумуляторды зарядтауға
тыйым салынады.
Адаптердің ашасын немесе бауын су қолмен ұстауға болмайды.
Егер құрылғы ұзақ уақыт бойы пайдаланылмайтын болса, оның ішінен
аккумуляторды шығарып қойыңыз.
Аккумулятордан қауіпсіздік техникасының талаптарын орындай отырып арылу
қажет.
Аспаптың қолданылуы
Аспап үй-жайларды тұрмыстық шаңнан тазартуға арналған.
Алғаш рет пайдаланар алдында
Аспапты қораптан түгелдей алыңыз да, он орауыш материалдардан босатыңыз.
Батареяларды басқару пультіне салыңыз.
Бүйір шөткелерін орнатыңыз.
Зарядтауыш станцияны тоққа қосыңыз.
Аккумуляторды зарядтаңыз.
Батареяларды басқару пультіне салу
Басқару пультінің артқы жағындағы батареяларға арналған ұяны ашыңыз, бұл
үшін ұяның қақпағының үстінен басыңыз.
Полярлығын сақтай отырып, екі батареяны ұяға салыңыз (ААА тұрпатты
батареялар, жинаққа кірмейді).
Батареяларға арналған ұяның қақпағын пультке сырт еткенше қайтадан
орнатыңыз.
Page 24

24.
Бүйір шөткелерді орнату
Аспапты еденге немесе үстелдің үстіне аяғын жоғары қаратып қойыңыз.
R әрпі бар бүйір шөткені R әрпі бар тесікке орнатыңыз.
L әрпі бар бүйір шөткені L әрпі бар тесікке орнатыңыз.
Шөткелерді дұрыс орнатқан кезде сырт еткен дыбыс естілуге тиіс.
Зарядтау бекетін жалғау
Аккумулятор зарядтала алуы үшін аспаптағы зарядтау құрылғысының түйіспелері
мен зарядтау бекеті әрқашан да таза болуы керек Бұл үшін оларды мезгіл-мезгіл
құрғақ шүберекпен сүртіп отырыңыз.
Зарядтау бекетін артқы жағын қабырғаға қаратып, таза тегіс еденге, розетканың
жанына орнатыңыз. Аспаптың зарядтау бекетіне баратын жолында кедергілер
болмауға тиіс. Зарядтау бекетінің алдында жиһаз бен басқа заттар жоқ 1.5-2 метр
бос кеңістік болуға тиіс. Зарядтау бекетінің артқы жағында шағылыстыратын
заттар (мысалы, айналар) болмауы керек.
Адаптерді зарядтау бекетіне жалғаңыз да, адаптердің ашасын электр желісіне
қосыңыз.
Аккумуляторды зарядтау
Бірнеше айда бір рет аккумулятордың зарядын толық тауысыңыз да, қайтадан
зарядтаңыз.
Алғаш рет тоққа қосар алдында немесе аспап ұзақ уақыт бойы пайдаланылмаған
болса, аккумуляторды зарядтау үшін шамамен 12 сағат керек болады; одан кейін
бұған шамамен 3 - 4 сағат уақыт кетеді. Аккумулятор ең көп дегенде толық
зарядтау мен таусылудың толық 2-3 циклынан кейін зарядталатын болады.
Егер аккумулятордың қуаты түгелдей таусылса, ал аспап зарядталу үшін өз
бетімен қайтып орала алмаса, оны зарядтау бекетіне қолдан орнату қажет.
Зарядтау бекетінен зарядталу
Аккумулятордың заряды таусылуға айналған бетте аспап зарядтау бекетіне өзі бет
алады да, сол жерде аккумулятор автоматты түрде зарядталады. Бұл үшін
зарядтау бекеті электр желісіне жалғаулы болуы керек.
Егер аспап зарядтау бекетін өз бетімен таба алмайтын болса (мысалы, бөлме тым
үлкен немесе оның жолында кедергі болған жағдайда), сіз оған көмектесуге
тиіссіз. Аспапты зарядтау бекетіне дейін бағыттау үшін басқару пультіндегі
бағыттау түймелерін пайдаланыңыз немесе оны тура зарядтау бекетіне қолмен
орнатыңыз.
Аспап зарядталып жатқанда, зарядтаудың жарық индикаторы жалқын түспен, ал
аспап толық зарядталғанда, жасыл түспен жанады.
Жұмысы
Дайындау
Аспап ұзын түкті кілемдерді тазалауға жарамайды.
Жұмысқа кірісер алдында аспаптың ішіне түсіп кетуі немесе оның қозғалысына
кедергі келтіруі мүмкін барлық заттарды еденнен алып тастаңыз.
Аспаптың жолында сым, кабель, перде шашақтарының, қапшықтардың
кездеспейтініне көз жеткізіңіз.
Page 25

25.
Аспап қағып кетуі мүмкін барлық заттарды (мысалы, ваза, шағын үстел шамдары,
безендіргіш элементтер) жинап тастаңыз.
Көршілес екі заттың арасынан аспап өтіп кете алуы үшін олардың арасында кем
дегенде 40 см орын қалуға тиіс.
Егер жиһаздың асты өте төмен болса, аспап олардың астында кептеліп қалуы
мүмкін. Оның жолына тосқауыл, мысалы, гүл егілген құмыраны қойыңыз.
Қосымшаны орнату
Сіздің смартфоныңыз немесе планшетіңіз 4G Wi-Fi интернетіне қосылғанына көз
жеткізіңіз.
Сіздің смартфоныңыз немесе планшетіңіз iOS 8.0 (не жоғары) немесе Android 4.4
(не жоғары) нұсқасындағы операциялық жүйемен жұмыс істейтініне көз
жеткізіңіз.
Сіздің роутеріңіздің сигналы 2,4 ГГц диапазонында екеніне көз жеткізіңіз.
Сіздің смартфоныңызда және робот-шаңсорғышта WLAN сигналының іске
қосылғанына көз жеткізіңіз.
Робот-шаңсорғыш толық зарядталғанына, базаның желіге қосылғанына көз
жеткізіңіз.
“Smart Life” қосымшасын жүктеп, орнату үшін смартфонмен төмендегі QR
code сканерлеңіз.
https://smartapp.tuya.com/smartlife
Қосымшаны ашыңыз және онда жаңа пайдаланушыны тіркеңіз.
Құрылғыны қосыңыз, ол үшін «Робот-шаңсорғыш» белгішесін табыңыз.
Page 26

26.
Шаңсорғышта іске қосу батырмасын 3 секунд бойы басып, ұстап тұрыңыз, аспап
іске қосылғанда, оны жіберіңіз. Шаңсорғыш іске қосылған кезде дыбыстық сигнал
шығып, жарық индикаторы жанады.
Өзіңіздің WiFi желіңізді таңдап алыңыз және құпиясөзді енгізіңіз.
Шаңсорғышты қосымшаға сәтті қосқаннан кейін, сіз өзіңіздің телефоныңыздан
аспапты басқара аласыз.
Егер сізде қосымшаны орнату немесе аспапты қосымшаға қосу бойынша
қиындықтар туындаса, қосымшадағы «Жиі қойылатын сұрақтар» тарауын
қараңыз.
Аспапты іске қосу
Аспап «жады картасы» функциясымен жабдықталған, соның арқасында
шаңсорғыш жинаған жерлерді есте сақтап, сол жерлерде қайта қозғалып
жүрмейді.
Аспаптың теріс жағындағы ажыратып-қосқышты басыңыз, шерткен дыбыс
шығады, аспап іске қосылып, күту режиміне көшеді, бұл кезде жұмыс істеудің
жарық индикаторы көгілдір түспен жанып тұрады.
Page 27

27.
Аспаптың үстіңгі панеліндегі басқару батырмасын басыңыз, шаңсорғыш жұмысын
қалыпты жағдайда бастайды.
Шаңсорғышты үзіліске қою үшін, басқару батырмасын тағы бір мәрте басыңыз.
Сіз шаңсорғышты мәжбүрлеп зарядтау станциясына қайтара аласыз, ол үшн үзіліс
режимінде басқару батырмасын басыңыз және 3 секунд бойы ұстап тұрыңыз.
Шаңсорғыш жұмысын ажыратып-қосу және басқару үшін басқару пультін
пайдаланыңыз.
Басқару пульті
Іске қосу түймесі
Бұл түйме аспаптың жұмысын бастау үшін пайдаланылады.
Ирек тәрізді траектория бойынша қозғалу режимінің түймесі. Әдепкі
бойынша аспап «ирек» траектория бойынша қозғалады.
Қосымша зарядталуға оралу.
Осы түйменің көмегімен зарядтау бекетінен қосымша зарядталу режимі іске
қосылады.
Алға қарай жылжу
Бұл түйменің көмегімен шаңсорғыштың алға қарай қозғалысы іске қосылады.
Сондай-ақ бұл түйме үй жинау кестесін баптау немесе ағымдағы уақытты орнату
үшін пайдаланылады.
Артқа қарай жылжу
Осы батырмамен шаңсорғышты 180 0-ге бұрып, құрылғыны күту режиміне
ауыстыруға болады. Сондай-ақ бұл түйме үй жинау кестесін баптау немесе
ағымдағы уақытты орнату үшін пайдаланылады.
Оңға қарай жылжу
Бұл түйменің көмегімен шаңсорғыштың оң жаққа қозғалысы іске қосылады.
Сондай-ақ бұл түйме сағаттан минутқа ауыстыру үшін пайдаланылады.
Солға қарай жылжу
Бұл түйменің көмегімен шаңсорғыштың сол жаққа қозғалысы іске қосылады.
Сондай-ақ бұл түйме сағаттан минутқа ауыстыру үшін пайдаланылады.
Кідіріс
Бұл түйме аспаптың жұмысын тоқтата тұру және оны кідірістен шығару үшін
пайдаланылады. Сондай-ақ бұл түйме берілген параметрлерді сақтайды.
Сору қуаты
Бұл түйме сору күшін өзгертуге мүмкіндік береді. қалыпты сору және күшті сору
режимі.
Сағат
Page 28

28.
Ағымдағы уақыт параметрлерін баптау режиміне бару үшін түймені басыңыз,
түймелерінің көмегімен уақытты орнатыңыз. Параметрлерді растау
үшін түймесін басыңыз.
Жекелеген бөлмені жинау
Жинауды жоспарлап отырған бөлек бөлменің есігін жабыңыз да, осы түймені
басыңыз.
Үй жинауды бастау уақытының түймесі.
.Кідіріс режимінде осы түймені басыңыз да, үй жинауды бастау параметрлеріне
кіріңіз. түймелерінің көмегімен үй жинау басталатын уақытты
орнатыңыз. Параметрлерді растау үшін түймесін басыңыз.
Бөлмені периметр бойынша жинау түймесі.
Шаңсорғыш бөлмені периметр бойынша жинауы үшін осы түймені басыңыз.
Бұл функция H-VCRQ90 моделі үшін қолжетімді емес.
Еденді жуу үшін матаны пайдалану
Шаңсорғыш жиынтығына мата кіреді, ол еденді ылғалды жинауға арналған.
Алдын ала суланған еденді жууға арналған матаны аспаптың түбіндегі
жабысқышқа бекітіңіз.
Аспапты іске қосудағы барлық жоғарыда сипатталған іс-әрекеттерді орындаңыз.
Ультракүлгін шам
Аспаптың теріс жағында ультракүлгін шам орналасқан, ол үй-жайды жинау
кезінде ауру тудыратын бактерияларды жояды.
ЕСКЕРТПЕ: Егер УК шамы сынып қалса, аспапты сөндіріңіз. УК шамы сынған
аспапты қолданбаңыз. УК шамының сынықтарын тазалау үшін шаңсорғышты
пайдаланбаңыз. Сынықтарды пластик пакетке жинап алыңыз және жергілікті
билік органдарының нұсқауларына сәйкес кәдеге жаратыңыз. УК шамын
ауыстыру үшін авторландырылған сервис орталығына жүгініңіз.
УК-шамын кәдеге жарату
Ескі УК шамдарын дұрыс кәдеге жарату және қайта өңдеу үшін жергілікті билік
органының өкілінен кеңес алыңыз.
УК шамының құрамында сынап бар. Шамдарды кәдімгі қоқыстарға тастамаңыз.
Құрамында сынап бар бөлшектерді кәдеге жарату жергілікті билік органдарының
нұсқауларына сәйкес жүзеге асырылуы тиіс.
Тазалау және күтіп ұстау
ЕСКЕРТУ! Аспапты күтіп ұстау бойынша кез келген жұмысты тек ол өшірулі және
электр желісінен ажыратулы тұрғанда ғана іске асыруға болады!
Қажет болған жағдайда корпусын дымқыл шүберекпен сүртіңіз.
Page 29

29.
Тек шаң жинауға арналған сауытты ғана суға жууға болады. Аспаптың өзін,
сүзгілерді, басқару пультін суға немесе кез келген басқа сұйықтыққа матыруға
болмайды. Шаң жинауға арналған сауытты орнына қоюярдан бұрын аспаптың
барлық бөліктерінің құрғақ екеніне көз жеткізіңіз.
Шаңсорғыштың ешқандай бөлшектері мен керек-жарақтары кір жуғыш немесе
ыдыс жуғыш машинада жууға жарамайды!
Аспапты тазалаған кезде жеміргіш немесе түрпілі құралдарды пайдалануға
болмайды. Олар оның беткі қабатын бүлдіруі мүмкін.
Шөткелерді тазалау
Шөткеге жабысып қалған қоқыс пен оратылып қалған шашты мезгіл-мезгіл алып
тастап отыру қажет. Оларды 4-5 жұмыс циклынан кейін тазалап отыру ұсынылады.
Аспапты өшіріңіз. Айналмалы шөткелерді тазалауға арналған жаққыштың қатты
ұшымен ақырындап тазалаңыз, жаққыш жинаққа кіреді.
Шаң жинауға арналған ыдысты тазалау
Шаң жинауға арналған контейнердің ажырату батырмасын басыңыз, ол корпустан
ырғып шығады.
Контейнерді ашыңыз және ішіндегісін қоқыс шелегіне төгіңіз.
Контейнерді орнына орнатыңыз.
Батареяларды ауыстыру:
Айқас ұшты бұрағыштың көмегімен батареяға арналған ұяның қақпағындағы
болтты алыңыз да, қақпағын алып, батареяны өзіңізге қарай тартып шығарыңыз.
Жаңа батареяны орнатқан кезде қадамдарды кері ретпен орындаңыз.
Сақталуы
Аспапты және оның керек-жарақтарын салқын әрі құрғақ, күн саәулесі тура
түспейтін жерде, сондай-ақ балалар мен үй жануарлары жете алмайтын жерде
сақтау керек.
Егер аспапты ұзақ уақыт бойы пайдаланбайтын болсаңыз, басқару пультіндегі
батареяларды шығарып қойыңыз.
Page 30

30.
Ақайлықтарды шешу
Аспапты өз бетіңізбен жөндеуге әрекет жасамаңыз!
Ақаулықтың сипаттамасы
Себебі
Шешімі
Аспап іске қосылмайды
Батареяның қуаты жоқ
Аспапты іске
пайдаланардан бұрын
оны зарядтау
Аспап жұмыс істей
бастағаннан кейін қайтақайта артқа жүреді
немесе қозғалу бағытын
үздіксіз өзгерте береді
Сенсордың құлаудан
қорғайтын мөлдір бөлігі
кірлеген
Сенсордың құлаудан
қорғайтын мөлдір
бөлігін сүртіңіз
Сенсордың қақтысығуға жол
бермейтін мөлдір бөлігі
кірлеген
Сенсордың қақтысығуға
жол бермейтін мөлдір
бөлігін сүртіңіз
Амортизациялық төсемін
бірнәрсе бітеп тастаған
Амортизациялық төсем
өзінің жұмыс қалпына
оралуы үшін оны
қолмен дұрыстаңыз
Аспап тиімсіз жұмыс
істейді, қатты шуыл
естіледі
Айналатын шөтке немесе
бүйір шөтке кептеліп қалған
немесе бүлінген
Шөткелерді тазалаңыз
және (немесе) бүліну
себебін жойыңыз
Шаң жинауға арналған сауыт
толып кеткен
Шаң жинауға арналған
сауытты босатыңыз
Сүзгіні қоқыс немесе шаң
бітеп тастаған
Сүзгіні тазалаңыз
Қашықтан басқару пульті
жұмыс істемейді
Батареялар пультке
полярлығын сақтамастан
салынған немесе
батареялардың қуаты
таусылған
Батареялардың
полярлығын сақтай
отырып қайта салыңыз
немесе батареяларды
жаңасымен
ауыстырыңыз
Аспаптың батареясының
қуаты таусылған
Аспапты зарядтаңыз
Пульт инфрақызыл сигнал
әрекет ететін көрсетілген
шектерден тыс жерде
пайдаланылады
Аспапқа жақынырақ
келіңіз
Аспап таңдалған режимде
жұмыс істемейді
Аспаптың батареясының
жеткіліксіз заряды оның
қосымша зарядталу үшін
автоматты түрде оралуына
әкеледі
Аспапты іске
пайдаланардан бұрын
зарядтау
Сенсордың құлаудан
қорғайтын мөлдір бөлігі
Сенсордың құлаудан
қорғайтын мөлдір
Page 31

31.
Аспап құлай береді
кірлеген
бөлігін сүртіңіз
Аспап жұмыс істейтін алаңның
беткі қабаты жарықты
шағылыстырады немесе
баспалдақтың немесе
ойықтың астыңғы аралығы 8
см-ден кем
Жұмыс алаңын
ауыстырыңыз
Аспап зарядтау
станциясын таба алмайды
Зарядтау станциясына барар
жолда кедергілер бар
Зарядтау станциясына
барар жолдағы
кедергілерді алып
тастаңыз
Зарядтау станциясы электр
желісіне жалғанбаған
Зарядтау станциясын
электр желісінің
розеткасына жалғаңыз
Құрылғы базаны анықтай
алмайды
Адаптер бұзылған
Адаптерді ауыстырыңыз
Зарядтау сстанциясы бұзылған
Зарядтау станциясын
ауыстырыңыз
Аспаптың батареясы бұзылған
немесе ол жоқ
Аспаптың батареясын
ауыстырыңыз
УК шамының жарығы УК
шамының терезесінен
көрінбейді
УК шамы сынған
Авторландырылған
сервис орталығына
жүгініңіз
Өнімдегі, қораптағы және/немесе қосымша құжаттағы осындай белгі
қолданылған электрлік және электрондық бұйымдар кәдімгі тұрмыстық
қалдықтармен бірге шығарылмауы керек дегенді білдіреді. Оларды арнайы
қабылдау бөлімшелеріне өткізу қажет.
Өнім, орам және/немесе қосымша құжатта бар осы бұйымда
пайдаланылатын аккумулятор немесе батарея әдеттегі тұрмыстық
қалдықтармен бірге шығарылмауы тиіс.
Қалдықтарды жинау жүйелері туралы қосымша мәліметтер алу үшін жергілікті
басқару органдарына хабарласыңыз.
Қалдықтарды дұрыс кәдеге жарату бағалы ресурстарды сақтауға және
қалдықтарды дұрыс шығармау салдарынан адамның денсаулығына және
қоршаған ортаға келетін теріс әсерлердің алдын алуға көмектеседі.
Page 32

www.hyundai-home.ru
Изготовитель: «Хоум Электроникс Лимитед», Китай
Manufactured/Distributed by Home Electronics Limited, China
Delivery and after service shall only be covered
within Russian Federation, Republic of Belarus
and Republic of Kazakhstan
Licensed by Hyundai Corporation Holdings, Korea
Made in China
 Loading...