

Page 1
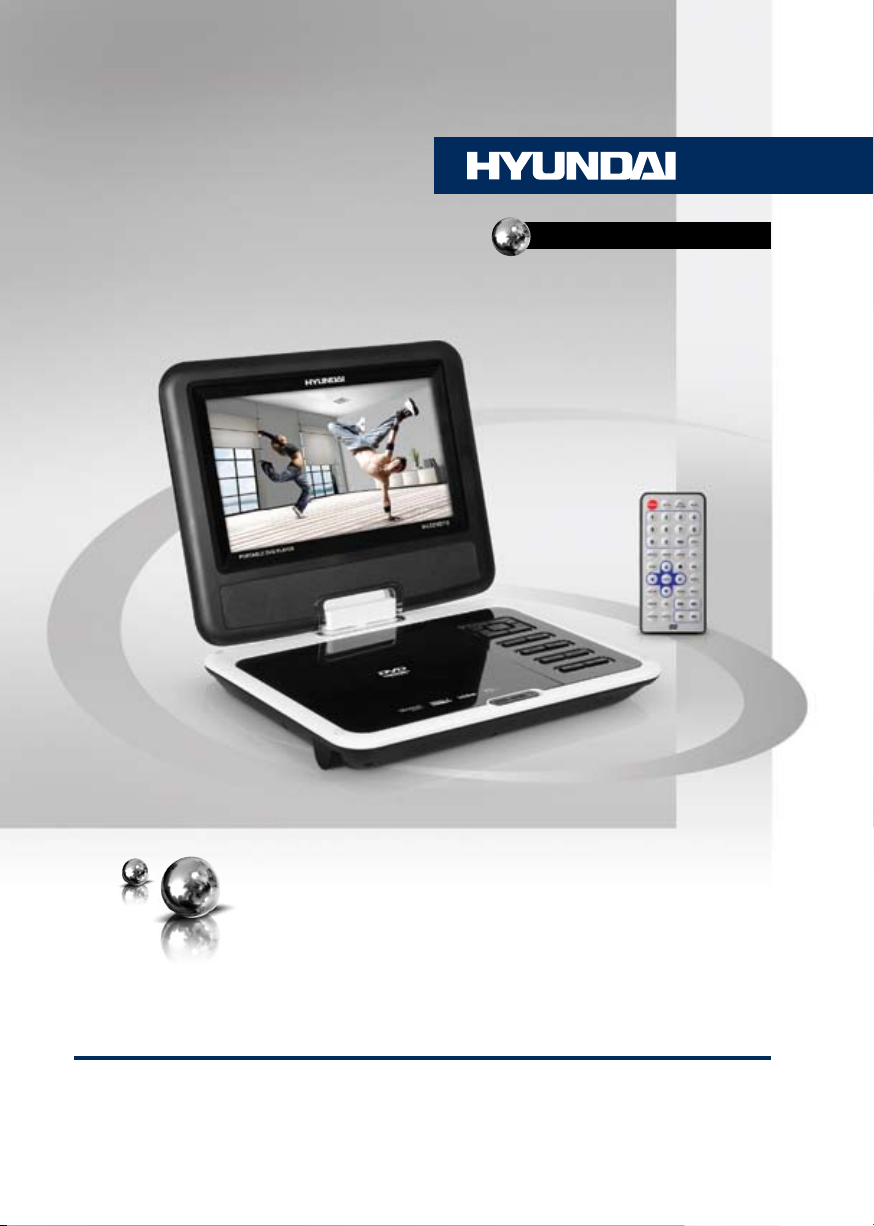
H-LCDVD712
PORTABLE DVD PLAYER WITH
LCD DISPLAY
ПОРТАТИВНЫЙ DVD-
ПРОИГРЫВАТЕЛЬ СО
ВСТРОЕННЫМ ЖК-ДИСПЛЕЕМ
Руководство по эксплуатации Instruction manual
Page 2
Table of contents Before you start
Dear customer!
Thank you for purchasing our product. For safety, it is strongly recommended to read this
manual carefully before connecting, operating and/or adjusting the product and keep the
manual for reference in the future.
Table of contents
Before you start
Utilization of the product
Important safeguards
Supported formats
Operation
Control elements
Remote controller
Changing the battery
Button functions
Power
Goto
DVD/SD/USB
Mute
Number button
Step
Subtitle
Anlge
Audio
PBC
Title
Stop
Play
Cursor buttons
VOL-/VOL+
Enter
Slow
Setup
Zoom
Menu
Repeat
AB
Program
Display
Previous/Next
Rewind/Forward
System setup
General setup
2
Audio setup
3
Video setup
3
Preference setup
3
Password setup
4
Other functions
5
MP3/JPEG/MPEG4 background
5
USB/SD/MMC operation
6
General information
6
Handling compact discs
7
Cleaning discs
7
Troubleshooting
7
Accessories
7
Specification
7
7
7
7
7
7
7
7
7
7
7
7
7
8
8
8
8
8
8
8
8
8
8
8
9
9
10
10
11
11
11
12
12
12
12
13
13
14
2 3
Page 3
Utilization of the product
If you want to dispose this product, do not mix it with general household waste. There is
a separate collection system for used electronic products in accordance with legislation
that requires proper treatment, recovery and recycling.
Please contact your local authorities for the correct method of disposal. By doing so, you
will ensure that your disposed product undergoes the necessary treatment, recovery and
recycling and thus prevent potential negative effects on the environment and human health.
Important safeguards
Alerts the user to the presence
of dangerous voltage within the
product’s enclosure.
Alerts the user to the presence
of important operating
instructions.
To reduce the risk of electric shock
W a rning
or fire, do not open the cover. Refer
RISK OF ELECTRIC SHOCK
DO NOT OPEN
servicing to qualified service
personnel.
This mark indicates this unit belongs
to class 1 laser product.
• To prevent the risk of fire or electric shock,
don’t allow water to come into contact with
the device and don’t use the device in high
humidity conditions.
• The device is equipped with high voltage
components and a laser system, hence you
shall not open the device and repair it by
yourself. The laser beam is dangerous to eyes
when the housing is removed. Don’t look at it.
• When the device is moved from cold
premises to the warm room or vice versa,
condensate may form on the laser head and
the device may not operate properly. In this
case please turn the device on for 1-2 hours
without disc before playback to heat it to a
proper operation temperature.
• Don’t try to manually open or close the
disc tray to load discs.
• Disconnect the receiver only when there is
no disc therein.
• If you are not going to use the device for a
long time disconnect it from the wall outlet.
• Before turning the device on, please make
sure that you have connected it properly,
adjust the volume of speakers and amplifiers
of your radio system to the minimum. Adjust
the volume as necessary only after normal
playback has started to avoid damage of your
audio system.
• Use supply sources of rated voltage,
otherwise the unit may not function or may be
damaged.
• Place the unit on a horizontal surface.
Keep the unit ventilated. Don’t block the heat
hole. Overheat may cause malfunction.
• Do not place any objects on the player’s
cover, this may make it function improperly
(incorrect playback).
• Please place the device in a dry and
well-aired area. Do not place it near heating
units or expose it to direct sunlight, mechanical
vibration, humidity or excessive dust.
• If using power plug and appliance coupler
as a cutting-connecting device, it should be
operated easily.
• Never use liquid detergents, abrasives or
organic compounds (alcohol, gasoline, etc) to
clean the unit body.
Page 4
Before you start
• All repairs and technical service should
be made by qualified specialist from service
centers.
All images provided herein are schematic
drawings of real objects and may differ
from their real images.
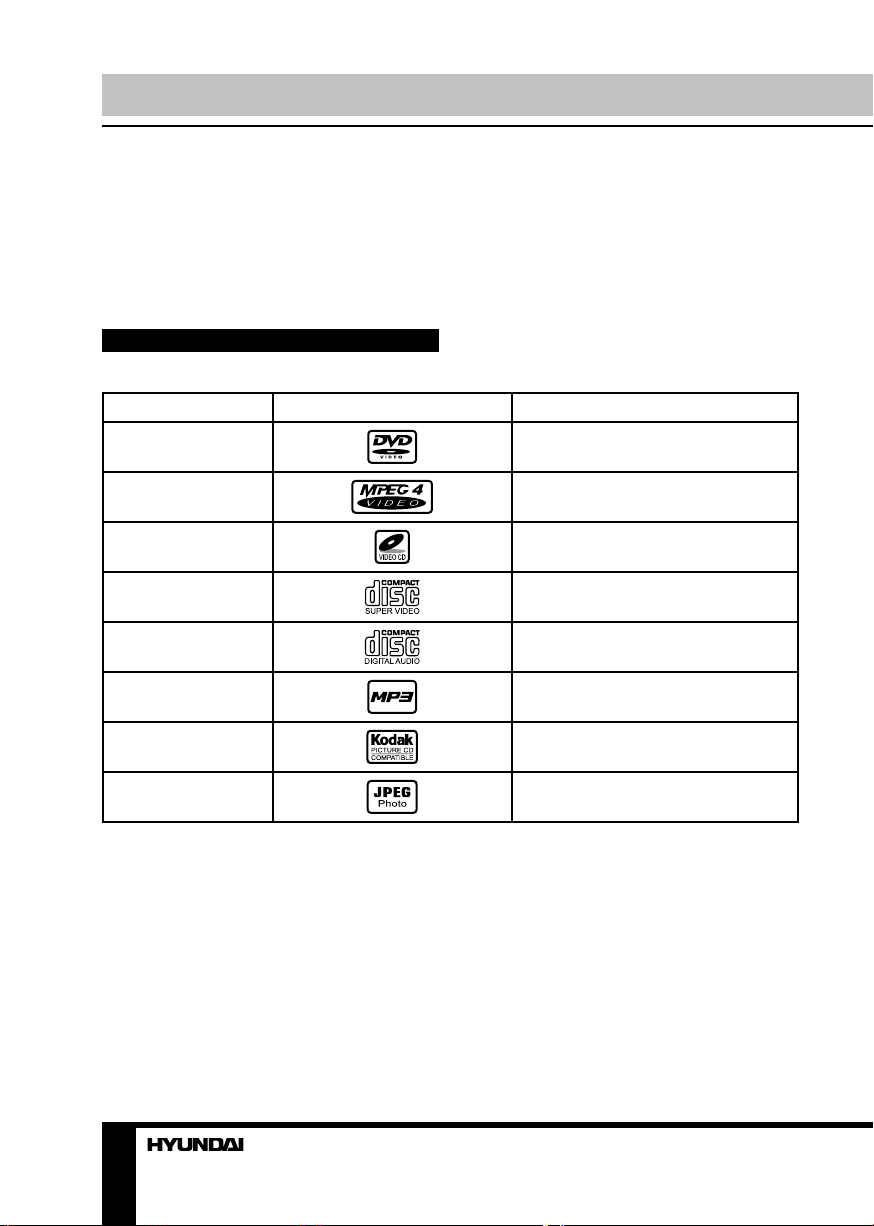
Supported formats
Disc types
DVD
MPEG4 (DivX)
Video-CD (VCD)
Super-VCD (SVCD)
CDDA
MP3
Kodak Picture CD
JPEG
Symbol Contents
Compressed digital audio - video
Compressed digital audio - video
Compressed digital audio - video
Compressed digital audio - video
Digital audio
Compressed digital audio
Compressed digital static image
Compressed digital static image
4
Page 5
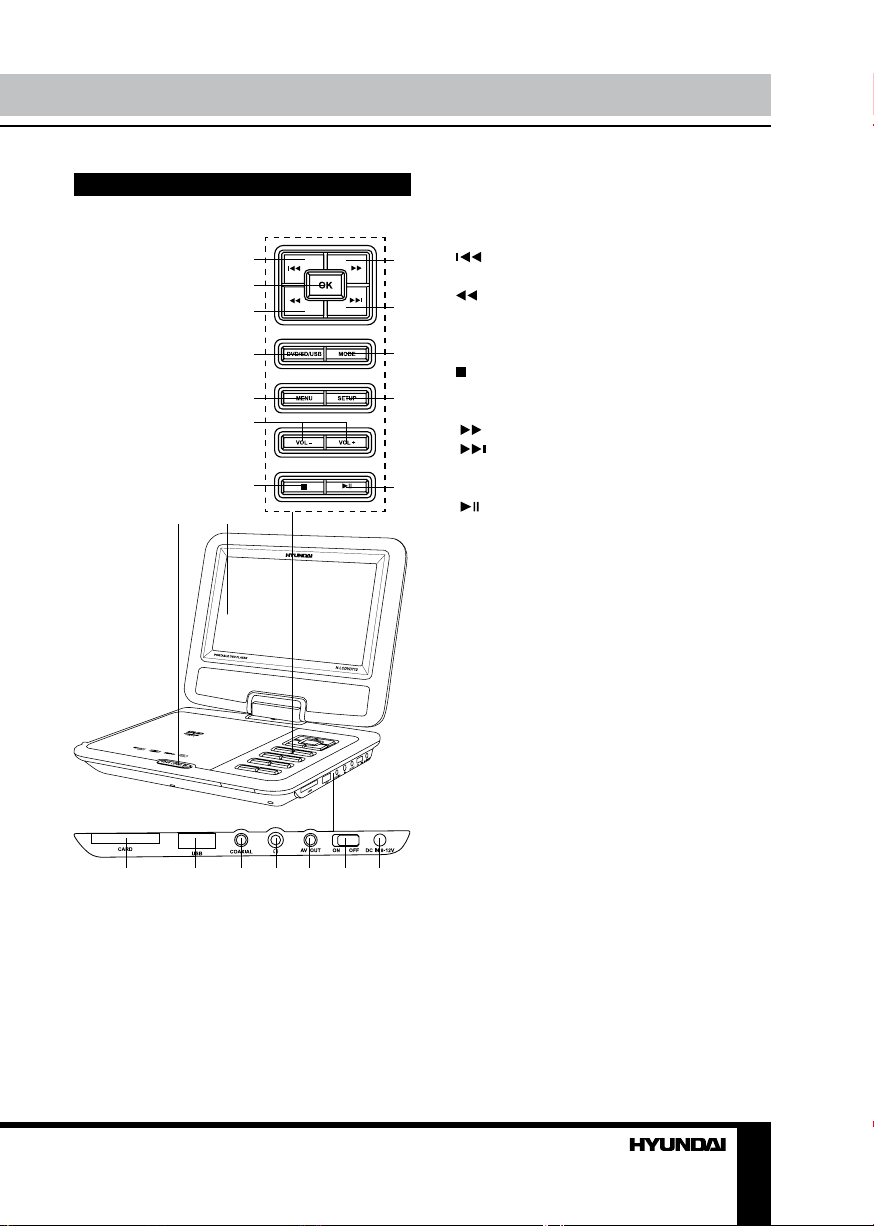
Control elements
8 9
1 10
2
3
4
5
6
7
1. button
2. ОК button
3. button
11
4. DVD/SD/USB button
5. MENU button
12
6. VOL-/VOL+ buttons
7. button
8. OPEN button
13
9. TFT-display
10. button
11. button
12. MODE button
14
13. SETUP button
14. button
15. Memory card slot
16. USB port
17. Coaxial audio out
18. Headphone jack
19. Audio-video out
20. Power switch
21. Power jack
Operation
15 16 17 18 19 20 21
5
Page 6

Operation
Remote controller (RC)
1
2
3
4
5
6
7
8
9
10
11
12
13
14
15 28
16
17
18
19
20
21
22
23
24
25
26
27
1. GOTO button
2. POWER button
3. Digit buttons
4. ANGLE button
5. SUBTITLE button
6. button
7. TITLE button
/VOL-button
8.
9. ENTER button
10. SETUP button
11.
button
12. REPEAT buttons
13. AB button
14. PROGRAM button
15. DISPLAY button
16. DVD/SD/USB button
17. MUTE button
18. STEP button
19. AUDIO button
20. PBC button
21. button
button
22.
23. SLOW button
24. /VOL+ button
25. MENU button
26. ZOOM button
27. / button
28. / button
Changing the battery
• Remove the battery compartment cover
on the back of the RC. Insert two AAA/1.5V
batteries into the battery compartment making
sure that the correct polarity is observed. Install
the cover back.
• The RC should be pointed at remote
sensor within 8 meters and within 30 degrees
at the left or the right side.
• Take the battery out of the RC if it is not
used for a long time.
• Do not mix new and used batteries or
different types of batteries. Weak batteries can
leak and severely damage the RC.
6
Page 7
Operation
Button functions
POWER
To switch on the unit, set the power switch
to ON position. When the unit is in operation,
press POWER button on the RC to set the unit
to standby mode. To turn on the unit press
POWER button on the RC (it may take several
seconds until the unit exits standby mode).
The power is not fully turned off in
standby state. If the unit will not be used for a
long time, turn off the power fully by setting the
power switch to OFF position.
GOTO
Press this button to display menus in which
you can input track/chapter/title number or disc
playback time by pressing digit buttons. After
you input the data, playback will start from the
input point.
DVD/SD/USB
Press this button to switch between disc/
USB and memory card mode. Mode selection
is available only if the corresponding storage is
inserted into the unit.
MUTE
Press MUTE button; the sound output will
be muted. Press this button again or adjust
volume to resume the sound.
Number buttons
Press number buttons to input digits and
numbers (e.g. track/chapter number, playback
time etc.).
STEP
When playing DVD, SVCD, VCD disc, press
STEP repeatedly to play video frame by frame.
Press ENTER or
playback.
SUBTITLE
When playing a disc with multi-language
subtitle, press SUBTITLE button continually,
the subtitle languages are changed in a circle,
button to resume normal
and you can select the needed one.
ANGLE
When playing the disc with multi-angle,
press ANGLE button to select the view angle.
AUDIO
• When playing DVD with more than one
audio stream, press this button to select the
needed language.
• When playing CD/VCD disc, press this
button to select audio channel (L-mono/Rmono/mix-mono/stereo).
PBC
When playing a VCD disc, press this button to
turn on or off Playback Control (PBC) function.
TITLE
When playing a DVD disc, press TITLE
button to return to the main title menu of the
disc.
(STOP)
When playing DVD/SVCD/VCD/CD disc,
press this button once, the unit will memorize
the previous ending point; when afterwards you
play the same disc, playback will start from the
memorized point. Press
will stop without memorizing the stop point.
This function is only active when ON is
set for Last Memory item in General setup page.
(PLAY)
When the disc is paused or stopped, press
button to start playback. During playback
press this button to pause playback.
Cursor buttons
Press cursor buttons to navigate in various
menus.
VOL+/VOL-
Press VOL+ button to adjust volume up.
Press VOL- button to adjust volume down.
ENTER
button twice, playback
7
Page 8
Operation Operation
Press ENTER button for confirmation of
chosen options.
SLOW
Press SLOW button repeatedly to change
slow playback speed as follows: 1/2 => 1/4 =>
1/8 => 1/16 => normal.
SETUP
Press SETUP button to enter or exit the
system setup menu.
ZOOM
When playing DVD/VCD disc, press ZOOM
button to zoom in the picture as follows: 2x =>
3x => 4x => 1/2 => 1/3 => 1/4 => normal. In
zoom in mode, press cursor buttons to move
the picture for viewing.
MENU
When playing DVD disc, press MENU button
once to return to the main menu of the disc.
REPEAT
Press REPEAT button to repeat a title,
chapter, track or the whole disc.
• When playing DVD disc, press REPEAT
button continually to repeat chapter => title =>
all => repeat off.
• When playing SVCD, VCD, CD disc, press
REPEAT button continually to repeat track =>
all => repeat off.
• When playing MP3 disc, press REPEAT
button continually to play shuffle => random =>
single => repeat one => repeat folder.
AB
• Press AB button at the start point (A)
and the ending point (B) to select the repeat
fragment.
• Press AB button the third time to cancel
fragment repeat and return to normal play.
PROGRAM
• If the disc contains 2 or more tracks,
chapters or titles, set up the playing order to
your preference. Press PROGRAM button to
enter program menu.
• Press cursor buttons to navigate in the
program menu. Press number buttons to
input the number of the track, title or chapter.
If programmed tracks are over ten, select
item and press ENTER button to go on
programming. Maximum 20 programmable
items are possible.
• Use cursor buttons to move the cursor
to START item. Press ENTER button to start
program playback. Press PROGRAM button to
cancel programming.
For MP3 disc, this function is not
available.
DISPLAY
Press DISPLAY button to display various info
on the current playback: title/chapter number or
time elapsed/remaining, etc.
/ (Previous/Next)
• When playing DVD disc, press
to go to the previous chapter.
• When playing SVCD, VCD, CD disc, press
button to go to the previous track.
• When playing DVD disc, press
to go to the next chapter.
• When playing SVCD, VCD, CD disc, press
button to go to the next track.
/ (Rewind/Fast forward)
Press
search. Press
forward search. Search speed will increase
with each pressing: 2x => 4x => 8x => 16x =>
32x => normal.
button repeatedly for quick rewind
button repeatedly for quick
button
button
System setup
1. Press SETUP button to enter the setup
menu. In Setup menu, press SETUP button
again to quit the setup page.
2. Use
General setup, Audio setup, Video setup,
Preference page, Password setup.
/ buttons to choose a setup page:
8 9
Page 9
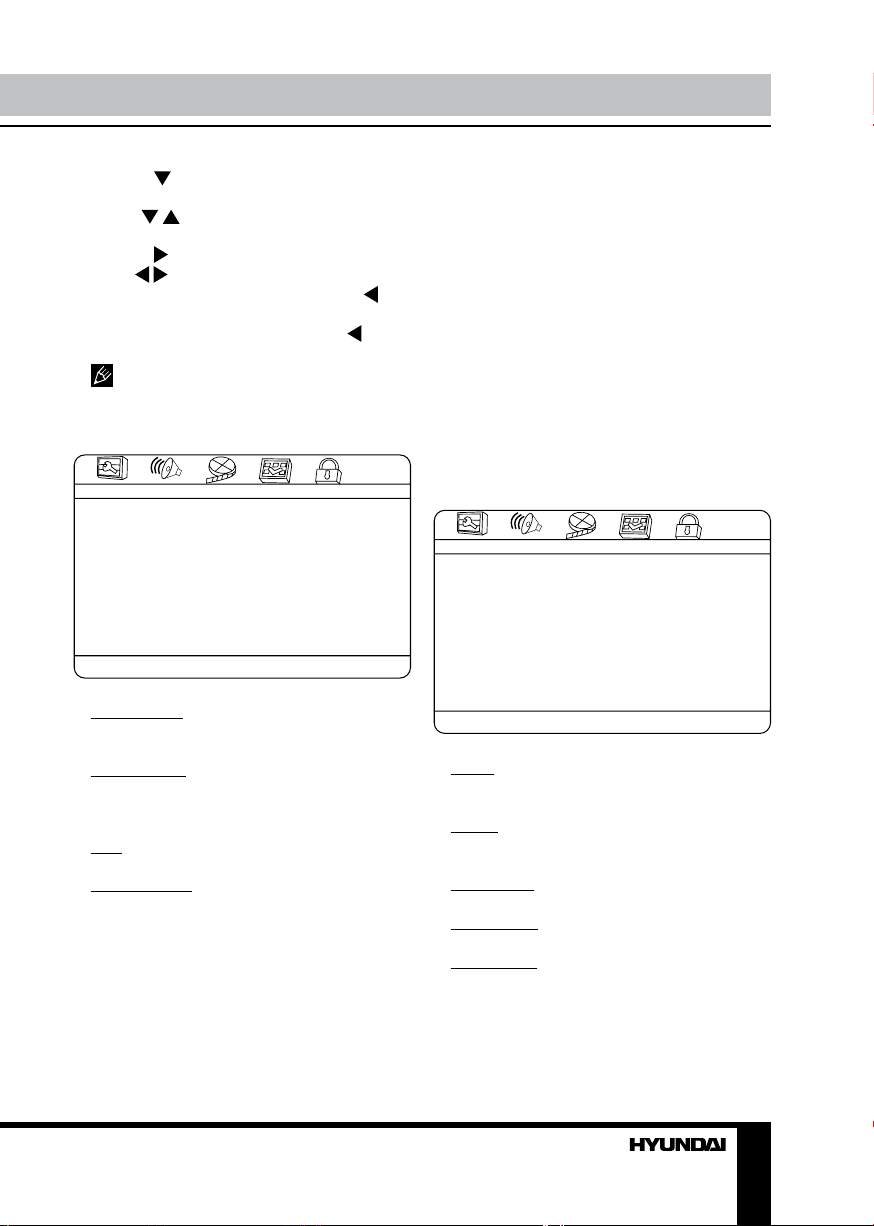
3. Press button to enter the setup page
selected.
4. Use / buttons to select the option you
want to adjust.
5. Press
button to enter the adjustment
list. Use / buttons to select the adjustment
and press ENTER button to confirm and
button to return to options list.
6. To return to setup page list press
button
when in the option list.
The items in gray can’t be set up. The
setup is memorized and kept after power is off.
General setup
This function doesn’t work with discs without
captions. If Caption is Off, press SUBTITLE
button on the RC to set Caption on. The default
setup is On.
• SCREEN SAVER
If Screen saver is set ON and the unit is
switched on without a disc playing for several
minutes, a moving picture appears on the
screen, and the unit will go to standby mode
after several minutes.
• LAST MEMORY
When this function is on, the unit can
memorize the time elapsed from the last time
you played the disc. Then at the next playing, it
will resume playing from the memorized point.
GENERAL SETUP PAGE
TV DISPLAY
ANGLE MARK
OSD LANGUAGE
CLOSED CAPTIONS
SCREEN SAVER
LAST MEMORY
• TV DISPLAY
4:3 PanScan: When the unit connects to the
normal TV set, the wide-screen image shows
on the full screen, but some part is cut off.
4:3 LetterBox: When the unit connects to the
normal TV set, the wide-screen image shows
and black bars appear on the top and bottom
of screen.
16:9: Use this item when the unit is
connected with the wide screen TV set.
Wide squeeze: Use this item when the unit is
connected with the normal TV set, if you want
to squeeze the picture.
• ANGLE MARK
It will show the angle mark when playing
DVD disc with multi-angle view if selecting On.
• OSD LANGUAGE
Select on-screen display language: English,
Russian.
• CLOSED CAPTIONS
Audio setup
AUDIO SETUP PAGE
DOWNMIX
DIGITAL OUTPUT
DOLBY DIGITAL
• DOWNMIX
LT/RT: The audio out is Left and Right
channels format even if the original sound is
5.1CH format.
Stereo: The audio out format is stereo even
if the original sound is 5.1CH format.
• DIGITAL OUTPUT
SPDIF/OFF: no digital signal out (coaxial
output off), only analog audio output.
SPDIF/RAW: digital signal output in the
original format recorded in the disc.
SPDIF/PCM: digital signal output in the
decoded PCM form.
Page 10

Operation
DOLBY DIGITAL SETUP
DUAL MONO
DYNAMIC
• DUAL MONO
Stereo: stereo output signal,
L-Mono: left output signal,
R-Mono: right output signal,
Mix-Mono: left and right output average
signal.
• DYNAMIC
If watching large dynamic scope movie
program at night, by selecting this mode you
can reduce volume to a very low level and at
the same time keep the fine details sounds. In
this case, this doesn’t disturb the family and
keep the quality sound.
Video setup
VIDEO SETUP PAGE
SHARPNESS
BRIGHTNESS
CONTRAST
HUE
SATURATION
VIDEO INVERSE
Preference setup
PREFERENCE PAGE
TV TYPE
AUDIO
SUBTITLE
DISC MENU
PARENTAL
DEFAULT
• TV TYPE
This unit is suitable for all kinds of TV
systems. You can select one of the PAL, NTSC
or Auto.
Auto: the TV system is auto switched
according to the disc system.
NTSC: this system is used in USA, Taiwan,
Japan etc.
PAL: this system is used in China, Europe,
Hong Kong etc.
• AUDIO, SUBTITLE, DISC MENU
LANGUAGE SETUP
These are the initial settings by your
preference. If a setting is supported by disc
content, it will work. Otherwise the disc default
value works.
• PARENTAL
The control level is for parental to control
playing content and protect your children from
violence and erotic. The disc, the level of which
is higher than the setting level can not be played.
• DEFAULT
Reset to the initial factory setups.
• SHARPNESS, BRIGHTNESS,
CONTRAST, HUE, SATURATION
Adjust according to you preference.
• VIDEO INVERSE
Select ON to display the picture upside
down.
10
Page 11

Operation
Password setup
PASSWORD SETUP PAGE
PASSWORD MODE
PASSWORD
Change the password. The initial factory
password is 1369. You can set your own
password. If you forget your own password,
you can use 1369 as general password.
Other functions
MP3/JPEG/MPEG4 background
MP3 - generally adopted standard of audio
compression, compressing audio data to 1/12
of their size. One CD disc mat store more than
600 minutes of music (170 songs). And the
quality of MP3 disc approximates to an audio
CD disc quality.
JPEG (Joint Photographic Expert Group) image compression algorithm, used all over the
world and providing high level of compression
of the source data. Any graphics editor may
edit images of this format and their size in 1520 times less then the original images.
MPEG4 - standard for transmitting audio and
video data via channels with low capacity. This
format is very popular since it made possible
to place full-length movies with good enough
resolution in one CD.
When a disc, a USB or a memory card
containing files of these formats is inserted,
following interface will be displayed:
1 2
3 4 5
1. Playback info window - shows current
playback time, track number, volume level,
playback status (stop/play/pause) etc.
2. Address window - shows directory
address at which the currently played file is
found.
3. Directory window - shows the currently
selected directory.
4. Scroll bar - shows file location in the
directory.
5. Preview window - shows the selected
JPEG file thumbnail.
/ buttons to select the directory you
Use
want and press or ENTER button to enter it.
Select a file and press or ENTER button to
start its playback.
JPEG playback notes:
• While a file playback, press
thumbnails will be shown on the screen.
• Press cursor buttons to select the desired
picture.
• Use cursor buttons to select SLIDE SHOW
item, then press or ENTER button to start
slide show.
• Use cursor buttons to select MENU item,
then press
function menu.
The button function menu is as follows:
or ENTER button to enter button
button, 12
11
Page 12

Operation/General information General information
Button Function
Program Slideshow effect
Entering thumbnail mode
Next picture
Previous picture
To play picture
Rotate 90 degrees
anticlockwise
Rotate 90 degrees clockwise
Select CONTINUE item and press ENTER
button to go to the other menu page:
ZOOM Change zoom mode
Zoom in picture
Zoom out picture
Cursor
buttons
Select EXIT MENU item and press ENTER
button to exit.
Depending on file volume and encoding,
some delay is possible when changing modes
or passing to the next menu item.
Move zoom center
USB/SD/MMC operation
Insert a USB drive in the USB port, then
press DVD/SD/USB button to play the readable
files in it.
Insert an SD or MMC card into the Memory
card slot, then press DVD/SD/USB button to
play readable files in it.
Operatoins with USB/SD/MMC file playback
are the same as disc operations.
SD/MMC/USB up to 32 Gb are supported by
this unit.
Handling compact discs
Handling compact discs
• Do not insert anything other than a CD into
the disc tray.
• Do not use cracked, chipped, warped, or
otherwise damaged discs as they may cause
damage to the player.
• Handle the disc only by the edges (as
shown in the picture). To keep discs clean do
not touch its surface.
• Store discs in their cases when not in use.
• Do not expose discs to direct sunlight, high
humidity, high temperature or dust.
• Prolonged exposure to extreme
temperature can wrap a disc.
• Do not attach labels, write on or apply
chemicals to the surface of the discs.
• Do not touch the recorded surface of the
discs.
• Use 12-cm CDs. Use only conventional,
fully circular discs. Do not use irregularly
shaped discs.
Cleaning discs
Fingerprints should be carefully wiped from
the surface of disc with a soft cloth. Unlike
conventional records, compact discs have no
grooves to collect dust and macroscopic dirt,
so gently wiping them with a soft cloth should
remove must panicles. Wipe in a straight
motion from the center to the edge.
Never use thinner benzine, record cleaner
or anti static spray on a compact disc. Such
chemicals can damage its plastic surface.
12 13
Page 13

Troubleshooting
Below is a table describing simple measures that can help you eliminate most problems likely
to emerge when this unit is in use. If below measures do not help, turn to a service center or to the
nearest dealer.
Symptom Cause Solution
No sound Poor audio cable connection Make proper connection
Disc dirty or damaged Clean the disc
MUTE function is on Disable MUTE function
No image Poor video cable connection Make proper connection
Incorrect setting of your TV set Correct the settings of your TV set
Disc cannot be
read
Remote control
does not
operate
Some functions
do not work
Unstable image Incorrect TV settings Correct the TV settings
Disc not inserted Insert the disc
Disc inserted incorrectly Install the disc with the label side facing up
Condensate on the unit laser
head
Remote control is incorrectly
directed at the unit
Distance and angle to the unit
are too large
Run out batteries Replace both batteries
Disc is recorded incorrectly Wait 5-10 seconds and the unit will
Incorrect key sequence Repeat the operation one more time
Static voltage on the unit
housing
Switch the unit on without disc for an hour
Use the remote controller according to the
manual
Decrease the distance and angle
automatically return to normal style
Switch the unit off for 1-2 minutes and then
switch it on again
Accessories
DVD player 1 pc
Remote controller 1 pс
Audio-video cable 1 pc
Battery AAA 1.5V 2 pcs
Headphones 1 pc
Car adaptor 1 pc
AC/DC adaptor 1 pc
Battery pack 1 pc
Protective bag 1 pc
Consumer information 1 pc
Warranty card 1 pc
Instruction manual 1 pc
Page 14

General information
Specifications
Appearance
Dimensions 210 mm x 170 mm x 42 mm
Net/Gross weight 0.75 kg/1.1 kg
Display 7” TFT LCD
Display format 16:9
Compatibility
Supports DVD/DVD±R/DVD±RW/CD/CD-R/CD-RW/USB/SD/MMC
Formats of playback DVD /Super VCD/DVCD/VCD/HDCD/CDDA/MP3/Kodak
Picture/JPEG/MPEG4 (DivX)
Audio
Built-in Dolby Digital decoder +
Video
Color system NTSC/PAL
Connectors
Audio-video out +
Earphone jack +
Coaxial out +
Functions
Children lock +
Rotary screen +
Russian and English OSD +
Power
AC/DC adaptor +
Car adaptor +
Battery Li-ion +
Specifications are subject to change without notice. Dimensions are approximate.
14
Page 15

Содержание
Уважаемый покупатель!
Благодарим Вас за покупку нашего изделия. Чтобы понять, как правильно и безопасно пользоваться приобретенным устройством, рекомендуется тщательно изучить
настоящее руководство перед подключением и эксплуатацией изделия. Сохраняйте
руководство для использования в будущем.
Содержание
Перед началом эксплуатации
Утилизация изделия
Меры предосторожности
Поддерживаемые форматы
Управление устройством
Элементы управления
Пульт дистанционного управления
Установка батареек
Функции кнопок
Goto
DVD/SD/USB
Mute
Кнопки с цифрами
Step
Subtitle
Anlge
Audio
PBC
Title
Стоп
Воспроизведение/пауза
Кнопки курсора
VOL-/VOL+
Enter
Slow
Setup
Zoom
Menu
Repeat
AB
Program
Display
Предыдущий/Следующий
Назад/Вперед
Настройка системы
Страница общих настроек
15
16
16
16
17
18
18
19
19
20
20
20
20
20
20
20
20
20
20
20
20
21
21
21
21
21
21
21
21
21
21
21
22
22
22
22
22
Страница установок аудио
Страница настройки видео
Настройка предпочтений
Страница настройки пароля
Прочие операции
Воспроизведение файлов MP3/JPEG/
MPEG4
Операции с USB/SD/MMC
Общая информация
Обращение с компакт-дисками
Чистка дисков
Комплект поставки
Руководство по устранению
неисправностей
Технические характеристики
23
24
24
24
25
25
26
27
27
27
27
28
29
15
Page 16

Перед началом эксплуатации
Утилизация изделия
Если вы желаете утилизировать данное изделие, не выбрасывайте его вместе с
обычным бытовым мусором. Существует отдельная система сбора использованных
электронных изделий в соответствии с законодательством, которая предполагает
соответствующее обращение, возврат и переработку.
Обращайтесь в органы местного управления за инструкциями по правильной
утилизации продукта. Тем самым Вы обеспечите утилизацию Вашего изделия
с соблюдением обязательных процедур по обработке, утилизации и вторичной
переработке и, таким образом, предотвратите потенциальное негативное воздействие
на окружающую среду и здоровье людей.
Меры предосторожности
Предупреждение о наличии
высокого напряжения внутри
устройства.
Напоминание о проведении
всех действий в соответствии
с инструкциями.
Во избежание риска поражения
W a rning
электрическим током или пожара
RISK OF ELECTRIC SHOCK
DO NOT OPEN
не открывайте корпус изделия.
Обращайтесь к квалифицированному персоналу.
Изделие принадлежит к лазерной
продукции 1 класса.
• Для предотвращения риска возгорания
или удара током избегайте попадания в
устройство воды и эксплуатации устройства
в условиях высокой влажности.
• Устройство содержит компоненты под
высоким напряжением и лазерную систему,
поэтому не пытайтесь самостоятельно открывать и ремонтировать устройство. Лазерный луч опасен при снятой крышке корпуса.
• При перемещении устройства из холод-
ного места в теплое и наоборот на лазерной головке может образоваться конденсат
и устройство не будет работать должным
образом. В этом случае перед началом воспроизведения включите устройство на 1-2
часа без диска для прогрева до комнатной
температуры.
• Не пытайтесь открывать или закрывать
лоток для загрузки дисков вручную.
• Отключайте питание устройства только
при отсутствии диска.
• Выключайте устройство из розетки,
если Вы не собираетесь использовать его в
течение долгого времени.
• Перед включением устройства убедитесь, что оно подключено правильно,
установите на минимум уровень громкости
усилителя и динамиков Вашей аудиосистемы. Регулируйте уровень громкости только
после начала воспроизведения, чтобы избежать повреждения аудиосистемы.
• Подключайте устройство только к сети
с параметрами, соответствующими напряжению питания аппарата.
• Устанавливайте устройство горизонтально; обеспечивайте хорошую вентиляцию, не закрывайте отверстия, предназначенные для отвода тепла.
• Не ставьте посторонние предметы на
корпус устройства; это может стать причи-
16
Page 17

Перед началом эксплуатации
ной некорректной работы устройства.
• Устройство должно находиться в сухом
и проветриваемом месте. Исключайте нахождение устройства вблизи нагревательных приборов, не подвергайте воздействию
солнечного света, механической вибрации,
влажности и пыли.
• Не используйте для чистки корпуса
устройства жидкие чистящие средства,
абразивные материалы или органические
соединения (алкоголь, бензин и др.).
• Для ремонта и технического обслуживания устройства обращайтесь в сервисные
центры.
Все иллюстрации, приведенные в настоящем руководстве, являются схематическими изображениями, которые
могут отличаться от реальных объектов.
Поддерживаемые форматы
Тип дисков Символ Содержимое
DVD
MPEG4 (DivX)
Video-CD (VCD)
Super-VCD (SVCD)
CDDA
Сжатое цифровое аудио - видео
Сжатое цифровое аудио - видео
Сжатое цифровое аудио - видео
Сжатое цифровое аудио - видео
Цифровое аудио
MP3
Kodak Picture CD
JPEG
Сжатое цифровое аудио
Сжатое цифровое статическое изображение
Сжатое цифровое статическое изображение
17
Page 18

Управление устройством
Элементы управления
8 9
1 10
2
3
4
5
6
7
1. Кнопка
2. Кнопка ОК
3. Кнопка
4. Кнопка DVD/SD/USB
11
5. Кнопка MENU
6. Кнопки VOL-/VOL+
12
7. Кнопка
8. Кнопка OPEN
9. TFT-дисплей
13
10. Кнопка
11. Кнопка
12. Кнопка MODE
13. Кнопка SETUP
14
14. Кнопка
15. Слот для карт памяти
16. USB-порт
17. Коаксиальный аудиовыход
18. Выход на наушники
19. Аудиовидеовыход
20. Переключатель питания
21. Разъем питания
15 16 17 18 19 20 21
18
Page 19

Управление устройством
Пульт дистанционного управления
1
2
3
4
5
6
7
8
9
10
11
12
13
14
15 28
16
17
18
19
20
21
22
23
24
25
26
27
1. Кнопка GOTO
2. Кнопка POWER
3. Кнопки с цифрами
4. Кнопка ANGLE
5. Кнопка SUBTITLE
6. Кнопка
7. Кнопка TITLE
8. Кнопка /VOL-
9. Кнопка ENTER
10. Кнопка SETUP
11. Кнопка
12. Кнопки REPEAT
13. Кнопка AB
14. Кнопка PROGRAM
15. Кнопка DISPLAY
16. Кнопка DVD/SD/USB
17. Кнопка MUTE
18. Кнопка STEP
19. Кнопка AUDIO
20. Кнопка PBC
21. Кнопка
22. Кнопка
23. Кнопка SLOW
24. Кнопка /VOL+
25. Кнопка MENU
26. Кнопка ZOOM
27. Кнопки /
28. Кнопки /
Установка батареек
• Снимите крышку отсека для батарей на
задней части ПДУ. Поместите две батареи
AAA/1.5V в отсек для батарей с правильным соблюдением полярности. Установите
крышку отсека на место.
• Необходимая мощность сигнала ПДУ
обеспечивается на расстоянии до 8 метров
и в пределах 30 градусов влево и вправо.
• Не используйте одновременно новые и
использованные батарейки или батарейки
разных типов.
19
Page 20

Управление устройством Управление устройством
Функции кнопок
POWER
Для включения питания устройства установите переключатель питания на правой
панели в положение ON. Когда устройство
работает, нажмите кнопку POWER на ПДУ,
чтобы перевести устройство в режим ожидания. Для включения устройства нажмите
кнопку POWER на ПДУ (выход устройства
из режима ожидания может занять несколько секунд).
В режиме ожидания питание отключается не полностью. Если устройство не
будет использоваться длительное время,
отключите питание полностью, установив
переключатель питания в положение OFF.
GOTO
Нажимайте эту кнопку для отображения
меню, в которых с помощью кнопок с цифрами Вы можете ввести номер трека/главы/
раздела или время диска. После этого
воспроизведение продолжится с учетом
введенных вами параметров.
DVD/SD/USB
Нажимайте эту кнопку для переключения
между режимами воспроизведения диска,
карты памяти или USB. Выбор режима
доступен только если соответствующий
носитель установлен в устройство.
MUTE
Нажмите кнопку MUTE; звук перестанет
воспроизводиться. Нажмите кнопку MUTE
повторно или регулируйте громкость для
восстановления звука.
Кнопки с цифрами
Используйте кнопки с цифрами для ввода
чисел (напр., номер главы/раздела, время
воспроизведения и др.).
STEP
При воспроизведении DVD, SVCD, VCD
диска нажимайте кнопку STEP для покадрового воспроизведения. Нажмите кнопку
ENTER или
воспроизведению.
для возврата к нормальному
SUBTITLE
При воспроизведении DVD диска с
субтитрами на нескольких языках, нажимая
кнопку SUBTITLE можно изменять их циклически, чтобы выбрать нужный.
ANGLE
При воспроизведении DVD диска со сценами, записанными более чем под одним
углом зрения, нажимайте кнопку ANGLE
для выбора требуемого угла.
AUDIO
• При воспроизведении DVD диска с
несколькими языками аудио нажимайте эту
кнопку для выбора требуемого языка.
• При воспроизведении CD/VCD диска
нажимайте эту кнопку для выбора аудиоканала (левый/правый/совокуп. моно/стерео).
PBC
При воспроизведении VCD диска нажимайте эту кнопку для включения или
выключения функции PBC (Playback Control
– управление воспроизведением).
TITLE
При воспроизведении DVD диска нажмите кнопку TITLE для перехода к меню
разделов диска.
(стоп)
При воспроизведении DVD/SVCD/VCD/
CD дисков, нажмите кнопку
устройство запомнит точку остановки, и
при последующем запуске данного диска
воспроизведение начнется с этой точки.
Нажмите кнопку
новки воспроизведения без запоминания
точки остановки.
Данная функция активна только при
дважды для полной оста-
один раз -
20 21
Page 21

выборе ВКЛ для пункта Последняя память
на странице общих настроек.
(воспроизведение/пауза)
Когда воспроизведение диска стоит на
паузе или остановлено, нажмите кнопку
, чтобы начать воспроизведение. Во время
воспроизведения нажмите эту кнопку для
приостановки воспроизведения.
Кнопки курсора
Используйте кнопки курсора для перемещения по меню.
VOL+/VOL-
Нажимайте кнопки VOL+/VOL- для увеличения или уменьшения уровня громкости
звука.
ENTER
Нажимайте кнопку ENTER для подтверждения выбранной опции.
SLOW
Нажимайте кнопку SLOW, чтобы изменять скорость замедленного воспроизведения в следующем порядке: 1/2 => 1/4 => 1/8
=> 1/16 => нормальное воспроизведение.
REPEAT
Нажмите кнопку REPEAT для повторного
воспроизведения трека, раздела, главы или
всего диска.
• При воспроизведении DVD диска нажимайте кнопку REPEAT; на экране Вам
будут предложены операции в следующем
порядке: повтор главы => повтор раздела
=> повтор всего диска => отмена повтора.
• При воспроизведении SVCD, VCD, CD
диска предлагаются операции в следующем порядке: повтор трека => повтор всего
диска => отмена повтора.
• При воспроизведении МРЗ диска предлагаются операции повтора в следующем
порядке: произвольное воспроизведение =>
случайный порядок => однократное воспроизведение трека => повтор трека => повтор
папки => отмена повтора.
АВ
• Нажмите кнопку АВ для выбора начальной точки (А) фрагмента для повтора.
Нажмите повторно кнопку АВ для выбора
конечной точки (Б).
• Нажмите кнопку АВ в третий раз для
отмены повтора и возврата к нормальному
воспроизведению.
SETUP
Нажмите кнопку SETUP для входа или
выхода из меню настроек устройства.
ZOOM
Во время воспроизведения DVD/VCD дисков нажимайте кнопку ZOOM для изменения размеров изображения в следующем
порядке: 2x => 3x => 4x => 1/2 => 1/3 => 1/4
=> нормальное изображение. Используйте
кнопки курсора для перемещения по увеличенному изображению.
MENU
При воспроизведении DVD диска нажмите кнопку MENU для перехода к главному
меню диска.
PROGRAM
• Если диск содержит два или более треков, разделов или глав, с помощью кнопки
PROGRAM Вы можете запрограммировать
порядок воспроизведения. При нажатии
этой кнопки Вы входите в меню программирования.
• Навигация по меню осуществляется
кнопками курсора. С помощью кнопок с
цифрами введите номер трека, раздела
или главы. Если записей более 10, установите курсор на пункт
ENTER для продолжения программирования (максимально возможно запрограммировать 20 записей).
• Используйте кнопки курсора для перемещения на пункт НАЧАТЬ. Нажмите кноп-
и нажмите кнопку
Page 22

Управление устройством Управление устройством
ку ENTER для запуска воспроизведения
программы. Для отмены программирования
нажмите кнопку PROGRAM.
Для дисков МРЗ программирование
невозможно.
DISPLAY
Нажимайте кнопку DISPLAY для отображения на экране различной информации
о текущем воспроизведении: истекшее/
оставшееся время или номер главы/раздела и др.
/ (предыдуший/следующий)
• При воспроизведении DVD диска на-
жмите кнопку
для перехода к предыду-
щей главе.
• При воспроизведении SVCD, VCD, CD
дисков нажмите кнопку
для перехода к
предыдущему треку.
• При воспроизведении DVD диска на-
жмите кнопку
для перехода к следую-
щей главе.
• При воспроизведении SVCD, VCD, CD
дисков нажмите кнопку
для перехода к
следующему треку.
/ (назад/вперед)
Нажимайте кнопку для ускоренного
воспроизведения назад. Нажимайте кнопку
для ускоренного воспроизведения
вперед. При каждом нажатии скорость воспроизведения будет изменяться в следующем порядке: 2X => 4X => 8X => 16X => 32X
=> нормальное воспроизведение.
Настройка системы
1. Нажмите кнопку SETUP, чтобы войти
в меню Настройки системы. Для выхода из
меню нажмите повторно кнопку SETUP.
2. С помощью кнопок / выберете
страницу настроек: Общие настройки, Настройки звука, Настройки видео, Настройка
предпочтений, Настройка пароля.
3. Нажмите кнопку , чтобы войти на
выбранную страницу настроек.
4. С помощью кнопок
/ выберите
параметр, который Вы хотите настроить.
5. Нажмите кнопку
список настроек. Используйте кнопки
, чтобы войти в
/
для выбора нужных настроек из списка;
для подтверждения выбора нажмите кнопку
ENTER. Для возвращения к списку настроек нажмите кнопку .
6. Чтобы вернуться к списку страниц на-
строек, нажмите кнопку
.
Некоторые пункты меню, соответствующие предустановленным режимам,
помечены серым и не могут быть выбраны.
Введенные установки сохраняются и после
выключения питания.
Страница общих настроек
СТР. ОСНОВНЫХ НАСТРОЕК
ФОРМАТ ТВ
ВЫБОР КАМЕРЫ
СИСТЕМНЫЙ ЯЗЫК
СУБТИТРЫ
ЗАСТАВКА
ПОСЛЕДНЯЯ ПАМЯТЬ
• Формат ТВ
4:3 PS: Когда устройство подключено
к обычному телевизору, широкоэкранное
изображение воспроизводится на всем
экране, но часть его обрезается.
4:3 LB: Когда устройство подключено к
обычному телевизору, широкоэкранное
изображение воспроизводится так, что
сверху и снизу появляются черные полосы.
16:9: Используйте этот режим, если
устройство подключено к обычному телевизору и вы хотите, чтобы изображение
было сжато.
Wide squeeze: Используйте этот режим,
если устройство подключено к обычному
22 23
Page 23

телевизору и вы хотите, чтобы изображение было сжато.
• Выбор камеры
При выборе в данной опции положения
ВКЛ на дисплее будет отображаться символ
угла обзора при воспроизведении дисков,
имеющих сцены, снятые под несколькими
углами.
• Системный язык
Выбор языка экранного меню (русский,
английский).
• Субтитры
Эта функция не работает, если диск не
имеет субтитров. Если функция субтитров
отключена, нажмите кнопку SUBTITLE на
ПДУ для включения функции. Установка по
умолчанию - ВКЛ.
• Заставка
Если функция ЗАСТАВКА включена,
устройство включено и диск не воспроизводится в течение нескольких минут, то на
экране появляется движущаяся заставка и
через несколько минут устройство переходит в спящий режим.
• Последняя память
Если эта функция включена, устройство
может запомнить время, на котором остановился просмотр. При следующем включении Вы можете начать воспроизведение с
момента, содержащегося в памяти.
Страница установок звука
СТР. УСТАНОВОК ЗВУКА
КОЛ-ВО КАНАЛОВ
ЦИФРОВОЙ ЗВУК
УСТ. DOLBY DIGITAL
• Количество каналов
LT/RT: Аудиосигнал будет воспроизво-
диться через левый и правый канал, даже
если источник сигнала имеет пятиканальный формат.
Стерео: Аудиосигнал будет воспроизводиться в режиме стерео, даже если источник сигнала имеет пятиканальный формат.
• SPDIF
SPDIF/OFF: отсутствует цифровой выходной сигнал (коаксиальный выход отключен),
задействован только аналоговый аудио
выход.
SPDIF/RAW: декодирование на цифровом
входе усилителя отсутствует.
SPDIF/PCM: цифровой выходной сигнал в
декодированном РСМ формате.
УСТАНОВКА DOLBY DIGITAL
АНАЛОГОВЫЙ ЗВУК
DYNAMIC
• Аналоговый звук
Стерео: стереофонический выходной
сигнал.
Левый: выходной сигнал левого канала.
Правый: выходной сигнал правого канала.
Совокуп. моно: смешанный выходной
сигнал левого и правого каналов.
• Dynamic
При просмотре в ночное время программ
с высоким динамическим диапазоном
звука выбор этого режима позволит Вам
установить такой формат обработки звука,
который обеспечит сохранение качества
и деталей звукового сопровождения. Это
даст Вам возможность не беспокоить
остальных членов семьи и сохранить высокое качество звука.
Page 24

Управление устройством Управление устройством
Страница настройки видео
СТР. ВИДЕО УСТАНОВОК
РЕЗКОСТЬ
ЯРКОСТЬ
КОНТРАСТ
ОТТЕНОК
НАСЫЩЕННОСТЬ
ПЕРЕВОРОТ ИЗОБРАЖ.
• Резкость, Яркость, Контраст, Отте-
нок, Насыщенность: Вы можете настроить
эти параметры в соответствии с вашими
предпочтениями.
• Переворот изображения: При выборе
ВКЛ изображение будет отображаться
перевернутым по вертикали.
Страница настройки предпочтений
СТР. ПРЕДПОЧТЕНИЙ
СИСТЕМА ТВ
ЗВУК
СУБТИТРЫ
МЕНЮ ДИСКА
ОГРАНИЧЕНИЯ
ЗАВОДСКИЕ УСТ.
• Язык аудио, субтитров, меню диска
Эти параметры могут быть изначально
установлены в соответствии с Вашими
предпочтениями. Если установленные Вами
параметры поддерживаются содержанием
диска, то воспроизведение будет происходить с учетом Ваших настроек. В противном случае будут использоваться установки
диска, заданные по умолчанию.
• Ограничения
Эта функция предназначена для осуществления родителями контроля над просмотром
детьми дисков и защищает Ваших детей от
сцен насилия и эротики. Диск, уровень которого выше, чем установленный с помощью
данной функции, не будет воспроизводиться.
• Заводские установки
Вы можете восстановить исходные фабричные настройки устройства.
Страница настройки пароля
СТР. УСТАНОВКИ ПАРОЛЯ
РЕЖИМ ПАРОЛЯ
ПАРОЛЬ
Изменение пароля. Первоначально уста-
• Система ТВ
Данное устройство подходит для всех
разновидностей телевизионных систем. Вы
можете выбрать PAL, NTSC или Мульти.
новлен фабричный пароль 1369. Вы можете
установить собственный пароль. Если Вы
забыли собственный пароль, вы можете использовать пароль 1369 как основной.
PAL: эта система используется в Китае,
Европе, Гонконге и пр.
Авто: система ТВ автоматически переключается в соответствии с системой, в
которой записан диск.
NTSC: эта система используется в США,
Тайване, Японии и пр.
24 25
Page 25

Прочие операции
Воспроизведение файлов MP3/
JPEG/MPEG4
MP3 - общепринятый стандарт сжатия
аудиоданных, позволяющий уплотнить
записываемую информацию о звуковом
сигнале до 12 раз. При использовании
формата MP3 на одном CD-диске может
храниться более 600 минут музыки (более
170 песен). При этом качество звука MP3диска практически соответствует качеству
аудио CD-диска.
JPEG (Joint Photographic Expert Group) алгоритм сжатия изображений, обеспечивающий очень высокую степень сжатия исходного материала. Изображения в таком формате
могут обрабатываться любыми графическими редакторами и занимают в 15-20 раз
меньше места, чем исходные изображения.
MPEG4 - стандарт, разработанный для
передачи аудио- и видеоинформации по
каналам с низкой пропускной способностью. Данный формат позволяет размещать полнометражные фильмы на одном
компакт-диске.
Если в устройство вставлен диск, USBнакопитель или карта памяти, содержащий
файлы данных форматов, на дисплее отобразится следующий интерфейс:
1 2
1. Окно отображения теущей информации о воспроизведении, такой как истекшее/оставшееся время трека, номер трека,
количество треков, состояние воспроизведения (пауза, остановка и др.), уровень
громкости и т.д.
2. Окно отображения адреса на диске, по
которому находится текущий файл.
3. Окно директорий - отображает текущую директорию.
4. Полоса прокрутки - отображает положение файла в директории.
5. Окно предпросмотра - отображает
миниатюру выбранного JPEG файла.
С помощью кнопок
нужную директорию и нажмите кнопку
или ENTER, чтобы войти в нее. Выберите
файл и нажмите кнопку или ENTER для
запуска воспроизведения.
Примечания по воспроизведению
JPEG файлов:
• Во время воспроизведения файла нажмите кнопку , на экране отобразится 12
миниатюр файлов.
• С помощью кнопок курсора выберите
нужную миниатюру.
• С помощью кнопок курсора выберите
пункт SLIDE SHOW инажмите кнопку или
ENTER для запуска последовательного воспроизведения файлов.
• С помощью кнопок курсора выберите пункт MENU и нажмите кнопку или
ENTER, чтобы войти в меню назначения
кнопок.
Меню назначения кнопок имеет следую-
щий вид:
/ выберите
Кнопка Функция
Program Эффект слайдшоу
вход в режим предварительного просмотра
3
4 5
следующая картинка
Page 26

Управление устройством Общая информация
предыдущая картинка
воспроизведение картинки
поворот картинки на 90
градусов против часовой
стрелки
поворот картинки на 90 градусов по часовой стрелке
Выберите пункт ПРОДОЛЖЕНИЕ и нажмите кнопку ENTER для перехода ко
второй странице меню:
ZOOM
Кнопки
курсора
Выберите пункт ВЫХОД ИЗ МЕНЮ и нажмите кнопку ENTER для выхода из меню
назначения кнопок.
изменение масштаба изображения
увеличение масштаба изображения
уменьшение масштаба изображения
перемещение по увеличенному изображению
Операции с USB/SD/MMC
Вставьте USB-накопитель в USB-порт,
затем нажимайте кнопку DVD/SD/USB; начнется воспроизведение файлов, содержащихся на накопителе.
Вставьте в соответствующий слот карту
памяти SD или MMC, нажимайте кнопку
DVD/SD/USB; начнется воспроизведение
файлов, содержащихся на носителе.
Операции с файлами, содержащимися на
USB-накопителях и картах памяти, соответствуют операциям с дисками.
Устройство поддерживает SD/MMC/USBносители объемом до 32 Гб.
26 27
Page 27

Обращение с компакт-дисками
• Не вставляйте в лоток для загрузки
компакт-диска ничего, кроме компакт-диска.
• Не используйте диски с трещинами,
отколотыми краями, деформированные
диски или диски с другими повреждениями, поскольку такие диски могут вызвать
искажение звука, шумы или повредить
проигрыватель.
• Держите диск только за края (как показано на рисунке). Чтобы обеспечить чистоту
диска, не прикасайтесь к его поверхности.
• Когда диски не используются, храните
их в футлярах.
• Не подвергайте диски действию
прямого солнечного света, повышенной
влажности, повышенным температурам или
действию пыли.
• Продолжительное влияние предельных
температур может деформировать диск.
• Не приклеивайте этикеток, не пишите
и не наносите химических веществ на поверхность дисков.
• Не прикасайтесь к записанной поверхности дисков.
• Используйте только традиционные круглые диски диаметром 12 см. Не используйте диски необычной формы и нестандартного размера.
Вытирайте прямолинейным движением от
центра к краю.
Не используйте растворитель, бензин,
очиститель пластинок или антистатический аэрозоль для чистки дисков. Такие
химические вещества могут повредить его
пластиковые поверхности.
Комплект поставки
DVD проигрыватель 1 шт
Пульт дистанционного управления 1 шт
Батареи ААА 1.5 В 2 шт
Аудио-видео кабель 1 шт
Наушники 1 шт
Устройство питания от бортовой
сети автомобиля 1 шт
Адаптер переменного тока 1 шт
Аккумуляторная батарея (вмонтирована в
корпус устройства) 1 шт
Защитный футляр 1 шт
Руководство по эксплуатации 1 шт
Информация для потребителя 1 шт
Гарантийный талон 1 шт
Чистка дисков
Отпечатки пальцев должны быть тщательно стерты с поверхности диска мягкой
тканью. В отличие от обычных пластинок,
компакт-диски не имеют канавок для сбора
пыли и микроскопических частиц грязи,
поэтому осторожно вытирайте их мягкой
тканью, чтобы удалить частицы грязи.
Page 28

Общая информация Общая информация
Руководство по устранению
неисправностей
Ниже приводится таблица, в которой описаны простые меры, способные помочь Вам
устранить большую часть проблем, могущих возникнуть при использовании данного
устройства. Если нижеуказанные меры не помогли, обратитесь в сервисный центр или к
ближайшему дилеру.
Неисправность Причина Решение
Диск не воспроизводится
Звук искажается
Звук отсутствует
Изображение
отсутствует
Не работает
ПДУ
Некорректная
работа устройства
Конденсат на лазерной головке
Диск вставлен неправильно
Диск не поддерживается Не используйте подобные диски
Неверно выбран уровень
громкости
Неверно выполнено подклю-
чение
Диск поврежден Замените диск
Включена функция приглуше-
ния звука
Уровень звука слишком низкий Скорректируйте уровень громкости
Неверно выполнено подклю-
чение
Загрязнен ИК-датчик
Препятствие на пути сигнала
Расстояние или угол использования ПДУ слишком велики
Сели батарейки Замените батарейки
Используется некорректно за-
писанный диск
Нажата неверная клавиша
или выбран неверный режим
работы
Влияние внешних помех или
статического электричества
Включите устройство на 1-2 часа без
диска
Вставьте диск маркированной стороной вверх
Скорректируйте уровень громкости
устройства
Проверьте правильность подключения
Отключите функцию приглушения
звука
Проверьте правильность подключения
Очистите ПДУ и переднюю панель
устройства
Используйте пульт только в прямой
видимости от устройства
Сократите расстояние или угол использования
Замените диск
Выберите корректный режим работы
Выключите устройство из сети на 1-2
минуты
28 29
Page 29

Технические характеристики
Внешний вид
Размер корпуса 210 х 170 х 42 мм
Вес нетто/брутто 0,75 кг/1,1 кг
Дисплей 7” ЖК
Формат дисплея 16:9
Совместимость с форматами
Поддержка носителей DVD/DVD±R/DVD±RW/CD/CD-R/CD-RW/
USB/SD/MMC
Воспроизведение форматов DVD/Super VCD/DVCD/VCD/HDCD/CDDA/
MP3/Kodak Picture/JPEG/MPEG4 (DivX)
Аудио
Встроенный декодер Dolby Digital +
Видео
Система цветности PAL/NTSC
Терминалы
Аудиовидеовыход +
Выход на наушники +
Коаксиальный цифровой аудио выход +
Функции
Поворотный экран +
Блокировка от просмотра детьми +
Многоязычное экранное меню +
Питание
От адаптера переменного тока +
От бортовой сети автомобиля +
От аккумуляторной батареи Li-Ion +
Технические характеристики могут быть изменены заводом-изготовителем без предварительного уведомления. Указанные геометрические размеры имеют приблизительные
значения.
 Loading...