

Page 1

H-LCD2617
LCD TV
ЦВЕТНОГО ИЗОБРАЖЕНИЯ
ТЕЛЕВИЗОР
ЖИДКОКРИСТАЛЛИЧЕСКИЙ
(LCD)
Руководство по эксплуатации Instruction manual
Page 2
Table of contents Before you start
Dear customer!
Thank you for purchasing our product. For safety, it is strongly recommended to read
this manual carefully before connecting, operating and/or adjusting the product and keep
the manual for reference in the future.
Table of contents
Before you start
Utilization of the product
Important safeguards
Connection
Operation
Control elements
Front panel
Back panel
Remote controller
Changing the battery
General operations
Signal sources
OSD operation
Picture setting
Sound setting
OSD setting
Advance setting
Function setting
PIP setting
USB operation
File playback
General information
Troubleshooting
Causes of interference
Accessories
Specifications
2
3
3
3
4
5
5
5
5
6
6
7
7
7
7
8
8
8
8
9
10
10
11
11
11
12
12
2 3
Page 3

Utilization of the product
If you want to dispose this product, do not mix it with general household waste. There is
a separate collection system for used electronic products in accordance with legislation
that requires proper treatment, recovery and recycling.
Please contact your local authorities for the correct method of disposal. By doing so,
you will ensure that your disposed product undergoes the necessary treatment, recovery
and recycling and thus prevent potential negative effects on the environment and human
health.
Important safeguards
• Before connecting the AC power cord to
the mains supply outlet, make sure that the
voltage designation of the unit corresponds to
the local electrical supply.
• Please unplug the power cord from the AC
outlet and contact a service center for repair
if following occurs: any obvious abnormality
appears in the unit, such as smoky, peculiar
smell or strange sound; liquid has been spilled or
other objects have fallen into the unit; no picture
or sound; cover or panel is broken; although you
have operated the unit following the operating
instructions, it still cannot work normally.
• This unit should only be connected to a
wall socket having grounding.
• Always disconnect the power cord and
antenna during a storm.
• Do not fix the power cord with a metal nail.
• Unplug the power cord from the AC outlet;
also unplug the signal cables from the input
ports when the unit is unused for long periods
of time.
• When unplugging the plug, always hold
the wide slot, do not touch the metal part, and
do not destroy, refit, twist, pull or roast the
power cord.
• Please contact the service center
immediately if you found that the core is
showed in the air or has been broken.
• Please replace the AC outlet if the metal
bolt cannot be inserted into the power socket
completely or it cannot be fastened even when
it was pushed in, otherwise, any accidents of
shocks and fires would happen.
• Never touch the antenna lie or power plug
if it stars to thunder.
• Do not touch the power plug with wet
hands.
• Do not use any non-rated power socket
with numerous devices jointed on one power
socket or cable device. The wire of nondesignated capacity may cause the fire due to
the generation of heat.
• All instructions must be read and
understood well before you operate the unit.
Heed all warnings and follow all instructions.
• Please use the accessories provided
by the manufacturer. Using inadequate
accessories may result in accidents.
• Please adjust the product through the
panel buttons or the remote controller, do
not remove the cover or attempt to service
the product by yourself. Do not disassemble
back cover and do not make maintenance by
yourself to avoid the electric shock.
• Over-press the panel may destroy the
product.
• Do not place the product on an unstable
cart, stand surface, tripod, bracket, or table.
The product may fall, causing serious accidents
as well as the damage to the product.
• Please place the product on a flat surface
in a well-ventilated location. Keep it away from
Page 4

Before you start/Connection
the burning-light, direct sunlight, vibration,
high-temperature and humidity.
• Do not place any vase, potted plant, cup,
medicine and any container with water on this
product. If the liquid is spilt, it may cause the
fire, electric shock or breakdown.
• Do not install it at the place on the strong
magnetic field or current field. It may cause
break down. This equipment may be observed
deterioration of the picture by electromagnetic
radiation in electromagnetic environment.
• Fasten the wheel of the product or shelf
with wheels when installing this product. If it
moves or is tipped over, it may be damaged.
• Do not place any fire source such as
candlelight close to this product or place it on
this product. If it is tipped over or fallen down, it
may cause damage or fire.
• Do not place the unit into closed space
of TV for better ventilation; it can reduce the
product lifetime. Keep a space at list 10 cm at
above, left, and right of the TV.
• Please place all the signal cords behind of
rear panel.
• Do not overexert or touch the panel when
you convey the product. Do not transfer the
LCD TV up or down display direction.
• Do not transport it with the power cord
or the connection cable connected. If you
move this product with the power cord or the
connection cable connected, the damaged
power cord, connection cable or connection
terminal may cause the fire, the electric shock
or breakdown.
• 2 persons or more shall transport the
device, which is heavier than 18 kg. If you drop
or tip over the device, it may damage it.
• The temperature of the product’s body
becomes a little higher after a long period use.
This phenomenon indicates that heat exchange
in normal working mode, thus please do not
let children or anyone who is sensitive of
temperature to touch.
All images provided herein are schematic
drawings of real objects and may differ
from their real images.
Connection
• Insert the power cord to the power
connector of this unit, then connect the cord
plug to a power supply source.
• Connect a video source to the Composite
video input jack with RCA cable.
• Connect an audio source to the proper
Audio input jacks (Left and Right).
• Connect a TV or CATV antenna to the
antenna jack.
• Connect PC audio input to PC main unit
with related audio cable in PC mode.
• If the video source has a HDMI output
jack, you can connect the signal to the unit by
HDMI cable.
• When using the unit as a computer screen,
connect the PC to the VGA jack of the unit by
the relevant cable.
• Component input is intended for receiving
component video signal if connected to the
component output of external signal source.
• Connect your headphones or earphones
(not included) to the headphone socket of this
unit. When headphones are connected, the
sound output through the built-in speakers of
this unit is mute.
4
Page 5
Operation
Control elements
Front panel
Back panel
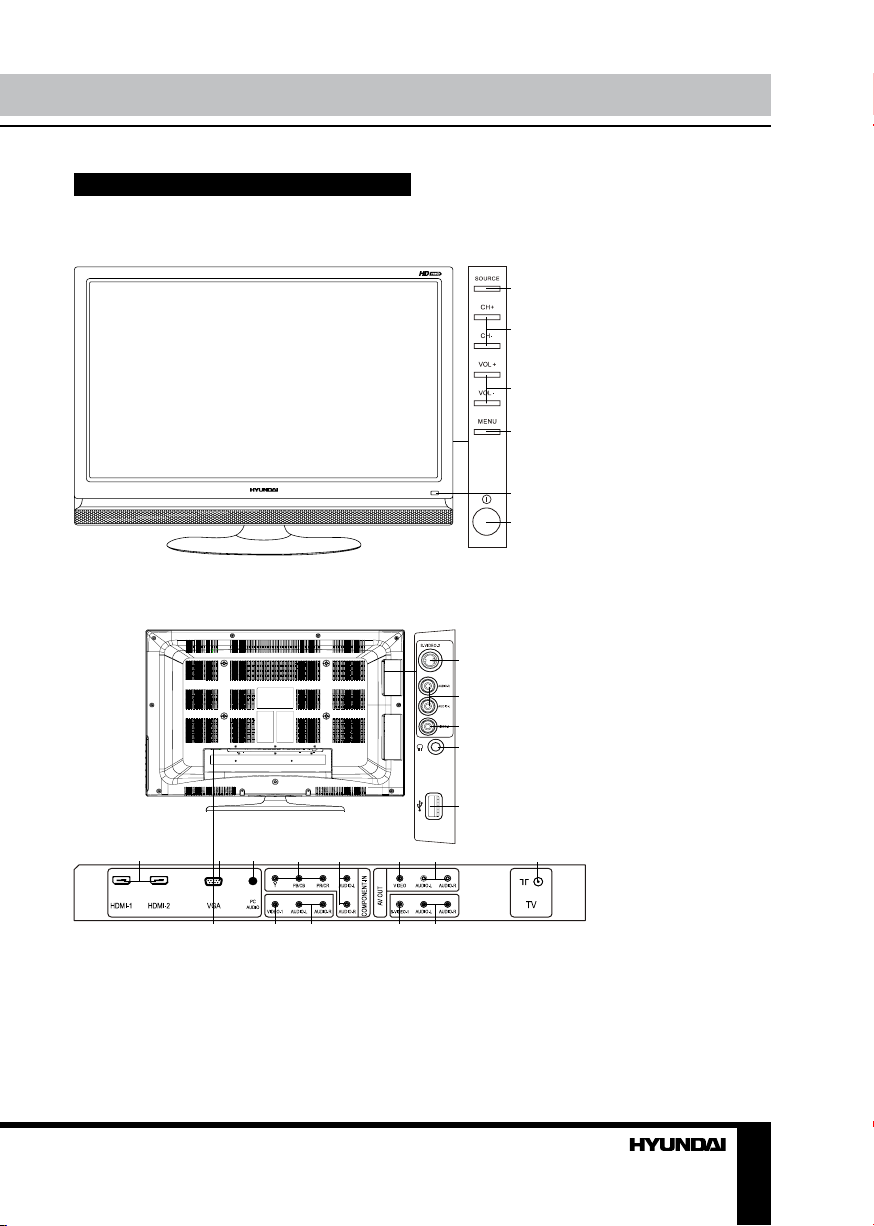
1. SOURCE button
2. CH+/CH- buttons
3. VOL+/VOL- buttons
4. MENU button
5. IR remote sensor
6. POWER button
1
2
3
4
5
6
14
15
16
17
1 2 3 4 5 6 7 8
109 11 12 13
1. HDMI1 and HDMI2 inputs
2. VGA input
3. PC audio input
4. Component video input
5. Component audio input (L+R)
6. Composite video output
18
7. Audio stereo output (L+R)
8. TV antenna jack
9. AC cord inlet
10. Composite video input-1
11. Audio stereo input-1
12. S-Video-1 input
13. Stereo audio input
14. S-Video-2
15. Audio stereo input-2
16. Composite video input-2
17. Headphone output
18. USB port
5
Page 6
Operation
Remote controller (RC)
1
2
3
4
5
6
7
8
9
10
11
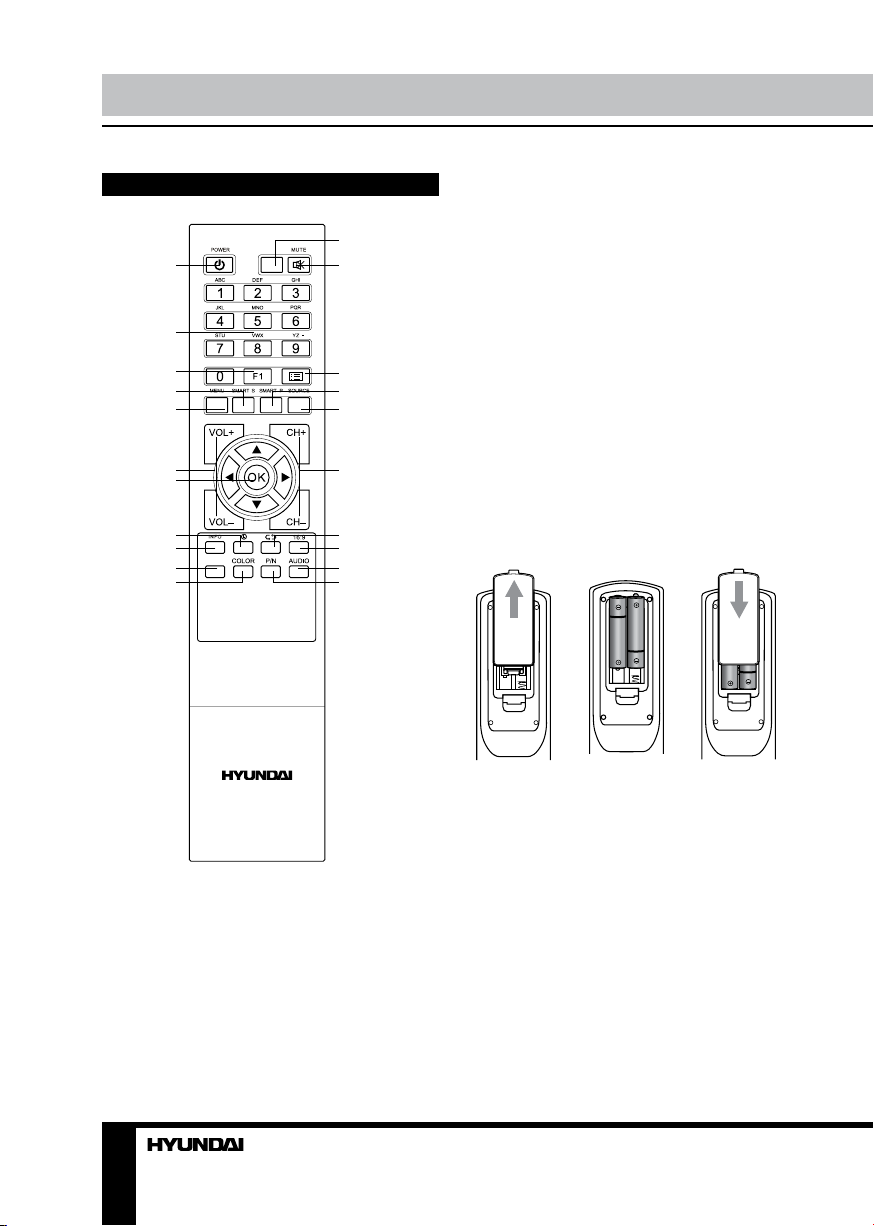
9. INFO button
10. Button not operable
11. COLOR button
12
13
12. Button not operable
13. MUTE button
14. PROGRAM LIST button
15. SMART P. button
16. SOURCE button
17. CH+/CH- buttons
18. RETURN button
14
15
16
19. 16:9 button
20. P/N button
21. AUDIO button (not operable)
Changing the battery
17
18
19
20
21
1. Remove the battery compartment cover
on the back of the RC.
2. Insert the batteries into the battery
compartment making sure that the correct
polarity is observed.
3. Install the cover back.
1. POWER button
2. Number buttons (Alphabetic function is
unavailable for this model)
3. F1 button
4. SMART S. button
5. MENU button
6. VOL+/VOL- buttons
7. Cursor (UP/DOWN/LEFT/RIGHT) buttons/
OK button
8. TIME button
6
1 2 3
• Use two AAA batteries for the RC. The RC
should be pointed at remote sensor within 8
meters and within 30 degrees at the left or the
right side.
• Take the battery out of the RC if it is not
used for a long time.
• Do not mix new and used batteries or
different types of batteries. Weak batteries can
leak and severely damage the RC.
• Do not expose the RC to shock, liquids,
and do not place it in an area with high
humidity.
Page 7

Operation
General operations
• Press POWER button on the unit or on the
RC to switch on the unit from standby mode.
Press POWER switch on the unit to switch off
power. When the unit is on, press POWER
button on the RC to switch the unit to standby.
When no signal input for 5 minutes, the
unit will switch to standby mode automatically.
• Press VOL- button repeatedly to decrease
the volume; press VOL+ button repeatedly to
increase the volume.
• Press TIME button repeatedly to set the
sleep time (from 0 to 120 min).
• Press RETURN button on the RC to select
from the present channel and the previously
displayed channel.
• Press 16:9 button repeatedly to select
a screen display size from the available list:
FULL => MOVIE => CAPTION => 4:3 =>
PANORAMA. Available aspects may differ for
different signal sources.
• Press MUTE button to cut off sound, press
this button again or adjust volume to resume
sound.
• Select the TV function mode. Press
CH-/CH+ buttons to select previous or next
channels; or press number buttons to enter a
channel number directly.
• Press SMART P. button repeatedly to
cycle through the available video picture
modes from the following types: Standard =>
Dynamic => Soft => Personal.
• Press SMART S. button repeatedly to
cycle through the available sound modes from
the following types: Personal => Standard =>
News => Music.
• Press INFO button to display the preset
TV channel play information.
• Press P/N button to select PAL/NTSC/Auto
color system.
• Press COLOR button to select Normal/
Warm/Cool color temperature mode.
• Press F1 button to freeze the picture on
or off.
• Press PROGRAM LIST button to scan or
set program list.
Signal sources
Press SOURCE button, then press DOWN/
UP cursor buttons on the RC or CH+/CHbuttons on the panel to select a source from
available source list: TV => AV1 => AV2 =>
SVideo1 => SVideo2 => YPbPr => HDMI1 =>
HDMI2 => PC => USB. Press OK button on the
RC or MENU button on the panel to confirm.
OSD operation
1. Press MENU button to enter the setting
menu displayed on the screen.
2. Press LEFT/RIGHT cursor buttons on the
RC or VOL+/VOL- buttons on the panel to go
to the needed setting page.
3. Press UP/DOWN cursor buttons on the
RC or CH+/CH- buttons on the panel to select
a parameter to adjust.
4. Press LEFT/RIGHT buttons on the RC or
VOL+/VOL- buttons on the panel to adjust the
selected parameter.
5. Press MENU button to return to the root
menu or exit menu setting.
Some menu items may be in grey color,
in this case they are not adjustable. Pictures
of OSD manu are for reference only; they may
differ from the real pictures.
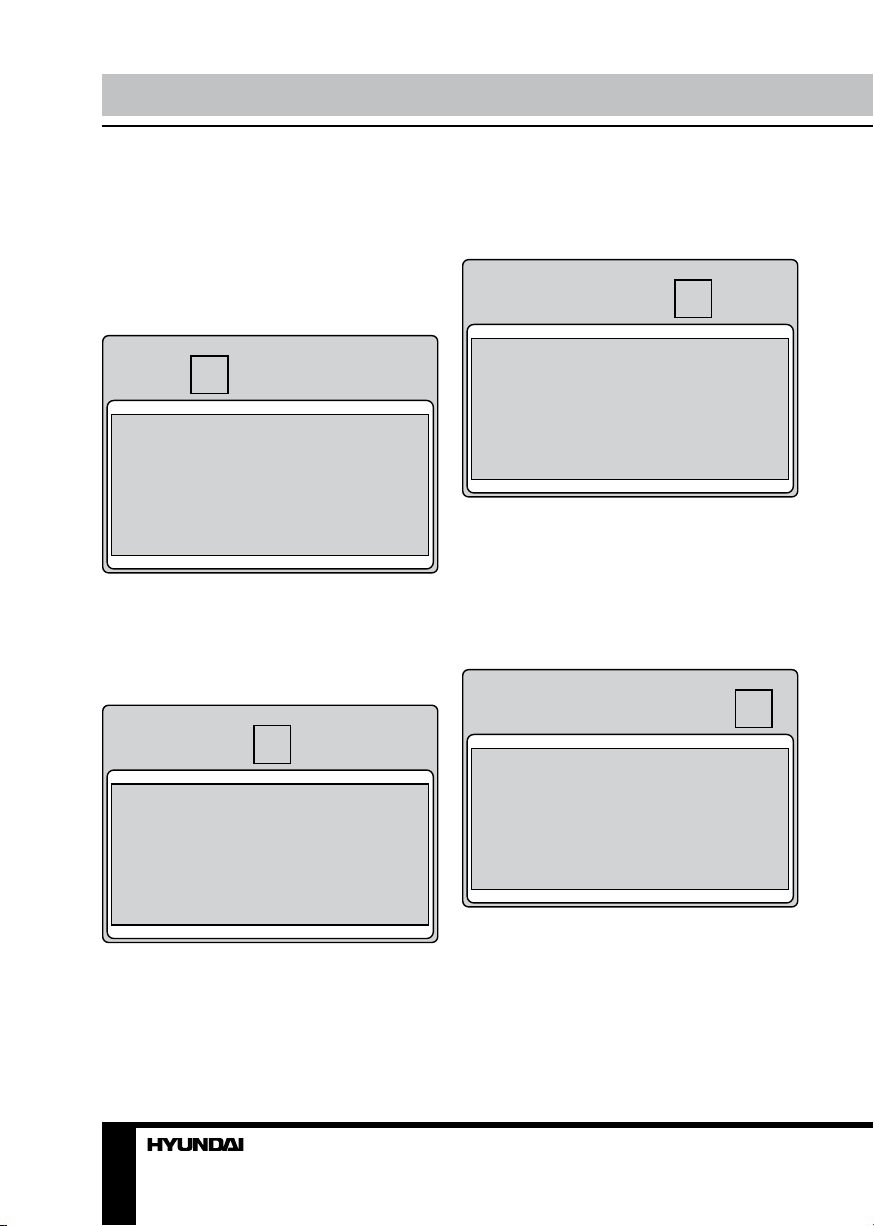
Picture setting
PICTURE
CONTRAST
BRIGHTNESS
HUE
SATURATION
SHARPNESS
PICTURE MODE
SCALE
COLOR TONE
3D NR
SEL ADJ MENU : EXIT
• Contrast, Brightness, Hue (available only
for NTSC system), Saturation, Sharpness.
7
Page 8
Operation Operation
• Picture Mode: Standard/Dynamic/Soft/
Personal.
• Scale: Full/Movie/Caption/4:3/Panorama.
• Color tone: Select color temperaure mode
of the picture - Normal/Warm/Cool.
• 3D NR: Middle/Strong/Weak/Off.
Sound setting
SOUND
BASS
TREBLE
BALANCE
SOUND MODE
SEL ADJ MENU : EXIT
• Bass, Treble, Balance (adjust output
between left and right speakers).
• Sound Mode: Standrard/News/Music/
Personal.
OSD setting
OSD
OSD-H POSITION
OSD-V POSITION
OSD-DURATION
OSD-HALFTONE
OSD-LANGUAGE
SEL ADJ MENU : EXIT
• OSD-H Position, OSD-V Position: adjust
horizontal and vertical position of the OSD menu.
• OSD-Duration: set OSD menu display
time from 5 to 60.
• OSD-Halftone: adjust the tone of the OSD
menu.
• OSD-Language: select the language of
the OSD menu.
Advance setting
ADVANCE
SLEEP-TIMER
DCC
BLUE SCREEN
RESETTING
SEL ADJ MENU : EXIT
• Sleep-timer: set the sleep time in minutes
(15M, 30M, 45M, 60M, 120M).
• DCC: set on or off dynamic contrast control.
• Blue screen: set on or off blue screen.
• Resetting: reset the parameters to initial
factory settings.
TV setting
TV
COLOR SYSTEM
SOUND SYSTEM
MTS
SKIP
AUTO SCAN
MANUAL SEARCH
FINE TUNING
CHANNEL EDIT
SEL ADJ MENU : EXIT
• Color system: PAL/NTSC/AUTO.
• Sound system: select sound system: I,
D/K, M, AUTO, B/G.
• MTS: select an MTS mode: STEREO/
MONO/DUAL I/DUAL II.
• Skip: set on or off skipping a channel.
• Auto scan: press RIGHT cursor button
on the RC or VOL+ button on the panel to
8 9
Page 9

start automatical search of available channels.
Current frequency and and channel number
will be displayed. To stop search, press MENU
button on the RC.
• Manual search: press RIGHT cursor
button on the RC or VOL+ button on the panel
to enter manual search mode. Press LEFT/
RIGHT cursor buttons on the RC or VOL+/VOLbuttons on the panel to select the channels
number. Then press DOWN cursor button
to select SEARCH, then again press LEFT/
RIGHT cursor buttons on the RC or VOL+/VOLbuttons on the panel to start channel search.
• Fine tuning: press RIGHT cursor button to
enter fine tune mode. Now press RIGHT/LEFT
cursor buttons to adjust the frequency.
• Channel edit: press RIGHT cursor button
on the RC to enter channel edit mode.
001 011 021
002 012 022
003 013 023
004 014 024
005 015 025
006 016 026
007 017 027
008 018 028
009 019 029
010 020 030
1 NAME 2 DELETE 3 SWAP MENU : EXIT
PIP setting
PIP
MULTI WINDOW
SUB SOURCE
SIZE
PIP-POSITION
BORDER COLOR
SOUND SOURCE
SWAP WINDOWS
SEL ADJ MENU : EXIT
• Multi window: select PIP display mode:
PIP/POP FULL/POP 4:3/OFF.
• Sub source: select PIP signal source.
• Size: select PIP window size: Lagre/Small/
Mid.
• PIP Position: select PIP window position:
Top Left/Top Right/Bottom Left/Bottom Right.
• Border Color: Blue/Red.
• Sound source: select Main/Sub sound
source.
• Swap windows: swap signal source
windows.
• Name: select a channel with cursor
buttons. Press “1” number button to name;
press UP/DOWN cursor buttons to select a
number. Press LEFT/RIGHT cursor buttons to
go to the next or previous digit. After selecting
all numbers, press “1“ number button to confirm.
• Delete: select a channel with cursor
buttons. Press “2“ number button to delete the
selected channel. Press “1“ button to confirm.
• Swap: select a channel with cursor buttons.
Press “3“ number button, then press UP/DOWN
cursor button to select the new position for the
channel. Press “1“ button to confirm.
Page 10

Operation
USB operation
Insert a USB into the USB jack. Select USB
source and press OK button. The screen will
show a USB playback window:
1 2 3 4 5
1. Image file indicator
2. Storage contents list
3. Audio file indicator
4. Current file information
5. File preview window
USB capacity supported: up to 16 Gb.
2.0 USB version is supported. For correct and
satisfactory operation, licensed USB devices
of famous brands should be used with this unit.
Avoid using USB devices of unknown brands.
File playback
• Press DOWN direction button to go to
contents list.
• Press UP/DOWN direction buttons to select the needed file. Press RIGHT cursor button
to play the selected file.
• Press MENU button to stop playback.
• Press LEFT cursor button to return to
previous menu level.
10
Page 11

General information
Troubleshooting
Below is a table describing simple measures that can help you eliminate most problems likely
to emerge when this unit is in use. If below measures do not help, turn to a service center or to the
nearest dealer.
Symptom Cause Solution
No picture, no
sound, and no
indicator light
Picture and
sound with
abnormity
Picture is spotted
or with snow
Blue background No video signal or the signal cord is
No sound No audio signal or the signal cord is
The RC does not
work
Causes of interference
Incorporated in your TV receiver are the most up-to-date devices to eliminate interference.
Local radiation however, can create disturbances, which visibly affect your picture. Proper
installations, a good aerial are your best safeguards against these disturbances.
• RF INTERFERENCE: Moving ripples across the screen are caused by nearby transmitting or
receiving short-wave radio equipment.
• DIATHERMY: Herringbone pattern and partial picture loss can result from the operation of
diathermy equipment from a nearby doctor’s surgery or hospital.
• SNOW: Weak TV signals from long distant stations result in an instead picture and give the
effect of falling snow. An antenna adjustment or antenna amplifier may be needed.
• GHOST: Multiple image, caused by TV signals reflected back from surrounding buildings,
hills, aircraft, etc. is minimized by correct aerial positioning.
• CAR IGNITION: Nearby cars and electrical motors can cause small streaks across the picture
or make the picture roll.
The power cord is not plugged in.
Contrast, brightness, color and
volume are all in the minimum value
or TV is in mute mode.
Contrast and color are set improperly.
Color system is set improperly.
Sound system is set improperly.
Signal source is low-grade or the
signal is in a lower quality.
improperly/not connected.
improperly/not connected.
Batteries are improperly installed or
exhausted.
Plug the power cord in.
Alter the value of contrast,
brightness, color and volume.
Set the value of Contrast and color
properly.
Set the sound system properly.
Use the qualified signal cord.
Connect the signal cord properly.
Connect the audio signal cord
properly.
Set the sound system properly.
Make sure the positive and the
negative polarities are correct.
Reattach the battery lid.
Replace the batteries.
11
Page 12

General information Содержание
Accessories
1. LCD TV 1 pc
2. Remote controller 1 pc
3. Power cord 1 pc
4. Consumer information 1 pc
5. Warranty card 1 pc
6. Instruction manual 1 pc
Specifications
ize (diagonal) 26” (66 cm)
S
Brightness 500 cd/m
Contrast 1000:1
Response time 5 ms
Resolution 1360 x 768
Aspect ratio 16:9
Color system PAL, SECAM
Sound system B/G, DK, I, L
NICAM Stereo 2 x 10 W
Headphone jack +
Component YPbPr +
AV RCA in x 2
S-Video x 2
AV RCA out +
PC audio input +
VGA +
HDMI x 2
Russian and English OSD +
Progressive scan +
Digital comb filter +
Sleep timer +
Picture-in-Picture function +
Quantity of channels 199
Nominal power ~100-240 V, 50/60 Hz
Power consumption 140 W
Unit dimensions 652 x 449 x 104 mm
Net/Gross weight 10.5 kg/12.5 kg
2
The LCD panel is a high technology product with many thin film transistors that can
give you a fine picture details. Occasionally, a few non-active pixels may appear on the screen
as a fixed point of blue, green, red, black or white, please note that this does not affect the
performance of your LCD TV.
Warning: Specifications may be subject to change without notice for improvement.
12 13
Page 13

Уважаемый покупатель!
Благодарим Вас за покупку нашего изделия. Чтобы понять, как правильно и безопасно пользоваться приобретенным устройством, рекомендуется тщательно изучить
настоящее руководство перед подключением и эксплуатацией изделия. Сохраняйте
руководство для использования в будущем.
Содержание
Перед началом эксплуатации
Утилизация изделия
Меры предосторожности
Подключение
Управление устройством
Элементы управления
Передняя панель
Задняя панель
Пульт дистанционного управления
Установка батареек
Общие операции
Источники аудио-видео сигнала
Экранное меню
Настройка изображения
Настройка звука
Меню
Установка
Настройка
PIP
Операции с USB
Воспроизведение файлов
Общая информация
Руководство по устранению
неисправностей
Источники помех
Комплект поставки
Технические характеристики
13
14
14
14
16
17
17
17
17
18
18
19
19
19
20
20
20
20
21
21
22
22
23
23
23
24
25
Page 14

Перед началом эксплуатации
Утилизация изделия
Если вы желаете утилизировать данное изделие, не выбрасывайте его вместе с
обычным бытовым мусором. Существует отдельная система сбора использованных
электронных изделий в соответствии с законодательством, которая предполагает
соответствующее обращение, возврат и переработку.
Обращайтесь в органы местного управления за инструкциями по правильной
утилизации продукта. Тем самым Вы обеспечите утилизацию Вашего изделия с
соблюдением обязательных процедур по обработке, утилизации и вторичной переработке и, таким образом, предотвратите потенциальное негативное воздействие на
окружающую среду и здоровье людей.
Меры предосторожности
• Перед подсоединением кабеля питания
к источнику тока убедитесь, что напряжение устройства соответствует напряжению
электрической сети.
• Пожалуйста, извлеките шнур питания из розетки и свяжитесь с сервисной
службой в следующих случаях: если в
устройстве имеются явные неисправности,
например, из него идет дым, чувствуется
специфический запах или слышен нехарактерный звук; если внутрь устройства
попала жидкость или посторонние предметы; если нет изображения или звука; если
поврежден корпус или панель; если Вы
пользуетесь устройством согласно инструкции, но оно не работает должным образом.
• Устройство можно подключать только к
розетке, имеющей заземление.
• Во избежание поражения электрическим током защищайте шнур питания от
возможного нажатия на него или защемления, особенно рядом с разъемами.
• Не закрепляйте шнур питания метизами.
• Если Вы не пользуетесь устройством
длительное время или в случае грозы
обязательно отключайте шнур питания из
розетки, а также отключайте все сигнальные кабели от входных разъемов.
• При отключении вилки из розетки всегда держитесь за утолщение на вилке, не
касайтесь металлических частей, не тяните
за шнур и не ломайте и не перегибайте его,
не ремонтируйте, не перекручивайте и не
нагревайте.
• Немедленно свяжитесь с сервисным
центром, в случае если имеются какие-либо
неисправности шнура питания, в нем оголились жилы или он поврежден.
• Замените сетевую розетку, если в
нее невозможно вставить вилку или вилка
плохо закрепляется в розетке. Иначе могут
возникнуть неисправности или произойти
несчастные случаи или возгорания.
• Не прикасайтесь к проводам мокрыми
руками.
• Запрещается использование розетки, в
которую подключено несколько устройств.
Перегрузка такой розетки может привести
к пожару.
• Перед работой с устройством необходимо полностью прочитать и понять все
инструкции. Необходимо соблюдать все предупреждения и следовать всем инструкциям,
приведенным в настоящем руководстве.
• Пожалуйста, используйте только рекомендованные производителем аксессуары.
Использование других аксессуаров может
привести к неисправностям.
14
Page 15

Перед началом эксплуатации
• Пожалуйста, проводите все настройки
и регулировки только с помощью кнопок
на передней и боковой панелях или на
пульте дистанционного управления. Ни в
коем случае не снимайте заднюю панель
и не пытайтесь самостоятельно проводить
техническое обслуживание устройства,
так как существует опасность поражения
электрическим током, а также возможно
возникновение неисправностей.
• Не устанавливайте устройство на
непрочные или неровные поверхности,
тележки, стойки, треноги, кронштейны
или столы. Устройство может упасть, в
результате чего могут возникнуть неисправности или произойти несчастные случаи.
Используйте только те приспособления,
которые рекомендованы производителем
или продавцом.
• Пожалуйста, устанавливайте устройство на горизонтальной поверхности в местах с хорошей вентиляцией. Не допускайте
воздействия на устройство вибрации, прямого солнечного света, высокой температуры, а также попадания пыли и влаги.
• Не ставьте на устройство вазы, сосуды
с жидкостью. Попадание жидкости внутрь
аппарата может привести к пожару или поломке устройства.
• Не устанавливайте устройство в зоне
магнитных волн. Это может привести к поломке устройства. В зоне электромагнитного излучения может наблюдаться искажение изображения.
• Не устанавливайте вблизи устройства
источники открытого огня, например, свечи.
В случае их падения устройство может быть
повреждено или может произойти возгорание.
• Установка телевизора в замкнутое
пространство при эксплуатации может сократить срок службы устройства; поэтому
необходимо обеспечить минимальную
дистанцию между LCD-телевизором и
внутренними границами приспособления
под аппарат для нормальной вентиляции
(минимум по 10 см свободного пространства со всех сторон).
• Располагайте кабели позади устройства. Не закрепляйте их метизами, не перегибайте, не ремонтируйте и не нагревайте.
• При перемещении телевизора не
нажимайте и не касайтесь панели. Не переносите телевизор в положении, при котором
экран направлен вверх или вниз.
• Не перемещайте устройство при подключенном проводе питания или других
подключенных проводах. Повреждение провода питания, подключенный провод или
подключенные устройства могут стать причиной пожара, электрошока или поломки.
• Если устройство тяжелее 18 кг, его
должны перемещать не менее 2 человек.
При падении устройство может повредиться.
• Слишком сильное нажатие на панель
может повредить устройство.
• При длительном использовании может
немного повысится температура корпуса
устройства. Это явление свидетельствует о
теплоотдаче в нормальном рабочем режиме. Однако не позволяйте детям и людям с
повышенной температурной чувствительностью касаться устройства.
Все иллюстрации, приведенные в настоящем руководстве, являются схематическими изображениями, которые
могут отличаться от реальных объектов.
15
Page 16

Подключение
Подключение
• Разъем питания предназначен для подключения телевизора к сети электрического
питания с помощью шнура питания.
• Композитный видео вход телевизора
подсоединяется к композитному выходу
другого видео оборудования с помощью
видеокабеля RCA.
• Подсоедините источник аудиосигнала
к соответствующим аудиоразъемам (левый
и правый).
• Подсоедините внешнюю телевизионную антенну или антенну кабельного
телевидения к соответствующему разъему
устройства.
• Компьютерный аудиовход служит для
получения телевизором аудиосигнала с
персонального компьютера.
• Если источник видеосигнала имеет
HDMI-выход, подключите его к HDMI-входу
телевизора, используя специальный HDMIкабель (не входит в комплект поставки).
• Подсоедините VGA-кабель к VGA порту
ПК и к входу VGA телевизора; затяните
болты по часовой стрелке на обоих концах
кабеля.
• Компонентный видеовход служит для
получения компонентного видеосигнала от
внешнего источника.
• Подсоедините наушники к разъему для
наушников. При подсоединенных наушниках звук через динамики телевизора не
воспроизводится.
16
Page 17

Элементы управления
Передняя панель
Задняя панель
Управление устройством
1. Кнопка SOURCE
1
2. Кнопки CH+/CH-
3. Кнопки VOL+/VOL-
2
4. Кнопка MENU
5. ИК-датчик
6. Кнопка POWER
3
4
5
6
14
15
16
17
1 2 3 4 5 6 7 8
109 11 12 13
1. Входы HDMI-1 и HDMI-2
2. Вход VGA
3. Компьютерный аудиовход
4. Компонентный видеовход
5. Аудиовход компонентного видеовхода
6. Композитный видеовыход
7. Стереоаудиовыход
8. Разъем ТВ-антенны
9. Разъем для шнура питания
18
10. Композитный видеовход-1
11. Стереоаудиовход-1
12. Вход S-Video-1
13. Стереоаудиовход
14. Вход S-Video-2
15. Стереоаудиовход-2
16. Композитный видеовход-2
17. Выход на наушники
18-. USB-порт
17
Page 18

Управление устройством Управление устройством
Пульт дистанционного управления
12
1
2
3
4
5
6
7
8
9
10
11
13
14
15
16
17
18
19
20
21
9. Кнопка INFO
10. Кнопка нефункциональна для данной
модели
11. Кнопка COLOR
12. Кнопка нефункциональна для данной
модели
13. Кнопка MUTE
14. Кнопка PROGRAM LIST
15. Кнопка SMART P.
16. Кнопка SOURCE
17. Кнопки CH+/CH-
18. Кнопка RETURN
19. Кнопка 16:9
20. Кнопка AUDIO (нефункциональна для
данной модели)
21. Кнопка P/N
Установка батареек
1. Снимите крышку отсека для батареек на
задней части ПДУ.
2. Поместите батарейки в отсек для батареек с правильным соблюдением полярности.
3. Установите крышку отсека на место.
1 2 3
• Вставьте две батарейки AAA/1.5V в
1. Кнопка POWER
2. Кнопки с цифрами (функция ввода букв
недоступна для данной модели)
3. Кнопка F1
4. Кнопка SMART S.
5. Кнопка MENU
6. Кнопки VOL+/VOL-
отсек для батарей ПДУ. Мощность сигнала, необходимая для приемного датчика,
обеcпечивается на расстоянии до 8 метров
и в пределах 30 градусов влево и вправо.
• Не используйте одновременно новые и
использованные батарейки или батарейки
разных типов.
7. Кнопки курсора (ВВЕРХ/ВНИЗ/ВЛЕВО/
ВПРАВО)/Кнопка OK
8. Кнопка TIME
18 19
Page 19

Общие операции
• Нажмите кнопку POWER на панели
или на ПДУ, чтобы устройство перешло в
режим ожидания. Нажмите выключатель
питания, чтобы отключить питание. Когда
устройство включено, нажимайте кнопку
POWER на ПДУ, чтобы устройство перешло
в режим ожидания или вышло из него.
При отсутствии сигнала в течение
более 5 минут устройство автоматически
перейдет в режим ожидания.
• Нажимайте кнопки VOL-/VOL+ для регу-
лирования уровня громкости звука.
• Нажимайте кнопку TIME для выбора
периода времени, по истечении которого
телевизор автоматически отключится (от 0
до 120 минут).
• Нажмите кнопку RETURN на ПДУ для
переключения между текущим и предыдущим просматриваемыми каналами.
• Нажмите кнопку 16:9 для выбора одного из доступных форматов изображения на
экране: ПОЛНЫЙ => КИНО => СУБТИТРЫ
=> 4:3 => ПАНОРАМА. Форматы могут
различаться в зависимости от текущего
источника сигнала.
• Нажмите кнопку MUTE для отключения
звука. Для включения звука нажмите эту
кнопку повторно или регулируйте громкость.
• Выберите режим TV. Нажимайте кнопки CH-/CH+, чтобы выбрать предыдущий
или следующий канал. С помощью кнопок
с цифрами 0-9 можно непосредственно выбрать номер нужного канала.
• Нажимайте кнопку SMART P. для перемещения по меню режимов изображения,
состоящему из следующих пунктов: Стандарт => Динамичный => Мягкий => Личный.
• Нажимайте кнопку SMART S. для перемещения по меню режимов звука, состоящему из следующих пунктов: Стандарт =>
Новости => Музыка => Личный.
• Нажмите кнопку INFO для отображения
информации о текущем канале.
• Нажимайте кнопку P/N для выбора
систем цветности PAL/NTSC/Авто.
• Нажимайте кнопку COLOR для выбора
режима температуры цвета: Нормальный/
Теплый/Холодный.
• Нажмите кнопку F1 для включения
стоп-кадра.
• Нажмите кнопку PROGRAM LIST для
просмотра или настройки списка программ.
Источники сигнала
Нажмите кнопку SOURCE, затем нажимайте кнопки курсора ВНИЗ/ВВЕРХ на
ПДУ или кнопки CH+/CH- на панели, чтобы
выбрать один из доступных источников
сигнала: TV (ТВ) => AV1 => AV2 => SVideo1
=> SVideo2 => YPbPr => HDMI1 => HDMI2
=> PC (ПК) => USB. Нажмите кнопку OK на
ПДУ или кнопку MENU на панели для подтверждения.
Экранное меню
1. Нажмите кнопку MENU, чтобы вызвать
экранное меню настройки.
2. Нажимайте кнопки курсора ВЛЕВО/
ВПРАВО на ПДУ или кнопки VOL+/VOL- на
панели для выбора нужной страницы меню.
3. Нажимайте кнопки курсора ВВЕРХ/
ВНИЗ на ПДУ или кнопки CH+/CH- на панели, чтобы выбрать параметр для настройки.
4. Нажимайте кнопки курсора ВЛЕВО/
ВПРАВО на ПДУ или кнопки VOL+/VOL- на
панели на панели, чтобы настроить выбранный параметр.
5. Нажмите кнопку MENU, чтобы вернуться в корневое меню или выйти из меню.
Пункты меню, написанные серым
шрифтом, не подлежат настройке. Изображения экранного меню, приводимые ниже,
служать для наглядности и могут отличаться от изображений в Вашем телевизоре.
Page 20

Управление устройством Управление устройством
Настройка изображения
ИЗОБРАЖЕНИЕ
КОНТРАСТ
ЯРКОСТЬ
ОТТЕНОК
НАСЫЩЕННОСТЬ
ЧЕТКОСТЬ
РЕЖИМ ИЗОБРАЖ.
ФОРМАТ
ЦВЕТОВОЙ ТОН
3D-ФИЛЬТР
ВЫБОР РЕГУЛ MENU : ВЫХОД
• Контраст, Яркость, Оттенок (доступно
только для системы NTSC), Насыщен-
ность, Четкость.
• Режим изображения: Стандарт/Динамичный/Мягкий/Личный.
• Формат: Полный/Кино/Субтитры/4:3/
Панорама.
• Цветовой тон: Нормальный/Теплый/
Холодный.
• 3D-фильтр: Средний/Высокий/Низкий/
Выкл.
Настройка звука
ЗВУК
НИЗКИЕ ЧАСТОТЫ
ВЫСОКИЕ ЧАСТОТЫ
БАЛАНС
РЕЖИМ ЗВУЧАНИЯ
Настройка меню
МЕНЮ
ГОРИЗ. ПОЗИЦИЯ
ВЕРТ. ПОЗИЦИЯ
ВРЕМЯ ОТОБРАЖ
ПРОЗРАЧНОСТЬ
ЯЗЫК МЕНЮ
ВЫБОР РЕГУЛ MENU : ВЫХОД
• Горизонтальная, Вертикальная по-
зиция: отрегулируйте горизонтальную и
вертикальную позицию экранного меню.
• Время отображения: установите время
отображения экранного меню (от 5 до 60).
• Прозрачность: установите уровень
прозравчности экранного меню.
• Язык меню: выберите язык экранного
меню.
Установка
ТАЙМЕР СНА
DCC
СИНИЙ ЭКРАН
СБРОС
УСТАНОВКА
ВЫБОР РЕГУЛ MENU : ВЫХОД
• Таймер сна: установите время в мину-
ВЫБОР РЕГУЛ. MENU : ВЫХОД
• Низкие частоты, Высокие частоты,
Баланс (между правым и левым каналами).
• Режим звучания: Стандарт/Новости/
Музыка/Личный.
тах, по истечении которого телевизор автоматически отключится (15, 30, 45, 60, 120).
• DCC: включите или отключите динами-
ческое регулирование контрастности.
• Синий экран: включите или отключите
эту функцию.
• Сброс: сброс выполненных настроек до
заводских значений.
20 21
Page 21

Настройка
НАСТРОЙКА
СИСТЕМА ЦВЕТА
РЕЖИМ ЗВУЧАНИЯ
РЕЖИМ ЗВУКА
ПРОПУСК ПРОГР.
АВТОПОИСК
РУЧНОЙ ПОИСК
ПОДСТРОЙКА
РЕДАКТИРОВАНИЕ
ВЫБОР РЕГУЛ MENU : ВЫХОД
• Система цвета: PAL/NTSC/Авто.
• Режим звучания: I, D/K, M, AUTO, B/G.
• Режим звука: Стерео/Моно/DUAL I/
DUAL II.
• Пропуск программы: включите или от-
ключите функцию пропуска программы.
• Автопоиск: нажмите кнопку курсора
ВПРАВО на ПДУ или кнопку VOL+ на панели для запуска автоматического поиска доступных каналов. На дисплее будет
отображаться текущая частота и номер
канала. Чтобы остановить поиск, нажмите
кнопку MENU на ПДУ.
• Ручной поиск: нажмите кнопку кур-
сора ВПРАВО на ПДУ или кнопку VOL+ на
панели, чтобы включить режим ручного
поиска. Нажимайте кнопки курсора ВЛЕВО/
ВПРАВО на ПДУ или кнопки VOL+/VOL- на
панели, чтобы выбрать номер канала. Затем нажмите кнопку курсора ВНИЗ на ПДУ
для выбора пункта ПОИСК и нажимайте
кнопки курсора ВЛЕВО/ВПРАВО на ПДУ
или кнопки VOL+/VOL- на панели для запуска поиска каналов.
• Подстройка: нажмите кнопку куросра
ВПРАВО на ПДУ для включения режима
подстройки. С помощью кнопок курсора
ВПРАВО/ВЛЕВО на ПДУ выполните точную
подстройку частоты.
• Редактирование: нажмите кнопку
курсора ВПРАВО на ПДУ для входа в меню
редактирования каналов.
001 011 021
002 012 022
003 013 023
004 014 024
005 015 025
006 016 026
007 017 027
008 018 028
009 019 029
010 020 030
1 ИМЯ 2 УДАЛ 3 ОБМЕН MENU : ВЫХОД
• Имя: выберите канал с помощью кнопок
курсора. Нажмите кнопку с цифрой 1 для
включения режима переименования; с помощью кнопок курсора ВВЕРХ/ВНИЗ выберите
нужный символ. Нажимайте кнопки курсора
ВПРАВО/ВЛЕВО для перехода к предыдущему или следующему символу имени канала.
после выбора всех символов нажмите кнопку с цифрой 1 для подтверждения.
• Удаление: выберите канал с помощью
кнопок курсора. Нажмите кнопку с цифрой
2 для удаления выбранного канала. Нажмите кнопку с цифрой 1 для подтверждения.
• Обмен: выберите канал с помощью
кнопок курсора. Нажмите кнопку с цифрой
3, затем нажимайте кнопки курсора ВВЕРХ/
ВНИЗ, чтобы выбрать новую позицию для
выбранного канала. Нажмите кнопку с цифрой 1 для подтверждения.
Настройки PIP (картинка в картинке)
PIP
ОКНА
ДОП. ИСТОЧНИК
РАЗМЕР
ПОЛОЖЕНИЕ PIP
ЦВЕТ ГРАНИЦЫ
ИСТОЧНИК ЗВУКА
ОБМЕН
ВЫБОР РЕГУЛ MENU : ВЫХОД
Page 22

Управление устройством Общая информация
• Окна: выберите режим отображения
картинки в картинке: вкл/POP FULL/POP
4:3/выкл.
• Доплнительный источник: выберите
источник сигнала для окна PIP.
• Размер: выберите размер окна PIP:
Большой/Малый/Средний.
• Положение PIP: выберите положение
окна PIP: Вверх-влево/Вверх-вправо/Внизвлево/Вниз-вправо.
• Цвет границы: выберите цвет границы
окна PIP: Синий/Красный.
• Источник звука: выберите источник
звука для второго режима.
• Обмен: с помощью данного меню вы
можете поменять местами окна двух источников сигнала.
Экранное меню Вашего телевизора
может быть изменено без предварительного уведомления и, следовательно, отличаться от меню, представленного в настоящем
Руководстве.
Операции c USB
Вставьте USB-накопитель в USB-порт
данного устройства. Выберите источник
сигнала USB и нажмите кнопку OK. На дисплее отобразится интерфейс воспроизведения файлов с USB:
1 2 3 4 5
1. Индикатор воспроизведения файлов с
изображениями
2. Список файлов, содержащихся на
носителе
3. Индикатор воспроизведения
аудиофайлов
4. Информация о текущем файле
5. Окно предпросмотра файла
Поддержка объема USB-носителя:
до 16 Гб, версия USB 2.0. Корректная
работа устройства гарантирована только
при использовании лицензионных USBнакопителей известных производителей.
Воспроизведение файлов
• Нажмите кнопку курсора ВНИЗ для
перехода к списку файлов.
• Нажимайте кнопки курсора ВВЕРХ/
ВНИЗ для выбора нужного файла в списке.
Нажмите кнопку курсора ВПРАВО для воспроизведения выбранного файла.
• Нажмите кнопку MENU для остановки
воспроизведения.
• Нажмите кнопку курсора ВЛЕВО для
возврата на предыдущий уровень меню.
22 23
Page 23

Руководство по устранению
неисправностей
Ниже приводится таблица, в которой описаны простые меры, способные помочь Вам
устранить большую часть проблем, могущих возникнуть при использовании данного
устройства. Если нижеуказанные меры не помогли, обратитесь в сервисный центр или к
ближайшему дилеру.
Неисправность Причина Решение
Изображение и
звук отсутствуют, индикатор
не горит
Изображение
и звук низкого
качества
Изображение
«заснеженное»
Синий фон
Звук отсутствует
ПДУ не работает
Шнур питания не подсоединен.
Контрастность, яркость, резкость,
цвет и громкость установлены
на минимальное значение или
телевизор находится в беззвучном
режиме.
Контрастность и цвет настроены
неверно.
Установлена неверная система
цвета.
Установлена неверная система
звука.
Сигнал низкого качества.
Отсутствует видео сигнал или
кабель плохо подсоединен/не подсоединен.
Отсутствует аудио сигнал или
кабель плохо подсоединен/не подсоединен.
Батарейки установлены неправильно или устарели.
Подсоедините шнур питания.
Установите нужное значение
контрастности, яркости, резкости, цвета и громкости.
Настройте контрастность и цвет.
Установите правильную систему
звука.
Используйте исправный и качественный кабель.
Подсоедините кабель должным
образом.
Подсоедините кабель должным
образом.
Установите правильную сигнальную систему.
Убедитесь, что полярность соблюдена.
Замените батарейки на новые.
Источники помех
В Вашем телевизоре приняты все самые современные меры для устранения возможных
помех, тем не менее, изображение может искажаться под воздействием местных электромагнитных излучений. Лучше всего в подобных случаях попытаться перенести телевизор в
другое место и подвести к нему лучшую антенну.
• РАДИОЧАСТОТНЫЕ ПОМЕХИ
Появление на изображении ряби может свидетельствовать о наличии вблизи телевизора коротковолнового радиопередатчика или радиоприемника.
• МЕДИЦИНСКОЕ ОБОРУДОВАНИЕ
Page 24

Общая информация Общая информация
Появление на экране «елочки» или частичное исчезновение изображения может быть свя-
зано с работой медицинского оборудования в близлежащей больнице или клинике.
• «СНЕГ» НА ЭКРАНЕ
В зоне приема слабых сигналов отдаленных телевизионных станций изображение становится нестабильным, а на экране появляются мерцающие белые пятна, так называемый
эффект «падающего снега». В этом случае помогает более точная настройка антенны и применение антенного усилителя.
• ФАНТОМНЫЕ ИЗОБРАЖЕНИЯ
Появление на экране нескольких контуров изображения объясняется тем, что телевизионный сигнал отражается от окружающих построек, холмов, самолетов и других объектов.
Свести такой эффект к минимуму можно, изменив направление антенны.
• АВТОМОБИЛЬНЫЕ ДВИГАТЕЛИ
Работающие неподалеку автомобильные двигатели и электромоторы могут создавать помехи в изображении в виде небольших полосок или дрожания изображения на экране.
Комплект поставки
1. Телевизор 1 шт
2. Пульт дистанционного управления 1 шт
3. Кабель питания 1 шт
4. Информация для потребителя 1 шт
5. Гарантийный талон 1 шт
6. Руководство по эксплуатации 1 шт
24 25
Page 25

Технические характеристики
Размер (диагональ) 26” (66 см)
Яркость 500 кд/м
2
Контрастность 1000:1
Время отклика 5 мс
Разрешение 1360 x 768
Формат экрана 16:9
Система цветности PAL, SECAM
Система звука B/G, DK, I, L
Стереозвук NICAM 2 x 10 Вт
Компонентный (YPbPr) вход +
Аудио-видео RCA вход 2 шт
Аудио-видео выход +
Компьютерный аудио вход +
Вход S-Video 2 шт
VGA вход +
HDMI вход 2 шт
Разъем для подключения наушников +
Экранное меню на русском и английском
языках +
Прогрессивная развертка +
Цифровой гребенчатый фильтр +
Таймер «сна» +
Функция «Картинка в картинке» +
Количество каналов 199
Номинальное напряжение питания ~ 220 В, 50/60 Гц
Рабочее напряжение 100 - 240 В
Потребляемая мощность 140 Вт
Размеры устройства 652 x 449 x 104 мм
Вес нетто/брутто 10,5 кг/12,5 кг
ЖК-панель является высокотехнологичным устройством, содержащим множество
тонкопленочных транзисторов, которые дают четкие детали изображения. В некоторых
случаях могут появляться неактивные точки на экране, которые имеют постоянный цвет
(синий, зеленый, красный, черный или белый). Это не является дефектом и не влияет на
характеристики Вашего ЖК-телевизора.
Технические характеристики могут быть изменены заводом-изготовителем без предварительного уведомления. Указанные геометрические размеры имеют приблизительные
значения.
Изготовитель: КРООИ “ТЕЛЕВОЛНА”, 238150 Калининградская обл.,
г.Черняховск, ул.Спортивная, д.5
 Loading...