

Hyundai H-HC4-20-UI709, H-HC4-30-UI711 User manual

RU
Электрический
инфракрасный обогреватель
Руководство по эксплуатации.
Гарантийный талон.
Electric ceiling heater
(infrared heater)
EN
Instruction manual.
Warranty card.
Модели / Models
H-HC4-20-UI709
H-HC4-25-UI710
H-HC4-30-UI711
www.hyundai-hvac.com

2.
Table of contents
Electric ceiling heater
EN
1. IMPORTANT INFORMATION
2. PRECAUTIONS
3. WORKING PARAMETERS
4. INFRARED HEATER DESCRIPTION
5. DELIVERY SET
6. INSTALLATION
7. OPERATION OF THE INFRARED HEATER
8. MAINTENANCE
9. TROUBLESHOOTING
10. WIRING SCHEMATIC DIAGRAM
3
3
4
6
6
7
10
11
11
11

Electric ceiling heater
3.
DEAR CUSTOMER!
Thank you for good choice and purchase of the Hyundai infrared heater. It will serve long. Electric
infrared heater Hyundai is designed for general, additional or local heating of living and production
premises, and also can be used outdoors. The heater can be installed on the ceiling, ceiling
constructions, wall, rack mounting horizontal arrangement of a longitudinal axis. In places where
it is possible to connect to the electrical wiring with single-phase power supply to 220V~, 50Hz.
This heater is eective and ecient in use in connection with the minimal losses of electricity.
1. IMPORTANT INFORMATION
Please carefully read the Operation Manual before using the infrared heater. This Operation
Manual contains the important information on your safety, as well as some recommendations
on proper use of the appliance and its maintenance.
Keep the Operation Manual along with the warranty certicate, sales receipt, and, if possible,
cardboard package and packing material. The purchased infrared may somewhat dier from
one described in the Manual, but this does not aect the methods of use and operation. Im-
portant precautions and instructions given in this Manual do not include all possible modes and
situations, which can be encountered. It is necessary to understand that common sense, cautiousness, and carefulness are the factors, which cannot be «integrated» to any product. These
factors should be considered by the person, who is interested in proper operation of the device.
The manufacturer is not responsible for damage of the appliance or its components during
transportation, as a result of incorrect installation, as a result of voltage surges, as well as in the
event of changes or modications in any part of the appliance.
WARNING!
This heater is not equipped with a device to control the room
temperature. Do not use this heater in small rooms when they are
occupied by persons not capable of leaving the room on their own,
unless constant supervision is provided. Aer the heater is xed on
the base and poles, the heater must be at least 1.8 meter above
the ground.
EN
2. PRECAUTIONS
During use of the infrared heater, it is necessary to observe some precautions. Improper opera-
tion with disregard of precautions may result in iniction of harm to health of the user and other
people, as well as in iniction of damage to their property.
1. Read all instructions before using the heater.
2. The temperature of the safety grille and body at the heater can reach very high values. To
avoid burns, do not touch the hands and other body parts to the surfaces of the device, as well
as prevent the ability to touch, including accidental person in the heater through training and the
placement of the device in a safe place.
3. The heater should be placed far from ammable and easily deformable objects.
4. The device is not equipped with the device temperature adjustment. Do not use the device in
small rooms, when they are people or animals who cannot leave on their own.
5. The power cord and other objects should not contact hot surfaces of the heater.
6. Make sure that the heater body and its radiating boards get cold before demounting and
placing the heater to the package for long storage.
7. During demounting of the heater or its movement, take special precautions to exclude hits of
the appliance and its falling.
8. When the heater is not used for a long time, keep it in dry cool place in the factory cardboard package.
9.DO NOT COVER the heater. Do not dry clothes and any other fabrics/materials on the appli-
ance. This may lead to its overheating, breakdown, or iniction of a signicant damage to you
and/or your property.

EN
4.
Electric ceiling heater
IMPORTANT!
The manufacturer considers this type of failure a nonguaranteed
event.
10. The heater should be connected to the electric mains equipped with an automatic circuit
breaker.
11. If you plan to use the device in the bathroom or rooms with high humidity, it must be installed so that the user could not touch the appliance, including by accident. The device should
not be exposed directly to water stream or direct ingress of moisture on the instrument housing.
12. Never try to repair the heater yourself. This may inict harm to your health and aect the
warranty service of the appliance.
13. Do not use this device in the place of permanent location of the animals or plants.
14. It is prohibited to use a heater near inammable, easily deformable items and/or substances.
15. Exclude operation of the heater without grounding.
16. Do not leave the appliance unattended during its operation.
17. Throughout enable and use the heater with the removed elements of the enclosure.
18. Do not operate any appliance with a damaged cord or plug. A damaged power cord must be
replaced by an authorized service center for the manufacturer.
19. It is prohibited to use the heater in dusty rooms and during redecoration.
20. During operation of the device is forbidden to touch the case and its protective grille.
21. Use the heater only as described in this Manual. Any other use not recommended by the
manufacturer may lead to re, electric shock, or injuries of people.
22. Never clean the heater, when it is connected to the electric mains, and do not wipe the heat-
er radiating boards with ammable liquids during its operation.
23. For normal operation of the heater, the mains voltage should be sucient and the mains
specications should strictly correspond to the technical parameters indicated on the appliance
body. If necessary, clarify the specications of your mains from the electricity supplier.
24. Install and operate the heater with horizontal arrangement of a longitudinal axis on the ceiling,
ceiling constructions, wall. The thermal resistance of the material shall be not less than 80 °C.
25. It is prohibited to install the appliance in immediate proximity to an electric socket. This may
result in its overheating causing an emergency situation.
26. The appliance is not designed for use by people (including children) with limited physical,
sensory, or mental capabilities and having insucient experience/knowledge, if they are not
supervised and instructed on use of the device by a person responsible for their safety. It is
necessary to watch that children do not play with the heater.
3. WORKING PARAMETERS
Operation principle
The infrared heater is an appliance with an electric heating element and radiating boards, which
upon heating emit heat to the environment via directed infrared radiation. Radiant energy is
absorbed by the surrounding surfaces and it heats them being transformed to thermal energy.
Surface temperature of objects can be dierent depending on their absorbing properties (surface color, material), incidence angle of infrared beams, surface shape and area. Surfaces also
release some heat to air. At that, heated air ows up to the ceiling and gradually cools down.
As a result, air temperature at the head level of a standing person appears below the oor
temperature by 1-2 °C.
Electric ceiling heater
5.
Main features
1. Signicant economic eect as compared to convectional heating, where heat is signicantly
consumed for heating of unused roof space (rst, air is heated throughout the room volume, and
then air heats objects and surfaces in the room).
2. Capability of local heating only for those areas in the room, where it is necessary, without
heating of the whole room volume.
3. Low air temperature in the room at comfortable temperature on surfaces of objects, oor,
and walls creates the freshness eect air is not dried up.
4. Low convection (thermal movement of air volumes) reduces amount of dust kicked up from
the oor.
5. High protection class of the device (IP65) allows to apply the device in environments with the
most adverse conditions.
6. The possibility of using the device in a portable rack. (Portable stand comes separately as
accessory).
Area of application
Infrared heaters are designed for general, additional, and local heating of industrial, production,
utility, and similar rooms (ats, oces, trade enterprises, exercise rooms, educational institutions, public catering enterprises, storage facilities, hangars, agricultural facilities, etc.) and can
be used outdoors.
Technical specications
Table 1
EN
Parameter
Rated power consumption, W
Power supply, V/Hz 220~/50 220~/50 220~/50
Rated current, A 9,1 11,4 13,6
Protection class IPX0 IPX0 IPX0
Electric protection class Class I Class I Class I
Heating area, m² 20-25 25-30 30-35
Net weight, kg 2,75 2,75 3,05
Device dimensions, mm 875x95x195 875x95x195 1010x95x195
H-HC4-20-UI709 H-HC4-25-UI710 H-HC4-30-UI711
2000 2500 3000

EN
6.
Electric ceiling heater
IMPORTANT!
The manufacturer reserves the right to change the set-list of the
device (including liquid and powder components) for dierent supplies
without prior notice. The changes either in no way inuence the basic
technical parameters of the device or may improve them, and also
not violate the legislation or quality standards of the countries of
manufacture, transit and selling. The changes in the set-list may
result in changing of the weight and dimensions of the device, but not
more than by +\- 5-20% (depending on the product category).
NOTE:
Heated area in the table is indicated for reference, since it depends
both on the heater power, and on room type, ceiling height, wall/
ceiling materials, number and area of glazing, presence of doors, etc.
2. SAFE OPERATION AND INSTALLATION OF ELECTRIC INFRARED HEATER
When operating appliance please observe safety rules. Improper operation or ignoring these
rules can lead to harming health of the user and other people as well as damage to their
Fig. 1
property. The manufacturer is not liable for personal injury and damage property resulting from
improper installation and operation of the device.
4. INFRARED HEATER DESCRIPTION
Infrared Heater description
1. Heater body
2. Protective grille
3. Heating element
4. Cover
5. Power cord and plug

Electric ceiling heater
7.
5. DELIVERY SET
1. Infrared heater – 1 pcs.
2. Fasteners kit – 1 pcs.
3. Operation manual and warranty certicate – 1 pcs.
4. Package – 1 pcs.
NOTE:
To improve the product quality, the design and technical specications
of the infrared heater, as well as its delivery set can be modied by
the manufacturer without preliminary notication.
6. INSTALLATION
NOTE:
Depending on material and design of ceiling structural elements, the
heater is secured onto appropriate fasteners chosen on basis of the
strength condition. Strength of the ceiling or structural elements,
to which the heater is secured, should be sucient to endure 5-fold
weight of the heater.
6.1 Safe distances required for installation
1. Expand the original packaging and carefully remove the heater
2. Remove the mounting kit
3. Collect the installation wall mount holes as shown in Fig. 2
4. Connect the hardware to the instructions shown in Fig. 3, 4, 5
5. Hang the heater on the smooth surface of the wall with the observance of the distance spec-
ied in item 6.1. Make sure that the mounting screws rmly fastened
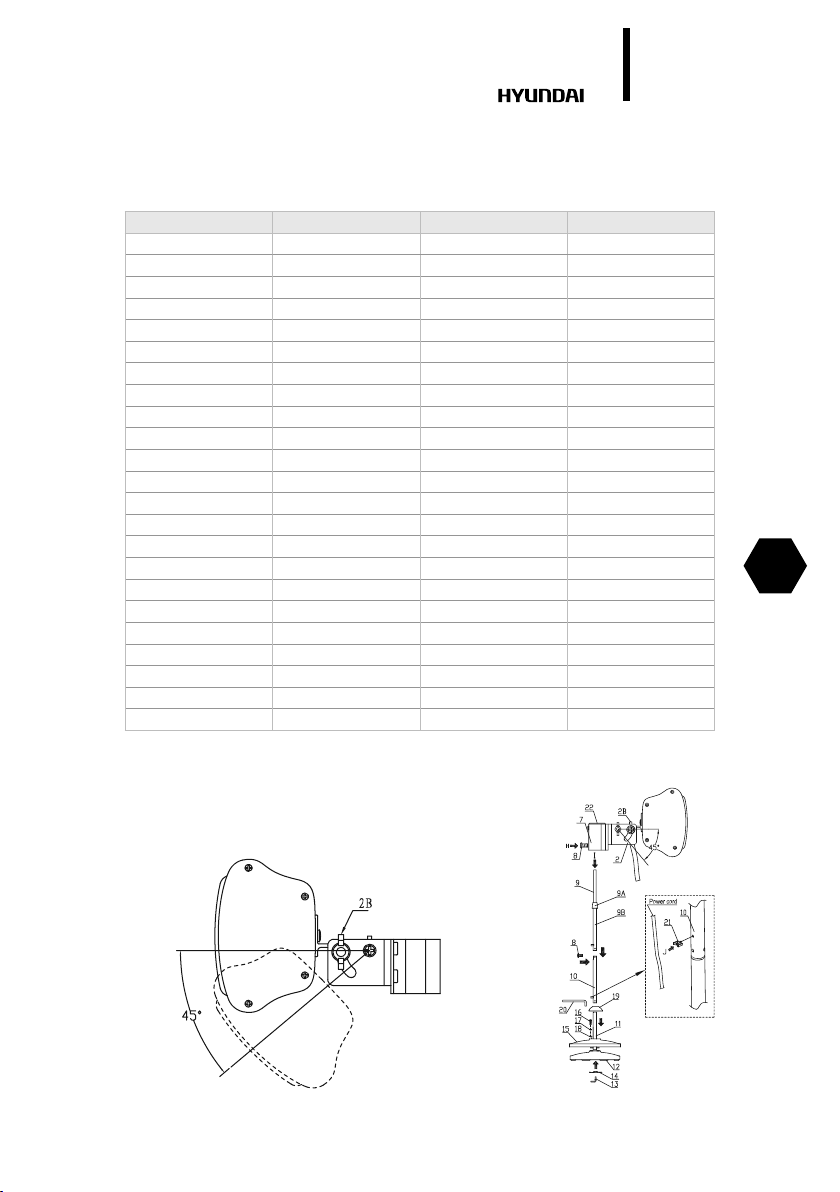
6. If necessary, install the heater, bracket, follow the instructions shown on Fig. 6, 7, 8, 9 and
specied in item 6.3
EN
6.2 Installation of the heater using the wall fasteners
Table 2
№ Parts name Specification Qty
1 Screw M6x20 1
2 Bracket set Aluminum 1
3 Expansion bolt M6x60 2
4 Hanger STEEL 1
5 Bolt M8х60 1
5A Nut M8 1
On Fig. 2, 3, 4, 5 shows stepwise instructions on assembly and installation of wall fasteners for
infrared heater.

EN
8.
Fig. 2
Electric ceiling heater
Fig. 4
Fig. 3
Fig. 5
Fig. 6 Fig. 7
Electric ceiling heater
9.
6.3 Installing the infrared heater on a portable rack
Table 3
Series Parts name Specification Qty
1 Screw M6x20 1
2 Bracket set Aluminum 1
3 Expansion bolt M6x60 2
4 Hanger Steel 1
5 Bolt M8х60 1
5A Nut M8 1
6 Nut M6 4
7 Bracket 3 Aluminum 1
8 Bolt M6х10 12
9 Telescopic tube set Steel 1
10 Telescopic tube Steel 1
11 Telescopic tube Steel 1
12 Base Plastic 1
13 M8 bolt L shpae 1
14 Fixing plate Steel 1
15 Base cover Steel 1
16 Bolt M6x50 3
17 Spring washer Ф6.2хФ8.2х1 3
18 Washer Ф6.2хФ14х1 3
19 Decorative cover Steel 1
20 Hex wrench Steel 1
21 wire holder PA 2
22 Telescopic tube cover Silicone 1
On Fig. 6, 7, 8, 9 shows stepwise instructions on assembly and installation of infrared heater
on the mobile rack.
EN
Fig. 8
Fig. 9

EN
10.
Electric ceiling heater
WARNING!
Aer installation of the heater and before switching for the rst time, it is
necessary to wipe the radiating board with alcohol. Aer that, it is PRO-
HIBITED to touch the radiating board.
Connection to electric mains
1. The patio heater is designed to be connected to 220V~, 50Hz singlephase voltage mains with
a grounding circuit.
2. Prior to connection make sure that parameters of electric mains in the place of connection
comply with parameters, indicated on the identication plate with technical data of the unit.
3. It is necessary to follow active electrical safety precautions, connecting the convector to
electric mains.
4. An electric outlet must be properly grounded. The outlet must be designed for rated current
not less than 16A for models with maximum power up to 2000W. Electric outlet and plug
must always stay dry to prevent current leakage. Regularly check if the electric plug is tightly
connected to the outlet. It must be done in the following order: connect an electric plug into
an outlet, aer half hour operation turn o the patio heater and disconnect the plug from the
outlet, check if the plug is heated by your hand. If the plug heated over 50°C then replace the
outlet by a new one to prevent damages, incidents, re as a result of bad electric contact. A
specialist must do the job.
7. OPERATION OF THE INFRARED HEATER
WARNING!
Warning! Please connect the cable with an industrial plug rated
3P 230V 16A IP67 of IEC 60309-2.
1. Before switching on the heater, ensure that no moisture on the device and on the heating element.
2. Aer the rst turn the heater on may appear briey burnt smell. This is normal. If the smell
persists for a long time, immediately disconnect the heater from the electric power supply and
contact your service representative.
3. To exclude the appearance of burnt smell when using the heater in the future it is
recommended to keep it clean, preventing the accumulation of dust on it.
4. Within several minutes aer switching on the heater to the heating element may appear black
dots. This is normal and does not aect the operation of the device.
5. Not recommended for long look at heater heating element, this can cause deterioration and
damage to health.
WARNING!
Slight crackles may be heard during operation at the moment of
heating or cooling, which disappear, when the heater reaches the
working mode.

Electric ceiling heater
11.
8. MAINTENANCE
1. During operation, it is necessary to periodically (once a year) check the electric cable contacts
and terminal connectors for good tightening.
2. If the body becomes dirty, wipe o dust with a towelette. Radiating boards should be wiped in
cold condition with alcohol.
9. TROUBLESHOOTING
Possible malfunctions and remedies for them:
Malfunction Cause Remedy
1. The heater heats poorly
2. The heater does not work
If you are not able to remedy a malfunction according to the
recommendations or other malfunctions occur, contact the authorized
service center of Hyundai.
1. The heating element is faulty 1. Contact the authorized service center of Timberk
2. Low voltage in the electric mains 2. Check voltage in the electric mains
1. No voltage in the electric mains 1. Check presence of voltage in the electric mains
2. Breakdown of the electric cable
3. Breakdown in the heating element circuit 3. Contact the authorized service center of Timberk
2. Check integrity of the electric cable and replace it
if necessary
10. WIRING SCHEMATIC DIAGRAM
EN
Fig. 10
220V~
 Loading...