

Page 1
H-CDM8031
CD/MP3/WMA RECEIVER CD/MP3/WMA
РЕСИВЕР
Instruction manual Руководство по эксплуатации
Page 2

Dear customer!
Thank you for purchasing our product. For safety, it is strongly recommended to read this manual carefully
before connecting, operating and/or adjusting the product and keep the manual for reference in the future.
Table of contents
Table of contents..................................................................................................................................................... 2
Important safeguards ..............................................................................................................................................3
Installation/ connection........................................................................................................................................... 4
Panel controls.......................................................................................................................................................... 7
General operations ................................................................................................................................................ 10
Digital tuner operations ........................................................................................................................................13
CD operations .......................................................................................................................................................16
MP3 overview....................................................................................................................................................... 18
Anti-theft system .................................................................................................................................................. 20
Handling discs ...................................................................................................................................................... 21
Cleaning................................................................................................................................................................ 21
Troubleshooting guide .......................................................................................................................................... 22
Specification ......................................................................................................................................................... 23
2
Page 3

Important safeguards
• Using the device at temperature below -10ºС may cause the breakage of the device. BEFORE USING
PLEASE HEAT UP THE PASSENGER COMPARTMENT TO THE RECOMMENDED
TEMPERATURE!
• Read carefully through this manual to familiarize yourself with this high-quality sound system.
• Disconnect the vehicle's negative battery terminal while mounting and connecting the unit.
• When replacing the fuse, be sure to use one with an identical amperage rating. Using a fuse with a higher
amperage rating may cause serious damage to the unit.
• DO NOT attempt to disassemble the unit. Laser beams from the optical pickup are dangerous to the eyes.
• Make sure that pins or other foreign objects do not get inside the unit; they may cause malfunctions, or create
safety hazards such as electrical shock or laser beam exposure.
• If you have parked the car for a long time in hot or cold weather, wait until the temperature in the car
becomes normal before operating the unit.
• DO NOT open covers and do not repair yourself. Consult the dealer or an experienced technician for help.
• Make sure you disconnect the power supply and aerial if you will not be using the system for a long period
or during a thunderstorm.
• Make sure you disconnect the power supply if the system appears to be working incorrectly, is making an
unusual sound, has a strange smell, has smoke emitting from it or liquids have got inside it. Have a
qualified technician check the system.
• The unit is designed for negative terminal of the battery, which is connected to the vehicle metal. Please
confirm it before installation.
• Do not allow the speaker wires to be shorted together when the unit is switched on. Otherwise it may
overload or burn out the power amplifier.
• Do not install the detachable panel before connecting the wire.
• Don't remove the detachable panel when encoding.
3
Page 4
Installation/ connection
First complete the electrical connections, and then check them for correctness.
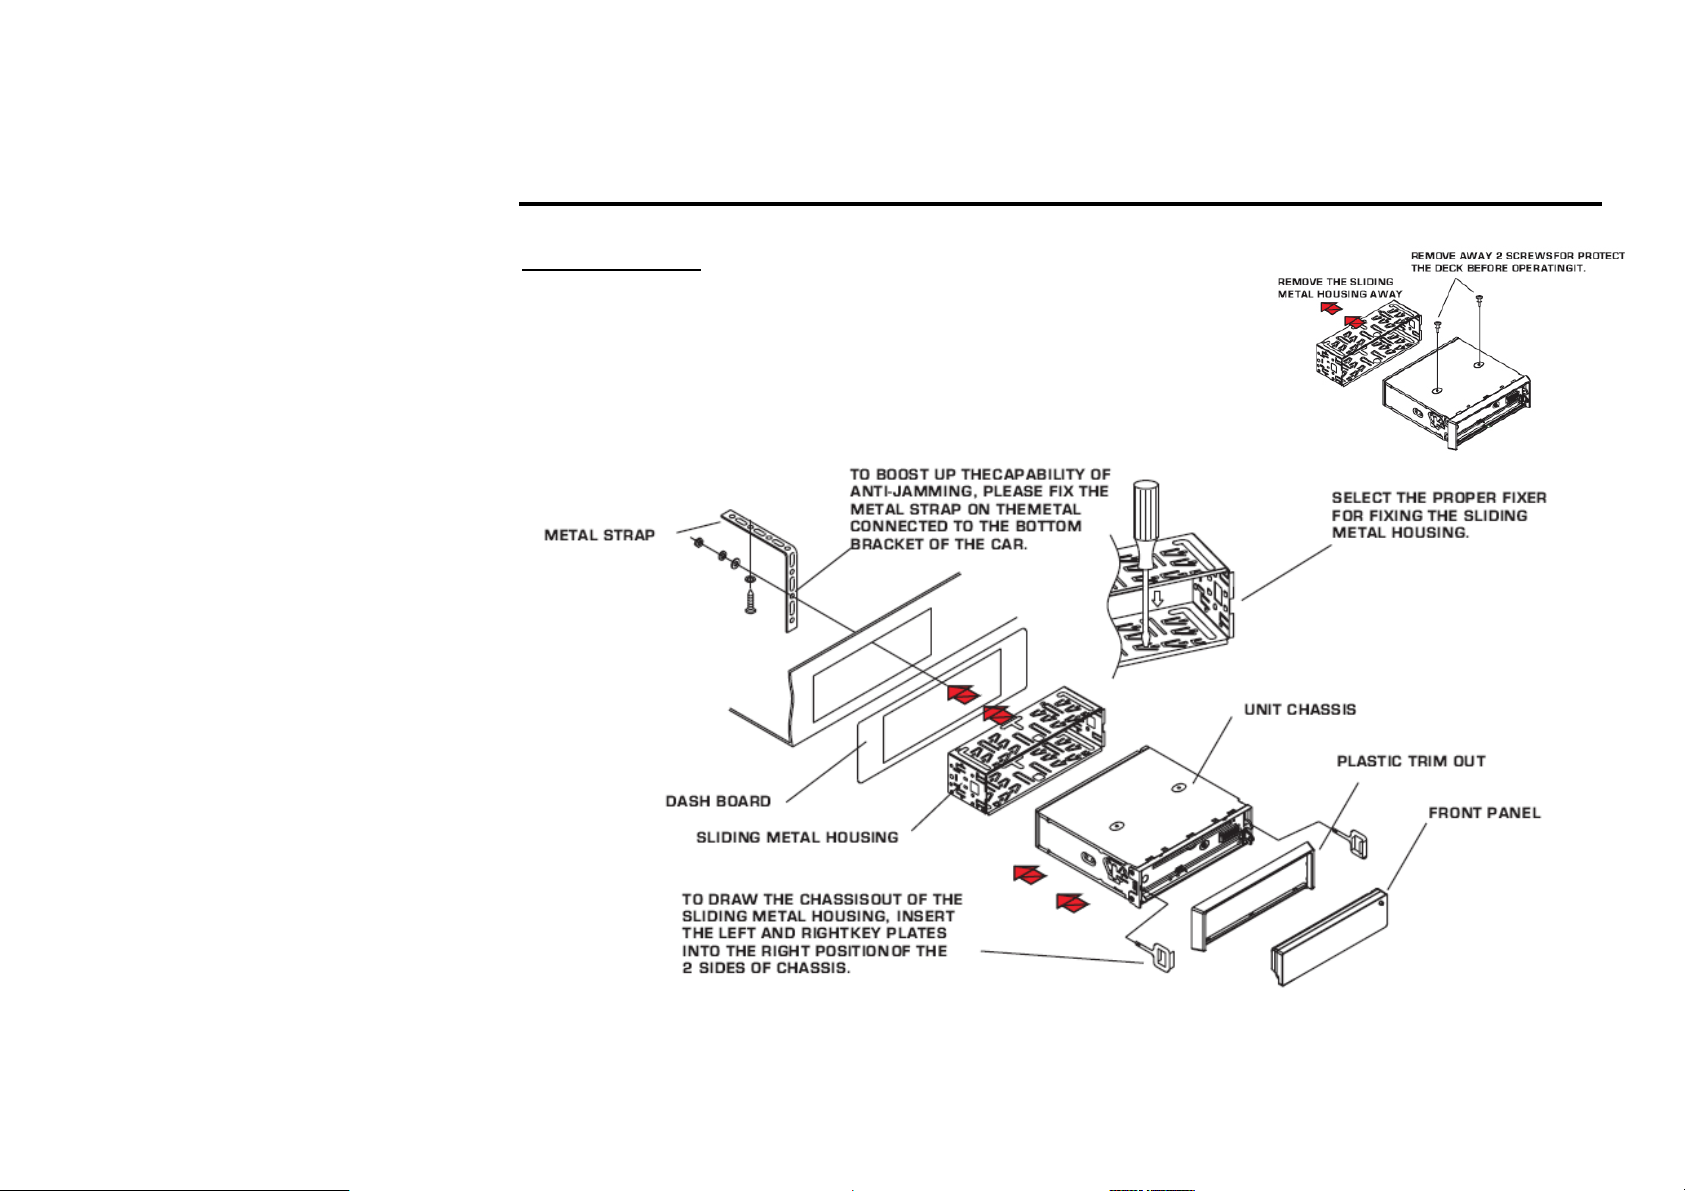
Installation way
It is an anti-theft installation way. The chassis wear a metal sliding housing.
Please have the wiring connection of the power supply, speakers and antenna
as for the requirement of the manual.
Before installation remove the 2 screws that protect the deck away, and then
install the metal sliding housing into the car according to the diagram.
4
Page 5

Electrical connection
Notes:
• In spite of having any kinds of speaker system, must use 4 ohms impedance of speaker to reduce the
distortion during high volume level.
• Prohibited t to make the conductors of auto antenna and ground touch with each other.
5
Page 6
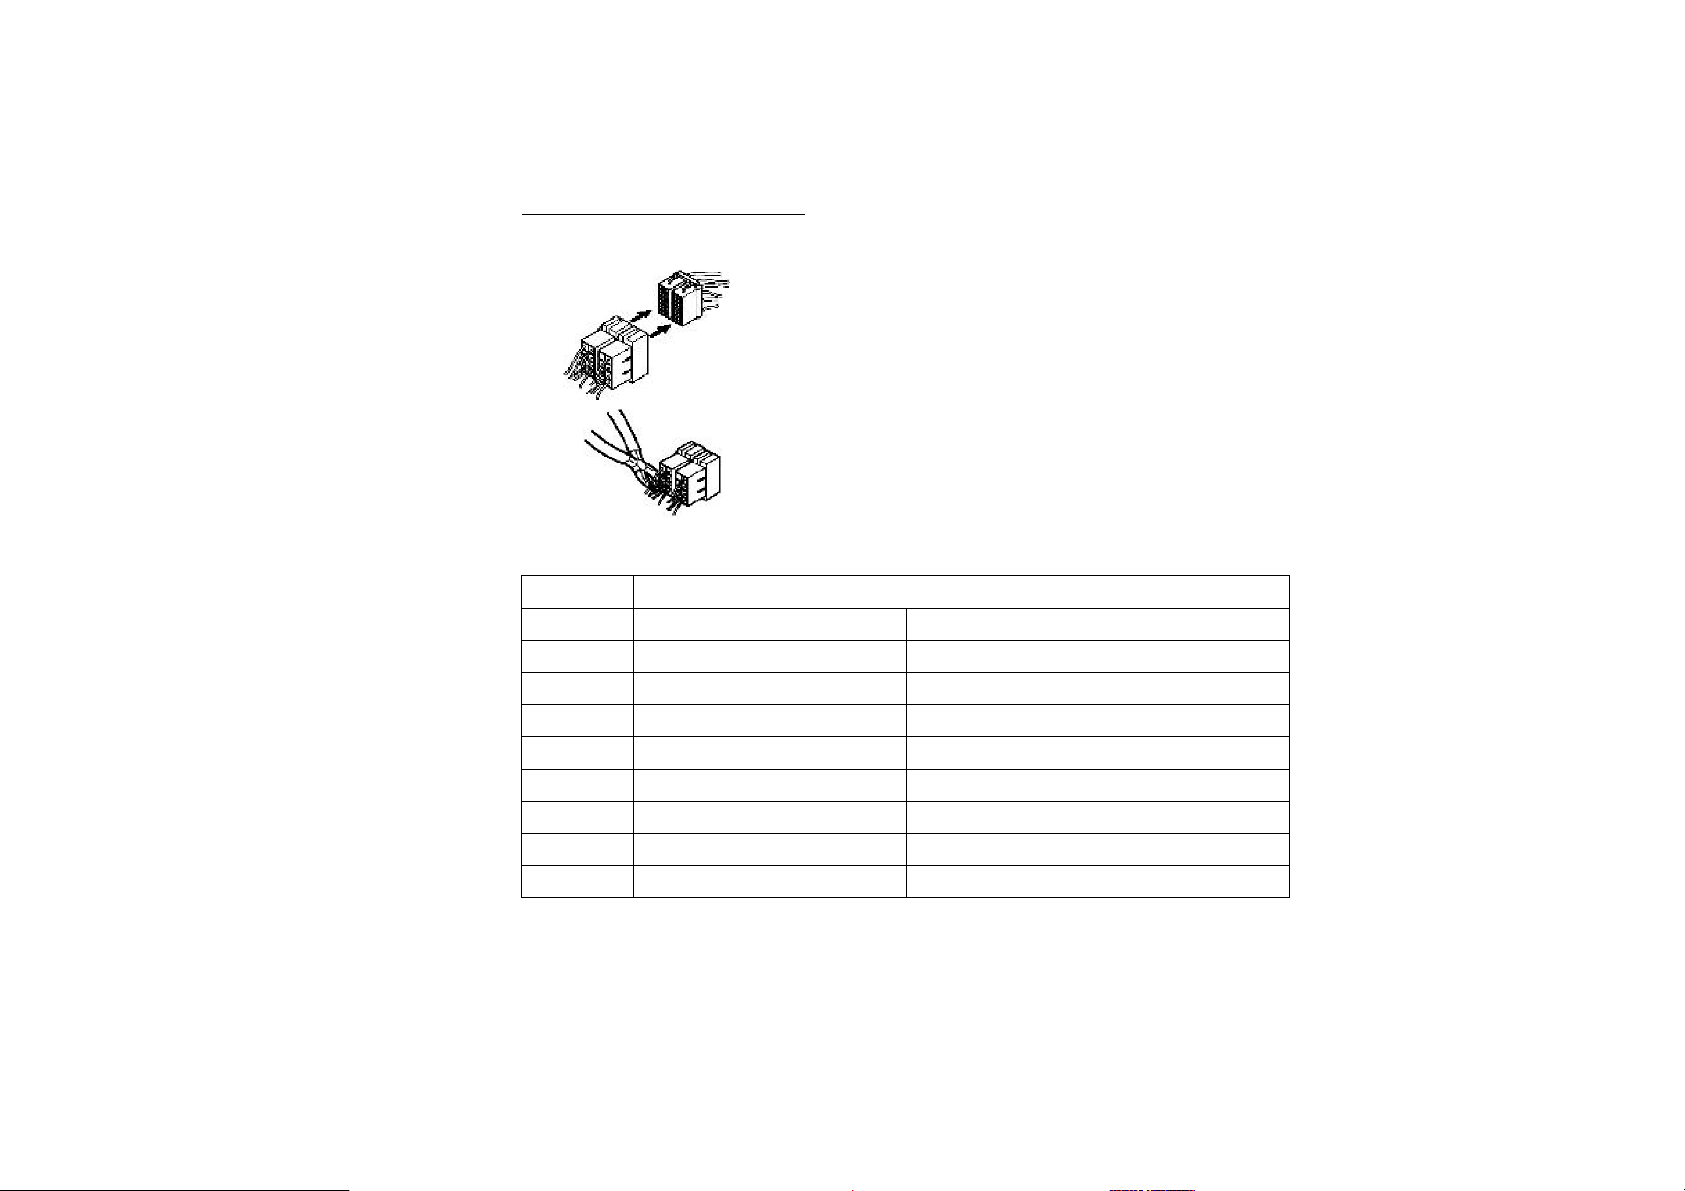
Using the ISO Connector
1. If your car is equipped with the ISO connector, then connect the ISO
connectors as illustrated.
2. For connections without the ISO connectors, check the wiring in the
vehicle carefully before connecting, incorrect connection may cause serious
damage to this unit.
Cut the connector, connect the colored leads of the power cord to the car
battery as shown in the color code table below for speaker and power cable
connections.
Location Function
Connector A Connector B
1 Rear Right(+)---Violet
2 Rear Right(-)---Violet/Black stripe
3 Front Right(+)---Grey
4 Battery 12V (+)/yellow Front Right(-)---Grey/Black Stripe
5 Auto Antenna/blue Front Left(+)---White
6 Front Left((-)---White/Black Stripe
7 ACC+/red Rear Left(+)---Green
8 Ground/black Rear Left(-)---Green/Black Stripe
6
Page 7
Panel controls
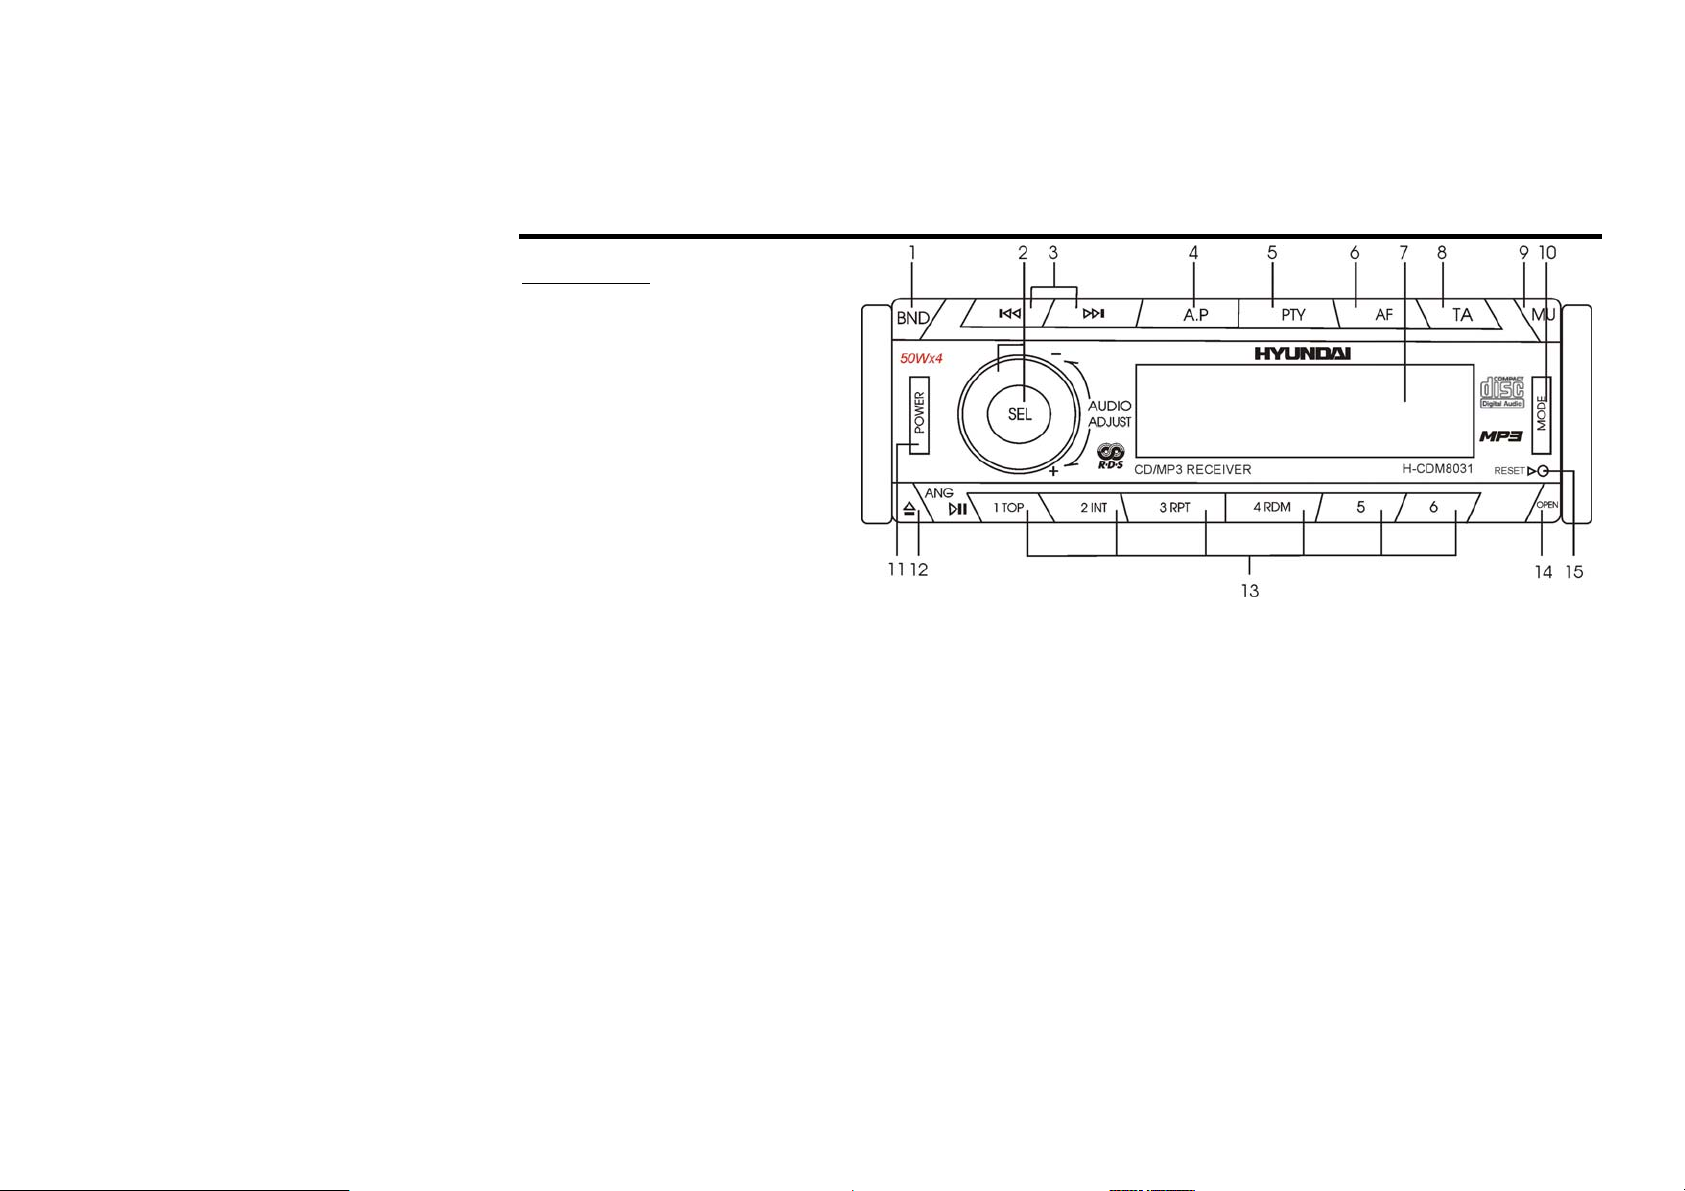
Front panel
1 BAND button
In Radio mode press it repeatedly to select your desired radio band.
2 VOL+/- knob / SEL button
Rotate VOL clockwise to adjust the volume level.
Press the SEL button shortly and repeatedly to select the audio modes: VOLUME => BASS => TREBLE =>
BALANCE => FADER
Press and hold SEL to enter the settings menu: EQ (FLAT => CLAS => ROCK => POP) => CLK (12 / 24)
=> CT =>STEREO / MONO => LO / DX (DX=>LOC) => AREA (OIRT => LATIN => EUROPE=>USA
=> ASIA => AUST) => V-PGM (0-46) => BEEP ON / OFF => CLK ON / OFF => SEEK ALL / RDS =>TA
SEEK=> TA VOL=> MASK DPI / ALL => REG ON / OFF.
Rotate VOL knob to adjust each mode.
For each mode the waiting time is about 5 seconds.
Rotate VOL to adjust the volume level.
7
Page 8

3 / buttons
In Disc mode press the buttons shortly to go to previous/next track. Press and hold them to start fast
backward/ forward rewind. In Radio mode press the buttons shortly to search the stations manually. Press
and hold for 2 seconds to start searching the stations automatically.
4 A.P button
Use the button for searching, scanning and storing radio stations.
5 PTY button
In Radio mode press it to activate the PTY function.
6 AF button
In Radio mode press it to activate the AF/EON function.
7 LCD (LIQUID CRYSTAL DISPLAY)
8 TA button
Press it to activate/ deactivate the TA function.
Press and hold for 2 seconds to turn the LOUD function on/off.
9 MUTE button
Press it to cut down the volume output, press it again to resume volume.
10 MODE button
Press to select the mode: RADIO => DISC.
11 POWER button
Press POWER button to turn the power on, press again to turn the power off. Press and hold for 2 seconds to
turn the power off and reset the clock.
12 ANGLE button (ANG)
Use this button to adjust the monitor tilt.
Keep on pressing it to open the inner panel with disk slot
13 Preset buttons:
PLAY / PAUSE / TOP button (1) – use to start or pause the playback.
8
Page 9
INT button (2) - Press it to start playback of first 10 second of each track.
RPT button (3)- Use this button to play current track repeatedly.
RDM (4) - button - Press to start random playback.
14 OPEN button
Press it to flip down the front panel.
15 RESET button
Use the button to restore the unit to the original factory settings.
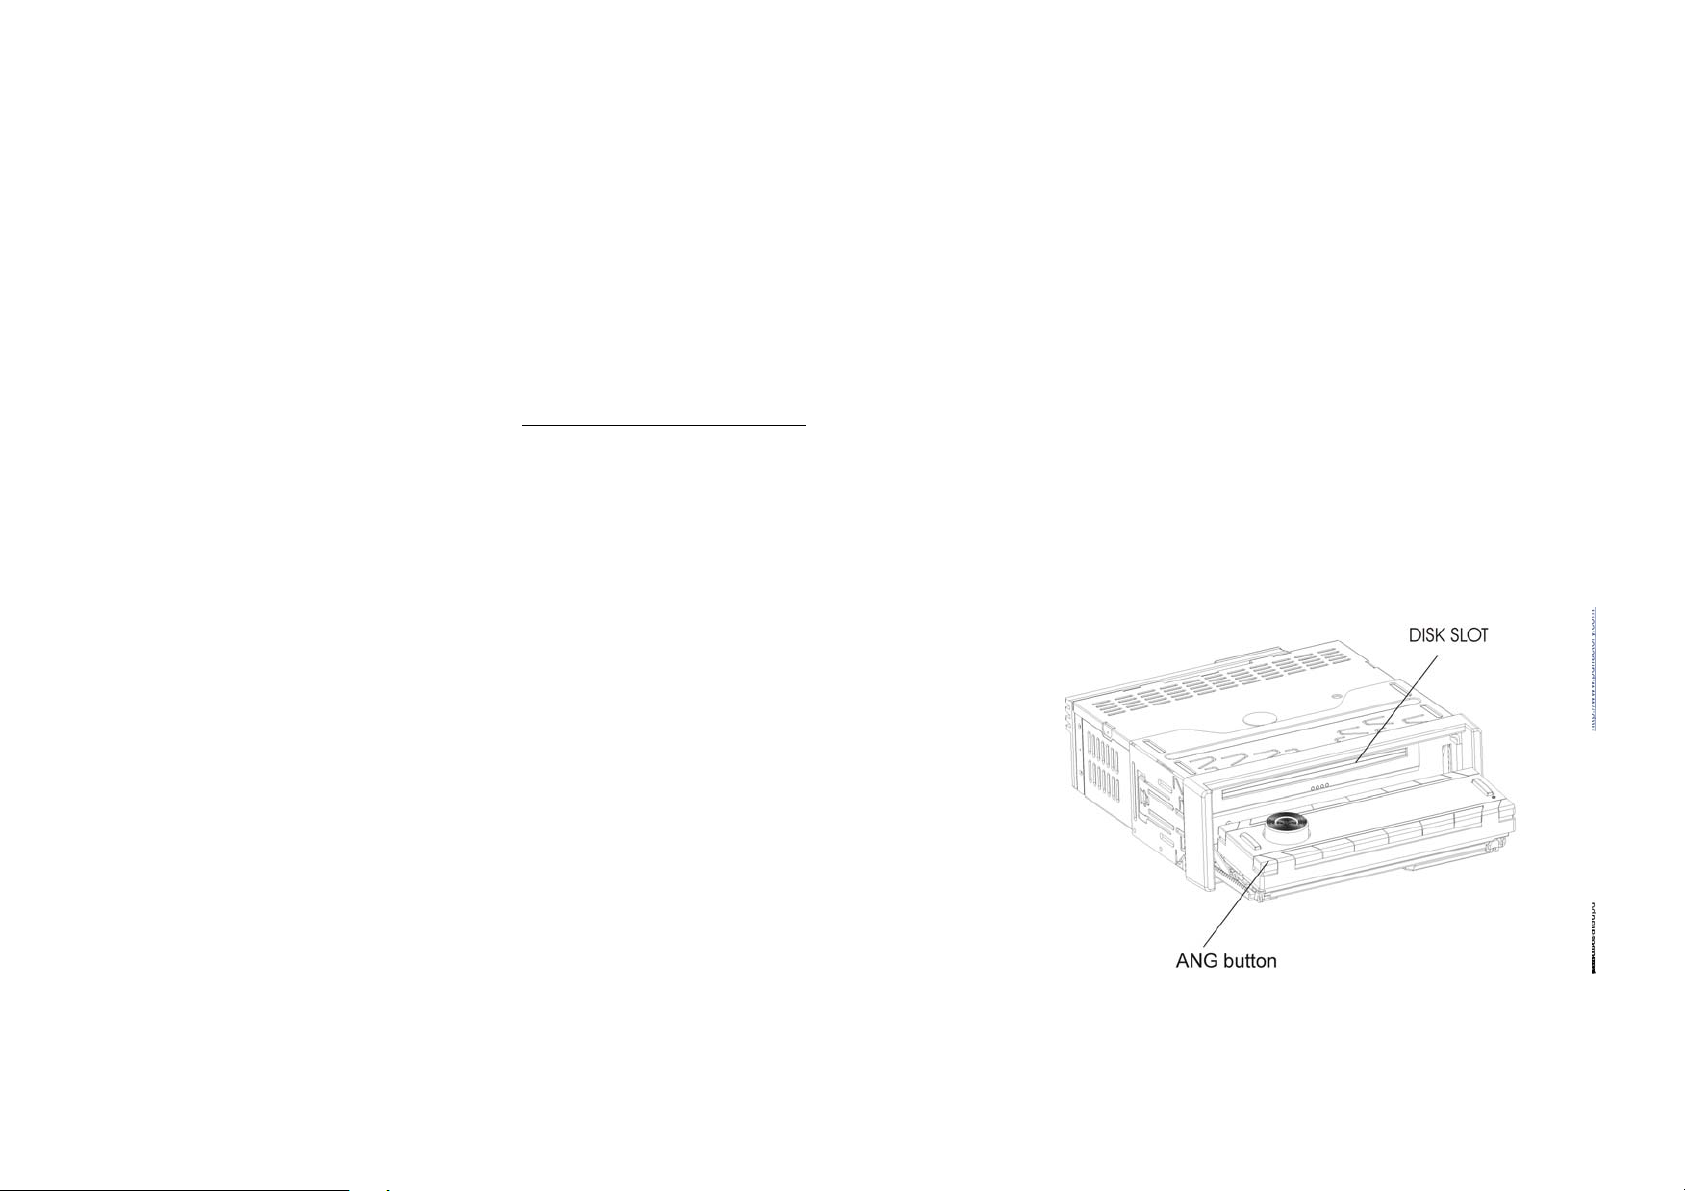
Inner panel with disk slot
The panel of this unit can be put aflet to show the inner pannel with disk slot. Keep on pressing ANGLE button
(ANG) and then insert a disk. It will start playing and the panel will get the initial position. To unload the disk
use ANG again.
To change the angle of the panel press ANG shortly.
9
Page 10

General operations
Reset the unit
Press the RESET button on the front panel with thin hard object to restore the unit to the original factory settings.
Power button
Press any button to turn the unit on. Press the POWER button shortly to turn off the unit but the electronic clock.
Press and hold POWER button to switch the unit and the clock settings off.
Note: After the unit is off, the volume level and radio current settings will be memorized, and when you turn the
unit on it will resume the stored status which you set.
Volume control
Rotate the VOL+/- knob to adjust the volume level.
Setting the sound characteristics
Press SEL button shortly and repeatedly to select the audio menu items: EQ (FLAT => CLAS => ROCK => POP)
=> CLK (12 / 24) => CT =>STEREO / MONO => LO / DX (DX=>LOC) => AREA (OIRT => LATIN =>
EUROPE=>USA => ASIA => AUST) => V-PGM (0-46) => BEEP ON / OFF => CLK ON / OFF => SEEK ALL
/ RDS =>TA SEEK=> TA VOL=> MASK DPI / ALL => REG ON / OFF.
in the sequence and circulation. After selecting the desired audio menu item, rotate VOL knob to adjust it.
Note: After selecting the BAL/FAD item, press / buttons to adjust BALANCE and rotate VOL knob to
adjust FADER.
10
Page 11

Adjusting the system menu
Press and hold for 2 seconds the SEL button, press it or the ► button repeatedly to select the system menu
settings: EQ (FLAT => CLAS => ROCK => POP) => CLK (12 / 24) => CT =>STEREO / MONO => LO /
DX (DX=>LOC) => AREA (OIRT => LATIN => EUROPE=>USA => ASIA => AUST) => V-PGM (0-46)
=> BEEP ON / OFF => CLK ON / OFF => SEEK ALL / RDS =>TA SEEK=> TA VOL=> MASK DPI /
ALL => REG ON / OFF.
Rotate the VOL knob to adjust each setting.
• EQ: you may adjust EQ options (FLAT => CLAS => ROCK => POP)
• CLK: you may choose either 12H or 24H clock mode.
• CT: you choose either 12:00 or 24:00 and set the exact time.
• Stereo / Mono: you may choose either Stereo or Mono mode
• Local/distant (LO/DX): select the LOC and DX mode. The default mode is DX.
- When you select LOC mode, “LOC” indication appears on the display and only local station is available.
- When you select DX mode, “DX” indication appears on the display and distant station is available.
Note: The initial mode is DX mode.
LOC/DX is functional only for selecting local or distant stations.
• Area (frequency) - the defaulted mode is selected by hardware jumper. Select the area: OIRT => LATIN
=>EUROPE => U.S.A => ASIA => AUST.
• Volume PGM - user can set up an initial volume value. The default value is 12. Every time the unit turned
from POWER OFF to POWER ON status, if the value is more than the current one, change the current
volume value to VOLUME PGM value.
• BEEP MODE
Rotate the VOL knob to select the desired mode: ON or OFF.
- BEEP OFF: disable audible beep tone when any function is accessed.
- BEEP ON: enable audible beep tone.
11
Page 12

• CLK ON
You may display time indication even with Power OFF
• SEEK RDS- user can switch between RDS and ALL. The defaulted is ALL.
• TA SEEK - user can switch between SEEK and ALARM.
• TA volume - the value define the minimum value of the TA Volume can be adjusted down. The adjustable
range is 0~40. The default one is 18.
• MASK DPI MODE
Rotate the VOL knob to select the desired mode: MASK DPI or MASK ALL.
1. MASK DPI: masked only the AF which has different PI.
2. MASK ALL: masked the AF which has different PI and any other interfering non PI station which having the
same transmitting frequency.
• Region - set the region code function ON or OFF.
Turning the sound off
Press the MUTE button to turn the sound off. Press it again to turn the sound on.
Mode setting
Press the MODE button repeatedly to select RADIO => DISC
Loudness adjustment
Press and hold for 2 seconds the TA button to turn the LOUD function on/off.
12
Page 13

Digital tuner operations
Note: RDS (Radio Data System) service availability varies with areas. Please understand if RDS service is not
available in you area, the following service is not available, either.
Band selection
Press the MODE button to select RADIO.
Press BAND once or more to select: FM1, FM2, FM3, AM1, AM2.
Manual/ automatic tuning
• Manual tuning: press / buttons for 2 seconds to enter manual tuning. Press / buttons to tune
down/up.
• Automatic tuning: press / buttons to activate the automatic search. It will play when finds the station.
Programming tuner stations
You can store up to a total of 30 radio stations in the memory (18 FM, 12 AM), manually or automatically.
• To store a station:
- Select a band (if needed)
- Select a station
- Hold a Preset button (1-6) you want store the station for at least 2 seconds.
• To recall a station:
- Select a band (if needed)
- Press a Preset button (1-6) briefly to recall the stored station
Auto memory store
Select a band. Press A.P button and hold for 2 seconds to enter auto store mode. The radio will automatically
store 6 stations to the 6 preset memories of the current band. To stop auto store, press it again.
13
Page 14

Preset scan
Select a band. Press A.P button to scan all preset stations in the memories of the current band and stay on each
memory stations for about 7 seconds. To stop preset scan, press the button again.
EON function
This unit is equipped with the latest technology of EON control, so that when you are listening to Radio or CD,
if there is any travel announcement from a nearby local station, the radio will already know the frequency of
that radio station. Then it will receive the station, turn up the volume, or interrupt the playback for the duration
of the announcement. At the end of the announcement the radio will return to its previous state ready for the
next announcement.
Press and hold for 2 seconds the AF button to turn the EON function on/off.
TA (Traffic Announcement) function
• Press the TA button shortly to turn on or turn off the TA function.
• In TA mode (LCD shows TA) traffic program will be automatically searched, until the program is received.
If the current volume level is less then the default one (you can set it pressing and holding the SEL button,
then rotating the VOL knob), when the tuner switches into the traffic program, the volume will be set as
default.
• Press and hold the SEl button, then rotate the VOL knob to select the SEEK mode ON or OFF setting and
adjust it.
Seek on mode: during searching the radio retunes to a different station, which contains TP information.
14
Page 15

AF (Alternative Frequencies) function
Press the AF button on the panel to turn on or turn off the AF function. If the AF function is on the display will
show “AF”. The RDS program will be automatically searched and received. After turning on, if the RDS signal is
week or even no signal, the unit will search another frequency with this RDS program.
Default setting is ON.
PTY (Program Type) function
Press PTY button shortly and repeatedly to turn on/off PTY mode. When turning the mode, the LCD will display
“PTY” and “NEWS”. Then rotate the VOL knob to select one of PTY programs: (=> NEWS) => AFFAIRS =>
INFOR => SPORT => EDUCAT => DRAMA => CULTURE => SCIENCE => VARIED => POP M =>
ROCK M => EASY M => LIGHT M => CLASSICS => OTHER M => WEATHER => FINANCE =>
CHILDREN => SOCIAL => RELIGION => PHONE IN => TRAVEL => LEISURE => JAZZ =>
COUNTRY => NATION M => OLDIES M=> FOLK M => DOCUMENT => ALR TEST => ALARM.
After selecting one of the programs, press SEL button to search for the stations of PTY program. During 1 loop, if
a desired PTY is not found, “PTY NONE” appears on the display, then return to previous normal radio and PTY
word disappear.
15
Page 16

CD operations
Discs for playback
This unit can play disc types: CD/CD-R/-RW.
Compatible with formats: MP3/WMA/CDDA.
Loading / unloading a disc
1. Turn the power on.
2. Long press the ANGLE button to tilt the front panel and here is the disk slot to insert a disk.
3. Insert the disc with the printed side facing upward into the slot. It will start playing.
4. To unload the disk you need just press ANGLE again to set the panel aflat.
Playing/ pausing
When the disc has been already loaded, the playback of the first track starts automatically.
To ensure good system performance, wait until the unit finishes reading the disc information before proceeding.
Press the PLAY/PAUSE button to start playback.
Press the PLAY/PAUSE button to pause the playback. Press again to resume the playback.
Playing the previous/ next track
1. During playback press the button to go to the beginning of the current track. Press again to go to
previous track.
2. During playback press the button to go to the next track.
Selecting the previous/ next folder
For MP3 and WMA files playback press the 5/6 number buttons to go to previous/ next folder.
16
Page 17

Fast forward and backward playback
Press and hold for 2 seconds the / buttons to fast the playing in backward or forward direction.
Release the button when the desired location is found.
Scanning (intro)
You can play the beginning of every track for 10 seconds in sequence. Press the INT button shortly to start intro
playback of tracks.
For MP3 and WMA files playback press and hold for 2 seconds the INT button to start the intro playing of the
tracks in current folder.
Repeat playback
Press the RPT button shortly to repeat current track. Press again to stop.
For MP3 and WMA files playback press and hold for 2 seconds the RPT button to start the repeat playing of the
tracks in current folder.
Random playback
During disc playback, press the RDM button to play all tracks on the disc in random order. Press again to cancel.
File search function
1. For MP3 and WMA files playback press the BAND (BND) button to enter the search menu. The display
will show “TRACK” indication.
2. Press SEL button or rotate the VOL knob to enter it. The display will show the folders list.
3. Rotate the VOL knob to select the desired folder.
4. Press SEL to enter it and start the playback.
5. Press SEL to start the selected file playback.
17
Page 18

Displaying the ID3 information
Under MP3 mode press the A.P button repeatedly, the folder name, file name, title, artist and album information
will be scrolling on the LCD display.
As long as the current playing MP3 music contains relevant ID3 tag information in version 1.0/2.0 format, the 3
items underlined above will be scrolling on the LCD display; otherwise, they will not.
MP3 overview
Notes on MP3:
• MP3 is short for MPEG Audio Layer 3 and refers to an audio compression technology standard.
• This product allows playback of MP3 files on CD-ROM, CD-R or CD-RW discs.
• The unit can read MP3 files written in the format compliant with ISO 9660. However it does not support the
MP3 data written by the method of packet write.
• The unit can not read an MP3 file that has a file extension other than “.mp3”.
• If you play a non- MP3 file that has the “.mp3” extension, you may hear some noise.
• In this manual, we refer to what are called “MP3 file” and “folder” in PC terminology as “track” and
“album”, respectively.
• Maximum number of directory level is 8, including the root directory. Maximum number of files and folders
per disc is 256.
• The unit may not play tracks in the order of Track numbers.
• The unit plays only the audio tracks if a disc contains both audio tracks and MP3 files.
• When playing a disc of 8 kbps or “VBR”, the elapsed playing time in the display window will not be correct
and also the intro play may not function properly. “VBR”: Variable Bit Rate.
18
Page 19

Notes on creating your own CD-R or CD-RW containing MP3 files:
• To enjoy high quality sound, we recommend converting to MP3 files with a sampling frequency of 44.1 kHz
and a fixed bit rate o f 128 kbps.
• DO NOT store more than 256 MP3 files per disc.
• For ISO 9660 - compliant format, the maximum allowable depth of nested folders is 8, including the root
directory (folder).
• When CD-R disc is used, playback is possible only for discs, which have been finalized.
• Make sure that when MP3 CD-R or CD-RW is burned that it is formatted as a data disc and NOT as an audio
disc.
• You should not write non-MP3 files or unneeded folders along with MP3 files on the disc otherwise it takes
a long time until the unit starts to play MP3 files.
• With some CD-R or CD-RW media, data may not be properly written depending on its manufacturing
quality. In this case, data may not be reproduced correctly. High quality CD-R or CD-RW disc is
recommended.
• Up to 16 characters are displayed for the name of an Album or a Track. ID3TAG version 1.x is required.
• Note that the unit may not play Tracks in the order that you wrote them to the disc.
19
Page 20

Anti-theft system
Removing the panel
1. Press POWER button to switch off the power of the unit.
2. Press OPEN button to flip down the panel (the right side of it will get detached).
3. Push the panel to the left and take it.
4. Use a special case when you get out of the car and take it with you.
Removing the unit
1. Remove the panel and the trim plate.
2. Insert both T-Keys into hole on the front of the set until they lock.
3. Pull out the unit.
Attaching the control panel
1. Insert the left side of the control panel into the main unit and press it.
Note: the control panel must be attached into the T-Joint.
2. Insert the right side into the main unit.
3. Close the panel and press it until a “click” sound is heard
Caution:
DO NOT insert the control panel from the right side. It can damage the control panel.
The control panel can easily be damaged by shocks. After removing it, place it in a protective case and be careful
not to drop it or subject it to strong shocks.
The rear connector that connects the main unit and the control panel is an extremely important part. Be careful not
to damage it by pressing on it with fingernails, pens, screwdrivers, etc.
20
Page 21

Note:
If the control panel is dirty, wipe off the dirt with soft, dry cloth only. And use a cotton
swab soaked in isopropyl alcohol to clean the socket on the back of the control panel.
Handling discs
• Dirty, scratched or warped discs may cause skip ping or noise.
• Handle the disc only by the edges. To keep clean do not touch its surface.
• Discs should be stored in their cases after use to avoid scratches.
• Do not expose discs to direct sunlight, high humidity, high temperature or dust.
• Prolonged exposure to extreme temperature can wrap the disc (such as leaving the discs in your car during
summertime).
• Do not stick or write anything on either side of disc. Sharp writing instruments, or the inks used in some
felt-tip pens, may damage its surface.
• DO NOT touch the unlabeled side. DO NOT attach any seal, label or data protection sheet to either side of a
disc.
Cleaning
Cleaning the cabinet
Wipe with a soft cloth. If the cabinet is very dampen (not dropping wet) the cloth with a weak solution of soapy
water, and then wipe clean.
Cleaning discs
Fingerprints should be carefully wiped from the surface of disc with a soft cloth. Unlike conventional records,
compact discs have no grooves to collect dust and macroscopic dirt, so gently wiping them with a soft cloth
should remove must panicles. Wipe in a straight motion from the center to the edge.
Never use thinner benzine, record cleaner or anti static spray on a compact
disc. Such chemicals can damage its plastic surface.
21
Page 22

Troubleshooting guide
Symptom
General
No power
Disc
Disc cannot be loaded.
Disc cannot be read. Inserting the disc in upside down.
No sound Volume is in minimum.
The operation keys do not
work.
Sound skips. The installation angle is more than 30
Cause Solution
The car ignition is not on.
The fuse is blown.
Presence of disc inside the player.
Compact disc is extremely dirty or
defective.
Temperature inside the car is too high.
Wiring is not properly connected.
The built-in microcomputer is not operating
properly due to noise.
Front panel is not properly fix into its place.
degrees.
The disc is extremely dirty or defective.
If the power supply is properly connected to the car
accessory switch the ignition key to “ACC”.
Replace the fuse.
Remove the disc in the player then put a new upward.
Insert the compact disc with the label facing upward.
Clean the disc or try to play a new one.
Cool off until the ambient temperature returns to
normal.
Adjust volume to a desired level.
Check wiring connection.
Press the RESET button.
Reinstall the front panel.
Adjust the installation angle to less than 30 degrees.
Clean the compact disc/try to play a new one.
The radio does not work,
the radio station automatic
selection does not work.
The antenna cable is not connected the
signals are too weak.
22
Insert the antenna cable firmly select a station
manually.
Page 23

Specification
General
Power supply:
Current consumption: max. 15 A
Maximum power output: 50 W x 4 channels
Dimensions (W x H x D): 178 x 165 x 50 mm
Working temperature range: -10ºС - +60ºС
FM Stereo Radio
Frequency range:
Usable sensitivity (S/N = 30 dB): 40dB
Preset memory stations: 18
MW and LW section
Frequency range:
Preset memory stations:
Audio specification
Maximum output:
Frequency response:
S/N ratio(A-vtd):
DSP sound effect:
Line out
12 V DC
65 – 74 / 87.5 - 108.0 MHz
522 kHz - 1620 kHz
12
2 Vrms (+/- 3 dB)
20 - 100Hz </= 5dB; 10 – 20KHz </= 5dB
> 50 dB
Classic, Rock, Pop, Flat
Output:
Specifications are subject to change without notice. Mass and dimension are approximate.
CD max 2000 mV
23
Page 24

Уважаемый покупатель!
Благодарим Вас за покупку нашего изделия. Для обеспечения безопасности рекомендуется тщательно
изучить настоящее руководство перед подключением, эксплуатацией и/или регулировкой изделия, и
сохраняйте руководство для использования в будущем.
Содержание
Содержание ......................................................................................................................................................... 24
Меры предосторожности ................................................................................................................................... 25
Установка/ подключение ................................................................................................................................... 26
Органы управления............................................................................................................................................. 29
Основные операции............................................................................................................................................ 33
Цифровой тюнер................................................................................................................................................. 36
Воспроизведение файлов с CD.......................................................................................................................... 39
Обзор МР3 ...........................................................................................................................................................42
Система против кражи ....................................................................................................................................... 44
Обращение с дисками......................................................................................................................................... 45
Чистка и уход ......................................................................................................................................................46
Руководство по устранению неисправностей ..................................................................................................47
Технические характеристики............................................................................................................................. 48
24
Page 25

Меры предосторожности
• Использование данного устройства при температуре ниже -10ºС может привести к поломке. Перед
использованием ПРЕДВАРИТЕЛЬНО ПРОГРЕЙТЕ САЛОН АВТОМОБИЛЯ до рекомендованной
температуры. Тщательно изучите настоящую инструкцию, чтобы ознакомиться с аудиосистемой.
• При установке и подключении изделия отключите отрицательную клемму аккумулятора
автомобиля.
• При замене предохранителя, убедитесь, что вы устанавливаете предохранитель с тем же номиналом.
Используя предохранитель с повышенным значением тока, можно причинить значительные
повреждения изделию.
• Не пытайтесь разбирать изделие. Лазерные лучи, исходящие из блока оптической головки
считывания информации с компакт-диска, опасны для глаз.
• Убедитесь, что шпильки или другие посторонние предметы не попали внутрь изделия. Они могут
вызвать сбои в работе или стать причиной опасности, такой, как поражение электрическим током
или лазерным лучом.
• Если вы ставите автомобиль на стоянку на длительное время в жаркое или холодное время года,
подождите, пока температура в автомобиле не станет нормальной, перед тем как включать изделие.
• НЕ открывайте крышки и не проводите ремонт самостоятельно. Обратитесь к дилеру или
квалифицированному персоналу
• Убедитесь, вы отключаете источник питания и антенну, если вы не будете пользоваться системой в
течение длительного времени или во время грозы.
• Убедитесь, что вы отключаете источник питания, если обнаружена неправильная работа системы,
система издает необычные звуки, запах, выделяет дым или внутрь ее попала жидкость. Проведите
квалифицированный технический осмотр системы.
• Прибор разработан так, чтобы отрицательный вывод аккумулятора был подключен к корпусу
транспортного средства. Пожалуйста, убедитесь в этом перед установкой.
• Не позволяйте проводам динамиков касаться друг друга при включении прибора. В противном
случае, может быть перегружен или выйти из строя усилитель питания.
• Не устанавливайте съемную панель перед подключением кабеля.
• Не снимайте панель во время записи.
25
Page 26

Установка/ подключение
Сначала проведите электрические подключения, затем проверьте их правильность.
Способ установки
Шасси имеет корпус с металлическими направляющими.
Пожалуйста, проведите соединение проводов источника питания,
динамиков и антенны в соответствии с требованиями инструкции.
Перед установкой удалите металлический корпус и выверните 2 винта,
защищающие устройство от повреждений до подключения. Затем
установите устройство в соответствии с приведенной схемой.
26
Page 27

Схема электрических соединений
Внимание:
Не меняйте соединение красного и желтого проводов!!!
Для некоторых моделей необходимо будет изменить соединение проводов питания. Перед установкой
свяжитесь с Вашим региональным дилером.
27
Page 28

Использование разъема ISO
1. Если в Вашем автомобиле есть разъем ISO, произведите подключение, как
показано на рисунке.
2. Для подключений без разъемов ISO внимательно проверьте все провода
перед подключением, неправильное подключение может привести к
повреждениям изделия.
Обрежьте разъем, подключите цветные головки разъема к шнуру питания
батареи в соответствии с приведенной таблицей.
Номер Функция
Разъем A Разъем B
1 Задний правый(+)---Фиолетовый
2 Задний правый(-)---Фиолетовый/Черный
3 Передний правый(+)---Серый
4 Питание 12В (+)/желтый Передний правый(-)---Серый/Черный
5 Авто антенна /синий Передний левый(+)---Белый
6 Передний левый((-)---Белый/Черный
7 ACC+/красный Задний левый(+)---Зеленый
8 Земля/черный Задний левый(-)---Зеленый/Черный
28
Page 29

Органы управления
Передняя панель
1. Кнопка BАND (BND)
Нажмите кнопку BND для установки диапазона радиоприемника в режиме Радио.
2. Регулятор громкости VOL/ Кнопка SEL
Вращайте регулятор громкости по часовой стрелке, чтобы увеличить уровень громкости, вращайте
против часовой стрелки, чтобы уменьшить уровень громкости.
Нажмите на него (кнопка SEL), чтобы открыть меню настроек аудио. Нажимайте на кнопку, чтобы
выбрать настройки: BASS => TREBLE => BALANCE L-R => FADER R-F.
Нажмите на кнопку и удерживайте 2 секунды, чтобы войти в режим настроек. Нажимайте на кнопку
SEL, чтобы выбрать настройку: EQ (FLAT => CLAS => ROCK => POP) => CLK (12 / 24) => CT
=>STEREO / MONO => LO / DX (DX=>LOC) => AREA (OIRT => LATIN => EUROPE=>USA =>
29
Page 30

ASIA => AUST) => V-PGM (0-46) => BEEP ON / OFF => CLK ON / OFF => SEEK ALL / RDS =>
TA SEEK=> TA VOL=> MASK DPI / ALL => REG ON / OFF.
Вращайте регулятор громкости, чтобы отрегулировать каждую настройку.
3. Кнопки /
В режиме диска нажимайте на кнопки для перехода к предыдущему/следующему треку. Нажмите
удерживайте для ускоренного воспроизведения назад/вперед.
В режиме радио нажимайте на кнопки для ручного поиска радиостанций. Нажмите удерживайте для
автоматического поиска радиостанций.
4. Кнопка A.P
Кнопка используется
5. Кнопка PTY
В режиме Радио нажмите на кнопку, чтобы включить/ выключить функцию PTY (настройки типа
принимаемой программы).
6. Кнопка AF
В режиме Радио нажмите на кнопку, чтобы включить/ выключить функцию AF (альтернативные
частоты).
Нажмите и удерживайте кнопку в течение 2 секунд, чтобы включить/ выключить функцию EON.
7. Жидкокристаллический дисплей.
8. Кнопка ТА
В режиме Радио нажмите на кнопку, чтобы включить/ выключить функцию TA (дорожных
объявлений).
Нажмите и удерживайте кнопку в течение 2 секунд, чтобы включить/ выключить функцию LOUD.
9 Кнопка MUТЕ (MU)
Нажмите на кнопку, чтобы выключить звук. Нажмите снова или вращайте регулятор громкости,
чтобы вернуть звук на прежний уровень.
для поиска и сохранения радиостанций.
30
Page 31

10 Кнопка MODЕ
Нажимайте на кнопку, чтобы выбрать режим: RADIO (Радио) => DISC (Диск).
11 Кнопка POWER
Нажмите на кнопку POWER, чтобы включить питание устройства. Нажимайте на кнопку еще раз,
чтобы выключить его.
Нажмите и удерживайте кнопку в течение 2 секунд, чтобы выключить питание и стереть
установленное время.
12 Кнопка ANGLE (ANG)
Используйте кнопку для регулировки угла наклона панели.
Удерживая кнопку, приведите панель в горизонтальное положение. Откроется внутренняя панель со
слотом для диска. Как только вы вставите диск в слот, воспроизведение начнется автоматически.
13 КНОПКИ С ЦИФРАМИ
- Первая кнопка (PLAY / PAUSE / TOP): для начала воспроизведения и паузы.
Вторая кнопка (INT): используется для активации функции Intro (воспроизведение первых 10 секунд
каждого трека).
Третья кнопка (RPT): используется для повторного воспроизведения текущего трека.
Четвертая кнопка (RDM): используется для случайного воспроизведения треков.
- Пятая и шестая кнопки наряду с кнопками 1-4 используются как кнопки сохраненных радиостанций
14 Кнопка OPEN
Нажмите на кнопку, чтобы снять панель.
15 Кнопка RESET
Кнопка используется для сброса всех установок и возврата к фабричным установкам.
31
Page 32

Внутренняя панель со слотом для диска
Панель данной магнитолы можно установить в горизонтальное положение нажатием кнопки ANGLE
(ANG) для того, чтобы открыть внутреннюю панель со слотом для диска. Кнопку ANG нужно нажать и
удерживать. После того, как диск будет вставлен, воспроизведение начнется автоматически, панель
примет вертикальное положение автоматически. Для прекращения воспроизведения и извлечения диска
из слота нажмите ANG.. Коротким нажатием кнопки ANG можно изменять угол наклона панели.
32
Page 33

Основные операции
Кнопка RESET (сброс)
Нажмите на кнопку сброса RESET, расположенную на передней панели.
Эта мера необходима в следующих ситуациях: исходная установка устройства после подключения,
никакие кнопки не действуют, символы ошибок появляются на дисплее.
Кнопка включения
Нажмите любую кнопку, чтобы включить устройство. Нажмите на кнопку POWER, чтобы выключить
питание.
Нажмите и удерживайте кнопку в течение 2 секунд, чтобы выключить питание и стереть установленное
время.
Внимание: Когда Вы выключаете систему или зажигание автомобиля, громкость звука и радио
настройки будут сохранена в памяти устройства, и при включении установки вернутся к сохраненным
значениям.
Регулировка громкости
Вращайте регулятор громкости VOL+/-, чтобы отрегулировать громкость.
Регулировка настроек аудио
Нажимайте на кнопку SEL, чтобы выбрать одну из настроек аудио: VOL (volume) => BAS (низкие
частоты) => TREВLE (высокие частоты) => BAL (баланс левые/ правые динамики)/ FAD (баланс задние/
передние динамики).
Вращайте регулятор громкости, чтобы отрегулировать настройку.
Внимание: В случае настройки BAL/FAD вращайте регулятор громкости, чтобы отрегулировать
FADER, нажимайте на /, чтобы отрегулировать BALANCE.
33
Page 34

Регулировка других настроек
Нажмите и удерживайте в течение 2 секунд кнопку SEL, чтобы выбрать настройку меню: EQ (FLAT
=> CLAS => ROCK => POP) => CLK (12 / 24) => CT =>STEREO / MONO => LO / DX (DX=>LOC) =>
AREA (OIRT => LATIN => EUROPE=>USA => ASIA => AUST) => V-PGM (0-46) => BEEP ON / OFF
=> CLK ON / OFF => SEEK ALL / RDS =>TA SEEK=> TA VOL=> MASK DPI / ALL => REG ON /
OFF.
Вращайте регулятор громкости, чтобы отрегулировать настройку.
• EQ:по умолчанию стоит настройка EQ OFF. Вы можете выбрать любую из четырех в меню: FLAT
=> CLAS => ROCK => POP.
• CLK (12 / 24): по умолчанию настройка 12H высветится на дисплее для Америки и 24H – lдля
Европы. Вращением регулятора можно настроить желаемый формат.
• CT: по умолчанию высветится настройка 12:00 для Америки и 24:00 – для Европы, вращением
регулятора можно установить правильное время (минуты и часы).
• LO/DX: по умолчанию высветится настройка Dx. Вращением регулятора можно настроить
желаемую опцию (DX => LOC).
Во время прослушивания радио нажмите на кнопку LOC на пульте ДУ, чтобы выбрать режим
приема локальных или региональных станций.
- При выборе режима LOC (локальный) на дисплее появляется индикация “LOC”. При этом доступны
только локальные станции и на экране появится “Loc”.
- При выборе режима DX (региональный) доступны сигналы удаленных радиостанций.
Внимание: по умолчанию установлен режим DX.
Функция LOC доступна только для выбора локальных или удаленных станций.
• AREA: выберите регион: OIRT => EUROPE => S. AMERICA => USA => ASIA => AUST.
• V-PGM (0-46): вращением регулятора можно настроить уровень громкости (0-46). Вы можете
установить определенный уровень громкости, подходящий Вам. После того, как Вы внесете этот
34
Page 35

показатель в память магнитолы, при каждом последующем включении уровень громкости будет
настраиваться на этот показатель.
• Режим BEEP
Вращайте регулятор громкости, чтобы выбрать режим: BEEP ON (звуковое сопровождение при
нажатии на кнопки на панели) или BEEP OFF (звуковое сопровождение выключено). Снова нажмите
на кнопку SEL, чтобы подтвердить настройку и вернуться к списку настроек. Для выхода из
опций подождите 5 секунд.
• CLK ON: функция вывода часов на дисплей даже при выключенном питании.
• Clock: установите часы и минуты. Нажмите SEL, чтобы ввести данные.
• Seek RDS: выберите значение: RDS и ALL (все).
• TA seek: выберите значение SEEK и OFF ALARM.
TA volume: установите уровень громкости звука в режиме ТА (0-40). По умолчанию уровень 18.
• Режим MASK
Когда для какой-либо станции включен режим, разрешающий переключение на альтернативную
частоту (AF), радиоприемник может переключиться на эту частоту, которая занята другой
радиостанцией с другим значением PI, но с той же AF.
Если автомобиль перемещается в критической зоне, может появиться эффект частого переключения
между двумя разными радиостанциями. Радиоприемник CD-ресивера имеет специальную
процедуру, направленную на снижение данного эффекта.
Радиоприемник в таком случае прекращает искать альтернативную частоту AF в течение некоторого
времени. В этой ситуации радиоприемник будет маскировать сигнал ошибочно принимаемой
радиостанции, в зависимости от выбранного режима: MASK DPI или MASK ALL.
Поворачивайте регулятор громкости на панели, чтобы выбрать один из режимов:
- MASK DPI:
Маскирует только альтернативные частоты с разными информационными программами.
- MASK ALL:
Маскирует и информационные программы, и станции, не поддерживающие RDS.
списка
35
Page 36

• Region: включите или выключите функцию регионального кода.
Выключение звука
Нажмите на кнопку MUТЕ, чтобы выключить звук. Нажмите на кнопку еще раз или вращайте регулятор
громкости, чтобы включить звук.
Выбор режима работы
Нажмите на кнопку MODЕ, чтобы выбрать режим работы устройства: RADIO(Радио) => DISC (Диск).
Настройка тонкомпенсации (LOUD)
Нажмите и удерживайте в течение 2 секунд кнопку TA, чтобы включить или выключить функцию
тонкомпенсации (LOUD).
Цифровой тюнер
Внимание: Сервис RDS (Система радио данных) доступен не во всех регионах. Имейте ввиду, что если
услуга RDS не доступна в Вашем регионе, то данная функция не будет работать.
Выбор диапазона
Нажмите на кнопку MODЕ, чтобы выбрать режим радио - RADIO.
Нажимайте на кнопку BАND, чтобы выбрать диапазон: FM1, FM2, FM3, AM1, AM2.
36
Page 37

Ручной/ автоматический поиск радиостанций
- Ручной поиск: Нажмите и удерживайте в течение 2 секунд кнопку/, чтобы войти в режим
ручного поиска. Нажимайте на кнопки /, чтобы вручную найти станцию.
- Автоматический поиск: Нажмите на кнопки /, чтобы начать автоматический поиск. Поиск
прекратится при приеме первой станции с сильным сигналом, при этом начнется ее воспроизведение.
Программирование радио станций
Вы можете хранить и воспроизводить 30 радиостанций (18 FM, 12 АМ).
• Чтобы сохранить станцию:
- Выберите диапазон (если нужно).
- Выберите станцию.
- Нажмите и удерживайте в течение двух секунд кнопку с номером 1~6, под которым Вы бы
хотели сохранить эту станцию.
• Чтобы вызвать станцию:
- Выберите диапазон (если нужно).
- Нажмите на кнопку с номером нужной сохраненной станции 1~6.
Функция автоматического сохранения станций в памяти
Выберите диапазон. Нажмите и удерживайте в течение 2 секунд кнопку А.Р, 6 самых сильных
доступных станций будут автоматически сохранены в памяти кнопок 1~6. Чтобы остановить
автоматическое сохранение, снова нажмите на кнопку А.Р.
37
Page 38

Функция автоматического предпрослушивания станций
Выберите диапазон. Нажмите на кнопку А.Р, чтобы прослушать все сохраненные в текущем диапазоне
станции в течение 7 секунд. Во время прослушивания номер каждой станции будет мигать на дисплее.
Чтобы остановить прослушивание, снова нажмите на кнопку А.Р.
Функция EON
При прослушивании радио или CD диска, если на приемник поступит информация о дорожном
движении от ближайшей радиостанции, приемник запомнит частоту этой радиостанции. Затем он
настроится на эту частоту, увеличит громкость и прервет прослушивание текущей радиостанции или
диска, чтобы Вы могли прослушать полученную информацию. После этого приемник вернется к
предыдущему состоянию.
Нажмите и удерживайте в течение 2 секунд кнопку АF, чтобы включить или выключить функцию EON.
Функция TA ( Программы о дорожном движении)
1. При нажатии на кнопку ТА режим ТА включается (ON) или выключается (OFF).
2. Когда функция ТА включена, начнется передача дорожного движения, при этом уровень громкости
приемника перейдет к установленному Вами уровню (Нажмите и удерживайте в течение 2 секунд
кнопку SEL, чтобы выбрать настройку TA VOLUME. Вращайте регулятор громкости, чтобы
установить уровень громкости в режиме ТА от 0 до 40).
3. Нажмите и удерживайте в течение 2 секунд кнопку SEL, чтобы выбрать настройку SEEK. Вращайте
регулятор громкости, чтобы включить или выключить функцию.
Функция AF (Альтернативные частоты)
Нажмите на кнопку AF, чтобы режим AF стал активным. На дисплее появится надпись AF.
В активном режиме AF радио постоянно проверяет силу сигнала альтернативных частот, на которых
может транслироваться RDS программа. Если сигнал слабый или исчезает, тюнер будет автоматически
38
Page 39

искать другую частоту с этой программой.
По умолчанию функция включена.
Функция PTY (Тип программы)
Нажмите кнопку PTY отрывисто несколько раз, чтобы активизировать функцию PTY, при этом на
экране появится индикация “PTY” и “NEWS”. Вращая регулятор громкости, выберите одну из
предлагаемых PTY программ: (=> NEWS) => AFFAIRS => INFOR => SPORT => EDUCAT => DRAMA =>
CULTURE => SCIENCE => VARIED => POP M =>
ROCK M => EASY M => LIGHT M => CLASSICS => OTHER M => WEATHER => FINANCE =>
CHILDREN => SOCIAL => RELIGION => PHONE IN => TRAVEL => LEISURE => JAZZ =>
COUNTRY => NATION M => OLDIES M=> FOLK M => DOCUMENT => ALR TEST => ALARM.
Выбрав желаемую программу, нажмите SEL для поиска радиостанции в соответствии с выбранной PTY
программой. Если поиск не дает результатов, на экране появляется индикация “PTY NONE”, при
возвращении к обычному режиму индикация исчезает.
Воспроизведение файлов с CD
Диски для воспроизведения
Это устройство может воспроизводить разновидности цифровых дисков: CD/CD-R/-RW.
Совместимо с форматами: MP3/WMA/CDDA.
Загрузка диска
1. Включите питание устройства.
2. Используя кнопку ANGLE (ANG), приведите панель в горизонтальное положение, чтобы открыть
внутреннюю панель со слотом для диска.
3. Вставьте диск стороной с печатными символами вверх. Воспроизведение начнется автоматически.
39
Page 40

4. Для извлечения диска нажмите кнопку ANGLE (ANG) и приведите панель в горизонтальное
положение.
Воспроизведение / Пауза
Когда диск в устройстве, начинается автоматическое воспроизведение первого трека. Чтобы обеспечить
высокое качество воспроизведения, дождитесь, пока плеер закончит читать диск, а затем начинайте
воспроизведение. Во время воспроизведения нажмите на кнопку PLAY/PAUSE, режим паузы
активируется. Нажмите на кнопку PLAY/PAUSE еще раз, чтобы продолжить воспроизведение.
Переход к предыдущему или следующему треку
- Нажмите во время воспроизведения на кнопки /, чтобы начать воспроизведение с начала
текущего трека. Нажмите еще раз, чтобы начать воспроизведение предыдущего трека.
- Нажмите во время воспроизведения на кнопки /, воспроизведение начнется со следующего
трека.
Переход к предыдущей или следующей папке
Во время воспроизведения MP3/WMA файлов нажимайте на кнопки с цифрами 5 и 6, чтобы переходить к
предыдущей и следующей папкам соответственно.
Ускоренное воспроизведение вперед или назад
Во время воспроизведения нажимайте на кнопки /, чтобы начать ускоренное воспроизведение назад
или вперед. Отпустите кнопку, когда дойдете до фрагмента, с которого хотите продолжить
воспроизведение.
Функция сканирования Intro
Вы можете последовательно воспроизводить начало каждого трека в течение 10 секунд.
40
Page 41

Во время воспроизведения треков нажмите на кнопку INT, чтобы начать воспроизведение всех треков.
Нажмите еще раз для отмены.
Во время воспроизведения MP3/WMA файлов нажмите и удерживайте в течение 2 секунд кнопку INT,
чтобы начать воспроизведение треков в текущей папке.
Повтор воспроизведения
Во время воспроизведения треков нажмите на кнопку RPT, чтобы начать повторное воспроизведение
текущего трека. Нажмите еще раз для отмены.
Во время воспроизведения MP3/WMA файлов нажмите и удерживайте в течение 2 секунд кнопку RPT,
чтобы начать повторное воспроизведение треков в текущей папке.
Случайное воспроизведение
Во время воспроизведения треков нажмите на кнопку RDM, чтобы начать воспроизведение всех треков
на диске в случайном порядке. Нажмите еще раз для отмены.
Функция поиска файлов
1. Во время воспроизведения MP3/WMA файлов нажмите на кнопку ВAND, чтобы открыть меню
поиска файлов. На дисплее появится индикация “TRACK”.
2. Нажмите на кнопку SEL или вращайте регулятор VOL, чтобы войти в меню поиска
3. Вращайте регулятор громкости, чтобы выбрать нужную директорию (трек).
4. Нажмите на кнопку SEL, чтобы войти в нее (начать воспроизведение выбранного трека).
Отображение ID3 тэгов
Во время воспроизведения MP3 файлов нажимайте на кнопку А.Р, чтобы отобразить на дисплее имя
текущей директории, имя текущего файла, заголовок, имя исполнителя и альбом.
Если текущий файл содержит ID3 тэги версии 1.0/2.0, они появятся на дисплее.
41
Page 42

Обзор МР3
Замечания по МР3:
• МР3 это краткое обозначение аудио слоя MPEG 3 и относится к стандарту технологии сжатия звука.
• Данное изделие позволяет воспроизводить файлы МР3 на дисках CD-ROM, CD-R или CD-RW.
• Изделие может считывать файлы МР3, записанные в формате, соответствующем ISO 9660. Однако
оно не поддерживает данные МР3, записанные методом пакетной записи.
• Изделие не может считывать файлы МР3, которые имеют расширение файла, отличающееся от
“.mp3”.
• Если вы воспроизводите не МР3 файл, который имеет расширение “.mp3”, вы можете слышать
некоторые шумы.
• В данном руководстве мы рассматриваем файлы, называемые “файлами MP3” и “папкой”, а в
технологии PC “дорожкой” и “альбомом” соответственно.
• Максимальное количество уровней директории равно 8, включая корневую директорию.
Максимальное количество файлов и папок на диске 256.
• Изделие может не воспроизводить дорожки в последовательном порядке.
• Изделие воспроизводит только аудио треки, если диск содержит как аудио треки, так и файлы МР3.
• При воспроизведении диска 8 килобит или VBR, истекшее время воспроизведения в окне дисплея
будет неправильным, а также ознакомительное воспроизведение может не действовать надлежащим
образом. VBR: Переменная скорость передачи битов.
42
Page 43

Замечание по созданию собственных CD-R или CD-RW, содержащих файлы MP3
• Для получения высокого качества звука мы рекомендуем преобразовывать файлы МР3 с эталонной
частотой 44,1 кГц и фиксированным битрейтом 128 Кбит/сек.
• НЕ сохраняйте более 256 файлов МР3 на диске.
• Для формата, совместимого с ISO 9660, максимально допустимая глубина вложенных папок
равняется 8, включая корневую директорию (папку).
• При использовании диска CD-R воспроизведение возможно только для дисков, которые были
закончены.
• Убедитесь, что при записи MP3 CD-R или CD-RW были отформатированы как диски данных, а НЕ
как аудио диски.
• Вы не должны записывать не-МР3 файлы или ненужные папки вместе с файлами МР3 на диск, в
противном случае потребуется много времени, пока изделие начнет воспроизводить файлы МР3.
• На некоторых CD-R или CD-RW данные могут не быть записаны надлежащим образом в
зависимости от качества их производства. В этом случае данные могут быть воспроизведены не
надлежащим образом. Рекомендуются диски CD-R или CD-RW высокого качества.
• Имя альбома или композиции может содержать до 16 символов. Необходима версия 1.х ID3TAG.
• Помните, что изделие может не воспроизводить треки в том порядке, в котором они записаны на
диске.
:
43
Page 44

Система против кражи
Снятие панели
1. Нажмите на кнопку POWER, чтобы выключить питание устройства.
2. Нажмите на кнопку OPEN, чтобы снять панель (правая сторона панели отсоединится).
3. Сдвиньте панель в левую сторону и снимите ее.
4. Положите панель в специальный футляр и возьмите его с собой, когда будете покидать машину.
Установка съемной панели
1. Держите панель так, чтобы ее лицевая сторона была направлена на Вас. Уст ано вит е левую нижнюю
часть панели в кронштейн магнитолы.
2. Нажмите на панель в левую сторону, установите правую нижнюю часть магнитолы.
3. Нажмите на панель, чтобы она защелкнулась.
Внимание:
Не пытайтесь установить панель в правый кронштейн. Это может повредить устройство.
Панель может повредиться из-за внешних факторов: тряски, ударов. После снятия ее с устройства
держите панель в защитном футляре и старайтесь не ронять и не наносить физических повреждений.
Очень важным элементом является коннектор на задней части панели. Не нажимайте на него ногтями,
ручками, отвертками.
Примечание:
Если панель загрязнилась или запылилась, протрите ее сухой чистой тканью. Для чистки разъема в
задней части панели используйте тампон, смоченный техническим спиртом.
44
Page 45

Выемка магнитолы
1. Снимите панель.
2. Вставьте два Т-образных ключа в отверстие лицевой стороны, пока не услышите щелчок.
3. Выньте изделие.
Обращение с дисками
• Грязные, поцарапанные или погнутые диски могут вызвать искажение звука или шумы
• Держите диск только за края (как показано на рисунке). Чтобы обеспечить чистоту,
не прикасайтесь к его поверхности.
• Диски должны храниться в их чехлах после использования, чтобы не поцарапать
их поверхность.
• Не подвергайте диски действию прямого солнечного света, повышенной влажности, повышенным
температурам или действию пыли.
• Продолжительное влияние предельных температур может изогнуть диск (например, пребывание
дисков в автомобиле в летнее время).
• Не царапайте и не пишите что-либо на любой стороне диска. Острые пишущие инструменты или
чернила, используемые в них, могут повредить поверхность диска.
• НЕ ПРИКАСАЙТЕСЬ к стороне, не имеющей маркировки.
• НЕ ПРИКРЕПЛЯЙТЕ какую-либо печать, этикетку или лист предохранения данных к любой
стороне диска.
45
Page 46

Чистка и уход
Чистка корпуса
Протирайте мягкой тканью. Если корпус очень загрязнен (не мочите его), используйте ткань, слегка
смоченную мыльным раствором, и затем вытрите его сухой тканью.
Чистка дисков
Отпечатки пальцев должны быть тщательно стерты с поверхности диска мягкой тканью. В отличие от
обычных пластинок, компакт-диски не имеют канавок для сбора пыли и микроскопических частиц грязи,
поэтому осторожно вытирайте их мягкой тканью, чтобы убрать частицы грязи. Вытирайте
прямолинейным движением от центра к краю.
Никогда не используйте растворитель, бензин, очиститель пластинок или антистатический аэрозоль
для чистки дисков. Такие химические вещества могут повредить его пластиковые поверхности.
46
Page 47

Руководство по устранению неисправностей
Неисправность Причина Решение
Нет питания
Невозможно загрузить диск
Невозможно считать диск
Нет звука
Не действуют
функциональные ключи
Звук пропадает
Зажигание машины не включено.
Сгорел предохранитель.
В плеер установлен диск. Уд а ли т е диск из плеера, затем установите
Диск установлен верхней стороной вниз.
Диск загрязнен или имеет дефект.
Температура внутри машины очень высокая.
Звук установлен на минимум.
Кабель не подключен надлежащим образом.
Встроенный микрокомпьютер не работает
надлежащим образом из-за шумов.
Передняя панель не установлена на свое место.
Уго л установки более 30 градусов.
Диск загрязнен или имеет дефект.
Если источник питания подключен надлежащим
образом к выключателю машины, установите
ключ зажигания в положение “АСС”.
Замените предохранитель.
новый.
Уст а н овит е компакт диск стороной с этикеткой
вверх.
Очистите диск или установите новый.
Подождите, пока температура не станет
нормальной.
Отрегулируйте звук до необходимого уровня.
Проверьте подключение кабеля.
Нажмите кнопку RESET.
Повторно установите переднюю панель.
Отрегулируйте угол установки, установив его
менее 30 градусов.
Очистите диск или установите новый.
Радио не работает.
Не работает автоматический
выбор радиостанции
Антенный кабель не подключен.
Сигналы слишком слабы.
47
Вставьте антенный кабель надежно.
Выберите станцию вручную.
Page 48

Технические характеристики
Общие
Источник питания:
Потребляемый ток/Предохранитель: Максимум 15 А
Максимальная выходная мощность: 50 Вт х 4 канала
Размеры (Д х Ш х В): 178 х 165 х 50 мм
Рабочий диапазон температур:
Стерео FM радио
Частотный диапазон:
Используемая чувствительность: 40 дБ
Память цифрового тюнера 18 станций
MW и LW радио
Частотный диапазон:
Память цифрового тюнера 12 станций
Аудио
Максимальный уровень сигнала на
выходе:
Частотный диапазон: 20 –100 Гц </= 5dB; 10 – 20 Кгц </=5dB
Уровень сигнал-шум (A-vtd): 55 дБ
12 В постоянного тока
-10ºС - +60ºС
65 – 74 / 87.5 - 108.0 МГц
522 кГц - 1620 кГц
2 В RMS (+/-3 дБ)
DSP процессор Classic, Rock, Pop, Flat
Линейный выход
Технические характеристики могут быть изменены заводом-изготовителем без предварительного уведомления.
Указанные масса и геометрические размеры имеют приблизительные значения.
CD макс. 2000 мВ
48
 Loading...