

Page 1
H-CDM8022
CD/MP3 RECEIVER WITH BLUETOOTH CD/MP3-РЕСИВЕР С BLUETOOTH
Instruction manual Руководство по эксплуатации
Page 2

Dear customer!
Thank you for purchasing our product. For safety, it is strongly recommended to read this manual carefully before
connecting, operating and/or adjusting the product and keep the manual for reference in the future.
Table of contents
Table of contents.................................................................................................................................................. 2
Important safeguards ........................................................................................................................................... 3
Installation/Connections......................................................................................................................................4
Panel controls ......................................................................................................................................................7
Remote controller (RC) ..................................................................................................................................... 10
General operation ..............................................................................................................................................11
Digital tuner....................................................................................................................................................... 14
Disc operations .................................................................................................................................................. 17
USB/SD/MMC operations................................................................................................................................. 21
Bluetooth operations.......................................................................................................................................... 22
Anti-Theft System ............................................................................................................................................. 24
Handling discs ................................................................................................................................................... 25
Cleaning............................................................................................................................................................. 25
Troubleshooting guide....................................................................................................................................... 26
Specification ...................................................................................................................................................... 27
2
Page 3

Important safeguards
• Using the device at temperature below -10ºС may cause the breakage of the device. Before using please heat
up the passenger compartment to the recommended temperature!
• Read carefully through this manual to familiarize yourself with this high-quality sound system.
• Disconnect the vehicle's negative battery terminal while mounting and connecting the unit.
• When replacing the fuse, be sure to use one with an identical amperage rating. Using a fuse with a higher
amperage rating may cause serious damage to the unit.
• Do not attempt to disassemble the unit. Laser beams from the optical pickup are dangerous to the eyes.
• Make sure that pins or other foreign objects do not get inside the unit; they may cause malfunctions, or create
safety hazards such as electrical shock or laser beam exposure.
• If you have parked the car for a long time in hot or cold weather, wait until the temperature in the car becomes
normal before operating the unit.
• Do not open covers and do not repair yourself. Consult the dealer or an experienced technician for help.
• Make sure you disconnect the power supply and aerial if you will not be using the system for a long period or
during a thunderstorm.
• Make sure you disconnect the power supply if the system appears to be working incorrectly, is making an
unusual sound, has a strange smell, has smoke emitting from it or liquids have got inside it. Have a qualified
technician check the system.
• Do not allow the speaker wires to be shorted together when the unit is switched on. Otherwise it may overload
or burn out the power amplifier.
• Do not install the detachable panel before connecting the wire.
3
Page 4
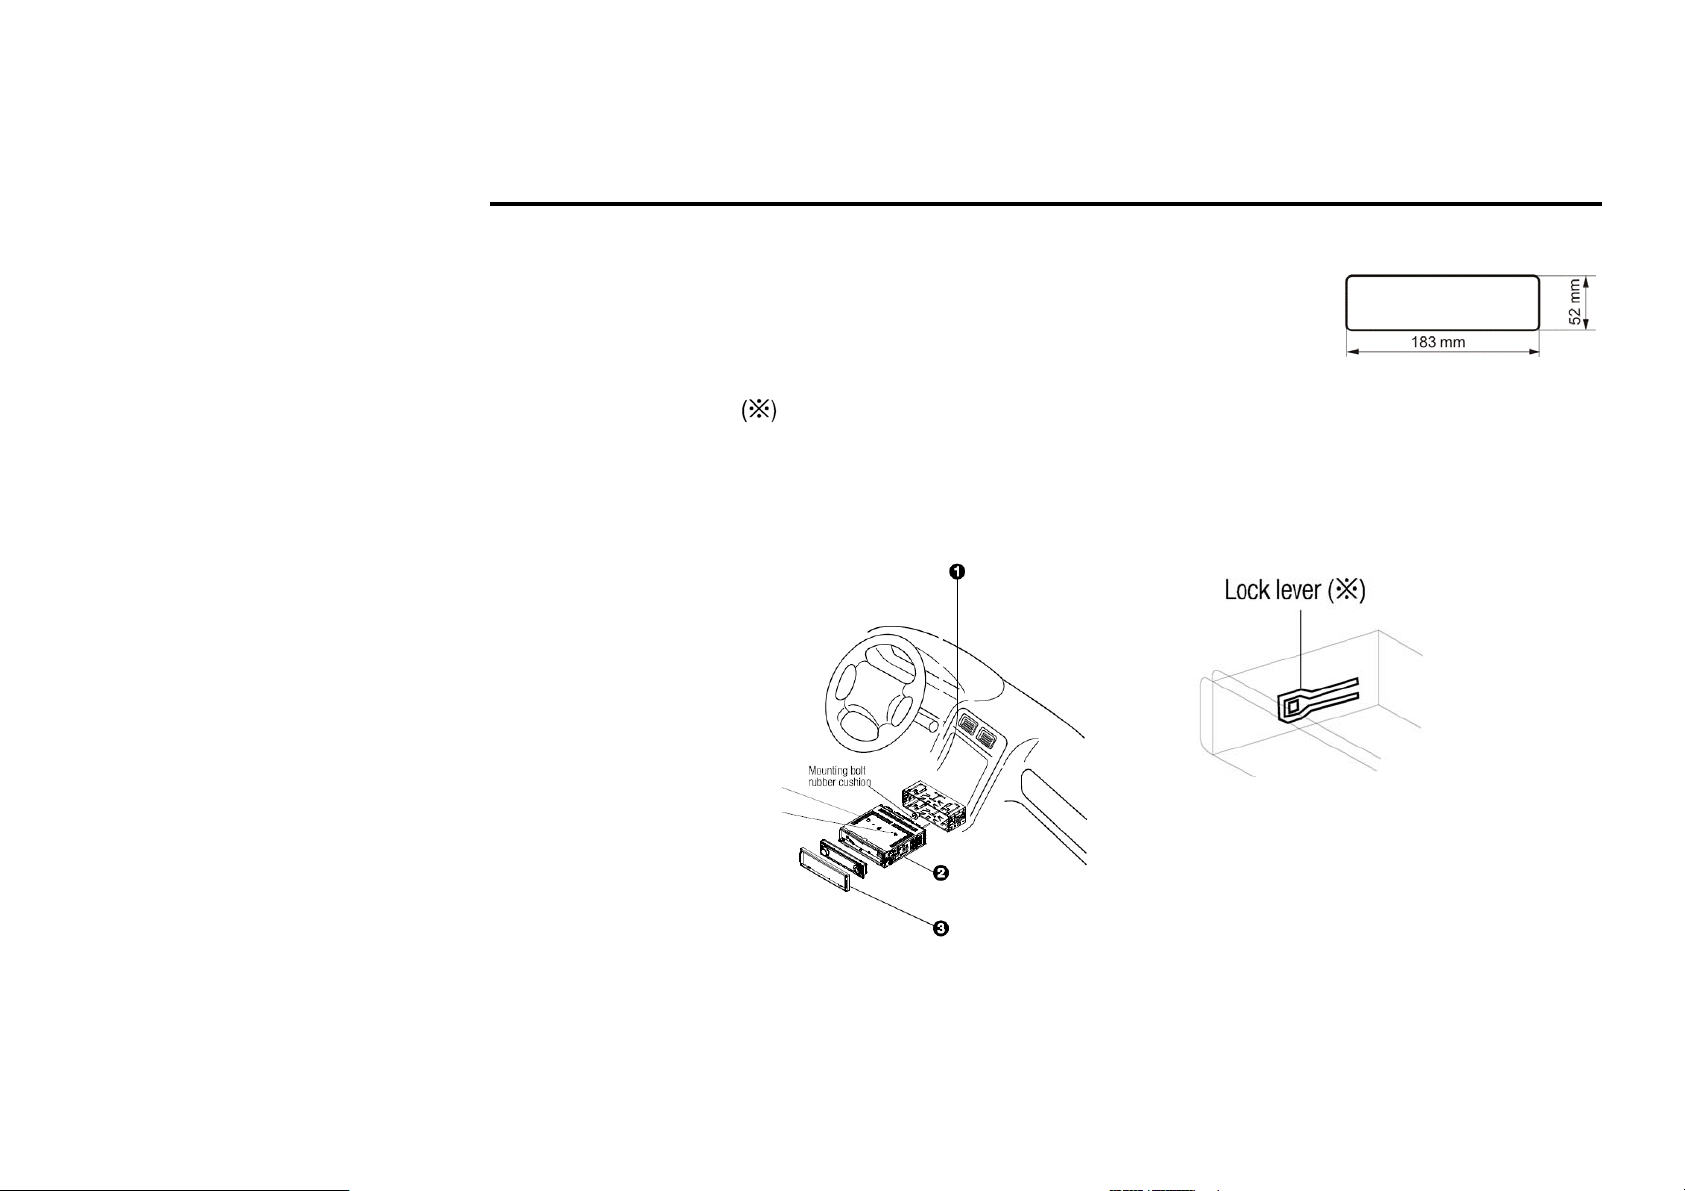
Installation/Connections
First complete the electrical connections, then check them for correctness.
This unit can be installed in any dashboard having an opening as shown below. The
dashboard should be 4.75 – 5.56 mm thick in order to be able to support the unit.
1. Insert mounting collar into the dashboard, and bend the mounting tabs out with a screwdriver.
Make sure that lock lever is flush with the mounting collar (not projecting outward).
2. Secure the rear of the unit.
After fixing mounting bolt and power connector, fix the rear of the unit to the car body by rubber cushion.
3. Insert trim plate.
When you prepare to insert trim plate, please check it’s direction. Once it was up side down, it cannot be fixed.
IMPORTANT:
Remove these two
screws before
installation.
Otherwise, the
СD/MP3 Player will
not work.
4
Page 5
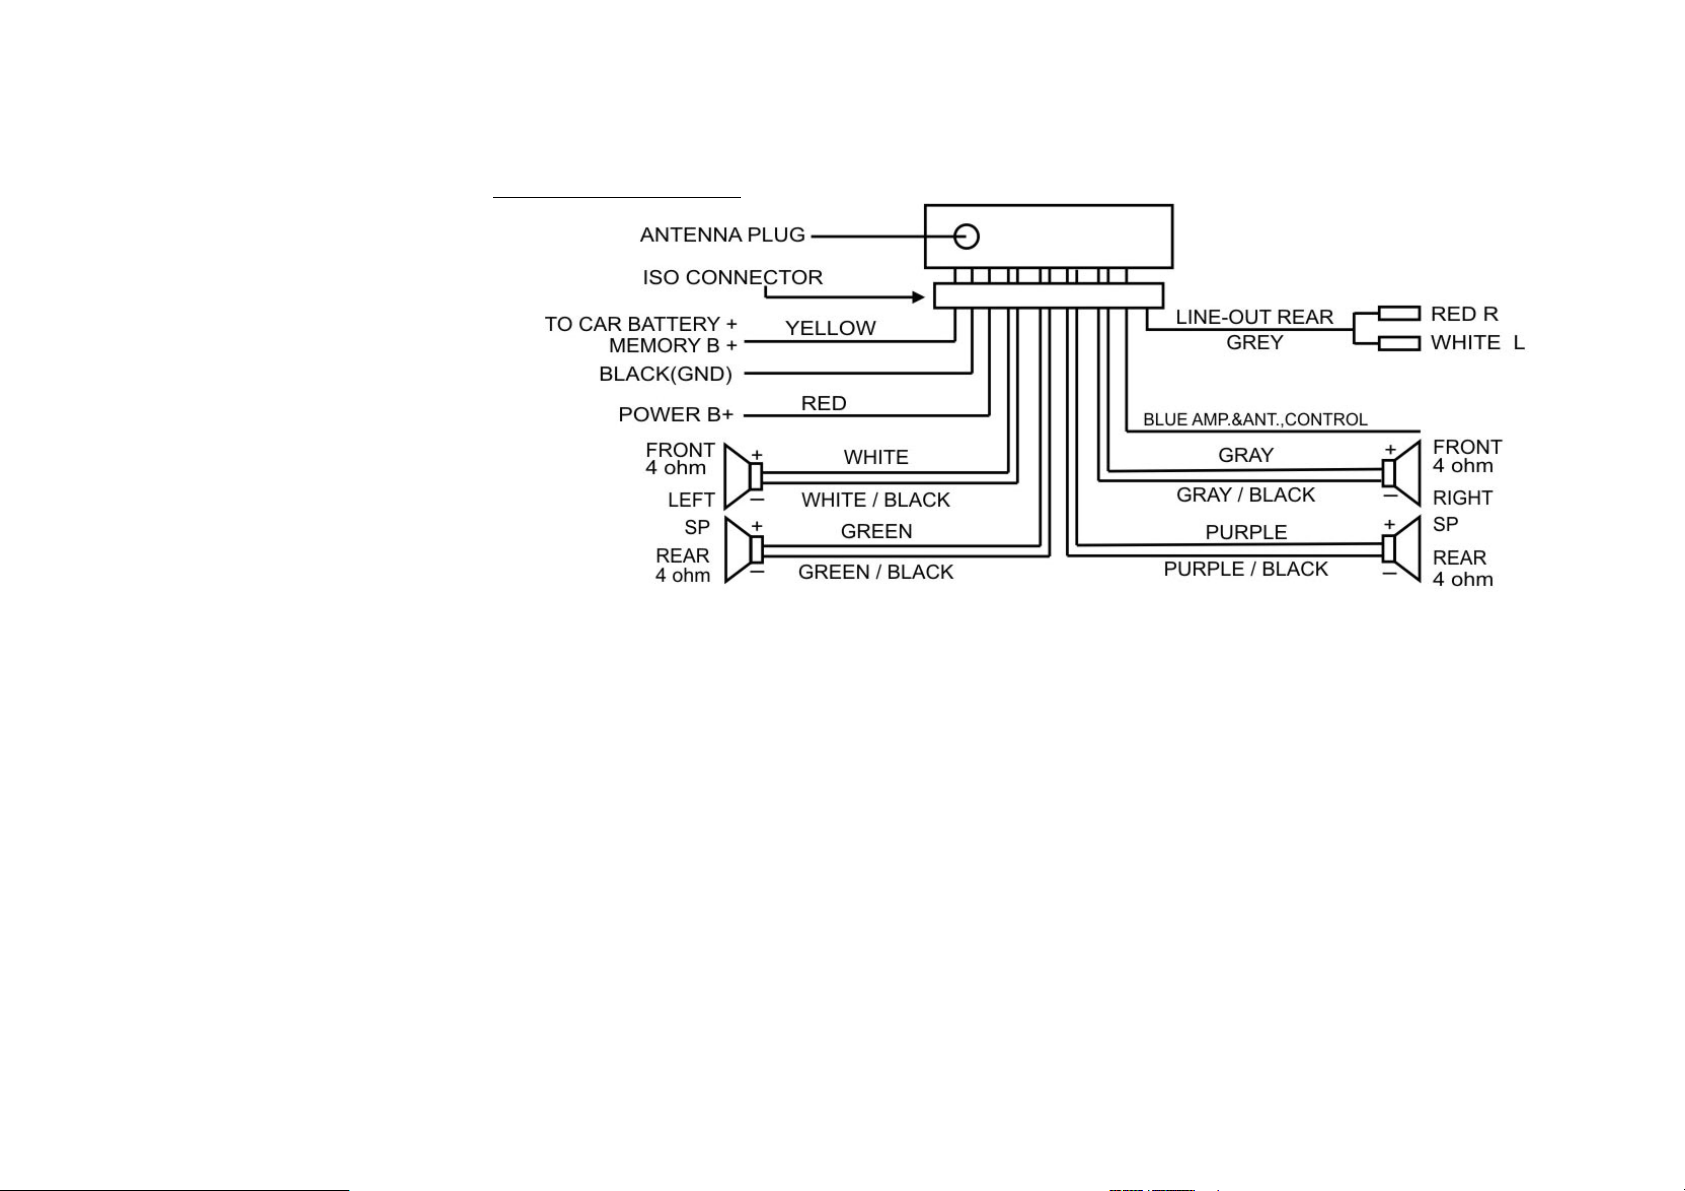
Electrical connections
Do not interchange the connection of the wiring!
For some car models you may need to modify wiring of the supplied power cord as illustrated (modified wiring), or
else the memory of the unit may be lost after you power off. Contact your authorized car dealer before installing this
unit.
5
Page 6
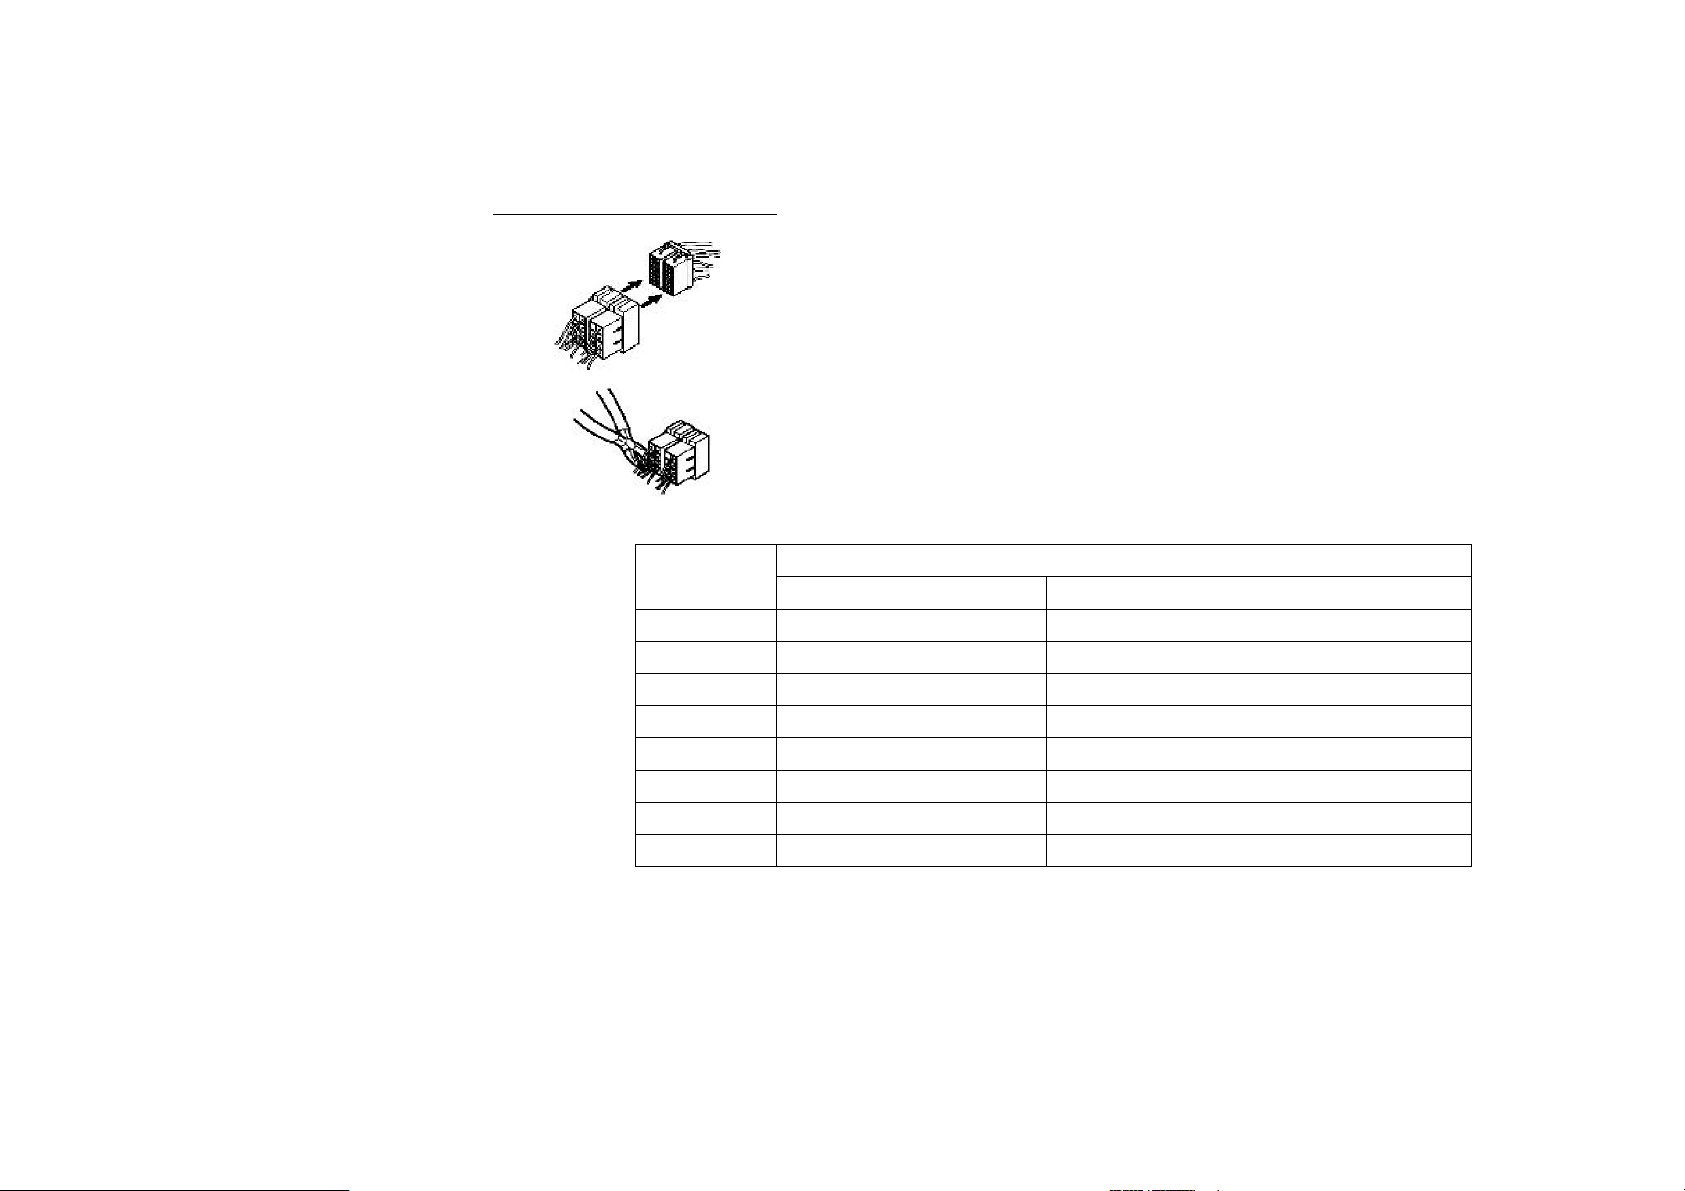
Using the ISO Connector
Location
1 Rear Right (+) --- Purple
2 Rear Right (-) --- Purple/Black Stripe
3 Front Right (+) --- Gray
4 Battery 12V (+)/yellow Front Right (-) --- Gray/Black Stripe
5 ANT/AMP control /blue Front Left (+) --- White
6 Front Left (-) --- White/Black Stripe
7 ACC+/red Rear Left (+) --- Green
8 Ground/black Rear Left (-) --- Green/Black Stripe
1. If your car is equipped with the ISO connector, then connect the ISO
connectors as illustrated.
2. For connections without the ISO connectors, check the wiring in the vehicle
carefully before connecting, incorrect connection may cause serious damage to
this unit.
Cut the connector, connect the colored leads of the power cord to the car battery
as shown in the color code table below for speaker and power cable connections.
Function
Connector A Connector B
6
Page 7
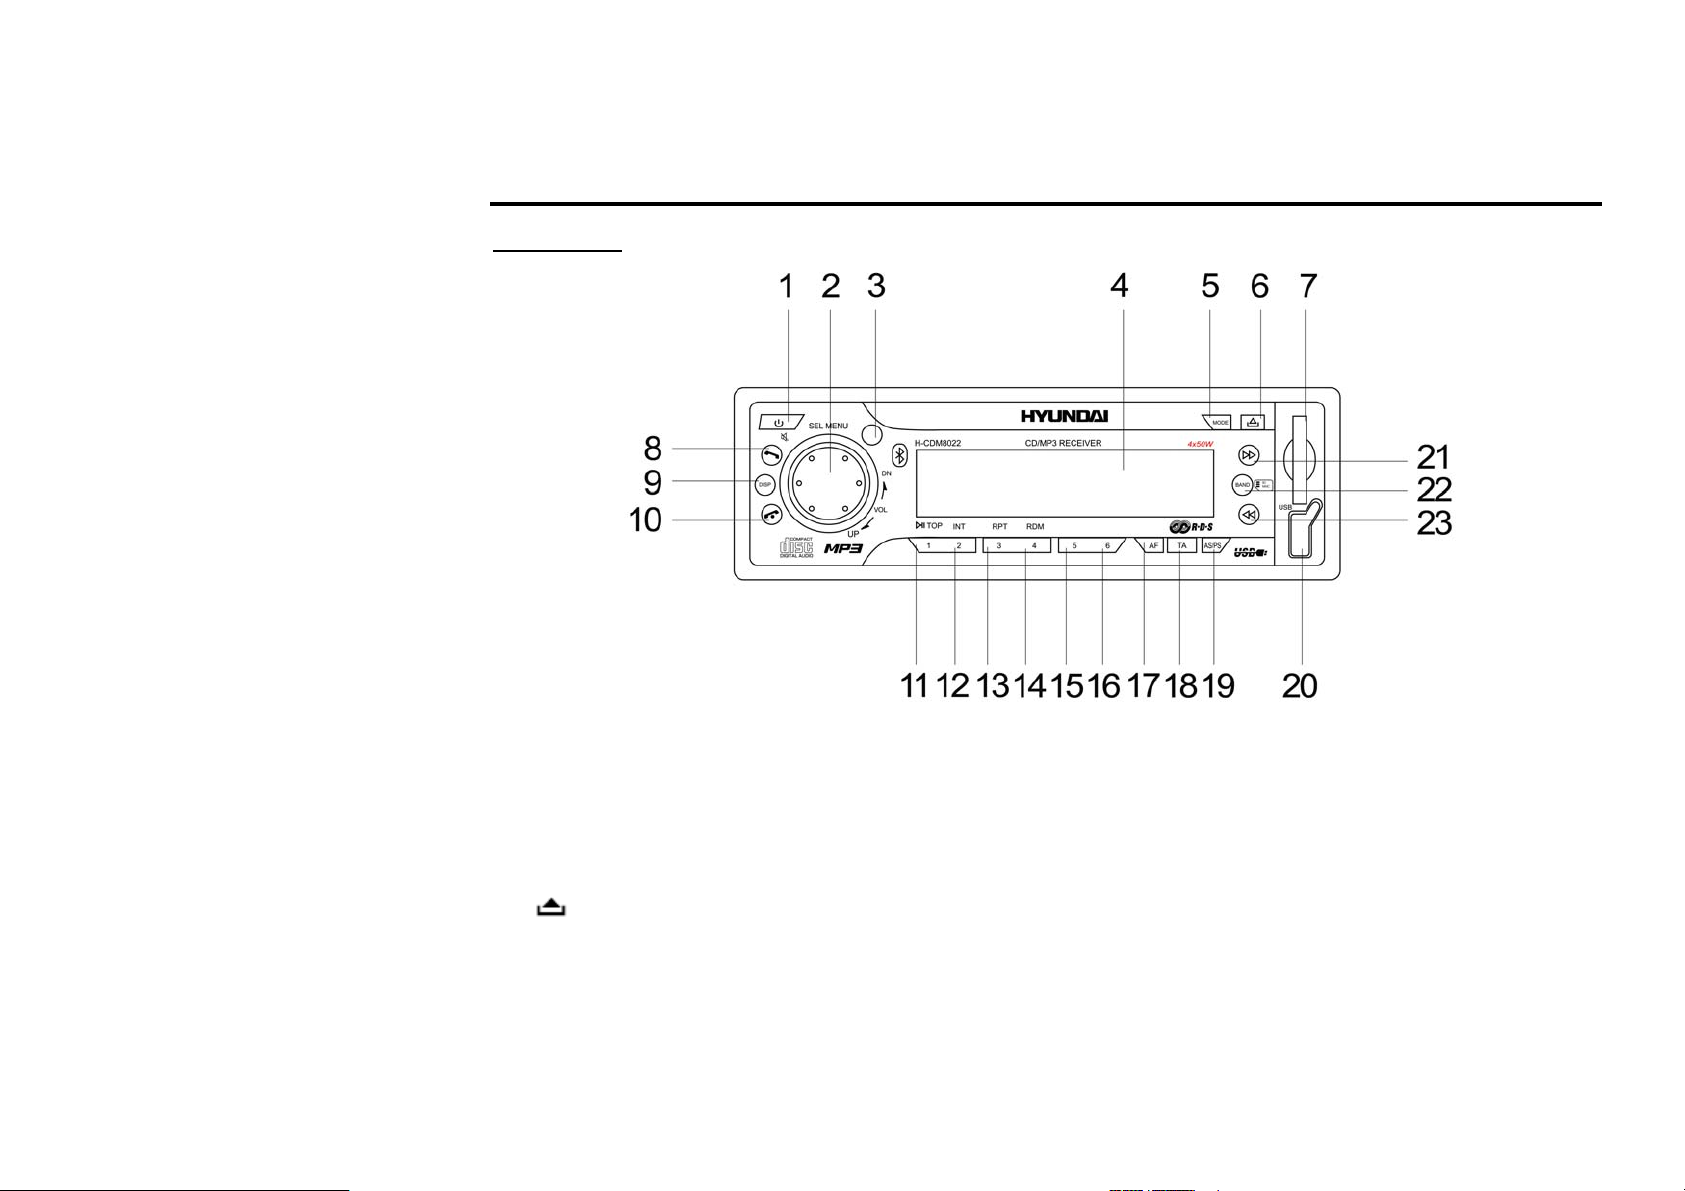
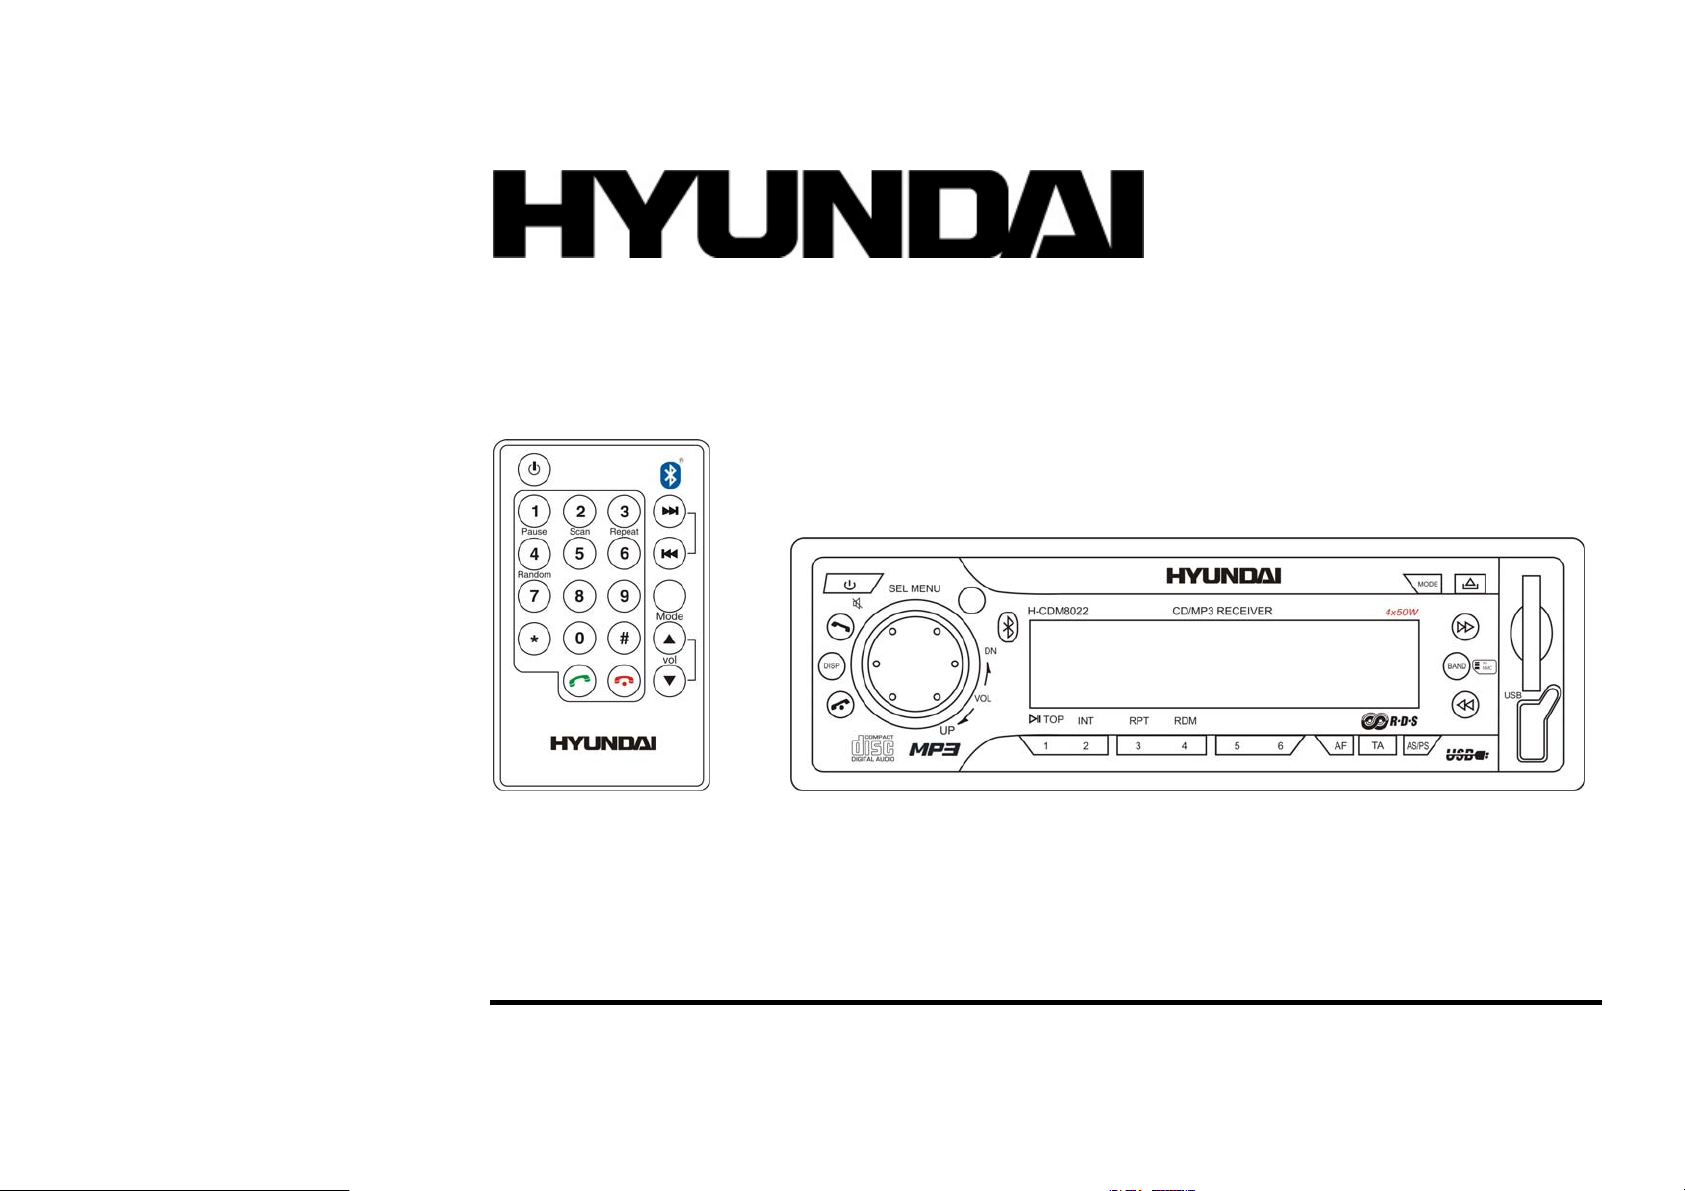
Panel controls
Front panel
1. PWR button
2. VOL/SEL knob (rotate it to adjust the volume). Repeatedly press SEL to select modes: VOL, BAS, TRE, BAL,
FAD; rotate the knob to adjust the level.
3. Remote control sensor
4. LCD display
5. MODE button
6.
7. SD/MMC slot
button
Press it to open the panel.
7
Page 8

8. Dial/Receive button
9. DISP button
10. Call off/cancel button
11. PLAY/PAUSE/TOP/1 number button
12. INT/2 number button
Press it to start intro playing (15 seconds).
13. RPT/3 number button
14. RDM/4 number button
15. 5 number button
16. 6 number button
17. AF button
18. TA button
19. AS/PS button
20. USB slot
21. button
22. BAND button
23. button
8
Page 9
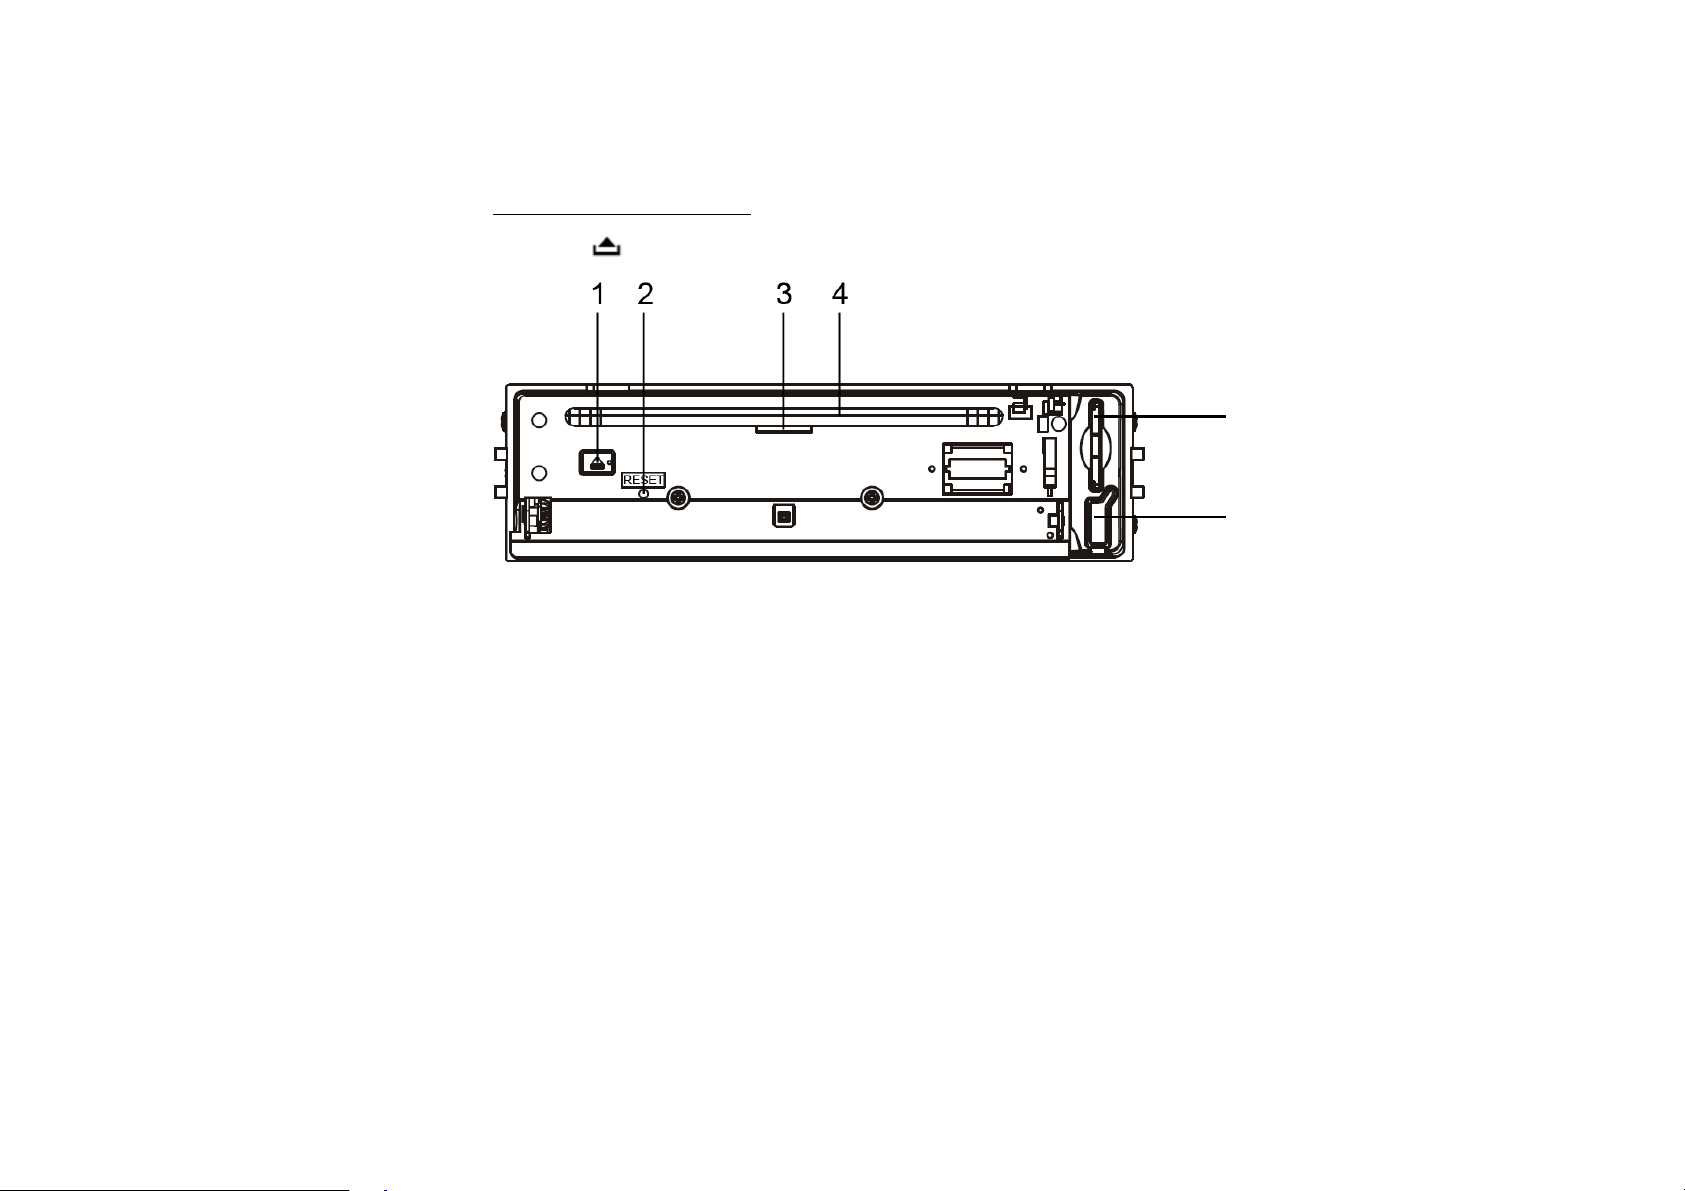
Back of the front panel
Press the button to open the panel and press EJECT button to eject the disc.
1. EJECT button
2. RESET hole
3. LED indicator
4. CD slot
5. SD/MMC slot
6. USB slot
Note: Pressing the RESET hole will erase the clock setting and stored stations.
Panel status indicator lights up when you slide the panel down; flashes when you remove the panel.
5
6
9
Page 10
Remote controller (RC)
1. PWR button
2. Numeric pad
3. Dial/Receive call
4. Call off/cancel
5.
6. MODE button
7. VOL+/- buttons
Battery information of RC
Warning: Store the battery where children cannot reach. If a child accidentally swallows the battery, consult a
doctor immediately.
Do not recharge, short, disassemble or heat the battery or dispose it in a fire.
Do not expose or bring into contact the battery with other metallic materials. Doing this may cause the battery to give
off heat, crack or start a fire.
When throwing away or saving the battery, wrap it in tape and insulate; otherwise, the battery may give off heat,
crack or start a fire.
/ buttons
1. Press the catch and at the same time pull out the battery tray.
2. Insert the 1 x lithium battery, type CR 2025 3V battery with the stamped (+) mark facing upward.
Insert the battery tray into the RC.
10
Page 11

General operation
Power on/off
Press PWR button on the front panel or RC to turn the unit on. To turn the unit off press PWR button on the front
panel once more or press and hold PWR button on the RC. When you switch off the system or car ignition, the
settings, tuner presets and the volume level will be retained in the unit’s memory.
Source select
Press MODE button once or more to select your desired function: DISC, USB, Tuner (Radio), BT audio, Card.
Note: the USB and Card items will be available if the USB or SD/MMC card is in.
Reset the unit
Operating the unit for the first time or after replacing the car battery, you must reset the unit. Press button on the
panel to open the panel and press the RESET hole with a point object to restore the unit to the original factory
settings.
VOL/SEL knob functions
Press the VOL/SEL knob to select VOL/BAS/TRE/BAL/FAD, rotate the control to adjust.
- VOLUME control
Display shows the volume level within 0 - 46.
- BASS control (available when DSP is OFF)
Display shows the BASS level within -6 – +6.
- TREBLE control (will be available when DSP is OFF)
Display shows the TREBLE level within -6 – +6.
- BALANCE control
Display shows the BALANCE level.
11
Page 12

- FADER control
Display shows the FADER level.
Press and hold the VOL/SEL knob for more then 2 seconds to enter the menu and select the mode. Each of the
following modes is adjustable by rotating the VOL/SEL knob.
TA seek mode: choose TA ALARM or TA SEEK mode.
• TA ALARM mode: alarm is turned on.
• TA SEEK mode: TA SEEK is automatically activated.
MASK mode: choose Mask DPI or Mask ALL.
• MASK DPI mode: Only AF which have different program identification is masked.
• MASK ALL mode: The AF which has different program identification and NO RDS signal with high field
strength is masked.
TA VOL mode: adjust the value within 0 – 46.
RETUNE mode: select Retune L or Retune S.
• RETUNE L mode: long; TA seek interval is 180 seconds.
• RETUNE S mode: short; TA seek interval is 45 seconds.
Note: Retune mode is active for TA SEEK mode only.
DSP mode: choose DSP sound effect: ROCK, POP, CLASSIC, FLAT, DSP OFF.
LOUD mode: switch the loud to ON or OFF.
12/24 hours mode: choose the 12 or 24 hours mode.
VOL LAST: switch to VOL ADJ.
• VOL LAST mode: the turn-on volume level is that of latest power-off.
• VOL ADJ mode: volume level is adjustable.
V-ADJ mode: adjust within 0 – 46.
BEEP mode: switch the beep sound to ON or OFF.
CONNT mode: choose CONNT A or CONNT M.
12
Page 13

• CONNT A mode: bluetooth is connected automatically.
• CONNT M mode: bluetooth is connected manually.
Turning the sound off
Short press the PWR button to turn the sound off. Press it again or use the VOLUME buttons to turn the sound on.
Adjusting clock
Press and hold DISP button for more than 2 seconds to select the hour setting. Rotate the VOL/SEL knob clockwise
to set the hours; rotate the VOL/SEL knob counterclockwise to set the minutes. Press DISP again to exit the clock
setting.
13
Page 14
Digital tuner
Note: RDS (Radio Data System) service availability varies with areas. Please understand if RDS service is not
available in you area, the following service is not available, either.
Band selection
Press PWR to turn the power on, then press the MODE button once or more to select TUNER.
Press BAND button once or more to select: FM1, FM2, FM (OIRT), AM1, AM2.
Manual/automatic tuning
• Automatic tuning: press the / buttons on the panel or / buttons on the RC repeatedly to
automatically select a station downward or upward, the radio automatically tunes to a station of sufficient
reception. It will play when finds the station.
• Manual tuning: Press and hold the / buttons on the panel or
search will be available.
Programming tuner stations
You can store up to a total of 30 radio stations in the memory (18 FM [12 FM + 6 FM (OIRT)], 12 AM), manually or
automatically.
• To store a station:
- Select a band (if needed)
- Select a station by / buttons on the panel or
- Hold a Preset button (1-6) under which you want store the station for at least 2 seconds.
• To recall a station:
- Select a band (if needed)
- Press a Preset button (1-6) briefly to recall the stored station
During radio mode press the / buttons on the panel or
/ buttons on the RC buttons.
/ buttons on the RC buttons to select upward or
/ buttons on the RC buttons, the manual
14
Page 15

downward stored stations.
AF function (Alternative Frequencies)
Press AF button to turn on or turn off the AF function. The RDS program will be automatically searched and
received. After turning on, if the RDS signal is week or even no signal, the unit will search another frequency with
this RDS program.
Note: AF indicator on LCD will flash until RDS information is received. If RDS service is not available in your area,
turn off the AF mode.
Press and hold AF button for more then 2 seconds, the unit will be under REGION ON or REGION OFF mode:
• REG ON: AF function will implement the regional code (of the PI) and only stations in the current region can be
tuned automatically;
• REG OFF: AF function will ignore the regional code (of the PI) and stations in the other regions can also be
tuned automatically.
TA (Traffic Announcements) function
Press the TA button, LCD shows “TA”, traffic program will be automatically searched and saved, LCD shows TP,
the program is received.
Note: This function is also valid during playback mode.
When traffic announcement is received, the TA indicator will display. The unit will temporarily switch to the tuner
mode (regardless of the current mode) and begin broadcasting the announcement at TA volume level. After the
traffic announcement is over, it will return to the previous mode and volume level.
EON (Enhanced Other Networks)
When EON data is received, the EON indicator lights and the TA and AF functions are enhanced.
TA: Traffic information can be received from the current station or stations in other network.
15
Page 16

AF: The frequency list of preset RDS stations is updated by EON data. EON enables the radio to make fuller use of
RDS information. It constantly updates the AF list of preset stations, including the one that currently tuned into. If
you preset a station around the area at your home, you will later be able to receive the same station at an alternative
frequency, or any other station serving the same program, EON also keeps track of locally available TP stations for
quick reception.
PTY (Program Type) function
Press and hold TA button, if no other button is pressed in 10 seconds, the unit will begin to search the program you
received last time.
Press and hold TA button for more than 2 seconds the first time, then press the number buttons, you can select the
music program style.
Press and hold TA button for more than 2 seconds the second time, then press the number buttons, you can select the
speech program style.
To choose the desired program style use the following table:
Button number Music group Speech group
1 Pop, Rock News, Affairs, INFO
2 Easy, Light Sport, Educate, Drama
3 Classics, Other Culture, Science, Varied
4 Jazz, Country Weather, Finance, Children
5 Nation, Oldies Social, Religion, Phone in
6 Folk Travel, Leisure, Document
16
Page 17
Disc operations
Loading a disc
1. Press button on the panel to slide down the panel. Insert the disc with the printed side facing upward into
the slot.
2. Press
Playing a disc
1. When disc inserted, display shows READ.
For MP3 or disc with mixed files, reading time may exceed 1 minute.
ERROR will be displayed if error found in disc operation.
• For CD, the CD icon will appear on the display.
• While MP3 files playback, MP3 icon will appear on the display.
2. Playback starts from the beginning of the 1st track automatically.
• To ensure good system performance, wait until the unit finishes reading the disc information before
• The current track number and elapsed time appear on the panel display.
Pausing playback
button to slide down the panel. Press EJECT button on the panel to eject the disc.
proceeding.
When pressing the PLAY/PAUSE/TOP/1 button during playback, pause mode is set. Press again to resume
playback. Press and hold the PLAY/PAUSE/TOP/1 button to start playing the first track of the disc from the
beginning. The same operations are performed by pressing the “1” numeric button on the RC.
Playing the previous/next track
Press / buttons on the panel or / buttons on the RC repeatedly to skip to previous/next track.
17
Page 18

ID3 tags display
Press BAND button repeatedly during playback to access the ID3 information manually. The display will show
following track information: folder name, file name, track title, artist name, album name, if available.
Scanning forward and backward
1. Press and hold / buttons for more than 2 seconds once or more to select X2, X4, X8, X20 to fast backward
or forward skip during playback.
2. During the fast forward or backward operation, release / buttons to playback again.
3. During the fast forward or backward operation, the volume will be muted.
Intro playing
You can play the beginning of every track for 10 seconds in sequence.
1. During playback, press INT/2 once. INT ON/OFF will appear on the display.
2. Press again to select the current track.
The same operations are performed by pressing the “2” numeric button on the RC.
Repeating of the playback
• Press RPT/3 button once to select RPT ON and repeat playback of the current file. RPT icon will appear on
the display.
• Press RPT/3 button again to select RPT FOLD and repeat playback of all the files in the current folder.
• To turn off repeat playback, press RPT/3 button again.
The same operations are performed by pressing the “3” numeric button on the RC.
Random track playback
• Press RDM/4 button once to select RDM ON and randomly play all the files on the disc. RDM icon will
18
Page 19

appear on the display.
• Press RDM/4 button again to select RDM FOLD and randomly play all the files in the current folder.
• To turn off random playback, press RDM/4 button again.
The same operations are performed by pressing the “4” numeric button on the RC.
Direct track search (for WMA/MP3)
1. Press AS/PS button to activate the track search function. “TRK SCH” will be displayed.
2. Turn the VOL/SEL knob to select the third digit.
3. Press the VOL/SEL knob to confirm and move to the second digit position.
4. Turn the VOL/SEL knob to select the second digit.
5. Press the VOL/SEL knob to confirm and move to the first digit position.
6. Turn the VOL/SEL knob to select the first digit.
7. Press the VOL/SEL knob to confirm and play the chosen track.
Navigation search (for WMA/MP3)
1. Press AS/PS button twice. “NAVIGATION” will be displayed.
2. Turn the VOL/SEL knob to navigate through all folders on the disc. The folder name will be displayed on the
LCD.
3. Press and hold the VOL/SEL knob for less than 3 seconds to access sub-folders or files.
4. Turn the VOL/SEL knob to navigate, then press the knob to select a file and start playback.
5. During navigation, turn the VOL/SEL knob counterclockwise to move back to the last upper level of a folder.
Direct character search (for WMA/MP3)
1. Press AS/PS button thrice. “CHAR-SCH” will be displayed.
2. Turn the VOL/SEL knob to choose a character, including letters A – Z, numbers 0 – 9 and blank spaces.
19
Page 20

3. Press and hold the VOL/SEL knob to confirm entry and move to the next character space. After the last character
is entered, press and hold the knob to access the file.
4. If only two characters are entered and there is more than one file that begins with these characters, turn the
VOL/SEL knob to navigate through the files or folders.
5. Press the VOL/SEL knob to confirm the choice and start playback.
20
Page 21

USB/SD/MMC operations
Loading SD/MMC Card
Insert the SD/MMC card into the slot. The unit will switch to MEM-CARD mode automatically and the LCD will
show “CARD”. SD icon will appear on the LCD.
Take out SD/MMC Card
Push MODE button and switch to non MEM-CARD mode, then push SD/MMC card and take out the card when part
of the card flip up.
Loading USB equipment
Open the rubber cap; put the USB into the connector. The unit will switch to USB mode automatically, and the LCD
will show “USB”. USB icon will appear on the LCD.
Take out USB equipment
Push the MODE button and switch to non USB-DRIV mode, then take off the USB equipment, close the rubber cap.
Note: All the file operations in USB-DRIV mode and in MEM-CARD mode are performed in the same way as
DISC mode.
21
Page 22

Bluetooth operations
Pairing
Turn on Bluetooth function of your mobile phone.
Press and hold MODE button more than two seconds to enter pairing mode, if you want to terminate pairing process,
press Call off/Cancel button. Keep phone within 3 meters to the unit, enter mobile phone’s bluetooth setup. Select
H-CDM8022 from the pairing list on the phone and enter 1234 as the password. If pairing is successful, LCD will
display “PAIR OK” and Bluetooth icon will light up. If pairing failed, “PAIR ERR” will flash on the LCD.
Disconnecting
If you want to disconnect the Bluetooth with the phone, press and hold BAND button. The LCD will display “NO
CONNT”, the bluetooth icon will disappear.
Reconnecting
Press and hold BAND button to reconnect manually.
Call answering
When you receive an incoming call, press the Dial/Receive button to answer. If you want to hang up, press the Call
off/Cancel button.
Call waiting
When talking and there is no another incoming call, “CALL WAITING” will flash on the LCD. Press Dial/Receive
button to terminate present call and second call will be answered automatically after 2 seconds. The unit cannot hold
the first call. Press Call off/Cancel button to terminate the second call.
22
Page 23

Dialing on RC
Press Dial/Receive button then dial the number on the numeric pad. Some buttons of the front panel may be used as
numeric buttons when dialing: AF button is “7”, TA button is “8”, AS/PS button is “9”, BAND button is “*”,
button is “0”, button is “#”, MODE button is “+”.
Once the number has been dialed, press Dial/Receive button again to call.
Call transfer
While talking, press Dial/Receive button to transfer audio from the unit back to mobile phone. The LCD will display
“TRANSFER”. Call transfer is only available when call is already connected.
Voice dialing
Voice dialing function is only available for mobile phone having voice dialing capabilities. Press and hold
Dial/Receive button to activate voice dialing function. “VOIC DIAL” will be displayed on the LCD. Pronounce the
name preset in the mobile phone voice dial list. If the number is recognized, the unit will repeat the number and call
out. If the unit does not recognize the number, LCD will display “NO MATCH”.
BT audio
The unit allows you to playback audio files via Advanced Audio Distribution Profile (A2DP) or Audio/Video
Remote Control Profile (AVRCP) from your phone, PDA or personal music player using a Bluetooth connection in
BT audio mode. Before using an audio player, it may be necessary to enter a PIN code (1234) into the unit. The unit
can control a Bluetooth audio player: Play/pause, song Selection, etc.
Note: Please turn A2DP off on your phone before attempting to make a phone call, as unexpected results may occur
depending on your mobile phone model.
23
Page 24

Anti-Theft System
This unit is equipped with a slide-down detachable panel. Panel can be detached and taken with you, helping to deter
theft.
Removing the panel
1. Press PWR button more than 0.5 seconds to switch off the power of the unit.
2. Press
3. Hold the panel to pull it out, and then push back the panel bracket.
4. Place the panel into the case and take it with you when you leave the car.
Install the panel
1. Hold the panel so that the panel faces toward you and set the left side of the panel bracket.
2. Press the right side of the panel unit it locks.
3. Check the panel was fasten or not before you operation.
Remove the unit
1. Remove the panel and the trim plate.
2. Insert keys into hole in front of the set until they lock.
3. Pull out the unit.
button to slide down the panel.
24
Page 25

Handling discs
• Dirty, scratched or warped discs may cause skip ping or noise.
• Handle the disc only by the edges. To keep clean do not touch its surface.
• Discs should be stored in their cases after use to avoid scratches.
• Do not expose discs to direct sunlight, high humidity, high temperature or dust.
• Prolonged exposure to extreme temperature can wrap the disc (such as leaving the discs in your car during
summertime).
• Do not stick or write anything on either side of disc. Sharp writing instruments, or the inks used in some
felt-tip pens, may damage its surface.
• Do not touch the unlabeled side. Do not attach any seal, label or data protection sheet to either side of a disc.
Cleaning
Cleaning the cabinet
Wipe with a soft cloth. If the cabinet is very dampen (not dropping wet) the cloth with a weak solution of soapy
water, and then wipe clean.
Cleaning discs
Fingerprints should be carefully wiped from the surface of disc with a soft cloth. Unlike conventional records,
compact discs have no grooves to collect dust and macroscopic dirt, so gently wiping them with a soft cloth should
remove must panicles. Wipe in a straight motion from the center to the edge.
Never use thinner benzine, record cleaner or anti static spray on a compact disc. Such
chemicals can damage its plastic surface.
25
Page 26

Troubleshooting guide
Symptom
No power
Disc cannot be loaded. Presence of disc inside the player. Remove the disc in the player then put a new
Disc cannot be read. Inserting the disc in upside down.
No sound Volume is in minimum.
The operation keys do not
work.
Sound skips. The installation angle is more than 30
The radio does not work,
the radio station
automatic selection does
not work.
Cause Solution
The car ignition is not on.
The fuse is blown.
Compact disc is extremely dirty or
defective.
Temperature inside the car is too high.
Wiring is not properly connected.
The built-in microcomputer is not
operating properly due to noise.
Front panel is not properly fix into its
place.
degrees.
The disc is extremely dirty or defective.
The antenna cable is not connected the
signals are too weak.
26
If the power supply is properly connected to the car
accessory switch the ignition key to “ACC”.
Replace the fuse.
upward.
Insert the compact disc with the label facing
upward.
Clean the disc or try to play a new one.
Cool off until the ambient temperature returns to
normal.
Adjust volume to a desired level.
Check wiring connection.
Press the RESET button.
Reinstall the front panel.
Adjust the installation angle to less than 30
degrees.
Clean the compact disc/try to play a new one.
Insert the antenna cable firmly select a station
manually.
Page 27

Specification
General
Power supply: 12 V DC (11 V – 16 V)
Maximum power output: 50 W x 4 channels
Dimensions (W x H x D) 178 x 50 x 166 mm
FM Stereo Radio
Frequency range: 65.0 – 74.0/87.5 - 108.0 MHz
Usable sensitivity: 10 dBµ
Preset memory: 18
MW Section
Frequency range: 522 kHz-1620 kHz
Preset memory: 12
Player
System Disc digital audio system
Disc types CD/CD-R/RW/USB/SD/MMC
Supported formats CDDA/MP3/WMA
Audio Specification
Frequency Response 20 Hz to 20 KHz
S/N Ratio/Separation >75 dB/ >60 dB
Line out
Output: 2 channels RCA line-out (2V)
Bluetooth
Bluetooth version
Compliance
SUNMBA 36
Bluetooth 2.0
27
Page 28

Working distance
On board flash memory
Supported profiles
Specifications are subject to change without notice. Dimensions are approximate.
Up to 10 m
8 Mb
A2DP/Headset/Handsfree/AVRCP
28
Page 29

Уважаемый покупатель!
Благодарим Вас за покупку нашего изделия. Для обеспечения безопасности рекомендуется тщательно
изучить настоящее руководство перед подключением, эксплуатацией и/или регулировкой изделия, и
сохраняйте руководство для использования в будущем.
Содержание
Содержание .............................................................................................................................................................. 29
Меры предосторожности ........................................................................................................................................ 30
Установка/Подключение ........................................................................................................................................ 31
Органы управления .................................................................................................................................................34
Пульт дистанционного управления (ПДУ)........................................................................................................... 37
Основные операции................................................................................................................................................. 38
Цифровой тюнер...................................................................................................................................................... 41
Воспроизведение дисков......................................................................................................................................... 45
Операции с USB/SD/MMC носителями ................................................................................................................49
Система защиты от воров ....................................................................................................................................... 53
Обращение с компакт-дисками .............................................................................................................................. 54
Чистка и уход........................................................................................................................................................... 54
Руководство по устранению неисправностей....................................................................................................... 56
Технические характеристики .................................................................................................................................58
29
Page 30

Меры предосторожности
• Использование данного устройства при температуре ниже -10ºС может привести к поломке. Перед
использованием предварительно прогрейте салон автомобиля до рекомендованной температуры!
• Тщательно изучите настоящую инструкцию, чтобы ознакомиться с высококачественной аудиосистемой.
• При установке и подключении изделия отключите отрицательную клемму аккумулятора автомобиля.
• При замене предохранителя, убедитесь, что вы устанавливаете предохранитель с тем
Используя предохранитель с повышенным значением тока, можно причинить значительные
повреждения изделию.
• Не пытайтесь разбирать изделие. Лазерные лучи, исходящие из блока оптической головки считывания
информации с компакт-диска, опасны для глаз.
• Убедитесь, что шпильки или другие посторонние предметы не попали внутрь изделия. Они могут
вызвать сбои в работе
лазерным лучом.
• Если вы ставите автомобиль на стоянку на длительное время в жаркое или холодное время года,
подождите, пока температура в автомобиле не станет нормальной, перед тем как включать изделие.
• Не открывайте крышки и не проводите ремонт самостоятельно. Обратитесь к
квалифицированному персоналу.
• Убедитесь, вы отключаете источник питания и антенну, если вы не будете пользоваться системой в
течение длительного времени или во время грозы.
• Убедитесь, что вы отключаете источник питания, если обнаружена неправильная работа системы,
система издает необычные звуки, запах, выделяет дым или внутрь ее попала жидкость. Проведите
квалифицированный технический осмотр системы.
• Не позволяйте проводам динамиков касаться друг друга при включении прибора. В противном случае,
может быть перегружен или выйти из строя усилитель питания.
• Не устанавливайте съемную панель перед подключением кабеля.
или стать причиной опасности, такой, как поражение электрическим током или
же номиналом.
дилеру или
30
Page 31

Установка/Подключение
Данное изделие может быть установлено в приборную панель, имеющую
показанное ниже отверстие. Приборная панель должна иметь толщину 4,75 –
5,56 мм, чтобы быть способной поддерживать изделие.
1. Вставьте установочную втулку в приборную панель и отогните установочные петли наружу при
помощи отвертки. Убедитесь, что запорный рычаг установлен на одном уровне с установочной втулкой
(не выступает наружу).
2. Закрепите заднюю сторону изделия.
После закрепления установочных болтов и разъема питания зафиксируйте заднюю часть изделия в отсеке
магнитолы в автомобиле при помощи резиновой прокладки.
3. Вставьте декоративную панель.
Когда вы готовы вставить переднюю панель, пожалуйста, проверьте ее направление. Если она перевернута,
ее невозможно закрепить.
Внимание: уда лите
эти два болта перед
установкой. Иначе
CD/MP3 плеер не
будет работать.
31
Page 32

Схема электрических соединений
Не меняйте соединение красного и желтого проводов!
Для некоторых моделей необходимо будет изменить соединение проводов питания, как показано на
картинке (измененное соединение), во избежание сброса всех настроек устройства после выключения
зажигания. Перед установкой свяжитесь с Вашим региональным дилером.
32
Page 33

Использование разъема ISO
1. Если в Вашем автомобиле есть разъем ISO, произведите подключение, как
показано на рисунке.
2. Для подключений без разъемов ISO внимательно проверьте все провода перед
подключением, неправильное подключение может привести к повреждениям
изделия. Обрежьте разъем, подключите цветные головки разъема к шнуру
питания батареи в соответствии с приведенной таблицей.
Номер
Разъем A Разъем B
1 Задний правый(+)---Фиолетовый
2 Задний правый(-)---Фиолетовый/Черный
3 Передний правый(+)---Серый
4 Питание 12В (+)/желтый Передний правый(-)---Серый/Черный
5 Авто антенна /синий Передний левый(+)---Белый
6 Передний левый((-)---Белый/Черный
7 ACC+/красный Задний левый(+)---Зеленый
8 Земля/черный Задний левый(-)---Зеленый/Черный
Функция
33
Page 34

Органы управления
Передняя панель
1. Кнопка PWR
2. Регулятор громкости VOL/SEL. Вращайте регулятор для регулировки уровня громкости. Нажимайте,
чтобы выбрать режим: VOL, BAS, TRE, BAL, FAD; вращайте регулятор, чтобы настроить каждый
режим.
3. ИК сенсор
4. Жидкокристаллический дисплей
5. Кнопка MODE
6. Кнопка
Нажмите, чтобы открыть панель.
34
Page 35

7. Разъем для SD/MMC карт
8. Кнопка Dial/Receive
9. Кнопка DISP
10. Кнопка Call off/Cancel
11. Кнопка PLAY/PAUSE/TOP/1
12. Кнопка INT/2
Нажмите, чтобы включить функцию Intro.
13. Кнопка RPT/3
14. Кнопка RDM/4
15. Кнопка 5
16. Кнопка 6
17. Кнопка AF
18. Кнопка TA
19. Кнопка AS/PS
20. Разъем для USB носителя
21. Кнопка
22. Кнопка BAND
23. Кнопки
35
Page 36

Обратная сторона передней панели
Нажмите кнопку , чтобы откинуть панель, и нажмите кнопку EJECT, чтобы извлечь диск.
1. Кнопка EJECT
2. Кнопка RESET
3. Индикатор статуса панели
4. Слот для диска
5. Разъем для SD/MMC карты
6. Разъем для USB устройства
Внимание: При нажатии на кнопку RESET внутри отверстия сохраненные станции и время будут удалены.
При открытии панели индикатор статуса панели загорится. При снятии панели
индикатор замигает.
36
Page 37

Пульт дистанционного управления (ПДУ)
1. Кнопка PWR
2. Цифровые кнопки
3. Кнопка Dial/Receive
4. Кнопка Call off/Cancel
5. Кнопки
6. Кнопка MODE
7. Кнопки VOL+/-
/
Замена батарей в ПДУ:
Примечание:
Неправильное использование батарей может стать причиной перегрева или взрыва, что в свою очередь
ведет к пожару.
Утечка батарей может сделать причиной повреждения ПДУ (Срок работы батарей – 6 месяцев при
эксплуатации в обычных условиях при комнатной
Не закорачивайте батареи. Не бросайте батареи в огонь. Не позволяйте детям играть с батареями.
1. Откройте отсек для батарей в направлении, указанном стрелкой.
2. Вставьте литиевую батарею CR 2025 3V с соблюдением полярности.
температуре).
37
Page 38

Основные операции
Включение/выключение питания
Нажмите кнопку PWR, чтобы включить устройство. Нажмите кнопку PWR на передней панели или
нажмите и удерживайте кнопку PWR на ПДУ, чтобы выключить устройство. Когда вы выключаете систему
или зажигание автомобиля, установки, предустановки тюнера и громкость звука будут сохранены в памяти
устройства.
Выбор источника сигнала
Нажимайте кнопку MODE, чтобы выбрать нужный Вам режим: DISC, USB, Tuner (Radio), BT audio, Card.
Внимание: Режимы USB и Card будут доступны для выбора только тогда, когда к устройству подключены
USB носитель или SD/MMC карта.
Кнопка RESET (сброс)
Нажмите на панели кнопку . Панель откроется. Нажмите с помощью острого предмета кнопку сброса
RESET, расположенную за передней внутренней панели.
Эта мера необходима в следующих ситуациях: исходная установка устройства после подключения, никакие
кнопки не действуют, символы ошибок появляются на дисплее.
Функции регулятора VOL/SEL
Нажимайте регулятор VOL/SEL, чтобы выбрать VOL/BAS/TRE/BAL/FAD, вращайте ее для настройки.
- Регулятор VOLUME
На дисплее отображается значения уровня громкости звука от 0 до 46.
- Регулятор BASS (доступна, когда функция DSP выключена)
На дисплее отображается уровень низких звуковых частот от –6 до +6.
- Регулятор TREBLE (доступна, когда функция DSP выключена)
38
Page 39

На дисплее отображается уровень высоких звуковых частот от –6 до +6.
- Регулятор BALANCE
На дисплее отображается уровень баланса левых и правых колонок.
- Регулятор FADER
На дисплее отображается баланс фронтальных и тыловых колонок.
Нажимайте и удерживайте регулятор VOL/SEL более 2 секунд, чтобы в меню выбрать режим:
TA seek: вращайте регулятор, чтобы выбрать TA ALARM или TA SEEK.
• ТА ALARM: когда станция найдена, функция автоматической перенастройки радиоприемника не
работает. Вместо этого на дисплее появится сообщение о том, что новая станция найдена.
• TA SEEK: когда станция найдена, радиоприемник автоматически перенастраивается на эту станцию.
MASK: вращайте регулятор, чтобы выбрать Mask DPI или Mask ALL.
TA VOL: вращайте регулятор, чтобы настроить громкость сигнала ТА (от 0 до 46).
RETUNE: Retune-S или Retune-L – это выбор временного интервала повторного поиска в режиме TA Seek.
• Retune L: длинный, интервал поиска в режиме TA SEEK 180 секунд.
• Retune S: короткий, интервал поиска в режиме TA SEEK 45 секунд.
Внимание: Режим Retune для режима TA активен только для TA SEEK.
DSP: Вы можете настроить качество звука в зависимости от направления музыки, которую Вы слушаете:
ROCK, POP, CLASSIC, FLAT, DSP OFF (Выкл.)
LOUD: этот режим позволяет изменять уровень басов (ON/OFF).
12/24 hours: вращайте регулятор, чтобы выбрать режим 12 часов или 24 часа.
VOL LAST: Вращайте регулятор, чтобы переключить на VOL ADJ.
• VOL LAST: Нажмите регулятор, чтобы выбрать VOL LAST, при этом уровень громкости будет тем же,
что при последнем выключении устройства.
• ADJUST: Вращайте регулятор, чтобы выбрать VOL ADJ, настройте желаемый уровень громкости звука
при включении.
V-ADJ: вращайте регулятор, чтобы настроить значение в интервале от 0 до 46.
39
Page 40

BEEP: включает или выключает звуковые сигналы, когда заданная функция выполнена.
CONNT: вращайте регулятор, чтобы выбрать CONNT A или CONNT M.
• CONNT A: автоматическое подключение bluetooth.
• CONNT M: bluetooth подключается вручную.
Выключение звука
Нажмите кнопку PWR, чтобы выключить звук. Нажмите кнопку PWR повторно или нажимайте кнопки
VOLUME, чтобы включить звук.
Установка времени
Нажмите и удерживайте кнопку DISP, чтобы выбрать функцию установки часов. Затем вращайте регулятор
VOL/SEL по часовой стрелке, чтобы установить часы, или против часовой стрелки, чтобы установить
минуты. Повторно нажмите кнопку DISP, чтобы сохранить настройки.
40
Page 41

Цифровой тюнер
Внимание: Сервис RDS (Система радио данных) доступен не во всех регионах. Имейте в виду, что если
услуга RDS не доступна в Вашем регионе, то данная функция не будет работать.
Выбор диапазона
Нажмите кнопку PWR, чтобы включить устройство. Нажимайте кнопку MODE, чтобы выбрать режим
Радио. Нажимайте кнопку BAND, чтобы выбрать диапазон: FM1, FM2, FM (OIRT), AM1, AM2.
Ручной/автоматический поиск радиостанций
• Автоматический поиск: нажимайте кнопки / на передней панели или кнопки / на ПДУ,
начнется автоматический поиск. При этом поиск будет происходить по наиболее сильным сигналам.
Первая найденная станция с сильным сигналом начнет воспроизводиться устройством. Повторно
нажмите и удерживайте, чтобы найти следующую станцию.
• Поиск вручную: нажмите и удерживайте кнопки / на передней панели или кнопки
чтобы вручную уменьшать или увеличивать частоту.
/ на ПДУ,
Программирование радио станций
Вы можете сохранить в памяти устройства до 30 радиостанций (18 FM [12 FM + 6 FM (OIRT)], 12 AM).
• Чтобы сохранить станцию:
- Выберите диапазон (если нужно).
- При помощи кнопок / на передней панели или кнопок
- Нажмите и удерживайте в течение двух секунд цифровую кнопку 1-6, под которой Вы хотите
сохранить эту станцию.
• Чтобы вызвать станцию:
- Выберите диапазон (если нужно).
- Нажмите цифровую кнопку с номером нужной сохраненной станции 1-6.
/ на ПДУ выберите станцию.
41
Page 42

Во время прослушивания радио нажмите кнопки / на передней панели или кнопки
чтобы переходить от одной сохраненной станции к другой вперед или назад.
/ на ПДУ,
Функция AF (Альтернативные частоты)
Нажмите кнопку AF, чтобы активировать режим AF. В активном режиме AF радио постоянно проверяет
силу сигнала альтернативных частот, на которых может транслироваться RDS. При включенной функции
AF, если сигнал слабый, приемник начнет поиск другой частоты с этой же программой.
Примечание: Индикатор AF будет мигать на дисплее до тех пор, пока станция не будет найдена. Если
станции
положение OFF (Выкл.).
Нажимайте и удерживайте в течение 2 секунд кнопку AF, чтобы выбрать режим REGION ON или REGION
OFF.
• REG ON (Включенный региональный режим):
• REG OFF (Выключенный региональный режим):
, передающие информационные программы, недоступны в Вашем регионе, установите режим AF в
Переключение AF или поиск информационных программ поменяются для станций с тем же кодом
идентификации, что и текущая.
Региональный код формата
информационных программ игнорируется.
информационной программы при переключении AF или поиске
Функция TA ( поиск программ о дорожном движении)
При нажатии на кнопку ТА, режим ТА включается или выключается. При включенном режиме на дисплее
начнет мигать «ТА». Начнется автоматический поиск программ дорожного движения. Когда программа
будет найдена, на дисплее загорится «ТА».
Внимание: Эта функция доступна также во время воспроизведения.
При включении ТА режима приемник будет транслировать передачу на специально установленном
громкости, после завершения передачи приемник вернется к текущей частоте и уровню громкости.
42
уровне
Page 43

Функция EON (расширенный диапазон)
При получении данных EON на дисплее загорится индикатор EON, при этом возможности функций TA и AF
существенно расширятся.
TA: Приемник может принимать передачи о дорожном движении не только местных станций, но и станций
других диапазонов.
AF: за счет расширенного диапазона частотный диапазон принимаемых систем радио данных
увеличивается.
EON дает возможность приемнику принимать большее количество информационных передач,
обновлять альтернативные частоты, которые уже хранятся в памяти. Если приемник настроится на
передачу, транслируемую региональной станцией, в дальнейшем Вы сможете принимать эту же передачу на
альтернативных частотах или с другой станции, которая предоставляет эту передачу. Система EON также
позволяет осуществлять быстрый доступ к локальным станциям.
а также
Функция PTY (Тип программы)
Нажмите и удерживайте кнопку TA. Если в течение 10 секунд не будут нажаты другие кнопки, начнется
поиск сигнала текущего типа программы.
Нажмите и удерживайте кнопку ТА более чем 2 секунды один раз, затем при помощи 6 кнопок
предварительной установки выберите другой код музыкальной группы.
Нажмите и удерживайте кнопку ТА более чем 2 секунды второй раз,
предварительной установки выберите другой код голосовой группы.
Для выбора кодов музыкальных групп используйте таблицу:
Номер кнопки Музыкальная группа Голосовая группа
1 Pop, Rock News, Affairs, INFO
2 Easy, Light Sport, Educate, Drama
затем при помощи 6 кнопок
43
Page 44

3 Classics, Other Culture, Science, Varied
4 Jazz, Country Weather, Finance, Children
5 Nation, Oldies Social, Religion, Phone in
6 Folk Travel, Leisure, Document
44
Page 45

Воспроизведение дисков
Загрузка диска
1. Нажмите кнопку , чтобы открыть панель. Вставьте диск в слот отпечатанной стороной вверх.
2. Нажмите кнопку
Воспроизведение диска
1. Когда диск в устройстве, на дисплее отображается надпись READ.
Для MP3 диска или диска с различными форматами файлов время чтения может превысить 1 минуту.
Если диск не вставлен или в работе CD обнаружена ошибка, на дисплее отображается ERROR.
• Для CD дисков на дисплее появится иконка CD.
• Во время воспроизведения файлов MP3, иконка MP3 будет появляться на экране.
2. Воспроизведение диска начинается автоматически с первого трека.
• Чтобы обеспечить высокое качество воспроизведения, дождитесь, пока плеер закончит читать диск,
а затем начинайте воспроизведение.
• На дисплее появится номер текущего трека и время его воспроизведения.
Пауза
Нажмите кнопку PLAY/PAUSE/TOP/1 во время воспроизведения, активируется режим паузы. Нажмите
кнопку PLAY/PAUSE/TOP/1 повторно, чтобы продолжить воспроизведение. Нажмите и удерживайте кнопку
PLAY/PAUSE/TOP/1, чтобы начать произведение первого трека на диске с начала. Те же операции можно
выполнить с помощью цифровой кнопки «1» ПДУ.
, чтобы открыть панель. Нажмите кнопку EJECT, выньте диск из слота.
Переход к предыдущему или следующему треку
Нажмите во время воспроизведения кнопки / на передней панели или кнопки / на ПДУ,
45
Page 46

воспроизведение начнется с начала текущего трека или с начала следующего трека.
Отображение ID№ тэгов
Нажимайте кнопку BAND во время воспроизведения, чтобы на дисплее отобразилась информация ID3
тэгов. Может быть отображена следующая информация: имя папки, имя файла, название трека, имя артиста,
название альбома.
Ускоренное воспроизведение вперед или назад
1. Во время воспроизведения нажмите и удерживайте больше 2 секунд кнопку /, чтобы начать
ускоренное воспроизведение назад или вперед. При каждом нажатии скорость будет меняться в
следующем порядке: Х2, Х4, Х8, Х20.
2. Во время ускоренного воспроизведения отпустите кнопку /, чтобы продолжить воспроизведение в
нормальном режиме.
3. Во время ускоренного воспроизведения звук пропадет
.
Функция Intro
Вы можете последовательно воспроизводить начало каждого трека в течение 10 секунд.
1. Во время воспроизведения один раз нажмите кнопку INT/2 на панели. На дисплее появится надпись
INT ON/OFF.
2. Нажмите эту кнопку повторно, чтобы выбрать текущий трек.
Те же операции можно выполнить с помощью цифровой кнопки «2» на ПДУ.
Повтор воспроизведения
• Нажмите кнопку RPT/3, чтобы выбрать режим повторного воспроизведения (RPT ON) текущего файла.
На дисплее отобразится символ RPT.
• Повторно нажмите кнопку RPT/3, чтобы выбрать режим повторного воспроизведения (RPT FOLD)
46
Page 47

всех файлов текущей папки.
• Чтобы отключить повторное воспроизведение, нажмите кнопку RPT/3.
Те же операции можно выполнить с помощью цифровой кнопки «3» на ПДУ.
Случайное воспроизведение треков
• Нажмите однократно кнопку RDM/4, чтобы выбрать режим случайного воспроизведения (RDM ON)
всех файлов на диске. На дисплее отобразится символ RDM.
• Нажмите повторно кнопку RDM/4, чтобы выбрать режим случайного воспроизведения (RDM FOLD)
всех файлов текущей папки.
• Чтобы отключить режим случайного воспроизведения, нажмите кнопку RDM/4.
Те же операции можно выполнить с помощью цифровой кнопки «4» на ПДУ.
Прямой поиск трека (для дисков WMA/MP3)
1. Нажмите кнопку AS/PS, чтобы активировать функцию поиска треков. На дисплее отобразится надпись
«TRK SCH».
2. Вращайте регулятор VOL/SEL, чтобы выбрать третью цифру номера трека.
3. Нажмите регулятор VOL/SEL, чтобы подтвердить выбор и перейти ко второй цифре.
4. Вращайте регулятор VOL/SEL, чтобы выбрать вторую цифру номера трека.
5. Нажмите регулятор VOL/SEL, чтобы подтвердить выбор и перейти к первой цифре.
6. Вращайте
7. Нажмите регулятор VOL/SEL, чтобы подтвердить выбор и начать воспроизведение трека.
регулятор VOL/SEL, чтобы выбрать первую цифру номера трека.
Навигационный поиск (для WMA/MP3)
1. Дважды нажмите кнопку AS/PS. На дисплее отобразится надпись «NAVIGATION».
2. Вращайте регулятор VOL/SEL для навигации по всем трекам и папкам диска. На дисплее будет
отображаться имя папки.
47
Page 48

3. Нажмите и удерживайте регулятор VOL/SEL менее, чем 3 секунды для перехода к папкам или трекам.
4. Вращайте регулятор VOL/SEL для навигации, затем нажмите регулятор, чтобы выбрать нужный файл и
начать его воспроизведение.
5. При навигации вращайте регулятор VOL/SEL против часовой стрелки, чтобы вернуться к верхнему
уровню последней папки.
Поиск по буквам (для WMA/MP3)
1. Трижды нажмите кнопку AS/PS. На дисплее отобразится надпись «CHAR-SCH».
2. Вращайте регулятор VOL/SEL, чтобы выбрать символ, а именно буквы A – Z, цифры 0 – 9 и пробелы.
3. Нажмите и удерживайте регулятор VOL/SEL, чтобы подтвердить ввод символа и перейти к выбору
следующего символа. После введения последнего символа нажмите и удерживайте регулятор, чтобы
перейти к файлу.
4. Если введены только два символа
вращайте регулятор VOL/SEL для навигации по таким файлам.
5. Нажмите регулятор VOL/SEL, чтобы подтвердить выбор и начать воспроизведение файла.
и имеются два или более файлов, начинающихся с этих символов,
48
Page 49

Операции с USB/SD/MMC носителями
Загрузка SD/MMC карты
Вставьте карту SD/MMC в слот. Устройство автоматически переключится в режим MEM-CARD и на LCD
отобразится надпись «CARD» и символ SD.
Извлечение SD/MMC карты
Нажмите кнопку MODE, чтобы переключить устройство на другой режим, затем нажмите на карту и
извлеките ее из слота.
Загрузка USB носителя
Отогните резиновую заглушку, вставьте USB носитель в разъем. Устройство автоматически переключится в
режим USB, на экране появится надпись «USB» и символ SUB.
Извлечение USB носителя
Нажмите кнопку MODE, чтобы переключить устройство на другой режим, извлеките носитель и закройте
резиновую заглушку.
Примечание: Все операции с файлами в режимах USB-DRIV и MEM-CARD выполняются тем же образом,
что и в режиме DISC.
49
Page 50

Операции с Bluetooth
Подключение
Включите функцию Bluetooth Вашего мобильного телефона.
Нажмите и удерживайте кнопку MODE более чем 2 секунды, чтобы войти в режим подключения. Если Вы
хотите завершить процесс подключения, нажмите кнопку Call off/Cancel. Телефон должен находиться на
расстоянии не более 3 метров от устройства. Войдите в меню настроек bluetooth Вашего телефона, выберите
в списке устройств H-CDM8022 и введите пароль 1234. Если подключение выполнено
устройства отобразится надпись «PAIR OK» и символ Bluetooth. В противном случае на дисплее
отобразится надпись «PAIR ERR».
Отключение
Если Вы хотите прервать соединение устройства и Вашего телефона по bluetooth, нажмите и удерживайте
кнопку BAND. На дисплее отобразится надпись «NO CONNT», символ bluetooth погаснет.
Новое подключение
Если Вы хотите подключиться заново вручную, нажмите и удерживайте кнопку BAND.
Ответ на звонок
успешно, на дисплее
При входящем звонке нажмите кнопку Dial/Receive, чтобы ответить на звонок. Если Вы хотите закончить
разговор, нажмите кнопку Call off/Cancel.
Ожидающий входящи й звонок
Если во время разговора поступил второй входящий звонок, на дисплее отобразится надпись «CALL
WAITING». Нажмите кнопку Dial/Receive, чтобы завершить текущий звонок, и ответ на второй звонок
50
Page 51

произойдет автоматически через 2 секунды. Устройство не может удерживать первый звонок. Чтобы
завершить разговор по второму звонку, нажмите кнопку Call off/Cancel.
Набор номера с помощью ПДУ
Нажмите кнопку Dial/Receive, затем наберите номер с помощью цифровых кнопок ПДУ. Для набора можно
использовать также кнопки передней панели устройства. В таком случае следующие кнопки соответствуют
следующим цифрам и символам: кнопка AF – «7», кнопка TA – «8», кнопка AS/PS – «9», кнопка BAND –
«*», кнопка - «0», кнопка - «#», кнопка MODE – «+».
После набора номера нажмите кнопку Dial/Receive для вызова.
Передача звонка
Во время разговора нажмите кнопку Dial/Receive, чтобы перевести звонок с устройство на мобильный
телефон. На дисплее отобразится надпись «TRANSFER». Передача звонка возможна только в том случае,
если Вы ответили на звонок.
Голосовой набор
Функция голосового набора доступна только в том случае, если подключаемый телефон оснащен этой
функцией. Нажмите и удерживайте кнопку Dial/Receive, чтобы активировать функцию голосового набора.
На дисплее отобразится надпись «VOIC DIAL». Произнесите такую же голосовую метку, какая присвоена
данному номеру в Вашем телефоне. Если номер будет распознан, устройство произведет набор этого номера
и осуществит вызов
. Если номер не будет распознан, на дисплее отобразится надпись «NO MATCH».
BT аудио
Устройство может воспроизводить аудио файлы, содержащиеся в Вашем телефоне или плеере, с помощью
профилей Advanced Audio Distribution Profile (A2DP) или Audio/Video Remote Control Profile (AVRCP) в
режиме ВТ аудио. Перед воспроизведением аудио файлов плеера необходимо ввести Pin-код устройства
51
Page 52

(1234). С помощью кнопок устройства можно управлять воспроизведением аудио файлов (выбор треков,
пауза, воспроизведение и т.д.).
Примечание: Перед совершением звонка отключите профиль A2DP Вашего телефона, поскольку, в
зависимости от модели телефона, в противном случае могут проявиться нежелательные эффекты.
52
Page 53

Система защиты от воров
Данное изделие снабжено сдвигаемой съемной и маскирующей панелью. Панель можно снять и взять с
собой, что помогает избежать воровства.
Съем панели
1. Нажмите кнопку PWR и удерживайте более 0,5 секунды для отключения питания изделия.
2. Нажмите кнопку
3. Возьмите панель, чтобы вынуть ее, затем потяните назад кронштейн панели.
4. Поместите панель в портфель и возьмите ее с собой, когда вы покидаете автомобиль.
Ус т а н ов к а панели
1. Держите панель так, чтобы ее лицевая сторона была направлена на вас, и установите левую сторону
кронштейна панели.
2. Нажмите на правую сторону панели, чтобы она защелкнулась.
3. Проверьте, что панель закреплена. Сделайте это сразу же, а не перед началом работы.
Съем изделия
1. Снимите панель.
2. Вставьте два ключа в отверстие лицевой стороны, пока не услышите щелчок.
3. Выньте изделие.
, чтобы сдвинуть панель вниз.
53
Page 54

Обращение с компакт-дисками
• Грязные, поцарапанные или погнутые диски могут вызвать искажение звука или
шумы
• Держите диск только за края (как показано на рисунке). Чтобы обеспечить чистоту,
не прикасайтесь к его поверхности.
• Диски должны храниться в их чехлах после использования, чтобы не поцарапать их поверхность.
• Не подвергайте диски действию прямого солнечного света, повышенной
температурам или действию пыли.
• Продолжительное влияние предельных температур может изогнуть диск (например, пребывание дисков
в автомобиле в летнее время).
• Не царапайте и не пишите что-либо на любой стороне диска. Острые пишущие инструменты или
чернила, используемые в них, могут повредить поверхность диска.
• Не прикасайтесь к стороне, не
предохранения данных к любой стороне диска.
имеющей маркировки. Не прикрепляйте печати, этикетки или листы
влажности, повышенным
Чистка и уход
Чистка корпуса
Протирайте мягкой тканью. Если корпус очень загрязнен (не мочите его), используйте ткань, слегка
смоченную мыльным раствором, и затем вытрите его сухой тканью.
Чистка дисков
Отпечатки пальцев должны быть тщательно стерты с поверхности диска мягкой
тканью. В отличие от обычных пластинок, компакт-диски не имеют канавок для
сбора пыли и микроскопических частиц грязи, поэтому осторожно вытирайте их
54
Page 55

мягкой тканью, чтобы убрать частицы грязи. Вытирайте прямолинейным
движением от центра к краю.
Никогда не используйте растворитель, бензин, очиститель пластинок или антистатический аэрозоль для
чистки дисков. Такие химические вещества могут повредить его пластиковые поверхности.
55
Page 56

Руководство по устранению неисправностей
Неисправность Причина Решение
Нет питания
Невозможно
загрузить диск
Невозможно
считать диск
Нет звука
Не действуют
функциональные
ключи
Звук пропадает
Зажигание машины не включено.
Сгорел предохранитель.
В плеер установлен CD диск. Уд а л и т е диск из плеера, затем
Диск установлен верхней стороной вниз.
Компакт диск загрязнен или имеет дефект.
Температура внутри машины очень
высокая.
Звук установлен на минимум.
Кабель не подключен надлежащим
образом.
Встроенный микрокомпьютер не работает
надлежащим образом из-за шумов.
Передняя панель не установлена на свое
место.
Угол установки более 30 градусов.
Если источник питания подключен
надлежащим образом к выключателю
машины, установите ключ зажигания в
положение «АСС».
Замените предохранитель.
установите новый.
Ус т а н о в и т е компакт диск стороной с
этикеткой вверх.
Очистите диск или установите новый.
Подождите, пока температура не станет
нормальной.
Отрегулируйте звук до необходимого
уровня.
Проверьте подключение кабеля.
Нажмите кнопку RESET.
Повторно установите переднею панель.
Отрегулируйте угол установки,
установив его менее 30 градусов.
56
Page 57

Радио не работает.
Не работает
автоматический
выбор
радиостанции
Компакт диск загрязнен или имеет дефект. Очистите диск или установите новый.
Антенный кабель не подключен.
Сигналы слишком слабы.
Вставьте антенный кабель надежно.
Выберите станцию вручную.
57
Page 58

Технические характеристики
Общие
Источник питания: 12 V DC (11 V – 16 V)
Максимальная выходная мощность: 50 Вт x 4 канал
Размеры (Ш x В x Г) 178 x 50 x 166 мм
Стерео FM радио
Частотный диапазон: 65.0 – 74.0/87.5 - 108.0 МГц
Используемая чувствительность: 10 дБ
Количество каналов: 18
MW радио
Частотный диапазон: 522 кГц -1620 кГц
Количество каналов: 12
Плеер
Система Цифровая аудио система
Типы дисков CD/CD-R/RW/USB/SD/MMC
Поддерживаемые форматы CDDA/MP3/WMA
Аудио
Частотные характеристики 20 Гц - 20 кГц
Отношение сигнал/шум >75 дБ
Выход
Выход: Один линейный RCA-выход (2V)
Bluetooth
Версия Bluetooth
Совместимость
SUNMBA 36
Bluetooth 2.0
58
Page 59

Рабочее расстояние
Встроенная память
Поддержка профилей
Технические характеристики могут быть изменены заводом-изготовителем без предварительного
уведомления.
Указанные геометрические размеры имеют приблизительные значения.
До 10 м
8 Мб
A2DP/Headset/Handsfree/AVRCP
59
 Loading...