

Hyundai H-1007 Instruction Manual
H-1007
RECORDER
ПОРТАТИВНАЯ МАГНИТОЛАPORTABLE RADIO CASSETTE
Руководство по эксплуатации Instruction manual
Instruction manual Instruction manual
Dear customer!
Thank you for purchasing our product. For safety, it is strongly recommended to read
this manual carefully before connecting, operating and/or adjusting the product and keep
the manual for reference in future.
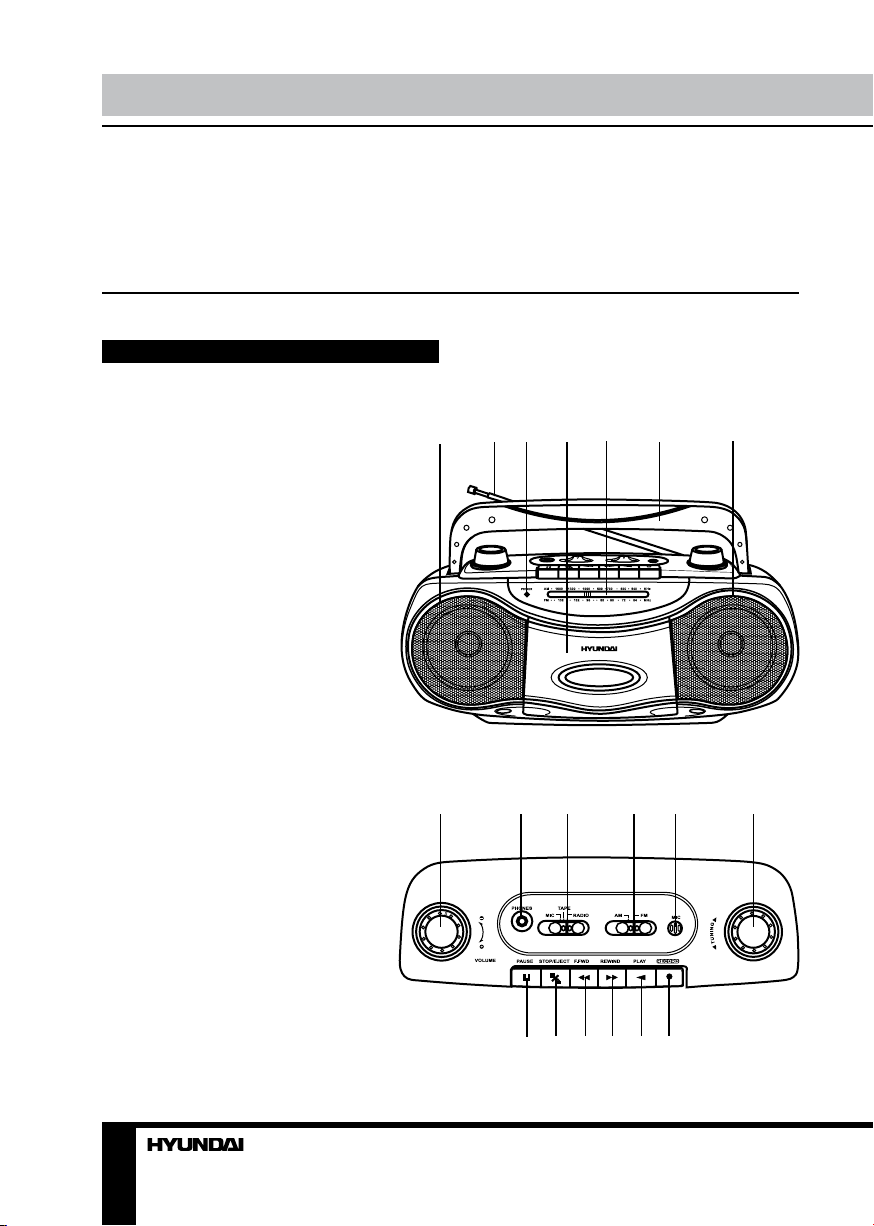
Description
Top panel:
1. Left speaker
2. Antenna
3. Power indicator
4. Cassette door
5. Frequency tuning scale
6. Handle
7. Right speaker
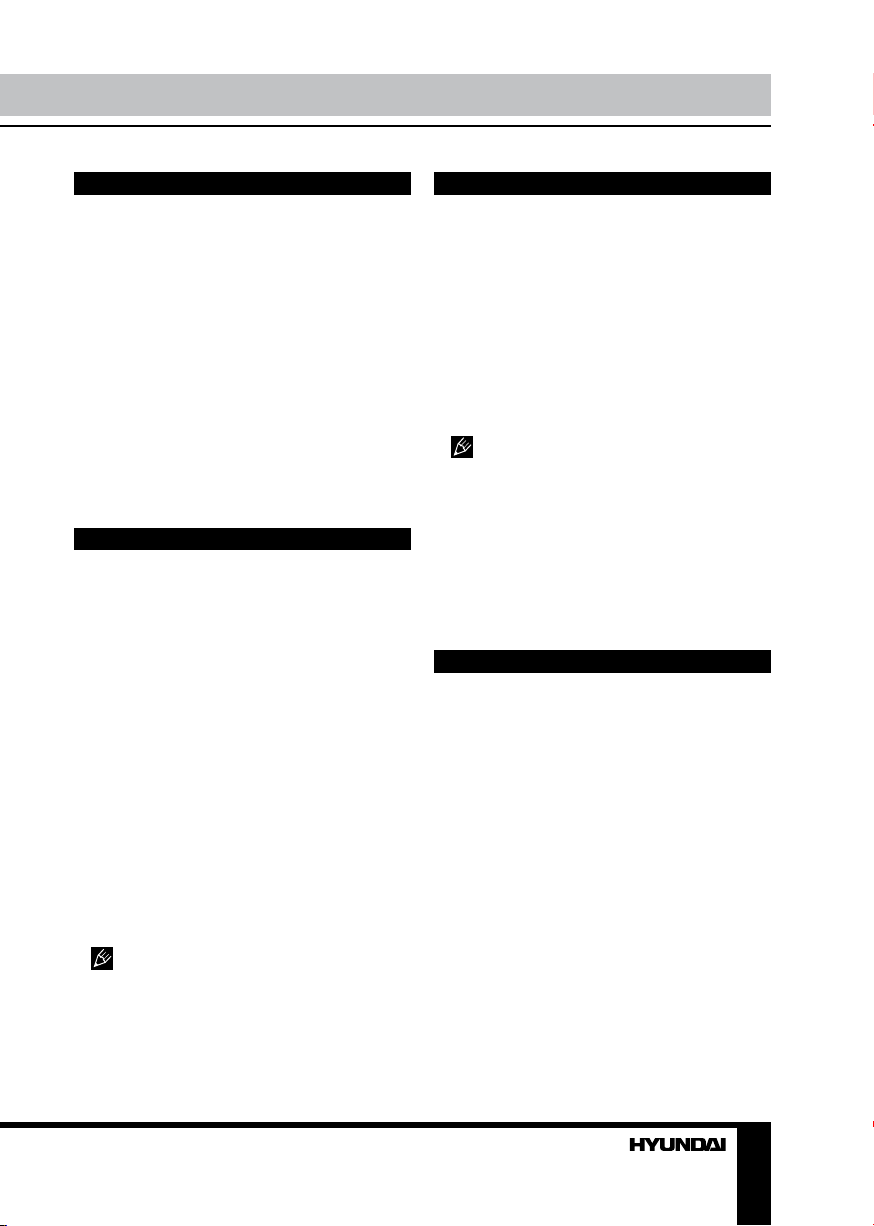
8. VOLUME knob
9. Phone jack
10. Function (MIC/TAPE/RADIO) switch
11. AM/FM switch
12. Microphone
13. TUNING knob
14. PAUSE button
15. STOP/EJECT button
16. F.FWD button
17. REWIND button
18. PLAY button
19. RECORD button
1
2 3 4 5
6 7
Back panel (not indicated):
Battery compartment
AC power cord socket
2 3
8 9 10 11 12 13
14 15 16 17 18 19
Important safeguards
• Attention: The Instruction Manual
contains important operating and maintenance
instructions. For your safety, it is necessary to
refer to the manual.
• Dangerous voltage: Uninsulated
dangerous voltage that may be of sufficient
magnitude to constitute a risk of electrical
shock to persons is present within this product
enclosure. Make sure that pins or other foreign
objects do not get inside the unit; they may
cause malfunctions, or create safety hazards
such as electrical shock.
• Caution: Do not remove cover (or back).
Refer servicing to qualified service personnel.
General operations
Function switch
• Set to RADIO for:
- Radio reception;
- Cassette recording from the radio;
• Set to TAPE for cassette playback;
• Set to MIC for recording from the built-in
microphone.
Volume adjustment
The volume level of sound reproduced by the
speakers is adjusted by rotating VOLUME knob.
During recording, adjusting the volume
only affects the monitor sound, not the content
of recording.
Power supply
Battery operation
• The power cord should be disconnected.
• Open the battery compartment cover.
• Insert 4 UM-1 (D)-size batteries. Please
observe correct battery polarity, otherwise the
set will not work.
• Close the battery compartment cover.
AC operation
• Before the first connecting of the appliance,
check that voltage indicated on the rating label
corresponds to your local mains voltage.
• Plug the corresponding end of the cord
into the AC power cord socket.
• Insert the plug into power supply.
• When the set is only used with AC or is
not used for 2 weeks or more, please remove
the batteries to avoid damage to the set from
leakage of batteries.
This unit cannot be operated by
batteries if the AC power cord is connected to
the unit.
Stereo headphone use
For private listening, insert the plug of a
stereo headphone (not included) into the
phone jack. During use of headphones, the
built-in speakers will disconnect automatically.
Radio operation
Operation
• Set Function switch to RADIO position.
• Select the needed broadcasting band with
AM/FM switch.
• Rotate TUNING knob to find the needed
frequency.
• To turn off the radio, set Function switch to
TAPE or MIC position.
Antenna
• For FM reception, adjust the telescopic
antenna appropriately to obtain the best
reception on the band selected.
• AM signals are picked up through the builtin ferrite antenna. The set should be placed to
a position for the best reception.

Instruction manual
Cassette operation
Controls
• STOP/EJECT button
During operation, press to stop all deck
operation. Press again to open the cassette
door.
• F.FWD button and REWIND button
Press to rapidly advance the tape in either
forward or reverse direction.
• PLAY button
Press to start playback.
• PAUSE button
Press to stop tape operation temporarily.
Press again to resume tape operation.
• RECORD button
Press to start recording. PLAY button will be
activated automatically.
Cassette playback
Slide Function switch to TAPE position.
Press STOP/EJECT button to open the
cassette compartment. Insert a cassette with
tape facing upwards and push the cassette
door to close the cassette compartment. Press
PLAY button to start the playing.
When the tape plays to the end, playing
will be stopped automatically.
Recording
Recording from radio
• Slide Function switch to RADIO position.
• Tune to the desired radio station.
• Insert a blank cassette into cassette
compartment with tape facing upwards.
• Press RECORD button to start recording.
PLAY button will be pressed automatically.
• To pause recording, press PAUSE button.
• Press STOP/EJECT button to stop
recording.
Recording from built-in microphone
• Slide Function switch to MIC position.
• Insert a blank cassette into cassette
compartment with tape facing upwards.
• Press RECORD button to start recording.
PLAY button will be pressed automatically.
• To pause recording, press PAUSE button.
• Press STOP/EJECT button to stop
recording.
Erasing
• Slide Function switch to TAPE position.
• Insert a cassette into cassette
compartment with tape facing upwards.
• Press RECORD button to start erasing.
PLAY button will be pressed automatically.
• Press STOP/EJECT button to stop
erasing.
Maintenance and care
• Check your batteries regularly; old or
discharged batteries should be replaced.
• Always unplug the appliance from power
supply, when not used for a long time.
• Electronic products of this kind should
never be subjected to moisture, dust or
extreme temperatures.
• Do not shake, hit or drop the unit.
• If necessary, clean the unit with a piece of
cloth dampened with water only (be sure the
AC power cord is disconnected from the power
supply).
• The heads and capstan are in constant
contact with the moving tape. Use a small
cotton bud with alcohol or special tape head
cleaner to clean these parts. Never touch the
heads with any metallic objects.
Erase protection
• To prevent accidental erasing of a
cassette, simply break off the two plastic tabs
located on the cassette tape’s rear side.
• When a cassette with removed plastic tabs
is inserted, RECORD button cannot be pressed.
• If a cassette is to be erased and rerecorded at a later stage, simply cover the
4
 Loading...