

Hyundai GENESIS COUPE (2010) User Manual
GENESIS COUPE(BK) > 2010 > G 3.8 DOHC > Body (Interior and Exterior)
Body (Interior and Exterior) > General Information > Specifications
Specifications
Hood Type Rear hinged, gas lifter type
Door Construction Front hinged, Frameless door construction
Regulator system Wire drum type
Locking system Pin-fork system
Trunk Lid Type Gas rifter type
Seat Belts Front 3 point type with Emergency Locking Retractor (E.L.R)
Rear 3 point type with Emergency Locking Retractor (E.L.R)
Tightening Torques
Items N.m Kgf.m Lb-ft
Trunk Trunk lid latch 16.7~21.6 1.7~2.2 12.3~15.9
Front doors Door hinge to body 34.3~41.2 3.5~4.2 25.3~30.4
Door hinge to door 7.8~19.6 1.0~2.0 7.2~14.5
Door striker 16.7~21.6 1.7~2.2 12.3~15.9
Checker to body 16.7~21.6 1.7~2.2 12.3~15.9
Checker to door 6.9~10.8 0.7~1.1 5.1~8.0
Seat Front seat mounting bolts 34.3~53.9 3.5~5.5 25.3~39.8
Rear seat mounting bolts 39.2~53.9 3.5~5.5 25.3~39.8
Seat belt Front seat belt buckle mounting bolt 39.2~53.9 4.0~5.5 28.9~39.8
Front seat belt retractor mounting bolt 39.2~53.9 4.0~5.5 28.9~39.8
Front seat belt lower anchor 39.2~53.9 4.0~5.5 28.9~39.8
Front seat belt upper anchor 39.2~53.9 4.0~5.5 28.9~39.8
Rear seat belt anchor attaching bolt 39.2~53.9 4.0~5.5 28.9~39.8
Rear seat belt retractor mounting bolt 39.2~53.9 4.0~5.5 28.9~39.8
Body (Interior and Exterior) > General Information > Special Service Tools
Special Service Tools
Tool (Number and name) Illustration Use
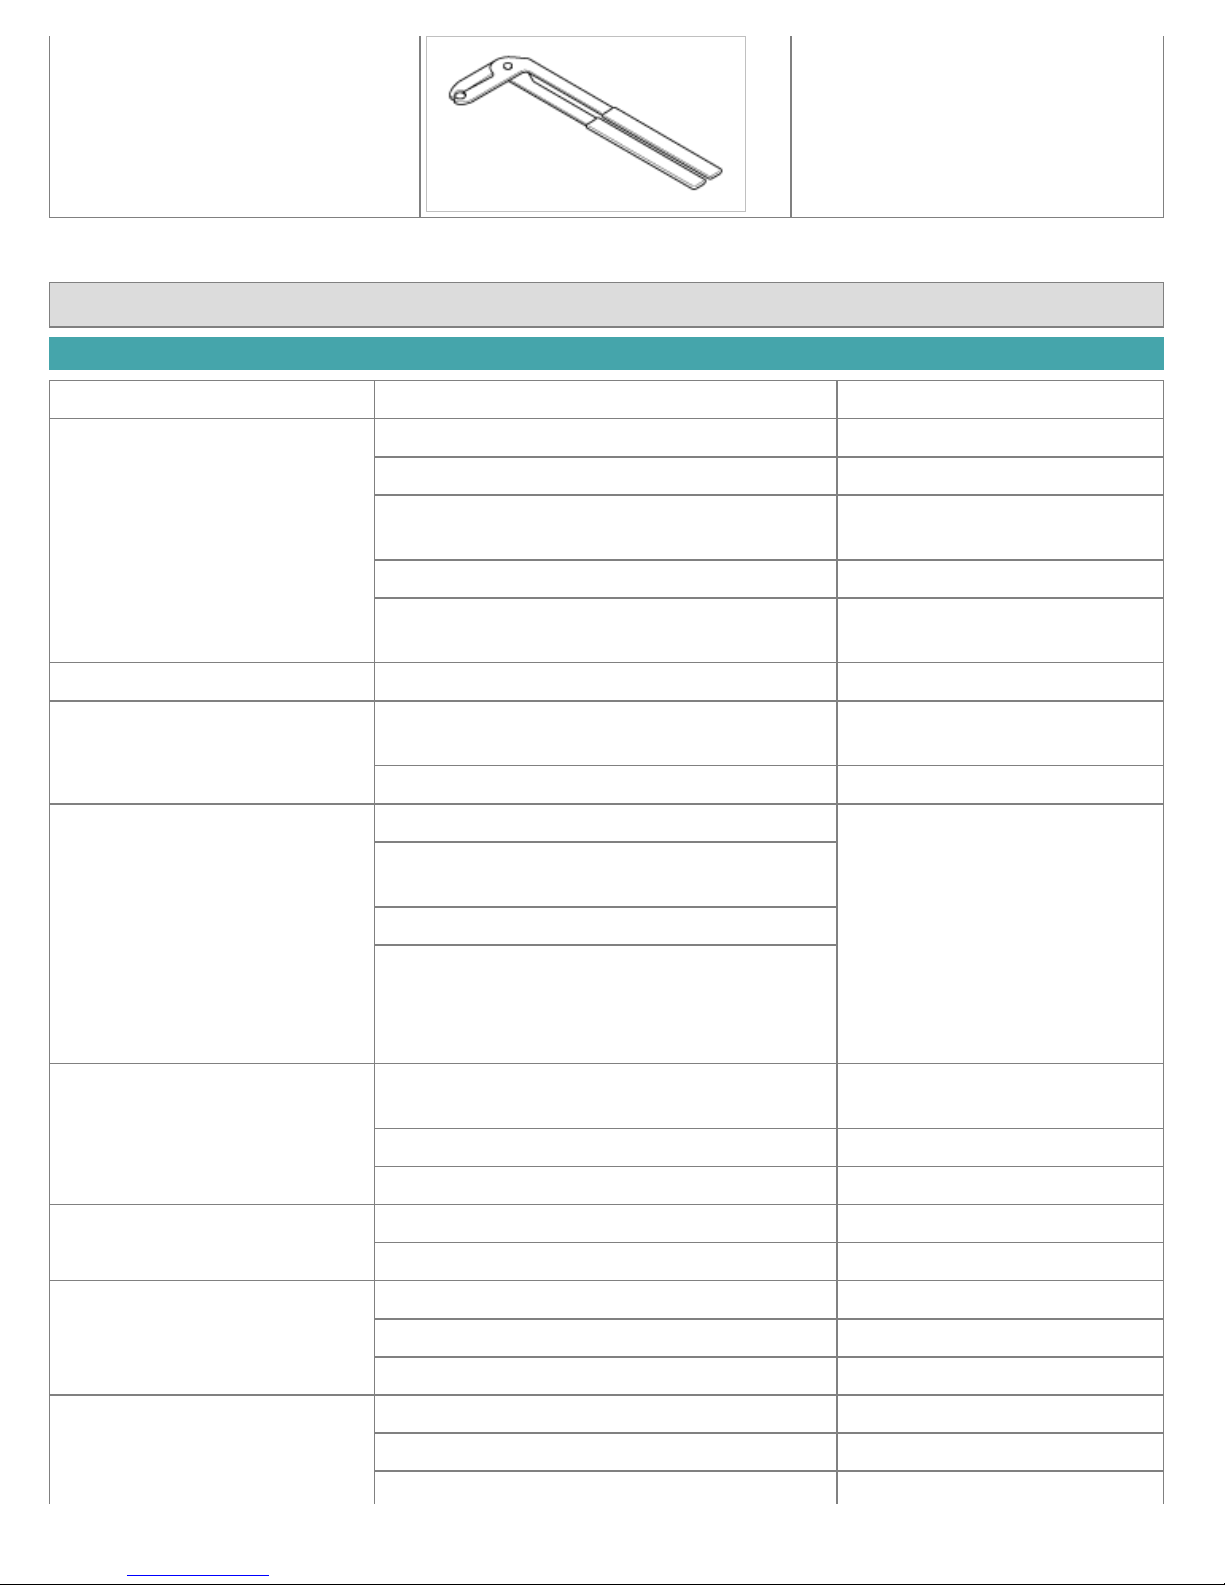
09793-21000
Adjustment, removal and installation of

Door hinge adjusting wrench the door hinge
09800-21000
Ornament remover
Trim removal
09853-31000
Headliner clip remover
Headliner clip removal
09861-31100
Sealant cut-out tool
Cutting windshield sealant
(use with 09861-31200)
09861-31200
Sealant cutting blade
Cutting windshield sealant
(use with 09861-31100)
09861-31000
Windshield molding remover
Windshield moding removal
09880-4F000
Hog ring clip installation
Hog ring clip installer
Body (Interior and Exterior) > General Information > Troubleshooting
Troubleshooting
Symptom Suspect Area Remedy
Water leaks from sunroof Dirt accumulation in drain tube Remove dirt from drain
Clogged drain tube Blow air into drain to remove dirt
Broken or dislocated drain tube, defective or
cracked clip
Check tube installation and flange
contact
Deteriorated roof lid weatherstrip Replace
Excessive roof lid-to-body clearance and
improperly fitted weatherstrip
Adjust
Wind noise around sunroof Loose or deformed deflector, gaps in body work Retighten adjust or replace
Noise heard when opening.
closing sunroof
Foreign particles lodged in guide rail Check drive cable and guide rails
for foreign particles
Loose guide rails and lid Retighten
Motor runs but sunroof does not
move or moves only partially
Foreign particles lodged in guide rail Adjust or replace
Incorrect engagement of motor pinion with drive
cable
Decrease in motor`s clutch slipping force
Increased sunroof sliding resistanceor
interference of sunroof with drive cables,
weatherstrip, etc. due tomal adjustment of
sunroof
Noise in motor (clutch slipping
noise from motor when sunroofIs
fully opened or closed is not an
unusual noise
Incorrect engagement of motor pinion with drive
cable
Check pinion installation and
retighten motor
Worn out or damaged motor pinion bearing Replace motor assembly
Worn out or deformed drive cable Replace
Door glass fails to operate up
and down
Incorrect window glass installation Adjust position
Damaged or faulty regulator arm or regulator Correct or replace
Door does not open or close
completely
Incorrect door installation Adjust position
Defective door check assembly Correct or replace
Door hinge requires grease Apply grease
Hood does not open or close
completely
Striker and latch not properly aligned Adjust
Incorrectly installed hood Adjust
Incorrect hood bumper height Adjust
Water leak through windshield
end rear window
Defective seal Fill with sealant
Defective flange Correct
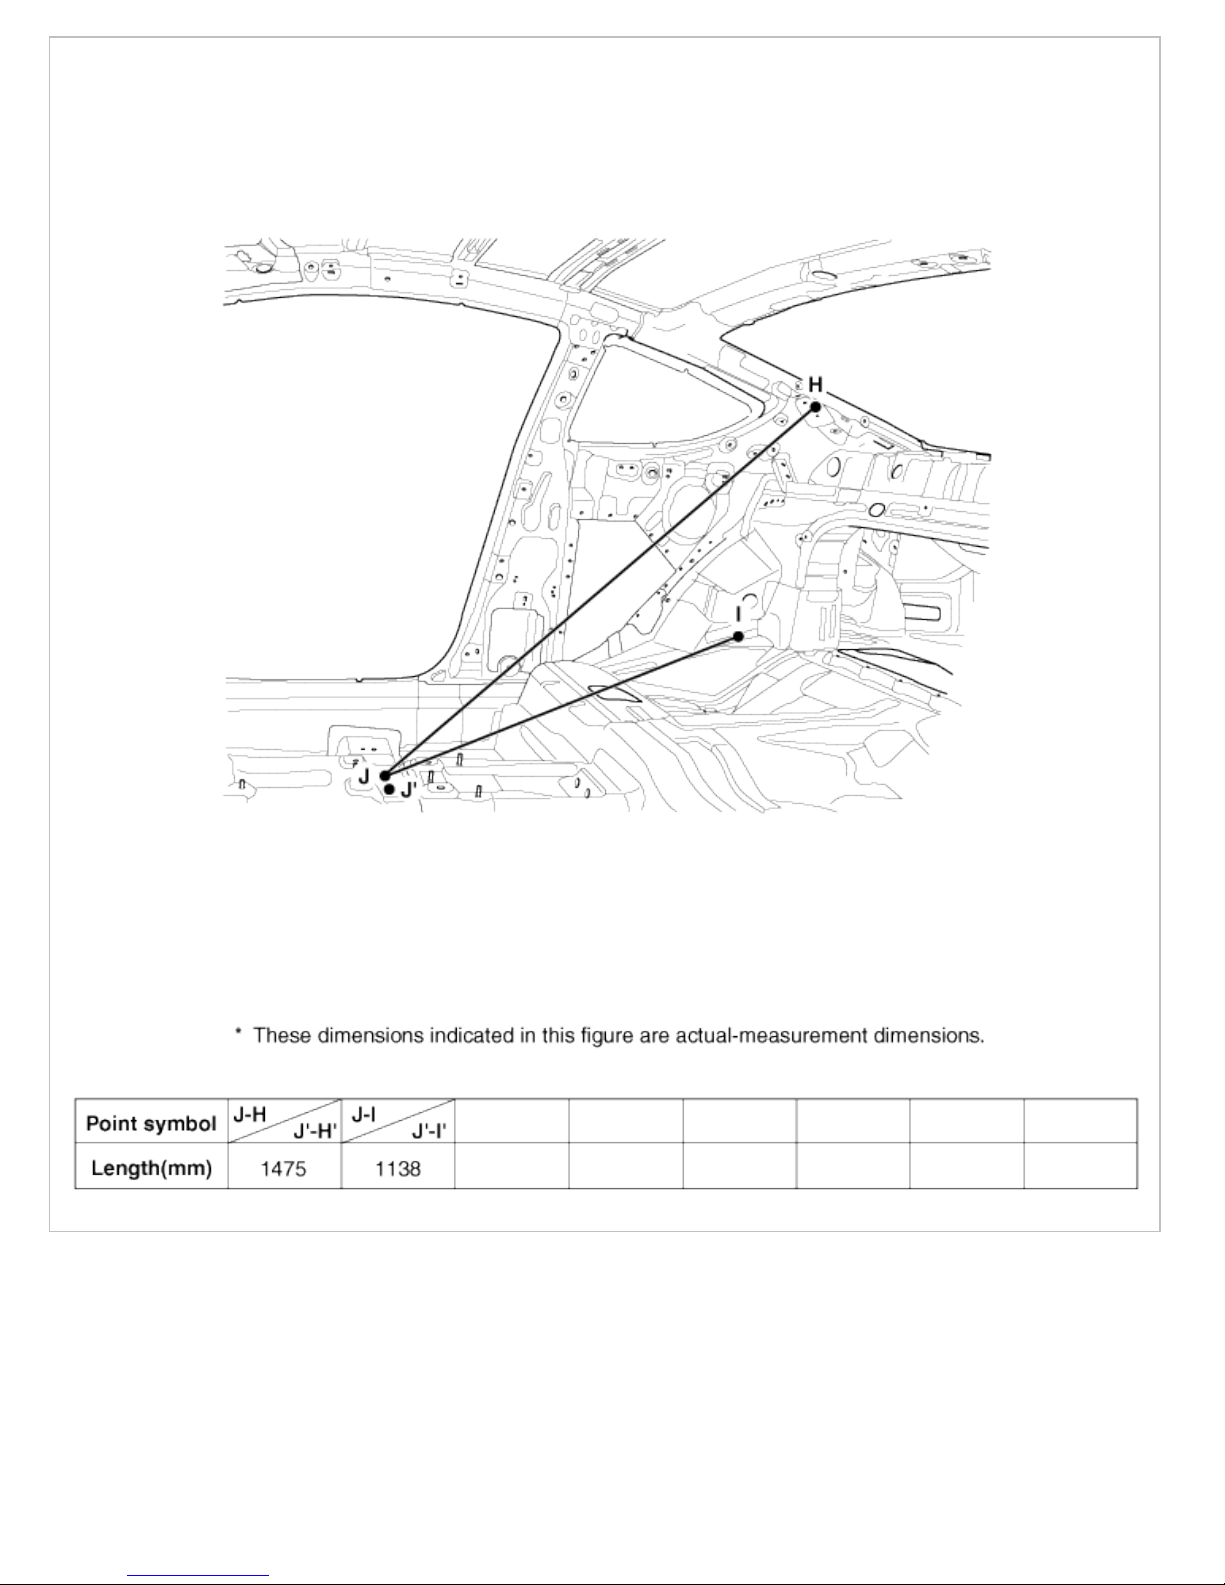
Body (Interior and Exterior) > Body Dimensions > General Information
General
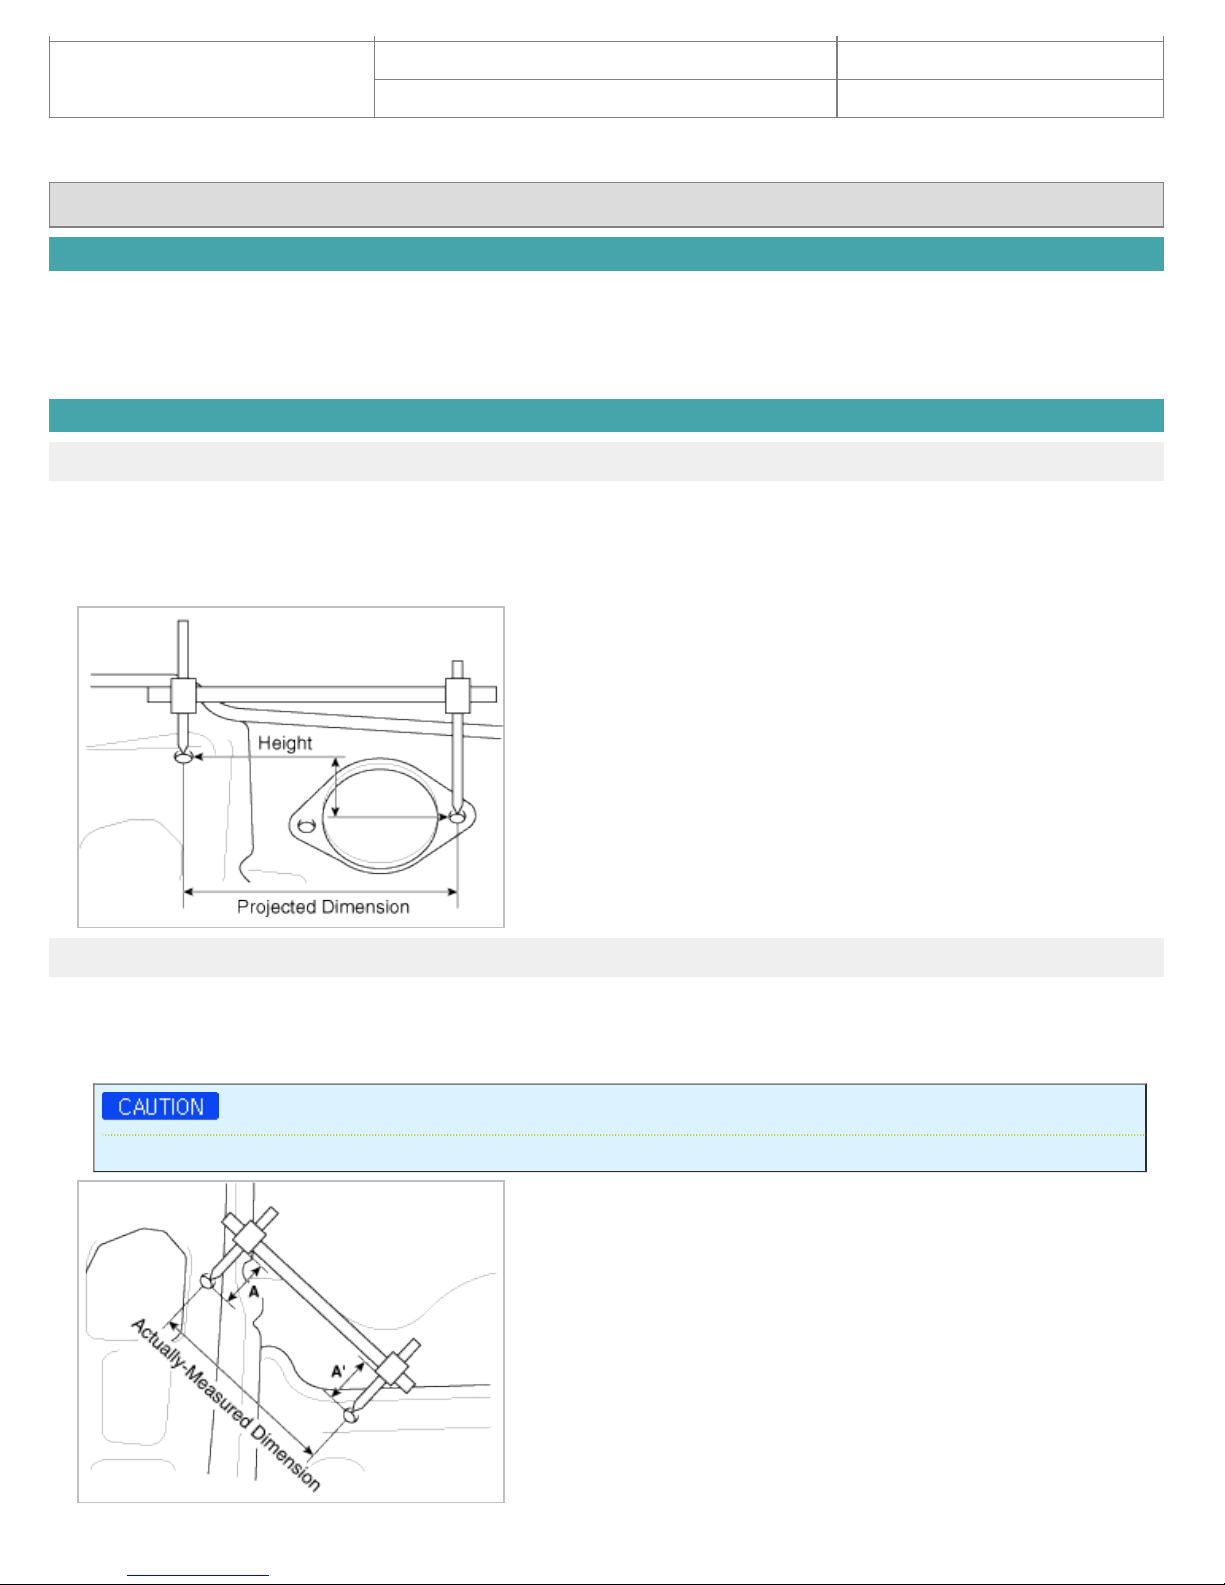
1. Basically, all measurements in this manual are taken with a tracking gauge.
2. When a measuring tape is used, check to be sure there is no elongation, twisting or bending.
3. For measuring dimensions, both projected dimension and actual-measurement dimension are used in this manual.
Measurement Method
Projected Dimensions
1. These are the dimensions measured when the measurement points are projected into the reference plane, and are
the reference dimensions used for body alterations.
2. If the length of the tracking gauge probes are adjustable, make the measurement by lengthening one probe by the
amount equivalent to the difference in height of the two surfaces.
Actual-Measurement Dimensions
1. These dimensions indicate the actual linear distance between measurement points, and are the reference
dimensions for use if a tracking gauge is used for measurement.
2. Measure by first adjusting both probes to the same length (A=A').
Check the probes and gauge itself to make sure there is no free play.

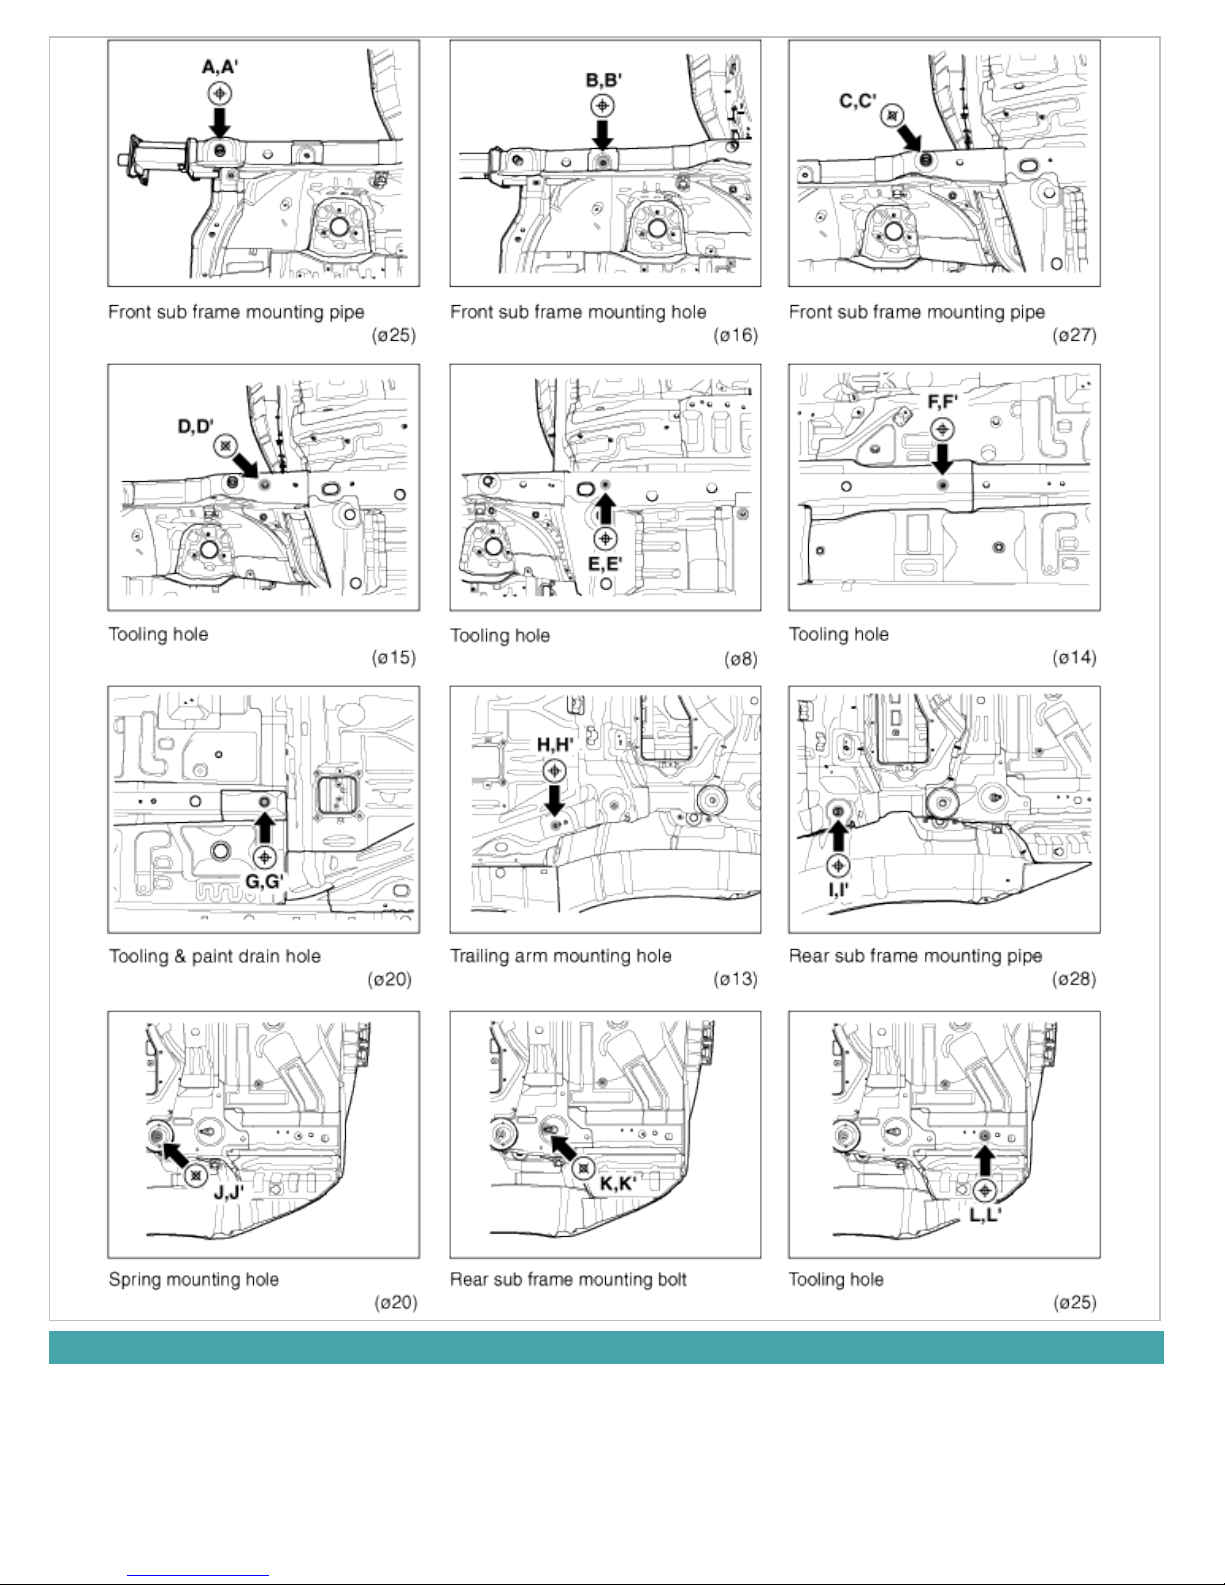
Measurement Point
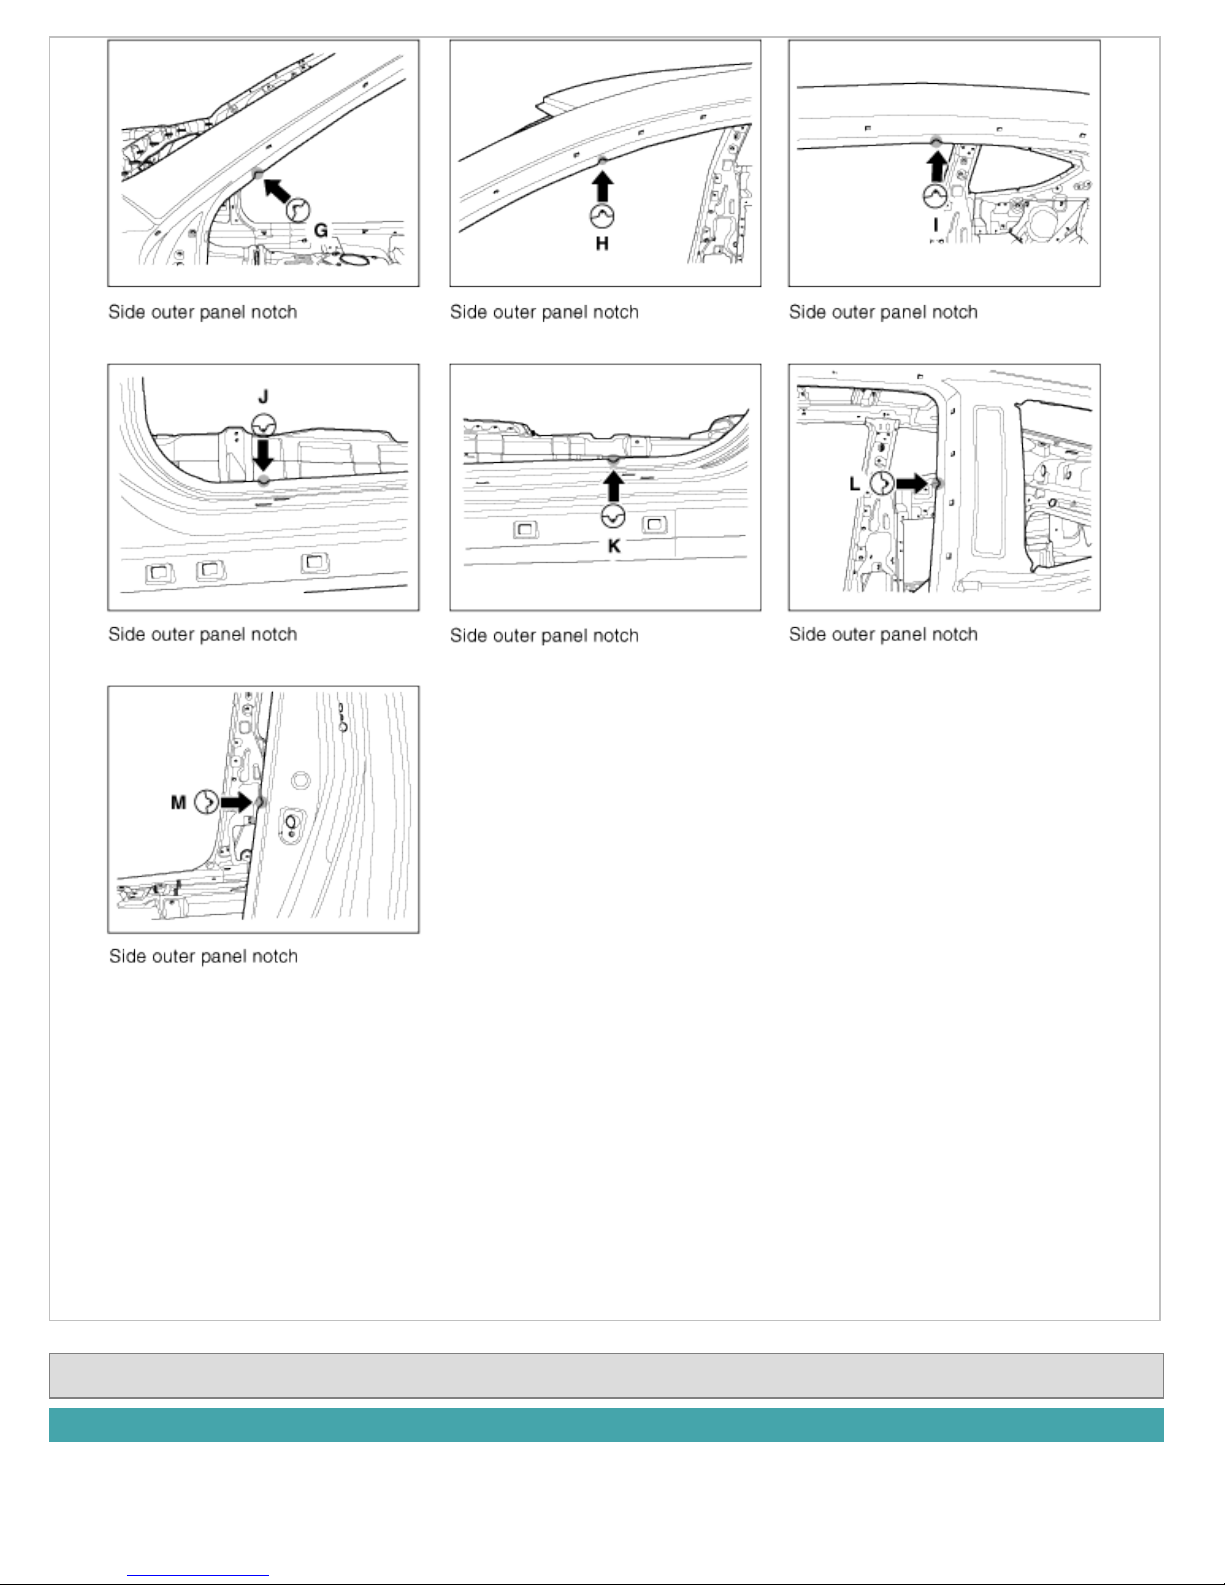
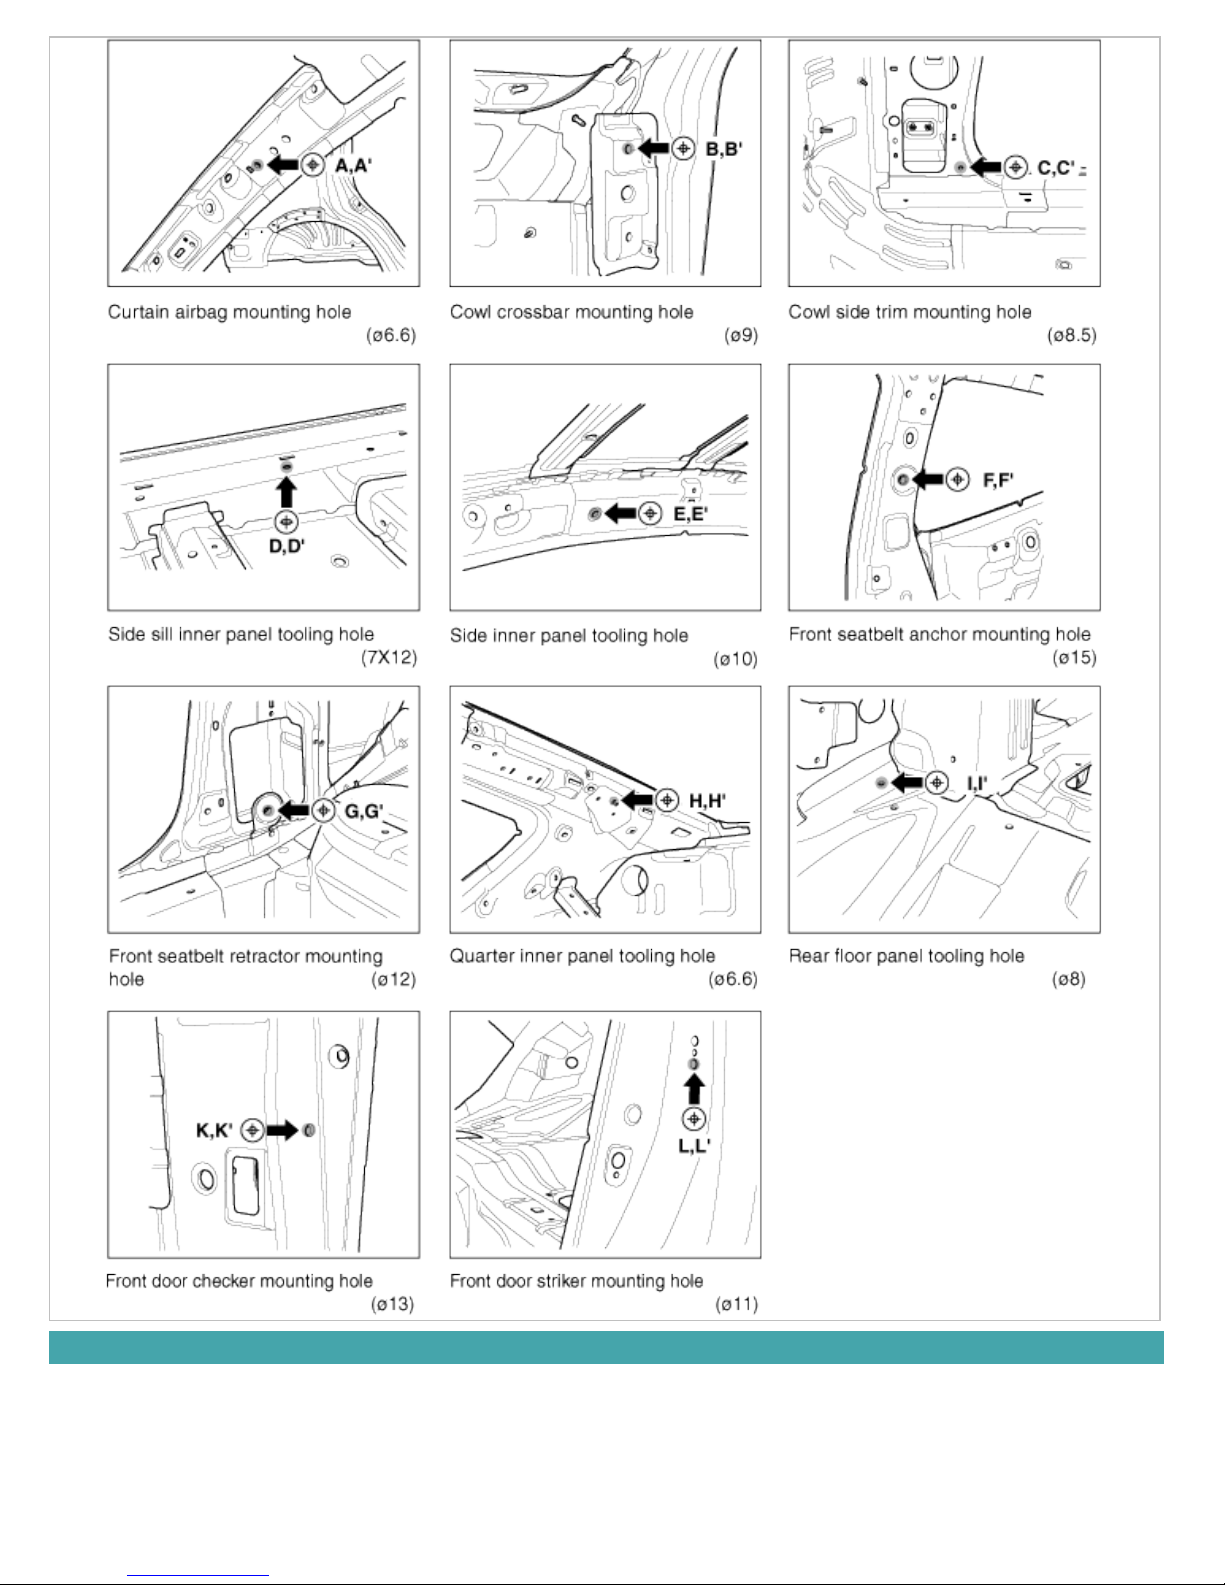
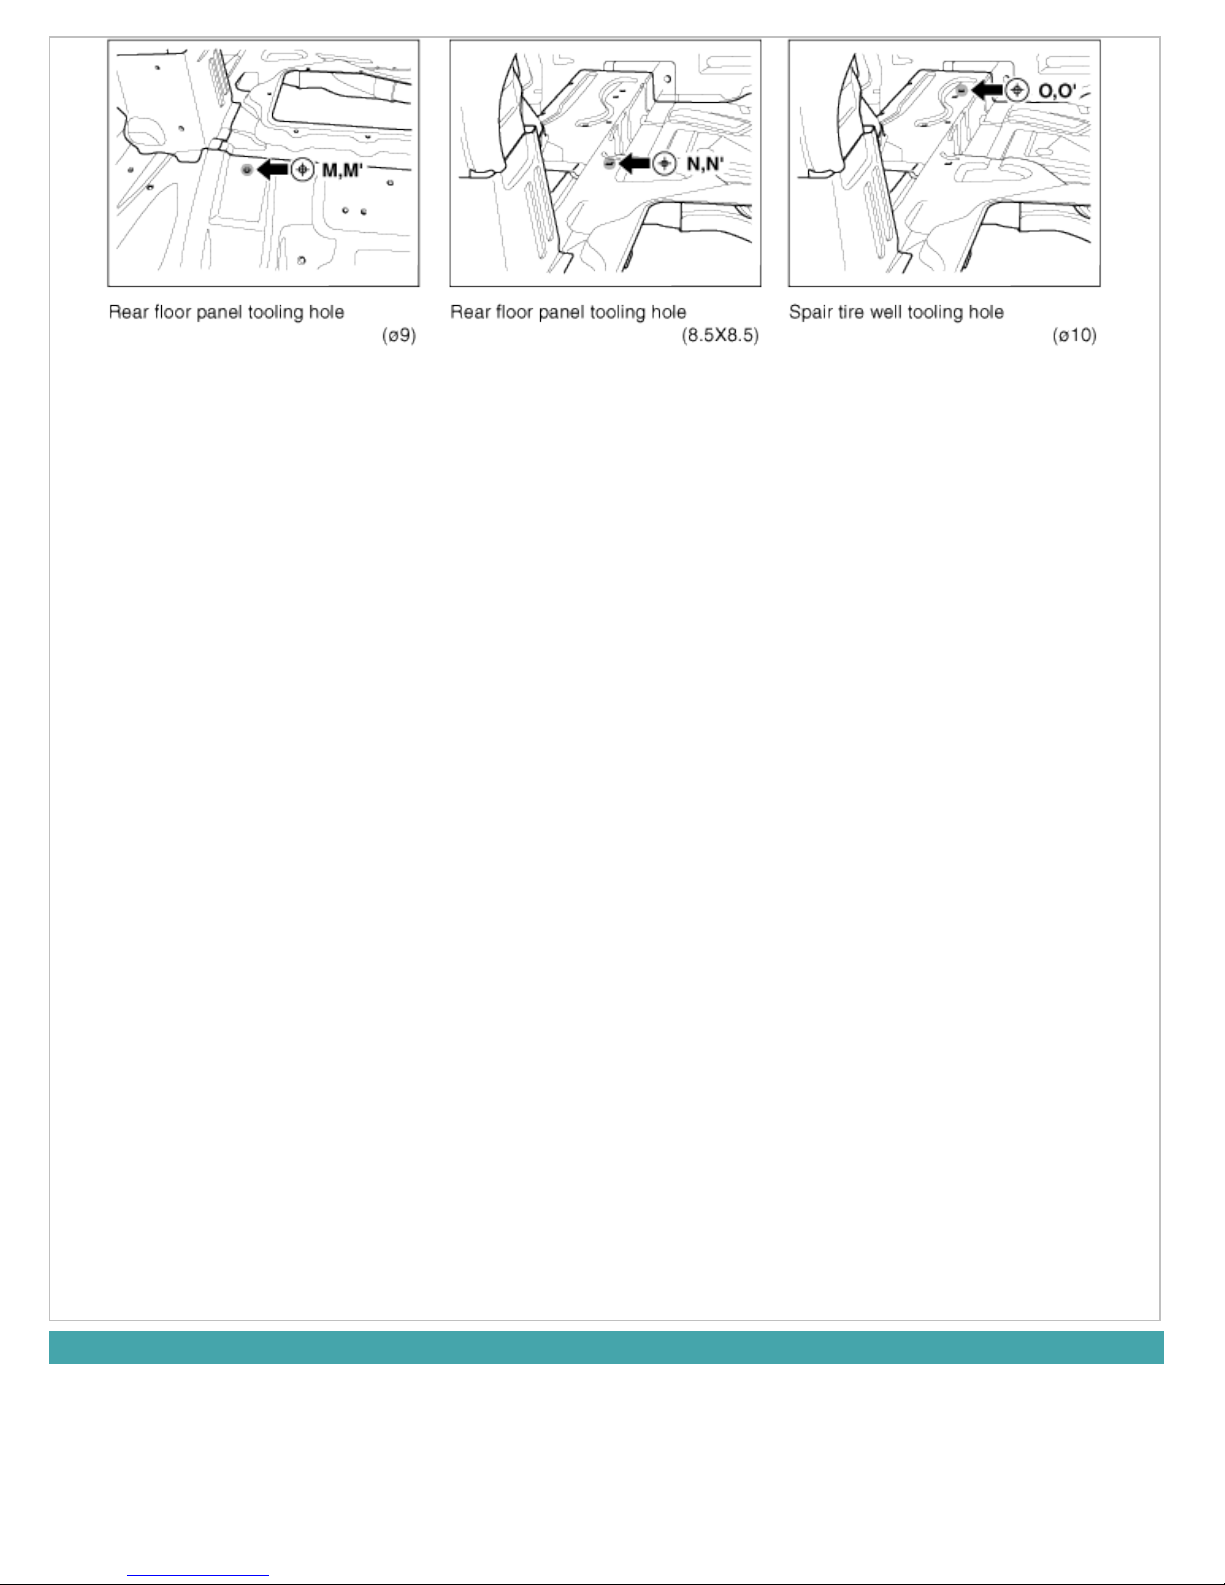
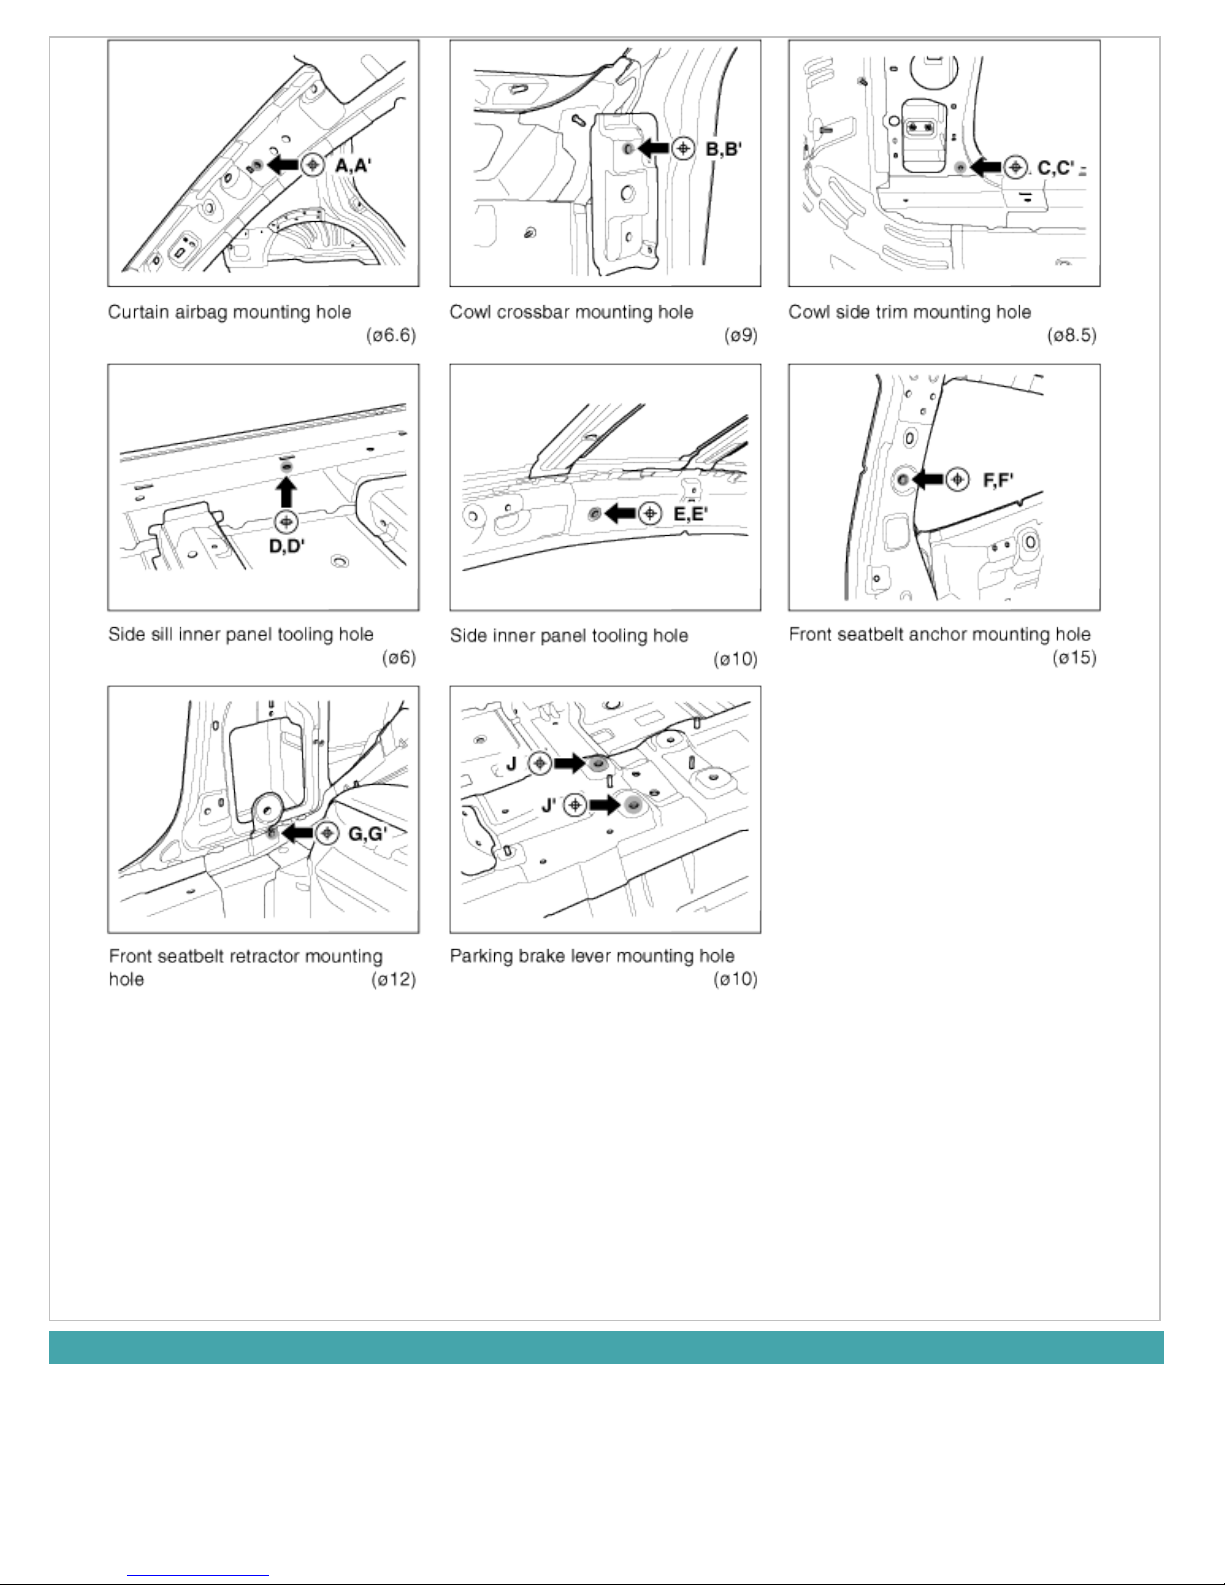
1. Measurements should be taken at the hole center.
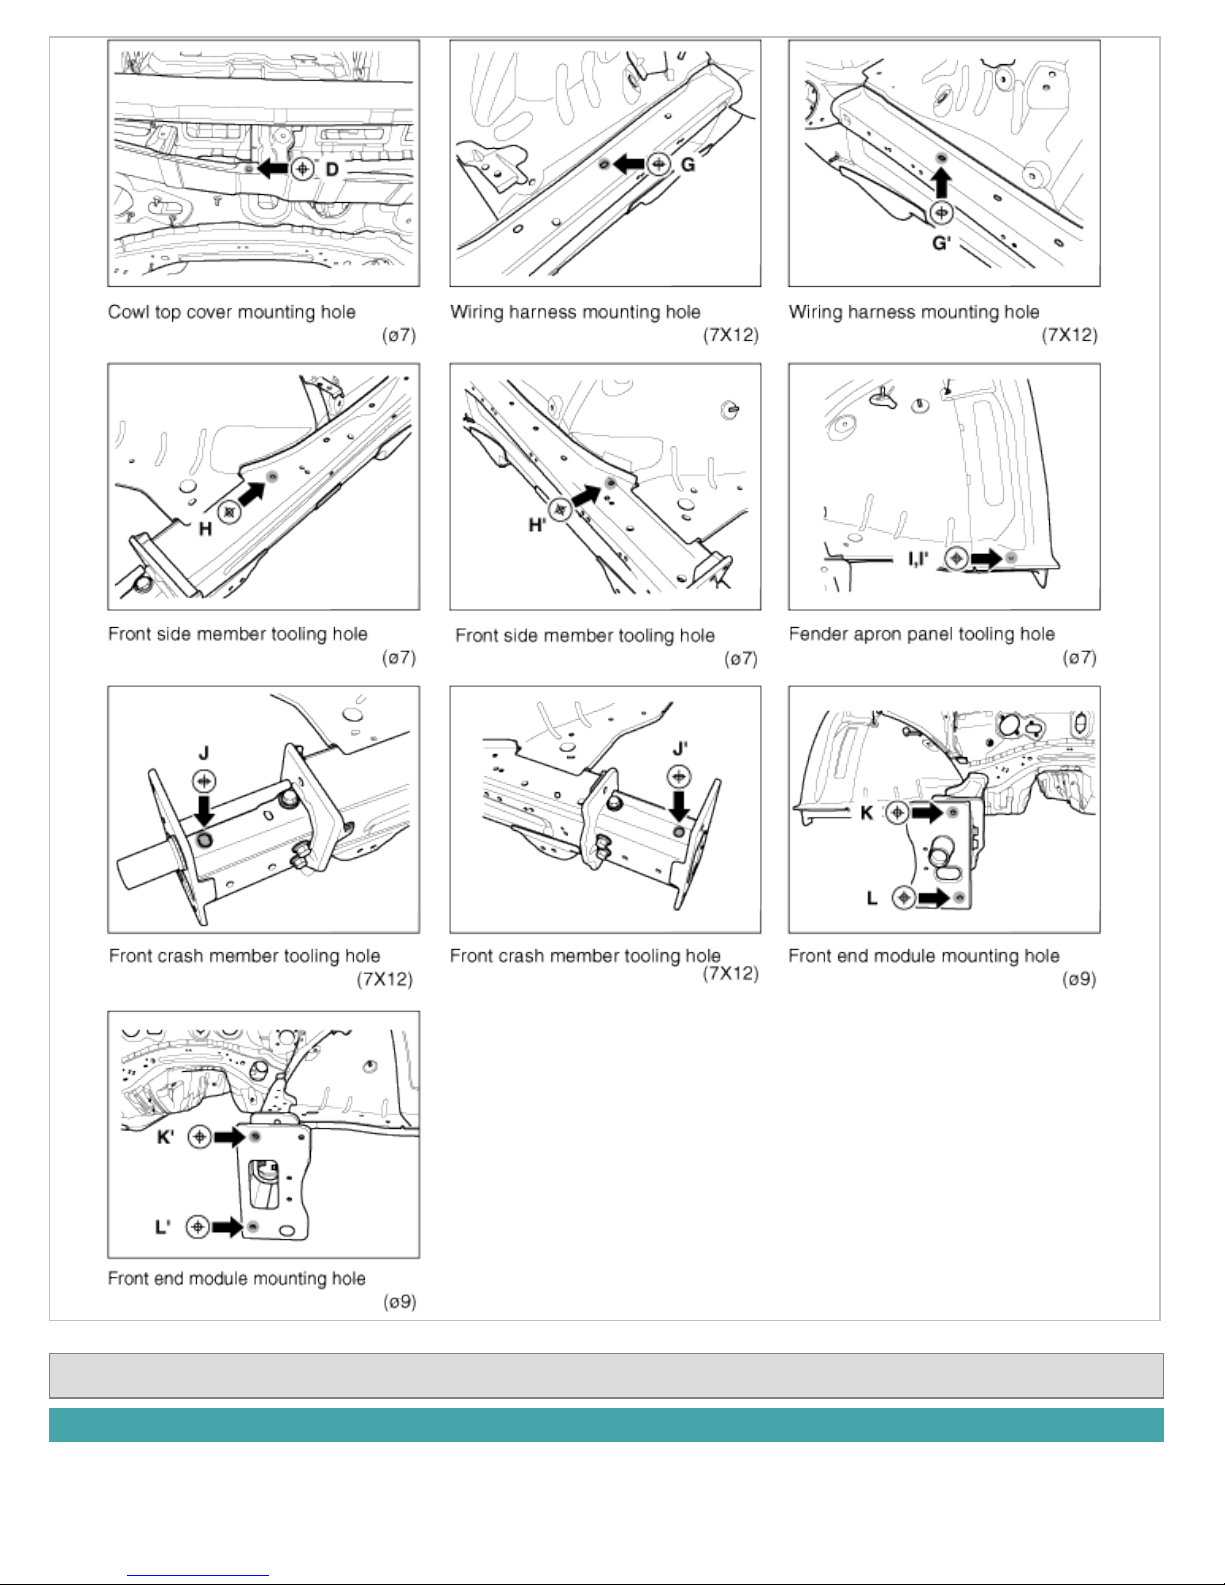
Body (Interior and Exterior) > Body Dimensions > Front Body > Body Repair
Front Body A
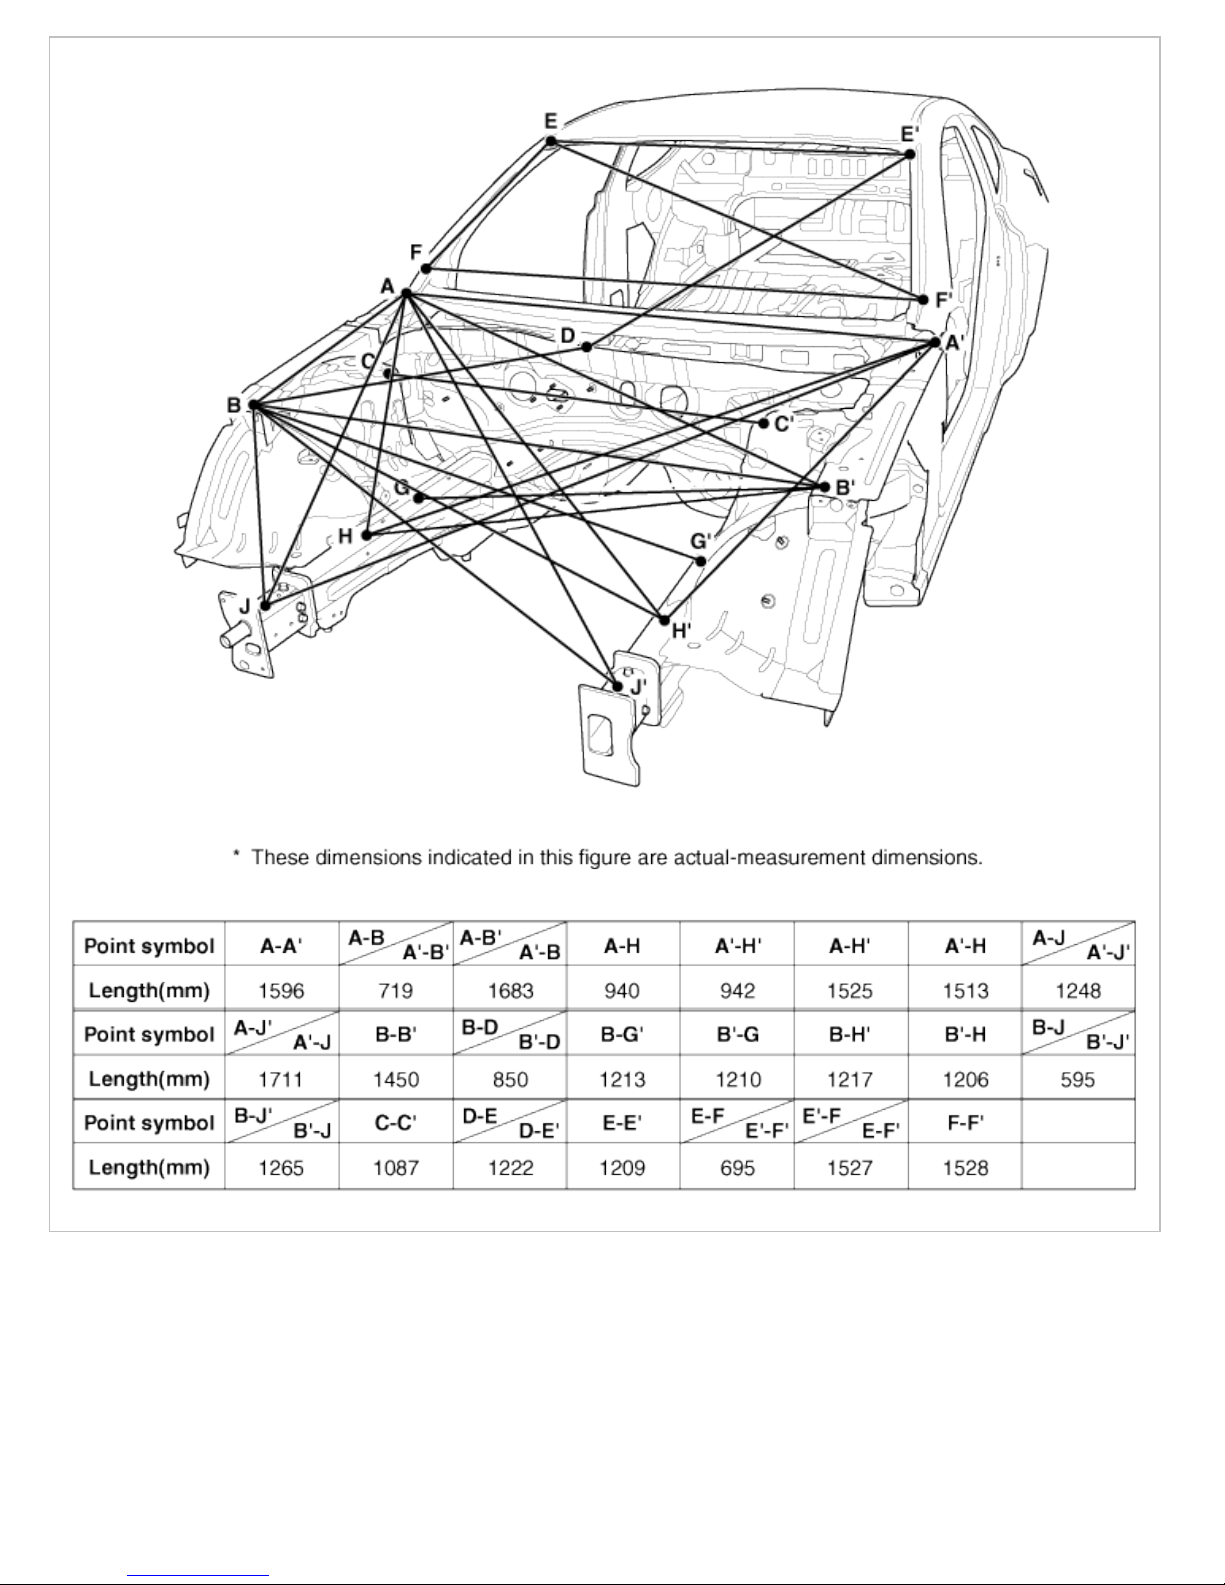
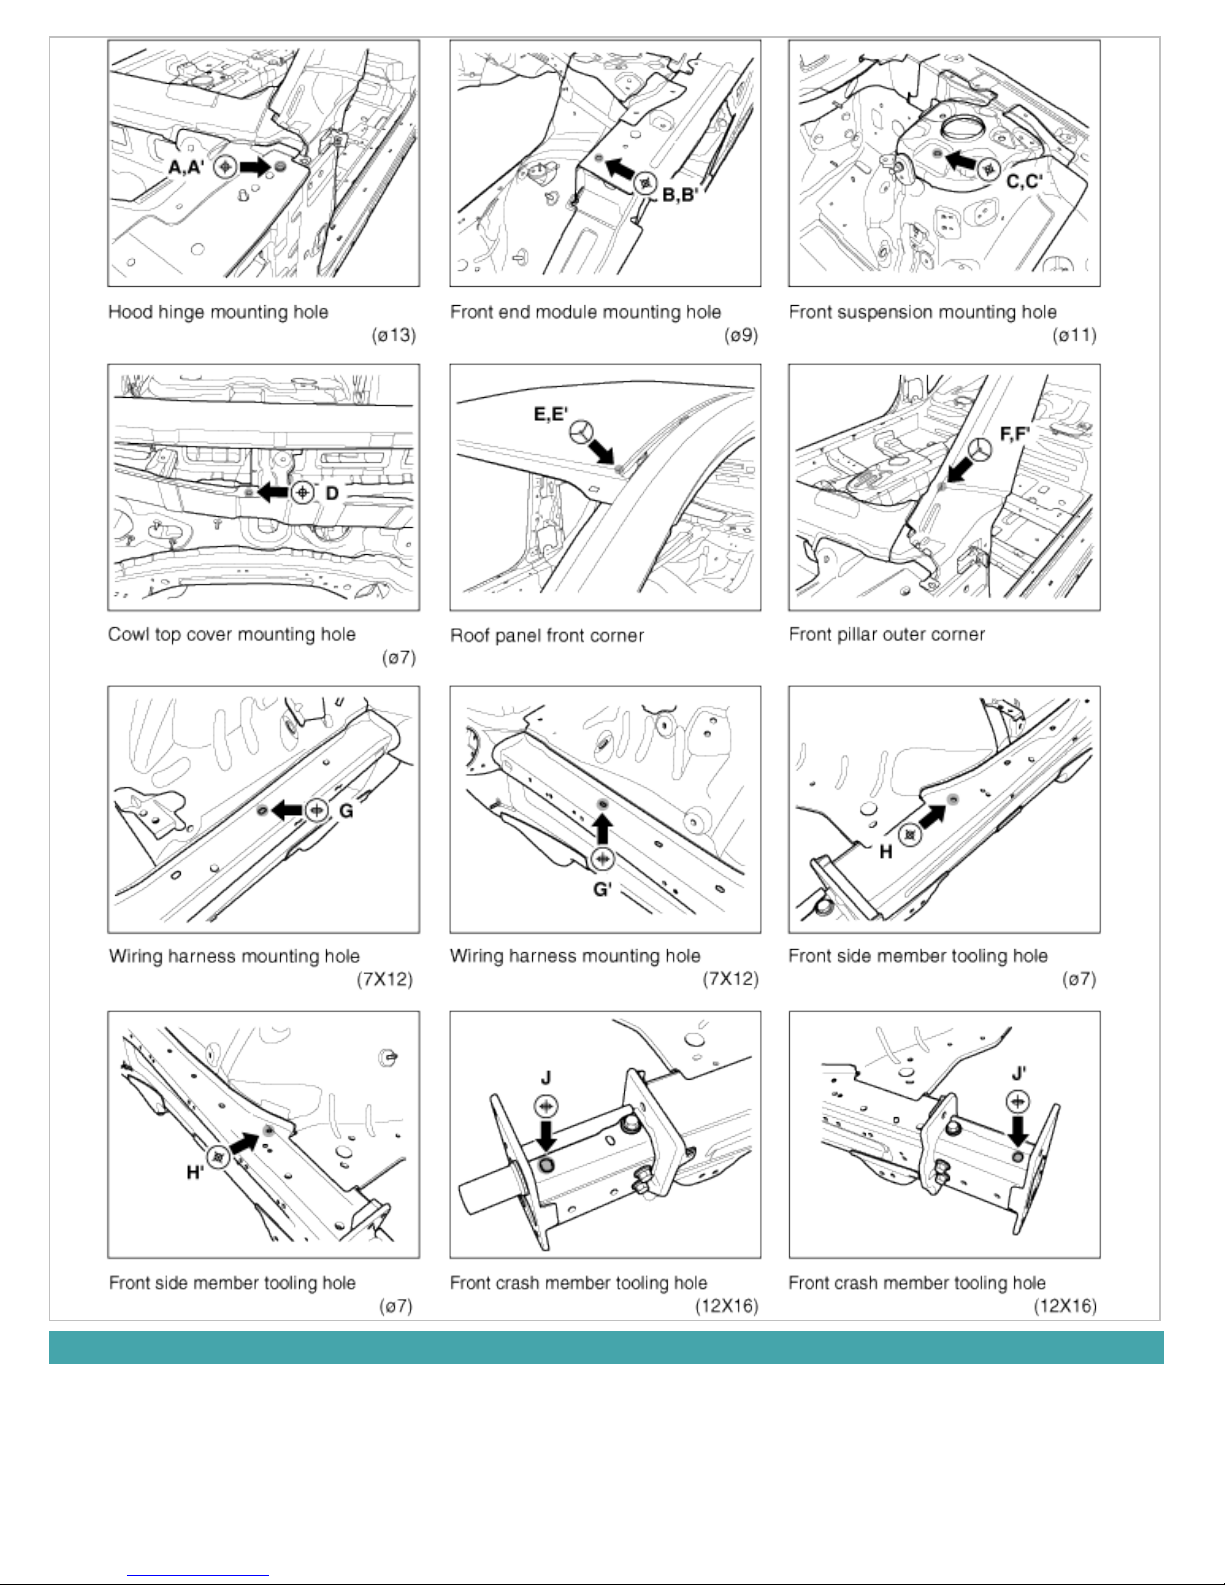
Front Body B

Body (Interior and Exterior) > Body Dimensions > Side Body > Body Repair
Side Body A

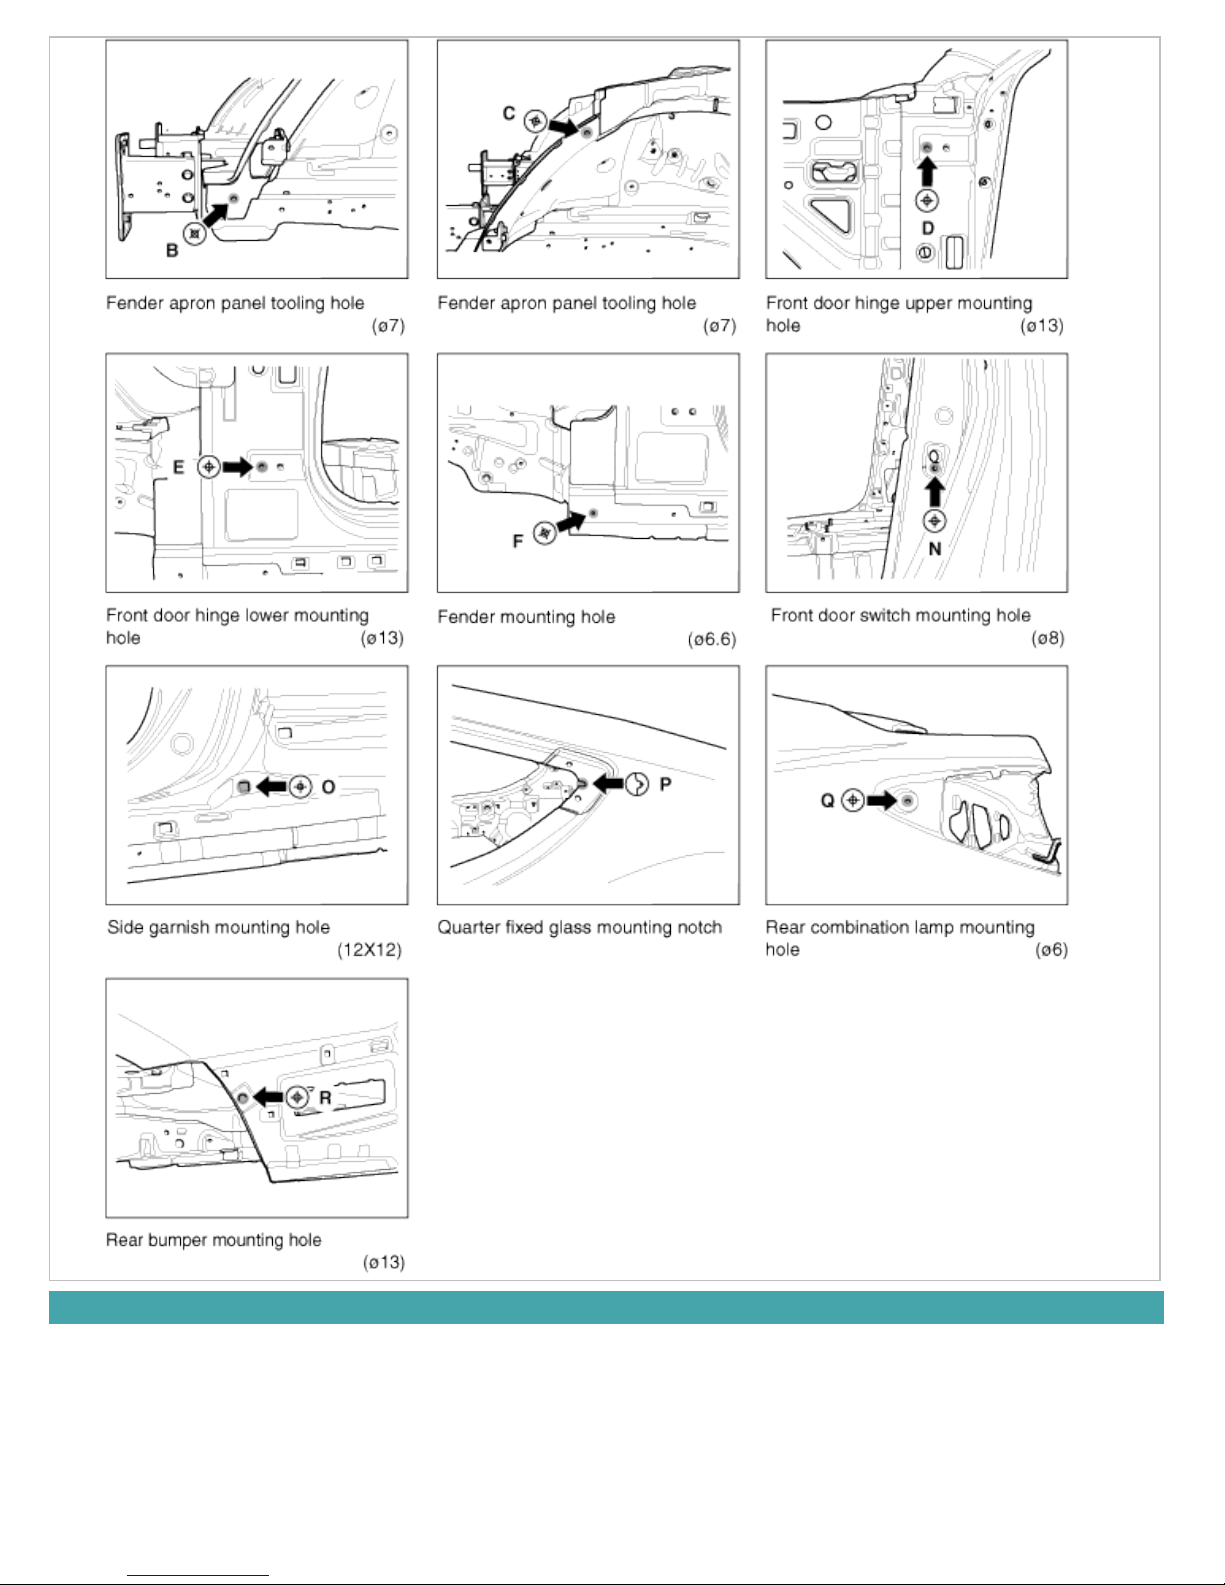
Side Body B
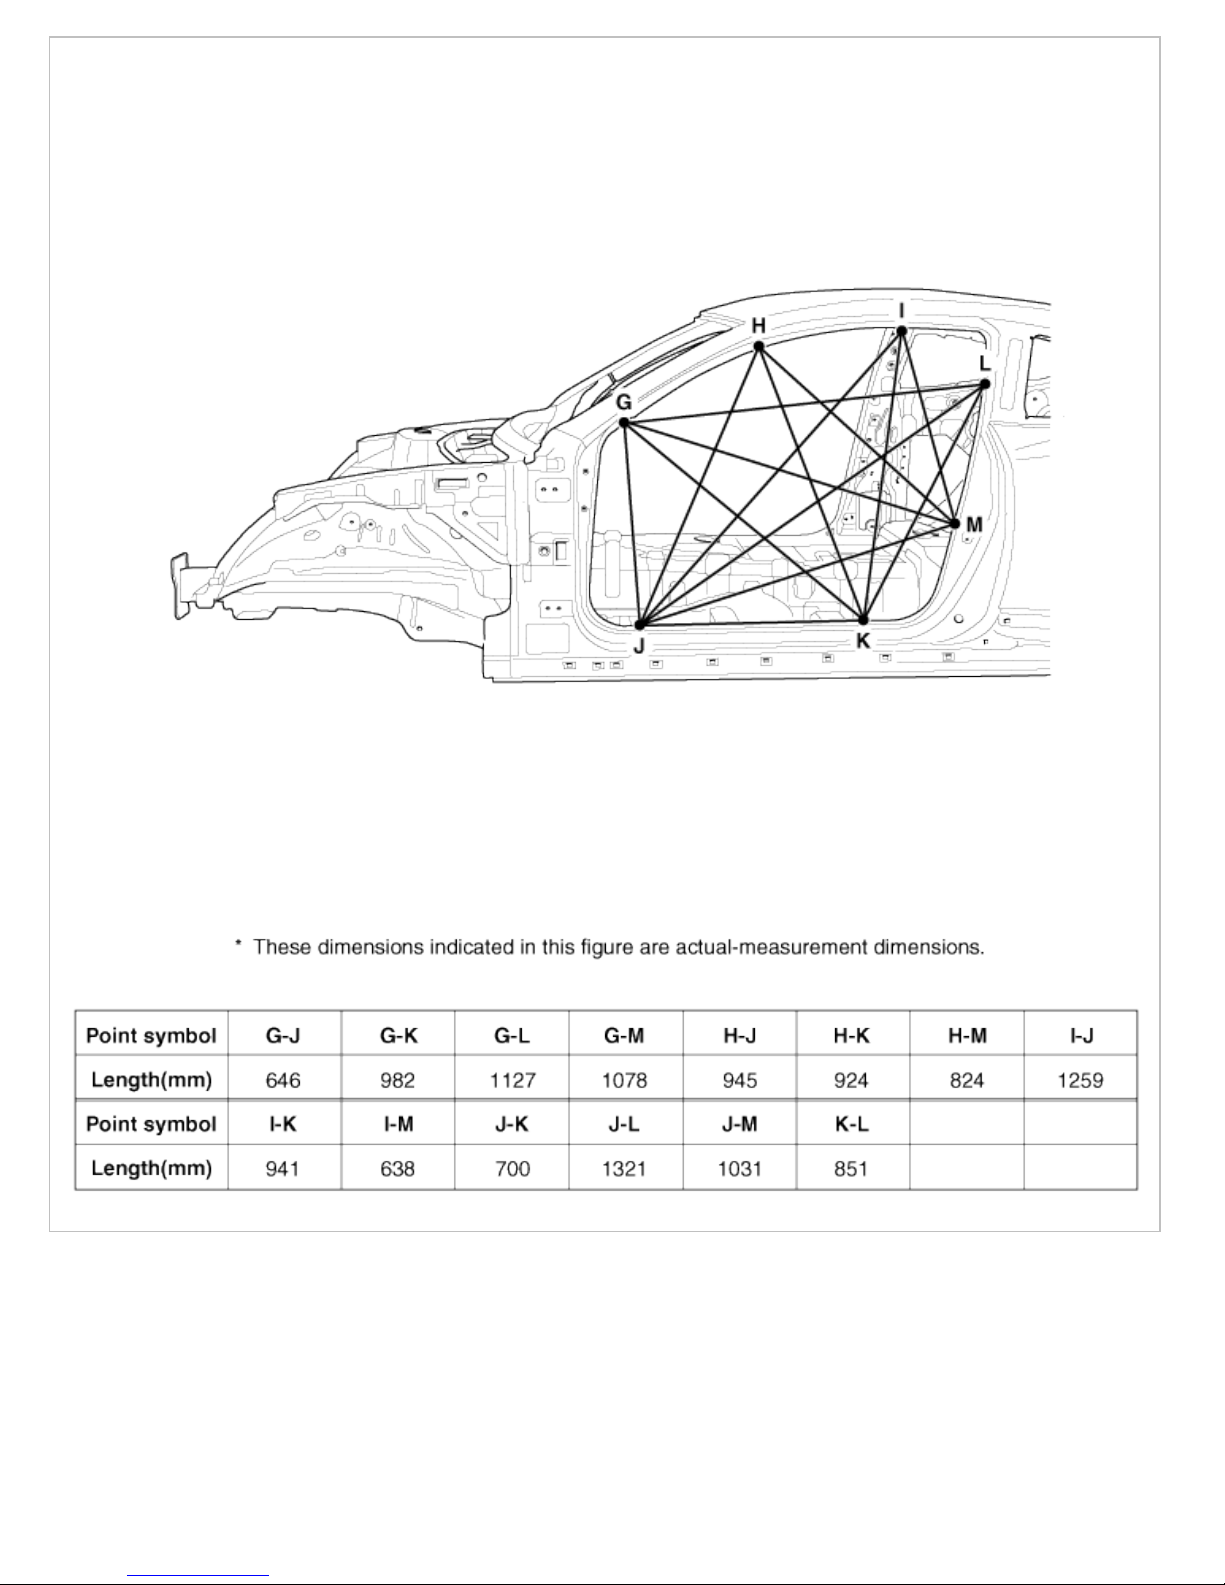
Body (Interior and Exterior) > Body Dimensions > Interior > Body Repair
Interior A

Interior B

Interior C

Interior D
Body (Interior and Exterior) > Body Dimensions > Rear Body > Body Repair
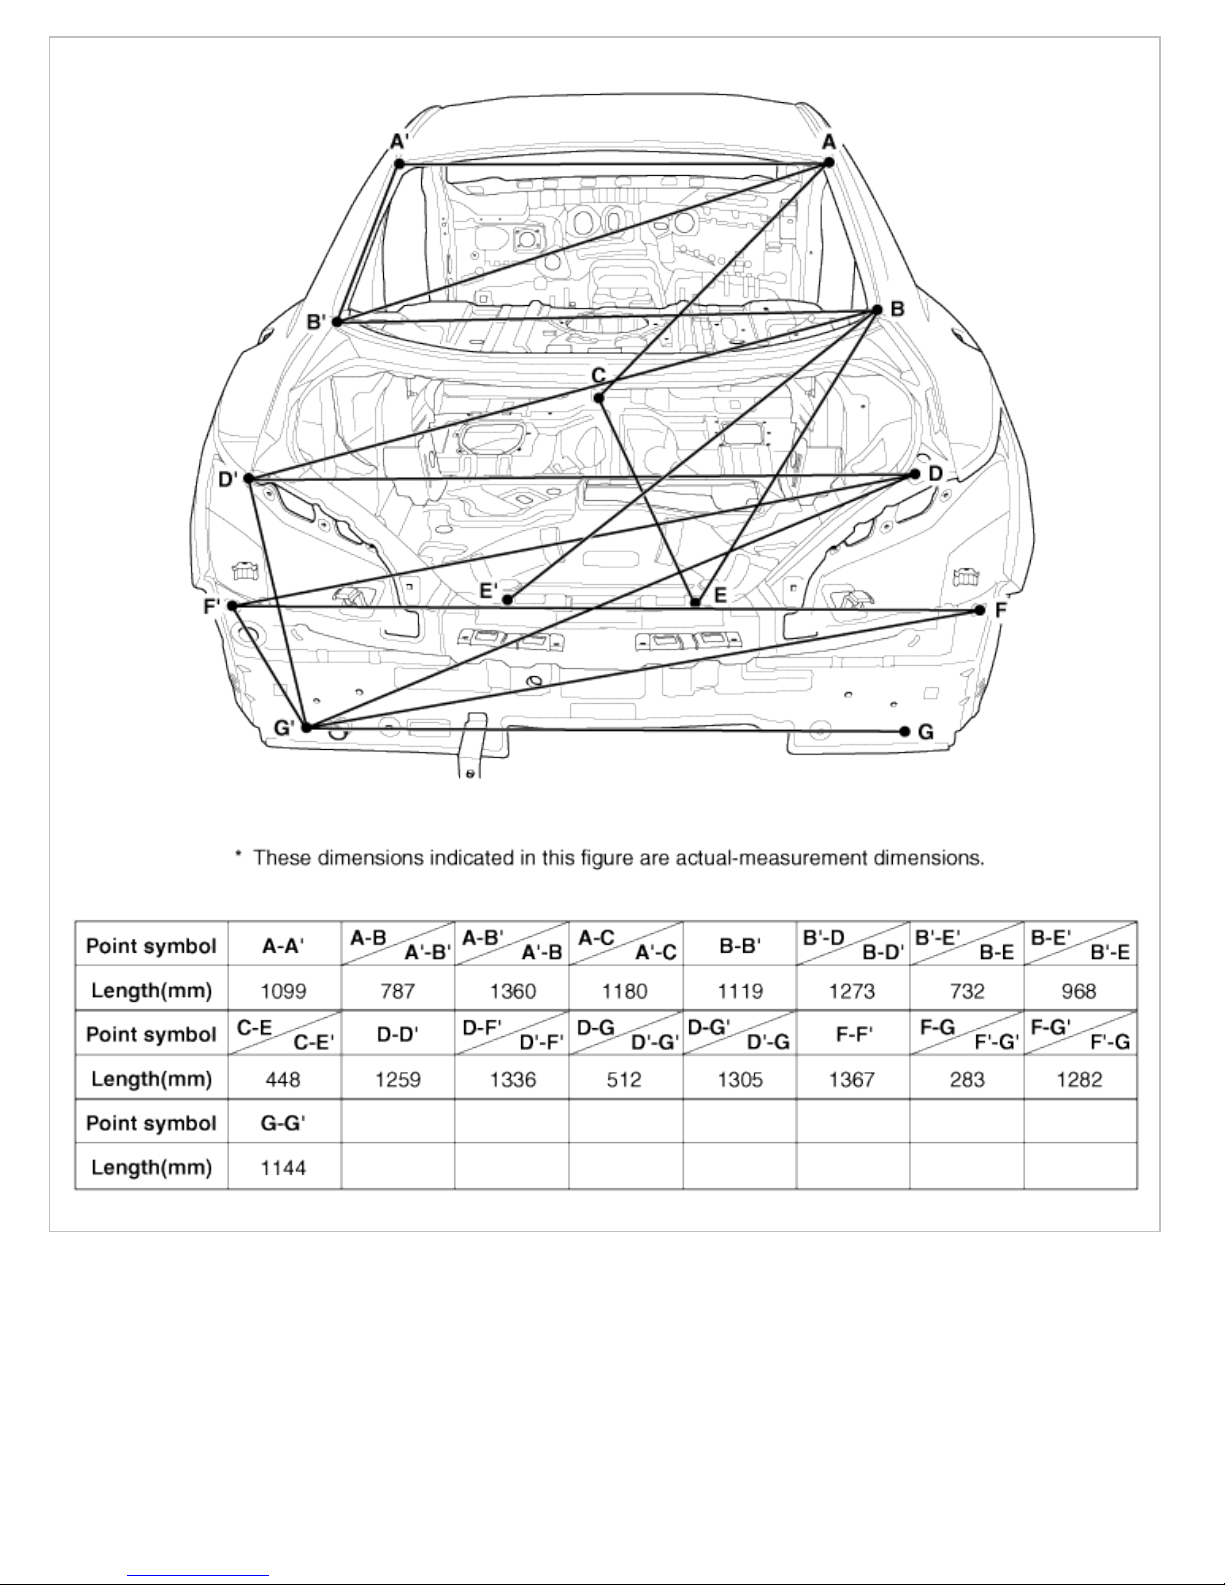
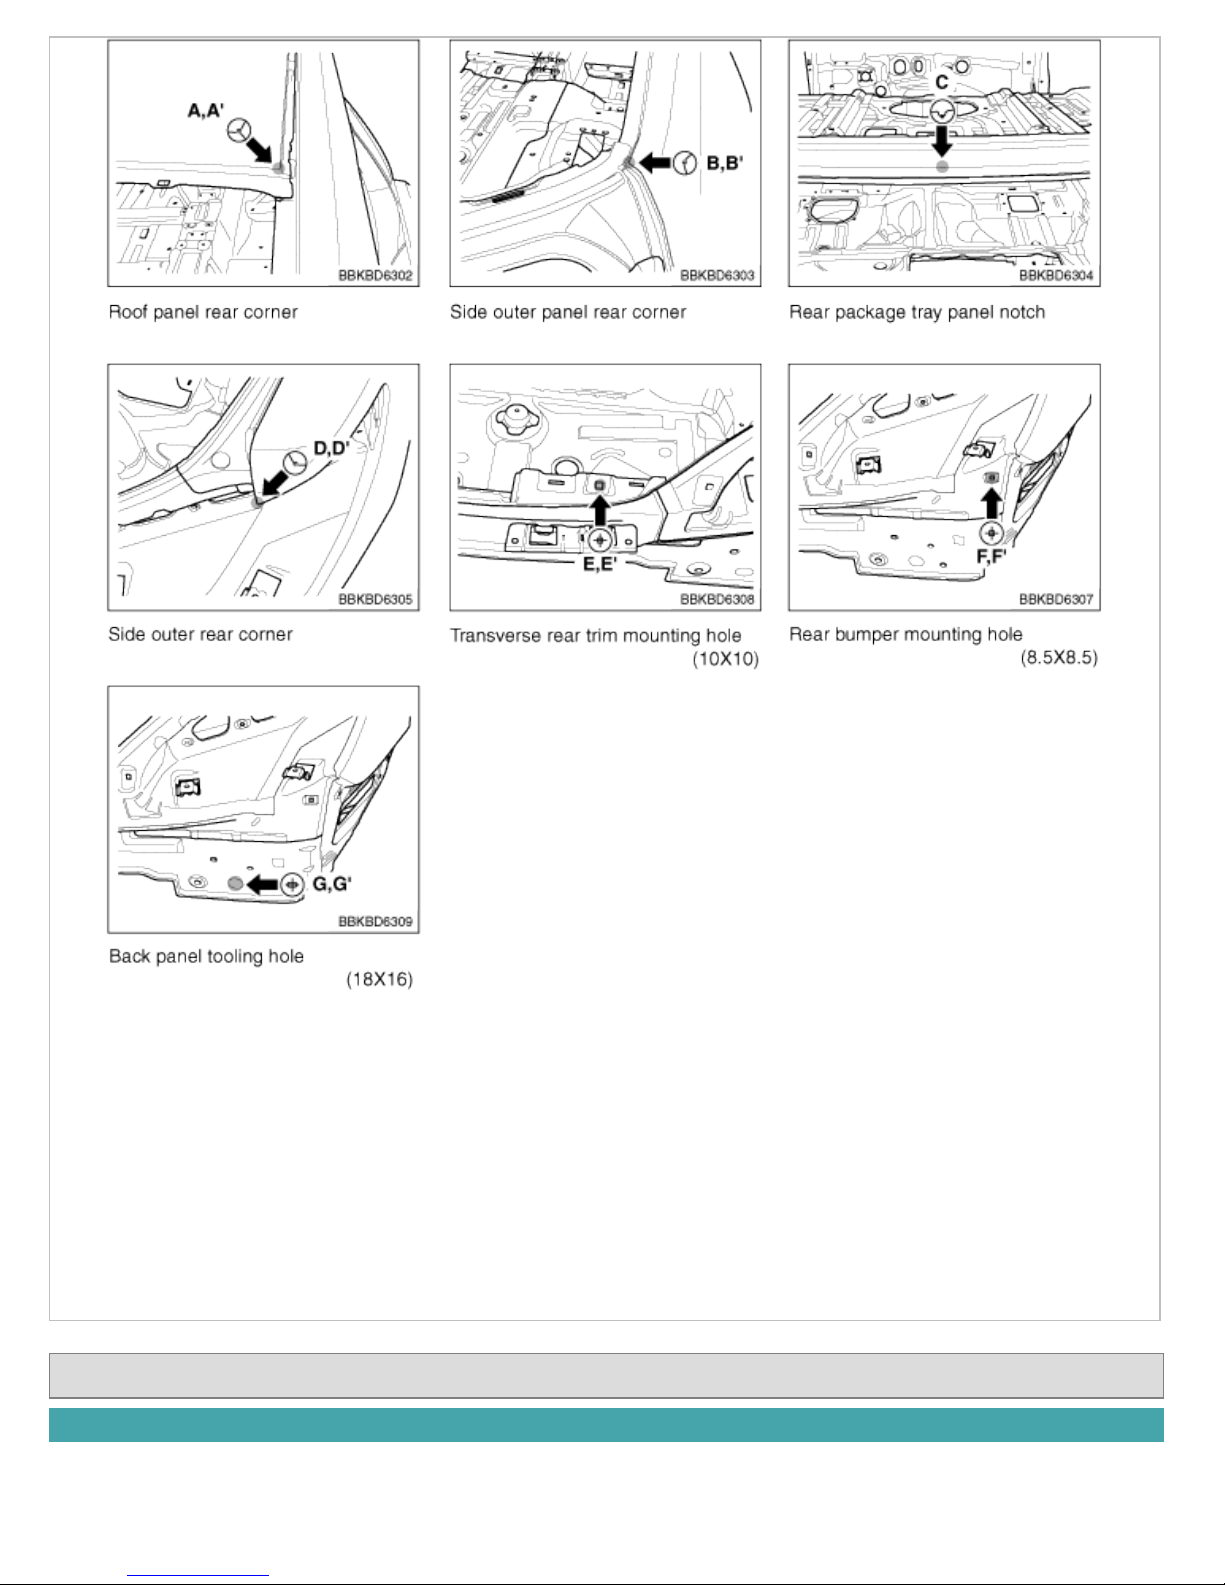
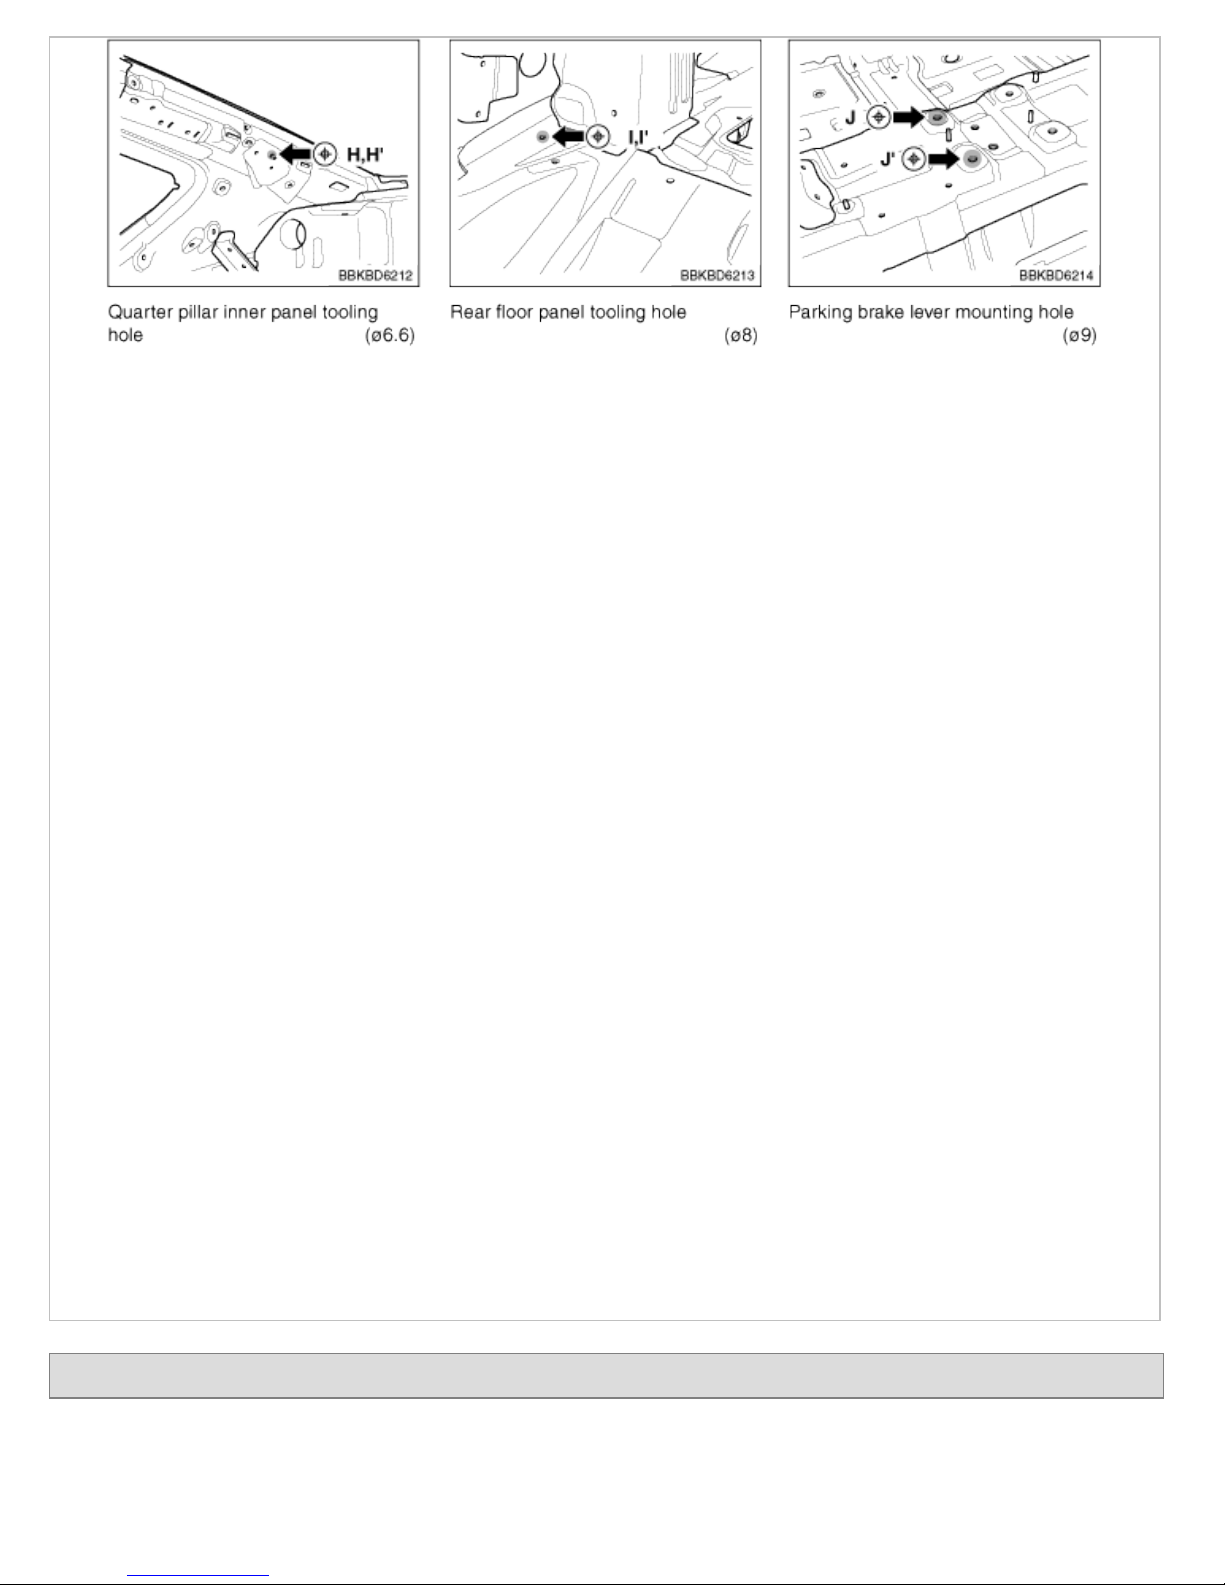
Body (Interior and Exterior) > Body Dimensions > Under Body > Body Repair
Projected Dimensions

Actual-Measurement Dimensions


Body (Interior and Exterior) > Exterior > Fender > Repair procedures
Replacement
• Be careful not to damage the hood and body.
• When removing the clips, use a clip remover.
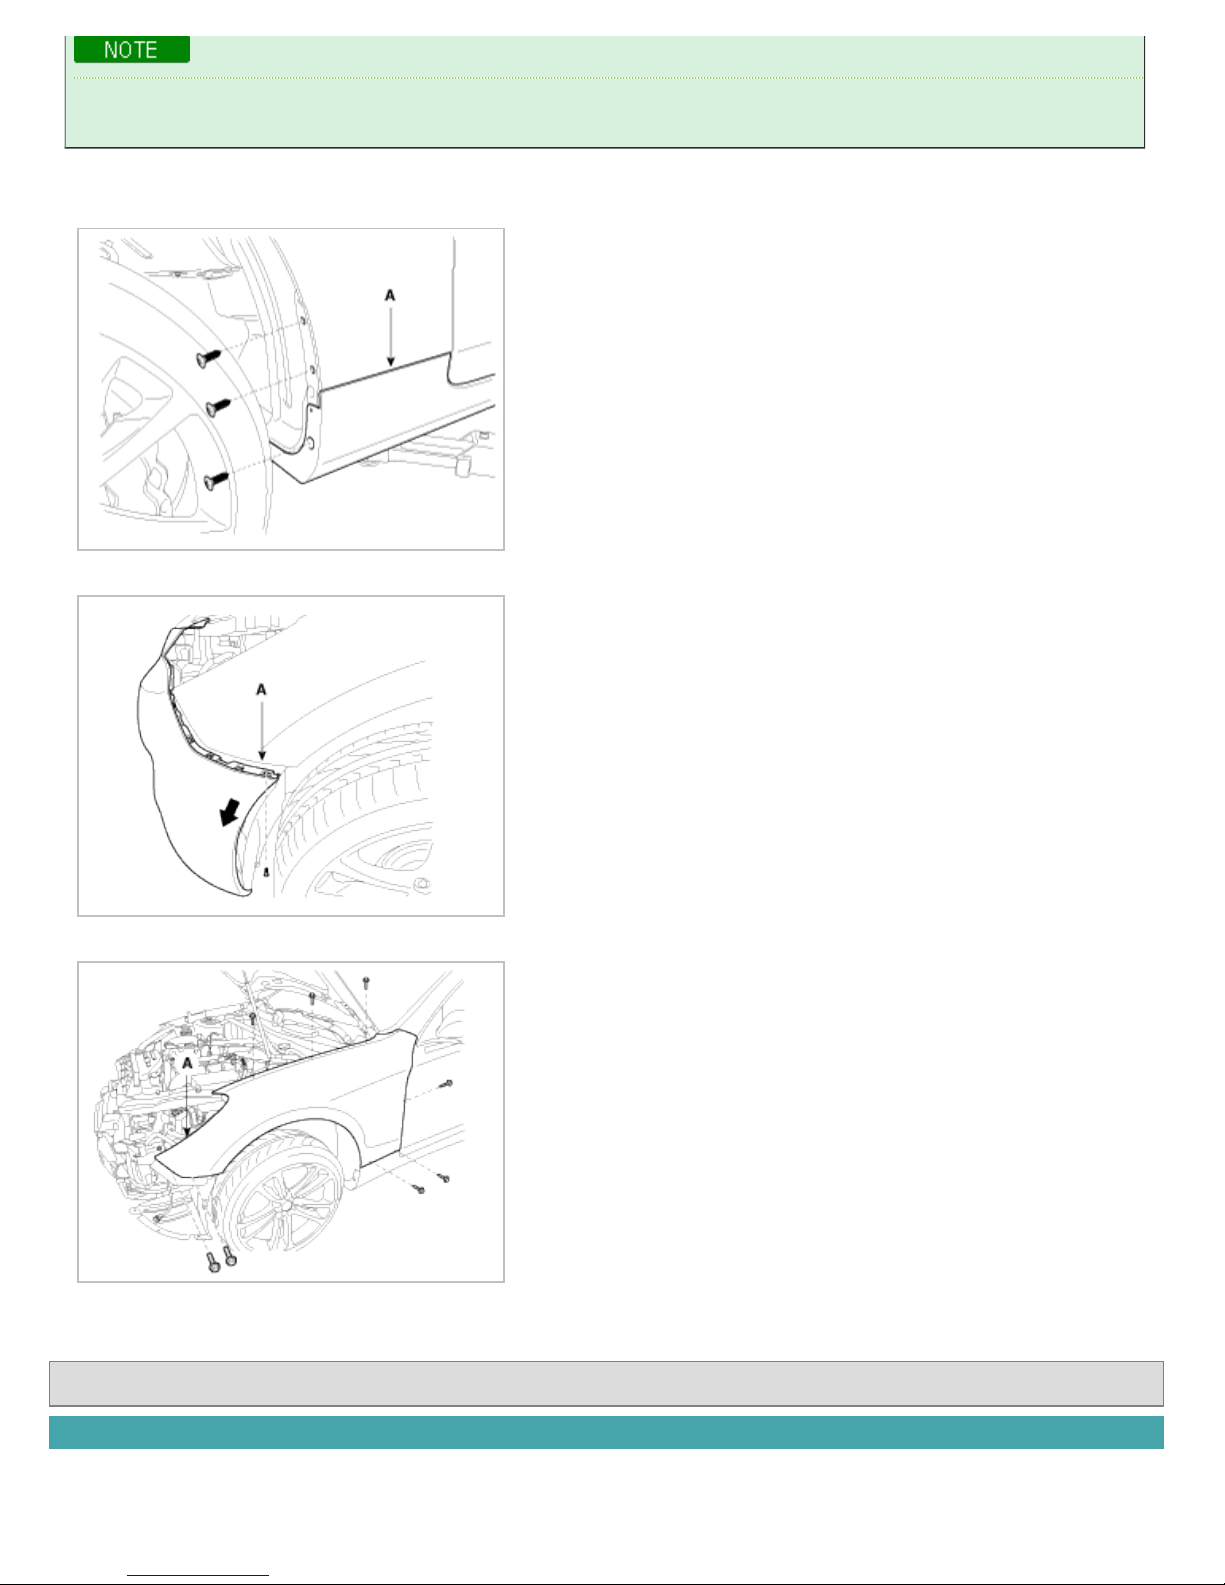
1. Remove the side sill molding (A).
2. Loosening the fender mounting screws.
3. Remove the front bumper mounting screw (A).
4. After loosening the fender mounting bolts, remove the fender (A).
5. Installation is the reverse of removal.
Body (Interior and Exterior) > Exterior > Hood > Repair procedures
Replacement
Hood Assembly Replacement
• When removing and installing the hood, an assistant is necessary.
• Be careful not to damage the hood and body.
• When removing the clips, use a clip remover.
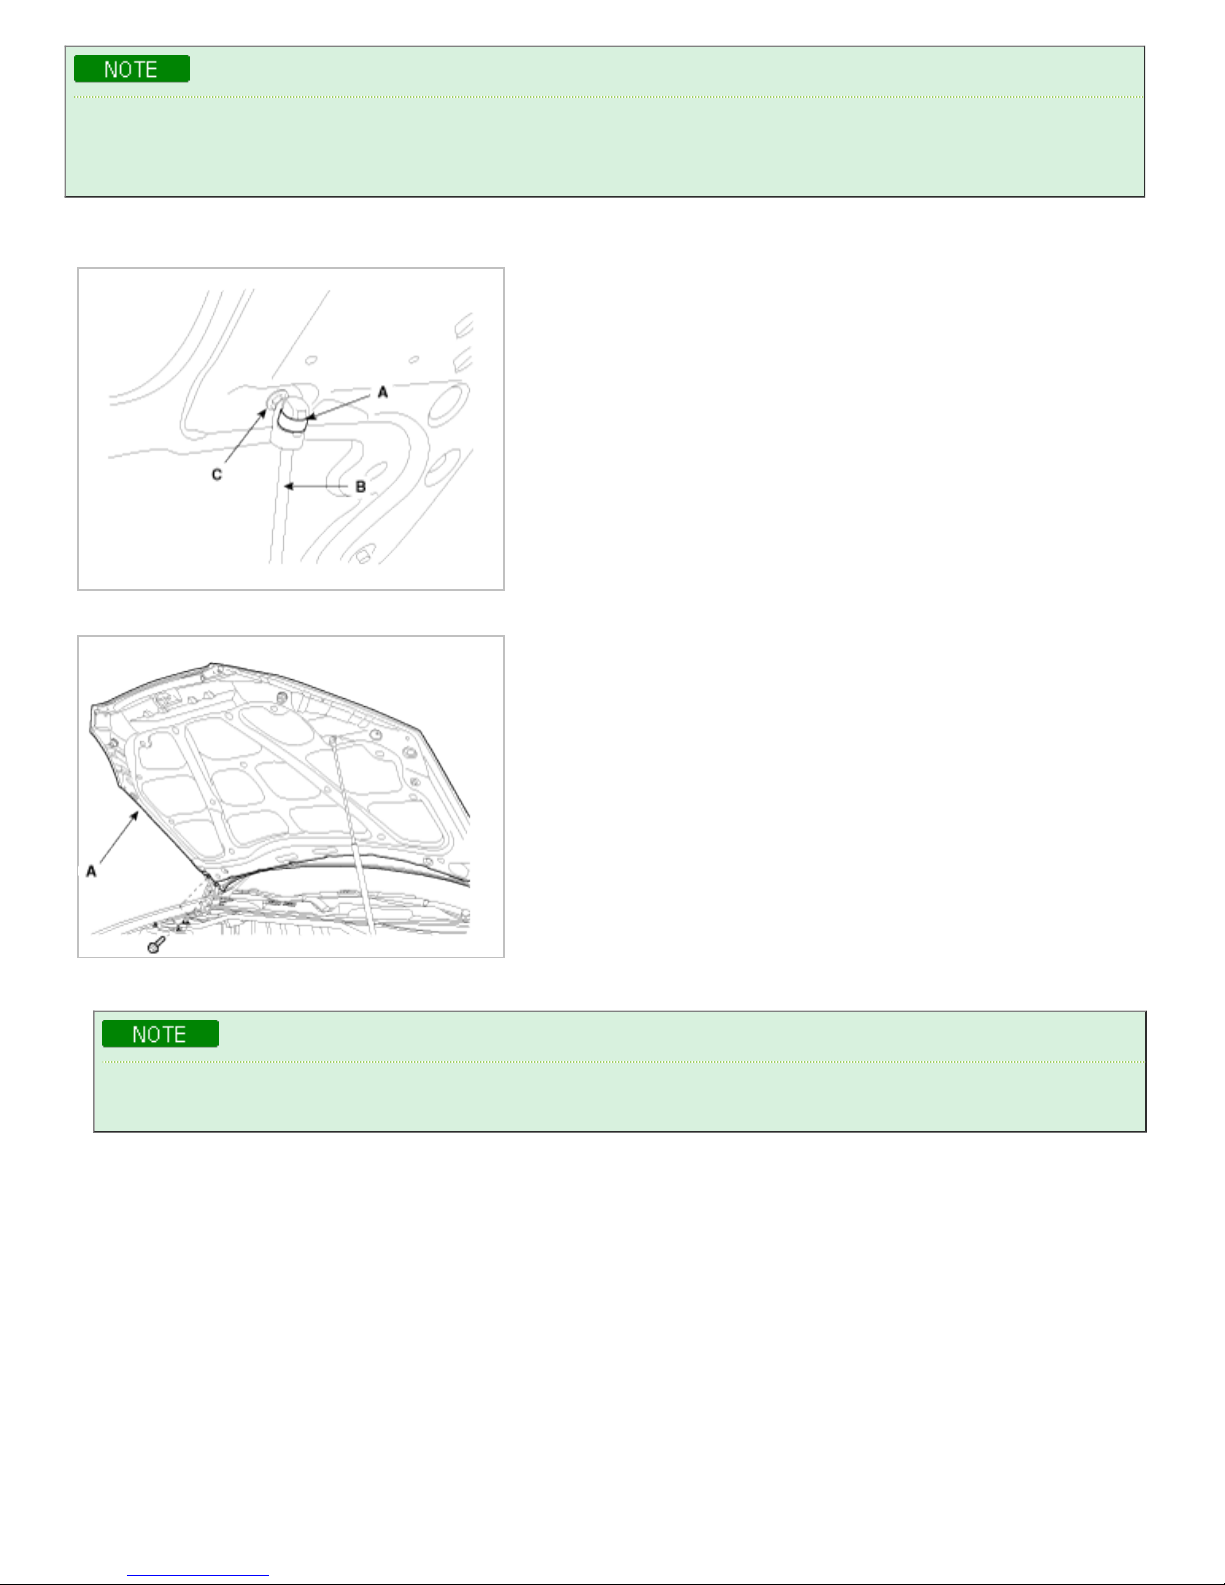
1. Using a screwdriver, lift up slightly the socket clips (A) of both ends on the lifter (B), and then remove the lifter from
the bracket (C).
2. After loosening the hood hinge mounting bolts, remove the hood (A).
3. Installation is the reverse of removal.
• Make sure the hood opens properly and locks securely.
• Adjust the hood alignment.
Hood Lift Replacement
1. Using a screwdriver (A), lift up slightly the socket clips (B) of both ends on the lifter (D), and then remove the lifter
from the bracket (C).
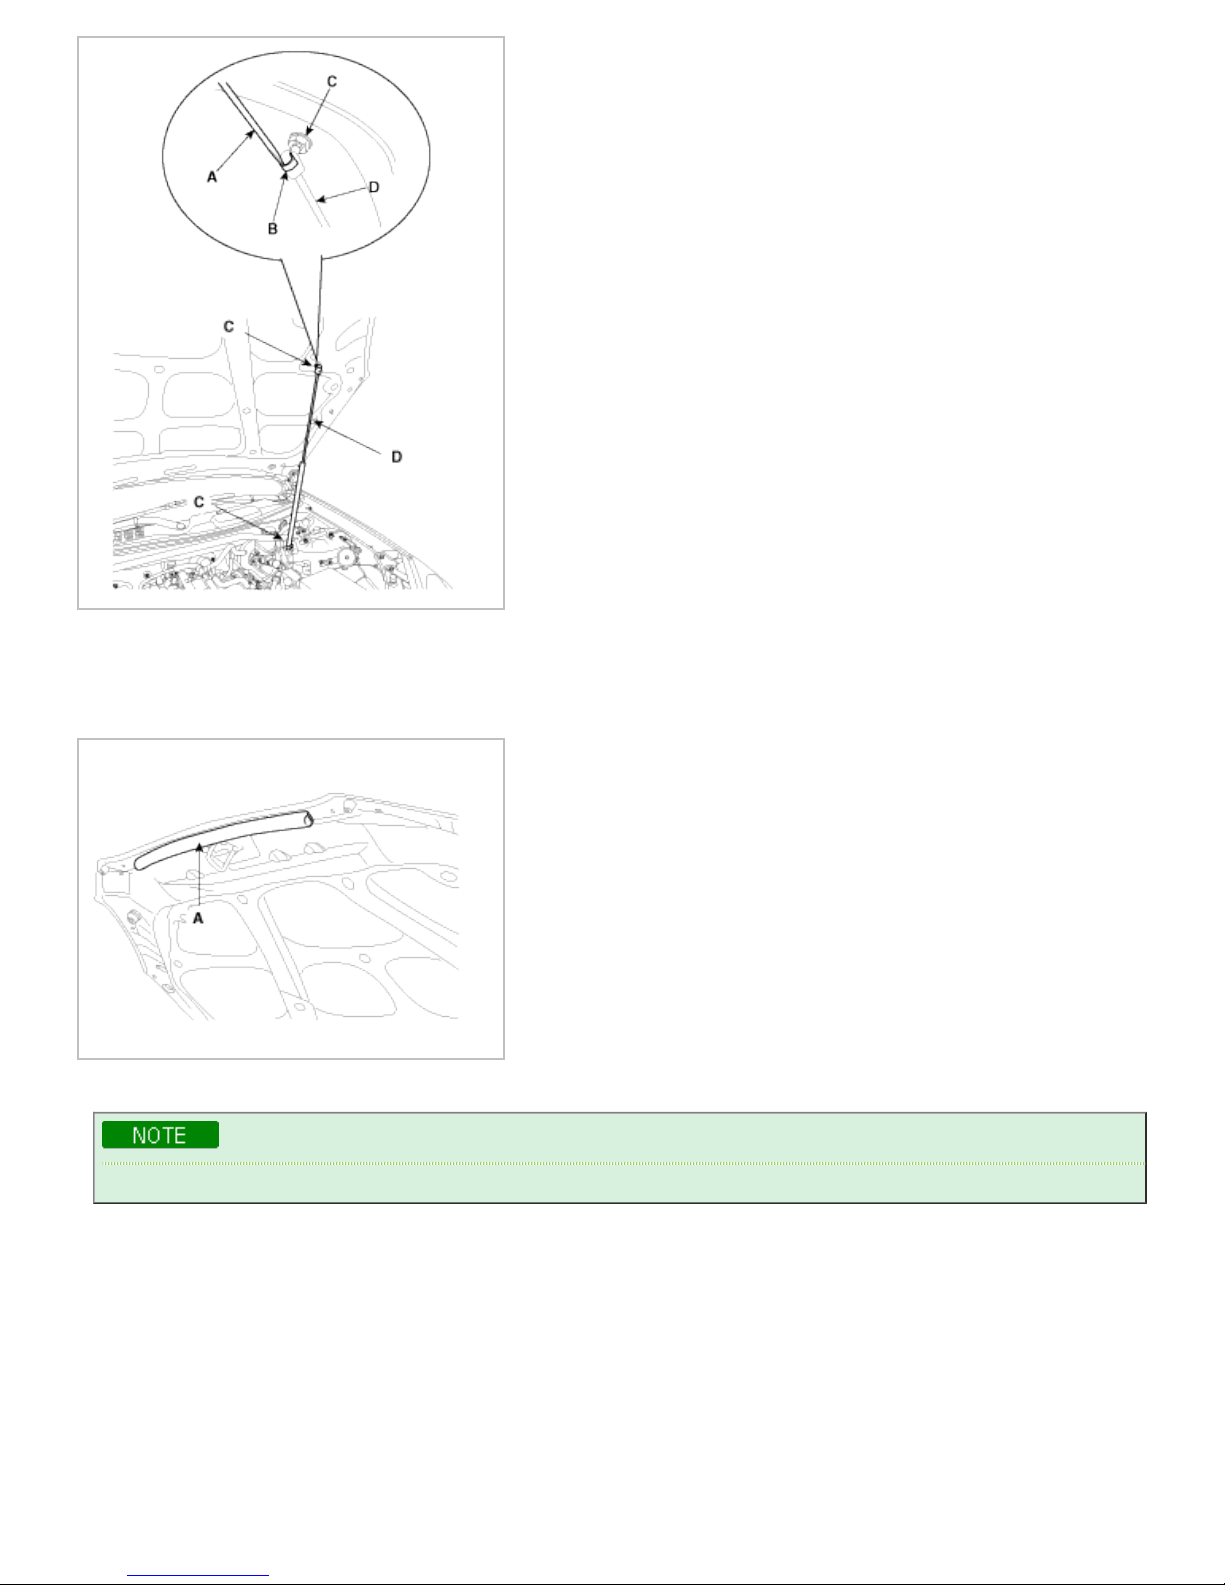
2. Installation is the reverse of removal.
Hood Seal Weatherstrip Replacement
1. Detach the clips, then remove the hood weatherstrip (A). Take care not to scratch the hood.
2. Installation is the reverse of removal.
• Replace any damaged clips.
Hood Weatherstrip Replacement
1. Detach the clips, then remove the hood weatherstrip (A). Take care not to scratch the hood.
 Loading...