

Page 1

MODEL NAME: AC1B0HGAN
Read the following safety cautions for your safety.
Please read the following safety matters for your safety. This User's Manual describes circumstances that may
inflict injury onto drivers and others with the following notations (Warning, Caution, Notice, Information).
Notations used within this User's Manual
Safety Warnings
Failure to observe the safety instructions within this category could result in serious injury or death.
Safety Cautions
Failure to observe the safety instructions within this category could result in accident related injuries or damage to the vehicle.
WARNING
• Possible Serious Injury or
Death
• Failure to observe safety
instructions in the 'Warning"
category could result in
serious injury or death.
CAUTION
• Possible Moderate or Minor
Injury
• Failure to observe safety
instructions in the "Caution"
category can result in
moderate or minor injury.
Information
• Additional information tips
and instructions are indicated
by this symbol (international
symbol for information).
NOTICE
• Possible vehicle damage
Failure to observe instructions
in the "Notice" category
could result in damage
to the vehicle.
Page 2

Before Use
Thank you for purchasing this Audio System.
This user's manual explains how to use the Audio System.
Before using the product, read the contents of this user's
manual carefully and use this product safely.
The screens shown in this manual may differ with the actual
screens of the product.
The design and specification of this product may change
without prior notification for product improvement.
When transferring the vehicle to another individual, include
this user's manual so that the next driver can continue its use.
If the temperature inside the vehicle is too high, open the
vehicle windows for ventilation before using your audio system.
When listening to music by connecting an external device
(USB/iPod, AUX), the device may become disconnected when
driving on unpaved roads if the connection state worsens due to
severe vibrations.
Some USB/iPod devices may not operate depending on the
manufacturer, method of manufacturer or recording method. In
such cases, continued use may lead to malfunctions.
When using the Bluetooth feature, supported options may
differ depending on the manufacturer and the mobile phone
model. (For more information on Bluetooth compatibility, refer to
the Hyundai Motor or Kia Motors website.)
®
iPod
®
iPod
Bluetooth
The Bluetooth
is a registered trademark of Apple Inc.
®
®
word mark and logos are registered trademarks
owned by Bluetooth SIG, Inc. and any use of such marks by
Hyundai/Kia is under license.
A Bluetooth
®
enabled cell phone is required to use Bluetooth
®
wireless technology.
HD Radio
TM
HD Radio Technology manufactured under license from iBiquity
Digital Corporation. U.S. and Foreign Patents. HD Radio™ and
the HD, HD Radio, and “Arc” logos are proprietary trademarks
of iBiquity Digital Corp.
2
Page 3

시작하기 전에
Thank you for purchasing this Audio System.
This user's manual explains how to use the Audio System.
Before using the product, read the contents of this user's
manual carefully and use this product safely.
The screens shown in this manual may differ with the actual
screens of the product.
The design and specification of this product may change
without prior notification for product improvement.
When transferring the vehicle to another individual, include
this user's manual so that the next driver can continue its use.
차내 온도가 높을 경우, 창을 열어 환기를 시킨 후 오디오를 동
작시켜 주십시오.
외부기기(USB/iPod, AUX)를 연결하여 음악을 들으며 비포장
도로를 운행할 때 차체 내에 심한 충격이 가해지면 연결상태(접
촉불량)가 나빠져서 연결이 해제되는 현상이 발생할 수 있습니다.
USB/iPod을 사용하실 경우에는 각 매체의 제조회사 및 제조방
법과 사용자의 녹음 방식에 따라 재생이 안될 수도 있습니다. 이
경우, 계속하여 사용하면 고장의 원인이 될 수 있습니다.
블루투스 기능을 사용하실 경우, 각 제조회사의 휴대폰 모델에
따라 지원되는 내용이 상이할 수 있습니다. (블루투스폰 호환성
관련 사항은 현대자동차 또는 기아자동차 홈페이지를 참조하십
시오.)
Basic
1
®
iPod
®
iPod
Bluetooth
The Bluetooth
owned by Bluetooth SIG, Inc. and any use of such marks by
Hyundai/Kia is under license.
A Bluetooth
wireless technology.
HD Radio
HD Radio Technology manufactured under license from iBiquity
Digital Corporation. U.S. and Foreign Patents. HD Radio™ and
the HD, HD Radio, and “Arc” logos are proprietary trademarks
of iBiquity Digital Corp.
is a registered trademark of Apple Inc.
Warnings and Cautions
®
®
TM
Component Names and Functions
®
word mark and logos are registered trademarks
enabled cell phone is required to use Bluetooth
®
3
Page 4

1 Basic
Warnings and Cautions
Safety Warnings
Do not stare at the screen while driving. Staring at the screen for
prolonged periods of time could lead to traffic accidents.
Do not disassemble, assemble, or modify the AVN system. Such acts
could result in accidents, fire, or electric shock.
Using the phone while driving may lead to a lack of attention of traffic
conditions and increase the likelihood of accidents. Use the phone
feature after parking th e ve hi cl e.
Heed caution not to spill water or introduce foreign objects into the
device. Such acts could lead to smoke, fire, or product malfunction.
Please refrain from use if the screen is blank or no sound can be
heard as these signs may indicate product malfunction. Cont inued use
in such conditions could lead to accidents(fires, electric shock) or
oduct malfunctions.
pr
Do not touch the antenna during thunder or lightening as
such acts may lead to lightning induced electric shock.
Do not stop or park in parking-restricted areas to operate
the product. Such acts could lead to traffic accidents.
Safety Cautions
Operating the device while driving could lead to accidents due to a
lack of attention to external surroundings. First park the vehicle before
operating the device.
Adjust the volume to levels that allow the driver to hear sounds from
outside of the vehicle. Driving in a state where external sounds cannot
be heard may lead to accidents.
Pay attention to the volume setting when turning the device on. A
sudden output of extreme volume upon turning the device on could
lead to hearing impairment. (Adjust the volume to a suitable levels
before turning off
the device.)
If you want to change the position of device installation, please inquire
with your place of purchase or service maintenance center. Technical
expertise is required to install or disassemble the device.
Turn on the car ignition before using this device. Do not operate the
Audio Video Navigation system for long periods of time with the
ignition turned off as such operations may lead to battery discharge.
Do not subject the device to severe shock or impact. Direct pressure
onto the front side of the monitor may cause damage to the LCD or
touch screen.
When cleaning the device, make sure to turn off the device and use a
dry and smooth clot h. Never use tough materials, chemical cloths, or
solvents (alcohol, benzene, thinners, etc.) as such materials may
damage the device panel or cause color/quality deterioration
Do not place beverages close to the audio system. Spilling beverages
may lead to system malfunction.
In case of product malfunction, please contact your place of purchase
or After Service center.
Page 5
1 Basic
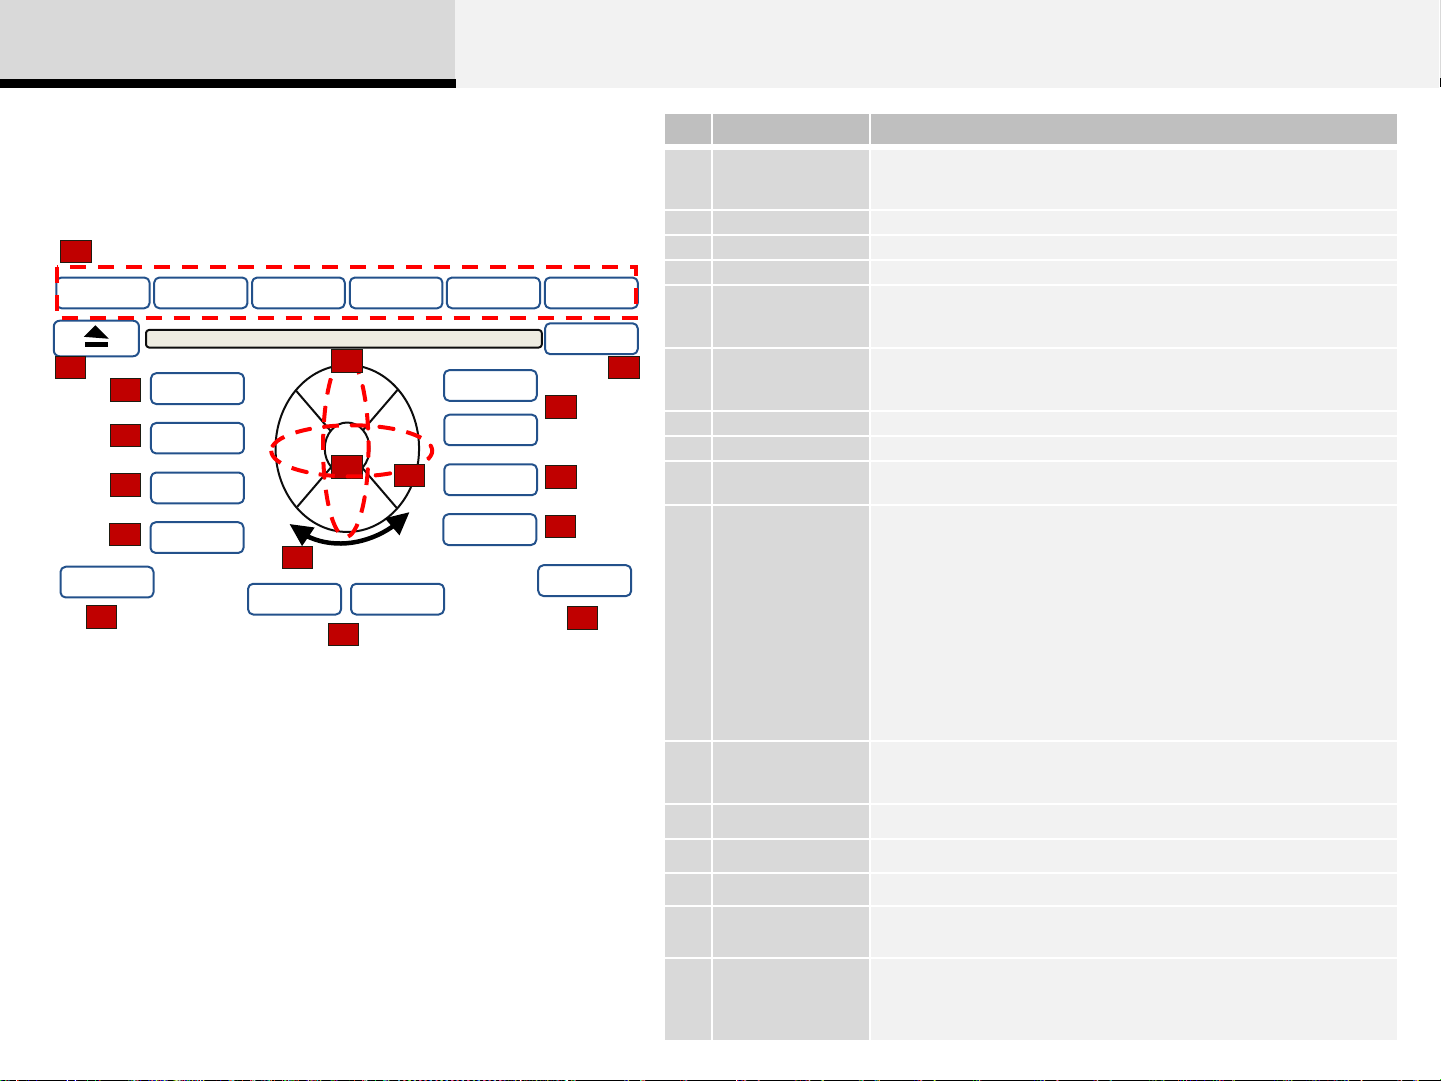
Component Names and Functions
Head Unit
1
1 RPT 2 RDM 3 4 5 6
2
RADIO
5
6
MEDIA
7
PHONE
13
MENU
PWR
4
15
TUNE
OK
9
TUNE
10
FOLDER
16
HD/CAT
8
VOLUME
SEEK TRACK
SEEK
TRACK
SCAN
SETUP
10
11
14
CLOCK
DISP
12
No. Name Description
Preset/ Repeat ·
1
Random
EJECT Press to insert or eject disc
2
Clock Displays the current time and date
3
PWR Press to turn power on/off
4
RADIO
5
3
MEDIA
6
PHONE Converts to Phone mode
7
VOL Knob Turn left/right to control volume
8
OK
9
SEEK(<)/TRACK(>)
10
SCAN
11
DISP Turns the monitor display on /off
12
MENU Displays supported Menus within each Mode
13
SETUP Converts to Setup mode
14
Tune
15
HD/CAT
16
FOLDER
• In Radio mode, saves a frequency or receives saved frequencies
• In MEDIA mode, press the [1] key to repeat and [2] key to play in
random order (shuffle)
• Converts to Radio (FM/AM/XM) mode
• Each time this key is pressed, the mode is changed in
order of FM1 → FM2 → AM → XM1 → XM2 → XM3 →
• Starts Media mode
• Each time this key is pressed, the mode is changed in
order of CD → USB(iPod) → AUX → My Music → BT Audio → CD
Used to select a setting/list/feature
Plays/Pauses or Selects menu
When [SEEK(<)/TRACK(>)] keys are pressed shortly(under 0.8
seconds)
• In FM/AM mode, plays previous/next frequency
• In CD/USB/iPod/My Music modes changes the track, file or chapter
When [SEEK(<)/TRACK(>)] keys are pressed shortly(over 0.8
seconds)
• In FM/AM mode, continuously changes the frequency until the key is
released and plays the current frequency.
• In CD/USB/iPod/My Music modes, rewinds or fast forwards the track or
file
• During a Handsfree call, controls the call volume
• In Radio mode, previews all receivable broadcasts for 5 seconds each
• In CD/USB/iPod/My Music mode, previews each song (file) for 10
seconds each
In FM/AM mode, turn to change broadcast frequencies
In CD, MP3, USB, and iPod modes, turn to search tracks/channels/files.
Within the mode menu displayed, moves menus focus to left/right
In CD/USB/MP3 modes, searches folders
In HD radio mode, changes channels
In XM radio mode, searches categories
Page 6
1장
기본
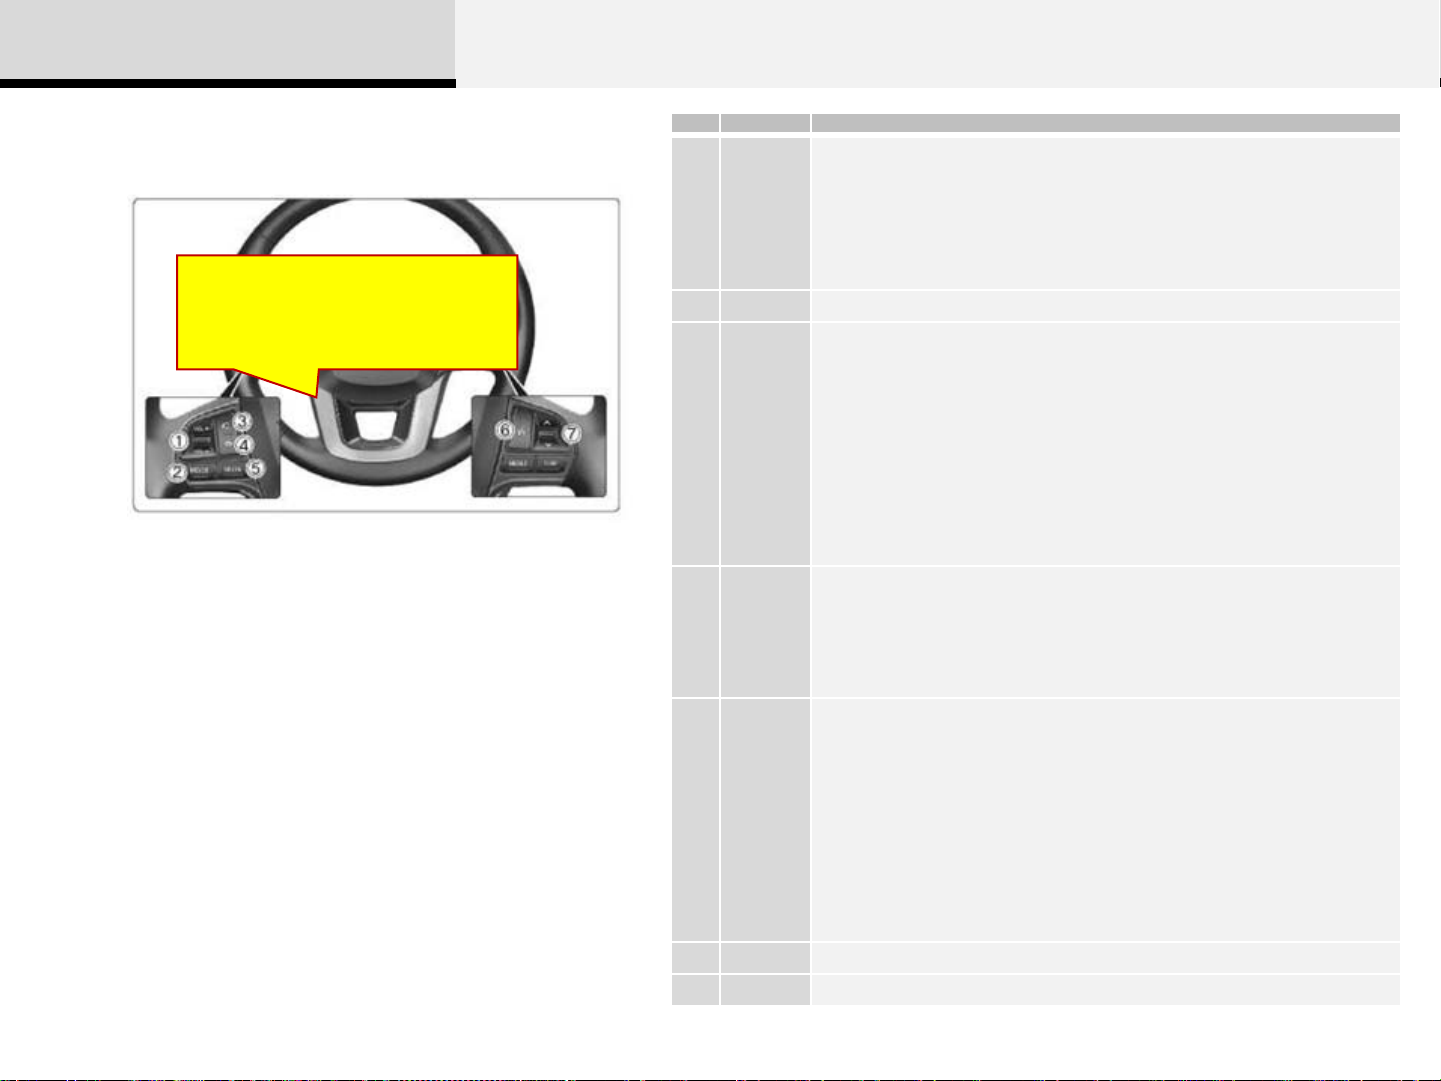
스티어링 리모트 컨트롤
HG 이미지로 교체 필요
No. Name Description
• Each time this key is pressed, the mode is changed in
order of FM1→ FM2→ AM→ XM1→ XM2 → XM3 → USB or iPod→AUX My Music
→BT Audio.
1 [MODE]
2 [VOL] Used to control volume
3 V, Λ
4
• If the media is not connected or a disc is not inserted,
corresponding m odes will be disabled.
• Press and hold the key (over 0.8 seconds) to turn the AV
system on/off
• When power is off, press the key to turn power back on
When, V, Λ keys are pressed shortly (under 0.8 seconds)
• In FM/AM mode, searches broadcast frequencies saved to
presets.
• In CD/USB/iPod/My Music/BT Audio modes, changes the
track, file or chapter.
When, V, Λ keys are pressed shortly (under 0.8 seconds)
• In FM/AM mode, automatically searches broadcast frequencies and channels
• In CD/USB/iPod/My Music/BT Audio modes, rewinds or fast
forwards the track or file
* BT Audio mode may not be supported in some mobile phones..
When pressed shortly (under 0.8 seconds)
• Starts voice recognition
• If pressed while receiving voice guidance, the guidance is continued and converts to
voice command waiting state
When pressed and held (over 0.8 seconds)
• Ends voice recognition
When pressed shortly (under 0.8 seconds)
• When pressed in the phone screen, displays call history screen
• When pressed in the dial screen, makes a call
• When pressed in the incoming call screen, answers the call
• When pressed during call waiting, switches to waiting call (Call Waiting)
5
6 Ends phone call
7 Mute Mutes audio volume
When pressed and held (over 0.8 seconds)
• When pressed in the Bluetooth® Handsfree wait mode,
redials the last call
• When pressed during a Bluetooth® Handsfree call,
switches call back to mobile phone (Private)
• When pressed while calling on the mobile phone, switches
call back to Bluetooth® Handsfree
• (Operates only when Bluetooth® Handsfree is connected)
6
Page 7

2
AV
Change Radio / Media Mode
FM/AM Mode
HD Radio Mode
XM Radio Mode
Audio CD Mode
MP3 CD Mode
USB Mode
iPod Mode
AUX Mode
My Music Mode
Bluetooth® Audio Mode
Page 8

2AV
Change Radio/Media Mode
Change Radio Mode Change Media Mode
Pressing the [RADIO] key will change the
operating mode in order of FM1 → FM2 → AM
→ XM1 → XM2 → XM3.
FM1
12:05
Radio
FM1
XM1 XM2
If [Mode Pop up] is turned on within [Setup] ▶
[Display], then pressing the [RADIO] key will
display the Radio mode pop up screen.
Use [Tune(Up)[,]Tune(Down)] and
[HD/CAT(Left)],[FOLDER(Right)] to move the
focus. Press the [OK] key to select.
Information
• If the [RADIO] key is pressed with the system
power off, then the power will turn on and the
most recently played broadcast will be played.
FM2 AM
XM3
Pressing the [MEDIA] key will change the
operating mode in order of CD USB(iPod)
AUX My Music BT Audio.
CD
12:05
Media
CD
My Music BT Audio
If [Mode Pop up] is turned on within [Setup] ▶
[Display], then pressing the [MEDIA] key will
display the Media mode pop up screen.
Use [Tune(Up)[,]Tune(Down)] and
[HD/CAT(Left)],[FOLDER(Right)] to move the
focus. Press the [OK] key to select.
Information
• If the [MEDIA] key is pressed with the system
power off, then the power will turn on and the
most recently played media will be played.
• The media mode pop up screen can be
displayed only when there are two or more
media modes turned on.
USB AUX
Page 9
2AV
FM/AM Mode
Basic Mode Screen
FM1
1
FM1
2
87.5
MENU
12:05
P1
3
4
12:05
No. Name Description
Mode
1
2 Frequency Currently playing frequency
3 Preset Displays currently playing preset number [1] ~ [6]
4 MENU Displays Radio menus
5 Preset Displays saved presets
6 Info Displays broadcast information
7 HD ▶ Changes HD channels
8 A.Store
Display
Displays currently operating mode
Automatically saves frequencies with superior
reception to Preset buttons
87.5
2 Info1 Preset
MENU
3 HD ▶
5 6 7 8
P1
4 A.Store
Page 10
2AV
HD Radio Mode
Basic Mode Screen
HD1
HD 1 2 3 4 5 6 7 8
5
1
6
2 7
HD1
HD 1 2 3 4 5 6 7 8
Album Name
Artist Name
Song Title
Album Name
Artist Name
Song Title
87.6
KWVEEE
MENU
12:05
3
P5
4
No. Name Description
1 Mode Display Displays currently operating mode
2 Frequency Currently playing frequency
3 Preset Displays currently playing preset number [1] ~ [6]
4 MENU HD Displays Radio menus
5 HD Channel
Song
6
Information
Displays information for the currently pl aying HD
broadcast
Displays the album, artist, and title information
12:05
HD Radio
7
Broadcast
Station
8 Preset Displays saved presets
9 Info Displays broadcast information
Displays the HD Radio broadcast station name
8 9
87.6
KWVEEE
MENU
10
11
10 HD▶ Changes to HD Radio broadcast
3 HD ▶ 4 A.Store2 Info1 Preset
11 A.Store
Automatically saves frequencies with superior
reception to Preset buttons
Page 11
2AV
XM Radio Mode
Basic Mode Screen
XM1
XM1
1
2
Category Name
194. Channel Name
1-888-539-SIRIUS
1-888-539-SIRIUS
4
MENU
3
12:05
P2
No. Name Description
1 Mode Display
Channel
2
Information
3 Preset
4 MENU XM Displays Radio menus
5 Preset Displays saved presets
Displays currently operating mode
Displays the category, channel number,
channel name, artist and title information
Displays currently playing preset number [1] ~
[6]
12:05
Category Name 1
185 Channel Name
Artist Name
Song Title
5
MENU
1 Preset
Page 12

2 AV
Using Auto Store
Press the [SEEK(<)],[TRACK(>)] keys to
play the previous/next frequency.
Using TUNE
Press the [Tune(Up)], [Tune(Down)] keys
to select the frequency.
• FM : Increases/decreased by 200kHz
• AM : Increases/decreased by 9kHz
Selecting Presets
Press the [MENU] key ▶ Select [Preset]
FM1
12:05
91.3
87.6
KWVEEE
MENU
3 HD ▶ 4 A.Store2 Info1 Preset
FM1
87.5 1
88.1 2
98.1 3
91.3
12:05
4 104.1
5 108.1
6 104.1
MENU
The 6 preset buttons are displayed.
Press the [1] ~ [6] keys to play the desired
preset.
Page 13

2AV
Saving Presets Scan
FM1
87.5 1
88.1 2
98.1 3
After selecting frequency ▶ Press and
hold the desired preset button from [1] ~
[6].
A 'beep' will sound and the frequency is
saved to the selected preset button.
91.3
MENU
12:05
4 104.1
5 108.1
6 104.1
Auto Store
After pressing the [MENU] ▶ Select the
[A.Store] button to automatically save
receivable frequencies to Preset buttons.
FM1
SCAN
12:05
88.1
MENU
Press the [SCAN] key to scan all radio
frequencies.
Press and hold the [SCAN] key (over 0.8
seconds) to scan preset buttons.
Scan All (Icon) : Scans frequencies with
superior reception for 5 seconds each
Preset Scan (Icon) : Scans broadcasts
saved to presets for 5 seconds each
A total of 18 frequencies with six preset
frequencies each for FM1/FM2/AM modes
can be saved
Information
• While Auto Store is operating, pressing
the Auto Store button again will cancel the
function and play the previous frequency.
During Scan, pressing the [SCAN] key
again will cancel the scan operation and
restore the previously played frequency.
Page 14
2 AV
HD Radio
Program Service Data: Contributes to the
superior user experience of HD Radio
Technology. Presents song name, artist,
station IDs, HD2/HD3 Channel Guide, and
other relevant data streams.
TM
Technology
Listening to HD RadioTM Stations
HD Radio Technology is a digital radio
technology used by AM and FM radio
station to transmit audio and data via a
digital signal in conjunction with their
analog signals.
FM1
HD 1 2 3 4 5 6 7 8
Album Name
Artist Name
Song Title
87.6
KWVEEE
MENU
12:05
P5
1. While listening to the radio, the HD
Radio icon will become displayed if
receiving an HD Radio broadcast.
Changing HD stations
FM1
HD 1 2 3 4 5 6 7 8
Album Name
Artist Name
Song Title
87.6
KWVEEE
MENU
3 HD ▶ 4 A.Store2 Info1 Preset
Press the [MENU] key ▶ Select [HD ▶]
▶ Select [Folder]
The HD Radio Station can be changed.
Viewing FM/AM Station Information
FM1
Information
12:05
12:05
#/#
Adjacent to traditional main stations are extra
local FM channels. These HD2/HD3 Channels
provide new, original music as well as deep
cuts into traditional genre.
Digital, CD-quality sound. HD Radio
Technology enables local radio stations to
broadcast a clean digital signal. AM sounds
like today’s FM and FM sounds like a CD.
Album Name
Artist Name
Song Name
Close
Press the [MENU] key ▶ Select [Info]
When listening to a HD Radio station, you
will be able to view station information
Page 15
2 AV
XM Radio Mode
Features of your vehicle
Satellite of your vehicle
You may experience difficulties in
receiving XM™ satellite radio signals in
the following situations.
• If you are driving on a mountain road
where is the signal blocked by mountains.
• If you are driving in an area with tall
trees that block the signal (30 ft./10m or
more). For example on an road that goes
through a dense forest.
• The signal can become weak in some
areas that are not covered by the XM™
repeater network.
NOTE:
There may be other unforeseen circumstances
leading to reception problems with the XM™
satellite radio signal
• If You are driving in a tunnel or a
covered parking area.
• If you are driving beneath the top level of
a multi-level freeway.
• If you are driving under a bridge.
• If you are driving next to a tall vehicle
(such as a truck or a bus) that blocks the
signal.
• If you are driving in a valley where the
surrounding hills or peaks block the signal
from the satellite
Page 16
2 AV
Using Seek
Press the [SEEK(<)],[TRACK(>)] keys to
play the previous/next channel.
❈ If the “Category” icon is displayed,
channels are changed within the current
category
Using Tune
Press the [Tune(Up)], [Tune(Down)] keys
to search all channels.
Searching Categories
Select the category by using the
[Folder(Left)], [Folder(Right)] keys and
press the [OK] key to select.
XM1
Category
▶ All Category
12:05
1/3
Selecting Presets
Press the [MENU] key ▶ Select [Preset]
XM1
Category Name 1
185 Channel Name
Artist Name
Song Title
MENU
1 Preset
XM1
77 1
87 2
95 3
Category Name 1
185 Channel Nam
Artist Name
Song Title
MENU
The 6 preset buttons are displayed.
Press the [1] ~ [6] keys to play the desired
preset.
12:05
12:05
4 103
5 128
6 145
Saving Presets
XM1
77 1
87 2
95 3
Category Name 1
185 Channel Nam
Artist Name
Song Title
MENU
After selecting the channel ▶ Press and
hold the desired preset [1]~[6] key.
A ‘beep’ will sound and the frequency is
saved to the selected channel is saved as
a preset.
12:05
4 103
5 128
6 145
Category Name 1
Category Name 2
MENU :
Channels for the selected category are
played.
Page 17

2 AV
Scan
XM1
SCAN
Category Name
194. Channel Name
1-888-539-SIRIUS
1-888-539-SIRIUS
MENU
12:05
Press the [SCAN] key to scan all channels
with superior reception for 5 seconds each.
Once scan is complete, the previously
played channel will be restored.
During Scan, pressing the [SCAN] key
again will cancel the scan operation and
restore the previously played channel.
If the “Category” icon is displayed,
channels are changed within the current
category.
Page 18

2 AV
Audio CD Mode
Precautions upon handling discs
• This device has been manufactured to be compatible with
software bearing the following logo marks.
• Do not clean discs with chemical solutions, such as record
sprays, antistatic sprays, antistatic liquids, benzene, or thinners.
• After using a disc, put the disc back in its original case to
prevent disc scratches.
• Hold discs by their edges or within the center hole to prevent
damages to disc surfaces.
• Do not to introduce foreign substances into the disc
insert/eject slot. Introducing foreign substances could damage
the device interior.
• Do not insert two discs simultaneously.
• When using CD-R/CD-RW discs, differences in disc reading
and playing times may occur depending on the disc
• The use of CD-R/CD-RW discs attached with labels may
result in disc slot jams or difficulties in disc removal. Such discs
may also result in noise while playing.
• Some CD-R/CD-RW discs may not properly operate
depending on the disc manufacturer, production method and
the record method as used by the user. If problems persist,
trying using a different CD as continued use may result in
malfunctions.
• The performance of this product may differ depending on the
CD-RW Drive Software.
• Copy-protected CDs such as S-type CDs may not function in
the device. DATA discs cannot be played.. (However, such
discs may still operate but will do so abnormally.)
• Do not use abnormally shaped discs (8cm, heart-shaped,
octagon-shaped) as such discs could lead to malfunctions.
• If the disc is straddled on the disc slot without removal for 10
seconds, the disc will automatically be re-inserted into the disc
manufacturer, production method and the recording method as
used by the user.
•Clean fingerprints and dust off the disc surface (coated side)
with a soft cloth.
• When playing CD-R/CD-RW discs with labels,
player.
• Only genuine audio CDs are supported. Other discs may
result in recognition failure (e.g. copy CD-R, CDs with labels)
Page 19

2 AV
MP3 File Information
• Supported Audio Formats
File
System
Audio
Compress
ion
※ File formats that do not comply with the
above formats may not be properly recognized
or play without properly displaying file names
or other information.
ISO 9660 Level 1
ISO 9660 Level 2
Romeo / Juliet (128문자)
MPEG1 Audio Layer3
MPEG2 Audio Layer3
MPEG2.5 Audio Layer3
Windows Media Audio Ver 7.X & 8.X
• Support for Compressed Files
1. Supported Bitrates (Kbps)
2. Sampling Frequencies (Hz)
MPEG1 MPEG2 MPEG2.5 WMA
44100 22050 11025 32000
48000 24000 12000 44100
3000 16000 8000 48000
- For MP3/WMA compression files, differences
in sound quality will occur depending on the
bitrate.
(Higher sound quality can be experienced
with higher bitrates.)
- This device only recognizes files with
MP3/WMA extensions. Other file extensions
may not be properly recognized.
3. Maximum number of recognized folders and
files
- Folder : 255 folders for CD, 2,000 folders for
USB
- File : 999 files for CD, 6,000 files for USB
- There are no limitations to the number of
recognized folder levels
• Language Support (Unicode Support)
1. Korean: 2,604 characters
2. English: 94 characters
3. Special characters and Symbols : 986
characters
※ Langua ge s other than Korean and English
(including Chinese) are not included.
4. Text Display (Based on Unicode)
- File name: Maximum 128 English characters
(64 Korean characters)
- Folder name: Max 64 English characters (32
Korean characters)
※ Using the scroll feature allows you to see
the entire name of files with names that are too
long to be displayed at once.
Page 20

2 AV
• Compatibility by Disc Type
1. Playing MIXED CDs: First plays the audio CD, then plays the
compressed file(s),
2. Playing EXTRA CDs: Plays in order of sessions.
3. Playing multisession CDs: Plays in order of sessions
- MIXED CD
: CD type in which both MP3 and audio CD files are recognized in one
disc.
- Multisession CD
CD type that includes more than two sessions.
Different from Extra CDs, multisession CDs are recorded by sessions
and have no media limitation.
• Precautions upon Writing CDs
1.In all cases except when creating multisession discs, also opt to
close session when writing a CD. While product malfunctions will not
occur, some time may be required for the device to check whether the
session state (approximately 25 seconds). Additional reading time may
also be necessary depending on the number of folders or files.)
2. Changing the MP3/WMA file extensions or changing files of other
extensions to MP3/WMA may result in product malfunction.
3. When naming files with MP3/WMA file extensions, write
using only Korean and English. (Languages other than
Korean and English are not supported and are displayed as
blank.)
4. Unauthorized use or duplication of music files are
prohibited by law.
5. Prolonged use of CD-R/CD-RW discs that do not satisfy
related standards and/or specifications could result in
product malfunction.
Page 21
2 AV
Basic Mode Screen
1
2
No. Name Description
1 Mode Displays currently operating mode
Operation
2
State
3
3
Track
Information
From Repeat/Shuffle/Scan, displays the
currently operating function
Displays information about the current track
4 Play State Displays the play/pause state
4
6
5
5 Play Time
Displays the current play time and total play
time
6 MENU Displays the Audio CD Menu
7 Repeat Repeats the current track
8 Shuffle Plays disc tracks in random order
9 List Moves to the list screen
7 8
10 Info shows track info, artist and album info
9
10
Page 22

2 AV
Play/Pause Changing Tracks
Once an audio CD is inserted, the mode
will automatically start and begin playing.
While playing, press the [OK] key to
pause and press again to play.
Information
• Only genuine audio CDs are supported.
Other discs may result in recognition
failure (e.g. copy CD-R, CDs with labels)
• The artist and title information are
displayed on the screen if track
information is included within the audio
CD.
Press the [SEEK(<)], [TRACK(>)] keys to
change tracks.
Information
• Pressing the [SEEK(<)] key after the
track has been playing for 3 seconds will
start the current track from the beginning.
• Pressing the [SEEK(<)] key before the
track has been playing for 3 seconds will
start the previous track.
Selecting from the List
Press the [Tune(Up)], [Tune(Down)] keys
to search and select for the desired track.
Once you find the desired track, press the
[OK] key to start playing.
Rewinding / Fast-forwarding Tracks
While playing, press and hold the
[SEEK(<)], [TRACK(>)] keys (over 0.8
seconds) to rewind or fast-forward the
current track.
Page 23

2 AV
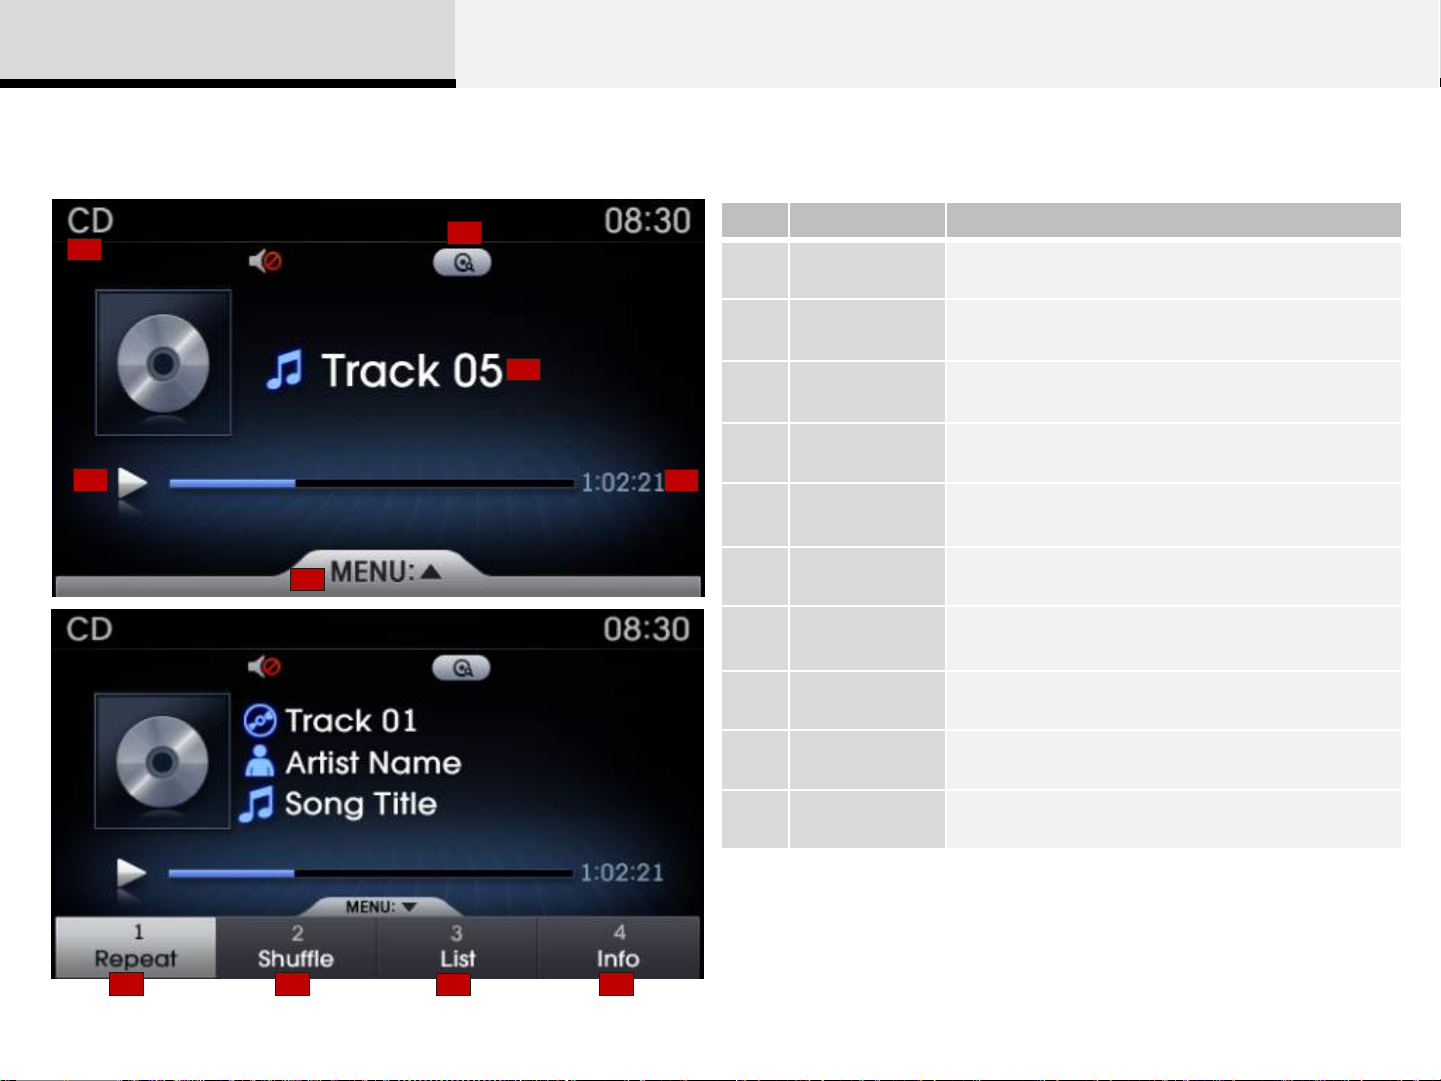
Audio CD Menu
If you press the [MENU] key, you will have
access to the Repeat, Shuffle, List and
Info features.
Repeat
Press the [MENU] key▶ Select [Repeat]
Repeat (Icon) : Repeats the currently
playing track
Shuffle
List
Press the [MENU] key ▶ Select [List]
Press the [Tune(Up)], [Tune(Down)] keys
to search for the desired track and press
the [OK] key to select.
Info
Press the [MENU] key ▶ Select [Info]
CD
12:05
Scan
Press the [SCAN] key to play the first 10
seconds of each track.
Press the [MENU] key ▶ Select [Shuffle]
Shuffle (Icon) : Plays tracks in random
order
Information
• The [1], [2] keys are shortcut keys to
set the Repeat and Shuffle features.
Close
SCANMUTE
Information
▤ No Disc Artist
Folder name
▤ No Disc Title
File name_01
Shuffle Repeat CopyInfo
Details for the currently playing track are
displayed.
Page 24

2 AV
MP3 CD Mode
Basic Mode Screen
CD
5
CD
1
2
Folder name
File name_01
REPEAT
4
12:05
FILE
3
101
No. Name Description
1 Mode Displays currently operating mode
Operation
2
State
3 File Index Displays t he total number of files
4 File Info Displays information about the current file
From Repeat/Shuffle/Scan, displays the currently
operating function.
6
5 Play State Displays the play/pause state
6 Play Time Displays the current play time
7 MENU Displays the CD MP3 Menu
MENU
00:01
7
12:05
Repeats the current file (each time the button is
Folder name
File name_01
REPEAT
FILE
101
8 Repeat
9 Shuffle
10 List Moves to the list screen
pressed, changes in order of Repeat Once →
Repeat Folder → Off).
Plays files in random order (each time the button
is pressed, changes option in order of Shuffle
Folder → Shuffle All → Off)
00:01
MENU
3 List2 Shuffle 4 Info1 Repeat 5 Copy
8
9
10 11
12
11 Info Displays additional information for the current file
12 Copy Copies the currently playing file to My Music
Page 25

2 AV
Play/Pause
• Once an MP3 disc is inserted the mode
will automatically start and being playing.
While playing, press the [OK] key to
pause and press again to play.
Information
If there are numerous songs and folders
within the disc, reading time could take
more than 10 seconds and the list may
not be displayed or song searches may
not operate. Once loading is complete,
try again.
Selecting MP3 files
Press the [SEEK(<)], [TRACK(>)] keys to
select the previous or next file.
Information
• Pressing the [SEEK(<)] key after the
file has been playing for 3 seconds will
start the current file from the beginning.
• Pressing the [SEEK(<)] key before the
file has been playing for 3 seconds will
start the previous file.
Selecting from the List
Press the [Tune(Up)], [Tune(Down)] keys
to search and select for the desired files.
CD
Current folder name
File name
▶ File name_01
12:05
1/3
Rewinding / Fast-forwarding Files
While playing, press and hold the
[SEEK(<)], [TRACK(>)] keys (over 0.8
seconds) to rewind or fast-forward the
current file.
Searching Folders
[Select the folder by using the
[HD/CAT(Left)], [Folder(Right)] keys and
press the [OK] key to select.
The first file within the selected folder will
begin playing.
File name
MENU : Back
Once you find the desired file, press the
[OK[ button to start playing.
Page 26

2 AV
MP3 CD Menu
If you press the [MENU] key, you will have
access to the Repeat, Shuffle, List, Info
and Copy features.
Repeat
Press the [MENU] key ▶ Select [Repeat]
Each time the button is pressed, the feature
changes in order of Repeat Once → Repeat
Folder → Off
Repeat Once (Icon) : Repeats the currently
playing file.
Repeat Folder (Icon) : Repeats all files
within the current folder.
Shuffle
Press the [MENU] key ▶ Select [Shuffle]
Each time the button is pressed, the
feature changes in order of Shuffle Folder
→ Shuffle All → Off
Folder Shuffle (Icon) : Plays all files within
the current folder in random order.
Shuffle All (Icon) : Plays all files in random
order.
Information
• The [1], [2] keys are shortcut keys to set
the Repeat and Shuffle features.
List
Press the [MENU] key ▶Select [List]
CD
Current folder name
File name
▶ File name_01
File name
MENU : Back
12:05
1/3
Play Information
Press the [MENU] key ▶ select [Info]
Details for the currently playing file are
displayed.
Information
• When the folder name/file name are set
as the default display within Display setup,
the album name/artist/file name
information are displayed as detailed file
information.
• When the album name/artist/file name
are set as the default display, the folder
name/file name are displayed as detailed
file information.
Caution
• The title, artist and album info are
displayed only when such information is
recorded within the MP3 file ID3 tag.
Press the [Tune(Up)], [Tune(Down)] keys
to search for the desired file and press the
[OK] key to select.
Page 27

2AV
Copying Files
Press the [MENU] key ▶ select [Copy]
The currently playing file is copied into My
Music.
Information
• Selecting another feature while
copying is in progress will display a popup asking whether you wish to cancel
copying. To cancel, select 'Yes'.
Scan
Press the [Scan] key to play the first 10
seconds of each file.
Page 28

2AV
USB Mode
Before playing a USB MP3
• Connect the USB device after turning on
the engine. The USB device may become
damaged if it is already connected when
the ignition is turned on.
• The USB device may not operate
properly if the car ignition is turned on or
off with the USB device connected.
• Heed caution to static electricity when
connecting/disconnecting USB devices.
• Encoded MP3 Players will not be
recognized when connected as an
external device.
• When connecting an external USB
device, the device may not properly
recognize the USB is in some states.
• Only products formatted with
byte/sectors under 64Kbyte will be
recognized.
• This device recognizes USB devices
formatted in FAT 12/16/32 as well as
NTFS file systems.
• Some USB devices may not be
supported due to compatibility issues.
• Avoid contact between the USB
connector with bodily parts or foreign
objects.
• Avoid contact between the USB
connector with bodily parts/foreign objects.
• Repeated connecting/disconnecting of
USB devices within short periods of time
may result in product malfunction.
• A strange noise may occur when
disconnecting the USB.
• Make sure to connect/disconnect
external USB devices with the audio
power turned off..
• The amount of time required to
recognize the USB device may differ
depending on the type, size or file formats
stored in the USB. Such differences in
time are not indications of malfunctions.
• The device only supports USB devices
used to play music files.
• Do not use the USB I/F to charge
batteries or USB accessories that
generate heat. Such acts may lead to
worsened performance or damage to the
device.
•The device may not recognize the USB
device if separately purchased USB hubs
and extension cables are being used.
Connect the USB directly with the
multimedia terminal of the vehicle.
• When using mass storage USB devices
with separate logical drives, only files
saved to the root drive can be played.
• Files may not properly operate if
application programs are installed to the
USBs.
• The device may not operate normally if
MP3 Players, cellular phones, digital
cameras, or other electronic devices (USB
devices not recognized as portable disk
drives) are connected with the device.
• Charging through the USB may not work
for some mobile devices.
• USB images and videos are not
supported.
• The device may not support normal
operation when using a USB memory type
besides (Metal Cover Type) USB Memory.
Page 29

2AV
• The device may not support normal
operation when using formats such as
HDD Type, CF, or SD Memory.
• The device will not support files locked
by DRM (Digital Rights Management.)
• USB memory sticks used by connecting
an Adaptor (SD Type or CF Type) may
not be properly recognized.
•The device may not operate properly
when using USB HDDs or USBs subject
to connection failures caused by vehicle
vibrations. (e.g. i-stick type)
• Avoid use of USB memory products that
can also be used as key chains or mobile
phone accessories. Use of such products
may cause damage to the USB jack.
Plug type connector
Page 30

2 AV
Basic Mode Screen
USB
5
USB
1
Folder name
File name_01
Folder name
File name_01
MENU
REPEAT
4
7
REPEAT
12:05
2
FILE
101
3
00:01
6
12:05
FILE
101
00:01
No. Name Description
1 Mode Displays currently operating mode
Operation
2
State
3 File Index Displays t he total number of files
4 File Info Displays information about the current file
5 Play State Displays the play/pause state
6 Play Time Displays the current play time
7 MENU Displays USB Menu
8 Repeat
9 Shuffle
10 List Moves to the list screen
From Repeat/Shuffle/Scan, displays the currently
operating function.
Repeats the current file (each time the button is
pressed, changes in order of Repeat Once →
Repeat Folder → Off).
Plays files in random order (each time the button
is pressed, changes option in order of Shuffle
Folder → Shuffle All → Off)
MENU
3 List2 Shuffle 4 Info1 Repeat 5 Copy
8
9
10 11
12
11 Info Displays additional information for the current file
12 Copy Copies the currently playing file to My Music
Page 31

2AV
Play/Pause
Once a USB is connected, the mode will
automatically start and begin playing.
12:05USB
REPEAT
Folder name
File name_01
MENU
While playing, press the [OK] key to
pause and press again to play.
Information
• Loading may require additional time if
there are many files and folders within
the USB and result in faulty list display
or file searching. Normal operations will
resume once loading is complete.
• The device may not support normal
operation when using a USB memory
type besides (Metal Cover Type) USB
Memory.
FILE
00:01
101
Changing Files
[Press the [SEEK(<)], [TRACK(>) ] key s to
select the previous or next file.
Information
• Pressing the [SEEK(<)] key after the
file has been playing for 3 seconds will
start the current file from the beginning.
• Pressing the [SEEK(<)] key before the
file has been playing for 3 seconds will
start the previous file.
Selecting from the List
Press the [Tune(Up)], [Tune(Down)] keys
to search and select desired files.
USB
Current folder name
File name
▶ File name_01
File name
MENU : Back
12:05
1/3
Rewinding / Fast-forwarding Files
While playing, press and hold the
[SEEK(<)], [TRACK(>)] keys (over 0.8
seconds) to rewind or fast-forward the
current file.
Searching Folders
Select the folder by using the
[HD/CAT(Left)], [Folder(Right)] keys and
press the [OK] key to select.
The first file within the selected folder will
begin playing.
Once you find the desired file, press the
[OK[ key to start playing.
Page 32

2AV
USB Menu
If you press the [MENU] key, you will have
access to the Repeat, Shuffle, List, Info
and Copy features.
Repeat
Press the [MENU] key ▶ Select [Repeat]
Each time the button is pressed, the
feature changes in order of Repeat Once
→ Repeat Folder → Off
Repeat (Icon) : Repeats the currently
playing file.
Folder Repeat (Icon) : Repeats all files
within the current folder.
Shuffle
Press the [MENU] key ▶ Select [Shuffle]
Each time the button is pressed, the
feature changes in order of Shuffle Folder
→ Shuffle All → Off
Folder Shuffle (Icon) : Plays the files in the
current folder in random order.
Shuffle All (Icon) : Plays all files in random
order.
Information
• The [1], [2] keys are shortcut keys to
set the Repeat and Shuffle features.
List
Press the [MENU] key ▶Select [List]
USB
Current folder name
File name
▶ File name_01
File name
12:05
1/3
Play Information
Press the [MENU] key▶ Select [Info]
Details for the currently playing file are
displayed.
Information
• When the folder name/file name are set
as the default display within Display setup,
the album name/artist/file name
information are displayed as detailed file
information.
• When the album name/artist/file name
are set as the default display, the folder
name/file name are displayed as detailed
file information.
Caution
• The title, artist and album info are
displayed only when such information is
recorded within the MP3 file ID3 tag.
MENU : Back
Press the [Tune(Up)], [Tune(Down)] keys to
search for the desired file and press the [OK]
key to select.
Page 33

2AV
Copying Files
Press the [MENU] key ▶ Select [Copy]
The currently playing file is copied into My
Music.
Information
• Selecting another feature while copying
is in progress will display a pop-up asking
whether you wish to cancel copying. To
cancel, select 'Yes'.
Scan
Press the [SCAN] key to play the first 10
seconds of each file.
Page 34

2
AV
iPod Mode
Using iPod Devices
iPod is a registered trademark of Apple Inc.
• In order to use the iPod while operating the
keys, you must use a dedicated iPod cable.
(the cable that is supplied when purchasing
iPod/iPhone products)
• During ACC ON state, connecting the iPod
through the iPod cable (the cable that is
supplied when purchasing iPod/iPhone
products), will charge the iPod through the
head unit.
• When connecting with the iPod cable, make
sure to fully insert the jack to prevent
communication interference.
• When the EQ features of an external device,
such as the iPod, and the audio system are
both active, EQ effects could overlap and
cause sound deterioration and distortion.
Whenever possible, turn off the EQ feature
within the external device upon use by
connecting with the audio system.
• Noise may occur when an iPod or AUX
device is connected. When such devices are
not being used, disconnect the device for
storage.
• When the iPod or AUX device power is
connected to the power jack, playing the
external device may result in noise. In such
cases, disconnect the power connection
before use.
• Skipping or improper operation may occur
depending on the characteristics of your
iPod/Phone device.
• If your iPhone is connected to both the
Bluetooth and USB, the sound may not be
properly played.
• In your iPhone, select the Dock connector or
Bluetooth to change the sound output (source).
iPod mode cannot be operated when the iPod
cannot be recognized due to the playing of
versions that do not support communication
protocols, cases of iPod abnormalities and
defects. .
• For fifth generation iPod Nano devices,
the iPod may not be recognized when the
battery level is low. Please charge the iPod for
use.
• Search/play orders shown within the iPod
device may differ with the orders shown within
the Audio Video Navigation system.
• If the iPod malfunctions due to an iPod
device defect, reset the iPod and try again. (To
learn more, refer to your iPod manual)
• In order to play the iPod by operating the
keys, you must use the dedicat e d iPo d cabl e
(the cable that is supplied when purchasing
iPod/iPhone products).
※ During ACC ON state, connecting the iPod
through the iPod cable (the cable that is
supplied when purchasing iPod/iPhone
products), the iPod will be charged through the
head unit.
• When connecting with the iPod cable, make
sure to fully insert the jack to prevent
communication interference. If the iPod is
connected to the vehicle while it is playing, a
high pitch sound could occur for approximately
1-2 seconds immediately after connecting. If
possible, connect the iPod to the vehicle with
the iPod stopped/paused.
• Within the iPhone, the streaming audio
feature and iPod control features may conflict.
If problems persist, remove the iPhone and
connect again.
• Some iPods may not sync with the System
depending on its version. If the Media is
removed before the Media is recognized, then
the system may not properly restore the
previously operated mode. (iPad charging is
not supported.)
Page 35

2AV
Basic Mode Screen
iPod
5
1
REPEAT
Album Name
Artist Name
Song Title 01
4
MENU
7
2
12:05
1/10000
3
6
00:01
No. Name Description
1 Mode Displays currently operating mode
Operation
2
State
3 Song Index Displays current song/total songs
Song
4
Information
5 Play State Displays the play/pause state
6 Play Time Displays the current play time
7 MENU Displays the iPod Menu
8 Repeat Turns on the Repeat feature
9 Shuffle
From Repeat/Shuffle, displays the currently
operating function
Displays information about the current file
Plays files in random order (each time the button
is pressed, changes option in order of Shuffle
Category → Shuffle Album → Off)
10 List Moves to the list screen
8
9
10
Page 36

2AV
Play/Pause
Once an iPod is connected, the mode will
automatically start and begin playing.
iPod
REPEAT
Album Name
Artist Name
MENU
Song Title 01
While playing, press the [OK] key to
pause and press again to play.
Information
• Some iPods with unsupported
communication protocols may not properly
operate in the Audio Video Navigation
system.
12:05
1/10000
00:01
Changing Songs
[Press the [SEEK(<)], [TRACK(>) ] key s to
select the previous or next file.
Information
• Pressing the [SEEK(<)] key after the
song has been playing for 3 seconds will
start the current song from the beginning.
• Pressing the [SEEK(<)] key before the
song has been playing for 3 seconds will
start the previous song.
• Slight time differences may exist
depending your iPod product.
Rewinding / Fast-forwarding Songs
While playing, press and hold the
[SEEK(<)], [TRACK(>)] keys (over 0.8
seconds) to rewind or fast-forward the
current song.
Searching Categories
Press the [Tune(Up)], [Tune(Down)] keys
to search categories and press the [OK]
key to select.
iPod
Home
Playlists
Artists
Albums
MENU
Information
• There are eight categories that can be
searched, such as Playlists, Artists,
Albums, Songs, Genres, Composers,
Audiobooks, and Podcasts.
12:05
1/3
Page 37

2AV
Category Menu iPod Menu
If you press the [MENU] key within the
Category Menu, you will have access to
Back, Home, and Up buttons.
iPod
Home
Playlists
Artists
Albums
MENU
Back
This button is used to return to the mode
play screen.
12:05
1/3
3 Up2 Home1
Information
•If the search mode is accessed while
playing a song, the most recently
searched category is displayed..
• Search steps upon initial connection
may differ depending on the type of iPod
device.
If you press the [MENU] key, you will have
access to the Repeat, Shuffle and List
features.
Repeat
Press the [MENU] key ▶ Select [Repeat]
Repeat Once (Icon) : Repeats the
currently playing song
Home
This button is used to go to the iPod root
category screen.
Up
This button is used to move to the
previous category.
Shuffle
Press the [MENU] key ▶ Select [Shuffle]
Shuffle Album : Plays songs within the
current category in random order.
Shuffle All (Icon) : Plays all songs in
random order
Information
• The [1], [2] keys are shortcut keys to
set the Repeat and Shuffle features.
Page 38

2AV
AUX Mode
Press the [MEDIA] key ▶ Select [AUX]
An external device can be connected to
play music.
Information
• If an external device connector is
connected with the AUX terminal, then
AUX mode will automatically operate.
Once the connector is disconnected, the
previous mode will be restored.
• AUX mode can be used only when an
external audio/video player (camcorder,
car VCR, etc.) has been connected.
• The AUX volume can be controlled
separately from other AV modes.
Caution
• Connecting a connector jack to the
AUX terminal without an external
device will convert the system to AUX
mode, but only output noise. When an
external device is not being used, also
remove the connector jack.
• When the external device power is
connected to the power jack, playing
the external device may output noise.
In such cases, disconnect the power
connection before use.
• Fully insert the AUX cable to the AUX
jack upon use.
Connecting an External Device
External AUDIO and VIDEO players
(Camcorders, car VCR, etc.) can be
played through a dedicated cable.
Page 39

2AV
My Music Mode
Basic Mode Screen
No. Name Description
My Music
5
My Music
1
Artist
File name_01
Artist
MENU
REPEAT
4
7
REPEAT
12:05
2
FILE
101
3
00:01
6
12:05
FILE
101
1 Mode Displays currently operating mode
Operation
2
State
3 File Index Displays t he total number of files
File
4
Information
5 Play State Displays the play/pause state
6 Play Time Displays the current play time
7 MENU Displays the My Music Menu
8 Repeat
9 Shuffle
From Repeat/Shuffle/Scan, displays the currently
operating function.
Displays information about the current file
Repeats the current file (each time the button is
pressed, changes in order of Repeat Once →
Repeat Folder → Off).
Plays files in random order (each time the button
is pressed, changes option in order of Shuffle
Folder → Shuffle All → Off)
File name_01
10 List Moves to the list screen
00:01
8
9
MENU
10
3 List2 Shuffle 4 Info1 Repeat 5 Delete
11
12
11 Info Displays additional information for the current file
12 Delete Deletes the currently playing file
Page 40

2AV
Play/Pause
My Music
REPEAT
Album Name
Artist Name
MENU
Song Title 01
While playing, press the [OK] key to
pause and press again to play.
Information
• If there are no files saved within My
Music, the [My Music] button will be
disabled.
12:05
1/100
00
00:01
Changing Files
[Press the [SEEK(<)], [TRACK(>) ] key s to
select the previous or next file.
Information
• Pressing the [SEEK(<)] key after the
file has been playing for 3 seconds will
start the current file from the beginning.
• Pressing the [SEEK(<)] key before the
file has been playing for 3 seconds will
start the previous file.
Selecting from the List
Press the [Tune(Up)], [Tune(Down)] keys
to search and select desired files.
My Music
12:05
Rewinding / Fast-forwarding Files
While playing, press and hold the
[SEEK(<)], [TRACK(>)] keys (over 0.8
seconds) to rewind or fast-forward the
current file.
Current folder name
File name
▶ File name_01
File name
MENU : Back
1/3
Once you find the desired file, press the
[OK[ key to start playing.
Page 41

2AV
My Music Menu
If you press the [MENU[ key, you will have
access to the Repeat, Shuffle, List, Info
and Delete features.
My Music
name
REPEAT
Folder
File name_01
12:05
FILE
101
MENU
3 List2 Shuffle 4 Info1 Repeat 5 Delete
Repeat
Press the [MENU] key ▶ Select [Repeat]
Repeat (Icon) : Repeats the current
playing file
00:01
Information
• The [1], [2] keys are shortcut keys to
set the Repeat and Shuffle features.
List
Press the [MENU] key ▶Select [List]
My Music
List
File name
▶ File name_01
File name
MENU :
Press the [Tune(Up)], [Tune(Down)] keys
to search for the desired file and press the
[OK] key to select.
12:05
1/3
Play Information
Press the [MENU] key ▶ Select [Info]
Details for the currently playing file are
displayed.
Caution
• The title, artist and album info are
displayed only when such information is
recorded within the MP3 file ID3 tag.
Deleting Files
Press the [MENU] key ▶ Select [Delete]
The currently playing file is deleted.
Scan
Shuffle
Press the [MENU] key ▶ Select [Shuffle]
Shuffle (Icon) : Plays all files in random
order
Press the [SCAN] key to play the first 10
seconds of each file.
Page 42

2AV
List Menu
From the List screen ▶ Press [MENU] ▶
Select [Edit]
Files saved in My Music can be selected
and deleted.
Use [Tune(Up)], [Tune(Down)] and the
[OK] key to search and select files you
want to delete and press the [Delete]
button from the Menu.
My Music
12:05
My Music
List
File name
▶ File name_01
File name
My Music
List
▶ File Name 1
File Name 2
File Name 3
MENU
MENU
12:05
1/3
2 Edit1 Back
List
▶ File Name 1
File Name 2
File Name 3
1
MENU
2
3
3 Unmark All2 Mark All1 4 Delete
1/3
4
Name Description
12:05
1/3
1. Moves to the previous screen
2. Mark All Selects all files
3. Unmark All Deselects all selected files
4. Delete Deletes selected files
Information
• If there is memory available, up to
6,000 files can be saved.
• The same file cannot be copied more
than 1,000 times.
• To check memory information, go to
[SETUP] ▶ [System] ▶ Memory
Information.
Page 43

2AV
Bluetooth® Audio Mode
About Using Bluetooth® Audio
Bluetooth® Audio Mode can be used
only when a Bluetooth® phone has
been connected.
While Bluetooth® Audio is playing, if
the Bluetooth® phone is connected,
then the music will also stop.
Bluetooth® streaming audio may not
be supported in some mobile phones.
Moving the Track up/down while
playing Bluetooth audio mode may
result in pop noises in some mobile
phones.
Page 44

2 AV
Using Bluetooth® Audio
Press the [MEDIA] key ▶ Select [BT
Audio]
While playing, press the [OK[ key to
pause the file being streamed from the
Bluetooth phone.
CD
12:05
Media
CD
My Music BT Audio
If the Bluetooth® device is not connected,
then the [BT Audio] button will be disabled.
USB AUX
Playing Bluetooth® Audio
Press the [OK] key to play files saved
within the Bluetooth® phone.
Information
The play/pause feature may operate
differently depending on the mobile
phone.
Selecting Bluetooth® Audio
Press the [SEEK(<)], [TRACK(>)] keys to
select the previous or next file.
Setting Connection
Press the [SETUP] key ▶ Press [Phone]
Setup
Display
Phone
Sound
System
12:05
Clock/
Calendar
It is possible to use the pair phone,
connect/disconnect and delete features
from your Bluetooth phone.
Information
• If the Bluetooth audio is not operating
properly, check whether the feature is
turned off at [SETUP] ▶ [phone] ▶
[Audio streaming]. If the feature is off,
turn back on and try again.
• If music is not yet playing from your
mobile device after converting to
streaming audio (Bluetooth® Audio)
mode , pressing the play button once
may begin mode play. Check to see
whether music is playing from the
Bluetooth® device after converting to
streaming audio mode.
• The Streaming audio feature may not
be supported in some mobile phones.
To learn more about supported devices
and compatibility, go to the Blu
Members website (blu.hyundai.com).
Page 45

3
Bluetooth®
About Using Bluetooth
Pairing from the Bluetooth®
Device
Setting Bluetooth ®
Connection Using Bluetooth
Using Bluetooth
Page 46

3 Bluetooth®
About Using Bluetooth
Using Bluetooth Handsfree
What is Bluetooth®?
Bluetooth® refers to a short-distance wireless networking
technology which uses a 2.45GHz frequency to connect
various devices within a certain distance.
Supported within PCs, external devices, Bluetooth®
phones, PDAs, various electronic devices, and automotive
environments, Bluetooth® allows data to be transmitted at
high speeds without having to use a connector cable.
Bluetooth® Handsfree refers to a device which allows the
user to conveniently make phone calls with Bluetooth®
mobile phones through the audio system.
※Some features may not be supported in some mobile
phone. To check out lists of compatible mobile phones, visit the
Blu Members website blu.hyundai.com
.
Precautions for safe driving
Bluetooth® Handsfree is a feature that enables drivers
to practice safe driving. Connecting the head unit with a
Bluetooth® phone allows the user to conveniently make
calls, receive calls, and manage the phone book. Before
using the Bluetooth®, carefully read the contents of this
user’s manual.
Excessive use or operations while driving may lead
to negligent driving practices and be the cause of accidents.
Do not operate the device excessively while
driving.
Viewing the screen for prolonged periods of time is dangerous
and may lead to accidents. When driving, view
the screen only for short periods of time.
Page 47

3 Bluetooth®
Cautions upon connecting Bluetooth® phone
Before connecting the head unit with the mobile phone, check to see
that the mobile phone supports Bluetooth® features.
Even if the phone supports Bluetooth®, the phone will not be found
during device searches if the phone has been set to hidden state or
the Bluetooth® power is turned off. Disable the hidden state or turn on
the Bluetooth® power prior to searching/connecting with the Head unit.
If you do not want to automatically connect your Bluetooth phone, try
the following.
1. Turn off the Bluetooth feature in your mobile phone
- For more information on Bluetooth features within your mobile,
refer to your mobile phone user’s manual.
2. Turn off the Bluetooth feature in your car audio system
- To turn off the Bluetooth feature in your car audio system, go to
[SETUP] > Phone and turn off the Bluetooth feature.
Park the vehicle when connecting the car audio system with your
mobile phone.
Bluetooth® connection may become intermittently disconnected in
some mobile phones. Follow these steps to try again.
1. Turn the Bluetooth® function within the mobile phone off/on and try
again.
2. Turn the mobile phone power Off/On and try again.
3 Completely remove the mobile phone battery, reboot, and then again.
4. Reboot the audio system and try again.
5. Delete all paired devices, pair and try again.
The Handsfree call volume and quality may differ depending on the
mobile phone.
• Bluetooth® features supported within the vehicle are as follows.
Some features may not be supported depending
on your Bluetooth® device.
- Answering and placing Bluetooth® Handsfree calls
- Menu operation during call (Switch to Private, Switch to call waiting,
Outgoing volume)
- Download Call History
- Download Mobile Contacts
- Contacts/ Call History Auto Download
- Bluetooth® device auto connection
- Bluetooth® Audio
• It is possible to pair up to five Bluetooth® devices to the car system.
• It is possible to pair up to five Bluetooth® devices to the car system.
• Only one Bluetooth® device can be connected at a time.
• Other devices cannot be paired while a Bluetooth® device is already
connected.
• When a Bluetooth® device is being connected, the connection
process cannot be canceled.
• Only Bluetooth® Handsfree and Bluetooth® audio related features
will operate within this system.
• Normal operation is possible only for devices that support handsfree
or audio features, such as a Bluetooth® mobile phone or a Bluetooth®
audio device.
• Only one function can be used at a time between the Bluetooth®
handsfree and Bluetooth® audio. (While playing Bluetooth® audio,
streaming will end upon entering the
Bluetooth® phone screen.)
• If a connected Bluetooth® device becomes disconnected for various
reasons, such as being out of range, turning the device OFF, or a
Bluetooth® communication error, Bluetooth® devices are
automatically searched and connected.
Page 48

3 Bluetooth®
Pairing from the Bluetooth®
Device
What is Bluetooth Device Pairing?
Pairing refers to the process of
synchronizing your Bluetooth phone or
device with the car audio system for
connection. Pairing is necessary to
connect and use the Bluetooth feature.
Customarily, pairing Bluetooth devices
can be done by either searching and
pairing from the car audio system or
searching and pairing from the Bluetooth
phone.
The car audio system can be searched
and paired from your Bluetooth device.
Pairing [PHONE] Key / [] Key on
the Steering Remote Controller
When no phones have been paired
1. Press the [PHONE]] key or the [[]] key on
the steering remote controller. The following
screen is displayed.
Select the [OK] button to enter the wait for
pairing state.
Setup
Phone>Pair Phone
트랙 01
Add from your
Bluetooth device
OK
Setup
Phone>Pair Phone
12:05
12:05
2. From your Bluetooth® device, search for
the car name and pair the device. When
searching from the Bluetooth® device, the
default passkey is ‘0000’.
3. Once pairing is complete, the following
screen is displayed.
등록 완료 화면
Name Description
Name of device as shown when
1. Device
2. Passkey
searching from your Bluetooth
device
Passkey used to pair the device
1
2
트랙 01
Device : AZERA
Passkey : 0000
Cancel
Page 49

3 Bluetooth®
When Pairing Additional Devices
1. If you already have a paired device but
wish to pair additional devices, press the
[PHONE]] key or the [[]] key on the steering
remote controller. The following screen is
displayed.
Select the [Pair] button to start the process to
pair additional devices.
12:05Title
?
To use Bluetooth calling.
You need to pair or connect a phone
Pair Connect
2. The following steps are same as the
process described in the ‘When no phones
have been paired’ section. Refer to the ‘When
no phones have been paired’ section for more
information.
Information
• Within the above screen, press [Connect] to
select/connect the previously paired Bluetooth
device and [Cancel] to return to the previous
screen.
Cancel
Pairing through [PHONE] Setup
Press the [SETUP] key ▶ Select [Phone] ▶
Select [Pair Phone] ▶ Press [OK]
Setup
Phone>Pair Phone
트랙 01
Add from your
Bluetooth device
OK
Setup
Phone>Pair Phone
트랙 01
Device : AZERA
Passkey : 0000
Cancel
12:05
12:05
From your mobile phone, search for the car
audio system. The initial passkey is “0000”.
Once pairing is complete, the following screen
is displayed.
등록 완료 화면
Information
• The wait for pairing state will last for one
minute. If the device is not paired within the
allotted time, pairing will fail. If pairing fails,
you must start the process from the begi n nin g .
• Generally, most Bluetooth devices will be
automatically connected once pairing is
complete. Some devices, however, require a
separate verification process to connect.
Check to see whether Bluetooth has been
properly connected within your mobile phone.
• List of paired Bluetooth devices can be
viewed at [SETUP] ▶ [Phone] ▶ [Paired
Phone List].
Page 50

3 Bluetooth®
Setting Bluetooth® Connection
Connecting a Device
Press the [SETUP] key ▶ Select [Phone]
▶Select [Paired Phone List]
Phone
Paired Phone
Paired Phone List
Contacts Download
MENU
Phone>Paired Phone List
1
Phone Name 1
▶ Phone Name 2
2
Phone Name 3
Connect
트랙 01
Phone name
Pairing Completed
Delete
MENU
Change
Priority
12:05
12:05Setup
12:05Setup
1/2
1/2
Name Description
1. Paired
Phone
2. Connected
Phone
Device that is paired but
not connected
Device that is currently
connected
Changing Priority
What is Priority?
It is possible to pair up to five Bluetooth
devices with the car audio system. As a
result, the “Change Priority’ feature is
used to set the order of connection from
the paired phones.
Press the [SETUP] key ▶ Saelect
[Phone] ▶Select [Paired Phone List]
12:05Setup
Phone>Paired Phone List
Phone Name 1
▶ Phone Name 2
Phone Name 3
Connect Delete
MENU
Change
Priority
1/2
12:05
i
트랙 01
Priority Changed
OK
From the paired phone list, select the
phone you want to change to the highest
priority, then select the [Change Priority]
button from the Menu. The selected
device will be changed to the highest
priority.
Information
OK
From the paired phone list, select the
device you want to connect then select
the [Connect] button from the Menu.
• If the priority is changed while a mobile
phone is currently connected, the
connected phone will always be set as
the highest priority.
Page 51

3 Bluetooth®
Disconnecting a Device
Press the [SETUP] key ▶ Select [Phone]
▶ Select [Paired Phone List]
12:05Setup
Phone>Paired Phone List
Phone Name 1
▶ Phone Name 2
Phone Name 3
Disconnect
Delete
MENU
Change
Priority
1/2
From the paired phone list, select the
currently connected device and press the
[Disconnect] button from the Menu.
연결해제 화면
Deleting a Device
Press the [SETUP] key ▶ Select [Phone]
▶Select [Paired Phone List]
12:05Setup
Phone>Paired Phone List
Phone Name 1
▶ Phone Name 2
Phone Name 3
Connect
Delete
MENU
Change
Priority
1/2
From the paired phone list, select the
device you want to delete and press the
[Delete] button from the Menu.
삭제 화면
Information
• Upon deleting the currently connected
Bluetooth device, the connection will
automatically be disconnected to delete.
• If a paired phone is deleted, its call
history and contacts lists will also be
deleted.
• To re-use a deleted device, you must
pair the device again.
Information
• Only devices that are currently
connected with the audio system can be
disconnected.
Page 52

3 Bluetooth®
Using Bluetooth
Phone Menu Screen
Phone Menus
With a Bluetooth device connected, press the
[Phone] key to display the Phone menu screen.
Phone
1 2
Dial
Number
Setup
4
Name Description
1. Dial
Number
Call
History
Close
Displays dial screen to
make call by dialing
numbers
12:05
3
Contacts
Information
• If you select the [Call History] button in a
state where there is no call history, a
prompt screen asking whether to
download call history is displayed.
• If you select the [Contacts] button in a
state where there are no saved contacts,
a prompt screen asking whether to
download contacts is displayed.
• This feature may not be supported in
some mobile phones. For more
information on download support, refer to
user mobile phone user’s manual.
Calling by dialing a number
Press the [PHONE] key ▶ Select [Dial
Number]
Phone
01234567890
2 3
4
Name Description
1. Dial Pad
2.
1
Used to enter phone
number
• If a number has been
entered, calls the number.
•If no number has been
entered, switches to call
history screen.
12:05
2. Call History
3. Contacts
4. Setup
Displays the call history
screen
Displays contacts list
screen
Displays Phone related
settings
3.
4. Delete
If a number has been
entered, deletes the
number.
Deletes entered numbers
one digit at a time.
Page 53

3 Bluetooth®
Answering Calls
Answering a Call
Answering a call with a Bluetooth device
connected will display the following
screen.
Title
Incoming call
1
Angelina Jolie
2
0001112223333
Accept Reject
3 4
Name Description
Displays the other part’s name
1. Caller
2.
Incoming
Number
3. Accept
4. Reject
when the incoming caller is saved
within your contacts
Displays the incoming number
Accept the incoming call
Reject the incoming call
12:05
Information
• When the incoming call pop-up is
displayed, most functions within AV mode
and Setup will not operate. Only the call
volume can be operated.
• The telephone number may not be
displayed in some mobile phones..
• When a call is answered with the mobile
phone, the call mode will automatically
convert to Private mode.
During a Handsfree Call
Phone
Scarlet Johanson
1
2
01234567890
3
00:59:59
5 6
Name Description
1. Caller
2. Incoming
Number
3. Call time
4.
5. Private
6. Out Vol.
7
4
Displays the other part’s
name when the incoming
caller is saved within your
contacts
Displays the incoming
number
Displays the call time
Ends call
Converts to Private mode
Sets cal volume as heard by
the other party
12:05
7.
Turns Mic Mute On/Off
Information
• If the mic is muted, the other party will
not be able to hear your voice.
Page 54

3 Bluetooth®
Call History
Press the [PHONE] key ▶ Select [Call
History]
Phone
Call History
01234567890
Scarlet Johanson
? Angelina Jolie
▲ MENU
Phone
Call History
01234567890
Scarlet Johanson
? Angelina Jolie
Call histories can be downloaded through the
Menu within the Call History screen
Name Description
1. Call History
2. Download
1
Download
MENU
Displays recent calls (call
history)
Connects call upon
selection
Download Recent Call
History
2
12:05
▲
▲
▼
▼
12:05
1/3
Information
• Up to 20 outgoing, incoming, and missed
call history lists can each be saved
• Upon downloading call histories,
previously saved histories will be deleted.
• Incoming calls with hidden caller IDs will
not be saved in the call history list.
• The download feature may not be
supported in some mobile phones. Check
to see that the Bluetooth® device supports
the download feature.
To learn more about supported devices
and compatibility, go to the Blu Members
website (blu.hyundai.com).
Contacts
Press the [PHONE] key ▶ Select
[Contacts]
Phone
Contacts
Name 1
Name 2
Name 3
▲ MENU
Phone
Contacts
Name 1
Name 2
Name 3
Contacts can be downloaded through the
Menu within the Contacts screen
1. Contact
List
2. Download
1
Download
MENU
▲ MENU
Name Description
Displays downloaded
contacts
Connects call upon
selection
Download Contacts
12:05
12:05
2
1/3
1/3
Page 55

3 Bluetooth®
Information
• Up to 1,000 contacts can be copied
into car contacts.
• Upon downloading contacts , previously
saved contacts will be deleted.
• Downloading is not possible if the
contacts download feature is turned off
within the Bluetooth device. Also, some
devices may require device authorization
upon attempting to download. If
downloading cannot be normally
conducted, check the Bluetooth device
setting or the screen state.
• The download feature may not be
supported in some mobile phones.
Check to see that the Bluetooth® device
supports the download feature.
To learn more about supported devices
and compatibility, go to the Blu Members
website (blu.hyundai.com).
Page 56

Voice
4
Recognition
Before Using Voice
Recognition
Using Voice Recognition
Command List
Page 57

4 Voice Recognition
Before Using Voice Recognition
When using the voice recognition feature, only commands
listed within the user's manual are supported.
Be aware that during the operation of the voice recognition
system, pressing any key other than the [VR] key or
touching the screen will terminate voice recognition mode.
For superior voice recognition performance, position the
microphone used for voice recognition above the head of
the driver’s seat and maintain a proper position when
saying commands.
Within the following situations, voice recognition may not
function properly due to external sound.
• When the windows and sunroof are open
• When the wind of the cooling / heating device is strong
• When entering and passing through tunnels
• When driving on rugged and uneven roads
• During severe rain (heavy rains, windstorms)
Phone related voice commands can be used only when a
Bluetooth device is connected.
When making calls by stating a name, the corresponding
contact must be downloaded and stored within the audio
system.
After downloading the Bluetooth contacts, it takes some
times to convert the contacts into voice information. During
this time, voice recognition may not properly operate.
When symbols or numbers are included within contacts,
only the Korean will be recognized.
(Example: For example, “ #John Doe%&” will be
recognized as “John Doe”.
Pronounce the voice commands naturally and clearly as if
in a normal conversation.
Page 58

4 Voice Recognition
Using Voice Recognition
Starting Voice Recognition
Starting Voice Recognition
Shortly press the [VR] key on the steering
remote controller ▶Say a command
이미지
Information
• If voice recognition is in [Expert Mode],
then the system will only say a “Beep~”
• To change the Normal Mode/Expert
Mode setting, go to [SETUP] ▶ [System]
▶ [Prompt Feedback].
Caution
• For proper recognition, say the
command after the voice instruction and
beep tone.
Skipping Prompt Messages
While prompt message is being stated▶
Shortly press the [VR] key on the steering
remote controller (under 0.8 seconds)
Re-starting Voice Recognition
While system waits for a command ▶
Shortly press the [VR] key on the steering
remote controller (under 0.8 seconds)
The command wait state is immediately
ended and the beep ton will sound. After
the “beep”, say the voice command.
이미지
If voice recognition is in [Normal Mode],
then the system will say “Please say a
command. Beep~”
The prompt message is immediately
ended and the beep tone will sound. After
the “beep”, say the voice command.
Page 59

4 Voice Recognition
Ending Voice Recognition
While Voice Recognition is operating ▶
Press and hold the [VR] key on the
steering remote controller (over 0.8
seconds)
Information
• While using voice command, pressing a
steering wheel remote control or a
different key will end voice command.
▪
In a state where the system is waiting for
a voice command, say “cancel” or “end” to
end voice command.
▪
In a state where the system is waiting for
a voice command, press and hold the
[VR] key on the steering remote controller
to end voice command.
Illustration on Using Voice Recognition
Starting Voice Recognition
Please say a command DING~
More Help
You can say Radio, FM, AM, XM, Media,
CD, USB, AUX, My music, iPod, Bluetooth
Audio, Phone, Call History or Contacts.
Please say a command.
Skipping Prompts
Ending Voice Recognition
Please say a command DING~
Contacts
Contacts.
Please say the name of the contact you
want to call.
DING~
Cancel
Di-Ding~ (Cancel Sound)
Please.....
DING~
More Help
You can say Radio, FM, AM, XM, Media, CD,
USB, AUX, My music, iPod, Bluetooth Audio,
Phone, Call History or Contacts. Please say a
command.
Page 60

4 Voice Recognition
Voice Command List
• Common Commands: Commands that can be used in all
situations. (However, some commands may not operate in
special circumstances.
Commands Function
More help
Help
Call <Name>
Dial <Name>
Phone
Call History Displays the Call History screen.
Contacts
(Call by Name)
Dial Number
Redial Connects the most recently called number.
Provides guidance on commands that can be used
anywhere in the system.
Provides guidance on commands that can be used within
the current mode.
Calls <Name> saved in Contacts.
Ex) Call “John”
* Call <Name> can be used when a Bluetooth device is
connected and contacts have been downloaded.
Call can be made by dialing the spoken numbers.
Ex) Dial “123”
Provides guidance on Phone related commands. After
saying this commands, say “Dial Number”, “Call History”,
“Contacts” to execute corresponding functions.
Displays the Contacts screen. After saying this command,
say the name of a contact saved in the Contacts to
automatically connect the call.
Display the Dial Number screen, After saying this
command, you can say the number what you want to call.
Commands Function
• When listening to the radio, displays the next radio screen.
Radio
FM
FM1 Displays the FM1 screen.
FM2 Displays the FM2 screen.
AM Displays the AM screen.
FM Preset 1~6
AM Preset 1~6 Plays the broadcast saved in AM Preset 1~6.
FM 87.5~107.9 Plays the FM broadcast of the corresponding frequency.
AM 530~1710 Plays the AM broadcast of the corresponding frequency.
XM(Satellite)
XM (Satellite)
1~3
(FM1→FM2→AM→XM1→XM2→XM3→FM1)
• When listening to a different mode, displays the most
recently played radio screen.
• When currently listening to the FM radio, maintains the
current state.
• When listening to a different mode, displays the most
recently played FM screen.
Plays the most recently played broadcast saved in FM
Preset 1~6.
• When currently listening to the XM, maintains the current
state.
• When listening to a different mode, displays the most
recently played XM screen.
Displays the selected XM screen.
XM Channel
0~255
Plays the selected XM channel.
60
Page 61

4 Voice Recognition
Commands Function
Media Moves to the most recently played media screen.
Play Track 1-30
CD Plays the music saved in the CD.
Search CD
USB Plays USB music.
Search USB
iPod Plays iPod music.
Search iPod
If a music CD has been inserted, plays the
corresponding track.
Moves to the CD track or file selection screen.
• For audio CDs, move to the screen and say the track
number to play the corresponding track.
• Moves to MP3 CD file selection screen. After manually
operate the device to select and play music.
Moves to USB file selection screen. After manually
operate the device to select and play music.
Moves to the iPod file selection screen‘ After,
manually operate the device to select and play
music.
Commands Function
AUX (Auxiliary)
Bluetooth Audio
Mute Mutes the radio or music volume.
Please repeat Repeats the most recent comment.
Cancel (Exit) Ends voice command.
Plays the connected external device.
Plays the music saved in connected Bluetooth®
device.
My Music Play s the music saved in My Music.
Search My Music
Moves to My Music file selection screen. After manually
operate the device to select and play music
Page 62

4 Voice Recognition
• FM/ AM radio commands: Commands that can be used
while listening to FM,AM radio.
Commands Function
Preset 1-6 Plays the broadcast saved in Preset 1-6.
Auto Store
Preset Save 1-6 Saves the current broadcast frequency to Preset 1-6.
Seek up Plays the next receivable broadcast‘
Seek down Plays the previous receivable broadcast.
Next Preset
Previous Preset
Automatically selects radio broadcast frequencies with
superior reception and saves in Presets 1-6‘
Selects the preset number next to the most recently
selected preset. (Example: When currently listening to
preset no. 3, then preset no. 4 will be selected.)
Selects the preset number previou s to t he mo st recen t ly
selected preset. (Example: When currently listening to
preset no. 3, then preset no. 2 will be selected.)
• Satellite radio commands: Commands that can be used
while listening to Satellite Radio.
Commands Function
Channel Up Plays the channel next to the current broadcast
Channel Down Plays the channel previous to the current broadcast.
Selects the preset number next to the most rece ntly
Next Preset
Previous Preset
Category Moves to the Category selection screen.
Scan
Preset 1-6 Plays the broadcast saved in Preset 1-6.
Information Displays the information of the current broadcast
selected preset. (Example: When currently listening to
preset no. 3; then preset no. 4 will be selected.)
Selects the preset number previo us to th e most
recently selected preset. (Example: When currently
listening to preset no. 3, then preset no. 2 will be
selected.)
Scans receivable channels from the current broadcast
and plays for 10 seconds each.
Scan
Preset Scan
Information
Scans receivable frequencies from the current broadcast
and plays for 10 seconds each.
Moves to the next preset from the current present and
plays for 10 seconds each.
Displays the information of the current broadcast. (This
feature can be used when receiving RBDS broadcasts.)
Page 63

4 Voice Recognition
• Audio CD commands : Commands that can be used while
listening to Audio CD.
Commands Function
Shuffle Randomly plays the tracks within the CD
Shuffle
Repeat Repeats the current track
Repeat Off Cancels repeat play to play tracks in sequential order.
Next Track Plays the next track.
Previous Track Plays th e previous track.
Scan
Track 1~30 Plays the desired track number.
Off Cancels random Play to play tracks in sequential order.
Scans the tracks from the next track for 10 seconds
each.
• MP3 CD / USB commands : Commands that can be used
while listening to music files saved in CD and USB.
Commands Function
Shuffle Randomly plays the files within the current folder.
All Shuffle Randomly plays all saved files‘
Shuffle
Repeat Repeats the current file.
Folder Repeat Repeats all files in the current folder.
Repeat Off Cancels repeat play to play files in sequential order.
Next File Plays the next file.
Previous File Plays the previous file.
Scan Scans the files from the next files for 10 seconds each.
Search File Moves to the file selection screen.
Off Cancels random play to play files in seque ntial order.
Search Track
Information Displays the information screen of the current track.
Play Plays the currently paused song.
Pause Pauses the current song.
Moves to the track selection screen. After say the track
name to play the corresponding track.
Search Folder Moves to the folder selection screen.
Information Displays the information screen of the current me.
Copy Copies the current file into My Music.
Play Plays the currently paused song.
Pause Pauses the current song.
Page 64

4 Voice Recognition
• iPod Commands : Commands that can be used while
playing iPod
Commands Function
Shuffle Randomly plays the songs within the current category.
Shuffle Off Cancels random play to play Songs in sequential order.
Repeat Repeats the current song.
Repeat Off Cancels repeat play to play songs in sequential order.
Next Song Plays the next song.
Previous Song Plays the previous song.
Search Song Moves to the song selection screen.
Play Plays the currently paused song.
Pause Pauses the current song.
• iPod Commands : Commands that can be used while
playing iPod
Commands Function
Shuffle Randomly plays all saved files.
Shuffle Off Cancels random play to play files in sequential order.
Repeat Repeats the current file.
Repeat Off Cancels repeat play t o play files in sequential order.
Next File Plays the next file.
Previous File Plays the previous song.
Scan Moves to the song selection screen.
Search File Moves to the file selection screen.
Information Displays the information screen of the current file.
Delete
Delete All
Play Plays the currently paused song.
Deletes the current file. You will bypass an additional
confirmation process.
Deletes all files saved in My Music. You will bypass an
additional confirmation process.
Pause Pauses the current song.
Page 65

4 Voice Recognition
• Bluetooth
Commands that can be used while playing Phone Music.
Commands Function
Play Plays the currently paused song.
Pause Pauses the current song.
®
Wireless Technology Audio Commands :
Page 66

5
Setup
Setup
Using Setup
Page 67

5Setup
Setup
Basic Mode Screen
No. Name Description
1
4
2
5
3
1
2
3
4
5
Display Sets display related settings
Sound Sets sound related settings
Clock
/Calendar
Sets clock/Calendar related settings
Phone Sets phone related settings
System Sets system related settings
Page 68

5Setup
Using Setup
Starting Mode
Press the [SETUP] key to display the
Setup screen.
You can select and control options related
to [Display], [Sound], [Clock/Calendar],
[Phone] and [System].
Information
• Once settings have been changed, press
the [MENU] key to return to the previous
menu.
Display Settings
Adjusting the Display
Press the [SETUP] key ▶ Select [Display]
▶ Select [Brightness]
1
Use [HD/CAT(Left)], [Folder(Right)] to
adjust the screen brightness or set the
Brightness on Automatic, Daylight, or
Night mode.
Select the [Default] button to reset.
Name Description
1. Automatic
2. Daylight
2 3
Adjusts the brightness
automatically
Always maintains the
brightness on max
Mode Pop Up
Press the [SETUP] key ▶ Select [Display]
▶ Select [Mode Pop up]
Setup
Display
Brightness
Mode Pop up
Text Scroll
MENU :
This feature determines whether to
display the Mode pop-up when changing
the radio and media mode.
On : When the [RADIO] or [MEDIA] key is
pressed, the Mode Pop up screen is
displayed.
Off : The Mode Pop up screen is not
displayed.
Information
• The media mode pop up screen can be
displayed only when two or more media
modes have been connected.
12:05
1/2
3. Night
Always maintains the
brightness on min
Page 69

5Setup
Text Scroll
Press the [SETUP] key ▶ Select [Display]
▶ Select [Text Scroll]
Setup
Display
Brightness
Mode Pop up
Text Scroll
MENU :
This feature is used to scroll text
displayed on the screen when it is too
long to be displayed at once.
On : Text is repeatedly scrolled..
Off : Text is scrolled just once.
12:05
1/2
MP3 Information Display
Press the [SETUP] key ▶ Select [Display]
▶ Select [M edia Display]
1
This feature is used to change the
information displayed within USB and
MP3 CD modes..
Name Description
1. Folder File
2. Album
Artist
Song
Displays file name and
folder name
Displays album
name/artist name/song
2
Page 70

5Setup
Sound Settings
Sound Settings
Press the [SETUP] key ▶ Select [Sound]
▶ Select [Sound Setting]
After selecting the Fader/Balance, use
[Tune(Up),[Tune(Down)] and
[HD/CAT(Left)], [Folder(Right)] to move
the cursor on the control screen to the
desired position.
Select the [Default] button to reset.
Variable EQ
This is a premium sound system feature in
which the acoustical mode can be
selected according to musical preferences.
• Innocente (Normal) : Natural sound,
sound optimized for driver.
• Forza (Dynamic) : Powerful sound
emphasizing bass, stereo sound.
• Concerto (Concert) : Sound similar to a
concert or live hall
SDVC (Speed Dependent Volume
Control)
Press the [SETUP] key ▶ Select [Sound]
▶ Select [Speed Dependent Vol]
The volume level is controlled
automatically according to the vehicle
speed.
Use [HD/CAT(Left)], [Folder(Right)] to
select from Off/Low/Mid/High.
Use [Tune(Up),[Tune(Down)] to adjust the
Bass/Middle/Treble and Fader/Balance
settings.
After selecting the Bass/Middle/Treble,
use [HD/CAT(Left)], [Folder(Right)] to
adjust the setting.
❈ May differ depending on the selected
audio.
Page 71

5Setup
Voice Recognition Setting
Press the [SETUP] key ▶ Select [Sound]
▶ Select [Voice Recognition Vol]
Use [HD/CAT(Left)], [Folder(Right)] to
adjust the Voice Recognition volume.
Blue Link Volume
Press the [SETUP] key ▶ Select [Sound]
▶
Select [Blue Link Voice Vol]
Clock/Date Setting
Clock Setting
Press the [SETUP] key ▶ Select
[Clock/Calendar] ▶ Select [Clock
Settings]
Use [HD/CAT(Left)], [Folder(Right)] to
select the Hour, Minutes and AM/PM
setting and use [Tune(Up), [Tune(Down)]
to change settings.
Calendar Setting
Use [HD/CAT(Left)], [Folder(Right)] to
select the Month, Day, and Year and use
[Tune(Up), [Tune(Down)] to change
settings.
Information
• Press and hold the [CLOCK[ key (over
0.8 seconds) to display the
Clock/Calendar screen.
Clock Display
Press the [SETUP] key ▶ Select
[Clock/Calendar] ▶ Select [Clock
Display(Power Off)]
Setup
Clock/Calendar
12:05
2/2
Use [HD/CAT(Left)], [Folder(Right)] to adjust
the Blue Link Voice Recognition volume.
Information
This feature may not be available depending
on whether your device supports Blue Link.
Press the [SETUP] key ▶ Select
[Clock/Calendar] ▶ Select [Calendar
Settings]
Clock Settings
Calendar Settings
Clock Display(Power Off)
When turned on, this feature is used to
display a clock on the screen when the
audio system is turned off.
5
MENU :
12:05
02.02.2012
Page 72

5Setup
Bluetooth® Setting
Pairing a New Device
Press the [SETUP] key ▶ Select [Phone]
▶ Select [Pair Phone]
Setup
Phone>Pair Phone
트랙 01
Add from your
Bluetooth device
OK
Bluetooth mobile phones can be paired
with the audio system.
For more information, refer to the “Pairing
through Phone Setup” section within Part
3 Bluetooth.
12:05
Viewing Paired Phone List
Press the [SETUP] key ▶ Select [Phone]
▶ Select [Paired Phone List]
Setup
Phone>Paired Phone List
Phone Name 1
Phone Name 2
MENU ▲
Setup
Phone>Paired Phone List
Phone Name 1
Phone Name 2
1
Connect Delete
2 3 4
MENU
12:05
1/2
12:05
1/2
Change
Priority
Name Description
1. Moves to the previous screen
2. Connect
3. Delete
4. Change
Priority
Connect/disconnects currently
selected phone
Deletes the currently selected
phone
Sets currently selected phone
to highest connection priority
Downloading Mobile Phone
Contacts
Press the [SETUP] key ▶ Select [Phone]
▶ Select [Contacts Download]
This feature is used to view mobile
phones that have been paired with the
audio system. Upon selecting a paired
phone, the setup menu is displayed.
For more information, refer to the “Setting
Bluetooth Connection” section within Part
3 Bluetooth.
Contacts are downloaded from the mobile
phone.
Information
• Up to 1,000 contacts can be copied
into car contacts.
Page 73

5Setup
Auto Download (Contacts)
Press the [SETUP] key ▶ Select [Phone]
▶ Select [Auto Download]
Setup
Phone
Auto Download
Audio Streaming
Outgoing Volume
MENU :
This feature is used to automatically
download mobile phone contacts once a
Bluetooth phone is connected.
Information
• The Auto Download feature will
download mobile phone contacts every
time the phone is connected. The required
download time may differ depending on
the number of saved contacts and the
communication state.
12:05
2/3
>
Audio Streaming
Press the [SETUP] key ▶ Select [Phone]
▶ Select [Audio Streaming]
Setup
Phone
Auto Download
Audio Streaming
Outgoing Volume
MENU :
When Audio Streaming is turned on, you
can play music files saved in your
Bluetooth device from the car.
Caution
• Bluetooth audio streaming may not be
supported in some Bluetooth phones.
12:05
2/3
>
Outgoing Volume
Use [HD/CAT(Left)], [Folder(Right)] to
adjust the outgoing volume level.
Turning Bluetooth System Off
Press the [SETUP] key ▶ Select [Phone]
▶ Select [Bluetooth System Off]
Caution
• This feature may not be supported in
some Bluetooth phones.
Press the [SETUP] key ▶ Select [Phone]
▶ Select [Outgoing Volume]
This feature is used to turn off the Bluetooth
system within your audio system.
Information
• To turn Bluetooth back on, go to
[SETUP] ▶ [Phone] and select “Yes”.
Page 74

5Setup
System Setting
Memory Information
Press the [SETUP] key ▶ Select [System]
▶
Select [Memory Information]
Setup
System > Memory Information
1
Using
2
Available
Capacity
3
9999.9 MB
9999.9 MB
9999.9 MB
MENU :
This feature displays information related
to system memory.
Name Description
1. Using
2. Available
3. Capacity Displays the total capacity
Displays memory currently in
use
Displays memory that is
currently available
12:05
Voice Recognition Mode Setting
Press the [SETUP] key ▶ Select [System]
▶ Select [Prompt Feedback]
Setup
System > Prompt Feedback
Normal
1
This feature is used to select the desired
prompt feedback option from Normal and
Expert.
Name Description
1. Normal
2. Expert
Expert
2
MENU :
When using voice recognition,
provides detailed guidance
prompts
When using voice recognition,
omits some guidance prompts
12:05
Language
Press the [SETUP] key ▶ Select [System]
▶ Select [Language]
This feature is used to change the system
and voice recognition language.
If the language is changed, the system will
reboot the system to apply the change.
Page 75

MAP DATABASE HOTLINE
M & SOFT AMERICA MAP CENTER
TEL : 888-757-0010
WEBSITE : www.mapnsoft.com
This equipment has been tested and found to comply with the limits for a Class A digital device, pursuant to part 15 of the FCC Rules.
These limits are designed to provide reasonable protection against harmful interference in a residential installation. This equipment
generates, uses and can radiate radio frequency energy and, if not installed and used in accordance with the instructions, may cause
harmful interference to radio communications. However, there is no guarantee that interference will not occur in a particular
installation. If this equipment does cause harmful interference to radio or television reception, which can be determined by turning the
equipment off and on, the user is encouraged to try to correct the interference by one or more of the following measures:
ˍ Reorient or relocate the receiving antenna.
ˍ Increase the separation between the equipment and receiver.
ˍ Connect the equipment into an outlet on a circuit different from that to which the receiver is connected.
ˍ Consult the dealer or an experienced radio/TV technician for help.
Caution: Any changes or modifications to this device not explicitly approved by manufacturer could void your authority to operate this
equipment.
This device complies with part 15 of the FCC Rules. Operation is subject to the following two conditions: (1) This device may not
cause harmful interference, and (2) this device must accept any interference received, including interference that may cause undesired
operation.
7KLVHTXLSPHQWFRPSOLHVZLWK)&&UDGLDWLRQH[SRVXUHOLPLWVVHWIRUWKIRUDQXQFRQWUROOHGHQYLURQPHQW
7KLVHTXLSPHQWVKRXOGEHLQVWDOOHGDQGRSHUDWHGZLWKPLQLPXPFPEHWZHHQWKHUDGLDWRUDQG\RXUERG\
7KLVWUDQVPLWWHUPXVWQRWEHFROORFDWHGRURSHUDWLQJLQFRQMXQFWLRQZLWKDQ\RWKHUDQWHQQDRUWUDQVPLWWHUXQOHVVDXWKRUL]HGWRGRVRE\WKH)&&
,&:DUQLQJ
7KLVGHYLFHFRPSOLHVZLWK,QGXVWU\&DQDGDOLFHQFHH[HPSW566VWDQGDUGV
2SHUDWLRQLVVXEMHFWWRWKHIROORZLQJWZRFRQGLWLRQVWKLVGHYLFHPD\QRWFDXVHLQWHUIHUHQFHDQG
WKLVGHYLFHPXVWDFFHSWDQ\LQWHUIHUHQFHLQFOXGLQJLQWHUIHUHQFHWKDWPD\FDXVHXQGHVLUHGRSHUDWLRQRIWKHGHYLFH
/HSUpVHQWDSSDUHLOHVWFRQIRUPHDX[&15G,QGXVWULH&DQDGDDSSOLFDEOHVDX[DSSDUHLOVUDGLRH[HPSWVGHOLFHQFH
/H[SORLWDWLRQHVWDXWRULVpHDX[GHX[FRQGLWLRQVVXLYDQWHVODSSDUHLOQHGRLWSDVSURGXLUHGHEURXLOODJHHW
OXWLOLVDWHXUGHODSSDUHLOGRLWDFFHSWHUWRXWEURXLOODJHUDGLRpOHFWULTXHVXEL
PrPHVLOHEURXLOODJHHVWVXVFHSWLEOHGHQFRPSURPHWWUHOHIRQFWLRQQHPHQW
 Loading...