

Page 1

The Checklist
Page 2
Basic Setup Instructions
If using a certified Hypercom T4220 Dual Com terminal to process
transactions over the Internet, follow the instructions below if your site
uses a DHCP Internet connection (“plug and play”). If your location
uses a Static IP connection, please contact your ISP or network
administrator to collect values for: IP Address, Subnet Mask, Gateway
IP Address, and DNS IP Address. Once you have collected these
values, contact your loyalty vendor for further instructions.
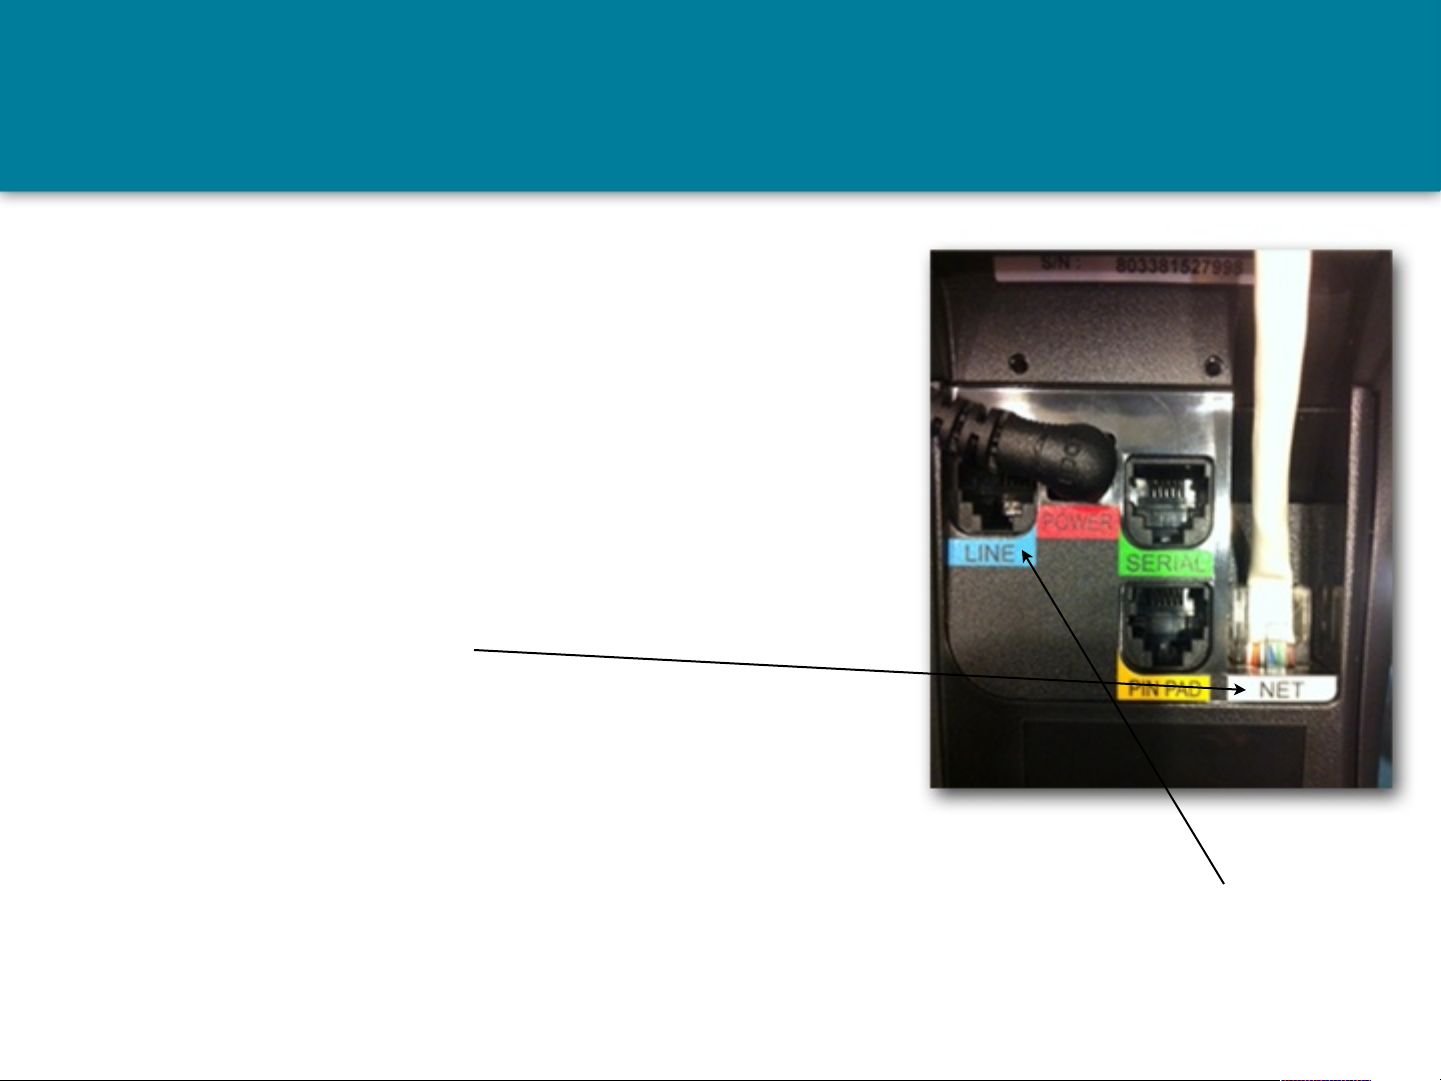
1. If using a T4220 Dual Com model, before powering on the terminal,
plug a Cat-5 Ethernet cable from an available port on your router
into the NET port underneath the device. We also recommend
plugging a telephone line into the LINE port underneath the device
for dial backup (recommended).
2. For T4220 Dual Com users, your terminal should by default, be
ready to process over the Internet with an auto dial backup if an
internet connection cannot be found. Please refer to Exhibits A and
B in the back of this slideshow for instructions on switching between
internet and dialup and enabling or disabling the auto dial backup feature.
3. If using a T4205 or T4210 Dial Only model Hypercom terminal, just plug a telephone line into the LINE port
underneath the machine.
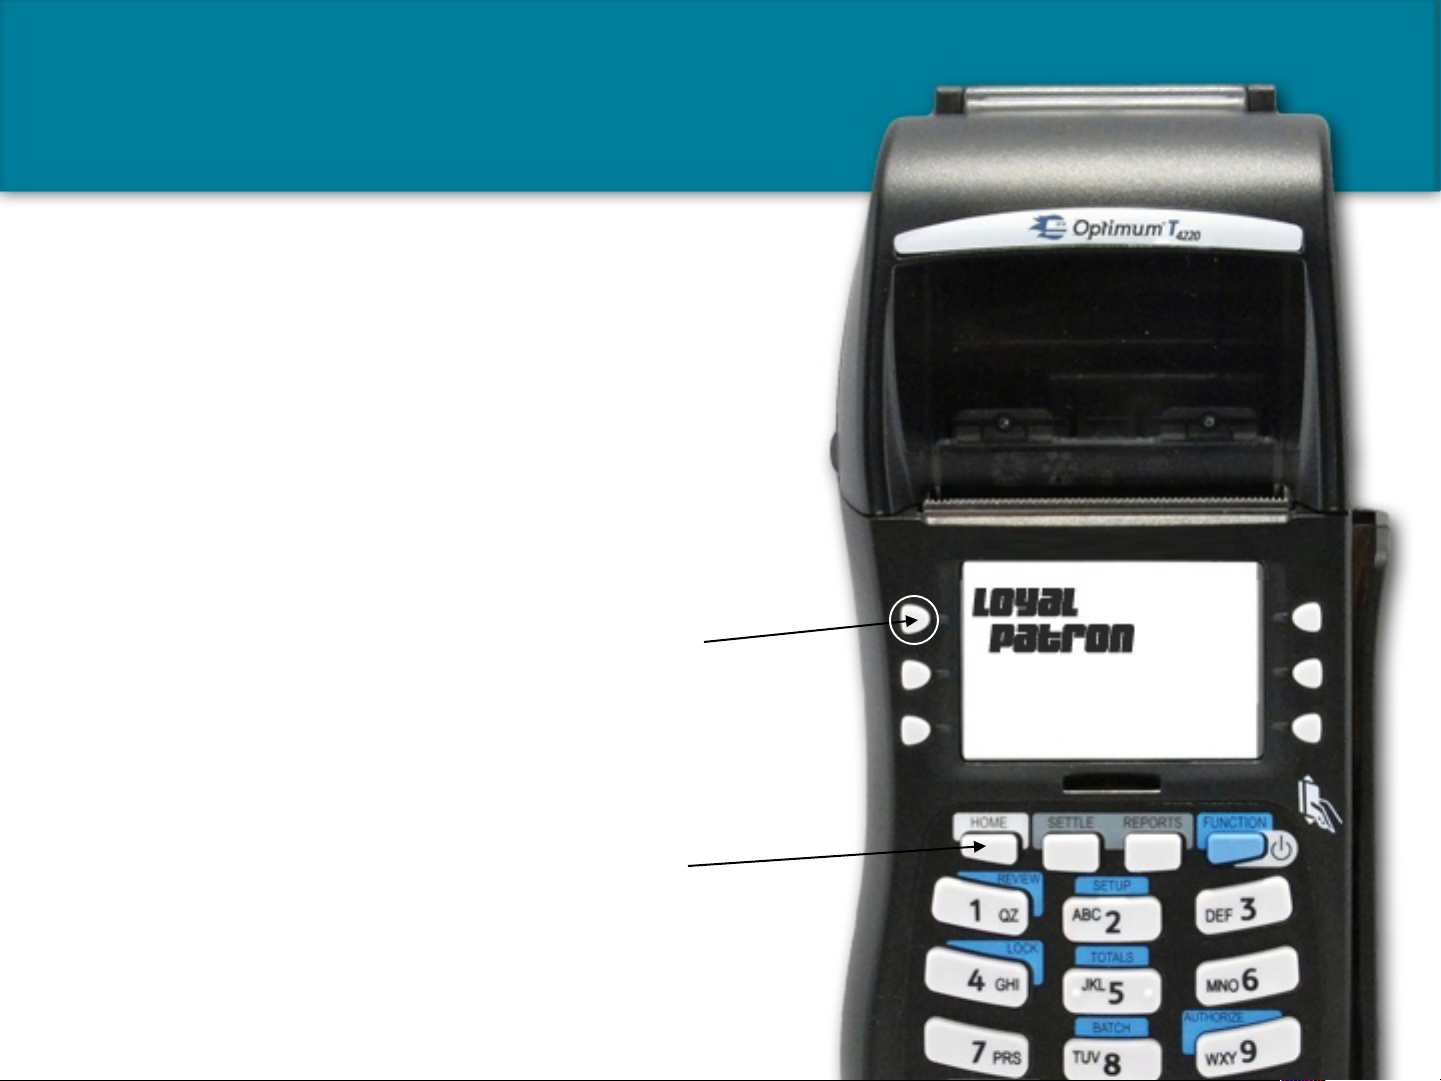
4. Power on the terminal connecting the power cord to an electric outlet. After boot up wait for the screen to stop
moving and select the function key next to the Loyal Patron logo.
Page 3
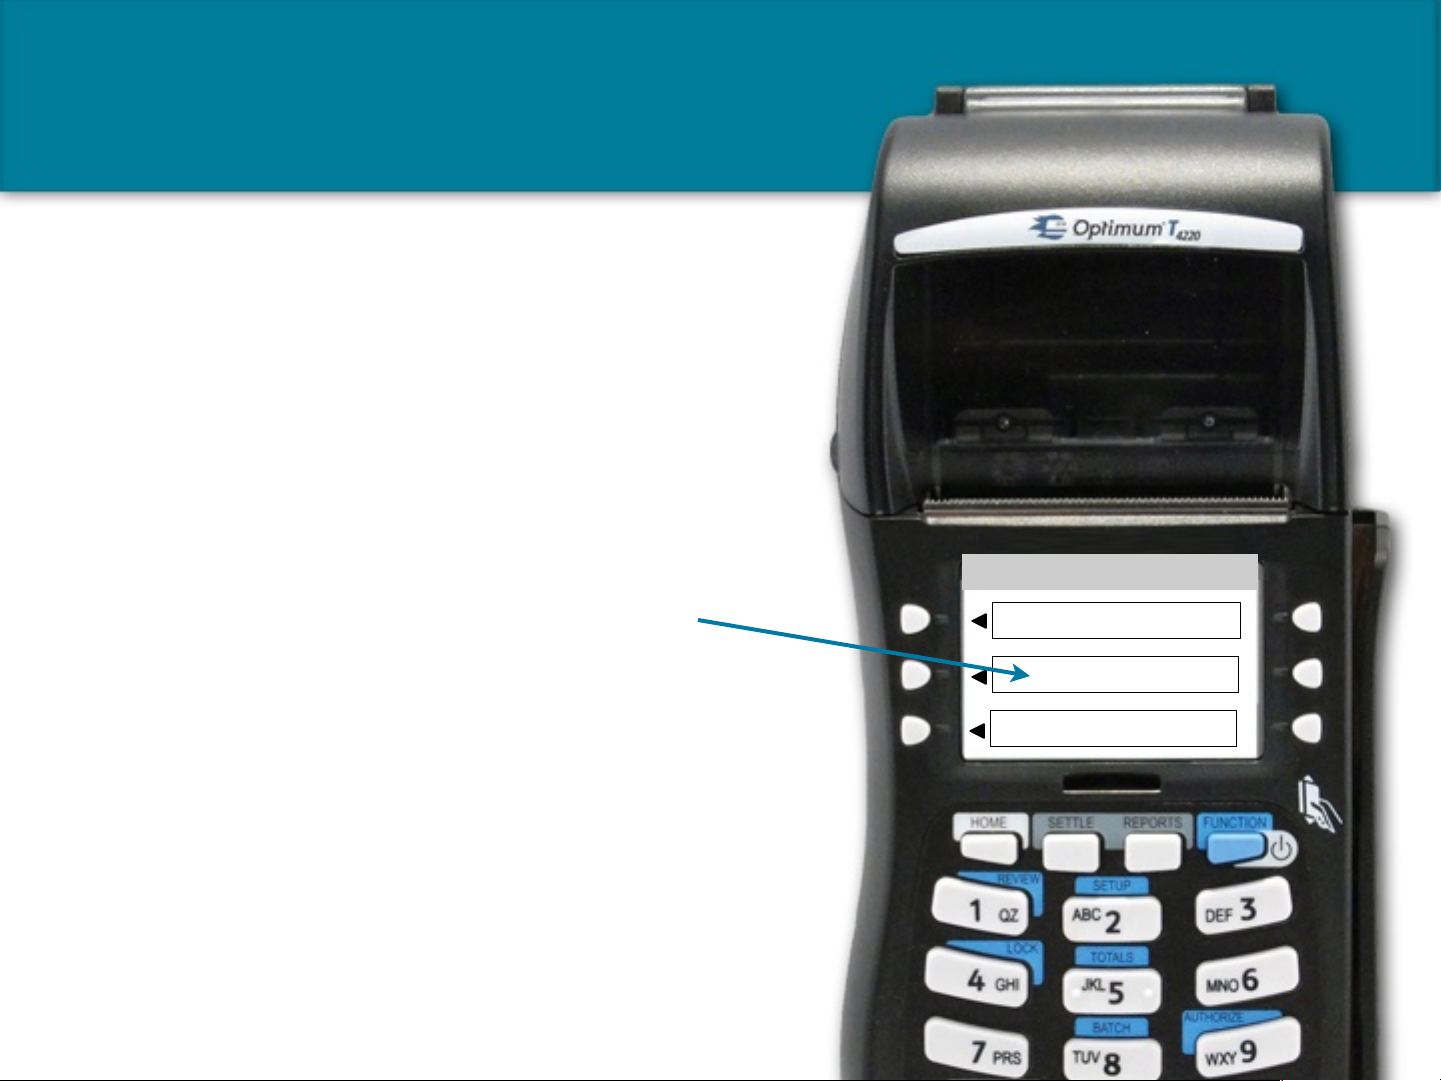
Root Menu Screen
Once the terminal has been powered on and
properly downloaded with software, the root menu
will display all applications that have been loaded
on your terminal.
Your gift and loyalty program and credit card
application (if installed) are completely separate
applications running on different processing
networks.
Press the function key next to LOYAL PATRON
on the root menu screen in order to access your gift
and loyalty program. The function key could be
situated on the left or the right depending on your
configuration.
Press the HOME key on the terminal to toggle
between your credit card application and your
loyalty program (if running both concurrently).
Page 4

Main Menu Screen
The gift and loyalty program main menu features the
three main terminal functions: Record Sale, Balance
Inquiry and Load Value.
Record Sale is the most commonly used function to enter
the sale amount of customer transactions and process
redemptions (if applicable), which drives the calculation of
earned rewards. Clerks can swipe cards at the main menu
screen to initiate a Record Sale transaction by default.
Balance Inquiry enables users to check the activation
status and available balances on a customer’s account in
addition to printing a history of recently processed
transactions.
,
Record Sale
Balance Inquiry
The Load Value function is used to manually add value to
patron accounts such as selling gift or prepaid card
packages.
Press the Report Menu to access reports of recently
processed transactions. Press the MORE purple key to
access the Setup Menu for configuration options. Press the
Red Cancel button to return to the main menu or the star
key to return to the root menu.
Load Value
Page 5

Swipe Card Screen
Go ahead and swipe a card at the main menu to
initiate a Record Sale transaction. If hand-keying the
ID off the back of a card, you do NOT need to enter
the first 4 zeroes.
If a registered customer does not have a card
available, you can enter their mobile number in this
screen in lieu of card ID#.
The mobile number in lieu of card ID transaction will
only process if the customer has registered with their
Mobile Phone #. Otherwise, the system!will return
Invalid Card ID error. An error message will also
return if the user registered more than one (1) card
with the same mobile number since the system
cannot detect which card the customer intended to
use. We recommend keeping the Max Accounts
Per Person value set to 1 in Registration Settings
to prevent customers from registering more than one
(1) loyalty account.
Swipe/Enter Card #:
701000000
Page 6

Record Sale
Amount Screen
On this screen the clerk simply enters the sales ticket
amount for the current transaction. Always enter the
FULL amount of the sales ticket in this screen. Do NOT
discount or adjust the sales amount for a redemption (that
screen comes later). This value should match the POS
system ticket so if a ticket rings up to $12.54 in the POS
system, enter $12.54 on this screen.
It’s up to management whether or not to include tax but
worse case with inputting tax is the customer receives a
few extra in rewards that trigger more spending. We
recommend entering the post-tax amount for this reason
plus you will avoid unpleasant confrontations with
customers when inputting the post-tax amount as
opposed to the pre-tax subtotal.
Record Sale Amount:
12.54
For most configurations, the Sale Amount value must be
greater than $0.00 or an error message will return with
one exception. The Sale Amount screen can only be left
at $0.00 when performing a Widget redemption
transaction (if enabled).
Page 7
Redemption Type Screen
Your gift and loyalty program enables clerks to record the
sale transaction AND process a redemption (removing
value from the patronʼs account) in ONE (1) consolidated
transaction. Select GIFT/RWDS to perform a redemption
for withdrawing funds from the Gift or Rewards balance.
The system automatically withdraws funds from the Gift
Balance first (if available) followed by the Rewards
Balance next by default.
Select Redemption Type
If widgets are enabled on your terminal, select the
function key to perform a redemption of widgets (e.g.,
“Games”, “Kids Meals”, “Draft Beers”, “Car Washes” etc.)
that was customized for your business as a separate
currency in single integer format as opposed to currency
format. The Widget currency is optional and enabled only
at client request.
Selecting NO REDEMPTION assumes the patronʼs sale
only will be recorded for the purposes of issuing rewards
back to the customer. Clerks will select this option unless
the consumer requests to redeem value off his or her
account.
GIFT / REWARDS
APPETIZERS
NO REDEMPTION
Page 8

Gift Rewards
Redemption Process
After selecting Gift / Rewards at the Redemption Type
screen, the clerk will be prompted whether to Redeem All
(Yes or No).
The Redeem All function overrides common Insufficient
Funds errors to force through any rewards redemptions as
long as the account is activated by cashing out any available
balances on the patronʼs account to apply toward the sales
ticket.
When selecting Yes to Redeem All, clerks are required to
collect the balance owed (Remitted Amount) from
customers if the patron’s combined gift and reward balance
cannot cover the total amount of the sale. Select No at the
Redeem All screen prompt to enter a specific value to be
redeemed by the customer.
REDEEM ALL?
YES
NO
The Redeem All feature provides convenience and fast
processing since neither the customer nor the clerk has to
know the patron’s available balances in order to finalize a
transaction. Just make darn sure your clerks collect the
difference between the sale and redemption (Remitted
Amount).
Page 9

Widget Redemption
Amount Screen (if enabled)
Merchants can enable an optional 3rd balance called the
Widget Balance to track loads and redemptions of specific
items in single integer format (1. 2. 3, etc.) as opposed to
currency ($X.XX) format. This extra currency balance can be
named anything you like such as: “Entrees”, “Lunches”,
“Games”, or “Kids Meals” that displays on the printed receipt.
If Widgets are enabled in your account you will see the option
to select the widget at the Redemption Type screen in addition
to Gift/Rwds. After pressing the widget, the clerk will be
prompted to enter a specific number of widgets to be redeemed
by the customer, e.g., 1 or 2 games of bowling, 1 car wash, 3
kids meals etc.
# Of UNITS To Redeem
1
Widget redemption limits can be set on specific card ranges or
membership classes so one group of patrons may have a
redemption limit of 1 or 2 per day while another group of
patrons has no redemption limit to suit promotional strategies.
It is optional for clerks to enter a Sale Amount when
performing a widget redemption. The sale amount screen can
either be left at $0.00 or entered by the clerk. If a sales
amount is entered by the clerk the patron will receive rewards
based on this value.
Page 10

Final Sales
Confirmation Screen
The final confirmation screen provides clerks with the
opportunity to check the accuracy of the transaction details
before finalizing the transaction and printing a receipt.
If a gift/rewards redemption is requested by the patron the
patron will earn rewards on the difference between the sale
and the redemption (The Remitted Amount) which is
explained in more detail on the following slides. Otherwise the
patron will earn rewards on the sale amount entered by the
clerk.
REDEEM 56.55 SALE
Clerks simply press CONFIRM to finalize the transaction and
generate a receipt or press CANCEL to exit the transaction
and return back to the main menu.
The merchant copy of the receipt automatically prints after a
successful transaction. The clerk is prompted with the option
to print a patron copy of the receipt or can cancel and return
back to the main menu.
Assuming the patron activated their account, he or she will
receive a thank you email the next morning reporting current
balances if the Thank You Note is enabled in your
Automated Emails module available from the back office.
CONFIRM
CANCEL
Page 11

Automated Email Marketing (Recommended)
Operators can create a variety of event bonuses and
promotional templates by clicking Event Triggers and
Promotions and Automated Emails when signed
into the back office account with Administrator security
clearance. Basic and Premium templates include:
Thank You Note
•
Happy Birthday
•
Happy Anniversary
•
Black Friday
•
New Yearʼs Day
•
St. Patrickʼs Day
•
Cinco de Mayo
•
Motherʼs Day
•
Fatherʼs Day
•
Valentineʼs Day
•
Independence Day
•
And many more!
•
Once enabled, messages promoting special
bonuses and promotions send out automatically
to the proper patrons in your customer database.
Just!set it and forget it.!
Page 12

Clerks do NOT need to perform any math in their
heads to calculate rewards. The Load Rewards
function on the terminal should NEVER be used to
manually calculate rewards for customers
(a common training mistake).
Please train your clerks to use the Record Sale
function to record customer sales with or without
redemptions and allow the system to automatically
calculate rewards for your customers based on
parameters configured in Edit Rewards page when
logged into the back office.
The Load Value function can be secured so only
managers can process load transactions
(Recommended). See Exhibit D at the back for
more information.
Page 13

SALE
Joe Smith
Sale Amount $23.00
Redeem $10.00 Gift
Remits $13.00
Earns $1.30 Reward
Joeʼs Crispy Chicken Shack
201 E. Main Street
Philadelphia, PA 19103
03/09/2012 1:18:02 PM
Card 10: 107000056
Trans. Num: 2012032565898
Activated: Yes
Trans. Amt: $23.00
Remitted: $13.00
Gift Bal: $0.00
Reward Bal: $1.30
Thank you for visiting.
Come back soon.
MERCHANT COPY
The Printed Receipt
The printed receipt summarizes all relevant transaction
details including displaying the card activation status (Yes
or No) along with current real-time balances available to
redeem toward future purchases.!
In the transaction illustrated on the right, the clerk recorded
a $23.00 sale with a $10.00 gift redemption resulting in a
remitted amount of $13.00 [$23.00 Sale LESS $10.00 Gift
Redemption = $13.00].
As described above, the Remitted Amount represents the
amount of money clerks need to collect from customers in
either cash or credit card. !
Rewards are automatically calculated based on the
Remitted Amount, which represents NEW money spent by
customers. In the example to the right, a $1.30 reward was
accrued by the patron based on a 10% reward ratio
multiplied by the remitted amount [$13.00 x 10% = $1.30].!
Footer messages can be customized by Administrators in
the Locations tab of your online account.
Page 14

SALE
Cardholder
Sale Amount $25.45
Earns $2.55 Reward
Salad Bowl
4065 Harvester
Burlington, ON L7L 5J1
02/29/2012 12:22:04 PM
Card 10: 302739572
Trans. Num: 20120229171925
Activated: Yes
Trans. Amt: $25.45
Gift Bal: $10.00
Reward Bal: $13.55
Games Bal: 10
$2.54 donated to
Colorado Youth Soccer
MERCHANT COPY
Fundraising Transaction Processing
There are two ways merchants can participate in a
fundraising program. (1) Distribute a personalized fundraising
card allocated to a specific non-profit organization that
contains the merchantʼs branding elements, OR (2) Accept a
non-personalized fundraising coalition card distributed and
marketed outside the merchantʼs place of business.""
Fundraising cardholders receive the exact same cash back
rewards as any other card transaction. There is no
difference in how cards are swiped by clerks or how rewards
are generated between fundraising cards and other card
types.""
Fundraising cards, however, trigger a donation accrual back
to a specific non-profit organization based on a % of sales
agreed to by the merchant. This donation accrual is displayed
on the printed receipt and recorded in the database for online
reporting."
Merchants are responsible for funding non-profit
organizations directly for their own subscription fundraisers
using personalized cards. For coalition fundraising
transactions, however, the program administrator performs all
billing and donation disbursements on behalf of participating
merchants.""
Page 15

Patron Online Activation Methods
The activation of a patron’s account is a critical step in your
loyalty program because it represents the collection and
authentication of customer data imported into your private
marketing database.
Customers can activate their accounts online through EITHER
our program website OR your business website if your
webmaster implemented our private labeling instructions.
EMAIL DOUBLE OPT-IN
The standard activation
method of clicking a link
inside a welcome email to
authenticate the patrons
email and activate their
account.
During online registration, your loyalty vendor runs all email
addresses and mobile phone numbers through TowerData, a
3rd party database, to verify the validity of data supplied by
patrons.
When patrons register by email or text, the system confirms the
patron is the owner of the email address or mobile phone
through a double opt in authentication process.
By default, rewards and widgets value (if enabled), whether
earned through sales activity, or received as an activation or
other promotional bonus, can only be redeemed by customers
if their account has been activated. Gift value on the other
hand, can be redeemed regardless of whether the account has
been activated by the customer.
MOBILE TEXT OPT-IN
Upon completing registration,
patrons are prompted to
finalize the activation process
by texting “ACT” to 55678
from their mobile phone.
FACEBOOK
Patrons simply click a button
when signed into their
Facebook account to “Allow”
our system to pull data from
their Facebook profile
including name, email,
birthday and location.
Page 16

Text Keyword to Short Code Activation
Method (Recommended)
The fastest and most efficient activation method is by keyword text to
short code. This method works by advertising your unique keyword to
customers with instructions to text “KEYWORD” to 55678 (USA) or
70734 (Canada) to register their loyalty account and unlock an activation
bonus.
After patrons text your keyword to the short code, patrons tap a link from
their phone to open the mobilized registration form and enter their name,
email address, birthday and anniversary (optional). The fields displayed
required or hidden can be customized in Registration Settings from the
back office when signed in as an Administrator.
Patrons can enter a physical card ID during registration or leave card ID
blank and create a card-less account. Upon registering, patrons will earn
an activation bonus in the form of a fixed reward (i.e., $5 or $10) or a
free widget such as an ʻAppetizerʼ, ʻGameʼ or ʻBeverageʼ as configured in
the Event Triggers and Promotions page from the back office.
Contact Technical Support to request the activation of your unique
keyword, if applicable. You can demo this registration method by texting
“CRISPY” to 55678 from a USA based wireless carrier.
Page 17

SALE
Joe Smith
Sale Amount $23.00
Remits $13.00
Redeem $10.00 Gift
Earns $1.30 Reward
Joeʼs Crispy Chicken Shack
201 E. Main Street
Philadelphia, PA 19103
03/09/2012 1:18:02 PM
Card 10: 107000056
Trans. Num: 2012032565898
Activated: Yes
Trans. Amt: $23.00
Remitted: $13.00
Gift Bal: $0.00
Reward Bal: $1.30
Thank you for visiting.
Come back soon.
MERCHANT COPY
Important Account Activation Rules
By default, patrons MUST activate their loyalty account in
order to redeem rewards value or widgets value that was
EITHER earned through sales activity OR triggered by
bonuses configured in the Event Triggers and
Promotions page of the back office.!
This control is critical to help merchants build an accurate
customer database since consumers have an incentive to
activate in order to redeem balances on their account. Gift
value, however, can be redeemed by clerks regardless of
whether or not the patron's account is activated. !
Clerks can still process sales and gift redemption
transactions even if a patron's account is not activated.
Patrons will not lose their rewards. The rewards will be
unlocked and available for redemption at the point of
activation. ! !!
Clerks can easily check the activation status of a patron's
account by running a balance inquiry or by inspecting the
Activated field on the printed receipt.
Page 18

Help Activating Account Trouble Tickets
IIn some cases, patrons have trouble registering a new account
OR register their account online but fail to follow the final
activation step that certifies their mobile number or email
address through double opt-in authentication.
Your loyalty vendor provides a Help Registering trouble ticket
service available from the online activation form (either our
website or your website if your webmaster implemented our
private labeling instructions). This service assists patrons
complete the registration and/or final activation step. These
tickets are resolved by your loyalty vendorʼs Technical Support
Department, usually within one business day.
Please direct your customers to the Help Registering link
online when they have difficulty activating an account and let us
resolve their issue.
Page 19

Balance Inquiry Screen
The Balance Inquiry function allows clerks to check
available patron balances, activation status and recent
transaction history without actually processing a
transaction.
Press the DISPLAY option to show the patron’s currently
available balances and activation status on screen only.
Press PRINT to generate a paper receipt (Balances
Report) showing the patron’s current balance, activation
status and most recent transaction details.
DISPLAY OR PRINT
DISPLAY
More detailed transaction history and sorting options can
be viewed on the Patron Activity Report available online
from Patron Search and View in your back office account.
PRINT
Page 20

Load Value Function
There are up to three separate currencies (balances) that
appear on the printed receipt: Gift, Rewards, and the optional
Widgets balance. All currencies can be manually loaded to
execute a variety of prepaid strategies to drive visitation and
frequency.
Gift value is commonly loaded when customers buy gift cards
or load their account with value in advance to take advantage
of a prepaid promotions strategy.
The customizable Widgets balance (e.g., “Games”,
“Appetizers”, “Beverages”) is commonly preloaded to drive
frequency with redemption limits of 1 or 2 per day.
SELECT LOAD TYPE
GIFT
REWARDS
Rewards value is commonly loaded to assuage customers
during a complaint or dispute situation and manually adjust
rewards for patrons.
We can disable any of the above Load Value functions from
appearing on the terminal or add a Manager Password so
only authorized personnel who know the passcode can access
the Load Value function. Refer to Exhibit D in the back of the
slideshow for instructions on enabling the Manager Password.
GAMES
Page 21

Load Gift Value Screen
Letʼs now walk through a Load Gift transaction. The
Load Widgets and Load Reward transactions follow
the exact same process.
Enter the exact amount of value being purchased by the
customer or manually loaded to run a prepaid marketing
strategy. In this example, we are loading $20.00 to the
Gift Balance side of the patronʼs account.
After successful processing, the transaction details
appear immediately on your online Reconciliation Report
in real-time denoted by the Load Gift transaction type.
Administrators can use the Fraud Monitor Settings utility
available online to flag any Load Value transactions equal
or exceeding a predetermined threshold. Flagged
transactions appear on the Fraud Monitoring Report for
management review.
Refer to Exhibit D in the back of this slideshow for
instructions on adding a Manager Password over all Load
Value functions.
GIFT Value to Load:
20.00
Page 22

Final Load Gift
Confirmation Screen
The final confirmation screen provides clerks with the
opportunity to check the accuracy of the transaction
details before processing and printing a receipt.
Clerks can either select CONFIRM to finalize the
transaction or press CANCEL to exit the transaction
without processing and return back to the main menu.
The merchant copy of the receipt automatically prints
after a successful transaction. The clerk is prompted with
the option to print a patron copy of the receipt or can
cancel and return back to the main menu.
LOAD $20.00 GIFT?
CONFIRM
CANCEL
Follow the same process noted above for Load Reward
or Load Widgets transactions, as applicable.
Page 23

Terminal Reports
Unlike credit card processing, there is no settlement or batching
function available or necessary in the gift and loyalty program.
All transaction activity and subsequent reporting occurs in realtime and is available on demand anytime by clicking
Reconciliation Report from the back office.
Clerks can access the Reconciliation Report directly from the
terminal by pressing the down arrow from the loyalty main menu
and selecting Report Menu.
Select Detail Report to pull line item details of each transaction
processed during a specific time period or select Summary
Report to view summary totals across transaction types.
Report activity is available for the present day (Today), the
previous day (Yesterday) or from two days ago (Two Days
Ago). Select appropriate time period to print out desired report.
Remember, the terminal reports will always match the detail or
summary areas of the Reconciliation Report available online for
the specific time period.
The Reconciliation Report can be emailed to authorized
managers each morning on a daily basis which summarizes all
transactions activity from the previous day. Click the appropriate
User profile in the back office account to enable this setting.
REPORT MENU
Detail Report
Summary Report
Page 24

Voiding Transactions
Similar to voiding a credit card transaction, any gift or
loyalty transaction can be voided as if it never happened.
Clerks or managers can void a previously processed
transaction directly from the terminal by pressing the down
arrow at the loyalty main menu screen and selecting Void
Transaction.
Swipe or hand-key the card ID# or patronʼs mobile number
associated with the void transaction. On the Void How?
Screen, select either VOID LAST to void the most recently
processed transaction OR select BY TRN# to void a
specific transaction identified by its transaction number
printed on the receipt.
VOID HOW?
VOID LAST
BY TRN#
If the printed receipt is not available, you can locate the
transaction number from the Reconciliation Report
available online. Click Display Trans Number in Display
Options and enter the transaction number in the terminal
screen or just process the void through the Internet
Terminal.
All void transaction activity is automatically reported on the
Fraud Monitoring Report for management review.
Page 25
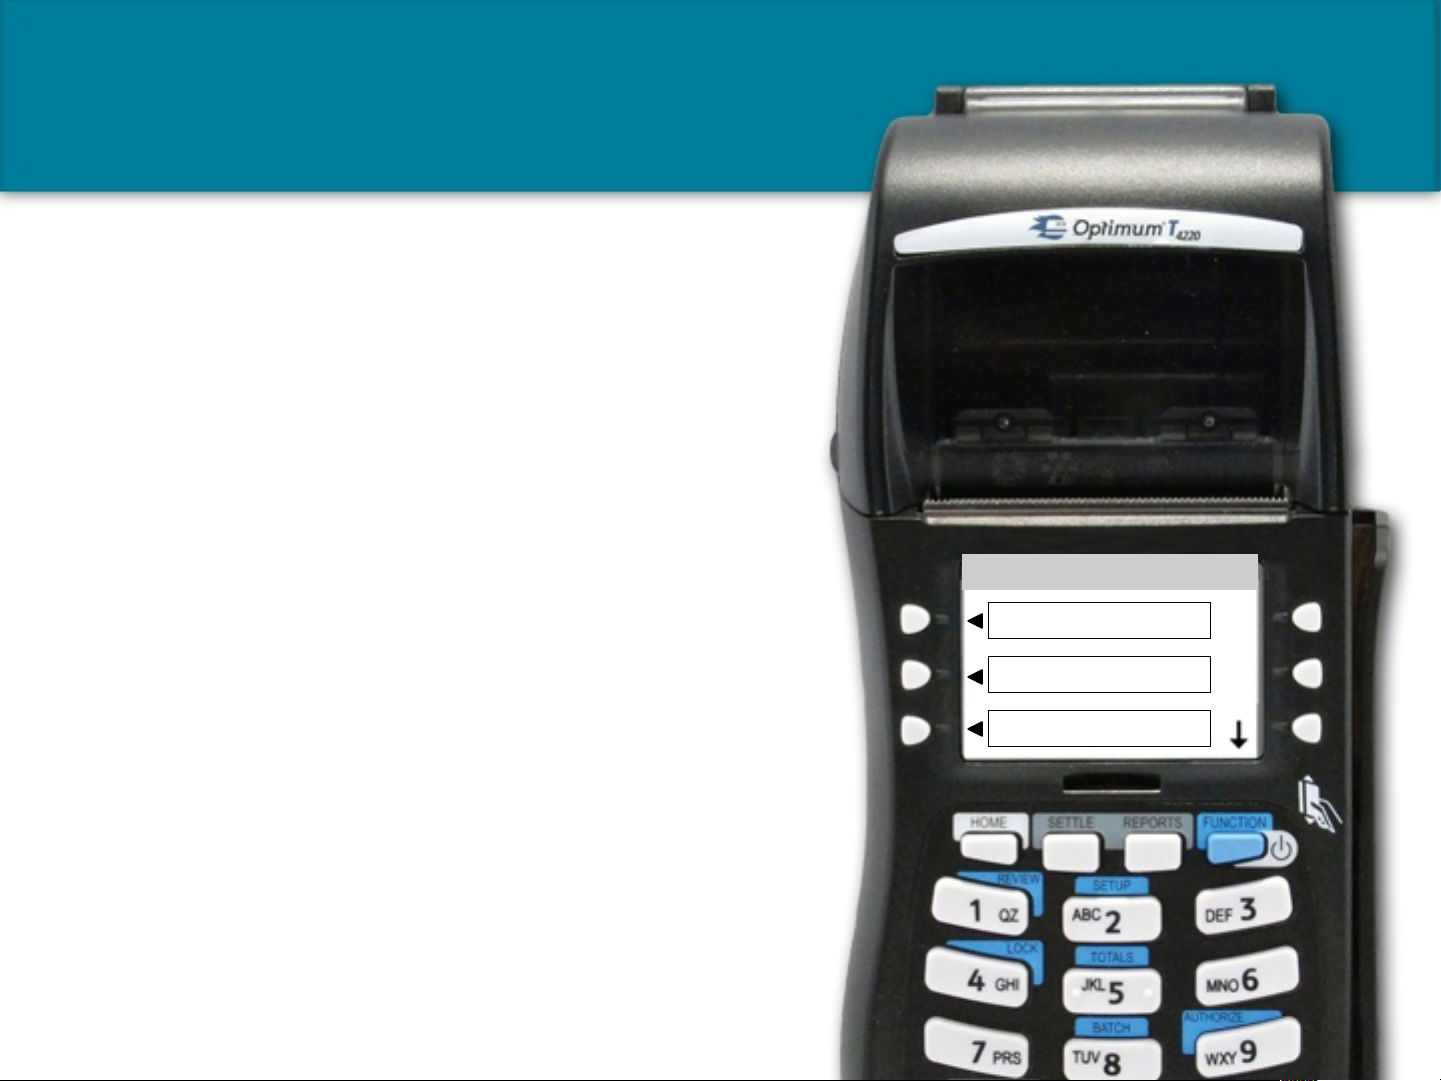
Exhibit A: Connectivity
Switching Terminal Connectivity from Dial-Up to
Internet (or vice versa) on T4220 Dual Com
Launch the loyalty program by selecting LOYAL PATRON
at the root menu screen to access the loyalty main menu
where Record Sale, Balance Inquiry and Load Value
functions are displayed. Press the down arrow and select
Setup Menu.
Select TERMINAL and when prompted, enter default
Manager Password of 92266831 and press Enter. If you
already changed the default Manager password, then enter
the new password value here instead of 92266831.
PRIMARY COMM LINK
PRIMARY COMM LINK
PREV
NEXT
Select NEXT once to display PRIMARY COMM LINK. Click
EDIT and observe value. The value should be set to 2 for
Ethernet (IP) processing or 1 for dialup processing. Press
the desired value on the keypad and select ENTER to save
changes.
Exit back to loyalty main menu and re-run a test transaction
to verify successful processing and receipt printing. If
problems persist, check cabling, try rebooting terminal and/
or router or call Technical Support for assistance.
EDIT
Page 26

Exhibit B: Dial Backup
Enabling or Disabling Dial Backup on T4220 Dual Com
If you intend to run a telephone line for auto dial-backup
(recommended) or wish to disable the auto dial backup
feature follow the procedures below to enable / disable the
function.
1. From the loyalty program menu, press the down arrow
and select the function Setup Menu.
2. Select Modem and when prompted, enter default Manager
Password of 92266831 and press Enter.!If you already
changed the default Manager password, then enter the
new password value here instead of 92266831.
3. Press the NEXT button until you see DIAL BACKUP?.!!
4. Select EDIT.!A value of 0 means the terminal will NOT
try to dial out to process a transaction if an Internet
connection cannot be located.!A value of 1 means the
terminal will attempt to dial out through a telephone line
if an Internet connection cannot be located. Set desired
value of 0 (No Backup) or 1 (Backup Enabled) and
press ENTER to save changes.!! $
DIAL BACKUP?
PREV
NEXT
EDIT
Page 27

Exhibit C: Enabling Clerk IDs
Enabling Clerk IDs for Linking Employees
to Specific Transactions
When Clerk IDs are enabled, clerks are
prompted to enter a specific numeric code (Clerk
ID) before finalizing a transaction on the terminal.
This code or ID is then validated for accuracy
against the database during processing. An error
message is returned if the clerk ID is entered
incorrectly.
Clerk IDs can be any character length of digits
such as the employee's Server ID in the POS
system or last 4 digits of their social security
number.
When enabled, Clerk IDs are published on all relevant reports including the Reconciliation Report and
applicable Fraud Monitoring Reports so management can link specific employees back to specific
transactions at a glance.
Setting up Clerk IDs should be initiated from your online account.!Login to your account online and then
click Terminal Only Clerks in the Users area.!Then click the Help button at the top for detailed
instructions for enabling Clerk IDs.!!
Page 28

Exhibit D: Enabling Manager Password
Enabling Manager Password on Load Value Transactions
You have two (2) options for setting manager passwords to lock down
the Load Value function. Operators can elect one of the following
options or enable both for ultimate security.
Option 1: Manager / Administrator ID Validation
This option validates the Clerk ID entered by the employee has either
Manager or Administrator security clearance as setup in the Users
area of the back office. If the employee has Clerk clearance the Load
Value transaction will fail and return an error. Turn on this feature by
first enabling Clerk IDs as described in Exhibit C.
Once Clerk IDs are enabled, log into your account online, click your
Locations tab(s) and check the box for Require Manager
Password for Load Value. Verify BOTH checkboxes are enabled as
shown below.
Page 29

Exhibit D: Enabling Manager Password
Option 2: Set Hard Coded Terminal Password
This option adds a hard coded password prompt to the terminal itself so
only users who input the correct password can even access the Load
Value screens. Follow the instructions below:
1. From the loyalty program main menu, press the down arrow and
select Setup Menu.
2. Select TERMINAL and when prompted, enter default Manager
Password of 92266831 and press Enter. If you already changed the
default Manager password, then enter the new password value here
instead of 92266831.
3. Select NEXT until you see ENABLE MANAGER PWD? Click EDIT
and observe value. The value should be set to 1 to enable the
password over Load Value functions or set to 0 to disable it. Press
the desired value on the keypad and select ENTER to save changes.
4. Select NEXT until you see MANAGER PASSWORD. Click Edit and
observe value. Change the default password to any combination of
digits you like that only authorized users will know. Press ENTER to
save changes.
Page 30

 Loading...