

Page 1
KEEPING THE WORLD SEWING
User’s Guide
Prelude 350, 370
Page 2

This houshold sewing machine is designed to comply with IEC/EN 60335-2-28 and UL1594
IMPORTANT SAFETY INSTRUCTIONS
When using an electrical appliance, basic safety precautions should always be followed,
including the following:
Read all instructions before using this household sewing machine.
DANGER - To reduce the risk of electric shock:
• A sewing machine should never be left unattended when plugged in. Always unplug this
sewing machine from the electric outlet immediately after using and before cleaning.
• Always unplug before relamping. Replace bulb with same type rated 15 Watt.
WARNING - To reduce the risk of burns, fi re, elec-
tric shock, or injury to persons:
• Do not allow to be used as a toy. Close attention is necessary when this sewing machine
is used by or near children and infi rm persons.
• Use this sewing machine only for its intended use as described in this manual. Use only
attachments recommended by the manufacturer as contained in this manual.
• Never operate this sewing machine if it has a damaged cord or plug, if it is not working
properly, if it has been dropped or damaged, or dropped into water. Return the sewing
machine to the nearest authorized dealer or service center for examination, repair,
electrical or mechanical adjustment.
• Never operate the sewing machine with any air openings blocked. Keep ventilation
openings of the sewing machine and foot controller free from the accumulation of lint,
dust, and loose cloth.
• Keep fi ngers away from all moving parts. Special care is required around the sewing
machine needle.
• Always use the proper needle plate. The wrong plate can cause the needle to break.
• Do not use bent needles.
• Do not pull or push fabric while stitching. It may defl ect the needle causing it to break.
• Switch the sewing machine off (“0”) when making any adjustment in the needle area,
such as threading needle, changing needle, threading bobbin, or changing presser foot,
etc.
• Always unplug sewing machine from the electrical outlet when removing covers,
lubricating, or when making any other user servicing adjustments mentioned in the
instruction manual.
• Never drop or insert any object into any opening.
• Do not use outdoors.
• Do not operate where aerosol (spray) products are being used or where oxygen is being
administrated.
• To disconnect, turn all controls to the off (“0”) position, then remove plug from outlet.
• Do not unplug by pulling on cord. To unplug, grasp the plug, not the cord.
SAVE THESE INSTRUCTIONS
Page 3

1
Table of Contents
Overview 2
Procedures 3-13
Unpacking, Packing Away After Sewing 3
Connecting the Foot Control 4
Connecting to the Power Supply 4
Accessory Box, Extended Sewing Surface 5
Spool Pin 6
Threading the Upper Thread 7
Bobbin Winding with the Machine
Threaded 7
Bobbin Winding – Vertical Spool Pin 8
Placing the Bobbin in the Machine 8
Thread tension 9
Changing the Needle, Changing the
Presser Foot 10
Presser Foot Pressure, Presser Foot Lever 10
Reverse, Lowering the Feed Teeth 11
Stitch Selection 12
Stitch Width, Stitch Length 13
Sewing 14-28
Guide Stitch Selection 14
Buttonholes 16
Perfectly Balanced Buttonholes (PBB) 17
Sewing Buttons, Cutting Buttonholes 18
Straight Stitch, Clearance Plate 19
Sewing Zippers, Lapped Zipper 20
Reinforced Straight Stitch 21
Needle Positions 21
Zigzag, Three-step Zigzag, Mending
and Darning 22
Sewing Terry Cloth, Seam and overcast 23
Blind Hem 24
Flatlock – Double Action Stitch,
model 370 25
Gathering Foot 26
Quilter’s 1/4” Piecing Foot 26
Transparent Foot B 27
Non-stick Glide Foot H 27
Decorative Stitches, model 370 28
Maintenance 29-30
Trouble Shooting 31-32
Some fabrics have a lot of excess dye which can cause discoloration on other fabric but also on
your sewing machine. This discoloring may be very diffi cult or impossible to remove.
Fleece and denim fabric in especially red and blue often contain a lot of excess dye.
If you suspect that your fabric/ready-to-wear garment contains a lot of excess dye, always pre-
wash it before sewing to avoid the discoloring.
Page 4
2
1.
2
.
3.
4.
5.
6.
7.
8.
9.
10.
11.
12.
13.
14.
15
.
16.
19.
18.
17.
20.
21.
22.
23.
24.
25.
30.
26.
28.
27.
29.
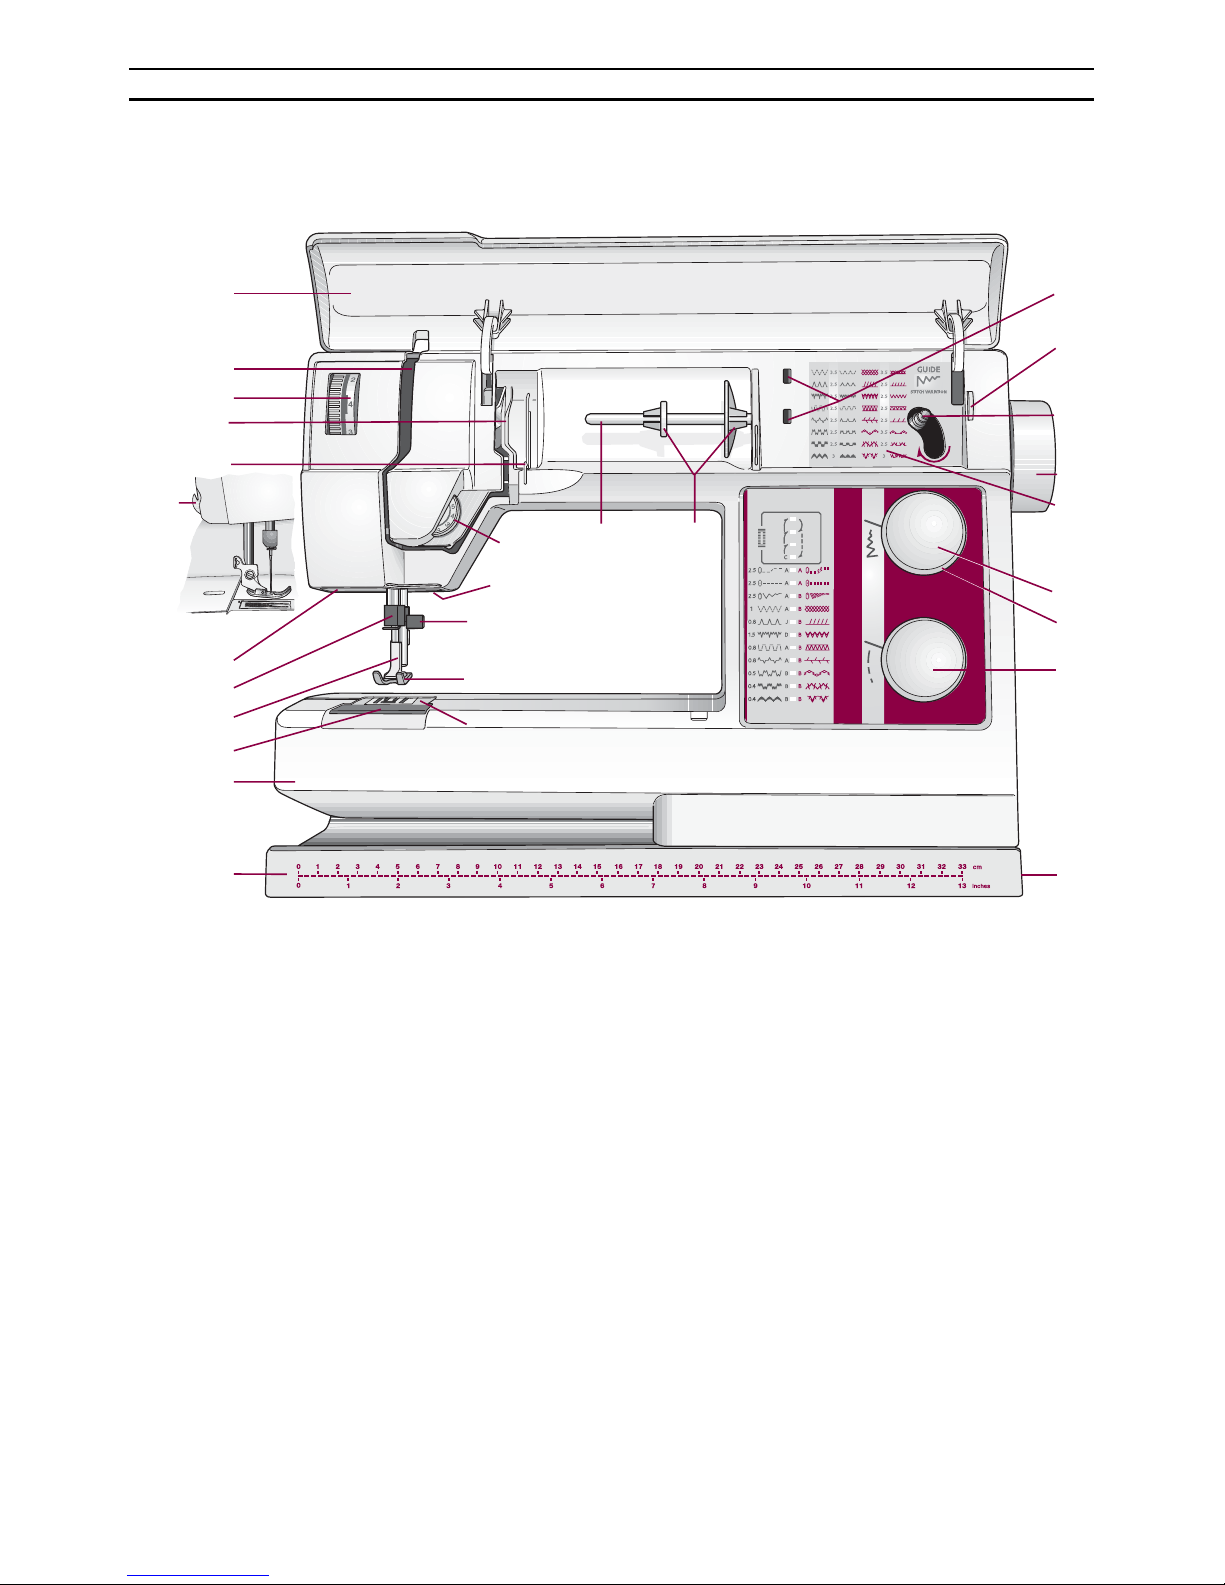
1. Lid
2. Thread take-up lever
3. Presser foot pressure dial
4. Thread guide
5. Thread guide for bobbin winding
6. Light
7. Needle bar with needle clamp
8. Presser bar and Presser foot ankle
9. Presser foot
10. Bobbin cover
11. Free arm
12. Base plate
13. Needle plate
14. Needle clamp screw
15. Presser foot lever
16. Thread tension dial
17. Spool pin
18. Spool holders
19. Thread cutter for bobbin winding
20. Recess for additional spool pin
21. Guide Stitch Variation, model 370
22. Bobbin spindle
23. Handwheel
24. Stitch selector
25. Stitch width dial
26. Stitch length dial
27. Reverse
28. Drop feed teeth
29. Main power switch, Connection to
power supply
30. Thread cutter
Overview
This book applies both to the 350 model and the 370. Should there be any difference in operation or
features we have pointed that out separately.
Page 5
3
Procedures
Unpacking
1. Place the machine on the table or cabinet and
lift off the cover.
2. The machine is delivered with a hard protective cover, a foot control, an accessory box, a
bag with accessories, a foot control cord and a
main cord.
3. Wipe the machine, particularly around the
needle and needle plate to remove any soil
before sewing.
Packing Away After Sewing
1. Unplug the cords from the wall socket and the
machine.
2. Wind the cords around your hand and place
the foot control cord in the foot control
storage space and the main cord in the pocket
of the cover. There is also space provided for
the User’s Guide.
3. Check to ensure that all accessories are in the
accessory box. Slide it onto the machine behind
the free arm.
4. Lower the presser foot.
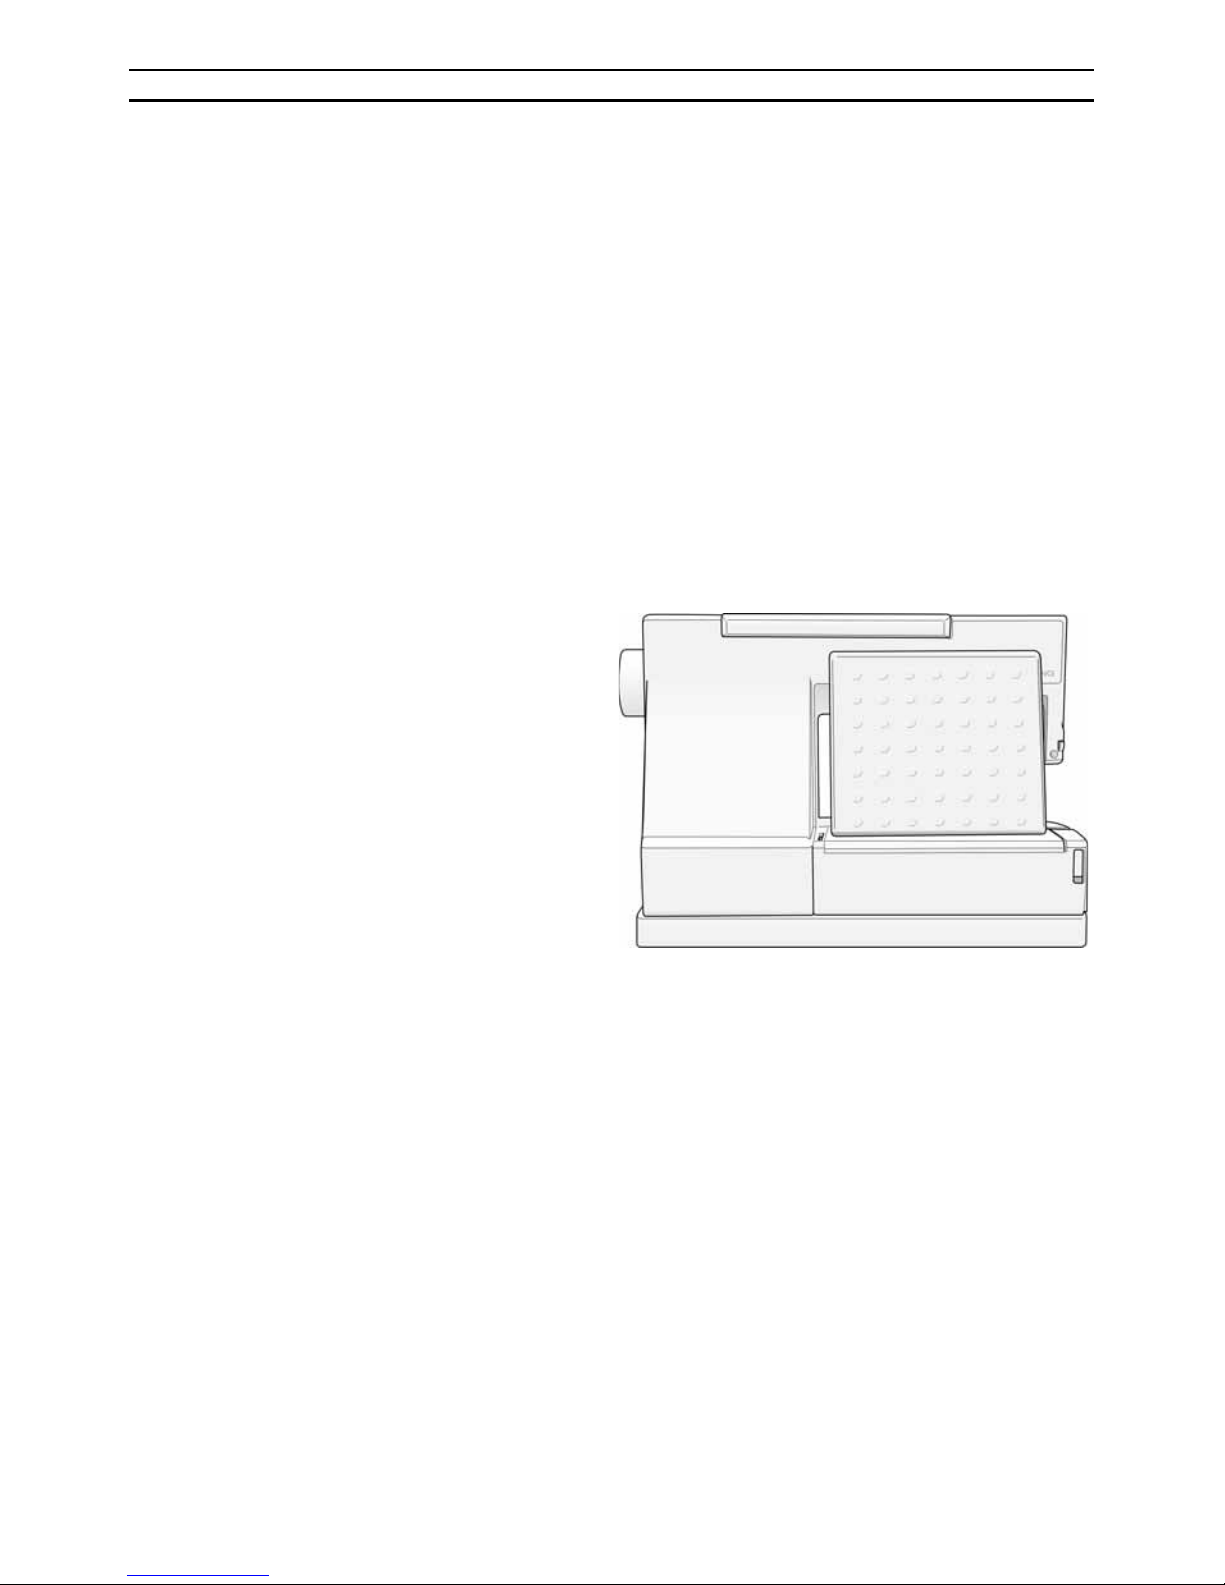
5. Place the foot control, underside toward
you, on the accessory tray at the back of the
machine. Fold up the handle and replace the
cover.
Page 6
4
1.3. 2.
Procedures
Connecting the Foot Control
Among the accessories you will fi nd the foot con-
trol cord and the main cord.
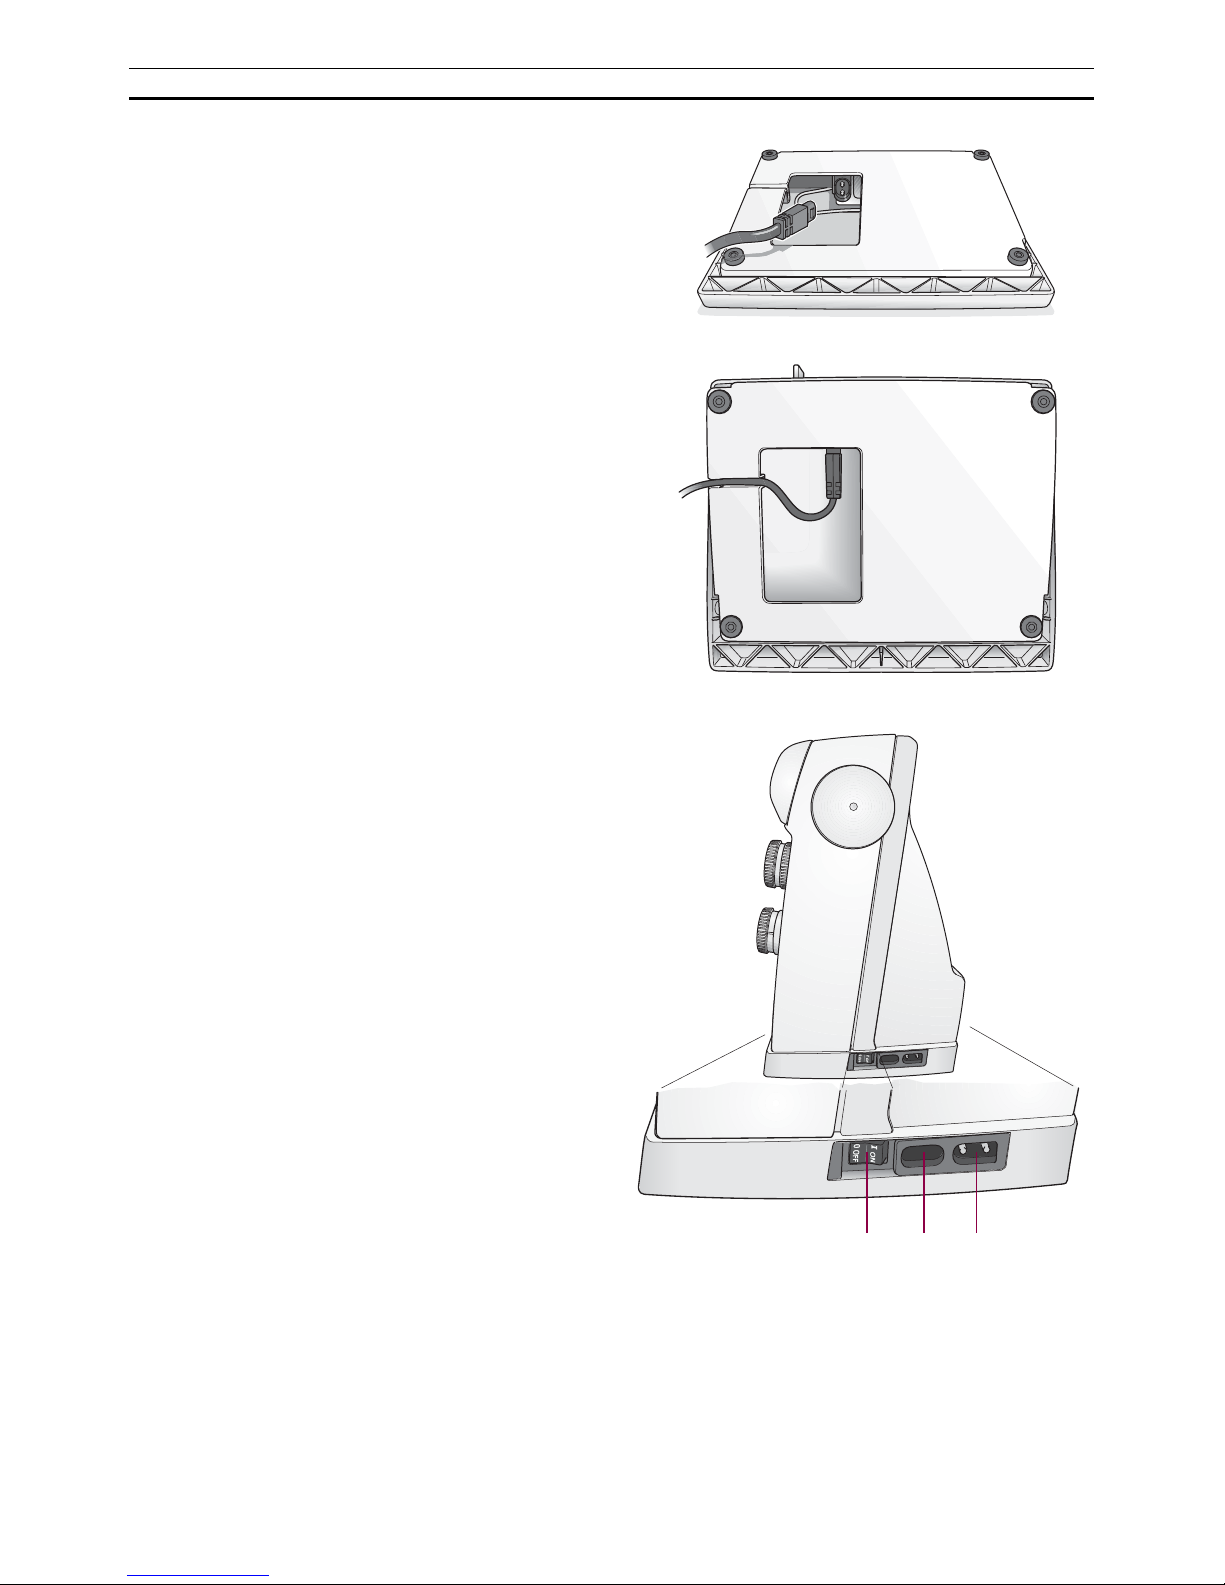
1. Remove the foot control cord. Place the foot
control on its narrow side. Fit the plug into the
socket inside the foot control compartment.
2. Push it fi rmly to make sure it is properly
connected. This operation is only necessary
the very fi rst time you are going to use the
machine.
3. To correctly turn away the cord, place it into
the slot.
Note: Before plugging in, check to ensure that
the foot control is of type ”FR4”.
Connecting to the Power
Supply
On the underside of the machine you will fi nd
information about the power supply (V) and the
frequency (Hz). Check the power supply setting
in the machine to ensure that this agrees with the
main supply before you connect the machine.
1. Connect the foot control cord to the fi rst
socket on the bottom right side of the
machine.
2. Connect the main cord to the back socket on
the bottom right side of the machine.
3. When you press the power switch, both the
machine and the light are switched on.
For the USA and Canada
This Sewing Machine has a polarized plug (one
blade wider than the other). To reduce the risk
of electric shock, this plug is intended to fi t in a
polarized outlet only one way. If the plug does
not fi t fully in the outlet, reverse the plug. If it
still does not fi t, contact a qualifi ed electrician to
install the proper outlet. Do not modify the plug
in any way.
Page 7
5
Procedures
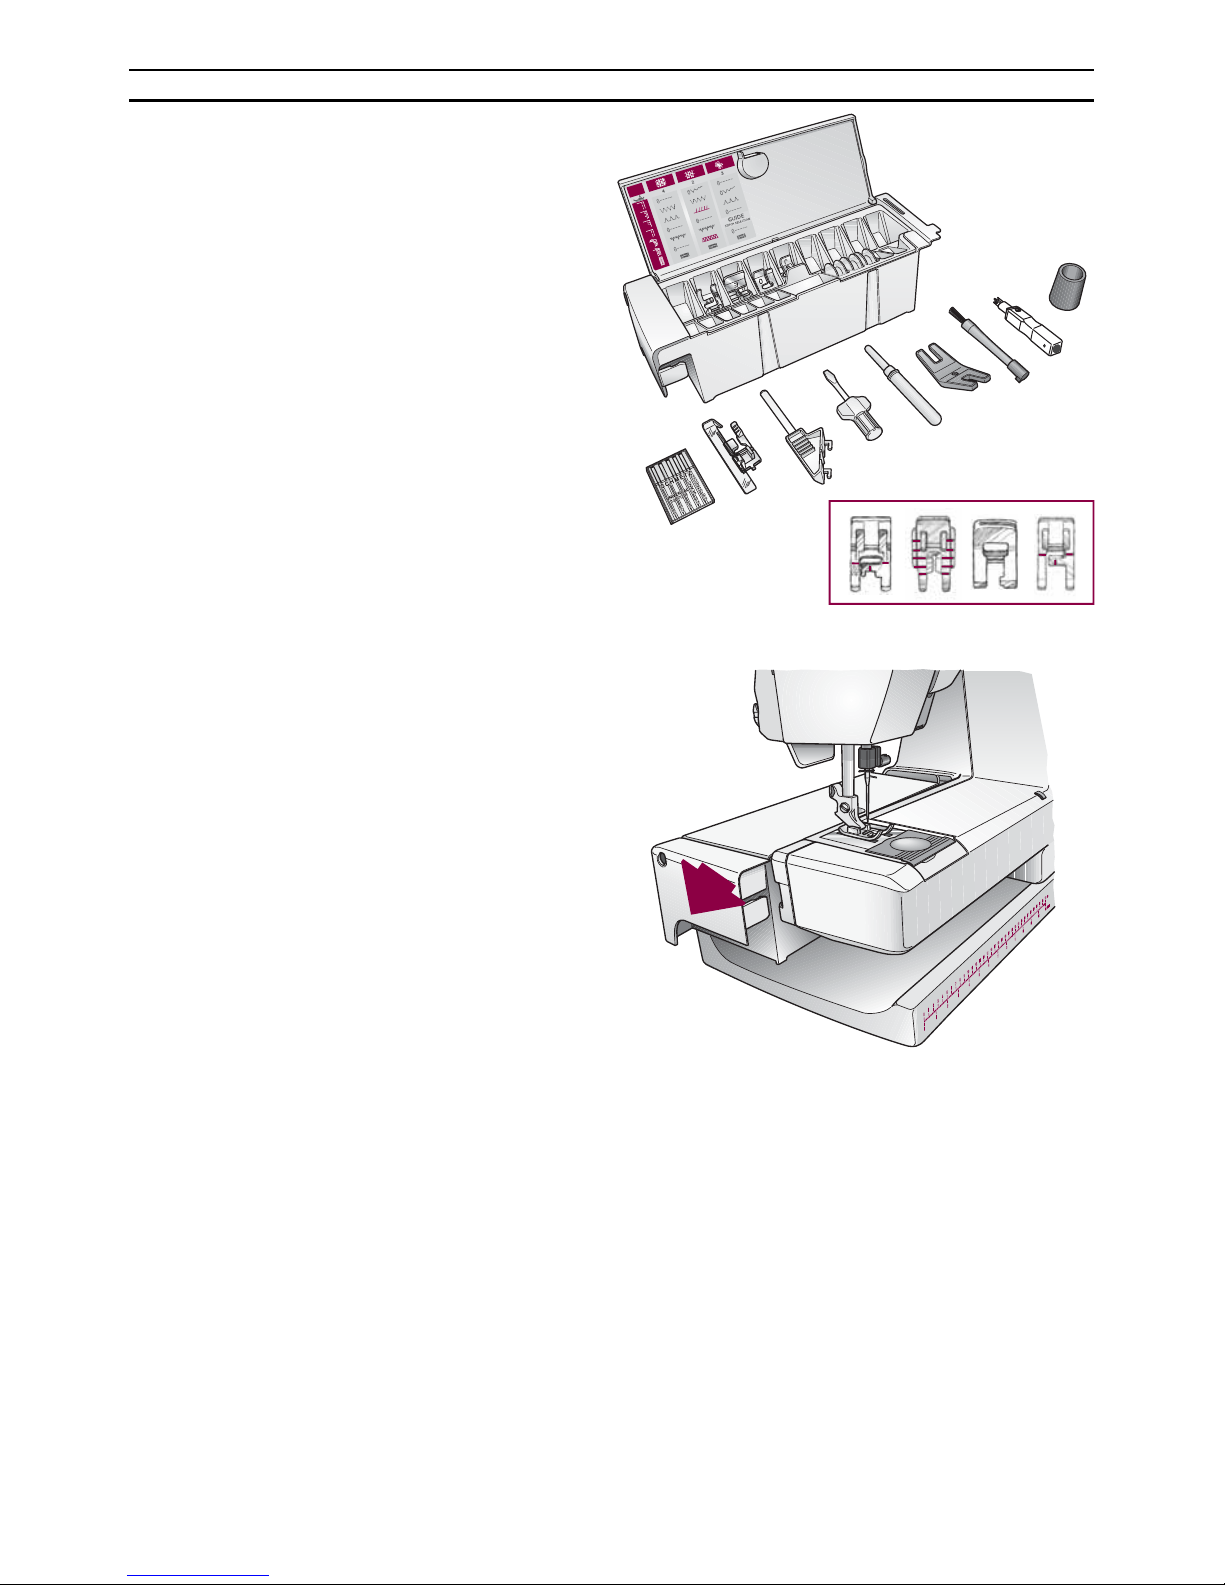
Accessory Box
1. Open the accessory box by placing your fi nger
in the space on the top and lift upward.
2. In the accessory box there is a special tray for
presser feet and bobbins plus space for other
accessories.
3. Store the presser feet and the bobbins in the
tray from the beginning so they are always
easily accessible (refer to the fi gure).
Extended Sewing Surface
1. Slide the accessory box onto the machine to
provide a larger fl at work surface.
2. Slide the accessory box to the left when you
wish to remove it and use the free arm.
3. To facilitate sewing trouser legs and sleeve
hems use the free arm. The free arm also
allows you to darn socks (darning foot is an
accessory).
4. To replace the accessory box, slide it tight onto
the machine.
An extension table is also available as an accessory
to provide an even larger sewingsurface.
Page 8
6
a
d
b
c
c
d
Procedures
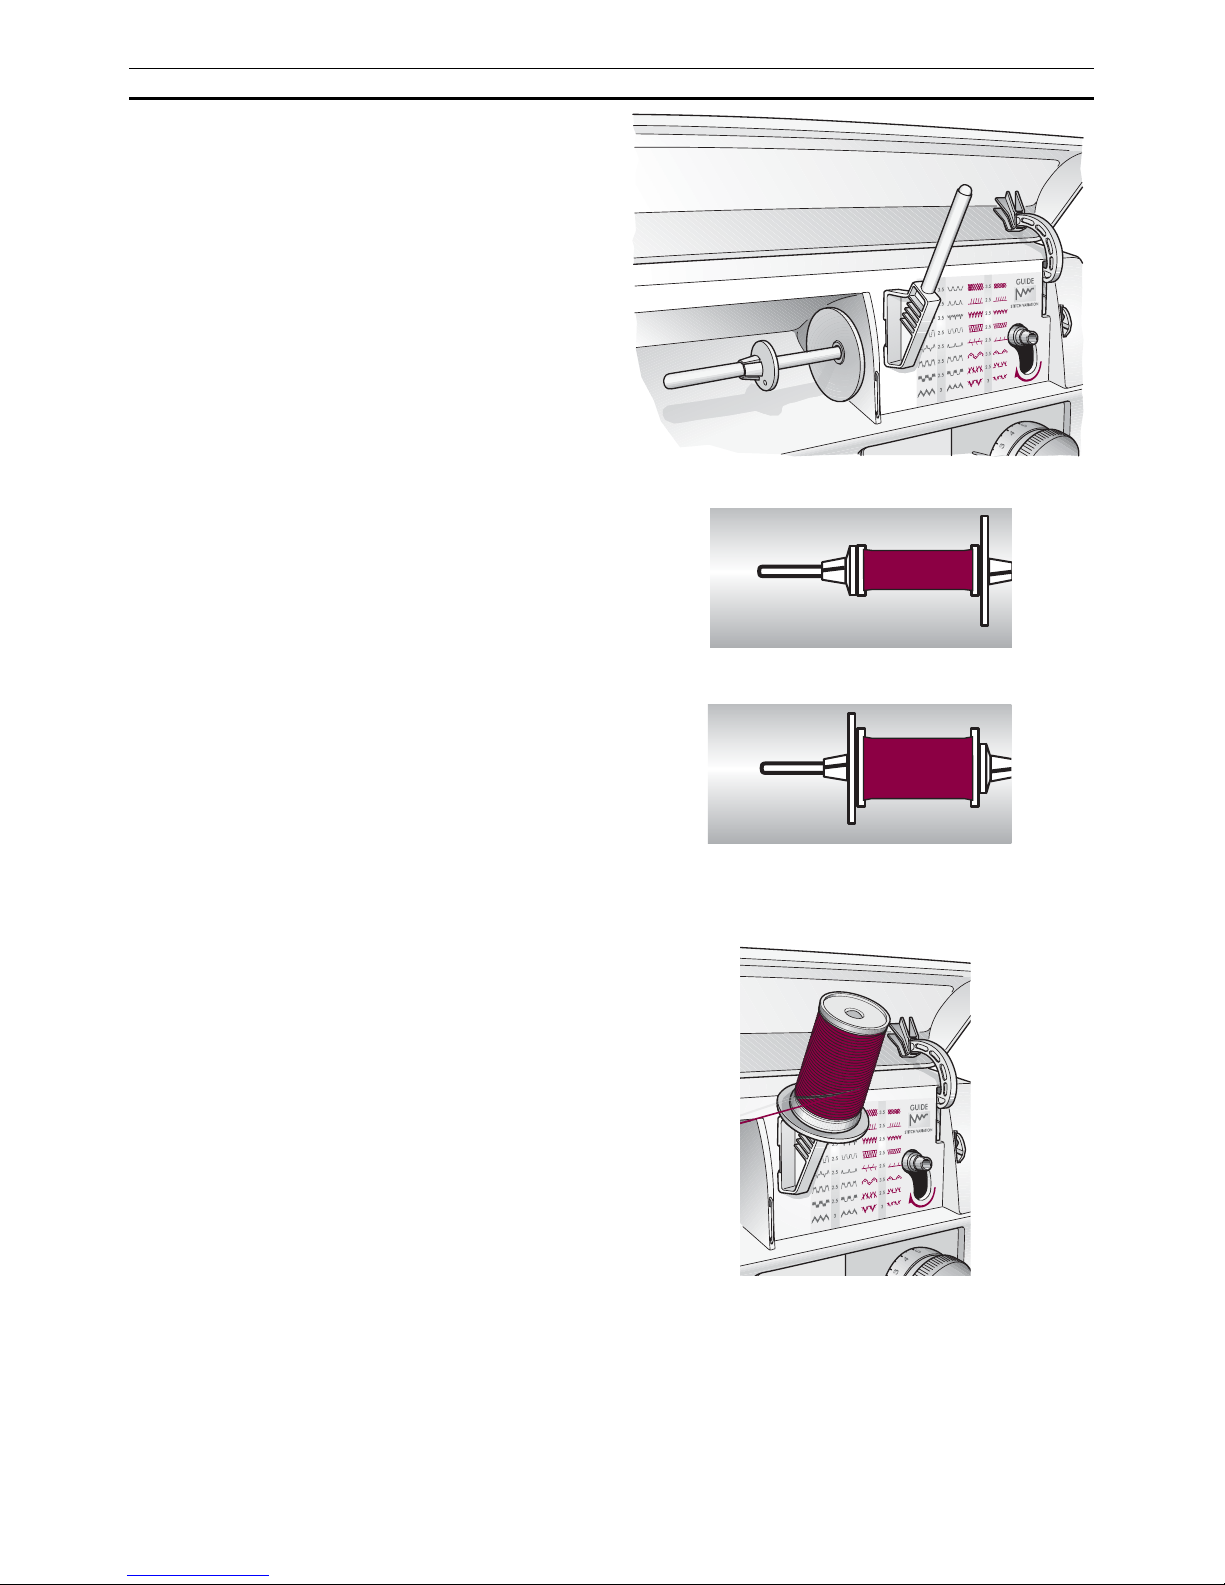
Spool Pin
The machine has spool pins suitable for all types
of thread. The main spool pin (a) is adjustable –
the thread reels off the stationary spool. Place the
spool so that the thread reels counter-clockwise.
There are two spool holders on the spool pin.
With narrow thread spools, the small holder (b)
is placed in front of the thread. If you use large
thread spools, the large holder (c) is placed in
front of the thread.
Slide the correct size spool holder in place so the
fl at side is pressed fi rmly against the spool. No
space between spool holder and spool.
There is also a separate spool pin (d) to be
attached onto the machine. The fi ngers on the
extra spool pin fi t into the two holes to the right
of the fi xed spool pin. Push downward to snap
in place.
The large spool holder (c) is placed under the
thread. This spool pin is used when winding a
bobbin from a second spool of thread or for a
second spool when sewing with a twin needle.
Narrow thread spool
Large thread spool
Page 9
7
1.
3.
5.
7.
b
2.
4.
6.
a
c
d
Procedures
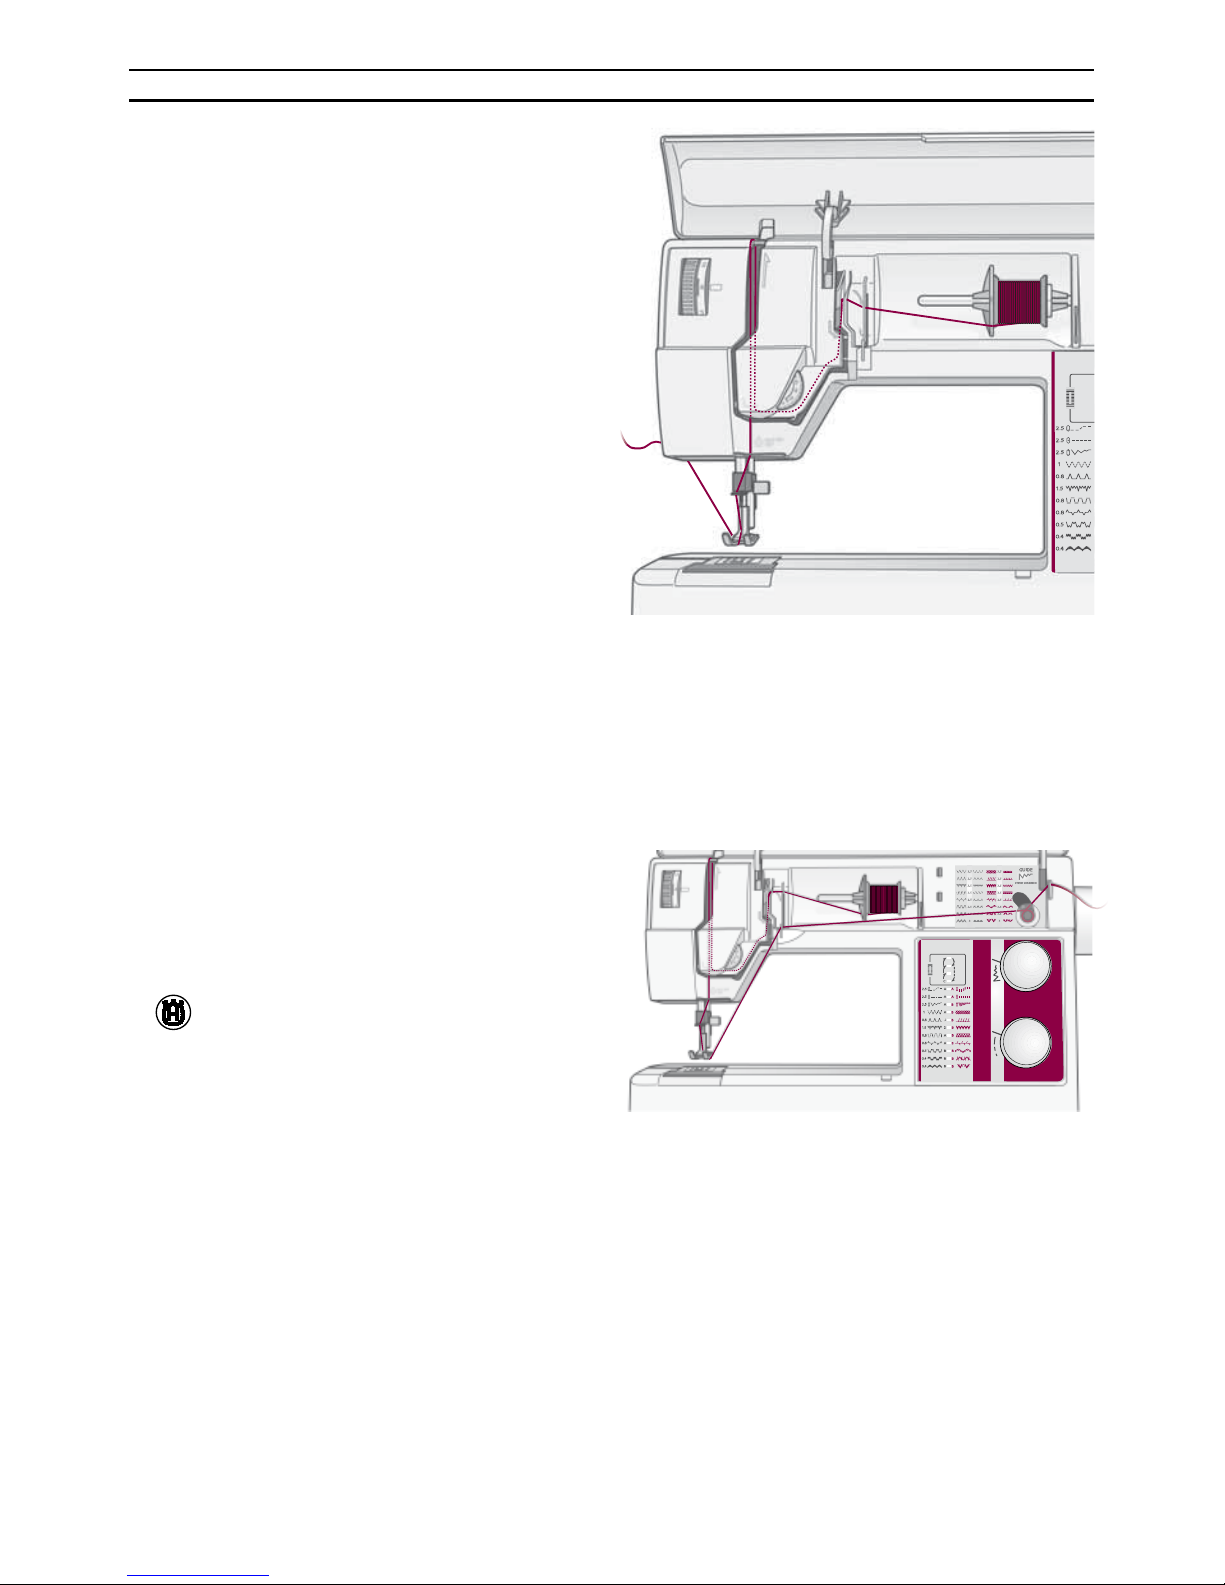
Threading the Upper Thread
Make sure the presser foot is raised and the needle
is in the up position
1. Pull the spool pin out. Place the thread on the
spool pin and the spool holder on the spool
pin as described. Push the spool pin back in.
2. Bring the thread in the direction of the arrow
under the thread guide (a) and over the thread
guide (b).
3. Bring the thread down between the thread
tension discs.
4. Continue threading by drawing the thread from
the right into the slot on the take-up lever.
5. Thread last guide just above the needle.
6. The needle is threaded from front to back. The
white on the presser foot ankle makes it easy to
see the eye of the needle.
7. Place thread under the presser foot and into
the thread knife where it is cut.
Bobbin Winding with the
Machine Threaded
Make sure that the presser foot is up and the
needle is in the highest position.
Note! Do not use a plastic presser foot when
bobbin winding.
1. Place your empty bobbin with the small mark
outwards on the bobbin spindle on the
front of the machine. Bring the bobbin spindle
down.
2. Pull the thread from the needle under the
presser foot and to the right over the thread
guide (c).
3. Start from above and wind a few turns of
thread around the bobbin. Cut off the thread
on the thread knife (d).
4. Press the foot control. When the bobbin winding is fi nished, remove the bobbin, cut off the
thread and bring the bobbin spindle up.
Note! We do not recommend winding specialty
threads such as clear nylon or other stretchy
threads through the needle. Instead see ”Bobbin
winding – vertical spool pin”.
Page 10
8
1
2
a
b
b
c
a
b
c
Procedures
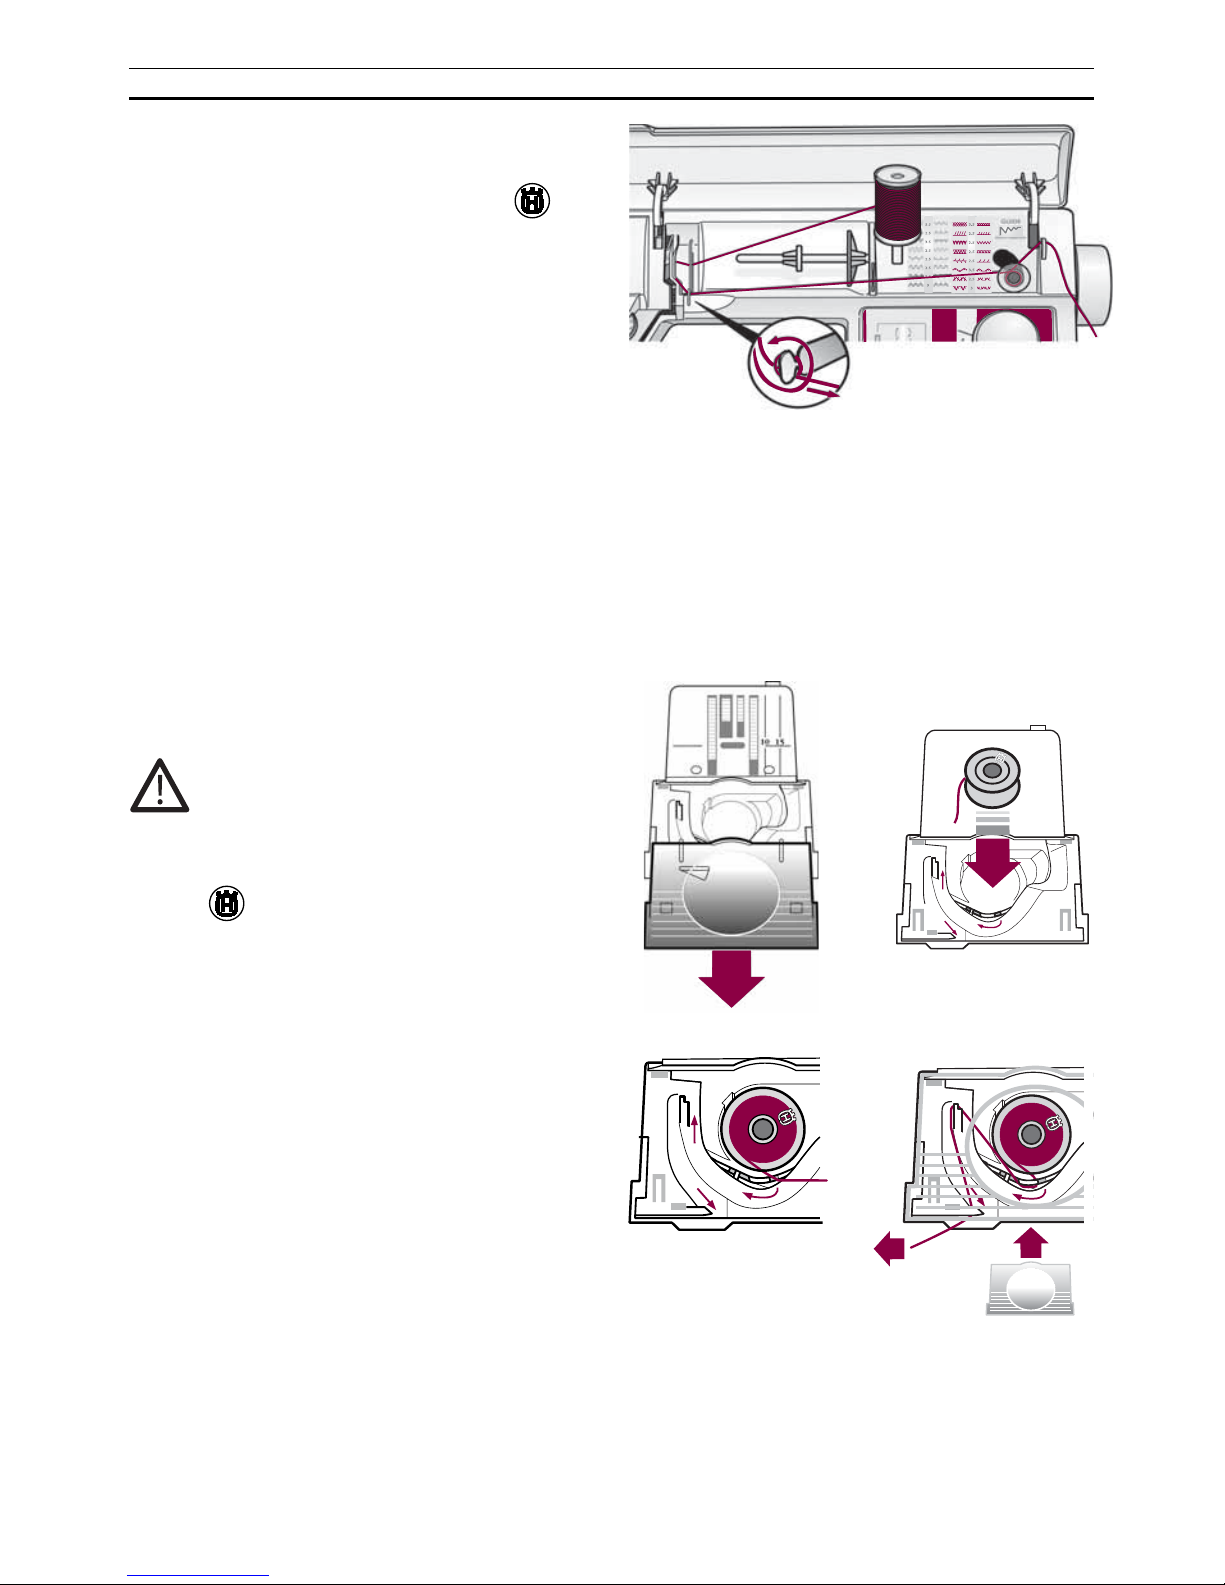
Bobbin Winding – Vertical
Spool Pin
1. Place an empty bobbin with the mark
out-wards on the bobbin spindle and bring it
down.
2. Place the large spool holder under the thread
on the spool pin.
3. Bring the thread under the thread guide (a)
and over thread guide (b), further under thread
guide (c).
4. From above wind a few turns of thread
around the bobbin and into the knife.
5. Press the foot control. When the bobbin winding is fi nished, remove the bobbin, cut off
the thread and bring the bobbin spindle up.
Placing the Bobbin in the
Machine
1. Remove the bobbin cover by sliding it towards
you.
2. Place the bobbin in the bobbin case with the
mark
facing up and the thread to the left
of the bobbin. The bobbin will then rotate
counter clockwise while pulling out the thread.
3. Place your fi nger on the bobbin to keep it
from turning as you pull the thread fi rmly to
the right and then to the left into the tension
spring (a) until it ‘‘clicks’’ into place.
4. Continue threading around (b) and to the right
of and then left into the thread cutter (c).
Replace the cover (1). Pull the thread to the left
to cut it (2).
Turn off the main switch.
Page 11
9
1.
2.
3.
Procedures
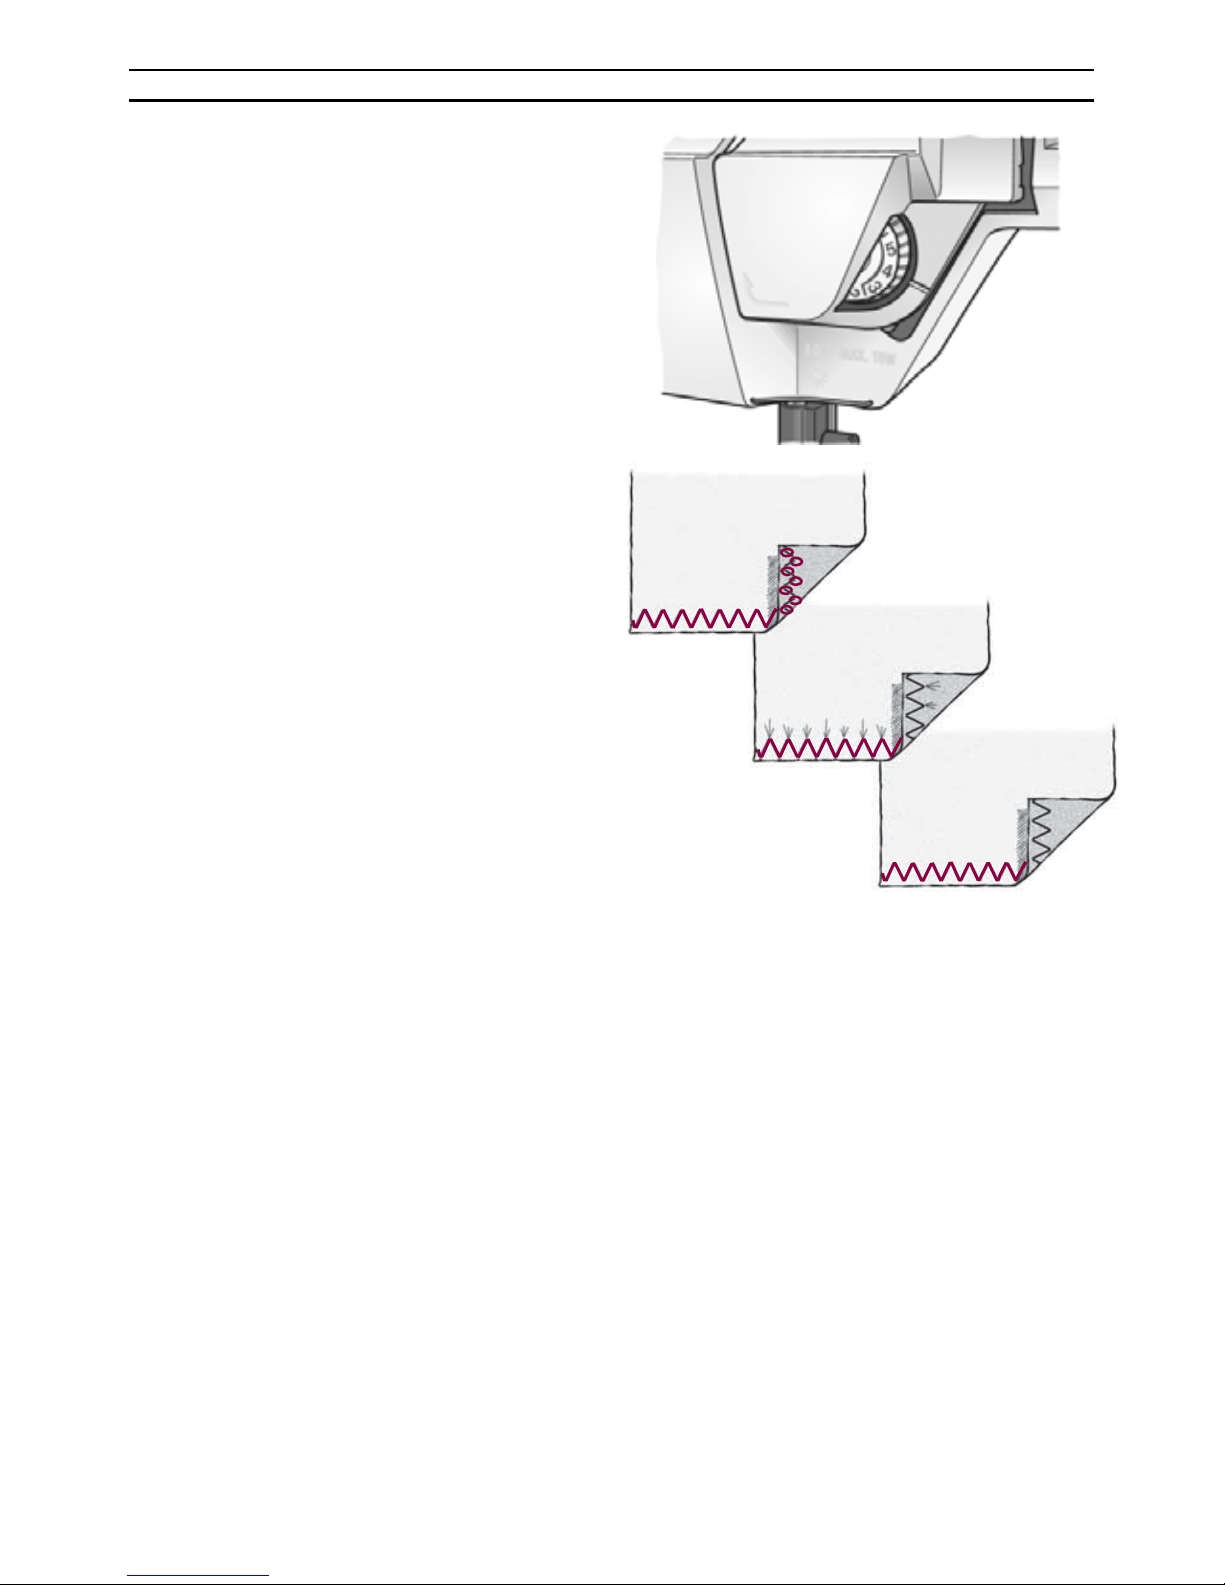
Thread tension
You can adjust the thread tension by turning the
dial which is numbered. The higher the number
the tighter the tension. Normal thread tension is
number 4.
When sewing buttonholes and decorative stitches
set thread tension to number 3.
When topstitching with a coarse thread in thick
fabric, increase the tension to 7-9.
Correct and Incorrect Thread Tension
To understand the correct thread
tension, sew a few sample stitches at
different settings.
1. Begin with a tension that is too loose, i.e. set
at ”1”. The lower thread will lie straight and
the upper thread will be drawn down on the
underside.
2. If you set the tension at the highest number,
the opposite will occur, and the seam may
pucker.
3. The correct thread tension is provided when
the threads interlock in the middle of both
layers of material or, in the case of decorative
stitches, on the underside.
Make a few tests on a scrap piece of the material
you are going to sew and check the tension.
Page 12
10
1. 2.
Procedures
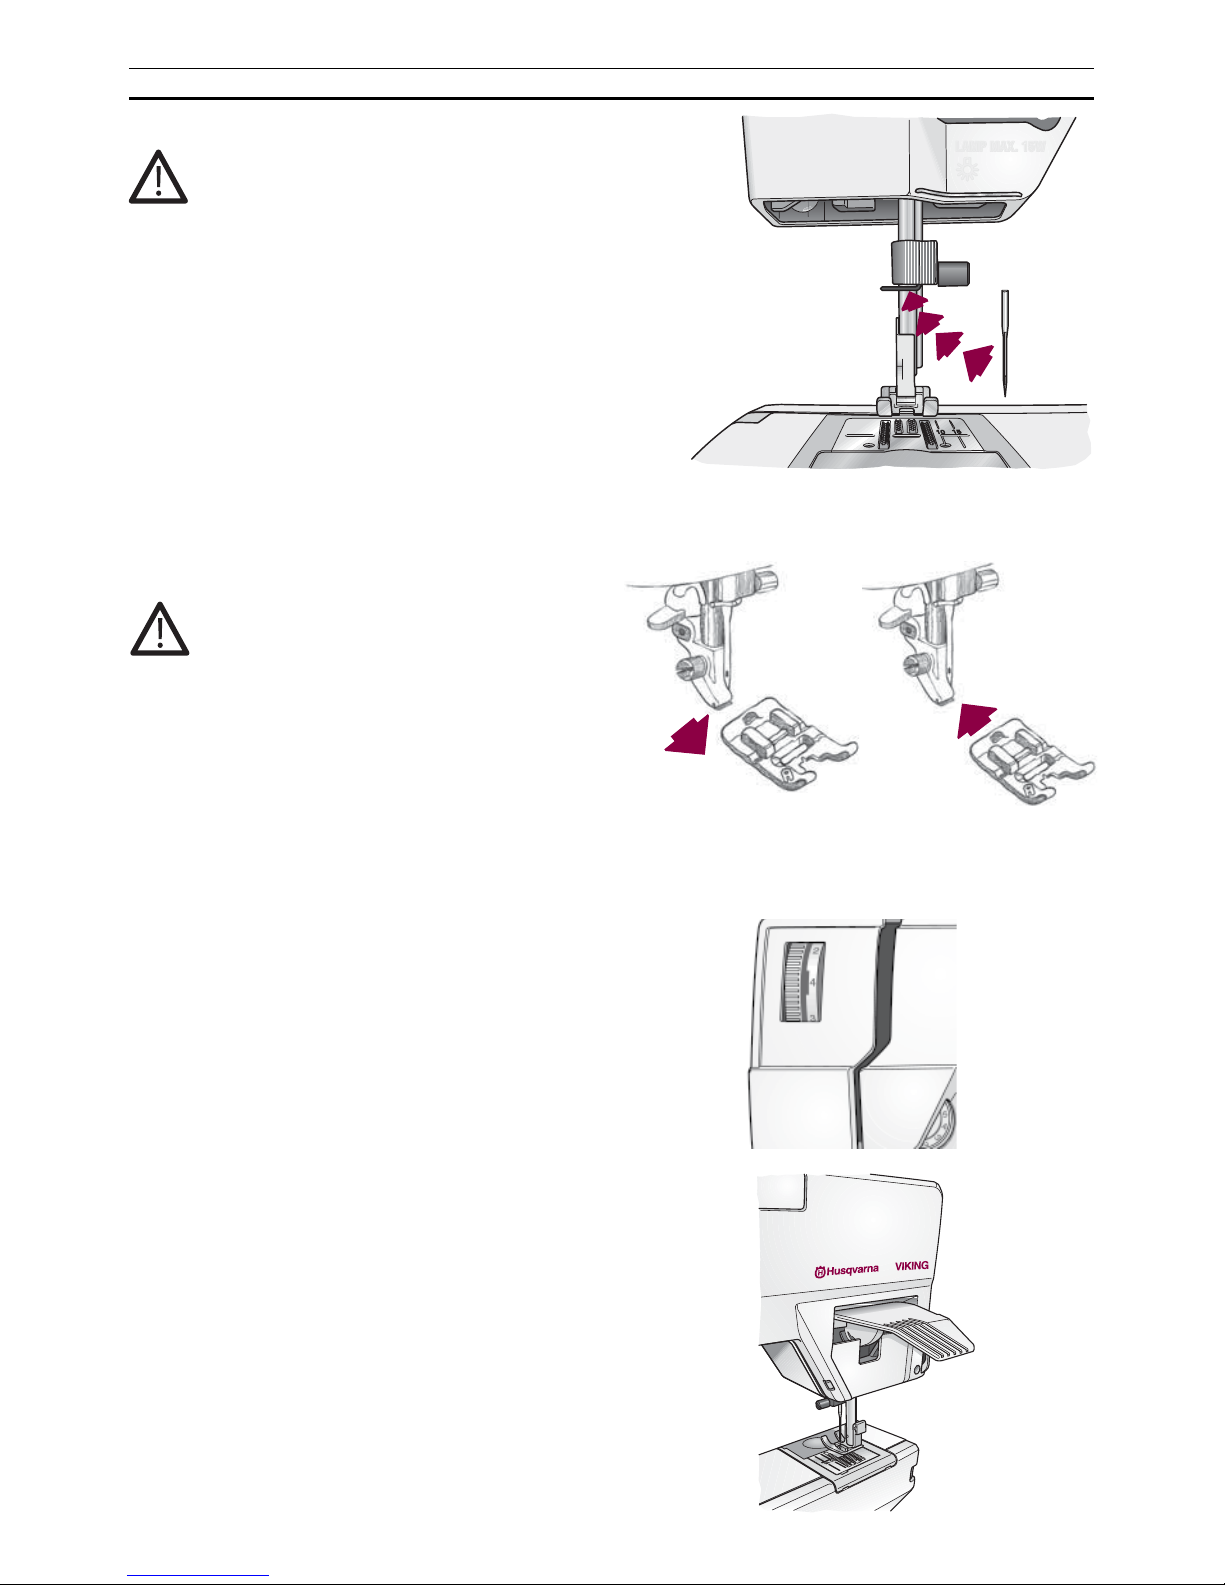
Changing the Needle
1. Loosen the screw in the needle clamp with the
screwdriver.
2. Remove the needle.
3. Push up the new needle with the fl at side away
from you until it will go no further.
4. Use the screwdriver to tighten the screw properly.
Always use needles of system 130/705H.
Changing the Presser Foot
1. Make sure that the needle is in the highest
position. Pull the presser foot towards you.
2. Line up the cross pin on the foot between the
spring and the presser foot ankle. Press back
until the foot snaps into place.
Presser Foot Pressure
The presser foot pressure is adjusted with the dial
on the front of the machine. Normal setting is 4.
The higher the number the more pressure on the
fabric. Knit and Soft fabrics should be sewn at
low pressure.
Presser Foot Lever
The presser foot is raised and lowered with the
presser foot lever. The presser foot must be lowered when sewing.
By raising the presser foot lever as far as it goes
and holding it there, the lift height of the presser
foot can be increased by several millimeters. This
is useful when sewing heavy materials.
Turn off the main switch.
Turn off the main switch.
Page 13
11
Procedures
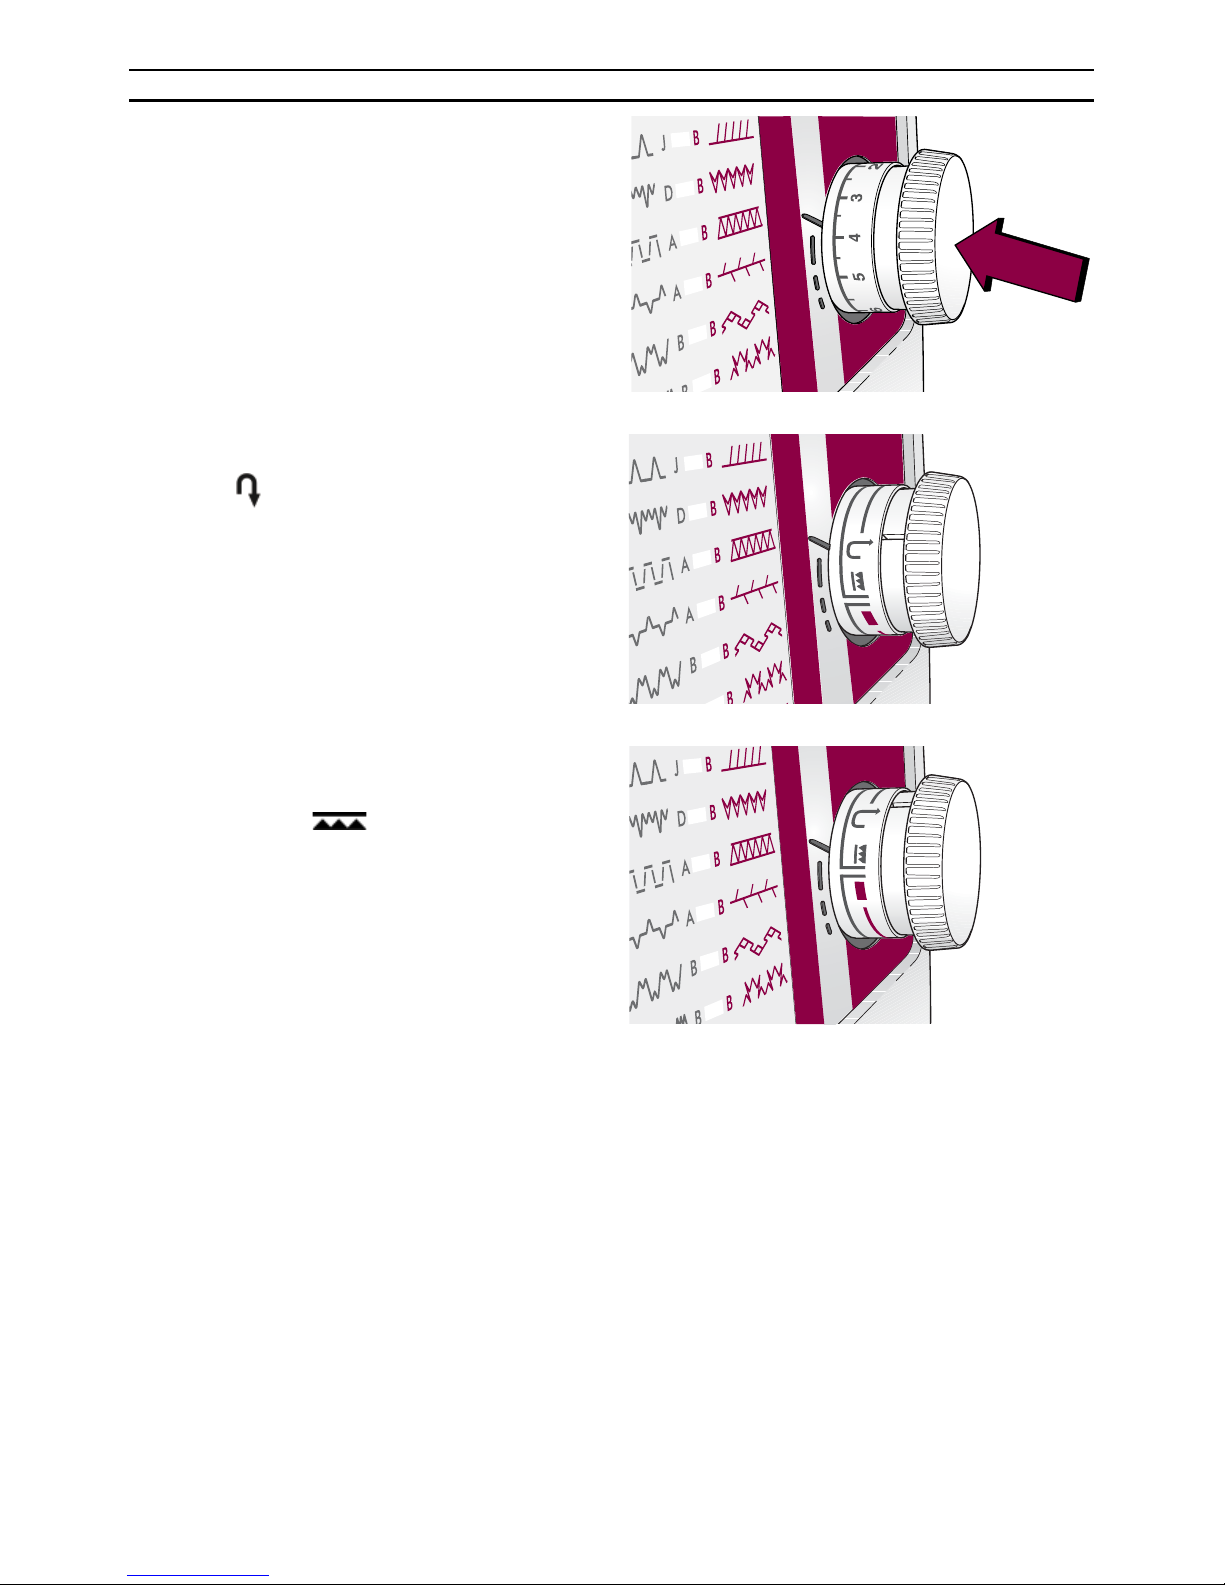
Reverse
Your machine sews backwards when the stitch
length dial is pressed. The machine sews forward
when the button is released.
For permanent reverse, turn the stitch length dial
to position
.
Lowering the Feed Teeth
The feed teeth are lowered when you turn the
stitch length dial to
. Turn the dial to the left
if you wish to raise the feed teeth. The feed teeth
will not come up until you begin to sew.
The feed teeth are lowered when sewing buttons
and for free-hand work.
By lowering the feed teeth it is easier to get thick
garments under the presser foot. Do not forget to
raise the feed teeth before starting to sew.
Page 14
12
Procedures
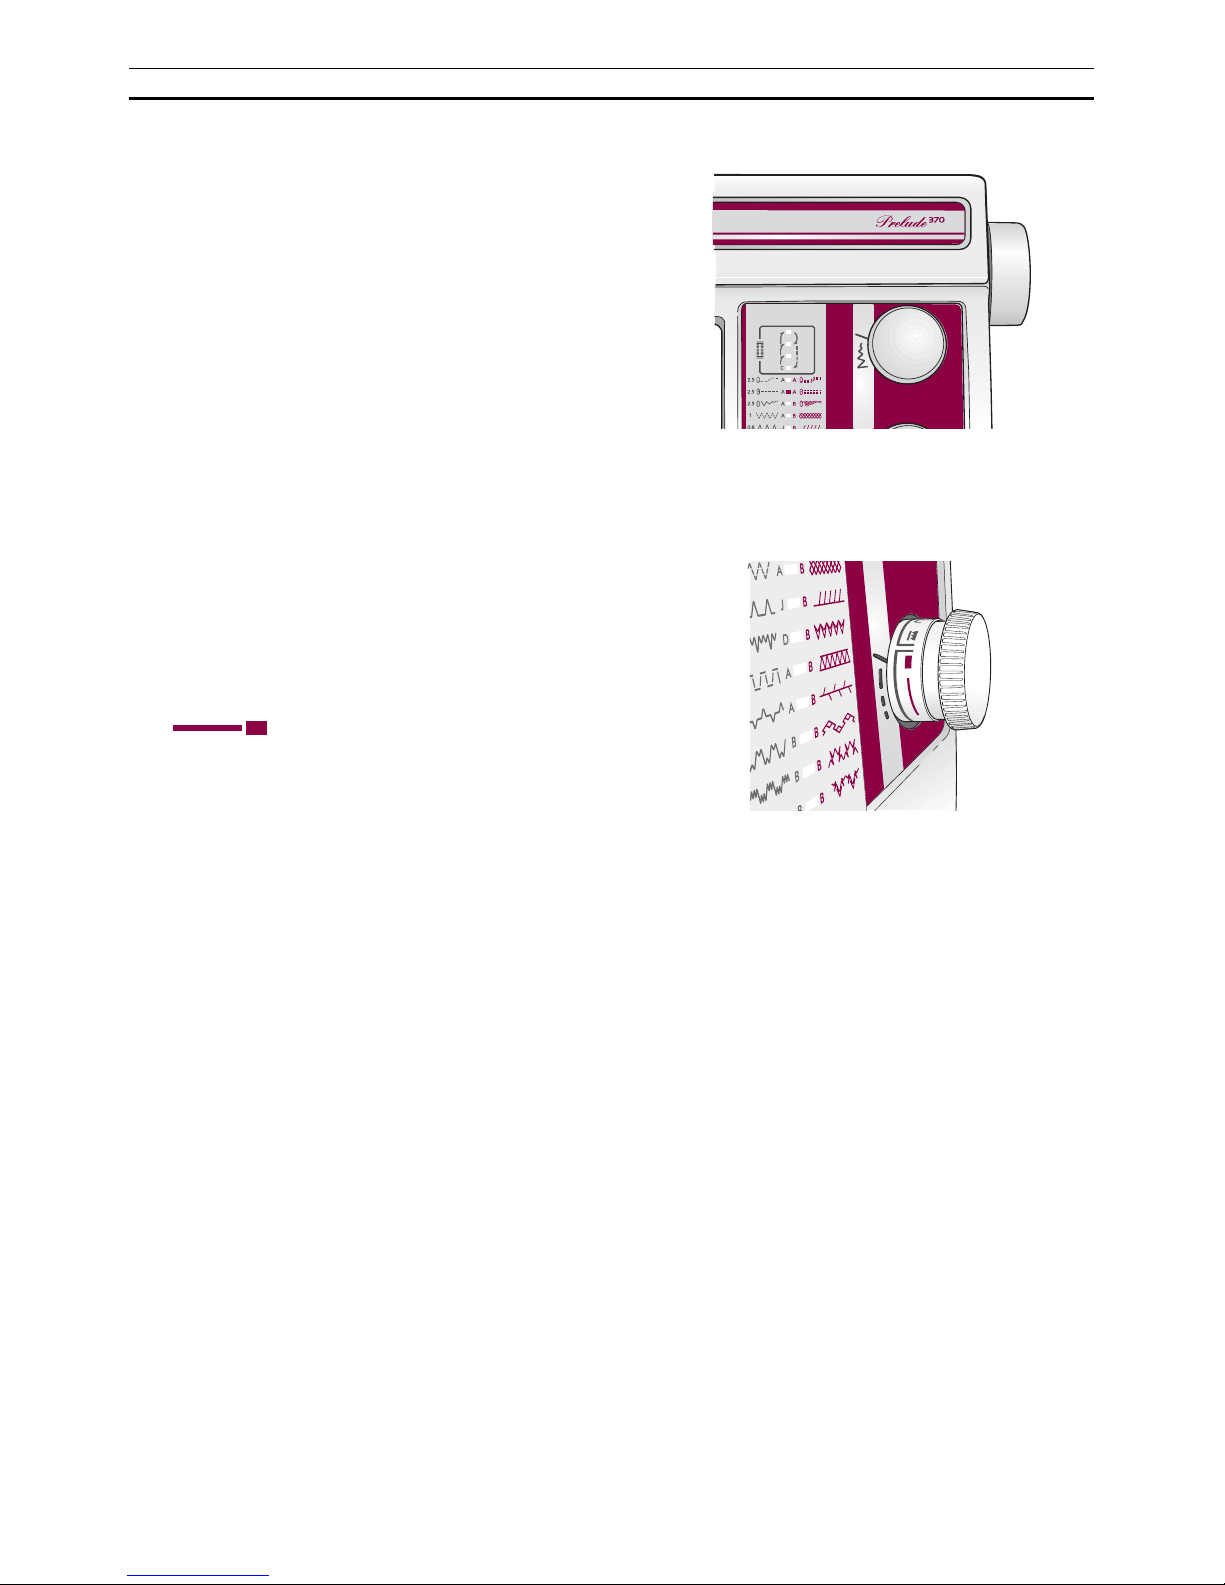
Stitch Selection
Your machine will sew all the stitches pictured on
the front. The stitch is set by turning the stitch
selector – the upper dial. A colored marker lines
up while turning the stitch selector, showing
which stitch is set.
Check that the needle is in its highest position
before you turn the stitch selector.
The lower dial is to ajdust the stitch length. The
stitches are divided into two groups. Forward
motion and trimotion stitches. The stitch length
for the left group, forward motion stitches, can
be varied between 0 and 6 and the width between
0-5.5.
Recommendations for the suggested stitch length
are given next to the stitches.
When you wish to use one of the stitches in the
right group, the trimotion stitches, you turn the
stitch length dial to the left until it reaches the
area
. The stitch length is set for these
stitches. The stitch width can be set between 0-
5.5.
There are letters between the stitch pictures which
indicate the most suitable presser foot for each
stitch. The letter is also marked on the presser
foot.
Page 15
13
Procedures
Stitch Width
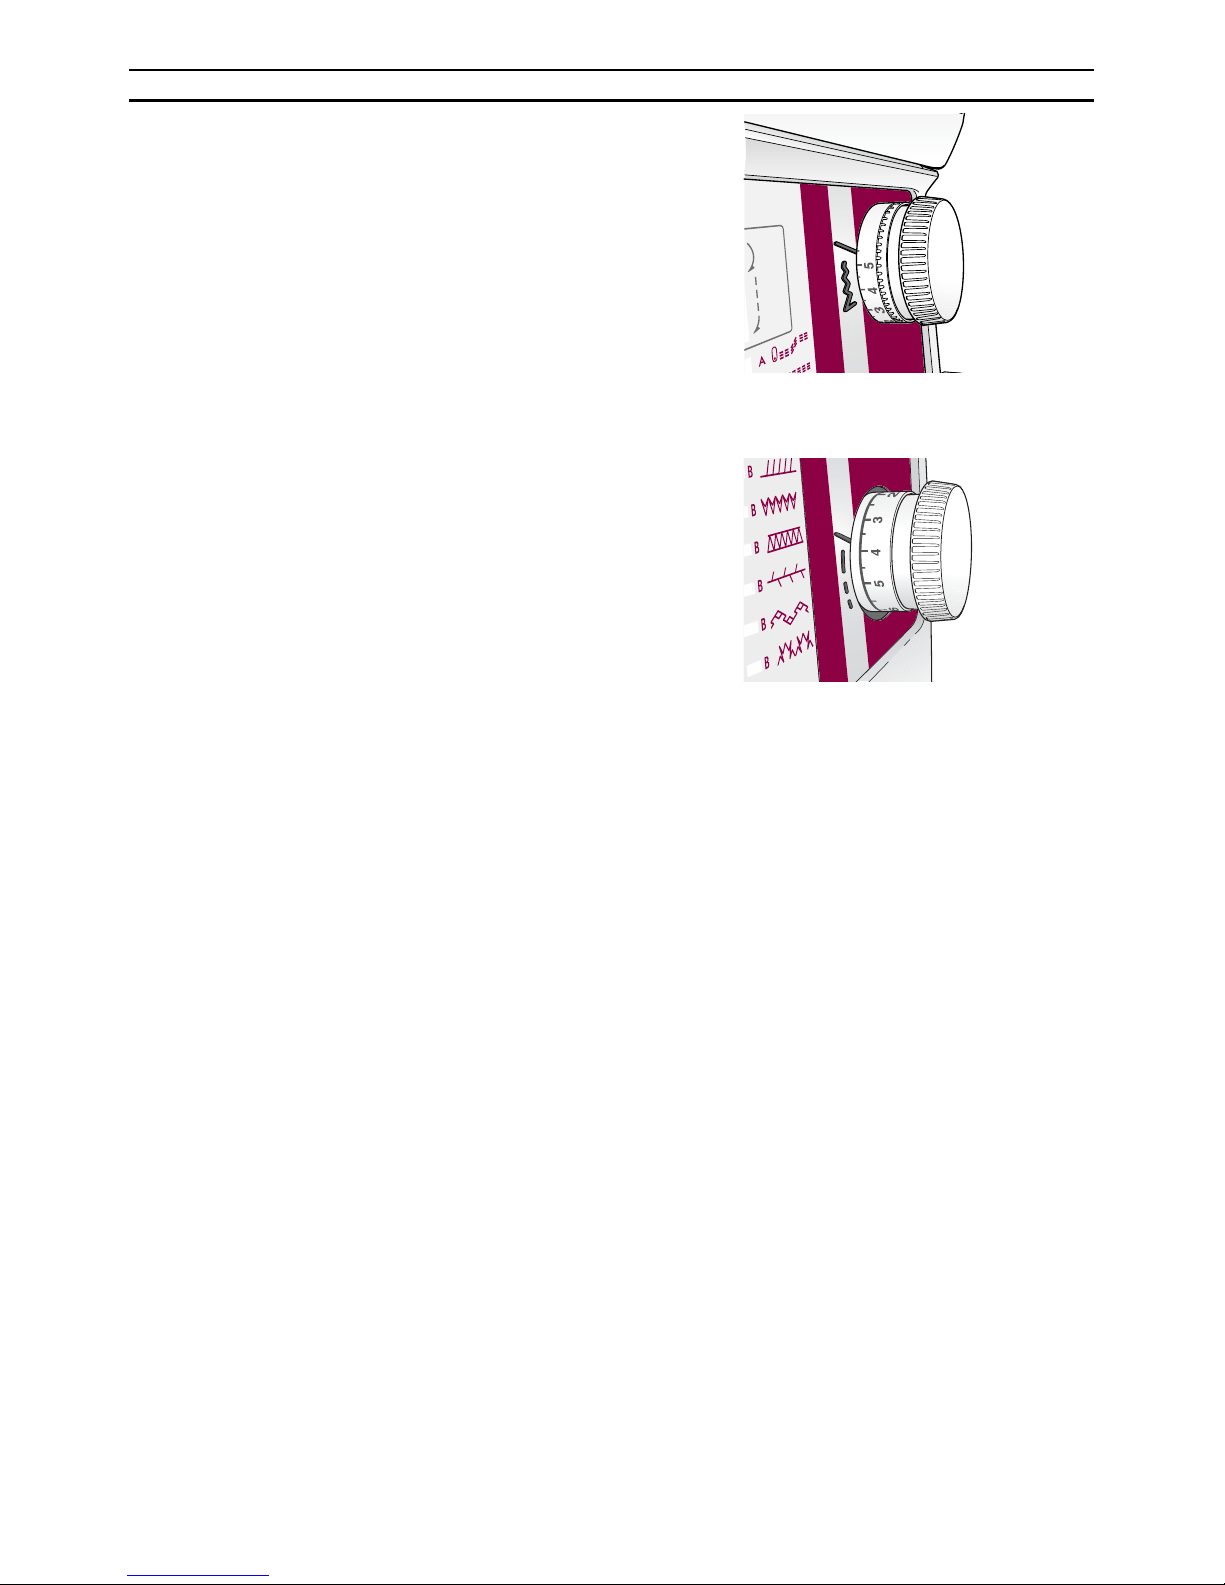
When you select a stitch the machine automatically sets the best stitch width. By turning the
stitch width dial (placed inside the stitch selector)
you can change the stitch width. The width is
numbered 0-5.5.
By setting the stitch width dial at 2.5 you can halve
the width of the stitches. Most of the stitches will
then get a different look and you have a selection
of ”new” stitches.
Stitch Length
Recommendations for the suitable setting are
given next to the forward motion stitches.
Always use the recommended setting to start with
but experiment until you arrive at the exact setting
for the actual work you will be doing.
Page 16
14
Sewing
Guide Stitch Selection
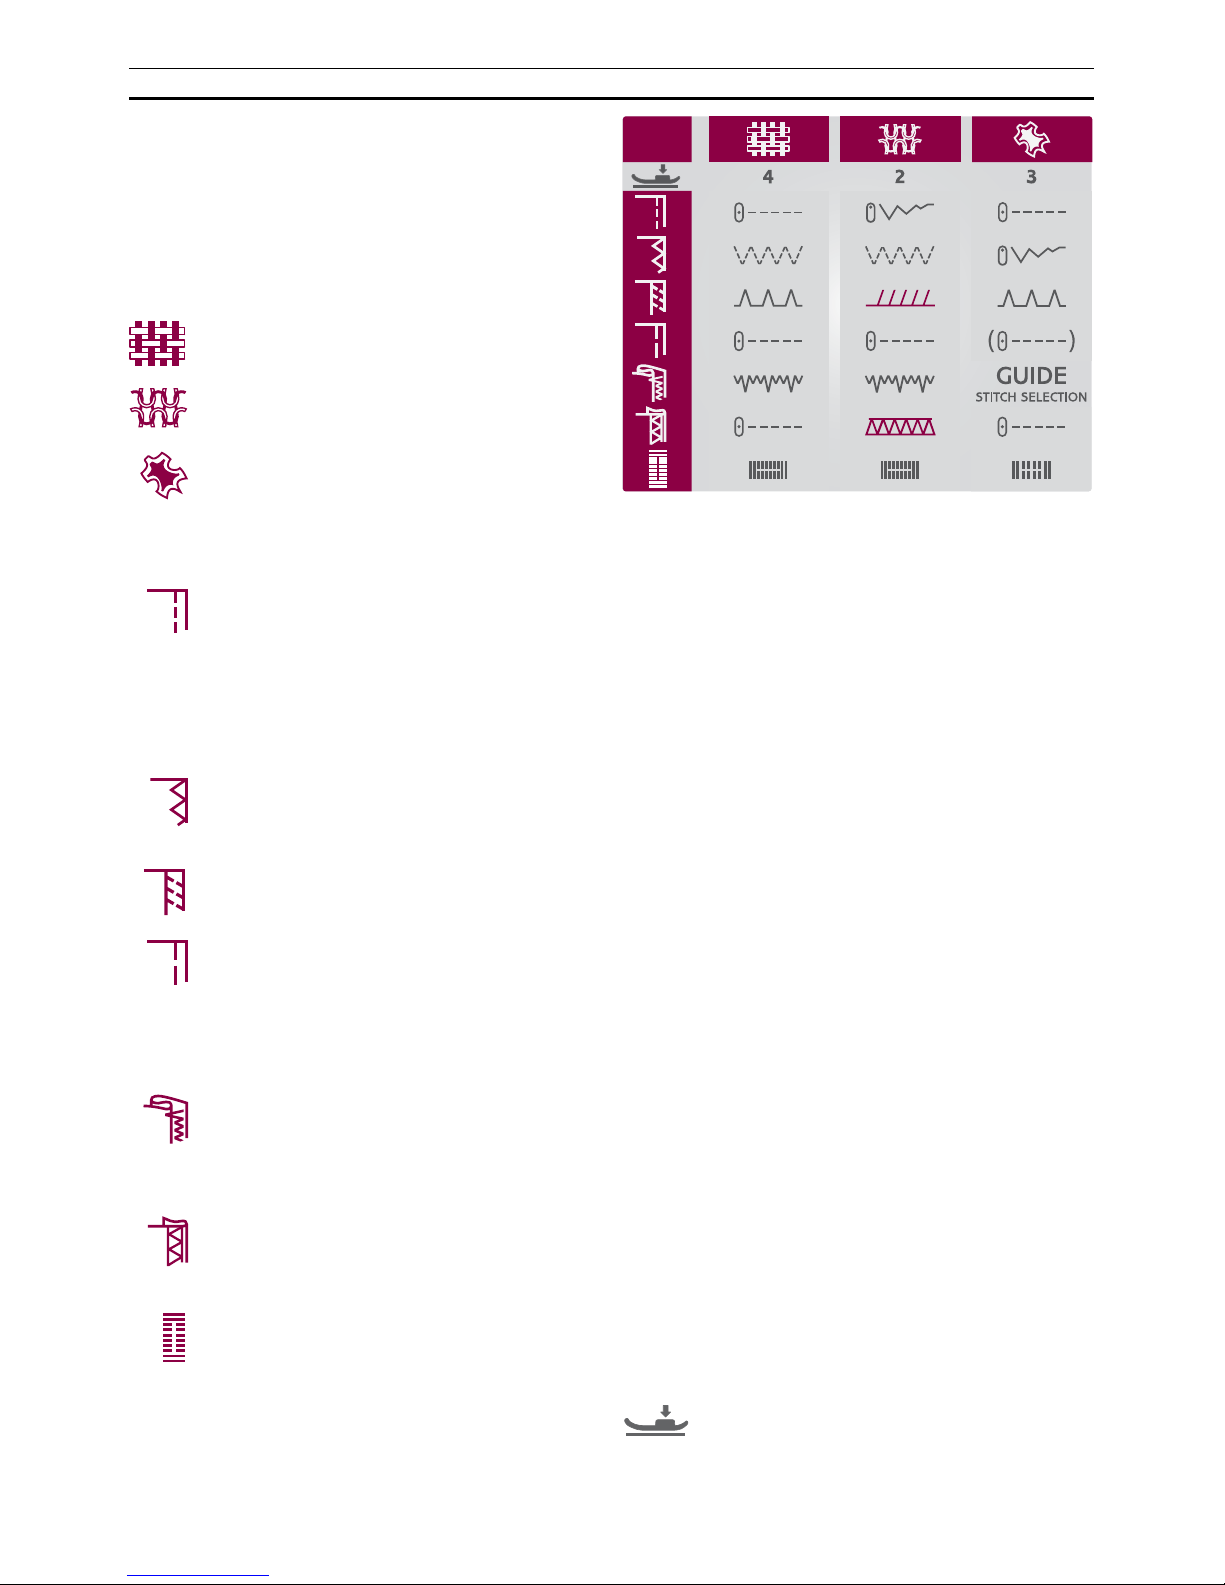
Consult the Guide Stitch Selection in the lid of
the accessory box for the fast easy way to select
the best stitch for your sewing technique and
fabric.
Look in the column for your fabric type:
WOVEN FABRICS: for stable fabrics that
have no stretch. Usually woven.
STRETCH FABRICS: for fabrics that have
stretch. Usually knit.
LEATHER/VINYL: for suede, real leather and
for artifi cial leather and suede.
Select the stitch for the technique you want to
sew:
SEAM: sews two pieces of fabric together.
Note: For Stretch Fabrics set the zig zag
stitch length to 1.5 and stitch width to 1.5
for a seam that stretches with the fabric.
OVERCAST: overcast fabric edges to pre-
vent them from fraying and to help them
lay fl at.
SEAM/OVERCAST: sews the seam and over-
casts the edge all at one time.
BASTE: a temporary stitching for fi tting
garments, gathering and marking. Use
maximum stitch length.
Note: Basting will leave permanent holes
in leather and vinyl.
BLIND HEM: creates an invisible hem on
garments. Is not recommended for light
weight fabric or for leather/vinyl.
HEM: sews the best visible or top stitch
hem for your fabric type and weight.
BUTTONHOLE: your Prelude sews the
Perfect Balanced Buttonhole (PBB).
Note: For leather and vinyl, increase the
buttonhole stitch length to 1 mm. Use the
Non-stick Glide foot H (see page 27) and
place a stabilizer underneath the fabric.
PRESSER FOOT PRESSURE: Your Guide
Stitch Selection also gives you recommendations on the best presser foot pressure
for your fabric.
Your sewing is easier than ever before when you use your
Guide Stitch Selection to recommend the best stitch and
presser foot pressure.
Page 17
15
Sewing
Fabric Selection
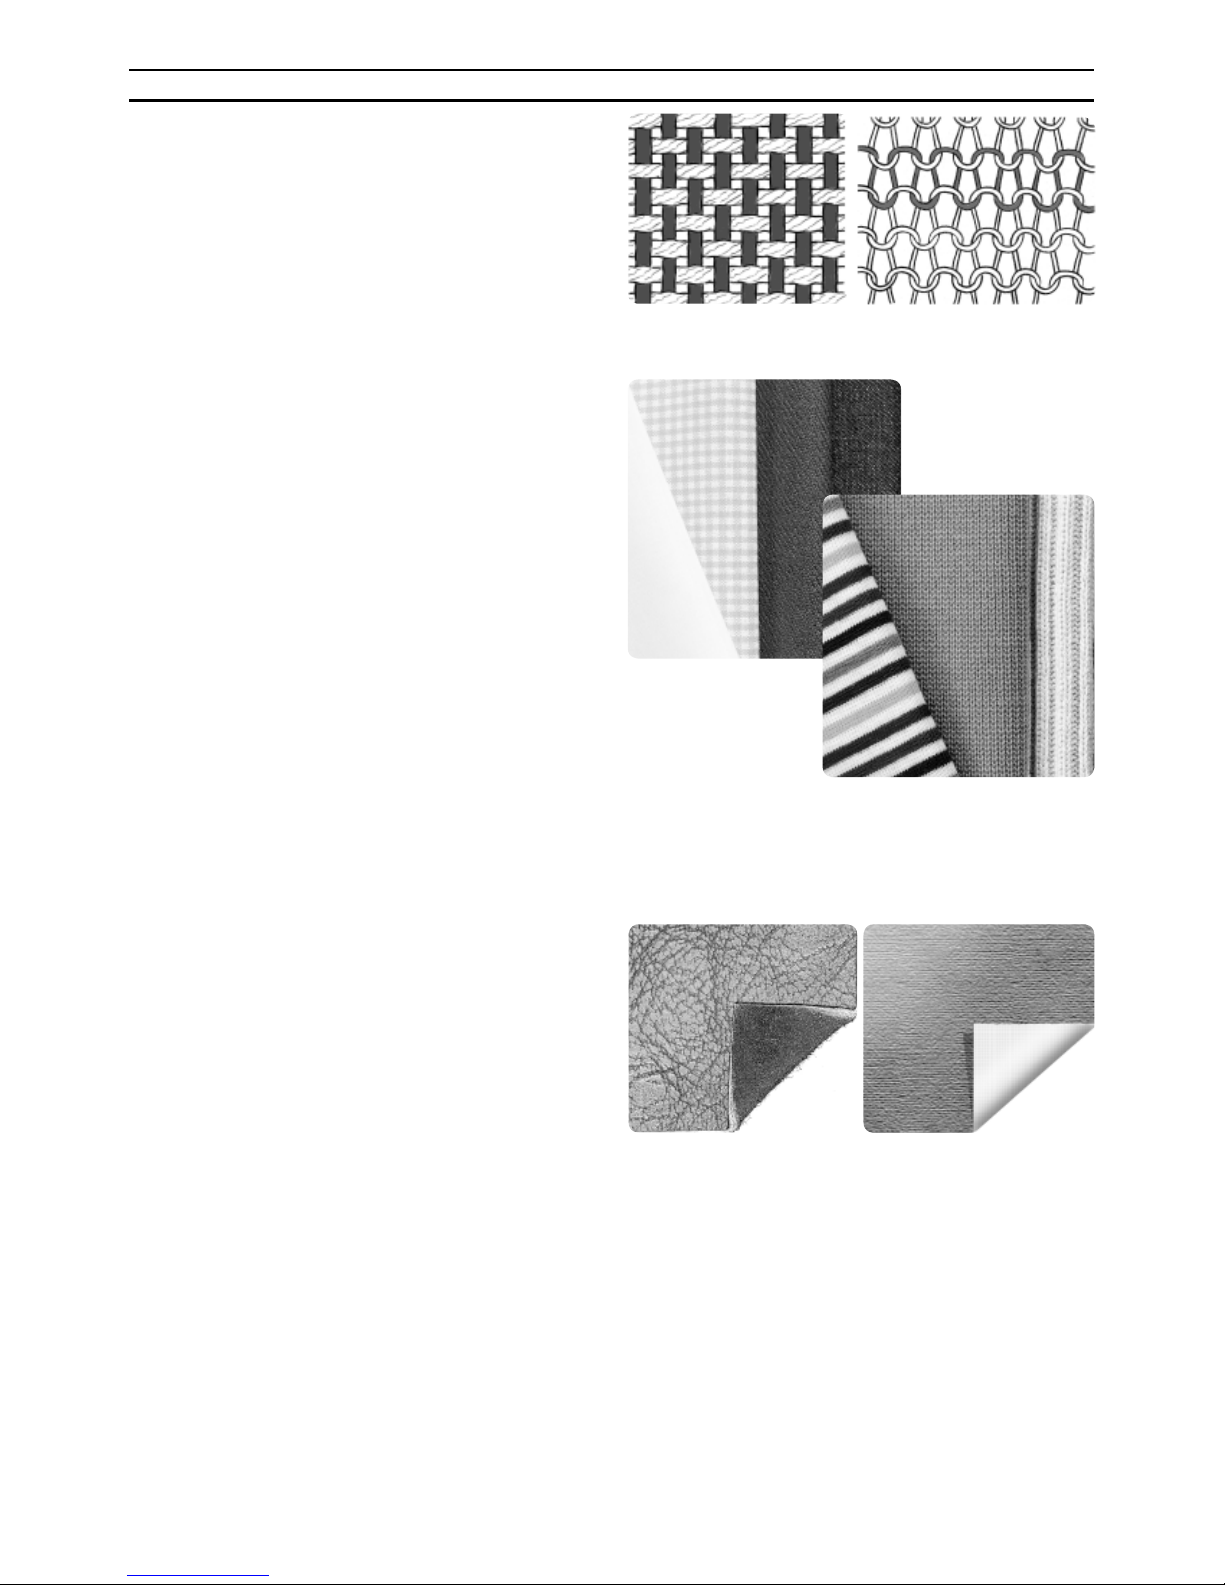
Woven or Knit
The difference between woven and knit fabric is
the way the threads are put together. Woven fabrics are made of two thread systems, warp lengthwise and weft crosswise that intersect at straight
angles. A knit fabric is made of one thread system
with interlaced stitches.
A woven fabric is usually stable and a knit fabric
usually has stretch. As a general rule, select Woven
for fabrics that have no stretch and Stretch for
fabrics that have stretch.
Knit fabric
Woven fabric
Leather
Vinyl
Leather/Vinyl
Leather is animal skin. Leather can be smooth or
sueded and has some give.
Vinyl is a synthetic material which often has a
woven wrong side. Vinyl can be smooth or patterned and some vinyl has stretch.
Page 18
16
Sewing
Buttonholes
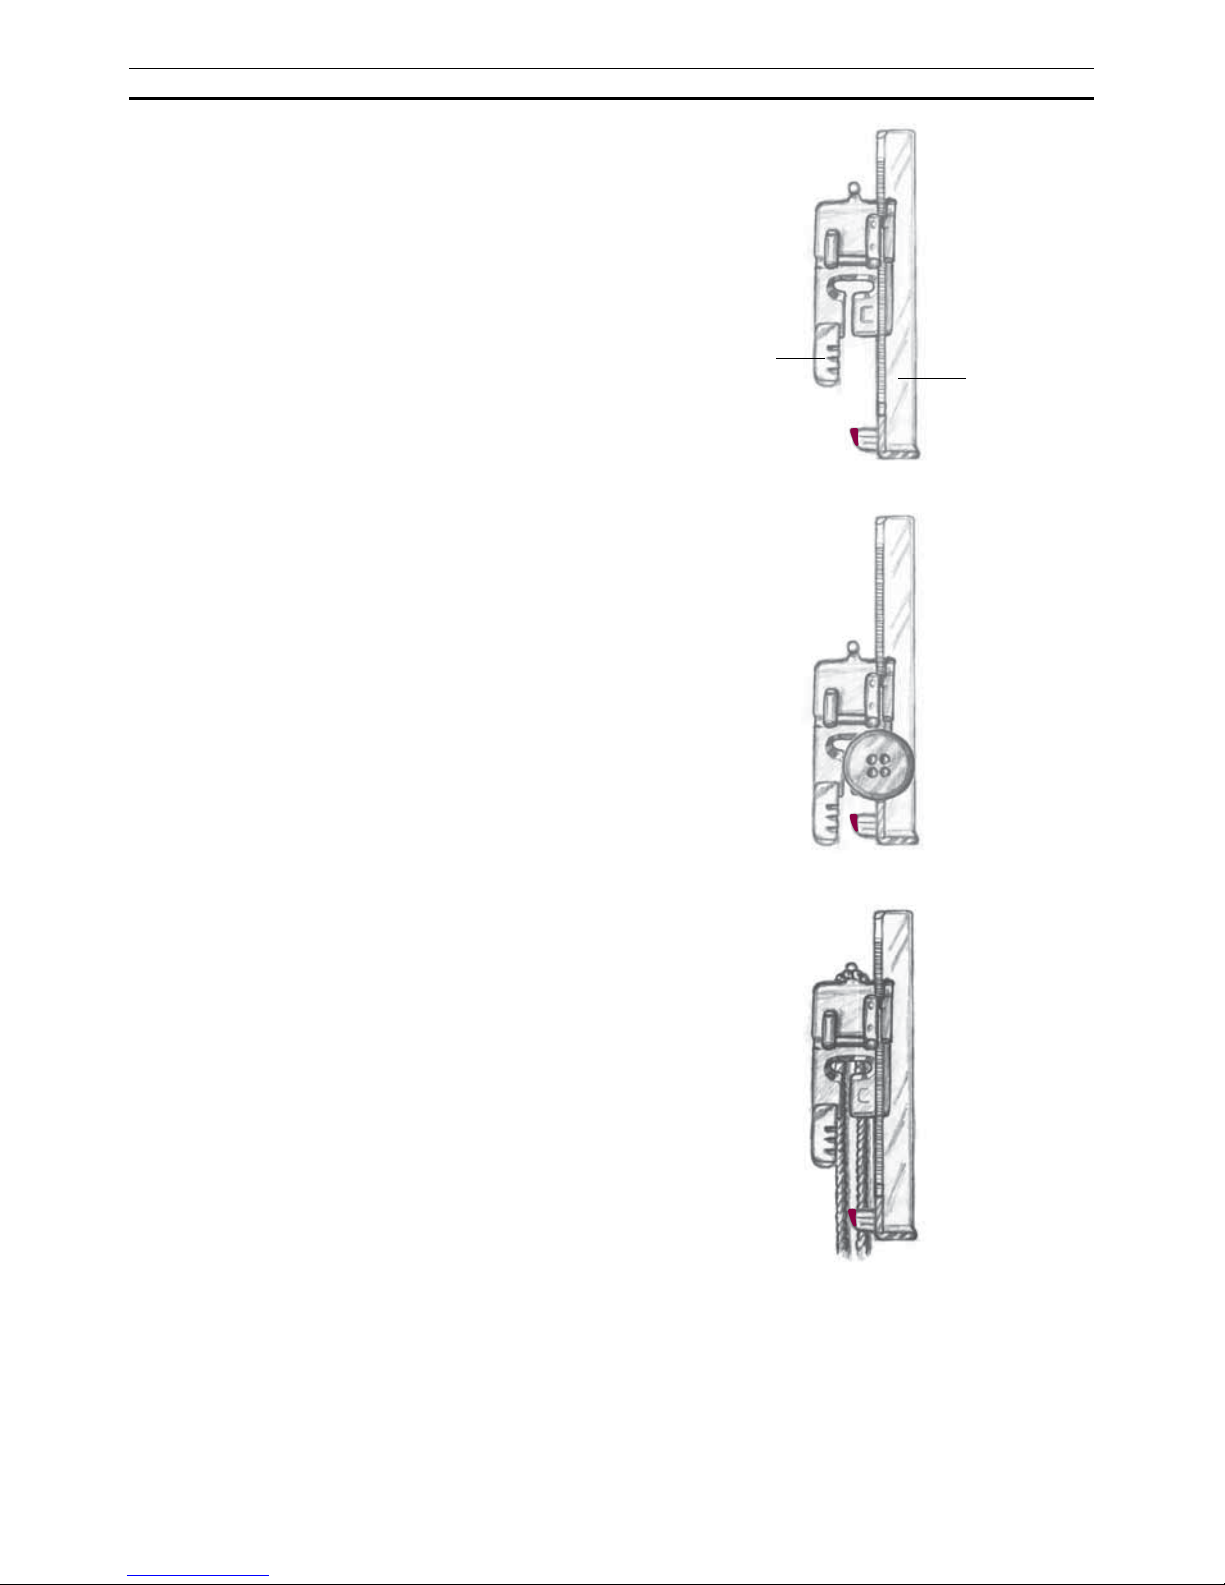
To sew buttonholes we recommend the buttonhole foot C. The buttonhole foot has a slide that
is adjustable for different sizes of buttons. Put the
button on the foot and push the slide together
as far as it will go. The machine sews the fi rst
column in reverse. Stop the machine when the red
mark on the slide has reached the beginning of
the stitching.
Use the markings on the left toe of the buttonhole foot to position the garment edge. Place the
edge of the garment at the middle mark to have
5/8" (15 mm) from the edge to the buttonhole.
When sewing buttonholes in stretch fabrics we
recommend cording the buttonhole to increase
the stability and to keep the buttonhole from
stretching out. For a corded buttonhole loop a
piece of heavy thread around the fi nger at the
back of the buttonhole foot as illustrated.
5/8" (15 mm)
Buttoning Edge
Slide
Page 19
17
1
2
4
3
12343
Sewing
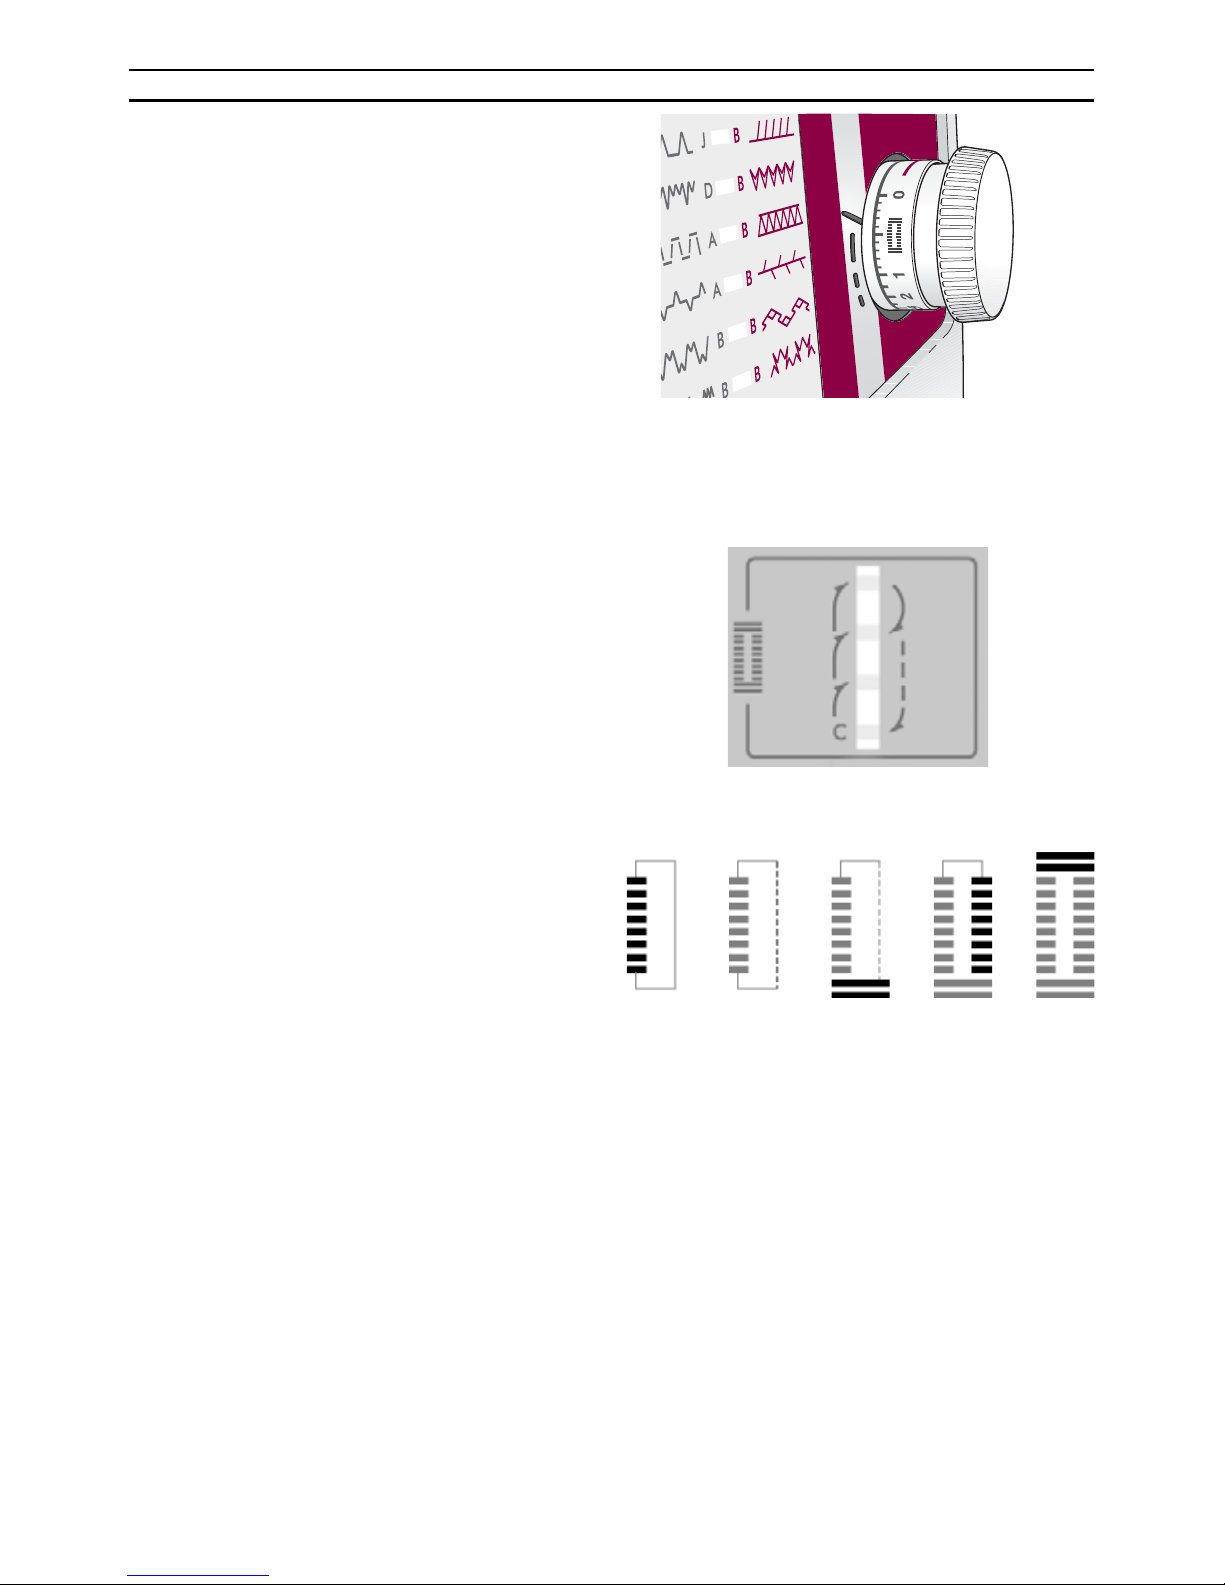
Perfectly Balanced
Buttonholes (PBB)
Your Prelude has the Perfect Balanced Buttonhole
(PBB). The machine sews buttonholes with both
columns stitched in the same direction to get a
perfect result.
1. Set the stitch length dial to buttonhole symbol.
Set the stitch selector to buttonhole (C), position 1. The size of the buttonhole is automatically determined by placing the button in the
special buttonhole foot. The machine sews
the fi rst column in reverse. Sew until the left
column of the buttonhole reaches the red mark
on your buttonhole foot.
2. Turn the stitch selector in position 2. Now the
machine will sew a straight stitch towards you
indicating the right column of your buttonhole.
Sew the straight until you have reached the
same length as the fi rst column.
3. Set the stitch selector in position 3. Now the
machine will stitch a bartack. Sew three or four
stitches.
4. Turn the stitch selector to position 4. The
machine will stitch the second column of
the buttonhole in reverse. Sew until you have
reached the same length as the fi rst column.
5. Now turn the stitch selector to position 3 and
stitch the fi nal bartack. Sew three or four stit-
ches. Turn the stitch selector to 2 and lock the
threads with a few stitches.
Page 20
18
Sewing
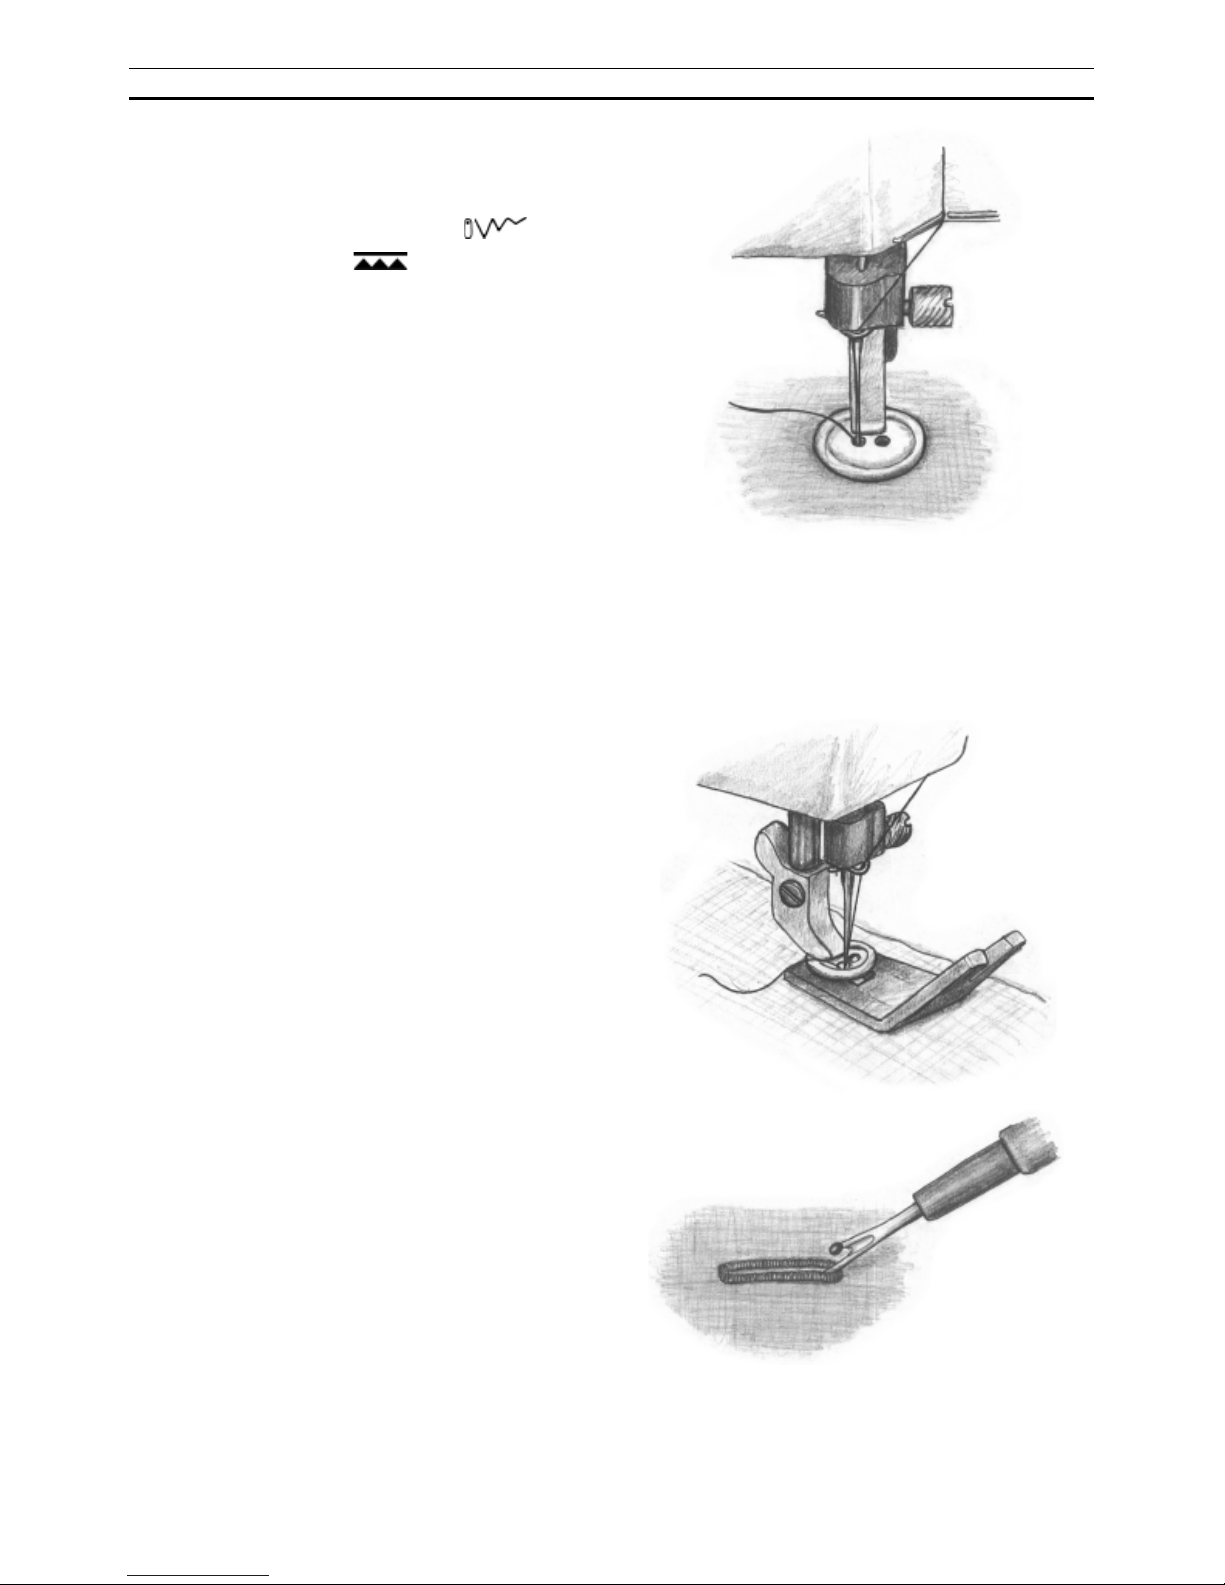
Sewing Buttons
1. Mark the fabric where the button is to be loca-
ted.
2. Turn the stitch selector to zigzag
.
3. Lower the feed teeth
. See page 11.
4. Snap off the presser foot.
5. Place the material under the presser foot ankle.
6. Place the button on marking and lower the
presser bar so that the presser foot ankle is
between the holes of the button (see picture).
7. Hold the thread ends to one side. Turn the
handwheel and check to be sure that the needle
goes into the holes of the button.
8. Sew 5-6 stitches. Set the stitch width dial to 0
and lock the threads with a few stitches.
Use the clearance plate to create a thread shank.
Use the thin end when sewing buttons on light
fabrics, the thick end for heavier fabrics.
Push in the plate between the button and the
fabric. Lower the presser bar and sew on the
button. Pull the threads between the button and
the fabric. Wind the threads a few times around
the shank and tie the ends.
Cutting Buttonholes
Cut buttonhole open with the seam ripper. Place a
straight pin across the end you are cutting toward
to avoid cutting too far!
Page 21
19
Sewing
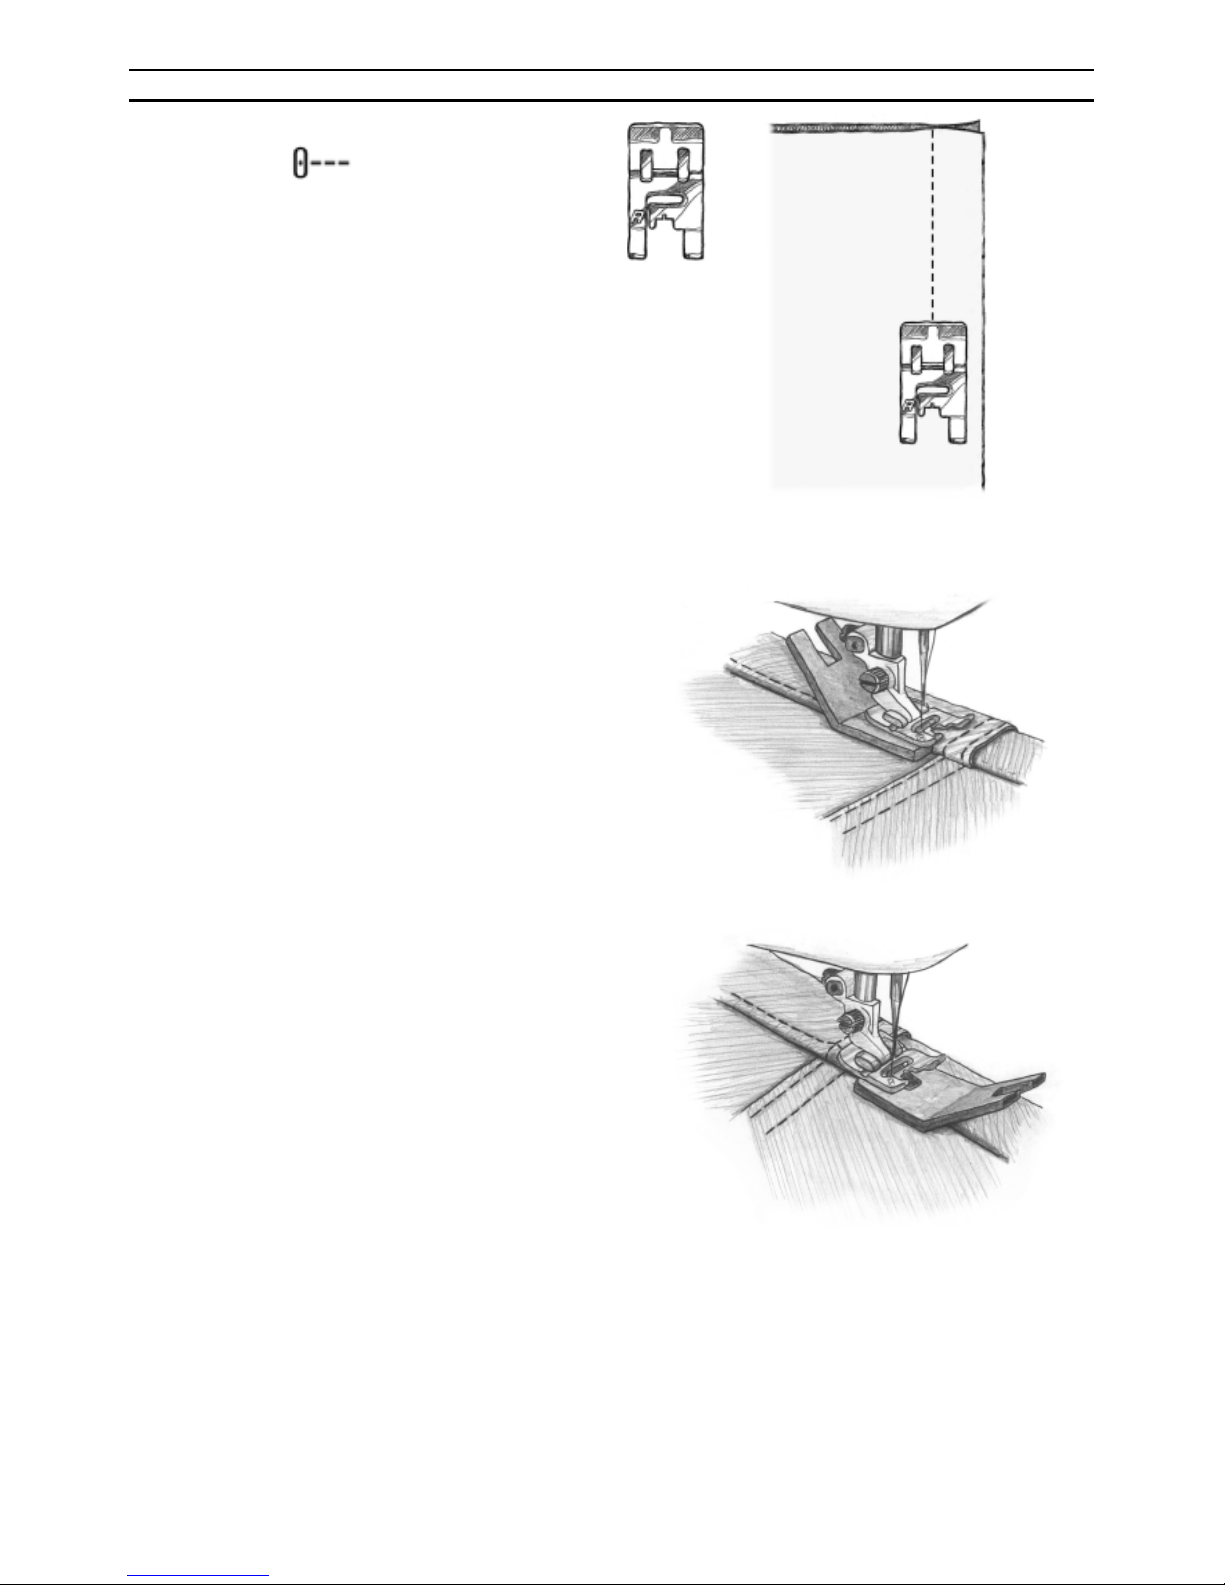
Straight Stitch
Straight stitching is used to join fabric
which does not stretch and for seams which will
not be subjected to great strain.
Turn the stitch length dial to the recommended
setting 2.5 to start with but experiment until you
arrive at the exact setting for the actual work you
will be doing.
Note: Increase the stitch length when basting and
when topstitching.
Clearance Plate
The clearance plate is used when sewing over
thick seams.
One side of the plate is thicker than the other.
Use the side that suits the thickness of the seam
best.
Page 22
20
1.
2.
3.
4.
Sewing
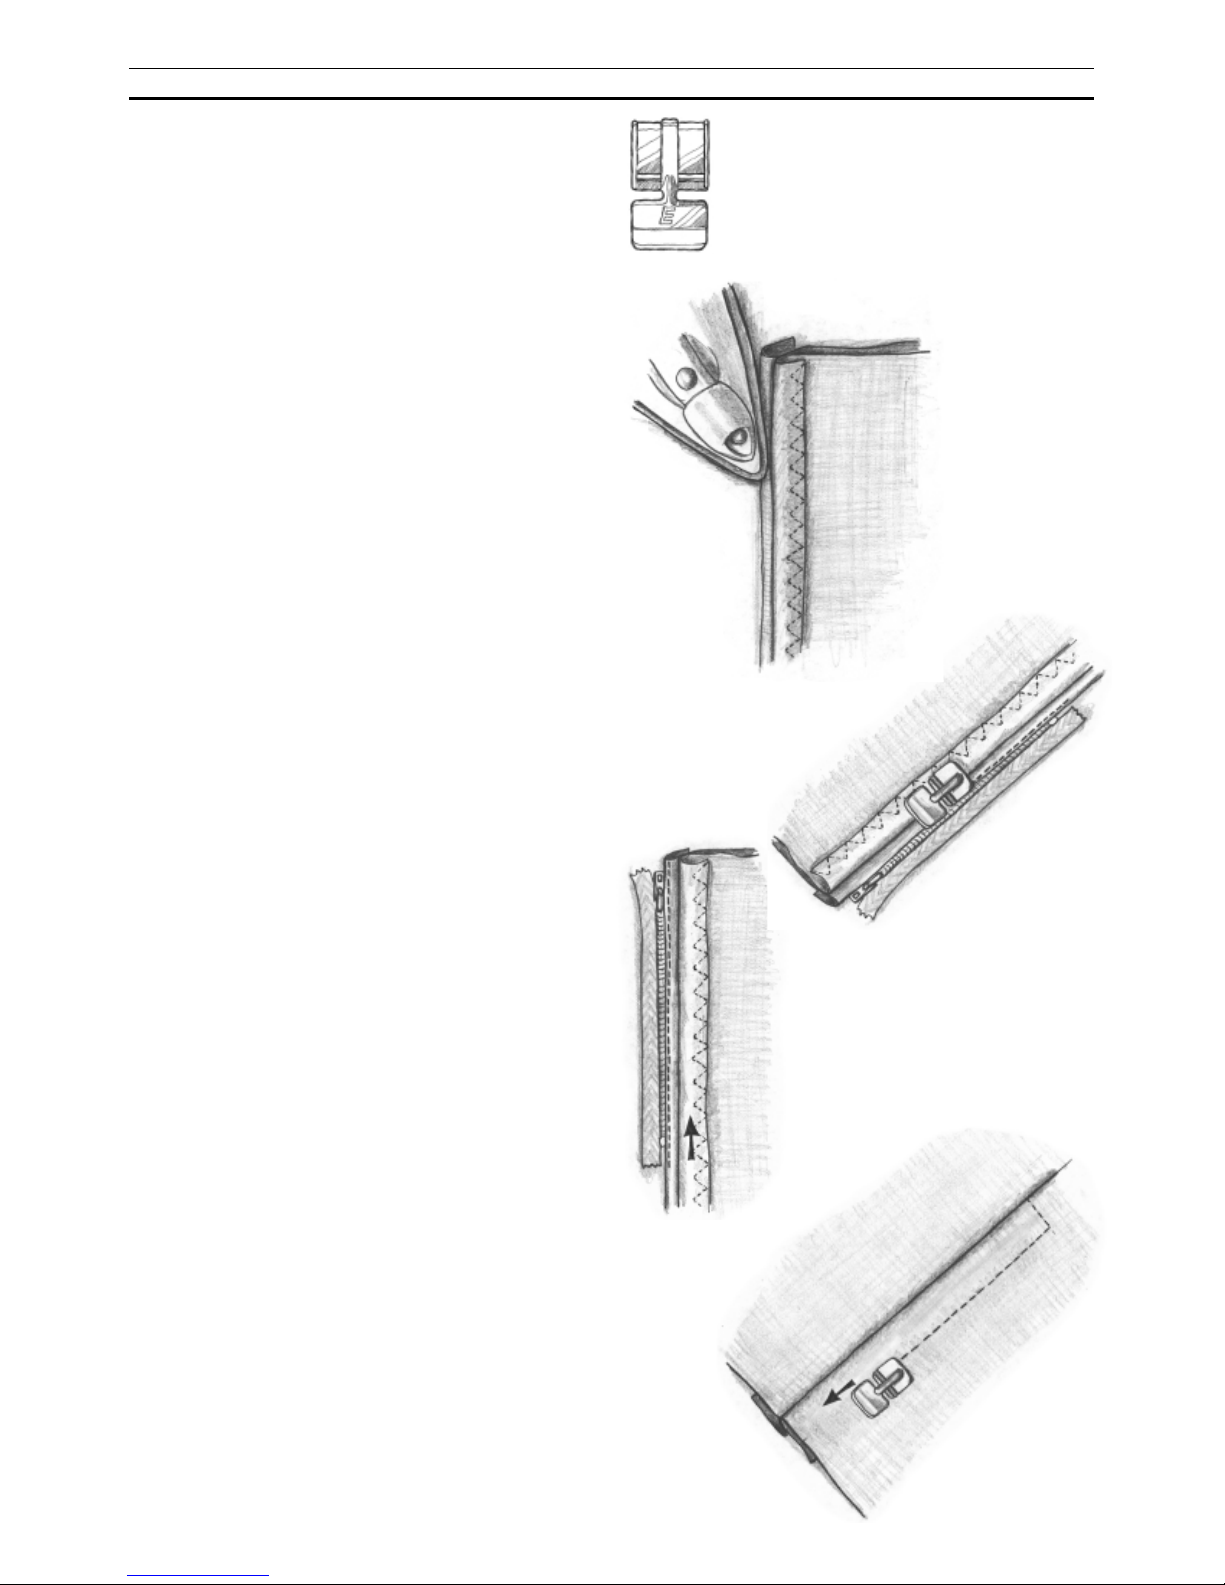
Sewing Zippers
The zipper foot E can be snapped on so that it
is located either to the right or to the left of the
needle, making it easy to sew both sides of the
zipper. To sew the other side of the zipper, reposition the zipper foot.
Lapped Zipper
1. Sew the seam together to the bottom of the
zipper placket. Baste the rest of the seam.
Leave about 2 cm open at the top. Press seam
open. Set the needle to the right position.
2. Place presser foot E to the left of the needle.
From the wrong side fold the fabric to one
side so both seam allowances are free. Fold
and press the left allowance under approximately 0.5 cm from the basted seam.
3. Place the zipper under the folded seam allowance with the teeth as near to the fold as possible and stitch zipper to fabric close to fold.
Begin sewing at the bottom of the zipper.
Before reaching the zipper pull, lift the presser
foot and slide the zipper pull down past the
zipper foot. Lower the foot and sew to the top
of the zipper.
4. Snap on the zipper foot so it is to the right of
the needle. Set the needle to the left posi-
tion. Turn the garment to the right side. It is
important that the seam on the right side is
sewn straight. Before you begin to sew, mark
the seam line. Sew the other side of the zipper.
Begin stitching across the bottom and con-
tinue upwards. Remove the basting.
If you want to sew a ”gentleman’s zipper”, follow
the instructions but insert in the other direction.
Page 23
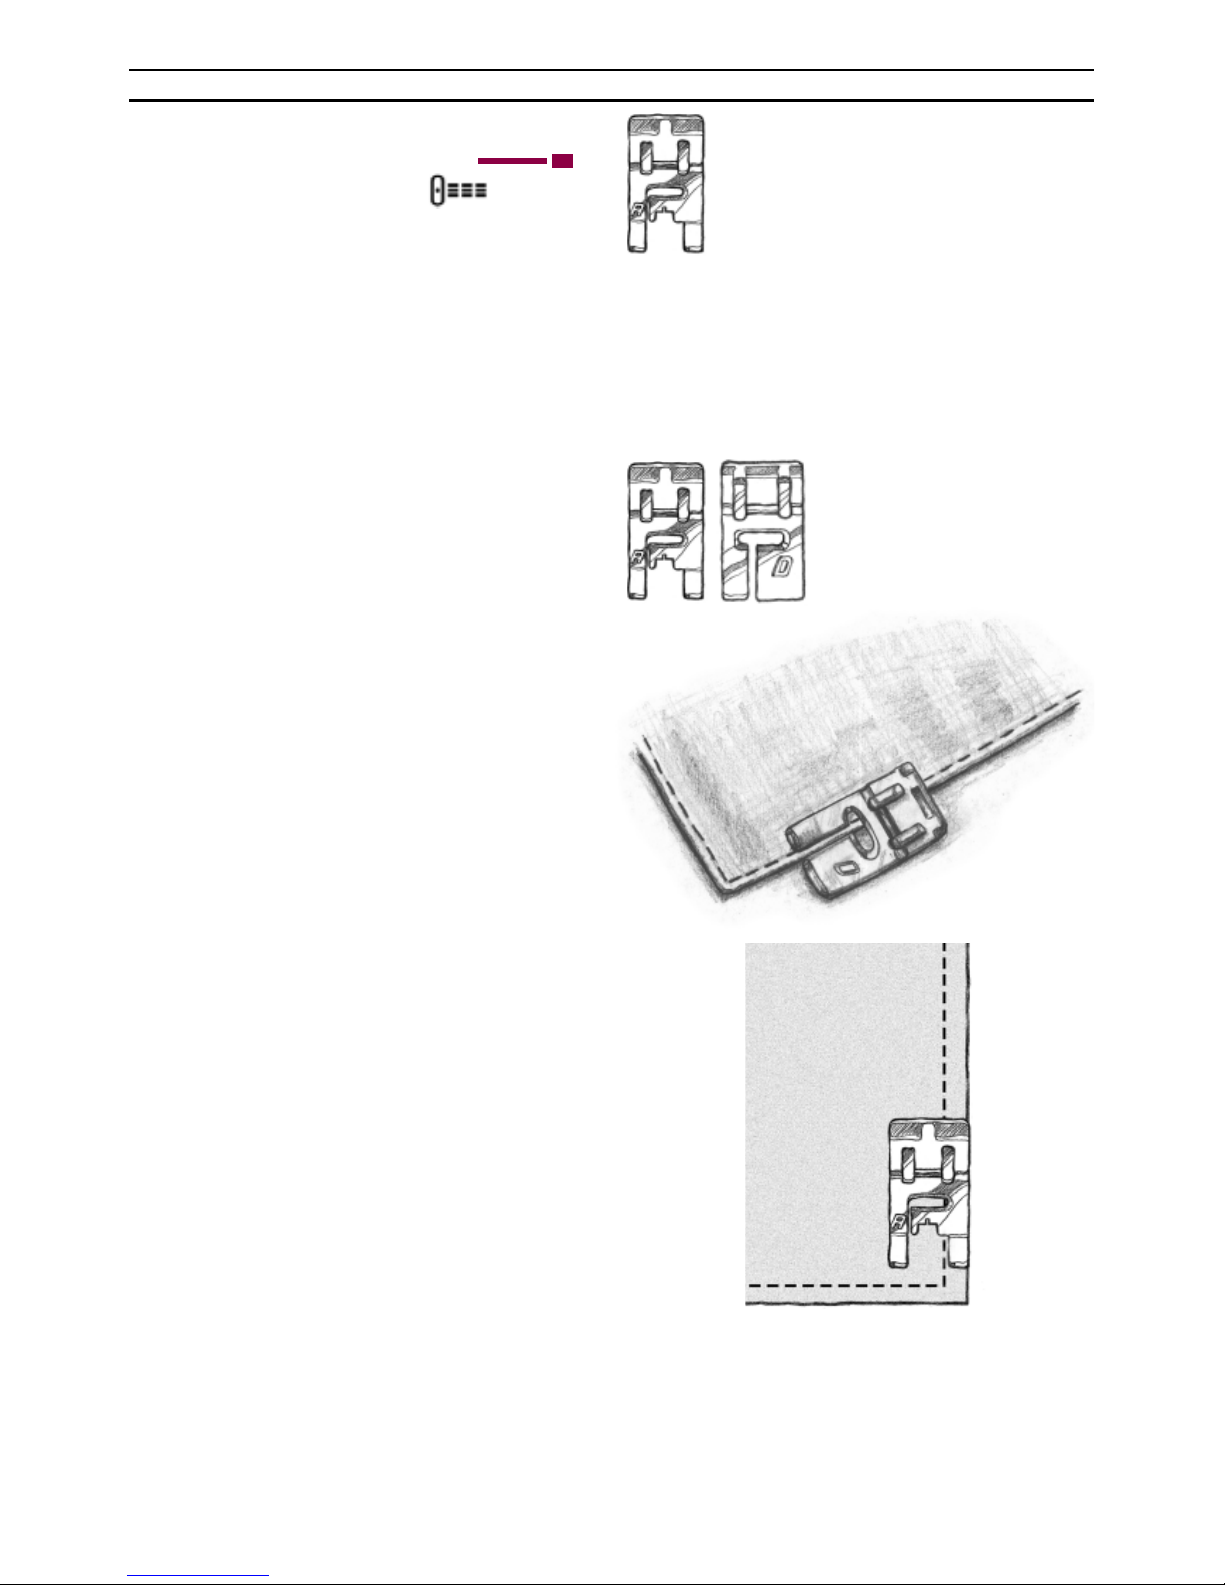
21
Sewing
Reinforced Straight Stitch
Turn the stitch length dial to the area
to sew reinforced straight stitch
. This
stitch is stronger than ordinary straight stitch, due
to the fact that it is a triple and elastic stitch.
The reinforced straight stitch can be used for
heavy stretch fabrics, for crotch seams which are
subject to considerable strain and for topstitching
in heavy fabrics.
Needle Positions
You can select straight stitch and reinforced
straight stitch, with the needle in left position.
The needle position can be adjusted in steps. Use
the stitch width dial, turn to the right to reach the
right position.
To edge stitch, you should take advantage of the
possibility to set the needle to the left or the right
position.
Fit presser foot A when sewing light fabrics and
presser foot D for other fabrics.
Place the fabric and sew so that the edge follows
the inside right edge of the presser foot D or the
fi rst mark of the left edge of the presser foot A.
If you wish to sew about 5 mm from the edge or
sew a narrow hem, use presser foot A and set the
needle to the right position.
Place the edge of the fabric so that it follows the
outside right edge of the presser foot and sew the
hem.
Page 24
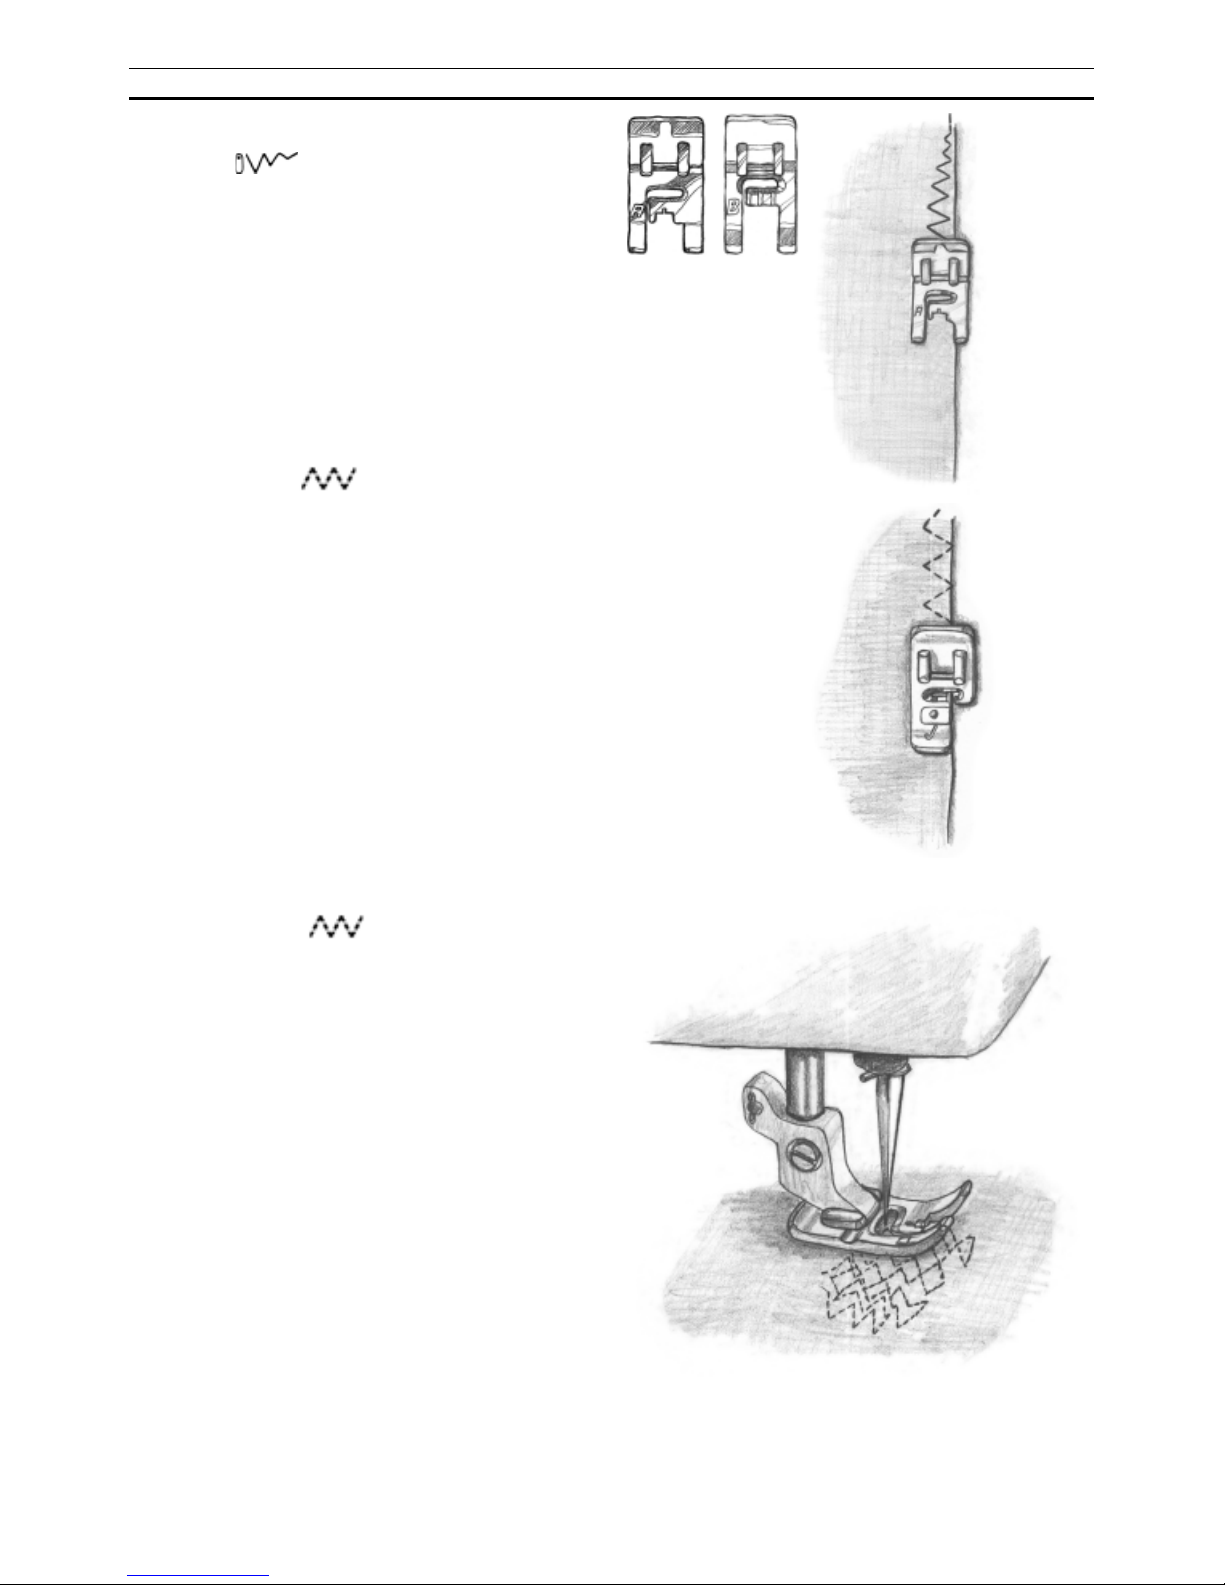
22
Sewing
Zigzag
The zigzag is utilized for sewing on lace,
bound edging and appliqués.
The zigzag width will be decreased from the left
5.5 mm width, steplessly to the right to 0 mm.
In this position the machine sews straight stitch
in the right needle position. Experiment until you
reach the best setting for your actual work.
Three-step Zigzag
Overcasting
Three-step zigzag
is suitable for overcasting most fabrics. Trim the edges of the fabric
before overcasting.
Make sure that the needle sews over the edge
of the fabric. Place the fabric according to the
presser foot (see picture).
Mending and Darning
Three-step zig-zag , can be utilized for
mending and darning. A threadbare spot is
mended by sewing back and forth with three-step
zig-zag.
Use the reverse and for every row of stitching,
guide the fabric slightly to the side. If the fabric
is very worn, a piece of fabric or lining may be
attached to the reverse side of the material as
reinforcement.
Page 25
23
Sewing
Sewing Terry Cloth
Terry cloth is a rather loosely woven fabric in
which seams easily break.
Sew the garment together with straight stitch.
Trim the seams and press the seam allowance fl at
and sew the edges down against the garment on
the wrong side with three-step zigzag.
Even though the stitching goes right through to
the ”right” side of the garment, it is nearly invisible and even the wrong side looks neat.
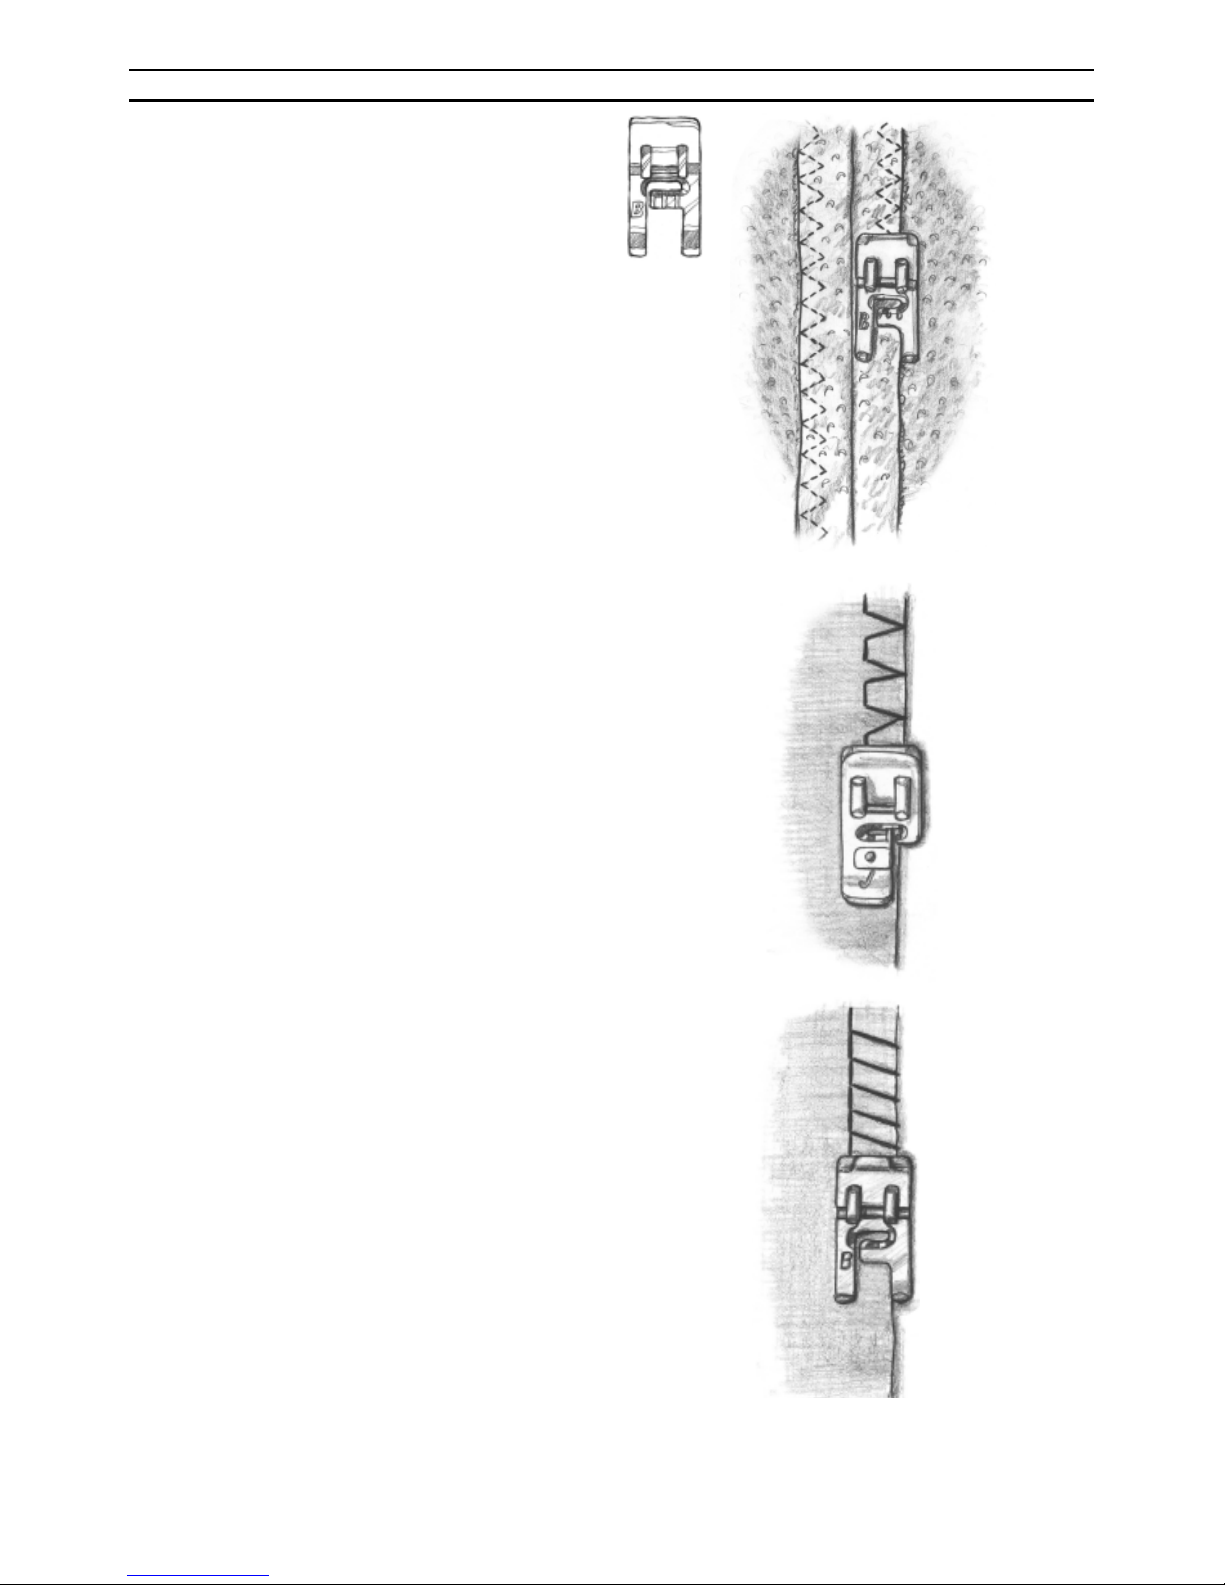
Seam and Overcast
Some stitches can be used for seaming and overcasting directly on the edge where a 5 mm (1/4")
seam is allowed. Place the fabric so that the inside
right ”toe” of the presser foot follows the edge of
the fabric.
Presser foot J is used to overlock and overcast
many different fabrics with the exception of
heavy, fi rm fabrics. The pin on the presser foot
should follow the edge of the fabric and will prevent the fabric from puckering. Stitch width 5.5
mm. Follow the recommended setting, given for
stitch length.
Overcast stitch may be used to sew light and
medium non-stretch fabric and light stretch fabric.
Snap on presser foot J.
Overlock is chiefl y used for sewing heavy stretch
fabric. Snap on presser foot B.
Page 26
24
Sewing
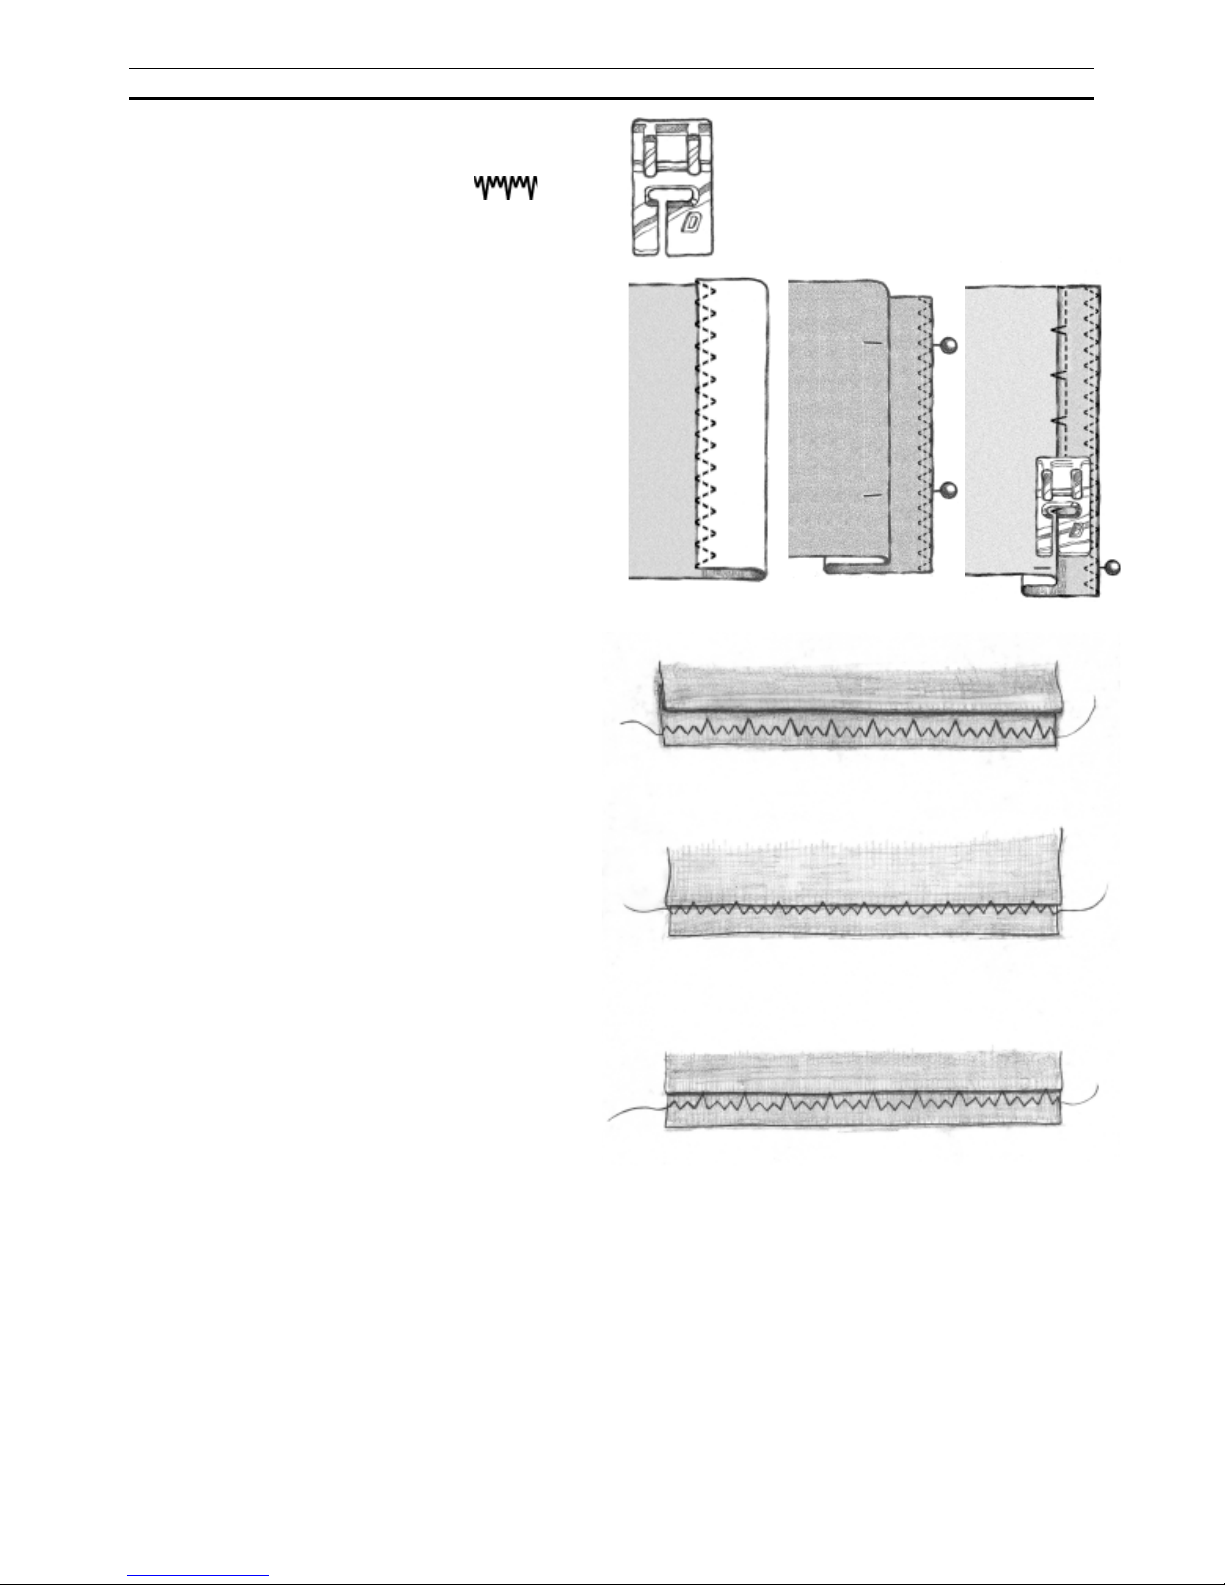
Blind Hem
Presser foot D is used for blind hem .
Fold the material as shown. Make sure that the
fold line of the fabric rides in the groove under
the right side of the presser foot.
Practice using a scrap of material and compare
with the illustrations.
1. If the stitch does not catch the folded edge,
increase the stitch width.
2. If the stitch catches too much of the fold,
decrease the stitch width.
3. For an invisible hem the needle catches a single
thread of the folded edge.
Page 27
25
Sewing
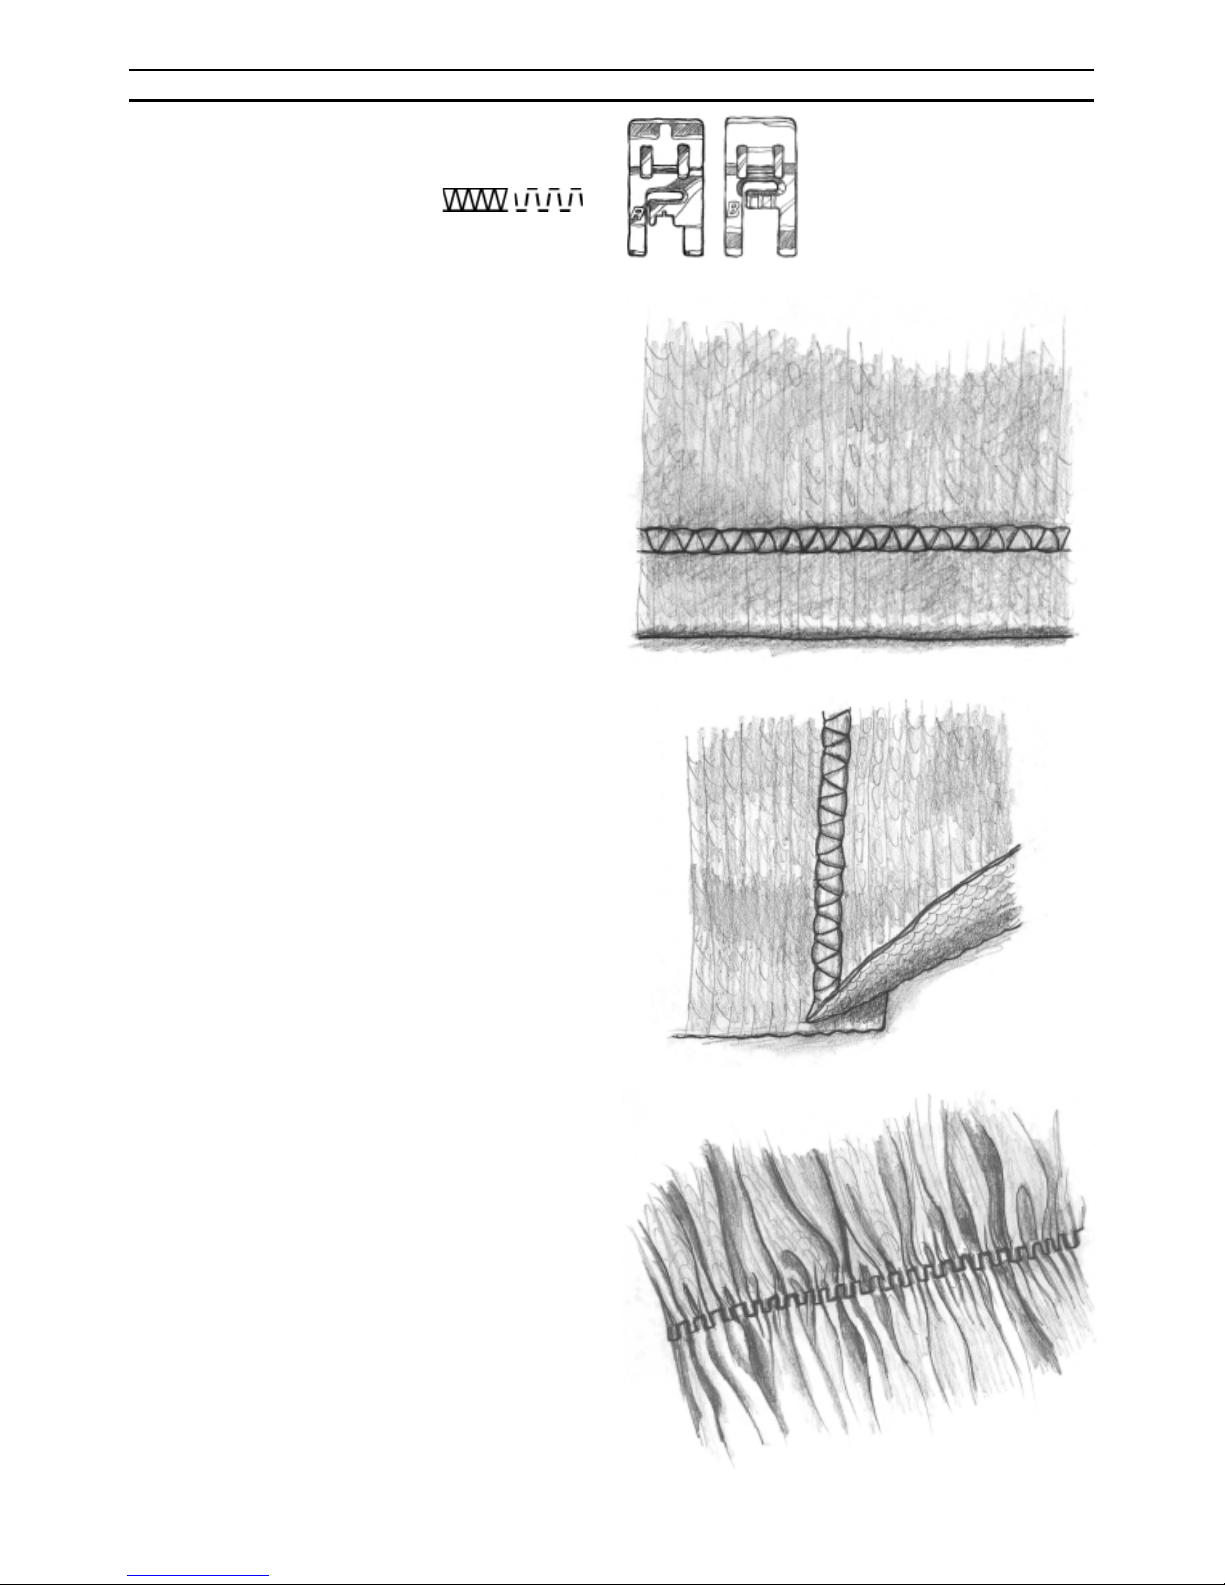
Flatlock – Double Action
Stitch, model 370
Flatlock or Double Action stitch ,
is suitable for sewing overlapped seams and decorative hems.
You can produce a decorative hem by folding a
single hem to the wrong side and sewing the fl at-
lock from the right side.
Trim excess hem to stitching from the wrong side.
To sew an overlapped seam, lap one piece of
fabric over the other piece and sew fl atlock stitch
over the fabric edge on the right side.
Trim from the wrong side or sew another seam
from the right side.
When gathering with narrow, fl at elastic or elastic
cord, use the double-action stitch. To be sure the
elastic does not get stitched in but can run freely,
use presser fot A or B and slip narrow elastic
between the toes of the foot.
Page 28
26
Sewing
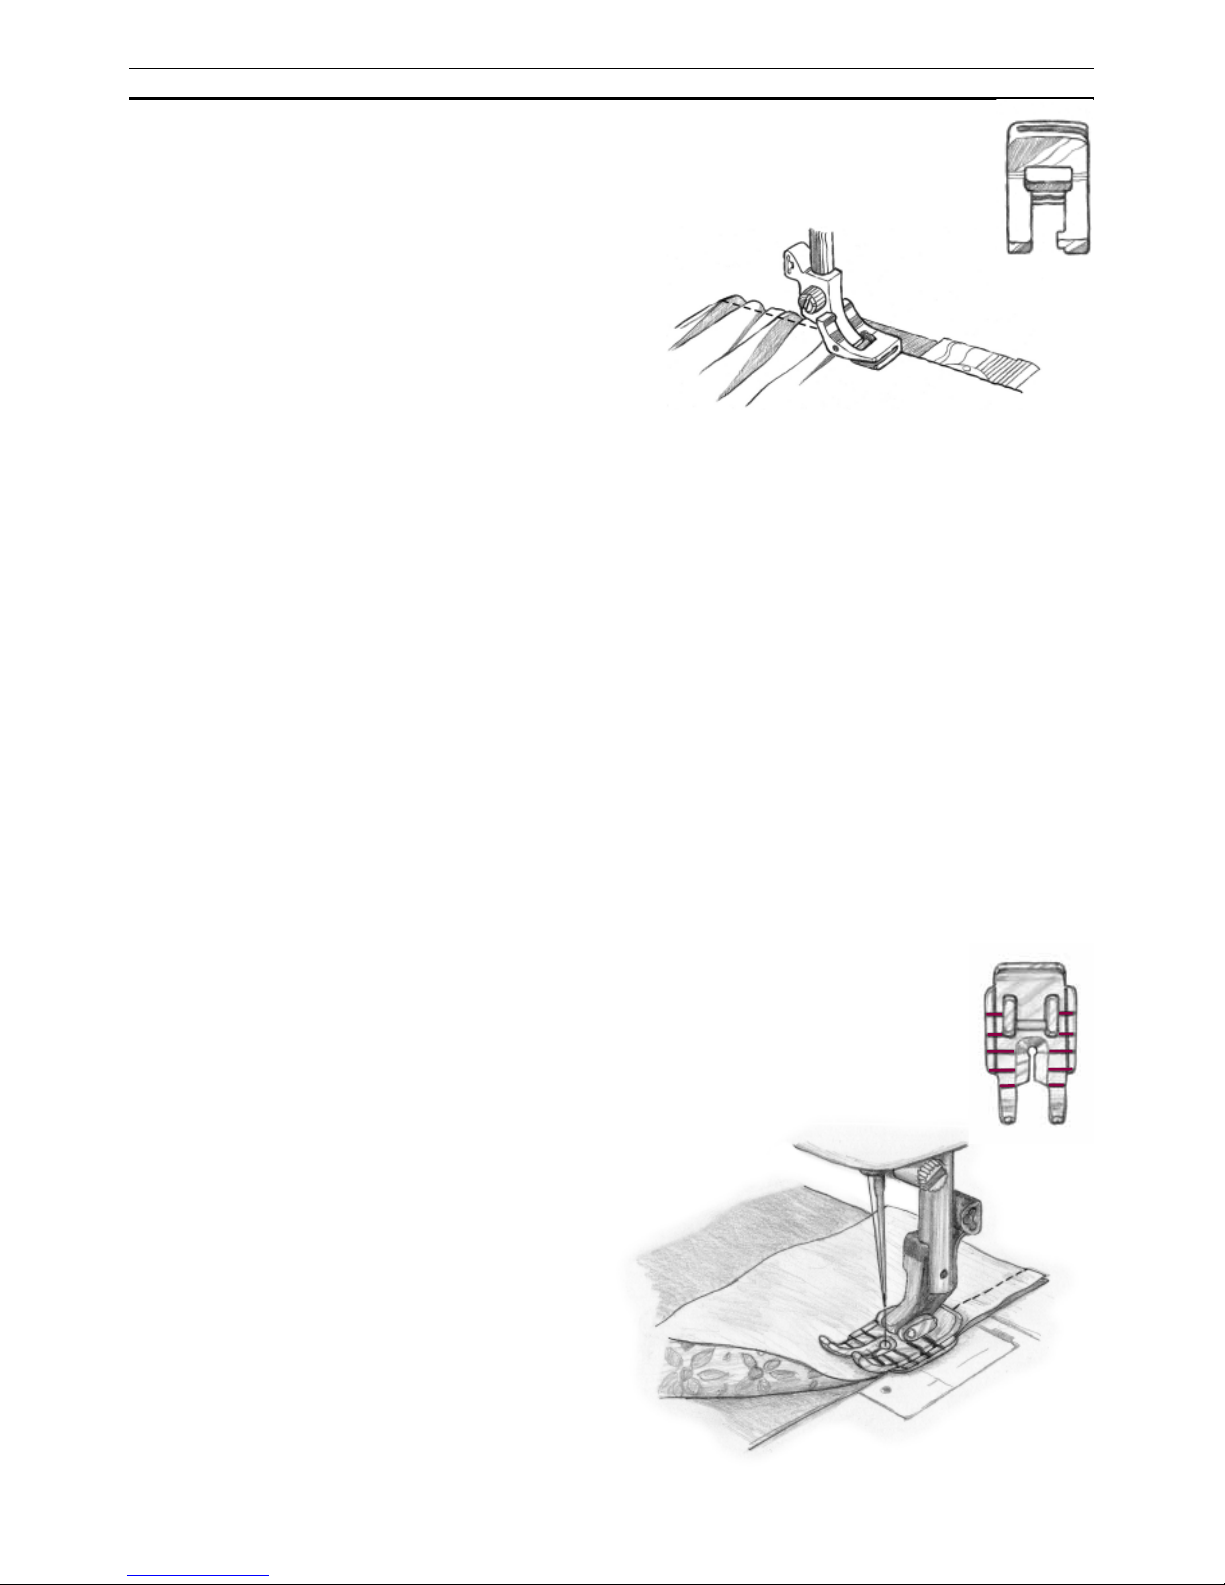
Gathering Foot
Gather fabric or gather and attach a ruffl e in one
step. Suitable for light to medium weight fabrics.
Straight stitch, (left needle position), length 3 to 6.
The longer the length, the more fabric will gather.
Snap on Gathering Foot.
For gathered fabric:
Place fabric under Gathering Foot and sew.
Increase upper tension for tighter gathers.
To gather and attach gathered fabric in one
step:
1. Place fabric to be gathered under the presser
foot right side up.
2. Place fabric to have ruffl e attached to it in the
groove of the foot right side down.
3. Sew, guiding the under fabric but do not hold
it back. Keep the top fabric in the groove
moving steadily as needed. Increase the stitch
length and the upper tension for more gathers.
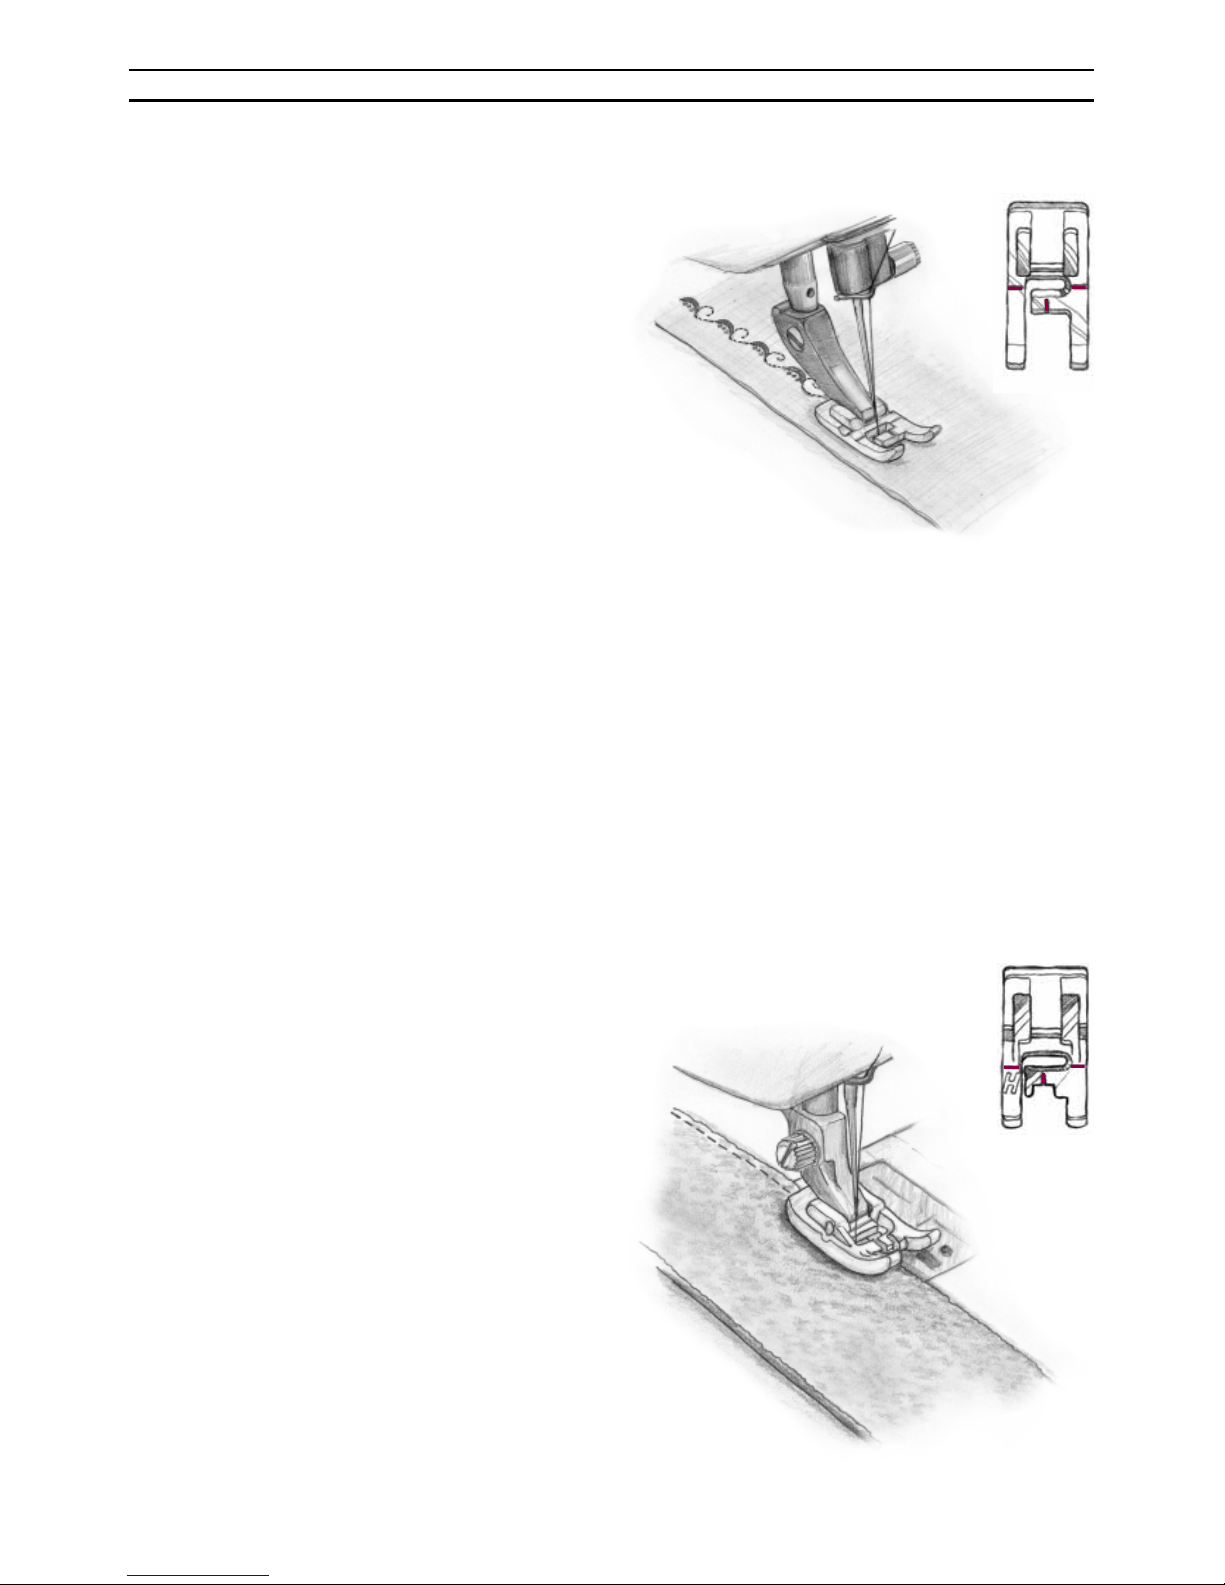
Quilter’s 1/4” Piecing Foot
Sew a scant 1/4” seam allowance. Red lines
mark 1/4” and 1/8” pivot points in front of and
behind the needle. Straight stitch, length 2.0-2.5.
1. Place to pieces of fabric right sides together.
2. Sew with edge of fabric at edge of foot. To
pivot 1/4” from end of fabric, stop sewing
with needle stop down, when fabric edge
reaches fi rst red mark on foot.
Page 29
27
Sewing
Transparent Foot B
Satin stitch applique, taper stitches and decorative stitches. Length as desired. The tunnel on the
underside of the foot feeds smoothly over the
stitches. Because it is clear and has red guidelines,
visibility and accuracy is improved. Use stabilizers
as needed.
1. Snap on foot.
2. Set decorative or satin stitch.
3. Sew
Non-stick Glide Foot H
When sewing foam, plastic, plastic coated fabrics,
leather and imitation leathers, the Non-stick Glide
Foot H feeds over the fabric without sticking. Use
it for general sewing and buttonholes on plastic
and leather type fabrics.
1. Snap on the Non-stick Glide Foot H.
2. Select desired stitch and sew.
Page 30
28
Sewing
Decorative Stitches, model
370
In addition to the stitches already described, there
are a number of decorative stitches.
Set the desired stitch with the stitch selector dial.
At fi rst try the recommended stitch length then
adjust as needed. Always make a test fi rst on a
scrap of fabric you are going to use. Start sewing
slightly in from the edge.
When sewing light-weight material you will get
a better result if you place a stabilizer under the
fabric.
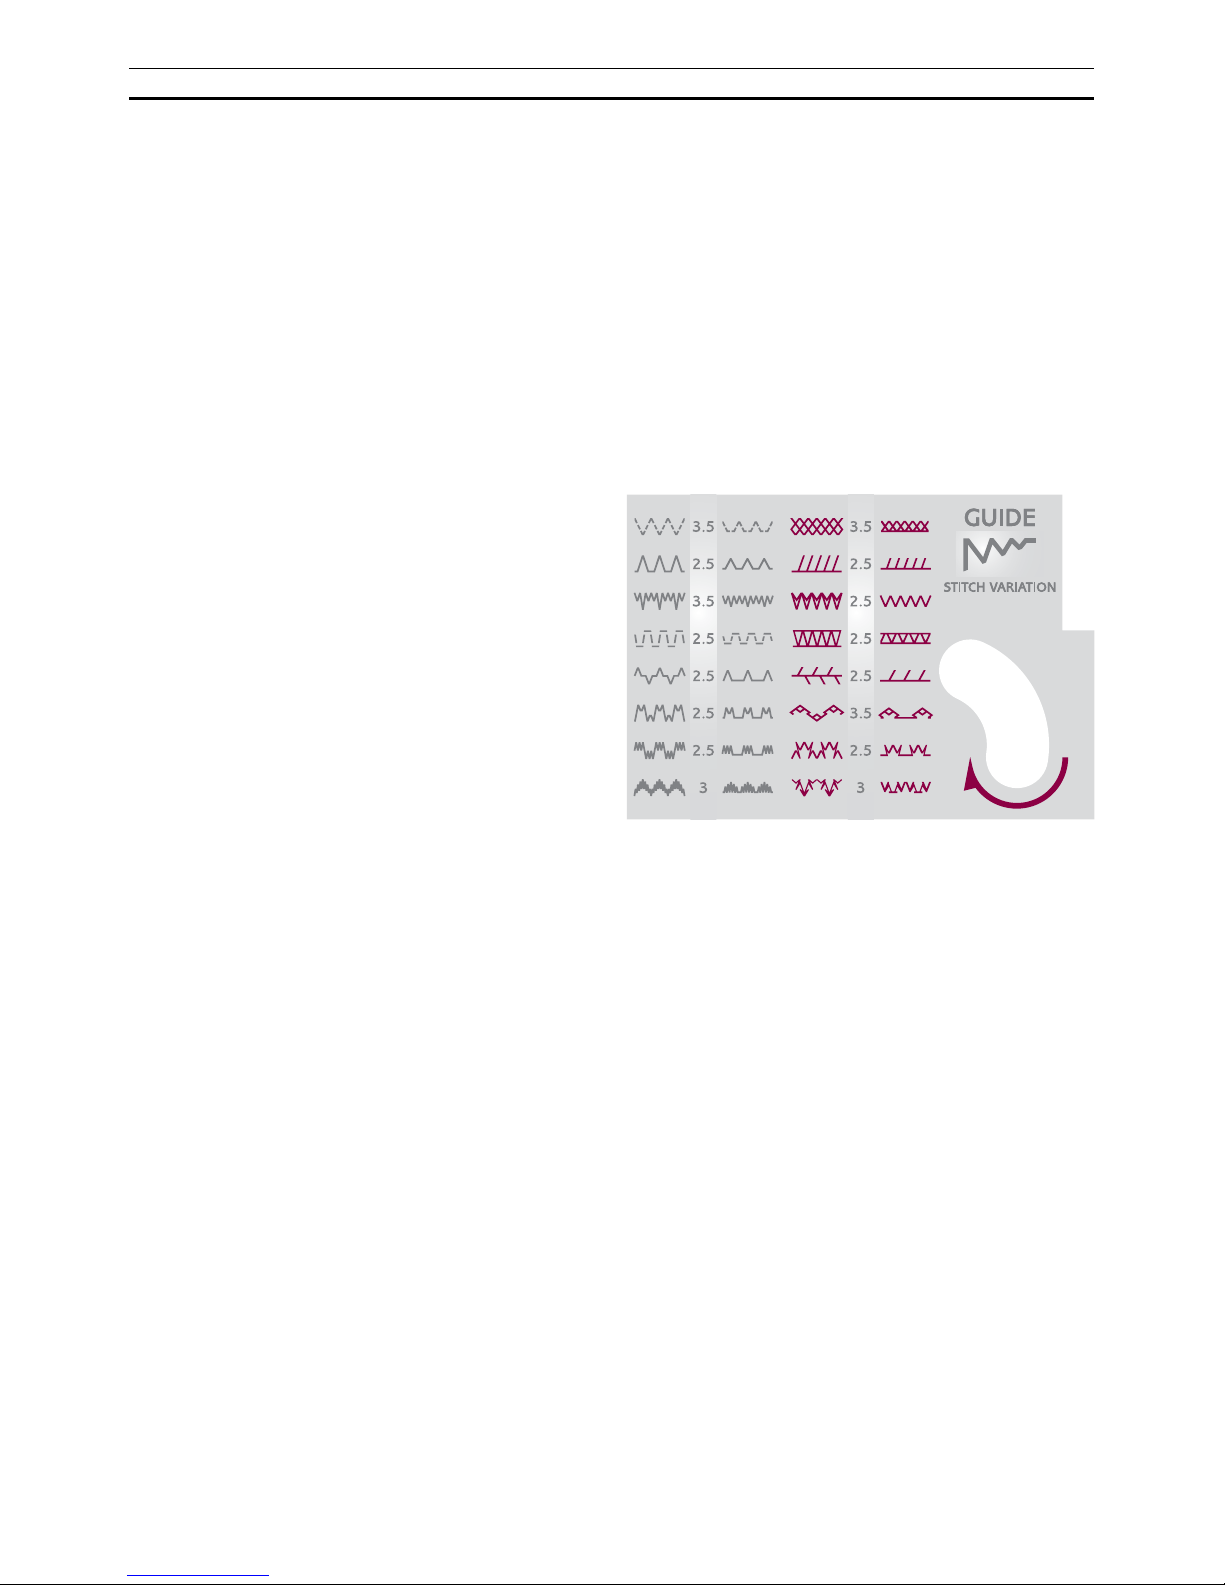
Guide Stitch Variation
Under the lid on the front of the machine is the
Guide Stitch Variation showing a number of
stitches.
By selecting one of the stitches from the left
column and decreasing the stitch width according
to the recommendation in the middle, the look
of the stitch will change according to the right
column. This gives you additional stitches.
Page 31
29
1.
2.
Maintenance
Maintenance
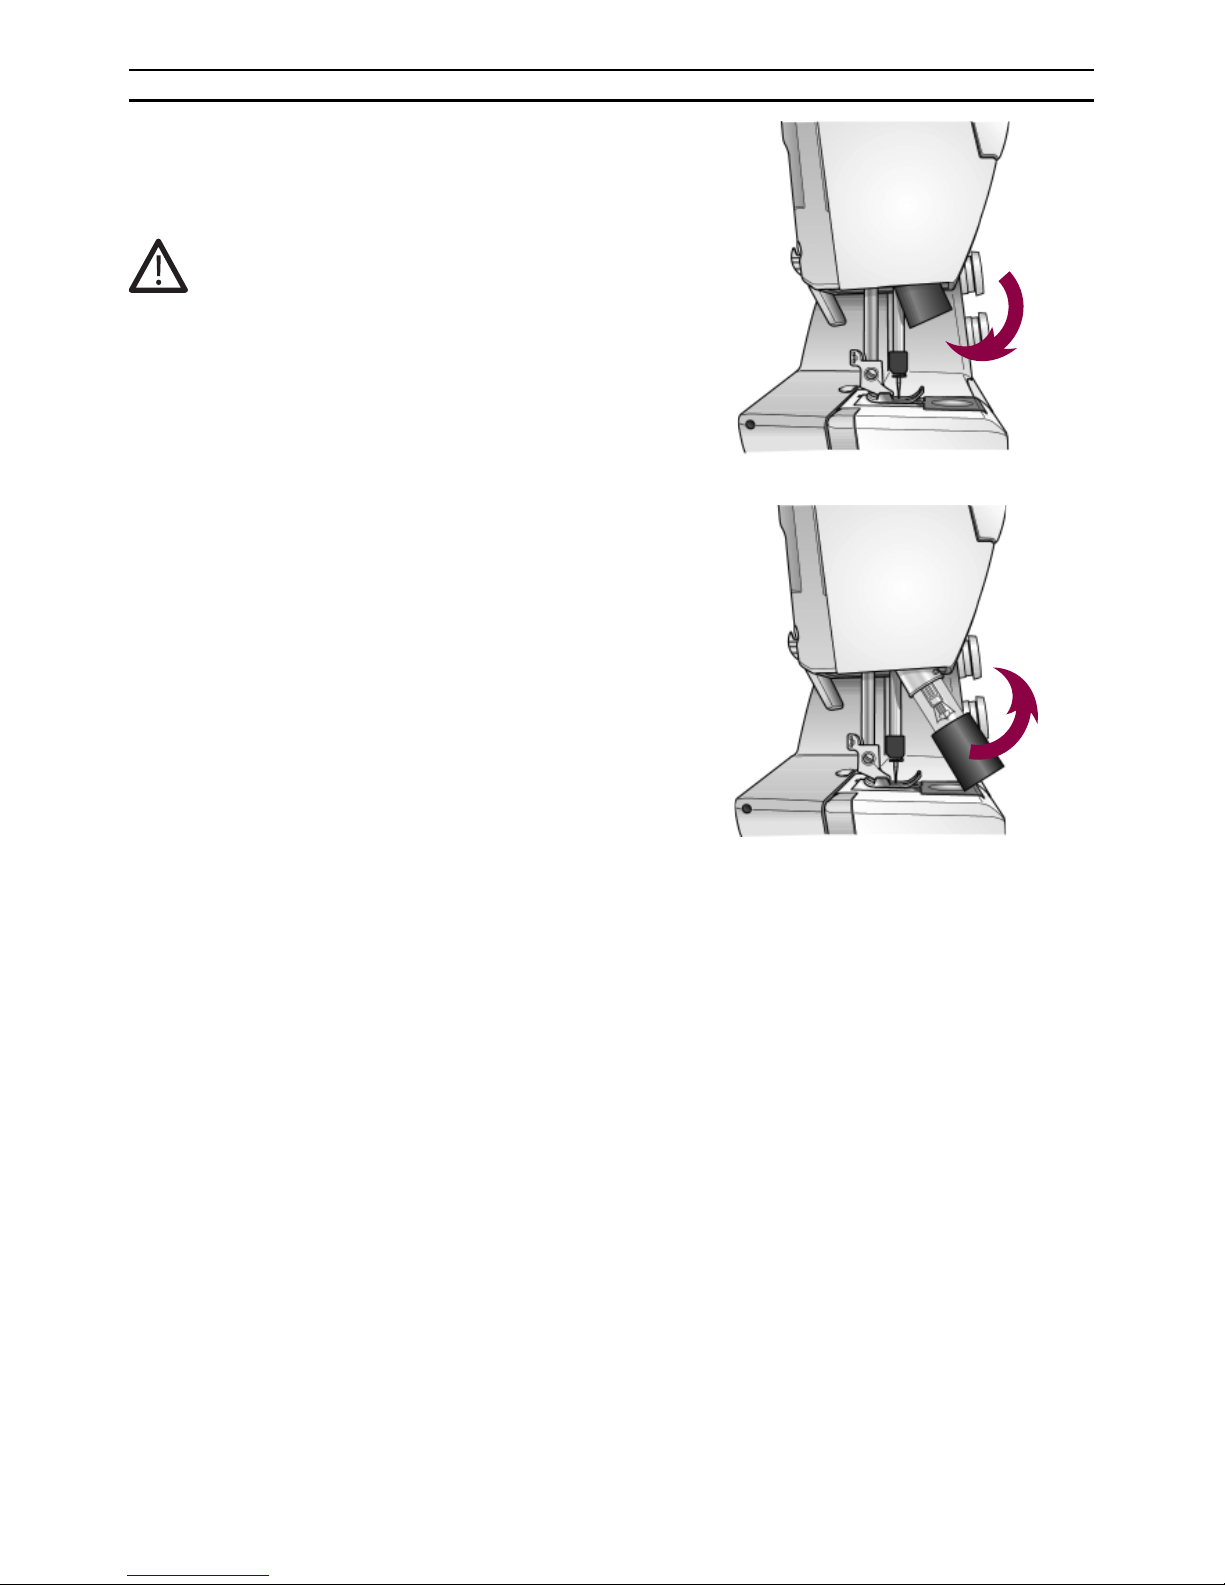
Changing the Light Bulb
1. The light bulb is placed to the left of the needle.
Place the rubber sheath found in the accessory
box around the bulb, turn a quarter of a turn in
the direction of the arrow and remove the bulb.
2. When inserting, place the rubber sheath around
the new bulb, insert the bulb and turn a quarter
of a turn in the direction of the arrow. Use light
bulb designed as indicated on the front of the
machine (15 W).
Turn off the main switch.
Page 32
30
1.
2.
Maintenance
Care of the Machine
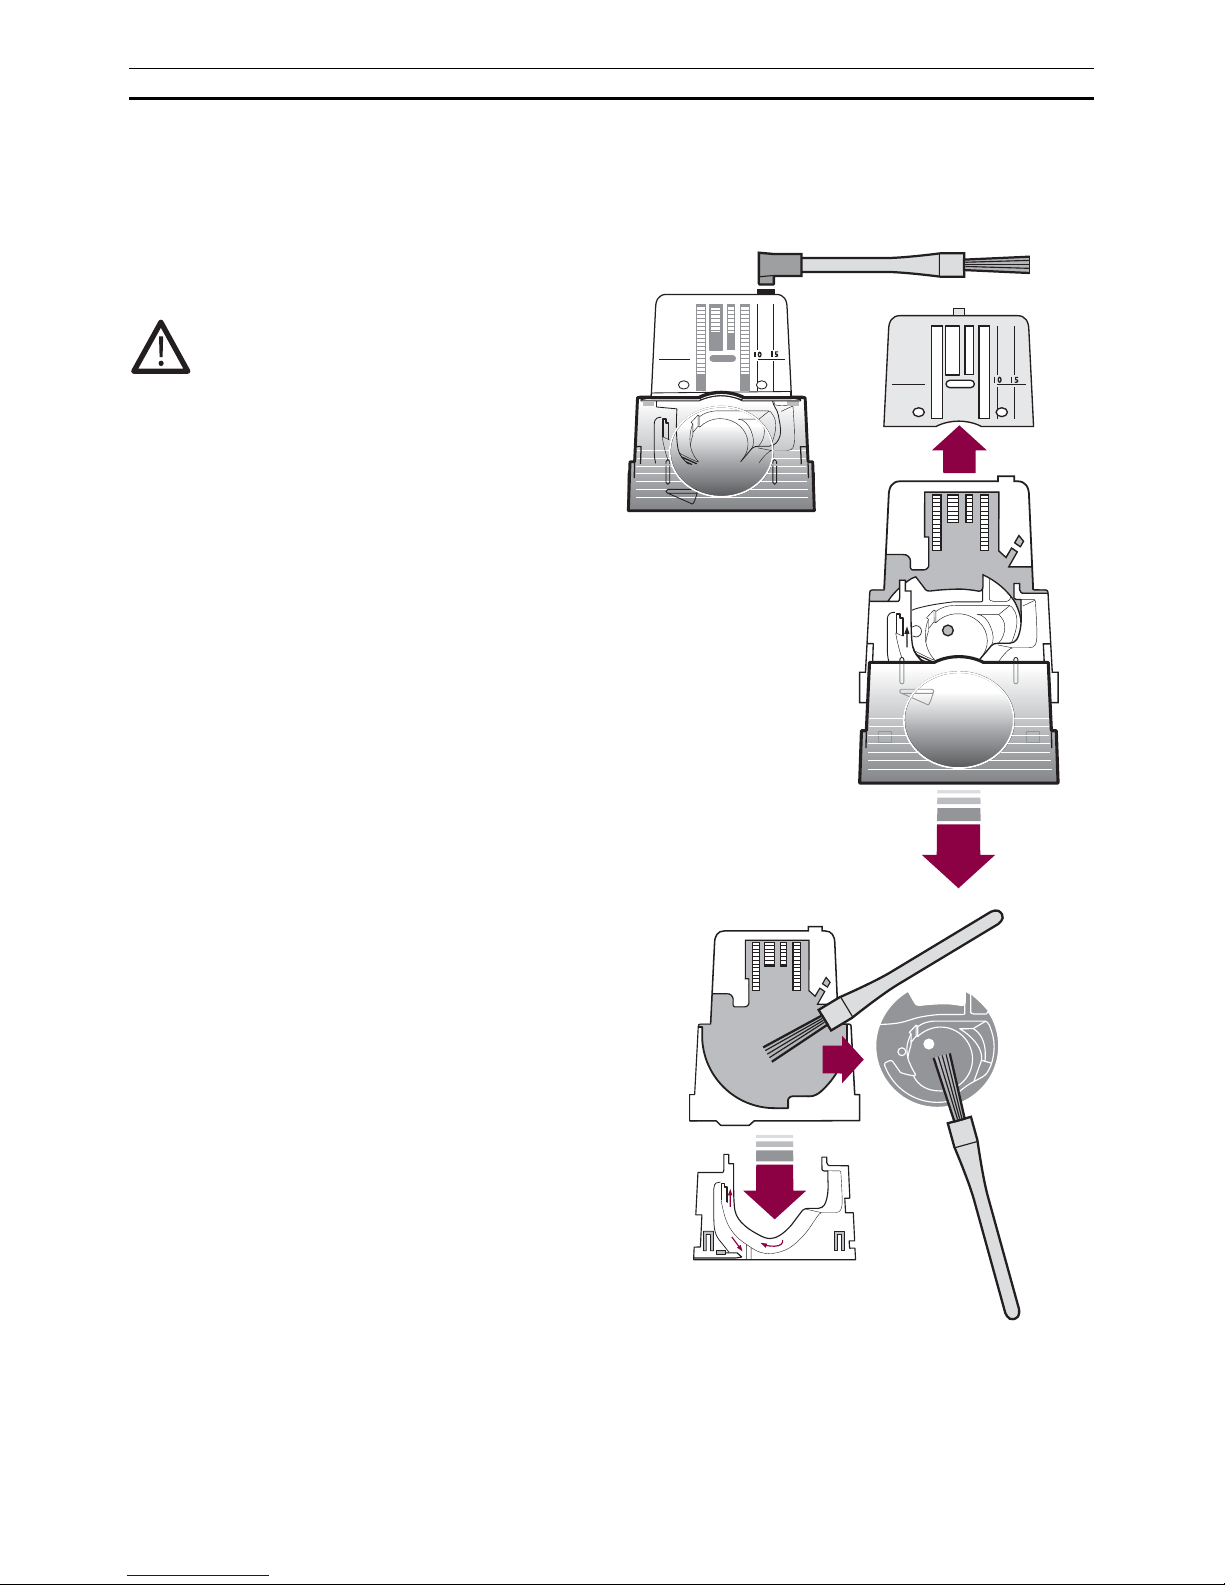
To keep your sewing machine operating satisfactorily, it requires, like other precision machines,
regular cleaning. No lubrication (oiling) is needed.
Clean the Bobbin Area
Remove the presser foot and slide off the bobbin
cover. Lower the feed teeth. Place the stitch plate
opener on the brush, and then in the recess at the
rear of the stitch plate. Turn toward you to pop
off the stitch plate. Clean the feed teeth with the
brush.
Cleaning Under the Bobbin Area
When lint builds up, the area under the bobbin
case must be cleaned.
Remove the bobbin case holder (1) covering the
front part of the bobbin case (2). Remove the
bobbin case by lifting it up. Clean with the brush.
Replace the bobbin case and the bobbin case
holder.
Replacing the Stitch Plate
With feed teeth down, place the stitch plate about
5 mm in front of the rear edge and push it back.
Slide on the bobbin cover. Raise the feed teeth.
Turn off the main switch.
Page 33

31
Trouble Shooting
Trouble Shooting
Always Start by Checking the Needle
• Always start with a new needle as soon as you
discover that a stitch is not what you expected. Test sew on a scrap of the fabric you are
sewing. Check that you have chosen the correct
needle and see that it is correctly inserted. See
page 10.
Unattractive Stitches
• The thread tension is not correct. See page 9.
• Make sure that the thread is not catching. Cer-
tain thread spools are unsuitable for spooling
from the horizontal spool pin. Try instead with
the vertical spool pin.
• The machine may be incorrectly threaded. Be
sure to place spool holders correctly.
The correct threading is shown on page 7.
• Wrong bobbin thread. It should be of the same
thickness as the upper thread.
The Needle Breaks
• You may have helped the machine to feed by
pulling the fabric. The needle can strike against
stitch plate and break. Change the needle. See
page 10.
The Upper Thread Breaks
• Check the thread spool to see that it has not
caught in any way.
• The needle eye may have sharp edges which cut
the thread. If so, change the needle. See page
10.
• The upper thread is incorrectly threaded. See
page 7.
• The upper thread may have too much tension.
Refer to page 9.
The Thread is Knotted
• The hole in the stitch plate may be chipped and
have sharp edges. We recommend that you
replace it.
The Bobbin Thread Breaks
• The bobbin thread may be incorrectly threaded.
See page 8.
• The stitch plate hole is damaged. See ”Upper
thread breaks”.
Irregular Bobbin Winding
• This may be due to poor quality thread. When
sewing with cotton thread, increase the thread
tension.
• The machine is not correctly threaded for
bobbin winding. See page 7-8.
The Fabric Puckers
• The upper thread tension is too tight. See page 9
for correct thread tension.
The Machine Does Not Feed the Fabric
• The stitch length is too short. Increase stitch
length.
• The feed teeth may be lowered. Raise them by
turning the stitch length dial to the left.
• The feed teeth are full of dust and dirt. Clean
with the brush. See page 30.
The Seam is Too Loose – Fabric Layers
Not Held Together
• The thread tension is far too loose. Page 9
shows how to adjust the thread tension.
Machine Runs Sluggishly
• Dirt or lint has built up under the stitch plate.
Loosen the plate and brush clean between the
feed teeth and in the bottom area. See page 30.
• Dirt or lint has packed in the hook. Remove the
bobbin and clean with the brush. See page 30.
Page 34

32
Trouble Shooting
Expert Assistance
Have your machine ”tuned up” regularly by your
dealer.
If you have followed the preceding points and still
do not get satisfactory results, you should contact
the dealer where you bought the machine.
When the machine is being checked, it is a great
help if it can be test sewn under as similar conditions as possible as when you used it.
Remember to take a sewing sample along with
you, preferably of the fabric and with the thread
you intend to use.
A sewing sample will often give much better
information than words.
Non-original Parts and Accessories
The warranty does not cover any defect or
damage caused by use of non-original accessories
or parts.
Page 35
We reserve the right to change the machine equipment and the ass ort ment of
accessories without prior notice, or make modifi cations to the performance or
design.
Such modifi cations, however, will always be to the benefi t of the user and the
product.
Please note that on disposal, this product must be safely
recycled in accordance with relevant National legislation
relating to electrical/electronic products. If in doubt
please contact your retailer for guidance
Page 36
412 91 25-26C • InHouse • © 2004 VSM Group AB • All rights reserved • Printed in Sweden on environmentally-friendly paper
VSM Group AB • SE-561 84 Huskvarna, Sweden
www.husqvarnaviking.com
 Loading...