

Page 1
LF
Safety and operating instructions
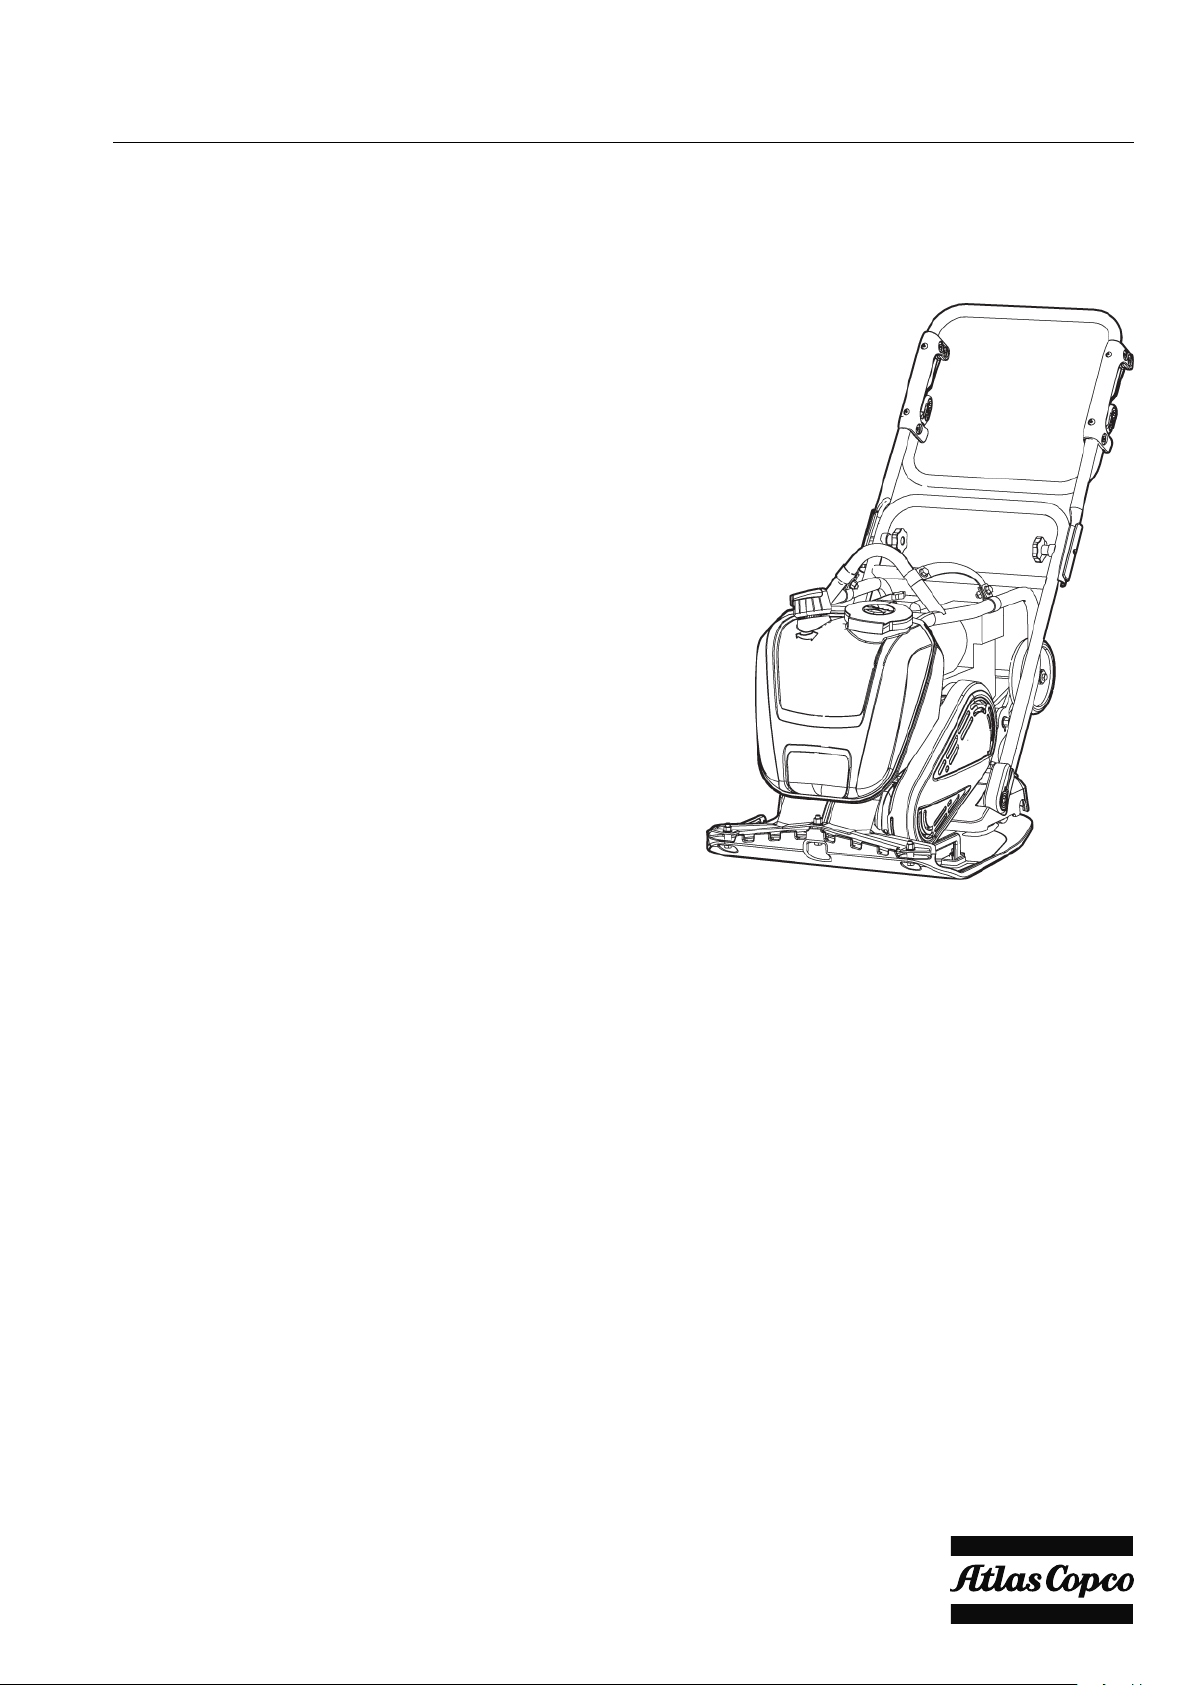
Forward plate
100
© 2015 Construction Tools EOOD | No. 9800 1125 01c | 2015-05-26
Original instructions
Page 2

ContentsLF 100
Contents
Introduction. . . . . . . . . . . . . . . . . . . . . . . . . . . . . . . . . . . . . . . . . . . . . . . . . . . . . . . . . . . . . . . . . . . . . . . . 5
About the Safety and operating instructions. . . . . . . . . . . . . . . . . . . . . . . . . . . . . . . . . . . . . . . . . . 5
Safety instructions. . . . . . . . . . . . . . . . . . . . . . . . . . . . . . . . . . . . . . . . . . . . . . . . . . . . . . . . . . . . . . . . . 6
Safety signal words. . . . . . . . . . . . . . . . . . . . . . . . . . . . . . . . . . . . . . . . . . . . . . . . . . . . . . . . . . . . . . 6
Personal precautions and qualifications. . . . . . . . . . . . . . . . . . . . . . . . . . . . . . . . . . . . . . . . . . . 6
Personal protective equipment. . . . . . . . . . . . . . . . . . . . . . . . . . . . . . . . . . . . . . . . . . . . . . . . . . . 6
Drugs, alcohol or medication. . . . . . . . . . . . . . . . . . . . . . . . . . . . . . . . . . . . . . . . . . . . . . . . . . . . 6
Operation, precautions. . . . . . . . . . . . . . . . . . . . . . . . . . . . . . . . . . . . . . . . . . . . . . . . . . . . . . . . . . . 6
Transport, precautions. . . . . . . . . . . . . . . . . . . . . . . . . . . . . . . . . . . . . . . . . . . . . . . . . . . . . . . . . . 10
Maintenance, precautions. . . . . . . . . . . . . . . . . . . . . . . . . . . . . . . . . . . . . . . . . . . . . . . . . . . . . . . 10
Storage, precautions. . . . . . . . . . . . . . . . . . . . . . . . . . . . . . . . . . . . . . . . . . . . . . . . . . . . . . . . . . . . 10
Overview. . . . . . . . . . . . . . . . . . . . . . . . . . . . . . . . . . . . . . . . . . . . . . . . . . . . . . . . . . . . . . . . . . . . . . . . . 11
Design and function. . . . . . . . . . . . . . . . . . . . . . . . . . . . . . . . . . . . . . . . . . . . . . . . . . . . . . . . . . . . 11
Main parts. . . . . . . . . . . . . . . . . . . . . . . . . . . . . . . . . . . . . . . . . . . . . . . . . . . . . . . . . . . . . . . . . . . . . 11
Labels. . . . . . . . . . . . . . . . . . . . . . . . . . . . . . . . . . . . . . . . . . . . . . . . . . . . . . . . . . . . . . . . . . . . . . . . . 12
Data plate. . . . . . . . . . . . . . . . . . . . . . . . . . . . . . . . . . . . . . . . . . . . . . . . . . . . . . . . . . . . . . . . . . . . 12
Noise level label. . . . . . . . . . . . . . . . . . . . . . . . . . . . . . . . . . . . . . . . . . . . . . . . . . . . . . . . . . . . . . 13
Lifting point label. . . . . . . . . . . . . . . . . . . . . . . . . . . . . . . . . . . . . . . . . . . . . . . . . . . . . . . . . . . . . . 13
Labels, Honda. . . . . . . . . . . . . . . . . . . . . . . . . . . . . . . . . . . . . . . . . . . . . . . . . . . . . . . . . . . . . . . . 13
Start label. . . . . . . . . . . . . . . . . . . . . . . . . . . . . . . . . . . . . . . . . . . . . . . . . . . . . . . . . . . . . . . . . 13
Safety label. . . . . . . . . . . . . . . . . . . . . . . . . . . . . . . . . . . . . . . . . . . . . . . . . . . . . . . . . . . . . . . 14
Labels, Hatz. . . . . . . . . . . . . . . . . . . . . . . . . . . . . . . . . . . . . . . . . . . . . . . . . . . . . . . . . . . . . . . . . . 14
Safety label. . . . . . . . . . . . . . . . . . . . . . . . . . . . . . . . . . . . . . . . . . . . . . . . . . . . . . . . . . . . . . . 14
Safety label. . . . . . . . . . . . . . . . . . . . . . . . . . . . . . . . . . . . . . . . . . . . . . . . . . . . . . . . . . . . . . . 14
Use ear protectors label. . . . . . . . . . . . . . . . . . . . . . . . . . . . . . . . . . . . . . . . . . . . . . . . . . . . . 14
Transport. . . . . . . . . . . . . . . . . . . . . . . . . . . . . . . . . . . . . . . . . . . . . . . . . . . . . . . . . . . . . . . . . . . . . . . . . 15
Transport wheels. . . . . . . . . . . . . . . . . . . . . . . . . . . . . . . . . . . . . . . . . . . . . . . . . . . . . . . . . . . . . . . 15
Lifting the machine. . . . . . . . . . . . . . . . . . . . . . . . . . . . . . . . . . . . . . . . . . . . . . . . . . . . . . . . . . . . . 15
Installation. . . . . . . . . . . . . . . . . . . . . . . . . . . . . . . . . . . . . . . . . . . . . . . . . . . . . . . . . . . . . . . . . . . . . . . . 16
Fuel. . . . . . . . . . . . . . . . . . . . . . . . . . . . . . . . . . . . . . . . . . . . . . . . . . . . . . . . . . . . . . . . . . . . . . . . . . . 16
Filling. . . . . . . . . . . . . . . . . . . . . . . . . . . . . . . . . . . . . . . . . . . . . . . . . . . . . . . . . . . . . . . . . . . . . . . 16
Operation. . . . . . . . . . . . . . . . . . . . . . . . . . . . . . . . . . . . . . . . . . . . . . . . . . . . . . . . . . . . . . . . . . . . . . . . . 17
Operating near edges. . . . . . . . . . . . . . . . . . . . . . . . . . . . . . . . . . . . . . . . . . . . . . . . . . . . . . . . . . . 17
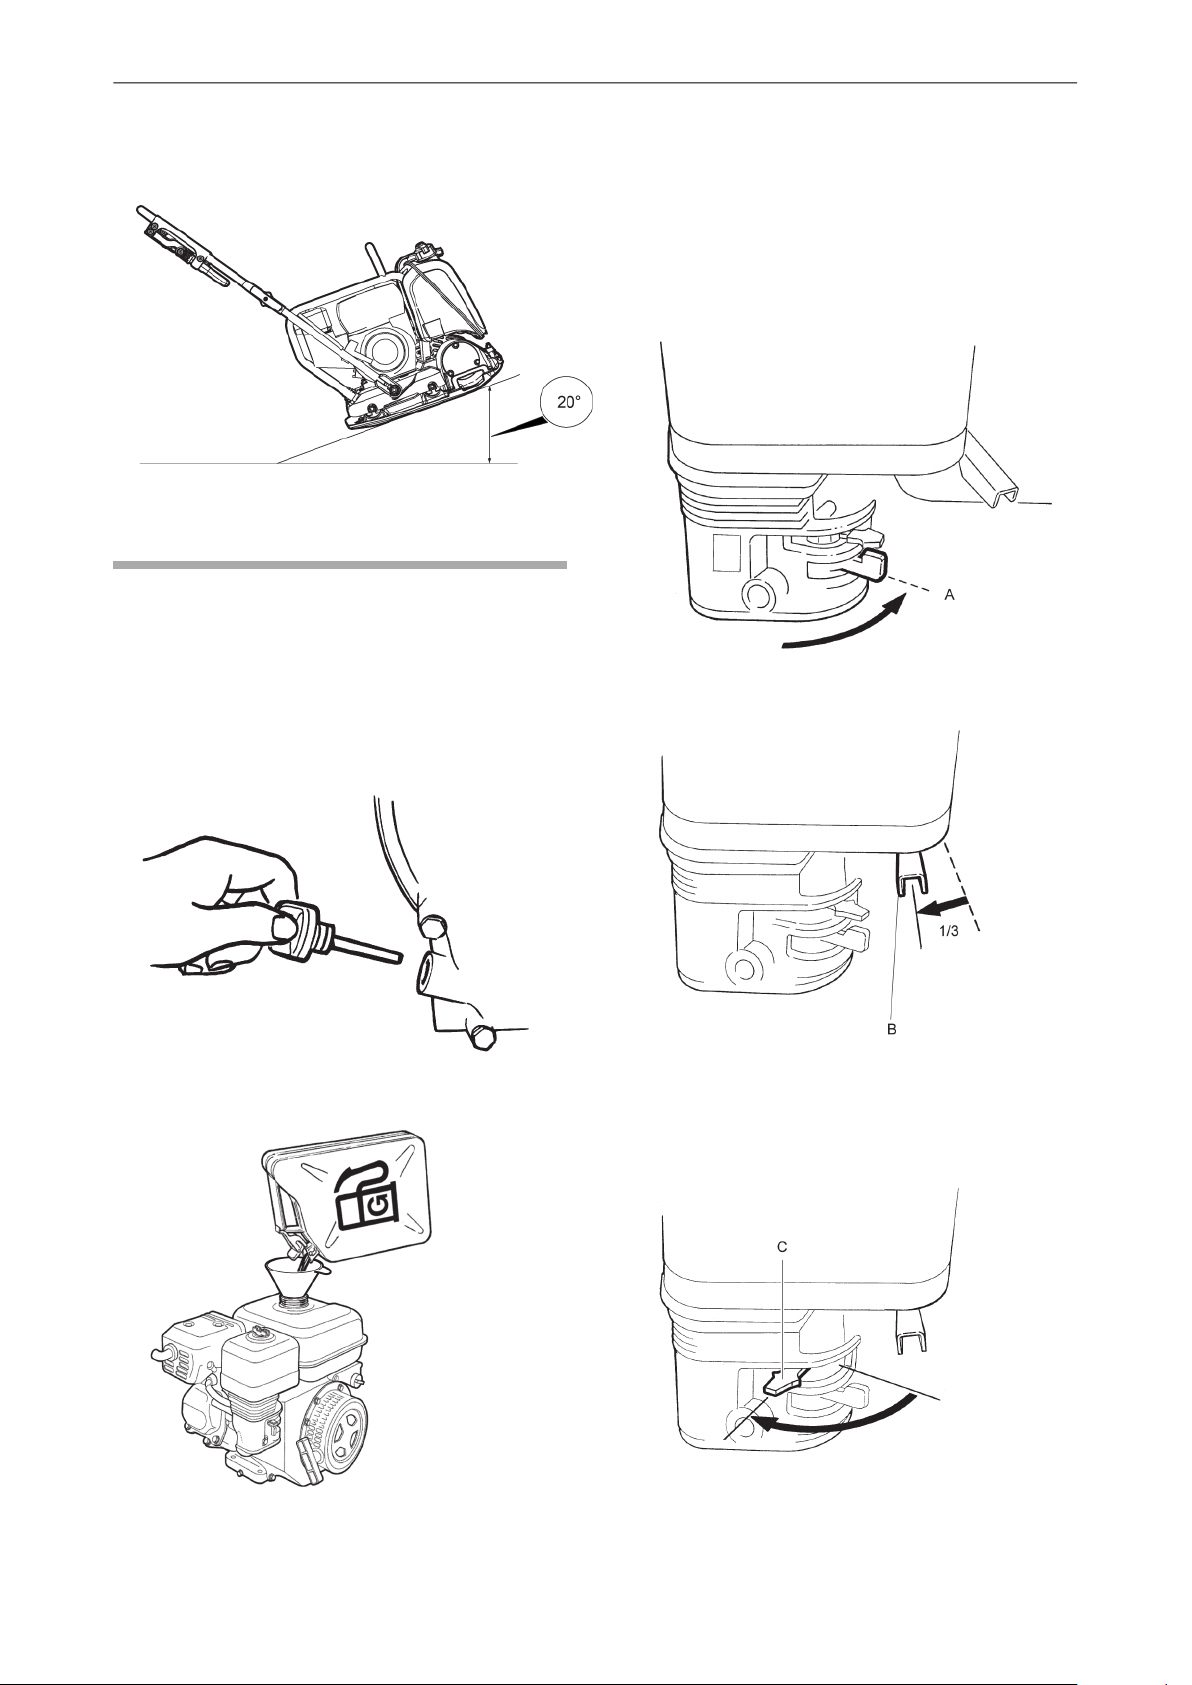
Operating on slopes. . . . . . . . . . . . . . . . . . . . . . . . . . . . . . . . . . . . . . . . . . . . . . . . . . . . . . . . . . . . 17
Start and stop. . . . . . . . . . . . . . . . . . . . . . . . . . . . . . . . . . . . . . . . . . . . . . . . . . . . . . . . . . . . . . . . . . 18
Honda. . . . . . . . . . . . . . . . . . . . . . . . . . . . . . . . . . . . . . . . . . . . . . . . . . . . . . . . . . . . . . . . . . . . . . . 18
Before starting, Honda. . . . . . . . . . . . . . . . . . . . . . . . . . . . . . . . . . . . . . . . . . . . . . . . . . . . . . 18
Starting the engine, Honda. . . . . . . . . . . . . . . . . . . . . . . . . . . . . . . . . . . . . . . . . . . . . . . . . . 18
Stopping the engine, Honda. . . . . . . . . . . . . . . . . . . . . . . . . . . . . . . . . . . . . . . . . . . . . . . . . 19
Hatz. . . . . . . . . . . . . . . . . . . . . . . . . . . . . . . . . . . . . . . . . . . . . . . . . . . . . . . . . . . . . . . . . . . . . . . . . 19
Before starting, Hatz. . . . . . . . . . . . . . . . . . . . . . . . . . . . . . . . . . . . . . . . . . . . . . . . . . . . . . . . 19
Starting the engine, Hatz. . . . . . . . . . . . . . . . . . . . . . . . . . . . . . . . . . . . . . . . . . . . . . . . . . . . 20
Stopping the engine, Hatz. . . . . . . . . . . . . . . . . . . . . . . . . . . . . . . . . . . . . . . . . . . . . . . . . . . 20
Operating. . . . . . . . . . . . . . . . . . . . . . . . . . . . . . . . . . . . . . . . . . . . . . . . . . . . . . . . . . . . . . . . . . . . . . 21
Handle positions. . . . . . . . . . . . . . . . . . . . . . . . . . . . . . . . . . . . . . . . . . . . . . . . . . . . . . . . . . . . . . 21
When taking a break. . . . . . . . . . . . . . . . . . . . . . . . . . . . . . . . . . . . . . . . . . . . . . . . . . . . . . . . . . . . 22
Maintenance. . . . . . . . . . . . . . . . . . . . . . . . . . . . . . . . . . . . . . . . . . . . . . . . . . . . . . . . . . . . . . . . . . . . . . 22
Every 10 hours of operation (daily). . . . . . . . . . . . . . . . . . . . . . . . . . . . . . . . . . . . . . . . . . . . . . . 22
Original instructions
3© 2015 Construction Tools EOOD | No. 9800 1125 01c | 2015-05-26
Page 3

Checking bolted joint. . . . . . . . . . . . . . . . . . . . . . . . . . . . . . . . . . . . . . . . . . . . . . . . . . . . . . . . . . 22
Checking the engine, Honda. . . . . . . . . . . . . . . . . . . . . . . . . . . . . . . . . . . . . . . . . . . . . . . . . . . 22
Checking the engine, Hatz. . . . . . . . . . . . . . . . . . . . . . . . . . . . . . . . . . . . . . . . . . . . . . . . . . . . . 23
After the first 20 hours of operation. . . . . . . . . . . . . . . . . . . . . . . . . . . . . . . . . . . . . . . . . . . . . . 23
Changing the engine oil, Honda. . . . . . . . . . . . . . . . . . . . . . . . . . . . . . . . . . . . . . . . . . . . . . . . . 23
Changing the engine oil, Hatz. . . . . . . . . . . . . . . . . . . . . . . . . . . . . . . . . . . . . . . . . . . . . . . . . . 24
Every 100 hours of operation (weekly). . . . . . . . . . . . . . . . . . . . . . . . . . . . . . . . . . . . . . . . . . . . 24
Checking the V-belt. . . . . . . . . . . . . . . . . . . . . . . . . . . . . . . . . . . . . . . . . . . . . . . . . . . . . . . . . . . 24
Checking the shock absorbers. . . . . . . . . . . . . . . . . . . . . . . . . . . . . . . . . . . . . . . . . . . . . . . . . . 25
Checking spark plug, Honda. . . . . . . . . . . . . . . . . . . . . . . . . . . . . . . . . . . . . . . . . . . . . . . . . . . . 25
Every 250 hours of operation (6 months). . . . . . . . . . . . . . . . . . . . . . . . . . . . . . . . . . . . . . . . . 25
Every 500 hours of operation (yearly). . . . . . . . . . . . . . . . . . . . . . . . . . . . . . . . . . . . . . . . . . . . 26
Cleaning the fuel tank. . . . . . . . . . . . . . . . . . . . . . . . . . . . . . . . . . . . . . . . . . . . . . . . . . . . . . . . . 26
Inspection and adjustment of engine. . . . . . . . . . . . . . . . . . . . . . . . . . . . . . . . . . . . . . . . . . . . . 26
Disposal. . . . . . . . . . . . . . . . . . . . . . . . . . . . . . . . . . . . . . . . . . . . . . . . . . . . . . . . . . . . . . . . . . . . . . . . . . 26
Storage. . . . . . . . . . . . . . . . . . . . . . . . . . . . . . . . . . . . . . . . . . . . . . . . . . . . . . . . . . . . . . . . . . . . . . . . . . . 27
Technical data. . . . . . . . . . . . . . . . . . . . . . . . . . . . . . . . . . . . . . . . . . . . . . . . . . . . . . . . . . . . . . . . . . . . . 28
Machine data. . . . . . . . . . . . . . . . . . . . . . . . . . . . . . . . . . . . . . . . . . . . . . . . . . . . . . . . . . . . . . . . . . . 28
Weights. . . . . . . . . . . . . . . . . . . . . . . . . . . . . . . . . . . . . . . . . . . . . . . . . . . . . . . . . . . . . . . . . . . . . . . . 28
Weights for options. . . . . . . . . . . . . . . . . . . . . . . . . . . . . . . . . . . . . . . . . . . . . . . . . . . . . . . . . . . . . 28
Noise and vibration declaration statement. . . . . . . . . . . . . . . . . . . . . . . . . . . . . . . . . . . . . . . . 29
Noise and vibration data. . . . . . . . . . . . . . . . . . . . . . . . . . . . . . . . . . . . . . . . . . . . . . . . . . . . . . . . 29
Uncertainties, sound value. . . . . . . . . . . . . . . . . . . . . . . . . . . . . . . . . . . . . . . . . . . . . . . . . . . . . . 29
Dimensions. . . . . . . . . . . . . . . . . . . . . . . . . . . . . . . . . . . . . . . . . . . . . . . . . . . . . . . . . . . . . . . . . . . . 30
LF 100Contents
EC Declaration of Conformity. . . . . . . . . . . . . . . . . . . . . . . . . . . . . . . . . . . . . . . . . . . . . . . . . . . . . . 31
EC Declaration of Conformity (EC Directive 2006/42/EC). . . . . . . . . . . . . . . . . . . . . . . . . . . 31
4
© 2015 Construction Tools EOOD | No. 9800 1125 01c | 2015-05-26
Original instructions
Page 4

Safety and operating instructionsLF 100
Introduction
Thank you for choosing a product from Atlas Copco. Since 1873, we have been
committed to finding new and better ways of fulfilling our customers' needs.
Through the years, we have developed innovative and ergonomic product
designs that have helped customers improve and rationalize their daily work.
Atlas Copco has a strong global sales and service network, consisting of
customer centers and distributors worldwide. Our experts are highly trained
professionals with extensive product knowledge and application experience.
In all corners of the world, we can offer product support and expertise to ensure
that our customers can work at maximum efficiency at all times.
For more information please visit: www.atlascopco.com
Construction Tools EOOD
7000 Rousse
Bulgaria
About the Safety and operating
instructions
The aim of the instructions is to provide you with knowledge of how to use the
machine in an efficient, safe way. The instructions also give you advice and
tell you how to perform regular maintenance on the machine.
Before using the machine for the first time you must read these instructions
carefully and understand all of them.
Original instructions
5© 2015 Construction Tools EOOD | No. 9800 1125 01c | 2015-05-26
Page 5

LF 100Safety and operating instructions
Safety instructions
To reduce the risk of serious injury or death to
yourself or others, read and understand the Safety
and operating instruction before installing, operating,
repairing, maintaining, or changing accessories on
the machine.
Post this Safety and operating instruction at work
locations, provide copies to employees, and make
sure that everyone reads the Safety and operating
instruction before operating or servicing the machine.
For professional use only.
In addition, the operator or the operator's employer
must assess the specific risks that may be present
as a result of each use of the machine.
Additional instructions for the engine can be found
in the manufacturer's engine manual.
Safety signal words
The safety signal words Danger, Warning and
Caution have the following meanings:
DANGER
WARNING
CAUTION
Personal precautions and
Indicates a hazardous situation
which, if not avoided, will result
in death or serious injury.
Indicates a hazardous situation
which, if not avoided, could
result in death or serious injury.
Indicates a hazardous situation
which, if not avoided, could
result in minor or moderate
injury.
● Appropriate work overall or similar clothing (not
loose-fitting) that covers your arms and legs.
Drugs, alcohol or medication
WARNING Drugs, alcohol or medication
Drugs, alcohol or medication may impair your
judgment and powers of concentration. Poor
reactions and incorrect assessments can lead to
severe accidents or death.
► Never use the machine when you are tired or
under the influence of drugs, alcohol or
medication.
► No person who is under the influence of drugs,
alcohol or medication may operate the machine.
Operation, precautions
DANGER Explosion hazard
If a warm machine or exhaust pipe comes into
contact with explosives, an explosion could occur.
During operating with certain materials, sparks and
ignition can occur. Explosions will lead to severe
injuries or death.
► Never operate the machine in any explosive
environment.
► Never use the machine near flammable materials,
fumes or dust.
► Make sure that there are no undetected sources
of gas or explosives.
► Avoid contact with the warm exhaust pipe or the
bottom of the machine.
qualifications
Only qualified and trained persons may operate or
maintain the machine. They must be physically able
to handle the bulk, weight, and power of the machine.
Always use your common sense and good
judgement.
Personal protective equipment
Always use approved protective equipment.
Operators and all other persons in the working area
must wear protective equipment, including at a
minimum:
● Protective helmet
● Hearing protection
● Impact resistant eye protection with side protection
● Respiratory protection when appropriate
● Protective gloves
● Proper protective boots
DANGER Fire hazard
If a fire starts in the machine, it can cause injury.
► If possible use an ABE-class powder extinguisher,
otherwise use a BE-type carbon dioxide fire
extinguisher.
DANGER Fuel hazard
The fuel is flammable and fuel fumes can explode
when ignited, causing serious injury or death.
► Protect your skin from contact with the fuel. If fuel
has penetrated the skin, consult a qualified health
professional.
► Never remove the filler cap, or fill the fuel tank
when the machine is hot.
► Fill the fuel tank outdoors or in a clean and well
ventilated place, free from sparks and open
flames. Fill the fuel tank at least ten meters (30
feet) from the place where the machine is to be
used.
6
© 2015 Construction Tools EOOD | No. 9800 1125 01c | 2015-05-26
Original instructions
Page 6

Safety and operating instructionsLF 100
► Release the filler cap slowly to let pressure
escape.
► Never overfill the fuel tank.
► Make sure the filler cap is screwed on when the
machine is used.
► Avoid spilling fuel on the machine, wipe off any
spilled fuel.
► Check regularly for fuel leaks. Never use the
machine if it is leaking fuel.
► Never use the machine in the proximity of material
that can generate sparks. Remove all hot or
spark-generating devices before starting the
machine.
► Never smoke when filling the fuel tank or when
working with the machine or servicing it.
► Only store fuel in a container that is specially
constructed and approved for the purpose.
► Consumed fuel and oil containers must be taken
care of and returned to the retailer.
► Never use your fingers to check for fluid leaks.
WARNING Unexpected movements
The machine is exposed to heavy strains during
operation. If the machine breaks or gets stuck, there
may be sudden and unexpected movement that can
cause injuries.
► Always inspect the machine prior to use. Never
use the machine if you suspect that it is damaged.
► Make sure that the handle is clean and free of
grease and oil.
► Keep your feet away from the machine.
► Never sit on the machine.
WARNING Dust and fume hazard
Dusts and/or fumes generated or dispersed when
using the machine may cause serious and permanent
respiratory disease, illness, or other bodily injury (for
example, silicosis or other irreversible lung disease
that can be fatal, cancer, birth defects, and/or skin
inflammation).
Some dusts and fumes created by compaction work
contain substances known to the State of California
and other authorities to cause respiratory disease,
cancer, birth defects, or other reproductive harm.
Some examples of such substances are:
● Crystalline silica, cement, and other masonry
products.
● Arsenic and chromium from chemically-treated
rubber.
● Lead from lead-based paints.
Dust and fumes in the air can be invisible to the
naked eye, so do not rely on eye sight to determine
if there is dust or fumes are the air.
To reduce the risk of exposure to dust and fumes,
do all of the following:
► Perform site-specific risk assessment. The risk
assessment must include dust and fumes created
by the use of the machine and the potential for
disturbing existing dust.
► Use proper engineering controls to minimize the
amount of dust and fumes in the air and to
minimize build-up on equipment, surfaces,
clothing, and body parts. Examples of controls
include: exhaust ventilation and dust collection
systems, water sprays, and wet drilling. Control
dusts and fumes at the source where possible.
Make sure that controls are properly installed,
maintained and correctly used.
► Never strike or abuse the machine.
► Pay attention and look at what you are doing.
Original instructions
► Wear, maintain and correctly use respiratory
protection as instructed by your employer and as
required by occupational health and safety
regulations. The respiratory protection must be
effective for the type of substance at issue (and if
applicable, approved by relevant governmental
authority).
► Work in a well ventilated area.
► If the machine has an exhaust, direct the exhaust
so as to reduce disturbance of dust in a dust filled
environment.
► Operate and maintain the machine as
recommended in the operating and safety
instructions
► Wear washable or disposable protective clothes
at the worksite, and shower and change into clean
clothes before leaving the worksite to reduce
exposure of dust and fumes to yourself, other
persons, cars, homes, and other areas.
7© 2015 Construction Tools EOOD | No. 9800 1125 01c | 2015-05-26
Page 7

LF 100Safety and operating instructions
► Avoid eating, drinking, and using tobacco products
in areas where there is dust or fumes.
► Wash your hands and face thoroughly as soon as
possible upon leaving the exposure area, and
always before eating, drinking, using tobacco
products, or making contact with other persons.
► Comply with all applicable laws and regulations,
including occupational health and safety
regulations.
► Participate in air monitoring, medical examination
programs, and health and safety training programs
provided by your employer or trade organizations
and in accordance with occupational health and
safety regulations and recommendations. Consult
with physicians experienced in relevant
occupational medicine.
► Work with your employer and trade organization
to reduce dust and fume exposure at the worksite
and to reduce the risks. Effective health and safety
programs, policies and procedures for protecting
workers and others against harmful exposure to
dust and fumes must be established and
implemented based on advice from health and
safety experts. Consult with experts.
DANGER Exhaust gas hazard
The exhaust gas from the machine’s combustion
engine contains carbon monoxide which is
poisonous, and chemicals known to the State of
California and other authorities to cause cancer, birth
defects, or other reproductive harm. Inhalation of
exhaust fumes can cause serious injury, illness, or
death.
► Never inhale exhaust fumes.
WARNING Slope hazards
During operation, secure the machine so it can not
fall if it is placed on a sloping ground. A fall can lead
to severe accidents and result in personal injury.
► Always ensure that all personnel in the working
area are higher up the slope than the machine.
► Always operate the machine straight up and down
when placed on slopes.
► Never exceed the maximum recommended slope
angle when operating the machine. Follow the
recommendations.
WARNING Motion hazards
When using the machine to perform work-related
activities, you may experience discomfort in the
hands, arms, shoulders, neck, or other parts of the
body.
► Adopt a comfortable posture while maintaining
secure footing and avoiding awkward off-balanced
postures.
► Changing posture during extended tasks may help
avoid discomfort and fatigue.
► In case of persistent or recurring symptoms,
consult a qualified health professional.
► Ensure good ventilation (extraction of air by fan if
necessary).
WARNING Projectiles
Failure of the work piece, of accessories, or even of
the machine itself may generate high velocity
projectiles. During operating, splinters or other
particles from the compacted material may become
projectiles and cause personal injury by striking the
operator or other persons. To reduce these risk:
► Use approved personal protective equipment and
safety helmet, including impact resistant eye
protection with side protection.
► Make sure that no unauthorised persons trespass
into the working zone.
► Keep the workplace free from foreign objects.
8
© 2015 Construction Tools EOOD | No. 9800 1125 01c | 2015-05-26
Original instructions
Page 8

Safety and operating instructionsLF 100
WARNING Vibration hazards
Normal and proper use of the machine exposes the
operator to vibration. Regular and frequent exposure
to vibration may cause, contribute to, or aggravate
injury or disorders to the operator’s fingers, hands,
wrists, arms, shoulders and/or nerves and blood
supply or other body parts, including debilitating
and/or permanent injuries or disorders that may
develop gradually over periods of weeks, months, or
years. Such injuries or disorders may include damage
to the blood circulatory system, damage to the
nervous system, damage to joints, and possibly
damage to other body structures.
If numbness, persistent recurring discomfort, burning
sensation, stiffness, throbbing, tingling, pain,
clumsiness, weakened grip, whitening of the skin, or
other symptoms occur at any time, when operating
the machine or when not operating the machine, stop
operating the machine, tell your employer and seek
medical attention. Continued use of the machine after
the occurrence of any such symptom may increase
the risk of symptoms becoming more severe and/or
permanent.
Operate and maintain the machine as recommended
in these instructions, to prevent an unnecessary
increase in vibration.
The following may help to reduce exposure to
vibration for the operator:
► If the machine has vibration absorbing handles,
keep them in a central position, avoid pressing the
handles into the end stops.
► When the percussion mechanism is activated, the
only body contact with the machine you must have
are your hands on the handle or handles. Avoid
any other contact, for example supporting any part
of the body against the machine or leaning onto
the machine trying to increase the feed force.
► Make sure that the machine is well-maintained
and not worn out.
► Immediately stop working if the machine suddenly
starts to vibrate strongly. Before resuming the
work, find and remove the cause of the increased
vibrations.
► Participate in health surveillance or monitoring,
medical exams and training programs offered by
your employer and when required by law.
► When working in cold conditions wear warm
clothing and keep hands warm and dry.
See the ”Noise and vibration declaration statement”
for the machine, including the declared vibration
values. This information can be found at the end of
these Safety and operating instructions.
WARNING Trapping hazard
There is a risk of neck ware, hair, gloves, and clothes
getting dragged into or caught by rotating machine
parts. This may cause choking, scalping, lacerations,
or death. To reduce the risk:
► Never grab or touch a rotating machine part.
► Avoid wearing clothing, neck ware or gloves that
may get caught.
► Cover long hair with a hair net.
DANGER Electrical hazard
The machine is not electrically insulated. If the
machine comes into contact with electricity, serious
injuries or death may result.
► Never operate the machine near any electric wire
or other source of electricity.
► Make sure that there are no concealed wires or
other sources of electricity in the working area.
WARNING Concealed object hazard
During operating, concealed wires and pipes
constitute a danger that can result in serious injury.
► Check the composition of the material before
operating.
► Watch out for concealed cables and pipes for
example electricity, telephone, water, gas, and
sewage lines.
► If the machine seems to have hit a concealed
object, switch off the machine immediately.
► Make sure that there is no danger before
continuing.
WARNING Involuntary start
Involuntary start of the machine may cause injury.
► Keep your hands away from the start and stop
device until you are ready to start the machine.
► Learn how the machine is switched off in the event
of an emergency.
WARNING Noise hazard
High noise levels can cause permanent and disabling
hearing loss and other problems such as tinnitus
(ringing, buzzing, whistling, or humming in the ears).
To reduce risks and prevent an unnecessary increase
in noise levels:
► Risk assessment of these hazards and
implementation of appropriate controls is essential.
► Operate and maintain the machine as
recommended in these instructions.
► If the machine has a silencer, check that it is in
place and in good working condition.
Original instructions
► Always use hearing protection.
9© 2015 Construction Tools EOOD | No. 9800 1125 01c | 2015-05-26
Page 9

Transport, precautions
WARNING Loading and unloading hazard
When the machine is lifted by a crane and similar
appliance, this can lead to injury.
► Use marked lifting points.
► Make sure that all lifting devices are dimensioned
for the weight of the machine.
► Never remain under or in the immediate vicinity
of the machine.
Maintenance, precautions
WARNING Machine modification
Any machine modification may result in bodily injuries
to yourself or others.
► Never modify the machine. Modified machines are
not covered by warranty or product liability.
LF 100Safety and operating instructions
► Always use original parts, cutting blades/working
tools, and accessories.
► Change damaged parts immediately.
► Replace worn components in good time.
CAUTION High temperature
The machine's engine exhaust pipe, and bottom
become hot during operation. Touching them can
lead to burns.
► Never touch a hot machine.
► Never touch the bottom of the machine when its
hot.
► Wait until the engine, exhaust pipe, and bottom of
the machine have cooled down before carrying
out maintenance work.
Storage, precautions
♦
Keep the machine in a safe place, out of the reach
of children and locked up.
10
© 2015 Construction Tools EOOD | No. 9800 1125 01c | 2015-05-26
Original instructions
Page 10
Safety and operating instructionsLF 100
Overview
To reduce the risk of serious injury or death to
yourself or others, read the Safety instructions
section found on the previous pages of this
manual before operating the machine.
Design and function
LF compacters are specially designed for compacting
thin to medium layers of granular soils and, with the
added water tank, for asphalt. They are ideal for
repair jobs and maintenance work such as driveways,
pathways, and parking lots. With a block paving kit
they are also suitable for block paving applications.
No other use is permitted.
LF compacters must only be used in well-ventilated
areas, as is the case for all combustion engine
machines.
Do not tow the machine behind vehicles.
To choose the correct accessories, see the spare
parts list.
For professional use only.
NOTICE Avoid mixing diesel or other toxic
substances in the water tank, this can damage the
machine and have negative influence on the
environment.
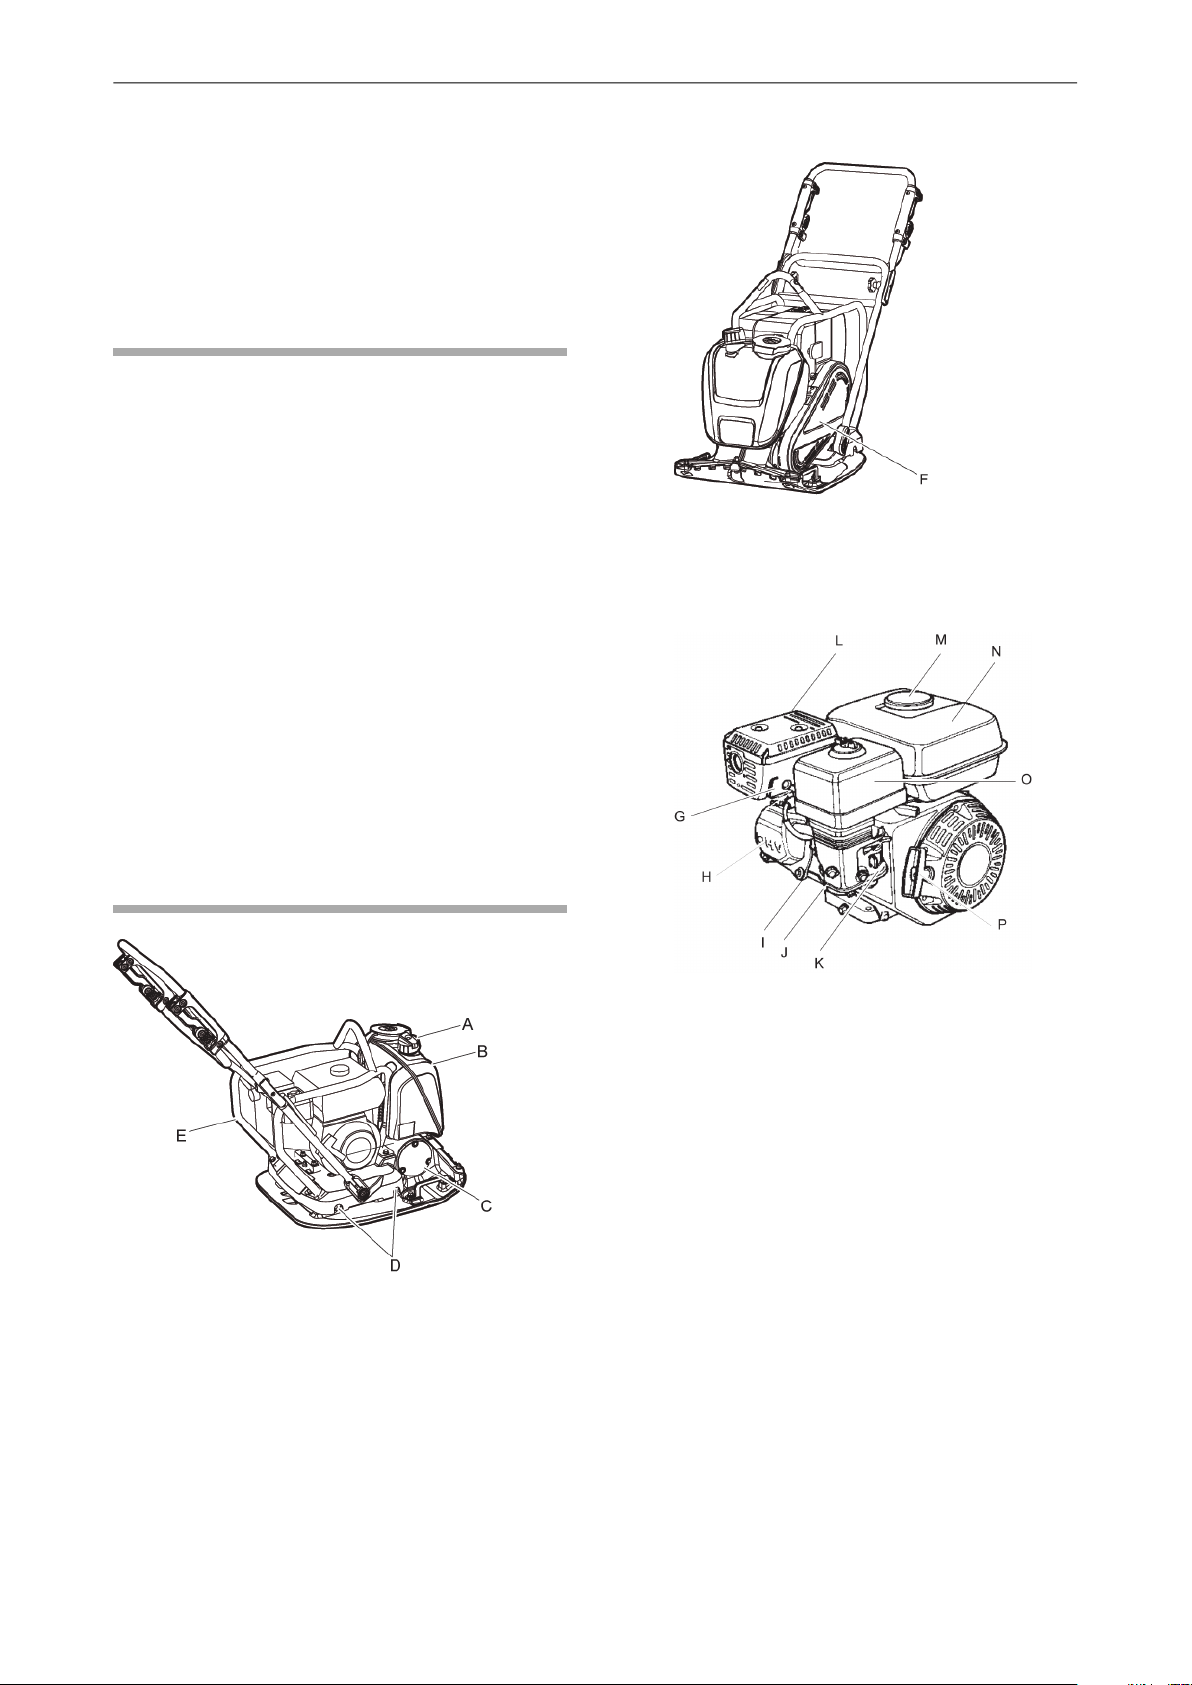
E. Protection frame
F. V-belt
Honda engine
Main parts
A. Water valve
B. Water tank
C. Eccentric element
D. Shock absorbers
G. Spark plug
H. Engine's valve
I. Cooling flanges
J. Engine oil/dipstick
K. Carburettor
L. Silencer
M. Fuel cap
N. Fuel tank
O. Air filter
Original instructions
11© 2015 Construction Tools EOOD | No. 9800 1125 01c | 2015-05-26
Page 11
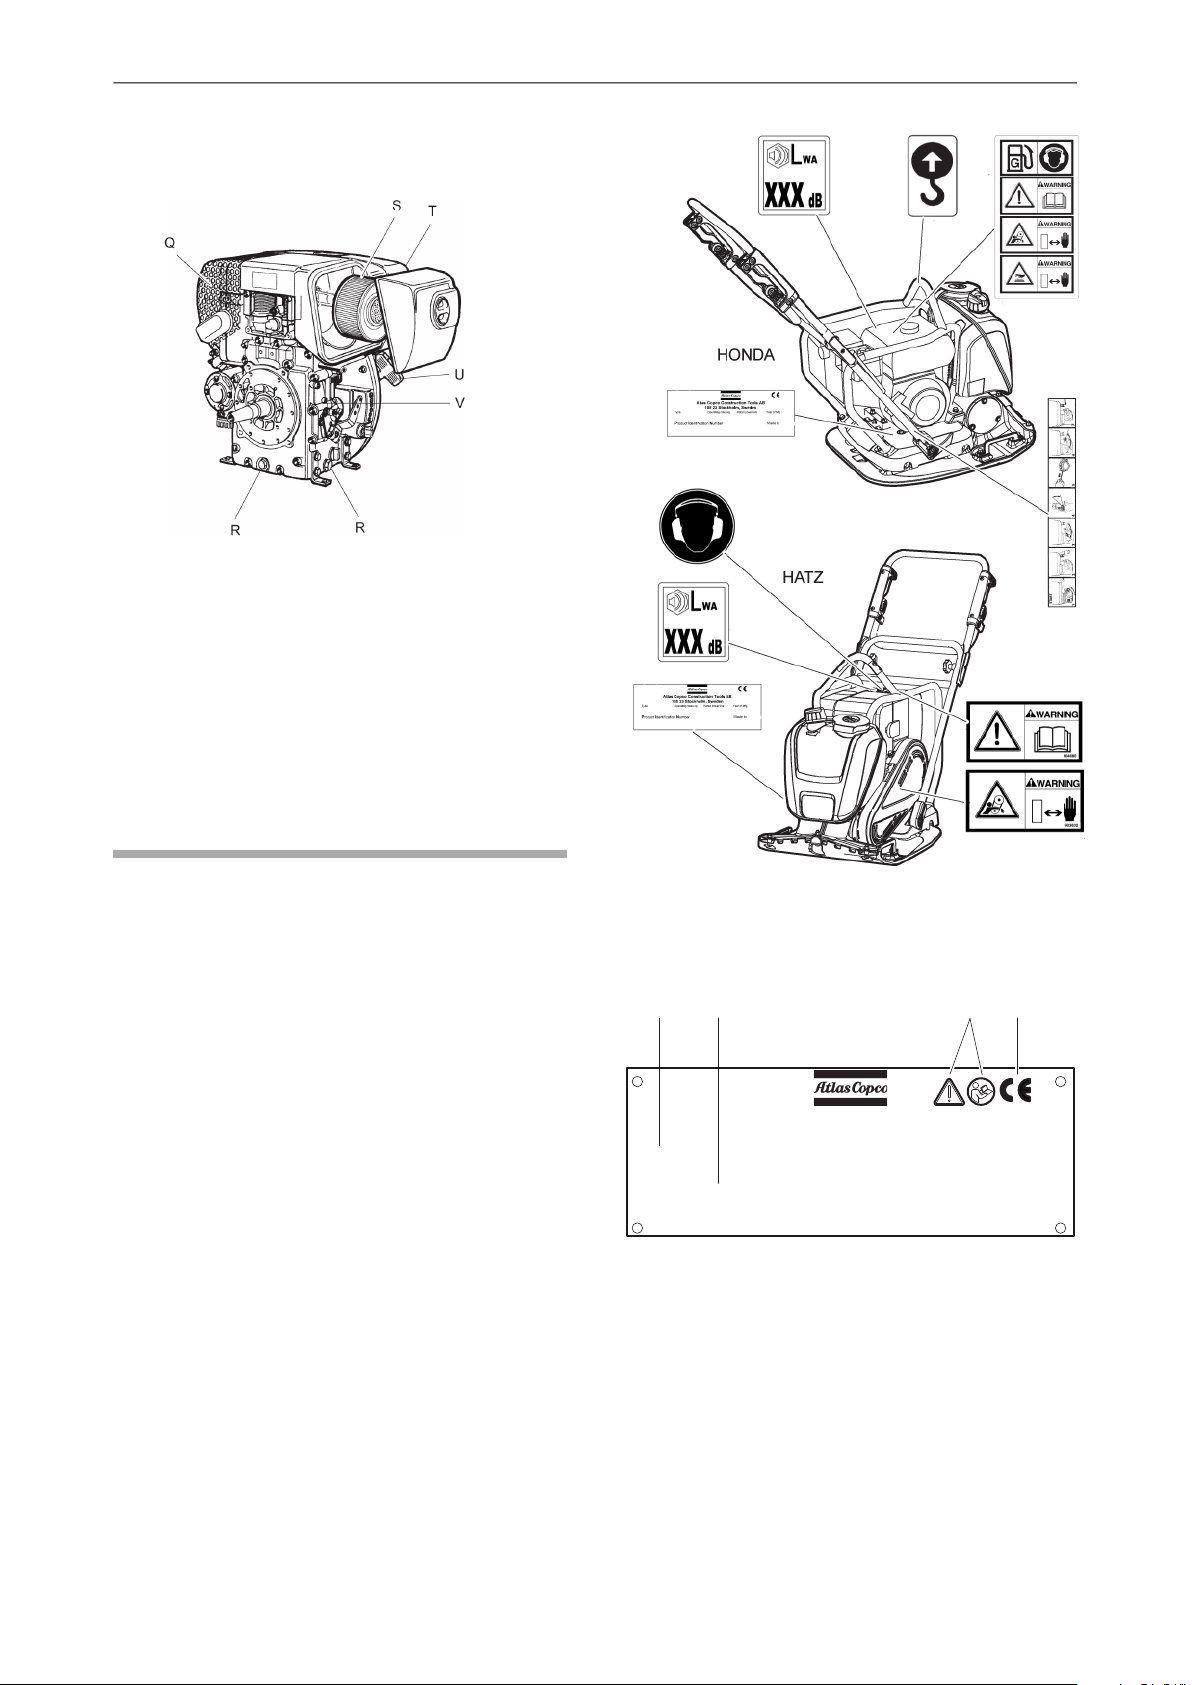
P. Recoil starter
Construction Tools EOOD
Type Operating mass kg Rated power kW Year of Mfg
Product Identification Number Made in xxxxxxxx
3382 0102 00
A B C D
Hatz engine
Q. Silencer
R. Drainage plugs
LF 100Safety and operating instructions
S. Air filter
T. Fuel tank
U. Recoil starter
V. Engine oil/dipstick
Labels
The machine is fitted with labels containing important
information about personal safety and machine
maintenance. The labels must be in such condition
that they are easy to read. New labels can be ordered
from the spare parts list.
Data plate
12
A. Machine type
B. Product Identification Number
C. The warning symbol together with the book
symbol means that the user must read the
safety and operating instructions before the
machine is used for the first time.
© 2015 Construction Tools EOOD | No. 9800 1125 01c | 2015-05-26
Original instructions
Page 12
WA
xxx
dB
Safety and operating instructionsLF 100
D. The CE symbol means that the machine is
EC-approved. See the EC Declaration of
Conformity which is delivered with the machine
for more information.
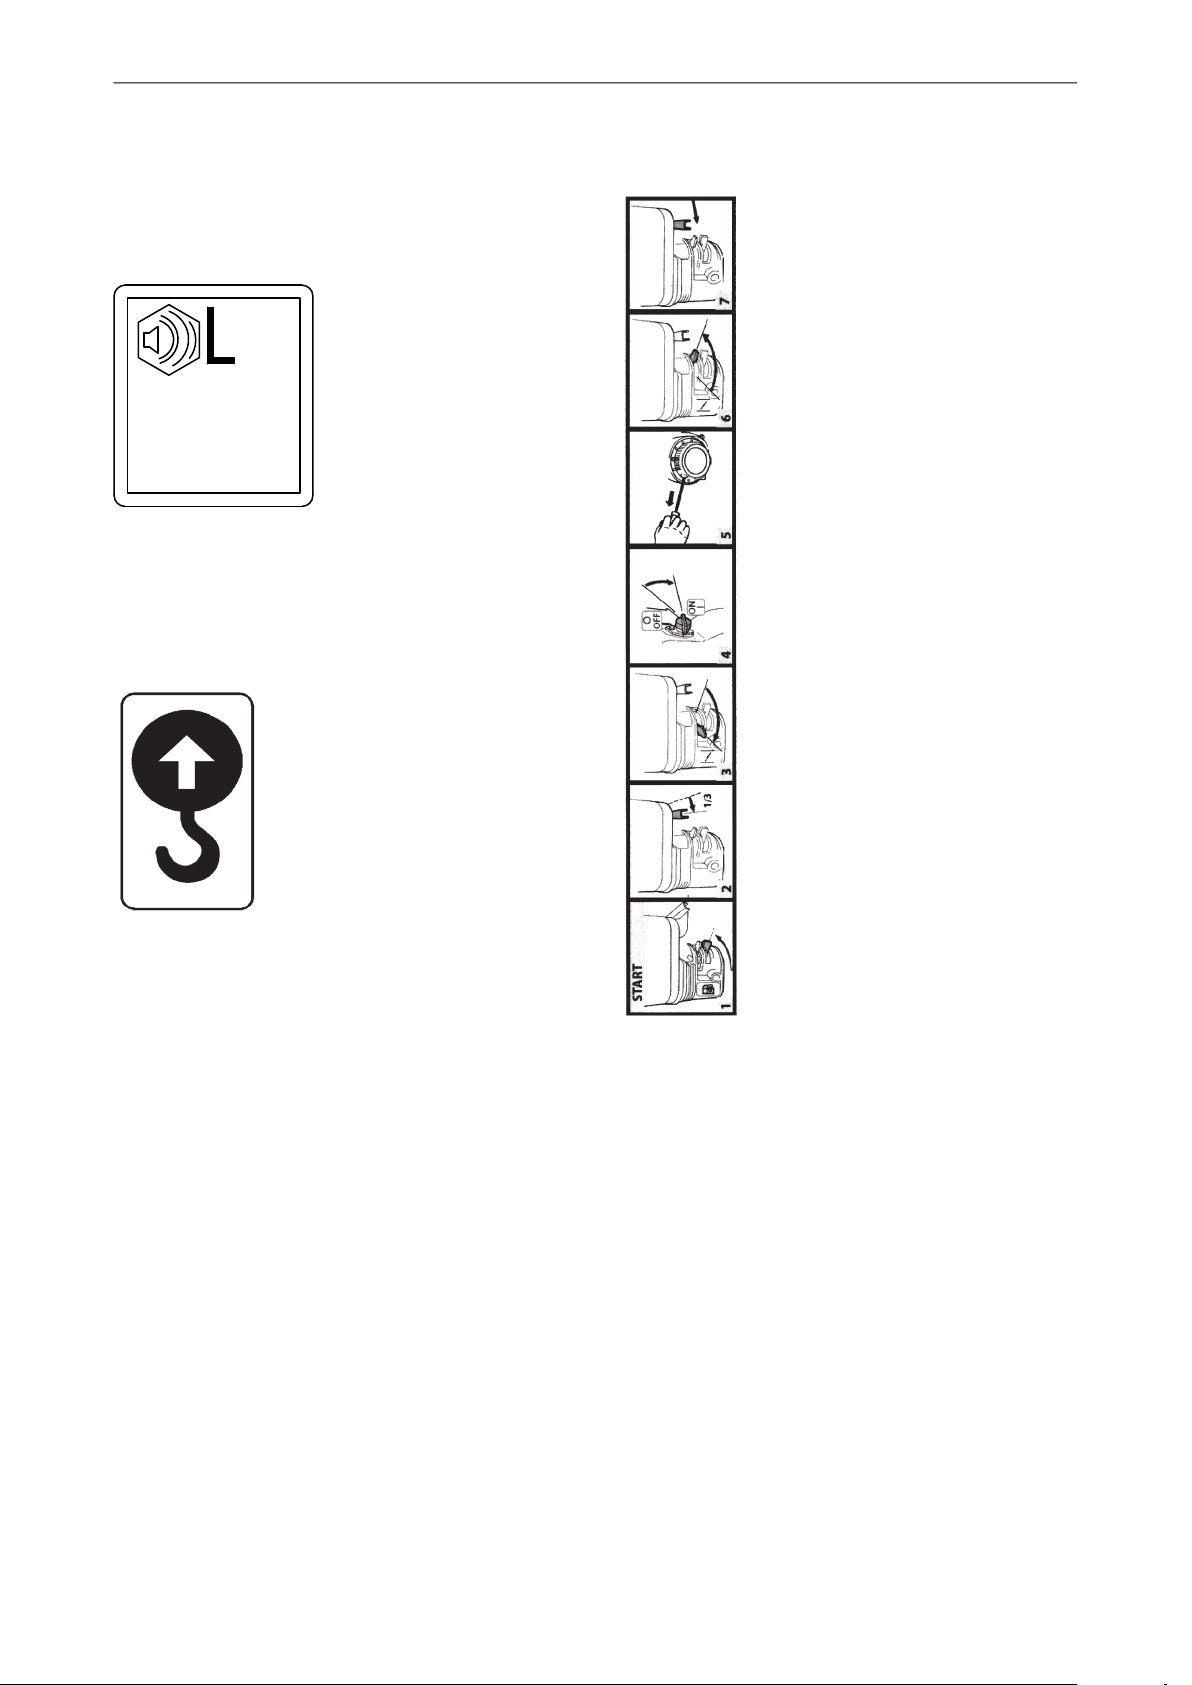
Noise level label
The label indicates the guaranteed noise level
corresponding to EC-directive 2000/14/EC. See
"Technical data" for accurate noise level.
Lifting point label
Labels, Honda
Start label
Original instructions
13© 2015 Construction Tools EOOD | No. 9800 1125 01c | 2015-05-26
Page 13
LF 100Safety and operating instructions
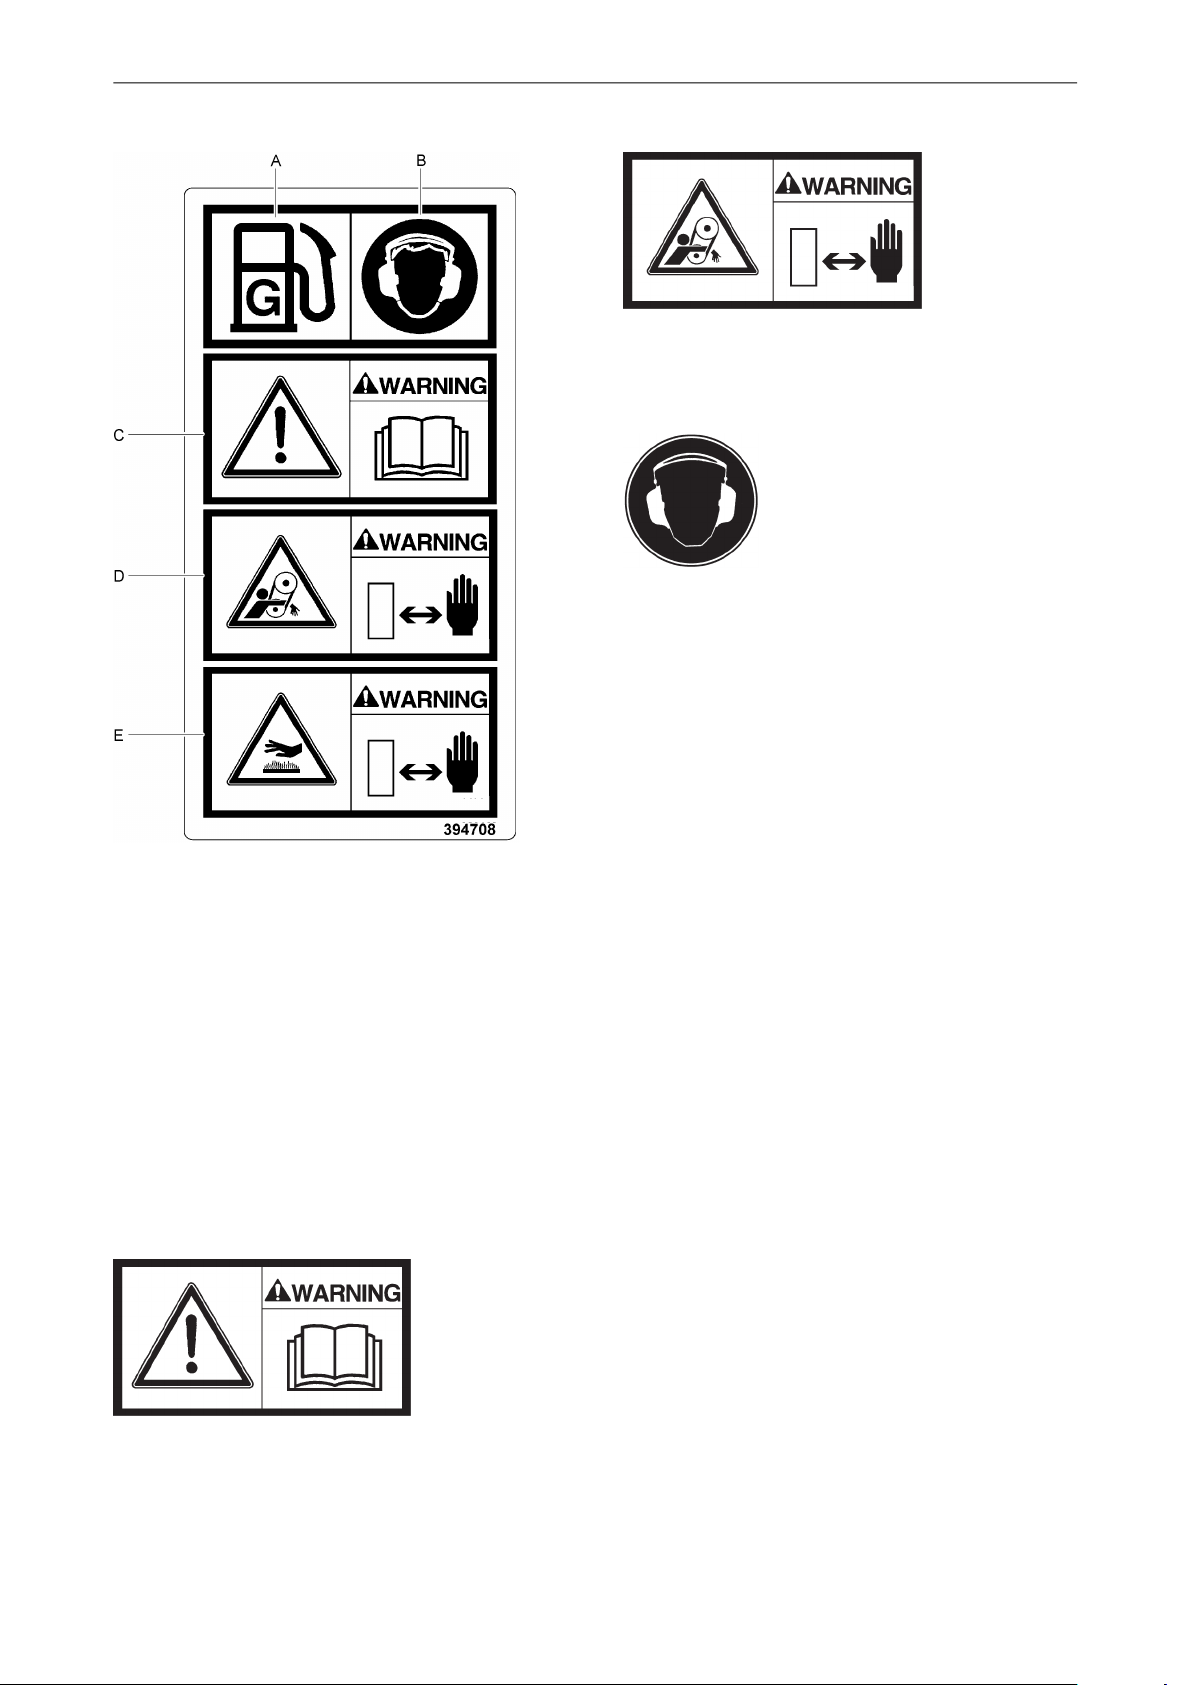
Safety label
Safety label
Rotating V-belts. Keep your hands at a safe distance
from the danger zone.
Use ear protectors label
A. Fuel.
B. Use ear protectors.
C. Read the instruction manual. The operator
must read the safety, operation and
maintenance instructions before operating the
machine.
D. Warning! Cutting hazards.
E. Warning! Hot surfaces in the engine
compartment. Keep hands at a safe distance
from the danger zone.
Labels, Hatz
Safety label
Instruction manual. The operator must read the
safety, operation and maintenance instructions before
operating the machine.
14
© 2015 Construction Tools EOOD | No. 9800 1125 01c | 2015-05-26
Original instructions
Page 14
B
Safety and operating instructionsLF 100
Transport
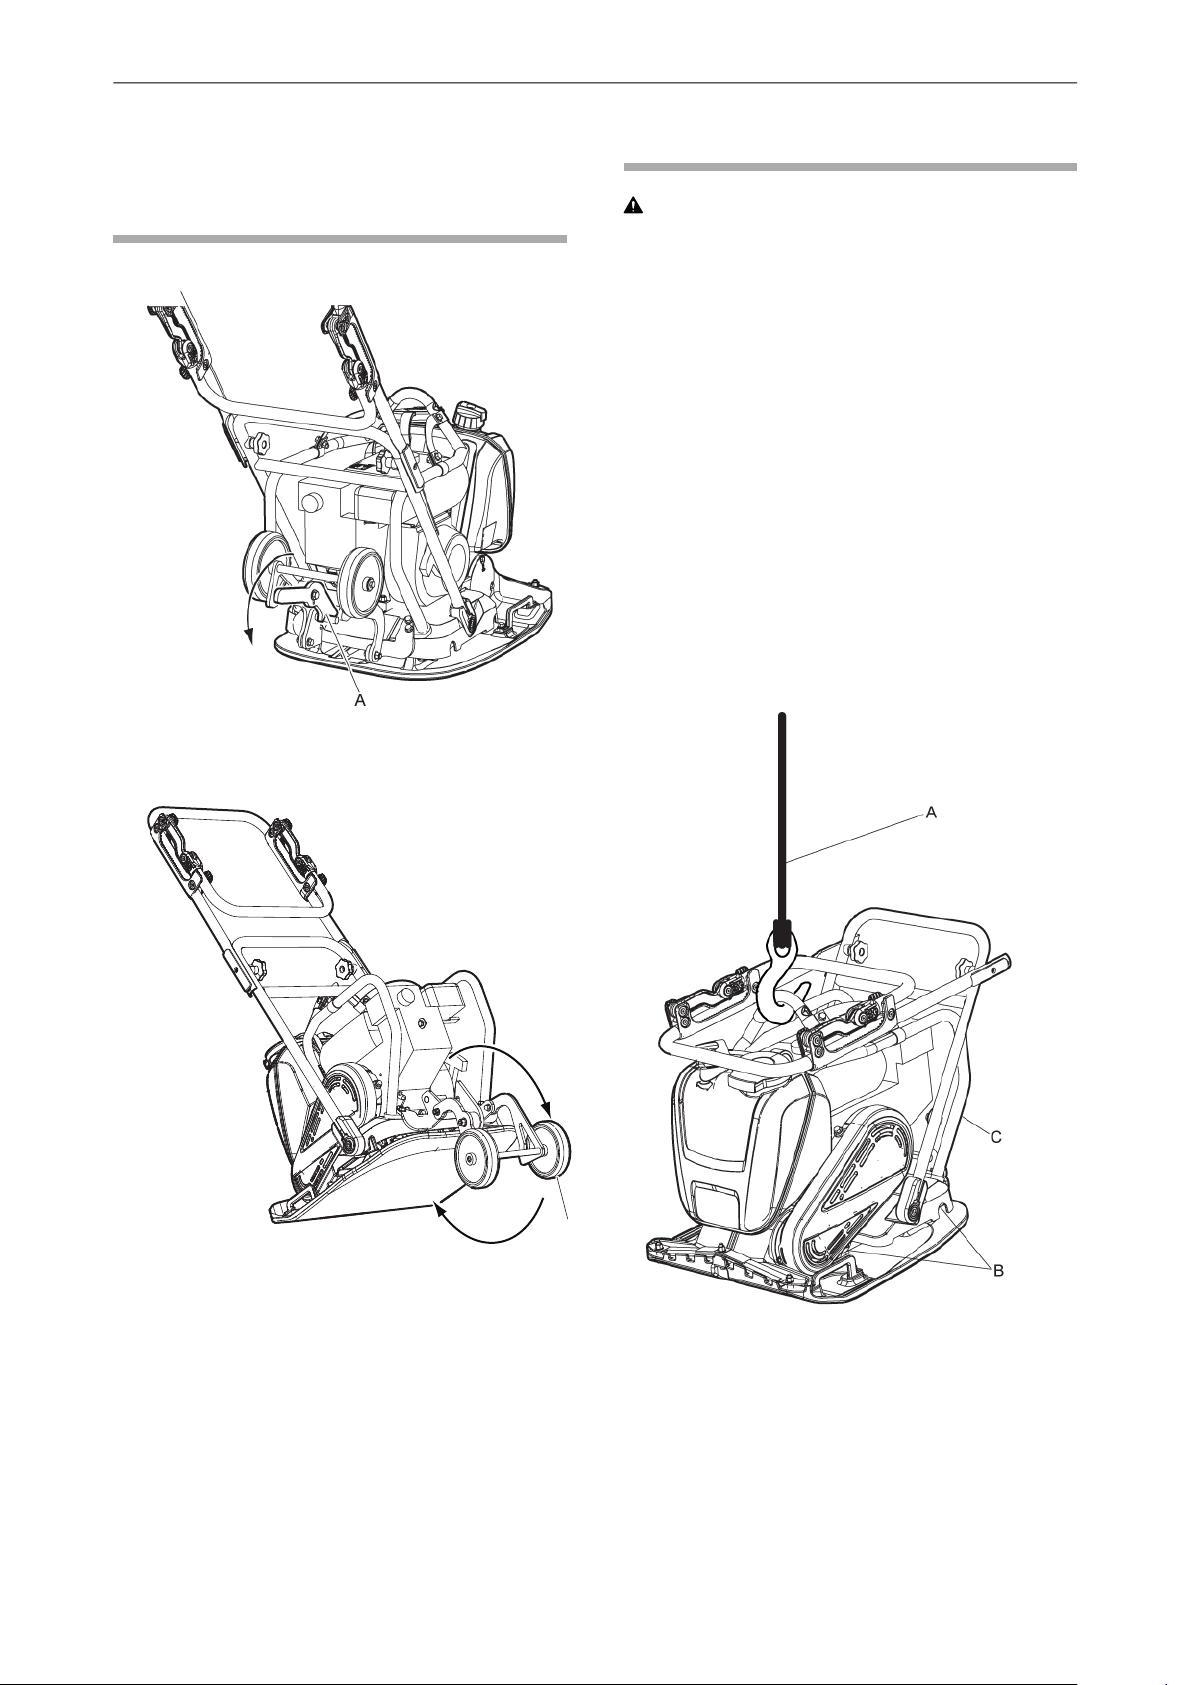
Transport wheels
1. Unlock the hook (A).
Lifting the machine
WARNING Lifting hazard
Never lift the machine without checking if it is intact.
A damaged machine can fall apart, which can result
in serious injury.
► Check that all equipment is dimensioned in
accordance with applicable regulations.
► Never walk or stand under a lifted machine.
► Only lift the machine by a hook on the frame.
► Check that the shock absorbers and safety frame
are correctly attached and not damaged.
► Never stand near the machine or forklift truck when
lifting and transporting the machine.
► Check the machine's data plate for weight
information.
Lifting
♦
Always use the machine's safety frame lifting point
(A) to lift the machine.
2. Fold the wheels (B) in under the bottom plate to
facilitate manual transport.
Original instructions
♦
Lifting equipment must be dimensioned in order
to fulfil all regulations.
♦
Before lifting check that the shock absorbers (B)
and safety frame (C) are correctly attached and
not damaged.
15© 2015 Construction Tools EOOD | No. 9800 1125 01c | 2015-05-26
Page 15
LF 100Safety and operating instructions
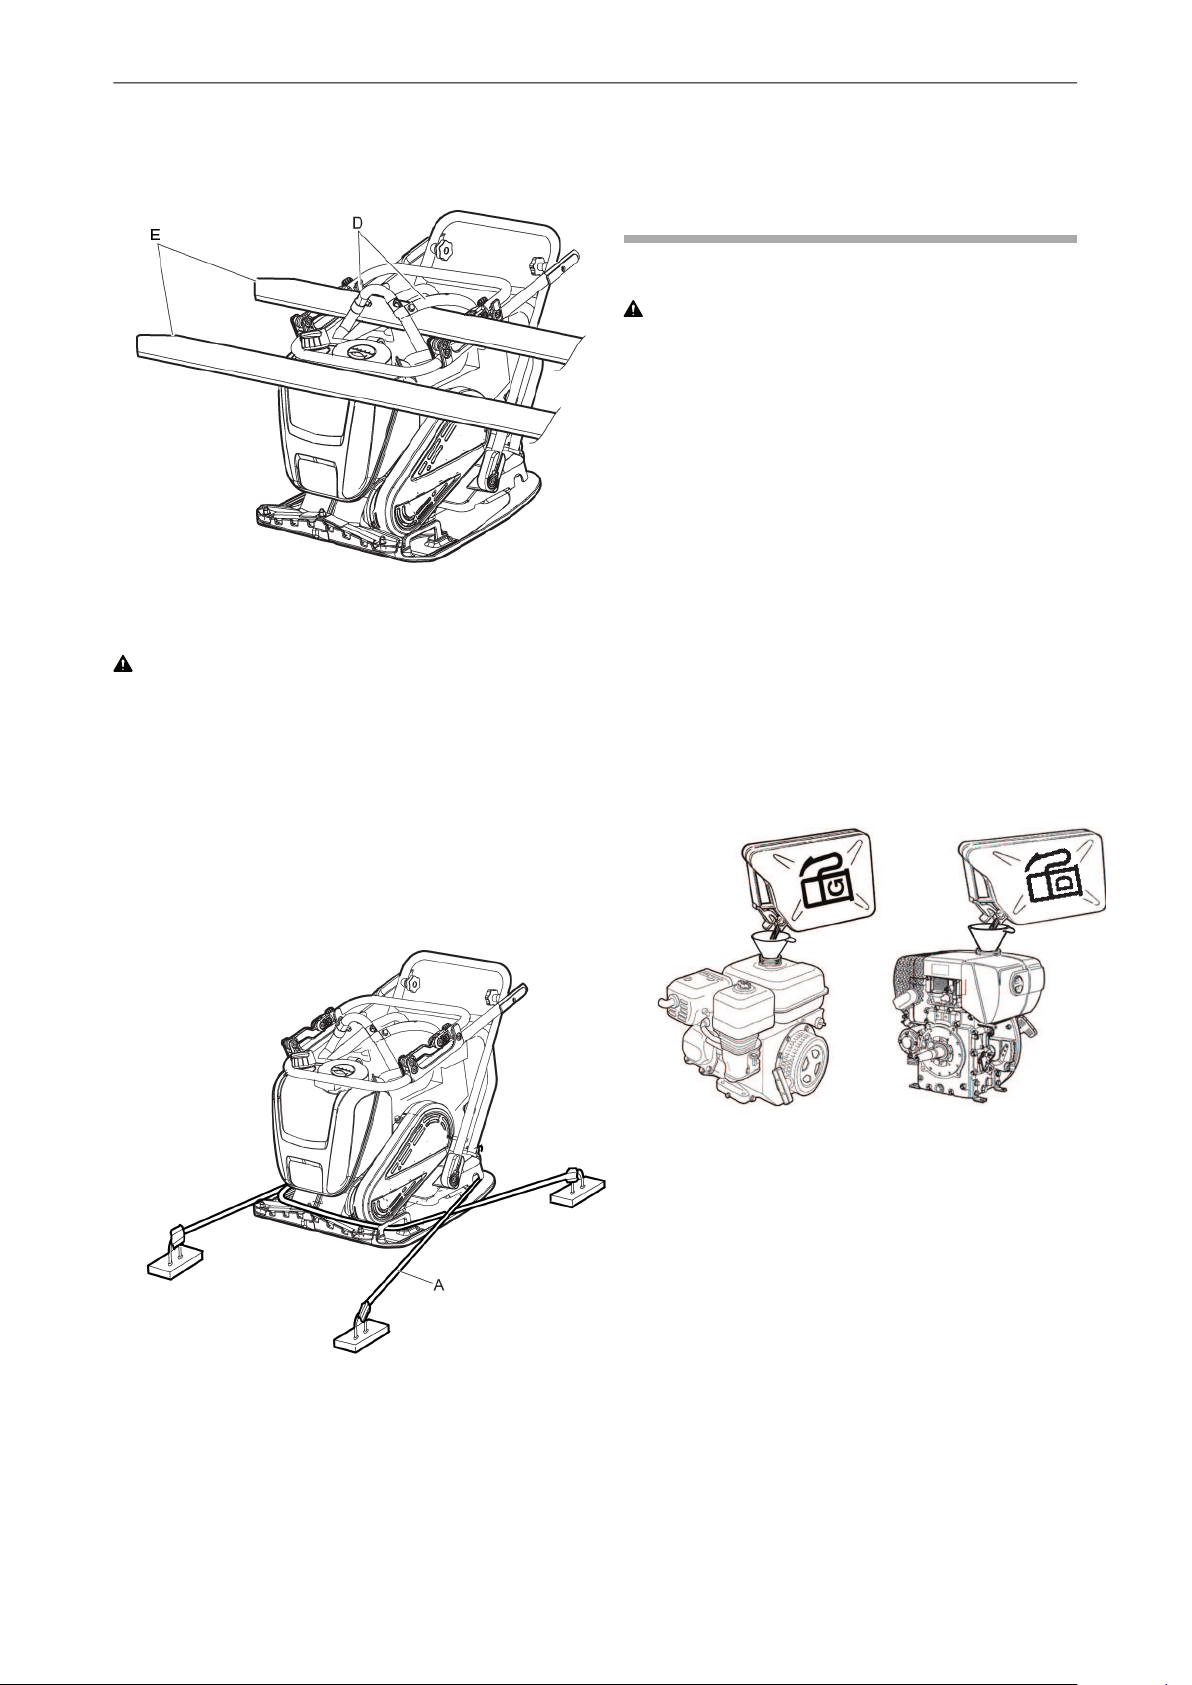
Lifting with forklift truck
♦
Both straps (D) must be used when lifting the
machine with forklift truck (E).
WARNING Transport
During transportation the machine can overturn and
cause serious injury.
► Always strap the machine down.
Installation
Fuel
Filling
WARNING Fuel hazard
The fuel is extremely flammable and fuel fumes can
explode when ignited, causing serious injury or death.
► Protect your skin from contact with the fuel.
► Never remove the filler cap or fill the fuel tank
when the machine is hot.
► Never smoke when filling the fuel tank or when
working with the machine or servicing it.
► Avoid spilling fuel and wipe off any fuel spilled on
the machine.
Filling procedure
1. Stop the engine and let it cool down before filling
the tank.
2. Release the filler cap slowly to let any pressure
escape.
► Keep your feet away from the machine.
Transporting the machine
1. Secure the machine for all transportation.
2. Place lashing straps (A) in U-shape around the
bottom plate and secure both front and rear.
3. Fill the fuel tank to the lower edge of the filler
pipe.
4. Never overfill the tank. Due to the movement of
the fuel within the tank, it is possible to have fuel
at a higher level than the tank cap, which can
lead to a spillage of fuel if the tank cap is opened.
This can be avoided by only opening the tank
cap when the machine is on level ground and
the tank cap is at the fuel tank's highest point.
16
© 2015 Construction Tools EOOD | No. 9800 1125 01c | 2015-05-26
Original instructions
Page 16
Safety and operating instructionsLF 100
Operation
WARNING Engine running hazard
Vibrations from the engine can cause material
changes, this can cause the machine to move and
cause injuries.
► Never leave the machine with the engine running.
► Ensure that only authorized personnel operate the
machine.
NOTICE When operating the machine, follow the
instructions in the manual; never sit or stand on the
machine when it is working.
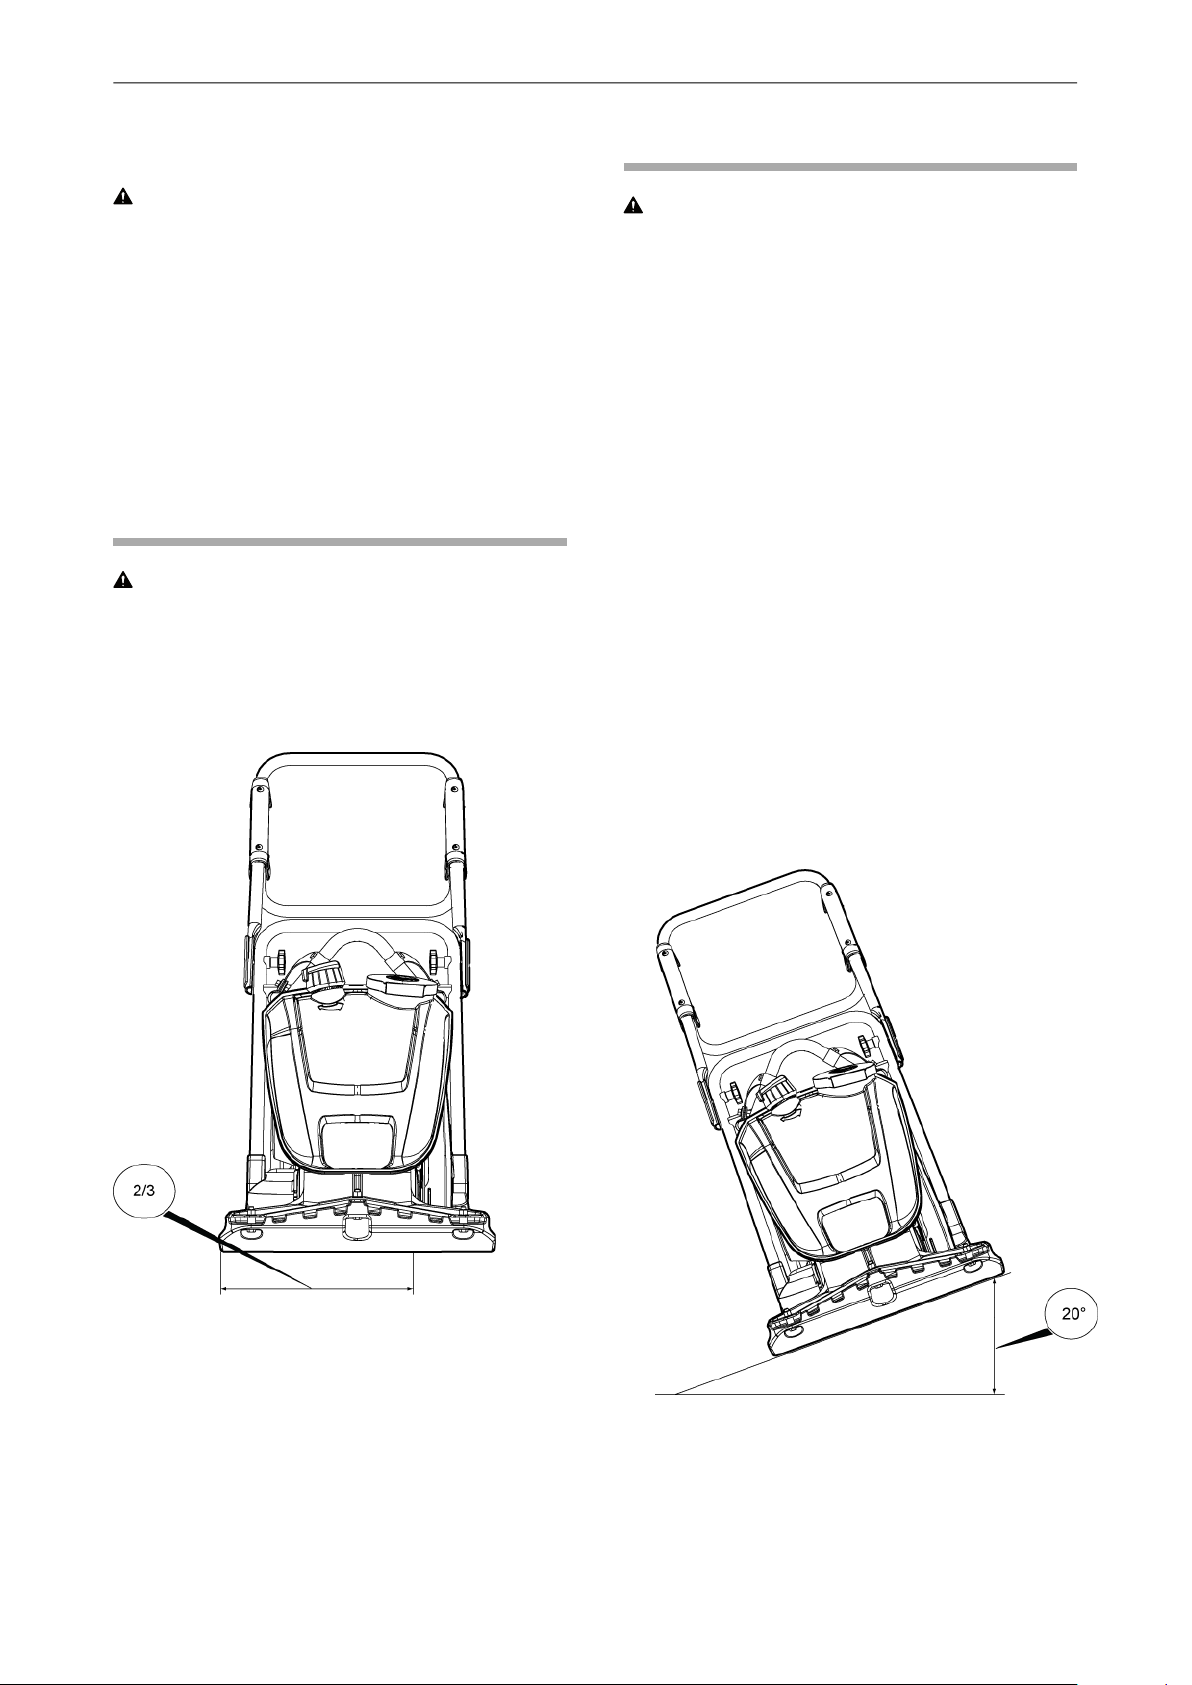
Operating near edges
WARNING Overturning hazard
When operating along edges, at least2⁄3of the
machine must be on a surface with full bearing
strength, otherwise the machine can tip over.
► Switch off the machine and lift it back on surface
with full bearing strength.
Operating on slopes
WARNING Slope hazards
During operation, secure the machine so it can not
fall if it is placed on a sloping ground. A fall can lead
to severe accidents and result in personal injury.
► Always ensure that all personnel in the working
area are higher up the slope than the machine.
► Always operate the machine straight up and down
when placed on slopes.
► Never exceed the maximum recommended slope
angle when operating the machine. Follow the
recommendations.
NOTICE Remember that loose ground, vibration
switched ON, and driving speed can all cause the
machine to tip over even on a lesser slope than
specified here.
Operating on slopes
♦
Ensure that the work area is secure. Wet and
loose earth reduces manoeuvrability especially
on sloping ground. Always exercise extreme
caution on sloping and uneven terrain.
♦
Never work on slopes that exceed the capabilities
of the machine. The maximum slope of the
machine in operation is 20° (depending on the
condition of the ground).
Original instructions
17© 2015 Construction Tools EOOD | No. 9800 1125 01c | 2015-05-26
Page 17
LF 100Safety and operating instructions
♦
The tilting angle is measured on a hard level
surface with the machine stationary. Vibration
switched OFF and all tanks full.
Start and stop
Honda
Before starting, Honda
Follow the general safety precautions supplied with
the machine at delivery. We recommend to study the
engine manual supplied with the machine. Check
that maintenance routines have been carried out.
♦
Check the engine oil level on the dipstick.
♦
Make sure that there is no oil leakage, and that
all bolted joints are tightened.
♦
After the engine is started, leave the speed control
in the idling position for a few minutes to warm up
the engine without loading it.
Starting the engine, Honda
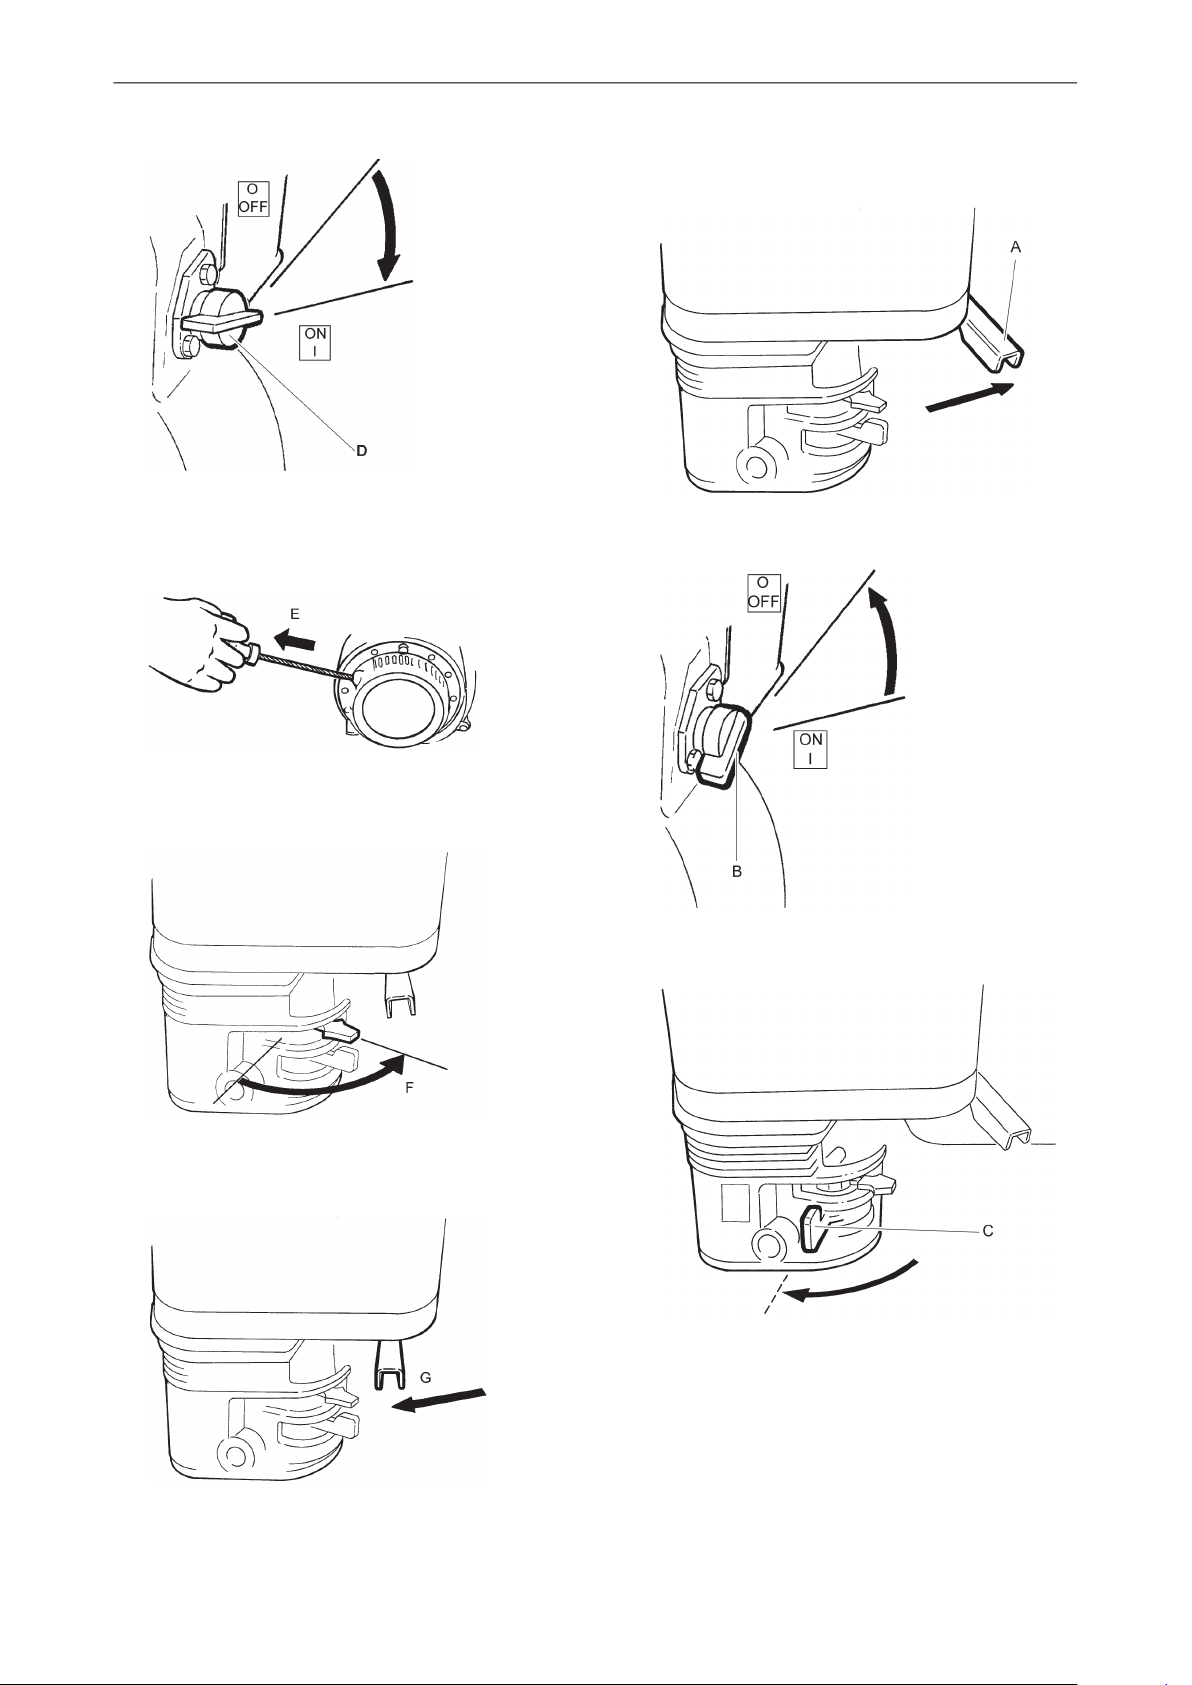
1. Open the fuel cock (A).
2. Set the throttle control (B) to1⁄3throttle.
♦
Fill the fuel tank with fuel.
♦
Check that all the controls are working.
18
3. Close the choke valve (C) if the engine is cold.
If the engine is warm or the ambient temperature
is high, close the choke valve halfway or leave
it open.
© 2015 Construction Tools EOOD | No. 9800 1125 01c | 2015-05-26
Original instructions
Page 18
Safety and operating instructionsLF 100
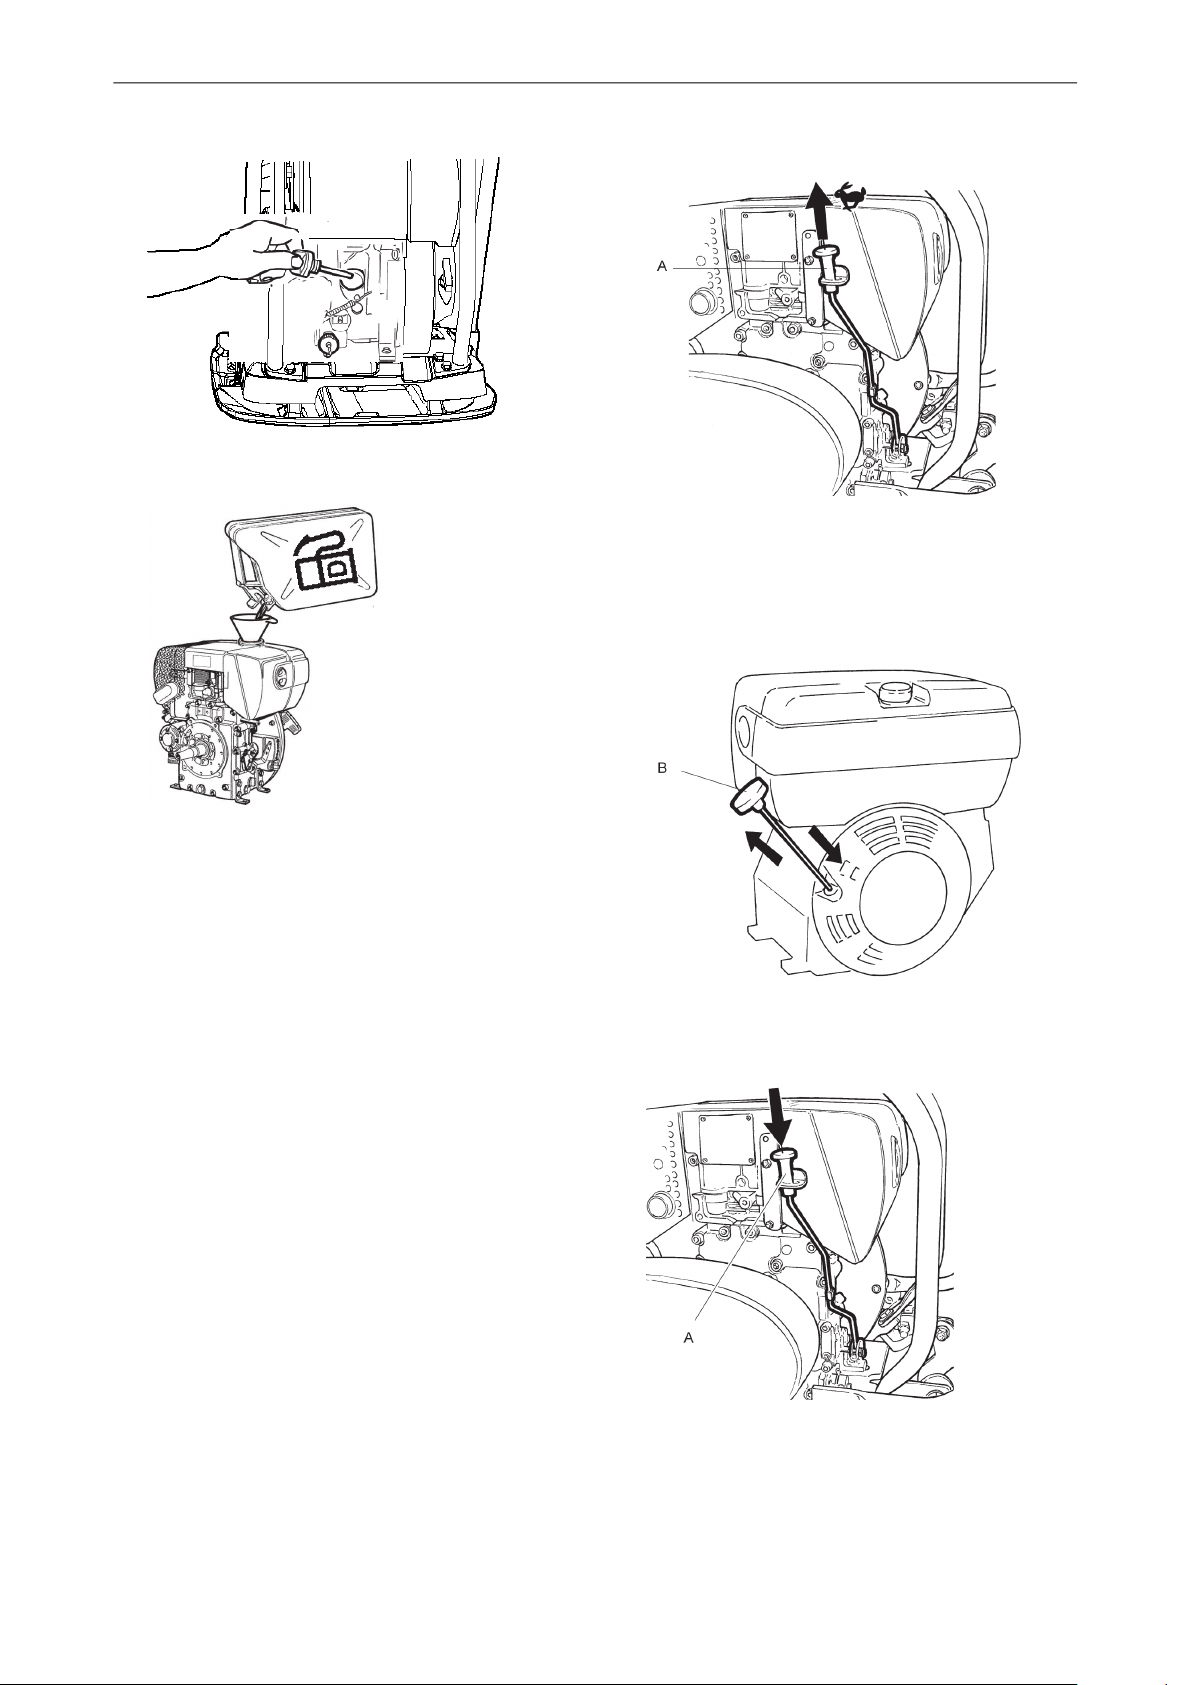
4. Turn the start switch (D) to ON.
5. Grip the handle of the recoil starter (E) and pull
until resistance is felt. Release the handle to the
initial position, then pull until the engine starts.
Stopping the engine, Honda
1. Move the throttle control to idling position (A).
Let the engine idle for a few minutes.
2. Turn the start switch (B) to OFF.
6. Move the choke valve (F) gradually to the fully
open position.
7. Allow the engine to idle a few minutes before
increasing to full power (G).
3. Close the fuel cock (C).
Hatz
Original instructions
Before starting, Hatz
Follow the general safety precautions supplied with
the machine at delivery. We recommend that you
study the engine manual supplied with the machine.
Check that maintenance routines have been carried
out.
19© 2015 Construction Tools EOOD | No. 9800 1125 01c | 2015-05-26
Page 19
LF 100Safety and operating instructions
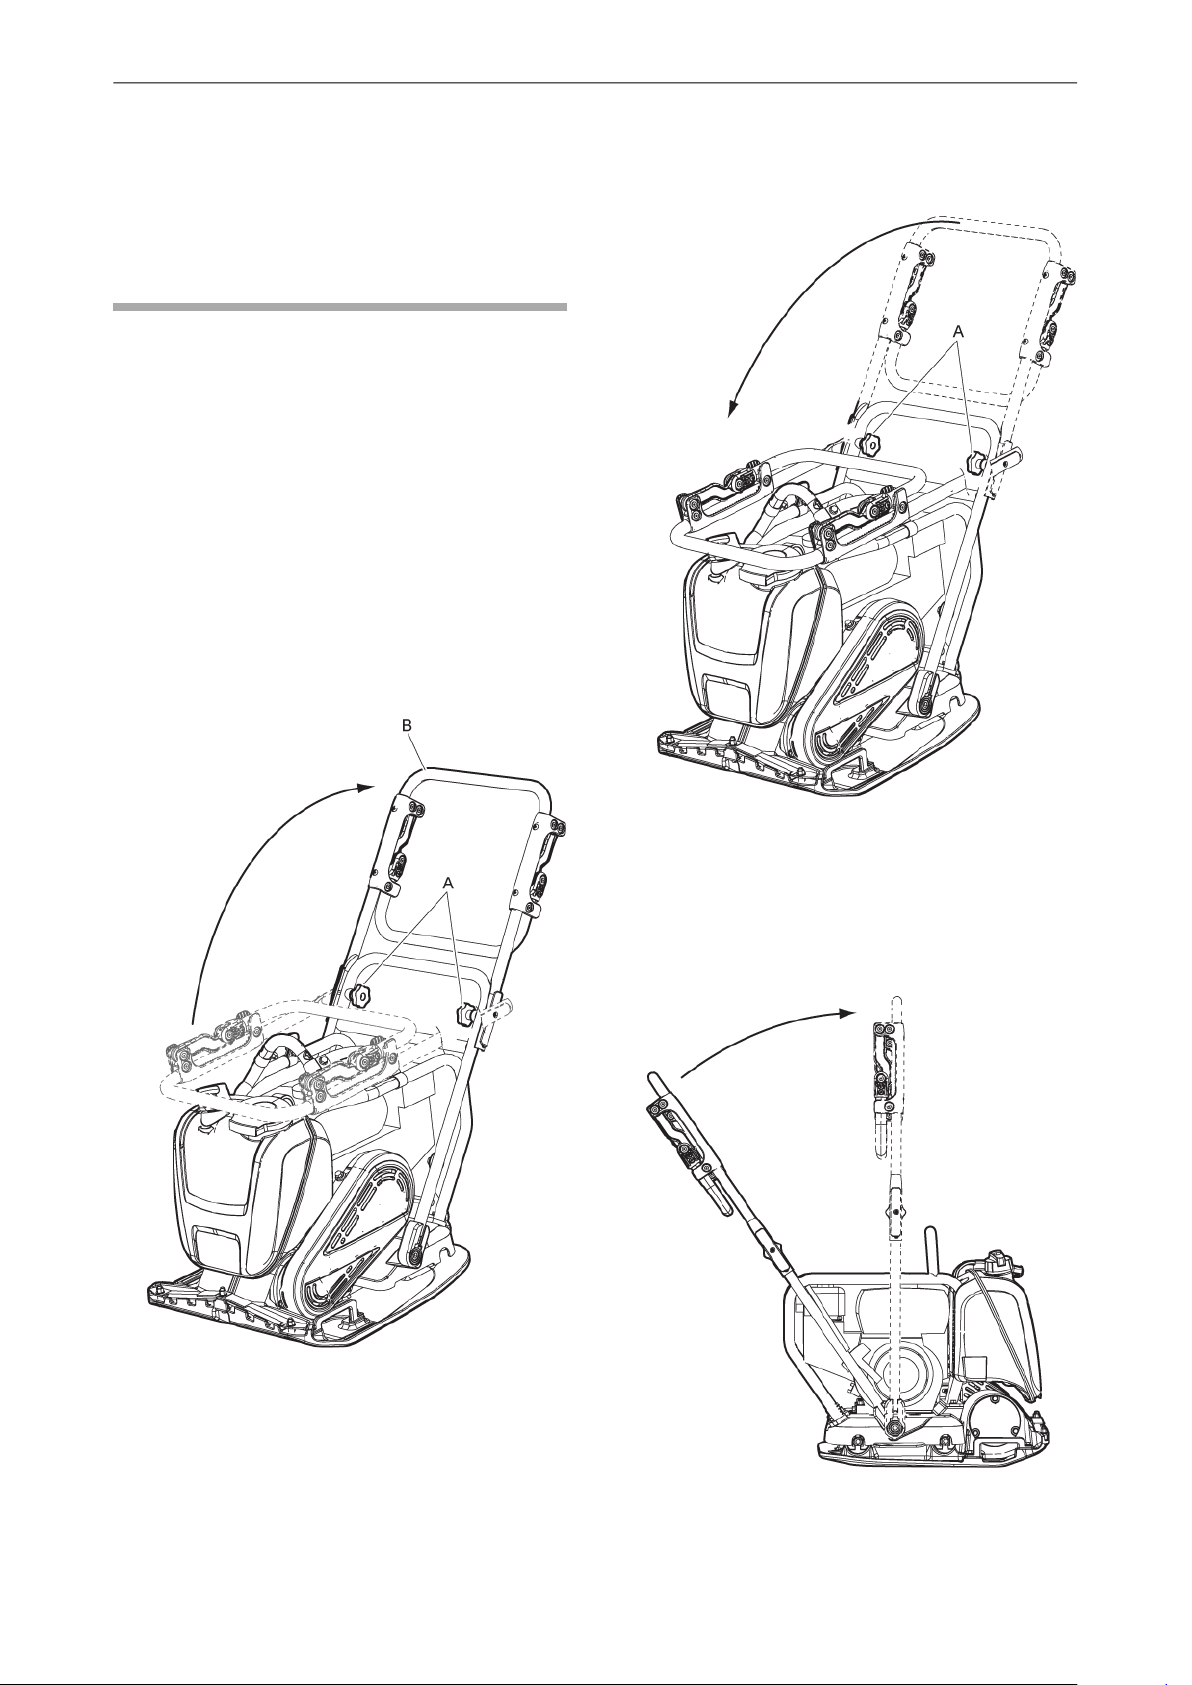
1. Check the engine oil level on the dipstick.
2. Fill the fuel tank with fuel.
Starting the engine, Hatz
1. Set the throttle control (A) to half throttle.
2. Grip the recoil starter handle (B) with both hands
and pull until it resists. Return the handle to the
initial position, then pull sharply and at an
increasing speed (but do not jerk) until the engine
starts.
3. Check that all the controls are working.
4. Make sure that there is no oil leakage, and that
all bolted joints are tightened.
5. When you have started the engine, leave the
speed control in the idling position for a few
minutes to warm up the engine without loading
it.
Stopping the engine, Hatz
♦
Put the throttle control (A) in the middle position.
20
If the exhaust begins to emit white smoke, after
several attempts of starting, do the following:
© 2015 Construction Tools EOOD | No. 9800 1125 01c | 2015-05-26
Original instructions
Page 20
Safety and operating instructionsLF 100
1. Move the throttle control to the stop position.
2. Slowly pull the starting cable out 5 times.
3. Repeat the starting procedure.
Operating
NOTICE Always operate the machine at full speed,
otherwise it prevents the eccentric element from
compacting correctly. It can result in machine failure.
Handle positions
NOTICE Always operate the machine forwards,
otherwise it opposes the force of the eccentric
element which works in a forward direction. Turn the
machine around to prevent machine failure.
Raise the handle to the operating position:
1. Loosen the knobs (A).
2. Raise the handle from the folded position.
3. Tighten the knobs when the upper handle (B) is
in the correct position.
1. Loosen the knobs (A) and lower the handle on
top of the machine.
2. Tighten the knobs.
Fold the handle to the transport position:
♦
Raise the handle to turn the machine on the
spot:
Raise the handle to a 90° angle towards the
ground, to turn the machine on the spot. This
function may be useful in a small narrow place or
on uneven ground.
Original instructions
21© 2015 Construction Tools EOOD | No. 9800 1125 01c | 2015-05-26
Page 21
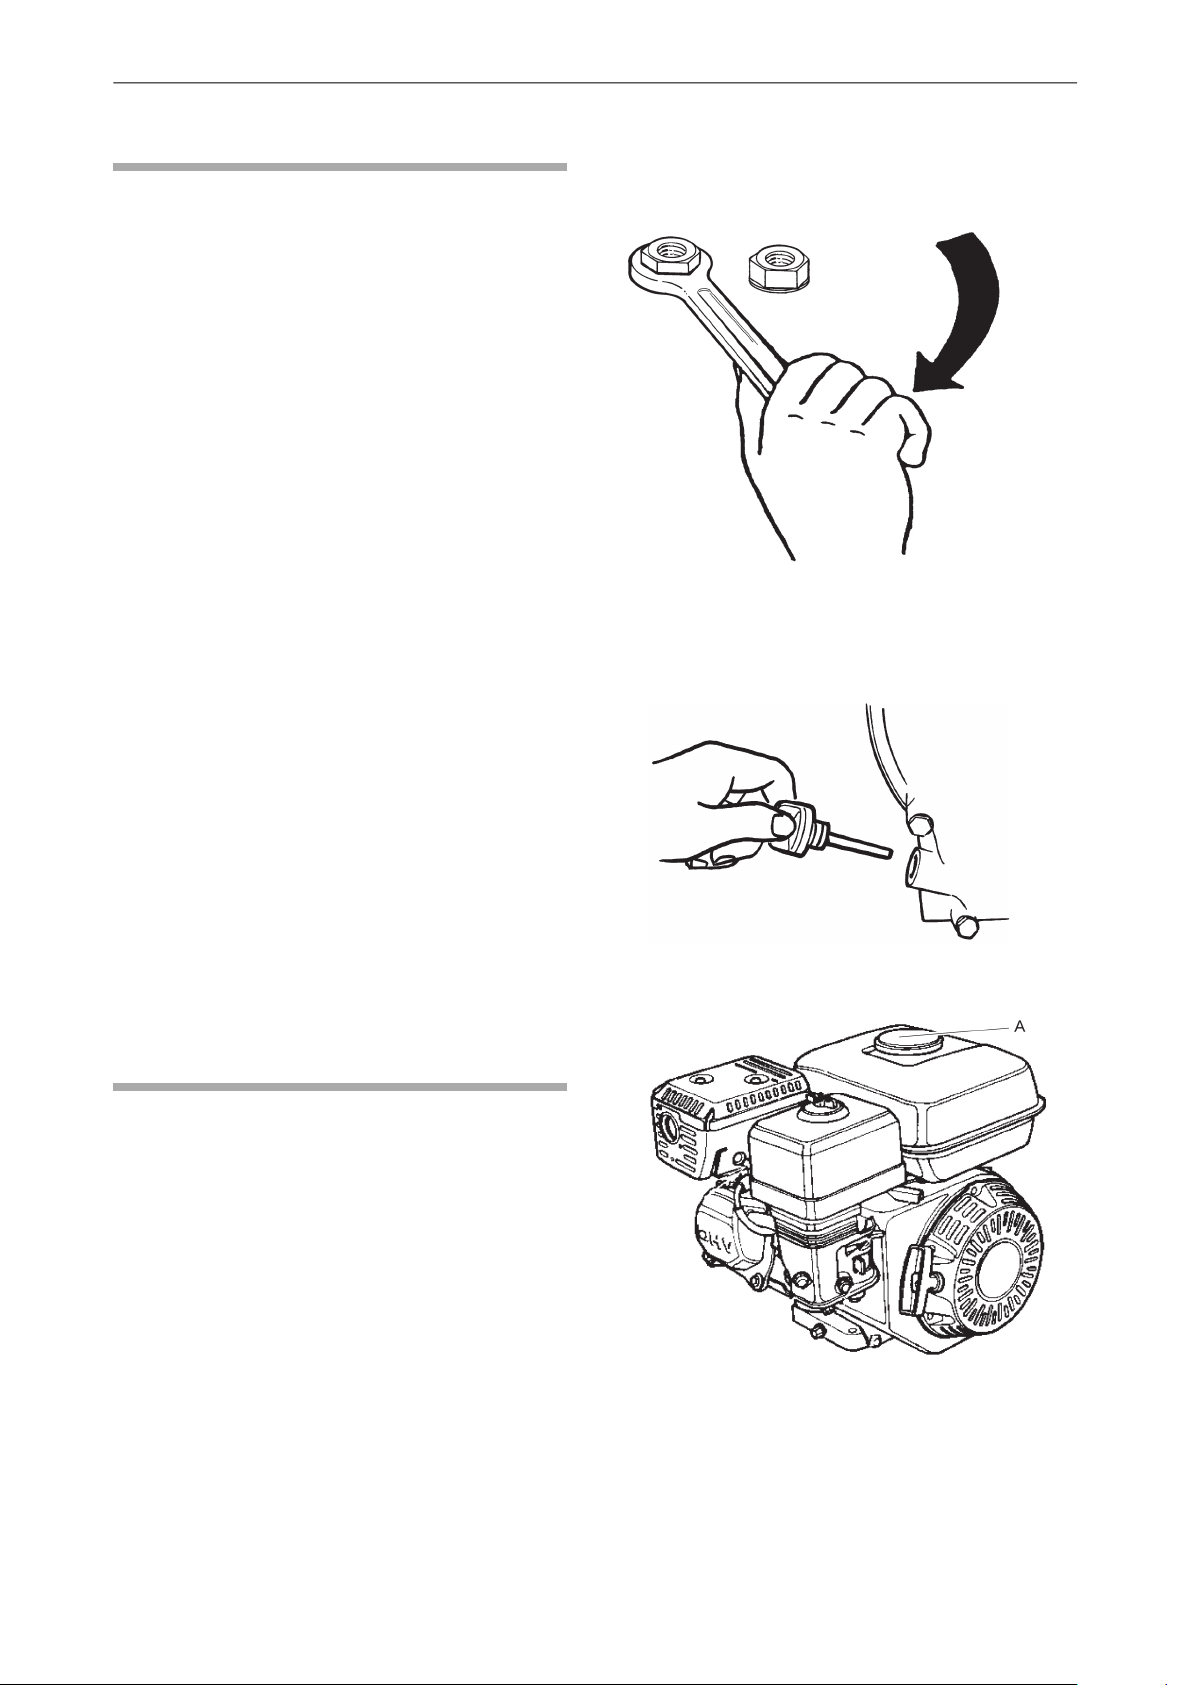
When taking a break
♦
Stop the machine during breaks.
♦
During all breaks, put the machine away so that
there is no risk for unintentional start.
Maintenance
Regular maintenance is a basic requirement for the
continued safe and efficient use of the machine.
Follow the maintenance instructions carefully.
♦
Before starting maintenance on the machine, clean
it in order to avoid exposure to hazardous
substances. See “Dust and fume hazard”.
♦
Use only authorised parts. Any damage or
malfunction caused by the use of unauthorised
parts is not covered by warranty or product liability.
LF 100Safety and operating instructions
♦
Check that the controls are not damaged and do
not jam.
Checking bolted joint
Check and if necessary tighten screws and nuts.
♦
When cleaning mechanical parts with solvent,
comply with appropriate health and safety
regulations and ensure there is satisfactory
ventilation.
♦
For major service of the machine, contact the
nearest authorised workshop.
♦
After each service, check that the machine's
vibration level is normal. If not, contact the nearest
authorised workshop.
NOTICE Never aim a water jet directly at the fuel
filler cap. This is particularly important when using a
high-pressure cleaner.
Every 10 hours of operation
(daily)
Maintenance routines:
♦
Check and replenish fuel.
♦
Check and replenish engine oil.
Checking the engine, Honda
♦
Check the oil level on the dipstick.
♦
Check the fuel level (A).
♦
Check for oil leaks.
♦
Check the tightness of all nuts and bolts.
♦
Clean the machine.
♦
Check and clean the engine's cooling flanges. See
the engine manual for more information.
♦
Check the engine's air filter indicator. See the
engine manual for more information.
♦
Clean and refit air filter.
22
♦
Check the engine for oil leaks.
© 2015 Construction Tools EOOD | No. 9800 1125 01c | 2015-05-26
Original instructions
Page 22
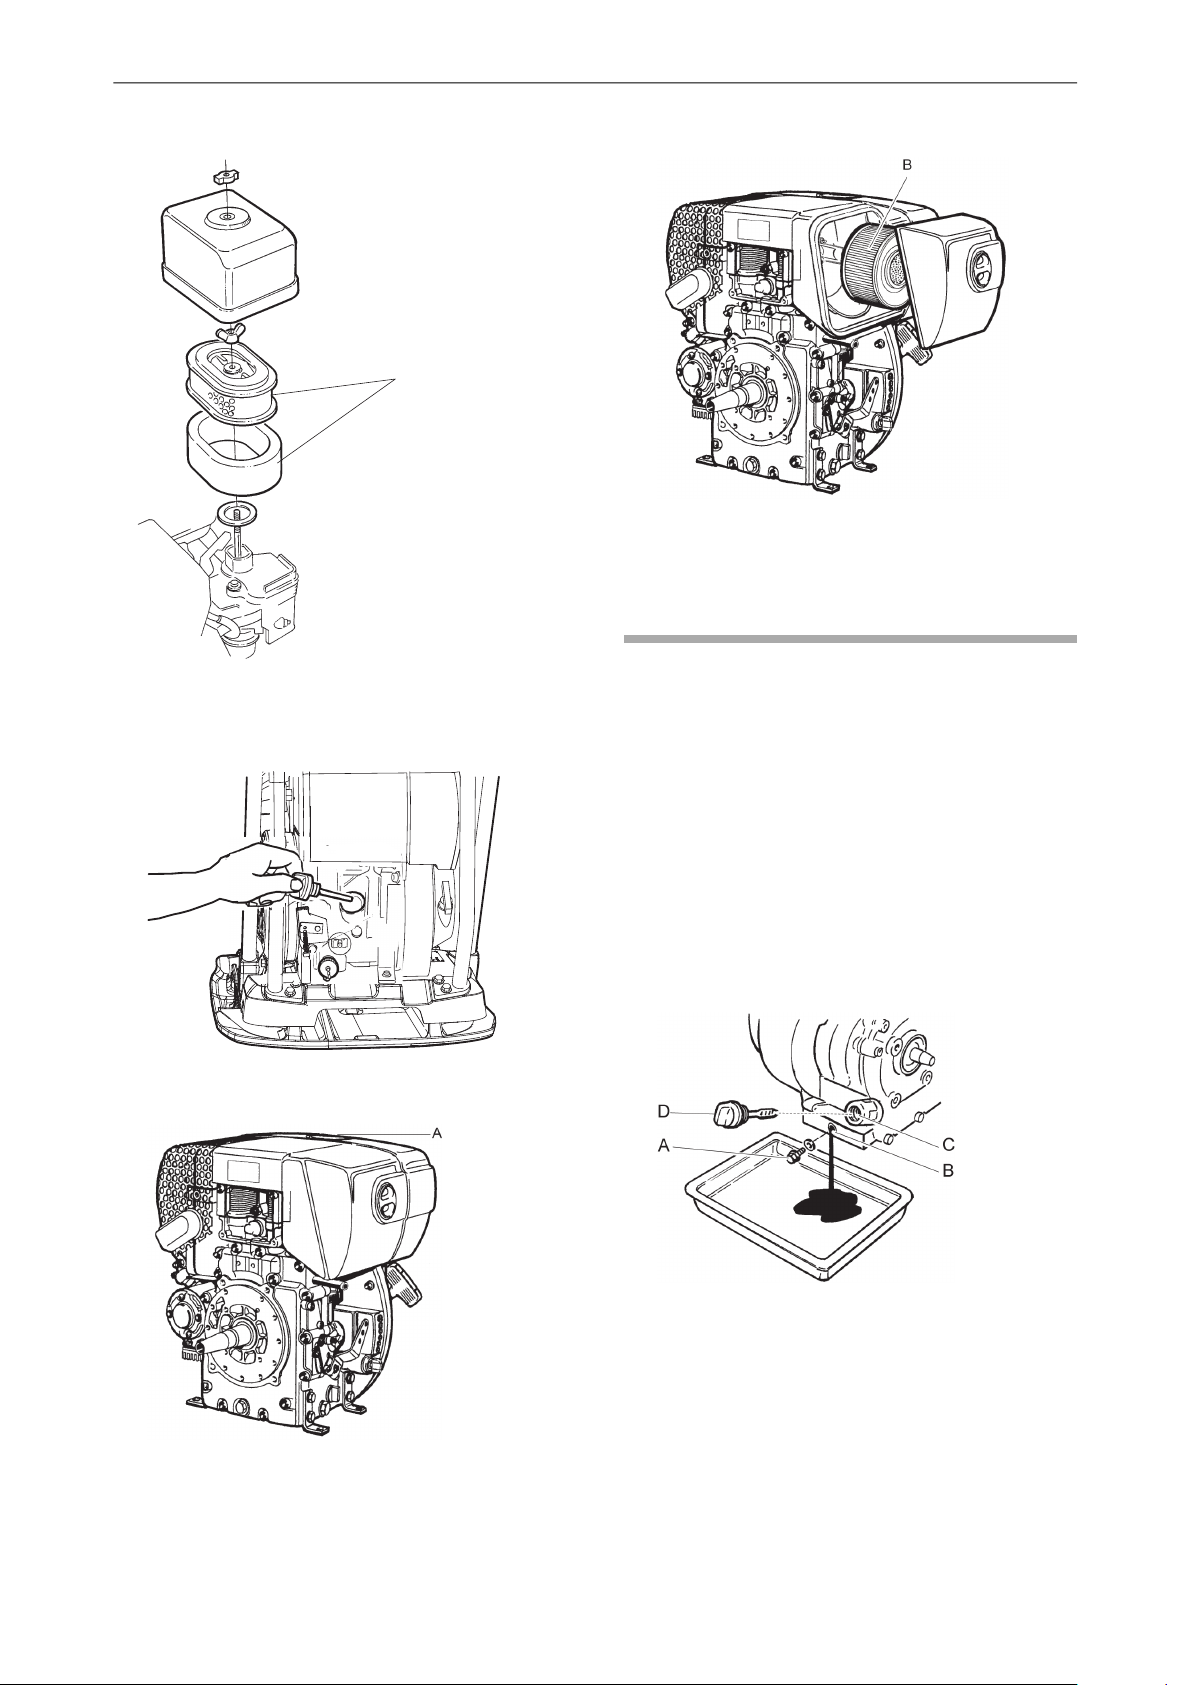
♦
B
Clean and replace the air filter (B) if necessary.
Safety and operating instructionsLF 100
4. Clean and refit the air filter (B) if needed.
After the first 20 hours of
operation
Checking the engine, Hatz
1. Check the oil level on the dipstick.
2. Check the fuel level (A).
Maintenance routines
Applies to all:
♦
Change engine oil.
♦
Clean and refit air filter.
♦
Check the engine speed.
Applies to Hatz engine:
♦
Check and adjust valve clearance. See engine
manual for more information.
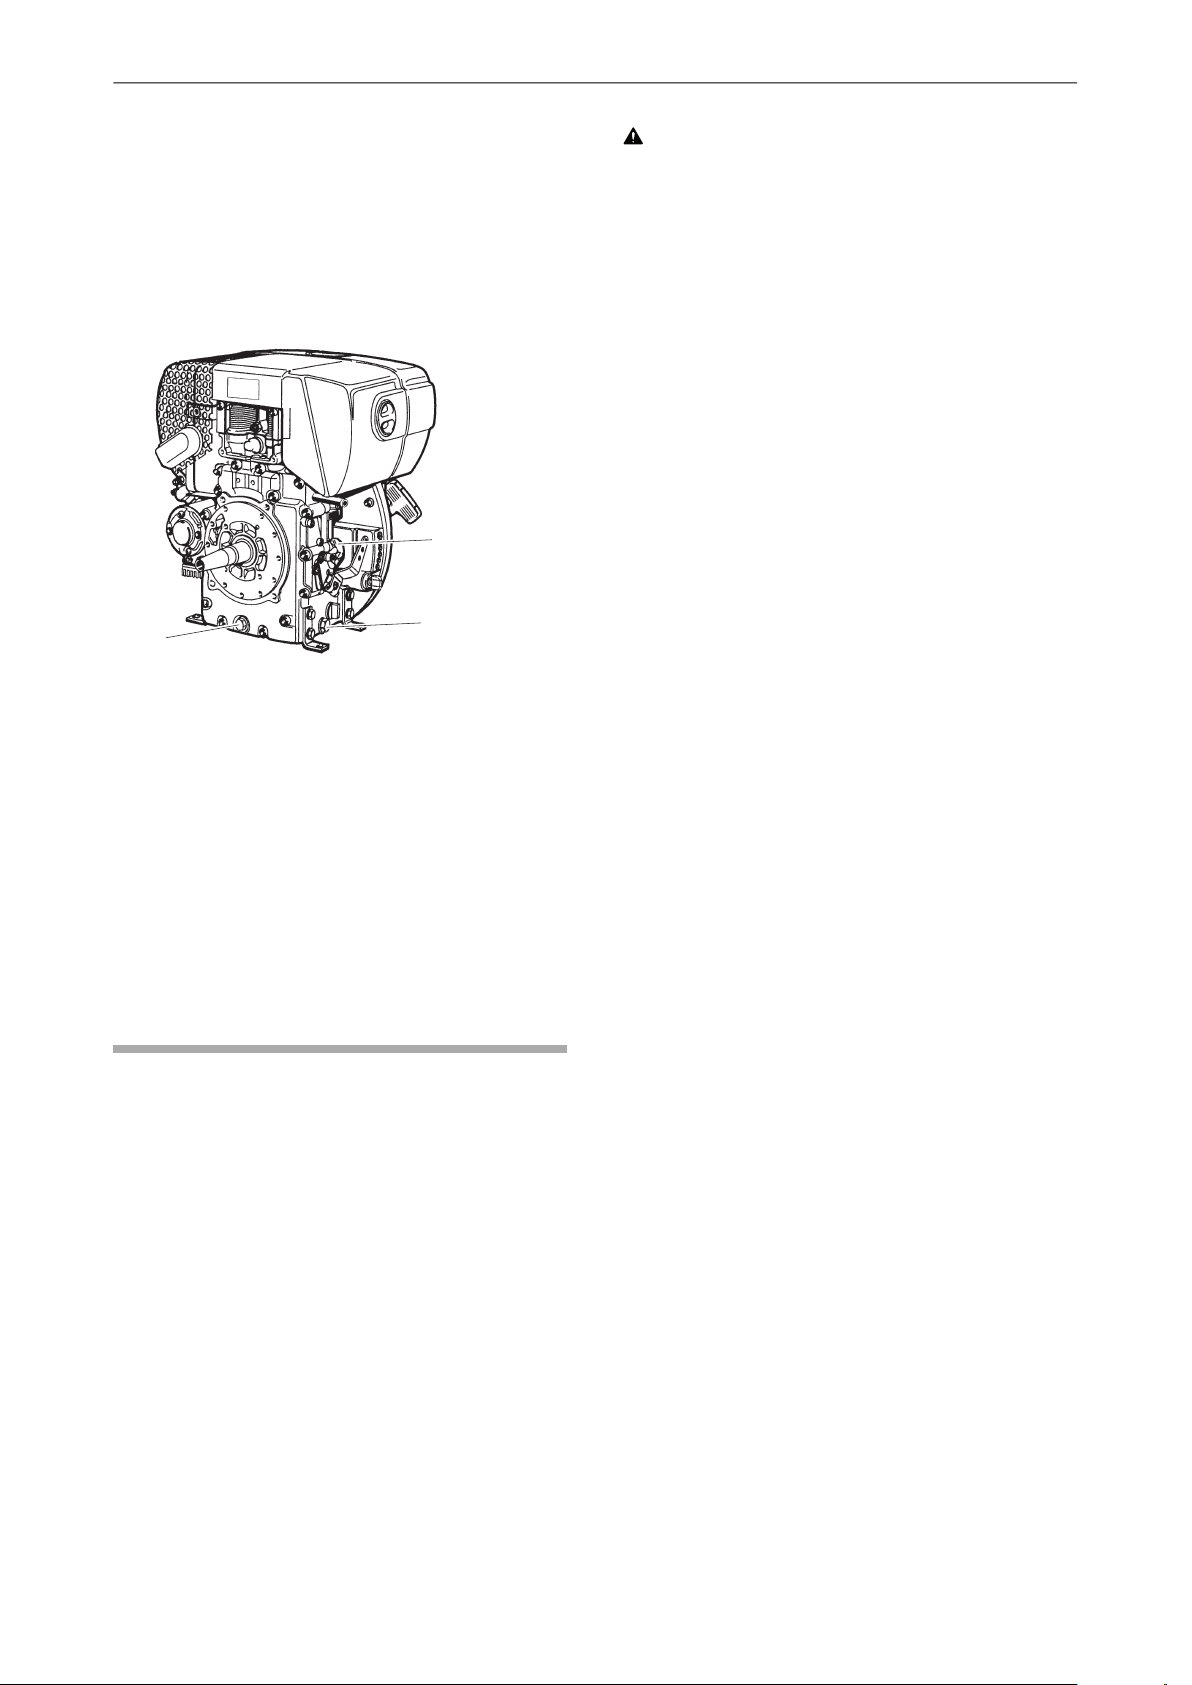
Changing the engine oil, Honda
1. Unscrew the drainage plug (A).
3. Check the engine for oil leaks.
Original instructions
2. Tilt the machine backwards and let the oil drain
in a drainage hose.
3. Clean around the hole (B) where the drainage
plug (A) was placed.
4. Refit the drainage plug (A).
5. Unscrew the dipstick (D).
23© 2015 Construction Tools EOOD | No. 9800 1125 01c | 2015-05-26
Page 23
A
A
B
LF 100Safety and operating instructions
6. Fill with oil (C).
7. Refit the dipstick (D).
8. Start the engine and allow the engine to idle a
few minutes before increasing to full power.
Changing the engine oil, Hatz
1. Unscrew the drainage plug (A).
2. Tilt the machine backwards and let the oil drain
in a drainage hose.
CAUTION Cover the V-belt
Running a machine without the protective cover over
the V-belt may cause trapping or machine damage,
which can cause injury.
► Never run the machine without the protective cover
over the V-belt.
► Stop the engine before removing the protective
cover.
Checking the V-belt
The V-belt must be checked and adjusted by
authorized service personnel.
3. Clean around the drainage plug (A).
4. Screw on the drainage plug (A).
5. Refill with oil at (B) and refit the dipstick.
6. Start the engine and allow the engine to idle a
few minutes before increasing to full power.
Every 100 hours of operation
(weekly)
Maintenance routines
Applies to all:
♦
Check the shock absorbers.
♦
Check the engine speed.
♦
Check that the V-belt is not damaged.
Applies to Honda engines:
♦
Change engine oil. See engine manual for more
information.
♦
Check and clean the spark plug. See engine
manual for more information.
♦
Clean the carburettor's fuel cock. See engine
manual for more information.
♦
Clean the silencer's spark catcher. See engine
manual for more information.
24
© 2015 Construction Tools EOOD | No. 9800 1125 01c | 2015-05-26
Original instructions
Page 24
Safety and operating instructionsLF 100
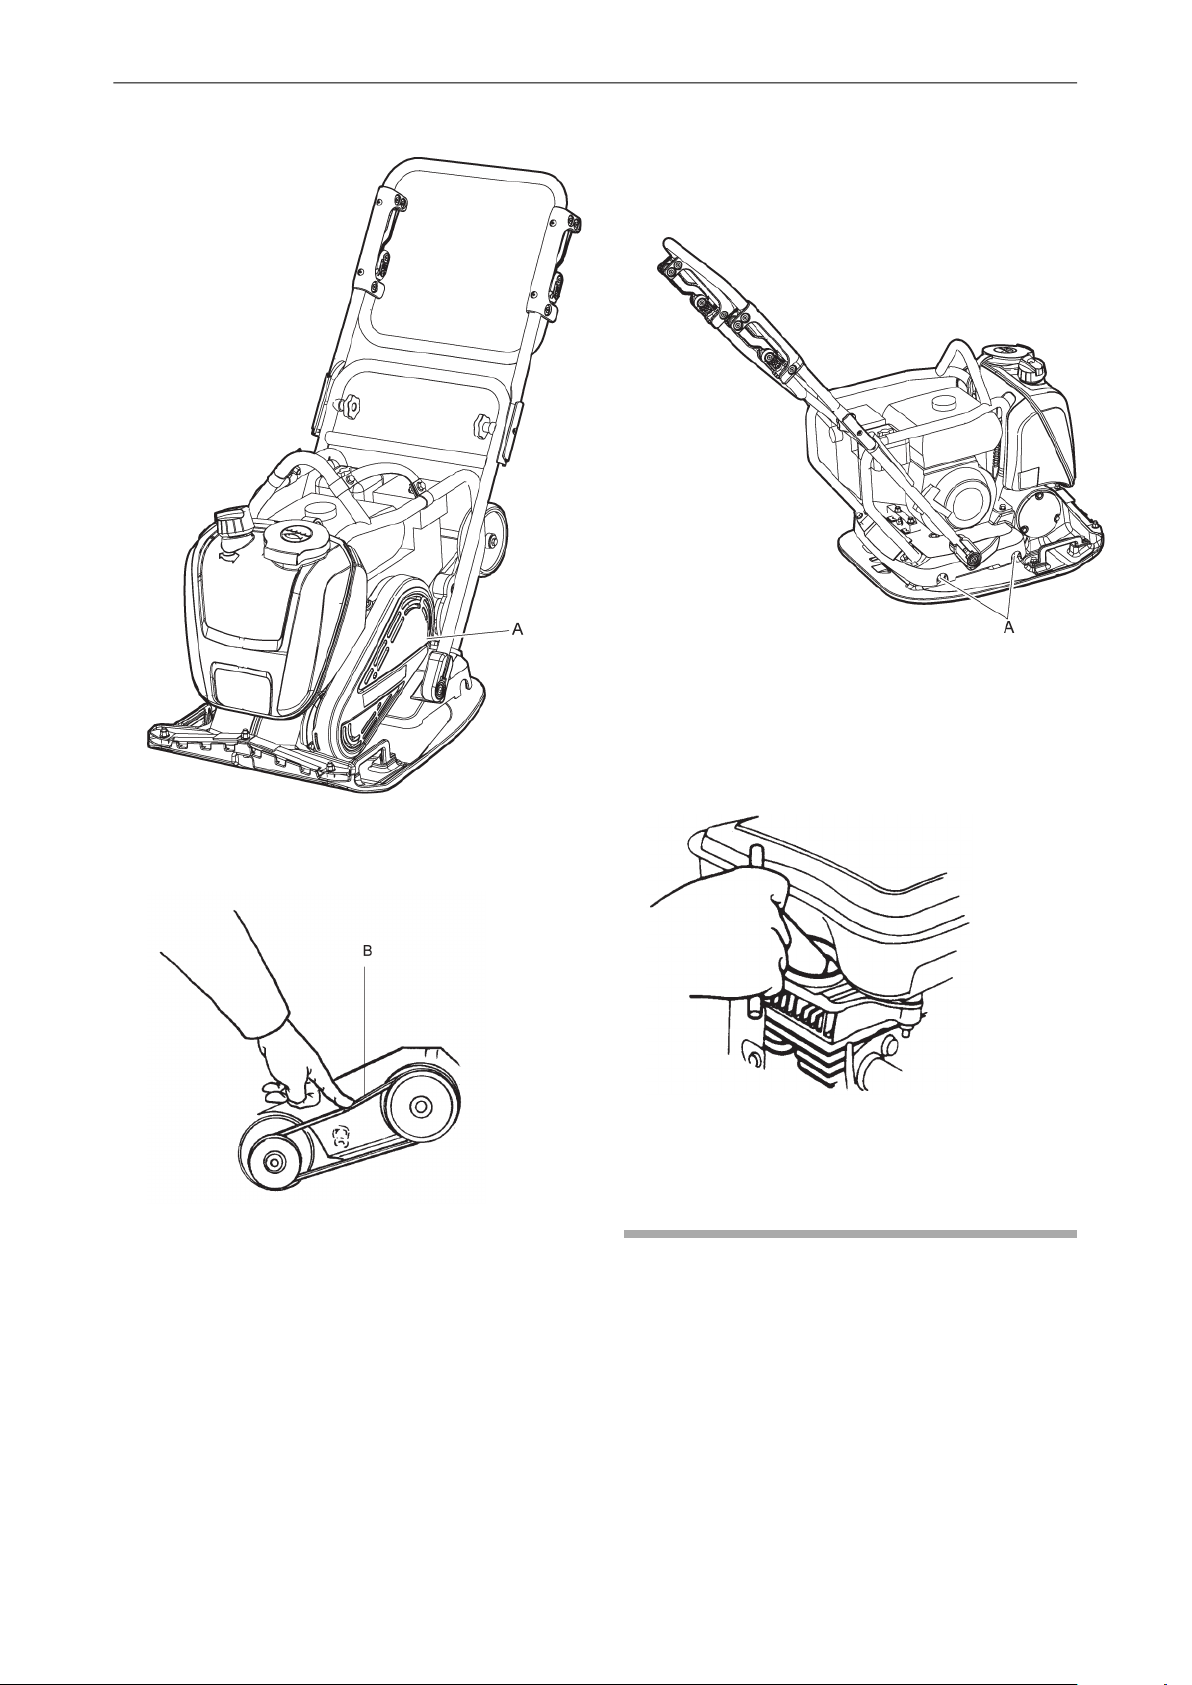
1. Remove the protective cover (A).
Checking the shock absorbers
1. Check all the shock absorbers (A) for cracks or
if they are exhausted. There are two shock
absorbers (A) on each side of the machine.
2. Change the shock absorbers (A) if they are
damaged.
2. Check if the V-belt (B) is damaged, change if
necessary.
3. If the V-belt tension needs adjusting, loosen the
four engine-plate bolts and slide the engine
backwards.
4. Check that the V-belt pulleys are in line, tighten
the screws and reinstall the protective cover (A).
Checking spark plug, Honda
♦
Check, clean and replace the spark plug.
Every 250 hours of operation
(6 months)
Maintenance routines
Applies to all:
♦
Check and if necessary adjust the engine's valve
clearance.
♦
Clean the engine's cooling flanges.
Original instructions
♦
Check the tightness of all screws and nuts.
♦
Check and lubricate controls and links.
♦
Check all shock absorbers. Replace if necessary.
25© 2015 Construction Tools EOOD | No. 9800 1125 01c | 2015-05-26
Page 25
LF 100Safety and operating instructions
Applies to Honda engines:
♦
Clean fuel tank and fuel filter. See engine manual
for more information.
Applies to Hatz engines:
♦
Clean and replace the air filter on the engine. See
engine manual for more information.
♦
Check the injection pump. See engine manual for
more information.
♦
Check the fuel injector. See engine manual for
more information.
♦
Change the engine oil. See engine manual for
more information.
♦
Clean the engine's exhaust pipe. See engine
manual for more information.
Every 500 hours of operation
(yearly)
Maintenance routines
Applies to all:
♦
Adjust valve head clearance for intake and exhaust
valves. See engine manual for more information.
Cleaning the fuel tank
♦
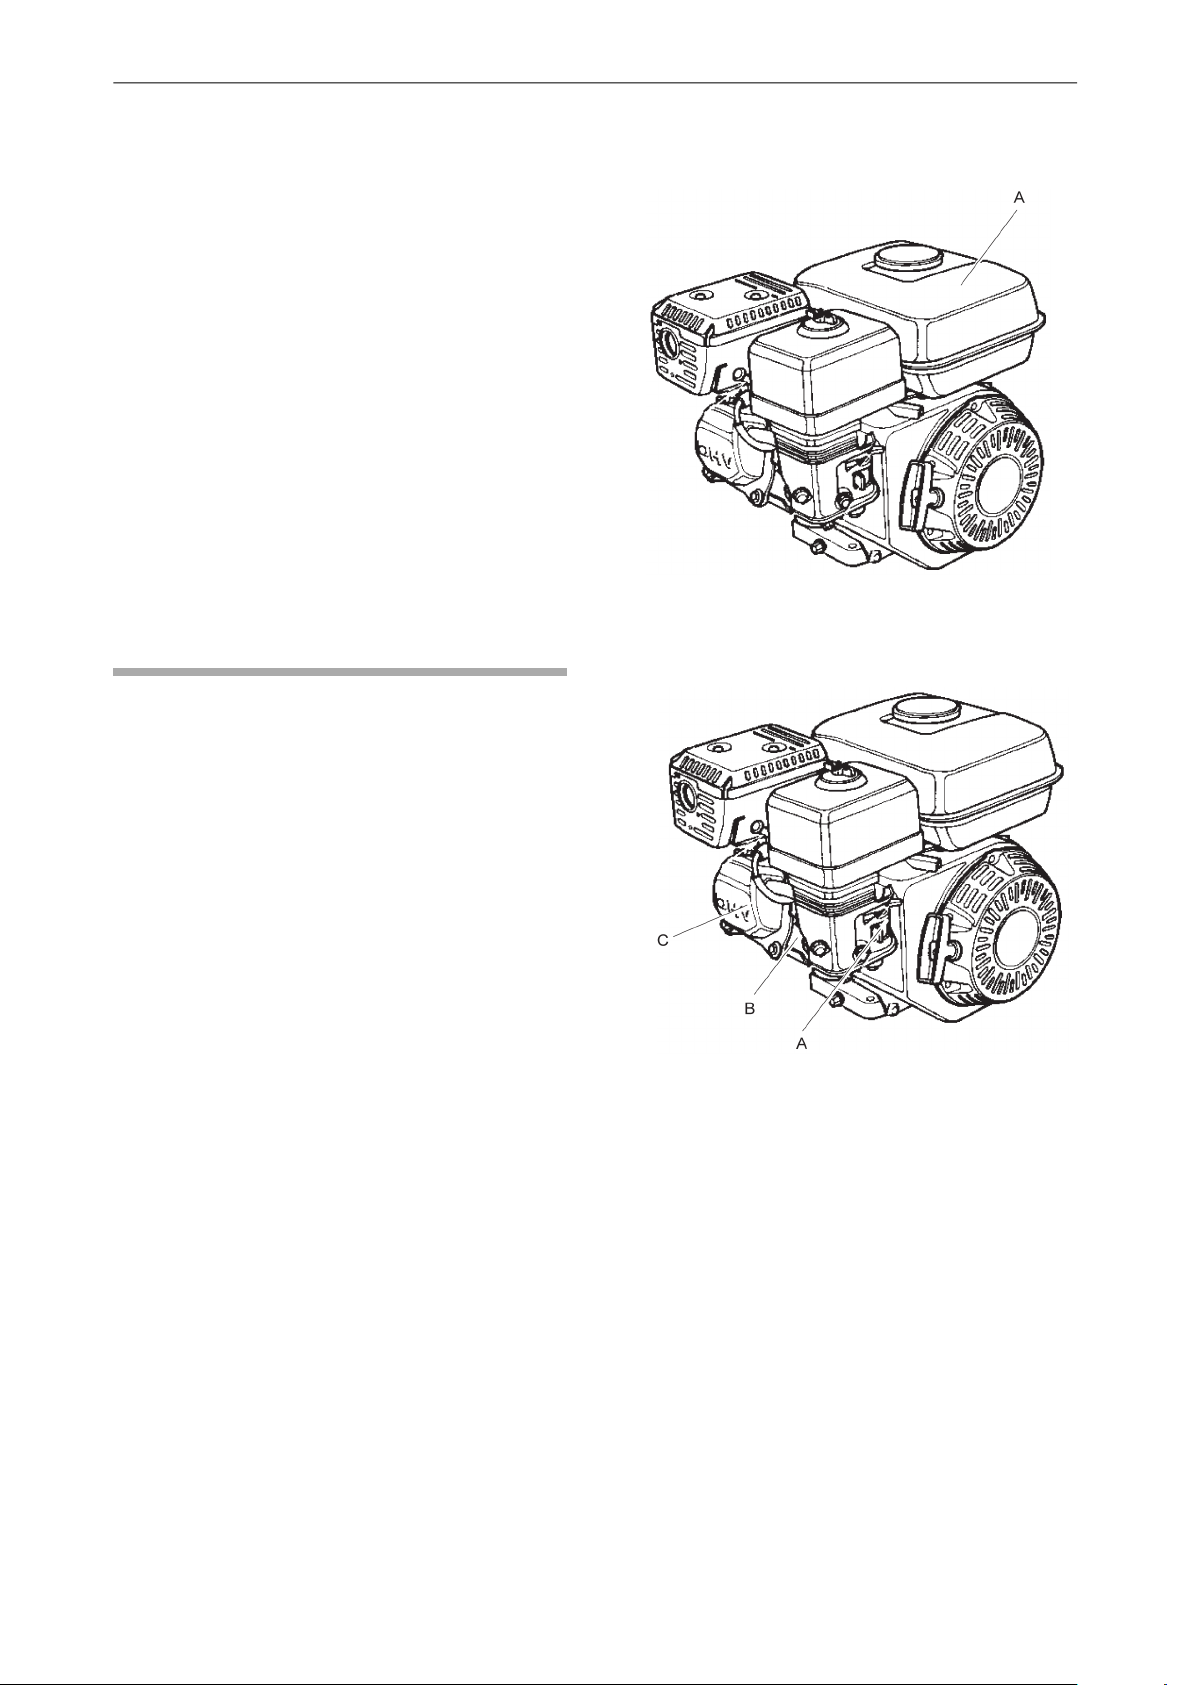
Inspect and clean the fuel tank (A).
Inspection and adjustment of engine
1. Clean and adjust the carburettor (A).
♦
Clean and check fuel filter and fuel tank. See
engine manual for more information.
♦
Replace air filter.
♦
Clean the engine's cooling flanges. See engine
manual for more information.
♦
Change oil in the engine. See engine manual for
more information.
Applies to Honda engines:
♦
Clean and adjust the carburettor. See engine
manual for more information.
Applies to Hatz engines:
♦
Check the injection pump. See engine manual for
more information.
♦
Check the injection nozzle. See engine manual
for more information.
♦
Drain the fuel system of water. See engine manual
for more information.
♦
Replace the fuel filter. See engine manual for more
information.
♦
Clean the oil strainer. See engine manual for more
information.
2. Clean engine cooling flanges (B).
3. Adjust the engine's valve (C) clearance.
Disposal
A used machine must be treated and disposed of in
such a way that the greatest possible portion of the
material can be recycled and any negative influence
on the environment is kept as low as possible, and
in accordance with local restrictions.
Before a fuel driven machine is deposited it must be
emptied and cleaned of all oil and fuel. Remaining
oil and fuel must be dealt with in a way that does not
adversely affect the environment.
Always send used filters, drained oil and fuel
remnants to environmentally correct disposal.
26
© 2015 Construction Tools EOOD | No. 9800 1125 01c | 2015-05-26
Original instructions
Page 26

Storage
♦
Empty the tank before storing the machine.
♦
Clean the machine.
♦
Clean the air filter.
♦
Carefully pull the start handle until a slight
resistance appears.
♦
Wipe off any oil and dust that has accumulated
on the rubber parts.
♦
Cover the machine and store it in a dry, dust-free
area.
Safety and operating instructionsLF 100
Original instructions
27© 2015 Construction Tools EOOD | No. 9800 1125 01c | 2015-05-26
Page 27

Technical data
Machine data
Engine
Compaction data
Performance
Fluid volumes
Lubricants
Fuel type
Petrol (gasoline). Use unleaded petrol of
standard quality.
LF 100Safety and operating instructions
HatzHondaLF 100
Hatz 1B20, 4-strokeHonda GX 160, 4-strokeManufacture/Model
2.5 (3.4)4.1 (5.6)Power, kW (hp)
3,1003,600Rated speed, r.p.m.
1,2001,400Idling, r.p.m.
95 (5700)95 (5700)Vibration frequency, Hz (r.p.m.)
0.85 (0.03)0.85 (0.03)Amplitude, mm (in.)
17 (3,822)17 (3,822)Centrifugal force, kN (lbf)
25 (82)25 (82)Operating speed, m/min (feet/min)
20° (30%)20° (30%)Max tilt,° (%)
3.6 (3.8)3.6 (3.8)Fuel tank capacity, litres (qts)
0.9 (0.95)0.6 (0.63)Crank case, litres (qts)
0.57 (0.6)1.21 (1.28)Fuel consumption, litres/hour (qts/h)
13 (13.7)13 (13.7)Water tank for asphalt, litres/hour (qts/h)
Diesel oil which conforms to EN500 or DIN
51601.
Shell Rimula R4 L 15W-40Shell Rimula R4 L 15W-40Engine oil
Weights
kg (lbs)
Weights for options
(lbs)
EN500, kg (lbs)
Honda LA,
asphaltHonda LLF 100
Honda LAT,
asphalt
Hatz LAT,
asphaltHatz L
111 (244.7)104.8 (231.0)102 (224.9)96.3 (212.3)95.2 (209.9)Net weight, kg (lbs)
117.5 (259)106.2 (234.1)108.5 (239.2)102.8 (226.6)96.6 (212.9)Operating weight EN500,
HatzHonda
4.7 (10.4)3.9 (8.6)Protective frame, kg (lbs)
6.7 (14.8)5.9 (13)Sprinkler system with protective frame, Net weight, kg
13.2 (29.1)12.4 (27.3)Sprinkler system with protective frame, Operating weight
5.9 (13.0)4.8 (10.6)Front cover with protective frame, kg (lbs)
5.4 (11.9)5.4 (11.9)Transport wheel, kg (lbs)
4.2 (9.6)4.2 (9.6)Block paving set, kg (lbs)
0.6 (1.3)0.6 (1.3)Lifting handle, kg (lbs)
5.0 (11.0)4.2 (9.3)Lifting tackle for truck fork with protective frame, kg (lbs)
1.2 (2.6)1.2 (2.6)Low vibration handle, kg (lbs)
28
© 2015 Construction Tools EOOD | No. 9800 1125 01c | 2015-05-26
Original instructions
Page 28

Safety and operating instructionsLF 100
Noise and vibration declaration statement
Guaranteed sound power level Lw according to EN ISO 3744 in accordance with directive 2000/14/EC.
Sound pressure level Lp according to EN ISO 11201, EN 500-4.
Vibration value determined according to EN 500-4. See table ”Noise and vibration data” for the values etc.
These declared values were obtained by laboratory type testing in accordance with the stated directive or
standards and are suitable for comparison with the declared values of other machines tested in accordance
with the same directive or standards. These declared values are not suitable for use in risk assessments and
values measured in individual work places may be higher. The actual exposure values and risk of harm
experienced by an individual user are unique and depend upon the way the user works, in what material the
machine is used, as well as upon the exposure time and the physical condition of the user, and the condition
of the machine.
We, Construction Tools EOOD, cannot be held liable for the consequences of using the declared values, instead
of values reflecting the actual exposure, in an individual risk assessment in a work place situation over which
we have no control.
This machine may cause hand-arm vibration syndrome if its use is not adequately managed. An EU guide to
managing hand-arm vibration can be found at http://www.humanvibration.com/humanvibration/EU/VIBGUIDE.html
We recommend a programme of health surveillance to detect early symptoms which may relate to vibration
exposure, so that management procedures can be modified to help prevent future impairment.
Noise and vibration data
VibrationNoise
Declared valuesDeclared values
Sound
pressure
EN ISO
11201
Lw
Lp
at operator's
earType
Permitted working hours per day are calculated on action value of 2.5 m/s2as per 2002/44/EC.
guaranteed
dB(A) rel
1pW
Lw
measured
dB(A) rel 1pW
m/s2value
Standard
handle
Three axes valuesSound power
EN 500-42000/14/EC
Low
vibration
handle
permitted working
hours/day
Standard
handle
Uncertainties, sound value
Uncertainties, sound value
Type
KpAdB(A)KwAdB(A)
2.5-3.01.5-2.5LF 100 Honda
2.5-3.01.5-2.5LF 100 Hatz
Low
vibration
handle
81.41.3610110493LF 100 Honda
80.61.99.310210493LF 100 Hatz
Uncertainty factor for gravel bed.
Original instructions
29© 2015 Construction Tools EOOD | No. 9800 1125 01c | 2015-05-26
Page 29
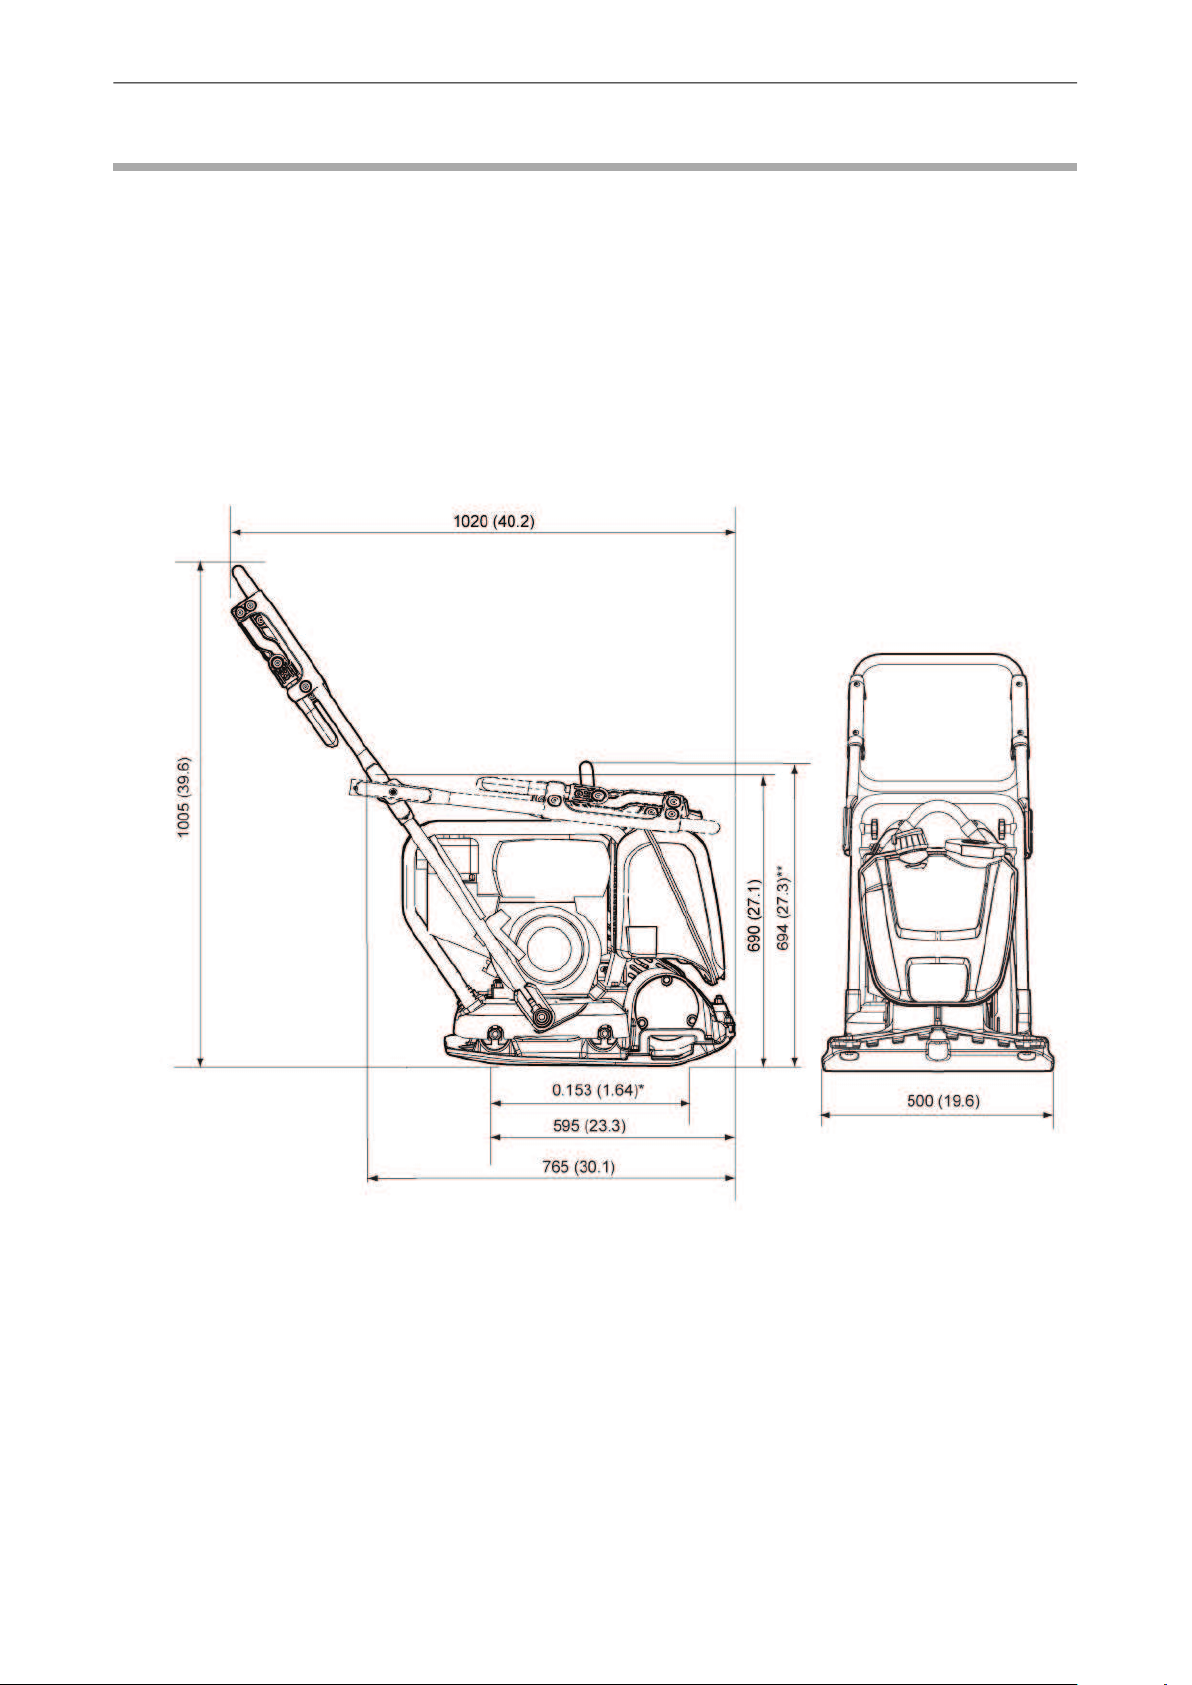
Dimensions
mm (in.)
*Contact area, m2(sq feet).
**Hatz, safety frame lifting point.
LF 100Safety and operating instructions
30
© 2015 Construction Tools EOOD | No. 9800 1125 01c | 2015-05-26
Original instructions
Page 30

Safety and operating instructionsLF 100
EC Declaration of Conformity
EC Declaration of Conformity (EC Directive 2006/42/EC)
We, Construction Tools EOOD, hereby declare that the machines listed below conform to the provisions of EC
Directive 2006/42/EC (Machinery Directive) and 2000/14/EC (Noise Directive), and the harmonised standards
mentioned below.
Forward moving vibration
plate
Following harmonised standards were applied:
♦
EN500-1+A1
♦
EN500-4
Following other standards were applied:
♦
2000/14/EC, appendix VIII
♦
2004/108/EC
Notified body involved for directive:
Mira, NoBo no.0888
Watling Street
Nuneaton
Warwickshire
CV10 0TU
UK
Technical Documentation authorised representative:
Emil Alexandrov
Construction Tools EOOD
7000 Rousse
Bulgaria
General Manager:
Nick Evans
Guaranteed sound power level
[dB(A)]
Measured sound power level [dB(A)]
101104LF 100 Honda
102104LF 100 Hatz
Manufacturer:
Construction Tools EOOD
7000 Rousse
Bulgaria
Place and date:
Rousse, 2015-05-26
Original instructions
31© 2015 Construction Tools EOOD | No. 9800 1125 01c | 2015-05-26
Page 31

Page 32

Page 33

Page 34

Page 35

Any unauthorized use or copying of the contents or any part thereof is prohibited.
This applies in particular to trademarks, model denominations, part numbers, and
drawings.
www.atlascopco.com
© 2015 Construction Tools EOOD | No. 9800 1125 01c | 2015-05-26
 Loading...