

Page 1
For Husqvarna Parts Call 606-678-9623 or 606-561-4983
48 INCH MOWER MULCH KIT
Model No. MK48A & 241480
INSTALLATION INSTRUCTIONS
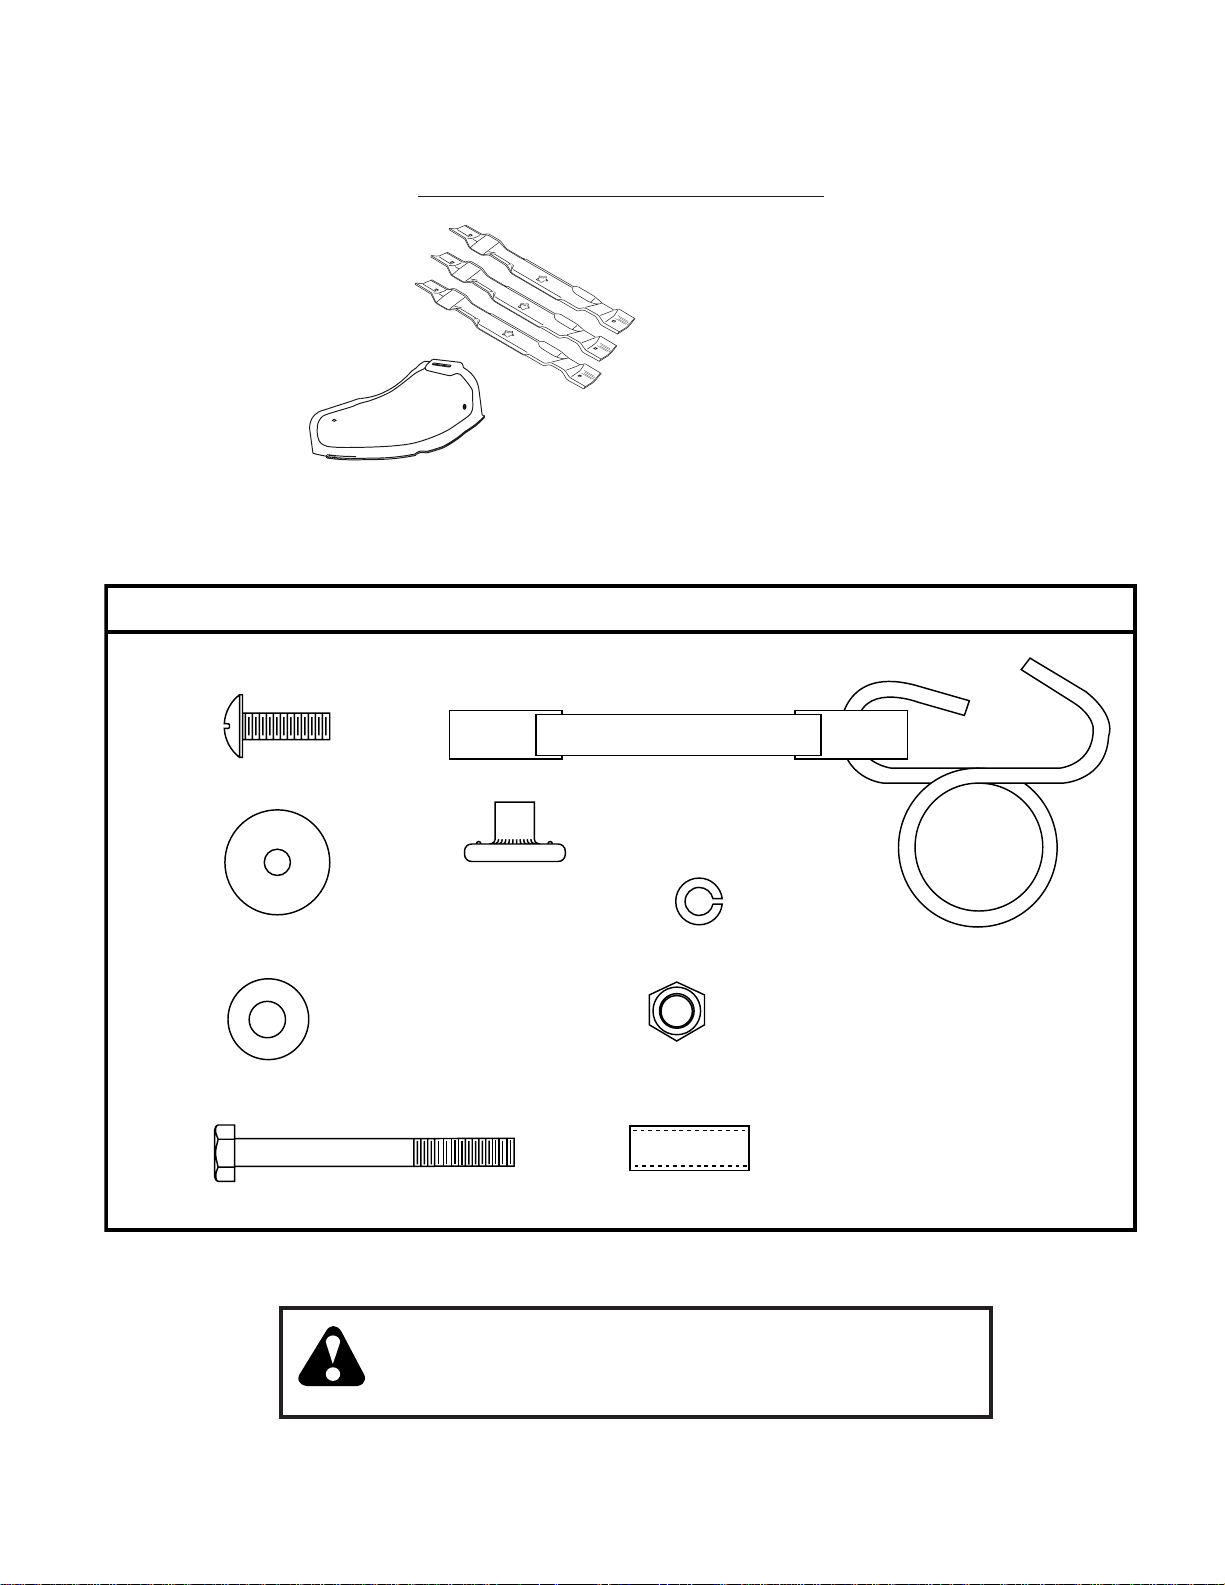
Kit Contains:
(3) Mulch Blades
(1) Mulch Cover
(1) Bag of Parts
(2) Screws #10 x 5/8
Tools Required:
A socket wrench set will make assembly eas i er.
Standard wrench sizes are listed.
(2) 7/16" wrenches
(1) 5/8" wrench (Blade Bolt)
(1) #1 or #2 Phillips Screwdriver (Mulch Cover)
BAG OF PARTS CONTENTS
(2) Latch Hook Assemblies
(2) Washers 3/16 x 3/4
(3) Washers 1/4 x 5/8
(1) Hex Bolt 1/4-20 x 2"
(2) Weld Nuts #10
(2) Lock Washers #10
(1) Lock Nuts 1/4-20
(1) Latch Hook Spacer
CAUTION: Muffl er and other engine parts be come extremely hot
during op er a tion and re main hot after en gine has stopped. To
avoid severe burns on contact, stay away from these areas.
186498 Rev. 1 7.14.03 MH Printed in U.S.A.
www.mymowerparts.com
Page 2
For Husqvarna Parts Call 606-678-9623 or 606-561-4983
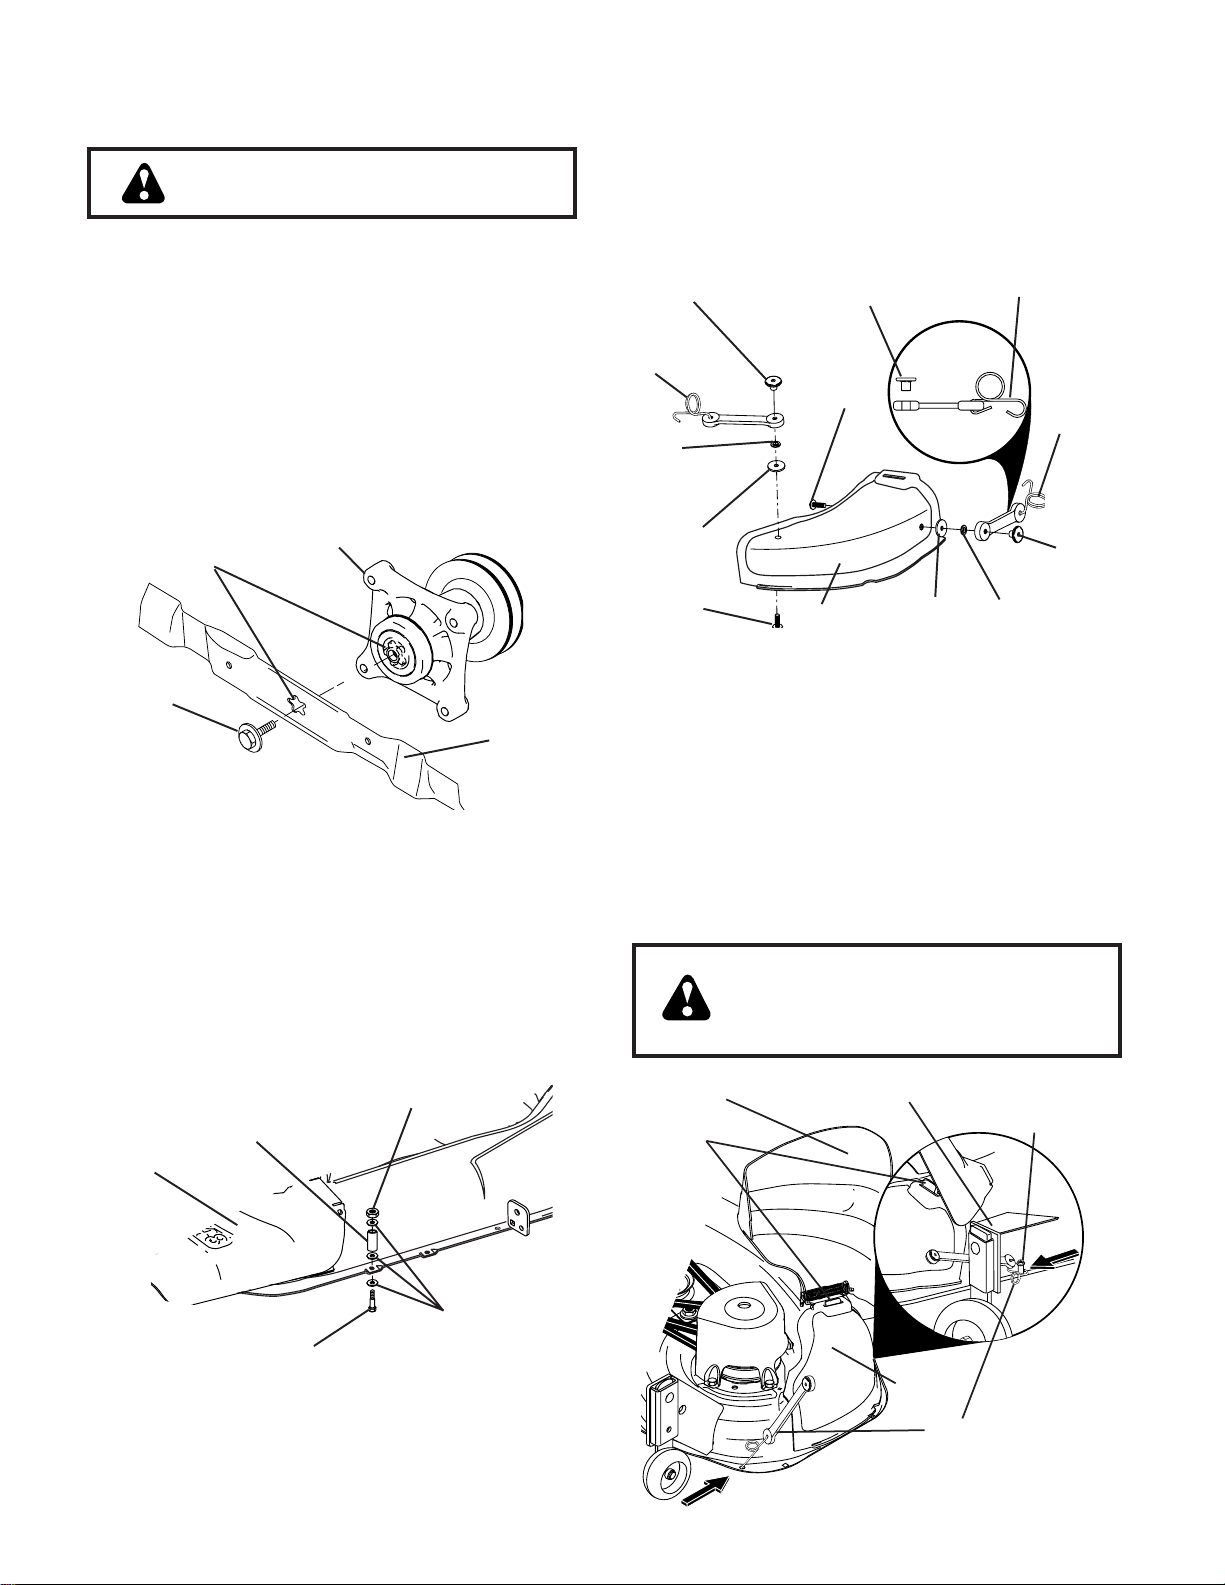
REPLACE MOWER BLADES (See Fig. 1)
1
CAUTION: Blades are sharp. Protect
your hands with gloves and/or wrap
blade with heavy cloth.
1. Raise mower to highest position to allow access to
blades.
2. Remove blade bolts by turning counterclockwise.
3. Install mulch blades with stamped "THIS SIDE UP"
facing up towards mower, or, blades stamped with
"GRASS SIDE" facing down towards grass.
IMPORTANT: TO ENSURE PROPER ASSEMBLY, CENTER
HOLE IN BLADE MUST ALIGN WITH STAR PATTERN ON
MANDREL ASSEMBLY.
4. Install and tighten blade bolts securely (45-55 Ft. Lbs.
torque).
IMPORTANT: SPECIAL BLADE BOLT IS HEAT TREATED.
STAR
PATTERN
BLADE BOLT
(SPECIAL)
ASSEMBLE LATCH HOOK SPACER
2
(See Fig. 2)
MANDREL
ASSEMBLY
FIG. 1
0
2545
BLADE
ASSEMBLE MULCH COVER (See Fig. 3)
3
NOTE: Pre-assemble weld nut to latch hook by in sert ing
weld nut from the top with hook pointing down.
1. Install the two latch hooks to mulch cover using screw,
3/16 washer, lock washer, and weld nut as shown.
2. Tighten hardware securely.
02546
WELD NUT
FROM THE TOP
SCREW
#10 X 5/8
MULCH
COVER
WASHER
3/16 X 3/4
WELD
NUT
LATCH
HOOK
LOCK
WASHER
WASHER
3/16 X 3/4
SCREW
#10 X 5/8
FIG. 3
INSTALL MULCH COVER (See Fig. 4)
4
1. Raise and hold defl ector shield in up right position.
2. Hook rear latch into hole on back of mower with hook
positioned as shown.
3. Place slot in mulch cover over tab on mower and position plate over mower opening as shown.
4. Hook front latch over latch hook spacer on front of
mower.
5. Check to be sure mower opening is completely cov ered
by the mulch cover.
HOOK POINTS
DOWN
LATCH
HOOK
WELD
NUT
LOCK
WASHER
1. Install the spacer with the 1/4-20 x 2" long hex bolt, three
(3) washers and lock nut as shown. Tighten hardware
securely.
2. Discard mulch baffl e and remaining mulch baffl e mount ing hardware (1/4 hex bolts, washers and lock nuts).
LOCK NUT
1/4-20
LATCH HOOK
SPACER
DEFLECTOR
SHIELD
WASHERS
1/4 X 5/8
LONG HEX BOLT
1/4-20 X 2"
FIG. 2
CAUTION: Do not remove defl ector
shield from mow er. Raise and hold
shield when at tach ing mulch cover
and al low it to rest on cover while in
op er a tion.
DEFLECTOR
SHIELD
TAB
2
OPTIONAL FRONT
GAUGE WHEEL
BRACKET
02547
MULCH
COVER
LATCH HOOKS
FIG. 4
LATCH
HOOK
SPACER
www.mymowerparts.com
Page 3
For Husqvarna Parts Call 606-678-9623 or 606-561-4983
TO CONVERT TO BAGGING OR
DISCHARGING
For best bagging and discharging install the high lift
blades.
1. Remove the mulch cover and mulch blades and install
high lift blades.
2. Store mulch cover and mulch blades in a safe place.
Your mower is now ready for dis charg ing or in stal la tion
of optional grass catcher ac ces so ry.
MULCHING MOWING TIPS
IMPORTANT: FOR BEST PERFORMANCE, KEEP MOWER
HOUSING FREE OF BUILT-UP GRASS AND TRASH. CLEAN
AFTER EACH USE.
• The spe cial mulch blades will recut the grass clip pings
many times and reduce them in size so that as they fall
onto the lawn they will disperse into the grass and not
be noticed. Also, the mulched grass will biodegrade
quick ly to provide nutrients for the lawn. Always mulch
with your highest engine (blade) speed as this will pro vide the best recutting action of the blades.
• Avoid cutting your lawn when it is wet. Wet grass tends
to form clumps and interferes with the mulch ing action.
The best time to mow your lawn is the early afternoon.
At this time the grass has dried and the newly cut area
will not be exposed to the direct sun.
• For best results, adjust the mower cutting height so
that the mower cuts off only the top one-third of the
grass blades. For ex tremely heavy mulch ing, re duce
your width of cut and mow slow ly.
• Cer tain types of grass and grass con di tions may re quire
that an area be mulched a second time to com pletely
hide the clippings. When doing a sec ond cut, mow
across or perpendicular to the fi rst cut path.
• Change your cutting pattern from week to week. Mow
north to south one week then change to east to west the
next week. This will help prevent matting and graining
of the lawn.
FOR FUTURE REFERENCE AND REPAIR PARTS OR DER ING, KEEP THIS INSTRUCTION SHEET WITH YOUR
TRACTORS OWNER'S MANUAL
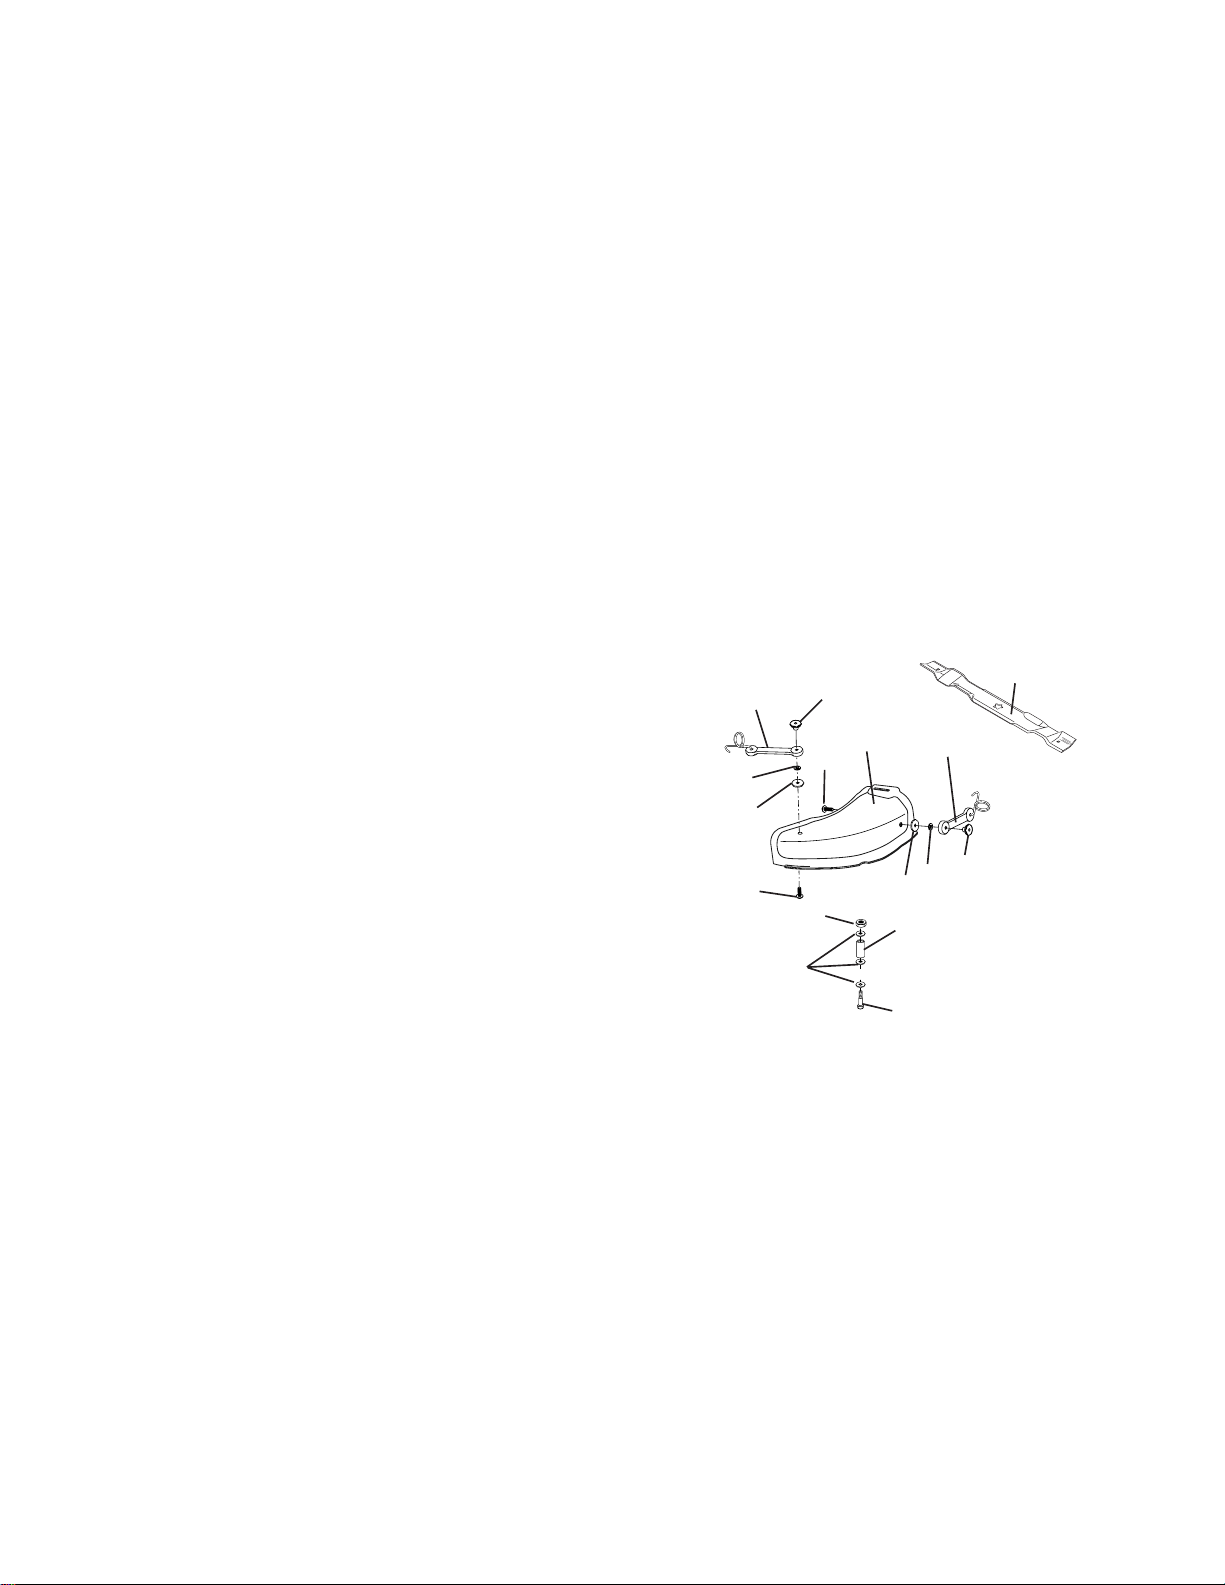
REPAIR PARTS
MODEL NO. MK48A,
PRODUCT NO. 954 12 00-96
KEY PART DESCRIPTION
NO. NO.
1 532 17 39-21 Mulch Blade
2 532 17 68-98 Mulch Cover
3 532 16 07-93 Latch Hook
4 532 12 50-04 Weld Nut
5 819 06 12-16 Washer 3/16 x 3/4
6 810 07 10-00 Washer, Lock #10
7 871 08 10-10 Screw #10 x 5/8
10 874 76 04-32 Hex Bolt 1/4-20 x 2
11 873 80 04-00 Lock Nut 1/4-20
12 532 12 12-49 Latch Hook Spacer
13 532 12 66-84 Washer 1/4 x 5/8
1
4
11
4
2
7
5
12
3
6
3
6
5
7
13
10
3
www.mymowerparts.com
Page 4

For Husqvarna Parts Call 606-678-9623 or 606-561-4983
4
www.mymowerparts.com
 Loading...