

Page 1

YTH1848XP
Owner's Manual
02478
Page 2

SAFETY RULES
Safe Operation Practices for Ride-On Mowers
IMPORTANT: THIS CUTTING MACHINE IS CAPABLE OF AMPUTATING HANDS AND FEET AND THROW ING OBJECTS. FAILURE
TO OBSERVE THE FOLLOWING SAFETY INSTRUCTIONS COULD RESULT IN SERIOUS INJURY OR DEATH.
I. GENERAL OPERATION
• Read, understand, and follow all instructions in the
manual and on the machine before starting.
• Only allow responsible adults, who are familiar with the
in struc tions, to operate the machine.
• Clear the area of objects such as rocks, toys, wire, etc.,
which could be picked up and thrown by the blade.
• Be sure the area is clear of other people before mow ing. Stop machine if anyone enters the area.
• Never carry passengers.
• Do not mow in reverse unless absolutely necessary.
Always look down and behind before and while back ing.
• Be aware of the mower discharge direction and do not
point it at anyone. Do not operate the mower without
either the entire grass catcher or the guard in place.
• Slow down before turning.
• Never leave a running machine unattended. Always
turn off blades, set parking brake, stop engine, and
remove keys before dismounting.
• Turn off blades when not mowing.
• Stop engine before removing grass catcher or un clog ging chute.
• Mow only in daylight or good artifi cial light.
• Do not operate the machine while under the infl uence
of alcohol or drugs.
• Watch for traffi c when operating near or crossing road ways.
• Use extra care when loading or unloading the machine
into a trailer or truck.
• Data indicates that operators, age 60 years and above,
are involved in a large percentage of riding mower-related injuries. These operators should evaluate their
ability to operate the riding mower safely enough to
protect them selves and others from serious injury.
• Keep machine free of grass , leaves or other debris
build-up which can touch hot exhaust / engine parts
and burn. Do not allow the mower deck to plow leaves
or other debris which can cause build-up to occur.
Clean any oil or fuel spillage before operating or
storing the machine. Allow machine to cool before
storage.
II. SLOPE OPERATION
Slopes are a major factor related to loss-of-control and tipover
accidents, which can result in severe injury or death. All slopes
require extra caution. If you cannot back up the slope or if you
feel uneasy on it, do not mow it.
DO:
• Mow up and down slopes, not across.
• Remove obstacles such as rocks, tree limbs, etc.
• Watch for holes, ruts, or bumps. Uneven terrain could
overturn the machine.
• Use slow speed. Choose a low gear so that you will
not have to stop or shift while on the slope.
• Follow the manufacturer’s recommendations for wheel
weights or counterweights to improve stability.
• Use extra care with grass catchers or other at tach ments.
These can change the stability of the machine.
• Keep all movement on the slopes
Do not make sudden changes in speed or direction.
Tall grass can hide obstacles.
slow
and
gradual
• Avoid starting or stopping on a slope. If tires lose traction, disengage the blades and proceed slowly
down the slope.
DO NOT:
•
Do not
turn slowly and gradually downhill, if possible.
•
Do not
The mower could suddenly turn over if a wheel is over
the edge of a cliff or ditch, or if an edge caves in.
•
Do not
cause sliding.
•
Do not
on the ground.
•
Do not
turn on slopes unless necessary, and then,
mow near drop-offs, ditches, or embankments.
mow on wet grass. Reduced traction could
try to stabilize the machine by putting your foot
use grass catcher on steep slopes.
III. CHILDREN
Tragic accidents can occur if the operator is not alert to
the presence of children. Children are often attracted to
the ma chine and the mowing activity.
children will remain where you last saw them.
• Keep children out of the mowing area and under the
watchful care of another responsible adult.
• Be alert and turn machine off if children enter the
area.
• Before and when backing, look behind and
small children.
• Never carry children. They may fall off and be seriously
injured or interfere with safe machine operation.
• Never allow children to operate the machine.
• Use extra care when approaching blind corners, shrubs,
trees, or other objects that may obscure vision.
Never
IV. SERVICE
• Use extra care in handling gasoline and other fuels.
They are fl ammable and vapors are explosive.
- Use only an approved container.
- Never remove gas cap or add fuel with the engine
running. Allow engine to cool before refueling. Do
not smoke.
- Never refuel the machine indoors.
- Never store the machine or fuel container inside where
there is an open fl ame, such as a water heater.
• Never run a machine inside a closed area.
• Keep nuts and bolts, especially blade attachment bolts,
tight and keep equipment in good condition.
• Never tamper with safety devices. Check their proper
op er a tion regularly.
• Keep machine free of grass, leaves, or other debris
build-up. Clean oil or fuel spillage. Allow machine to
cool before storing.
• Stop and inspect the equipment if you strike an object.
Repair, if necessary, before restarting.
• Never make adjustments or repairs with the engine
run ning.
• Grass catcher components are subject to wear, dam age, and deterioration, which could expose moving
parts or allow objects to be thrown. Frequently check
com po nents and replace with manufacturer's rec om mend ed parts, when nec es sary.
• Mower blades are sharp and can cut. Wrap the blade(s)
.
or wear gloves, and use extra caution when servicing
them.
• Check brake operation frequently. Adjust and service
as required.
2
straight
assume that
down
for
Page 3

SAFETY RULES
Safe Operation Practices for Ride-On Mowers
• Be sure the area is clear of other people before mowing.
Stop machine if anyone enters the area.
• Never carry passengers or children even with the blades
off.
• Do not mow in reverse unless absolutely necessary. Al ways
look down and behind before and while backing.
• Never carry children. They may fall off and be seriously
injured or interfere with safe machine operation.
• Keep children out of the mowing area and under the watchful
care of another responsible adult.
• Be alert and turn machine off if children enter the area.
• Before and when backing, look behind and down for small
children.
• Mow up and down slopes (15° Max), not across.
• Remove obstacles such as rocks, tree limbs, etc.
• Watch for holes, ruts, or bumps. Uneven terrain could overturn the machine. Tall grass can hide obstacles.
• Use slow speed. Choose a low gear so that you will not
have to stop or shift while on the slope.
• Avoid starting or stopping on a slope. If tires lose traction,
disengage the blades and proceed slowly straight down the
slope.
• If machine stops while going uphill, disengage blades, shift
into reverse and back down slowly.
• Do not turn on slopes unless necessary, and then, turn
slowly and gradually downhill, if possible.
WARNING: In order to prevent ac-
ci den tal starting when setting up,
trans port ing, ad just ing or making repairs, al ways dis con nect spark plug
wire and place wire where it can not
contact spark plug.
WARNING: Do not coast down a hill
in neutral, you may lose control of the
tractor.
WARNING: Tow only the attachments
that are rec om mend ed by and comply with spec i fi ca tions of the man u fac tur er of your tractor. Use common
sense when towing. Operate only at
the low est possible speed when on a
slope. Too heavy of a load, while on
a slope, is dan ger ous. Tires can lose
trac tion with the ground and cause you
to lose control of your tractor.
WARNING
Engine exhaust, some of its con stit u ents, and cer tain vehicle com po nents contain or emit chem i cals
known to the State of Cal i for nia to cause can cer and
birth de fects or oth er re pro duc tive harm.
WARNING
Battery posts, terminals and related ac ces so ries
contain lead and lead compounds, chem i cals known
to the State of Cal i for nia to cause can cer and birth
defects or oth er re pro duc tive harm. Wash hands
after handling.
3
Page 4

PRODUCT SPECIFICATIONS
GASOLINE CAPACITY 3.5 GALLONS
AND TYPE: UNLEADED REGULAR
OIL TYPE (API-SF-SJ): SAE 30 (above 32°F)
SAE 5W-30 (below 32°F)
OIL CAPACITY: W/ FILTER: 3.8 PINTS
W/O FILTER: 3.2 PINTS
CONGRATULATIONS on your purchase of a new tractor.
It has been designed, engineered and manu fac tured to give
you the best possible dependability and performance.
Should you experience any problem you cannot easily remedy, please contact your nearest authorized service center/
department. We have com pe tent, well-trained tech ni cians
and the proper tools to ser vice or repair this tractor.
Please read and retain this manual. The instructions will
enable you to assemble and maintain your tractor prop erly.
Always observe the “SAFETY RULES”.
SPARK PLUG: CHAMPION RCJ8Y
(GAP: .030")
GROUND SPEED (MPH): FORWARD: 0 – 5.5
REVERSE: 0 – 2.4
TIRE PRESSURE: FRONT: 14 PSI
REAR: 10 PSI
CHARGING SYSTEM: 16 AMPS @ 3600 RPM
BATTERY: AMP/HR: 35
MIN. CCA: 280
CASE SIZE: U1R
BLADE BOLT TORQUE: 45-55FT. LBS.
CUSTOMER RESPONSIBILITIES
• Read and observe the safety rules.
• Follow a regular schedule in maintaining, caring for
and using your tractor.
• Follow the instructions under “Maintenance” and “Stor age” sec tions of this own er’s manual.
WARNING: This tractor is equipped with an internal com bus tion engine and should not be used on or near any
un im proved forest-covered, brush-covered or grass-cov ered
land unless the engine’s exhaust system is equipped with
a spark arrester meeting applicable local or state laws (if
any). If a spark arrester is used, it should be maintained
in effective working order by the operator.
A spark arrester for the muffl er is available through your
nearest authorized service center/depar tment (See RE PA IR
PARTS section of this manual).
In the state of California the above is required by law
(Section 4442 of the California Public Resources Code).
Other states may have similar laws. Federal laws apply
on federal lands.
TABLE OF CONTENTS
SAFETY RULES .........................................................2-3
PRODUCT SPECIFICATIONS ....................................... 4
CUSTOMER RESPONSIBILITIES................................. 4
ASSEMBLY .................................................................6-9
OPERATION ........................................................... 10-15
MAINTENANCE SCHEDULE ...................................... 16
MAINTENANCE ..................................................... 16-19
SERVICE AND AD JUST MENTS ............................ 20-25
STORAGE ....................................................................26
TROU BLE SHOOT ING ............................................27-28
REPAIR PARTS - TRACTOR ..................................30-45
4
Page 5

UNASSEMBLED PARTS
Steering
Sleeve
(1) Large Flat
Washer
Steering Wheel
Steering
Wheel
Adapter
Steering
Extension
Shaft
Steering
Wheel Insert
(1) Locknut 1/2-20
(2)Flanged
Pins
(1)Front Plate
Assembly
(2) Retainer Springs
(single loop)
Gauge Wheels
(4) Adjusting Bars
(4) Shoulder Bolts
(4) Locknuts 3/8-16
(4) Retainer Springs
(double loop)
(4) Clevis Pins
Mower
(5) Retainer Springs
(double loop)
(4) Wheels
(4) Washers
3/8 x 3/4 x 14 Ga.
(1) Hex Bolt 1/4-28 x 1-1/4
Seat
(1) Washer
17/32 x 1-3/16 x 12 Gauge
(1) Knob
(1) Locknut 1/4-28
Nose Roller
Rod
(2) Hex Bolts
5/16 x 18 x 1
Keys
(2) Keys
(1) Oil Drain Tube
For Future Use
Retainer
Spring
(2) Locknuts
5/16-18
Nose Roller
Brackets
Slope Sheet
5
Page 6

ASSEMBLY
Your new tractor has been assembled at the factory with exception of those parts left unassembled for shipping purposes.
To ensure safe and proper operation of your tractor all parts and hardware you assemble must be tightened securely. Use
the correct tools as necessary to insure proper tightness.
TOOLS REQUIRED FOR ASSEMBLY
A socket wrench set will make assembly easier. Stan dard
wrench sizes are listed.
STEER ING
WHEEL INSERT
1/2 HEX NUT
(1) Tire pressure gauge
(2) 3/4" wrenches (1) Utility knife
(2) 7/16" wrenches (1) 3/4" socket w/drive ratch et
(1) Pliers
When right or left hand is mentioned in this man ual, it means
when you are in the operating po si tion (seated be hind the
steer ing wheel).
TO REMOVE TRACTOR FROM
CAR TON
UNPACK CARTON
• Remove all accessible loose parts and parts cartons
from carton.
• Cut along dotted lines on all four panels of carton.
Remove end panels and lay side panels fl at.
• Remove mower and packing materials.
• Check for any additional loose parts or cartons and
remove.
BEFORE REMOVING TRACTOR FROM
SKID
ATTACH STEERING WHEEL (See Fig. 1)
ASSEMBLE EXTENSION SHAFT AND BOOT
• Slide extension shaft onto lower steering shaft. Align
mount ing holes in extension and lower shafts and install
1/4 hex bolt and lock nut. Tighten securely.
IMPORTANT: TIGHTEN BOLT AND NUT SECURELY TO 10-12
FT. LBS TORQUE.
• Place tabs of steering boot over tab slots in dash and push
down to secure.
INSTALL STEERING WHEEL
• Position front wheels of the tractor so they are pointing straight
forward.
• Remove steering wheel adapter from steering wheel and
slide adapter onto steer ing shaft ex ten sion.
• Position steering wheel so cross bars are hor i zon tal (left to
right) and slide inside boot and onto adapt er.
• Assemble large fl at washer, 1/2 hex nut and tighten se cure ly.
• Snap steering wheel insert into center of steer ing wheel.
• Remove protective materials from tractor hood and grill.
IMPORTANT: CHECK FOR AND RE MOVE ANY STA PLES
IN SKID THAT MAY PUNC TURE TIRES WHERE TRACTOR
IS TO ROLL OFF SKID.
LARGE FLAT
WASHER
STEERING
STEER ING
BOOT
ADAPTER
1/4 LOCKNUT
LOWER
STEERING
SHAFT
WHEEL
TABS
EXTENSION
SHAFT
1/4 HEX BOLT
TAB
SLOTS
FIG. 1
HOW TO SET UP YOUR TRACTOR
CHECK BATTERY (See Fig. 2)
• Lift hood to raised position.
• If this battery is put into service after month and year
indicated on label (label located between terminals)
charge battery for minimum of one hour at 6-10 amps.
(See "BATTERY" in Maintenance section of this man u al
for charg ing instructions).
LABEL
FIG. 2
6
Page 7

ASSEMBLY
INSTALL SEAT (See Fig. 3)
Adjust seat before tightening adjustment knob.
• Remove adjustment knob and fl at washer securing
seat to cardboard packing and set aside for assembly
of seat to tractor.
• Pivot seat upward and remove from the cardboard packing. Remove the cardboard packing and discard.
• Place seat on seat pan so head of shoulder bolt is
positioned over large slotted hole in pan.
• Push down on seat to engage shoulder bolt in slot and
pull seat towards rear of tractor.
• Pivot seat and pan forward and assemble adjustment
knob and fl at washer loosely. Do not tighten.
• Lower seat into operating position and sit on seat.
• Slide seat until a comfortable position is reached
which allows you to press clutch/brake pedal all the
way down.
• Get off seat without moving its ad just ed position.
• Raise seat and tighten adjustment knob securely.
SEAT
SEAT PAN
SHOULDER
BOLT
FLAT WASHER
TO DRIVE TRAC TOR OFF SKID (See Op er a tion section for location and function of
con trols)
WARNING: Before star t ing, read, un der stand and fol low
all in struc tions in the Op er a tion section of this man u al. Be
sure tractor is in a well-ventilated area. Be sure the area in
front of tractor is clear of other peo ple and objects.
• Be sure all the above assembly steps have been completed.
• Check engine oil level and fi ll fuel tank with gasoline.
• Place freewheel control in "trans mis sion en gaged"
po si tion (see "TO TRANSPORT" in Op er a tion section
of this manual).
• Sit on seat in operating position, depress clutch/brake
pedal and set the parking brake.
• Place motion control lever in neutral (N) position.
• Press lift lever plunger and raise attachment lift lever
to its highest position.
• Start the engine. After engine has star ted, move throttle
control to idle position.
• Release parking brake.
• Slowly move the mo tion control lever for ward and slowly
drive tractor off skid.
• Apply brake to stop trac tor, set park ing brake and place
motion con trol lever in neutral po si tion.
• Turn ignition key to "STOP" position.
Continue with the in struc tions that follow.
TO ATTACH NOSE ROLLER (See Fig. 4)
• Assemble brackets "A" and "B" to the inside of mower
mounting brack ets as shown. Tighten securely.
NOTE: Be sure bracket tabs are po si tioned in tab holes
in mower brackets.
• Position nose roller between brackets and install rod
and retainer spring.
LOCK
NUT
HEX
BOLT
ROD
ADJUSTMENT
KNOB
FIG. 3
Note: You may now roll or drive your tractor off the skid.
Follow the ap pro pri ate instruction below to remove the
tractor from the skid
.
TO ROLL TRACTOR OFF SKID (See Op er a tion section for location and function of
con trols)
• Press lift lever plunger and raise attachment lift lever
to its highest po si tion.
• Release parking brake by de press ing clutch/brake
ped al.
• Place freewheel control in "trans mis sion dis en gaged
position" (See “TO TRANS PORT” in the Op er a tion
section of this manual).
• Roll tractor forward off skid.
"B"
TAB
HOLE
"A"
BRACKET
RETAINER SPRING
BRACKET
NOSE
ROLLER
FIG. 4
ASSEMBLE GAUGE WHEELS TO MOWER
DECK (See Fig. 5)
The gauge wheels are designed to keep the mower deck
in proper position when operating mower. Be sure they
are prop er ly adjusted to ensure optimum mower per for mance.
• Slide gauge wheel bar down into bracket channel, Be
sure that gauge wheel bar aligning holes are on top.
As sem ble gauge wheels as shown using shoulder bolts,
3/8 washers and 3/8-16 center locknuts and tighten
7
securely.
Page 8

ASSEMBLY
• For ease of mower to tractor assembly, raise gauge
wheels to highest position and retain with clevis pins
and spring retainers.
• Adjust gauge wheels before operating mower. See “TO
ADJUST GAUGE WHEELS” in the Operation sec tion
of this manual.
RETAINER SPRING
PIN
AD JUST ING
SHOULDER
BOLT
GAUGE
WHEEL
3/8 WASH ER
BAR
3/8-16 CENTER
LOCKNUT
FIG. 5
INSTALL MOWER AND DRIVE BELT (See
Figs. 6 and 7)
Be sure tractor is on level surface and mower suspension
arms are raised with attachment lift control. Engage park ing brake.
• Cut and remove ties securing anti-sway bar and belts.
Swing anti-sway bar to left side of mower deck.
• Slide mower under tractor with defl ector shield to right
side of tractor.
IMPORTANT: Check belt for proper routing in all mower
pulley grooves.
• If equipped, turn height ad just ment knob coun ter clock wise until it stops.
• Lower mower linkage with attachment lift control.
• Be sure belt tension rod is in dis en gaged position.
• Install belt into electric clutch pulley groove.
• Place the suspension arms on outward pointing deck
pins. Retain with double loop re tain er spring with loops
up as shown.
• Install front plate assembly to tractor suspension
brack ets and retain with single loop retainer springs
as shown.
• Position front plate assembly between front mower
brackets. Raise deck and plate assembly to align holes
and insert fl anged pins. Secure pins with double loop
retainer springs between the plate assembly and mower
brackets.
NOTE: To assist in locating hole in fl anged pin, the hole in
pin is inline with notch on head of pin.If necessary, move
mower side-to-side to give space between plate and mower
brackets.
IMPORTANT: Check belt for proper routing in all mower
pulley grooves. Engage belt tension rod by pushing rod
into locking bracket.
• Engage belt tension rod by pushing rod into locking
bracket.
CAUTION: Belt tension rod is spring
loaded. Have a tight grip on rod and
engage slowly.
• Connect anti-sway bar to chassis bracket under left
foot rest and retain with double loop retainer spring.
• If equipped, turn height adjustment knob clock wise to
remove slack from mower sus pen sion.
• Raise deck to highest position.
• Adjust gauge wheels before op er at ing mower as shown
in the Operation section of this manual.
BELT TENSION ROD
(DISENGAGED POSITION)
CHASSIS
BRACKET
GAUGE
WHEEL
DOUBLE LOOP
RETAINER SPRING
USE PLIERS FOR
RETAINER SPRINGS
LOOP UP
LOCK BRACKET
ANTI-SWAY
BAR
SUSPENSION
ARMS
DOUBLE LOOP RETAINER
SPRING (OUTWARD POINTING DECK PINS)
FIG. 6
8
ELECTRIC
CLUTCH PULLEY
FRONT
MOWER
BRACKET
FRONT SUS PEN SION
BRACKETS
DOUBLE LOOP
RE TA IN ER
SPRING
FLANGED PIN
FRONT
PLATE
AS SEM BLY
SINGLE
LOOP
RETAINER
SPRINGS
DE FLEC TOR
SHIELD
Page 9

ASSEMBLY
CHECK TIRE PRESSURE
The tires on your tractor were overinfl ated at the factory
for shipping purposes. Correct tire pressure is important
for best cutting performance.
• Reduce tire pressure to PSI shown in “PRODUCT
SPEC I FI CA TIONS” section of this manual.
CHECK MOWER LEV EL NESS
For best cutting results, mower should be properly leveled.
See “TO LEVEL MOWER HOUSING” in the Service and
Adjustments section of this manual.
CHECK FOR PROPER POSITION OF ALL
BELTS
See the fi gures that are shown for replacing motion, mower
drive, and mower blade drive belts in the Service and Adjustments section of this manual. Verify that the belts are
routed correctly.
CHECK BRAKE SYSTEM
After you learn how to operate your tractor, check to see that
the brake is properly adjusted. See “TO ADJUST BRAKE”
in the Service and Adjustments section of this manual.
✓
CHECKLIST
BEFORE YOU OPERATE AND ENJOY YOUR NEW TRAC TOR, WE WISH TO ASSURE THAT YOU RECEIVE THE
BEST PER FOR MANCE AND SATISFACTION FROM THIS
QUALITY PROD UCT.
PLEASE REVIEW THE FOLLOWING CHECKLIST:
✓ All assembly instructions have been completed.
✓ No remaining loose parts in carton.
✓ Battery is properly prepared and charged. (Minimum
1 hour at 6 amps).
✓ Seat is adjusted comfortably and tightened securely.
✓ All tires are properly infl ated. (For shipping purposes,
the tires were overinfl ated at the factory).
✓ Be sure mower deck is properly leveled side-to-side/
front-to-rear for best cutting results. (Tires must be
properly infl ated for leveling).
✓ Check mower and drive belts. Be sure they are routed
properly around pulleys and inside all belt keepers.
✓ Check wiring. See that all connections are still secure
and wires are properly clamped.
✓ Before driving tractor, be sure freewheel control is in
drive position.
WHILE LEARNING HOW TO USE YOUR TRACTOR, PAY
EX TRA ATTENTION TO THE FOLLOWING IMPORTANT
ITEMS:
✓ Engine oil is at proper level.
✓ Fuel tank is fi lled with fresh, clean, regular unleaded
gas o line.
✓ Become familiar with all controls - their location and
function. Operate them before you start the engine.
✓ Be sure brake system is in safe operating condition.
✓ It is important to purge the transmission before op er -
at ing your tractor for the fi rst time. Follow proper starting and transmission purging instructions (See “TO
START EN GINE” and “PURGE TRANSMISSION” in
the Op er a tion section of this manual).
9
Page 10

OPERATION
These symbols may appear on your tractor or in literature supplied with the product. Learn and understand their meaning.
REVERSE
ENGINE OFF
OVER TEMP
LIGHT
ATTACHMENT
CLUTCH ENGAGED
(Automatic Models only)
LIGHTS ON
FREE WHEEL
NEUTRAL
FUEL
ATTACHMENT
CLUTCH DISENGAGED
HIGH
ENGINE ON
OIL PRESSURE
LOW
ENGINE START
BATTERY
DANGER, KEEP HANDS
AND FEET AWAY
CHOKE
PARKING BRAKE
REVERSE
DANGER indicates a hazard which, if not avoided,
will result in death or serious injury.
WARNING indicates a hazard which, if not avoided,
could result in death or serious injury.
CAUTION indicates a hazard which, if not avoided,
might result in minor or moderate injury.
FAST
P
FORWARD
KEEP AREA CLEAR
SLOW
PARKING BRAKE
LOCKED
MOWER HEIGHT
15
SLOPE HAZARDS
(SEE SAFETY RULES SECTION)
IGNITION
PARKING BRAKE
UNLOCKED
MOWER LIFT
15
15
Failure to follow instructions
could result in serious injury or
death. The safety alert symbol
is used to identify safety information about hazards which can
result in death, serious injury
and/or property damage.
CAUTION when used without the alert symbol,
indicates a situation that could result in damage
to the tractor and/or engine.
HOT SURFACES indicates a hazard which,
if not avoided, could result in death, serious injury
and/or property damage.
FIRE indicates a hazard which, if not avoided,
could result in death, serious injury and/or
property damage.
10
Page 11

OPERATION
KNOW YOUR TRACTOR
READ THIS OWNER'S MANUAL AND SAFETY RULES BEFORE OPERATING YOUR TRACTOR
Compare the illustrations with your tractor to familiarize yourself with the locations of various controls and ad just ments.
Save this manual for future reference.
CHOKE
CONTROL
THROTTLE
CONTROL
CLUTCH/BRAKE
PEDAL
HEIGHT AD JUST MENT
KNOB
FREEWHEEL
CONTROL
AMMETER
AT TAC H MENT
CLUTCH SWITCH
IGNITION
SWITCH
LIGHT
SWITCH
POSITION
LIFT LEVER
PLUNGER
ATTACHMENT
LIFT LEVER
HOURMETER
PARKING BRAKE
MOTION
CONTROL
LEVER
Our tractors conform to the safety standards of the American National Standards Institute.
ATTACHMENT CLUTCH SWITCH: Used to engage the
mow er blades, or other attachments mounted to your
tractor.
LIGHT SWITCH POSITION - Turns the headlights on.
THROTTLE CONTROL: Used to control engine speed.
CHOKE CONTROL: Used when starting a cold engine.
FREE WHEEL CONTROL - Disengages transmission for
pushing or slowly towing the tractor with the engine off.
CLUTCH/BRAKE PEDAL - Used for declutching and
brak ing the tractor and starting the engine.
HEIGHT ADJUSTMENT KNOB - Used to adjust the mow er
cutting height.
HOURMETER- Indicates hours of operation.
FIG. 7
AMMETER - Indicates charging (+) or discharging (-) of
battery.
PARKING BRAKE - Locks clutch/brake pedal into the
brake position.
MOTION CONTROL LEVER - Selects the speed and
di rec tion of tractor.
ATTACHMENT LIFT LEVER - Used to raise and lower
the mower deck or other attachments mounted to your
tractor.
LIFT LEVER PLUNGER - Used to release attachment lift
lever when changing its position.
IGNITION SWITCH - Used for starting and stopping the
engine.
11
Page 12

OPERATION
The operation of any tractor can result in foreign objects thrown into the eyes, which can result
in severe eye dam age. Always wear safety glass es or eye shields while operating your tractor or
per form ing any adjustments or repairs. We rec om mend a wide vision safety mask over spectacles
or stan dard safety glasses.
HOW TO USE YOUR TRACTOR
TO SET PARKING BRAKE (See Fig. 8)
Your tractor is equipped with an operator presence sens ing switch. When engine is running, any attempt by the
op er a tor to leave the seat without fi rst setting the parking
brake will shut off the engine.
• Depress clutch/brake pedal into full “BRAKE” position
and hold.
• Place parking brake lever in “ENGAGED” position and
re lease pressure from clutch/brake pedal. Pedal should
re main in “BRAKE” position. Make sure parking brake
will hold tractor secure.
ATTACHMENT CLUTCH LEVER
PULL OUT TO “ENGAGE”
CHOKE
THROTTLE
CONTROL
“BRAKE”
PO SI TION
CLUTCH/BRAKE
PEDAL “DRIVE”
POSITION
HEIGHT
ADJUSTMENT
KNOB
IG NI TION
KEY
“DISENGAGED”
POSITION
FIG. 8
STOPPING (See Fig. 8)
MOWER BLADES -
• To stop mower blades,move attachment clutch switch
to “DIS EN GAGED” po si tion.
GROUND DRIVE -
• To stop ground drive, depress clutch/brake pedal into
full “BRAKE” position..
• Move motion control lever to neutral (N) position.
IMPORTANT: THE MOTION CONTROL LEVER DOES NOT
RETURN TO NEUTRAL (N) POSITION WHEN THE CLUTCH/
BRAKE PEDAL IS DEPRESSED.
ENGINE -
• Move throttle control to slow position.
NOTE: Failure to move throttle control to slow position
and allowing engine to idle before stopping may cause
engine to “backfi re”.
• Turn ignition key to “OFF” position and remove key.
Always remove key when leaving tractor to prevent
un author ized use.
• Never use choke to stop engine.
IMPORTANT: LEAVING THE IGNITION SWITCH IN ANY
POSITION OTHER THAN "OFF" WILL CAUSE THE BATTERY
TO BE DIS CHARGED, (DEAD).
PUSH IN TO
“DISENGAGE”
MOTION
CON TROL
LEVER
PA RK ING BRAKE
“EN GAGED”
PO SI TION
NOTE: Under certain conditions when tractor is standing
idle with the engine running, hot engine exhaust gases
may cause “browning” of grass. To eliminate this
possibility, always stop engine when stopping tractor on
grass areas.
CAUTION: Always stop tractor com plete ly, as described above, before leav ing the operator's position; to empty
grass catcher, etc.
TO USE THROTTLE CONTROL (See Fig. 8)
Always operate engine at full throttle.
• Operating engine at less than full throttle reduces the
battery charging rate.
• Full throttle of fers the best bagging and mower per for mance.
TO USE CHOKE CONTROL (See Fig. 8)
Use choke control whenever you are starting a cold engine.
Do not use to start a warm engine.
• To engage choke control, pull knob out. Slowly push
knob in to disengage.
TO MOVE FORWARD AND BACKWARD (See
Fig. 8)
The direction and speed of movement is controlled by the
motion control lever.
• Start tractor with motion control lever in neutral (N)
position.
• Release parking brake.
• Slowly move motion control lever to desired position.
TO ADJUST MOWER CUTTING HEIGHT (See
Fig. 8)
The cutting height is controlled by turning the height ad just ment knob in desired direction.
• Turn knob clockwise ( ) to raise cutting height.
• Turn knob counterclockwise (
) to lower cutting
height.
The cutting height range is approximately 1-1/2" to 4". The
heights are measured from the ground to the blade tip with
the engine not running. These heights are ap proxi mate and
may vary depending upon soil conditions, height of grass
and types of grass being mowed.
• The average lawn should be cut to approximately 2-1/2
inches during the cool season and to over 3 inches
during hot months. For healthier and better looking
lawns, mow often and after moderate growth.
• For best cutting performance, grass over 6 inches
in height should be mowed twice. Make the fi rst cut
relatively high; the second to desired height.
12
Page 13

OPERATION
TO ADJUST GAUGE WHEELS (See Fig. 9)
Gauge wheels are properly adjusted when they are slightly
off the ground when mower is at the desired cutting height
in operating position. Gauge wheels then keep the deck
in proper position to help prevent scalping in most terrain
conditions.
NOTE:Adjust gauge wheels with tractor on a fl at level
surface.
• Adjust mower to desired cutting height (See “TO AD JUST MOWER CUT TING HEIGHT” in the Operation
sec tion of this manual).
• Remove retainer spring and clevis pin which secure
each gauge wheel bar.
• Lower gauge wheels to ground. Raise gauge wheels
slightly to align holes in bracket and gauge wheel bar
and insert clevis pin. Gauge wheels should be slightly
off the ground.
• Replace retainer spring into clevis pin.
• Be sure all gauge wheels are in the same setting.
IMPORTANT: BE SURE TO READJUST GAUGE WHEELS IF YOU
CHANGE THE CUTTING HEIGHT OF THE MOWER DECK.
RETAINER
SPRING
CLEVIS
PIN
FIG. 9
TO OPERATE MOWER (See Fig. 10)
Your tractor is equipped with an operator presence sensing
switch. Any attempt by the operator to leave the seat with
the engine running and the attachment clutch engaged will
shut off the engine.
• Select desired height of cut.
• Lower mower with attachment lift control.
• Start mower blades by engaging attachment clutch
control.
• TO STOP MOWER BLADES - disengage attachment
clutch con trol.
AT TAC H MENT CLUTCH
SWITCH PULL OUT TO
"ENGAGE"
PUSH IN TO
"DISENGAGE"
AT TAC H MENT
LIFT LEVER
HIGH
POSITION
LOW
POSITION
DE FLEC TOR
SHIELD
FIG. 10
TO OPERATE ON HILLS
WARNING: Do not drive up or down
hills with slopes greater than 15° and
do not drive across any slope.
• Choose the slowest speed before starting up or down
hills.
• Avoid stopping or changing speed on hills.
• If slowing is necessary, move throttle control lever to
slower position.
• If stopping is absolutely necessary, push clutch/brake
pedal quickly to brake position and engage parking
brake.
• Move motion control lever to neutral (N) position.
IMPORTANT: THE MOTION CONTROL LEVER DOES NOT
RETURN TO NEUTRAL (N) POSITION WHEN THE CLUTCH/
BRAKE PED AL IS DEPRESSED.
• To restart movement, slowly release parking brake and
clutch/brake pedal.
• Slowly move motion control lever to slowest setting.
• Make all turns slowly.
TO TRANSPORT (See Figs. 7 and 11)
When pushing or towing your tractor, be sure to disengage
transmission by placing freewheel control in free wheel ing
po si tion. Free wheel control is located at the rear drawbar
of tractor.
• Raise attachment lift to highest position with at tach ment
lift control.
• Pull freewheel control out and down into the slot and
release so it is held in the disengaged position.
• Do not push or tow tractor at more than two (2)
MPH.
• To reengage transmission, reverse above procedure.
NOTE: To protect hood from damage when transporting
your tractor on a truck or a trailer, be sure hood is closed
and secured to tractor. Use an appropriate means of tying
hood to tractor (rope, cord, etc.).
CAUTION: Do not operate the mower
without either the en tire grass catcher,
on mowers so equipped, or the de fl ec tor
shield in place.
13
FIG. 11
Page 14

OPERATION
TOWING CARTS AND OTHER AT TACH MENTS
Tow only the attachments that are recommended by and
comply with specifi cations of the manufacturer of your tractor. Use common sense when towing. Too heavy of a load,
while on a slope, is dangerous. Tires can lose traction with
the ground and cause you to lose control of your tractor.
BEFORE STARTING THE ENGINE
CHECK ENGINE OIL LEVEL
• The engine in your tractor has been shipped, from the
factory, already fi lled with sum mer weight oil.
• Check engine oil with tractor on level ground.
• Remove oil fi ll cap/dipstick and wipe clean, reinsert the
dipstick and screw cap tight, wait for a few seconds,
remove and read oil level. If necessary, add oil until
“FULL” mark on dipstick is reached. Do not overfi ll.
• For cold weather operation you should change oil for
easier starting (See “OIL VISCOSITY CHART” in the
Maintenance sec tion of this manual).
• To change engine oil, see the Maintenance section in
this manual.
ADD GASOLINE
• Fill fuel tank to bottom of fi ller neck. Do not overfi ll.
Use fresh, clean, regular un lead ed gasoline with a
minimum of 87 octane. (Use of leaded gasoline will
increase carbon and lead oxide deposits and reduce
valve life). Do not mix oil with gasoline. Purchase fuel
in quan ti ties that can be used within 30 days to assure
fuel fresh ness.
CAUTION: Wipe off any spilled oil or
fuel. Do not store, spill or use gasoline
near an open fl ame.
IMPORTANT: When operating in temperatures
below32°F(0°C), use fresh, clean winter grade gas o line
to help insure good cold weather start ing.
CAUTION: Alcohol blended fuels (called
gasohol or using ethanol or methanol) can attract moisture which leads to sep a ra tion and
for ma tion of acids during storage. Acidic gas
can damage the fuel system of an engine while
in storage. To avoid engine problems, the fuel
sys tem should be emptied before stor age of
30 days or longer. Drain the gas tank, start
the engine and let it run until the fuel lines
and carburetor are empty. Use fresh fuel next
season. See Storage In struc tions for additional
information. Never use engine or carburetor
cleaner products in the fuel tank or permanent
damage may occur.
TO START ENGINE (See Fig. 8)
When starting the engine for the fi rst time or if the engine
has run out of fuel, it will take extra cranking time to move
fuel from the tank to the engine.
• Be sure freewheel control is in the transmission en gaged
position.
• Sit on seat in operating position, depress clutch/brake
pedal and set parking brake.
• Place motion control lever in neutral (N) position.
• Move attachment clutch to “DISENGAGED” position.
• Move throttle control to fast position
• Pull choke control out for a cold engine start attempt.
For a warm engine start attempt the choke control may
not be needed.
NOTE: Before starting, read the warm and cold starting
procedures below.
• Insert key into ignition and turn key clockwise to
“START” position and release key as soon as engine
starts. Do not run starter continuously for more than
fi fteen sec onds per minute. If the engine does not start
after several attempts, push choke control in, wait a
few minutes and try again. If engine still does not start,
pull the choke control out and retry.
WARM WEATHER STARTING (50° F and above)
• When engine starts, slowly push choke control in until
the engine begins to run smoothly. If the engine starts
to run roughly, pull the choke control out slightly for a
few seconds and then continue to push the control in
slowly.
• The attachments and ground drive can now be used. If
the engine does not accept the load, restart the engine
and allow it to warm up for one minute using the choke
as described above.
COLD WEATHER STARTING (50° F and below)
• When engine starts, slowly push choke control in until
the engine begins to run smoothly. Continue to push
the choke control in small steps allowing the engine to
accept small changes in speed and load, until the choke
control is fully in. If the engine starts to run roughly, pull
the choke control out slightly for a few seconds and
then continue to push the control in slowly. This may
require an engine warm-up period from several sec onds
to several minutes, depending on the temperature.
AUTOMATIC TRANSMISSION WARM UP
• Before driving the unit in cold weather, the trans mis sion
should be warmed up as follows:
• Be sure the tractor is on level ground.
• Place the motion control lever in neu tral.
Re lease the parking brake and let the clutch/
brake slowly return to operating po si tion.
• Allow one minute for transmission to warm up. This
can be done during the engine warm up period.
• The attachments can be used during the engine warmup period after the transmission has been warmed
up and may require the choke con trol be pulled out
slight ly.
NOTE: If at a high altitude (above 3000 feet) or in cold
temperatures (below 32 F) the carburetor fuel mixture may
need to be adjusted for best engine performance. See “TO
ADJUST CARBURETOR” in the Service and Adjustments
section of this manual.
14
Page 15

OPERATION
PURGE TRANSMISSION
CAUTION: Never engage or dis en gage
freewheel lever while the en gine is run ning.
To ensure proper operation and performance, it is rec om mend ed that the transmission be purged before operating
tractor for the fi rst time. This procedure will remove any
trapped air inside the transmission which may have de vel oped during shipping of your tractor.
IMPORTANT: SHOULD YOUR TRANSMISSION REQUIRE
REMOVAL FOR SERVICE OR REPLACEMENT, IT
SHOULD BE PURGED AFTER REINSTALLATION
BEFORE OPERATING THE TRACTOR.
• Place tractor safely on level surface with engine off and
parking brake set.
• Disengage transmission by placing freewheel control
in freewheeling position (See “TO TRANSPORT” in this
section of manual).
• Sitting in the tractor seat, start engine. After the engine is running, move throttle control to slow position.
With motion control lever in neutral (N) position, slowly
disengage clutch/brake pedal.
• Move motion control lever to full forward position and
hold for fi ve (5) seconds. Move lever to full reverse
position and hold for fi ve (5) seconds. Repeat this
procedure three (3) times.
NOTE: During this procedure there will be no movement
of drive wheels. The air is being removed from hydraulic
drive system.
• Move motion control lever to neutral (N) position. Shutoff engine and set parking brake.
• Engage transmission by placing freewheel control in
driving position (See “TO TRANSPORT” in this section
of manual).
• Sitting in the tractor seat, start engine. After the engine
is running, move throttle control to half (1/2) speed.
With motion control lever in neutral (N) position, slowly
disengage clutch/brake pedal.
• Slowly move motion control lever forward, after the
tractor moves approximately fi ve (5) feet, slowly move
motion control lever to reverse position. After the
tractor moves approximately fi ve (5) feet return the
motion control lever to the neutral (N) position. Repeat
this procedure with the motion control lever three (3)
times.
• Your transmission is now purged and now ready for
normal operation.
MOWING TIPS
• Mower should be properly leveled for best mowing performance. See “TO LEVEL MOWER HOUSING” in the
Service and Adjustments section of this manual.
• The left hand side of mower should be used for trim ming.
• Drive so that clippings are discharged onto the area
that has been cut. Have the cut area to the right of the
machine. This will result in a more even dis tri bu tion of
clippings and more uniform cutting.
• When mowing large areas, start by turning to the right so
that clippings will discharge away from shrubs, fences,
driveways, etc. After one or two rounds, mow in the
opposite direction making left hand turns until fi nished
(See Fig. 12).
FIG. 12
• If grass is extremely tall, it should be mowed twice to
reduce load and possible fi re hazard from dried clip pings. Make fi rst cut relatively high; the second to the
desired height.
• Do not mow grass when it is wet. Wet grass will plug
mower and leave undesirable clumps. Allow grass to
dry before mowing.
• Always operate engine at full throttle when mow-
ing to assure better mowing performance and proper
dis charge of material. Regulate ground speed by se lect ing a low enough gear to give the mower cut ting
per for mance as well as the quality of cut desired.
• When operating attachments, select a ground speed
that will suit the terrain and give best performance of
the at tach ment being used.
15
Page 16
g
MAINTENANCE
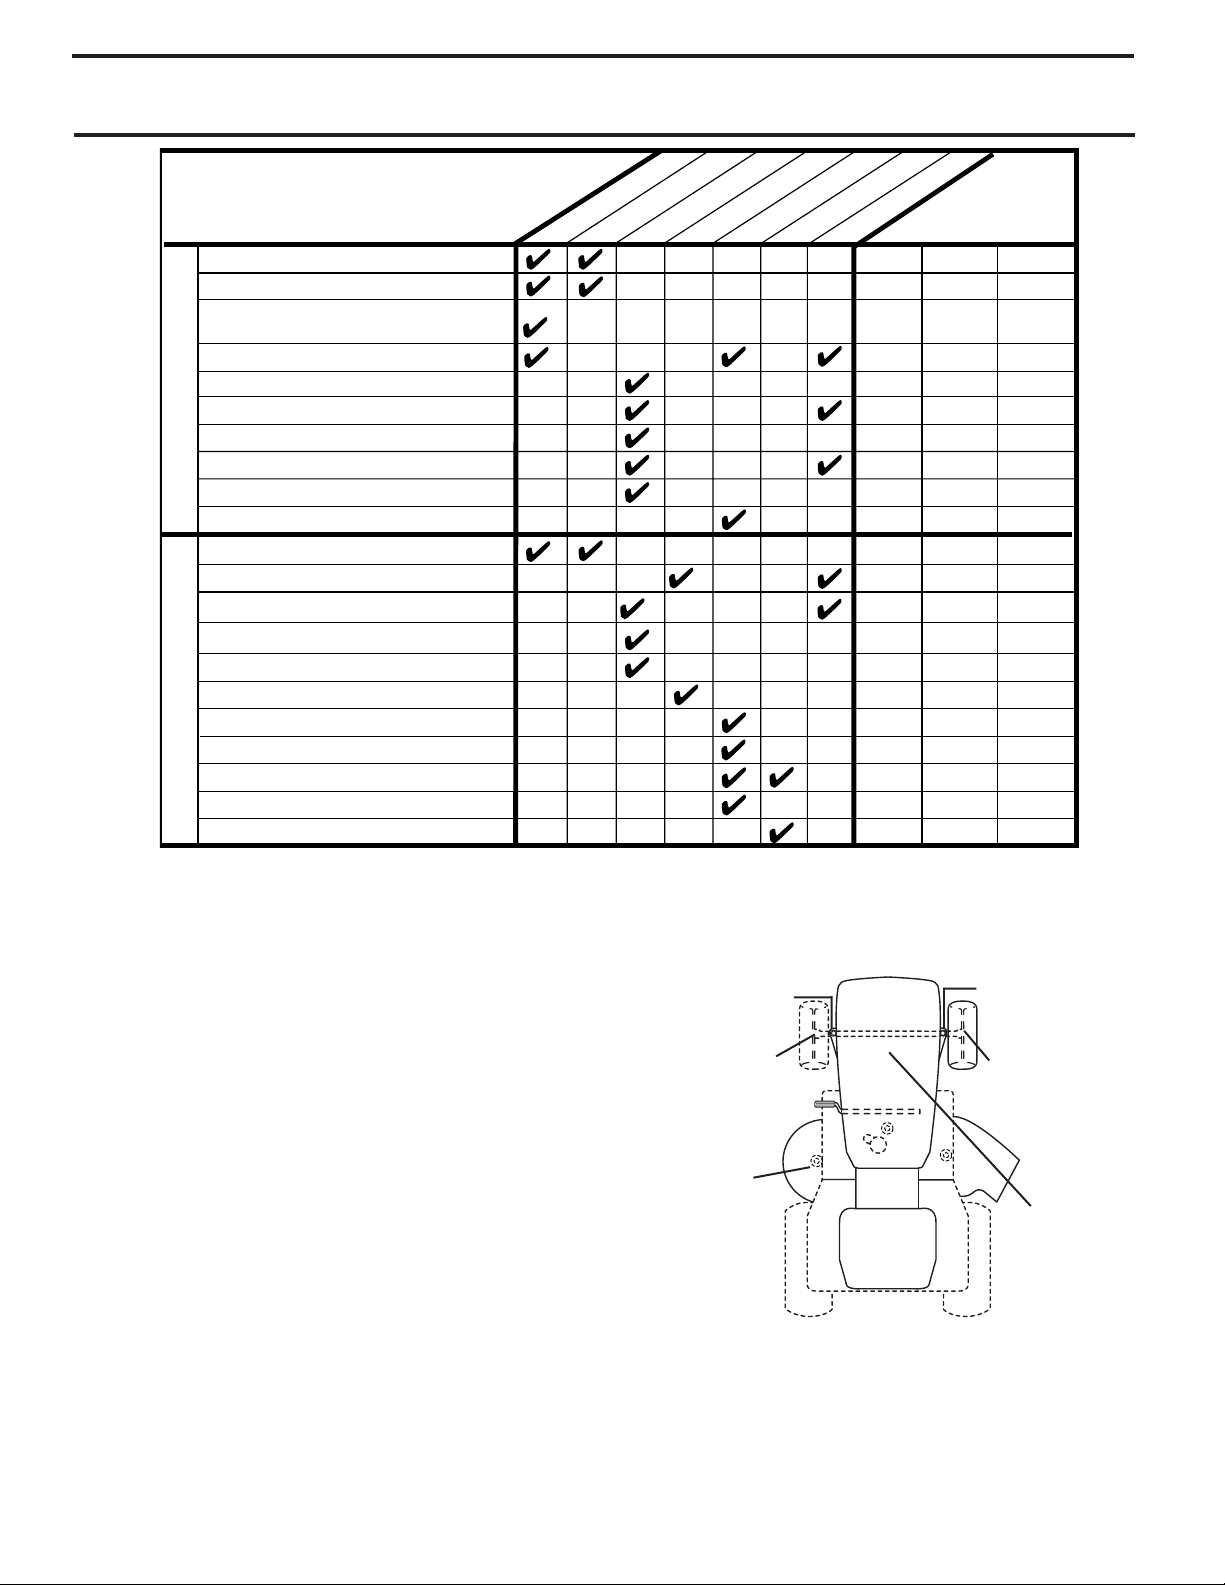
MAINTENANCE SCHEDULE
FILL IN DATES
AS YOU COMPLETE
REGULAR SERVICE
Check Brake Operation
Check Tire Pressure
Check Operator Presence and
Interlock Systems
T
Check for Loose Fasteners
R
A
Sharpen/Replace Mower Blades
C
Lubrication Chart
T
Check Battery Level
0
Clean Battery and Terminals
R
Check Transaxle Cooling
Check V-Belts
Check Engine Oil Level
Change Engine Oil (with oil filter)
Change Engine Oil (without oil filter)
E
Clean Air Filter
N
G
Clean Air Screen
I
Inspect Muffler/Spark Arrester
N
Replace Oil Filter (If equipped)
E
Clean Engine Cooling Fins
Replace Spark Plug
Replace Air Filter Paper Cartridge
Replace Fuel Filter
1 - Change more often when operating under a heavy load or
in high ambient temperatures.
2 - Service more often when operating in dirty or dusty conditions.
E
B
R
O
F
U
H
C
A
E
E
EVERY 8 H
E
3
4
1,2
2
2
E
S
OURS
Y
R
E
V
1,2
3 - Replace blades more often when mowing in sandy soil.
4 - Not required if equipped with maintenance-free battery.
5 - Tighten front axle pivot bolt to 35 ft.-lbs. maximum.
Do not overti
S
R
R
U
U
O
O
H
H
0
5
5
2
R
E
V
E
1
Y
Y
R
E
V
E
E
5
1
,
2
2
2
hten.
S
U
O
H
0
0
Y
R
E
V
S
R
N
O
S
A
E
S
BEFORE STO
E
RAG
SERVICE DATES
GENERAL RECOMMENDATIONS
The warranty on this tractor does not cover items that have
been subjected to operator abuse or negligence. To receive
full value from the warranty, operator must main tain tractor
as instructed in this manual.
Some adjustments will need to be made periodically to
properly maintain your tractor.
All adjustments in the Service and Adjustments section
of this manual should be checked at least once each
season.
• Once a year you should replace the spark plug, clean
or replace air fi lter, and check blades and belts for wear.
A new spark plug and clean air fi lter assure proper airfuel mixture and help your engine run better and last
longer.
BEFORE EACH USE
• Check engine oil level.
• Check brake operation.
• Check tire pressure.
• Check operator presence and
interlock systems for proper operation.
• Check for loose fasteners.
LUBRICATION CHART
➀ SPINDLE ZERK
➀ FRONT WHEEL
BEARING ZERK
➀ MANDREL
ZERKS
➀ General Purpose Grease
➁ Refer to Maintenance “ENGINE” Section
IMPORTANT: DO NOT OIL OR GREASE THE PIVOT POINTS
WHICH HAVE SPECIAL NYLON BEARINGS. VISCOUS
LU BRI CANTS WILL ATTRACT DUST AND DIRT THAT WILL
SHORT EN THE LIFE OF THE SELF-LU BRI CAT ING BEARINGS.
IF YOU FEEL THEY MUST BE LU BRI CAT ED, USE ONLY A DRY,
POW DERED GRAPHITE TYPE LU BRI CANT SPARINGLY.
➀ SPINDLE ZERK
➀ FRONT WHEEL
BEAR ING ZERK
➁ ENGINE
16
Page 17
MAINTENANCE
TRACTOR
Always observe safety rules when performing any main te nance.
BRAKE OPERATION
If tractor requires more than six (6) feet stopping distance
at high speed in highest gear, then brake must be adjusted.
(See “TO ADJUST BRAKE” in the Service and Ad just ments
section of this manual).
TIRES
• Maintain proper air pressure in all tires (See “PROD UCT
SPECIFICATIONS” section of this man ual).
• Keep tires free of gasoline, oil, or insect control chemi cals which can harm rubber.
• Avoid stumps, stones, deep ruts, sharp objects and
other hazards that may cause tire damage.
NOTE: To seal tire punctures and prevent fl at tires due to
slow leaks, tire sealant may be purchased from your
local
parts dealer. Tire sealant also prevents tire dry rot and
corrosion.
OPERATOR PRESENCE SYSTEM
Be sure operator presence and interlock sys tems are work ing properly. If your tractor does not function as described,
repair the problem immediately.
• The engine should not start unless the clutch/brake
pedal is fully depressed and attachement clutch control
is in the disengaged position.
• When the engine is running, any attempt by the op er a tor
to leave the seat without fi rst setting the parking brake
should shut off the engine.
• When the engine is running and the at tach ment clutch
is engaged, any attempt by the operator to leave the
seat should shut off the engine.
• The attachment clutch should never operate unless
the operator is in the seat.
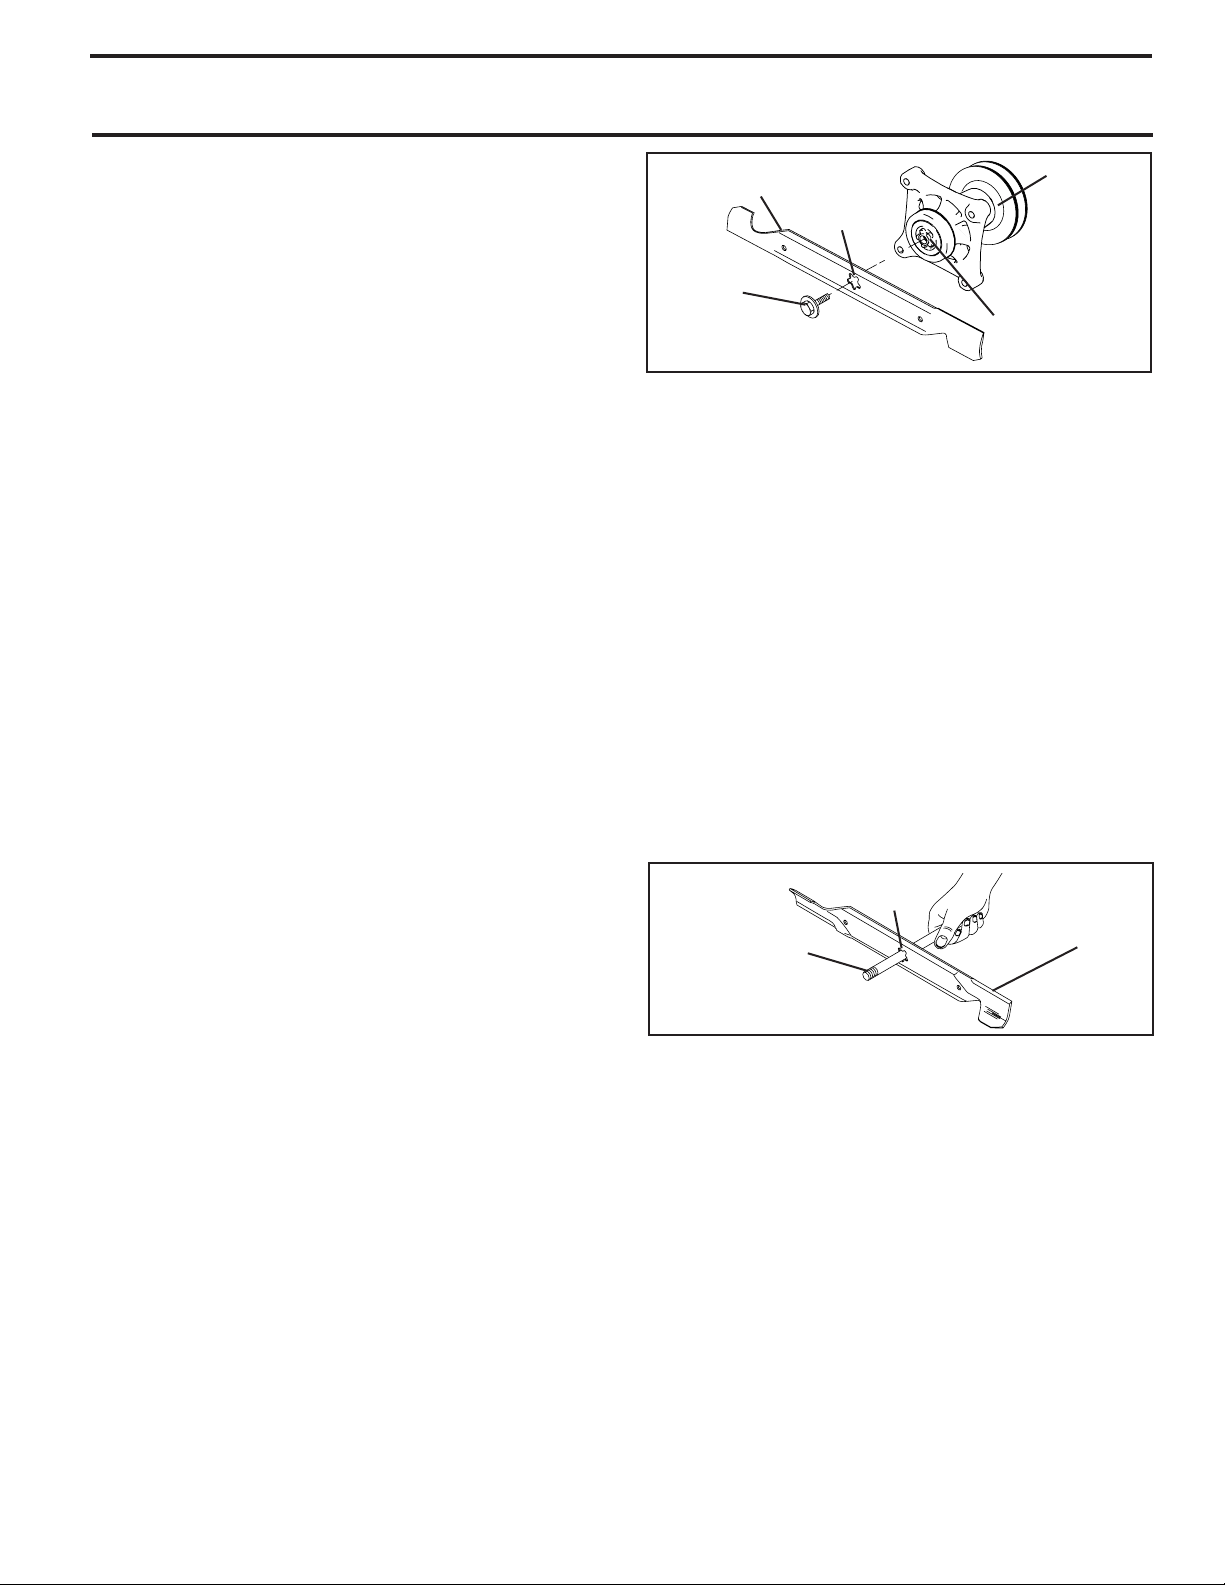
BLADE
CENTER
HOLE
BLADE BOLT
(SPECIAL)
FIG. 13
MANDREL
ASSEMBLY
STAR
TO SHARPEN BLADE (See Fig. 14)
NOTE: We do not recommend sharp en ing blade - but if
you do, be sure the blade is balanced.
Care should be taken to keep the blade balanced. An un-
balanced blade will cause excessive vibration and even tual
damage to mower and engine.
• The blade can be sharpened with a fi le or on a grinding wheel. Do not attempt to sharpen while on the
mower.
• To check blade balance, you will need a 5/8" diameter
steel bolt, pin, or a cone balancer. (When using a
cone balancer, follow the instructions supplied with
bal anc er.)
NOTE: Do not use a nail for balancing blade. The lobes of
the center hole may appear to be centered, but are not.
• Slide blade on to an unthreaded portion of the steel bolt
or pin and hold the bolt or pin parallel with the ground.
If blade is balanced, it should remain in a horizontal
position. If either end of the blade moves downward,
sharpen the heavy end until the blade is balanced.
CENTER
HOLE
5/8" BOLT OR PIN
BLADE
BLADE CARE
For best results mower blades must be kept sharp. Re place
bent or damaged blades.
BLADE REMOVAL (See Fig. 13)
• Raise mower to highest position to allow access to
blades.
NOTE: Protect your hands with gloves and/or wrap blade
with heavy cloth.
• Remove blade bolt by turning counterclockwise.
• Install new or resharpened blade with stamped "THIS
SIDE UP" facing deck and mandrel assembly.
IMPORTANT: TO ENSURE PROPER ASSEMBLY, CENTER
HOLE IN BLADE MUST ALIGN WITH STAR ON MANDREL
ASSEMBLY.
• Install and tighten blade bolt securely (45-55 Ft. Lbs.
torque).
IMPORTANT: SPECIAL BLADE BOLT HEAT TREATED.
FIG. 14
BATTERY
Your tractor has a battery charging system which is suf fi cient
for normal use. However, periodic charging of the battery
with an automotive charger will extend its life.
• Keep battery and terminals clean.
• Keep battery bolts tight.
• Keep small vent holes open.
• Recharge at 6-10 amperes for 1 hour.
NOTE: The original equipment battery on your tractor is
maintenance free. Do not attempt to open or remove caps
or covers. Adding or checking level of electrolyte is not
necessary.
TO CLEAN BATTERY AND TERMINALS
Corrosion and dirt on the battery and terminals can cause
the battery to “leak” power.
• Remove terminal guard.
• Disconnect BLACK battery cable fi rst then RED bat tery cable and remove battery from tractor.
17
Page 18
MAINTENANCE
• Rinse the battery with plain water and dry.
• Clean terminals and battery cable ends with wire brush
until bright.
• Coat terminals with grease or petroleum jelly.
• Reinstall battery (See “REPLACING BATTERY" in
the SERVICE AND ADJUSTMENTS section of this
man u al).
V-BELTS
Check V-belts for deterioration and wear after 100 hours
of operation and replace if necessary. The belts are not
ad just able. Re place belts if they begin to slip from wear.
TRANSAXLE COOLING
The transmission fan and cooling fi ns should be kept clean
to assure proper cooling.
Do not attempt to clean fan or transmission while engine
is running or while the transmission is hot. To prevent pos si ble damage to seals, do not use high pressure water or
steam to clean transaxle.
• Inspect cooling fan to be sure fan blades are intact and
clean.
• Inspect cooling fi ns for dirt, grass clippings and other
materials. To prevent damage to seals, do not use
compressed air or high pressure sprayer to clean cooling fi ns.
TRANSAXLE PUMP FLUID
The transaxle was sealed at the factory and fl uid main te nance is not required for the life of the transaxle. Should
the transaxle ever leak or require servicing, contact your
near est au tho rized ser vice center/department.
ENGINE
See Engine Manual.
LUBRICATION
Only use high quality detergent oil rated with API service
classifi cation SF-SJ. Select the oil’s SAE viscosity grade
according to your expected operating temperature.
SAE VISCOSITY GRADES
SAE 30
5W-30
-20 0 30 40
F
C
-30
TEMPERATURE RANGE ANTICIPATED BEFORE NEXT OIL CHANGE
-20 0
-10
32
60
10
80
20 30 40
FIG. 15
NOTE: Although multi-viscosity oils (5W30, 10W30 etc.)
improve starting in cold weather, these multi-viscosity oils
will result in increased oil consumption when used above
32°F. Check your engine oil level more frequently to avoid
possible engine damage from running low on oil.
Change the oil after every 50 hours of operation or at least
once a year if the tractor is not used for 50 hours in one
year.
Check the crankcase oil level before starting the engine
and after each eight (8) hours of operation. Tighten oil fi ll
cap/dipstick securely each time you check the oil level.
100
TO CHANGE ENGINE OIL (See Figs. 15 and 16)
Determine temperature range expected before oil change.
All oil must meet API service classifi cation SF-SJ.
• Be sure tractor is on level surface.
• Oil will drain more freely when warm.
• Catch oil in a suitable container.
• Remove oil fi ll cap/dipstick. Be careful not to allow dirt
to enter the engine when changing oil.
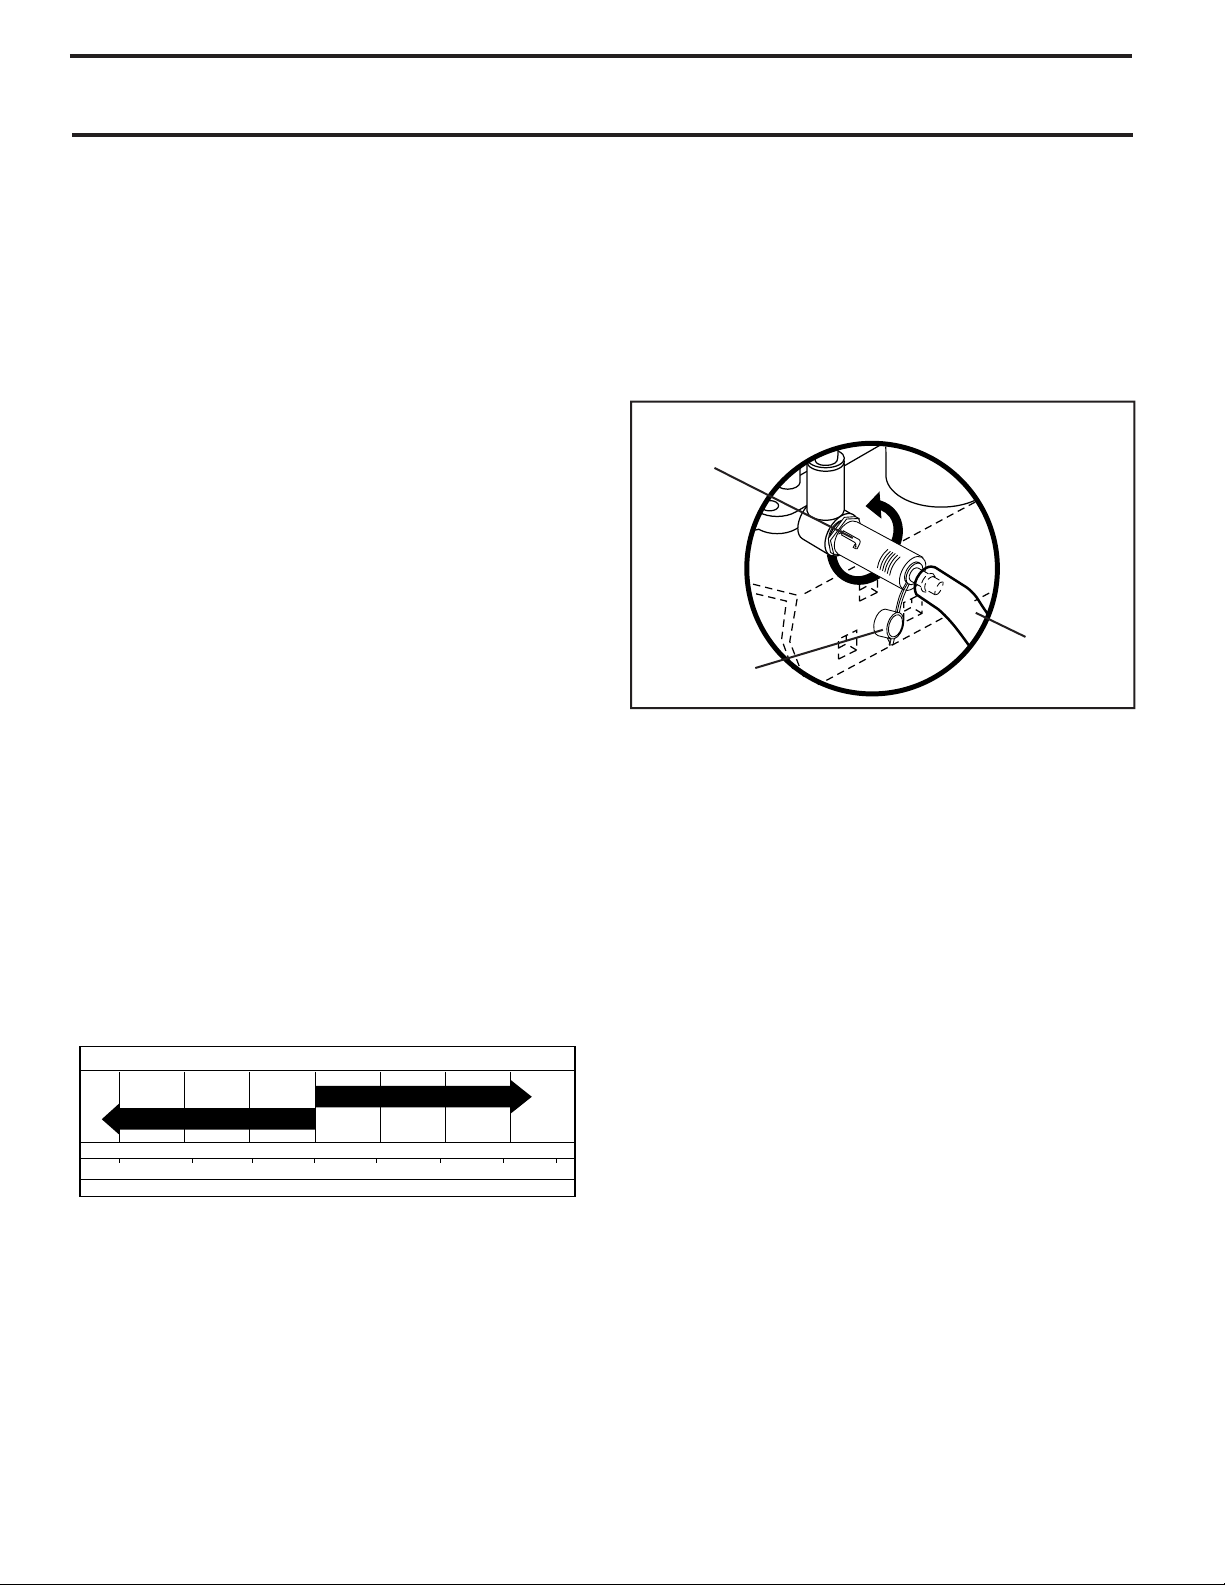
• Remove yellow cap from bottom fi tting of drain valve
and install the drain tube onto the fi tting.
CLOSED AND
LOCKED POSITION
YELLOW CAP
OIL DRAIN VALVE
DRAIN
TUBE
FIG. 16
• Unlock drain valve by pushing inward and turning
coun ter clock wise.
• To open, pull out on the drain valve.
• After oil has drained completely, close and lock the
drain valve by pushing inward and turning clockwise
until the pin is in the locked position as shown.
• Remove the drain tube and replace the cap onto to the
bottom fi tting of the drain valve.
• Refi ll engine with oil through oil fi ll dipstick tube. Pour
slowly. Do not overfi ll. For approximate capacity see
“PRODUCT SPECIFICATIONS” section of this man u al.
• Use gauge on oil fi ll cap/dipstick for checking level.
Insert dipstick into the tube and rest the oil fi ll cap on
the tube. Do not thread the cap onto the tube when
taking reading. Keep oil at “FULL” line on dipstick.
Tighten cap onto the tube securely when fi nished.
CLEAN AIR SCREEN
Air screen must be kept free of dirt and chaff to prevent
engine dam age from overheating. Clean with a wire brush
or compressed air to re move dirt and stubborn dried gum
fi bers. See Engine Manual.
AIR FILTER
Your engine will not run properly using a dir ty air fi lter. Clean
the foam pre-cleaner after every 25 hours of op er a tion or
every season. Service paper cartridge every 100 hours
of operation or every season, whichever occurs fi rst. See
Engine Manual.
18
Page 19
MAINTENANCE
MUFFLER
Inspect and replace corroded muffl er and spark arrester
(if equipped) as it could create a fi re hazard and/or damage.
SPARK PLUGS
Replace spark plugs at the beginning of each mowing
season or after every 100 hours of operation, whichever
occurs fi rst. Spark plug type and gap setting are shown in
“PROD UCT SPECIFICATIONS” section of this manual.
ENGINE OIL FILTER
Replace the engine oil fi lter every season or every other oil
change if the tractor is used more than 100 hours in one
year. See Engine Manual.
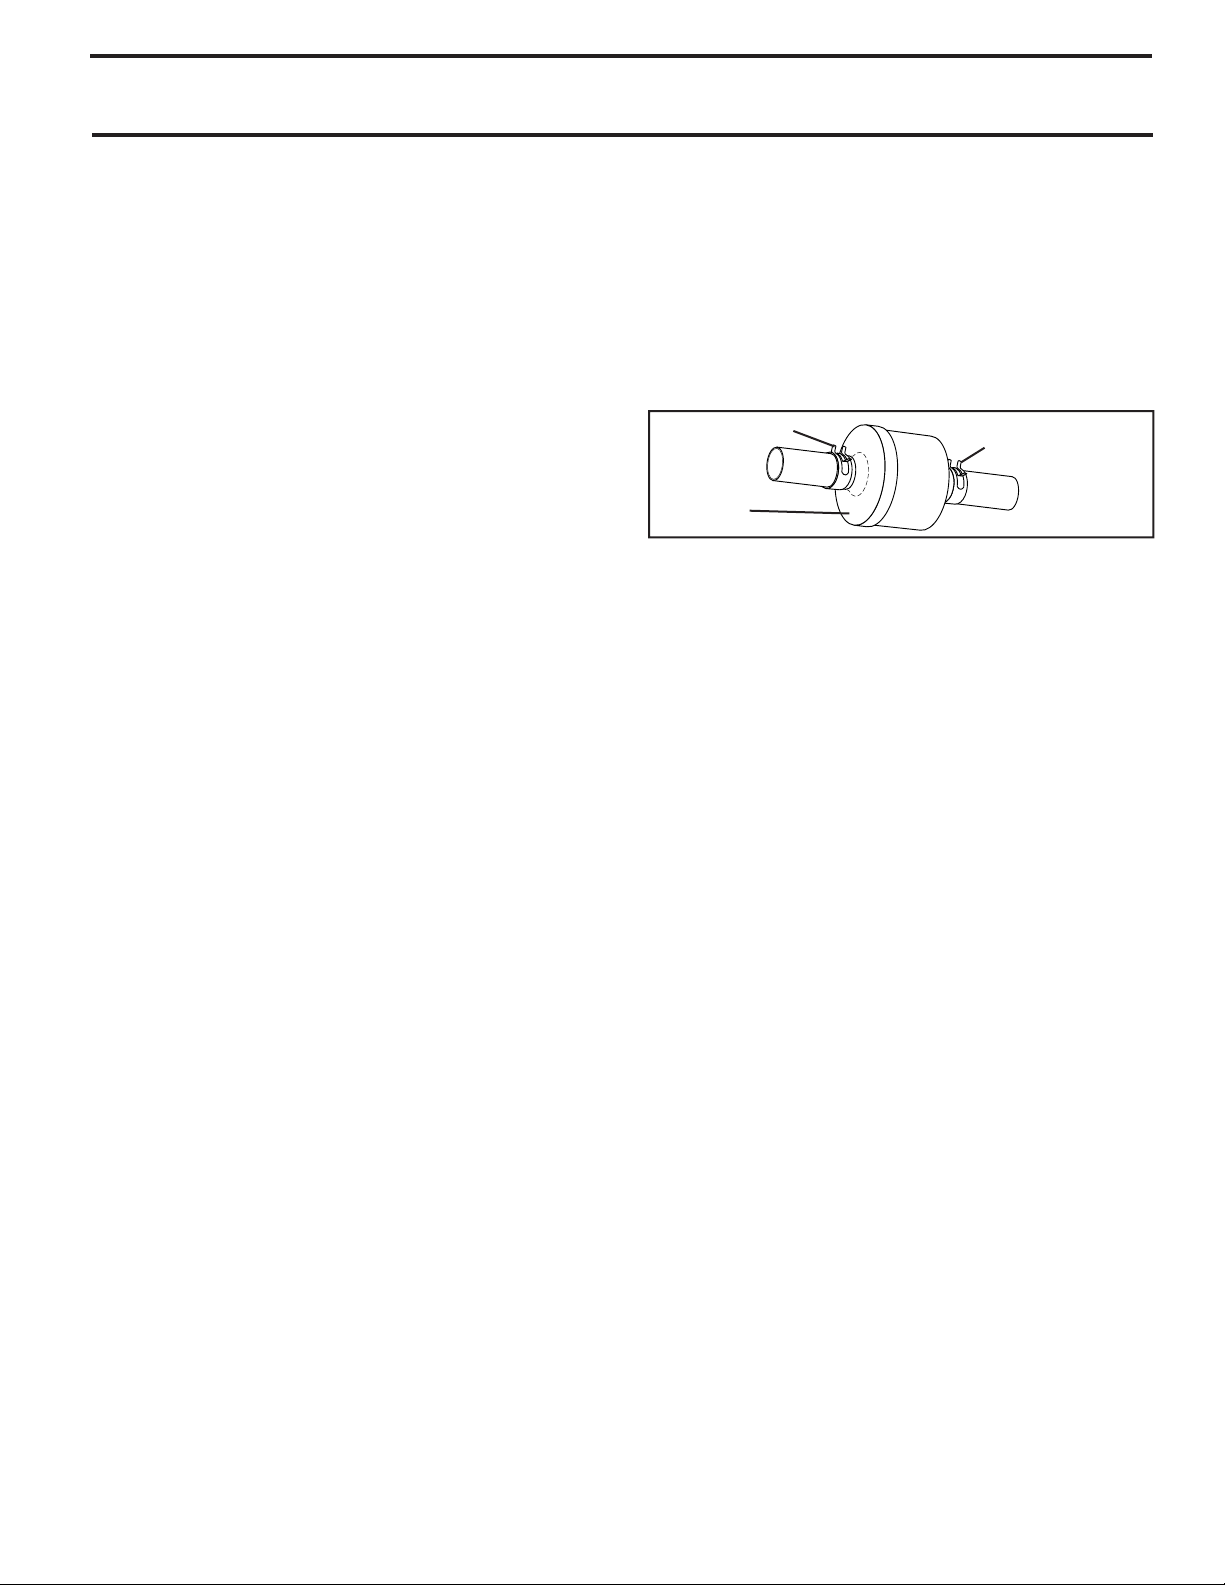
IN-LINE FUEL FIL TER (See Fig. 17)
The fuel fi lter should be re placed once each season. If fuel
fi l ter becomes clogged, ob struct ing fuel fl ow to car bu re tor,
re place ment is re quired.
• With engine cool, remove fi lter and plug fuel line sec tions.
• Place new fuel fi lter in position in fuel line with arrow
point ing towards carburetor.
• Be sure there are no fuel line leaks and clamps are
properly positioned.
• Immediately wipe up any spilled gas o line.
CLAMP
FUEL
FILTER
FIG. 17
CLAMP
CLEANING
• Clean engine, battery, seat, fi nish, etc. of all foreign
matter.
• Keep fi nished surfaces and wheels free of all gasoline,
oil, etc.
• Protect painted surfaces with automotive type wax.
We do not recommend using a garden hose or pressure
washer to clean your tractor unless the engine and transmission are covered to keep water out. Water in engine or
transmission will shorten the useful life of your tractor. Use
compressed air or a leaf blower to remove grass, leaves
and trash from tractor and mower.
19
Page 20
SERVICE AND ADJUSTMENTS
WARNING: TO AVOID SERIOUS INJURY, BEFORE PERFORMING ANY SER VICE OR AD JUST MENTS:
• Depress clutch/brake pedal fully and set parking brake.
• Place motion control lever in neutral (N) position.
• Place attachment clutch in “DISENGAGED” position.
• Turn ignition key to “STOP” and remove key.
• Make sure the blades and all moving parts have completely stopped.
• Disconnect spark plug wire from spark plug and place wire where it cannot come in contact with plug.
TRACTOR
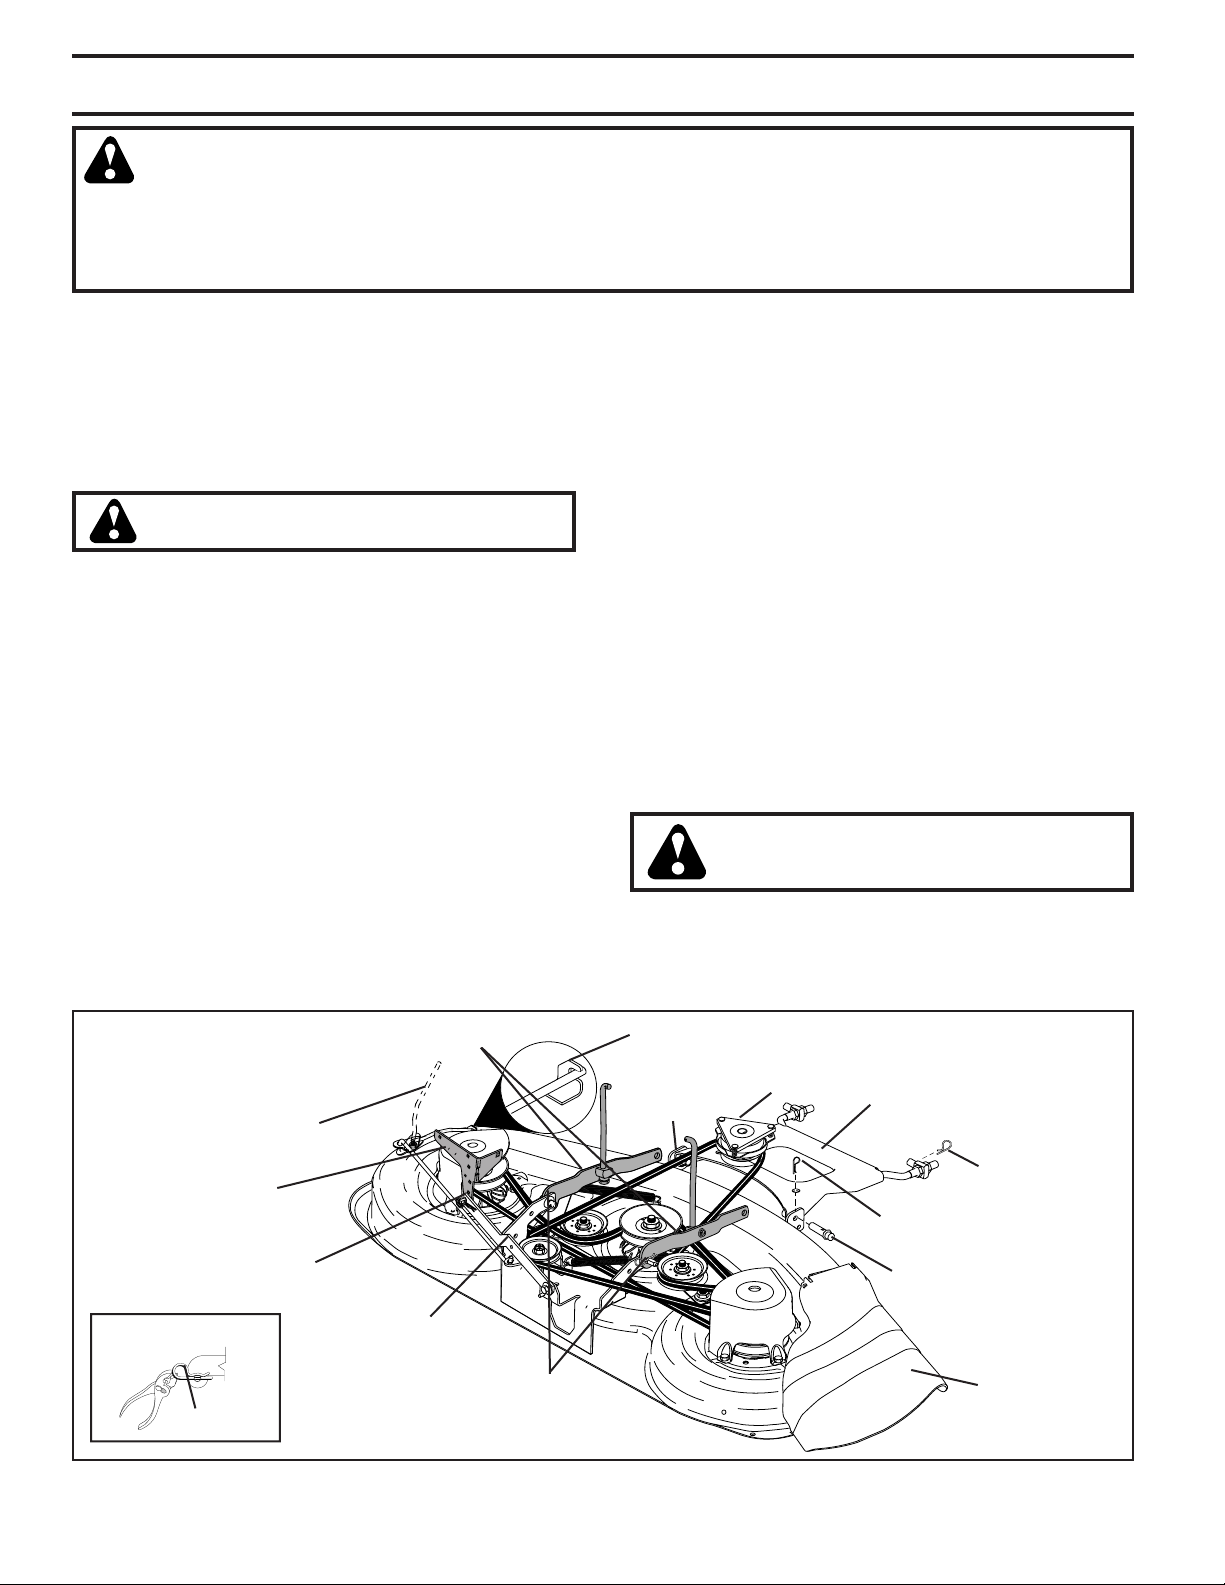
TO REMOVE MOWER (See Fig. 18)
• Place attachment clutch in “DIS EN GAGED” position.
• If equipped, turn height adjustment knob to low est
set ting.
• Lower mower to its lowest position.
• Disengage belt tension rod from lock bracket.
CAUTION: Rod is spring loaded. Have a
tight grip on rod and release slowly.
• Remove retainer spring holding anti-swaybar to chas sis
bracket and dis en gage anti-swaybar from bracket.
• Remove four retainer springs from front plate assembly
and remove plate.
• Remove retainer springs from sus pen sion arms at deck
and dis en gage arms from deck.
• Raise attachment lift to its highest position.
• Slide mower forward and remove belt from electric
clutch pulley.
• Slide mower out from under right side of tractor.
TO INSTALL MOWER
Be sure tractor is on level surface and mower suspension
arms are raised with attachment lift control. Engage park ing brake.
• Swing anti-sway bar to left side of mower deck.
• Slide mower under tractor with defl ector shield to right
side of tractor.
IMPORTANT: CHECK BELT FOR PROPER ROUTING IN ALL
MOWER PULLEY GROOVES.
• If equipped, turn height ad just ment knob coun ter clock wise until it stops.
• Lower mower linkage with attachment lift control.
• Be sure belt tension rod is in dis en gaged position.
• Install belt into electric clutch pulley groove.
• Place the suspension arms on outward pointing deck
pins. Retain with double loop re tain er spring with loops
up as shown.
• Install front plate assembly to tractor suspension
brack ets and retain with single loop retainer springs
as shown.
• Position front plate assembly between front mower
brackets. Raise deck and plate assembly to align holes
and insert fl anged pins. Secure pins with double loop
retainer springs between the plate assembly and mower
brack ets.
NOTE: To assist in locating hole in fl anged pin, the hole in
pin is inline with notch on head of pin. If necessary, move
mower side-to-side to give space between plate and mower
brackets.
IMPORTANT: CHECK BELT FOR PROPER ROUTING IN ALL
MOWER PULLEY GROOVES.
• Engage belt tension rod by pushing rod into locking
bracket.
CAUTION: Belt tension rod is spring
loaded. Have a tight grip on rod and
engage slowly.
• Connect anti-sway bar to chassis bracket under left
foot rest and retain with double loop retainer spring.
• If equipped, turn height adjustment knob clock wise to
remove slack from mower sus pen sion.
• Raise deck to highest position.
BELT TEN SION ROD
(DISENGAGED POSITION)
CHAS SIS BRACK ET
RE TA IN ER SPRING
USE PLIERS FOR
RETAINER SPRINGS
LOOP UP
ANTI-SWAY BAR
SUSPENSION ARMS DOUBLE
LOOP RE TA IN ER SPRINGS
(Out ward pointing deck pins)
SUS PEN SION
ARMS
FIG. 18
20
LOCK
BRACK ET
FRONT
MOWER
BRACKET
ELEC TRIC
CLUTCH
PULLEY
FRONT PLATE
AS SEM BLY
SINGLE LOOP
RE TA IN ER SPRING
DOUBLE LOOP
RETAINER SPRING
FLANGED PIN
DE FLEC TOR
SHIELD
Page 21
SERVICE AND ADJUSTMENTS
TO LEVEL MOWER HOUSING
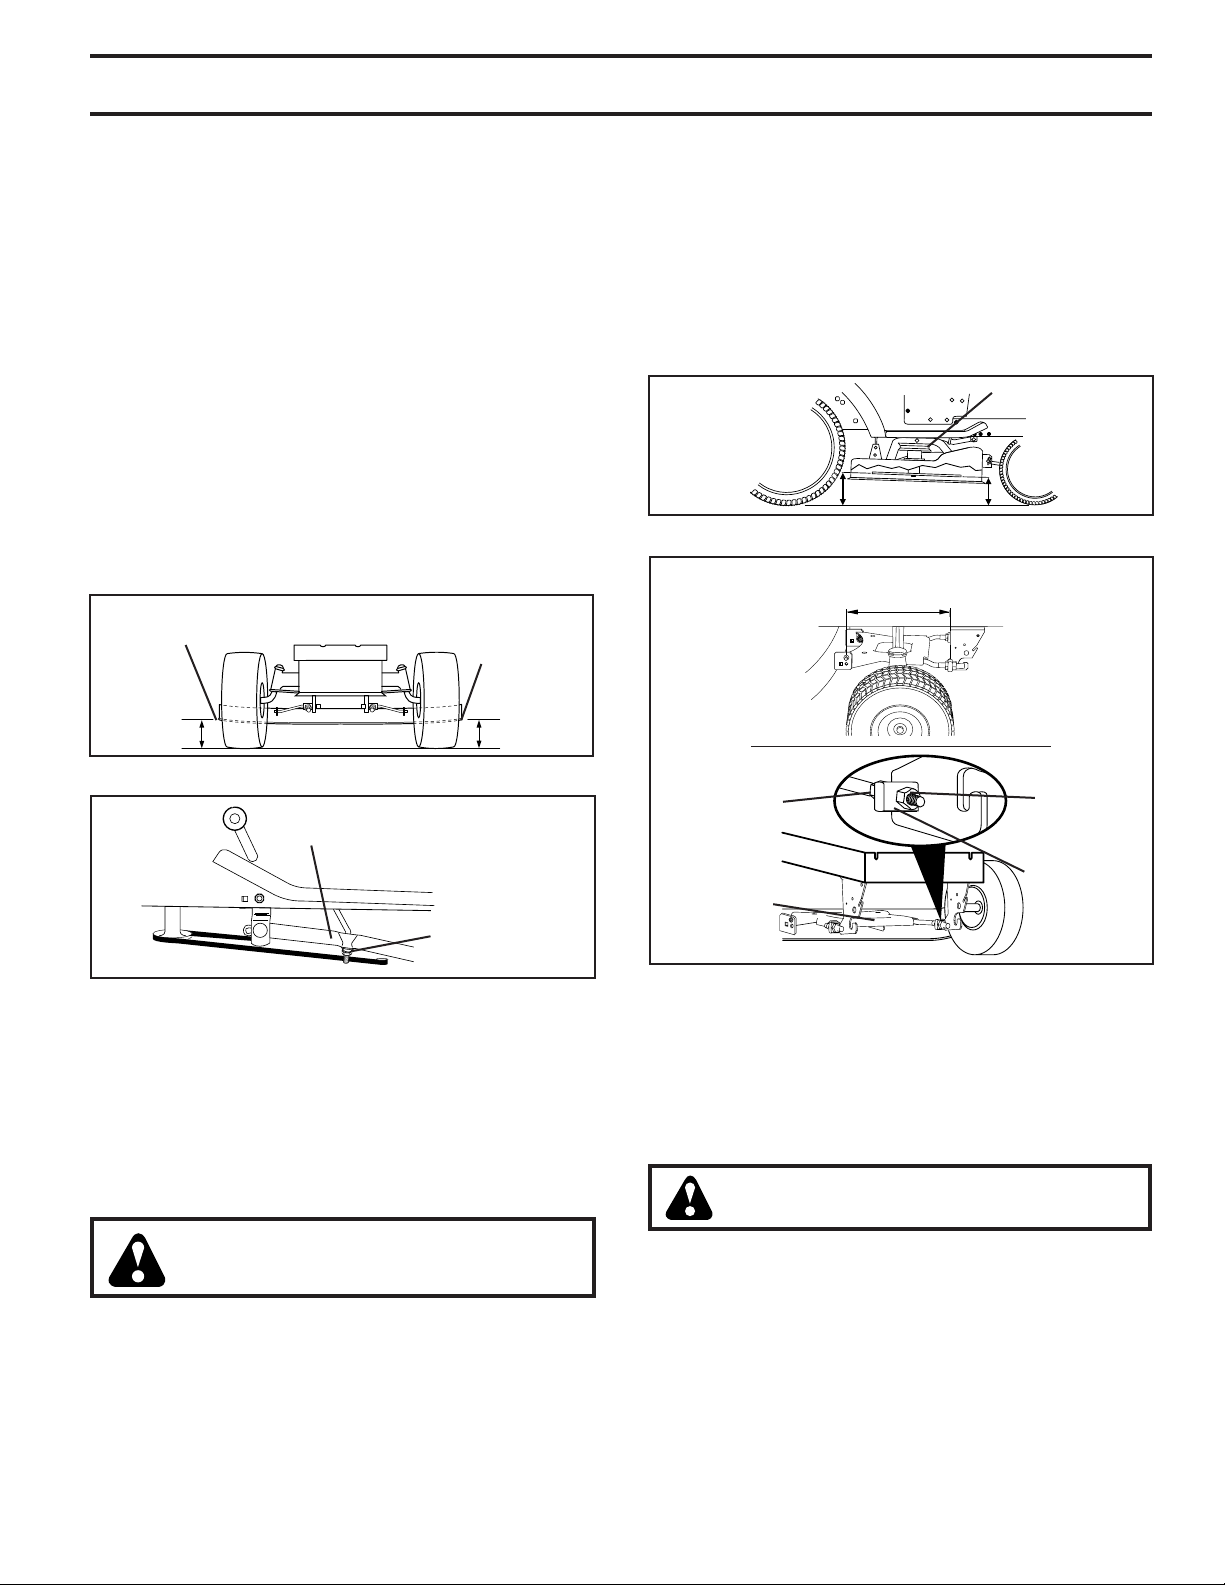
Adjust the mower while tractor is parked on level ground
or driveway. Make sure tires are properly infl ated (See
“PROD UCT SPECIFICATIONS” section of this manual). If
tires are over or underinfl ated, you will not properly adjust
your mower.
SIDE-TO-SIDE ADJUSTMENT (See Figs. 19 and 20)
• Raise mower to its highest position.
• Measure height from bottom edge of mower to ground
level at front cor ners of mower. Distance “A” on both
sides of mower should be the same.
• If adjustment is necessary, make adjustment on one
side of mower only.
• To raise one side of mower, tighten lift link ad just ment
nut on that side.
• To lower one side of mower, loosen lift link ad just ment
nut on that side.
NOTE: Each full turn of adjustment nut will change mower
height about 3/16".
• Recheck measurements after ad just ing.
BOTTOM EDGE
OF MOWER TO
GROUND
BOTTOM EDGE
OF MOWER TO
GROUND
NOTE: Each full turn of nut “C” will change distance. “B”
by approximately 3/16".
• When distance “B” is 1/8" to 1/2" lower at front than rear,
tighten nut “D” against trunnion on both front links.
• To raise front of blade, loosen nut “D” from trunnion on
both front links. Tighten nut “C” on both front links an
equal number of turns. The two front links must remain
equal in length.
• When distance “B” is 1/8" to 1/2" lower at front than rear,
tighten nut “D” against trunnion on both front links.
• Recheck side-to-side adjustment.
BLADE
“B” “B”
FIG. 21
BOTH FRONT PLATE LINKS MUST BE
EQUAL IN LENGTH
A
GROUND LINE
A
FIG. 19
SUSPENSION ARM
LIFT LINK
AD JUST MENT
NUT
FIG. 20
FRONT-TO-BACK ADJUSTMENT (See Figs. 21 and 22)
IMPORTANT: DECK MUST BE LEVEL SIDE-TO-SIDE. IF THE
FOLLOWING FRONT-TO-BACK AD JUST MENT IS NECESSARY,
BE SURE TO ADJUST BOTH FRONT LINKS EQUALLY SO
MOWER WILL STAY LEVEL SIDE-TO-SIDE.
To obtain the best cutting re sults, the mower blades should
be adjusted so the front tip is ap prox i mate ly 1/8" to 1/2"
lower than the rear tip when the mower is in its highest
position.
CAUTION: Blades are sharp. Protect
your hands with gloves and/or wrap
blade with heavy cloth.
Check adjustment on right side of trac tor. Position any blade
so the tip is pointing straight forward. Measure distance "B"
at front and rear tip of the blade.
• Before making any necessary ad just ments, check that
both front plate links are equal in length.
• If links are not equal in length, adjust one link to same
length as other link.
• To lower front of blade, loosen nut “C” on both front
links an equal number of turns.
NUT “D”
FRONT PLATE
AS SEM BLY
NUT “C”
TRUN NION
FIG. 22
TO REPLACE MOWER DRIVE BELT
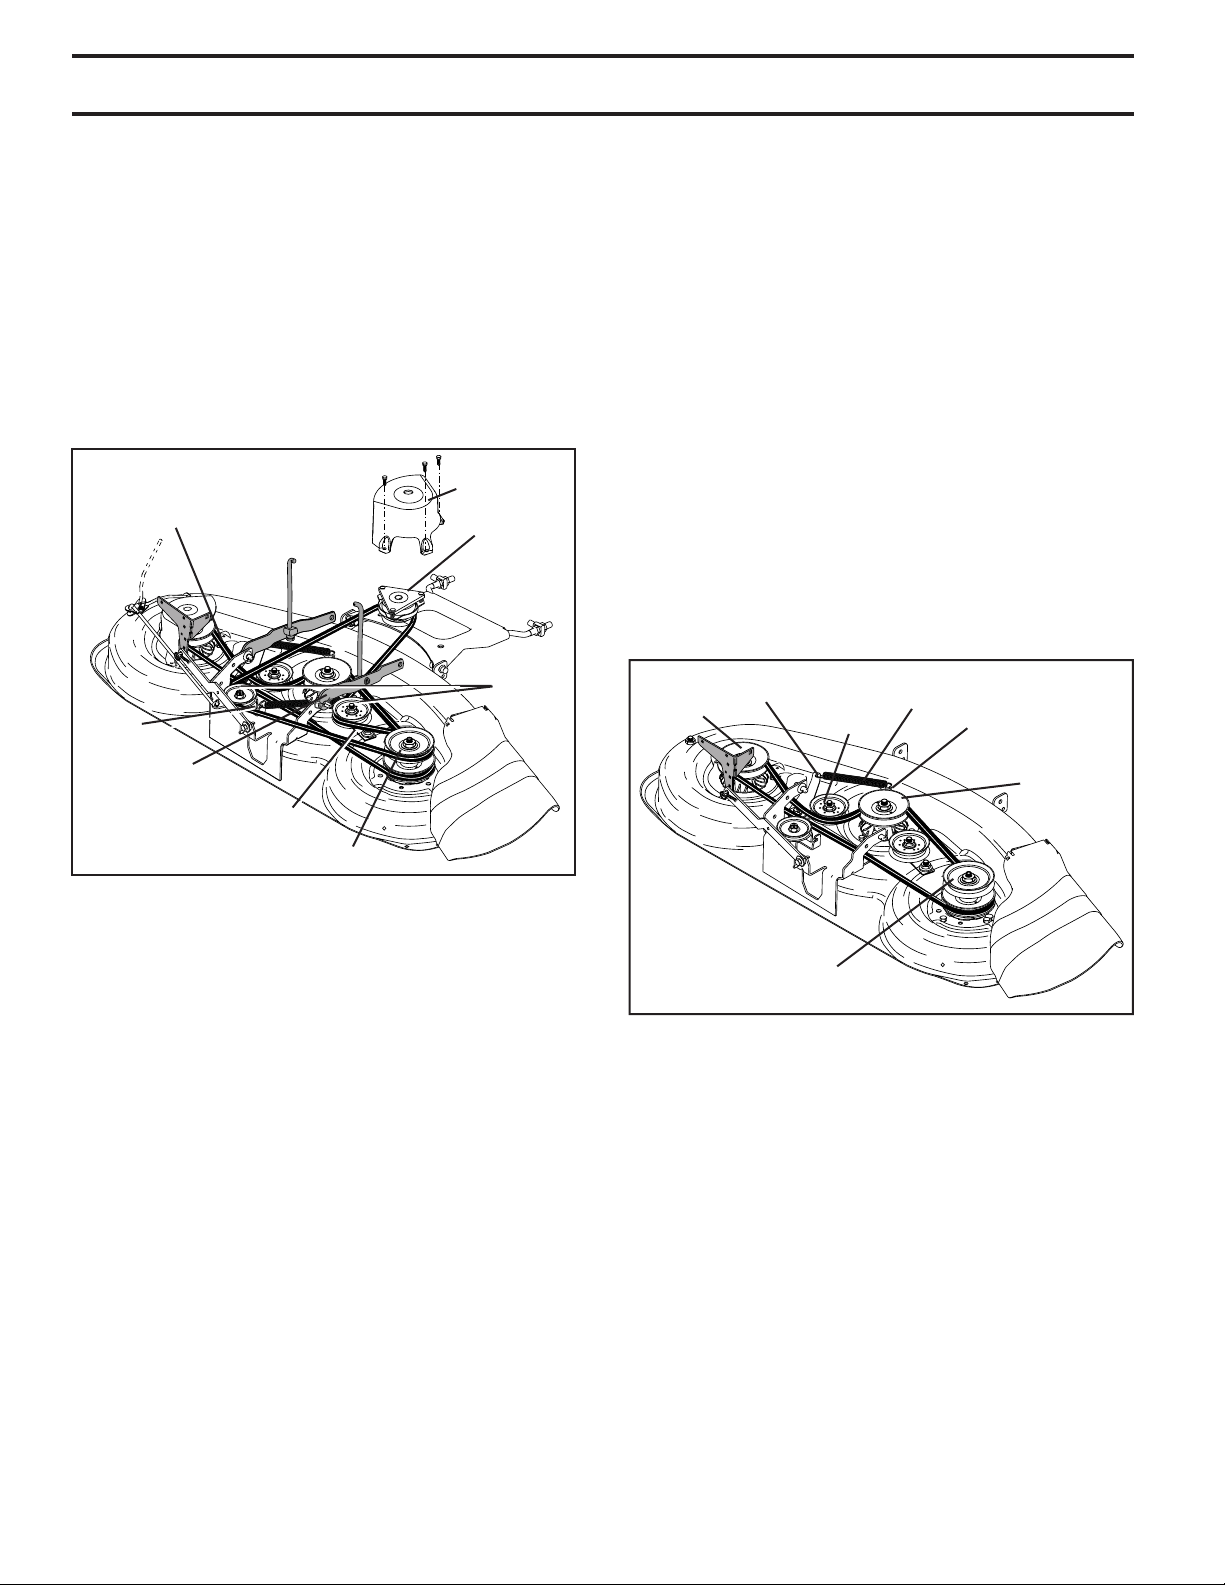
MOWER DRIVE BELT REMOVAL (See Fig. 23)
• Park tractor on a level surface. En gage parking
brake.
• Lower mower to its lowest position.
• Disengage belt tention rod from lock bracket.
CAUTION: Rod is spring loaded. Have a
tight grip on rod and release slowly.
• Remove screws from R.H. mandrel cover and remove
cover.
• Remove any dirt or grass clippings which may have
accumulated around mandrels and entire upper deck
surface.
• Disconnect R.H. suspension arm from rear deck bracket
by removing retainer spring.
• Roll belt over the top of R.H. mandrel pulley carefully.
• Remove belt from electric clutch pulley.
• Remove belt from idler pulleys.
• Check primary idler arm and two idlers to see that they
rotate freely.
21
Page 22
SERVICE AND ADJUSTMENTS
• Be sure spring is securely hooked to primary idler arm
and spring arm.
MOWER DRIVE BELT INSTALLATION (See Fig.23)
• Install belt in both idlers.
• Install new belt onto electric clutch pulley.
• Roll belt into upper groove of R.H. mandrel pulley carefully.
• Carefully check belt routing making sure belt is in the
grooves correctly.
• Reconnect R.H. suspension arm to rear deck bracket
with retainer spring.
• Reassemble R.H. mandrel cover.
• Engage belt tension rod by pushing rod into locking
bracket.
RH MAN DREL
COVER
BELT TEN SION ROD (DIS EN GAGED PO SI TION)
SPRING
ARM
RH SUS PEN SION
ARM
PRI MA RY IDLER
ARM
R.H.
MAN DREL
ELEC TRIC
CLUTCH
PUL LEY
IDLER
PUL LEYS
FIG. 23
• Check secondary idler arm and idler pulley to see that
they rotate freely.
• Be sure spring is hooked in sec ond ary idler arm and
secondary spring arm.
INSTALL NEW MOWER BLADE (SECONDARY) DRIVE
BELT
• Install new belt in lower groove of R.H. mandrel pulley,
idler pulley, and center mandrel pulley as shown.
• Carefully roll belt over L.H. mandrel pulley. Make sure
belt is in all grooves properly.
REINSTALL MOWER DRIVE BELT
(Refer to “TO REMOVE MOWER DRIVE BELT” illustration
in this section of man u al).
• Install belt into upper groove of R.H. mandrel pulley
and around both idlers. Pull belt to front of mower to
remove slack.
• Reinstall mandrel covers and se cure ly tighten all
screws.
• Carefully check belt routing making sure belt is in all
grooves correctly.
• Reinstall mower to tractor (See “TO INSTALL MOWER”
in this section of manual).
L.H. MAN DREL
SEC OND ARY
IDLER ARM
IDLER
PUL LEY
SPRING
SEC OND ARY
SPRING ARM
CEN TER
MAN DREL
TO REPLACE MOWER BLADE (SEC OND ARY)
DRIVE BELT(See Fig. 24)
Park the tractor on level surface. En gage parking brake.
• Remove mower (See “TO REMOVE MOWER” in this
section of manual).
• Remove screws from R.H. and L.H. mandrel covers
and re move covers.
REMOVE MOWER DRIVE BELT
(Refer to “TO REMOVE MOWER DRIVE BELT” il lus tra tion
in this section of manual).
• Carefully roll belt over the top of R.H. mandrel pulley.
• Remove belt from idler pulleys.
• Check primary idler arm and two idlers to see that they
rotate freely.
• Be sure spring is securely hooked to primary idler arm
and spring arm.
REMOVE MOWER BLADE (SECONDARY) DRIVE
BELT
• Carefully roll belt off L.H. mandrel pulley.
• Remove belt from center mandrel pulley, idler pulley,
and R.H. man drel pulley.
• Remove any dirt or grass which may have ac cu mu lat ed
around mandrels and entire upper deck surface.
R.H. MAN DREL
FIG. 24
TO CHECK AND ADJUST BRAKE (See Fig. 25)
Your tractor is equipped with an ad just able brake system
which is mounted on the right side of the transaxle.
If tractor requires more than fi ve (5) feet to stop at highest
speed in high est gear on a level, dry concrete or paved
surface, then brake must be checked and ad just ed.
TO CHECK BRAKE
• Park tractor on a level, dry concrete or paved surface,
depress clutch/brake pedal all the way down and engage parking brake.
• Disengage transmission by placing freewhel control
in “transmission disengaged” position. Pull freewheel
con trol out and into the slot and release so it is held in
the disengaged position.
The rear wheels must lock and skid when you try to manually
push the tractor forward. If the rear wheels rotate, the brake
needs to be adjusted or the pads need to be replaced.
22
Page 23
SERVICE AND ADJUSTMENTS
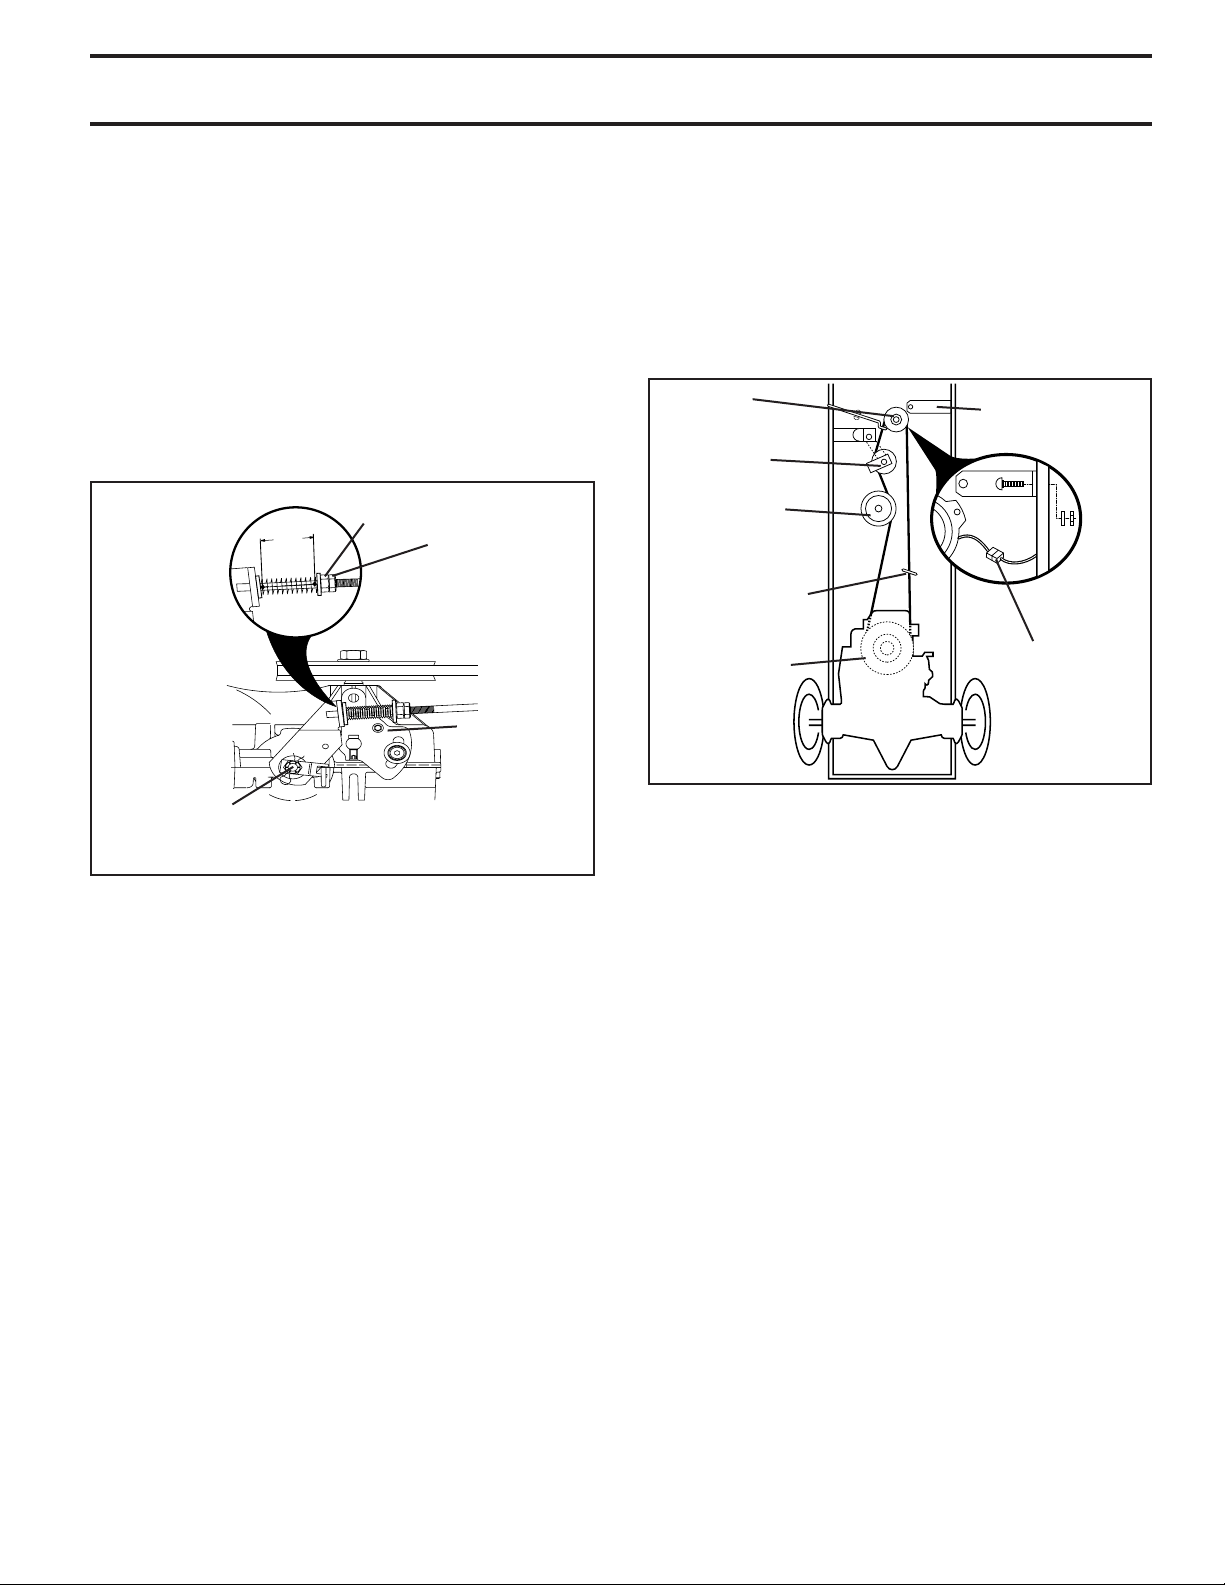
TO ADJUST BRAKE
• Depress clutch/brake pedal all the way down and en gage parking brake.
• Measure distance between brake operating arm and
nut “A” on brake rod.
• If distance is other than 1-9/16", loosen jam nut and
turn nut “A” until distance becomes 1-9/16". Retighten
jam nut against nut “A”.
• Engage transmission by placing freewheel control in
“trans mis sion engaged” position.
• Road test tractor for proper stopping distance as stated
above. Readjust if nec es sary. If stopping distance is
still greater than fi ve (5) feet in high est gear, further
main te nance is nec es sary. Replace brake pads or
contact a qualifi ed service center.
WITH PARKING BRAKE “ENGAGED”
1-9/16"
NUT “A”
JAM NUT
OPERATING
ARM
• Pull belt toward front of tractor and roll belt around
electric clutch and onto engine pulley.
• Install belt through stationary idler and clutch ing
idler.
• Reinstall clutch locator and tighten nut securely.
• Reconnect clutch harness.
• Make sure belt is in all pulley grooves and in side all
belt guides and keep ers.
• Install mower (See “TO IN STALL MOWER” in this sec tion of manual).
ELECTRIC
CLUTCH
CLUTCH ING
IDLER
STATIONARY
IDLER
CENTER SPAN
KEEPER
TRANS MIS SION
INPUT PULLEY
CLUTCH LOCATOR
CLUTCH
WIRE
HAR NESS
DO NOT TOUCH THIS NUT. IF FURTHER BRAKE AD JUST MENT
IS NECESSARY CONTACT YOUR NEAREST AU THO RIZED SERVICE CENTER/DE PA RT MENT
FIG. 25
TO REPLACE MOTION DRIVE BELT
(See Fig. 26)
Park the tractor on level surface. En gage parking brake.
For as sis tance, there is a belt installation guide decal on
bottom side of left footrest.
BELT REMOVAL -
• Remove mower (See “TO RE MOVE MOWER” in this
section of manual).
NOTE: Observe entire motion drive belt and position of all
belt guides and keepers.
• Disconnect clutch wire harness.
• Remove clutch locator.
• Remove belt from stationary idler and clutching idler.
• Remove belt downward from engine pulley and around
electric clutch.
• Pull belt slack toward rear of trac tor. Carefully remove
belt up wards from trans mis sion input pulley and over
cooling fan blades.
• Remove belt from center span keeper and pull belt
away from tractor.
BELT INSTALLATION -
• Carefully work new belt down around transmission
cooling fan and onto the input pulley.
• Slide belt into the center span keeper.
FIG. 26
TRANSAXLE MOTION CONTROL LE VER
NEUTRAL ADJUSTMENT (See Fig. 27)
The motion control lever has been pre set at the factory and
adjustment should not be necessary.
• Loosen adjustment bolt in front of the right rear wheel,
and lightly tighten.
• Start engine and move motion control lever until tractor
does not move forward or backward.
• Hold motion control lever in that position and turn engine
off.
• While holding motion control lever in place, loosen the
adjustment bolt.
• Move motion control lever to the neutral (N) (lock gate)
position.
• Tighten adjustment bolt securely.
NOTE: If additional clearance is needed to get to
adjustment bolt, move mower deck height to the lowest
osition.
After above adjustment is made, if the tractor still creeps
forward or backward while motion control lever is in
neutral position, follow these steps:
• Loosen the adjustment bolt.
• Move the motion control lever 1/4 to 1/2 inch in the
direction it is trying to creep.
• Tighten adjustment bolt securely.
• Start engine and test.
• If tractor still creeps, repeat above steps until satisfi ed.
23
Page 24
SERVICE AND ADJUSTMENTS
MOTION CONTROL
LEVER
NEUTRAL
LOCK GATE
ADJUSTMENT
BOLT
FIG. 27
TRANSMISSION REMOVAL/RE PLACE MENT
Should your transmission require removal for service or
replacement, it should be purged after reinstallation and
before operating the tractor. See “PURGE TRANS MIS SION”
in the Operation section of this manual.
TO AD JUST STEER ING WHEEL ALIGN MENT
If steering wheel crossbars are not horizontal (left to right)
when wheels are positioned straight forward, remove steer ing wheel and reassemble per instructions in the Assembly
section of this manual.
FRONT WHEEL TOE-IN/CAMBER
The front wheel toe-in and camber are not adjustable on
your tractor. If damage has occurred to affect the front
wheel toe-in or camber, contact your nearest authorized
service center/department.
TO REMOVE WHEEL FOR REPAIRS
(See Fig. 28)
• Block up axle securely.
• Remove axle cover, retaining ring and washers to allow
wheel removal (rear wheel contains a square key - Do
not lose).
• Repair tire and reassemble.
• On rear wheels only: align grooves in rear wheel hub
and axle. Insert square key.
• Replace washers and snap retaining ring securely in
axle groove.
• Replace axle cover.
NOTE: To seal tire punctures and prevent fl at tires due
to slow leaks, tire sealant may be purchased from your
local parts dealer. Tire sealant also prevents tire dry rot
and corrosion.
TO START ENGINE WITH A WEAK BATTERY
(See Fig. 29)
WAR NING: Lead-acid batteries gen-
er ate ex plo sive gases. Keep sparks,
fl ame and smoking ma te ri als away from
bat ter ies. Always wear eye pro tec tion
when around batteries.
If your battery is too weak to start the engine, it should be
recharged. (See "BATTERY" in the Maintenance sec tion
of this man u al).
If “jumper ca bles” are used for emer gen cy starting, follow
this pro ce dure:
IMPORTANT: YOUR TRACTOR IS EQUIPPED WITH A 12 VOLT
SYSTEM. THE OTHER VEHICLE MUST ALSO BE A 12 VOLT
SYSTEM. DO NOT USE YOUR TRACTOR BATTERY TO START
OTHER VEHICLES.
TO ATTACH JUMPER CABLES -
• Connect one end of the RED cable to the POSITIVE
(+) terminal of each battery(A-B), taking care not to
short against tractor chassis.
• Connect one end of the BLACK ca ble to the NEGA TIVE
(-) terminal (C) of fully charged battery.
• Connect the other end of the BLACK cable (D) to good
chassis ground, away from fuel tank and bat tery.
TO REMOVE CABLES, REVERSE ORDER -
• BLACK cable fi rst from chassis and then from the fully
charged battery.
• RED cable last from both batteries.
WEAK OR DEAD
BATTERY
FULLY CHARGED
BATTERY
FIG. 29
RETAINING
AXLE
COVER
SQUARE KEY
(REAR WHEEL ONLY)
RING
WASHERS
FIG. 28
24
Page 25
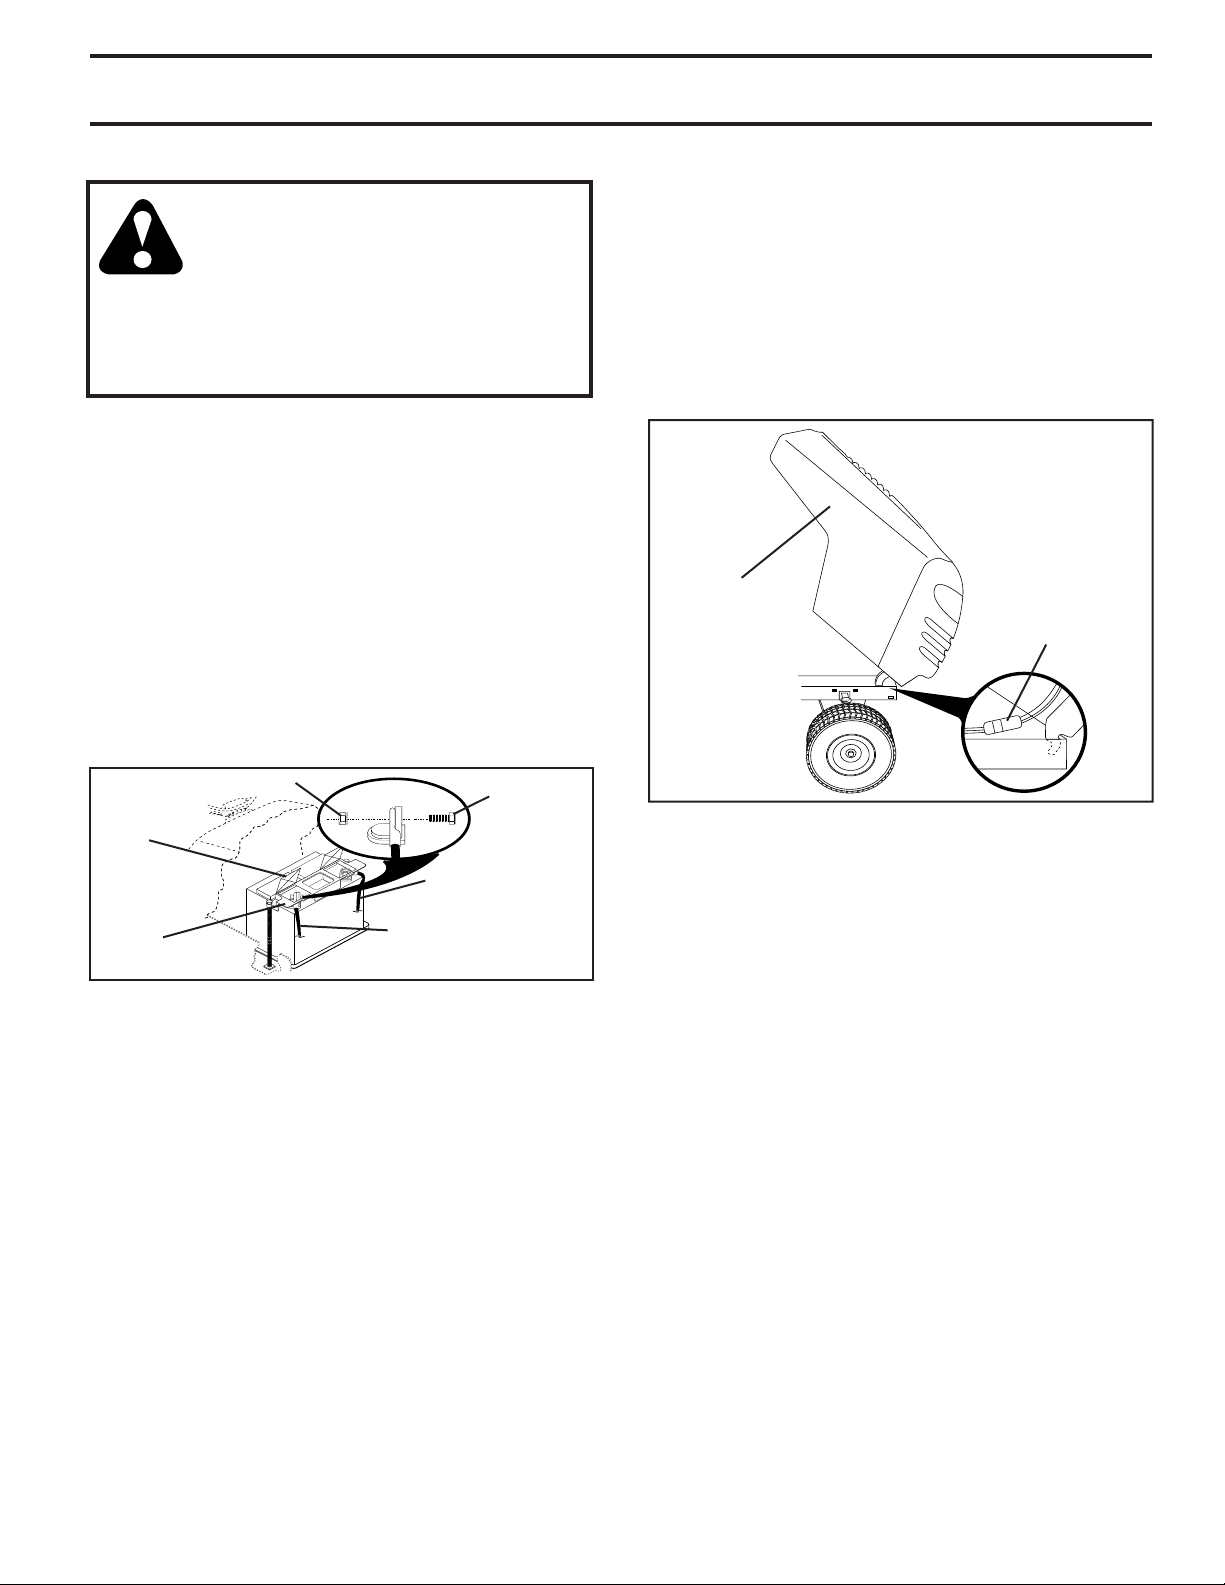
SERVICE AND ADJUSTMENTS
REPLACING BATTERY (See Fig. 30)
WARNING: Do not short battery ter mi nals by allowing a wrench or any other
object to contact both terminals at the
same time. Before connecting battery,
remove metal bracelets, wristwatch
bands,rings,etc.
Positive terminal must be connected
fi rst to prevent sparking from ac ci den tal
ground ing.
• Lift hood to raised position.
• Remove terminal guard.
• Disconnect BLACK battery cable then RED battery
cable and carefully remove battery from tractor.
• Install new battery with terminals in same position as
old battery.
• Reinstall terminal guard.
• First connect RED battery cable to positive (+) battery
terminal with hex bolt and keps nut as shown. Tighten
securely.
• Connect BLACK grounding cable to negative (-) bat tery
terminal with remaining hex bolt and keps nut. Tighten
securely
• Close terminal access doors.
• Close hood.
TO REPLACE FUSE
Replace with 20 amp automotive-type plug-in fuse. The
fuse holder is located behind the dash.
TO REMOVE HOOD AND GRILL ASSEMBLY
(See Fig. 31)
• Raise hood.
• Unsnap headlight wire connector.
• Stand in front of tractor. Grasp hood at sides, tilt toward
engine and lift off of tractor.
• To replace, reverse above procedures.
HOOD
HEADLIGHT
WIRE
CONNECTOR
TER MI NAL
ACCESS
DOOR
TER MI NAL
GUARD
KEPS NUT
POSITIVE (RED)
CABLE
NEG A TIVE (BLACK)
CABLE
FIG. 30
HEX BOLT
TO REPLACE HEADLIGHT BULB
• Raise hood.
• Pull bulb holder out of the hole in the backside of the
grill.
• Replace bulb in holder and push bulb holder securely
back into the hole in the backside of the grill.
• Close hood.
INTERLOCKS AND RELAYS
Loose or damaged wiring may cause your tractor to run
poorly, stop running, or prevent it from starting.
• Check wiring. See electrical wiring diagram in the
Repair Parts section.
FIG. 31
ENGINE
TO AD JUST THROTTLE CON TROL CABLE
The throttle control has been preset at the factory and
ad just ment should not be necessary. If adjustment is nec es sary, see engine manual.
TO AD JUST CHOKE CON TROL
The choke control has been preset at the factory and ad just ment should not be necessary. If adjustment is necessary, see engne manual.
TO ADJUST CARBURETOR
Your carburetor is not adjustable. If your engine does not
operate properly due to suspected carburetor problems,
take your tractor to an authorized service center for repair
and/or adjustment.
25
Page 26

STORAGE
Immediately prepare your tractor for storage at the end
of the season or if the tractor will not be used for 30 days
or more.
WARNING: Never store the trac tor with
gas o line in the tank inside a building
where fumes may reach an open fl ame
or spark. Allow the engine to cool before
storing in any en clo sure.
TRACTOR
Remove mower from tractor for winter storage. When mower
is to be stored for a period of time, clean it thor oughly, remove
all dirt, grease, leaves, etc. Store in a clean, dry area.
• Clean entire tractor (See “CLEANING” in the Main te nance section of this manual).
• Inspect and replace belts, if necessary (See belt re place ment instructions in the Service and Adjustments
section of this manual).
• Lubricate as shown in the Maintenance section of this
man ual.
• Be sure that all nuts, bolts and screws are securely
fastened. Inspect moving parts for damage, breakage
and wear. Replace if necessary.
• Touch up all rusted or chipped paint surfaces; sand
lightly before painting.
BATTERY
• Fully charge the battery for storage.
• After a period of time in storage, battery may require
recharging.
• To help prevent corrosion and power leakage during
long periods of storage, battery cables should be dis con nect ed and battery cleaned thoroughly (see “TO
CLEAN BATTERY AND TERMINALS” in the Maintenance sec tion of this manual).
• After cleaning, leave cables disconnected and place
cables where they cannot come in contact with battery
terminals.
• If battery is removed from tractor for storage, do not
store battery directly on concrete or damp surfaces.
ENGINE
FUEL SYSTEM
IMPORTANT: IT IS IMPORTANT TO PREVENT GUM DEPOSITS
FROM FORMING IN ES SEN TIAL FUEL SYSTEM PARTS SUCH
AS CARBURETOR, FUEL FIL TER, FUEL HOSE, OR TANK
DURING STORAGE. ALSO, EXPERIENCE INDICATES THAT
ALCOHOL BLENDED FUELS (CALLED GASOHOL OR USING
ETHANOL OR METHANOL) CAN ATTRACT MOIS TURE WHICH
LEADS TO SEPARATION AND FOR MA TION OF ACIDS DURING
STOR AGE. ACIDIC GAS CAN DAMAGE THE FUEL SYSTEM
OF AN ENGINE WHILE IN STORAGE.
• Drain the fuel tank.
• Start the engine and let it run until the fuel lines and
carburetor are empty.
• Never use engine or carburetor cleaner products in the
fuel tank or permanent damage may occur.
• Use fresh fuel next season.
NOTE: Fuel stabilizer is an acceptable alternative in minimizing the formation of fuel gum deposits during stor age.
Add stabilizer to gasoline in fuel tank or storage container.
Always follow the mix ratio found on stabilizer container.
Run engine at least 10 minutes after adding stabilizer to
allow the stabilizer to reach the carburetor. Do not drain
the gas tank and carburetor if using fuel stabilizer.
ENGINE OIL
Drain oil (with engine warm) and replace with clean engine oil. (See “ENGINE” in the Maintenance section of
this man ual).
CYLINDER(S)
• Remove spark plug(s).
• Pour one ounce of oil through spark plug hole(s) into
cylinder(s).
• Turn ignition key to “START” position for a few seconds
to distribute oil.
• Replace with new spark plug(s).
OTHER
• Do not store gasoline from one season to another.
• Replace your gasoline can if your can starts to rust.
Rust and/or dirt in your gasoline will cause problems.
• If possible, store your tractor indoors and cover it to
give protection from dust and dirt.
• Cover your tractor with a suitable protective cover that
does not retain moisture. Do not use plastic. Plastic
cannot breathe which allows condensation to form and
will cause your tractor to rust.
IMPORTANT: NEVER COVER TRACTOR WHILE EN GINE AND
EXHAUST AREAS ARE STILL WARM.
26
Page 27

TROUBLESHOOTING POINTS
PROBLEM CAUSE CORRECTION
Will not start 1. Out of fuel. 1. Fill fuel tank.
2. Engine not “CHOKED” properly. 2. See “TO START ENGINE” in Operation section.
3. Engine fl ooded. 3. Wait several minutes before attempting to start.
4. Bad spark plug. 4. Replace spark plug.
5. Dirty air fi lter. 5. Clean/replace air fi lter.
6. Dirty fuel fi lter. 6. Replace fuel fi lter.
7. Water in fuel. 7. Drain fuel tank and carburetor, refi ll tank with fresh
gasoline and replace fuel fi lter.
8. Loose or damaged wiring. 8. Check all wiring.
9. Carburetor out of adjustment. 9. See “To Adjust Carburetor” in Service Adjustments
section.
10. Engine valves out of adjustment. 10. Contact an authorized service center/department.
Hard to start 1. Dirty air fi lter. 1. Clean/replace air fi lter.
2. Bad spark plug. 2. Replace spark plug.
3. Weak or dead battery. 3. Recharge or replace battery.
4. Dirty fuel fi lter. 4. Replace fuel fi lter.
5. Stale or dirty fuel. 5. Drain fuel tank and refi ll with fresh gasoline.
6. Loose or damaged wiring. 6. Check all wiring.
7. Carburetor out of adjustment. 7. See “To Adjust Carburetor” in Service Adjustments
section.
8. Engine valves out of adjustment. 8. Contact an authorized service center/department.
Engine will not turn over 1. Clutch/brake pedal not depressed. 1. Depress clutch/brake pedal.
2. Attachment clutch is engaged. 2. Disengage attachment clutch.
3. Weak or dead battery. 3. Recharge or replace battery.
4. Blown fuse. 4. Replace fuse.
5. Corroded battery terminals. 5. Clean battery terminals.
6. Loose or damaged wiring. 6. Check all wiring.
7. Faulty ignition switch. 7. Check/replace ignition switch.
8. Faulty solenoid or starter. 8. Check/replace solenoid or starter.
9. Faulty operator presence switch(es). 9. Contact an authorized service center/department.
Engine clicks but will not 1. Weak or dead battery. 1. Recharge or replace battery.
start 2. Corroded battery terminals. 2. Clean battery terminals.
3. Loose or damaged wiring. 3. Check all wiring.
4. Faulty solenoid or starter. 4. Check/replace solenoid or starter.
Loss of power 1. Cutting too much grass/too fast. 1. Set in “Higher Cut” position/reduce speed.
2. Throttle in “CHOKE” position. 2. Adjust throttle control.
3. Build-up of grass, leaves and trash under mower. 3. Clean underside of mower housing.
4. Dirty air fi lter. 4. Clean/replace air fi lter.
5. Low oil level/dirty oil. 5. Check oil level/change oil.
6. Faulty spark plug. 6. Clean and regap or change spark plug.
7. Dirty fuel fi lter. 7. Replace fuel fi lter.
8. Stale or dirty fuel. 8. Drain fuel tank and refi ll with fresh gasoline.
9. Water in fuel. 9. Drain fuel tank and carburetor, refi ll tank with fresh
gasoline and replace fuel fi lter.
10. Spark plug wire loose. 10. Connect and tighten spark plug wire.
11. Dirty engine air screen/fi ns. 11. Clean engine air screen/fi ns.
12. Dirty/clogged muffl er. 12. Clean/replace muffl er.
13. Loose or damaged wiring. 13. Check all wiring.
14. Carburetor out of adjustment. 14. See “To Adjust Carburetor” in Service Adjustments
section.
15. Engine valves out of adjustment. 15. Contact an authorized service center/department.
Excessive vibration 1. Worn, bent or loose blade. 1. Replace blade. Tighten blade bolt.
2. Bent blade mandrel. 2. Replace blade mandrel.
3. Loose/damaged part(s). 3. Tighten loose part(s). Replace damaged parts.
27
Page 28

TROUBLESHOOTING POINTS
PROBLEM CAUSE CORRECTION
Engine continues to run 1. Faulty operator-safety presence control system. 1. Check wiring, switches and connections. If not
when operator leaves corrected, contact an authorized service center/
seat with attachment department.
clutch engaged
Poor cut - uneven 1. Worn, bent or loose blade. 1. Replace blade. Tighten blade bolt.
2. Mower deck not level. 2. Level mower deck.
3. Buildup of grass, leaves, and trash under mower. 3. Clean underside of mower housing.
4. Bent blade mandrel. 4. Replace blade mandrel.
5. Clogged mower deck vent holes from buildup of 5. Clean around mandrels to open vent holes.
grass, leaves, and trash around mandrels.
Mower blades will not 1. Obstruction in clutch mechanism. 1. Remove obstruction.
rotate 2. Worn/damaged mower drive belt. 2. Replace mower drive belt.
3. Frozen idler pulley. 3. Replace idler pulley.
4. Frozen blade mandrel. 4. Replace blade mandrel.
Poor grass discharge 1. Engine speed too slow. 1. Place throttle control in “FAST” position.
2. Travel speed too fast. 2. Shift to slower speed.
3. Wet grass. 3. Allow grass to dry before mowing.
4. Mower deck not level. 4. Level mower deck.
5. Low/uneven tire air pressure. 5. Check tires for proper air pressure.
6. Worn, bent or loose blade. 6. Replace/sharpen blade. Tighten blade bolt.
7. Buildup of grass, leaves and trash under mower. 7. Clean underside of mower housing.
8. Mower drive belt worn. 8. Replace mower drive belt.
9. Blades improperly installed. 9. Reinstall blades sharp edge down.
10. Improper blades used. 10. Replace with blades listed in this manual.
11. Clogged mower deck vent holes from buildup of 11. Clean around mandrels to open vent holes.
grass, leaves, and trash around mandrels.
Headlight(s) not working 1. Switch is “OFF”. 1. Turn switch “ON”.
(if so equipped) 2. Bulb(s) or lamp(s) burned out. 2. Replace bulb(s) or lamp(s).
3. Faulty light switch. 3. Check/replace light switch.
4. Loose or damaged wiring. 4. Check wiring and connections.
5. Blown fuse. 5. Replace fuse.
Battery will not charge 1. Bad battery cell(s). 1. Replace battery.
2. Poor cable connections. 2. Check/clean all connections.
3. Faulty regulator (if so equipped). 3. Replace regulator.
4. Faulty alternator. 4. Replace alternator.
Loss of drive 1. Freewheel control in “disengaged” position. 1. Place freewheel control in “engaged” position.
2. Motion drive belt worn, damaged, or broken. 2. Replace motion drive belt.
3. Air trapped in transmission during shipment 3. Purge transmission.
or servicing.
Engine “backfi res” 1. Engine throttle control not set at “SLOW” 1. Move throttle control to “SLOW” position and allow
when turning engine position for 30 seconds before stopping engine. to idle for 30 seconds before stopping engine.
“OFF”
28
Page 29
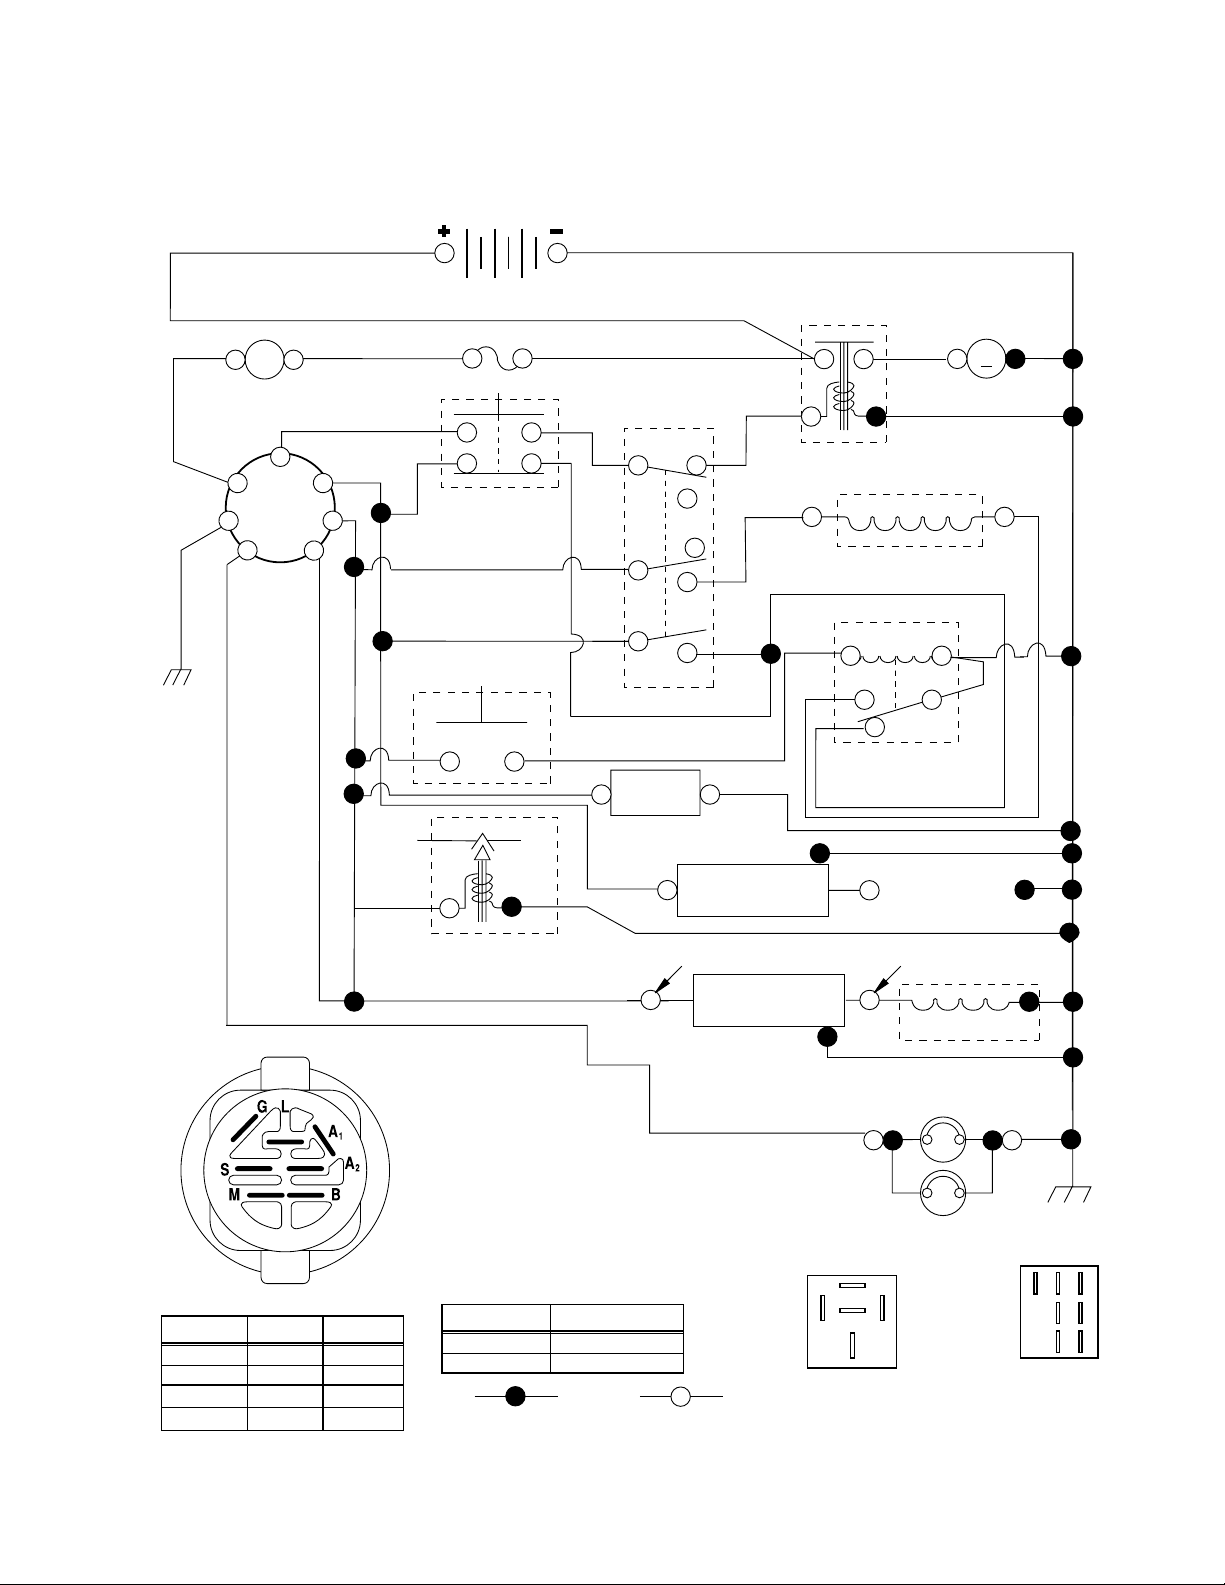
TRACTOR - MODEL NO. YTH1848XP (HAU18H48E), PRODUCT NO. 954 17 00-57
SCHEMATIC
AMMETER
(OPTIONAL)
RED
G
IGNITION
SWITCH
BLACK
RED
BLACK
BATTERY
SOLENOID
A
RED
FUSE
WHITE
WHITE
RED
WHITE
RED
M
STARTER
BLACK
CG
A2
M
A1
BLACK
ORANGE
CLUTCH / BRAKE
(PEDAL UP)
RED
SEAT SWITCH
(NOT OCCUPIED)
BLACK
F
H
B
E
A
D
PTO (DISENGAGED)
RED
ELECTRIC CLUTCH
BLACK
85 86
87
BLACK
30
S
B
L
87A
GREEN GREEN
BLUE
FUEL
HOUR
METER
(OPTIONAL)
BLACK
OPERATOR
PRESENCE
RELAY #1
LINE
SPARK
PLUGS GAP
(2 PLUGS ON
BLUE
BLACK
IGNITION
UNIT
TWIN CYL. ENGINES)
FUEL SHUT-OFF SOLENOID
RED
CHARGING SYSTEM OUTPUT
16 AMP DC @ 3600 RPM
REGULATOR
28 VOLTS AC @ 3600 RPM
(REGULATOR DISCONNECTED)
ALTERNATOR
IGNITION SWITCH
CIRCUITPOSITION
OFF
M+G+A1
B+A1RUN/LIGHT
B+A1RUN
B + S + A1START
“MAKE”
NONE
A2+L
NONE
NONE
WIRING INSULATED CLIPS
NOTE: IF WIRING INSULATED
CLIPS WERE REMOVED FOR
SERVICING OF UNIT, THEY
SHOULD BE REPLACED TO
PROPERLY SECURE YOUR WIRING.
PTO SWITCH
CIRCUITPOSITION
OFF
NON-REMOVABLE
CONNECTIONS
C + G, B + H
C + F, B + E, A + DON
REMOVABLE
CONNECTIONS
29
BROWN
87
87A
30
RELAY
HEADLIGHTS
8586
BLACK
G
FC
H
E
B
A
D
Page 30
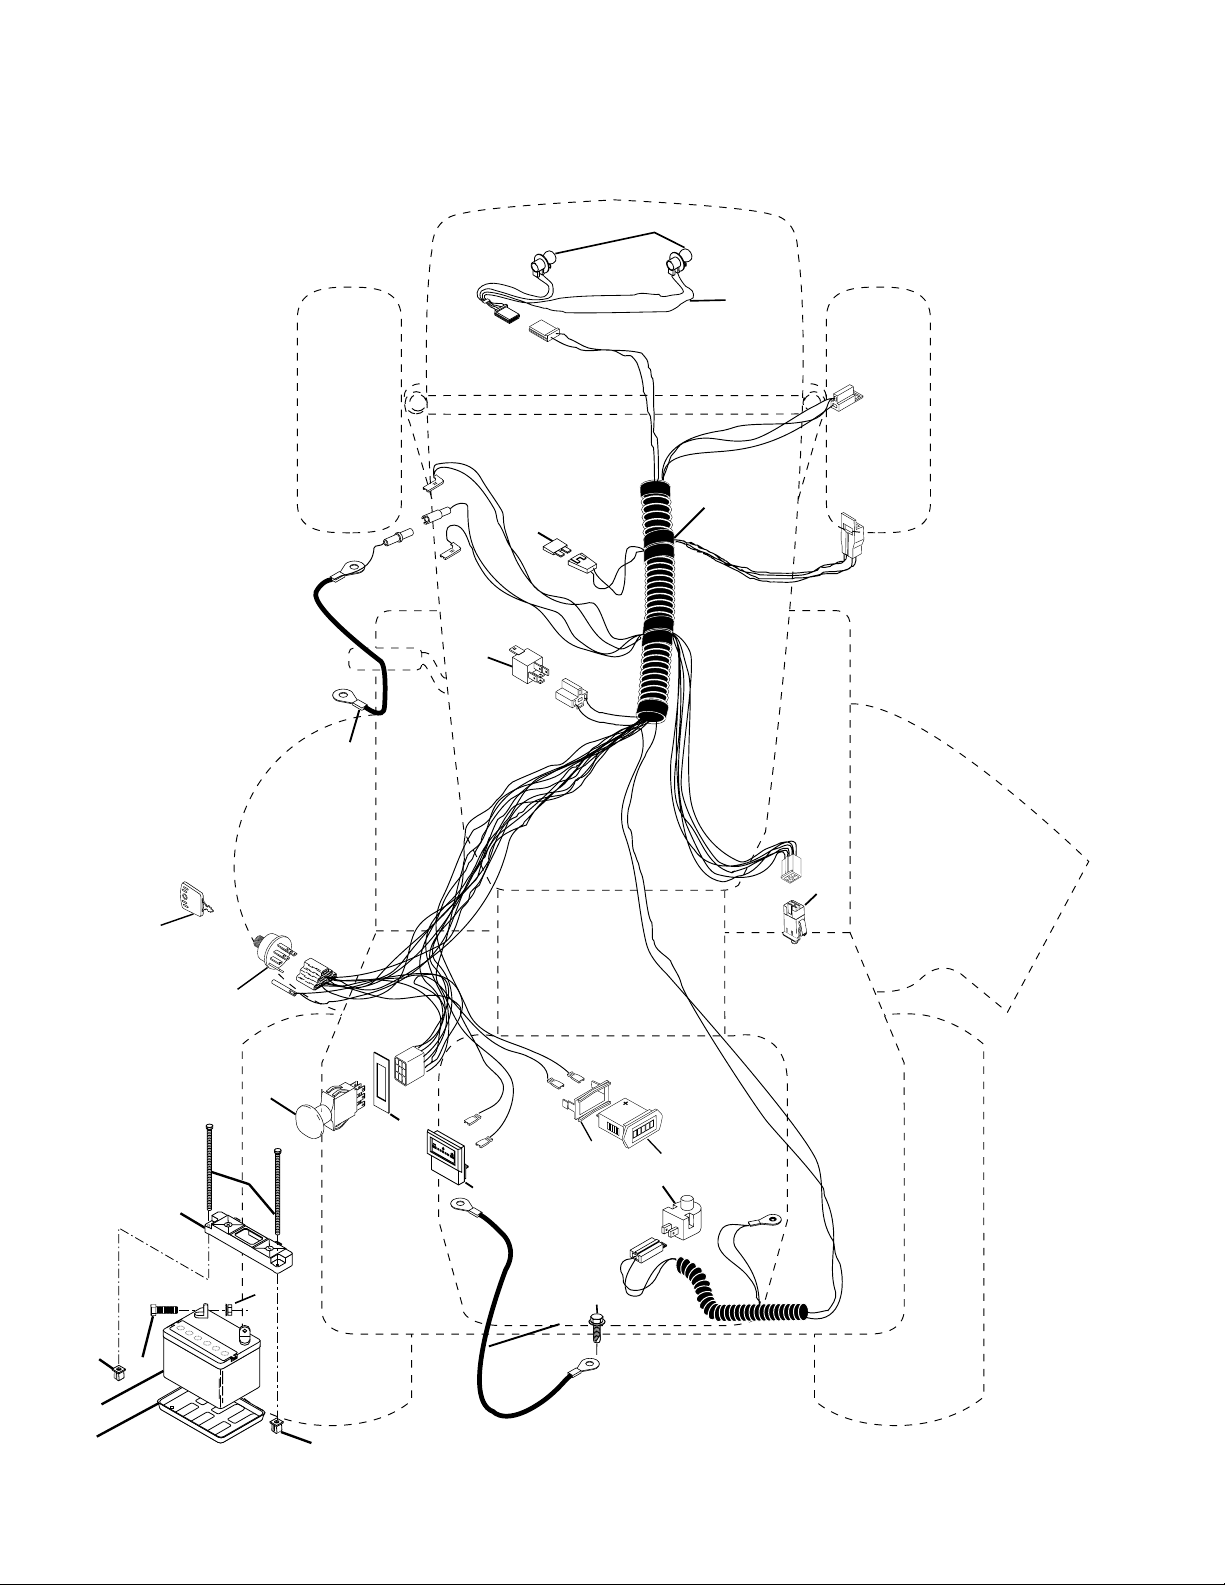
REPAIR PARTS
TRACTOR - MODEL NO. YTH1848XP (HAU18H48E), PRODUCT NO. 954 17 00-57
ELECTRICAL
22
21
40
26
33
11
30
10
50
25
51
81
16
D
.
C
.
A
M
P
E
R
E
S
45
89
29
46
12
27
55
28
2
1
8
12
30
Page 31

REPAIR PARTS
TRACTOR - MODEL NO. YTH1848XP (HAU18H48E), PRODUCT NO. 954 17 00-57
ELECTRICAL
KEY PART
NO. NO. DESCRIPTION
1 532 14 49-27 Battery 12 Volt 35 AMP
2 874 76 04-12 Bolt Hex Hd 1/4-20unc X 3/4
8 532 12 48-86 Tray Battery
10 532 14 52-11 Bolt Brt Frt 1/4-20 x 75 Ainc
11 532 15 01-09 Holddown Battery Front Mount
12 532 14 57-69 Nut Push Nylon 1/4" Battery Frt
16 532 17 61-38 Switch Interlock
21 532 17 56-85 Harness Asm Light W/4152j
22 532 00 41-52 Bulb Light #1156
24 532 12 47-80 Cable Battery 6 Ga 11" red
25 532 14 61-48 Cable Battery 6 Ga 22" red w/16 wire
26 532 17 51-58 Fuse
27 873 51 04-00 Nut Keps Hex 1/4-20 Unc
28 532 14 54-91 Cable Ground 6 Ga 21" black
29 532 16 07-84 Switch Plunger Nc Gray
30 532 17 55-66 Switch Ign
33 532 14 04-01 Key Ign Molded Generic
40 532 17 97-24 Harness Ign.
41 871 11 04-08 Bolt Blk Fin Hex 1/4 - 20 x 1/2
42 532 13 15-63 Cover Terminal Red
43 532 17 88-61 Solenoid
45 532 12 28-22 Ammeter Rectangular 15 Amp
46 532 16 96-35 Meter Hour
50 532 17 46-51 Switch PTO
51 532 14 04-05 Ring Retainer
55 817 49 05-08 Screw Thdrol 5/16-18 x 1-1/2 Tyt
81 532 10 97-48 Relay Asm.
89 532 16 96-39 Bracket Snap-In Hourmeter
NOTE: All component dimensions given in U.S. inches.
1 inch = 25.4 mm.
31
Page 32
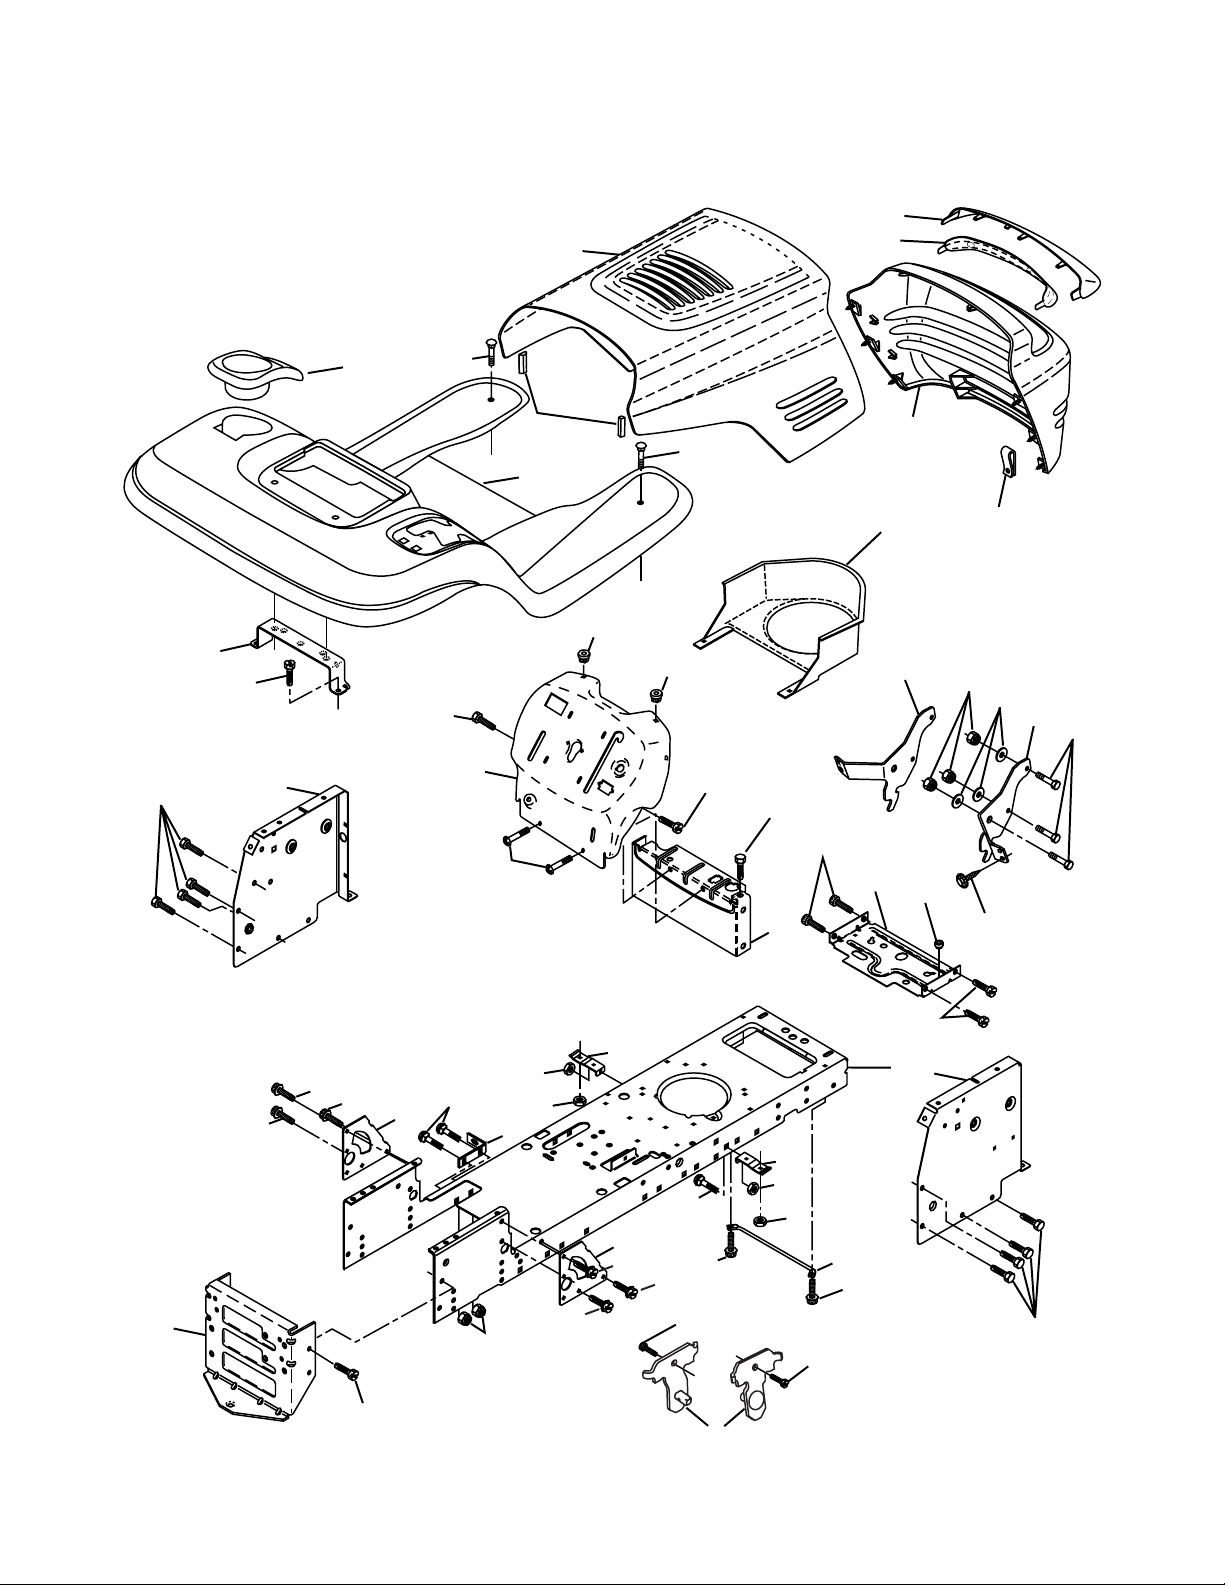
REPAIR PARTS
TRACTOR - MODEL NO. YTH1848XP (HAU18H48E), PRODUCT NO. 954 17 00-57
CHASSIS AND ENCLOSURES
29
17
212
208
31
209
11
159
209
10
18
10
30
5
5
9
209
208
219
207
64
20
58
53
28
23
51
54
12
52
55
57
219
144
74
143
26
26
144
26
60
142
3
3
37
3
14
38
26
14
3
3
3
2
3
60
142
145
37
1
13
208
32
Page 33

REPAIR PARTS
TRACTOR - MODEL NO. YTH1848XP (HAU18H48E), PRODUCT NO. 954 17 00-57
CHASSIS AND ENCLOSURES
KEY PART
NO. NO. DESCRIPTION
1 532 17 46-19 Chassis Stamping
2 532 17 65-54 Drawbar
3 817 06 06-12 Screw 3/8-16x3/4
5 532 15 52-72 Bumper
9 532 17 16-82 Dashboard
10 872 14 06-08 Bolt Rdhd Sqnk 3/8-16 Unc x 1
11 532 17 49-96 Panel Dash Lh
12 532 14 56-60 Clip Tinnerman Grille
13 532 17 21-06 Panel Dash Rh
14 817 49 06-08 Screw Thdrol 3/8-16 x 1/2
17 532 16 22-37 Hood
18 532 18 49-21 Bumper
20 532 18 06-79 Plate Mtg Battery/Fuel Tank
23 532 12 40-28 Bushing
26 873 80 06-00 Nut Lock w/Insert 3/8-16 UNC
28 532 17 98-45 Grille Lens Asm
29 532 17 66-45 Lens
30 532 18 10-01 Fender
31 532 13 99-76 Bracket
37 817 49 05-08 Screw Thdrol 5/16-18 x 1/2
38 532 17 57-10 Bracket Asm Pivot Mower Rear
51 873 80 04-00 Nut Lock w/Insert 1/4-20
52 819 09 14-16 Washer 9/32 x 7/8 x 16 Ga.
53 532 14 46-97 Bracket Grille Lh
54 532 16 14-64 Screw Hex Wshd 8-18 x 7/8
55 532 14 46-96 Bracket Grille Rh
57 874 78 04-12 Bolt Fin Hex 1/4-20 Unc x 3/4
58 532 17 49-30 Duct Air
60 872 14 06-06 Bolt RDHD SQNK 3/8-16 x 3/4
64 532 15 47-98 Dash Lower Stlt
74 873 68 06-00 Nut Crownlock 3/8-16
142 532 17 57-02 Plate Reinforcement
143 532 15 49-66 Bracket Swaybar Chassis
144 532 17 55-82 Bracket Ft Rest
145 532 15 65-24 Rod Pivot Chassis Hood
159 532 16 65-08 Cupholder YTGT Grey
207 817 67 05-08 Screw Thdrol 5/16-18 x 1/2 TYTT
208 817 67 06-08 Screw Thdrol 3/8-16 x 1/2 Ty-TT
212 532 15 62-29 Insert Lens Refl ect
219 817 00 05-12 Screw 5/16-18 x 3/4
NOTE: All component dimensions given in U. S. inches.
1 inch = 25.4 mm
33
Page 34
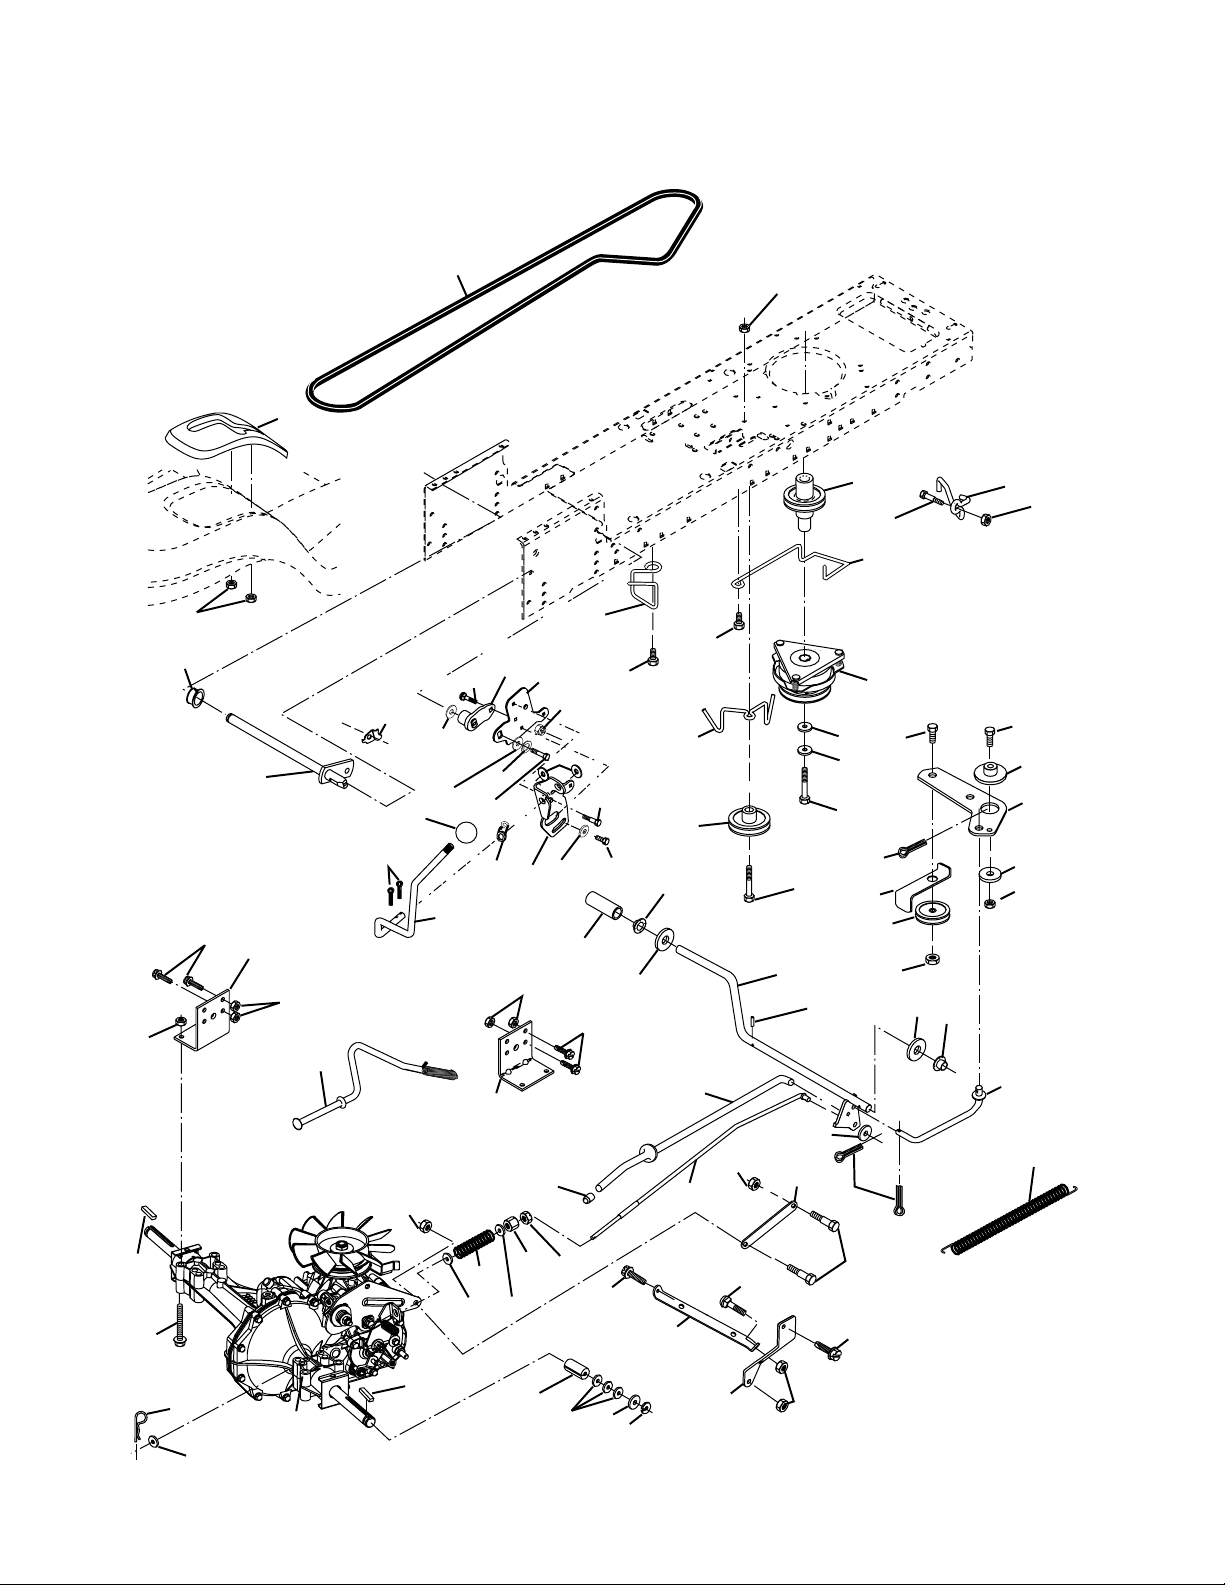
REPAIR PARTS
TRACTOR - MODEL NO. YTH1848XP (HAU18H48E), PRODUCT NO. 954 17 00-57
DRIVE
57
51
89
16
90
197
32
81
30
52
95
169
10
16
21
198
164
8
161
14
163
82
30
159
165
52
158
29
162
83
156
62
59
168
32
166
61
36
35
41
38
28
22
56
16
34
84
39
26
37
17
20
27
65
63
49
116
66
9
27
47
120
50
36
23
212
202
150
48
151
51
35
53
55
77
15
96
26
19
26
74
75
24
250
78
200
71
73
76
25
26
77
1
199
250
16
34
Page 35

REPAIR PARTS
TRACTOR - MODEL NO. YTH1848XP (HAU18H48E), PRODUCT NO. 954 17 00-57
DRIVE
KEY PART
NO. NO. DESCRIPTION
1 - - - - - - - - Transaxle, Hydro 314-0510
(Order Parts From Transaxle Manu-
facturer)
8 532 16 58-66 Rod Shift Fender Adjust STLT
9 532 17 93-34 Clutch Elecric
10 876 02 04-16 Pin Cotter 1/8 x 1 CAD
14 810 04 04-00 Washer Lock Hvy Helical
15 874 49 05-44 Bolt Hex 5/16-18 Unc Flghd
16 873 80 05-00 Nut Lock Hex W/Ins. 5/16-18 Unc P
17 532 12 61-97 Washer
19 873 80 06-00 Nut Lock Hex W/Ins 3/8-16 Unc
20 532 17 39-37 Bolt, Hex 7/16-20 x 4-1/4 Ga. 5
21 532 14 08-45 Knob Deluxe 1/2-13 UNC BLK/BLK
22 532 16 94-98 Rod, Brake Hydro
23 532 17 82-89 Bracket Anti-Rotation
24 873 35 06-00 Nut Hex Jam 3/8-16 UNC
25 532 10 68-88 Spring, Brake Rod
26 819 13 13-16 Washer
27 876 02 04-12 Pin Cotter 1/8 x 3/4 CAD.
28 532 17 57-65 Rod, Parking Brake
29 532 07 16-73 Cap,Parking Brake
30 532 16 95-92 Bracket, Transaxle
32 874 76 05-12 Bolt Hex Hd 5/16-18 Unc x 3/4
34 532 17 55-78 Shaft, Foot Pedal
35 532 12 01-83 Bearing, Nylon
36 819 21 16-16 Washer
37 532 12 49-63 Pin, Roll
38 532 17 91-14 Pulley, Composite
39 874 76 06-48 Bolt, Fin, Hex 3/8-16 x 3
41 532 17 55-56 Keeper, Belt Idler
47 532 12 77-83 Pulley, Idler, V-Groove Plastic
48 532 15 44-07 Bellcrank Clutch Grnd Drv STL
49 532 12 32-05 Retainer, Belt Style Spring
50 872 11 06-12 Bolt Carr 3/8-16 x 1-1/2 Gr. 5
51 873 68 06-00 Nut
52 873 68 05-00 Nut Crownlock 5/16-18
53 532 10 57-10 Link, Clutch
55 532 10 57-09 Spring, Return, Clutch
56 817 06 06-20 Screw 3/8-16 x 1-1/4
57 532 14 02-94 V-Belt, Ground Drive
59 532 16 96-91 Keeper, Center Span
61 817 12 06-14 Screw 3/8-16 x .875
62 532 12 48-72 Cover, Pedal
KEY PART
NO. NO. DESCRIPTION
63 532 17 46-07 Pulley, Engine
65 810 04 07-00 Washer Lock Hvy HLCL Spr 7/16
66 532 15 47-78 Keeper Belt Engine
71 532 16 91-83 Strap Torque Lh Hydro
73 532 16 91-82 Strap Torque Rh Hydro
74 532 13 70-57 Spacer, Axle
75 532 12 17-49 Washer 25/32 x 1-1/4 x 16
Ga.
76 812 00 00-01 E-Ring
77 532 12 35-83 Key, Square
78 532 12 17-48 Washer 25/32 x 1-5/8 x 16
Ga
81 532 16 55-96 Shaft Asm Cross Tapered
82 532 16 57-11 Spring Torsion T/A
83 819 17 12-16 Washer 17/32 x 3/4 x 16 Ga.
84 532 16 95-94 Link Transaxle
89 532 16 65-10 Console, Shift
90 532 12 43-46 Nut Self Thd 1/4
95 532 17 02-01 Control Asm. Bypass Hydro
96 532 12 47-88 Retainer Spring 1" Zinc/Cad
116 872 14 06-08 Bolt Rdhd Sqnk 3/8-16 Unc x 1
120 873 90 06-00 Nut Lock Flg 3/8-16
150 532 17 54-56 Spacer Retainer
151 819 13 32-10 Washer 13/32 x 2 x 10 Ga.
156 532 16 60-02 Washer Srrted 5/16ID x 1.125
158 532 16 55-89 Bracket Shift Mount
159 532 18 39-00 Hub Tapered Flange Shift Lt
161 872 14 04-06 Bolt Rdhd Sqnk 1/4-20 x 3/4 Gr 5
162 873 68 04-00 Nut Crownlock 1/4-20 Unc
163 874 78 04-16 Bolt Hex Fin 1/4-20 Unc x 1 Gr 5
164 819 09 10-10 Washer 5/8 x .281 x 10 Ga
165 532 16 56-23 Bracket Pivot Lever
166 532 16 68-80 Screw 5/16-18 x 5/8
168 532 16 54-92 Bolt Shoulder 5/16-18 x .561
169 532 16 55-80 Plate Fastening STLT/CRD
197 532 16 96-13 Nyliner Snap 5/8" ID
198 532 16 95-93 Washer Nyl 7/8 ID x .105 Hyd
199 532 16 96-12 Bolt Shoulder 5/16-18 Unc
200 872 14 05-08 Bolt Rdhd Sqnk 5/16-18 Unc x 1
202 872 11 06-14 Bolt RDHD 3/8-16 Unc x 1-3/4 Gr. 5
212 532 14 52-12 Nut Hex Flange Lock
250 817 06 06-12 Screw 3/8-16 x .75
NOTE: All component dimensions given in U.S. inches
1 inch = 25.4 mm
35
Page 36
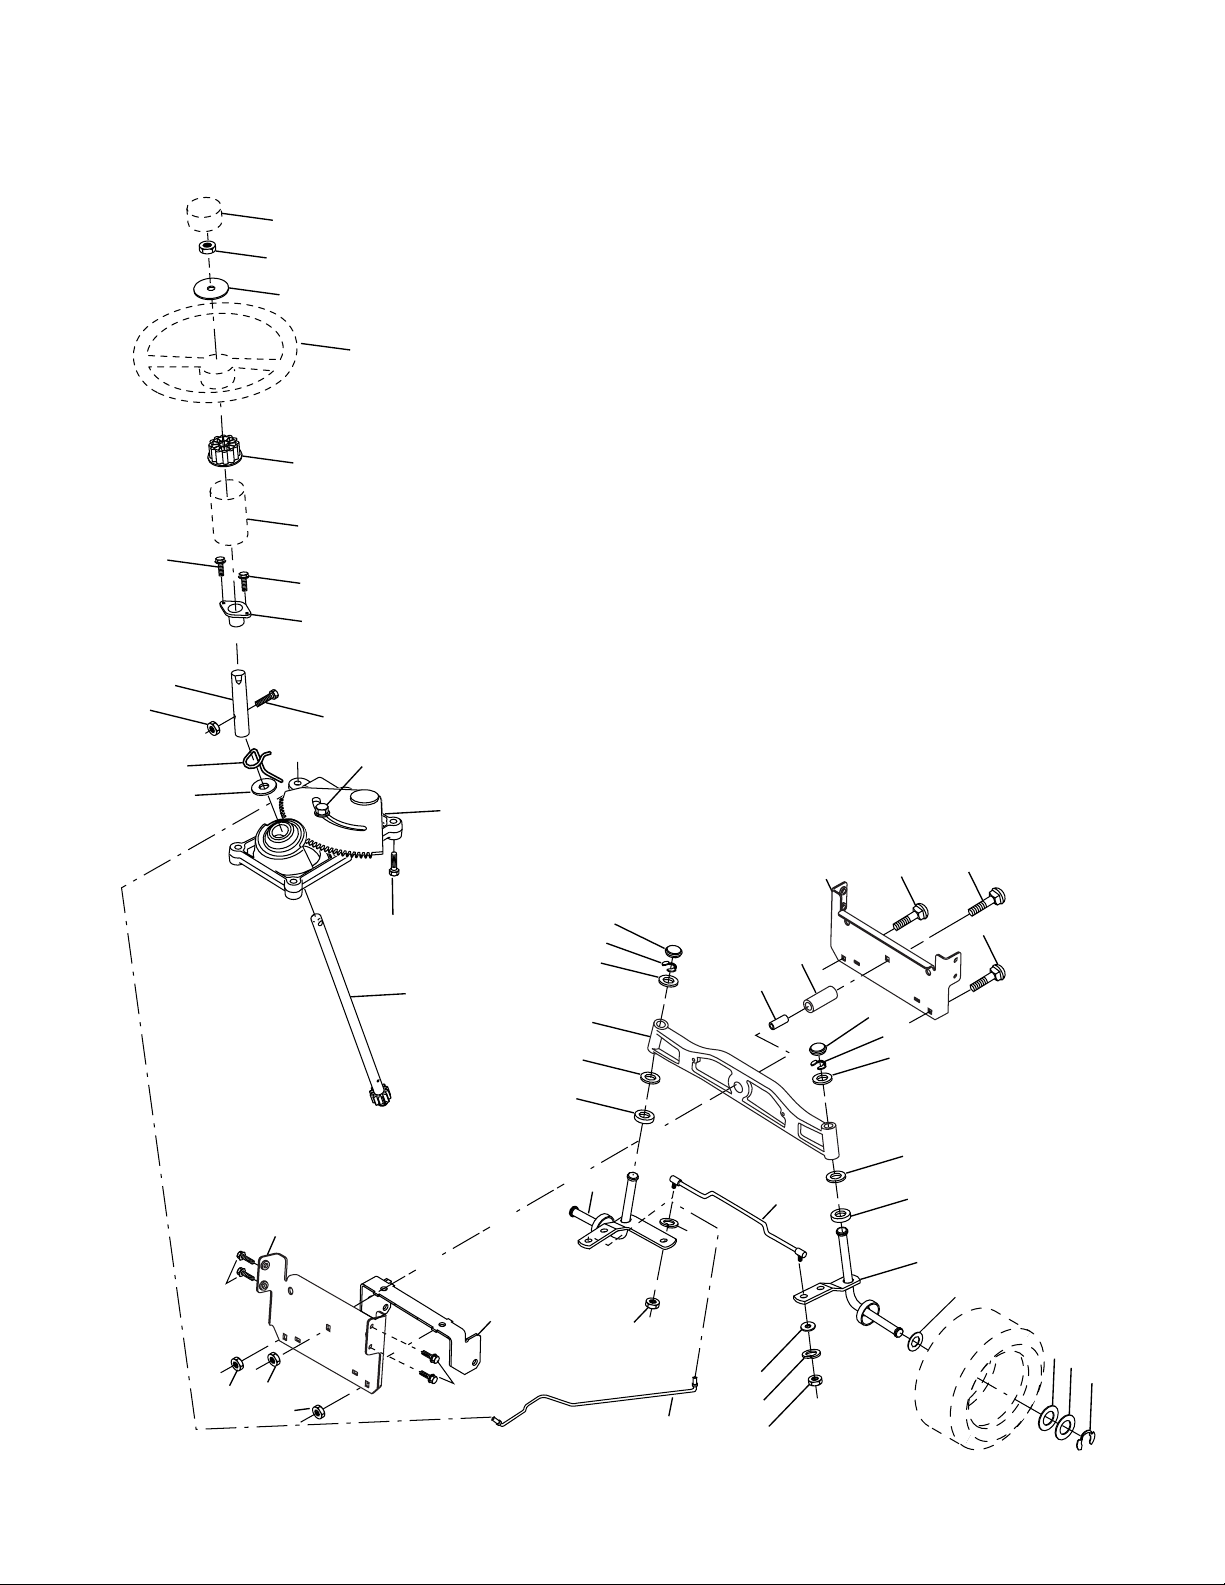
REPAIR PARTS
TRACTOR - MODEL NO. YTH1848XP (HAU18H48E), PRODUCT NO. 954 17 00-57
STEERING ASSEMBLY
38
12
39
1
41
42
37
37
36
44
51
91
43
29
15
15
54
88
71
68
29
17
68
82
29
15
46
8
6
2
87
5
3
11
40
10
13
65
32
93
34
40
67
46
8
6
67
67
87
5
4
43
43
6
8
36
Page 37

REPAIR PARTS
TRACTOR - MODEL NO. YTH1848XP (HAU18H48E), PRODUCT NO. 954 17 00-57
STEERING ASSEMBLY
KEY PART
NO. NO. DESCRIPTION
1 532 16 66-27 Wheel Steering
2 532 17 23-93 Axle Cast Lt Machined
3 532 16 98-40 Spindle Asm LH
4 532 16 98-39 Spindle Asm RH
5 532 12 49-31 Bearing Race Thrust Harden
6 532 12 17-48 Washer 25/32 X 1-5/8 X 16 Ga
8 812 00 00-29 Ring Klip #t5304-75
10 532 17 51-21 Link Drag
11 810 04 06-00 Washer Lock Hvy Hlcl Spr 3/8
12 873 94 08-00 Nut Hex Jam Toplock 1/2-20 UNF
13 532 13 65-18 Spacer Brg Axle Front
15 532 14 52-12 Nut Hex Flange Lock
17 532 18 06-41 Shaft Asm Strg
29 817 06 06-12 Screw 3/8-16x3/4
32 532 18 05-80 Rod Tie Ball J
34 810 04 06-00 Washer Lock Hvy Helical 3/8
36 532 15 50-99 Bushing Strg
37 532 15 29-27 Screw
38 532 16 66-26 Insert Cap Strg Wh
39 819 18 24-11 Washer 9/16 x 1-1/2
40 532 12 47-01 Lock nut
41 532 15 99-45 Adaptor Wheel Strg
42 532 16 96-34 Boot Steering Shaft
43 532 12 17-49 Washer 25/32 X 1 1/4 X 16 Ga
44 532 18 06-40 Extension Steering Shaft LR/LT
46 532 12 12-32 Cap Spindle Fr Top Blk
51 873 54 04-00 Nut Crownlock 1/4-28
54 871 13 04-20 Bolt Hex 1/4-28 UNF x 1-1/4 Gr 8
65 532 16 03-67 Spacer Brace Axle
67 872 14 06-18 Bolt Rdhd Sq 3/8-16 x 2-1/4
68 532 16 98-27 Axle, Brace
71 532 17 51-46 Steering Asm
82 532 16 98-35 Bracket Susp Chassis Front
87 532 17 39-66 Washer Flat .781 x 1-1/2 x .14
88 532 17 51-18 Bolt Shoulder 7/16-20
91 532 17 55-53 Clip Steering
93 819 12 14-14 Washer 3/8 x 7/8 x 14 Ga.
NOTE: All component dimensions given in U.S. inches.
1 inch = 25.4 mm.
37
Page 38
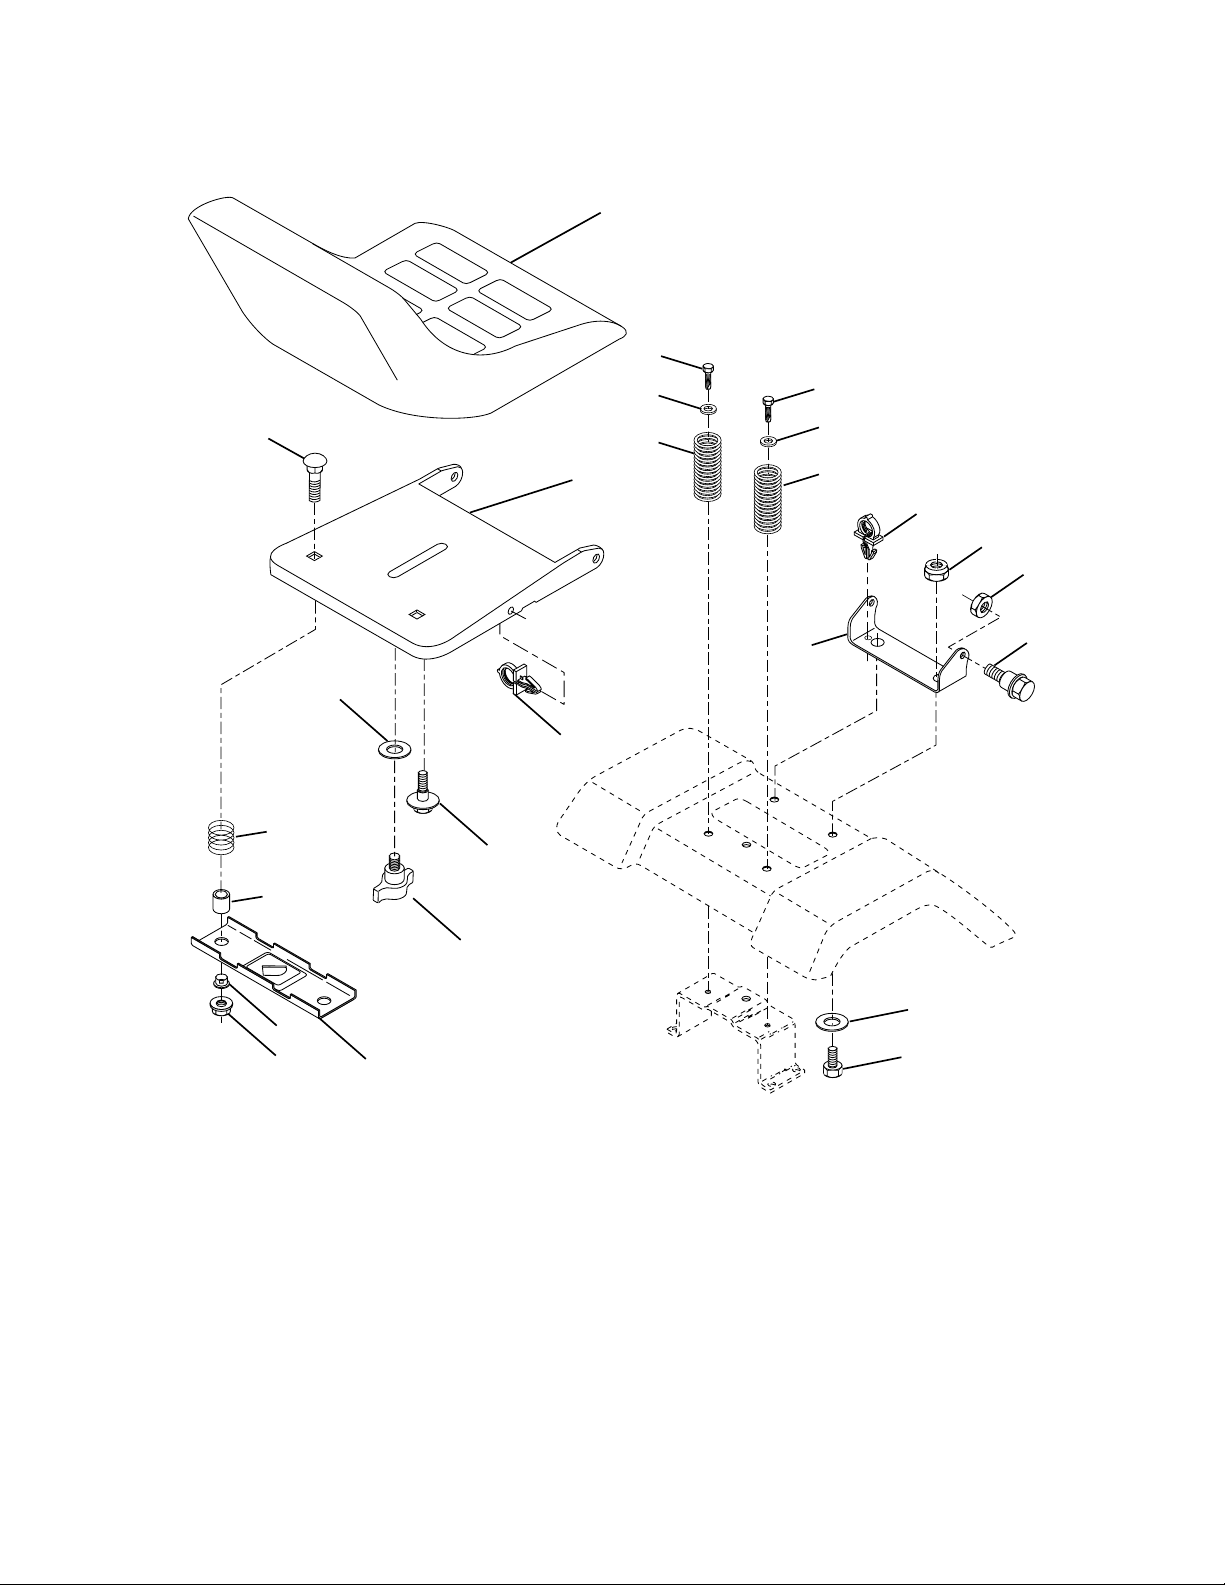
REPAIR PARTS
TRACTOR - MODEL NO. YTH1848XP (HAU18H48E), PRODUCT NO. 954 17 00-57
SEAT ASSEMBLY
1
8
8
9
7
5
6
22
14
9
7
10
24
16
25
15
11
13
17
KEY PART
NO. NO. DESCRIPTION
1 532 14 08-40 Seat
2 532 14 05-51 Bracket Pivot Seat 8 720
3 871 11 06-16 Bolt Fin Hex 3/8-16 x 1
4 819 13 16-10 Washer Flat 13/32 x 1.0 x 10 Ga.
5 532 14 50-06 Clip Push-In
6 873 80 06-00 Nut Hex w/Ins. 3/8-16 Unc
7 532 12 41-81 Spring Seat Cprsn 2 250 Blk Zi
8 817 00 06-16 Screw 3/8-16 x 1
9 819 13 16-14 Washer 13/32 x 1.0 x 14 Ga.
10 532 18 24-93 Pan Seat
11 532 16 63-69 Knob Seat Adj Wingnut
12 532 12 12-46 Bracket Mounting Switch
12
2
5
4
3
KEY PART
NO. NO. DESCRIPTION
13 532 12 12-48 Bushing Snap Blk Nyl 50 Id
14 872 05 04-12 Bolt Rdhd Sqnk 1/4-20x1-1/2
15 532 12 12-49 Spacer Split 28 x .88 Zinc
16 532 12 37-40 Spring Cprsn Plate
17 532 12 39-76 Nut Lock 1/4 Lge Flg Gr 5 Zinc
21 532 17 18-52 Bolt Shoulder 5/16-18 Unc
22 873 80 05-00 Nut Hex Lock W/Ins 5/16-18
24 819 17 19-12 Washer 17/32 X 1 -3/16 X 12 Ga.
25 532 12 70-18 Bolt Shoulder 5/16-18 X 62
NOTE: All component dimensions given in U.S. inches.
1 inch = 25.4 mm
21
38
Page 39
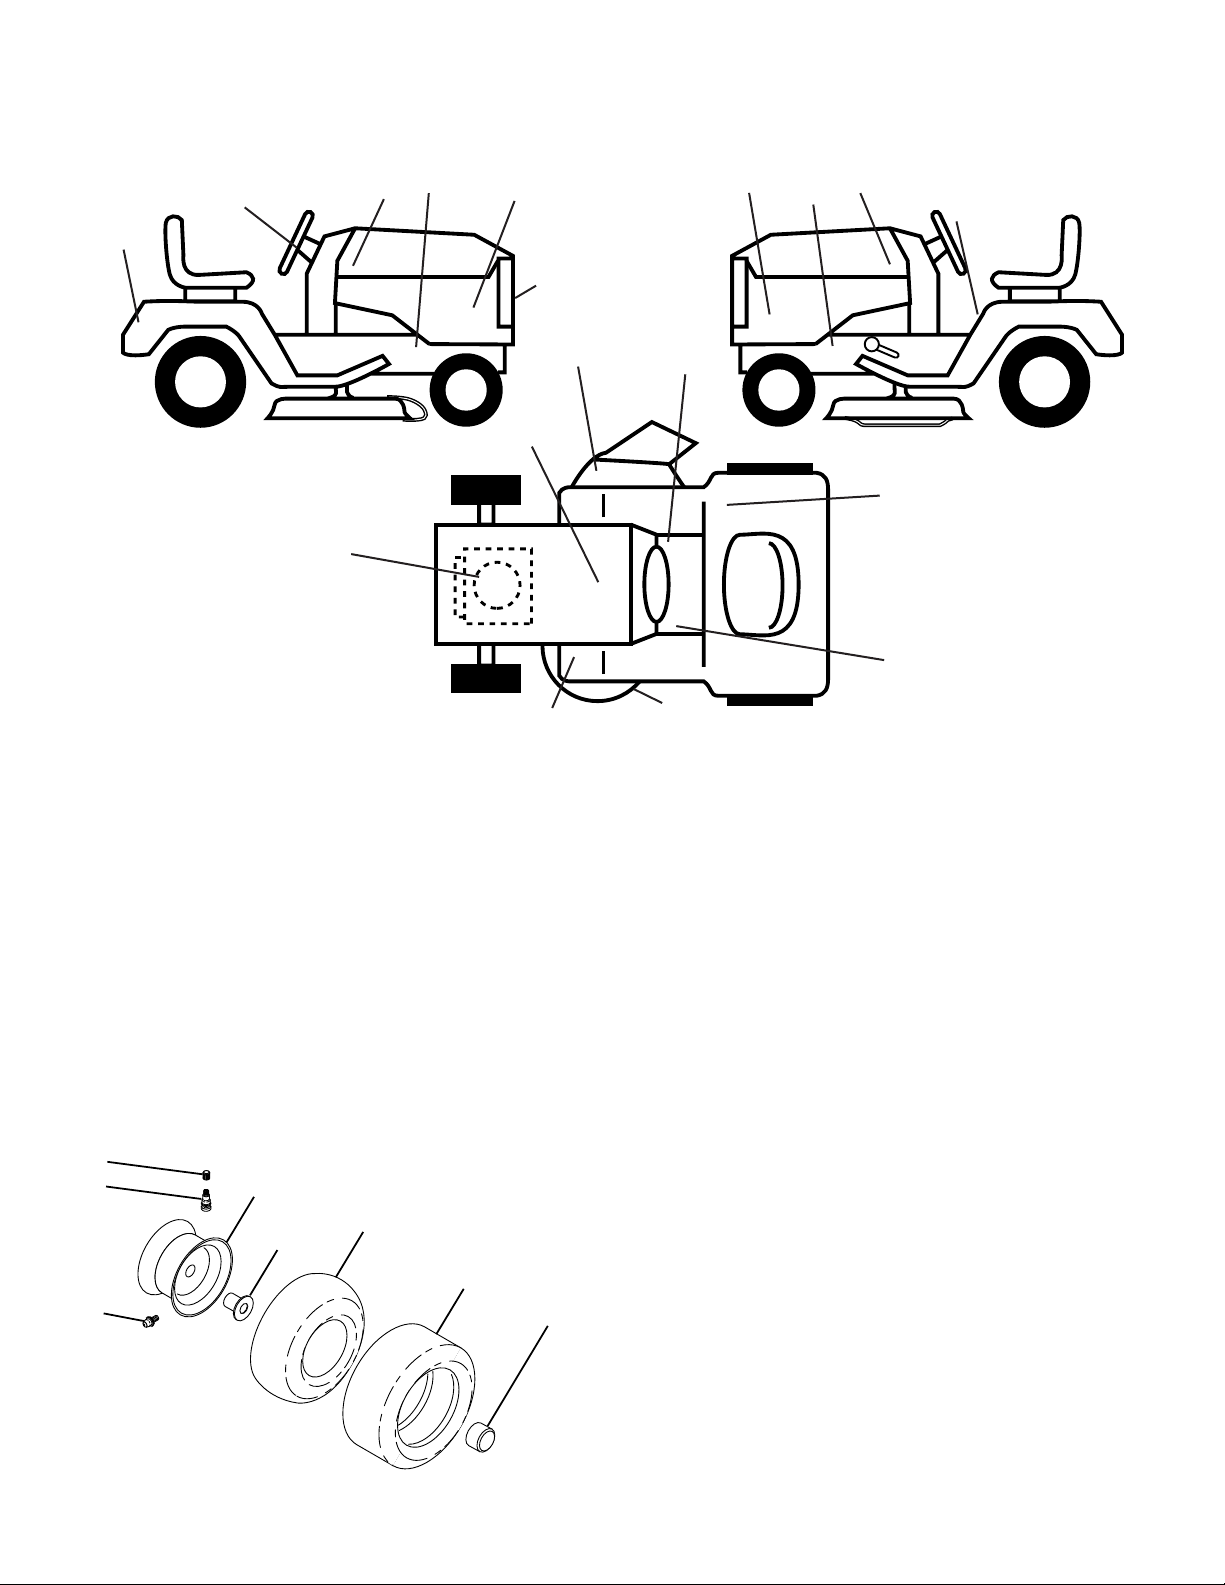
REPAIR PARTS
TRACTOR - MODEL NO. YTH1848XP (HAU18H48E), PRODUCT NO. 954 17 00-57
DECALS
13
2
9
3
5
11
20
6
12
8
14
11
7
13
4
1
15
10
KEY PART
NO. NO. DESCRIPTION
1 532 14 54-98 Decal Oper Inst Hyd E/F
2 532 17 05-64 Decal Strg Wheel Logo
3 532 17 76-72 Decal Hood RH
4 532 17 76-73 Decal Hood LH
5 532 17 83-86 Supplied By Kawaski
6 532 15 06-16 Decal Grille Husq
7 532 14 08-37 Decal Brake Parking
8 532 18 21-66 Decal Cut Finger CE
9 532 17 68-22 Decal Fender Husq
10 532 15 97-37 Decal Brake/Clutch Symbol
11 532 17 68-71 Decal Hood Sides
WHEELS & TIRES
1
2
6
5,8
4,10
7
3,9
11
KEY PART
NO. NO. DESCRIPTION
12 532 17 85-02 Decal Clutch/Brake
13 532 15 97-36 Decal Chassis Hot Muffl er
14 532 17 52-91 Decal V-Belt Schematic
15 532 16 88-69 Decal Tick Mark
20 532 14 50-05 Decal Bat Dan/Psn
- - 532 16 92-10 Decal By Pass Lt Hydro
- - 532 17 12-84 Pad Footrest LH
- - 532 17 12-85 Pad Footrest RH
- - 532 13 83-11 Decal Handle Lft Height Adjust
- - 532 16 25-98 Decal Draw Bar Load Limit
- - 532 18 59-40 Manual Owner's (English)
KEY PART
NO. NO. DESCRIPTION
1 532 05 91-92 Cap Valve Tire
2 532 06 51-39 Stem Valve
3 532 10 62-22 Tire F Ts 15 X 6 0 - 6 Service
4 532 05 99-04 Tube Front (Service Item Only)
5 532 13 83-36 Rim Asm 6"front Silver Service
6 532 12 49-57 Fitting Grease (Front Wheel Only)
7 532 12 49-59 Bearing Flange (Front Wheel Only)
8 532 13 83-37 Rim Asm 8"rear Silver Service
9 532 12 20-82 Tire R Ts 20x10-8 C Service
10 532 12 49-26 Tube Rear (Service Item Only)
11 532 17 50-39 Cap Axle Blk 1 50 X 1 00
- - 532 14 43-34 Sealant, Tire ( 10 oz. Tube)
NOTE: All component dimensions given in U.S. inches
1 inch = 25.4 mm
39
Page 40
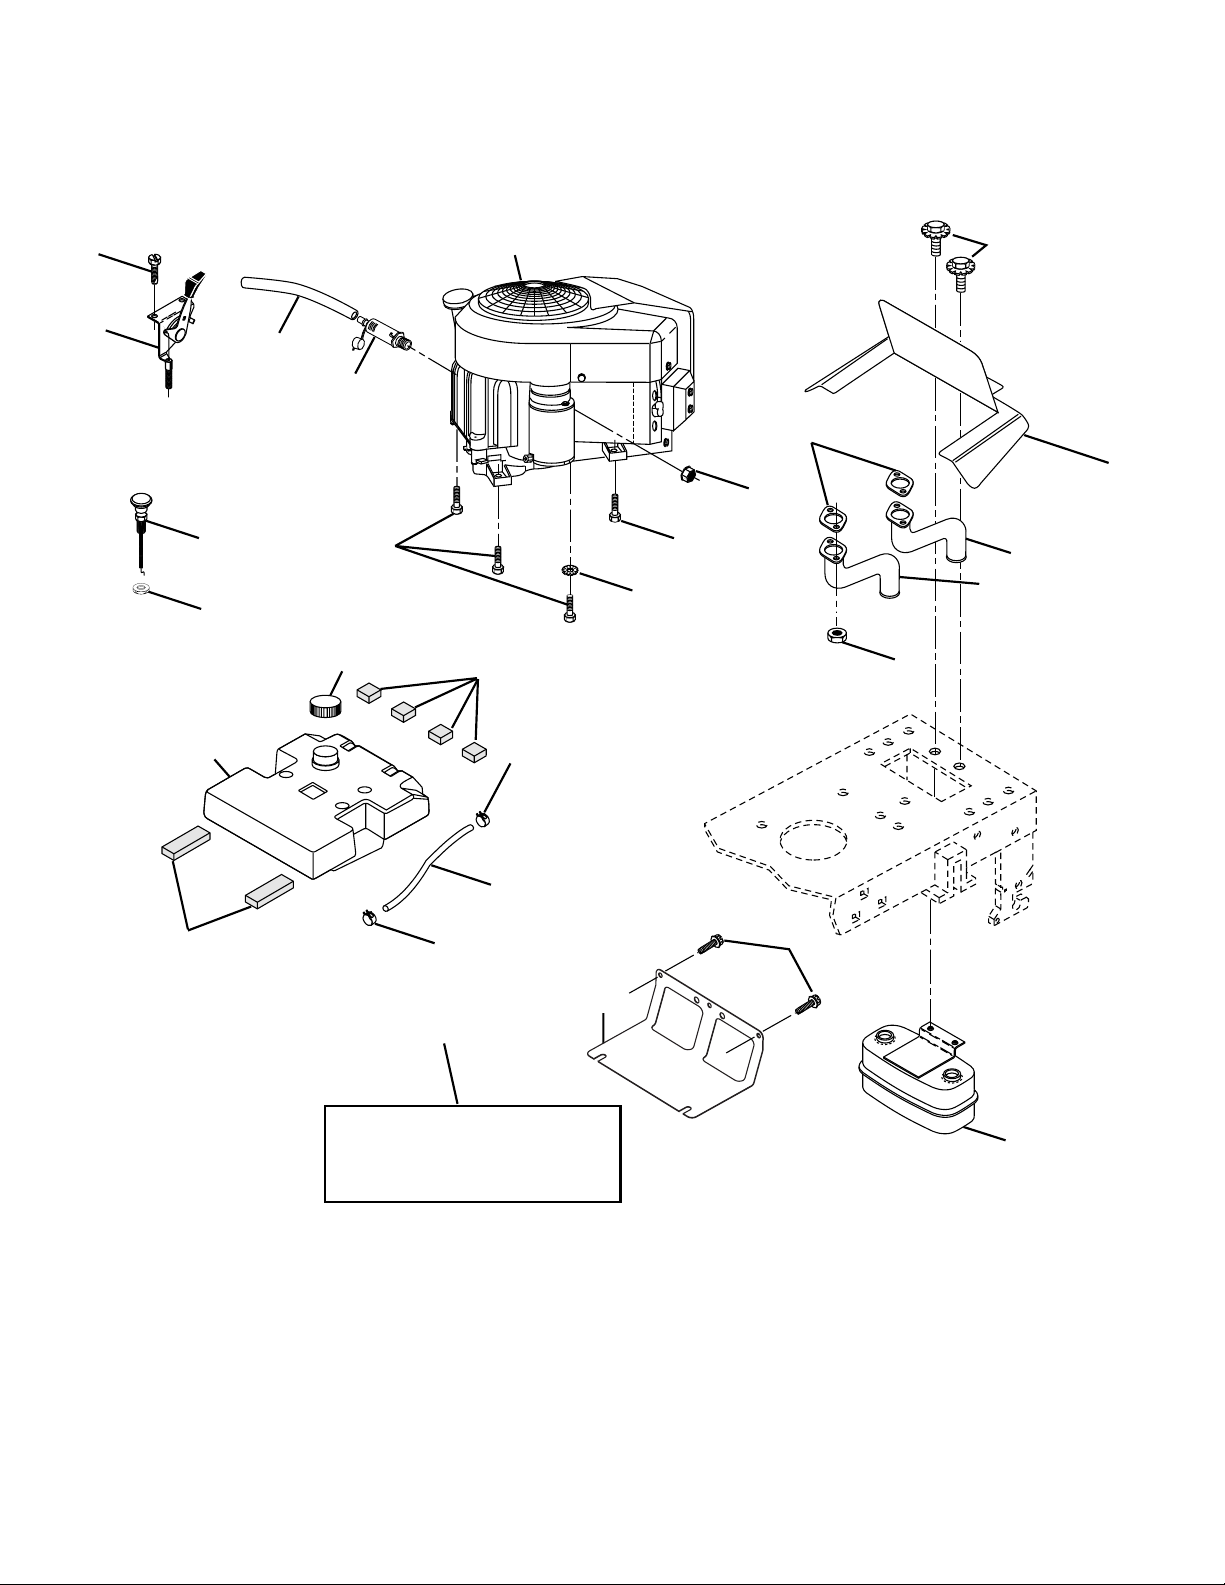
REPAIR PARTS
TRACTOR - MODEL NO. YTH1848XP (HAU18H48E), PRODUCT NO. 954 17 00-57
ENGINE
34
3
13
81
105
16
101
33
2
1
25
14
38
105
26
32
31
8
10
6
5
39
37
33
29
OPTIONAL EQUIPMENT
Spark Arrester
45
23
4
40
Page 41

REPAIR PARTS
TRACTOR - MODEL NO. YTH1848XP (HAU18H48E), PRODUCT NO. 954 17 00-57
ENGINE
KEY PART
NO. NO. DESCRIPTION
1 532 17 08-03 Control Throt Flg
2 817 72 04-08 Screw Hex Thd Cut 1/4-20 x 1/2
3 - - - - - - - - Engine KAWA FH531V
(Order Parts from Engine Manufacturer)
4 532 14 97-23 Muffl er Asm Twin Lo-Tone
5 532 17 60-67 Exhaust Tube
6 532 17 60-68 Exhaust Tube
8 532 17 18-77 Bolt 5/16-18unc x 3/4 W/Sems
10 532 14 66-29 Shield Browning
13 - - - - - - - - Gasket Muffl er
(Order from Engine Manufacturer)
14 532 14 84-56 Tube Drain Oil Easy
16 811 05 06-00 Washer Lock Ext Tooth 3/8
23 532 16 98-37 Shield Browning
25 532 13 27-82 Choke Control
26 873 92 06-00 Nut, Keps 3/8-24 Unf
29 532 13 71-80 Kit Spark Arrestor (Flat Scrn)
31 532 15 71-03 Tank Fuel 3 50 Rear
32 532 14 05-27 Cap Asm Fuel
33 532 12 34-87 Clamp Hose Blk
34 532 10 60-82 Pad, Spacer
37 532 14 21-58 Line Fuel
38 - - - - - - - - Plug Drain Oil (Order from Engine Manufacturer)
39 532 10 92-27 Pad, Idler
45 817 00 06-12 Screw Hexwsh Thdr 3/8-16 x 3/4
81 873 51 04-00 Nut Keps Hex 1/4-20 Unc
101 532 16 33-05 Nut Flange M8-1.25
105 817 12 06-16 Screw 3/8-16 x 1
NOTE: All component dimensions given in U.S. inches
1 inch = 25.4 mm
41
Page 42
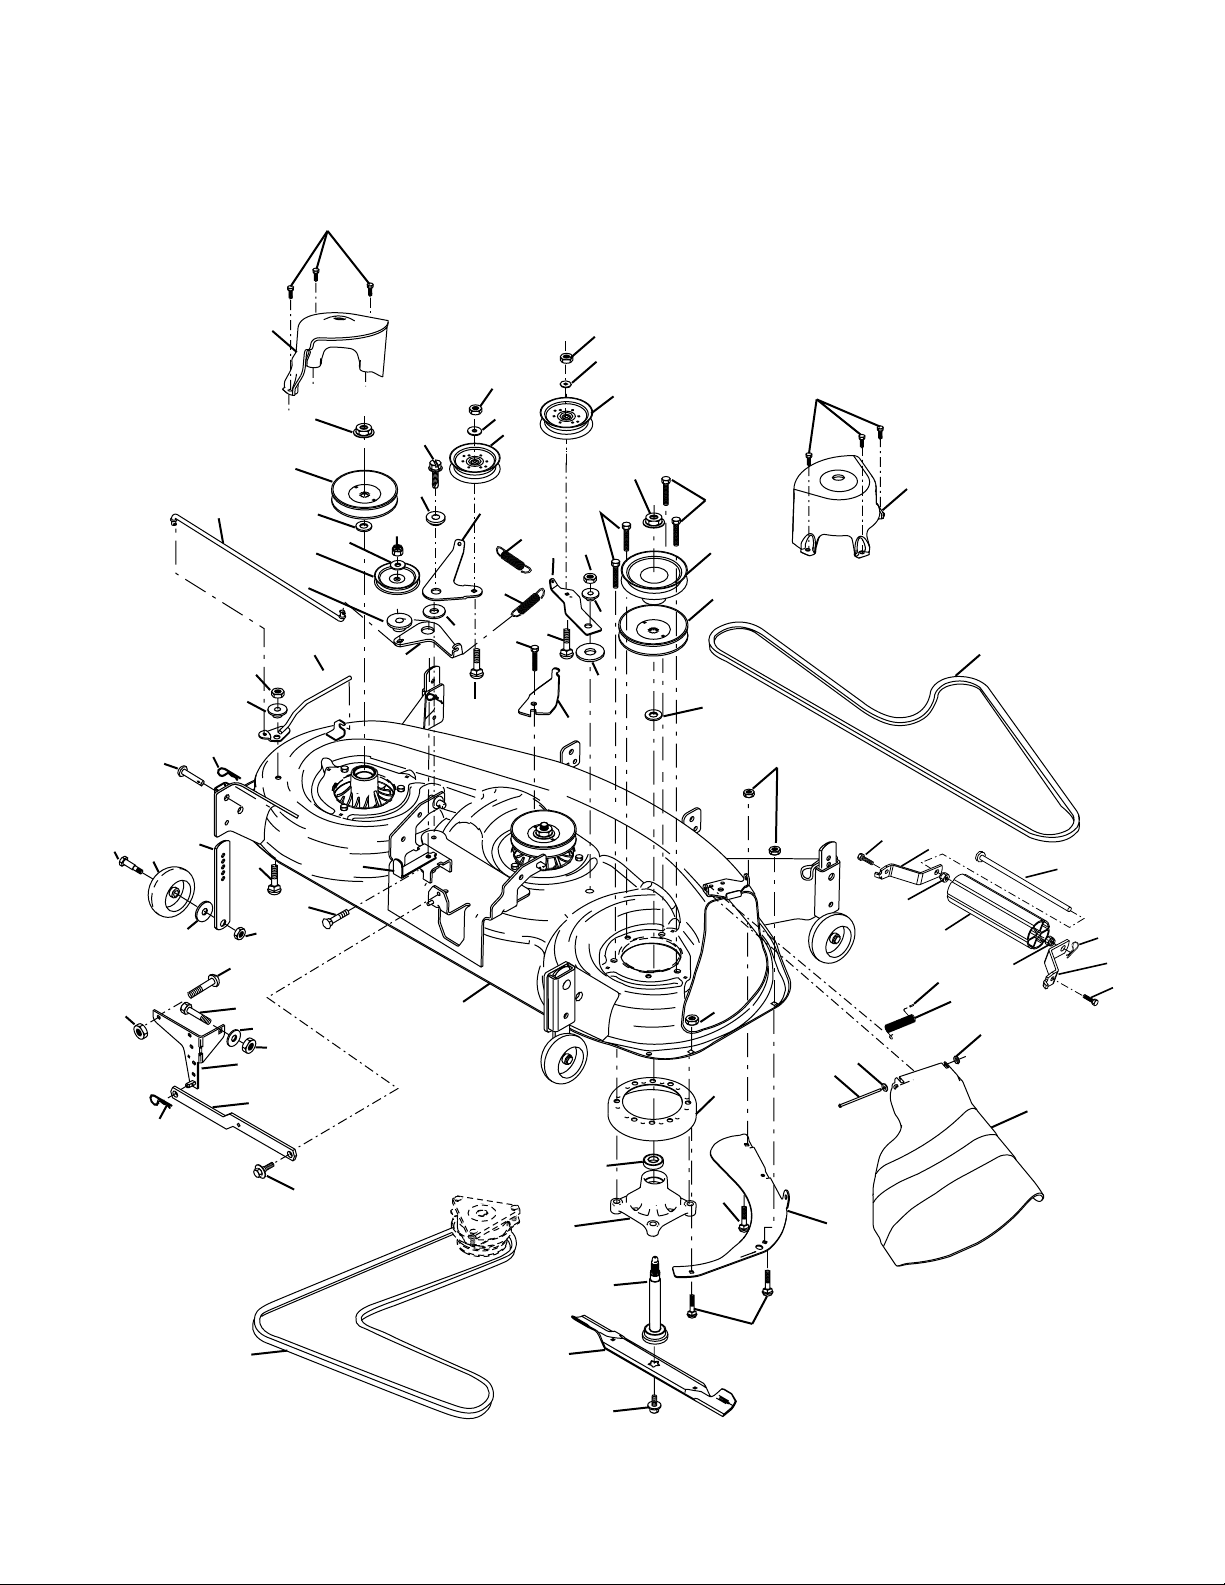
REPAIR PARTS
TRACTOR - MODEL NO. YTH1848XP (HAU18H48E), PRODUCT NO. 954 17 00-57
MOWER DECK
46
116
92
57
117
45
49
1
97
50
43
98
36
30
52
121
50
33
32
112
21
122
5
56
119
55
5
113
54
3
118
72
6
92
31
99
42
100
36
114
184
130
42
49
115
126
110
49
30
49
36
42
97
37
33
31
30
32
21
16
39
21
46
29
28
90
180
45
94
95
24
25
47
26
180
182
183
91
90
27
48
19
11
14
15
18
20
13
18
8
42
Page 43

REPAIR PARTS
TRACTOR - MODEL NO. YTH1848XP (HAU18H48E), PRODUCT NO. 954 17 00-57
MOWER DECK
KEY PART
NO. NO. DESCRIPTION
1 532 18 18-48 Deck Weldment Mower 48
3 532 13 80-17 Bracket Asm., Sway Bar
5 532 12 46-70 Retainer Spring
6 532 17 80-24 Sway Bar Deck
8 532 17 43-65 Bolt, 7/16 Asm. Blade
11 532 18 00-54 Blade
13 532 17 43-60 Shaft Asm. greaseable
14 532 17 43-58 Housing Mandrel 48"
15 532 11 04-85 Bearing, Ball, Mandrel
16 532 17 44-93 Stripper, Mower
17 872 11 06-10 Bolt Rdhd Sq Neck 3/8-16 x 1.25
18 872 14 05-05 Bolt, Carriage 5/16-18 x 5/8
19 532 13 28-27 Bolt, Hex Head, Shoulder 5/16-18
20 532 17 43-78 Baffl e, Vortex Mower
21 873 68 05-00 Nut, Crownlock 5/16-18 UNC
24 532 10 53-04 Cap, Sleeve
25 532 17 81-02 Spring, Torsion
26 532 11 04-52 Nut, Push
27 532 18 17-07 Shield, Defl ector Mower
28 819 11 10-16 Washer 11/32 x 5/8 x 16 Ga.
29 532 13 14-91 Rod, Hinge
30 532 17 39-84 Screw, Thdroll, Washer Head
31 532 12 99-63 Washer, Spacer Mower Vented
32 532 17 78-65 Pulley, Mandrel
33 532 17 83-42 Nut, Flg. Top Lock Cntr. 9/16
36 819 13 13-16 Washer 13/32 x 13/16 x 16 Ga.
37 532 17 79-68 Pulley, Idler, Flat
39 532 17 43-75 Pulley, Idler, Driven
42 532 12 20-52 Spacer, Retainer
43 532 17 43-73 Arm, Idler Secondary
45 532 18 08-06 Cover, Mandrel Deck
46 532 13 77-29 Screw, Thdroll. 1/4-20 x 5/8
47 532 18 08-08 V-Belt, Mower, Secondary
48 532 17 43-68 V-Belt, Mower, Primary
49 873 68 06-00 Nut, Crownlock 3/8-16 UNC
50 872 11 06-12 Bolt, Carriage 3/8-16 x 1-1/2 Gr. 5
KEY PART
NO. NO. DESCRIPTION
52 532 17 58-20 Pulley Idler Flat 46 Pri. Drive
54 874 78 06-16 Bolt Fin Hex 3/8-16 x 1
55 872 14 06-08 Bolt Rdhd Sqnk 3/8-16 x 1
56 532 15 59-86 Bar Pnt Adjusting Wheel Gauge
57 532 15 69-41 Pin Head Rivet
72 819 13 13-12 Washer 13/32 x 13/16 x 12
90 874 76 05-16 Bolt, Fin, Hex 5/16-18 x 1.0
91 532 18 05-34 Bracket, Asm Noseroller, LH 48
92 873 80 06-00 Nut Lock Hex w/Ins 3/8-16
94 532 17 60-66 Roller, Nose 48"
95 532 18 05-35 Bracket, Asm Noseroller RH 48
97 532 17 85-15 Washer Hardened
98 532 17 94-79 Spring Primary Drive
99 532 18 40-58 Pulley Idler "V"
100 872 11 06-16 Bolt RDHD Sqnk 3/8-16 Unc x 2
110 532 17 50-16 Arm Spring Secondary
112 532 17 43-87 Link Tension Relief Lever
113 872 11 05-06 Bolt Rdhd Sqnk 5/16-18 Unc x 3/4
114 532 17 43-84 Tension Asm Relief Lever
115 532 17 46-09 Arm Spring Tension Relief
116 532 18 42-19 Bolt, Shoulder
117 532 13 39-57 Gauge Wheel
118 873 93 06-00 Nut, Centerlock 3/8-16 UNC
119 819 12 14-14 Washer 3/8 x 7/8 x 14 Ga.
121 532 17 43-71 Spring Secondary Drive
122 532 17 46-06 Bushing Pivot Tension Relief
126 532 17 43-72 Arm, Idler, Primary Deck
130 817 00 06-16 Screw 3/8-16 x 1.0
180 873 80 05-00 Nut 5/16-18
182 532 17 91-27 Rod Roller Nose
183 532 16 35-52 Retainer Spring
184 532 17 39-79 Keeper Belt Idler
- - 532 17 43-56 Mandrel Assembly Service
- - 532 18 15-91 Replacement Mower, Complete
NOTE: All component dimensions given in U.S. inche
1 inch = 25.4 mm
43
Page 44
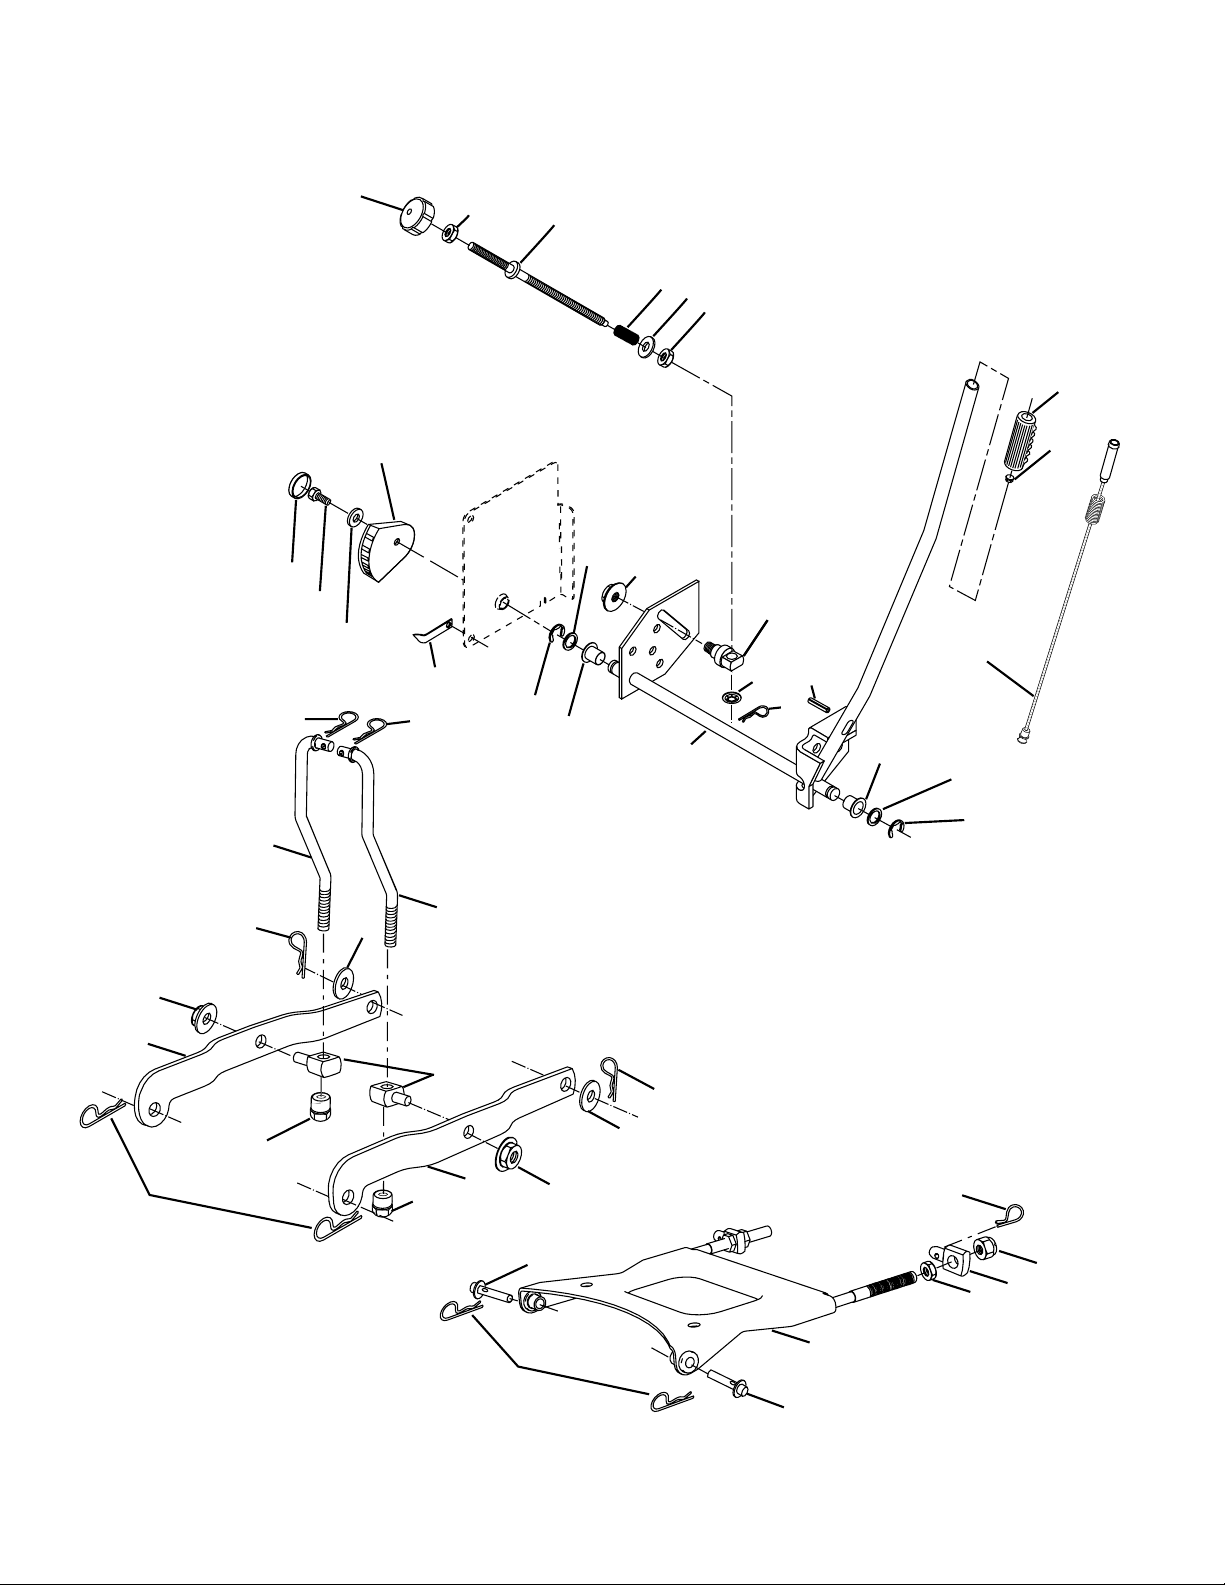
REPAIR PARTS
TRACTOR - MODEL NO. YTH1848XP (HAU18H48E), PRODUCT NO. 954 17 00-57
MOWER LIFT
37
13
38
29
40
41
13
36
28
27
25
24
23
7
8
5
49
30
3
50
4
6
2
26
6
1
5
49
52
13
13
32
11
51
32
12
31
53
13
54
49
51
13
54
15
20
4
18
16
17
44
Page 45

REPAIR PARTS
TRACTOR - MODEL NO. YTH1848XP (HAU18H48E), PRODUCT NO. 954 17 00-57
MOWER LIFT
KEY PART
NO. NO. DESCRIPTION
1 532 15 94-60 Wire Asm Inner/Spring W/Plunger LT
2 532 15 94-71 Shaft Asm Lift RH w/Inf
3 532 10 57-67 Pin Groove 1 500 Zinc
4 812 00 00-02 E Ring #5133-62
5 819 21 16-21 Washer 21/32 X 1 X 21 Ga
6 532 12 01-83 Bearing Nylon Blk 629 Id
7 532 12 56-31 Grip Handle Fluted Blk
8 532 12 45-26 Button Plunger Black
11 532 17 53-70 Link Lift LH
12 532 17 53-71 Link Lift RH
13 532 12 46-70 Retainer Spring
15 532 17 55-62 Plate Asm Susp Front
16 873 35 08-00 Nut Jam Hex 1/2-13 Unc
17 532 17 56-89 Trunnion
18 873 80 08-00 Nut Lock w/Wsh 1/2-13unc
20 532 16 35-52 Retainer Spring
23 532 11 08-07 Nut Special
24 819 13 10-16 Washer 13/32 X 5/8 X 16 Ga
25 532 12 48-74 Spring 2-1/8"
26 532 16 94-84 Retainer Clip
27 532 12 69-71 Rod Adj Lift Zinc 7.49 Wrk Lg
28 873 35 06-00 Nut Hex Jam 3/8-16 Unc
29 532 13 80-57 Knob Inf 3/8-16 Unc Blk W/sym
30 532 15 02-33 Trunnion Infi n Height
31 532 17 62-05 Trunnion
32 532 17 59-94 Nut Lift Link 7/16-20
36 532 15 50-97 Indicator Height STLT
37 532 12 39-35 Plug Hole Blk 1.485/1.515 Dia.
38 817 06 05-16 Screw 5/16-18 x 1
40 819 11 24-10 Washer 11/32 x 1-1/2 10 Ga.
41 532 15 50-98 Scale Ind. Height Blk.
49 532 14 52-12 Nut Hex Flange Lock
50 532 11 04-52 Nut, Push Phos & Oil
51 819 17 14-16 Washer 17/32 x 7/8 x 16 Ga.
52 532 17 53-78 Arm Susp. Rear Lh
53 532 17 58-02 Arm Susp. Rear Rh
54 532 17 55-60 Pin Flange
NOTE: All component dimensions given in U.S. inches
1 inch = 25.4 mm
45
Page 46
46
ON 1: LI
I
T
C
E
S
Husqvarna Forest & Garden Company (“Husqvarna”) warrants Husqvarna product to the original purchaser to be free from defects in material and workmanship from the date of purchase for the “Warranty
Period” of the product as set forth below:
W
Lifetime
held prod uct.
ear Warranty: Sp
3 Y
2 Year COMMERCIAL-Warranty: Hu
walks, and ground engaging commercial equipment.
N-COMMERCIAL
O
ear N
2 Y
walk behind mowers, tillers, chain saws, trimmers, brushcutters, clearing saws, snow blowers, handheld
blowers, backpack blowers,
non com mer cial, nonprofessional, noninstitutional or nonincome producing use, except as herein stated
Emissi
except for those components which are part
facturers for which the purchaser has received a separate warranty with product information supplied at
time of purchase.
1 Year Warranty: Power cu
fessional, non-institutional or non-income producing use
ing trimmers, stick edgers, backpack blowers, hand held blowers, hedge trimmers, power-assist collection
systems used for commercial, institutional, professional or income producing purposes or use
Batteries have a one-year prorated limited warranty with 100% replacement during the fi rst 6 months.
90 Day Warranty: Automatic Mower, Chain saws, power cutters, stump grinders, pole saws, pole prun-
ers, snow throwers, model series 580 & 600 walk-behind mowers and commercial turf equipment or any
Husqvarna product used f
except as otherwise provided herein
Husqvarna Safety Apparel
for
uct must be returned to Charlotte with a warranty claim form. All care and maintenance instructions must
be followed as stated by the manufacturer on the care label. The fi t of the protective apparel/boot is not
covered under warranty.
30 Day Warranty:
S
Husqvarna will repair or replace defective components without charge for
fails because of a defect in mater
S
The following items are not covered by this warranty:
(1)Normal customer maintenance items which become worn through normal regular use, including, b
not limited to
chain, spark plugs, starter ropes and tines;
(2)Natural discoloration of material due to ultraviolet light;
(3)Engine and drive systems not manufactured by Husqvarna; these items are covered b
manufacturer’s warranty as provided in writing with the product information supplied at the time of pur chase; all claims must be sent to the appropriate manufacturer;
(4)Lawn and garden attachments are covered by a third party which gives a warranty, all claims for war ranty should be sent to the manufacturer; and
(5)Emission Control System components necessary to comply with CARB-TIER-II and EPA regulations
which are manufactured by th
on control system components necessary to comply
defects in material and workmanship. Normal wear,
ON 2: H
I
T
C
E
ON 3: IT
TI
C
E
MIT
All tiller tines against breakage, trimmer shafts, ignition coils and modules on hand
arranty:
indles (on Zero Turn Riders and Commercial Wal
sqvarna Commercial Turf Equipment—zero turn riders, wide area
Warranty: Automatic Mower, Riding lawn mowers, yard and garden tractors,
hedge trimmers, electr
tters, stump grinder, pole pruners and pole saws for non-co
or commercial, institutional, professional, or income producing purposes or use
Replacement parts, accessories including bars and chains, tools and display items.
QVA
S
U
MS NOT COVE
E
, belts, blades, blade adapters, bulbs, fi lters, guide bars, lubricants, rewind springs, saw
.
carries a 90-day warranty from the date of the customer’s original purchase
’S OB
A
N
R
ial or workmanship during the warranty period.
ird party engine manufacturer.
ical products and power-assist collection systems f
of engine systems manufactured by third party engine ma
. All trimmers, brushcutters, clearing saws, hover-
tear or abuse is not covered under warranty. Pr
U
IONS
T
A
IG
L
IS
TH
Y
B
D
E
R
k-Behinds)
with CARB-TIER-II and EPA regulations,
mmercial, non-pro-
TY
N
A
R
R
A
W
E
TH
R
E
D
N
parts or labor if a component
Y
T
N
A
R
R
A
W
y the respective
or
.
nu-
.
od-
ut
Y
T
N
A
R
R
A
W
D
E
WARRANTY STATEMENT
S
ON
I
MITAT
LI
D
N
A
S
ON
I
T
ST
U
ROCE
P
O
e unit in accordance with the Owner’s/Operator’s manual or instruc-
ects the product’s per-
with an
OVIDED UNDER THIS WARRANTY IS THE EXCLUSIVE REMEDY OF
NTY OF MERCHANTABIL-
MER
U
D
R
R
E
E
TO
ONS
P
S
TA
B
O
H
7349 St
harl
C
IT
IL
IB
the customer.
A
W
IN
A
QV
S
U
atesville R
e, N
tt
o
S
IE
R
R
A
N
R
28269
C
NTY STATEMENT. HUSQVARNA RE-
S
CON
Y
T
N
A
ty Regist
. Pick-up and delivery charges are
oad
WITHOUT NO TICE,
T
A
R
E
ID
ration Card is properly
531 83 81-23 2002
y applicable
y of the above.
UCTS.
ns on how long
ON
I
ON 4: EXCE
I
T
C
E
S
This warranty shall be inapplicable to defects resulting from the following:
(1)Accident, abuse, misuse, negligence and neglect, including stale fuel, dirt, abrasives, moisture, rust,
corrosion, or any adverse reaction due to incorrect storage or use habits;
(2)Failure to operate or maintain th
tion sheet furnished by Husqvarna;
(3)Alterations or modifi cations that change the intended use of the product or aff
formance, operation, safety, or durability, or causes the product to fail to comply
laws; or:
(4)Additional damage to parts or components due to continued use occurring after an
REPAIR OR REPLACEMENT AS PR
THE PUR CHAS ER. HUSQVARNA SHALL NOT BE LIABLE FOR ANY INCIDENTAL OR CONSEQUENTIAL
DAMAGES FOR BREACH OF ANY EXPRESS OR IMPLIED WARRANTY ON THESE PRODUCTS EXCEPT
TO THE EXTENT PROHIBITED BY APPLICABLE LAW. ANY IMPLIED WARRA
ITY OR FITNESS FOR A PARTICULAR PURPOSE ON THESE PRODUCTS IS LIMITED IN DURATION TO
THE WARRANTY PERIOD AS DEFINED IN THE LIMITED WARRA
SERVES THE RIGHT TO CHANGE OR IMPROVE THE DESIGN OF THE PRODUCT
AND DOES NOT ASSUME OBLIGATION TO UPDATE PREVIOUSLY MANUFACTURED PROD
Some states do not allow the exclusion of incidental or consequential damages, or limitatio
an implied warranty lasts, so the above limitations or exclusions may not apply to you. This warranty gives
you specifi c legal rights, and you may also have other rights which vary from state to state.
ON 5: C
I
T
C
E
S
The product must exhibit reasonable care, maintenance, operation, storage and general upkeep as written
in the maintenance section of the Owner’s/Operator’s manual. Should an operational problem or failure occur,
the product should not be used, but delivered as is to an authorized Husqvarna dealer for evaluation. Proof
of purchase, as explained in section 6, rests solely with
ON 6: P
I
T
C
E
S
It is the Owner’s and Dealer’s responsibility to make certain that the Warran
fi lled out and mailed to Husqvarna Forest & Garden Company. This card should be mailed within ten (10) days
from the date of purchase in order to confi rm the warranty and to facilitate post-sale service.
Proof of purchase must be presented to the authorized Husqvarna dealer in order to obtain warranty ser-
vice. This proof must include date purchased, model number, serial number, and complete name and address
of the selling dealer.
To obtain the benefi t of this warranty, the product believed to be defective must be delivered to an au-
thorized Husqvarna dealer in a timely manner, no later than thirty (30) days from date of the operational
problem or failure. The product must be delivered at the owner’s expense
not covered by this warranty. An authorized Husqvarna dealer can be normally located through the “Yellow
Pages” of the local telephone directory or by calling 1-800-HUSKY62 for a dealer in your area.
Page 47
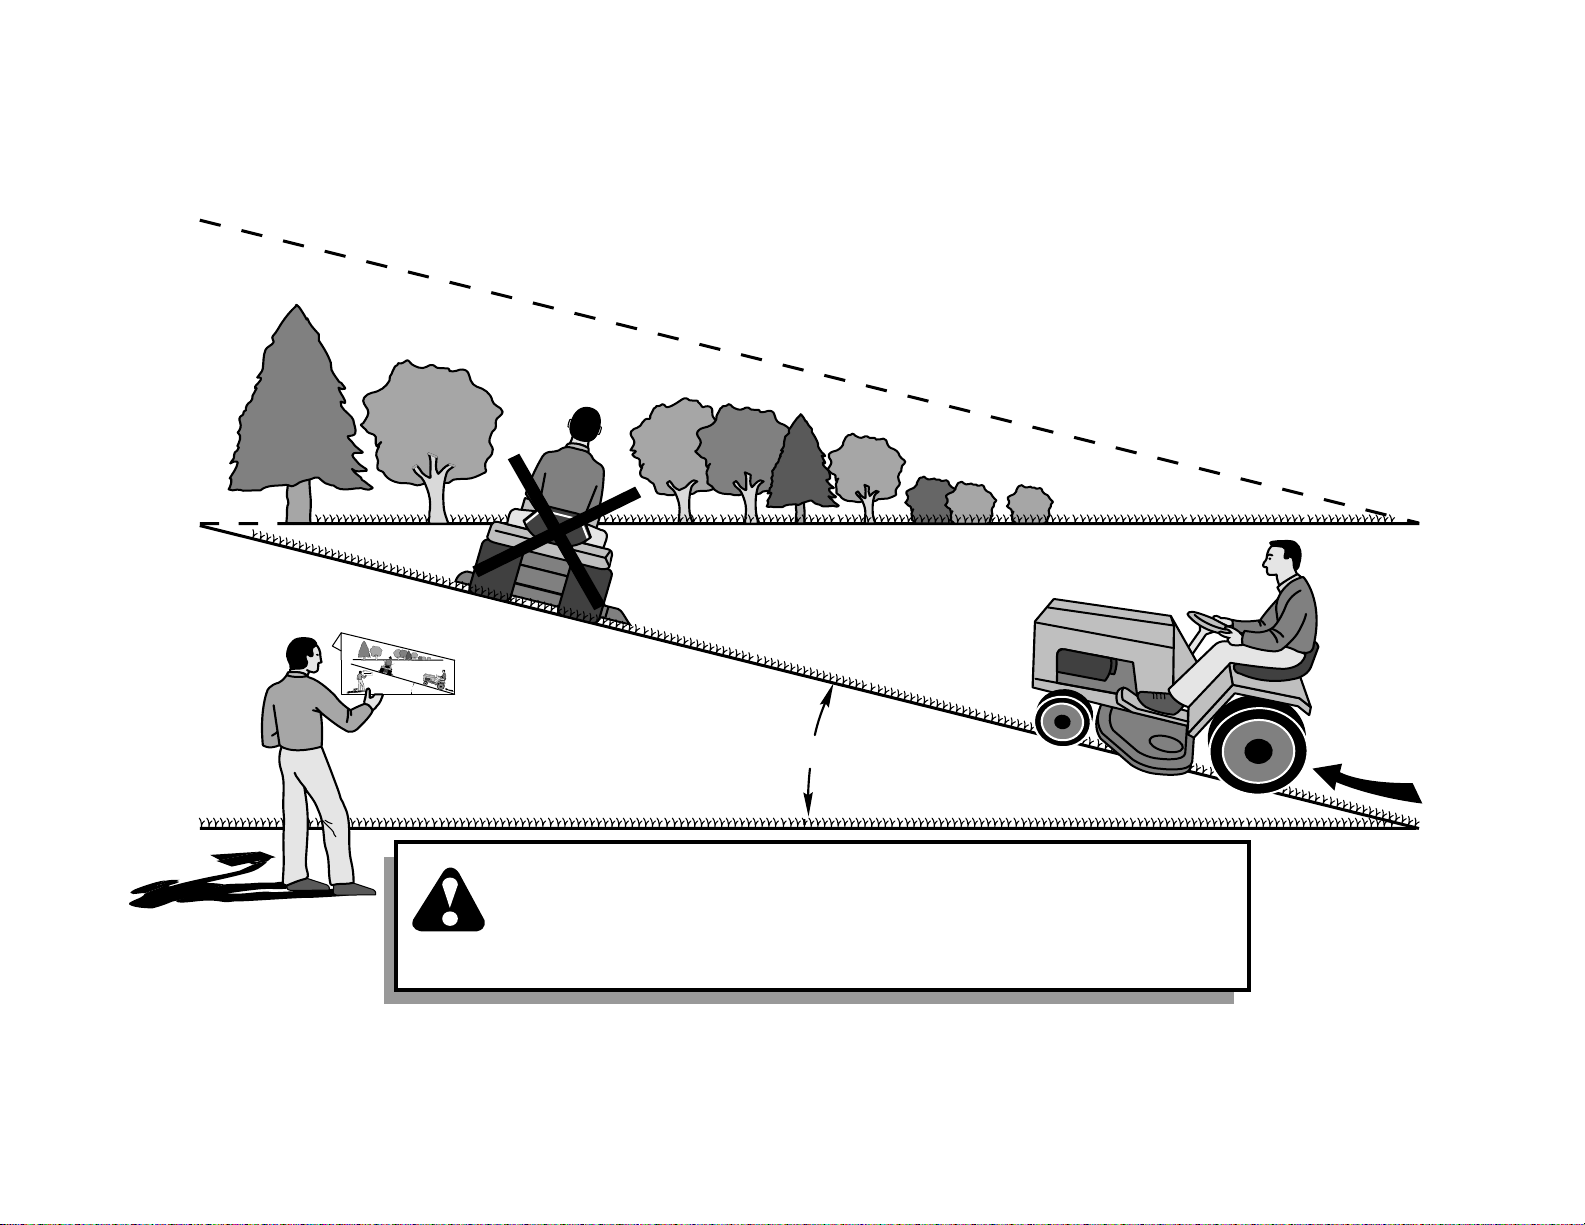
SUGGESTED GUIDE FOR SIGHTING SLOPES FOR SAFE OPERATION
F
O
L
D
A
L
O
A
N
15 D
G
E
D
G
O
R
T
T
E
D
L
IN
E
E
S
E
L
O
P
E
T
H
IS
IS
ONLY RIDE UP AND DOWN HILL,
NOT ACROSS HILL
47
15 DEGREES MAX.
WARNING: To avoid serious injury, operate your tractor up and
down the face of slopes, never across the face. Do not mow
slopes greater than 15 degrees. Make turns gradually to prevent
tipping or loss of control. Exercise extreme caution when
changing direction on slopes.
1. Fold this page along dotted line indicated above.
2. Hold page before you so that its left edge is vertically parallel to a tree
trunk or other upright structure.
3. Sight across the fold in the direction of hill slope you want to measure.
4. Compare the angle of the fold with the slope of the hill.
Page 48

532 18 59-40 11.18.02 TR
Printed in U.S.A.
 Loading...