

Page 1
7iy
‘(
/
I
Page 2
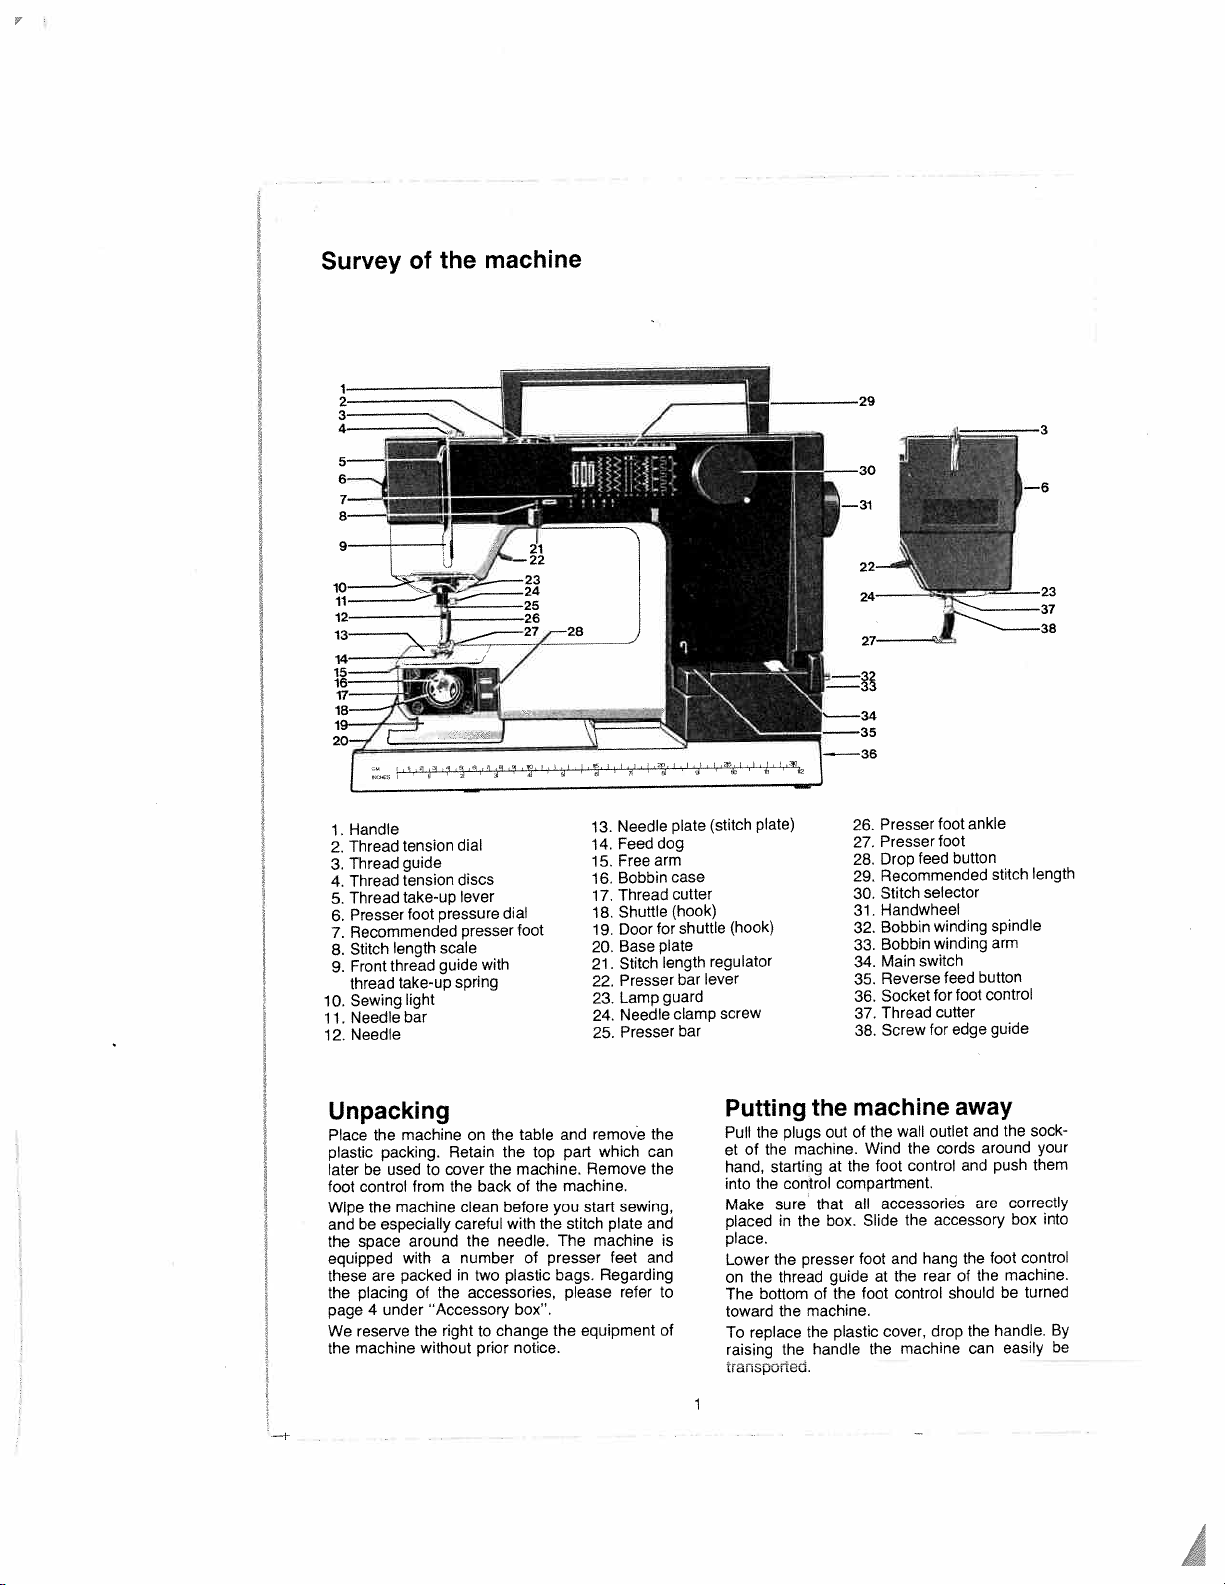
Survey
of
the
machine
Handle
1
2.
3.
4.
5.
6.
7.
8.
9.
10.
11.
12.
tension
Thread
guide
Thread
tension
Thread
take-up
Thread
foot
Presser
Recommended
length
Stitch
thread
Front
take-up
thread
light
Sewing
bar
Needle
Needle
Unpacking
Place
plastic
laterbeused
foot
Wipe
and
the
equipped
these
the
page
We
the
the
packing.
control
the
especially
be
space
are
placing
4
under
reserve
machine
machine
machine
around
with
packed
pressure
scale
guide
cover
to
from
a
the
of
‘Accessory
right
the
without
dial
discs
lever
presser
with
spring
on
Retain
the
backofthe
the
clean
careful
the
number
two
in
accessories,
to
prior
dial
the
the
before
with
needle.
plastic
box”.
change
notice.
foot
table
top
machine.
you
the
The
presser
of
bags.
the
13.
14.
15.
16.
17.
18.
19.
20.
21.
22.
23.
24.
25.
remove
and
part
Remove
machine.
start
stitch
machine
please
equipment
Needle
Feed
Free
Bobbin
Thread
Shuttle
Door
Base
Stitch
Presser
Lamp
Needle
Presser
which
sewing,
plate
feet
Regarding
refer
arm
the
can
the
and
and
plate
dog
case
cutter
(hook)
for
plate
length
guard
clamp
is
to
of
shuttle
lever
bar
bar
(stitch
(hook)
regulator
screw
Putting
Pull
of
et
hand,
into
Make
placed
place.
Lower
the
on
The
toward
replace
To
raising
transportea.
plate)
the
the
starting
the
sure
in
the
thread
bottom
the
the
plugs
machine.
control
the
presser
machine.
the
the
26.
27.
28.
29.
30.
31.
32.
33.
34.
35.
36.
37.
38.
machine
of
out
Wind
the
at
compartment.
all
that
Slide
box.
foot
guideatthe
foot
the
of
plastic
handle
foot
Presser
foot
Presser
feed
Drop
Recommended
selector
Stitch
Handwheel
winding
Bobbin
winding
Bobbin
switch
Main
Reverse
for
Socket
cutter
Thread
for
Screw
outlet
wall
the
the
cords
control
foot
accessories
accessory
the
hang
and
rear
control
drop
cover,
machine
the
button
feed
foot
edge
away
and
the
of
should
ankle
button
control
and
around
are
the
the
can
stitch
spindle
arm
guide
the
push
correctly
box
foot
machine.
be
handle,
easily
length
sock
your
them
into
control
turned
By
be
Page 3
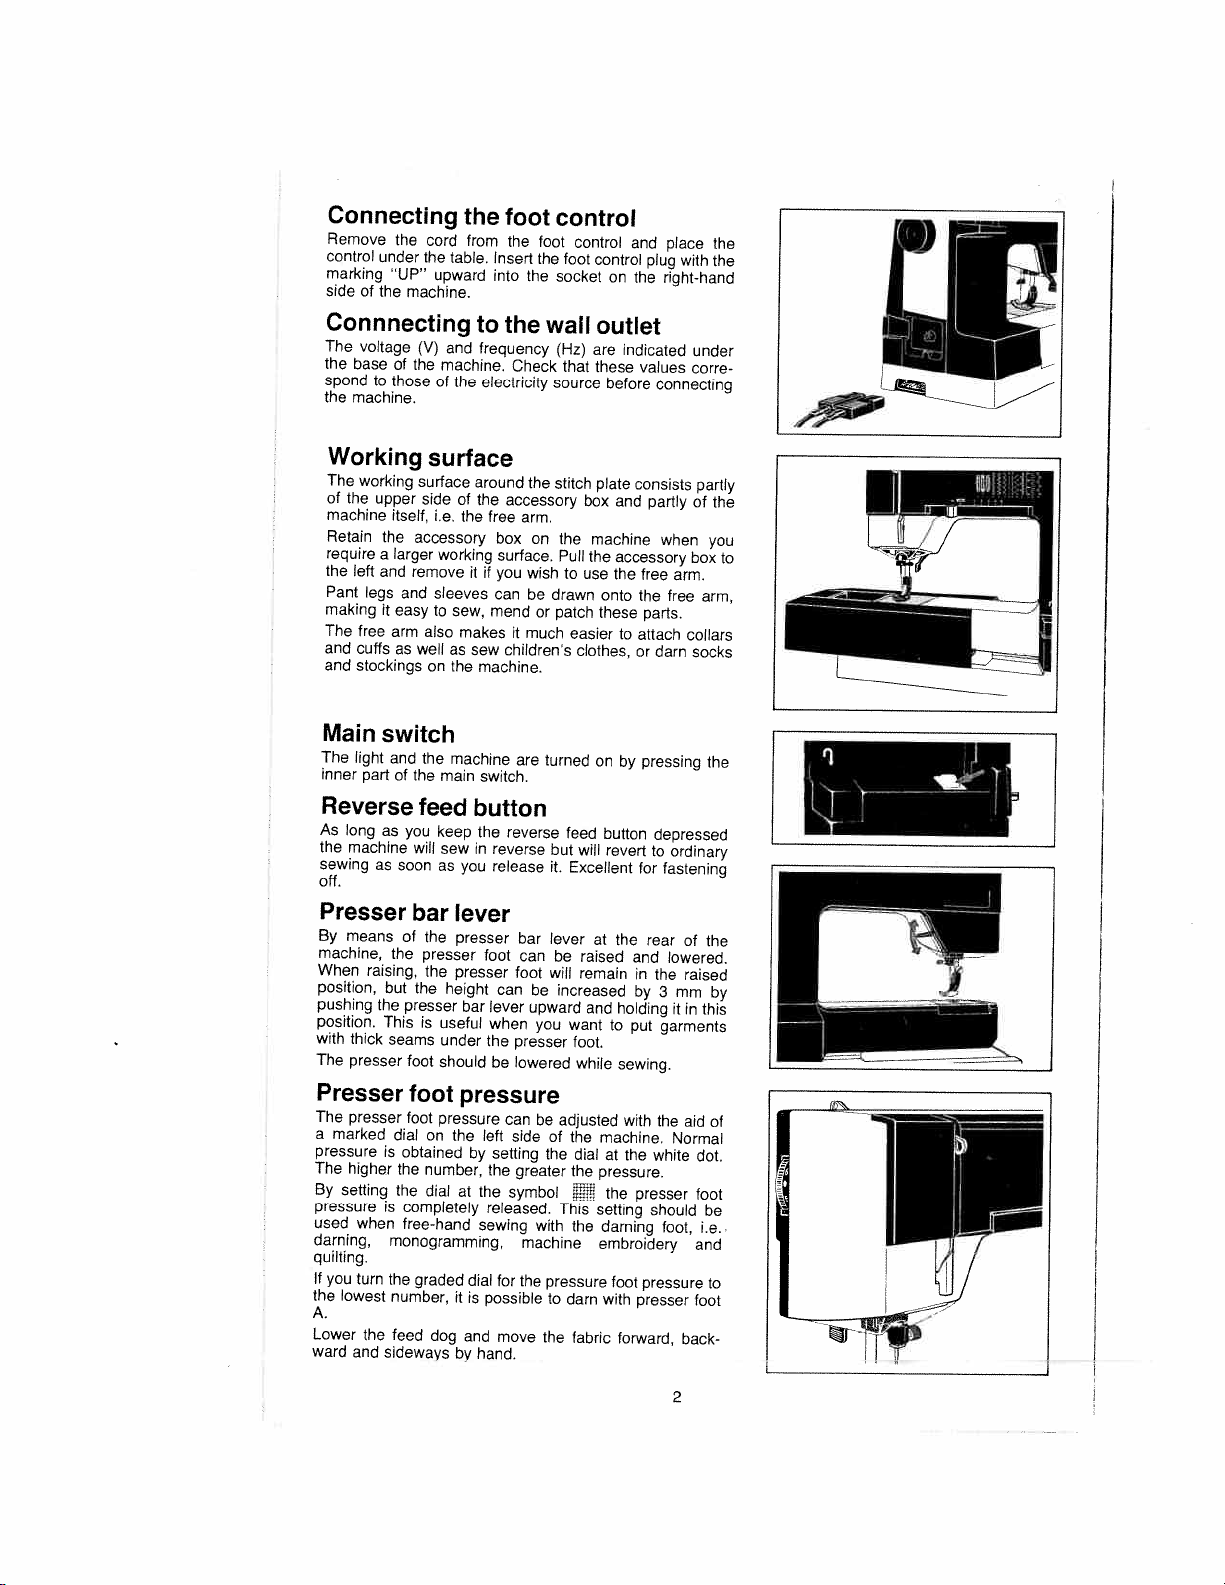
Connecting
Remove
control
marking
side
of
the
under
‘UP”
the
cord
the
machine.
Connnecting
The
the
spond
the
voltage
base
machine.
to
of
those
(V)
the
the
from
table.
upward
and
machine.
of
the
foot
the
Insert
into
to
the
frequency
Check
electricity
foot
the
the
control
control
foot
socket
wall
(Hz)
that
source
control
on
outlet
are
indicated
these
before
and
plug
the
values
connecting
place
the
with
the
right-hand
under
corre
ii
I
I—
Working
The
working
of
the
machine
Retain
require
the
left
Pant
legs
making
The
free
and
cuffs
and
stockings
Main
The
light
inner
part
Reverse
As
long
the
machine
sewing
off.
Presser
means
By
machine,
When
position,
pushing
position.
with
thick
The
presser
Presser
The
presser
a
marked
pressure
The
higher
setting
By
pressure
used
when
darning,
quilting.
If
you
turn
the
lowest
A.
Lower
the
ward
and
surface
surface
upper
side
itself,
the
accessory
larger
a
and
remove
and
sleeves
it
easytosew,
arm
also
well
as
on
switch
and
the
of
the
feed
as
you
will
soon
as
bar
of
the
the
presser
raising,
the
but
the
the
presser
This
is
seams
foot
foot
foot
dial
on
is
obtained
the
number,
the
dial
is
completely
free-hand
monogramming,
the
graded
number,
feed
dog
sideways
of
i.e.
the
working
it
makes
as
sew
the
machine
main
keep
sew
as
you
lever
presser
presser
height
bar
useful
under
should
pressure
pressure
the
by
at
dial
it
is
and
by
around
the
accessory
free
box
surface.
if
you
can
mend
it
children’s
machine.
are
switch.
button
the
reverse
in
reverse
release
foot
foot
can
lever
when
the
presser
lowered
be
can
left
side
setting
the
greater
the
symbol
released.
sewing
for
possible
move
hand.
the
arm.
on
wish
drawn
be
or
much
turned
but
it.
lever
bar
can
will
be
upward
you
be
of
the
with
machine
the
pressure
to
the
stitch
plate
box
the
machine
Pull
the
to
use
patch
easier
clothes,
onbypressing
feed
will
Excellent
at
be
raised
remain
increased
and
want
foot.
while
adjusted
the
dial
the
This
the
darn
fabric
consists
and
partly
accessory
the
free
onto
the
these
parts.
attach
to
or
button
revert
for
the
rear
and
in
by
holding
to
put
sewing.
with
machine.
the
at
pressure.
the
presser
setting
darning
embroidery
pressure
foot
with
presser
forward,
when
box
arm.
free
collars
darn
socks
depressed
ordinary
to
fastening
of
lowered.
raised
the
mm
3
it
in
garments
the
aid
Normal
white
should
foot,
back
partly
of
you
arm,
the
the
this
dot.
foot
be
i.e.
and
to
foot
the
to
LZ
by
of
2
Page 4

Lowering
You
lower
push-button.
the
lower
feed
thick
dog
part.
and
garments
are
The
darning
get
feed
Removing
Open
the
on
the
the
bobbin
door
the
bobbin
latch
recess
Grip
that
The
depressed.
released.
the
In
dog
when
not
is
will
When
the
feed
order
should
sewing
under
above
the
in
front
left
side.
case
depressed
remain
you
feed
dog
by
to
be
the
bobbin
of
the
with
in
release
pushing
raise
lowered
on
the
the
and
the
dog
the
buttons.
presser
level
shuttle
thumb
pull
case
the
in
feed
of
case
by
the
as
latch,
for
foot
the
and
the
dog
a
It
stitch
means
bobbin
long
the
upper
certain
is
also
if
the
index
as
bobbin
again
teeth
plate.
of
the
part
easier
the
finger
case
latch
push
type
of
small
will
of
out.
be
the
so
the
is
__—
in
of
to
I
L.
-
‘‘
-_
-
‘
-—
‘
Bobbin
Turn
side
is
Slide
on
the
Grip
the
hand
the
presser
by
the
the
thread
from
underneath.
allow
the
under
the
eye
the
risk
lightly
depress
you
can
Threading
When
the
beside
should
case
without
Slide
the
case.
Pull
that
the
wise)
when
The
thread
otherwise
Insertion
Slide
the
and
to
the
bobbin
case
thread
cutter
the
thread
up
toward
cut
oft
and
Thread
On
the
back
thread
cutter,
threads
when
the
outward.
the
right
lower
side
needle
thread
the
of
of
release
its
run
thread
the
bobbin
the
thread
right.
end
the
kept
cutter
winding
empty
bobbin
side
part
of
the
foot
clamp
around
presser
the
needle
bending
the
bobbin
case
as
shown
turning
thread
rotates
the
thread
must
spring
of
behind
Put
until
it
is
located
and
thread
in
of
the
by
means
you
have
bobbin
onto
of
the
of
machine
and
the
If
to
go
foot.
the
foot
the
thread
the
winding
with
it
into
the
be
pulled
will
the
the
clicks
draw
cutter.
place.
presser
until
the
machine.
the
pull
the
through
bobbin
you
are
through
Never
to
the
needle.
control.
lower
the
in
the
around.
slot
in
under
in
the
is
pulled.
be
bobbin
the
bobbin
to
ensure
to
the
the
By
Shut
bar
of
which
finished
the
small
bobbin
bobbin
winding
and
turn
thread
the
groove
a
couple
using
the
run
bobbin
Hold
As
soon
end.
thread
is
finished,
marking
figure.
Place
on
the
the
tension
direction
in
the
direction
overloaded.
case
projection
case
into
that
left
of
the
thread
from
doing
so
the
door.
you
will
you
can
sewing.
round
winding
it
out
from
of
a
metal
eye
of
the
thread
because
the
as
place
upward.
the
edge
of
the
of
the
place.
it
fits
bobbin
underneath
the
find
easily
spindle
arm
to
the
the
thread
on
the
times,
presser
the
you
thread
winding
the
The
bobbin
of
the
spring.
arrow
of
the
bobbin
Press
properly.
case.
thread
a
notch,
cut
mark
on
the
side.
arm.
beginning
needle
direct
will
end
bobbin
thread
bobbin
Check
(clock
spring,
case
The
Hold
and
will
the
off
the
on
one
located
rightRaise
guide
Wind
foot,
and
from
run
and
starts
in
its
the
be
Page 5

Threading
the
Raise
highest
pin
Slide
draw
the
Continue
into
the
Thread
the
the
under
presser
position.
thread
and
the
thread
it
upward.
tension
threading
slotonthread take-up
the
needle, ensuring
the
presser
threading
the
presser
discs
needle
foot
of
the
Place
the
into
Then
ankle
foot.
machine
thread
3
by
from
the
foot
upper
Check
spool
the
for
guide
the
draw
down
and
drawing
thatitgoes
the
front.
the
needle-eye
needle,
about
thread
lever
7,
15
sewing.
the
is
thread
the
that
of
thread
on
2
to
around
thread
and
5
through
to
Due
is
easier.
cm
(6”)
the
the
thread
the
clearly
toward
needle
on
upper
front
from
draw
thread
white
Pull
the
is
left
arm
between
guide
the
it
down
guide
color
seen
the
the
at
spool
and
right
and
thread
rear.
its
4.
to
6.
of
Tension
The
thread
higher the
tension
may
thickness
There
tension
stitching,
is
be
necessary
of
is
also
that
topstitching,
number,
obtained
Correct
tension
In
order
to
tension,
thread
on
sewing
loose
thread
neath
number,
The
the
Please
thickness.
sometimes
tension,
lies
the
thread
middle
note
a
fabric.
the
of
When
Accessory
Store
the
accessories
as
the
the
doing.
foot
for
when
the
in
allowance
of
the
at
the
footEcan
edging
joining
or
illustrated,
correct
straight
This
center
them
replace
Select
are
Presser
used
stitches.
guides
dle
seam
edge
(/32”)
Zipper
the needle,
The
zag
of
the
tension
the
is
and
easily
scrapoffabric.
straight
opposite
tension
that
be
thread
mark
a
suitable
you
i.e.
If,
both
even
visible.
dial
the
by
to
embroidering,
incorrect
understand
can
set
the
and
however,
will
is
correct
layers
the
sewing
box
it
foot
sewing.
if
4
fine,
will
presser
stitching,
has notches
When
position,
guide
you
mm
attached
be
foot.Isused
slippery
box.
Aisfitted
foot;
innermost
makingiteasy
presser
upper thread
is
graduated
tension.
the
tighter
the
the
the
type
the thread
making
dial
thread
of
tension
buttonholes,
etc.
setting
adapt
and
on
for
thread
importance
the
different
try
Beginbyusing
tension
the upper
you
occur,
when
of
fabric.
best
in
the
in
easier
be
foot
the
on
straight
you
the
at
(3A6”)
notch.
to
sew
fabrics
dial
thread
set
or
the
the
quality
fabrics,
fine
accessory
for
the
for
machine
zig-zag
which
will
fabric
the
the
to
both
for
with
thread
near
the
typeofsewing
stitching
have
inner
right
overcasting
from
Normal
white
at the
tension
fabric.
dial
tensions
an
excessively
0”.
is
drawn
dial
at
the
may
seam
threads
thread
may
the
box.
to
remove and
you
delivery
at
and
other
canbeused
with
7
a
even
with
edge
ortothe
of
sides
overcast
0—b.
thread
dot.
to
for
for
of
correct
The
lower
under
highest
pucker.
interlock
vary
knot
placing
By
and
utility
the
mm
outer
the
and
2
left
zipper.
the
with
stitch.
4
The
the
the
satin
may
you
nee
(¼’)
mm
zig
It
LX
by
in
in
is
as
of
N/’
Page 6

Needle
The
machine
can
which
Mercerized
For
buttonholes,
No.
30—50
Always
use
machine
the
Two
needles
specially
and
is
be
used
cotton
is
recommended.
needles
is
No.
for
designed
thread
delivered
for
all
can
also
topstitching
coded
80.
sewing
for
the
with
spool
a
typesoffabrics
used.
be
and
darning
1
30,705
H.
in
stretch
purpose.
fabric
of
synthetic
and
embroidery
The
needle
and
most
denim
thread,
seams.
fitted
silk
in
are
Changing
Even
if
the
tions
which
high
quality
Only
a
completely
sewing
results.
the
slightest
point
is
screw
away
socket
screwdriver.
damaged.
in
the
from
as
Stitch
The
pattern
machine
with
between
widths
The
at
needle
hems
fabric
needle
The
selector
indicator
the
to
straight
the
and
is
hole.
required
indicates
machine.
0
choose
center
position
well
to
linesupwith
the
needles
affect
can
needles.
Therefore,
reason
needle
insert
you,
far
it
as
selection
scale
located
which
The
and
5mmand
from.
stitch
canbesewn
left
or
is
suitable
when
sewinginlight
supported
stitch
the
left
or
needle
look
alike
the
sewing
undamaged
change
to
believe
To
remove
clamp.
With
the
will
go.
on
stitches
stitch
length
there
needle
when
the
in
is
set
by
to
the
stitch
the
there
that
the
new
Tighten
the
are
with
position.
sewing
fabrics
outer
turning
right
symbol.
can
be
result.
Be
needle
will
the
needle
it
is
bent
the
needle,
flat
side
needle
into
the
screw
front
of
you
can
canbevaried
three
zig-zag
the
needle
The
narrow
where
edgeofthe
stitch
the
until
the
of
the
sew
left
the
red
slight
sure
give
if
you
or
loosen
the
the
varia
to
perfect
have
that
shank
needle
with
There
stitch.
foot.
use
the
the
the
Choice
are
There
indicate
sewing
Set
the
regulator.
for
sewing
Always
with
start
exact
stitch
doing.
Presser
are
indicate
The
of
figures
the
most
normal
stitch
lengthbymeans
under
indicates
buttonholes.
use
the
experiment
but
length
foot
letters
the
most
letter
stitch
above
suitable
fabrics.
the
symbols.
the
stitch
recommended
for
the
under
the
suitable
is
also
length
the
stitch
stitch
length
until
actual
stitch
presser
marked
of
you
work
symbols
length
the
stitch
The
which
stitch
arrive
symbols
foot
on
the
length
you
which
when
length
symbol
is
at
will
which
each
for
presser
best
to
the
be
5
Page 7

General
The
lightly
of
the
Do
and
When
the
seam.
the
the
Lower
increase
When
of
mm
being
extend
few
reverse
presser
Fasten
ton
and
When
the
work
least
Straight
Check
stitch
Set
the
setting
stitch
length
Increase
It
is
even
in
the
left
step
to
fabrics.
best
on
fabric
not
pull
let
the
you
needle
When
overcast
left
edge
the
the
sewing
(l/s”)
pulled
the
foot
off
sew
the
seam
from
15
cm
that
selector
stitch
2.5
the
possible
needle
the
hints
way
to
the
work
at
B
the
fabric—just
machine
wish
to
goes
down
sewing
stitch
of
the
presser
speed
fine
from
the
down
seam
out
stitches
when
the
seam
a
few
is
finished,
behind
(6”)
of
stitching
the
needle
to
the
length
but
experiment
for
the
stitch
length
to
position
left.
This
hold
at
A
with
do
straight
zig-zag
place
needle
foot,
gradually.
and
soft
edge
into
to
and
sewing
by
reverse
and
thread.
is
straight
regulator
actual
do
straight
is
the
fabric
and
guide
your
right
guide
the
feeding.
stitch,
in
the
center
and
the
hole.
start
fabrics,
of
the
the
needle
the
very
then
hold
forward
depressing
stitches.
raise
cut
in
the
stitch
to
until
work
when
basting
by
turning
very
useful
is
to
it
hand
it
toward
place
other
marking
the
start
fabric,
edge
the
again.
the
the
presser
off
the
highest
symbol.
the
recommended
you
you
will
stitching
the
when
let
your
forward.
and
the
of
the
wide
for
machine
the
to
hole.
of
the
threads
reverse
threads
position.
arrive
be
doing.
and
with
stitch
left
hand
Hold
the
guide
the
the
presser
work
so
marking
stitches,
the
seam
gently
seam
a
couple
prevent
it
If
you
wish
fabric,
sew
behind
feed
foot,
remove
leaving
Turn
basic
at
the
exact
topstitching.
the
needle
selector
sewing
one
light
edge
work.
for
along
and
from
the
but
the
rest
foot
that
the
e.g.
to
at
B
a
Zig-zag
Check
that
the
choice
Turn
the
Recommended
Zig-zag
edging,
Three-step
binds
is
appliqués,
better
Three-step
Check
that
stitch
selector
length
1.
Three-step
rics,
especially
rics.
It
has
zag.
It
is
fabric.
darning
more
It
is
ideal
and
the
needle
of
three
stitch
stitch
used
zig-zag
and
the
needle
to
zig-zag
stretch,
many
elastic
for
mending.
is
zig-zag
selector
length
for
sewing
etc.
is
recommended
is
more
zig-zag
is
symbol
is
suitable
lightweight
advantages
and
sewing
in
the
widths,
to
the
1.5—2.5.
on
attractive.
in
the
,..,,.\.\.‘.
for
compared
will
not
terry
highest
1.5,
required
lace,
for
highest
Recommended
overcasting
or
loosely
pucker
cloth
and
position.
3
and
5
zig-zag
gathering,
overcasting,
position.
most
woven
to
ordinary
the
edge
is
also
You
mm.
symbol.
Turn
of
used
have
bound
as
the
stitch
fab
fab
zig
the
for
it
Oil
Page 8

Blindstitching
Blindstitching
and
knitted
right
side.
Check
stitch
stitch
The
thicker
stitches
is
unavoidable
side.
Fold
the
the
presser
edge
guide
thickness
Be
sure
underneath
Sew
a
catch
just
reach
the
too
far
that
selecter
length
will
fabric
of
that
few
inches
one
fold,
in
on
is
fabrics
the
1.5.
and
be.
foot
1
underneath
the
the
the
thread
turn
the
used
without
needle
at
the
softer
When
that
illustrated.
as
0
fabric.
folded
presser
and
the
fabric
for
symbol
sewing
small
a
can
check
of
the
red
fold,
hemming
the
is
in
the
be
may
edge
foot.
folded
roller
turn
the
stitch
shifted
that
skirts
stitches
being
highest
will
fabrics
sideways
be
set
large
edge.
roller
position.
the
show
vary
according
the
If
the
toward
Recommended
fabric,
lightweight
As
follows
the
slightly
the
made
visible
less
woven
on
in
edge
zig-zag
stitches
+.
toward
of
visible
fabrics,
the
thickness
so
that
guide
stitches
If
they
—.
woven
on
Set
right
to
fail
the
the
the
it
the
the
1
to
are
Overcast
Check
that
stitch
The
ing
Join
(/ie’)
seam
close
the
selector
overcast
lightweight
and
overcast
seam
is
allowance,
to
the
stitching.
Double-action
Check
that
selector
the
elastic
under
that
selector
the
edges.
would
(without
Use
around
bridging
the
double-action
seams
with
does
the
seams
stitch
the
to
like
sewing
each
other
stitch
the
its
stitch
Use
overlapped
gathering
the
freely
Overlapped
leather.
Bridging
Check
stitch
Use
folded
If
you
edges
ters
from
The
bridging
elastic.
elastic
stitch
needle
to
the
stitch
can
woven
directly
allowed,
sew
needle
to
the
symbol
in
narrow,
not
get
stitching.
are
needle
the
symbol
stitch
a
decorative
and
is
also
buttonhole
heel”.
is
in
symbol
be
and
or
cut
with
stitch
in
is
stitch
tricot
flat
stitched
also
is
in
for
joining
them
join
useful
the
highest
vVV.
used
elastic
on
the
out
overcast
the
highest
for
and
soft
elastic
in
recommended
the
highest
two
seam,
together
with
for
foot
C
for
joining
fabrics.
edge
the
garment
stitch
hemming
material
or
elastic
by
mistake
position.
pieces
first)
bridging
gathering
and
place
position.
where
and
position.
cord.
of
place
a
few
stitch.
with
and
and
and
the
with
but
for
Turn
fabric
the
millime
Turn
overcast
a
5
wider
a
then
Turn
sewing
also
Be
sure
can
sewing
the
with
folded
shirring
shirring
the
mm
trim
the
for
run
7
Page 9

Buttonholes
When
sewing
C.
This
foot
buttonholes
tension
symbol.
Set
buttonhole
attractive
the
Always
setting.
bering
ii
0
the
fabric
that
turning
by
stitch
and
where
test
Insert
the
Set
The
reverse.
rect
Turn
Now
Sew
buttonholes,
has
graduated
the
same
selector
symbol.
even
you
sew
a
the
machine
the
stitch
machine
Stop
column
to
symbol
the
machine
three
length.
the
thread
and
The
finer
buttonhole
the
wish
buttonhole
fabric
under
will
selector
sews
when
length.
2—4.
or
four
change
markings
Decrease
tension
stitch
thread
to
begin
and
begin
to
the
you
will
form
stitches.
length
will
the
adjust
the
to
symbol
first
reach
the
to
the
to
help
dial
you
be.
buttonhole.
presser
sew
column
the
bar
buttonhole
you
the
upper
to
the
regulator
use,
Make
the
stitch
foot,
in
reverse.
1.
in
cor-
tack.
foot
make
the
thread
buttonhole
at
the
the
more
a
mark
length
remem
on
_________
Turn
to
symbol
Sew
the
the
as
first
2
Turn
back
will
form
four
stitches.
the
threads
other
to
the
one.
final
in
3.
column
symbol
bar
Turn
the
to
first
the
2—4.
tack.
symbol
column.
same
The
Sew
machine
three
1
and
length
or
lock
Corded
A
small
material,
around
shown
normal
In
heavy
sewing
time.
Cutting
The
buttonhole
box,
is
can
be
handle.
When
you
must
be
Pierce
edge
reaches
With
the
forward,
buttonhole.
buttonhole
other
direction.
Sewing
Lower
the
button
in
selector
handwheel
enters
the
six
stitches.
needle
fasten
the
When
a
trated.
buttonholes
cord
in
order
the
projection
in
the
way,
garments
the
columns
the
equipped
pushed
have
cut
open
the
fabric
down
knife
taking
The
to
the
on
feed
place
at
the
toward
first
Move
to
straight
threads
shank”
can
be
usedtosew
to
keep
at
illustration
you
twice
buttonhole
knife
which
with
a
onto
the
finished
as
follows:
at
right
a
to
the
more
or
care
not
small
red
middle
buttons
dog.
Remove
and
lower
widest
or
you
and
to
stitch
with
is
required,
and
the
a
hole
the
shape
the
heel
and
can
sew
and
you
safety
cap
back
of
sewing
angle
buttonhole.
less
parallel
to
bead
and
then
presser
the
intermediate
test
then
the
other
in
the
few
stitches.
use
of
sew
reinforced
the
will
which,
the
knife,
all
until
cut
the
serves
repeat
the
presser
carefully
other
holes
left
the
buttonholes
better.
Attach
the
buttonhole
the
buttonhole
buttonholes
bar
tacks
find
in
the
when
providing
buttonholes,
the
the
curved
to
the
columns
guide.
as
a
the
foot,
bar.
Set
zig-zag.
that
hole.
and
repeat.
needle
button
reedasillus
in
the
accessory
taken
fabric,
cut
from
the
Turn
the
Sew
position
elastic
the
foot
in
second
a
good
blade
push
of
Cut
put
stitch
needle
five
Set
cord
as
the
by
off,
Er
they
the
the
the
the
the
or
the
and
Page 10

Changing
The
lamp
the
lamp
recess
leverage,
To
in
push
the
The
machine.
Care
If
and
to
straight
Clean
you
When
the
small
place.
guard.
at
you
remove,
direction
the
it
upward
arrow.
wattage
of
want
you
lower
the
right
up
between
will
find
replacing
recessinthe
pin
and
Belts
Belt
adjustment
Why
haven’t
expected?
start
Always
An
important
from
time
to
new
needle
a
seam
is
thread
machine
3.
needle
may
the
upper
the
in
needle
thread,
upper
much
thread
hole
sharp
thread
bobbin
bobbin
may be
not
inserted.
threading
upper
as
wrongly
have
the
any
tension.
in
See
thread
correctly
Unattractive
The
The
correct
Wrong
thickness
Bobbin
page
The
You
pulling
against
The
Check
caught
The
the
The
too
The
The
have
Lower
The
inserted.
The
Uneven
This
the
located
is
the
the
to
the
and backward
left
can
press
of
and
of
clean
feed
above
the
in
the
the
continue
is
to
By
inserting
edge
slide
the
the
turn
the
bulb
machine
the
dog.
the
teeth
accessory
stitch
arm.
not
I
by
checking
which
part
time
is
the
as
soon
what
you
stitches
tension
is
may
be
is
shown
thread.
the
lower
inserted
breaks
helped
fabric.
The
needle
plate
thread
breaks
thread
spool
way.
eye
may
change
so,
is
See
knotted.
needle
Replace
breaks
case
page
3.
overwound.
tension
due
to
have
incorrectly
is
poor
If
thread
is
the
edges.
is
light
left
the
and
the guard
light
bulb
arrow.
it
a
is
machine,
There
hook
at
of
plate,
Ease
push
to
required.
got
the
the
needs
needle.
as
you
expected.
not
correct.
incorrectly
on
It
should
thread.
in
the
the
machine
needle
and
to
sharp
the
needle.
page
may
plate
the
incorrectly
quality
bulb
of
the
the
applying
upward.
To
insert
quarter
indicated
isarecess
cover.
the
same
the
feed
box.
insert
the
it
forward
results
needle
to
Always
discover
Check
See
threaded.
pages
be
bobbin
can
break.
see
that
edges
threaded
4.
be
needle
thread.
needle.
small
down
turn
remove
Push
time
dog
front
be
page
3
of
the
case.
to
easily
it
which
See
chipped
threaded
First
screwdriver
slight
the
to
stitch
turn
quarter
a
the
new
in
the
on
the
the
presser
in
the
the
until
with
it
from
behind
edge
up
until
it
I
changed
start
with
that
that
it
4.
The
and
4.
same
See
feed
by
strike
has
not
cut
page
5.
or
has
and
plate.
or
remove
in
downward
plate.
bulb,
light
direction
rear
of
free
stitch
plate
it
loosens.
the
brush
onto
snaps
a
is
9
the
turn
of
the
foot
arm
into
the
into
Irregular
The
The
winding.
The
The upper
for
The
The
length
The
pressing
See
The
page
The
the
Machine
Dirt
Loosen
tween
See
Dirt
bobbin
See
We
equipment
sories
in
Such
benefit
bobbin
bobbin
machine
See
fabric
thread
thread
correct
machine
stitch
regulator
feed
dog
the
page
3.
presser
2.
feed
dog
brush.
See
runs
or
lint
has
the
the
teeth
instructions
or
lint
has
case
instructions
reserve
and
without
the
designorappearance
modifications
of
the
winding
not
placed
is
is
not
page
puckers
does
length
to
may
lower
foot
is
instructions
sluggishly
fastened
needle
of
fastened
and
the
the
prior
user
full
above.
clean
above.
correctly.
correctly
3.
tension
is
tension.
feed
not
short,
is
too
higher
a
be
part
of
pressureisdisengaged.
of
dust
under
plate
the
feed
in
the
with
right
to
assortment
notice,
however
the
and
threaded
too
tight.
the
number.
lowered.
the
feed
and
above.
the
and
brush
dog.
hook.
the
brush.
change
make
or
of
will
always
product.
page
See
for
See
fabric
Shift
the
Raise
dog
dirt.
Clean
needle
clean
Remove
machine
the
of
extra
modifications
machine.
the
be
bobbin
page
stitch
it
button.
See
with
plate.
be
the
acces
to
the
3.
by
4
>
o
C
0
0
C?
Cd
0)
N
 Loading...