

Page 1

UJAbSflH
-L
Page 2
CONGRATULATIONS
A
CHOOSING
HUSKYLOCK!
ON
Your
machine
enjoy
that
If
Huskylock,
service.
Enjoy
you
all
you
need
Yourself!
the
study
your
is
a
features
this
more
Husqvarna
high
quality,
incorporated,
booklet.
information
easy-to-use
regarding
dealer
however,
is
always
product.
we
the
use
happy
To
fully
suggest
of
your
to
be
of
Page 3

TABLE
OF
CONThNTS
NAMES
ELECTRONIC
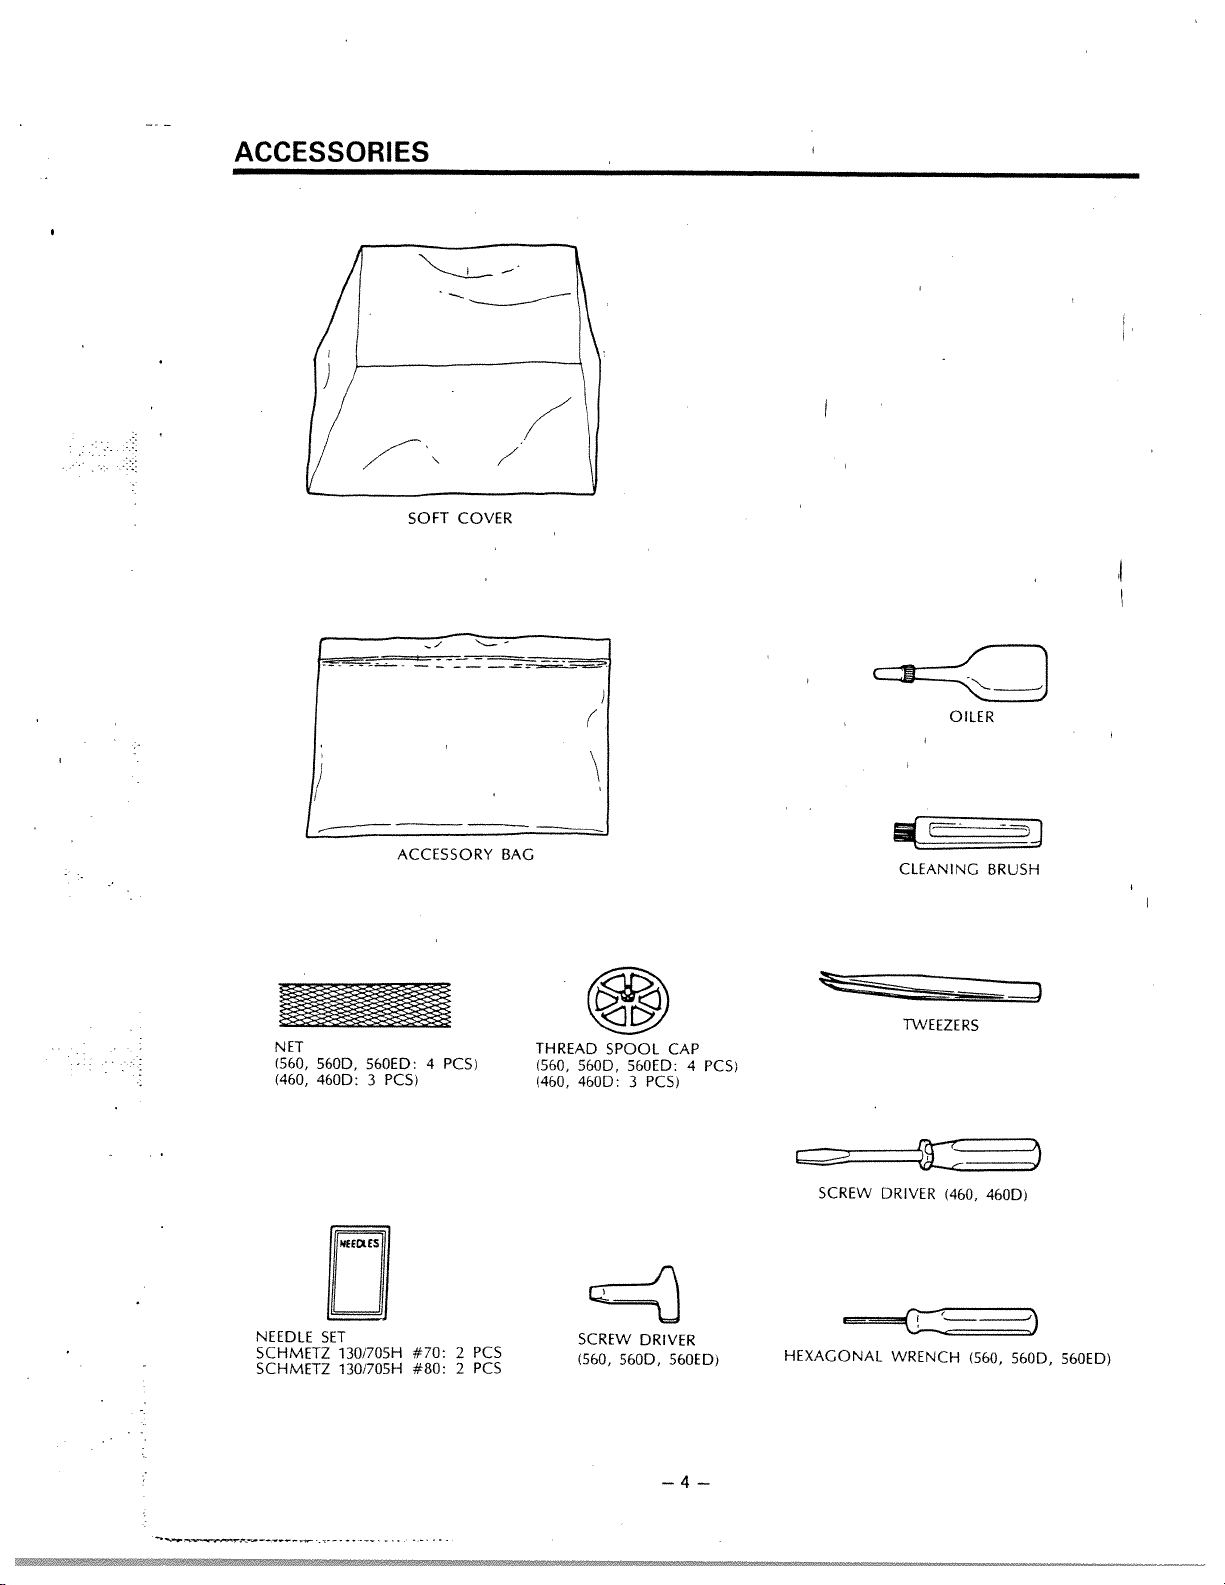
ACCESSORIES
NEEDLE
MOTOR
SElliNG
THREADING
SEWING
STITCH
RATIO
THREAD
CHART
STITCH
STITCH
MECHANISM
DIFFERENTIAL
PRESSER
STITCH
PERFORMANCE
CHANGING
RETRACTING
MAINTENANCE
MACHINE
OF
UP
Before
Threading_overlooper
Threading_underlooper
Threading
To
start
Operation
To
remove
Chaining-off
If
threads
CHART
TENSION
Thread
OF
LENGTH
Stitch
Stitch
WIDTH
FOOT
SPECIFICATION
PARTS_AND
NOTE]
I
FUNCTIONS
TE
YOUR
NOTE
threading...
NOTE
I
[NOTE
NOTE
I
needles
sewing
the
break
NOT1
OF
SEWING
tension
[NOTE
THREAD
AND
length
width
AND
FEED
PRESSURE
[NOTE
PROBLEMS
THE
LIGHT
THE
BLADE
THEIR
Turning
Two-needle
MACHINE
How
to
I
Threading
If
overlooper
I
If
underlooper
I
work
during
Optional
control
Order
TENSION
STITCH
CUTrING
MECHANISM
Don’t
I
sewing
MATERIAL,
levers
of
touch
FAULT-FINDING
BULB
FUNCTIONS
direction
use
order
stitches
thread
ADJUSTMENT
WIDTH
WIDTH
models
the
thread
thread
the
of
thread
THREAD
tension
FINE
stitch
motor
spool
breaks
during
breaks
tongue
during
AND
adjustment
ADJUSTMENT
cap
and
NEEDLE
changing
the
sewing
sewing
1-2
3
4
5
6
7
net
8-11
12
13-14
15
16
17-20
21
22
23
25
25
knob
26
28
28
29
30
Page 4
CAUTION!
THREADING,
WHEN
SWITCH
WHEN
OF
THE
THE
MACHINE
DISCONNECTED
REPLACING
MACHINE.
IS
FROM
THE
NOT
NEEDLE
IN
WALL
USE,
SOCKET
LIGHT
OR
IS
RECOMMENDED
IT
TO
BULB,
AVOID
BE
ANY
TO
SURE
THAT
POSSIBLE
TURN
THE
ELECTRIC
HAZARDS.
OFF
THE
SUPPLY
MAIN
POWER
PLUG
IS
Page 5
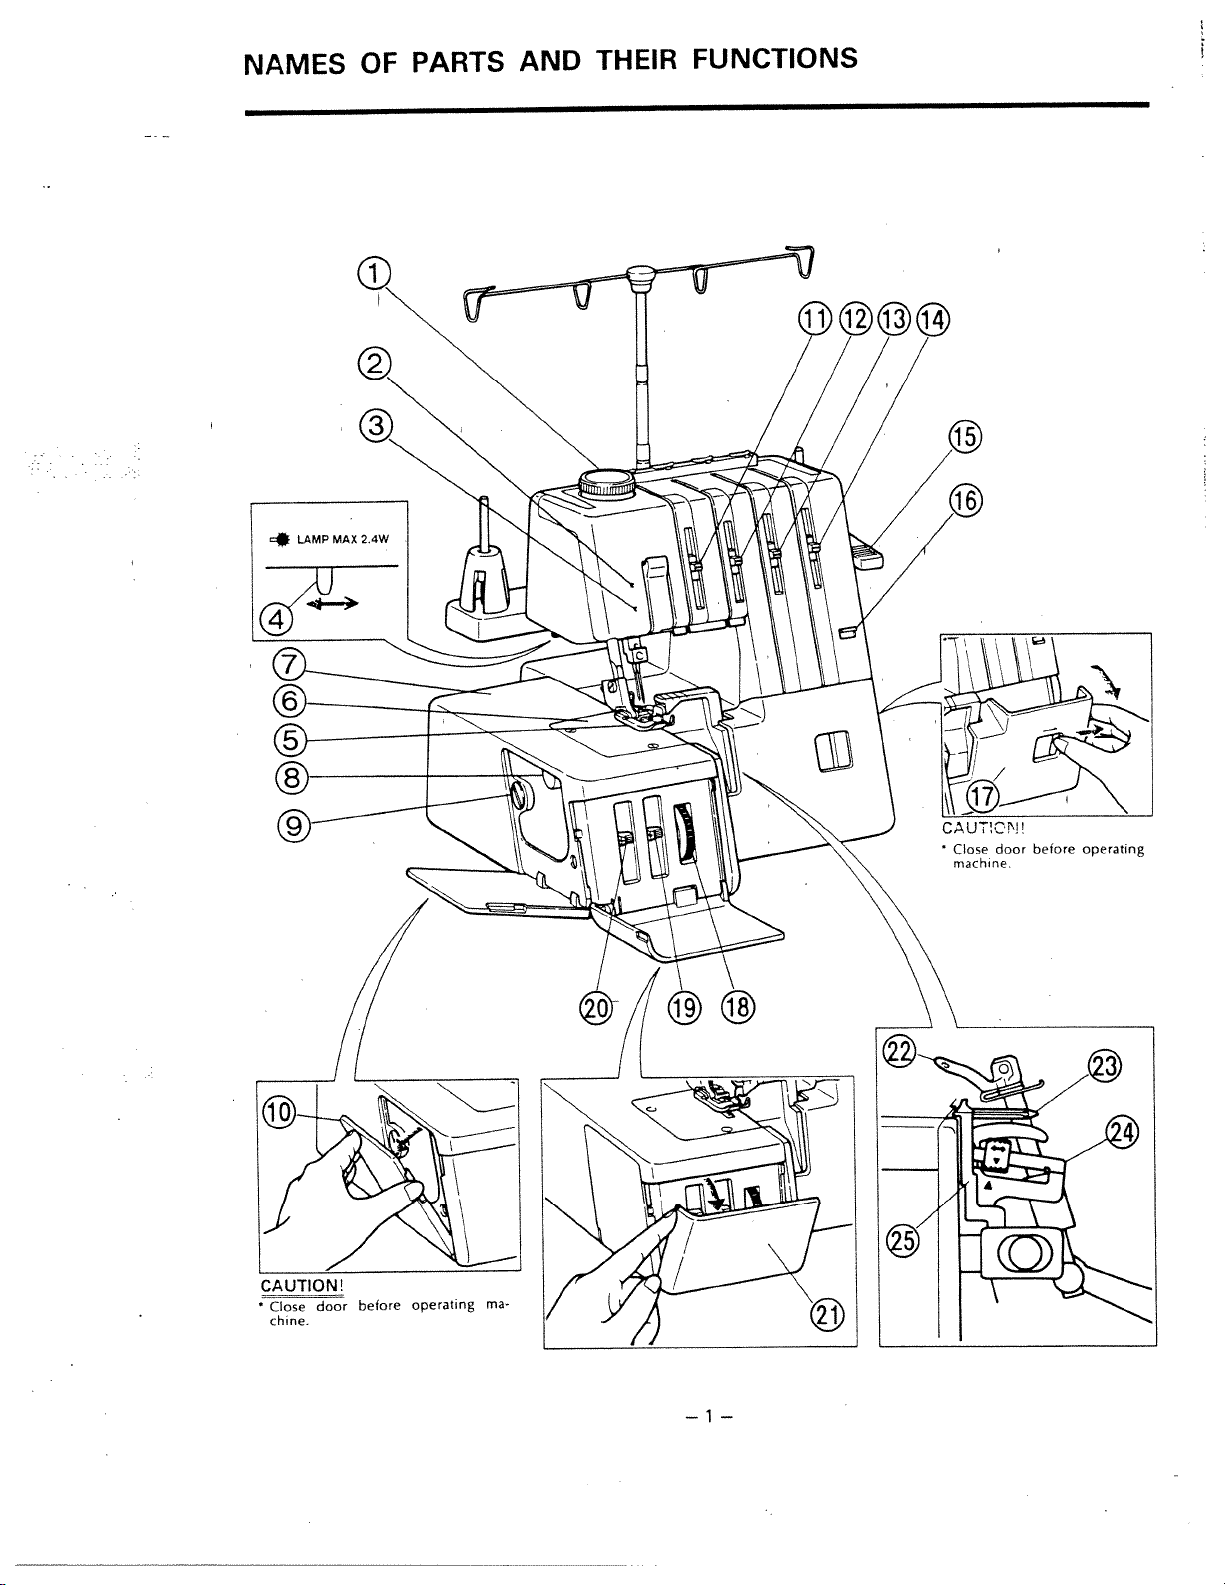
NAMES
OF
PARTS
AND
THEIR
FUNCTIONS
CAUT!CN’
door
*
Close
rnachioe.
before
operatiog
—1—
Page 6
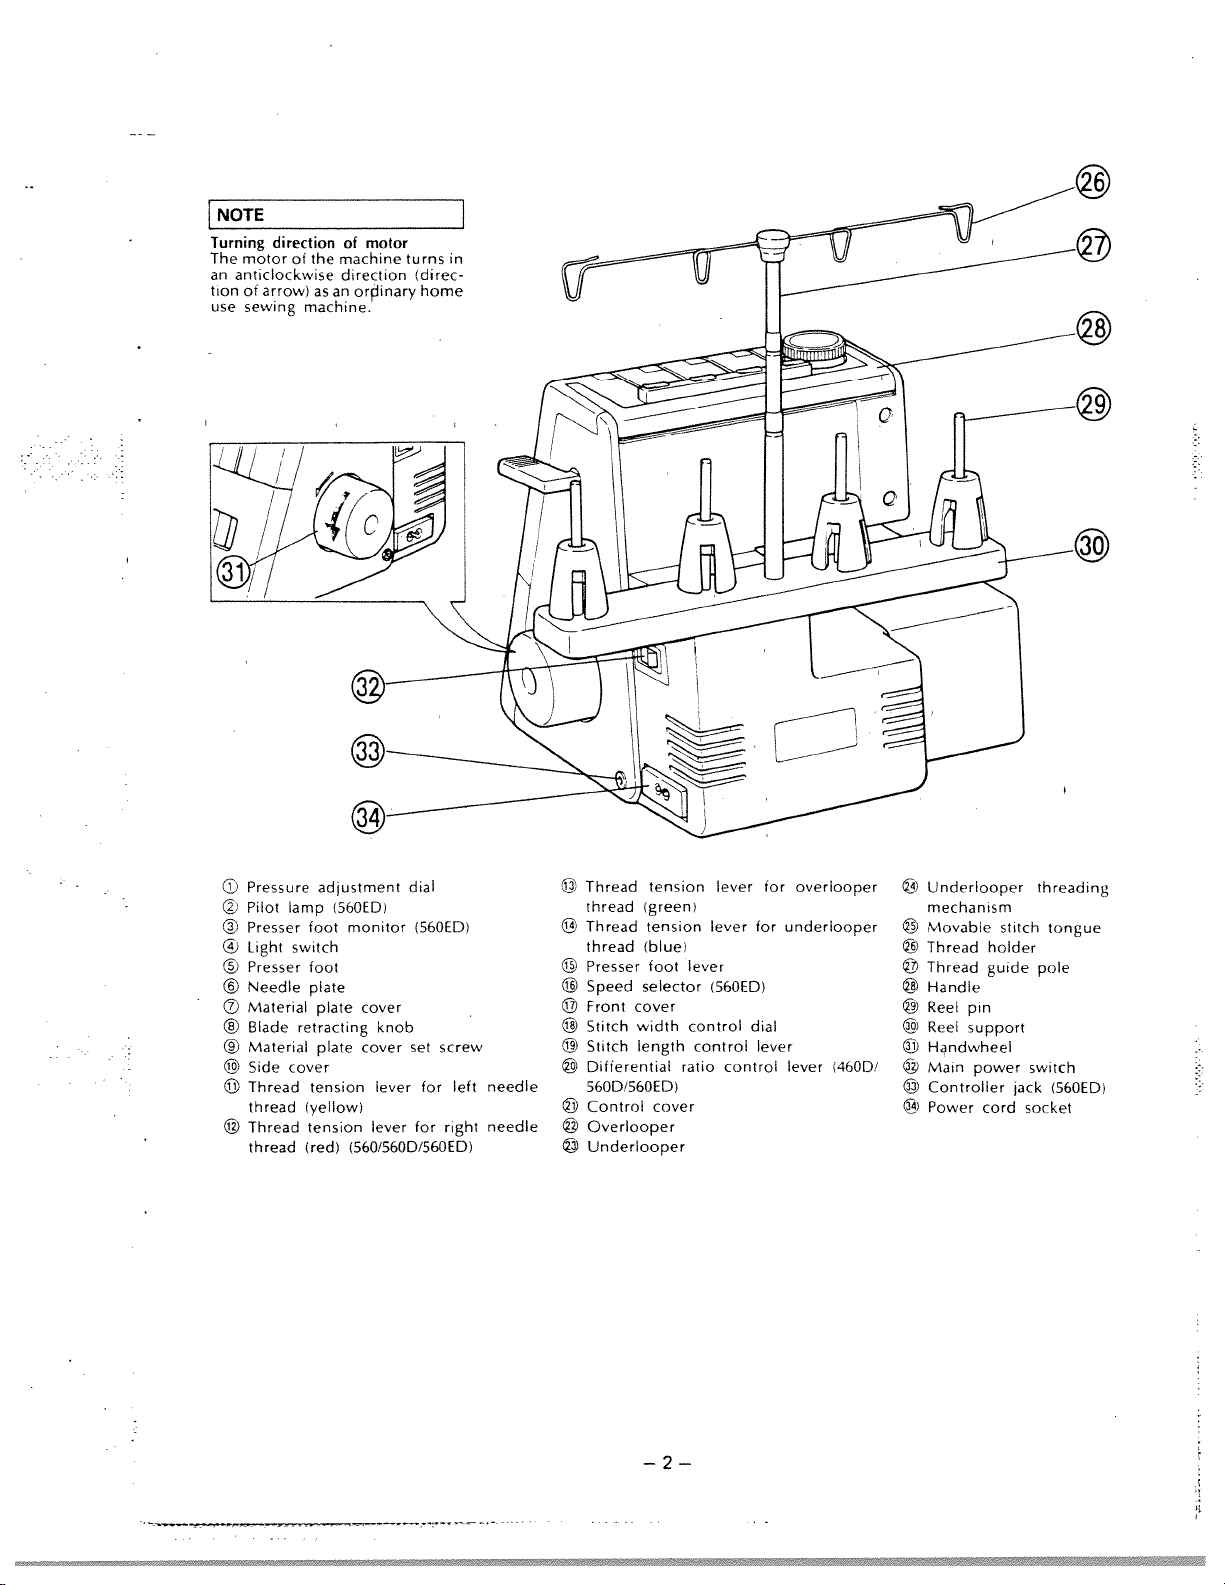
Turning
The
motorofthe
an
anticlocksvise
tion
ot
use
sewing
direction
arrow)
machine.
as
of
machine
direction
an
orØinary
motor
turns
(direc
home
in
(J
©
®
®
©
®
®
©
©
©
©
Pressure
Pilot
Presser
Light
Presser
Needle
Material
Blade
Material
Side
Thread
thread
Thread
thread
adjustment
lamp
foot
switch
foot
plate
plate
retracting
plate
cover
tension
(yellow
tension
(red)
(360E0,
monitor
cover
knob
cover
lever
lever
(
560
/560D/S6OED(
dial
1560ED)
set
screw
for
for
right
left
needle
needle
Thread
©
thread
Thread
®
thread
Presser
®
Speed
®
Front
©
Stitch
®
Stitch
©
Difterenjj
©
5
600/569W)
Control
©
©
Overlooper
@
Underlooper
tension
(green;
tension
(blue;
foot
selector
cover
width
length
cover
—2—
lever
control
control
ratio
lever
lever
(560ED)
control
for
for
dial
lever
overlooper
underlooper
lever
1460D’
©
Underloop
mechanism
©
Movable
Thread
®
Thread
©
Handle
@
Reel
©
Reel
©
Handwh
Main
©
Controller
©
Power
©
holder
guide
pin
support
power
cord
stitch
lack
threading
tongue
pole
switch
(560ED)
socket
Page 7

ELECTRONIC
Pilot
lamp.
FUNCTIONS
(560ED)
Presser
560ED
1)
2)
foot
monitor—
has
Electronic
a.
Two
Excellent
b.
C.
Steady
monitor
LED
a.
Pilot
Main
Alarm
When
automatically
b.
Presser
Flashes
depress
following
speed
speed
needle
speed
lamp
power
for
overload
the
foot
when
foot
electronic
control
selection
control
machine
to
monitor
presser
controller.
in
by
penetration
protection
is
locked,
avoid
overload.
toot
functions:
machine
speed
also
s
the
in
body
selector
at
pilot
upper
E
(1500/700
ow
speed
lamp
flashes
position.
spm)
with
In
this
sound.
case,
At
the
machine
same
does
time,
not
Speed
the
run
selector
High
Low
machine
even
1/2
stops
if
you
—3—
Page 8
C,
0
m
Cl)
-
fi
0
rn
fill
0
jJ
:zU:_J
cJwz
fifirn
I
I
I
>
fi
fi
I
0
Q
m
(‘
rn
N
rfl
N
41
iEEi
-<
>
0
Ix
fi
c-I,
fin
c-fcc-I,
00
rn
4-c1,>
00
-v
fi
II
fl
Iii
Im><
>
z
9
0
II
ii
a
rnf
rn
z
liii
mIj
m
N
IIl
Q
z
I
niIi
01111
:1lIII
c-ri
ijI!
lI’J
C
I
0
9
ai
U,
0
c-ri
rn
-Q
9
Page 9
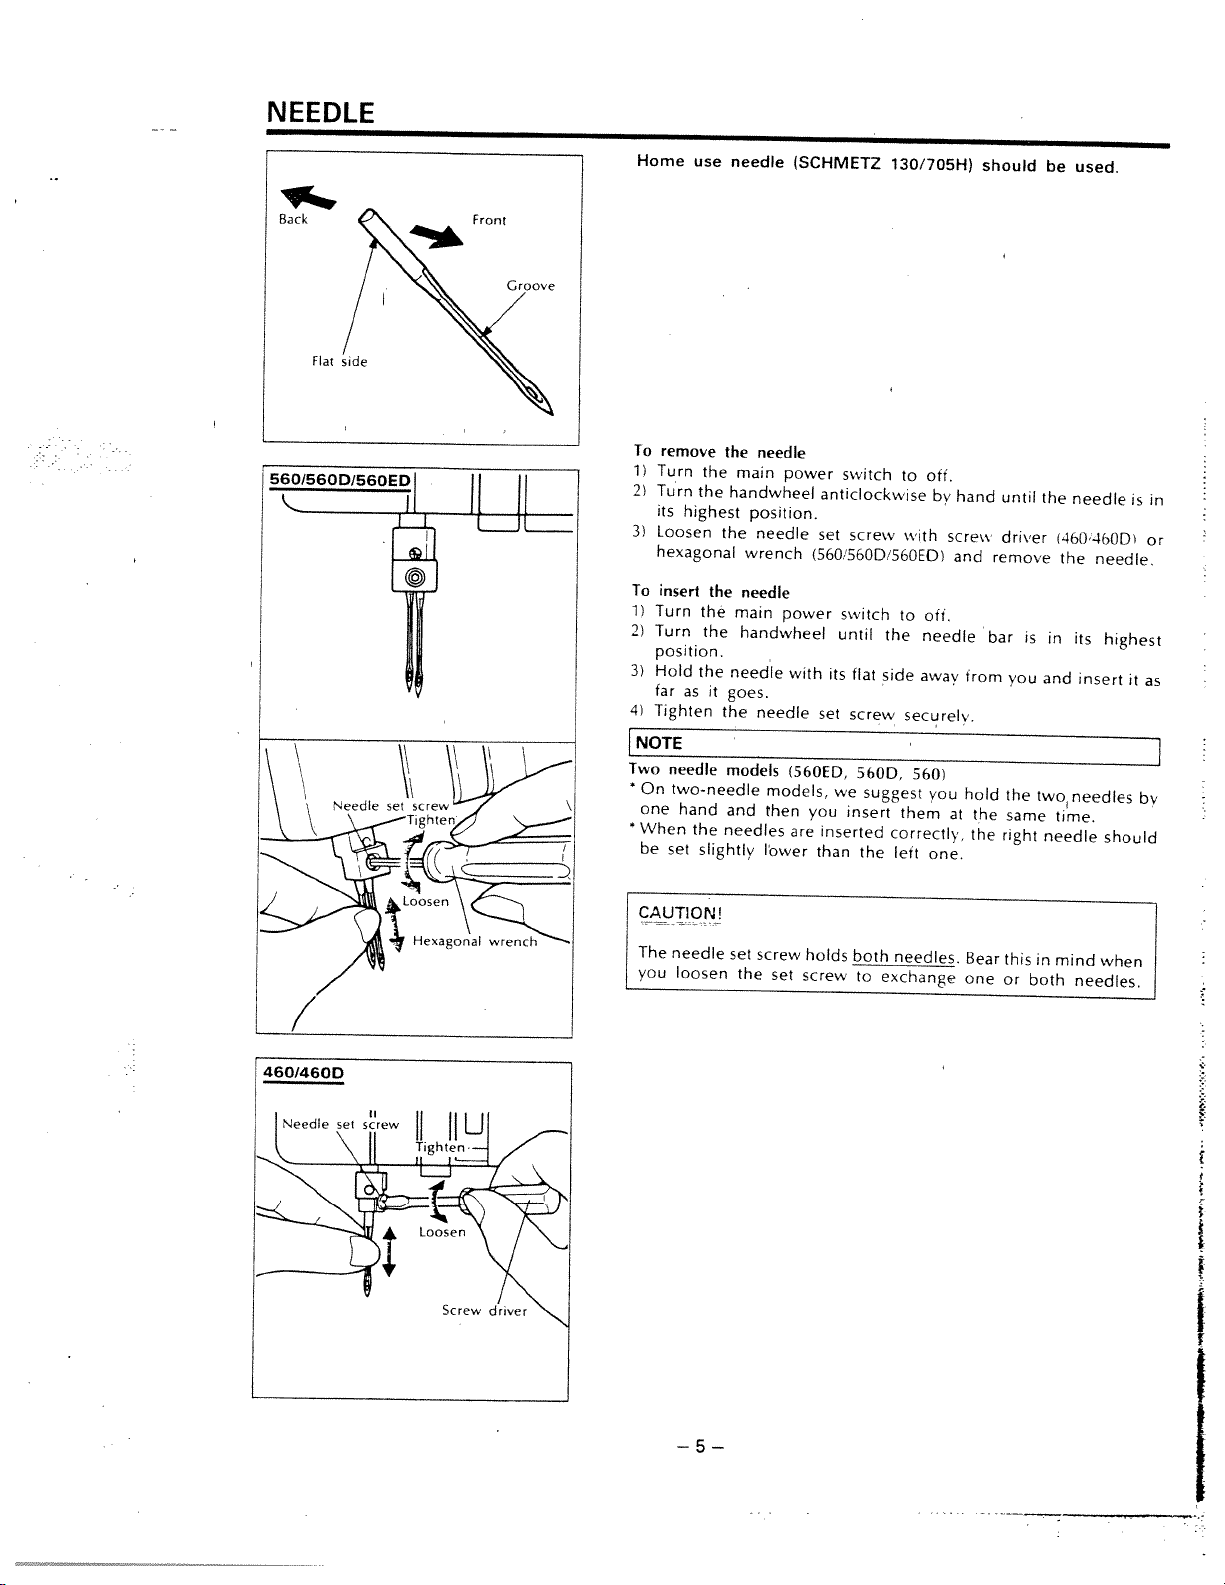
NEEDLE
Back
Flat
Home
To
11
2)
3)
To
1)
2)
3)
4)
NOTE
j
Two
On
one
When
be
use
remove
Turn
the
Turn
the
its
highest
Loosen
hexagonal
insert
Turn
the
Turn
the
position.
Hold
the
far
as
Tighten
needle
two-needle
hand
the
set
slightly
needle
the
main
handwheel
the
the
needle
main
handwheel
needle
it
goes.
the
models
and
needles
needle
position.
needle
wrench
needle
models,
then
lbwer
(SCHMETZ
power
switch
anticlockwise
set
screw
(56056ODi56OED)
power
switch
until
with
its
flat
set
screw
(560W,
are
you
inserted
than
we
5600,
suggest
insert
the
130/705H)
to
off.
with
off.
to
the
needle
side
away
securely
560)
them
correctl’,
left
by
you
one.
hand
screw
and
from
hold
at
should
bar
the
the
until
driver
remove
you
the
same
right
is
two
be
the
needle
46D460D
the
in
and
needles
time.
needle
used.
its
insert
needle.
highest
should
is
in
or
it
as
by
CAUTION
The
needle
you
loosen
—5—
set
the
screw
set
holds
screw
both
to
needles.
exchange
Bear
one
this
or
in
both
mind
when
needles.
Page 10
MOTOR
The
maximum
to
the
operating
noted
that
machine.
*
The
bearings
withstand
Continuous
controller,
The
motor
paper
during
When
the
opposite
significance.
Satety
Article
When
disconnected
8V/2
The
and
the
regulation
7.1”.
the
.4W.
machine
C.l.S.P.R.
operating
the
motor
in
long
operation
but
and
use.
motor
handwheel.
machine
from
has
speed
the
hours
tiis
will
foot
controller
is
running,
for
domestic
is
the
an
interference
of
of
this
motor
of
of
not
power
speed
600
to
sewing
are
continuous
the
sewing
in
no
sparks
These
sewing
in
use,
supply
of
this
sewing
800
stitches
machine
made
of
operation.
way
affect
are
equipped
may
sparks
machines
or
when
by
suppressor
turns
special,
machine
the
be
seen
are
produced
threading,
removing
for
machine
per
minute
in
the
sintered
will
slightly
performance.
with
ventilating
through
by
in
conformity
the
radio
and
is
1,500
for
same
oil-impregnated
increase
the
the
carbon
replacing
plug
from
television,
stitches
the
ordinary
direction
holes,
ventilating
brushes
with
“CEE
needle
the
complying
per
as
the
which
wall
minute,
home
the
motor
alloy
temperature
must
hole
in
and
he
Publication
or
light
socket.
with
which
sewing
in
mounted
not
be
the
motor
commutator,
No.10,
bulb,
Use
birective
machine.
an
ordinary
of
covered
the
bulbs
quite
is
in
the
bracket
fast
home
oil-soaked
motor
with
and
Part
II,
machine
designed
No.82/499
compared
It
should
and
cloth
on
the
are
Section
must
for
sewing
felt
foot
side
of
no
C,
be
max
E.E.C.
be
to
or
—6—
Page 11

SETTING
UP
YOUR
MACHINE
Raise
the
positioning
and
lower
thread
support.
thread
stopper
holders
Connect
power
guide
sections.
are
supply.
pole
at
the
Make
right
the
machine
and
joint
above
sure
to
the
set
tiv
the
that
the
the
tipper
the
reel
of
NOTE
HI
How
to
Thread
When
you
the
use
trated.
Net
If
you
are
nylon
thread,
you
cover
supplied
slipping
the
to
illustration.
use
spool
thread
to
off
shape
thread
cap
use
a
sewing
we
the
prevent
the
of
spool
wooden
spool
with
recommend
spool
the
spool.
the spool,
—7—
cap
thread
cap
loosely
with
thread
Adapt
and
as
the
the
as
net
reel,
illus
spun
that
net
from
net
per
Place
thread
reels
on
reel
suppdrt
1
Page 12

THREADING
Before
1)
Turn
Raise
2)
When
discs
thread
tension
threading...
off
the
main
the
presser
the
presser
in
the
thread
runs
clearly
cannot
food
tension
between
be
power
by
foot
is
obtained.
switch
means
raised,
control
them.
for
safety.
of
the
the
panel
Otherwise
presser
two
are
foot
thread
released
correct
lever.
tension
so
that
thread
NOTE
Threading
Thread
Overlooper
1)
2)
Right
3)
4)
Left
order
in
the
Underlooper
needle
(560/5600/560ED>
needle
following
thread
thread
thread
thread
3
Set
handwheel
In
overlooper,
order:
(green)
(blue)
(red)
(yellow)
—8—
this
the
needle
toward
position,
right
bar
you
you.
and
in
can
its
left
highest
thread
needle,
all
position
parts,
easily.
by
i.e.
underlooper,
turning
the
Page 13

Threading
Run
the
thread
overlooper
in
the
sequence
illustrated.
4601460D
—9—
If
overlooper
Underlooper
on
overlooper.
overlooper
and
take
from
overlooper.
overlooper.
thread
by
the
breaks
thread
In
such
turning
underlooper
Then
during
sometimes
a
case,
the
handwheel
re-thread
lower
thread
sewing
hangs
the
ott
the
Page 14

Threading
--
-
Run
ihe
thread
underlooper
in
the
sequence
illustrated.
Easy
threading
a
Pull
b
Thread
hook
c
Push
basic
CAUTION!
When
always
meet
each
out
the
of
the
the
position
pushing
make
rechanism
the
undertooper
underlooper
underlooper
underlooper
while
the
sure
that
other
as
threading
and
threading
threading
holding
underlooper
the
two
per
illustration.
position
the
end
threading
red
lever.
the
lever.
lever
of
triangle
back
the
thread
thread.
lever,
marks
to
on
.ts
—10—
Page 15

Threading
CAUTION
needles
Thread
underlooper
1)
Right
needle
1560156001560ED)
the
needles
and
thread
after
overlooper.
threading
of
2)
Left
needle
(5601560D1560E0
thread
AND
4601460D)
—11—
Page 16

SEWING
To
start
*
Thread
from
*
Place
foot
hand.
*
Check
re-check
Operation
Turn
When
and
as
With
presser
On
model
upper
flashes
lowered.
sewing
the
you
a
spare
and
sew
the
on
the
the
it
is
the
spare
foot
560ED
position
with
machine
behind
a
stitch
that
main
pedal
depressed
and
even
sound
piece
few
the
is
piece
the
and
the
of
the
stitches
formation
threading
power
lightly
of
test-sew
machine
if
you
telling
pull
prser
fabric
by
switch
depressed
further
fabric
at
depress
you
the
threads
foot.
you
turning
produced
has
been
and
the
under
low
speed.
does
not
that
intend
the
lamp
the
machine
run
the
foot
the
about
handwheel
to
see
carried
machine
the
it
presser
15
to
use
if
it
out
switch.
runs
will
increase
presser
the
presser
controller.
cm
(6
under
towards
is
uniforrt.
correctly.
foo,
The
foot
inches)
at
foot
should
the
low
speed
lower
is
monitor
away
presser
you
If
npt,
speed
t[e
in
its
be
by
To
remove
*
After
to
scissors.
you
obtain
the
work
reach
the
chaining-off.
end
of
Then
the
fabric
trim
continue
off
the
sewing
stitches
for
with
about
a
pair
5
cm
of
Chaining-off
‘After
sewing,
(chaining-off).
be
•
fed
enough,
If
threads
*
Remove
“Threading”).
cm
over
forward
pull
break
the
fabric
Put
the
previous
hold
the
The
threads
automatically.
the
thread
during
and
the
foot
sewing
fabric
stitches.
control
will
gently.
re-thread
back
entwine
If
feeding
correctly
under
depressed
themselves
the
presser
slightly
for
chaining-off
(refer
into
foot
for
a
while
a
chain
and
is
not
to
page
8—11,
and
sew
3—5
—12—
Page 17

STITCH
SELECTION
560!560D1560E0
*These
follows:
machines
1.
Four-thread
Use
overlock
knitted
Use:
2.
Three-thread
Use
which
Remove
Use:
all
three
For
Ideal
will
right
can
four
stitches,
ones.
for
overlock
threads
fit
all
needle
overlock
form
overlock
threads
which
sewing
and
kinds
stitching
three
and
stitch
left
of
when
stitch
will
knitted
needle,
materials.
and
kinds
two
neatly
(5.
sewing
of
(5,
6,
needles
fit
garments
6,7
producing
this
sewing
stitches
7
all
kinds
mm)
overlocL
suits,
mm)
for
in
producing
of
materials,
5.
6.
or
stitch.
blouses,
simple
7
mm
slacks,
steps
four-thread
especialls’
seams.
etc.
as
3.
Three-thread
Use
seams.
Remove
three
threads
left
overlock
needle
and
when
right
stitch
needle,
sewing
(2.8,
this
3.8,
producing
overlock
4.8
mm)
2.8.
3.8
stitch.
and
4.8
mm
—
13
—
Page 18

46014600
NOTE
j
OptonaI
stitches
Three-thread
Use
three
will
fit
Use:
all
For
overlock
threads
kinds
overlock
and
of
stitching
Optional
t
those
stitch
one
materials.
stitches.
(3—5
needle,
and
special
mm)
producing
sewing
presser
suits,
3—5
blouses,
feet
mm
are
seams,
slacks,
necessary
which
etc.
I
for
Narrow/Rolled
Blind
stitch
Overlock
stitch
hemming
with
elastic
stitches
tape
—
14
—
Page 19

RATIO
CHART
OF
SEWING
MATERIAL
THREAD
AND
NEEDLE
Light
material
Medium
material
Heavy
material
Materials
Georgette
Crepe
Lawn
Organdie
Tricot
Poplin
Gingham
Sucker
Gabardine
Serge
Knitted
Cashmere
Tweed
Denim
Jersey
de
(Broadi
chine
Overiock
lOptiona0
Narrow
Rolled
Overlock
Overlock
Stitch
hem
NEEDLE
Overlock
LOOPER
Overlock
Textured
NEEDLE
Overlock
LOOPER
Overlock
Textured
NEEDLE
Overlock
LOOPER
Overlock
Textured
NEEDLE
Sewing
Overlock
LOOPER
Overiock
Thread
THREAD
thread
THREAD
thread
thread
THREAD
thread
THREAD
thread
thread
THREAD
thread
THREAD
thread
thread
THREAD
thread
thread
THREAD
thread
120—150
120—150
120—150
120—150
120—150
120—150
80—100
120—150
120—150
Stitch
2.0—3.0
Less
2.5—3.5
3.0—4.0
than
length
2.0
nim
SCHMETZ
130/705
SCHMETZ
13H705
SCHMETZ
130705
Ball
point
accessories
SCHMETZ
130-705
Needle
H
H
H
H
70
80
needle
90
70
r
CAUTION!
When
you
please
push
and
wind
carry
the
threads
the
spool
machine
down
on
each
with
at
spool.
threads
the
lowest
threaded,
position
—15—
Page 20

THREAD
Thread
tension
For
left
TENSION
control
levers
For
right
(except
needle
nedle
460/460D)
thread
(red)
For
overIoopr
For
thread
underlooper
(green)
thread
(blue)
I
Tension
Sewing
circumstances.
ing
Order
When
following
1)
2)
3)
4)
This
control
is
to
the
The
thread
the
thread
needle
underlooper
with
the
Adjust
the
lar
case.
and
downwards
Whenever
be
sure
“Chart
NOTE
of
you
Left
needle
Right
Overlooper
Underlooper
is
the
thread(s),
kind
Move
to
of
thread
order;
needle
easiest
possible
If
drawing.
tension
tension
thread.
of
thread
you
adjust
Thread
adjust
thread
thread
you
fabric,
tension
slide
to
change
the
tension
thread
thread
way
at
position
find
it
of
this
adjustment
the
overlooper
The
correct
the
lever
upwards
decrease
fabric,
thread
Tension
adjustment.
the
thread
(except
to
obtain
“5”
impossible,
machine
levers
thread
thickness
as
required
it.
thread
tension.
Adjustment”.
tension,
430/430D)
correct
under
can
of
to
adjust
be
for
the
thread
tension
the
in
each
increase
or
stitch
See
do
thread
almost
accord
adjusted
two
and
thread
particu
tension
width,
Page
in
it
tension.
any
by
(one)
the
varies
etc.
17—20
the
.
-I
.4
16—
—
Page 21

CHART
560/560D/560ED
OF
THREAD
TENSION
ADJUSTMENT
Lett
Right
needle
needle
keit
L.
thread
needle
thread
is
thread
is
slack.
slack
is
tlZhL
I
Page 22

I
III
1
III
I
III
I
I
III
I
IIII
I
I
I
I
III’
I
I
ii
III
ii
III
ii
III
ii
÷—III
II
I
j
III
II
III
I
I
III
II
I
I
i
III
I
I
III
III
I
I
III
III
E
I
III—
II
III
I
I
III—’
I
a,
III——*
1
I
III
I
J
4—III
I
I
III———’
I
Page 23

CHART
4601460D
OF
THREAD
TENSION
ADJUSTMENT
Needle
Fabric
Overlooper
Underlooper
thread
puckers
thread
thread
is
slackf
is
is
tight.
slack.
Overlooper
Underlooper
Overooper
Underlooper
thread
thread
s
s
thread
thread
tJack.
slack.
is
is
slack.
tight.
I
—19--
.
Page 24

I
III
____________
I
I
I
_1
III
_________
.—III
I
III
I
F
I
1
n
0
(D
n
(t
C
0
0
0
0
III
_________
1
1
III
I
I
III
I
III
+—fj
III
I
I
III-—
I
1
III
liii
I
1II
L
I
III
F
I
I
I
I4t.
I
lII—
I
0
N)
I
Page 25

STITCH
Stitch
Stitch
Width
LENGTH
AND
STITCH
WIDTH
Stitch
Open
control
Minimum
Maximum
1—2
Stitch
The
stitch
stitch
CAUTION!
When
always
(ength
the
lever
mm
Width
width
adjusting
raise
control
1
5
for
width
control
mm
mm
cover,
in
the
proper
(position
(position
narrow/rolled
can
be
dial
the
the
presser
then
RI
5)
adjusted
inside
sutch
foot
set
position.
hem
through
the
width
lever.
the
stitch
(optional)
turning
control
control
CO\
length
the
e
dial.
REMARK
L
I
560/5600!560ED
4
thread-stoch
thread-stch
3
needle
thread-stitch
3
right
needle
Narrow/Rolled
Position
rolled
optional
attachment
left
by
by
hemming
hemming
Narrowa
Rolled
hemming
—
with
“R”
special
is
necessary.
is
5
5
2.8
optional
used
stitclt.
5
mm
mm
mm
for
In
presser
mm
6
mm
6
3.8
mm
foot
narrow:
this
4.8
7
7
case.
toot/
mm
mm
mm
—21
460/460D
Mm.
3
mm—Max
Narrow/Rolled
—
mm
5
hemming
with
optional
foot
and
needle
plate
..
Page 26

STITCH
Stitch
width
Cutting
width
Stitch
width
Cutting
width
Standard
positioni
WIDTH
5
mm
5—6
mm
5
mm
5
mm
AND
CUTTING
When
sometimes
because
you
control
width.
result
How
When
at
5,
6
mm.
when
within
elastic
WIDTH
you
of
contraction
can
eliminate
dial
through
This
unique
also
on
to
adjust?
you
turn
or
7
mm
If
you
want
sewing
elastic
“A”
area
materials.
sew
will
the
while
as
FINE
elastic
find
the
Homelock
knitted
stitch
the
to
sew
materials,
illusrated.
ADJUSTMENT
that
of
problem
keeping
materials.
width
cutting
5
materials
the
the
mm
This
material
by
the
feature
control
width
stitch
you
like
garments
fine
stitch
is
width
only
will
e.g.
after
adjustment
width
will
ensure
dial,
the
increased
but
set
the
result
MECHANISM
are
cutting.
and
stitch
stitch
in
knitted
not
5,5
correct
properly
When
of
the
increasing
a
satisfactory
width
gradually
mm
cutting
width
overcasting
garments,
control
this
stitch
the
can
from
you
overcast
occurs
width
cutting
sewing
be
set
5
to
width
dial
in
7
a
—
22
—
Page 27

DIFFERENTiAL
FEED
MECHANISM
What
The
machine
one
(the
less
in
It
is
adjustable
dependent
stitch
length
the
more
How
to
1)
Open
2)
Adjust
ratio
3)
Close
is
“differential
difterential
relation
on
also
material
adjust
the
control
the
feed
control
the
control
is
equipped
to
between
the
affects
th
ratio
lever.
feed
feeder)
the
rear
thickness
the
is
being
differential
cover.
as
required
cover.
ratio”?
with
two
can
one
0.7—2.0.
and
adjustment.
fed
feed
feeders,
be
adjusted
(the
main
The
elasticity
forwards.
ratio
by
means
exact
of
The
of
which
to
feeder).
the
longer
of
the
the
feed
more
adjustment
material.
the
differential
front
or
is
The
stitch
I
Adjustment
.
:
‘
:
L4_.__J
M
example
:\
D
ll°
Stretch
material
Ad1ustment
REMARK
j
M
Main
D
—
“.
Ieeder
Diftereritial
Direction
of
feeder
feeding
J
Adjustment
stretching
Non-stretch
Adjustment
Ad1ustment
to
to
material
to
0.7
to
2.0
0.7
2.0
result
prevents
results
results
in
in
in
a
stretched
the
a
straight
puckering
edge
edge
edge
trom
-
—
23
—
:-
Page 28

N)
Page 29

PRESSER
FOOT
PRESSURE
*
The
the
Since
suitable
is
and
pressure
pressure
the
for
necessary
elastic
of
adjustment
machine
light
except
material.
the
and
presser
has
medium
when
dial.
already
sewing
toot
fabrics,
can
been
be
adjusted
vçry
adjusted
no
heavy
further
b’
to
a
pressure
adjustment
or
very
turning
light
tcmr
Heavy
material
Standard
STITCH
NOTE
560/560D!560ED
-
position
TONGUE
Decrease
Increase
DON’T
KNOB.
You
can
knob.
However
narrow/rolled
don’t
touch
operation.
In
case
you
cannot
TOUCH
(560,
retract
this
the
overlooper
THE
560D,
the
stitch
mechanism
hemming
the
changing
push
the
STITCH
560ED
stitch
is
safety
tongue
is
not
TONGUE
using
used
optional).
knob
in
its
guard.
the
only
during
lowest
CHANGING
changing
for
the
Therefore
normal
position,
—
25
—
Page 30

—
Page 31

CHANGING
THE
LIGHT
BULB
CHANGING
Remove
the
Use
Maximum
Recording
the
new
correct
cover
bulb
Rated
#:
LIGHT
THE
as
and
bulb.
light
input
X50228001
BULB
illustrated.
replace
of
the
bulb:
Pull
cover.
8V,
out
the
2.4W
light
bulb,
insert
RETRACTING
THE
BLADE
In
case
needle
the
knob.
CAUTION
Make
than
reasonisthatifthe
and
*
Close
28
—
you
sure
the
needle
door
—
wishtosew
plate
that
width
stitch
can
before
and
the
seam
be
without
the
retract
allowance
have
you
seam
allowanceiswider
damaged.
operating
cutting,
blade
on
chosen
machine.
set
the
needle
of
means
by
materialisnot
machine.
on
the
the
above
retracting
wider
The
overlooper
Page 32

MAINTENANCE
Oiling
smooth
For
machine
the
illustration.)
REMARKS:
ONCE
OIL
1.
IS
USED
MORE
HIGH
After
2.
Wipe
avoid
Cleaning
front
Open
mechanical
cally.
and
silent
should
OR
NORMALLY.
OFTEN,
QUALITY
oiling,
excess
off
stains.
oil
cover
parts
TWICE
OIL
SEWING
run
oil
(see
inside
operation
be
MONTH
A
IF
ONCE
machine
the
with
page
the
moving
the
oiled
periodically.
IF
MACHINE
THE
WEEK.
A
MACHINE
without
scrap
a
pieceofcloth
1.
©(
coverbybrush
parts
THE
MACHIN
IS
ALWAYS
OIL.
and
clean
periodi
of
(See
USED
USE
thread.
to
up
REMARKS
for
one
service
losening
off
cover
can
itisnecessary
but
plate
Cloth
screw
at
—
29
—
per
dealers.
illustration,
taken
be
by
Page 33

PERFORMANCE
FAULT-FINDING
PROBLEMS
1.
2.
3.
4.
not
Does
Needle breaks.
Thread
Skipped
Problem
fed.
breaks.
stitches
Probable
Preser
weak.
(1)
(2)
(3)
(1)
(2)
(3)
(4)
(5)
(1)
(2)
(3)
foot
Needle
blunt.
Needles
Fabric
Improper threading
Thread
Thread
Needle
wrong
Needle
blunt.
Needle
Wrong
bent,orneedle
incorrectly
has
tangled.
tension
incorrectly
needle
bent,orneedle
incorrectly
needle
cause
pressure
been
pulled.
too
used.
used.
set.
tight.
set.
set.
too
tip
tip
Turn
pressure
increase
Insert
new
Re-set
needle.
not
Do
Re-thread
Check
remove
See
page
Re-set
needle.
Usesewing
SCHMETZ
Insert
new
Re-set
sewing
Use
SCHMETZ
presser
needle.
press or
machine
spool
tangled
l6—2O
l30!705H
needle.
130/705H
Possible
adjustment
foot
(See
pin,,
thread.
(See
machine
needle.
(See
machine
correction
pressure.
(See
page
pull
fabric—guide
(See
thread
“Thread
page
ned(es—
(See
page
needles—
dial
page
5)
page
holders,
tension”
5)
page
5)
clockwise
page
(See
5)
it
8—il)
etc.
5)
to
25)
gently.
and
I
•11
Stitches
5.
Fabric
6.
Machine
(Monitor
not
puckers.
does
flashes,
uniform.
not
S6OED)
work.
(4)
Improper
Presser
(5)
weak.
Thread
properly.
Thread
(1>
Improper
(2)
thread
Presser
(1)
position
Machine
(2)
thread
foot
tension
tension
tangled.
foot
(560ED).
tangle.
threading
pressure
not
too
threading
is
is
locked
adjusted
tight.
in
upper
too
or
by
Re-thread
Turn
pressure
increase
See
page
Decrease
weight
Re-thread
Lower
page
(See
Remove
Check
(See
page
presser
or
the
tangled
and
machine.
adjustment
16—20
thread
fine
machine.
presser
3)
re-thread
8—li)
foot
“Thread
tension
fabric.
thread.
(See
pressure.
(See
(See
foot
machine.
page
dial
tension”.
when
page
page
(560ED).
8—il)
clockwise
(See
page
sewing
16—20)
8—li)
to
25)
light
 Loading...