

Page 1
UltrasonicUltrasonicUltrasonic
Humidier
Owner’s Guide
English
Form# 44065-01
20101102
©2010 Hunter Fan Co.
©2010 Hunter Fan Company
Model
31006
1
Page 2

Table of Contents
At A Glance
Warnings and Introduction ................................................................................ 3
Know Your Humidier ....................................................................................... 4
Using Your Humidier
Initial Setup and Operation ................................................................................ 5
Controls ........................................................................................................... 6
Maintenance
Cleaining and Storage ...................................................................................... 7
Humidier Assistance
Troubleshooting ................................................................................................ 8
Service Parts and Support ................................................................................. 9
Treatments ...................................................................................................... 10
Warranty
3 Year Guarantee ........................................................................................... 11
Page 3

1
At A Glance
Warnings and Introduction
READ AND SAVE THESE INSTRUCTIONS
Important Safety Instructions: Read all instructions before using this humidier.
• This humidier may not work properly on an uneven surface. ALWAYS place this humidier on a rm, level, and water
resistant surface.
• ALWAYS place the humidier at least six (6) inches away from walls, heat sources, and electrical appliances such as
stoves, radiators, or heaters.
• ALWAYS place the humidier in an area that is out of the reach of children.
• Before using the humidier, extend the cord and inspect for any signs of damage. DO NOT use the product if the cord
has been damaged.
• This product has a polarized plug (one blade is wider than the other) as a safety feature. This plug will t into a polarized
outlet only one way. If the plug does not t fully into the outlet, reverse the plug. If it still does not t, contact a qualied
electrician. DO NOT attempt to defeat or override this safety feature.
• ALWAYS UNPLUG AND EMPTY the humidier when it is not in operation or while it is being cleaned.
• Use only clean, cool tap water when lling the tank. DO NOT use hot water.
• Never add medication of any type to the water tank.
• You should never leave the unit unattended in a closed room. The room can become saturated and leave condensation
on walls and furniture. Always leave a door partially open.
• This part has been tested and complies with part 18 of the FCC.
Thank you for purchasing The Ultrasonic Humidier by Hunter Fan Company. Please read and save these instructions to receive the
maximum benet and performance from your humidier.
©2010 Hunter Fan Company
3
Page 4
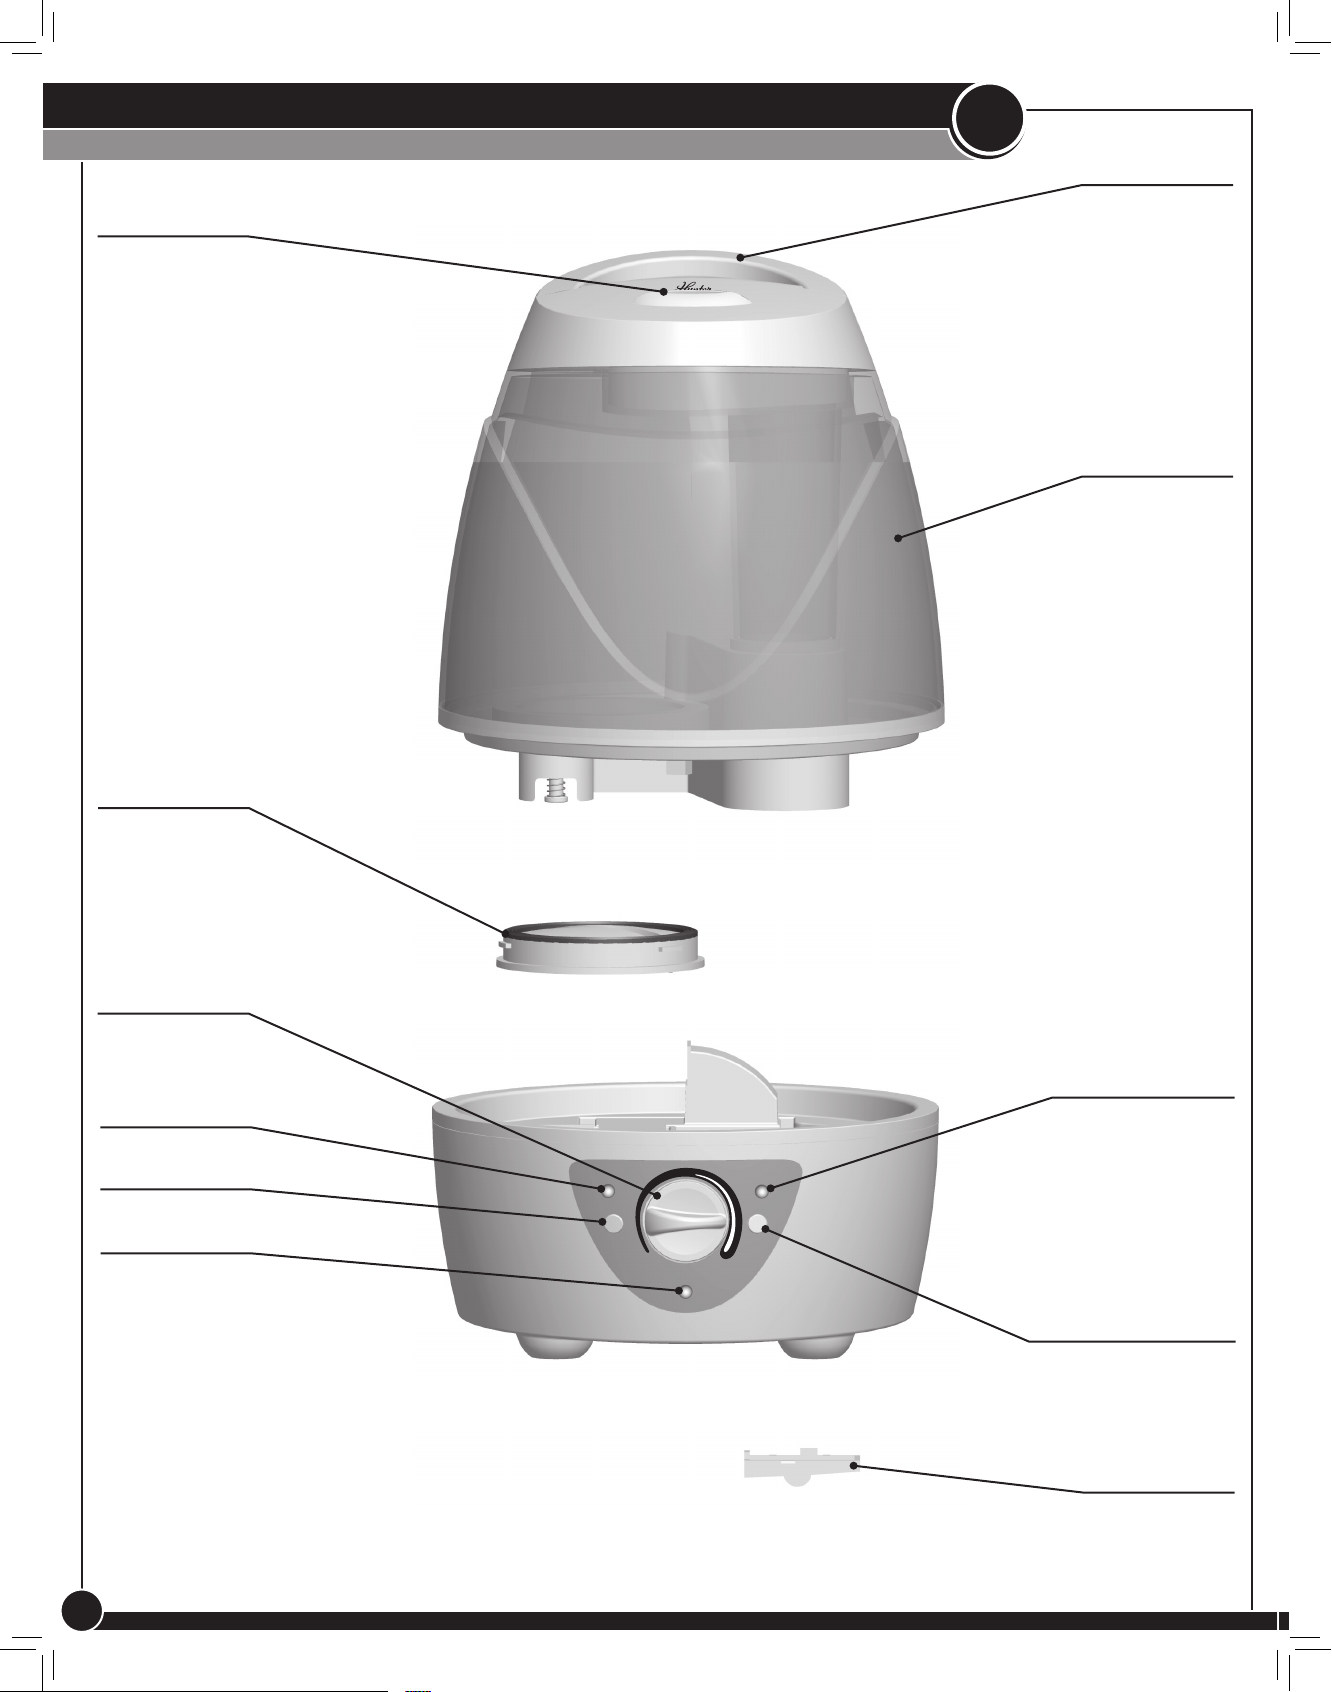
Mist Exhaust
Know Your Humidifier
At A Glance
1
Tank Handle
Tank
Tank Cap
Control Knob
Indicator
Reset Button
Rell Tank Light
Silver Ion
Demineralization
Cartridge Indicator
Demineral
O
Rell Tank
Demineralization
Cartridge Reset Button
Vapor Pad
Compartment
4
44065-01 • 11/02/2010
Page 5
2
Using Your Humidifier
Initial Setup and Operation
Initial Setup:
1. Remove the plastic bag covering from the humidier.
2. Unravel and straighten the cord before use.
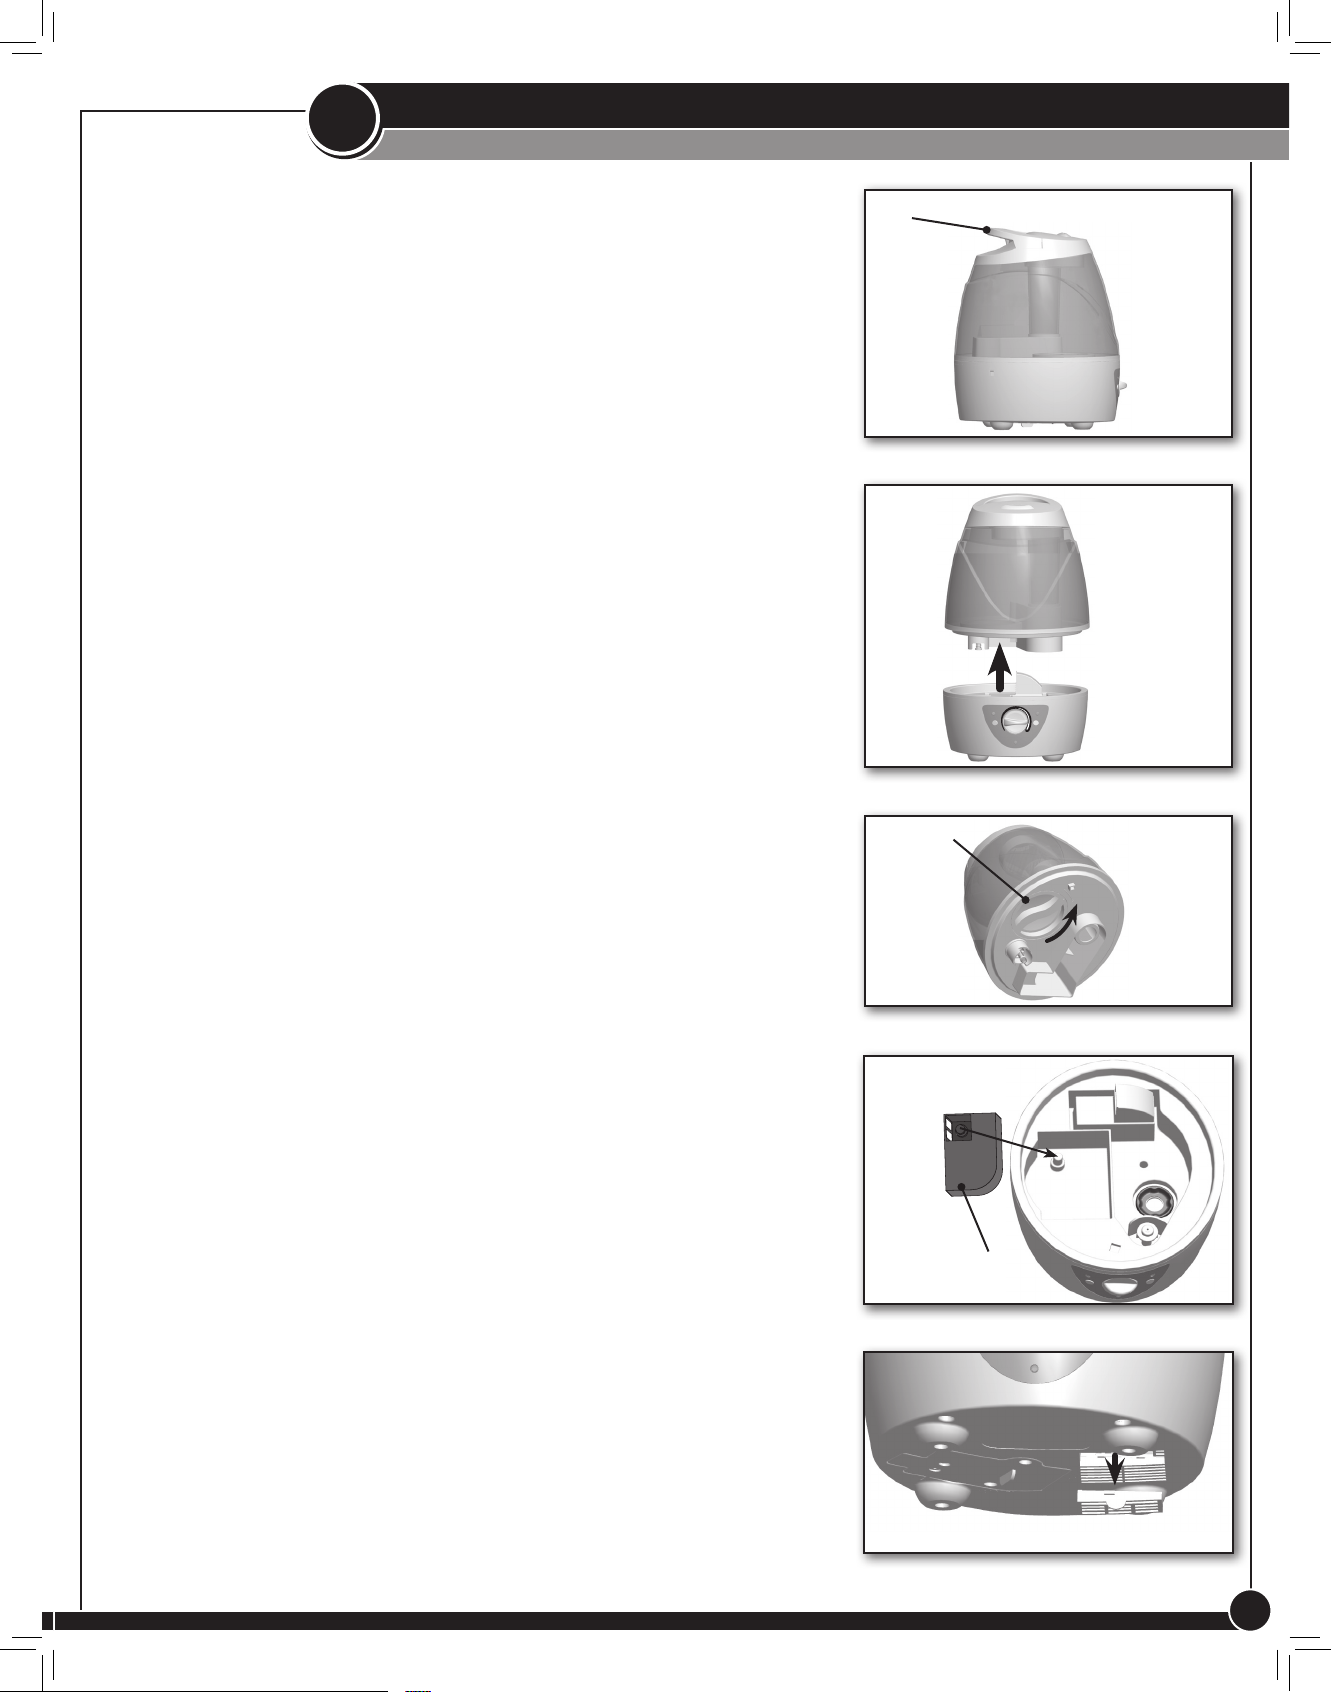
3. Remove the tank from the humidier base by grasping the tank handle, Figure
1, and pulling straight up. Figure 1 and Figure 2.
4. If you plan to use a demineralization cartridge, insert it now into the base of
the unit. Figure 4.
5. If you will be using a vapor pad in the unit, turn the base over and remove the
vapor pad compartment grill. Insert 1 vapor pad into the compartment and
reattach the compartment to the base of the unit. Figure 5.
6. Turn the tank upside down and twist the tank cap counter-clockwise to remove.
Figure 3.
7. If you plan to use a silver ion cartridge, drop it into the tank now.
8. Fill the unit with clean, cool tap water.
Warning: Never ll the humidier with hot water.
9. Place the tank cap back on the tank and turn clockwise till secure.
10. Seat the tank back into the humidier base making sure the tank is seated
securely.
Tank Handle
Tank Cap
Figure 1
Silver Ion
Demineral
O
Rell Tank
Figure 2
NOTE: Failure to ensure the tank is seated correctly could cause the unit to leak
water from the tank.
11. Plug the humidier into a wall outlet and start the unit.
Figure 3
Demineralization
Cartridge
Figure 4
©2010 Hunter Fan Company
Figure 5
5
Page 6
Operation:
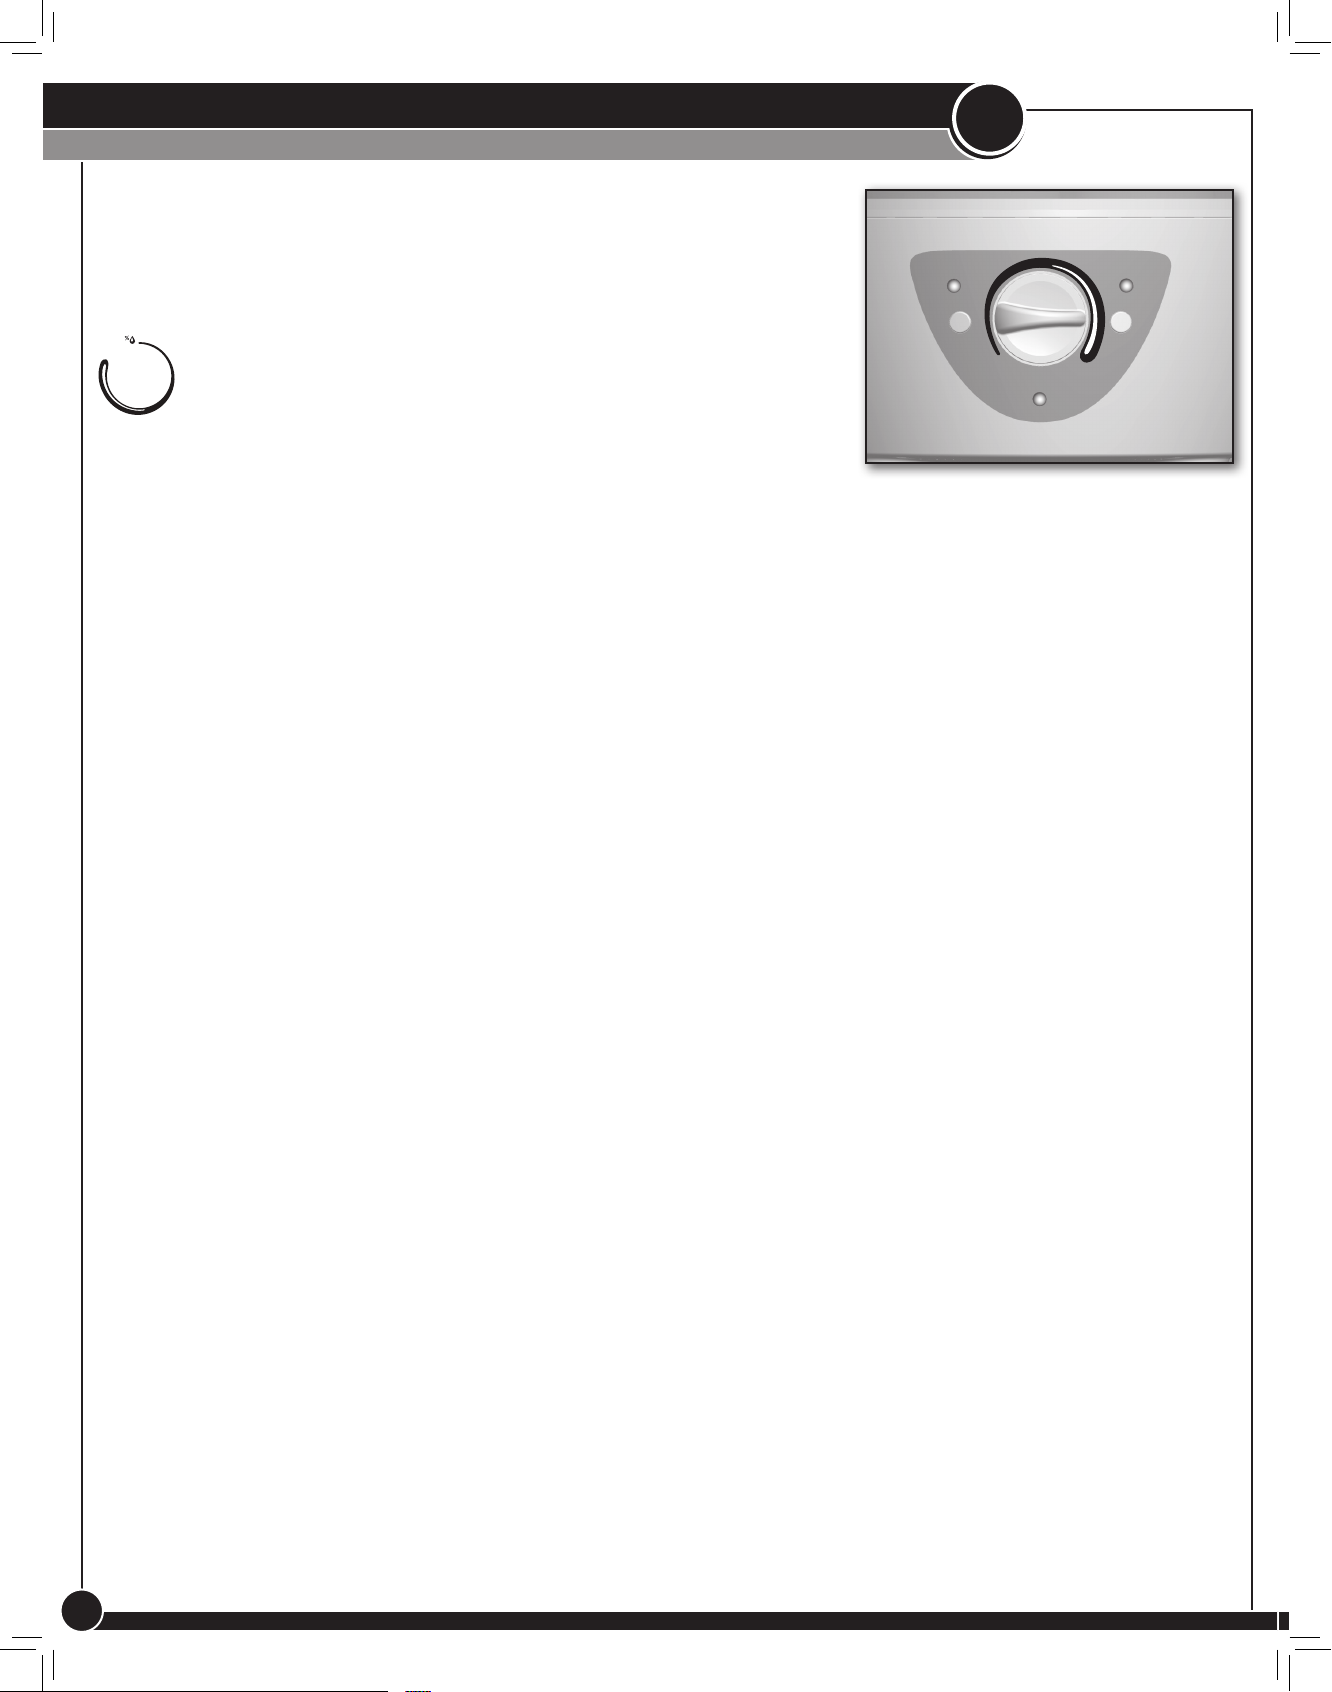
See Figure 6.
Using Your Humidifier
Controls
2
Humidity Control:
The output control allows you to set the amount of humidity you want
the unit to output. Turn the knob clockwise to increase output. To turn the
unit off, turn the the humidity knob past the lowest setting to off.
Indicators:
Silver Ion Indicator: When the silver ion indicator lights up, it is time to replace the
silver ion cartridge in the tank, if you are using one. Simply remove the silver ion
cartridge in the tank and drop in a new one. Hold the reset button down under
the indicator for a few seconds until the light goes out to reset.
Demineral Indicator: When the demineral indicator lights up, it is time to replace
the demineralization cartridge in the base of the unit, if you are using one. Remove
the tank from the unit, and the demineralization cartridge should be sittng inside
the water tray in the bottom. Hold the reset button down under the indicator for a
few seconds until the light goes out to reset.
Rell Tank Indicator: This indicates the tank is out of water. Once you have relled
the tank with water and set it back onto the unit, the rell tank light will reset.
Silver Ion
Demineral
O
Rell Tank
Figure 6
6
44065-01 • 11/02/2010
Page 7

3
Maintenance
Cleaining and Storage
Note: ALWAYS unplug the humidier from the electrical outlet before cleaning.
NEVER allow water to sit in the tank when not in use.
Daily Maintenance:
1. Turn off the humidier and unplug it from the wall outlet.
2. Remove the tank unit by pulling it straight off the humidier base.
3. Turn the tank upside down and drain any water into a sink or tub. Shake the
unit gently to remove any remaining water.
4. Rinse the tank thoroughly with water, empty, and wipe with a dry, clean cloth.
5. Wipe the humidier base with a dry cloth if necessary.
6. Rell the tank as directed under “Initial Setup and Operation” on page 5 and
resume use.
Weekly Maintenance:
1. Turn off the humidier and unplug it from the wall outlet.
2. Remove the tank unit by pulling it straight off the humidier base.
3. Turn the tank upside down and drain any water into a sink or tub. Shake the
unit gently to remove any remaining water.
4. Fill the Water Tank with a mixture of one (1) gallon of water and eight (8)
ounces of white vinegar. Leave the mixture in the Water Tank for 20 minutes,
giving the Water Tank a shake every few minutes. After 20 minutes, give the
Water Tank a nal shake and discard the mixture.
5. Rinse the Water Tank several times with clean water. Leave the Water Tank
Cap off to allow the Water Tank to dry completely.
6. Wipe the surfaces of the main housing with a soft damp cloth.
7. Once all the parts are clean and dry, reassemble the humidier, rell the
water tank, and resume use.
Note: The tank has built-in antimicrobial properties to inhibit the growth of
bacteria, mold, and fungi that may affect the water in the tank. Daily and weekly
maintenance is still necessary to prevent the growth of bacteria, mold, and fungi.
End of Season Maintenance:
1. Follow the instructions for weekly maintenance before storing the unit.
2. Ensure all parts are completely dry before storing the unit.
3. Store the unit in a cool dry place.
4. Never store the unit with water in the tank.
©2010 Hunter Fan Company
7
Page 8

Humidifier Assistance
Troubleshooting
Problem:
Excessive noise.
Solution:
1. Check the Water Tank to make sure it is properly seated on the base.
2. Check the Water Tank to make sure there are no bubbles when the Water Tank
is full and running. If there are bubbles, turn the unit OFF until the bubbling stops.
When the bubbling has stopped, set the unit to the desired speed.
Problem:
Humidier not working.
Solution:
1. Make sure the Power Knob is not set to OFF.
2. Adjust the humidity level using the Humidity Knob. Once the room reaches the
set humidity level, the humidier will turn OFF; this is normal.
Problem:
Mineral build-up on the Water Tank or Tray.
Solution:
1. Refer to the section “Cleaning and Storage” on page 8.
4
Problem:
Humidity output and water usage decreased.
Solution:
1. Check the Humidistat Knob and Power Knob to make sure they are set to the
desired humidity level and speed.
2. Check the Water Tank to make sure there are no bubbles when the Water Tank
is full and running. If there are bubbles, turn the unit OFF until the bubbling stops.
When the bubbling has stopped, set the unit to the desired speed.
3. Clean any components that have mineral build-up. Refer to the section”Cleaning
and Storage” on page 7.
8
44065-01 • 11/02/2010
Page 9
4
Service Parts and Support
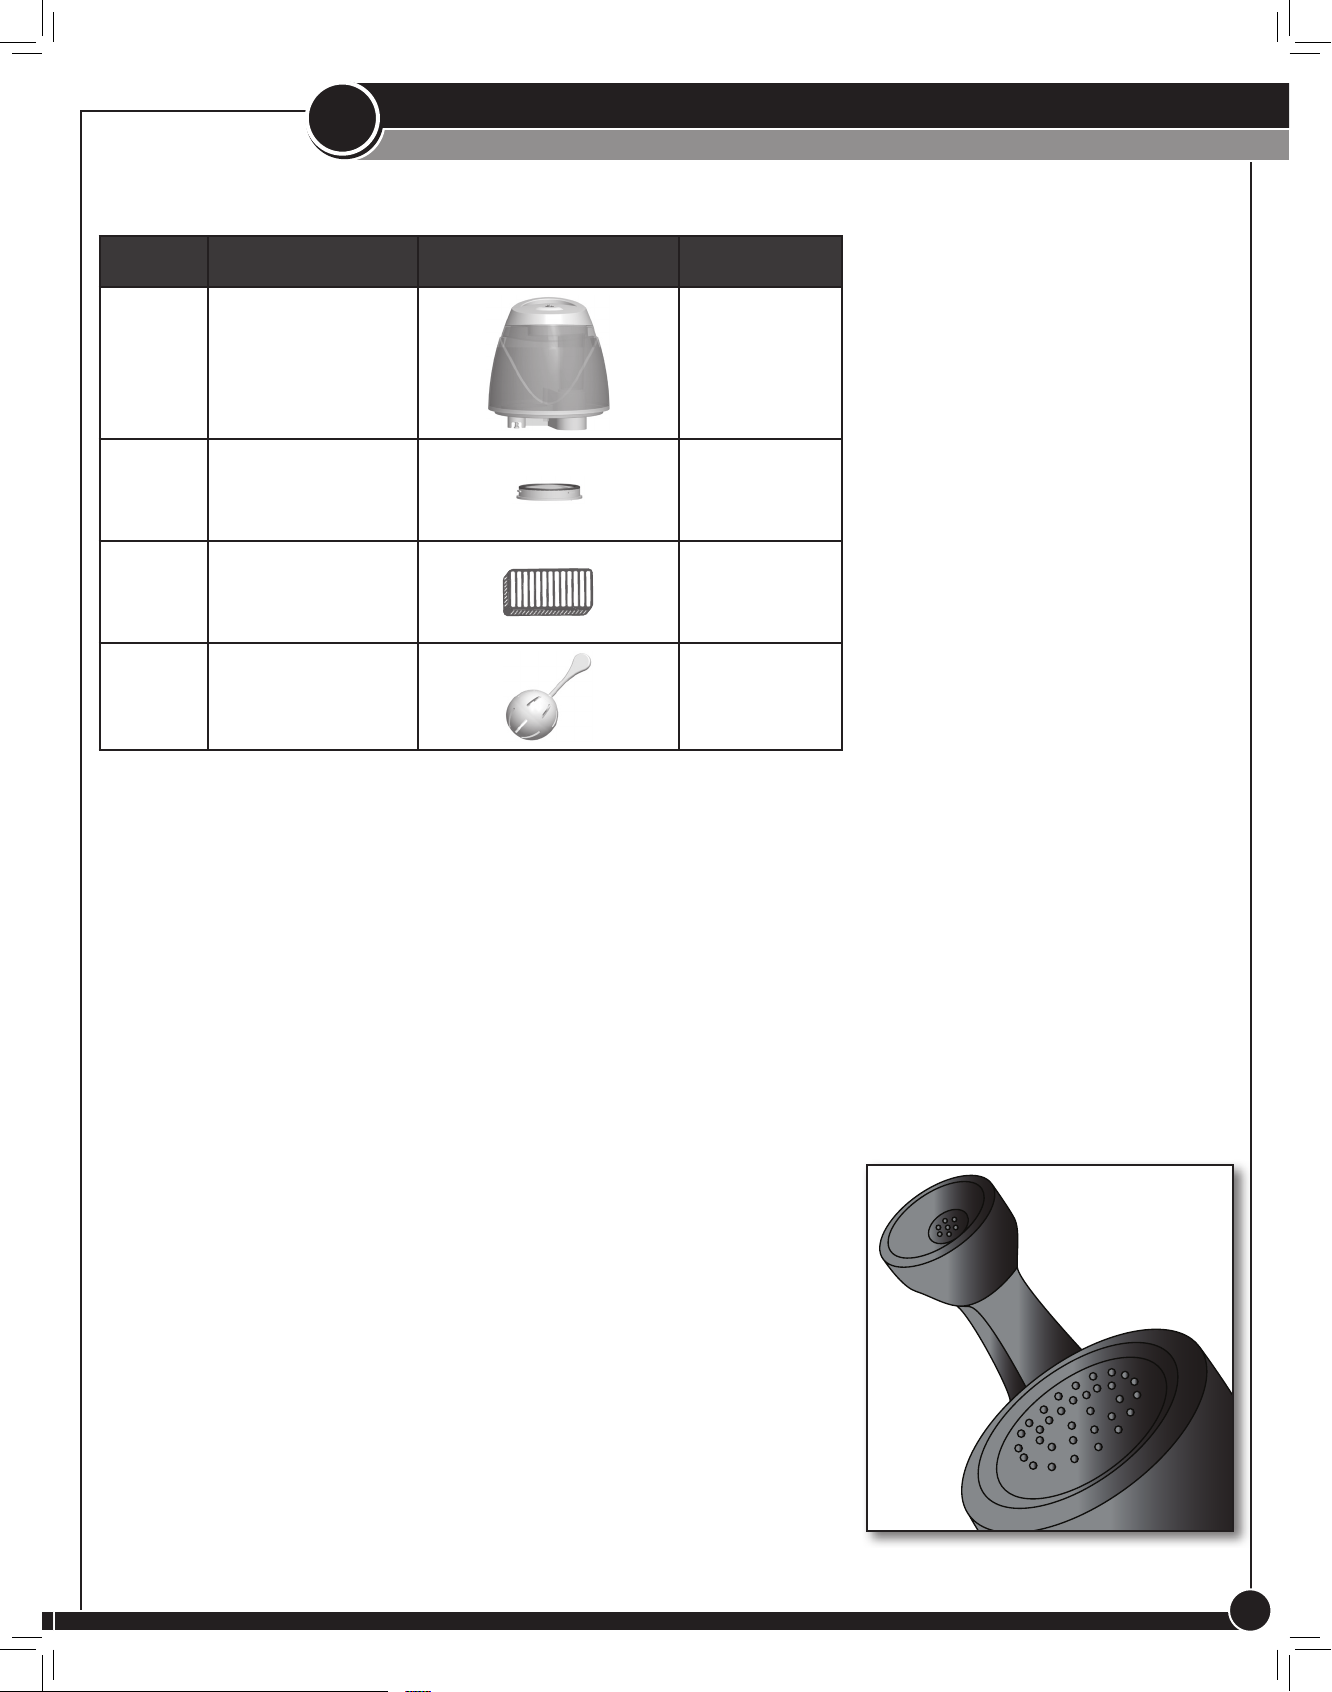
Service Parts
Part # Part Name Part Replace
Humidifier Assistance
8975501-326
G0843-
01-679
31954
31955
Water Tank
Tank Assembly Cap
Demineralization
Cartridge
Silver Ion
Cartridge
1 per month
1 per month
Technical Support
If you need any assistance with setup, operation, or parts for your new Hunter
Humidier, please call us, our technical support staff is ready to help!
USA: 1-888-830-1326
Canada: 1-866-268-1936
Hours of operation are from 7:00 am to 7:00 pm Monday - Friday and 8:00 am
to 5:00 pm on Saturday, Central Time. You may also contact us over the Internet
at www.hunterfan.com or register your product at www.hunterfan.
com/register and select your product under product registration.
©2010 Hunter Fan Company
9
Page 10
Humidifier Accessories
5
Treatments
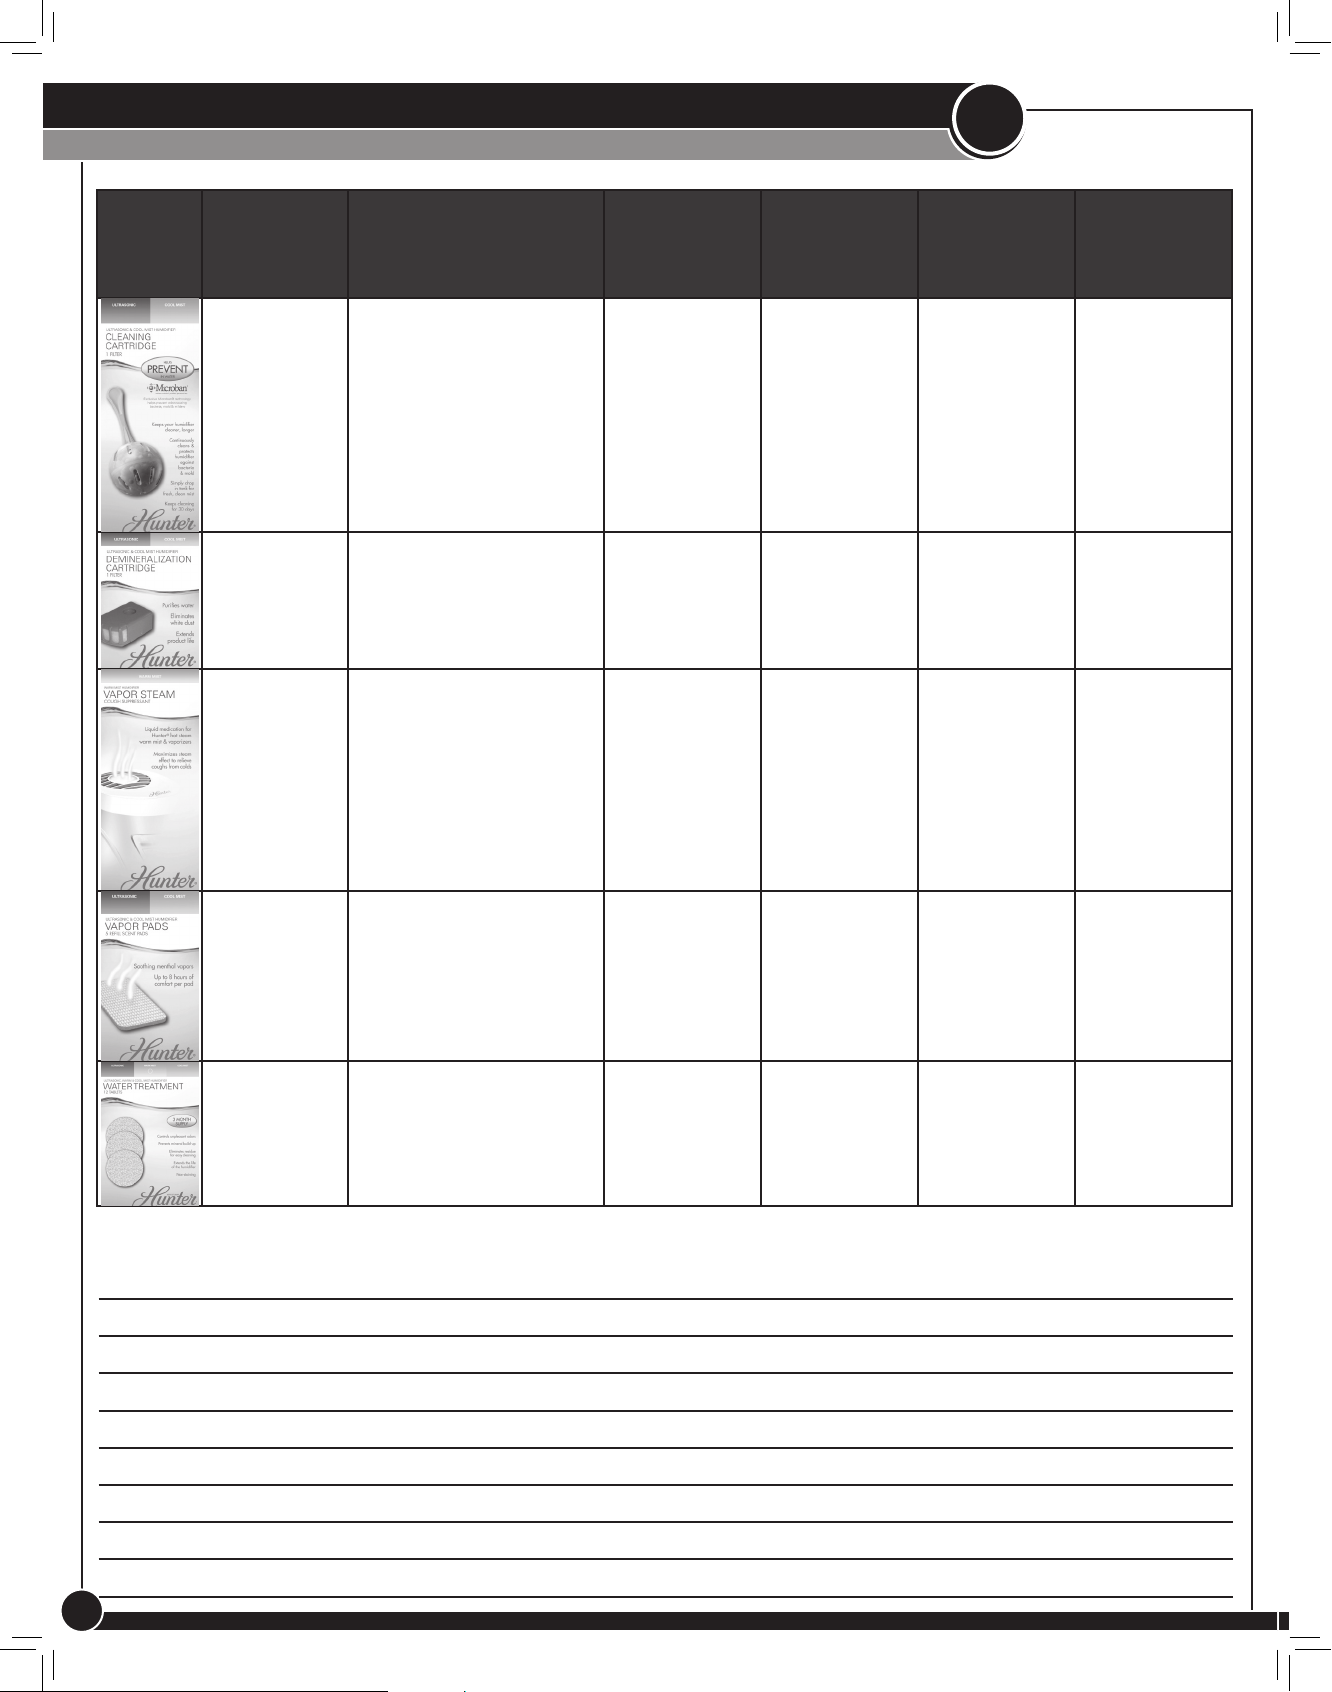
Model Product Evaporative Ultrasonic Vaporizer Warm Mist
31955 Cleaning Cartridge
31954 Demineralization Cartridge
31961 Vapor Steam
31956 Vapor Pads
31960 Water Treatment Tablets
Notes
10
44065-01 • 11/02/2010
Page 11
6
Warranty
Warranty
3 Year Guarantee
The Hunter Fan Company, Inc. makes the following warranty to the original
residential user or consumer purchaser of the ultrasonic humidier:
If any part of the ultrasonic humidier fails during the rst 3 (three) years from the
date of purchase due to a defect in material or workmanship, we will provide a
replacement part free of charge.
If no replacement part can be provided, we will replace your humidier.
IF THE ORIGINAL RESIDENTIAL USER OR CONSUMER PURCHASER CEASES
TO OWN THE HUMIDIFIER, THIS WARRANTY AND ANY IMPLIED WARRANTY
WHICH THEN REMAINS IN EFFECT, INCLUDING BUT NOT LIMITED TO ANY
IMPLIED WARRANTY OF MERCHANTABILITY OR FITNESS FOR A PARTICULAR
PURPOSE, ARE VOIDED. THIS WARRANTY IS IN LIEU OF ALL OTHER EXPRESS
WARRANTIES. THE DURATION OF ANY IMPLIED WARRANTY, INCLUDING
BUT NOT LIMITED TO ANY IMPLIED WARRANTY OF MERCHANTABILITY OR
FITNESS FOR A PARTICULAR PURPOSE IS EXPRESSLY LIMITED TO THE PERIOD
OF THE EXPRESS WARRANTY SET FORTH ABOVE.
This warranty is voided if your ultrasonic humidier is not purchased and used in
the USA or Canada.
This warranty excludes and does not cover defects, malfunctions, or failures of
the humidier which were caused by repairs by persons not authorized by us,
use of parts, or accessories not authorized by us, mishandling, modications, or
damage to the humidier while in your possession, or unreasonable use, including
failure to provide reasonable and necessary maintenance. This warranty does
not cover humidiers used in commercial applications. There are no express or
implied warranties as to commercial purchasers or users.
To obtain service, contact the nearest Hunter authorized service center or the
Hunter Fan Company Service Department, 7130 Goodlett Farms Pkwy., Suite
400, Memphis, TN 38016, 1-888-830-1326. You will be responsible for
insurance and freight or other transportation to our factory service center. We
will return the humidier freight prepaid to you. The humidier should be properly
packaged to avoid damage in transit since we will not be responsible for any
such damage. Proof of purchase is required when requesting warranty service.
The purchaser must present the sales receipt or other document that establishes
proof of purchase.
IN NO EVENT SHALL HUNTER FAN COMPANY BE LIABLE FOR DIRECT,
INDIRECT, SPECIAL, CONSEQUENTIAL OR INCIDENTAL DAMAGES IN EXCESS
OF THE PURCHASE PRICE OF THE HUMIDIFIER. YOUR SOLE REMEDY WILL BE
REPAIR OR REPLACEMENT AS PROVIDED ABOVE. SOME AMERICAN STATES
AND CANADIAN PROVINCES DO NOT ALLOW:
• LIMITATIONS ON HOW LONG AN IMPLIED WARRANTY LASTS;
• THE EXCLUSION OR LIMITATION OF DIRECT, INDIRECT, SPECIAL, INCIDENTAL
OR CONSEQUENTIAL DAMAGES;
• THE EXCLUSION OR INVALIDITY OF EXPRESS OR IMPLIED WARRANTIES IF
THE USER CEASES TO OWN THE HUMIDIFIER;
• THE LIMITATION OF THE REMEDIES AND RECOURSES AVAILABLE TO THE
PURCHASER; OR THE INVALIDITY OF AN EXPRESS WARRANTY WHEN A
PRODUCT IDENTIFIED BY BRAND NAME IS NOT USED (UNLESS SPECIFIC
CONDITIONS ARE FULFILLED);
SO THE ABOVE LIMITATIONS OR EXCLUSIONS MAY NOT APPLY TO YOU.
THIS WARRANTY GIVES YOU SPECIFIC LEGAL RIGHTS AND YOU MAY ALSO
HAVE OTHER RIGHTS WHICH VARY FROM STATE TO STATE OR PROVINCE TO
PROVINCE.
©2010 Hunter Fan Company
Printed in china and Taiwan
11
 Loading...