

All Groups
Group 1
Group 2
Group 3
Group 4
Group 5
Group 6
Favorite
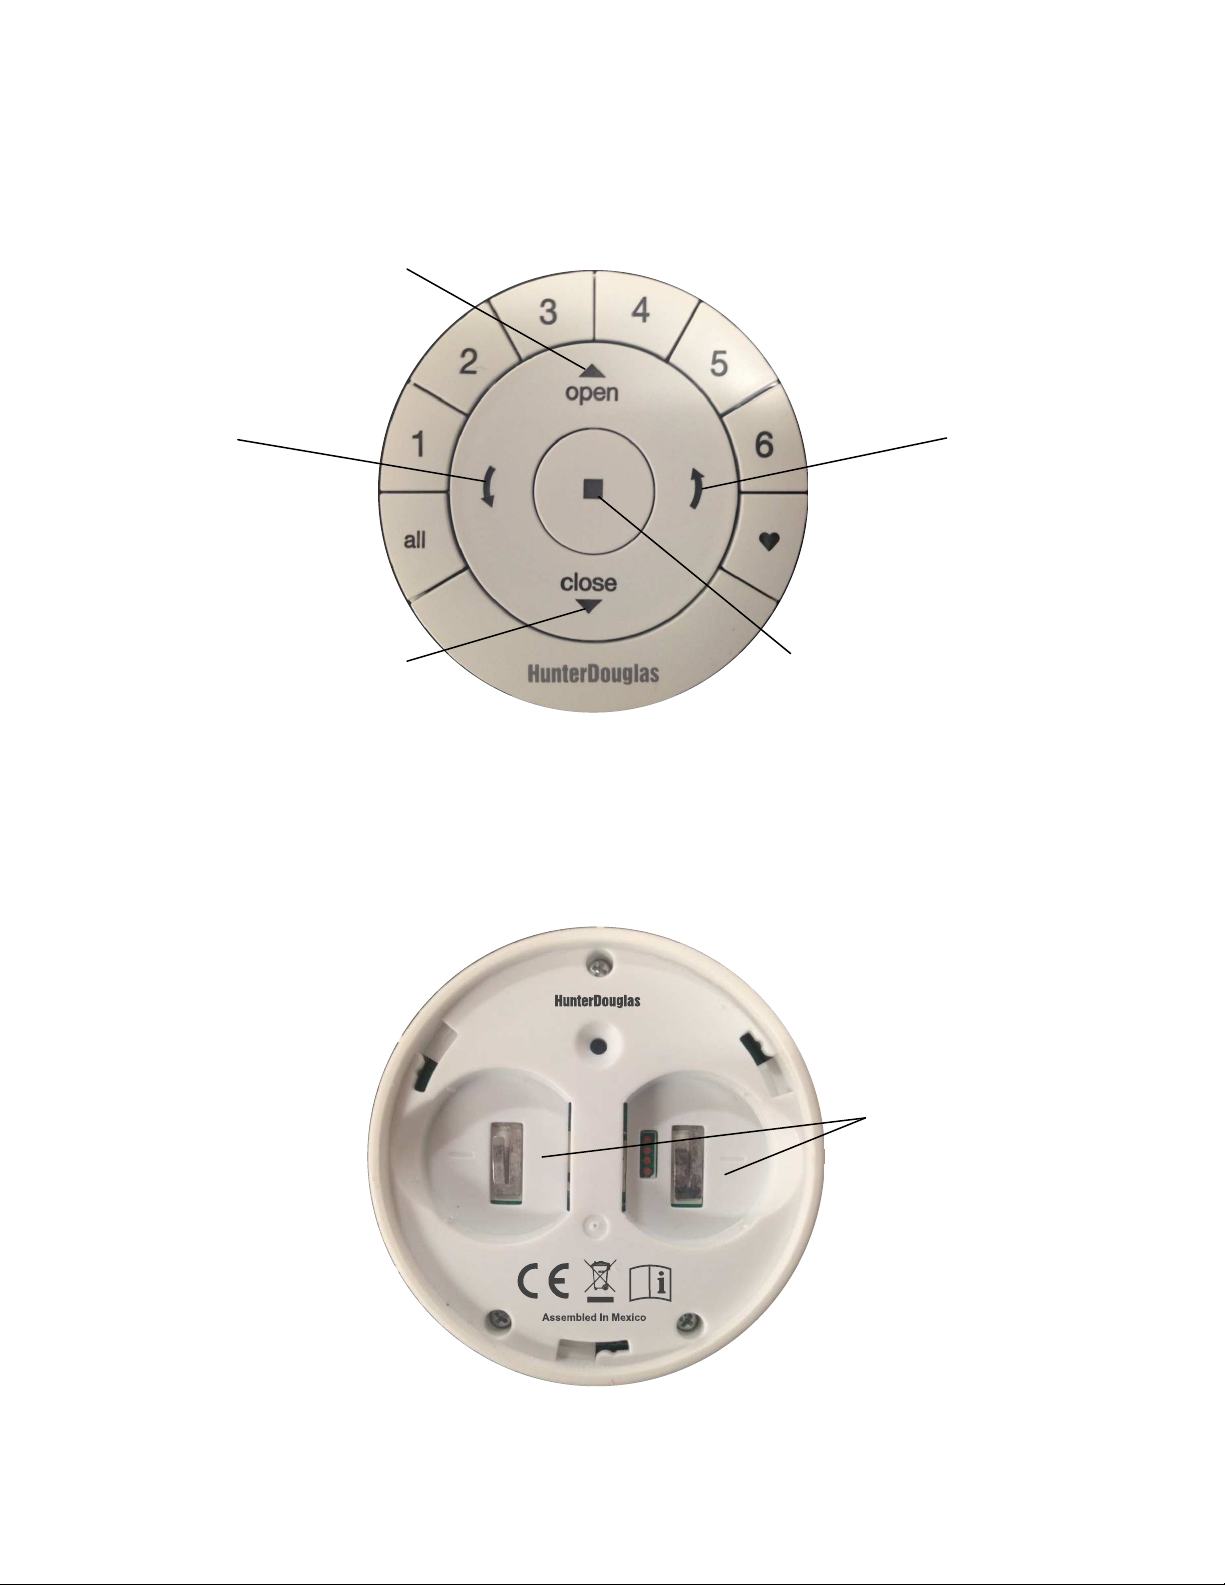
OPEN
CLOSE
STOP
RIGHT ARROW
LEFT ARROW
BACK
BATTERY
FRONT:
PowerView™ Remote Control Guide
Sends the middle rail DOWN
on Top-Down/Bottom-Up or
Duolite™ products
Sends vanes to fully
closed left-facing
position on Luminette®
Sheers
(cover removed):
Sends the middle rail UP
on Top-Down/Bottom-Up
or Duolite™ products.
Sends vanes to fully
(shade position)
(Press and hold for program mode)
closed right-facing
position on Luminette®
Sheers
Page 1 of 8
Rev 1.8 01292015
COMPARTMENT
(2) 3V CR 2032
Power
V
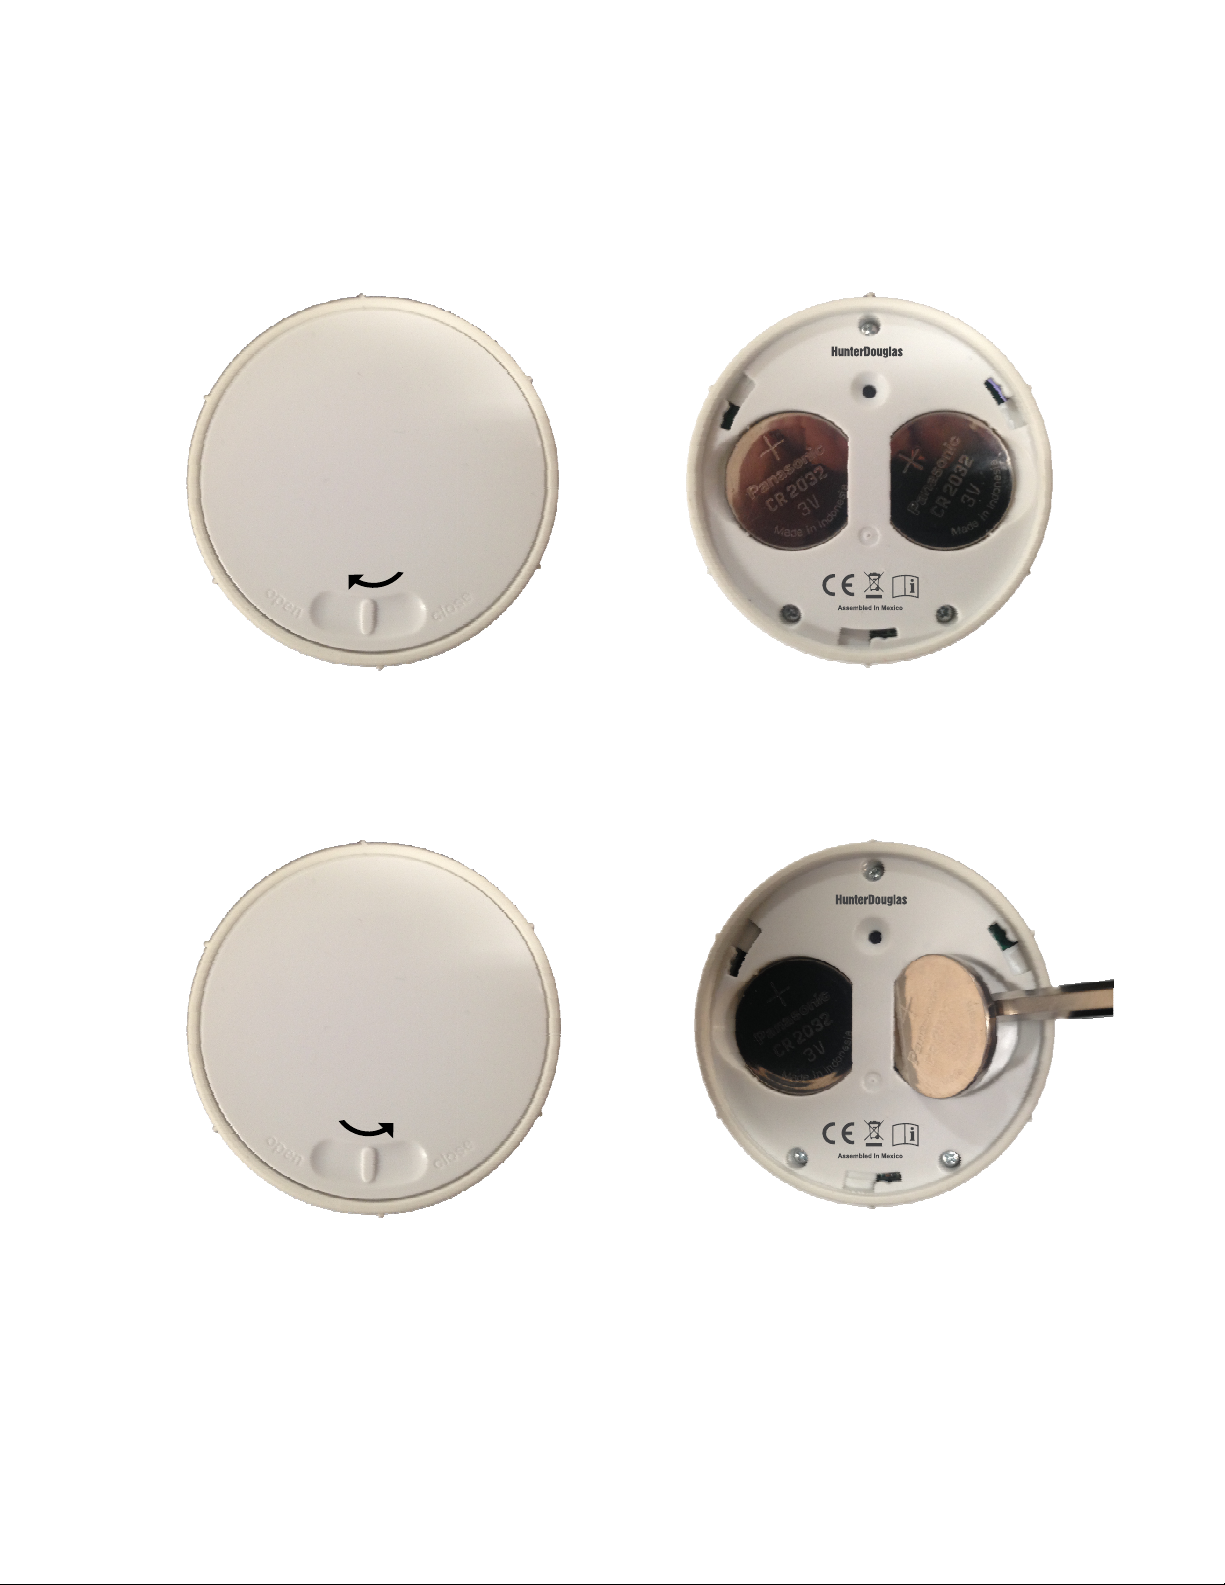
Press notch to move cover slightly
clockwise to release and remove cover.
Position cover over slots. Press notch to
move cover slightly counterclockwise to
Use two CR 2032 3V batteries.
each compartment
To remove batteries use a small screwdriver or
iew™ Remote Control Guide
Battery Placement:
1. Remove Cover.
2. Place Batteries.
Slide one
battery into
place to fully seat.
and press into
3. Replace Cover.
lock into position.
Page 2 of 8
Rev 1.8
4. Battery Removal
fingernail to lift battery
and remove from slot.
01292015

PowerView™ Remote Control Guide
Groups
A GROUP can be a single window covering or multiple window coverings. There are six unique
assignable groups to use on each remote. NOTE: It is recommended that only similar window coverings
be included in a group because of differences in product features and operation. When a shade is added
to a group for the first time, it is also added to a network that links shades and devices together.
To join a shade to a GROUP:
1. Press and hold Stop for four seconds to put remote in program mode. The lights on remote
will blink to indicate it is in program mode.
2. Press desired group number (1 – 6) on the remote. The light for the group number selected will
blink to show it is selected.
3. Press and hold the manual control button on the shade.
4. While continuing to press the manual button, Press Open on the remote. The shade will jog
to indicate it has joined the group.
5. Press and hold Stop for four seconds to exit program mode.
To remove a shade from a group:
1. Press and hold Stop for four seconds to put remote in program mode. The lights on remote
will blink to indicate it is in program mode.
2. Press desired group number (1 – 6) on the remote. The light for the group number selected will
blink to show it is selected.
3. Press and hold the manual control button on the shade.
4. While continuing to press the manual button, Press Close on the remote. The shade will jog
to indicate it has been removed from the group.
5. Press and hold Stop for four seconds to exit program mode.
Resetting Limits:
Applause® honeycomb shades; Design Studio Roman Shades; Duette® honeycomb shades; Nantucket™
window shadings; Pirouette® window shadings; Pleated Shades; Silhouette® window shadings; Solera™
Soft Shades; Vignette® Modern Roman Shades.
1. Press and hold the manual control button on the shade for six seconds. The shade will jog to
indicate it has been cleared.
2. Then run the shade fully to Open to set a new upper limit. The shade will run slowly to
the top where it will set a new upper limit. The shade will jog to indicate a new limit has
been set.
3. Then press Close. The shade will run down slowly until it reaches its mechanical lower
Page 3 of 8
limit. The shade will jog to indicate a new limit has been set.
Rev 1.8 01292015

PowerView™ Remote Control Guide
Resetting Limits – Designer Roller Shades & Designer Screen Shades Only
1. Press and hold the manual control button on the shade for eighteen seconds. Continue to
hold the manual control button as the shade jogs at six seconds and twelve seconds. Release
it after a third jog at eighteen seconds to clear the bottom limit.
2. Then run the shade fully to Open to set a new upper limit. The shade will run to the top
where it will set a new upper limit. The shade will jog to indicate a new limit has been set.
3. Then press Close. The shade will run down. Press
Adjust up or down as needed. Caution: When lowering the shade, the shade will not stop
until you stop it. If it is not stopped, it will roll up backwards.
4. Press and hold Stop for four seconds to put remote in program mode. The lights on
remote will blink to indicate it is in program mode. Check to make sure no group number is
flashing. If a group number is lit, press it to deselect the group.
5. Press and hold the manual control button on the shade.
6. While continuing to press the manual button, Press Close on the remote. The shade will
jog to indicate it has set a new lower limit.
7. Press and hold Stop for four seconds to exit program mode.
Resetting Limits – Luminette® Privacy Sheers and Skyline™ Gliding Panels
1. Press and hold the manual control button on the shade for six seconds. The shade will jog to
indicate it has been cleared.
2. Then run the shade fully to Open to set a new open limit. The shade will run slowly to
the stack side where it will set a new traverse open limit.
Stop at the desired bottom length.
3. Then press Close. The shade will run slowly to the closed position where it will set a new
traverse closed limit.
4. (Luminette Only) Press
right rotation will be set.
5. (Luminette Only) Press
rotation will be set
Page 4 of 8
Rev 1.8 01292015
right arrow to rotate vanes fully to the right where a new limit for
left arrow to rotate vanes fully to the left where a new limit for left

Power
V
Each shade has one favorite position
new favorite position replaces any previous setting. Resetting
favorite position to the default position.
To set a new favorite position:
Run shade to the desired favorite position.
Stop for
to indicate it is in program mode.
Press and hold the manual control button on the shade.
While continuing to press the manual button, Press the
jog to indicate it has set this as your favorite position..
Stop for
Radio Control Operation
Once shades have been joined to a group, radio c
to aim the remote toward the shade(s) being operated. Multiple shades can be operated at the same
time even if they are in another room.
simply pick it up or
ed will be highlighted and active.
-6 to select specific shade(s) to move.
Selected groups will light to show they are selected.
number
roup, press
out
button to send selected shade(s) UP
button to send selected shade(s) DOWN to 100%
shade is in motion, press
which is set by default at 50% of the shade height. Setting a
shade limits will also reset the
put remote in program mode. The lights on
favorite button on the remote.
ontrol is used to operate the shades. There is no need
the opposite of shade motion
Setting Favorites Position
iew™ Remote Control Guide
1.
2. Press and hold
remote will blink
3.
4.
The shade will
5. Press and hold
Remote Functions:
1. To wake up remote,
select
four seconds to
♥
four seconds to exit program mode.
press Stop. The last group(s)
2. Press “All” or Groups 1
a. Multiple Group
b. To deselect a G
that group will go
3. Select the
4. Select the
5. While a
to reverse direction.
Page 5 of 8
OPEN
CLOSE
.
may be selected at a time.
the Group number again. The light for
to 100%.
OPEN or CLOSE,
Rev 1.8
.
01292015

PowerView™ Remote Control Guide
6. Selecting the
a. OR send the middle rail UP on Top-Down/Bottom-Up or Duolite™ products.
b. OR send vanes to fully closed right-facing position on Luminette® Sheers.
7. Select the left arrow* to close vanes.
a. OR send the middle rail DOWN on Top-Down/Bottom-Up or Duolite™ products.
b. OR send vanes to fully closed left-facing position on Luminette® Sheers.
right arrow* will open vanes to 100%.
8. Selecting the
9. Select the
STOP button will stop shade movement at current position.
♥
FAVORITE button, shown to send selected shade(s) to preset favorite positions.
* The right or left arrows will not send operational commands for a standard bottom-up product
Page 6 of 8
Rev 1.8 01292015

PowerView™ Remote Control Guide
window
window
both rails at
window
window
window
window
window
Table of Remote Functions by Shade Type:
Standard Stacking
Products
TDBU/Duolite
Stacking Products
TD Stacking Products
Roller products
Silhouette/Pirouette
Products
Vertical Products
Open
shade stacked shade down
at top at bottom
uncovered
shade stacked shade down shade stacked shade down
both rails at top bottom rail down At bottom bottom rail down
uncovered
shade stacked shade up
bottom
uncovered
shade rolled shade down
into headrail at bottom
uncovered
shade rolled shade down shade down shade down
into headrail vanes closed vanes closed vanes open
uncovered
shade stacked shade extended
uncovered
Close
window covered
window covered Window uncovered window covered
moving rail up
window covered
window covered
window covered window covered window covered
window covered
Left Arrow
No effect No effect Stops shade
No effect No effect Stops shade
No effect No effect Stops shade
No effect No effect Stops shade
Right Arrow
Stop ♥ Heart
Moves shade to
preset favorite
Stops shade
Stops shade
Moves shade to
preset favorite
Moves shade to
preset favorite
Moves shade to
preset favorite
Moves shade to
preset favorite
Moves shade to
preset favorite
position*
position*
position*
position*
position*
position*
shade stacked shade extended shade extended shade extended
Luminette Products
uncovered
Vanes open tilted left tilted right
Page 7 of 8
Rev 1.8 01292015
window covered vanes closed vanes closed
Stops shade
Moves shade to
preset favorite
position*

Power
V
This device complies with Part 15 of the FCC Rules. Operation is subject to the following two conditions:
(1) This device may not cause harmful interference, and
interference received, including interference that may cause undesired operation.
This equipment has been tested and found to comply with the limits for a Class B digital device, pursuant to Part 15 of the F
asonable protection against harmful interference in a residential installation. This equipment generates, uses
and can radiate radio frequency energy and, if not installed and used in accordance with the instructions, may cause harmful
o communications. However, there is no guarantee that interference will not occur in a particular installation. If this equip
harmful interference to radio or television reception, which can be determined by turning the equipment off and on,
try to correct the interference by one or more of the following measures:
• Increase the separation between the equipment and receiver.
cuit different from that to which the receiver is connected.
• Consult the dealer or an experienced radio/TV technician for help.
Any changes or modifications not expressly approved by the party responsible for compliance could void the user’s authority t
Under Industry Canada regulations, this radio transmitter may only operate using an antenna of a type and maximum (or lesser)
for the transmitter by Industry Canada. To reduce potential radio interferen
that the equivalent isotropically radiated power (e.i.r.p.) is not more than that necessary for successful communication.
This device complies with Industry Canada licence
may not cause interference, and (2) this device must accept any interference, including interference that may cause undesired
This Class B digital apparatus complies with Canadian ICES
Conformément à la réglementation d’Industrie Canada, le présent émetteur radio peut fonctionner avec une antenne d’un type et
maximal (ou inférieur) approuvé pour l’émetteur par Industrie Canada. Dans le but de réduire les risques de brouillage r
l’intention des autres utilisateurs, il faut choisir le type d’antenne et son gain de sorte que la puissance isotrope rayonné
ne dépasse pas l’intensité nécessaire à l’établissement d’une communication satisfaisante
Le présent appareil est conforme aux CNR d’Industrie Canada applicables aux appareils radio exempts de licence. L’exploitatio
aux deux conditions suivantes : (1) l’appareil ne doit pas produire de brouillage, et (2) l’utilisateur de l’appa
radioélectrique subi, même si le brouillage est susceptible d’en compromettre le fonctionnement.
rique de la classe B est conforme
Address: One Duette Way, Broomfield, CO 80020, USA
Piekstraat 2, 3071 EL Rotterdam, The Netherlands
certify and declare under our sole responsibility that the
R&TTE directive 1999/5/EC.
A copy of the original declaration of conformity may be found at
the user is encouraged to
ce to other users, the antenna type and its gain should be so chosen
dard(s). Operation is subject to the following two conditions: (1) this device
reil doit accepter tout brouillage
conforms with the essential requirements of the
U.S. Radio Frequency FCC Compliance
(2) This device must accept any
limits are designed to provide re
radi
• Reorient or relocate the receiving antenna.
• Connect the equipment into an outlet on a cir
equipment.
Industry Canada
device.
Class B Digital Device Notice
Industrie Canada
iew™ Remote Control Guide
CC Rules. These
interference to
ment does cause
o operate the
gain approved
-exempt RSS stan
operation of the
-003, RSS-Gen and RSS-210.
d’un gain
adioélectrique à
e équivalente (p.i.r.e.)
.
n est autorisée
Appareil Numérique de la Classe B – Avis
Cet appareil numé
CAN ICES-3 (B)/NMB-3(B)
European Conformity
We, the undersigned,
Hunter Douglas Window Fashions
Authorized representative in Europe:
Hunter Douglas Europe B.V.
directive 2004/108/EC and
Page 8 of 8
à la norme NMB-003, CNR-Gen et CNR-210 du Canada.
PowerView™ Remote Control
www.hunterdouglas.com/RFcertifications.
Rev 1.8
EMC
01292015
 Loading...