

Mercury Operating Instructions
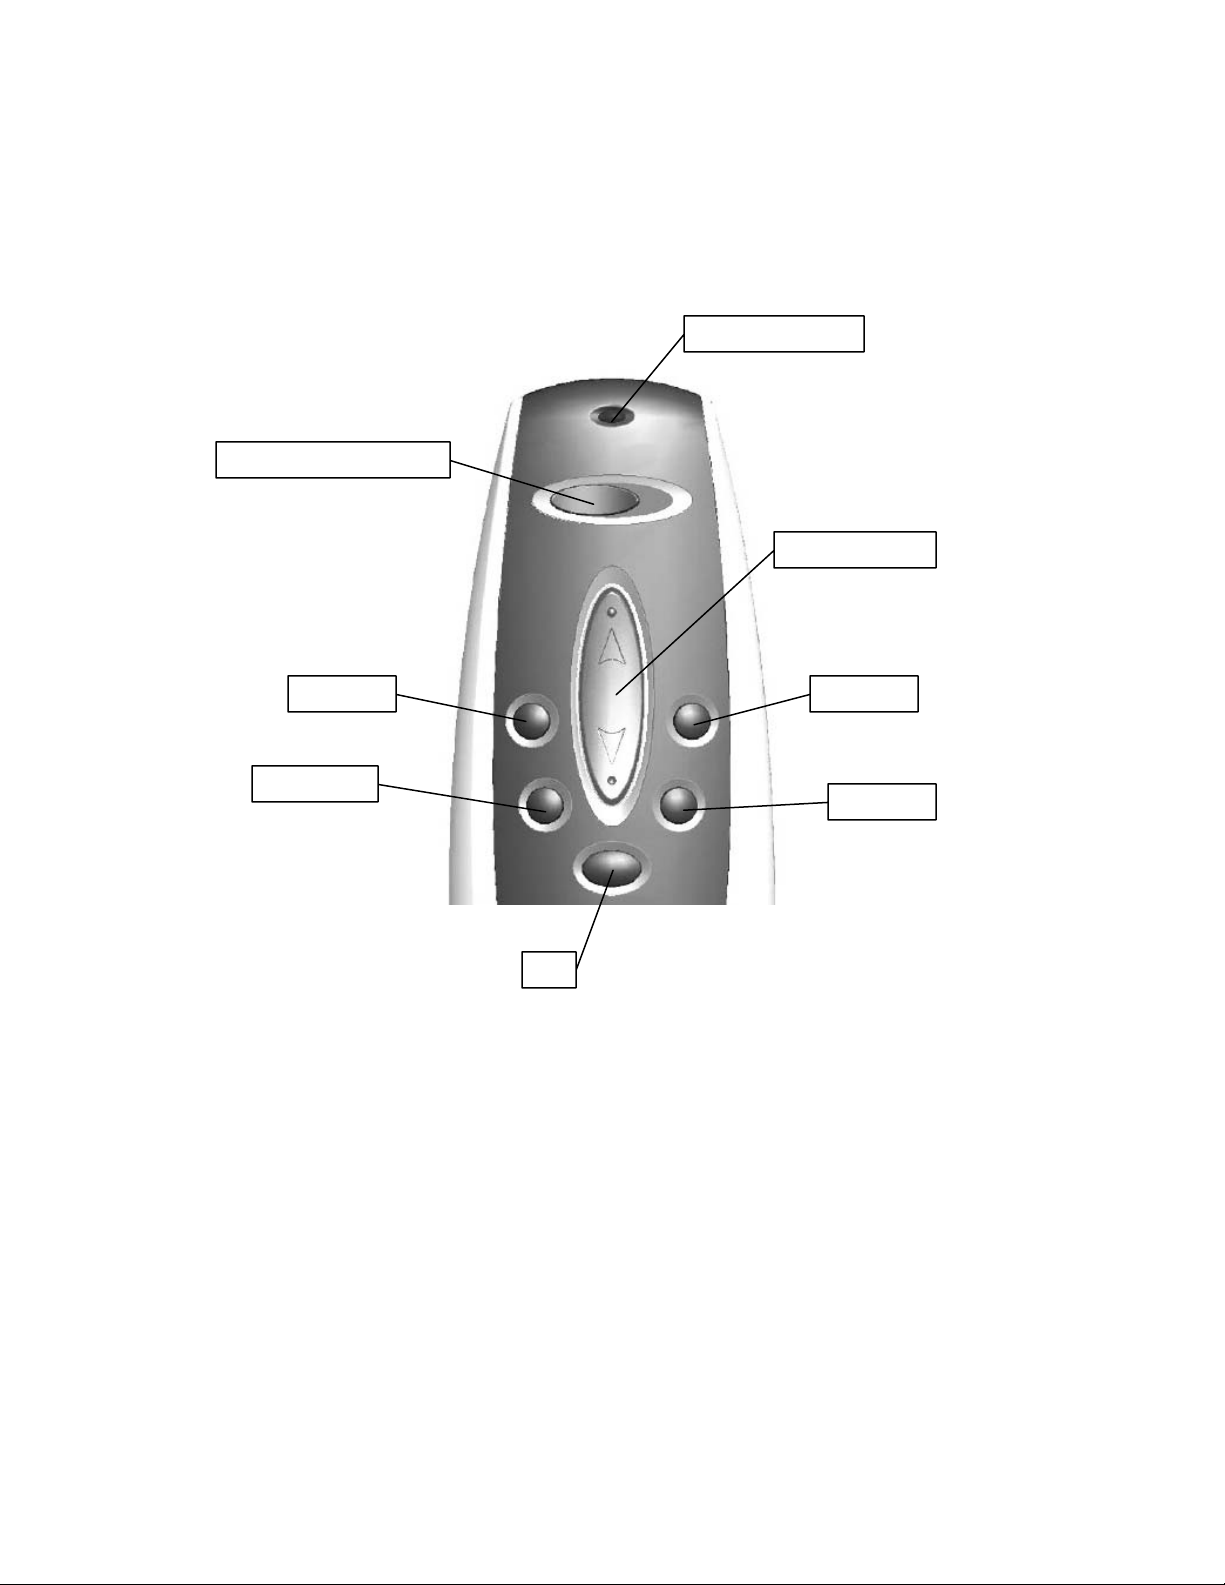
Channel Selector
Group 1
Group 3
Indicator LED
UP/DOWN
Group 2
Group 4
All
Operation
Individual Mode
• By default, the shade will function on Channel 1. Ensure that the Channel
Selector is switched to Channel 1 by moving it to the left position. (If Channel
2 is desired, switch the Channel Selector to the right position.)
• Point the remote control at the window covering you wish to control. Try to point
at the receiver of the window covering as much as possible. While pointing,
briefly press the
cause the desired shade to move continually in the desired direction. Note that the
Indicator LED lights red when pushing the UP or DOWN button. This
indicates that you are in Individual Mode.
UP or DOWN button as desired. A brief press of the button will

• To stop the shade, point the remote control at the window covering. While
pointing, press either the UP or DOWN button. Either one will stop the shade.
• If the shade is not stopped while moving, it will automatically stop at its end limit.
Group Mode
Please see programming instructions below before attempting to use the Group Mode.
• In order to operate a group, the desired Group button must be pushed (Group 1,
Group 2, Group 3, or Group 4). Note that the Indicator LED lights green
after the Group button is pushed. This indicates that the remote is in Group
Mode. It will stay in this mode with the green Indicator LED for three seconds,
and then return to Individual Mode.
• While in Group Mode, press the UP or DOWN button to operate the window
covering group as desired. A brief press of the button will cause the group of
window coverings to move continually in the desired direction. Note that the
Indicator LED is still green and that the remote will remain in Group Mode for
three seconds after operation.
• To stop the group, enter the desired Group Mode as described above. Press either
the UP or DOWN button. Either one will stop the shade.
• If the shade is not stopped while moving, it will automatically stop at its end limit.
• All Functionality
o All of the window coverings included in groups may be controlled
simultaneously via the
o Use the ALL button just as the Group buttons are used. Press the ALL
button briefly, and then press the UP or DOWN button as desired.
o Every shade that currently belongs to a group will operate as commanded.
• Note that pointing is not necessary to control groups. Control of window
coverings in groups is possible in other rooms or areas out of the line of sight of
the remote control.
ALL Button.

Programming
Individual Mode
No programming is necessary to operate window coverings in Individual Mode. The
remote will operate the window coverings in Channel 1 right out of the box. If Channel 2
operation is required, follow these steps to change the channel on the window covering:
• Switch the remote control to Channel 2 by sliding the
right.
• Press and hold down the button on the receiver.
• Point the remote control at the receiver and press the UP button for three seconds.
The shade should move slightly to indicate that the programming has taken place.
Group Mode
• To add window coverings into groups or remove window coverings from Groups,
you must first depress the Program button on the back of the remote control.
Use the end of a paperclip or a pushpin to do this. After the Program button has
been pressed the Indicator LED on the front of the remote control will flash
green. This indicates the remote control is in Programming Mode. It will stay in
Programming Mode until the Program button is pressed again or until 30
seconds have passed without any buttons being pushed.
• Adding Window Coverings to a Group
o To add a window covering into a group, briefly press the desired Group
button. Then point the remote control at the window covering you wish
to add and briefly press the UP button. Note that the window covering
will jitter up and down briefly to indicate that it has been added.
o At this point, the remote control is still in Programming Mode.
• Removing Window Coverings to a Group
o To remove a window covering from a group, briefly press the desired
Group button. Then point the remote control at the window covering
you wish to remove and briefly press the DOWN button. Note that the
window covering will jitter up and down briefly to indicate that it has been
removed.
o At this point, the remote control is still in Programming Mode
• Since the remote control remains in Programming mode, other window coverings
can be added to or removed from any of the 4 groups by repeating the previous
steps.
Channel Selector to the

• When programming is completed, briefly press the Program button on the back
of the remote control. The LED on the front should stop blinking, indicating that
you are back in normal operating mode.
• Clearing All Group Programming
o To clear all of the group programming that has been done with a remote
control, you must press the Reset button on the back of the remote for 10
seconds.
o To access this button, remove the battery cover and press the recessed
button with the end of a paperclip or a pushpin.
o Upon clearing the entire group programming, none of the window
coverings will respond to Group Mode commands until they have been
added to a group.
o Even with the group programming cleared, the window coverings are still
fully functional in the Individual Mode.
This device complies with part 15 of the
FCC Rules. Operation is subject to the following
two conditions: (1) This device may
not cause harmful interference, and (2) this
device must accept any interference received,
including interference that may
cause undesired operation.
Do NOT make changes or modifications to this equipment.
Changes or modifications not expressly approved by the
manufacturer may degrade performance, void user’s authority
to operate this equipment, and void manufacturer’s warranty.
Rev1.1
 Loading...