

Page 1

Model/Modelo:
HPAC-10C150-(A-Z)
HPAC-12C150-(A-Z)
HPAC-14C150-(A-Z)
HPAC-14C150P-(A-Z)
For questions about features, operation/performance, parts or service,
call: (855) 887-144
()
0
0
Page 2

Page 3

TABLE OF CONTENTS
IDENTIFICATION OF PARTS
AIR CONDITIONER SAFETY
INSTALLATION REQUIREMENTS
Tools and Parts
Electrical Requirements
Location Requirements
INSTALLATION INSTRUCTIONS
Unpack the Air Conditioner
Install The Portable Air Conditioner
Installation In Vertical Sliding Windows
Installation In Horizontal Sliding Windows
PORTABLE AIR CONDITIONER USE
2
3
3
3
4
4
5
5
6
7
8
9
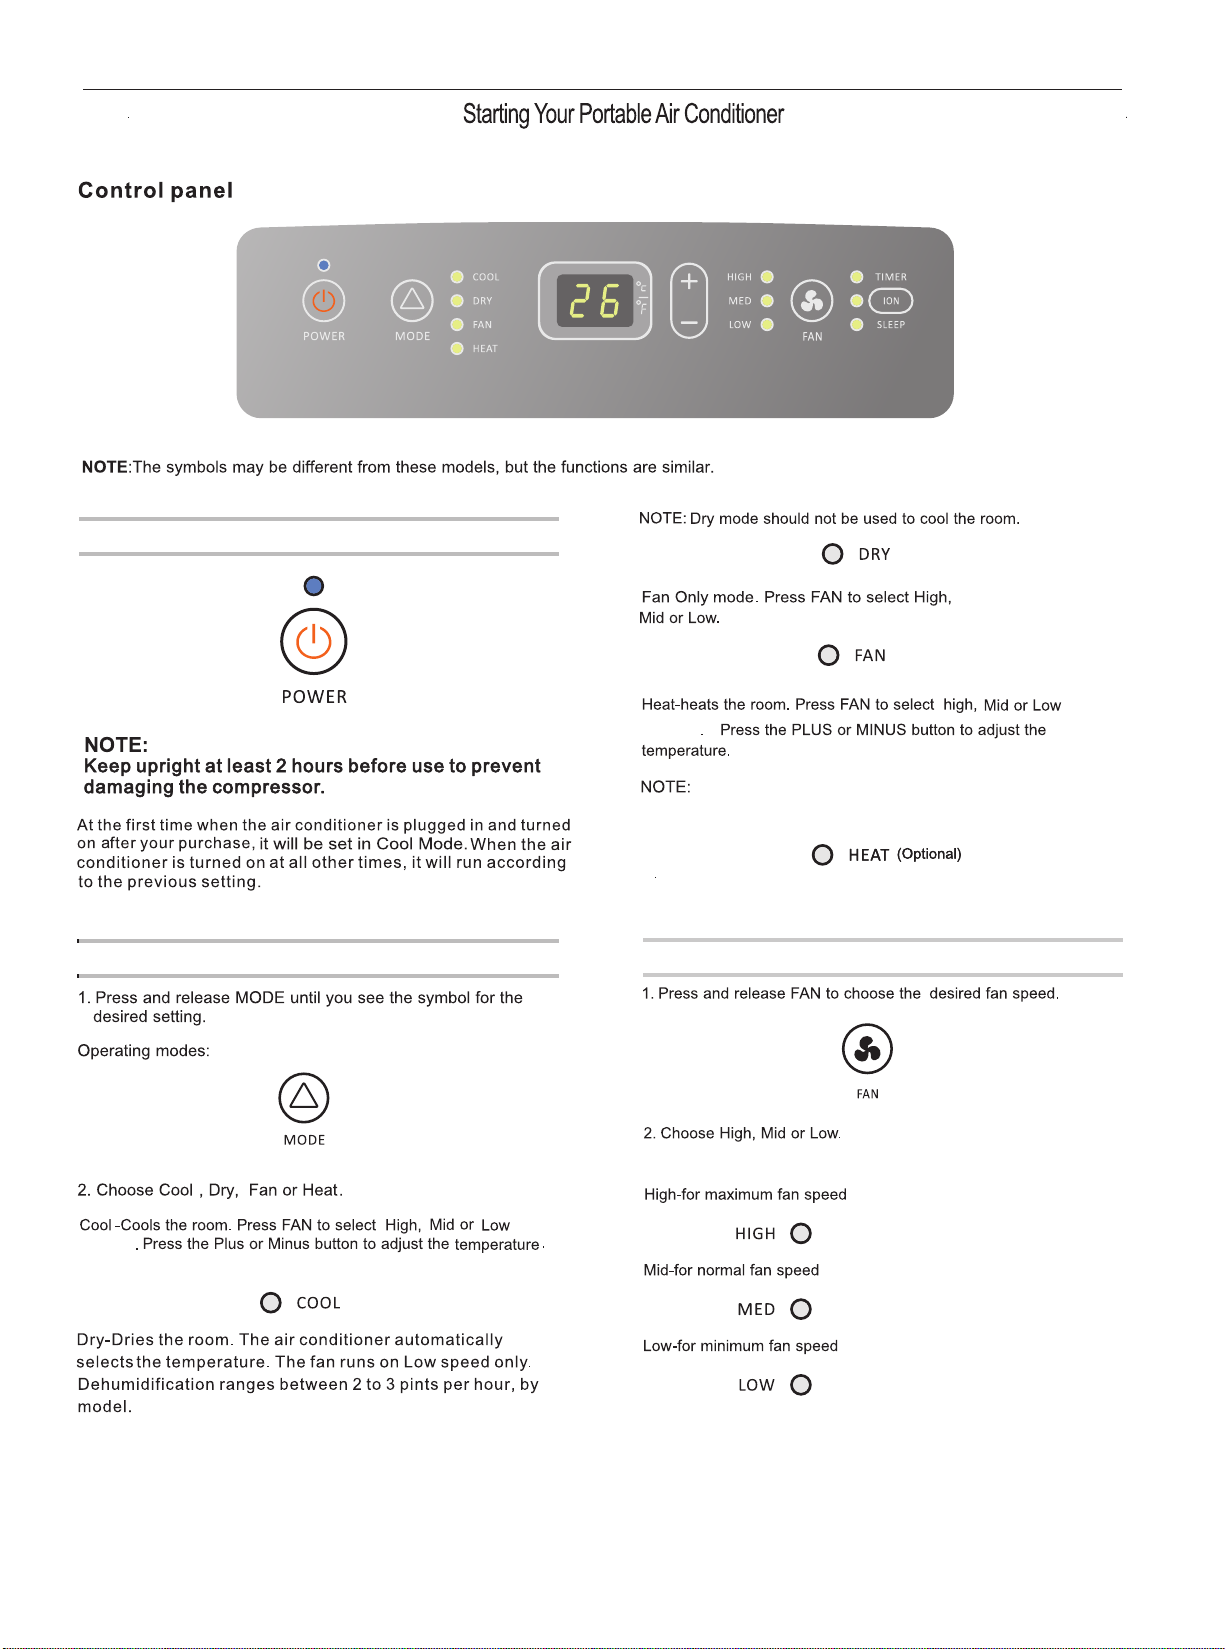
Starting Your Portable Air Conditioner
Using the Remote Control
Normal Sounds
PORTABLE AIR CONDITIONER CARE
Draining the Air Conditioner(non-Heating models)
Draining the Air Conditioner(Heating models)
Cleaning the Outside
Cleaning the Air Filter
Storing After Use
TROUBLESHOOTING
TROUBLESHOOTING
TROUBLESHOOTING
WARRANTY..............................................................
10
11
13
14
14
14
14
14
14
15
15
15
151515
17
Page 4
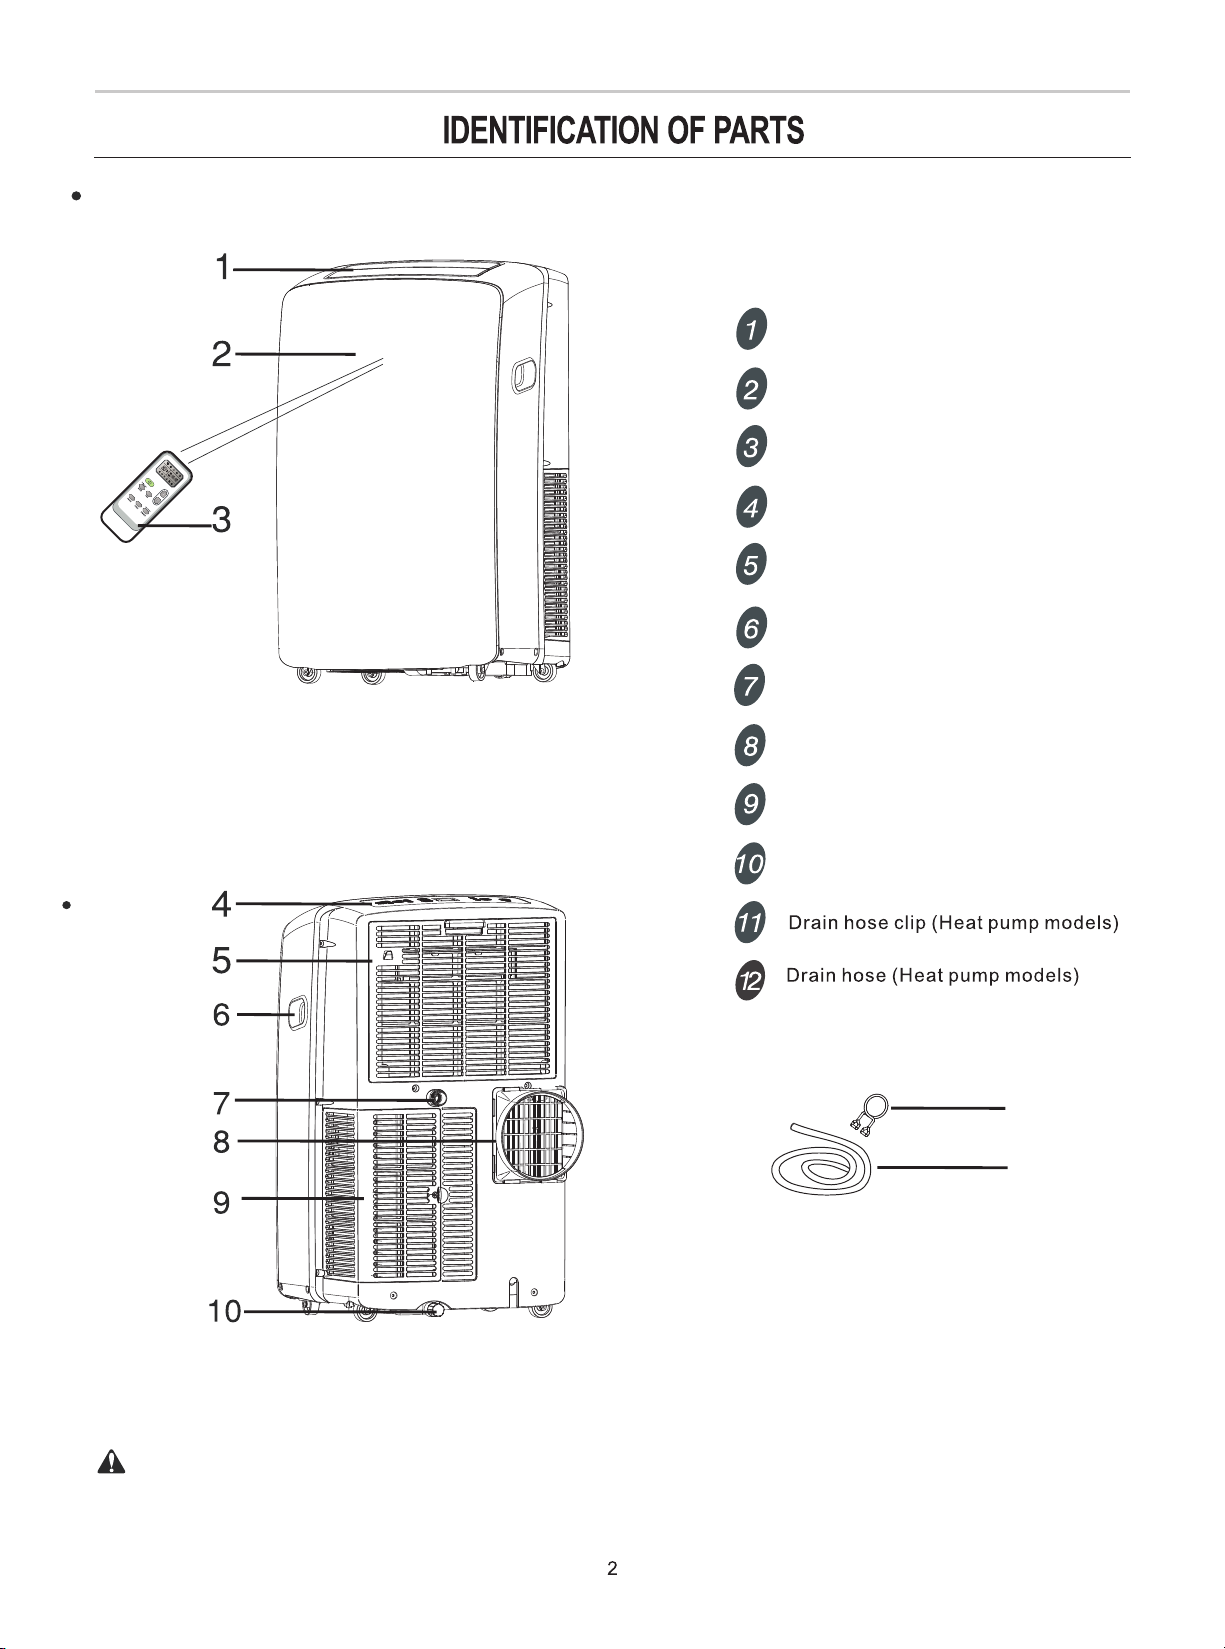
Front
Cool air outlet
Signal receptor
Remote control
Control panel
Evaporator air intake
Transport handle
Secondary drain port
Air outlet hose
Back
Condenser air intake
Primary drain port
11
12
The figures in this manual are based on the external view of a standard model.
They may differ from that of the air conditioner you have selected.
Page 5
Your safety and the safety of others is very important.
We have provided many important safety messages in this manual and on your appliance. Always read and obey all safety
messages.
This is the safety alert symbol.
This symbol alerts you to potential hazards that can kill or hurt you and others.
All safety messages will follow the safety alert symbol and either the word "DANGER" or "WARNING ."
These words mean:
DANGER
WARNING
All safety messages will tell you what the potential hazard is and tell you how to reduce the chance of injury.
A haz ard t hat i f not avoided wil l res ult i n death or
serious inju ry.
A haz ard t hat i f not avoided cou ld re sul t in death or
serious inju ry.
IMPORTANT SAFETY INSTRUCTIONS
WARNING:
Plug into a grounded 3 prong outlet.
Do not remove ground prong.
Do not use an electrical adapter.
The appliance is not intended for use by young children or impaired persons without supervision. Young children should be
supervised to ensure that they do not play with the appliance.
To reduce the risk of fire, electrical shock or injury when using your air conditioner, follow these basic precautions:
Do not use an extension cord.
Unplug air conditioner before servicing.
Use two or more people to move and install air conditioner.
SAVE THESE INSTRUCTIONS
STORAGE AND DISPOSING OF THE UNIT
Please recycle or dispose of the packaging material for product in an environmentally responsible manner.
Never store or ship the air conditioner upside down or sideways to avoid damage to the compressor .
Dispose of thi s app lia nce in accordan ce wi th Fe deral and Local regu lat ion s. Refrigeran ts mu st be e vacuated befo re
disposal.
Tools and Parts
Gather the required tools and parts before starting installation.
Read and follow the instructions provided with any tools listed
here.
Tools needed
■ Phillips screwdriver
■ Cordless drill and ¹⁄₈" bit
Parts supplied
Check that all parts are included in parts package.
■ Scissors
■ Pencil
A.Foam seal
B.Coupling
C.Flexible e xha ust h ose
D.Window exh aus t ada pter
E.Screws(4 )
F.Window-l ock b rac ket(2)
G.Outer slid er se ction
H. Inner slide r sec tio n
I.Foam seal- lon g(2 )
J.Foam seal- sho rt(2)
K.Drain hose ( Hea t pum p models)
L.Drain hose c lip ( Hea t pump models)
3
Page 6
Electrical Requirements
WARNING
Electrical Shock Hazard
Plug into a grounded 3 prong outlet.
Do not remove ground prong.
Do not use an adapter.
Do not use an extension cord.
Failure to follow these instructions can result in death,
fire, or electrical shock.
Recommended Grounding Method
portable air c ond iti oner must be grou nde d. This
This
portable air c ond iti oner is equipped wit h a pow er supply
cord with a thre e-p ron g grounding plu g. Th e cor d must
be plugged int o a mat ing , grounded thre e-p ron g outlet,
grounded in ac cor dan ce with all local code s and
ordinances . If a ma ting outlet is not ava ila ble , it is the
customer's r esp ons ibility to have a p rop erl y grounded
three-pron g out let i nstalled by a qua lif ied e lectrical
installer.
It is the customer’s responsibility:
To contact a qualified .electrical installer
To assure that the e lec tri cal installat ion i s
adequate and c onf orm s to the Nation Ele ctr ica l
Code,ANSI/ NFPA 70-l ast e dit ion,and all local
codes and ordi nan ces .
Copies of the st and ard s listed may be obt ain ed fr om:
Nation Fire Pr ote ction Association
1 Batterymar ch Pa rk
Quincy,Ma 02169-74 71
www.nfpa.or g
Wiring requirement
115 V (103.5 min. to 126.5 max.)
15 A time-delay fuse or circuit breaker
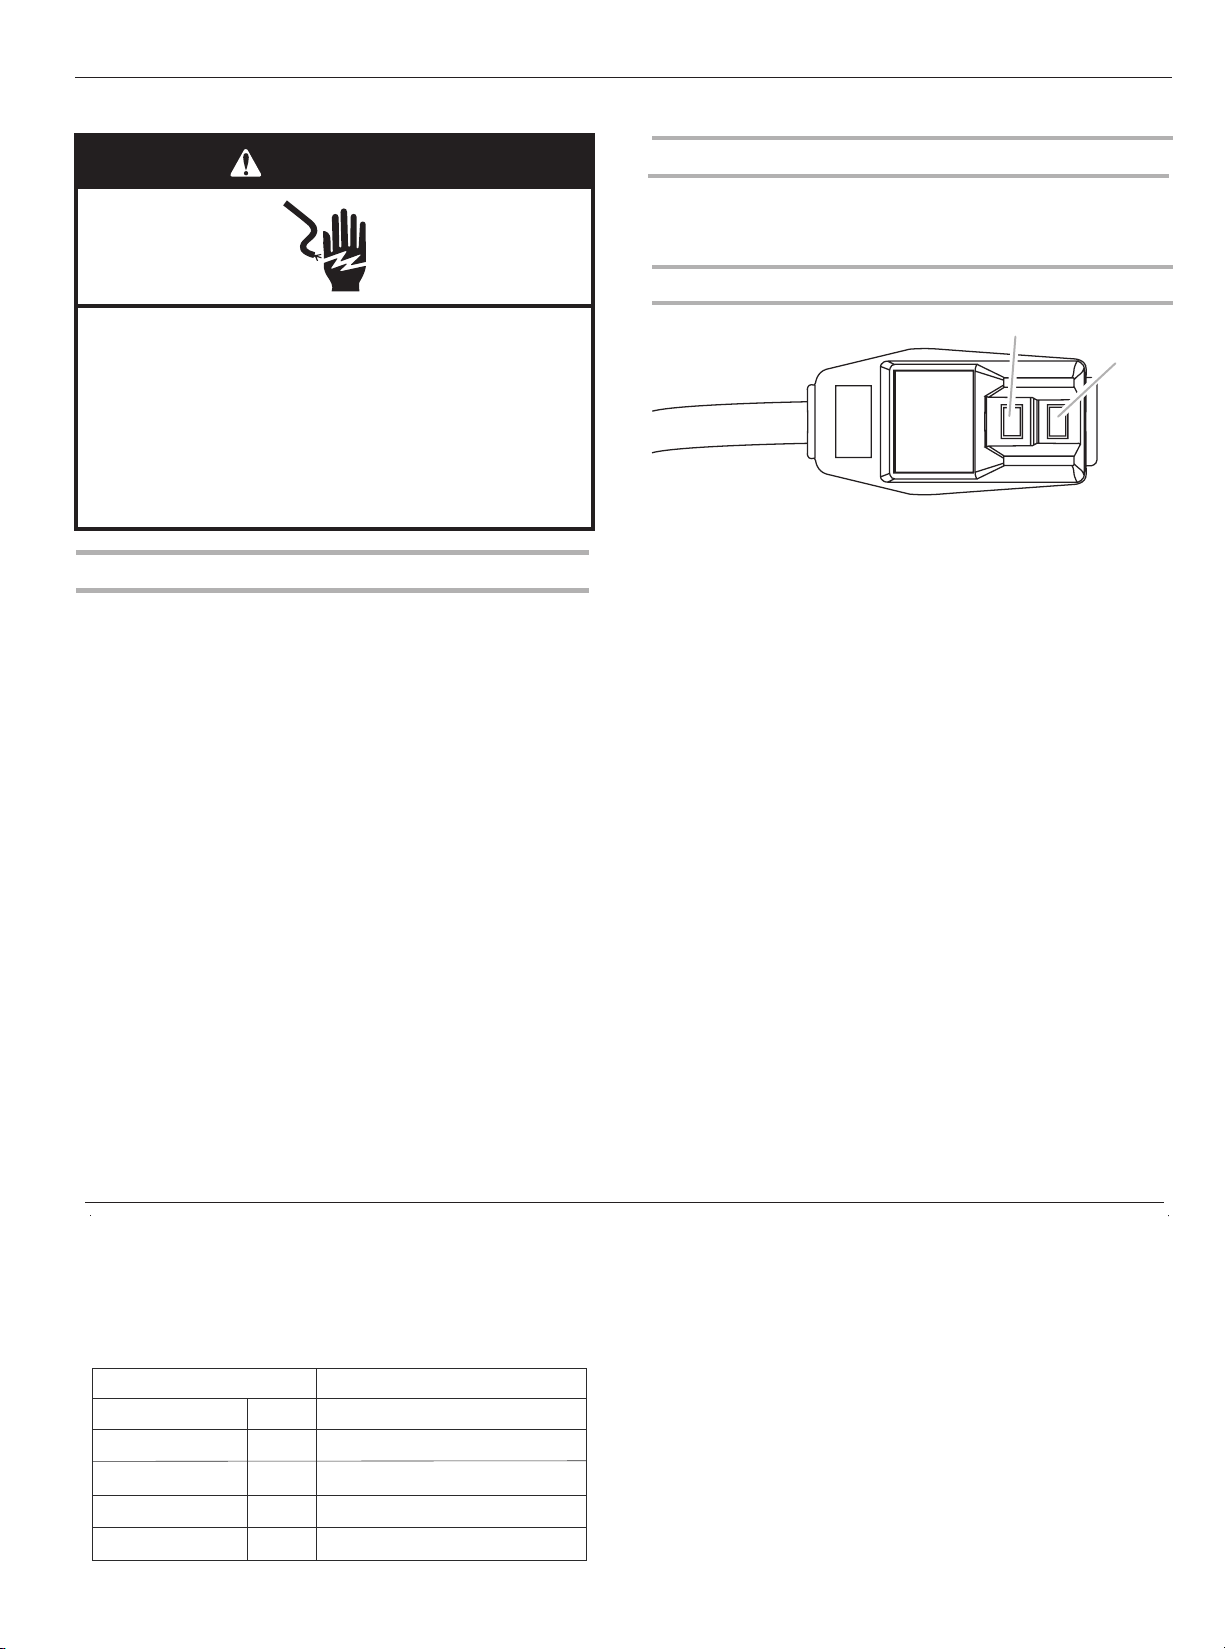
Power Supply Cord
A
B
RESET
TEST
A. Test button
B. Reset button
NOTE:
Your air conditioner’s device may differ from the one shown.
This room air conditioner is equipped with a power supply cord
required by UL. This power supply cord contains state-of-the-art
electronics that sense leakage current. If the cord is crushed, the
electronics detect leakage current and power will be
disconnected in a fraction of a second.
To test your power supply cord:
1. Plug power supply cord into a grounded 3 prong outlet.
2. Press RESET (on some devices, a green light will turn on).
3. Press TEST (listen for click; Reset button will trip, and on
some devices, a green light will turn off).
4. Press and release RESET (listen for click; Reset button will
latch, and on some devices, a green light will turn on). The
power supply cord is ready for operation.
NOTE:
■ The Reset button must be pushed in for proper operation.
■ The power supply cord must be replaced if it fails to trip when
the test button is pressed or fails to reset.
■ Do not use the power supply cord as an off/on switch. The
power supply cord is designed as a protective device.
■ A damaged power supply cord must be replaced with a new
power supply cord obtained from the product manufacturer
and must not be repaired.
■ The power supply cord contains no user serviceable parts.
Opening the tamper-resistant case voids all warranty and
performance claims.
Location Requirements
NOTE:
■ The flexible exhaust hose allows placement of the air
conditioner at least 20" from window or door.
■ Confirm you are using the correct size air conditioner for
the space to be cooled, per sizing recommendations, below:
Area to be coole d
Up to 10 'x 2 0' R oo m
Up to 15 'x 2 0' R oo m
Up to 20 ' x 20 'R oo m
Up to 20 ' x 25 ' Ro om
Up to 20 ' x 30 ' Ro om
200 sq ft.
300 sq ft.
400 sq ft.
500 sq ft.
600 sq ft.
DOE Capacity n eed ed( BTUs)
5,000/5,500
6,000/6,500
7,000/7,500
8,000/8,500
9,000/9,500
NOTE: Match BT Us to r oom use and location :
■ Shaded room re duc e to ne xt smaller size
■ Sunny room inc rea se to n ext larger size
■ For kitchens , inc rea se to next larger s ize
4
Page 7

WARNING
The length of the exhaus t hose is spe cially designed accord ing to the sp ecification of the produ ct.
Do not replace, or exten d , or otherw ise modify the hose.
Vertical Sliding Window
NOTE:
■ For best performance, allow at least 20 in of air space on all sides of the unit for good air circulation.
■ Do not block the air outlet.
■ Provide easy access to the grounded 3 prong outlet.
Horizontal Sliding Window
INSTALLATION INSTRUCTIONS
Unpack the Air Conditioner
WARNING
Excessive Weight Hazard
Use two or more people to move and install
air conditioner.
Failure to do so can result in back or other injury.
Remove packaging materials
■ Remove and recycle packaging materials.
Remove tape and glue residue from surfaces before turning
on the air conditioner. Rub a small amount of liquid dish soap
over the adhesive with your fingers. Wipe with warm water
and dry.
Caution: Installat ion acces sories are stored in the top o f the carto n, and are required for prop er coolin g
performance. Pleas e remove al l accessories from packi ng materi als before use.
■ Do not use sharp instruments, rubbing alcohol, flammable
fluids, or abrasive cleaners to remove tape or glue. These
products can damage the surface of your air conditioner.
■
Handle the air conditioner gently.
■
Keep unit upright at least 2 hours prior to use.
5
Page 8

Install The Portable Air Conditioner
Install Exhaust Hose and Adapter
1. Roll the air conditioner to selected location. see Location
Requirements" in page 4.
2. Preparing the exhaust hose assembly:
Press the coupling and the window exhaust adapter into the
flexible exhaust hose, Both the coupling and window exhaust
adapter have integral clips that snap onto the hose.
flexible exhaust hose
coupling
window exhaust adapter
"
Window Installation
Your window installation kit has been designed to fit most
standard vertical and horizontal window applications. Roll the
air conditioner to selected location. see "Location
Requirements" in page 4.
1. Attach the window exhaust adapter to the outer slider
NOTE: Product must be used with inc luded Duct
Window installatio n kit for effective cooli ng.
A
B
exhaust hose assembly
3. Insert the coupling into the slot on the back of the air
conditioner.
4. Slide down to lock the hose into place.
A
A. Flexible exhaust hose assembly
A. Outer slider section
B. Window exhaust adapter
5. Confirm the ho se is l ock ed in place befor e
operating.
6
Page 9

Installation In Vertical Sliding Windows
NOTE:The win dow i nst allation kit ca n be us ed wi th vertical slidin g win dow s between 18'' an d 50' ' wid e.
Foam s eal J
(Adh esive t ype-s horte r)
Foam s eal I
(Adh esive t ype
-lon g)
Cut the foam sea l I(a dhe sive type-lon g) & J
(adhesive ty pe- sho rter)to the pro per l eng th,and
attcah it to the w ind ow sash and frame.
A
Cut the foam sea l A(No n-a dhesive type) t o the
window width . Stu ff the fo am se al A bet ween the
glass and the wi ndo w to pr event air and for eig n
objects from g ett ing i nto the room.
Insert the ven t pan el as sembly, including extens ion
panels, if nee ded , int o the window open ing . Ext end
the extensio n pan els t o the window widt h.
Wind ow-lock B racke t
scre w E
Install the
screw as shown i f you n eed .
Window-loc k bra cke t with a type E
5
Insert the win dow e xha ust adapter int o the o pen ing
in the vent pane l.
7
Page 10

Inse rt
Slot
Align the tabs on the
adapter with the slots in th e vent pane l.
window exhau st
Insert the window exhaust ad apt er into the
opening in the vent pane l.
Installation In Horizontal Sliding Windows
NOTE: The wi ndow inst allation kit can be used wit h horizon tal sliding windows betw een 18'' and 50'' wide.
Foam seal J
(Adhesi ve
type-sh orter)
Foam seal I
(Adhesi ve
type-lo ng)
Cut the foam seal I(adhe sive type ) & J
-long
(adhesive type-sho rter)to t he proper length,
and attach it to the windo w sash and fr ame.
A
Cut the foam seal A(Non-a dhesive t ype)
to the window width. Stu ff the foam seal
A between the glass and the w indow to
prevent air and foreig n objects f rom
getting into the room.
E
Install the Window-l ock brack et with a type E
screw as shown if you need .
8
Page 11

Insert
Slot
5
Insert the win dow e xha ust adapter int o the o pen ing
in the vent pane l.
PORTABLE AIR CONDITIONER USE
Operating your portable air conditioner properly helps you to
obtain the best possible results.
This section explains proper air conditioner operation.
IMPORTANT:
Do not stay in dir ect a irflow from the air co ndi tio ner
■
for extended p eri ods o f time.
Never use in tig htl y enc losed spaces. Al way s ens ure
■
there is sufficient a irf low o f outside air enteri ng th e
household es pec ial ly when used in conjun cti on with
combustibl e dev ice s such as gas stove s, fi rep laces,
furnaces, ho t wat er heaters etc. Do not p lac e the
power cord or ai r con dit ioner near a heater, ra dia tor,
stoves or othe r app ara tus(includi ng am pli fiers) that
produce heat .
This air condi tio ner i s intended for ho use hol d use as
■
a residentia l app lia nce. Do not use it as a p rec isi on
climate cont rol f or commercial use, o r for p rec ision
equipment, f ood , pet s, plants, artw ork , etc .
Align the tabs on the
adapter with the slots in th e vent pane l.
window exhau st
Insert the window exhaust ad apt er into the
opening in the vent pane l.
■
Do not block or ob str uct the exhaust vent h ose a s it
may severely a ffect p erf orm ance, or cause failu re of
the air condit ion er.
■
The air condit ion er di splay shows the c urr ent r oom
temperatur e.
When changing modes while the air conditioner is in
■
operation, the compressor will stop for 3 to 5 minutes
before restarting. If a button is pressed during this time,
the compressor will not restart for another 3 to 5 minutes.
■
In Cooling or Dr y mod e, th e compressor an d con den ser
fan will stop wh en th e roo m temperature r eac hes t he
set temperat ure .
■
On Dry mode, the h umi dit y level is automa tic all y set,
but is not able to b e dis pla yed.
NOTE: In the event of a power failure, your air conditioner will
operate at the previous settings when the power is restored.
9
Page 12
Power On or Off
spee ds
Heat ing is NOT availa ble for cooling onl y models.
Mode
spee ds
Fan Speed
10
Page 13
Temperature
NOTE:
■
In the Cooling m ode , the t emperature can be s et betw een
.61°F and 86°F (16°C a nd 30°C )
■
In Fan Only mode , the t emperature can not b e set .
■
The unit LED sho ws th e target temperatu re fo r 5 sec onds
and then displ ays t he ro om temperatur e.
Insert the Batteries
1. Remove the battery cover along the arrowed direction.
Change display between °F and °C
To change t he temp eratu re di splay b etwee n °F and °C
press both the P lus a nd Mi nus Adjust butto ns at t he sa me
time.
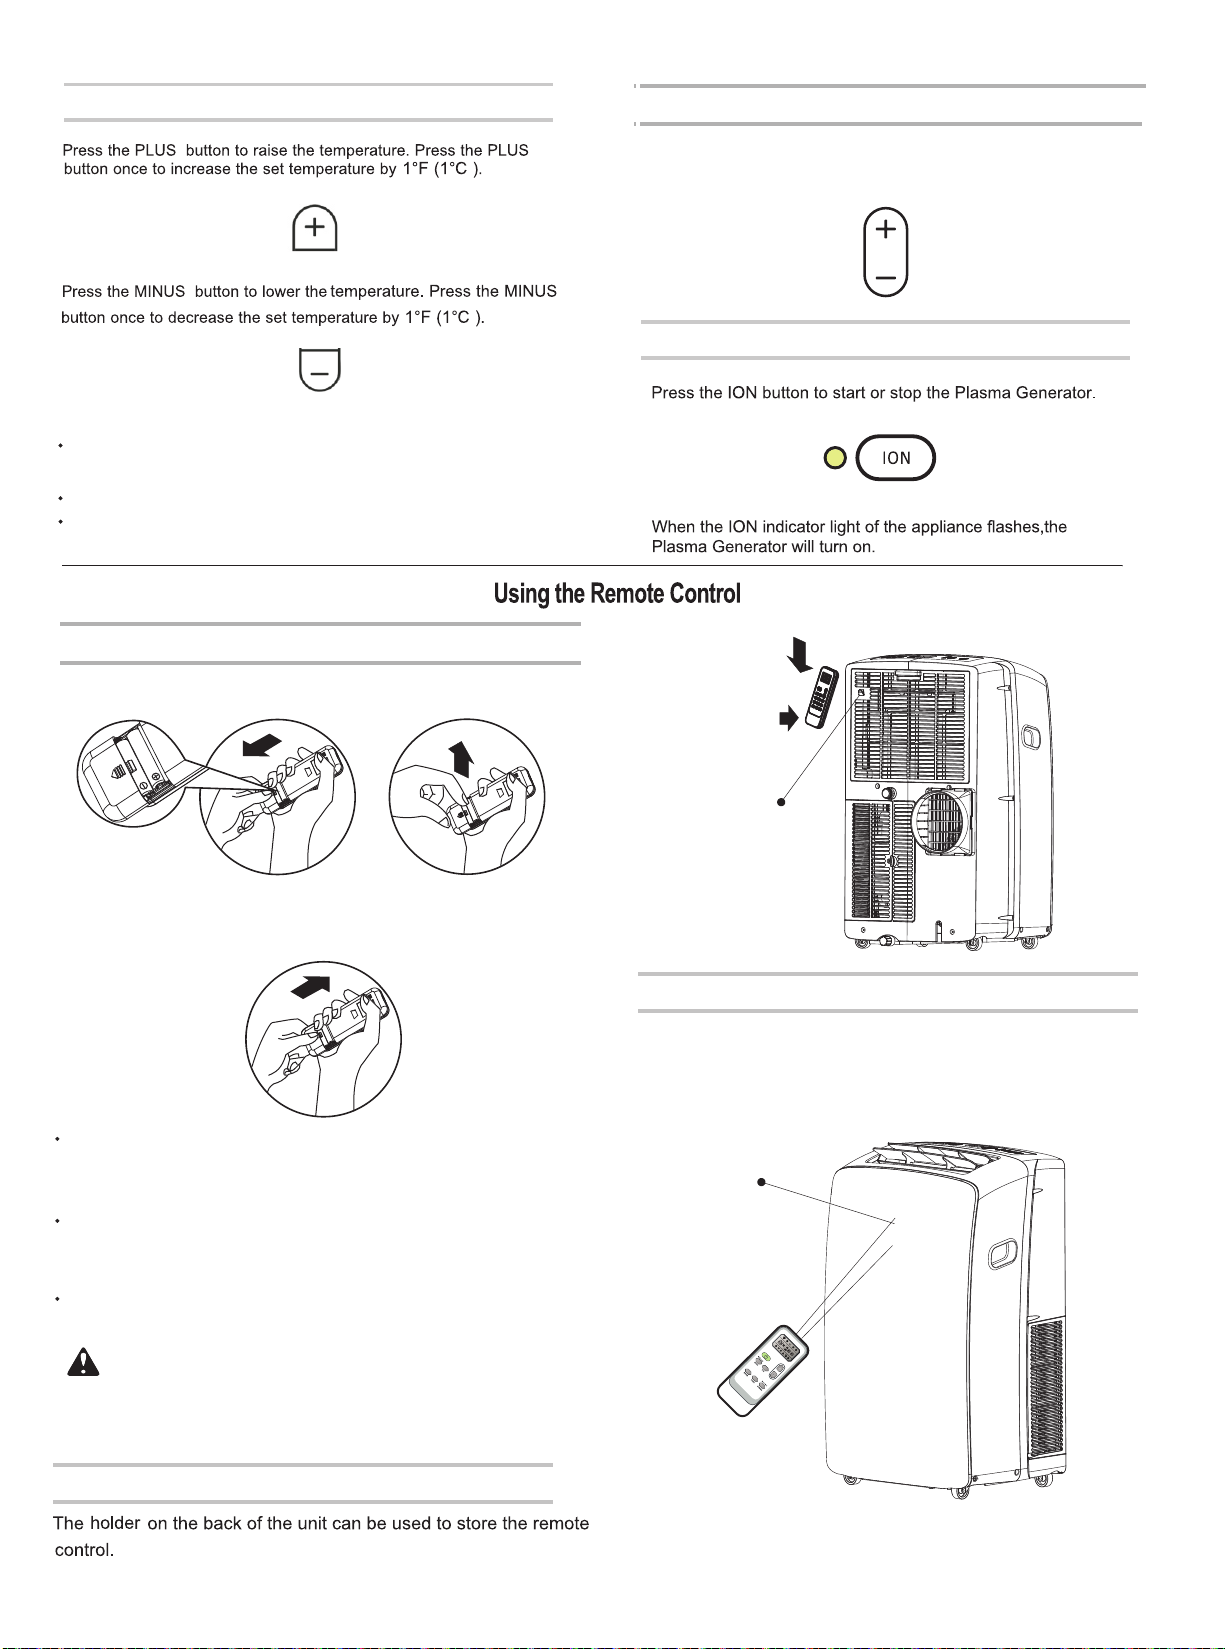
ION (Optional)
2. Insert new batteries making sure that the (+) and (-) of
battery are matched correctly.
3. Re-attach the cover by sliding it back into position.
NOTE:
■
Use 2 standard AAA(1.5volt) batteries. Do not use rechargeable
batteries.
■
Replace batteries with new ones of the same type when the
display
■
When replacing batteries, always replace both batteries with new
becomes dim, or after 6 months.
batteries. Do not mix old and new batteries. Do not mix alkaline,
standard( carbon-zinc), or rechargeable (ni-cd, ni-mh, etc)
batteries.
■
If the air conditioner will not be used for an extended period of
time, remove the batteries from the remote.
CAUTION
Holder
How to Use
To operate the roo m air c ond itioner, aim the r emo te
control at the s ign al re ceptor. The remote control
will operate t he ai r con ditioner at a dis tan ce of u p to
23'(7m) when p oin tin g at signal recep tor o f the a ir
conditione r.
Signal receptor
■
Do not use the remote if the batteries have leaked.
The chemicals in batteries could cause burns or other health hazards.
Storage Tip
11
Page 14

Remote control
NOTE:
Remote control may differ in appearance.
Button and Function
ON/OFF
MODE
FAN
FAN
SWING
SWIN G
NOTE: Press and hold the MO DE bu tton on the remote
for 5 seconds to s wit ch the temperature d isp lay f rom
degrees Fahr enh eit (°F) to degrees Cel siu s(°C).
UP
DOWN
DIMMER or Sleep
Timer On/Off
TIME R
Indication symbols
12
Page 15

DIMMER
Press the DIMMER button to turn off the control panel display.
NOTE:
When in DIMMER mode, new control inputs will return display
■
to normal.
Setting the Air C ond iti oner to Turn On:
1.Plug in the ai r con dit ioner and use the r emo te to p ower it
ON.
2.Use the remo te to s et the desired mode, t emp era ture, fan
speed, etc.
3.Use the remo te to p owe r OFF the air condi tio ner.
4.Press TIMER on the re mot e and u se the UP, D OWN
buttons to set t he de sired delay time unt il th e air c onditioner
turns ON. The delay tim e can b e set f rom 0 to 24 hours in
one-hour inc rem ent s.
5.Press TIMER again t o con fir m the delay time. The TIMER
light on the uni t wil l be on .
Sleep mode
SLEEP mode can only be set in Co oli ng, Heating or Dryin g
modes. When in s lee p mod e the unit will uti liz e low er, quieter
fanspeeds an d aut oma tic temperatu re ad jus tments offering 8
hours of optim al sl eep ing condition s bef ore s hutting off.
NOTE:
■
The appliance will stop operation automatically after operating
for 8 hours.
■
Fan speed is automatically set at low speed.
■
In the Cooling m ode , if th e current room te mpe rat ure is
below 79°F(26°C) , the t emp erature will au tom ati cally
increase 1°F(1°C ) dur ing t he first hour aft er Sl eep c ontrol
is activated , and c ont inue running at t hat t emp erature.
If the room temp era tur e is 79°F(26°C) or abov e, se t
temperatur e wil l not c hange.
In Heating mode, the set temperature will decrease by 6°F(3°C)
■
at most, during 3 hours, and continues running at that
temperature until auto shut off.
Setting the Air C ond iti oner to Turn OFF:
1.Plug in the ai r con dit ioner and use the r emo te to p ower it
ON.
2.Use the remo te to s et the desired mode, t emp era ture, fan
speed, etc.
3.Press TIMER on the re mot e and u se the UP, D OWN
buttons to set t he de sired delay time unt il th e air c onditioner
turns OFF. The delay time can b e set f rom 0 t o 24 hours in
one-hour inc rem ent s.
4.Press TIMER again t o con fir m the delay time. The TIMER
light on the uni t wil l be on .
To cancel TIMER :
Press the TIMER butto n aga in. O nce a “beep” is heard an d
the indicato r dis app ears, the TIMER mode has been
canceled.
NOTE:
The TIMER function can only be set by the remote control.
■
SWING
Press SWING on ce to c hange the vertical a irf low d irection.
Press again to h old t he lo uver in a desired p osi tio n.
Press MODE to select COOL, Heating or DRY.
1.
NOTE: Sleep control cannot be selected in Fan mode.
2. Press the UP or DOWN button to set the temperature.
Press and hold t he DI MME R button on the rem ote f or 5
3.
seconds to swi tch t he DIMMER mode to the Sl eep m ode .
4. After 5 seconds, the lights on the control panel display will dim.
NOTE: The temperatu re an d air flow direction may b e
adjusted dur ing S lee p control. The fan speed is aut oma tic ally
set to Low speed . Afte r 5 seconds, the light s on th e con trol
panel displa y wil l dim a gain.
5. To turn off Sleep control, press MODE, FAN, Sleep or wait
8 hours for Sleep control to turn off automatically.
NOTE: The air co ndi tio ner will return t o pre vio us settings
after Sleep mo de is t urn ed off.
TIMER
Use the TIMER functio n to tu rn th e air conditioner ON /OF F
automatica lly.
NOTE:
■
Airflow is aut oma tic ally adjusted t o a pre set d irection
after turnin g on th e uni t.
■
The directio n of ai rfl ow can be adjuste d by pr ess ing
the SWING butt on.
■
Do not turn the ai rfl ow lo uvers manuall y, to prevent
damage, turn o ff the un it fi rst a nd cut off the power
supply. Then r estore power again a fte r adj ustment.
Normal Sounds
When your air conditioner is operating normally, you may hear
sounds such as:
■ Air movement from the fan.
■ Clicks from the thermostat cycling.
■ Vibration or noise due to poor wall or window construction.
■ A high-pitched hum or pulsating noise caused by the
high-efficiency compressor cycling on and off.
13
Page 16
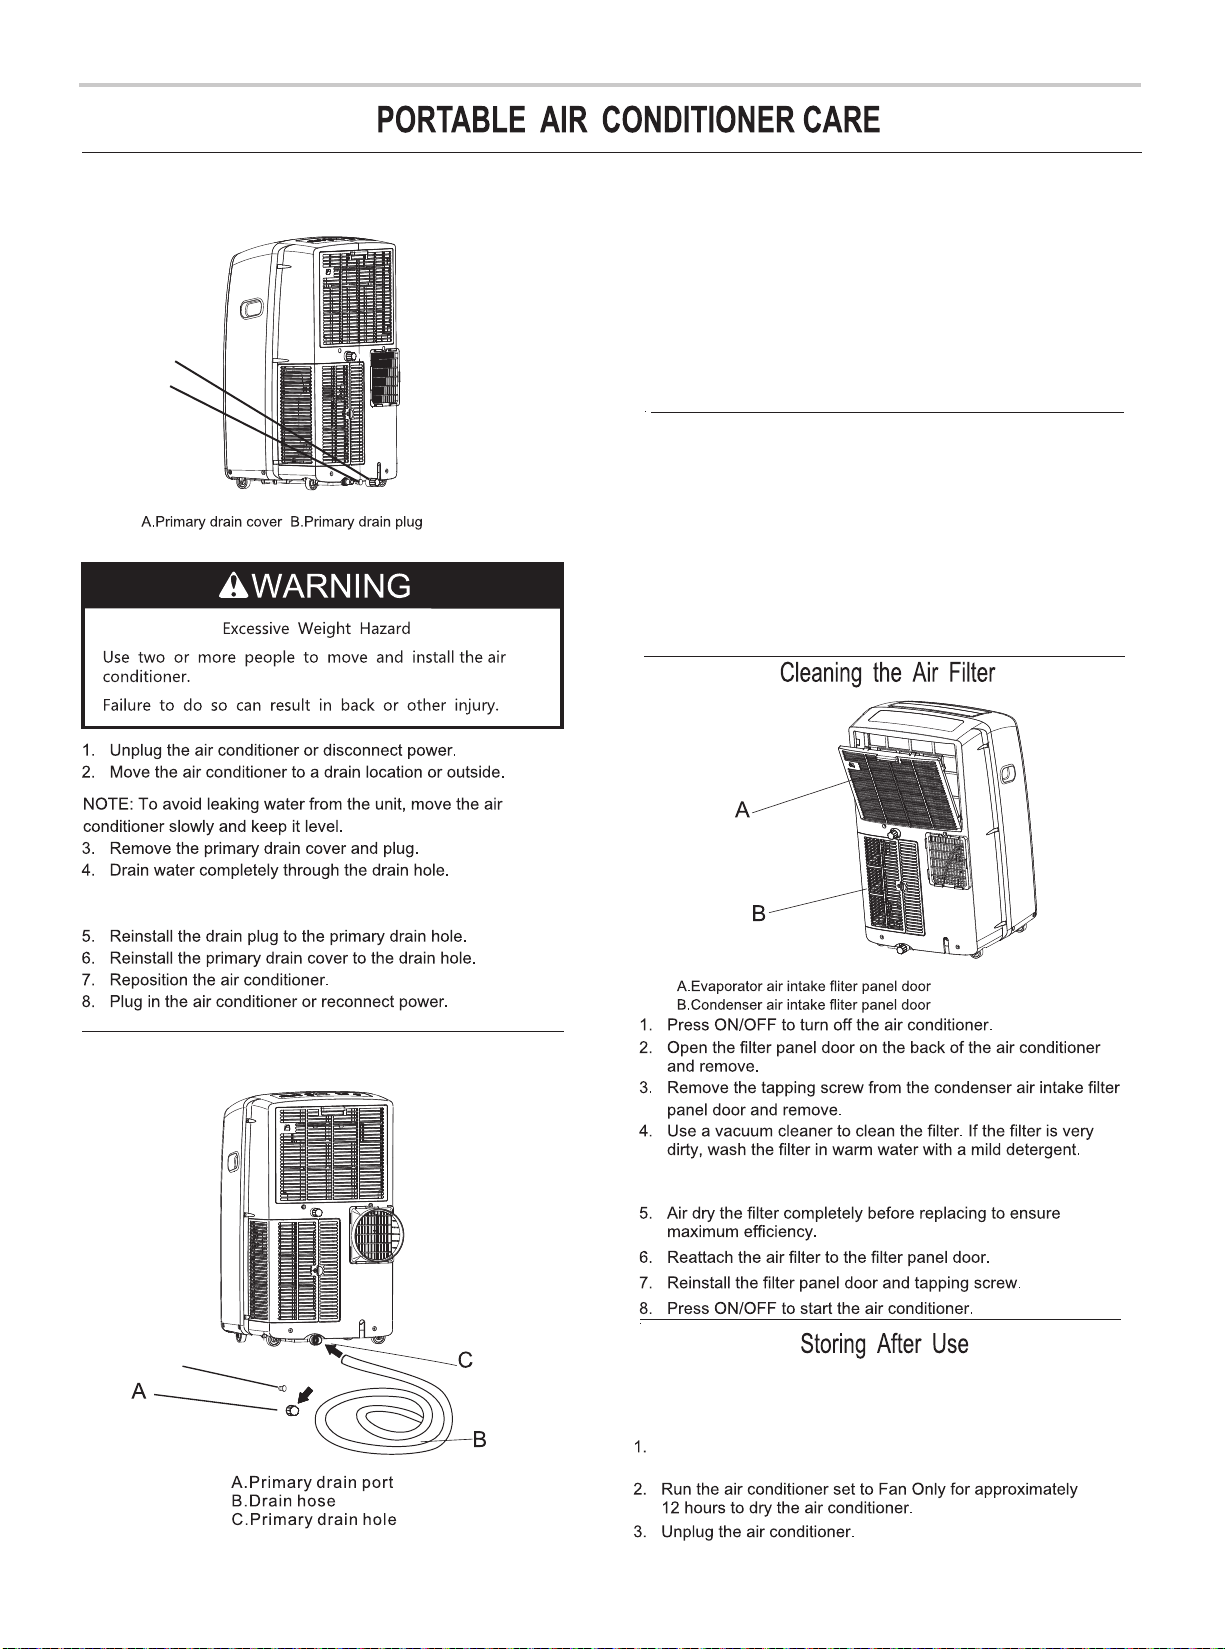
Draining the Air Conditioner(non-Heating models)
A
B
WARNING: Please connect the drain hose on heating
mode, or the uni t wil l sto p running after t he wa ter t he water
reaches warn ing l eve l.
1. Uncove r the p rimary drain port.
2. Attach the dra in ho se to the primary drai n hos e.
Make sure the co nne ctor has no water leak .
3. Place the oth er en d of drain hose into a out fal l. Ch eck to
see that the hos e lie s flat and is in the drain . Mak e sur e
the hose end tha t goe s to the drain is on a lower l eve l
than the hose en d tha t connects to the unit . The hos e
should not be ki nke d or pi nched.
Cleaning the Outside
1. Press ON/OFF to turn off the air conditioner.
2. Unplug the air conditioner or disconnect power.
3. Remove the air filter and clean separately. See "cleaning the
Air Filter ."
4. Wipe the outside of the air conditioner with a soft, damp
cloth.
5. Plug in the air conditioner or reconnect power.
6. Press ON/OFF to start the air conditioner.
NOTE: If the air conditioner will be stored after use, see
"Storing After Use".
Draining the Air Conditioner(Heating models)
D
NOTE: Do not wash the filter in the dishwasher or use any
chemical cleaners.
If the air condi tio ner w ill not be used for a n ext end ed
period of time :
Drain the water completely. See "draining the Air
Conditioner ."
D.Primary drain plug
14
Page 17

4. Remove the flexible exhaust hose and store with the air
conditioner in a clean, dry area. See installation"
Instructions ."
5. Remove the window kit and store with the air conditioner in a
clean, dry area. See " Installation Instructions ."
6. Remove the filter and clean. See Cleaning the Air Filter.
7. Clean the outside of the air conditioner. See "Cleaning the
Outside ."
8. Reinstall the filter.
Air conditioner will not operate
Before using t he ai r con ditioner agai n:
1. Mak e sur e the filter and drain c ap ar e in place.
2. Che ck th e power cord to make sur e it is i n good
condition, w ith n o cracks or damage.
3. Pla ce ne w batteries in the rem ote .
4. Ins tal l the air conditione r. See " Installation Ins tru cti ons".
Air conditioner power supply cord trips (Reset button
pops out)
Plug into a grounded
Requirements."
Replace with a time-delay fuse or circuit breaker of the
correct capacity. See "electrical
Press and release RESET (listen for click; Reset
button will latch and remain in) to resume operation.
Replace the fuse, or reset the circuit breaker. See
" "Electrical Requirements .
Press ON/OFF.
Wait for power to be restored.
3 prong outlet. See "electrical
Requirements ."
Air conditioner blows fuses or trips circuit breakers
Air conditioner seems to run too much
Air conditioner runs for a short time only, but room is
cool
not
■ Set temperature is close to room temperature.
Lower set temperature. See " portable Air Conditioner Use ."
Display error code
15
Page 18

■ If the unit displays error code E5, the water container is full.
Drain the water, see Draining the air " "conditioner . After
draining, the unit can be operated again.
■
If the unit display error code E1/E2/E3/E4/E6/E7/EA
please contact customer service.
Air conditioner runs, but does not cool
Air conditioner cycles on and off too much
16
Page 19

1 YEAR LIMITED WARRANTY
17
Your appliance is covered by a limited one-year warranty and a limited 2-5 year warranty on the sealed
system (the compressor, condenser, evaporator and tubing). For one year from your original date of
purchase, Mindful, LLC will pay all costs for repairing or replacing any parts of this appliance that prove
to be defective in materials or workmanship when such appliance is installed, used and maintained in
accordance with the provided instructions. You will be responsible for insurance and freight or
other transportation to our factory service center. We will return the portable air conditioner
freight prepaid. The portable air conditioner should be properly packaged to avoid damage in
transit since we will not be responsible for any such damage. Proof of purchase is required
when requesting warranty service. From the second to the fifth year from your original
purchase date, Mindful, LLC will repair or replace any parts in the Sealed Refrigeration System
(compressor, condenser, evaporator and tubing) that prove to be defective in materials or
workmanship. In years 2-5, the consumer will be responsible for diagnostic, labor and parts costs as
well as any removal, transportation and reinstallation expenses which are incurred during service on
components other than those covered under the Sealed Refrigeration System 5-year warranty.
Exclusions: This warranty does not cover the following
1. Products with original serial numbers that have been removed, altered or cannot be readily determ
2. Product that has been transferred from its original owner to another party or removed outside the USA or
Canada.
3. Rust on the interior or exterior of the unit.
4. Products purchased "as-is" are not covered by this warranty.
5. Food loss due to any refrigerator or freezer failures.
6. Products used in a commercial setting.
7. Service calls which do not involve malfunction or defects in materials or workmanship, or for appliances not
in ordinary household use or used other than in accordance with the provided instructions.
8. Service calls to correct the installation of your appliance or to instruct you how to use your appliance.
9. Expenses for making the appliance accessible for servicing, such as removal of trim, cupboards, shelves,
etc., which are not a part of the appliance when it is shipped from the factory.
10. Service calls to repair or replace appliance light bulbs, air filters, water filters, other consumables, or knobs,
handles, or other cosmetic parts.
11. Surcharges including, but not limited to, any after hour, weekend, or holiday service calls, tolls, ferry trip
charges, or mileage expense for service calls to remote areas, including the state of Alaska.
12. Damages to the finish of appliance or home incurred during installation, including but not limited to floors,
cabinets, walls, etc.
13. Damages caused by: services performed by unauthorized service companies; or external causes such as
abuse, misuse, inadequate power supply, accidents, fires, or acts of God.
14. Insurance and freight or other transportation to our factory service center. The portable air conditioner
should be properly packaged to avoid damage in transit since Mindful, LLC will not be responsible for any such
damage.
DISCLAIMER OF IMPLIED WARRANTIES; LIMITATION OF REMEDIES
CUSTOMER'S SOLE AND EXCLUSIVE REMEDY UNDER THIS LIMITED WARRANTY SHALL BE PRODUCT REPAIR OR
REPLACEMENT AS PROVIDED HEREIN. CLAIMS BASED ON IMPLIED WARRANTIES, INCLUDING WARRANTIES OF
MERCHANTABILITY OR FITNESS FOR A PARTICULAR PURPOSE, ARE LIMITED TO ONE YEAR OR THE SHORTEST
PERIOD ALLOWED BY LAW, BUT NOT LESS THAN ONE YEAR. MINDFUL, LLC SHALL NOT BE LIABLE FOR
CONSEQUENTIAL OR INCIDENTAL DAMAGES SUCH AS PROPERTY DAMAGE AND INCIDENTAL EXPENSES
RESULTING FROM ANY BREACH OF THIS WRITTEN LIMITED WARRANTY OR ANY IMPLIED WARRANTY. SOME
STATES AND PROVINCES DO NOT ALLOW THE EXCLUSION OR LIMITATION OF INCIDENTAL OR CONSE-QUENTIAL
DAMAGES, OR LIMITATIONS ON THE DURATION OF IMPLIED WARRANTIES, SO THESE LIMITATIONS OR
EXCLUSIONS MAY NOT APPLY TO YOU. THIS WRITTEN WARRANTY GIVES YOU SPECIFIC LEGAL RIGHTS. YOU MAY
ALSO HAVE OTHER RIGHTS THAT VARY FROM STATE TO STATE.
ined.
If you need service:
Keep your receipt, delivery slip, or some other appropriate payment record to establish the warranty period should service be
required. If service is performed, it is in your best interest to obtain and keep all receipts. Service under this warranty must be
obtained by contacting Mindful, LLC at 1-855-887-1440.
This limited warranty only applies in the USA and Canada. Mindful, LLC authorizes no person to change or add to any obligations under
this warranty. Obligations for service and parts under this warranty must be performed by Mindful, LLC or an authorized Hunter service
company. Product features or specifications as described or illustrated are subject to change without notice.
Page 20

Version No. 4110433-01
 Loading...