

Page 1

553311446600--11__AA
Page 2

THANK YOU!
Thank you for choosing Humminbird®, America's #1 name in fishfinders. Humminbird® has built
its reputation by designing and manufacturing top-quality, thoroughly reliable marine equipment.
Your Humminbird® is designed for trouble-free use in even the harshest marine environment. In
the unlikely event that your Humminbird® does require repairs, we offer an exclusive Service
Policy - free of charge during the first three years after purchase, and available at a reasonable
rate after the three-year warranty period expires for the radio, and free of charge during the first
year after purchase for the Ni-MH battery pack. For complete details, see the separate warranty
sections in the back of this manual. We encourage you to read this operations manual carefully
in order to get full benefit from all the features and applications of your Humminbird® product.
Contact our Customer Resource Center at either 1-800-633-1468 or visit our website at
www.humminbird.com.
WARNING! Disassembly and repair of this electronic unit should only be performed by
authorized service personnel. Any modification of the serial number or attempt to repair the
original equipment or accessories by unauthorized individuals will void the warranty. Handling
and/or opening this unit may result in exposure to lead, in the form of solder.
WARNING! This product contains lead, a chemical known to the state of California to cause
cancer, birth defects and other reproductive harm.
Humminbird® is a registered trademark of Humminbird®.
© 2005 Humminbird®, Eufaula AL, USA. All rights reserved.
11
Page 3

TABLE OF CONTENTS
VHF55S Introduction 3
How VHF Works 3
Parts Supplied 4
Optional Accessories 4
What's On the Display 5
VHF55S Controls 6
Features Overview 7
Before Using Your VHF55S 8
1. Installing the alkaline batteries or charging and installing the Ni-MH battery pack .......... 8
2. Attaching the antenna............................................................................................................ 10
3. Attaching the belt clip (optional) .......................................................................................... 10
Using Your VHF55S 11
1. Turning the power on/off ...................................................................................................... 11
2. Adjusting squelch .................................................................................................................. 11
3. Selecting the U.S./International/Canadian band ................................................................ 12
4. Transmitting and receiving ....................................................................................................12
5. Accessing the 16/9 priority channels .................................................................................. 12
6. Selecting a channel................................................................................................................ 12
7. Selecting high/low power...................................................................................................... 13
8. Locking the keypad ................................................................................................................ 13
9. Selecting a weather channel ................................................................................................ 13
10. Adding channels to memory .............................................................................................. 14
11. Scanning .............................................................................................................................. 14
12. Accessing channels saved to memory .............................................................................. 15
13. Using the monitor modes....................................................................................................15
14. Resetting the radio .............................................................................................................. 16
Maintenance 17
Troubleshooting 17
VHF55S Doesn't Power Up 17
Radio 3-Year Limited Warranty 17
Ni-MH Battery 1-Year Limited Warranty 18
Humminbird® Service Policy 19
Returning Your Unit for Service 19
Specifications 21
Marine Channels 22
Contact Humminbird® 29
22
Page 4

VHF55S INTRODUCTION
The Humminbird® VHF55S represents state-of-the-art high tech VHF Handheld engineering, and
is skillfully designed and constructed with the finest components. It is constructed to commercialgrade standards to give you clear, reliable communication.
The Humminbird® VHF55S is available in three different versions:
• VHF55S.
• VHF55SC Camouflage.
• VHF55S Plus.
HOW VHF WORKS
The most popular method of communicating with other boats is via very high frequency (VHF)
radio. In technical terms, this is similar to the way that commercial radio stations transmit. VHF
equipment is relatively simple, and can therefore be compact and low cost.
To ensure that maritime users do not cause interference for other radio users, a part of the radio
spectrum has been allocated specifically to this group of users. These reserved frequencies have
been numbered; for example, Channel 16 (usually abbreviated Ch16) actually refers to a
frequency of 156.800 mHz.
Because radio does not recognize geographic or political boundaries, and to make sure that boats
traveling on international voyages can always communicate, the VHF marine band is the same
worldwide. There are 55 international marine channels, a similar number of private channels
(allocated on a local basis to commercial organizations) and some other unique national channels.
The United States and Canada employ a slightly different application of marine channels, using
the same frequencies but allocating more simplex (one-way) rather than duplex (two-way)
channels.
National channels include WX (weather) channels in the U.S., fishing channels in Norway and the
marina channels M and M2 in the U.K. To make sure that your radio is fitted with the correct local
channels, be sure to purchase type-approved equipment in the country of intended use.
33
Page 5

PARTS SUPPLIED
Before using your VHF55S, please make sure that the following parts are included for your model:
• VHF55S Radio:
• Alkaline battery compartment (6 AA batteries not included).
• Belt clip.
• Flexible antenna.
• VHF55SC Camouflage Radio:
• Alkaline battery compartment (6 AA batteries not included).
• Belt clip.
• Flexible antenna.
• VHF55S Plus Radio:
• Alkaline battery compartment (6 AA batteries not included).
• One Nickel-Metal Hydride (Ni-MH) rechargable battery pack.
• AC/DC chargers with desktop cradle.
• Belt clip.
OPTIONAL ACCESSORIES
The following optional accessories are available for the VHF55S radios:
• A battery eliminator, which allows the radio to be powered by a 12 Volt source without
the need for batteries. The adapter plugs into any standard 12 Volt cigarette lighter
plug. (Part # BE 2)
• A rechargeable Ni-MH Battery pack. (Part # BVHF55)
• A rechargeable Ni-MH Battery pack with AC/DC charger and desktop cradle included.
(Part # BKVHF55)
NOTE: You can visit our website at www.humminbird.com to order these accessories online or
contact our Customer Resource Center at 1-800-633-1468.
44
Page 6

WHAT'S ON THE DISPLAY
The Humminbird® VHF55S uses an LCD display, together with an 8-button keypad, to control all
user functions. The figure shows a typical view you might see on the display at initial power-up.
Stored icon [diskette]
Receiving icon [BUSY]
Transmit on [TX]
Low power transmit icon
[LO]
High power transmit icon
[HI]
Priority channel icon [P]
Scan mode icon [SCAN]
Signal power level icon
Keys locked icon [key]
Canadian band icon [C]
International band icon [I]
U.S. band icon [U]
Channel number [88]
Weather station alarm [A]
Weather station icon [WX]
Memory channel icon [M]
Dual Watch icon [DU]
Tri Watch icon [TRI]
Receive Only icon [B]
Battery Level icon
Duplex (Receive and
Transmit on same
channel) icon [A]
55
Page 7
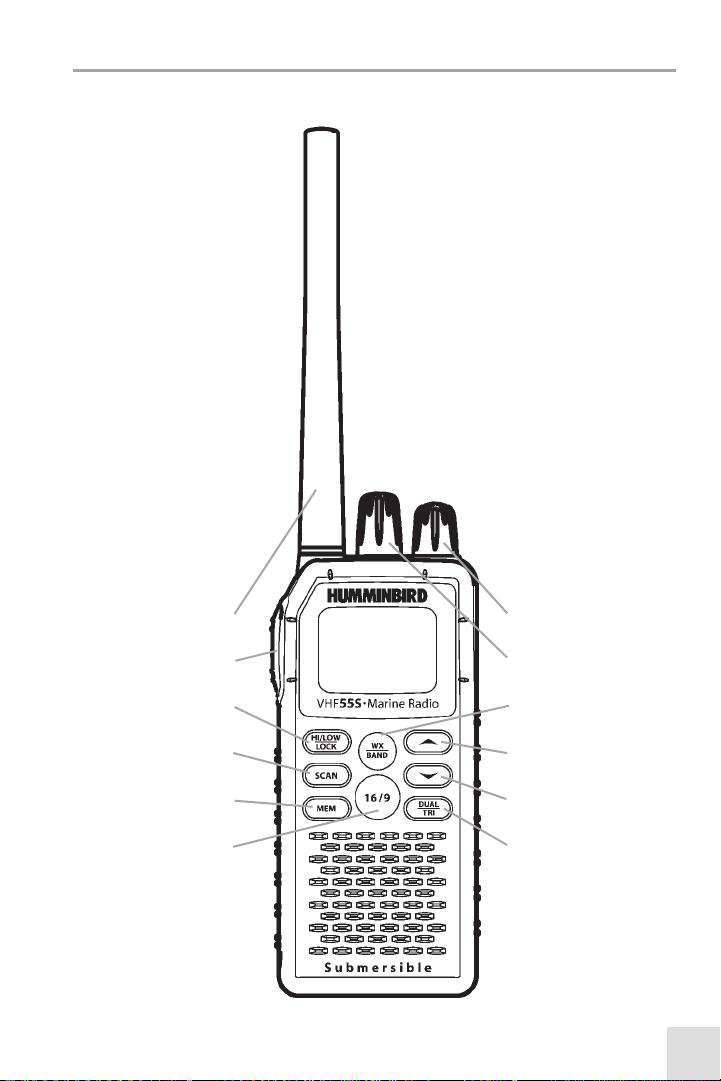
VHF55S CONTROLS
The following drawing shows the Humminbird® VHF55S controls:
Antenna
Push-To-Talk (PTT) key
HI/LOW/LOCK key
SCAN key
Memory (MEM) key
Channel 16/9 Priority key
PWR/VOL knob
Squelch (SQ) knob
WX/BAND key
Up Channel key
Down Channel key
DUAL/TRI Watch key
66
Page 8

FEATURES OVERVIEW
Your Humminbird® VHF55S has the following features:
Channel 16/9 Priority Key: Provides quick access to emergency Channel 16, the universal and
most frequently-used marine channel, which is used for distress or safety communications.
Pressing and holding the 16/9 channel key for 3 seconds allows quick and easy access to Channel
9. Channel 9 is an alternate frequency for distress or safety in some areas in the event Channel
16 is congested.
PLL (Phase Lock Loop) Controlled Circuitry: Provides accurate and stable channel selection.
Squelch Adjustment: Allows you to eliminate static and background noises during
communications.
Key Lock: Allows you to lock the keypad in order to prevent accidental key presses.
High/Low Transmit Power Selection: Allows you to select either High Power Transmit for long-
range communications or Low Power Transmit for shorter-range communications to save battery
power.
Battery Level Indicator: Indicates the amount of battery life remaining.
Battery Charging Station: Allows you to recharge your Ni-MH battery pack (not included with
all models)
Backlit LCD Display: Allows you to operate the radio in low light conditions.
Memory Channels: Allows you to store channels as “memory channels” that you can easily
retrieve for future use.
WX/BAND Key: Allows you to select the Weather Band, the U.S. Channel Band, the International
Channel Band or the Canadian Channel Band.
SCAN Key: Allows you to scan all channels, to scan channels saved in memory or to conduct a
priority scan.
Signal Strength Meter: Allows you to see the strength of the transmit and receive signals.
Dual Watch: Allows you to scan alternately between your currently-selected channel and
Channel 16 to make sure you don’t miss distress or emergency calls.
Tri Watch: Allows you to scan alternately between your currently selected channel, Channel 16,
and Channel 9 to make sure you don’t miss distress or emergency calls.
Normal Scan: Allows you to scan all available channels for active channels.
Memory Scan: Allows you to rapidly scan pre-programmed channels to locate active channels.
77
Page 9

Priority Scan: Allows you to scan all channels while alternately scanning Channel 16 to make
sure that you don’t miss distress or emergency calls.
NOTE: You should record your VHF55S’s serial number, which is on the back panel of the radio, here.
Serial Number: ________________________.
BEFORE USING YOUR VHF55S
Before using your VHF55S radio, you should do two things:
1. Install the 6 alkaline batteries or charge and install the battery pack onto the radio.
2. Attach the antenna to the radio.
In addition, you may want to perform the additional optional step:
3. Attach the belt clip to the radio (optional).
1. Installing the Alkaline Batteries or Charging and Installing
the Ni-MH Battery Pack
NOTE: If you are using alkaline batteries, you must make sure you have six fully-charged
batteries.
NOTE: Rotate fastener as shown to remove battery pack from the radio. Lift the battery pack
out and up from the bottom to remove it from the radio.
88
Page 10

1a. If you are going to use alkaline batteries, remove the alkaline battery compartment cover
and install 6 AA alkaline batteries. Re-install the cover to the battery compartment, then
secure in place.
or...
1b. If you are going to use the Ni-MH re-chargeable battery pack, make sure that it is fully
charged before trying to operate the radio. You can either charge the battery pack when
it is attached to the radio or when it is not yet attached. To charge the Ni-MH battery pack,
place it in the desktop charging cradle and plug either the AC or DC charger into the
cradle, depending on the power source that you plan to use. You will know that the battery
pack is seated correctly in the charger when the charging indicator LED lights up. You
should charge the battery pack for 14-15 hours. Attach the battery pack to the radio when
it is finished charging if you have not already done so.
CAUTION: The battery pack will continue to charge as long as it is in the charger and the
charger is connected to a power source, so you must remember to take the radio/battery pack
out of the charger when it has been fully charged. Overcharging batteries may result in damage
to both the battery pack and radio.
99
Page 11

2. Attaching the Antenna
You will need to make sure that the flexible antenna is attached to the
radio.
To install the antenna:
1. Install the antenna securely onto the radio, making sure that the
antenna and the threads on the unit are free from debris. Finger tighten
only.
3. Attaching the Belt Clip (Optional)
The belt clip supplied with your radio allows you to attach the radio to
your belt.
To attach the belt clip:
1. Attach the belt clip to the back of your VHF55S radio, making sure
that the fitting groove is aligned.
1100
Page 12

USING YOUR VHF55S
You should be famliar with several operating procedures:
1. Turning the power on/off.
2. Adjusting Squelch.
3. Selecting the U.S./International/Canadian band.
4. Transmitting and receiving.
5. Accessing the 16/9 priority channels.
6. Selecting a channel.
7. Selecting high/low power.
8. Locking the keypad.
9. Selecting a weather channel.
10. Adding channels to memory.
11. Scanning.
12. Accessing channels saved to memory.
13. Using the monitor modes.
14. Resetting the radio.
1. Turning the Power On/Off
Use the PWR/VOL knob to turn the radio on, and once on, to adjust the volume as well.
To turn on the r
1. Rotate the PWR/VOL knob to turn the radio on or off. The knob will make a clicking noise
when you have turned the radio on.
2. Once on, rotate the PWR/VOL knob further to adjust the volume.
adio:
2. Adjusting Squelch
Squelch is used to eliminate static and background noise in between transmissions, and allows
for silent operation of the radio until a transmission is received. If Squelch is set too high, only the
strongest transmissions can be heard, and if it is set too low, intermittent static and noise may be
annoying. Squelch is controlled by the SQ knob located on the top of the radio.
To set Squelch:
1. Turn the SQ knob counter-clockwise as far as it will go. You will hear a lot of static.
2. Then turn the SQ knob clockwise until the static stops; this is the correct position for the
1111
SQ knob.
Page 13

3. Selecting U.S./International/Canadian Band
When operating in U.S. waters, your radio should be set for the U.S. band; when operating in
Canadian waters, the radio should be set for the Canadian band; when operating in International
waters, the radio should be set for the International band.
To select a band:
1. To select a band, press and hold the WX/BAND key for 3 seconds, then release. The LCD
will display the U, I or C icon (for U.S., International, or Canadian). Continue to press and
hold the WX/BAND key for 3 seconds, then release until the LCD shows the desired band.
4. Transmitting and Receiving
Use the Push-To-Talk (PTT) key to transmit (speak) and receive (listen) on the selected channel.
To transmit and receive:
1. Press and hold the Push-To-Talk (PTT) key, then speak into the radio to transmit. The TX icon
will appear on the LCD while you are transmitting.
2. Release the Push-To-Talk (PTT) key to listen.
NOTE: Before transmitting, make sure that the channel you have selected is not a receive-only
channel.
5. Accessing the 16/9 Priority Channels
The Channel 16/9 Priority key allows you to access the emergency channel 16 quickly; pressing
and holding this key also allows you to access channel 9, which is an alternate emergency
channel in some areas.
To access the 16/9 channels:
1. Press the Channel 16/9 Priority key to access channel 16.
2. To access the alternate channel 9 which is available in some areas, press and hold the
Channel 16/9 Priority key for 3 seconds, then release.
6. Selecting a Channel
Use the Up/Down key to scroll through the available channels. See Marine Channels for a list of
channels and their frequencies.
To select a channel:
1. To select a channel, use the Up/Down key to find a channel. Stop when you find the
desired channel.
NOTE: Not all channel numbers are available in INT bands.
1122
Page 14

7. Selecting High/Low Power
You must press and release the HI/LOW/LOCK key to toggle the transmit power between High
and Low. Select HI (High Power Transmit) for long-range communications, and LOW (Low Power
Transmit) for shorter-range communications to save battery power.
To change the transmit power:
1. Press the HI/LOW/LOCK key to toggle between High and Low transmit power. When the
radio is operating at high power, the HI icon appears on the LCD, and when operating at
low power, the LOW icon appears on the LCD.
8. Locking the Keypad
Use the HI/LOW/LOCK key to activate the Key Lock function in order to avoid accidental key
presses of the radio keypad.
To lock and unlock the keypad:
1. To lock the keypad, press and hold the HI/LOW/LOCK key until the Key Lock icon appears
on the LCD.
NOTE: Once Key Lock is turned on, pressing the keys will have no effect except for the PushTo-Talk (PTT) key, which is not affected by Key Lock.
2. To unlock the keypad, press and hold the HI/LOW/LOCK key again until the Key Lock icon
is removed from the LCD.
9. Selecting a Weather Channel
The U.S. National Oceanic and Atmospheric Administration (NOAA) broadcasts continuous
weather reports and severe weather alerts, as needed. Your Humminbird® VHF55S is programmed
to receive 10 NOAA weather channels, and to sound an alarm if a weather alert is received. The
A icon will appear on the LCD above the WX icon if there is a Weather Alarm. See Marine
Channels for a list of channels and their frequencies.
o select a weather channel:
T
1. Press and release the WX/BAND key to enter Weather mode. The WX icon will appear on
the LCD. After selecting the WX band you must press and hold the WX/BAND key for three
seconds to receive weather alarms. The weather alarm icon will appear on the display.
2. Press the Up or Down Channel keys to change the WX channel from 1 through 10.
3. Press and release the WX/BAND key again to return to normal operation.
NOTE: Weather broadcasts are available in North America, but may not be heard in all parts of Canada.
NOTE: During Weather mode, the PTT, Scan, HI/LOW/LOCK and MEM keys are disabled and an
error beep will sound if they are pressed.
1133
Page 15

10. Adding/Deleting Channels to/from Memory
Your VHF55S can store any channel (including private channels). The stored channels are the ones
scanned in the Memory Scan mode.
To add channels to memory:
1. During normal operating mode, use the Up or Down Channel keys to select the desired
channel for programming.
2. Press and hold the MEM key for 3 seconds. The Stored icon will appear, indicating that the
current channel has been saved in memory. Any number of channels scan be saved as
memory channels.
To delete channels from memory:
1. During normal operating mode, use the Up or Down Channel keys to select the saved
channel you wish to delete.
2. Press and hold the MEM key for 3 seconds. The selected channel will be deleted from
memory.
11. Scanning
Your Humminbird® VHF55S comes with three scan options:
• Normal Scan: If there are no channels in memory, the default is Normal Scan. In Normal
Scan mode, all channels in the channel set are scanned in sequence, assuming no
channels have been stored in memory. After the last channel number has been scanned,
the cycle repeats. Normal Scan automatically searches for transmissions on the channel
set being scanned. If a TX signal is received, the scan stops on the receiving channel as
long as it is present and the Scan icon is flashing. If the signal is lost for five seconds or
more, the radio resumes scanning.
• Memory Scan: In Memory Scan mode, only the channels that have been saved in
memory are scanned in sequence. After the last saved channel number has been
scanned, the cycle repeats.
• Priority Scan: In Priority Scan mode, you can scan all channels while alternately scanning
Channel 16 to make sure that you don’t miss distress or emergency calls.
To activate scan modes:
1a. Press and release the SCAN key when no channels are stored in memory to activate the
Normal Scan function. The Scan icon will appear on the LCD.
or...
1b. Press and release the SCAN key when there is at least one channel in memory to activate
the Memory Scan function. The Stored and Scan icons will appear on the LCD.
or...
1144
Page 16

1c. Press and release the SCAN key for 3 seconds to enter Priority Scan mode. The Priority
Scan (P) icon will appear on the LCD just before the Scan icon.
2. During any of the Scan modes, press the Up or Down Channel keys to change the scan
direction. Up increases the channel number while Down decreases it.
3. Press and release the SCAN key to terminate the Scan mode.
NOTE: During Scan mode, the WX/BAND, MEM, and DUAL/TRI Watch keys will not function
and will sound an error beep if pressed.
12. Accessing Channels Saved to Memory
Once channels have been saved, you can easily access them by pressing the MEM key. Once in
Memory mode, only the channels saved to memory will be accessible using the Up or Down
Channel keys.
To access saved channels:
1. Press the MEM key. The Stored and M icons will appear on the LCD to indicate that you
are in Memory mode.
2. Use the Up or Down Channel keys to scan through the saved channels.
3. Press the MEM key again to regain access to all channels.
13. Using the Watch Monitor Modes
The Humminbird® VHF55S is equipped with two types of monitor modes: Dual Watch and
Tri Watch.
Dual Watch monitors the current working channel and Channel 16 alternately.
To activate and terminate Dual Watch mode:
1. Press and release the DUAL/TRI Watch key to activate the Dual Watch mode. The DU icon
will appear on the LCD.
2a. Press and release the DUAL/TRI Watch key again to terminate Dual Watch mode and
return to the previous working channel.
or...
2b. Press and hold the DUAL/TRI Watch key for 3 seconds to terminate Dual Watch mode and
enter into Tri Watch mode. The TRI icon will appear on the LCD.
NOTE: During Dual Watch mode, the SCAN, MEM, WX/BAND, and the Up and Down Channel
keys are inactive and will sound an error beep if pressed.
Tri Watch monitors Channel 16, Channel 9 and the current working channel.
1155
Page 17

To activate and terminate T
1. Press and hold the DUAL/TRI Watch key for 3 seconds to activate the Tri Watch mode. The
TRI icon will appear on the LCD.
2a. Press and hold the DUAL/TRI Watch key again for 3 seconds to terminate Tri Watch Mode
and to return to the previous working channel.
2b. Press and release the DUAL/TRI Watch key to terminate Tri Watch mode and enter into
Dual Watch mode. The DU icon will apear on the LCD.
NOTE: During Tri Watch mode, the SCAN, MEM, WX/BAND and Up or Down Channel keys are
inactive and will sound an error beep if pressed.
ri Watch mode:
or...
14. Resetting the Radio
You can reset many radio settings back to the factory default settings. Resetting the radio will:
• Erase any channels stored in memory.
• Return to U.S. channels, if another mode is currently selected at the time of reset.
• Turn Off the Weather Alert setting, if it is currently active.
• Return power settings to their original state.
eset the radio:
To r
1. Turn the radio Off by rotating the PWR/VOL knob to the Off position.
2. Simultaneously press and hold both the SCAN and WX/BAND keys.
then...
3. While continuing to hold the SCAN and WX/BAND keys, power the radio back On, then
continue to hold the SCAN and WX/BAND keys down for 3 seconds, then release both
keys.
1166
Page 18

MAINTENANCE
To keep your Humminbird® VHF55S working properly, perform the following maintenance as
needed.
If your unit comes into contact with salt spray, simply wipe the affected surfaces with a cloth
dampened in fresh water. Do not use a chemical glass cleaner on the lens, as chemicals in the
solution may cause cracking in the lens. When cleaning the LCD protective lens, use a chamois
and non-abrasive, mild cleaner. Do not wipe while dirt or grease is on the lens. Be careful to avoid
scratching the lens.
WARNING: Never leave your VHF55S in a closed car or trunk; the extremely high temperatures
generated in hot weather can damage the electronics.
TROUBLESHOOTING
Before contacting the Humminbird® Customer Resource Center, please read the following section.
Taking the time to review these troubleshooting guidelines may allow you to solve a performance
problem yourself, and therefore avoid sending your unit back for repair.
NOTE: Do not attempt to repair the VHF55S yourself, as there are no user serviceable parts
inside, and special tools and techniques are required for reassembly in order to maintain the
waterproof integrity of the housing. Repairs should be performed only by authorized
Humminbird® technicians.
VHF55S Doesn't Power Up
If your VHF55S doesn't power up, refer to the Installation section, and make sure that:
• The Ni-MH battery pack is fully charged (14-15 hours).
• The battery pack or batteries are installed properly.
• If you are using six AA alkaline batteries, make sure they have a charge.
Correct any known problems, including removing corrosion from the battery terminals, or actually
replacing the batteries (if using alkaline) if necessary.
RADIO 3-YEAR LIMITED WARRANTY
We warrant the original retail purchaser that products made by Humminbird® have been
manufactured free from defects in materials and workmanship. This warranty for the VHF55S
radio is effective for three years from the date of original retail purchase. Humminbird® products
found to be defective and covered by this warranty will be replaced or repaired free of charge at
Humminbird's option and returned to the customer freight prepaid. Humminbird's sole
responsibility under this warranty is limited to the repair or replacement of a product that has
been deemed defective by Humminbird®. Humminbird® is not responsible for charges connected
with the removal of such product or reinstallation of replaced or repaired parts.
1177
Page 19

This warranty does not apply to a product that has been:
• Improperly installed;
• Used in an installation other than that recommended in the product installation and
operation instructions;
• Damaged or has failed because of an accident or abnormal operation;
• Repaired or modified by entities other than Humminbird®.
Please retain your original receipt as a proof of the purchase date. This will be required for inwarranty service.
THIS WARRANTY IS EXPRESSLY IN LIEU OF ANY OTHER WARRANTIES, OBLIGATIONS OR
LIABILITIES ON THE PART OF HUMMINBIRD® AND WILL BE THE CUSTOMER'S EXCLUSIVE
REMEDY, EXCEPT FOR ANY APPLICABLE IMPLIED WARRANTIES UNDER STATE LAW WHICH ARE
HEREBY LIMITED IN DURATION TO THREE YEARS FROM THE DATE OF ORIGINAL PURCHASE. IN
NO EVENT WILL HUMMINBIRD® BE LIABLE FOR ANY INCIDENTAL OR CONSEQUENTIAL
DAMAGES FOR BREACH OF ANY EXPRESS OR IMPLIED WARRANTY RELATING TO THE
PRODUCTS.
Some states do not allow limitations on an implied warranty, or the exclusion of incidental or
consequential damages, so the above exclusions may not apply to you. You may also have other
rights, which vary from state to state.
NI-MH BATTERY 1-YEAR LIMITED WARRANTY
We warrant the original retail purchaser that products made by Humminbird® have been
manufactured free from defects in materials and workmanship. This warranty for the Ni-MH
battery pack is effective for one year from the date of original retail purchase. Humminbird®
products found to be defective and covered by this warranty will be replaced or repaired free of
charge at Humminbird's option and returned to the customer freight prepaid. Humminbird's sole
responsibility under this warranty is limited to the repair or replacement of a product that has
been deemed defective by Humminbird®. Humminbird® is not responsible for charges connected
with the removal of such product or reinstallation of replaced or repaired parts.
This warranty does not apply to a product that has been:
• Improperly installed;
• Used in an installation other than that recommended in the product installation and
operation instructions;
• Damaged or has failed because of an accident or abnormal operation;
• Repaired or modified by entities other than Humminbird®.
Please retain your original receipt as a proof of the purchase date. This will be required for inwarranty service.
1188
Page 20

THIS WARRANTY IS EXPRESSLY IN LIEU OF ANY OTHER WARRANTIES, OBLIGATIONS OR
LIABILITIES ON THE PART OF HUMMINBIRD® AND WILL BE THE CUSTOMER'S EXCLUSIVE
REMEDY, EXCEPT FOR ANY APPLICABLE IMPLIED WARRANTIES UNDER STATE LAW WHICH ARE
HEREBY LIMITED IN DURATION TO ONE YEAR FROM THE DATE OF ORIGINAL PURCHASE. IN NO
EVENT WILL HUMMINBIRD® BE LIABLE FOR ANY INCIDENTAL OR CONSEQUENTIAL DAMAGES
FOR BREACH OF ANY EXPRESS OR IMPLIED WARRANTY RELATING TO THE PRODUCTS.
Some states do not allow limitations on an implied warranty, or the exclusion of incidental or
consequential damages, so the above exclusions may not apply to you. You may also have other
rights, which vary from state to state.
HUMMINBIRD® SERVICE POLICY
Even though you'll probably never need to take advantage of our incredible service policy, it's good
to know that we back our products this confidently. We do it because you deserve the best. We
will make every effort to repair your unit within three business days from the receipt of your unit
at our factory. This does not include shipping time to and from our factory. Units received on Friday
are typically shipped by the following Wednesday, units received Monday are typically shipped by
Thursday, etc.
All repair work is performed by factory-trained technicians to meet exacting factory specifications.
Factory-serviced units go through the same rigorous testing and quality control inspections as
new production units.
After the original warranty period, a standard flat rate service charge will be assessed for each
repair (physical damage and missing parts are not included). Any repairs made after the original
warranty will be warranted for an additional 90 days after service has been performed by our
factory technicians. You can contact our Customer Resource Center or visit our website to verify
the flat rate repair fee for your product (visit the Product Support section):
http://www.humminbird.com
We reserve the right to deem any product unserviceable when replacement parts are no longer
available or impossible to obtain. This Service Policy is valid in the United States only. This applies
only to Humminbird® products returned to our factory in Eufaula, Alabama. This Service Policy is
subject to change without notice.
Returning Your Unit for Service
Before sending your unit in for repair, please contact the factory, either by phone or by email, to
obtain a Repair Authorization Number for your unit. Please have your product model name and
serial number available before calling the factory. If you contact the factory by e-mail, please
include your product model name and serial number in the e-mail, and use Request for Repair
Authorization Number for your e-mail subject header. You should include your Repair
Authorization Number in all subsequent communications about your unit.
1199
Page 21

For IN-WARRANTY service, complete the f
• Obtain a Repair Authorization Number from the Humminbird® Customer Resource Center.
• Tag product with your name, street address, phone number and your assigned Repair
Authorization Number.
• Include a brief written description of the problem.
• Include a copy of your receipt (to show proof and date of purchase).
• Return product freight prepaid to Humminbird®, using an insured carrier with delivery
confirmation.
ollowing steps:
For OUT-OF-WARRANTY service, complete the following steps:
• Obtain a Repair Authorization Number from the Humminbird® Customer Resource Center.
• Include payment in the form of credit card number and expiration date, money order or
personal check. Please do not send cash.
• Tag product with your name, street address, phone number and your assigned Repair
Authorization Number.
• Include a brief written description of the problem.
• Return product freight prepaid to Humminbird®, using an insured carrier with delivery
confirmation.
2200
Page 22

SPECIFICATIONS
Channels . . . . . . . . . . . . . . . . . . . . . . . . . . . . . . . . . All U.S., Canadian and International Channels
. . . . . . . . . . . . . . . . . . . . . . . . . . . . . . . . . . . . . . . . . . . . . . . . . . . . . . . . . 10 NOAA Weather Channels
Frequency Method . . . . . . . . . . . . . . . . . . . . . . . . . . . . . . . . . . . . . . . . . . . . . . . . . Phase Lock Loop
Frequency Range. . . . . . . . . . . . . . . . . . . . . . . . . . . . . . . . . . . . . . . . . . . TX 156.025~157.950 MHz
. . . . . . . . . . . . . . . . . . . . . . . . . . . . . . . . . . . . . . . . . . . . . . . . . . . . . . . . . . . RX 156.300~163.275 MHz
Antenna Impedance. . . . . . . . . . . . . . . . . . . . . . . . . . . . . . . . . . . . . . . . . . . . . . . . . . . . . . . 50 Ohms
Power Supply . . . . . . . . . . . . . . . . . . . . . . . . . . . . . . . . . . . . . . . . . . . . . . . . . . . . . . . . . . . . . 7.2 VDC
Display. . . . . . . . . . . . . . . . . . . . . . . . . . . . . . . . . . . . . . . . . . . . . . Backlit Liquid Crystal Diode (LCD)
Operating Temperatures . . . . . . . . . . . . . . . . . . . . . . . . . . . . . . . . . . -4°F to 140°F (-20°C to 60°C)
Dimensions (with 7.2 V Battery Pack): . . . . . . . . . . . . . . . . . . . . . . . . . . . . . . . . . . . . . . . . . . . . . .
2.52 in (64 mm) (W) x 0.63 in (16 mm) (H) x 1.50 in (38 mm) (D)
Weight (with 7.2 V Battery Pack):. . . . . . . . . . . . . . . . . . . . . . . . . . . . . . . . . . . . 0.96 lbs. (435 g)
Transmitter:
Power Output. . . . . . . . . . . . . . . . . . . . . . . . . . . . . . . . . . . . . . . . . 1 or 5 Watts (Switch Selectable)
Modulation Type . . . . . . . . . . . . . . . . . . . . . . . . . . . . . . . . . . . . . . . . . . . . . . . . . . . . . . . . . . . . . . . FM
Hum and Noise Attenuation. . . . . . . . . . . . . . . . . . . . . . . . . . . . . . . . . . . . . . . . . . . . . . . . . . . 40 dB
Audio Distortion . . . . . . . . . . . . . . . . . . . . . . . . . . . . . . . . . . . . . . . . . . . . . . . . . . . . . . . . . . . . . . . 5%
Spurious Signal Suppression . . . . . . . . . . . . . . . . . . . . . . . . . . . . . . . . . . . . . . . . . . . . . . . . . . 70 dB
Receiver:
Sensitivity at 12 dB SINAD. . . . . . . . . . . . . . . . . . . . . . . . . . . . . . . . . . . . . . . . . . . . . . . . . . . 0.5 µV
S/N Ratio (20 dB) . . . . . . . . . . . . . . . . . . . . . . . . . . . . . . . . . . . . . . . . . . . . . . . . . . . . . . . . . . . 0.8 µV
Squelch Sensitivity. . . . . . . . . . . . . . . . . . . . . . . . . . . . . . . . . . . . . . . . . Threshold -12 dB µV (EMF)
Adjacent Channel Rejection. . . . . . . . . . . . . . . . . . . . . . . . . . . . . . . . . . . . . . . . . . . . . . . . . . 65 dB
Audio Power Output . . . . . . . . . . . . . . . . . . . . . . . . . . . . . . . . . . . . . . . . . . . . 200 mW at 10% THD
Spurious Response Attenuation . . . . . . . . . . . . . . . . . . . . . . . . . . . . . . . . . . . . . . . . . . . . . . . 65 dB
Hum and Noise Attenuation. . . . . . . . . . . . . . . . . . . . . . . . . . . . . . . . . . . . . . . . . . . . . . . . . . . 40 dB
Modulation Acceptance Bandwidth . . . . . . . . . . . . . . . . . . . . . . . . . . . . . . +/- 7.0 kHz Minimum
NOTE: Product specifications and features are subject to change without notice.
NOTE: This device complies with part 15 of the FCC Rules. Operation is subject to the following
two conditions: 1) This device may not cause harmful interference, and 2) this device must
accept any interference received, including interference that may cause undesired operation.
FCCID: KLLTM-886
2211
Page 23

MARINE CHANNELS
Refer to the following Marine Channels tables, depending on your location.
NOAA* Weather Radio Frequencies
Channel Frequency (MHz)
WX0 163.275 NOAA Weather.
WX1 162.550 NOAA Weather.
WX2 162.400 NOAA Weather.
WX3 162.475 NOAA Weather.
WX4 162.425 NOAA Weather.
WX5 162.450 NOAA Weather.
WX6 162.500 NOAA Weather.
WX7 162.525 NOAA Weather.
WX8 161.650 Canadian Weather.
WX9 161.775 Canadian Weather.
* NOAA stands for National Oceanic and Atmospheric Administration.
Use
2222
Page 24

U.S. Marine Channels
Channel
No.
Ship Transmit
MHz
Ship Receive
MHz
Use
01A 156.050 156.050 Port Operations and Commercial, VTS*.
Available Only in New Orleans / Lower
Mississippi area.
05A 156.250 156.250 Port Operations or VTS in the Houston, New
Orleans and Seattle areas.
06 156.300 156.300 Intership Safety.
07A 156.350 156.350 Commercial.
08 156.400 156.400 Commercial (Intership Only).
09 156.450 156.450 Boater Calling. Commercial and Non-Commercial.
10 156.500 156.500 Commercial.
11 156.550 156.550 Commercial. VTS in Selected Areas.
12 156.600 156.600 Port Operations. VTS in Selected Areas.
13 156.650 156.650 Intership Navigation Safety (Bridge to Bridge).
Ships >20 m in Length Maintain a Listening
Watch on this Channel in U.S. Waters.
14 156.700 156.700 Port Operations. VTS in Selected Areas.
15 -- 156.750 Environmental (Receive Only).
Used by Class C EPIRBs.
16 156.800 156.800 International Distress, Safety and Calling. Ships
Required to Carry Radio, USCG, and Most Coast
Stations Maintain a Listening Watch on this Channel.
17 156.850 156.850 State Control.
18A 156.900 156.900 Commercial.
19A 156.950 156.950 Commercial.
20 157.000 161.600 Port Operations (duplex).
20A 157.000 157.000 Port Operations.
21A 157.050 157.050 U.S. Coast Guard only.
22A 157.100 157.100 Coast Guard Liaison and Maritime Safety
Information Broadcasts. Broadcasts
Announced on Channel 16.
23A 157.150 157.150 U.S. Coast Guard Only.
24 157.200 161.800 Public Correspondence (Marine Operator).
25 157.250 161.850 Public Correspondence (Marine Operator).
26 157.300 161.900 Public Correspondence (Marine Operator).
2233
Page 25

U.S. Marine Channels
Channel
No.
Ship Transmit
MHz
Ship Receive
MHz
Use
27 157.350 161.950 Public Correspondence (Marine Operator).
28 157.400 162.000 Public Correspondence (Marine Operator).
63A 156.175 156.175 Port Operations and Commercial, VTS.
Available Only in New Orleans / Lower
Mississippi area.
65A 156.275 156.275 Port Operations.
66A 156.325 156.325 Port Operations.
67 156.375 156.375 Commercial. Used for Bridge to Bridge
Communications in Lower Mississippi River.
Intership Only.
68 156.425 156.425 Non-Commercial.
69 156.475 156.475 Non-Commercial.
70 156.525 156.525 Digital Selective Calling (Voice Communications
Not Allowed).
71 156.575 156.575 Non-Commercial.
72 156.625 156.625 Non-Commercial (Intership Only).
73 156.675 156.675 Port Operations.
74 156.725 156.725 Port Operations.
77 156.875 156.875 Port Operations (Intership Only).
78A 156.925 156.925 Non-Commercial.
79A 156.975 156.975 Commercial. Non-Commercial in Great Lakes Only.
80A 157.025 157.025 Commercial. Non-Commercial in Great Lakes Only.
81A 157.075 157.075 U.S. Government Only - Environmental Protection
Operations.
82A 157.125 157.125 U.S. Government Only.
83A 157.175 157.175 U.S. Coast Guard Only.
84 157.225 161.825 Public Correspondence (Marine Operator).
85 157.275 161.875 Public Correspondence (Marine Operator).
86 157.325 161.925 Public Correspondence (Marine Operator).
88A 157.425 157.425 Commercial, Intership Only.
* VTS stands for Vessel Traffic Service, and is a system that provides active monitoring and navigational advice
for vessels in particularly confined and busy waterways.
2244
Page 26

International Marine Channels
Channel
15 (1) 156.750 156.750 On Board Communications, Intership.
17 (1) 156.850 156.850 On Board Communications, Intership.
Ship Transmit
No.
01 156.050 160.650 Public Correspondence (Marine Operator).
02 156.100 160.700 Public Correspondence (Marine Operator).
03 156.150 160.750 Public Correspondence (Marine Operator).
04 156.200 160.800 Public Correspondence (Marine Operator).
05 156.250 160.850 Public Correspondence (Marine Operator),
06 156.300 156.300 Intership Safety.
07 156.350 160.950 Public Correspondence (Marine Operator),
08 156.400 156.400 Intership.
09 156.450 156.450 Intership, Port Operations, Ship Movement.
10 156.500 156.500 Intership.
11 156.550 156.550 Port Operations, Ship Movement.
12 156.600 156.600 Port Operations, Ship Movement.
13 156.650 156.650 Intership Navigation, Safety.
14 156.700 156.700 Port Operations, Ship Movement.
16 156.800 156.800 International Distress, Safety.
18 156.900 161.500 Public Correspondence (Marine Operator),
19 156.950 161.550 Public Correspondence (Marine Operator),
20 157.000 161.600 Public Correspondence (Marine Operator),
21 157.050 161.650 Public Correspondence (Marine Operator),
22 157.100 161.700 Public Correspondence (Marine Operator),
23 157.150 161.750 Public Correspondence (Marine Operator).
24 157.200 161.800 Public Correspondence (Marine Operator).
25 157.250 161.850 Public Correspondence (Marine Operator).
26 157.300 161.900 Public Correspondence (Marine Operator).
27 157.350 161.950 Public Correspondence (Marine Operator).
28 157.400 162.000 Public Correspondence (Marine Operator).
60 156.025 160.625 Public Correspondence (Marine Operator).
61 156.075 160.675 Public Correspondence (Marine Operator).
MHz
Ship Receive
MHz
Use
Port Operations, Ship Movement.
Port Operations, Ship Movement.
Port Operations, Ship Movement.
Port Operations, Ship Movement.
Port Operations, Ship Movement.
Port Operations, Ship Movement.
Port Operations, Ship Movement.
Port Operations, Ship Movement.
Port Operations, Ship Movement.
2255
Page 27

International Marine Channels
Channel
Ship Transmit
No.
62 156.125 160.725 Public Correspondence (Marine Operator).
63 156.175 160.775 Public Correspondence (Marine Operator).
64 156.225 160.825 Public Correspondence (Marine Operator).
65 156.275 160.875 Public Correspondence (Marine Operator).
66 156.325 160.925 Public Correspondence (Marine Operator).
67 156.375 156.375 Intership, Port Operations.
68 156.425 156.425 Port Operations, Ship Movement.
69 156.475 156.475 Intership, Port Operations, Ship Movement.
71 156.575 156.575 Port Operations, Ship Movement.
72 156.625 156.625 Intership, Port Operations, Ship Movement.
73 156.675 156.675 Intership, Port Operations, Ship Movement.
74 156.725 156.725 Port Operations, Ship Movement.
77 156.875 156.875 Intership.
78 156.925 161.525 Public Correspondence, Port Operations.
79 156.975 161.575 Public Correspondence, Port Operations.
80 157.025 161.625 Public Correspondence, Port Operations.
81 157.075 161.675 Public Correspondence, Port Operations.
82 157.125 161.725 Public Correspondence, Port Operations.
83 157.175 161.775 Public Correspondence, Port Operations.
84 157.225 161.825 Public Correspondence, Port Operations.
85 157.275 161.875 Public Correspondence, Port Operations.
86 157.325 161.925 Public Correspondence, Port Operations.
87A 157.375 157.375 Public Correspondence, Port Operations.
88A 157.425 157.425 Public Correspondence, Port Operations.
MHz
Ship Receive
MHz
Use
Port Operations, Ship Movement.
Port Operations, Ship Movement.
Port Operations, Ship Movement.
Port Operations, Ship Movement.
Port Operations, Ship Movement.
1. For channels 15 and 17, output power is fixed at 1 Watt only. Transmission at high power is not
permitted.
2. Channel 70 is used for Digital Selective Calling (DSC) only and is not available for voice transmissions.
Channel 70 does not appear on the display.
IMPORTANT NOTICE: The International frequency mode is not legal for use while operating in U.S. waters.
The TX/RX frequencies available in International frequency mode were agreed upon by the attending
countries at the 1968 ITU-International Telecommunication Union meeting in Geneva, and are legal for use
in International waters only.
2266
Page 28

Canadian Marine Channels
Channel
04A 156.200 156.200 Pacific Coast: Coast Guard, East Coast:
05A 156.250 156.250 Port Operation, VTS in Seattle.
07A 156.350 156.350 Commercial.
18A 156.900 156.900 Commercial.
19A 156.950 156.950 Coast Guard.
21A 157.050 157.050 Coast Guard.
22A 157.100 157.100 U.S. And Canadian Coast Guard Liaison And
No.
Ship Transmit
MHz
Ship Receive
MHz
Use
01 156.050 160.650 Public Correspondence (Marine Operator).
02 156.100 160.700 Public Correspondence (Marine Operator).
03 156.150 160.750 Public Correspondence (Marine Operator).
Commercial Fishing.
06 156.300 156.300 Intership Safety.
08 156.400 156.400 Commercial Intership only.
09 156.450 156.450 Boater Calling Channel, Commercial and
Noncommercial (Recreational).
10 156.500 156.500 Commercial.
11 156.550 156.550 Commercial. VTS in Selected Areas.
12 156.600 156.600 Port Operations. VTS in Selected Areas.
13 156.650 156.650 Intership Navigation Safety (Bridge to Bridge).
14 156.700 156.700 Port Operations. VTS in Selected Areas.
15 156.750 156.750 Commercial, Noncommercial, Ship Movement
(1 Watt only).
16 156.800 156.800 International Distress, Safety and Calling.
17 156.850 156.850 State Controlled (1 Watt only).
20 157.000 161.600 Coast Guard.
Maritime Safety Info. Broadcasts Announced
On Ch. 16.
23 157.150 161.750 Public Correspondence (Marine Operator).
24 157.200 161.800 Public Correspondence (Marine Operator).
25 157.250 161.850 Public Correspondence (Marine Operator).
26 157.300 161.900 Public Correspondence (Marine Operator).
2277
Page 29

Canadian Marine Channels
Channel
61A 156.075 156.075 Pacific Coast: Coast Guard East Coast:
62A 156.125 156.125 Pacific Coast: Coast Guard East Coast:
63A 156.175 156.175 Port Operation and Commercial. VTS in
64A 156.225 156.225 Commercial Fishing.
65A 156.275 156.275 Port Operations.
66A 156.325 156.325 Port Operations.
79A 156.975 156.975 Commercial.
80A 157.025 157.025 Commercial.
81A 157.075 157.075 U.S. Government Only, Environmental
82A 157.125 157.125 Coast Guard Only.
No.
Ship Transmit
MHz
Ship Receive
MHz
Use
27 157.350 161.950 Public Correspondence (Marine Operator).
28 157.400 162.000 Public Correspondence (Marine Operator).
60 156.025 160.625 Public Correspondence (Marine Operator).
Commercial Fishing Only.
Commercial Fishing Only.
Selected Areas.
67 156.375 156.375 Commercial Fishing.
68 156.425 156.425 Noncommercial (Recreational).
69 156.475 156.475 Commercial Fishing Only.
71 156.575 156.575 Noncommercial (Recreational).
72 156.625 156.625 Noncommercial (Intership Only).
Protection Operations.
84 157.225 161.825 Public Correspondence (Marine Operator).
85 157.275 161.875 Public Correspondence (Marine Operator).
86 157.325 161.925 Public Correspondence (Marine Operator).
87 157.375 161.975 Public Correspondence (Marine Operator).
88 157.425 162.025 Public Correspondence (Ship to Coast).
* VTS stands for Vessel Traffic Service, and is a system that provides active monitoring
and navigational advice for vessels in particularly confined and busy waterways.
2288
Page 30

NOTES
2299
Page 31

NOTES
3300
Page 32

CCoonnttaacctt HHuummmmiinnbbiirrdd¤¤
Contact the Humminbird® Customer Resource Center
in any of the following ways:
By Telephone:
(Monday - Friday 8:00 a.m. to 4:30 p.m.
Central Standard Time):
1-800-633-1468
By e-mail:
(typically we respond to your e-mail within three business days):
custserv@johnsonoutdoors.com
For direct shipping, our address is:
Humminbird
Service Department
678 Humminbird Lane
Eufaula, AL 36027 USA
3311
 Loading...