

Page 1
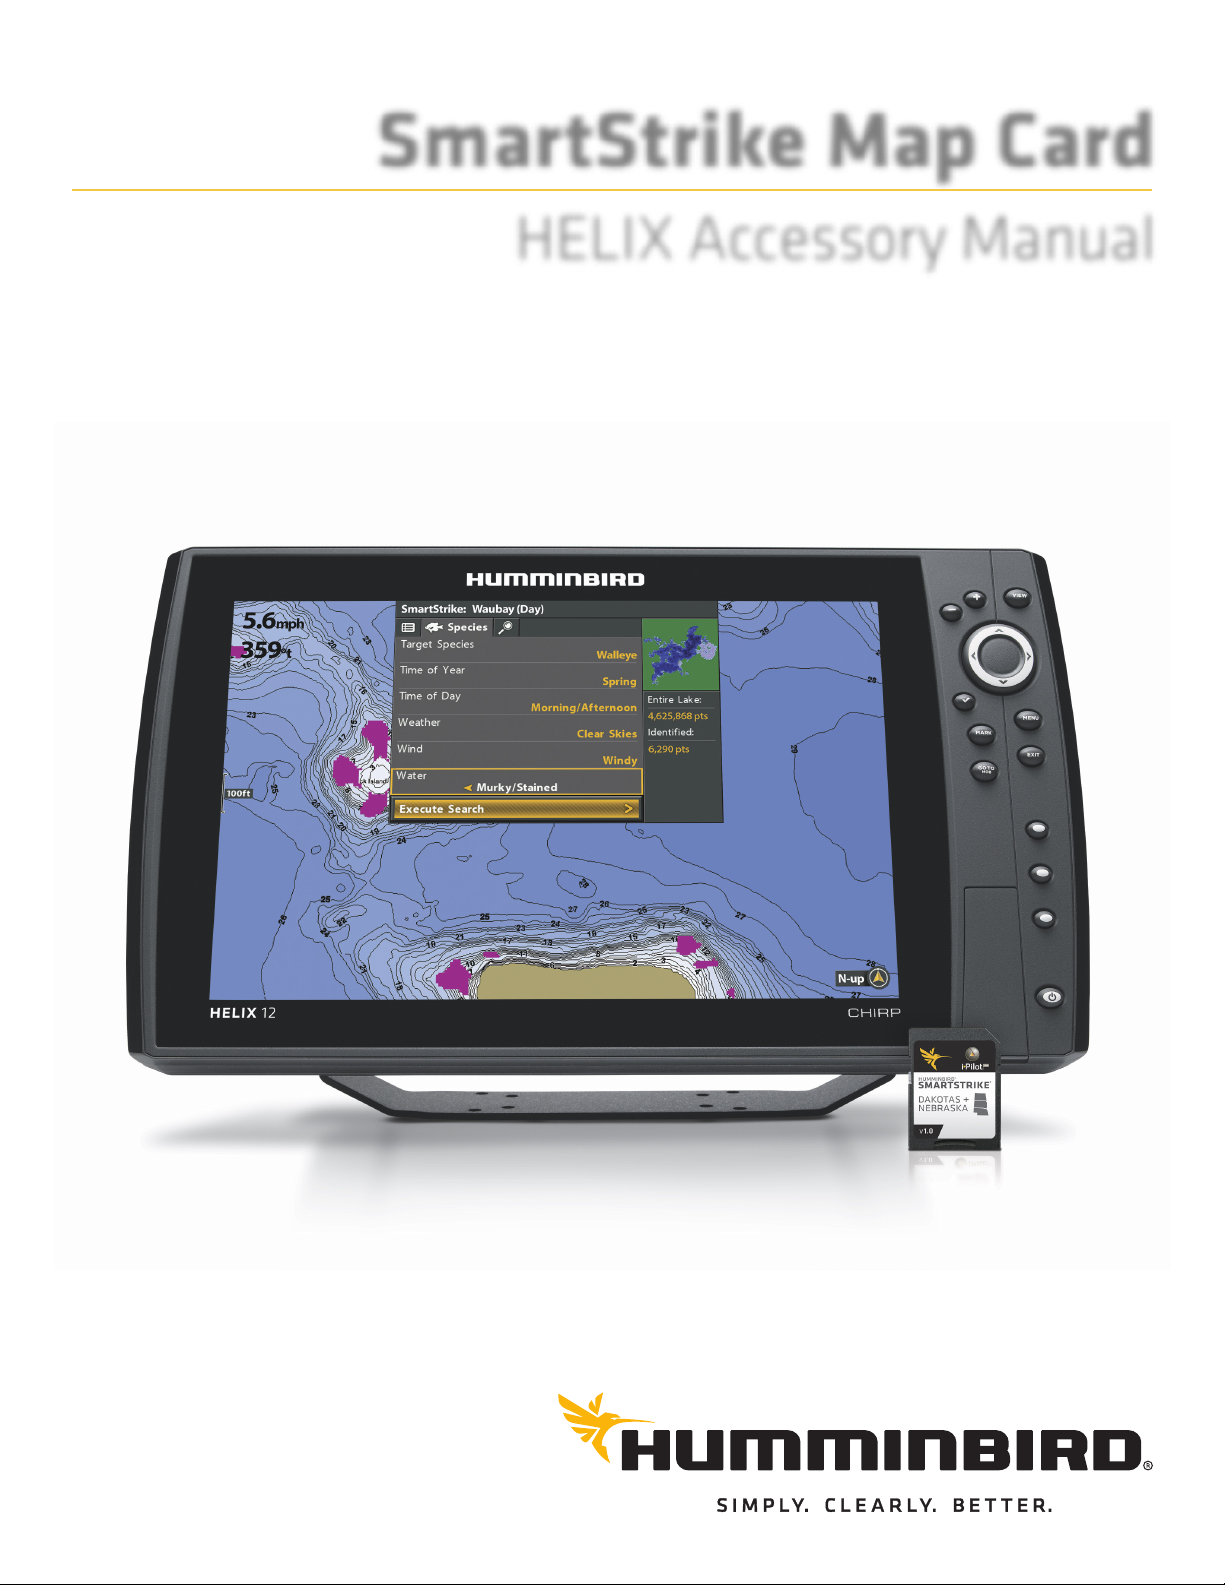
SmartStrike Map Card
HELIX Accessory Manual
532476-1EN_A
Page 2
THANK YOU!
Thank you for choosing Humminbird®, the #1 name in marine electronics. Humminbird has built its reputation by designing and
manufacturing top quality, thoroughly reliable marine equipment. We encourage you to read this guide carefully in order to get the
full benefit from all the features and applications of your Humminbird product.
Contact Humminbird Customer Service at humminbird.com or call 1-800-633-1468.
WARNING! This device should not be used as a navigational aid
to prevent collision, grounding, boat damage, or personal injury.
When the boat is moving, water depth may change too quickly to
allow time for you to react. Always operate the boat at very slow
peeds if you suspect shallow water or submerged objects.
s
WARNING! The electronic chart in your Humminbird unit is an
aid to navigation designed to facilitate the use of authorized
government charts, not to replace them. Only official
government charts and notices to mariners contain all of the
current information needed for the safety of navigation, and the
captain is responsible for their prudent use.
WARNING! Do NOT delete or change the lakes or LkMaster
folders on the SmartStrike™ map card. Changing these folders
will permanently damage the SmartStrike map card.
WARNING! Do not save data files (waypoints, routes, tracks,
groups, recordings, screen snapshots, etc.) to the SmartStrike
map card.
WARNING! Humminbird is not responsible for the loss of data files
(waypoints, routes, tracks, groups, recordings, etc.) that may
occur due to direct or indirect damage to the unit’s hardware or
software. It is important to back up your control head’s data files
periodically. Data files should also be saved to your PC before
restoring the unit’s defaults or updating the software. See your
Humminbird online account at humminbird.com and your control
head operations manual for details.
WARNING! Disassembly and repair of this electronic unit should
only be performed by authorized service personnel. Any
modification of the serial number or attempt to repair the
original equipment or accessories by unauthorized individuals
will void the warranty.
WARNING! This product contains chemicals known to the State of
California to cause cancer and birth defects or other reproductive
harm.
WARNING! Do NOT leave the control head SD card slot cover open.
The slot cover should always be closed to prevent water damage to
the unit.
NOTE: Some features discussed in this manual require a
separate purchase, and some features are only available on
international models. Every effort has been made to clearly
identify those features. Please read the manual carefully in
rder to understand the full capabilities of your model.
o
NOTE: The illustrations in this manual may not look the same as
your product, but your unit will function in the same way.
NOTE: To purchase accessories or any additional equipment
for your control head configuration, visit our Web site at
humminbird.com or contact Humminbird Customer Service at
1-800-633-1468.
NOTE: The procedures and features described in this manual are
subject to change without notice. This manual was written in
English and may have been translated to another language.
Humminbird is not responsible for incorrect translations or
discrepancies between documents.
NOTE: Product specifications and features are subject to change
without notice.
ROHS STATEMENT: Product designed and intended as a fixed
installation or part of a system in a vessel may be considered beyond
the scope of Directive 2002/95/EC of the European Parliament and of
the Council of 27 January 2003 on the restriction of the use of certain
hazardous substances in electrical and electronic equipment.
ATTENTION INTERNATIONAL CUSTOMERS: Products sold in the U.S.
are not intended for use in the international market. Humminbird
international units provide international features and are designed
to meet country and regional regulations. Languages, maps, time
zones, units of measurement, and warranty are examples of
features that are customized for Humminbird international units
purchased through our authorized international distributors.
To obtain a list of authorized international distributors, please visit
our Web site at humminbird.com or contact Humminbird Customer
Service at (334) 687-6613.
2
Page 3

ENVIRONMENTAL COMPLIANCE STATEMENT: It is the intention of
Johnson Outdoors Marine Electronics, Inc. to be a responsible
corporate citizen, operating in compliance with known and applicable
environmental regulations, and a good neighbor in the communities
here we make or sell our products.
w
WEEE DIRECTIVE: EU Directive 2002/96/EC “Waste of Electrical and
Electronic Equipment Directive (WEEE)” impacts most distributors,
sellers, and manufacturers of consumer electronics in the European
Union. The WEEE Directive requires the producer of consumer
electronics to take responsibility for the management of waste from
their products to achieve environmentally responsible disposal during
the product life cycle.
WEEE compliance may not be required in your location for electrical &
electronic equipment (EEE), nor may it be required for EEE designed
and intended as fixed or temporary installation in transportation
vehicles such as automobiles, aircraft, and boats. In some European
Union member states, these vehicles are considered outside of the
scope of the Directive, and EEE for those applications can be
considered excluded from the WEEE Directive requirement.
This symbol (WEEE wheelie bin) on product indicates the
product must not be disposed of with other household refuse. It
must be disposed of and collected for recycling and recovery of
waste EEE. Johnson Outdoors Marine Electronics, Inc. will mark
all EEE products in accordance with the WEEE Directive. It is our goal to
comply in the collection, treatment, recovery, and environmentally
sound disposal of those products; however, these requirements do vary
within European Union member states. For more information about
where you should dispose of your waste equipment for recycling and
recovery and/or your European Union member state requirements,
please contact your dealer or distributor from which your product was
purchased.
HELIX™, Humminbird®, i-Pilot® Link™, LakeMaster®, Minn Kota®, SmartStrike™, and X-Press Menu™ are trademarked by or registered trademarks of Johnson Outdoors
Marine Electronics, Inc.
Adobe, Acrobat, Adobe PDF, and Reader are either registered trademarks or trademarks of Adobe Systems Incorporated in the United States and/or other countries.
© 2016 Johnson Outdoors Marine Electronics, Inc. All rights reserved.
3
Page 4

4
Page 5

TABLE OF CONTENTS
Warnings 2
Overview 7
SmartStrike . . . . . . . . . . . . . . . . . . . . . . . . . . . . . . . . . . . . . . . . . . . . . 7
umminbird LakeMaster . . . . . . . . . . . . . . . . . . . . . . . . . . . . . . . . . . 7
H
i-Pilot Link . . . . . . . . . . . . . . . . . . . . . . . . . . . . . . . . . . . . . . . . . . . . . . 7
Update the Control Head Software 8
Set up SmartStrike 9
Install the SmartStrike Map Card . . . . . . . . . . . . . . . . . . . . . . . . . . 9
Open a Chart View . . . . . . . . . . . . . . . . . . . . . . . . . . . . . . . . . . . . . . 10
Open the SmartStrike Menu . . . . . . . . . . . . . . . . . . . . . . . . . . . . . . 11
Select the Lake . . . . . . . . . . . . . . . . . . . . . . . . . . . . . . . . . . . . . . . . . 12
Search for Species 13
Search for Structure, Spots, Feeding Shelves, and More
(Preset and Advanced Searches) 16
Review Search Results 20
Hide/Show Search Results 22
Edit Search Criteria 23
Contact Humminbird 25
5
Page 6

6
Page 7
OVERVIEW
The SmartStrike map card contains Humminbird LakeMaster map data for freshwater lakes in your region. Use the SmartStrike map
card to set specific search parameters, such as fish species and time of day, to locate fish. The search results are highlighted in
pink on the Chart Views, so you can quickly target spots to investigate.
SmartStrike
The following features are exclusive to the SmartStrike map card and can be applied to the Chart View and Chart Combo Views:
Species Search allows you to search the lake for a specific fish species. Select the species
Species Search
name and the time of year, time of day, weather conditions, wind conditions, and water
conditions you want to target.
Preset Searches
Advanced Search
Preset Searches allow you to choose a preselected search based on water depth and
underwater structure.
Advanced Search allows you to refine your preset search or create your own search using
criteria such as lake region, depth/slope, sun and direction, proximity, and structure.
Humminbird LakeMaster
The following Humminbird LakeMaster features are included on the SmartStrike map card and can be applied to the Chart View and
Chart Combo Views. To adjust the menu settings, press the MENU key twice. Select the HB Chart tab. For more information, see your
control head operations manual.
Depth Highlight
Depth Highlight Range
Water Level Offset
Highlight a depth setting in the Chart Views. The depth you set will be highlighted in green.
Use Depth Highlight with Depth Highlight Range (see below).
Adjust the range on each side of the highlighted depth, when a Depth Highlight is active in
the Chart Views.
Change the level of the water being read from the control head. The displayed numbers on
the Contour Lines in the Chart Views will adjust from the Water Level Offset setting, and the
water level offset will be highlighted in dark brown.
Shallow Water Highlight
Select a minimum shallow depth setting so that the depth is highlighted in red in the Chart
Views.
i-Pilot Link
The following features are available if you have i-Pilot Link connected to your HELIX control head and a Minn Kota trolling motor
installed on your boat:
Follow the Contour
Contour Offset Set a distance to maintain away from the selected contour line while following a contour.
For more information, see the i-Pilot Link Installation and Operations Guide.
Navigate a contour on a Humminbird LakeMaster chart. Use Follow the Contour with
Contour Offset (see below).
7
Overview
Page 8

UPDATE THE CONTROL HEAD SOFTWARE
It is important to install the latest software update (version 1.210 or later) on your control head to enable SmartStrike.
ompatibility: Visit our Web site at humminbird.com for the latest list of compatible models.
C
1. Before the control head software is updated or restored to system defaults, export your navigation data and copy your screen
snapshots to an SD card. See your control head operations manual for instructions.
WARNING! Humminbird is not responsible for the loss of data files (waypoints, routes, tracks, groups, snapshots, recordings, etc.)
that may occur due to direct or indirect damage to the unit’s hardware or software. It is important to back up your PC and control
head data files periodically. See your control head operations manual for more information.
2. Install a blank SD card into the PC card slot.
3. Go to humminbird.com, and select My Humminbird to sign in to your account.
4. Select the My Equipment tab. The available software updates are listed as Downloads under each registered product.
• Under Downloads, click the file name.
• Read the instructions in the dialog box and select Download.
• Follow the on-screen prompts to save the software file to the SD card.
5. Repeat step 4 to download the software updates posted to each registered product.
6. Power on your Humminbird control head. Start Normal mode.
7. Insert the SD card (with the software file) into the control head card slot.
8. Follow the on-screen prompts to update the control head software. See your control head operations manual for more details.
9. When the software update is complete, remove the SD card from the control head card slot and restart the control head.
Update the Control Head Software
8
Page 9

SET UP SMARTSTRIKE
Use the instructions in this section to use SmartStrike on your HELIX control head.
Install the SmartStrike Map Card
|
1
Your control head is compatible with either an SD card or a microSD card. If you do not know how to insert the card into the control
head, see your control head operations manual for information. It is important to note the following guidelines to install the card:
• Confirm the map card is locked (see the illustrations below).
• Do not force the card into the slot. The card should click easily in place.
• Do not leave the card slot cover open. Close the slot cover to prevent water damage to the unit.
SD Card
switch in
switch in
locked
position
WARNING! Do not delete or change the contents of your map card. Changing the card will permanently damage it.
WARNING! Do NOT save data files (waypoints, routes, tracks, groups, recordings, screen snapshots, etc.) to the map card.
WARNING! Do NOT leave the control head card slot cover open. The slot cover should always be closed to prevent water damage to the unit.
locked
position
adapter
microSD
card
microSD Card
9
Set up SmartStrike
Page 10

Open a Chart View
|
2
SmartStrike features are available in the Chart View and Chart Combo Views.
1. Press and hold the VIEW key.
2. Select Chart. Press the RIGHT Cursor key.
3. Select Chart View or a Chart Combo View. Press the RIGHT Cursor key.
Opening the Views X-Press Menu
Set up SmartStrike
Press and Hold to Open
the Views X-Press Menu
10
Page 11

Open the SmartStrike Menu
|
3
The SmartStrike menu can be opened from the Chart View and Chart Combo Views.
1. Press the CHECK/INFO key.
2. Press the RIGHT Cursor key.
NOTE: The SmartStrike Menu will not display when the cursor is active. If the SmartStrike Menu does not display, press the EXIT
key to remove the active cursor. Also, confirm the SmartStrike map card is installed correctly in one of the SD card slots on the
control head. For additional assistance, visit our Web site at humminbird.com or contact Customer Service.
Opening the SmartStrike Menu
Open the
SmartStrike Menu
11
Set up SmartStrike
Page 12

Select the Lake
|
4
To use SmartStrike, you must first select the lake where you are fishing. For larger lakes, there may be multiple menu options
vailable for specific areas of the lake. The selected lake will be saved if you shut off the control head.
a
Change Lakes: If you change lake locations after initial setup, or to search a different lake, change the lake location in the SmartStrike
menu (see Edit Search Criteria: Change the Selected Lake).
Select the Current Lake
1. Follow the menu prompts to select a lake.
2. Press the RIGHT Cursor key.
Sort By: Select the Sort By field, and press the RIGHT or LEFT Cursor keys to select a sort option for the list.
Scroll: Press the UP or DOWN Cursor keys to scroll through the list.
Display: Select a lake on the list. Press the RIGHT Cursor key.
Selecting a Lake
lake list
sort options
selected lake area
Scroll through the List Select
Set up SmartStrike
12
Page 13

SEARCH FOR SPECIES
Use Species Search to target a specific fish species. The available search options are determined by the selected lake and the
selected species. The search criteria is saved until you start a new species search or until the control head is powered off.
. Open the SmartStrike Menu: Press the CHECK/INFO key.
1
Select SmartStrike. Press the RIGHT Cursor key.
2. Select the Species tab.
3. Select Target Species.
4. Press the RIGHT or LEFT Cursor keys to select a species.
5. Optional: Use the Cursor Control key to select from any of the additional search options shown below. Press the RIGHT or LEFT
Cursor keys to select a search option.
Time of Year Select the time of year you want to target.
Time of Day Select the time of day you want to target.
Weather Select the weather conditions you want to target.
Wind Select the wind conditions you want to target.
Water Select the water conditions you want to target.
6. Start Search: Select Execute Search. Press the RIGHT Cursor key.
NOTE: To understand the search results, see Review Search Results.
13
Search for Species
Page 14

species tab
search options
Selecting Search Options for a Species Search
Change SettingsScroll through the List
Search for Species
14
Page 15

start search
Starting the Species Search
Execute Search
15
Search for Species
Page 16

SEARCH FOR STRUCTURE, SPOTS, FEEDING SHELVES, AND MORE
(PRESET AND ADVANCED SEARCHES)
Preset Searches allow you to target structure, spots, and feeding shelves based on depth. You can also add advanced criteria to your
earch such as lake region, sun exposure, distance, and more.
s
The available Preset Searches are determined by the selected lake and the other conditions you select. For example, if you select
a lake where the deepest water is 25 feet, the deep water Preset Searches or certain search options may not be available.
The search criteria is saved until you start a new search or until the control head is powered off.
NOTE: The criteria in the Advanced tab does not apply to the Species search. They are independent searches.
Start a Preset Search
1. Open the SmartStrike Menu: Press the CHECK/INFO key.
Select SmartStrike. Press the RIGHT Cursor key.
2. Select the Advanced tab.
3. Select Preset Searches. Press the RIGHT Cursor key.
4. Select a depth or Other. Press the RIGHT Cursor key.
Shallow 0 to 15 feet (0 to 4.6 meters)
Mid-Depth 16 to 30 feet (4.9 to 9.1 meters)
Deep 31 to 45 feet (9.4 to 13.7 meters)
Other
NOTE: The depth parameters are estimated. To refine the depth search, see Start an A dvanced Search.
Select drop-offs, structures at weedline, or structures at thermocline. To make your selection,
press the RIGHT Cursor key. Proceed to step 6.
Search for Structure, etc.
16
Page 17

. Select a search option. Press the RIGHT Cursor key.
5
Structure
Spots on Spots
Search for fish-attracting structure on the lake bottom, such as points, humps, wrecks, timber,
rocks, creek beds, and drop-offs. To refine the structure search, see Start an Advanced Search.
Search for structure on top of geographical variations on the lake bottom. For example, rocks
or timber on a ledge, lip, or drop off.
Feeding Shelves Search for underwater shelves or flats.
6. Start Search: Select Execute Search. Press the RIGHT Cursor key.
OR
Advanced (Optional): To edit the advanced filters for your search, see Start an Advanced Search.
Selecting a Preset Search
select Preset
Searches
start search
preset search
options
Scroll through the List Select
NOTE: To understand the search results, see Review Search Results.
17
Search for Structure, etc.
Page 18

Start an Advanced Search
You can create a search based on the advanced options shown below. You can also edit these advanced options for your Preset
Search (see Start a Preset Search).
1. Open the SmartStrike Menu: Press the CHECK/INFO key.
Select SmartStrike. Press the RIGHT Cursor key.
2. Select the Advanced tab.
3. Select any of the advanced search options (shown below). Press the RIGHT Cursor key.
Change Setting: Press the RIGHT or LEFT Cursor keys.
Add/Remove Check Mark: Press the RIGHT Cursor key. (check mark = search, blank = do not search)
Close a Menu: Press the EXIT key.
Lake Region
Depth/Slope
Sun and Direction
Proximity
Select the areas of the lake where you want to focus your search. For example, select the entire
lake or inlets, coves, or channels.
Depth Range: Select specific depth values for your search. For example, to search a depth
range between 5 and 20 feet from the bottom, set the Depth Range to Between, and set the
Depth Start to 5 and the Depth End to 20. See the illustration Selecting Advanced Search
Options for Depth/Slope.
Slope: Add a check mark next to the bottom type you want to target. As you select a depth
range, the options for slope will change.
Sun Exposure: Select sunny or shady areas. When an exposure level has been selected, you
can also select the Season and Time of day to search.
Direction: Add a check mark next to the sun direction you want to target. As you select from the
Sun Exposure menu, the options for sun direction will change.
Select a specific distance from a lake feature. For example, to search an area less than 80 feet
from the shoreline, set Proximity to Less Than, Distance to 80 ft, 27 yds, 25m, and Distance
From to Shoreline.
Structure
NOTE: The depth parameters are estimated.
Select from a list of possible structure for the selected lake. You can select more than one type
of structure in this list.
4. Start Search: Select Execute Search. Press the RIGHT Cursor key.
NOTE: To understand the search results, see Review Search Results.
Search for Structure, etc.
18
Page 19

advanced tab
advanced search
options
Selecting Advanced Search Options
Selecting Advanced Search Options for Depth/Slope
Open a MenuScroll through the List Add/Remove Check MarkChange Settings
19
Search for Structure, etc.
Page 20

REVIEW SEARCH RESULTS
After you execute a Species Search or a Preset/Advanced Search, the results are displayed in the Chart View and the SmartStrike
menu.
Review Detailed Search Results in the Chart View
The Chart View displays the identified points from the search results with SmartStrike icons. To see the search area details, zoom
in.
1. To execute a search, see Search for Species or Search for Structure, Spots, Feeding Shelves, and More (Preset and
Advanced Searches).
2. Use the Cursor Control key to move the cursor to a SmartStrike icon on the view.
3. Zoom In: Press the +ZOOM key.
Zoom Out: Press the -ZOOM key.
4. Close: Press the EXIT key.
Chart View with SmartStrike Icons Zooming in to see SmartStrike Search Details
SmartStrike icons show identified points from search results pink highlighted areas identify search results in detail
Review Search Results
OR
ZOOM OutZOOM In
Move the Cursor
20
ZOOM In
Page 21

Review Identified Points in the SmartStrike Menu
The SmartStrike menu shows a preview of the searched lake, the total SmartStrike points available, and the points identified by the
last executed search.
1. To execute a search, see Search for Species or Search for Structure, Spots, Feeding Shelves, and More (Preset and
Advanced Searches).
2. Open the SmartStrike Menu: Press the CHECK/INFO key.
Select SmartStrike. Press the RIGHT Cursor key.
3. Review the Identified points number (see the illustration below).
4. Close: Press the EXIT key.
Reviewing Search Results from the SmartStrike Menu
selected lake
lake preview
total points
points from
last executed
search
21
Review Search Results
Page 22

HIDE/SHOW SEARCH RESULTS
Hide/Show Search Results
se the instructions in this section to hide search results temporarily from the Chart View. To delete the results, see Clear Search
U
Results.
1. Open the SmartStrike Menu: Press the CHECK/INFO key.
Select SmartStrike. Press the RIGHT Cursor key.
2. Select Display Results.
3. Press the RIGHT Cursor key. (check mark = visible, blank = hidden)
Show: To display the results again, add a check mark to Display Results.
Clear Search Results
Use Clear Search Results to delete the search results from the Chart View. Your last search criteria is still saved in the SmartStrike
menu, so you can execute the search again. To hide search results temporarily from the display, so they can be displayed again
quickly, see Hide/Show Search Results in this section.
1. Open the SmartStrike Menu: Press the CHECK/INFO key.
Select SmartStrike. Press the RIGHT Cursor key.
2. Select Clear Results.
3. Press the RIGHT Cursor key.
Hide/Show Search Results
22
Page 23

EDIT SEARCH CRITERIA
Edit Search Criteria
he SmartStrike menu saves your most recent search until the control head is powered off. To run a search again, select the Execute
T
Search menu in the Species tab or the Advanced tab. You can edit the search at any time. See Search for Species or Search for
tructure, Spots, Feeding Shelves, and More.
S
Clear Search Criteria
Use Clear Criteria to reset the search criteria in the SmartStrike menu. The latest search criteria will be deleted, and the SmartStrike
menu will be reset to its default settings.
1. Open the SmartStrike Menu: Press the CHECK/INFO key.
Select SmartStrike. Press the RIGHT Cursor key.
2. Select Clear Criteria.
3. Press the RIGHT Cursor key.
Change the Selected Lake
If you change lake areas after initial setup (see Set up SmartStrike), or to search a different lake, use the following instructions to
change the lake location in the SmartStrike menu.
1. Open the SmartStrike Menu: Press the CHECK/INFO key.
Select SmartStrike. Press the RIGHT Cursor key.
2. Choose Select Lake.
3. Press the RIGHT Cursor key.
Sort By: Select the Sort By field, and press the RIGHT or LEFT Cursor keys to select a sort option for the list.
Scroll: Press the UP or DOWN Cursor keys to scroll through the list.
Display: Select a lake on the list. Press the RIGHT Cursor key.
23
Edit Search Criteria
Page 24

lake list
sort options
selected lake area
Selecting a Lake
Scroll through the List Select
Edit Search Criteria
24
24
Page 25

CONTACT HUMMINBIRD
Contact Humminbird Customer Service in any of the following ways:
Web site:
humminbird.com
E-mail:
service@humminbird.com
Telephone:
1-800-633-1468
Direct Shipping:
Humminbird
Service Department
678 Humminbird Lane
Eufaula, AL 36027 USA
Hours of Operation:
Monday - Friday
8:00 a.m. to 4:30 p.m. (Central Standard Time)
Social Media Resources:
Facebook.com/HumminbirdElectronics
Twitter.com (@humminbirdfish)
YouTube.com/humminbirdtv
25
 Loading...