

Page 1

Thank You!
Thank you for choosing Humminbird®, America's #1 name in fishfinders. Humminbird® has built its reputation by designing and manufacturing top-quality, thoroughly reliable marine equipment. Your Humminbird®is designed for trouble-free
use in even the harshest marine environment. In the unlikely event that your Humminbird®does require repairs, we offer
an exclusive Service Policy-free of charge during the first six months after purchase, and available at a reasonable rate
after the six month period. For complete details, see the warranty information at the end of this manual. We encourage you
to read this operations manual carefully in order to get the full benefit from all the features and applications of your
Humminbird
®
product.
The RF20 SmartCast product should have:
• One Remote Sonar Sensor - RSS
TM
- Channel A
• One Rod Mounted Display with installed 2450 CR battery
• One extra 2450 CR battery
• Three different Mounting Sleeves: A, B and C
• This RF20 SmartCast Operations Manual.
If any of these components are missing, please contact our Customer Resource Center at either 1-334-687-0503 or visit
our website at www.humminbird.com.
NOTE: The RF20 also comes in an International version that is CE-compliant.
WARNING! Disassembly and repair of this electronic unit should only be performed by authorized service personnel. Any modification of
the serial number or attempt to repair the original equipment or accessories by unauthorized individuals will void the warranty. Handling and/or
opening this unit may result in exposure to lead, in the form of solder.
WARNING! This product contains lead, a chemical known to the state of California to cause cancer, birth defects and other reproductive
harm.
WARNING! The bottom of the RSS should not be handled during sonar operation, as this may cause physical discomfort and may result in
personal injury in the form of tissue damage. Handle the RSS only by the antenna tower when it has been in the water.
WARNING! The RSS (Remote Sonar Sensor) is not intended for use by children younger than 6 years old without adult supervision as the
RSS may represent a choking hazard to small children.
Using the SmartCast
The SmartCast is a first-of-its-kind wireless fishfinder that is incredibly easy to use.
Simply attach the Rod Mounted Display to your rod, then attach the Remote Sonar
Sensor (RSS) to the end of your fishing line and cast it into the water as you would a normal float or lure. Then power on the SmartCast RF20 and you are ready to fish. The
SmartCast system uses sonar technology to send sound waves from the RSS into the
water. The returned “echoes” are transmitted with wireless technology to the RF20 and
plotted on the display. New information appears on the right. As this information moves
to the left a very accurate picture of the underwater world is created, including objects
such as the bottom, fish, and structures, as well as the depth of the bottom.
NOTE: The RF20 display is designed to be used with polarized sunglasses only when the user is looking straight at the screen. You may
not be able to read the display from other angles when wearing polarized sunglasses.
To scan an area, cast and
then reel in at a slow, steady
rate with your rod tip up.
Page 2
WARNING! The electronic parts in the Remote Sonar Sensor (RSS) are made to withstand use when casting into water. Because shock from
abrupt contact with rocks can damage your RSS, we do NOT recommend using your RSS in water that is less than one foot (0.3 m) deep.
Operational Modes
The RSS can be used in two distinct ways:
Sonar Graph: The RSS can be used to create a sonar graph of the bottom. Cast the RSS into the water beyond an area of
interest, then reel in the RSS at a slow and steady rate The digital display will provide precise information for bottom contour, depth and structure below the RSS. Fish and bait fish will be displayed when detected.
Stationary Float: The RSS can be used as a float in a stationary location to monitor the area below, giving you a live
update as fish approach your bait.
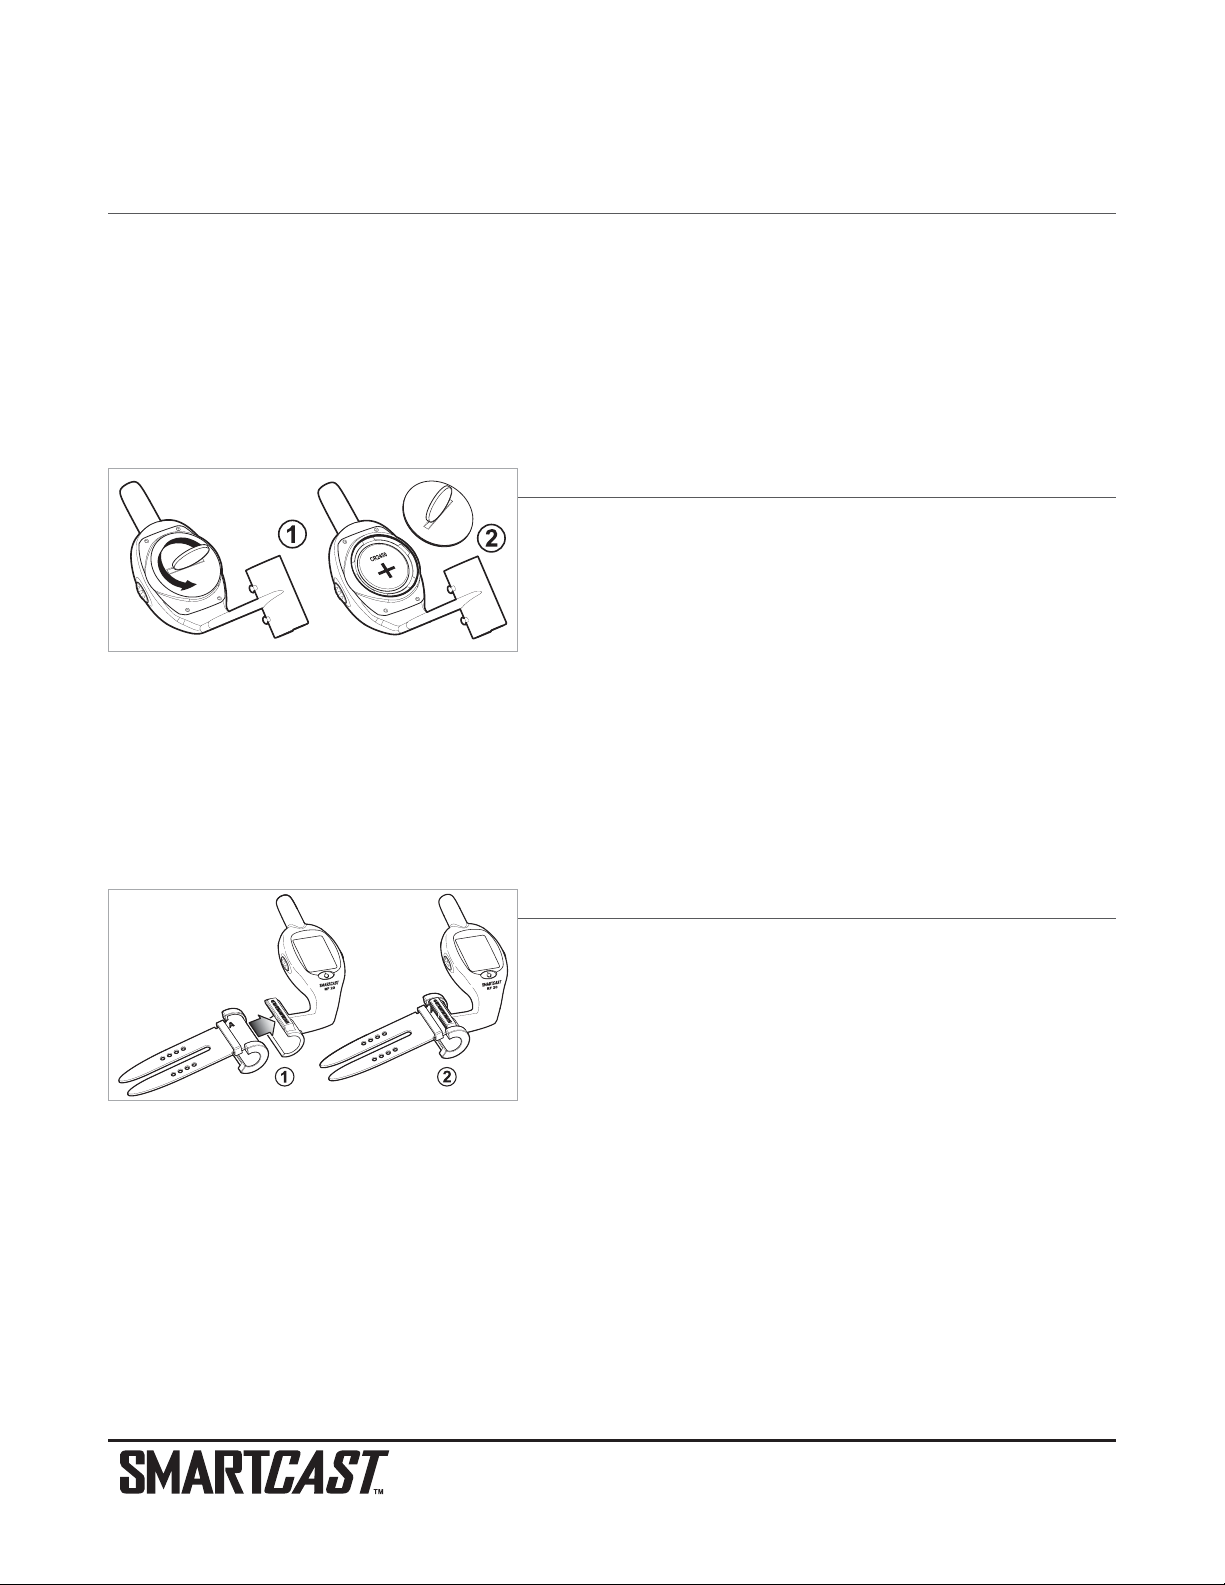
Activating the Rod Mounted Display Battery
When you first use the RF20 SmartCast Rod Mounted Display you will
need to activate the display battery. Use a coin to remove the battery
door on the back of the Rod Mounted Display, then remove the plastic
strip located in the battery compartment.
Make sure that the O-ring in the battery compartment is present, positioned correctly in the grooves, and free of debris
before re-installing the battery door.
NOTE: Replace the Rod Mounted Display battery only with a 2450 CR-type battery.These batteries can be purchased from most electronics
retailers.
NOTE: Under normal use you should expect the life of the display battery to last up to 40 hours of operation. Operation in cold weather will
significantly reduce the life of the battery.
Attaching the Rod Mount Display
1. Determine which of the three Sleeves will fit onto your rod. Each
Sleeve will fit a variety of rod sizes, but Sleeve A fits rods closest to
¹₂
" diameter, B fits rods closest to
⁷₁₆
" diameter, while C fits rods
closest to
³₈
" diameter.
2. Once you have selected a specific Sleeve, attach it to the Rod Mounted Display, then slip the assembled unit onto
your rod and tighten the straps. Make sure that the letter on the Sleeve is visible once the unit is mounted on the
rod, so that the Rod Mounted Display and the Sleeve are both on the top side of the rod when you are fishing.
NOTE: You should remove the RF20 from your rod and store it when you are not actively using it. See Maintenance for important storage
information.
NOTE: Keep the unused Sleeves in case you get a rod of a different size. If you need a replacement Sleeve, you may order it from our
website, www.humminbird.com, or from participating retailers and dealers.
Sleeve Mount
Assembled
Rod Mounted Display
Page 3
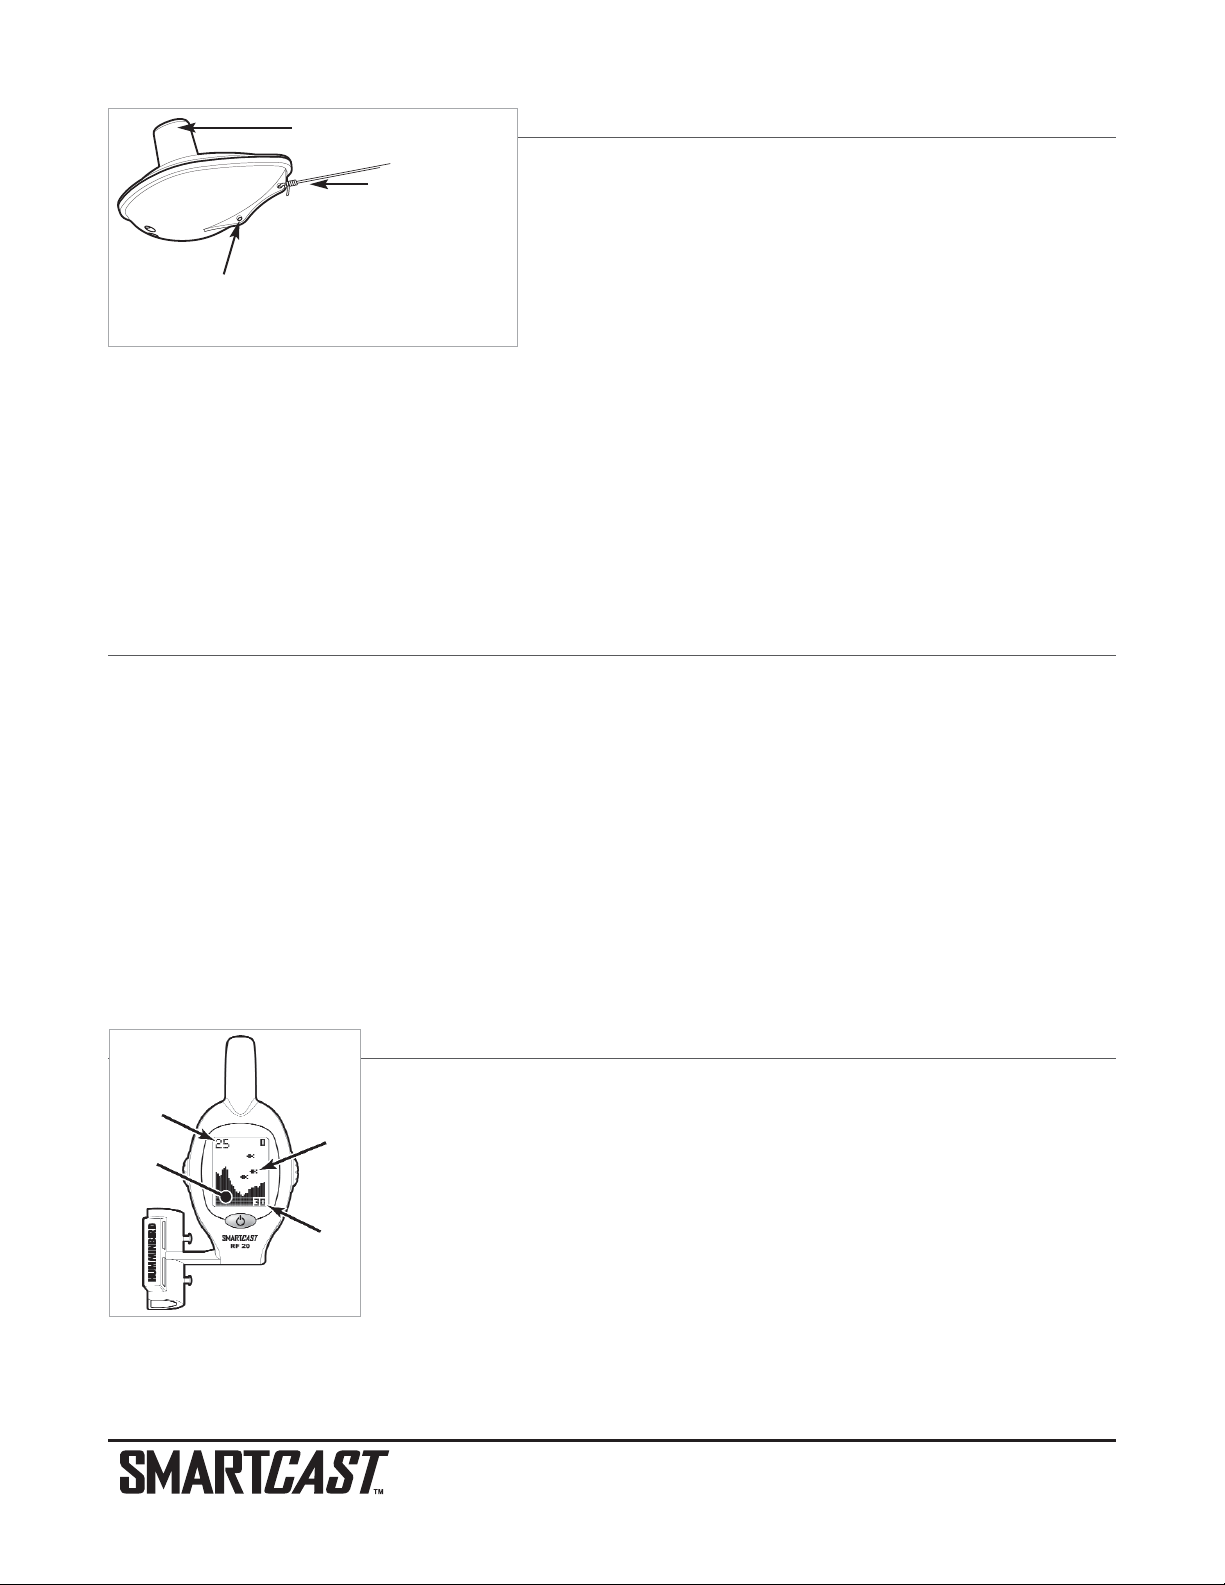
Attaching the RSS
The line coming from your reel can be tied off to the front hole in the
Remote Sonar Sensor (RSS). If you also wish to use the RSS as a conventional float, use the second hole to attach your hook using a lighter
weight line. A snag will break the lighter line if you have to break free.
Slip line techniques are not recommended because of the higher risk
of losing the RSS. If you do use the slip line method, use a lighter
weight line after the lower stop, enabling retrieval of the RSS if the
lower line with hook breaks away.
CAUTION: You will increase the possibility of breaking your line if you use light test pound line on your reel. The RSS is positively buoyant (is
buoyant under its own weight plus 0.2 ounces or 5.7 g of bait and lead weight.) The maximum amount of weight for any attachment to the
RSS is approximately
¹
²₆₄
to
¹³₆₄
ounces (5.3 g to 5.8 g), and includes the combined weight of any hook, line, weight, swivel/snap swivel and
bait that is attached to the RSS. The RSS itself weighs 1 ounce (28 g), and therefore light test line might break.
NOTE: Store the RSS in a dry, non-metallic container, such as a tackle box, in a separate compartment, and isolated from any metallic
devices.
RSS Power
The Remote Sonar Sensor (RSS) has a separate, non-replaceable lithium battery that has a shelf life of three years and
will last for approximately 400 hours of in-water use. Discard the used RSS in compliance with local laws as you would
any electronic component or battery.
The RSS will turn on its Sonar Transmitter/Receiver automatically when it is immersed in the water. Once immersed, the
RSS will begin transmitting the sonar information via radio frequency (RF) to the Rod Mounted Display. The RSS automatically stops using power a few seconds after being pulled out of the water.
WARNING! Do not place the RSS in a wet area when not in use as this will turn on the RSS and shorten its usable life. Store the RSS in a
dry area when not in use to conserve power. Never place the RSS in a wet area of a boat or on a metal surface that could accidentally power
it on.
NOTE: If the RSS was used in salt water, rinse it with fresh water before storing it.
What’s On the Display
The SmartCast displays under-water information in an easy to understand format. The top
of the display corresponds to the water surface, and the bottom of the display corresponds
to the selected Depth Range (see Depth Range). The display varies as the area under the
RSS changes.
Underwater conditions vary greatly, so some experience and interpretation is needed to
realize all the benefits of the SmartCast – use the diagram as a guide to the most common conditions and practice using the SmartCast over known bottom types.
Present
Depth
Bottom
Fish
Icon
Depth
Range
Use a heavy test line, standard
knots, and tackle such as a
swivel.
Handle the RSS by the antenna tower when it
has been in water.
The second leader hole is for using the RSS as a float. Connect a lighter weight
hook line to this hole. Do not over-weight the hook line as this will submerge the
RSS, causing signal loss.
Page 4
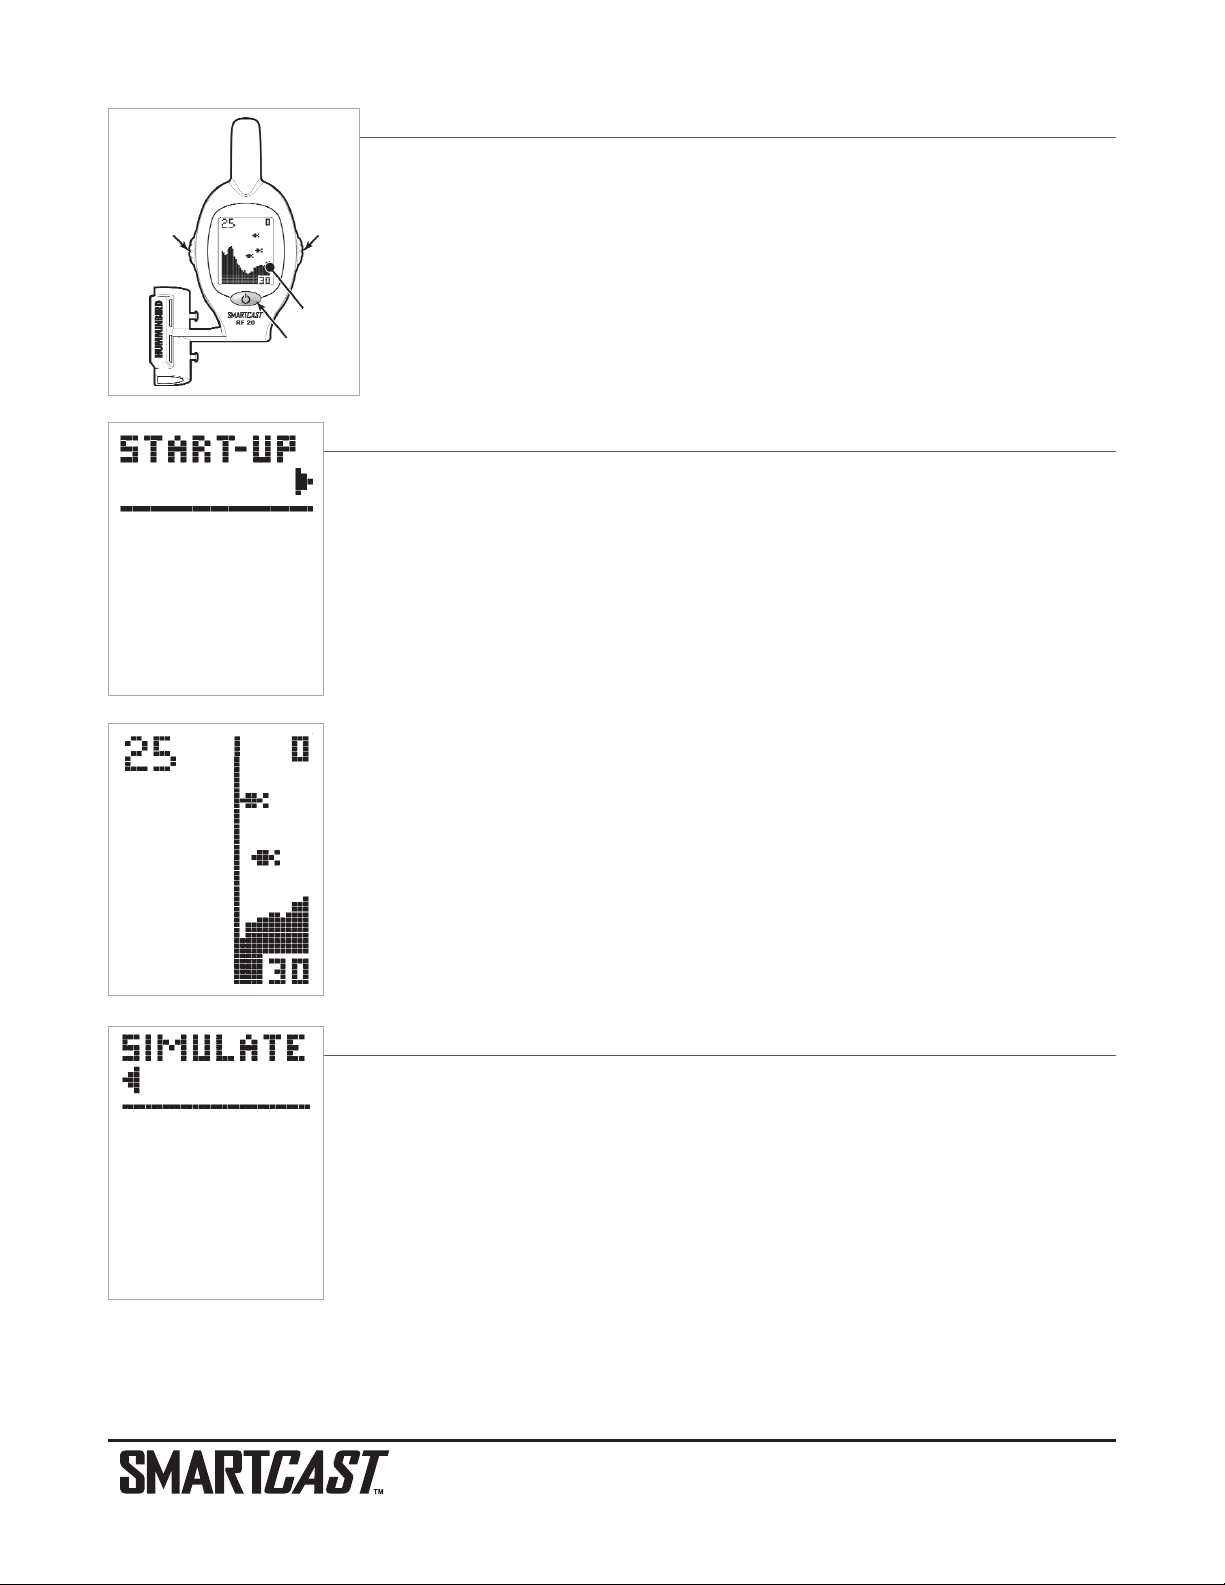
Powering the Display ON and OFF
To turn on the display, press and hold the POWER-MENU button until you hear the beep,
then release. To power off the display, press and hold the POWER-MENU button until the
display shuts down, then release.
CAUTION! The Rod Mounted Display DOES NOT have an automatic shut off function. It will continue to
draw current unless you shut it down manually by pressing and holding the POWER-MENU button.
Start-Up in Fishing Mode
After pressing the POWER-MENU button to turn on the Rod Mounted Display, you will see the
Start-Up screen. The Start-Up screen will disappear automatically after two seconds have
passed, without further action from you. In Fishing mode, the screen will either display sonar
information or the RF20 SmartCast screen will appear, indicating that no sonar information is
currently available.
When you have powered on the Rod Mounted Display and have cast the RSS into the water,
returned sonar data will start to be displayed. A vertical line will appear first, followed by a bottom depiction and possible fish locations if fish are sensed.
Startup in Simulator Mode
To enter Simulator mode, press the POWER-MENU button to turn on the RF20, wait until you
see the Start-up screen, then quickly press the RIGHT Cursor Button. Once you are in
Simulator mode, the display will show the word Simulate, and then, after two seconds, will
show simulated data. To exit Simulator mode, you must power down the RF20.
POWER/MENU
Button
Display
RIGHT
Cursor
Button
LEFT Cursor
Button
Page 5
Menu Features
A simple menu system accesses the adjustable features of the SmartCast RF20. To activate the menu system, press the
POWER-MENU button; the first time you do this after power up, the Sensitivity menu choice will appear. Once the RF20
has been powered on, pressing the POWER-MENU button will display the last menu choice viewed. Press the POWERMENU button repeatedly to access other SmartCast menu choices, one at a time. When a menu choice is on the display,
use the RIGHT and LEFT Cursor buttons to adjust the menu settings. Menus are automatically removed from the display
after several seconds.
NOTE: Menu settings are not saved in memory. All settings return to factory defaults when the SmartCast is turned off.
Sensitivity
Press the POWER-MENU button until SENSITIVITY appears. Select a higher number to show weaker sonar returns on the
display, or a lower number to remove clutter from the display. Adjusting Sensitivity also affects how sonar returns are identified as Fish ID Symbols - more fish will be detected at the highest setting of 5, fewer at the lowest setting of 1. (1, 2, 3,
4, 5, Default = 3)
Depth Range
Press the POWER-MENU button until DEPTH RANGE appears. Auto is the default setting. When in automatic, the lower
range will be adjusted by the unit to follow the bottom. Selecting a manual depth range locks it to the setting you select.
(Auto, 10, 15, 20, 30, 60 or 100 feet [3, 5, 6, 9, 18, or 30 meters], Default = Auto)
NOTE: In manual operation, if the water depth is greater than the depth range setting, the bottom will not be visible on the display. Select
Auto to return to automatic operation.
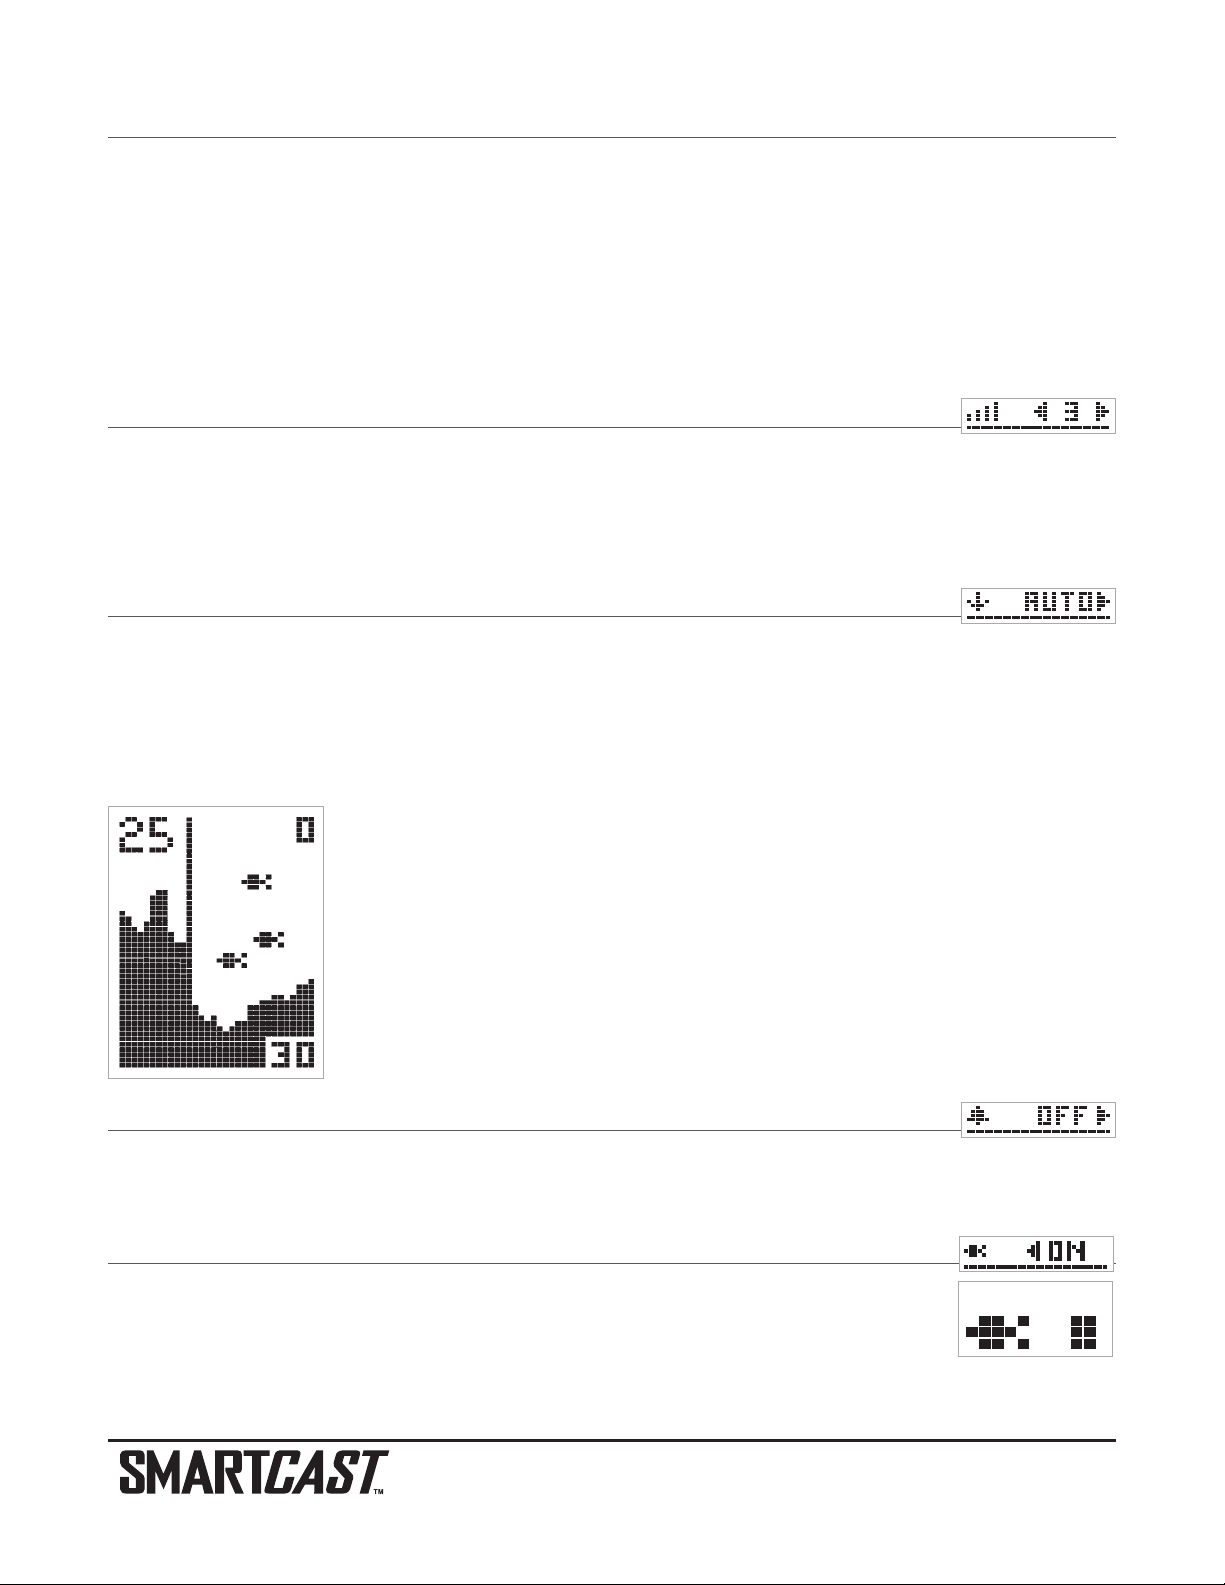
Depth scale changes or signal loss will cause lines with missing detail and/or abrupt changes
in the graphed bottom. When the Depth Range is set to Auto, the depth is set to keep the bottom in the lower third of the screen. The screen image jump shown here is due to an automatic change in depth. New returns graphed at a different scale will not match up with the historic
data already graphed at a higher or lower scale. Vertical lines can also occur as the radio signal from the RSS is lost and then regained in rough water conditions.
Fish Alarm
Press the POWER-MENU button until FISH ALARM appears. Select Off for no fish alarm, or On for fish alarm. Fish ID
must be set to On for Fish Alarm to work. (Off,On, Default = Off)
Fish ID
Press the POWER-MENU button until FISH ID appears. Select either Off to view “raw” sonar returns,
or On to view fish symbols. Fish ID uses advanced signal processing to interpret sonar returns and
will display a Fish Symbol when very selective requirements are met. Fish Alarm does not sound if
Fish ID is turned off. (On, Off, Default = On)
Fish ID
Raw Sonar
Page 6

Channel
Press the POWER-MENU button until CHANNEL appears. Select either A or B to match your RSS. See Channel A and B
RSS Units. (A, B, Default = A)
Channel A and B RSS Units
There are two versions of the RSS that are available at your local tackle dealer, major outdoor retailers, or at the site
www.humminbird.com: Channel A and Channel B.
The Channel A RSS unit comes standard with the RF20. You also have the option to purchase additional Channel A or
Channel B RSS units. When using the A or B version of the RSS, make sure to select the appropriate channel using the
CHANNEL menu choice. This gives you the flexibility to use a different type of RSS than the one you are currently using if
another angler is using a SmartCast product within 100 feet (30 meters) of your Rod Mounted Display. If you have a Channel
B RSS, you will need to set the channel to B each time you power up the RF20. Two Channel A or two Channel B RSS units
in the water within 100 feet (30 meters) of the display will cause RF interference that prevents the product from functioning
properly, resulting in fluctuating depth readings and excessive clutter on the display. If you use a Channel B RSS while another angler is using a Channel A RSS or vice versa, the interference will be reduced but not completely eliminated.
NOTE: RSS units, regardless of Channel, either in close proximity to each other or to other sonar devices (closer than 40 feet or 12 meters)
can also experience or cause sonar interference, which may result in erratic depth readings.
Maintenance
Your SmartCast is designed to provide years of trouble-free operation with virtually no maintenance. Follow these simple
procedures to ensure your SmartCast continues to deliver top performance.
WARNING! Never leave the RF20 SmartCast product in a closed car or trunk - the extremely high temperatures generated in hot weather
can damage the electronics.
Rod Mounted Display Maintenance: If the Rod Mounted Display comes into contact with salt spray, wipe the affected
surfaces with a cloth dampened with fresh water. When cleaning the protective lens on the display, use a chamois and
non-abrasive, mild cleaner. Do not wipe while dirt or grease is on the lens. Be careful to avoid scratching the lens. Do not
use a chemical glass cleaner on the lens, as this may cause it to crack.
Do not store the Rod Mounted Display on your fishing rod, in direct sunlight, or in extreme temperatures. When you are
not fishing for extended periods, remove the rod mount from the rod and store it in a dry, cool place such as your tackle
box, away from extreme temperatures and ultraviolet light.
RSS Maintenance: After using the RSS in salt water, wipe the affected surfaces with a cloth dampened with fresh water.
The RSS Wet Switch
TM
pins must be rinsed with fresh water after exposure to salt water to prevent corrosion.
If your RSS remains out of the water for a long period of time, it may take some time to wet it when returned to the water.
Small air bubbles can cling to the surface of the RSS and interfere with proper operation. Wipe the face of the RSS with a
wet cloth to remove them.
If sonar performance becomes weak (i.e., there are bottom gaps or "0" depth readings) the bottom of
the RSS needs to be cleaned with a drop or two of a 5 to 10 percent solution of liquid dish-washing
detergent and water. Use approximately one tablespoon (15 ml) detergent to 8 ounces (237 ml) of water
to remove oils from the face of the RSS, then wipe with a damp cloth.
Page 7

Troubleshooting
Do not attempt to repair the RF20 Rod Mounted Display or RSS yourself. There are no user serviceable parts inside, and
special tools and techniques are required for assembly to ensure the waterproof integrity of the housings. Repairs should
be performed only by authorized Humminbird technicians.
Many requests for repair received by Humminbird involve units that do not actually need repair. These units are returned
“no problem found.” If you have a problem with your SmartCast, use the following troubleshooting guide before calling
the Customer Resource Center or sending your unit in for repair.
1. The SmartCast loses signal.
If the SmartCast is not able to get an RF signal from the RSS, the display will stop updating
(the screen will freeze) and the RF20 SmartCast screen will be displayed after several seconds.
Whenever reception is lost or the RSS emerges from the water for more than a few seconds,
the RF20 SmartCast screen will be displayed until the RSS is placed back in the water and
reception is regained.
• The SmartCast system is a line-of-sight wireless product. If objects are placed between
the RSS and the Rod Mounted Display, the reception may be lost.
• The RF20 depth range is 2 to 100 feet (0.6 to 30 meters). Erratic readings may occur in water that is shallower than
2 feet (0.6 m). In addition, because of the nature of sonar, this product is not intended for use in swimming pools
or small enclosed bodies of water.
• Reeling the RSS too fast can cause loss of signal and the screen will freeze.
• Check the buoyant balance between the RSS and your tackle; over 0.2 ounce (5.7 grams) will submerge the RSS,
causing signal loss.
• The RF20 may not obtain its maximum RF distance of 100 feet (30 meters) unless the water is smooth. Waves or
chop may reduce the RF range significantly.
NOTE: Retrieving the RSS too rapidly, or the repetitive rocking motion of rough water, can result in loss or distortion of the bottom detail on
the display. For best bottom detail, perform a smooth and slow reel-in with constant speed and the rod tip up (holding the rod tip low or
using a heavy line may cause the RSS to submerge and momentarily lose radio contact). The RSS has a maximum transmit range of 100
feet (30 meters). If the unit is cast or drifts more than 100 feet (30 meters) away from the receiver, the signal may be inconsistent or lost.
2. Nothing happens when I turn the Rod Mounted Display on.
Check the battery position and make sure that the battery door is properly closed. Also, make sure that you have removed
the plastic strip that is in the battery compartment when it is new.
If this doesn’t help, replace the battery. After replacing the battery, if the unit still doesn’t power up, remove the battery door
again and re-install.
3. When in very shallow water, I get gaps in the bottom reading and inconsistent digital depth indication.
The SmartCast will work reliably in water 2 feet (0.6 meter) or deeper. The depth is measured from the RSS.
Page 8

4. The display begins to fade out. Images are not as sharp as normal.
Check the battery position and make sure that the battery door is properly closed. Also, make sure that you have removed
the plastic strip that is located in the battery compartment when it is new.
If this doesn’t help, replace the battery. After replacing the battery, if the unit still has a faded display, remove the battery
door again and re-install.
5. The display shows many black dots at high sensitivity settings.
You are seeing noise or interference caused by one of several sources. Noise can be caused by other electronic devices.
Turn off any nearby electronics and see if the problem goes away. Other sonar devices or any electronic device operating
in the 900 mHz range (in the 400 mHz range for International versions) could cause interference with your SmartCast.
6. The display shows fluctuating depth readings and excessive clutter, including vertical bars that may be
drawn on top of fish icons.
The SmartCast system comes with the capability to receive separate signals from a Channel A RSS or a Channel B RSS.
Two A- or B-type RSS units used simultaneously, as well as one A- and one B-type RSS unit used simultaneously, can
cause RF interference between each other.
7. The display jumps and the bottom has an abrupt change; sometimes a vertical line is missing or a black line
from top to bottom is displayed.
This display image jump is due to an automatic change in depth. New returns graphed at a different scale will not match
up with the historic data already graphed at a higher or lower scale. Vertical lines can also occur as the radio signal from
the RSS is lost and then regained in rough water conditions.
Techsonic Industries 6 Month Limited Warranty
We warrant the original retail purchaser that products made by Techsonic Industries have been manufactured free from
defects in materials and workmanship. This warranty is effective for 6 months from the date of original retail purchase.
Techsonic Industries products found to be defective and covered by this warranty will be replaced or repaired free of charge
at Techsonic Industries' option and returned to the customer freight prepaid. Techsonic Industries' sole responsibility
under this warranty is limited to the repair or replacement of a product that has been deemed defective by Techsonic
Industries. Techsonic Industries is not responsible for charges connected with the removal of such product or reinstallation of replaced or repaired parts.
This warranty does not apply to a product that has been:
• Improperly installed;
• Used in an installation other than that recommended in the product installation and operation instructions;
• Damaged or has failed because of an accident or abnormal operation;
• Repaired or modified by entities other than Techsonic Industries.
Please retain your original receipt as a proof of the purchase date. This will be required for in-warranty service.
Page 9

THIS WARRANTY IS EXPRESSLY IN LIEU OF ANY OTHER WARRANTIES, OBLIGATIONS OR LIABILITIES ON THE PART
OF TECHSONIC INDUSTRIES AND WILL BE THE CUSTOMER'S EXCLUSIVE REMEDY, EXCEPT FOR ANY APPLICABLE
IMPLIED WARRANTIES UNDER STATE LAW WHICH ARE HEREBY LIMITED IN DURATION TO SIX MONTHS FROM THE
DATE OF ORIGINAL PURCHASE. IN NO EVENT WILL TECHSONIC INDUSTRIES BE LIABLE FOR ANY INCIDENTAL OR
CONSEQUENTIAL DAMAGES FOR BREACH OF ANY EXPRESS OR IMPLIED WARRANTY RELATING TO THE PRODUCTS.
Some states do not allow limitations on an implied warranty, or the exclusion of incidental or consequential damages, so
the above exclusions may not apply to you. You may also have other rights, which vary from state to state.
International Purchases
A separate warranty is provided by international distributors for units purchased outside the United States. This warranty
is included by your local distributor and this distributor maintains local service for your unit. Warranties are only valid in
the area of intended distribution. Units purchased in the United States or Canada must be returned to our factory in the
United States for service.
Techsonic Industries Service Policy
Even though you'll probably never need to take advantage of our incredible service policy, it's good to know that we back
our products this confidently. We do it because you deserve the best. We will make every effort to repair your unit within three business days from the receipt of your unit at our factory. This does not include shipping time to and from our
factory. Units received on Friday are typically shipped by the following Wednesday, units received Monday are typically
shipped by Thursday, etc.
All repair work is performed by factory-trained technicians to meet exacting factory specifications. Factory-serviced units
go through the same rigorous testing and quality control inspections as new production units.
After the original warranty period, a standard flat rate service charge will be assessed for each repair (physical damage
and missing parts are not included). Any repairs made after the original warranty will be warranted for an additional 90
days after service has been performed by our factory technicians. You can contact our Customer Resource Center or visit
our website to verify the flat rate repair fee for your product (visit the Product Support section):
http://www.humminbird.com
We reserve the right to deem any product unserviceable when replacement parts are no longer available or impossible to
obtain. This Service Policy is valid in the United States only. This applies only to Humminbird products returned to our
factory in Eufaula, Alabama. This Service Policy is subject to change without notice.
Returning Your Unit for Service
Before sending your unit in for repair, please contact the factory, either by phone or by email, to obtain a Repair
Authorization Number for your unit. Please have your product model name and serial number available before calling the
factory. If you contact the factory by e-mail, please include your product model name and serial number in the e-mail,
and use Request for Repair Authorization Number for your e-mail subject header. You should include your Repair
Authorization Number in all subsequent communications about your unit.
Page 10

For IN-WARRANTY service, complete the following steps:
• Obtain a Repair Authorization Number from Techsonic Industries Customer Resource Center.
• Tag product with your customer name, street address, phone number and your assigned Repair Authorization
Number.
• Include a brief written description of the problem.
• Include a copy of your receipt (to show proof and date of purchase).
• Return product freight prepaid to Techsonic Industries, Inc., using an insured carrier with delivery confirmation.
For OUT-OF-WARRANTY service, complete the following steps:
• Obtain a Repair Authorization Number from Techsonic Industries Customer Resource Center.
• Include payment in the form of credit card number and expiration date, money order or personal check. Please do
not send cash.
• Tag product with your customer name, street address, phone number and your assigned Repair Authorization
Number.
• Include a brief written description of the problem.
• Return product freight prepaid to Techsonic Industries, Inc., using an insured carrier with delivery confirmation.
Techsonic Industries
This device complies with Part 15 of the FCC Rules. Operation is subject to the
following two conditions:
(1) This device may not cause harmful interference and;
(2) This device must accept any interference received, including interference
that may cause undesired operation.
Caution: Changes or modifications not expressly approved by Techsonic
Industries could void the users authority to operate the device.
FCC ID: ICLSMC1
Page 11

Contact Humminbird
Your Humminbird accessory is designed for trouble-free operation
and is backed by a six-month warranty.
If you have any questions, contact our
Humminbird Customer Resource Center:
By Telephone
(Monday - Friday : a.m. to : p.m. Central Standard Time):
334-687-0503
By e-mail
(typically we respond to your e-mail within three business days):
custserv@techsonic.com
For direct shipping, our address is:
Techsonic Industries, Inc.
Service Department
108 Maple Lane
Eufaula, AL 36027 USA
SPECIFICATIONS
Rod Mounted Display Specifications:
Power Requirement ..............................................................One 2450 CR Battery
Display Matrix..................................................................................48 X 32 Pixels
Display Type
........................................................................................ STN
RSS Specifications:
Power Requirement ................................One non-replaceable Lithium RSS Battery
Battery Expected Life..................................................................................3 years
(approximately 400 hours of in-water use)
Depth Capability .................................................... 2 - 100 feet (0.6 - 30 meters)
Sonar Coverage ............................................................................ 90° @-10 dB*
Sonar Operating Frequency .................................................................... 120 kHz
Operational Radio Frequency .............................................................. 916.5 mHz
(433.92 mHz International)
Operational Range ................................................................ 100 feet (30 meters)
* Area of bottom coverage equals twice the current depth.
Page 12

Merci !
Merci d'avoir choisi Humminbird®, le chef de file dans le secteur des sondeurs de poissons aux États-Unis. Humminbird
®
a bâti sa réputation en créant et en fabriquant des équipements marins de haute qualité et très fiables. Votre appareil
Humminbird®a été conçu pour pouvoir être utilisé sans problèmes, quelles que soient les conditions, même dans les
milieux marins les plus hostiles. Dans l'éventualité peu probable où votre appareil Humminbird
®
aurait besoin de réparations, nous offrons une politique de service après-vente exclusive - gratuite pendant la première année, et disponible à
un taux raisonnable après la période initiale d'un an. Vous trouverez des détails complets sur cette garantie à la fin de ce
guide. Nous vous invitons à lire attentivement ce guide d'utilisation afin de profiter pleinement de toutes les fonctions et
applications de votre produit Humminbird
®
.
Le produit RF20 SmartCast devrait contenir :
• Un capteur sonar à distance (Remote Sonar Sensor - RSS™) - Canal A
• Un écran à monter sur canne à pêche muni d'une pile 2450 CR
• Une pile 2450CR supplémentaire
• Trois manchons de montage distincts : A, B et C
• Le présent guide d'utilisation du RF20 SmartCast.
S'il vous manque l'un de ces composants, veuillez communiquer avec notre Centre de ressources pour la clientèle au 1334-687-0503 ou visitez notre site Web au www.humminbird.com.
REMARQUE : Il existe également une version internationale conforme CE du RF20.
AVERTISSEMENT ! La réparation et/ou le démontage de cet appareil électronique doit être effectué uniquement par un personnel
d'entretien autorisé. Toute modification du numéro de série et/ou réparation par un personnel non autorisé entraînera l'annulation de la
garantie. La manipulation et/ou le démontage de cet appareil pourrait entraîner une exposition au plomb sous forme de soudure.
AVERTISSEMENT ! Ce produit contient du plomb, un produit chimique reconnu par l'état de la Californie comme pouvant causer le cancer,
des défauts de naissance et d'autres toxicités reproductives.
AVERTISSEMENT ! Ne manipulez pas le dessous du capteur sonar à distance (RSS) en cours de fonctionnement, car ceci pourrait causer
un inconfort physique et une irritation du tissu cellulaire. Tenez le RSS par le socle d'antenne quand il a été dans l'eau.
AVERTISSEMENT ! L'utilisation du RSS (Remote Sonar Sensor) ne convient pas à des enfants de moins de 6 ans sans la surveillance d'un
adulte car le système peut représenter des risques d'électrocution pour les jeunes enfants.
Utilisation du SmartCast
Premier détecteur de poissons sans fil de sa catégorie, le SmartCast est d'une extrême
simplicité d'utilisation. Fixez simplement l'écran à votre canne à pêche, puis le RSS à
l'extrémité de votre ligne et lancez-le dans l'eau comme un flotteur ou un leurre classique.
Mettez ensuite sous tension le SmartCast RF20 et vous êtes prêt à pêcher. Le système
SmartCast utilise la technologie sonar pour transmettre dans l'eau les ondes sonores
issues du RSS. Les échos renvoyés atteignent le RF20 par technologie sans fil et sont
tracés sur l'écran. Les nouvelles informations s'affichent sur la droite. A mesure que ces
informations se déplacent vers la gauche, une image très précise du monde subaquatique
se dessine, montrant les objets subaquatiques comme le fond, les poissons et les structures, ainsi que la profondeur.
Pour analyser une zone,
lancez puis moulinez lentement et à vitesse constante,
en orientant la canne vers le
haut.
Page 13

REMARQUE : L'écran LCD du RF20 est conçu pour être utilisé avec des lunettes de soleil polarisantes seulement lorsque l'utilisateur regarde
directement l'écran. L'affichage peut être peu lisible obliquement avec des lunettes de soleil polarisantes.
AVERTISSEMENT ! Les composants électroniques du RSS sont faits pour supporter une utilisation dans l'eau. Du fait que des chocs liés
à un contact brusque avec des pierres peuvent endommager votre capteur sonar à distance, nous vous recommandons d'utiliser celui-ci
dans une eau dont la profondeur atteint au moins 30 cm.
Modes de fonctionnement
Vous pouvez utiliser le RSS de deux manières :
Relevé sonar : Le RSS peut servir à créer un relevé sonar du fond. Lancez le RSS à l'eau, plus loin que la zone d'intérêt,
puis ramenez-le à une vitesse lente et régulière. L'écran vous fournira des renseignements précis sur le profil du fond, la
profondeur et la structure sous le RSS. Les poissons et les poissons appâts s'affichent lorsqu'ils sont détectés.
Flotteur fixe : Vous pouvez utiliser le RSS comme un flotteur fixe pour observer la zone au-dessous, pour savoir en temps
réel quand le poisson s'approche de l'appât.
Mise en service de la pile de l'écran à monter sur
canne à pêche
La première fois que vous utiliserez l'écran à monter sur canne à pêche
RF20 SmartCast, vous devrez activer sa pile. Utilisez une pièce de
monnaie pour retirer le couvercle de la pile à l'arrière de l'équipement,
puis retirez la languette de plastique présente dans le logement de la
pile. Avant de remettre en place le couvercle de la pile, vérifiez que le joint est correctement positionné dans les rainures
du logement de pile et sans aucune poussière pour garantir l'étanchéité.
REMARQUE : Remplacez la pile de l'écran à monter sur canne à pêche exclusivement par une pile 2450 CR. Ces piles sont disponibles
chez la plupart des détaillants de produits électroniques.
REMARQUE : Dans des conditions d'utilisation normales, la pile de l'écran est prévue pour assurer jusqu'à 40 heures de fonctionnement.
L'utilisation par temps froid réduira sensiblement la durée de vie de la pile.
Montage de l'écran sur la canne à pêche
1. Déterminez lequel des trois manchons s'adapte le mieux à votre
canne. Chaque manchon convient à une variété de grosseurs de
canne à pêche, mais le manchon A est celui qui convient le mieux à
une canne d'un diamètre de 13 mm (
¹₂
po), le manchon B à un
diamètre de 11 mm (
⁷₁₆
po) et le manchon C à un diamètre de 9,5
mm (
³₈
po).
2. Lorsque vous aurez choisi un manchon précis, fixez-le à l'écran, posez ensuite l'ensemble sur la canne à pêche,
puis serrez les courroies. Assurez-vous que la lettre inscrite sur le manchon demeure visible lorsque l'ensemble
est monté à la canne, de façon à ce que l'écran et le manchon soit tous deux sur le dessus de la canne lorsque
vous pêchez.
Montage à
manchon
Assemblé
Écran à monter sur
canne à pêche
Page 14

REMARQUE : Vous devriez retirer le RF20 de votre canne et le ranger lorsque vous ne vous en servez pas. Voir la section traitant de
l'entretien pour obtenir des renseignements importants sur l'entreposage.
REMARQUE : Conservez les manchons inutilisés, au cas où vous décideriez de pêcher avec une canne d'un diamètre différent. Vous pouvez
également commander des manchons de rechange sur notre site Web www.humminbird.com, ou chez des magasins et détaillants
participants.
Fixation du RSS
Vous pouvez fixer la ligne qui vient de votre moulinet au trou avant du capteur RSS. Si vous souhaitez vous servir également du RSS comme d'un
flotteur classique, utilisez le second trou pour fixer l'hameçon avec un bas
de ligne plus fin. Une secousse suffira pour casser la ligne fine et vous
libérer si vous êtes accroché. Les techniques de flotteur coulissant sont
déconseillées car elles augmentent le risque de perdre le RSS. Si vous les
utilisez, prévoyez un fil plus fin après la butée inférieure, pour pouvoir
récupérer le RSS si le bas de ligne portant l'hameçon se casse.
MISE EN GARDE : Vous augmenterez le risque de casser la ligne si vous utilisez un fil plus fin sur le moulinet. Le RSS flotte (il porte son
propre poids plus 5,7 g [0,2 oz] pour l'appât et les plombs). Le RSS accepte au maximum une charge de 5,3 g à 5,8 g (0,19 oz à 0,20
oz) pour les accessoires, incluant le poids combiné d'un hameçon, d'une ligne, d'un plomb, d'un émerillon/agrafe et d'un appât fixés au RSS.
Le RSS lui-même pèse 30 grammes (1 once) et un bas de ligne fin risque de casser.
MISE EN GARDE : Rangez le RSS dans un conteneur sec, non métallique, par exemple une boîte à cuillers, dans un compartiment séparé
et isolé de tout autre objet métallique.
Alimentation du RSS
Le RSS contient une pile au lithium indépendante, non remplaçable, dont la durée de vie hors utilisation est de trois ans
et l'autonomie dans l'eau de 400 heures environ. Débarrassez-vous du RSS usagé conformément aux réglementations
locales, comme pour tout autre composant électronique ou pile.
Le capteur sonar à distance (RSS) activera automatiquement son émetteur-récepteur lorsqu'il sera immergé dans l'eau.
Une fois dans l'eau, le RSS commencera à transmettre vers l'écran les données sonar par signal radio. Le RSS s'arrête
automatiquement quelques secondes après avoir été retiré de l'eau.
AVERTISSEMENT ! Ne placez jamais le RSS dans un endroit humide quand vous ne l'utilisez pas : vous risqueriez de le mettre en marche
et de diminuer sa durée de vie. Rangez le RSS dans un endroit sec quand vous ne l'utilisez pas pour préserver son autonomie. Ne placez
jamais le RSS dans un endroit humide d'un bateau ou sur une surface métallique qui risquerait de le mettre sous tension accidentellement.
REMARQUE : Si vous utilisez le RSS dans de l'eau salée, rincez-le à l'eau douce avant de le ranger.
Utilisez une ligne résistante
ainsi que vos nœuds et accessoires standard, comme un
émerillon.
Tenez le RSS par le socle d'antenne quand il a
été dans l'eau.
Le second trou permet d'utiliser le RSS comme flotteur. Fixez à ce trou un bas de
ligne plus fin. Ne surchargez pas le bas de ligne, car vous risquez de submerger le
RSS et de provoquer une perte du signal.
Page 15

Représentations à l'écran
Le SmartCast affiche les informations subaquatiques reçues par le sonar, dans un format
simple à comprendre. Le haut de l'affichage correspond à la surface de l'eau et la partie
inférieure à l'échelle de profondeur sélectionnée (voir Echelle de profondeur). L'affichage
varie quand la zone située sous le RSS change.
Les conditions subaquatiques varient considérablement, et il faut une certaine expérience
et une interprétation pour comprendre tous les avantages du SmartCast - Utilisez l'image
comme guide des conditions les plus courantes et exercez-vous à utiliser le SmartCast
avec des types de fond connus.
Mise en marche et arrêt de l'écran
Pour allumer l'écran, tenez enfoncé le bouton Mise en marche/Menu jusqu'à ce que vous entendiez un bip, puis relâchez
le bouton. Pour fermer l'écran, enfoncez et tenez enfoncé la touche Mise en marche/Menu (POWER-MENU) jusqu'à ce
qu'il s'éteigne, puis relâchez la touche.
MISE EN GARDE ! L'affichage NE possède PAS de fonction d'arrêt automatique. Il continue à consommer du courant jusqu'à ce que vous
l'arrêtiez manuellement en appuyant sur le bouton Mise en marche/Menu.
Démarrage en mode Pêche
Après avoir mis l'écran sous tension en appuyant sur le bouton Mise en marche/Menu
(POWER-MENU), vous apercevrez l'écran de démarrage. Cet écran disparaît automatiquement au bout de deux secondes, sans intervention de votre part. En mode Pêche, l'appareil
affiche soit les données sonar, soit l'écran RF20 SmartCast pour indiquer qu'aucune donnée
sonar n'est disponible.
Après avoir mis en marche l'appareil et lancé le RSS dans l'eau, les données de sonar renvoyées commencent à s'afficher sur l'écran LCD. Une ligne verticale apparaît d'abord, suivie
par la représentation du fond et des zones de pêche possibles si des poissons sont détectés.
Profondeur
actuelle
Fond
Icône de
poisson
Échelle de
profondeur
Page 16

Démarrage en mode Simulateur
Pour entrer en mode Simulateur, appuyez d'abord sur la touche Mise en marche/Menu
(POWER-MENU) pour allumer le RF20, et quand vous apercevrez l'écran de démarrage,
appuyez rapidement sur la touche de déplacement du curseur de DROITE. Dans ce mode,
l'écran affiche le mot Simulation (Simulate) et commence à afficher les données simulées au
bout de deux secondes. Pour quitter le mode Simulateur, éteignez l'appareil.
Fonctions de menu
Un système de menus très simple permet d'accéder aux réglages de l'affichage du SmartCast. Pour activer le système de
menus, appuyez sur le bouton Mise en marche/Menu; la première fois que vous appuyez sur ce bouton après la mise sous
tension, le menu Sensibilité (SENSITIVITY) apparaît. Une fois le RF20 sous tension, une pression sur le bouton Mise en
marche/Menu affiche le dernier menu visualisé. Appuyez sur la touche Mise en marche/Menu à plusieurs reprises pour
accéder, l'une après l'autre, à chacune des options de menu du SmartCast. Lorsqu'une option de menu est affichée,
utilisez les touches de déplacement de curseur DROITE et GAUCHE pour ajuster les réglages de menu. Les menus disparaissent automatiquement de l'écran au bout de quelques secondes.
REMARQUE : Les réglages de menu ne sont pas mémorisés. Tous les réglages par défaut sont restaurés à l'arrêt du système SmartCast.
Sensibilité
Appuyez sur la touche Mise en marche/Menu (POWER-MENU) jusqu'à ce que le menu Sensibilité (SENSITIVITY) s'affiche. Sélectionnez un nombre plus élevé pour afficher des retours sonar plus faibles ou sélectionnez un nombre inférieur
pour éliminer les interférences de l'écran. Le réglage de sensibilité influe également sur la façon d'identifier les retours
sonar comme des symboles de poisson - l'appareil détectera plus de poissons si la sensibilité est réglée à 5, et moins si
elle est réglée à 1. (1, 2, 3, 4, 5, valeur implicite = 3)
Échelle de profondeur
Appuyez sur la touche Mise en marche/Menu (POWER-MENU) jusqu'à ce que le menu Échelle de profondeur (DEPTH
RANGE) s'affiche. Le mode automatique est réglé par défaut. En mode automatique, la limite inférieure de l'échelle de profondeur est réglée par l'appareil de façon à suivre le fond. Le fait de sélectionner manuellement une échelle de profondeur
fixe cette échelle. (autom. [Auto], 3, 5, 6, 9, 18 ou 30 m [10, 15, 20, 30, 60 ou 100 pi], valeur implicite = autom. [Auto])
REMARQUE : En fonctionnement manuel, si la profondeur de l'eau est supérieure au réglage d'échelle de profondeur, le fond n'est pas
visible à l'écran. Sélectionnez AUTO pour revenir au fonctionnement automatique.
Page 17

Les changements d'échelle de profondeur ou la perte de signal engendrent des lignes avec des
détails manquants et/ou des changements brutaux du fond dans la représentation graphique.
Lorsque l'échelle de profondeur est réglée sur AUTO, la profondeur est définie pour maintenir le
fond dans le tiers inférieur de l'écran. Le saut d'image affiché ici est dû à un changement
automatique de la profondeur. Les nouveaux retours représentés graphiquement avec une
échelle différente ne correspondront pas aux données historiques déjà tracées à une échelle
supérieure ou inférieure. Des lignes verticales peuvent également apparaître lorsque le signal
radio du RSS est perdu, puis rétabli dans une eau agitée.
Alarme de poisson
Appuyez sur la touche Mise en marche/Menu (POWER-MENU) jusqu'à ce que le menu Alarme d'identification de poisson (FISH ALARM) s'affiche. Sélectionnez DÉSACTIVÉE (OFF) ou ACTIVÉE (ON) pour l'alarme de poisson.
L'identification du poisson doit être définie sur ACTIVÉE (ON) pour que l'alarme de poisson fonctionne. (Activée, désactivée, valeur par défaut = désactivée)
Identification du poisson
Appuyez sur la touche Mise en marche/Menu (POWER-MENU) jusqu'à ce que le menu Identification
de poisson (FISH ID) s'affiche. Sélectionnez soit Désactivée (OFF) pour afficher les retours de sonar
bruts, soit Activée (ON) pour afficher les symboles de poisson. L'option d'identification des poissons
(Fish ID+) utilise des algorithmes de traitement avancés de signal afin d'interpréter les retours sonar et d'afficher une icône
de poisson lorsque des conditions très ciblées sont remplies. L'alarme de poisson ne sonne pas si l'identification du poisson est désactivée. (Activée, désactivée, valeur par défaut = désactivée)
Canal
Appuyez sur la touche Mise en marche/Menu (POWER-MENU) jusqu'à ce que le menu Canal (CHANNEL) s'affiche.
Sélectionnez A ou B selon votre système RSS. Voir Appareils RSS A et B. (A, B, valeur implicite = A)
Unités RSS canal A et B
Deux versions du RSS sont proposées chez les détaillants d'articles de pêche, les principaux magasins d'équipement de
plein air et sur le site www.humminbird.com :
L'appareil RSS Canal A est fourni de série avec le produit RF20. Vous pouvez également acheter un RSS canal A ou B
supplémentaire. Lorsque vous utilisez la version A ou B du RSS, sélectionnez le canal approprié dans le menu Canal
(Channel) de l'affichage. Ceci vous donne la souplesse d'utiliser un RSS différent de celui utilisé actuellement, au cas où
un autre pêcheur utiliserait un produit SmartCast en deçà de 30 m (100 pi) de votre écran à monter sur canne à pêche. Si
vous disposez d'un RSS à canal B, vous devrez régler le canal à B chaque fois que vous mettrez le RF20 sous tension.
Deux appareils RSS Canal A ou deux appareils RSS Canal B immergés dans un rayon de 30 m (100 pi) de l'affichage
provoquent des interférences RF qui empêchent le produit de fonctionner correctement, provoquant ainsi une fluctuation
des lectures de profondeur et des parasites à l'écran. Si vous utilisez un RSS Canal B et qu'un autre pêcheur utilise un
RSS Canal A ou inversement, les interférences seront réduites mais pas complètement éliminées.
Fish ID
Raw Sonar
Page 18

REMARQUE : Quel que soit le canal, les appareils RSS très proches les uns des autres ou d'autres appareils sonar (moins de 12 mètres)
risquent également de subir ou de provoquer des interférences de sonar, susceptibles d'aboutir à des lectures de profondeur incertaines.
Entretien
Votre système SmartCast est conçu pour fonctionner correctement pendant des années sans pratiquement aucun entretien. Suivez ces consignes simples pour que votre système SmartCast vous offre des performances optimales.
AVERTISSEMENT ! Ne laissez jamais le RF20 SmartCast dans une voiture ou un coffre : une température élevée peut endommager les
composants électroniques.
Entretien de l'écran à monter sur canne à pêche : Si l'écran à monter sur canne à pêche entre en contact avec des
embruns, essuyez les surfaces concernées avec un linge humecté d'eau douce. Lorsque vous nettoyez le verre protecteur
de l'affichage LCD, utilisez une peau de chamois et un détergent doux non abrasif. N'essuyez pas tant qu'il reste de la
poussière ou de la graisse sur le verre. Veillez à ne pas rayer le verre. N'utilisez pas de nettoyant chimique pour verre sur
l'écran, car cela risquerait de le fendre.
Ne laissez pas l'écran sur la canne à pêche pour le ranger, et ne le laissez pas exposé au soleil ni à des températures
extrêmes. Lorsque vous ne pêchez pas pendant de longues périodes, démontez l'ensemble de la canne à pêche et rangezle dans un endroit sec et frais comme votre coffre à pêche, à l'écart des températures extrêmes et des rayons ultraviolets.
Entretien du RSS : Après avoir utilisé le RSS dans l'eau salée, essuyez les surfaces touchées avec un linge humecté d'eau
douce. Les broches Wet Switch du RSS TM doivent être rincées à l'eau douce après voir été exposées à l'eau salée pour
éviter la corrosion.
Si le RSS reste hors de l'eau pendant une période prolongée, il peut falloir un certain temps pour l'humidifier une fois remis dans
l'eau. De petites bulles d'air peuvent se coller à la surface du RSS et gêner son fonctionnement. Essuyez la surface du RSS avec
un linge humide pour les retirer.
Dépannage
Ne tentez pas de réparer l'écran à monter sur canne à pêche RF20 ou le système RSS par vos propres moyens.
L'appareil ne contient aucune pièce réparable par l'utilisateur; par ailleurs, des outils et des techniques spécifiques sont
nécessaires pour garantir l'étanchéité des boîtiers. Toute réparation doit être effectuée exclusivement par un technicien
Humminbird agréé.
De nombreuses demandes de réparation reçues par Humminbird concernent des appareils qui ne nécessitent pas vraiment de réparation. Ces appareils sont renvoyés " sans problème détecté ". Si vous rencontrez un problème avec votre
produit SmartCast, utilisez le guide de dépannage suivant avant de contacter le Centre de ressources clientèle ou d'envoyer l'appareil en réparation.
Si la performance du sonar s'affaiblit (c'est-à-dire, s'il y a des trous dans la lecture du fond ou
des lectures de profondeur de " 0 ") le dessous du RSS a besoin d'être nettoyé avec une ou deux
gouttes d'une solution de 5 à 10 pour cent de détergent liquide pour vaisselle et d'eau. Utilisez
environ une cuillerée à table (15 millilitres) de détergent et 237 millilitres (8 onces) d'eau pour
enlever les huiles de la surface du RSS et ensuite essuyez avec un tissu humide.
Page 19

1. Le SmartCast perd le signal.
Si vous ne parvenez pas à obtenir un signal radio du RSS avec le SmartCast, l'affichage
cessera de se mettre à jour (l'écran se figera) et l'écran du RF20 SmartCast s'affichera après
plusieurs secondes. Chaque fois que la réception s'interrompt ou que le RSS est sorti de l'eau
pendant plus de quelques secondes, l'écran du RF20 SmartCast s'affiche jusqu'à ce que le
RSS soit remis à l'eau et la réception rétablie.
• Le système SmartCast est un produit sans fil à visibilité directe. Si le RSS et l'écran à monter sur canne à pêche sont
séparés par des objets, vous risquez de perdre la réception.
• L'échelle de profondeur du RF20 va de 0,6 m à 30 m (2 pi à 100 pi). Des lectures irrégulières peuvent se produire
si la profondeur est inférieure à 60 cm (2 pieds). En outre, de par la nature du sonar, ce produit n'est pas prévu pour
être utilisé en piscine ou dans de petites étendues d'eau fermées.
• Le fait de ramener le RSS trop vite peut entraîner la perte du signal et un écran figé.
• Vérifiez l'équilibre de flottaison entre le RSS et votre équipement de pêche; un poids supérieur à 5,7 grammes (0,2
onces) provoquera la submersion du RSS et la perte du signal.
• Le RF20 pourrait ne pas atteindre sa portée maximale de 30 m (100 pi) si l'eau est agitée. Les vagues et les clapotis réduisent substantiellement la portée des émissions radioélectriques.
REMARQUE : Une récupération trop rapide du RSS ou les oscillations répétées d'une eau agitée, peuvent entraîner la perte ou la distorsion
de l'image du fond. Pour obtenir une vue optimale du fond, rembobinez le fil régulièrement et lentement, à vitesse constante, avec l'extrémité
de la canne dirigé vers le haut (si vous dirigez la canne vers le bas ou utilisez une ligne lourde, vous risquez de submerger le RSS et de
perdre momentanément le contact radio). La portée du RSS est de 30 m (100 pi) au maximum. Si l'appareil est lancé ou dérive à plus de
30 m (100 pi) du récepteur, le signal peut devenir irrégulier ou s'interrompre.
2. Il ne se passe rien quand je mets l'écran à monter sur canne à pêche sous tension.
Vérifiez la position de la pile et la fermeture de son couvercle. Vérifiez également que vous avez retiré la languette de
plastique située dans le logement de la pile initialement.
Si cela ne résout pas le problème, remplacez la pile. Après avoir remplacé la pile, si l'appareil ne s'allume toujours pas,
retirez de nouveau le couvercle de la pile et remettez la pile en place.
3. Quand la profondeur est très faible, j'obtiens des trous dans la lecture du fond et des indications de profondeur incohérentes.
Le SmartCast est fiable lorsque l'eau est d'une profondeur de 60 cm (2 pi) ou plus. La profondeur est mesurée à partir du RSS.
4. L'écran commence à faiblir. Les images ne sont pas aussi nettes que d'habitude.
Vérifiez la position de la pile et la fermeture de son couvercle. Vérifiez également que vous avez retiré la languette de
plastique située dans le logement de la pile initialement.
Si cela ne résout pas le problème, remplacez la pile. Après avoir remplacé la pile, si l'appareil ne s'allume toujours pas,
retirez de nouveau le couvercle de la pile et remettez la pile en place.
Page 20

5. L'affichage montre de nombreux points noirs aux réglages de sensibilité élevés.
Vous obtenez du " bruit " ou des interférences causés par l'une de plusieurs sources. Les parasites peuvent être provoqués par d'autres appareils électroniques. Éteignez tout appareil électronique proche et vérifiez si le problème disparaît.
D'autres appareils sonar ou électroniques fonctionnant dans la gamme de fréquences de 900 MHz (400 MHz pour les versions internationales) risquent de provoquer des interférences avec le SmartCast.
6. L'affichage montre des lectures de profondeur fluctuantes et un encombrement excessif, notamment des barres verticales sur les icônes de poisson.
Le système SmartCast possède la capacité de recevoir des signaux séparés d'un RSS Canal A ou Canal B. Deux appareils
RSS de type A ou B utilisés simultanément ou un RSS de type A et un RSS de type B utilisés simultanément, peuvent
provoquer entre eux des interférences de RF.
7. L'écran saute et la partie inférieure change brusquement; il manque parfois une ligne verticale ou une ligne
noire apparaît de haut en bas.
Ce saut d'image est dû à un changement automatique de la profondeur. Les nouveaux retours représentés graphiquement
avec une échelle différente ne correspondront pas aux données historiques déjà tracées à une échelle supérieure ou
inférieure. Des lignes verticales peuvent également apparaître lorsque le signal radio du RSS est perdu, puis rétabli dans
une eau agitée.
Techsonic Industries - Garantie limitée de 6 mois
Nous garantissons à l'acheteur au détail initial que les produits fabriqués par Techsonic Industries sont exempts de
défauts de matière et de fabrication. Cette garantie est en vigueur pour une durée de 6 mois à partir de la date de l'achat
initial. Les produits de Techsonic Industries qui sont effectivement défectueux et couverts par cette garantie seront remplacés ou réparés sans frais, à la discrétion de Techsonic Industries, et renvoyés au client, fret payé à l'avance. La seule
responsabilité de Techsonic Industries relativement à cette garantie se limite à réparer ou à remplacer un produit jugé
défectueux par Techsonic Industries. Techsonic Industries n'est pas responsable des frais liés à la désinstallation d'un tel
produit ni à la réinstallation de la pièce remplacée ou réparée.
Cette garantie ne couvre pas un produit qui a été :
• mal installé;
• installé d'une façon autre que celle recommandée dans la notice d'installation ou le mode d'emploi du produit;
• endommagé ou qui a cessé de fonctionner par suite d'un accident ou d'une utilisation anormale;
• réparé ou modifié par une entité autre que Techsonic Industries.
Veuillez conserver le reçu de caisse original comme preuve de la date d'achat. Il vous sera demandé pour toute réparation effectuée sous garantie.
CETTE GARANTIE REMPLACE EXPRESSÉMENT TOUTE AUTRE GARANTIE, OBLIGATION OU RESPONSABILITÉ DE LA
PART DE TECHSONIC INDUSTRIES, ET CONSTITUE LE SEUL RECOURS DU CLIENT, EXCEPTION FAITE DE TOUTE
GARANTIE APPLICABLE IMPLICITE EN VERTU D'UNE LOI PROVINCIALE (D'ÉTAT), LIMITÉE PAR LA PRÉSENTE À UNE
DURÉE DE SIX MOIS À PARTIR DE LA DATE D'ACHAT INITIALE. TECHSONIC INDUSTRIES NE POURRA EN AUCUN CAS
ÊTRE TENUE RESPONSABLE DE TOUT DOMMAGE ACCESSOIRE OU CONSÉCUTIF À L'INOBSERVATION D'UNE
GARANTIE EXPRESSE OU IMPLICITE RELATIVE AUX PRODUITS.
Page 21

Certains états n'autorisant pas de limitation sur une garantie implicite, ni l'exclusion de dommages accessoires ou consécutifs, les exclusions ci-dessus peuvent ne pas vous concerner. Vous pourriez également bénéficier d'autres droits, qui
varient d'une province (d'un État) à une (un) autre.
Achats internationaux
Une garantie distincte est fournie par les distributeurs internationaux pour les appareils achetés en dehors des États-Unis.
Cette garantie est incluse par votre distributeur local et celui-ci gère la maintenance locale de votre appareil. Les garanties
ne sont valables que dans la région de distribution prévue. Les appareils achetés aux États-Unis ou au Canada doivent
être retournés à notre usine aux États-Unis pour toute question d'entretien et de réparation.
Politique de service après-vente de Techsonic Industries
Même si vous n'aurez probablement jamais à utiliser notre incroyable politique de service après-vente, il est plaisant de
savoir que nous soutenons nos produits avec tant de confiance. Nous agissons ainsi parce que nous croyons que vous
méritez ce qu'il y a de mieux. Nous ferons tout en notre pouvoir pour réparer votre appareil en deçà de trois jours
ouvrables, à partir de la date de réception de l'appareil à notre usine. Ce délai ne comprend pas la durée du transport
jusqu'à notre usine, ni de notre usine jusqu'à vous. Les appareils reçus le vendredi sont habituellement retournés le mercredi suivant, les appareils reçus le lundi sont habituellement retournés le jeudi, et ainsi de suite.
Toutes les réparations sont effectuées en accord avec les spécifications rigoureuses de l'usine, par des techniciens formés en usine. Les appareils réparés en usine sont testés de la même façon et subissent les mêmes contrôles de qualité
que les nouvelles unités en production.
À la fin de la période de garantie initiale, une évaluation des frais de service à tarif fixe régulier sera effectuée pour chaque appareil
en réparation (dommages physiques et pièces manquantes non compris). Toute réparation effectuée après la période de garantie
initiale est garantie pendant 90 jours à partir de la date de la réparation par notre technicien en usine. Vous pouvez communiquer
avec notre Centre de ressources pour la clientèle ou visiter notre site Web pour vérifier les frais de service à tarif fixe pour votre
produit (voir la section de soutien technique sur les produits) :
http://www.humminbird.com
Nous nous réservons le droit de considérer un produit irréparable si les pièces de rechange sont discontinuées ou impossibles à
obtenir. La politique de service après-vente n'est valide qu'aux États-Unis. Elle ne s'applique qu'aux produits Humminbird
retournés à notre usine située à Eufaula, Alabama. La politique de service après-vente est modifiable sans préavis.
Comment retourner votre appareil pour réparation
Avant de retourner votre appareil pour réparation, veuillez communiquer avec l'usine, soit par téléphone ou par courrier
électronique, afin d'obtenir un numéro d'autorisation de réparation pour votre appareil. Assurez-vous d'avoir le nom de
modèle et le numéro de série de votre produit avant d'appeler l'usine. Si vous communiquez avec l'usine par courrier électronique, veuillez inclure le nom de modèle et le numéro de série de votre produit dans le message et inscrire " Demande
de numéro d'autorisation de réparation " dans le sujet du courriel. Par la suite, vous devriez toujours vous référer à ce
numéro d'autorisation de réparation lors de communications subséquentes au sujet de votre appareil.
Page 22

Veuillez suivre les étapes suivantes pour les réparations à effectuer SOUS GARANTIE :
• Obtenir un numéro d'autorisation de réparation du Centre de ressources à la clientèle de Techsonic Industries.
• Étiqueter le produit du nom, de l'adresse et du téléphone du client, ainsi que du numéro d'autorisation de réparation.
• Décrire brièvement le problème.
• Joindre une copie du reçu (comme preuve d'achat et de date d'achat).
• Retourner le produit, fret payé à l'avance, à Techsonic Industries, Inc. Assurer l'expédition et demander une preuve
de livraison.
Veuillez suivre les étapes suivantes pour les réparations d'appareils N'ÉTANT PLUS SOUS GARANTIE :
• Obtenir un numéro d'autorisation de réparation du Centre de ressources à la clientèle de Techsonic Industries.
• Joindre le paiement, soit en incluant un numéro de carte de crédit avec date d'expiration, soit en joignant un mandat postal ou bancaire, ou un chèque personnel. Ne pas envoyer d'argent comptant.
• Étiqueter le produit du nom, de l'adresse et du téléphone du client, ainsi que du numéro d'autorisation de réparation.
• Décrire brièvement le problème.
• Retourner le produit, fret payé à l'avance, à Techsonic Industries, Inc. Assurer l'expédition et demander une preuve
de livraison.
Techsonic Industries
Cet appareil est conforme à la Section 15 des Normes FCC. Son utilisation est
soumise aux deux conditions suivantes :
(1) Cet appareil ne peut pas provoquer d'interférences dangereuses et;
(2) Cet appareil doit accepter toute interférence reçue, y compris les interférences
susceptibles de provoquer un fonctionnement non souhaité.
MISE EN GARDE :
Les modifications non expressément approuvées par
Techsonic Industries peuvent annuler l'autorisation de l'usager d'utiliser l'appareil.
ID FCC : ICLSMC1
Page 23

SPÉCIFICATIONS
Caractéristiques techniques de l'écran à monter sur canne à pêche :
Source d'alimentation .......................................................... Une pile 2450 CR
Matrice d'affichage.................................................................... 48 x 32 pixels
Type d'affichage ...................................................................................... STN
Caractéristiques techniques du RSS :
Source d'alimentation ................................Une pile au lithium non remplaçable
pour capteur sonar à distance
Durée de vie normale de la pile................................................................3 ans
(environ 400 heures d'utilisation dans l'eau)
Portée verticale .................................. 0,6 mètre à 30 mètres (2 à 100 pieds).
Couverture sonar .................................................................... 90 ° à -10 dB*
Fréquence de fonctionnement du sonar.............................................. 120 KHz
Radiofréquence de fonctionnement ................................................ 916,5 MHz
(433,92 MHz pour les modèles internationaux)
Plage de fonctionnement............................................................ 30 m (100 pi)
Communications avec Humminbird
Cet accessoire de Humminbird a été conçu dans le but d'offrir
un fonctionnement sans tracas; il est garanti pour une durée six
mois. Pour toute question, n'hésitez pas à communiquer avec le
Centre de ressources pour la clientèle Humminbird :
Par téléphone,
du lundi au vendredi, de h à h
(heure normale du Centre) :
334-687-0503
Par courrier électronique
(nous devrions normalement répondre à votre courriel
en deçà de trois jours ouvrables) :
custserv@techsonic.com
Adresse d'expédition directe :
Techsonic Industries, Inc.
Service Department
108 Maple Lane
Eufaula, AL 36027 USA
*La couverture de la zone du fond équivaut à deux fois la profondeur courante.
 Loading...