

Page 1

Page 2

Notice
Thank you for purchasing a HUMAX product. Please read this user’s manual carefully to be able to safely
install, use and maintain the product at maximum performance. Keep this user’s manual next to your
product for future reference. The information in this user’s manual is subject to change without notice.
Copyright (Copyright © 2008 HUMAX Corporation)
Not to be copied, used or translated in part or whole without HUMAX’s prior consent in writing except
approval of ownership of copyright and copyright law.
Warranty
The warranty does not cover parts which may become defective due to misuse of the information
contained in this manual.
Trademarks
• Irdeto is a trademark of Mindport BV.
• Nagravision is a registered trademark of KUDELSKI S.A.
• Conax is a trademark of Telenor Conax AS.
Warnings, Cautions and Notes
Throughout the whole manual, pay special attention to the following marks that indicate hazardous
situations.
• Warning
Indicates a hazardous situation which could result in serious injury.
• Caution
Indicates a situation which could damage the equipment or other apparatus.
• Note
Indicates additional information to make the user aware of possible problems and information of any
importance to help understand, use and maintain the installation.
GB1
User’s Manual
Page 3

Notice
Meaning of Symbols
To reduce the risk of electric shock, do not remove cover (or back). No user serviceable
parts inside. Refer servicing to quali ed service personnel.
This symbol indicates dangerous voltage inside the product that presents a risk of
electric shock or personal injury.
This symbol indicates important instructions accompanying the product.
Customer information
According to art. 13 of the Legislative Decree 25th July 2005, no. 15 „Application of
the Directives 2002/95/CE, 2002/96/CE and 2003/108/CE, regarding the reduction
of dangerous substances in electric and electronic products, as well as the waste
disposal“.
The symbol with the crossed refuse bin, present on the product, indicates that the product must be
collected separately from other refuse after his lifetime is expired.
This means that the customer must hand over the product at the end of the lifetime to an authorized
collection center for electronic and electro technical refuse. As an alternative the customer can hand over
the product to a dealer when he purchases an equivalent product, accordingly to the principle one in
return for one.
A professional di erentiated collection of no longer used products for recycling, utilization or disposal,
helps to reduce negative consequences for the environment and the health. In addition the utilization of
materials composing the product will be supported.
The illegal disposal of the product by the customer results in the application of the administrative nes
according to Legislative Decree no. 22/1997 (article 50 and followings of Legislative Decree no. 22/1997).
GB2
User’s Manual
Page 4

Safety Warning
This product has been manufactured to comply with international safety standards. Please read the
following safety precautions carefully.
Safety Instructions and Precautions
1. MAINS SUPPLY
90-250V a.c., 50/60Hz
• Operate this product only from the type of power supply indicated on the marking label.
If you are not sure of the type of power supplied to your home, consult your local power
company.
• Disconnect the product from the mains before you start any maintenance or installation
procedures.
2. OVERLOADING
• Do not overload a wall outlet, extension cord or adapter as this may result in electric re or
shock.
3. LIQUID
• The product should not be exposed to liquid of any kind. In addition, no objects lled with
liquid should be placed on the apparatus.
4. CLEANING
• Disconnect the product from the wall outlet before cleaning.
• Use a light damp cloth (no solvents) to dust the product.
5. VENTILATION
• The slots on top of the product must be left uncovered to allow proper air ow into the unit.
• Do not stand the product on soft furnishings or carpets.
• Do not stack electronic equipments on top of the product.
6. ATTACHMENTS
• Do not use any unsupported attachments as these may be hazardous or cause damage to
the product.
7. CONNECTION TO THE SATELLITE DISH LNB/AERIAL
• Disconnect the product from the mains before connecting or disconnecting the cable from
the satellite dish/aerial. Failure to do so can damage the LNB/aerial.
8. CONNECTION TO THE TV
• Disconnect the product from the mains before connecting or disconnecting the cable from
the TV. Failure to do so can damage the TV.
9. EARTHING
• The LNB cable must be earthed to the system earth for the satellite dish.
GB3
User’s Manual
Page 5

Safety Warning
10. LOCATION
• Place the product indoors to avoid exposing it to lightning, rain or sun.
• Do not place it near a radiator or heat register.
• Make sure it has more than 10 cm clearance from any appliances susceptible to
electromagnetic in uences, such as a TV or a VCR.
• Do not block the openings with any object, and do not place the product on a bed, sofa, rug,
or other similar surface.
• If you place the product on a rack or a bookcase, ensure that there is adequate ventilation
and that you have followed the manufacturer’s instructions for mounting.
• Do not place the product on an unstable cart, stand, tripod, bracket, or table where it can fall.
• A falling product can cause serious injury to a child or adult, and serious damage to the
appliance.
11. LIGHTNING, STORM OR NOT IN USE
• Unplug the product from the wall outlet and disconnect the antenna during a thunderstorm
or when left unattended and unused for long periods of time. This will prevent damage to
the unit due to lightning and power-surges.
12. EXTRANEOUS OBJECTS
• Do not insert anything through the openings in the unit, where they can touch dangerous
voltage points or damage parts.
13. REPLACEMENT OF PARTS
• When replacement of parts is required, be sure the service technician uses replacement parts
speci ed by the manufacturer or those that have the same characteristics as the original part.
Unauthorized substitution may result in additional damage to the unit.
GB4
User’s Manual
Page 6

Safety Warning
Warning
1. To avoid damage of the power cord or plug;
• Do not modify or process the power cord or plug arbitrarily.
• Do not bend or twist the power cord.
• Make sure to disconnect the power cord holding the plug.
• Keep heating appliances as far as possible from the power cord in order to prevent the
cover vinyl from melting.
• The mains plug, as a disconnection device, shall remain readily accessible by the user.
2. To avoid electrical shock;
• Do not open the main body.
• Do not insert metal or in ammable objects inside the product.
• Do not touch the power plug with wet hands.
• Disconnect the power cord in case of lightning.
3. To avoid damage of product;
• Do not use the product when it is out of order. If you continue to use the product when defective,
serious damage can be caused to it. Make sure to contact your local product distributor if the
product is out of order.
• Do not insert metal or alien substance into the slots for the modules or Smartcards.
It may cause damage to the product and reduce its life span.
GB5
User’s Manual
Page 7

Contents
1. Before Using the Product . . . . . . . . . . . . . . . . . . . . . . . . . . . . . . . . . . . . . . . . . .GB8
1.1 Package Contents . . . . . . . . . . . . . . . . . . . . . . . . . . . . . . . . . . . . . . . . . . . . . . . . . GB8
1.2 Front Panel . . . . . . . . . . . . . . . . . . . . . . . . . . . . . . . . . . . . . . . . . . . . . . . . . . . . . GB9
1.3 Conditional Access . . . . . . . . . . . . . . . . . . . . . . . . . . . . . . . . . . . . . . . . . . . . . . . GB10
1.4 Rear Panel . . . . . . . . . . . . . . . . . . . . . . . . . . . . . . . . . . . . . . . . . . . . . . . . . . . . . GB12
1.5 Remote Control . . . . . . . . . . . . . . . . . . . . . . . . . . . . . . . . . . . . . . . . . . . . . . . . . GB13
1.6 Remote Control Batteries . . . . . . . . . . . . . . . . . . . . . . . . . . . . . . . . . . . . . . . . . . . GB15
2. Setup . . . . . . . . . . . . . . . . . . . . . . . . . . . . . . . . . . . . . . . . . . . . . . . . . . . . . . . GB16
2.1 Connecting to the Antenna . . . . . . . . . . . . . . . . . . . . . . . . . . . . . . . . . . . . . . . . . . GB16
2.2 Connecting TV . . . . . . . . . . . . . . . . . . . . . . . . . . . . . . . . . . . . . . . . . . . . . . . . . . GB17
2.3 Connecting the TV and VCR. . . . . . . . . . . . . . . . . . . . . . . . . . . . . . . . . . . . . . . . . . GB20
2.4 Connecting the Audio System . . . . . . . . . . . . . . . . . . . . . . . . . . . . . . . . . . . . . . . . GB21
2.5 Connecting the Modem . . . . . . . . . . . . . . . . . . . . . . . . . . . . . . . . . . . . . . . . . . . . GB22
2.6 Powering On . . . . . . . . . . . . . . . . . . . . . . . . . . . . . . . . . . . . . . . . . . . . . . . . . . . GB23
3. Installation Wizard. . . . . . . . . . . . . . . . . . . . . . . . . . . . . . . . . . . . . . . . . . . . . . . . GB24
3.1 Language . . . . . . . . . . . . . . . . . . . . . . . . . . . . . . . . . . . . . . . . . . . . . . . . . . . . . GB24
3.2 Country . . . . . . . . . . . . . . . . . . . . . . . . . . . . . . . . . . . . . . . . . . . . . . . . . . . . . . GB24
3.3 Terrestrial Channel Search . . . . . . . . . . . . . . . . . . . . . . . . . . . . . . . . . . . . . . . . . . . GB25
3.4 Default Channel List . . . . . . . . . . . . . . . . . . . . . . . . . . . . . . . . . . . . . . . . . . . . . . GB25
3.5 Number of Satellite . . . . . . . . . . . . . . . . . . . . . . . . . . . . . . . . . . . . . . . . . . . . . . . GB25
3.6 Antenna Setting . . . . . . . . . . . . . . . . . . . . . . . . . . . . . . . . . . . . . . . . . . . . . . . . . GB26
3.7 Search Type . . . . . . . . . . . . . . . . . . . . . . . . . . . . . . . . . . . . . . . . . . . . . . . . . . . . GB26
3.8 Satellite Channel Search . . . . . . . . . . . . . . . . . . . . . . . . . . . . . . . . . . . . . . . . . . . . GB27
3.9 Time Setting . . . . . . . . . . . . . . . . . . . . . . . . . . . . . . . . . . . . . . . . . . . . . . . . . . . GB27
3.10 Result . . . . . . . . . . . . . . . . . . . . . . . . . . . . . . . . . . . . . . . . . . . . . . . . . . . . . . . GB27
3.11 Installation Checklist . . . . . . . . . . . . . . . . . . . . . . . . . . . . . . . . . . . . . . . . . . . . . GB28
4. Basic Operation. . . . . . . . . . . . . . . . . . . . . . . . . . . . . . . . . . . . . . . . . . . . . . . . . . GB29
4.1 Switching Channel . . . . . . . . . . . . . . . . . . . . . . . . . . . . . . . . . . . . . . . . . . . . . . . GB29
4.2 Volume Control . . . . . . . . . . . . . . . . . . . . . . . . . . . . . . . . . . . . . . . . . . . . . . . . . GB29
4.3 Audio/Subtitle/Teletext . . . . . . . . . . . . . . . . . . . . . . . . . . . . . . . . . . . . . . . . . . . . GB29
4.4 MHP Application. . . . . . . . . . . . . . . . . . . . . . . . . . . . . . . . . . . . . . . . . . . . . . . . . GB30
4.5 Option List. . . . . . . . . . . . . . . . . . . . . . . . . . . . . . . . . . . . . . . . . . . . . . . . . . . . . GB31
4.6 Programme Information . . . . . . . . . . . . . . . . . . . . . . . . . . . . . . . . . . . . . . . . . . . GB32
4.7 Channel List. . . . . . . . . . . . . . . . . . . . . . . . . . . . . . . . . . . . . . . . . . . . . . . . . . . . GB34
4.8 Guide . . . . . . . . . . . . . . . . . . . . . . . . . . . . . . . . . . . . . . . . . . . . . . . . . . . . . . . . GB35
4.9 MyEPG . . . . . . . . . . . . . . . . . . . . . . . . . . . . . . . . . . . . . . . . . . . . . . . . . . . . . . . GB37
4.10 MEDIASET Premium PPV (MEDIASET Smartcard Users Only) . . . . . . . . . . . . . . . . . . . . GB38
5. Preferences . . . . . . . . . . . . . . . . . . . . . . . . . . . . . . . . . . . . . . . . . . . . . . . . . . . . GB39
5.1 Parental Control . . . . . . . . . . . . . . . . . . . . . . . . . . . . . . . . . . . . . . . . . . . . . . . . . GB39
5.2 Language Setting . . . . . . . . . . . . . . . . . . . . . . . . . . . . . . . . . . . . . . . . . . . . . . . . GB40
5.3 Time Setting . . . . . . . . . . . . . . . . . . . . . . . . . . . . . . . . . . . . . . . . . . . . . . . . . . . GB41
5.4 Schedule. . . . . . . . . . . . . . . . . . . . . . . . . . . . . . . . . . . . . . . . . . . . . . . . . . . . . . GB42
GB6
User’s Manual
Page 8

Contents
5.5 A/V Control . . . . . . . . . . . . . . . . . . . . . . . . . . . . . . . . . . . . . . . . . . . . . . . . . . . . GB42
5.6 Miscellaneous Settings. . . . . . . . . . . . . . . . . . . . . . . . . . . . . . . . . . . . . . . . . . . . . GB44
5.7 MHP Settings . . . . . . . . . . . . . . . . . . . . . . . . . . . . . . . . . . . . . . . . . . . . . . . . . . . GB45
6. Edit Channels . . . . . . . . . . . . . . . . . . . . . . . . . . . . . . . . . . . . . . . . . . . . . . . . . . . GB46
6.1 Edit Terrestrial Channel Lists . . . . . . . . . . . . . . . . . . . . . . . . . . . . . . . . . . . . . . . . . GB46
6.2 Edit Satellite Channel Lists. . . . . . . . . . . . . . . . . . . . . . . . . . . . . . . . . . . . . . . . . . . GB47
6.3 Edit Favourite Channels . . . . . . . . . . . . . . . . . . . . . . . . . . . . . . . . . . . . . . . . . . . . GB47
6.4 Automatic Channel Numbering . . . . . . . . . . . . . . . . . . . . . . . . . . . . . . . . . . . . . . . GB48
6.5 Renew Channel Numbers . . . . . . . . . . . . . . . . . . . . . . . . . . . . . . . . . . . . . . . . . . . GB48
6.6 Import/Export Channels . . . . . . . . . . . . . . . . . . . . . . . . . . . . . . . . . . . . . . . . . . . . GB48
7. Installation. . . . . . . . . . . . . . . . . . . . . . . . . . . . . . . . . . . . . . . . . . . . . . . . . . . . . GB49
7.1 Terrestrial Channel Search . . . . . . . . . . . . . . . . . . . . . . . . . . . . . . . . . . . . . . . . . . . GB49
7.2 Satellite Channel Search . . . . . . . . . . . . . . . . . . . . . . . . . . . . . . . . . . . . . . . . . . . . GB51
7.3 Software Update. . . . . . . . . . . . . . . . . . . . . . . . . . . . . . . . . . . . . . . . . . . . . . . . . GB58
7.4 Regular Auto Update . . . . . . . . . . . . . . . . . . . . . . . . . . . . . . . . . . . . . . . . . . . . . . GB61
7.5 Default Setting . . . . . . . . . . . . . . . . . . . . . . . . . . . . . . . . . . . . . . . . . . . . . . . . . . GB62
8. System . . . . . . . . . . . . . . . . . . . . . . . . . . . . . . . . . . . . . . . . . . . . . . . . . . . . . . . GB63
8.1 Status. . . . . . . . . . . . . . . . . . . . . . . . . . . . . . . . . . . . . . . . . . . . . . . . . . . . . . . . GB63
8.2 Signal Detection . . . . . . . . . . . . . . . . . . . . . . . . . . . . . . . . . . . . . . . . . . . . . . . . . GB63
8.3 Common Interface . . . . . . . . . . . . . . . . . . . . . . . . . . . . . . . . . . . . . . . . . . . . . . . GB63
8.4 Modem Setup . . . . . . . . . . . . . . . . . . . . . . . . . . . . . . . . . . . . . . . . . . . . . . . . . . GB64
9. Pay per View services . . . . . . . . . . . . . . . . . . . . . . . . . . . . . . . . . . . . . . . . . . . . . . GB65
9.1 MEDIASET PREMIUM . . . . . . . . . . . . . . . . . . . . . . . . . . . . . . . . . . . . . . . . . . . . . . GB65
9.2 Irdeto/Conax Conditional Access . . . . . . . . . . . . . . . . . . . . . . . . . . . . . . . . . . . . . . GB65
9.3 PANGEA . . . . . . . . . . . . . . . . . . . . . . . . . . . . . . . . . . . . . . . . . . . . . . . . . . . . . . GB65
10. Appendix . . . . . . . . . . . . . . . . . . . . . . . . . . . . . . . . . . . . . . . . . . . . . . . . . . . . . GB66
10.1 Menu Map . . . . . . . . . . . . . . . . . . . . . . . . . . . . . . . . . . . . . . . . . . . . . . . . . . . . GB66
10.2 Universal Remote Control . . . . . . . . . . . . . . . . . . . . . . . . . . . . . . . . . . . . . . . . . . GB67
10.3 Multi Custom Code . . . . . . . . . . . . . . . . . . . . . . . . . . . . . . . . . . . . . . . . . . . . . . GB75
10.4 Trouble Shooting. . . . . . . . . . . . . . . . . . . . . . . . . . . . . . . . . . . . . . . . . . . . . . . . GB76
10.5 Error Message. . . . . . . . . . . . . . . . . . . . . . . . . . . . . . . . . . . . . . . . . . . . . . . . . . GB78
10.6 Speci cation . . . . . . . . . . . . . . . . . . . . . . . . . . . . . . . . . . . . . . . . . . . . . . . . . . GB80
10.7 Glossary . . . . . . . . . . . . . . . . . . . . . . . . . . . . . . . . . . . . . . . . . . . . . . . . . . . . . GB82
10.8 Service and Support. . . . . . . . . . . . . . . . . . . . . . . . . . . . . . . . . . . . . . . . . . . . . . GB84
GB7
User’s Manual
Page 9
1. Before Using the Product
This chapter provides detail instructions on the product and its accessories.
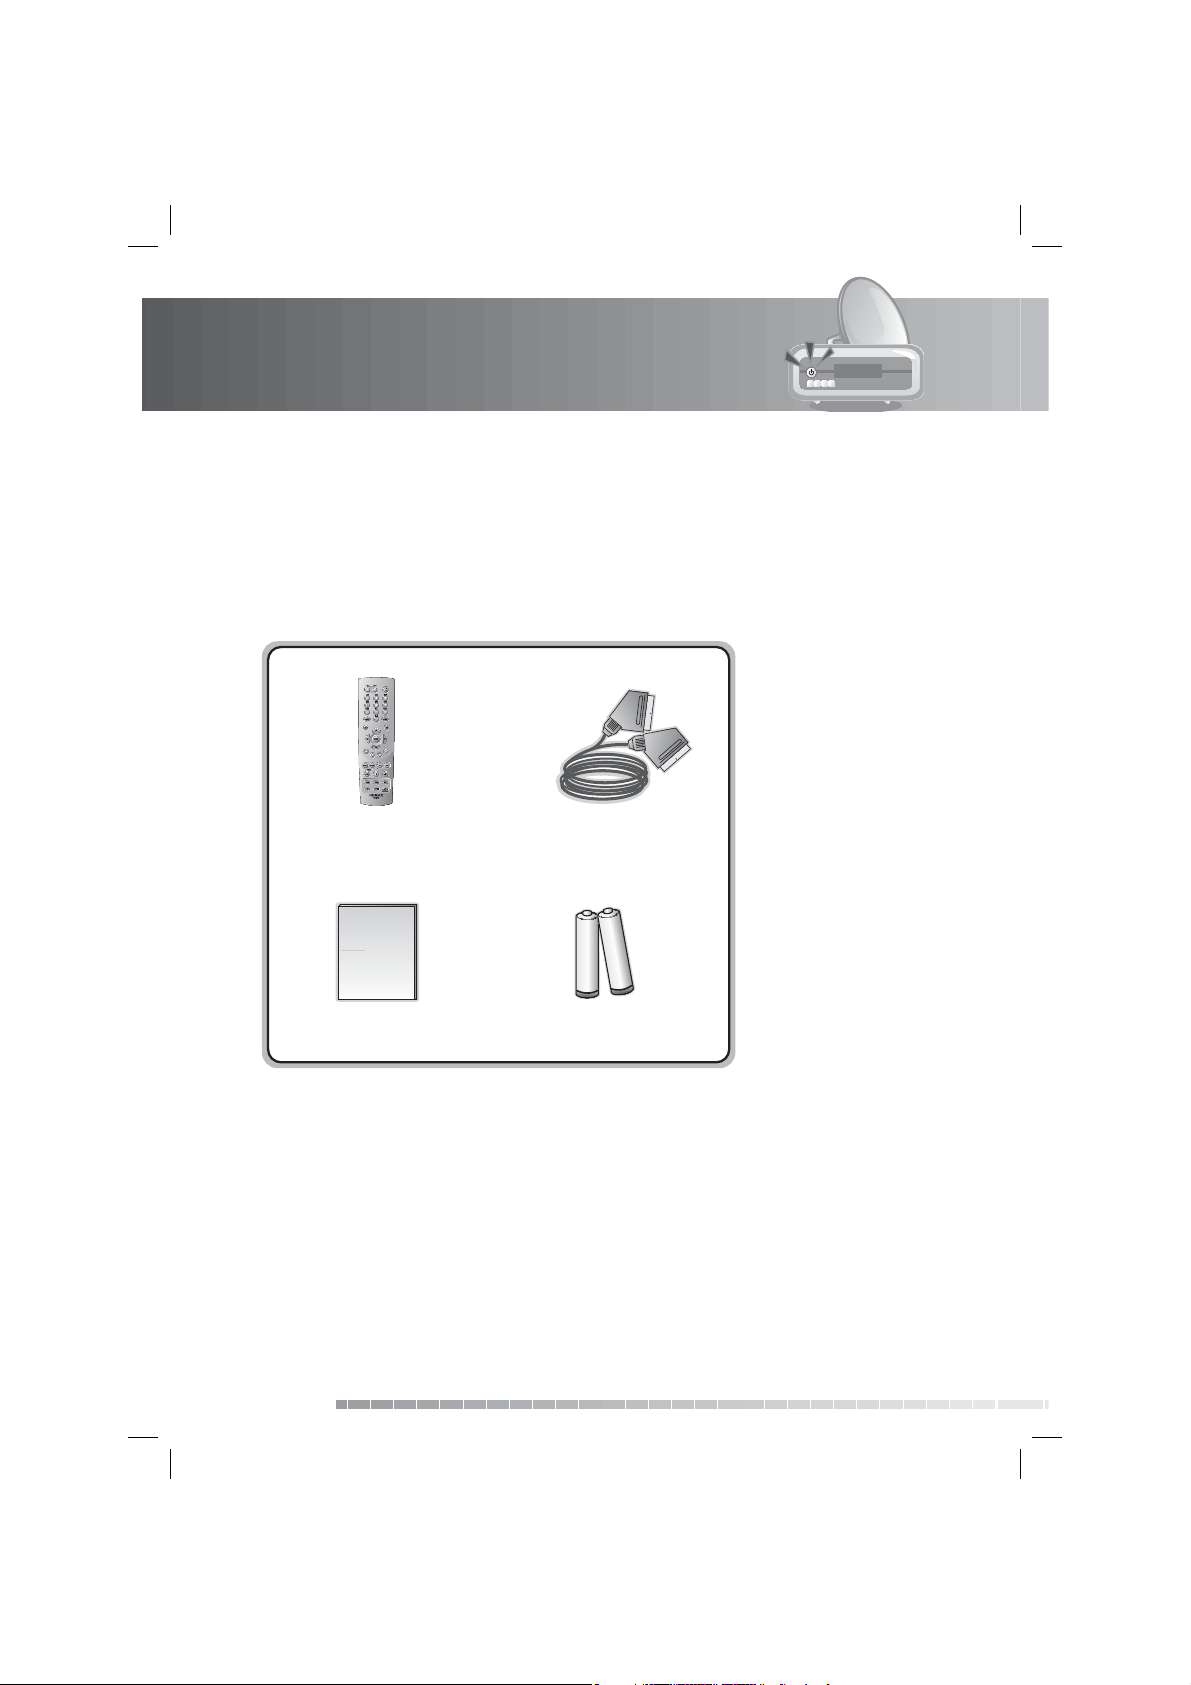
1.1 Package Contents
Please check all package contents before using your product.
Remote Control
User’s Manual
User’s Manual
Note:
• Faults may occur if the remote control is left without battery for a long time.
Always keep the battery inserted in the remote control.
• Package contents may vary according to area.
SCART Cable
Batteries
GB8
User’s Manual
Page 10
1. Before Using the Product
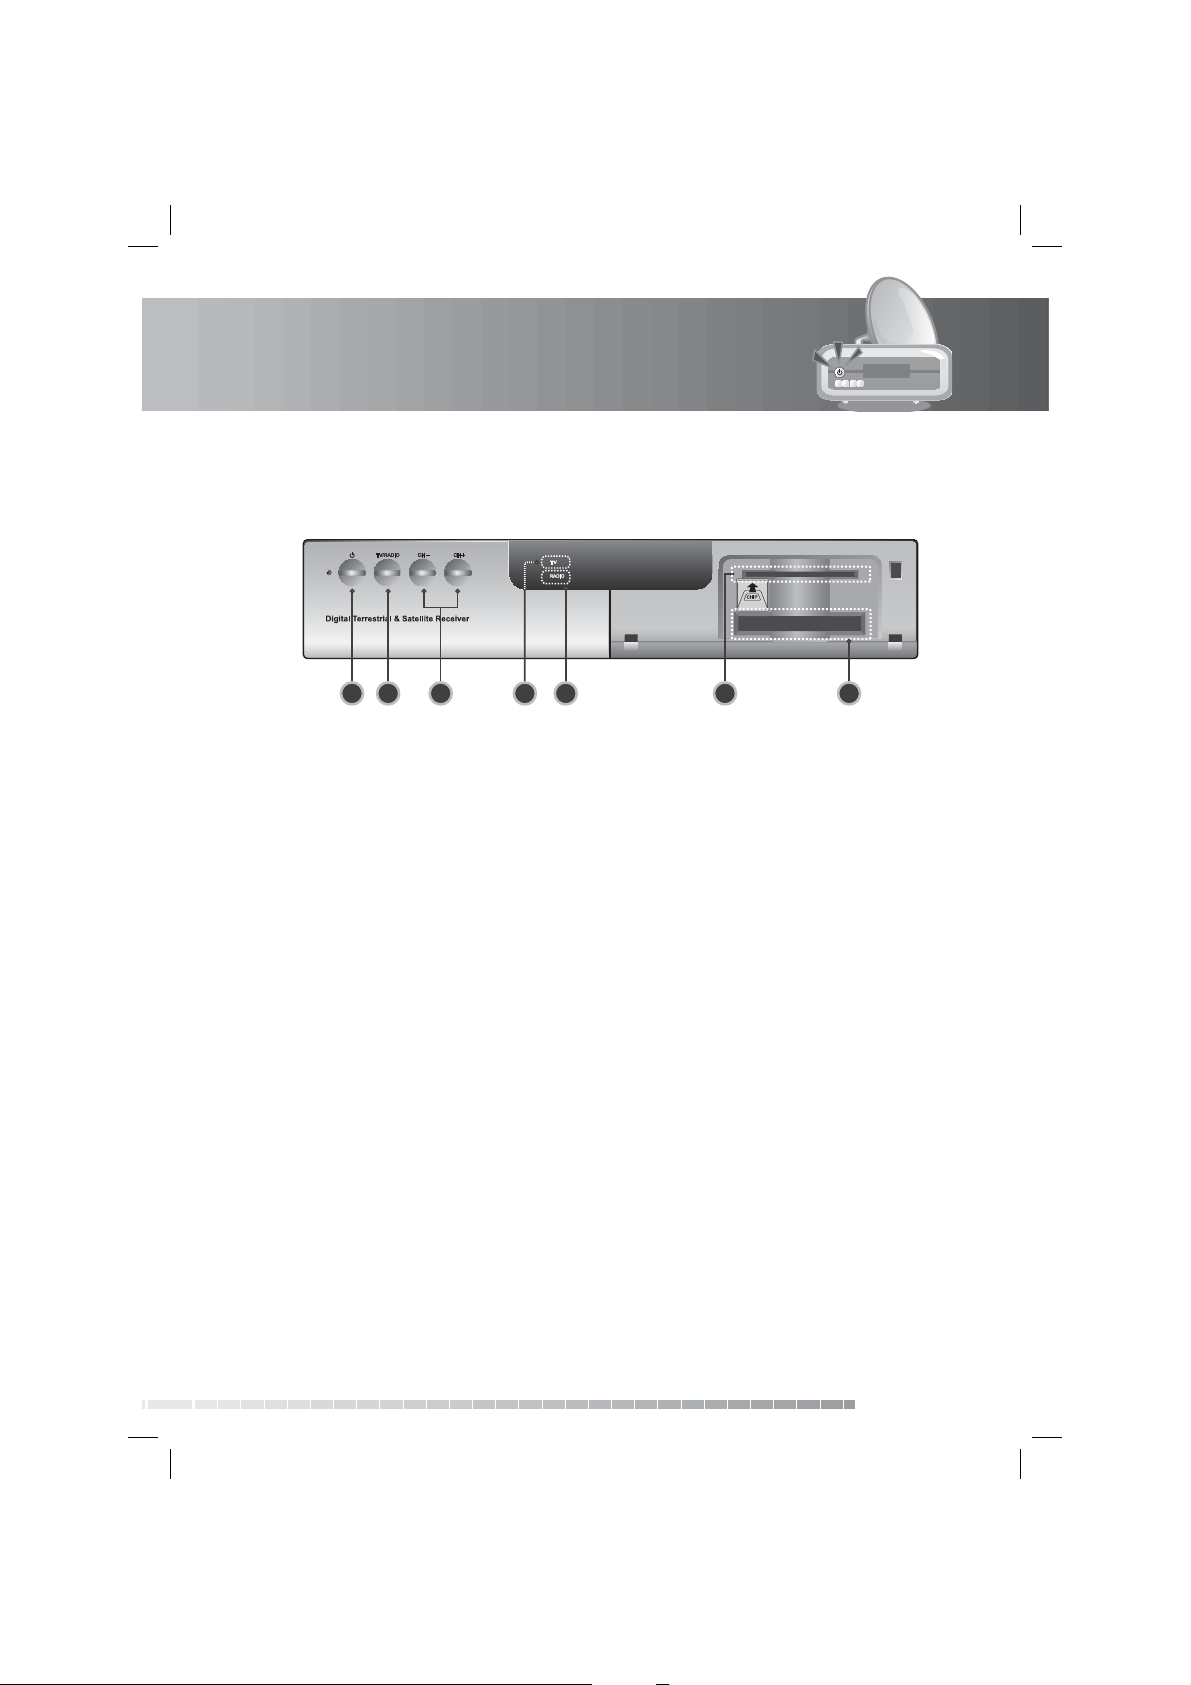
1.2 Front Panel
1. STANDBY BUTTON
Switches between operation and standby modes.
2. TV/RADIO BUTTON
Switches between TV and radio modes.
3. CH-/CH+ BUTTON
Moves the TV/radio channel up or down.
4. TV LED
Green light is emitted when the product is in TV mode.
5. RADIO LED
Amber light is emitted when the product is in radio mode.
6. SMARTCARD SLOT
A slot for a Smartcard
7. CI-MODULE SLOT
A slot for a CI-Module
Note: The front of the product is subject to change without notice.
6 74 51 2 3
GB9
User’s Manual
Page 11
1. Before Using the Product
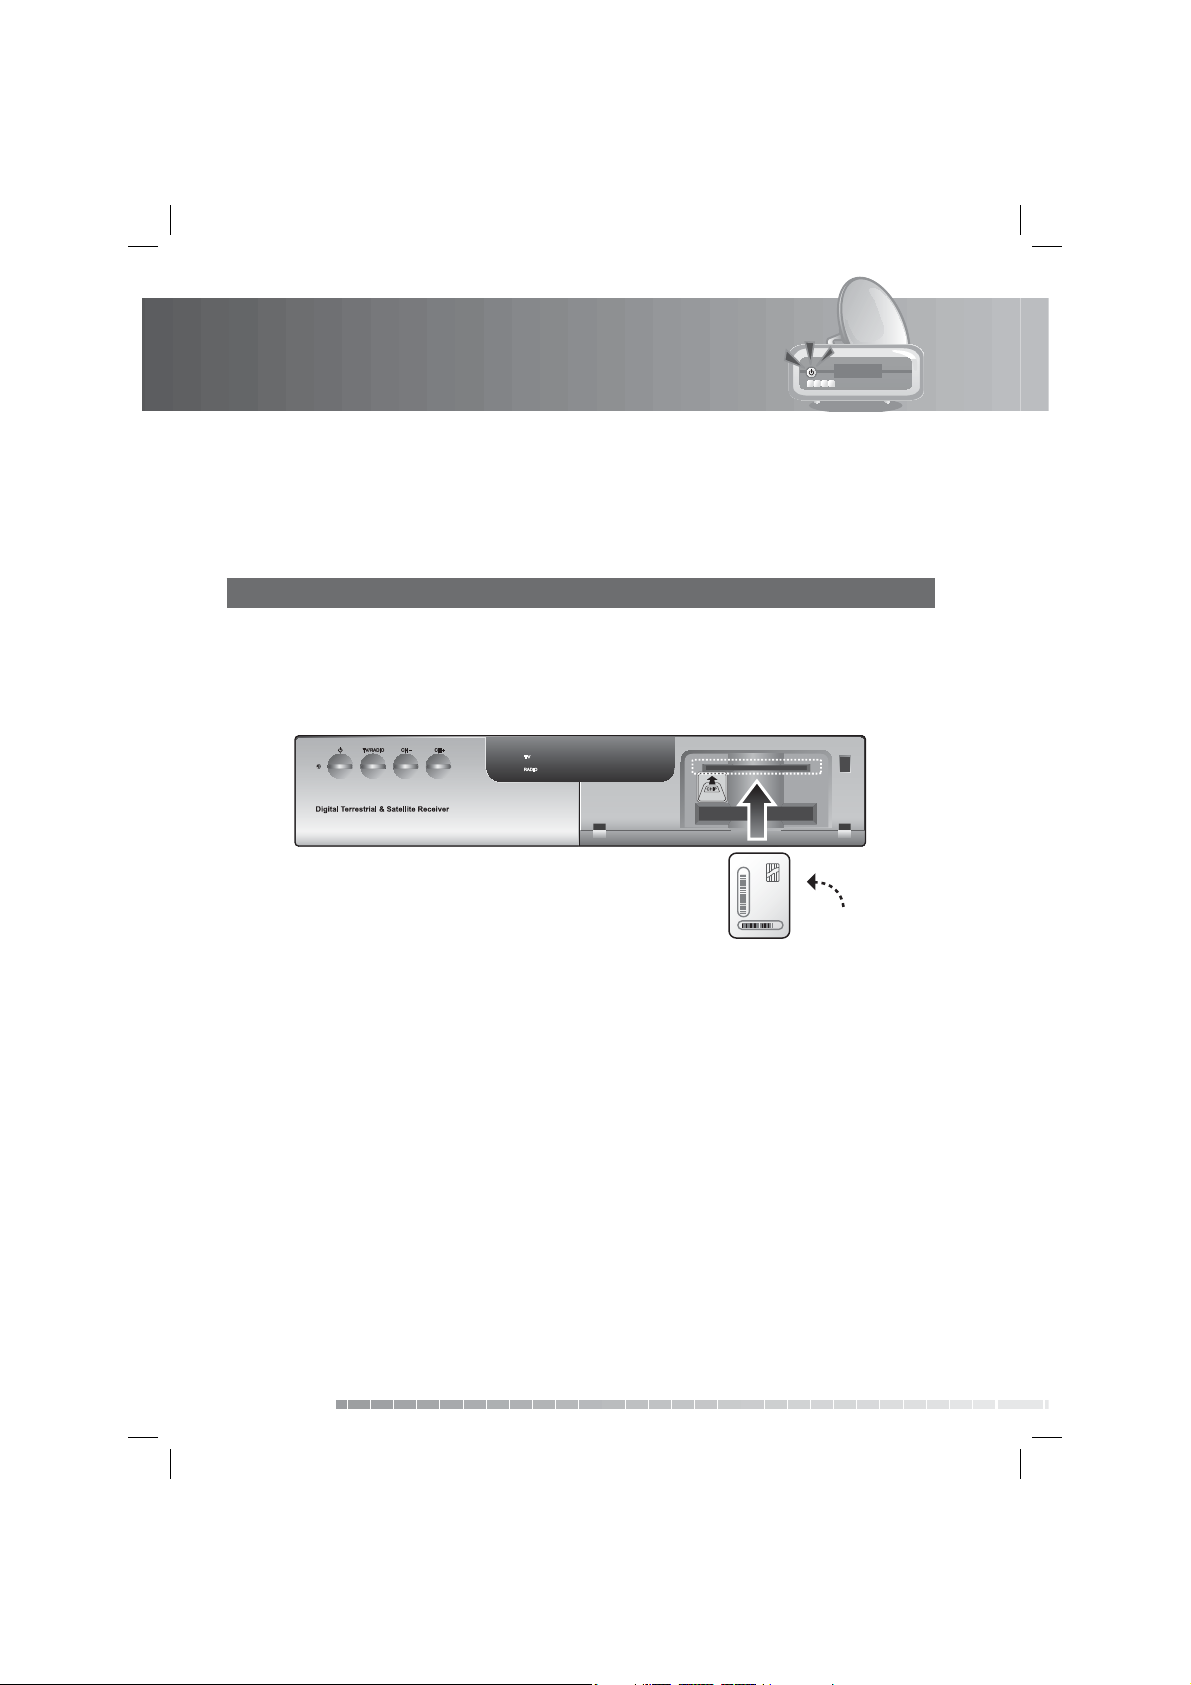
1.3 Conditional Access
Although some TV and radio channels are free to air, most TV and radio/music channels are available on a
subscription basis and can only be enjoyed via a Conditional Access component.
1. Inserting the Smartcard
1. Open the right-hand ap on the front panel of the product to expose the card slot.
2. Hold the Smartcard horizontally with the electronic chip (small square-shaped, gold in colour) facing
upwards.
3. Insert the Smartcard into the top slot.
Smartcard
GB10
User’s Manual
Page 12
1. Before Using the Product
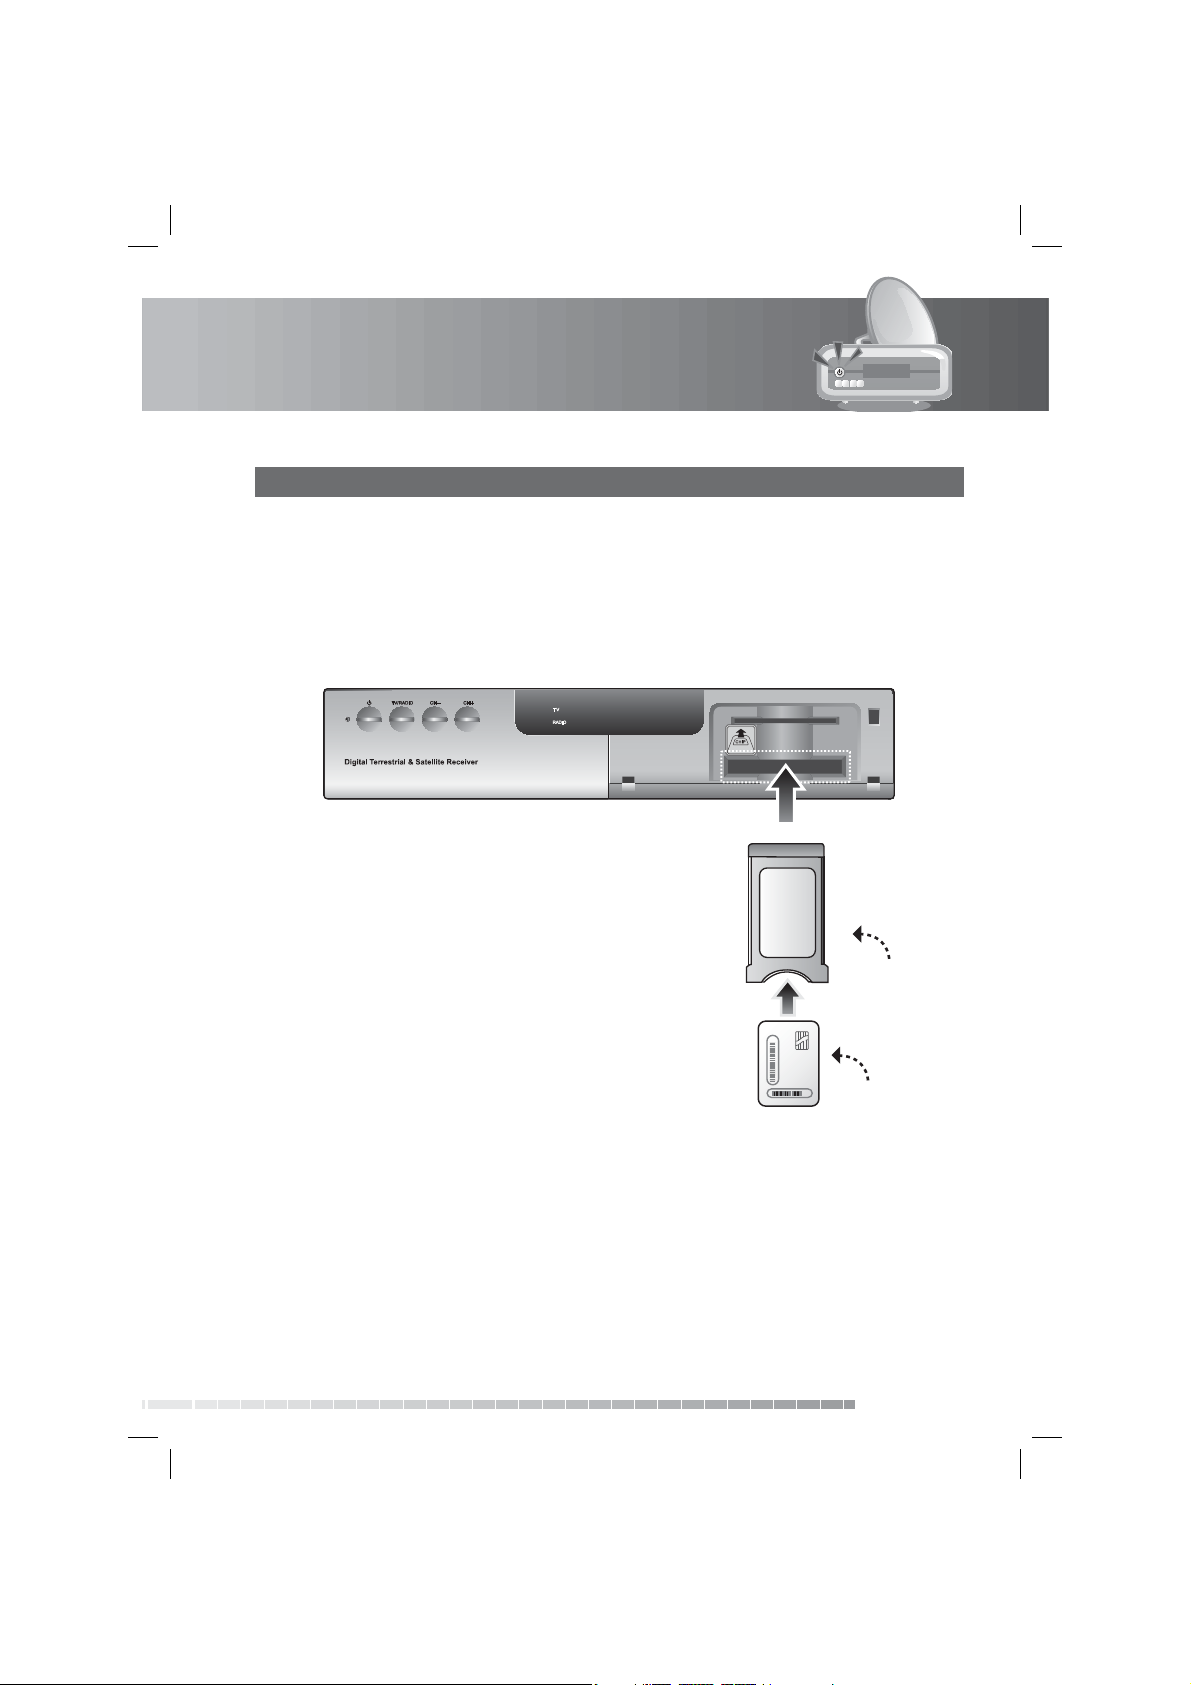
2. Inserting a CI (with Smartcard)
A CI module looks like a PC map (PCMCIA) for laptops. There are di erent kinds of CI Modules, suitable for
di erent coding systems; Irdeto, Conax and more. Additionally to the CI module, a Smartcard is needed to
decode the channels.
1. Open the right-hand ap on the front panel of the product to expose the card slot.
2. Follow the instructions of the module and insert the Smartcard into the CI module.
3. Keep the CI module (with the Smartcard) horizontal.
4. Insert the CI module into the slot.
CI Module
Smartcard
User’s Manual
GB11
Page 13
1. Before Using the Product
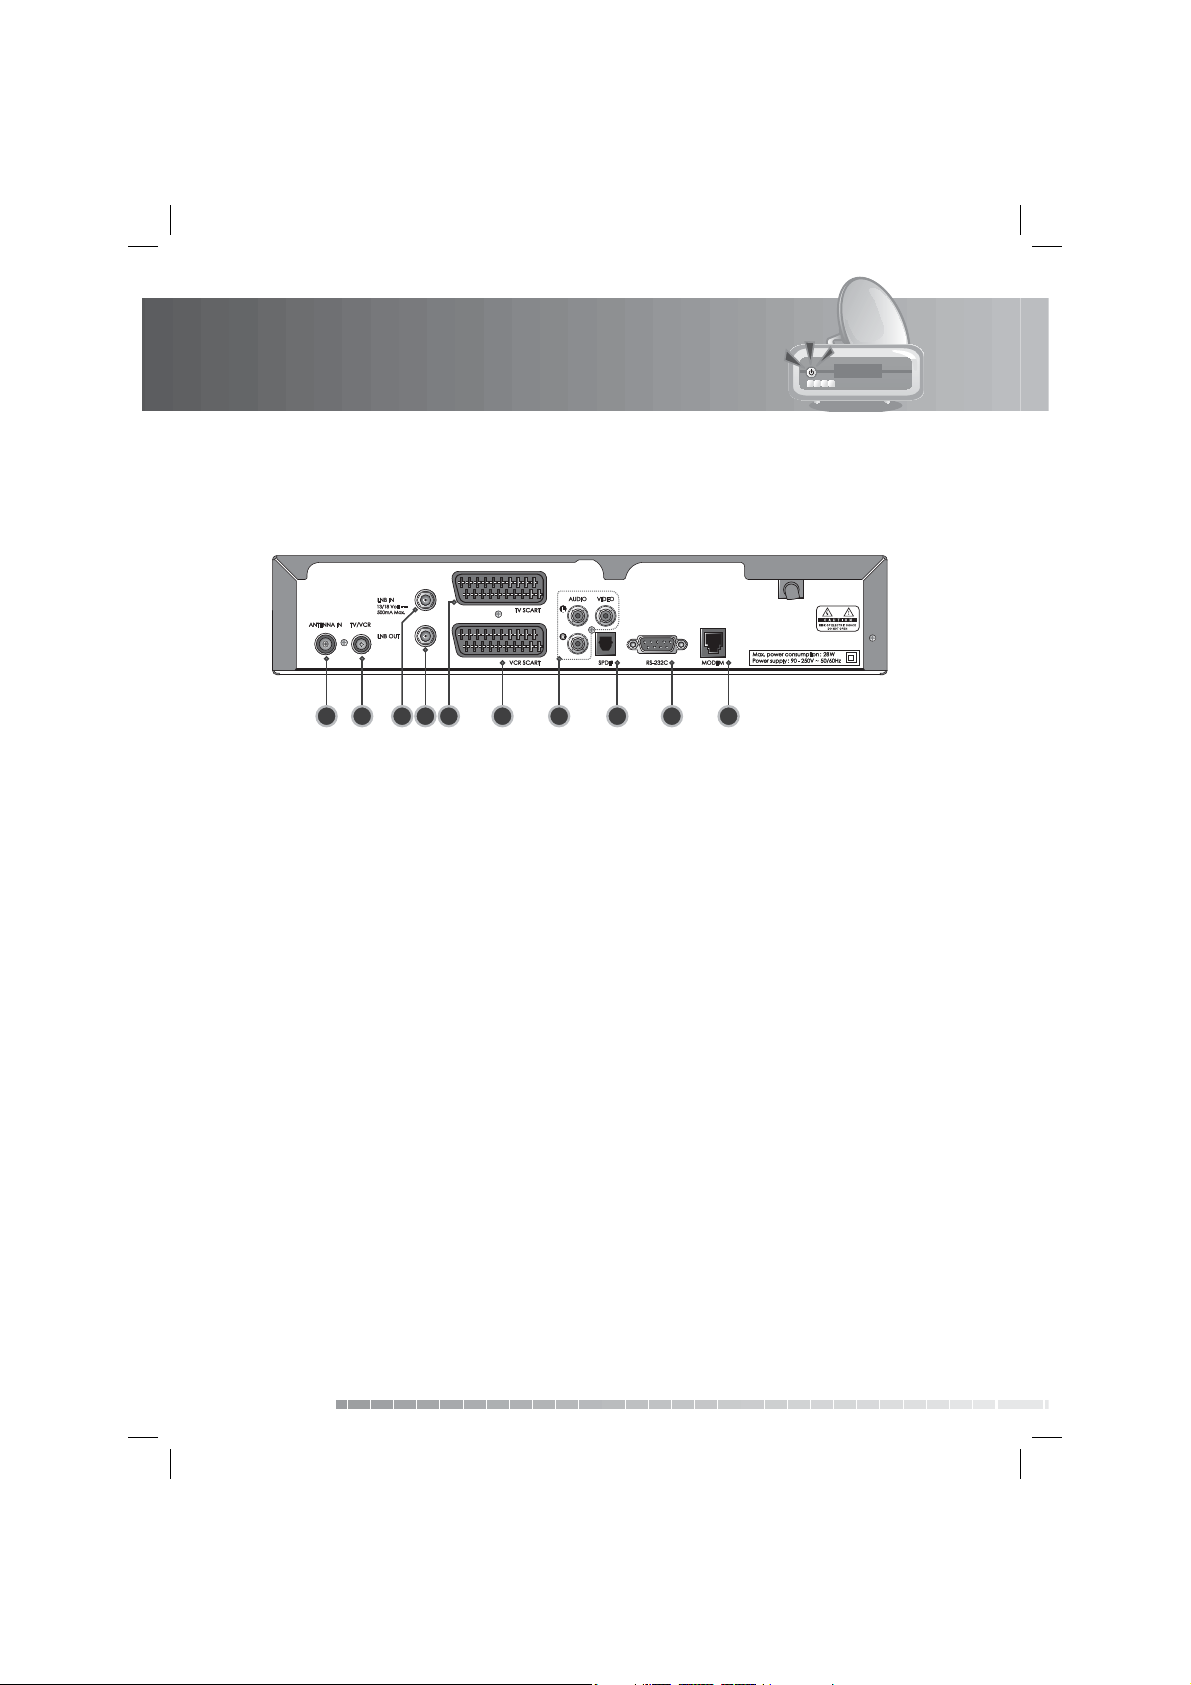
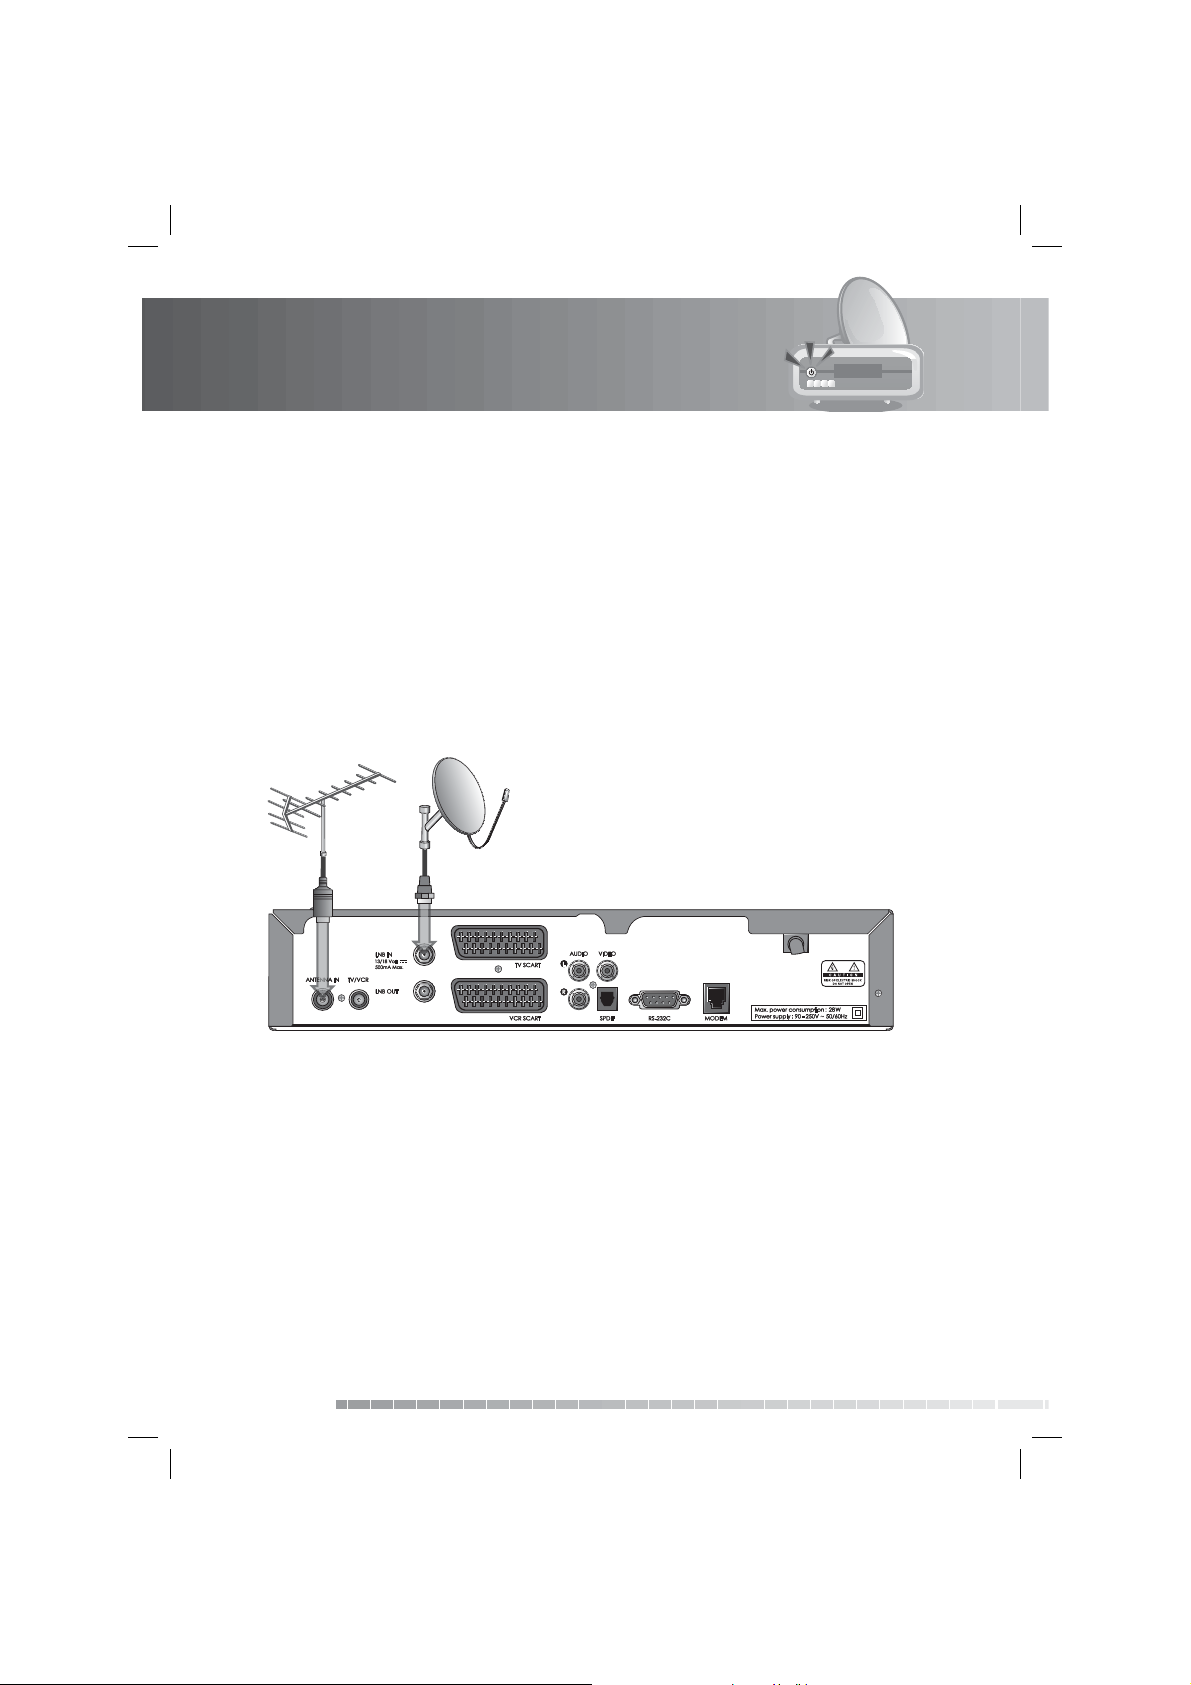
1.4 Rear Panel
1 2 43 6 7 8
1. ANTENNA IN
Connects the aerial cable.
2. TV/VCR
Connects to the RF IN of the TV using an RF cable.
3. LNB IN
Connects a satellite antenna cable.
4. LNB OUT
Connects another digital satellite receiver.
5. TV SCART
Connects to the TV using a TV SCART cable.
6. VCR SCART
Connects to the VCR or DVD using a VCR SCART cable.
7. AUDIO/VIDEO
Connects to the TV or VCR using an RCA cable.
8. SPDIF
Connects to the audio system using an S/PDIF cable. (digital audio)
9. RS-232C
Connects to the PC to update software.
10. MODEM
Connects to the telephone line.
Note: The rear of the product is subject to change without notice.
105
9
GB12
User’s Manual
Page 14
1. Before Using the Product
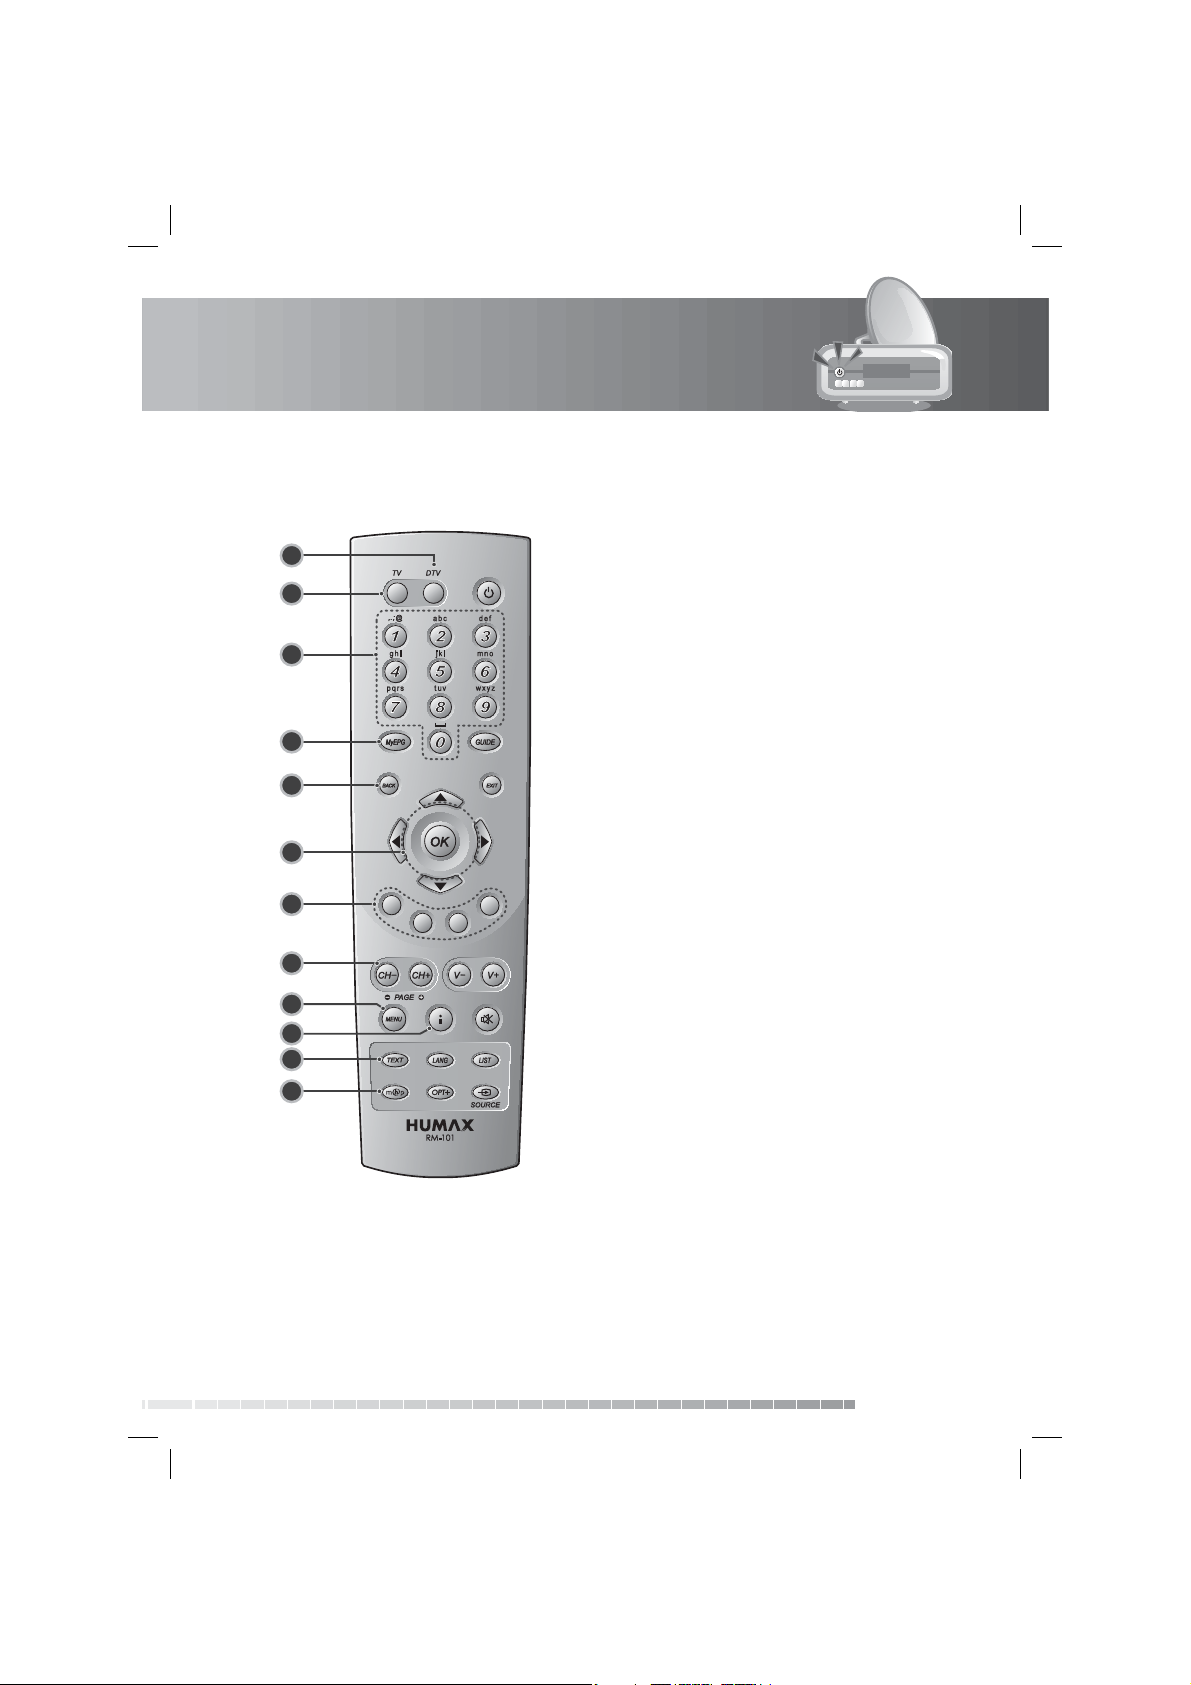
1.5 Remote Control
1
2
3
4
5
6
7
8
9
10
11
12
1. DTV
Controls the receiver.
2. TV
Controls the TV.
3. NUMERIC(0-9) BUTTONS
Enters a TV/radio channel number or menu option
number.
4. MyEPG
Displays the MyEPG.
5. BACK
Closes and returns to the previous menu and
screen.
6. ARROW BUTTONS
Changes the channel or moves the cursor up,
down, left or right.
7. COLOUR BUTTONS
Select the colour keys for interactive applications.
8. CH-/CH+ (PAGE-/PAGE+)
Changes the channel or page.
9. MENU
Displays the main menu.
10. i (Information)
Displays the channel and programme information.
11. TEXT
Switches between the teletext and TV modes.
12. MHP
Displays the MHP application list.
Note:
• The remote control is subject to change without notice.
• This remote control can also control your TV. To set the remote control for your TV, please refer to 10.2
Universal Remote Control.
GB13
User’s Manual
Page 15
1. Before Using the Product
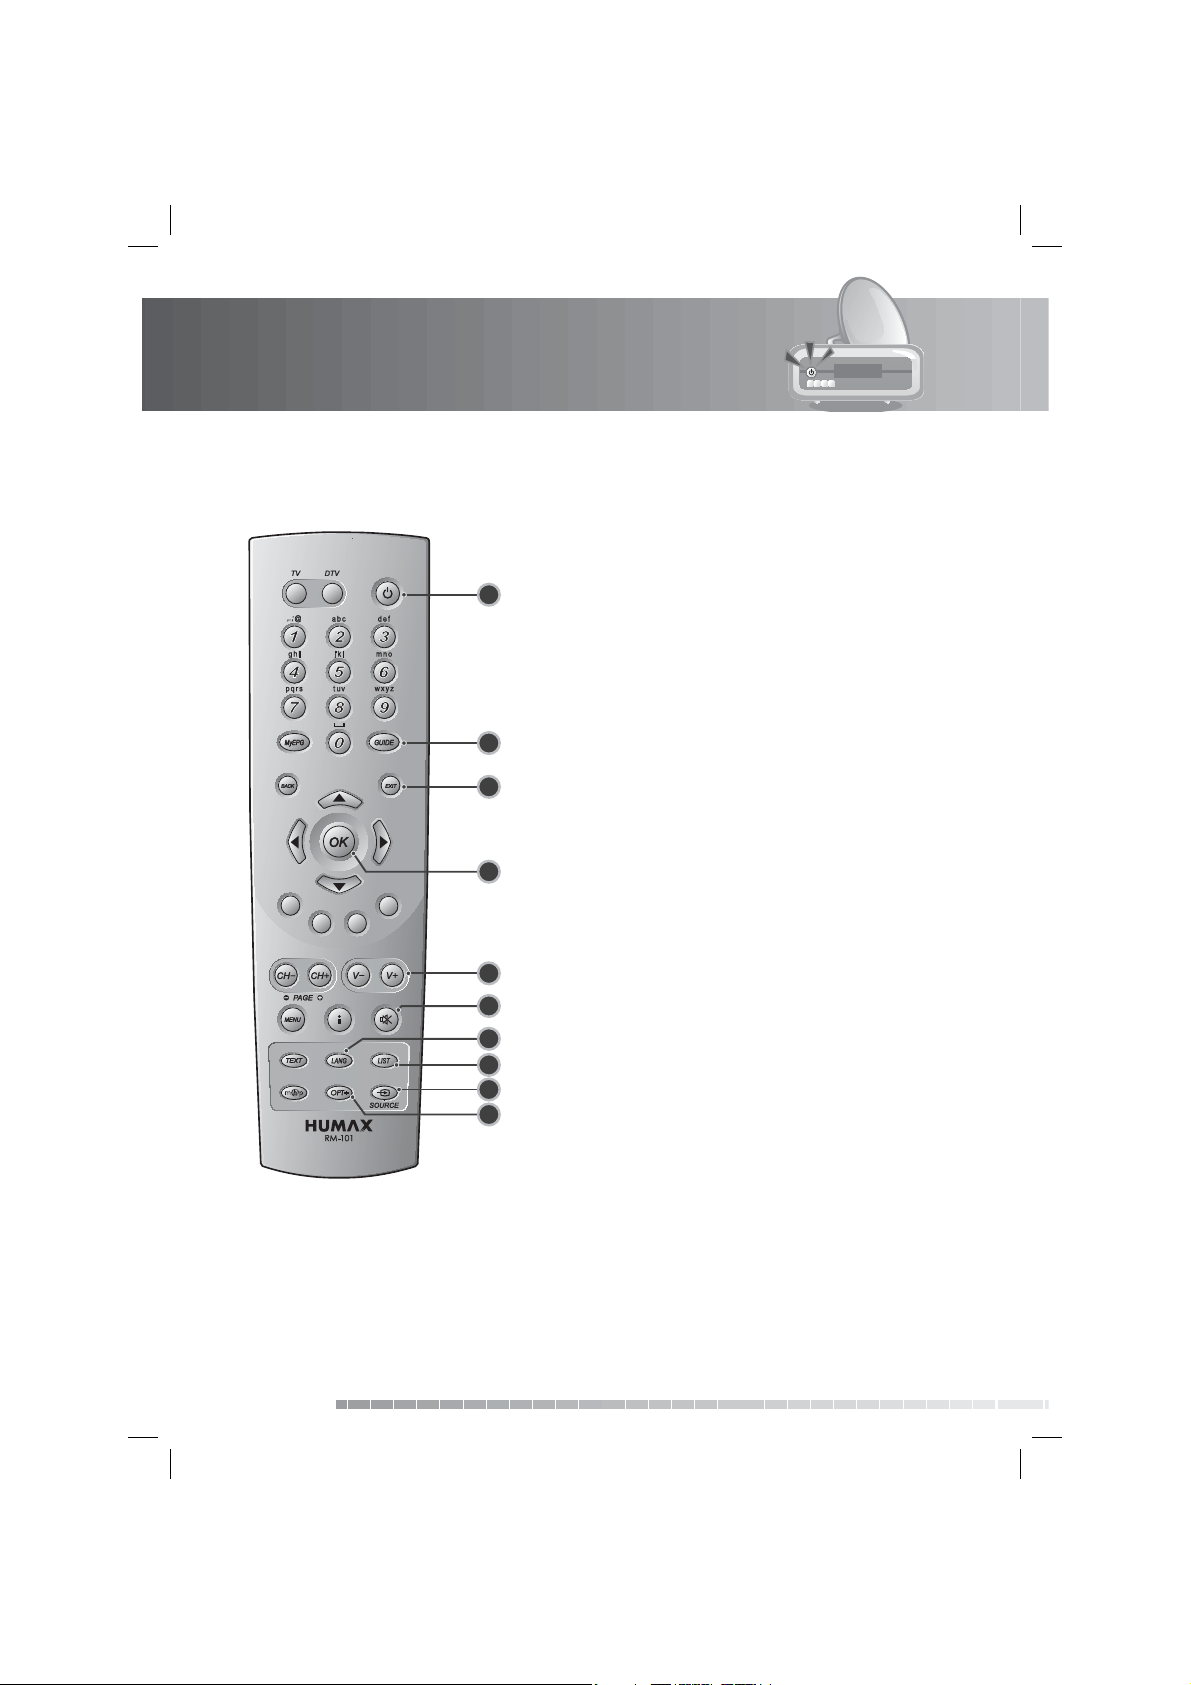
13. STANDBY
Switches between operation and standby modes.
13
14
15
16
17
18
19
20
21
22
14. GUIDE
Displays the standard EPG.
15. EXIT
Exits all On-Screen Display (OSD) screens.
16. OK
Selects a menu or con rms the selected operation.
Displays the channel list while watching a
programme.
17. V-/V+
Adjusts the audio volume.
18. MUTE
Mutes or unmutes the audio temporarily.
19. LANG
Displays the audio, subtitle list and teletext.
20. LIST
Displays the channel list.
21. SOURCE
Selects the input source between TV and the
product.
22. OPT+
Displays the channels attributes while watching
a programme.
GB14
User’s Manual
Page 16
1. Before Using the Product
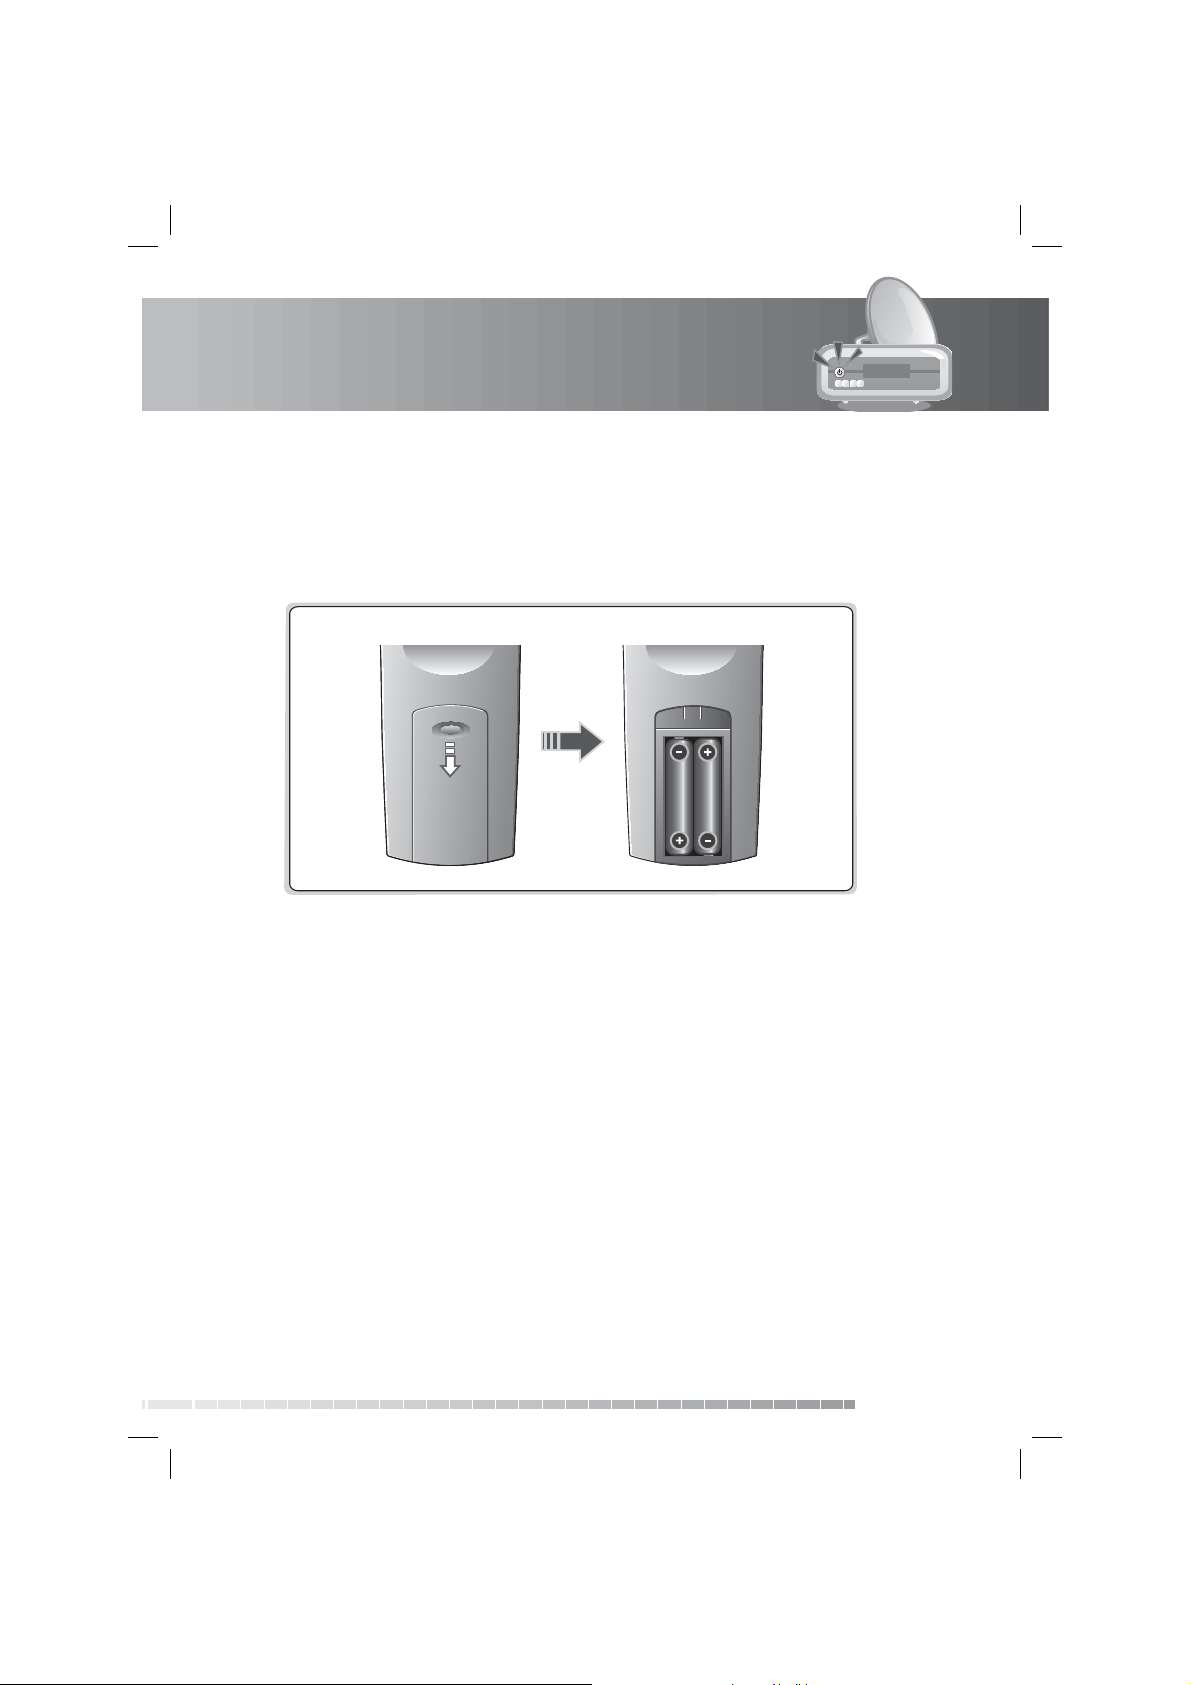
1.6 Remote Control Batteries
1. Press down the top of the battery cover and slide the cover o .
2. Insert the new batteries. Make sure the plus (+) ends meet the plus markings on the battery case.
3. Slide the cover back into place.
i
GB15
User’s Manual
Page 17
2. Setup
This chapter describes how to connect the product to the TV with the particular equipments for gaining
optimum signal quality. The product provides various interfaces to connect to the TV, VCR or other devices.
Select the most appropriate procedure depending on the equipment you have.
Note: If you encounter any problems setting up your product, please contact your local product
distributor.
2.1 Connecting to the Antenna
1. Connect your aerial to the ANTENNA IN.
2. Connect the antenna to the LNB IN
GB16
User’s Manual
Page 18
2. Setup
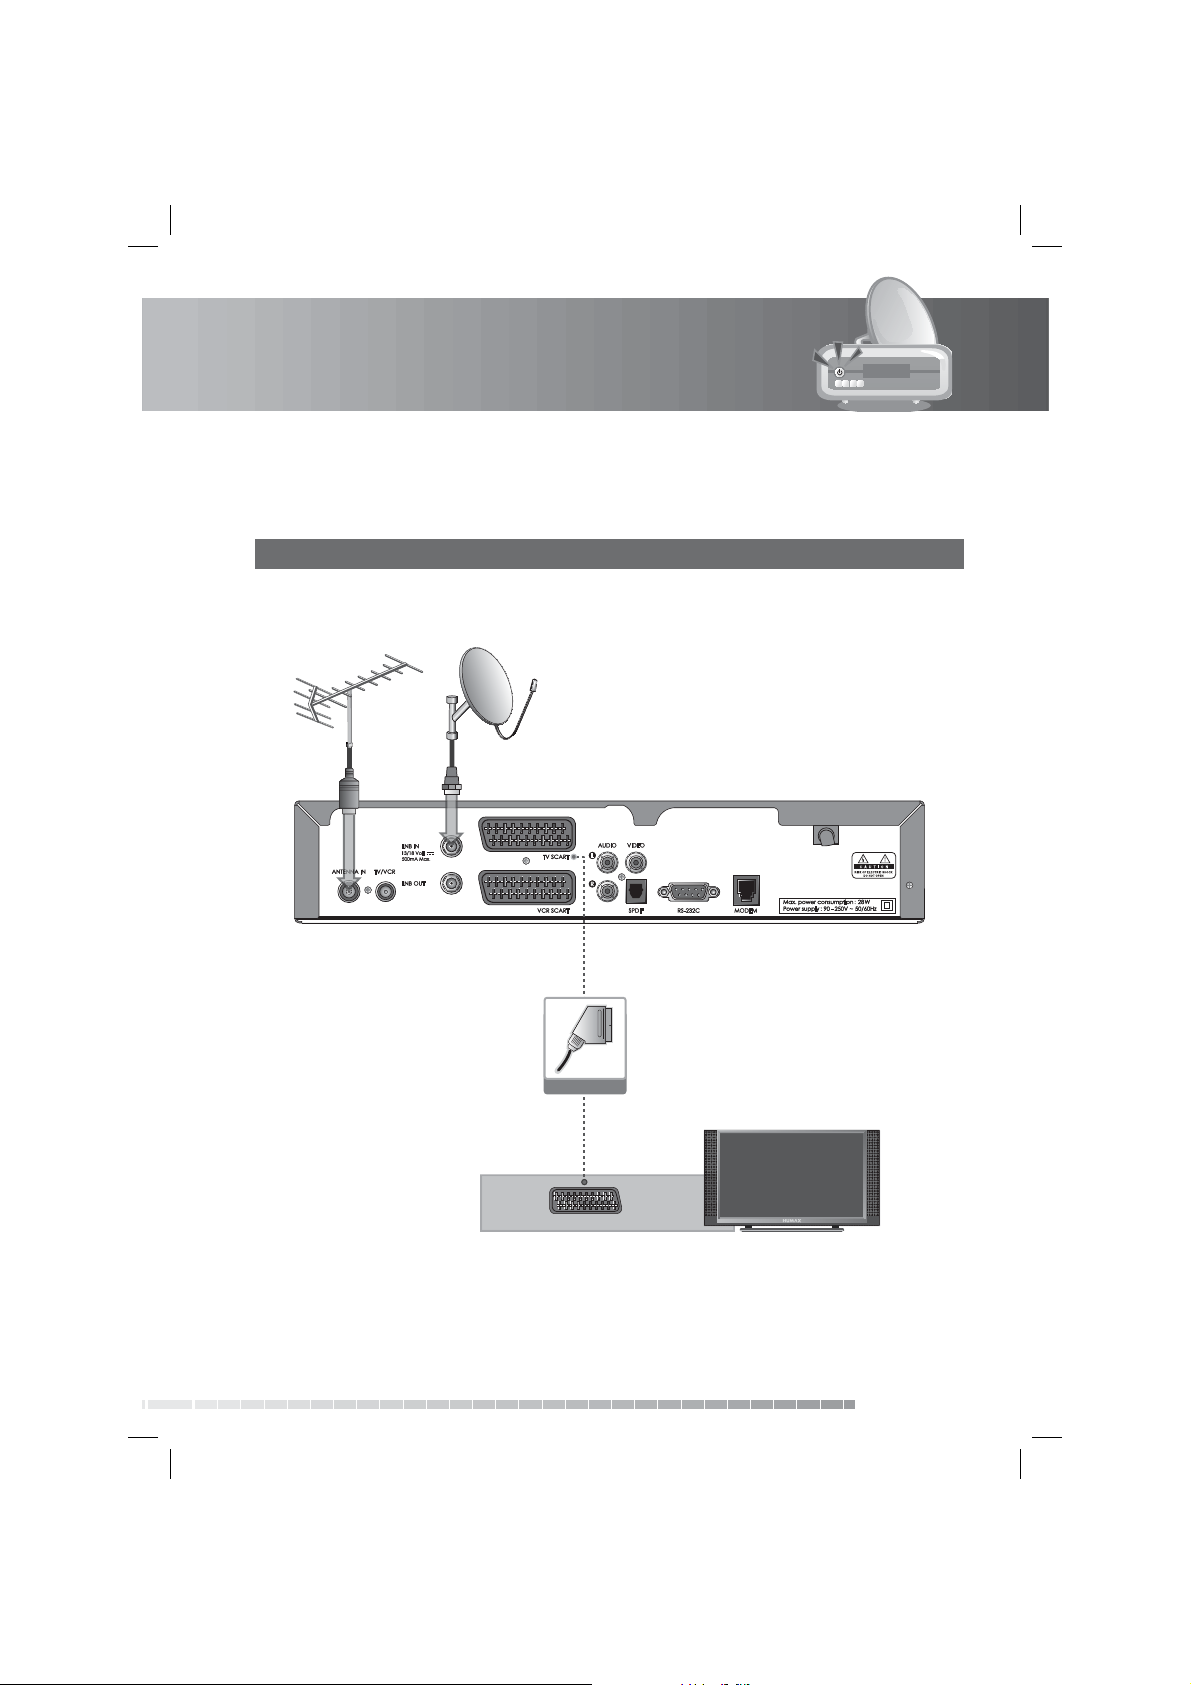
2.2 Connecting TV
1. Using SCART Cable
Connect the product and the TV using a SCART cable.
SCART Cable
TV SCART
GB17
User’s Manual
Page 19
2. Setup
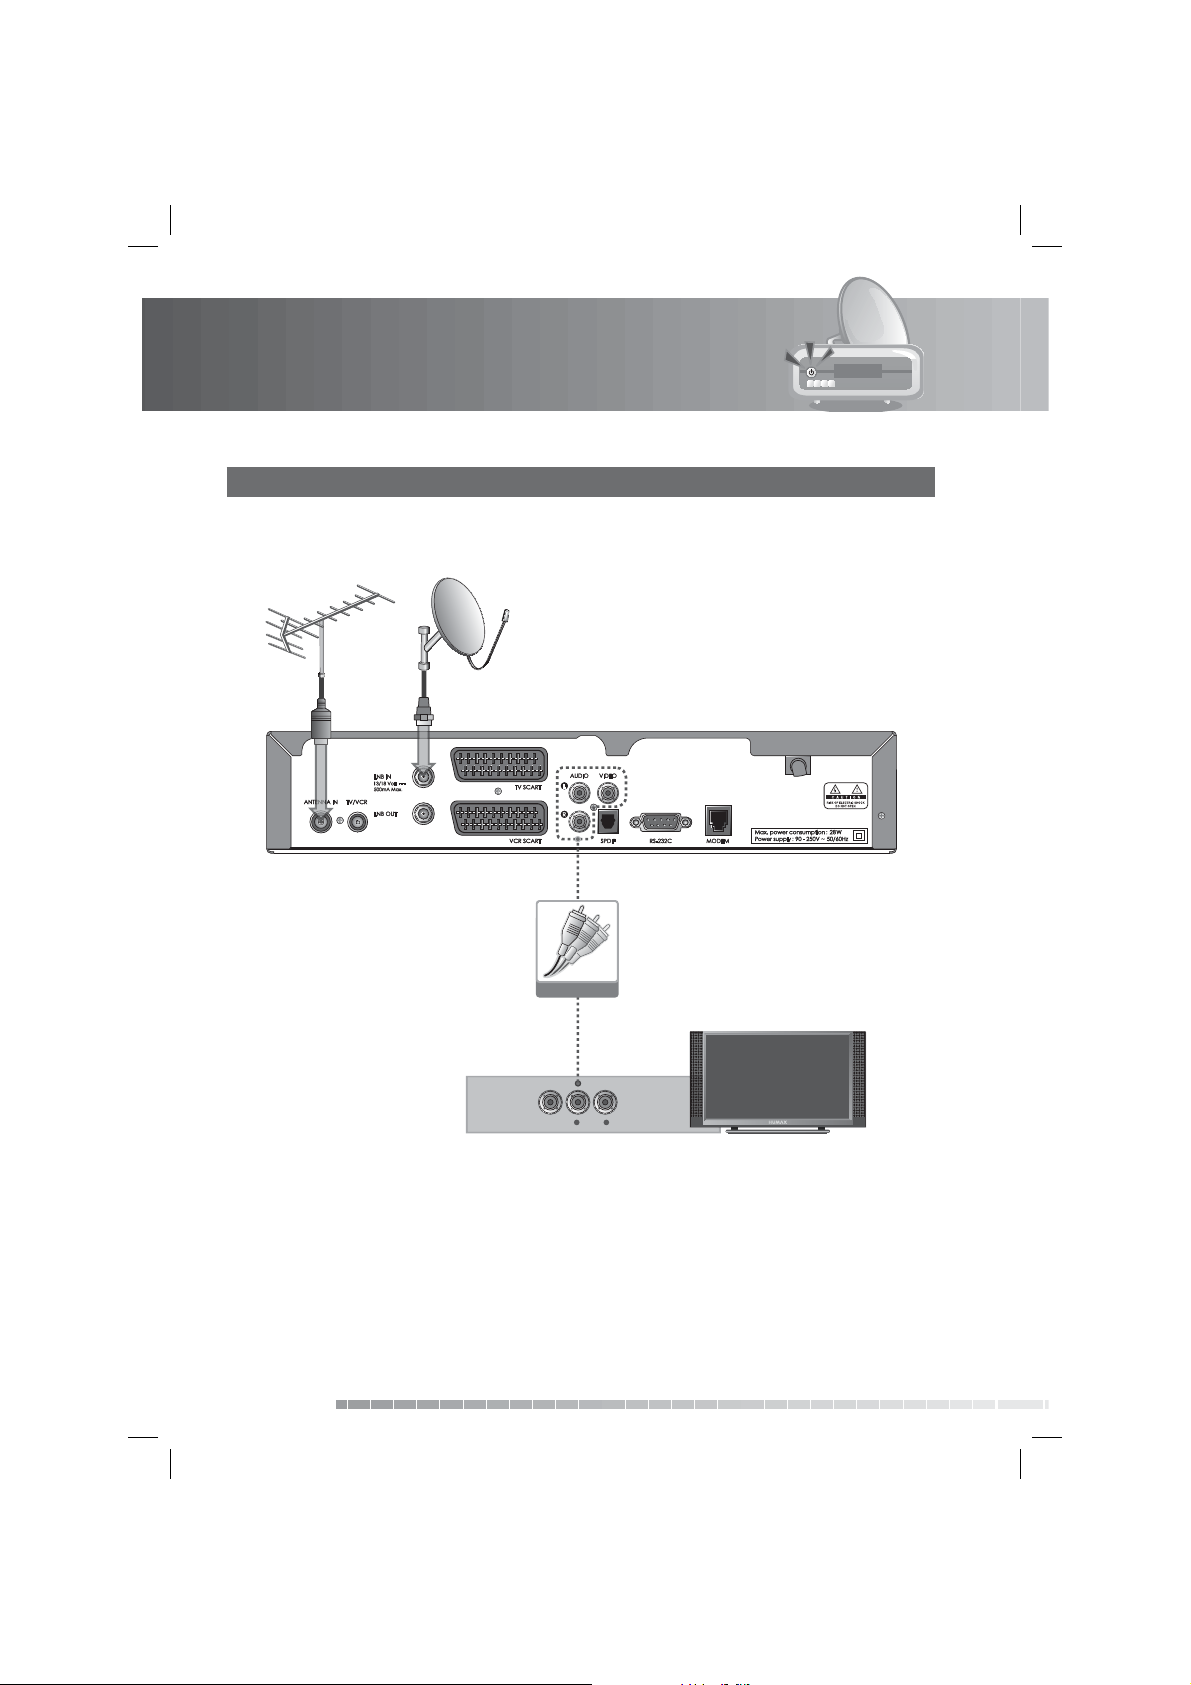
2. Using RCA Cable
Connect the product and the TV using an RCA cable.
GB18
User’s Manual
RCA Cable
LR
VIDEO AUDIO
Page 20
2. Setup
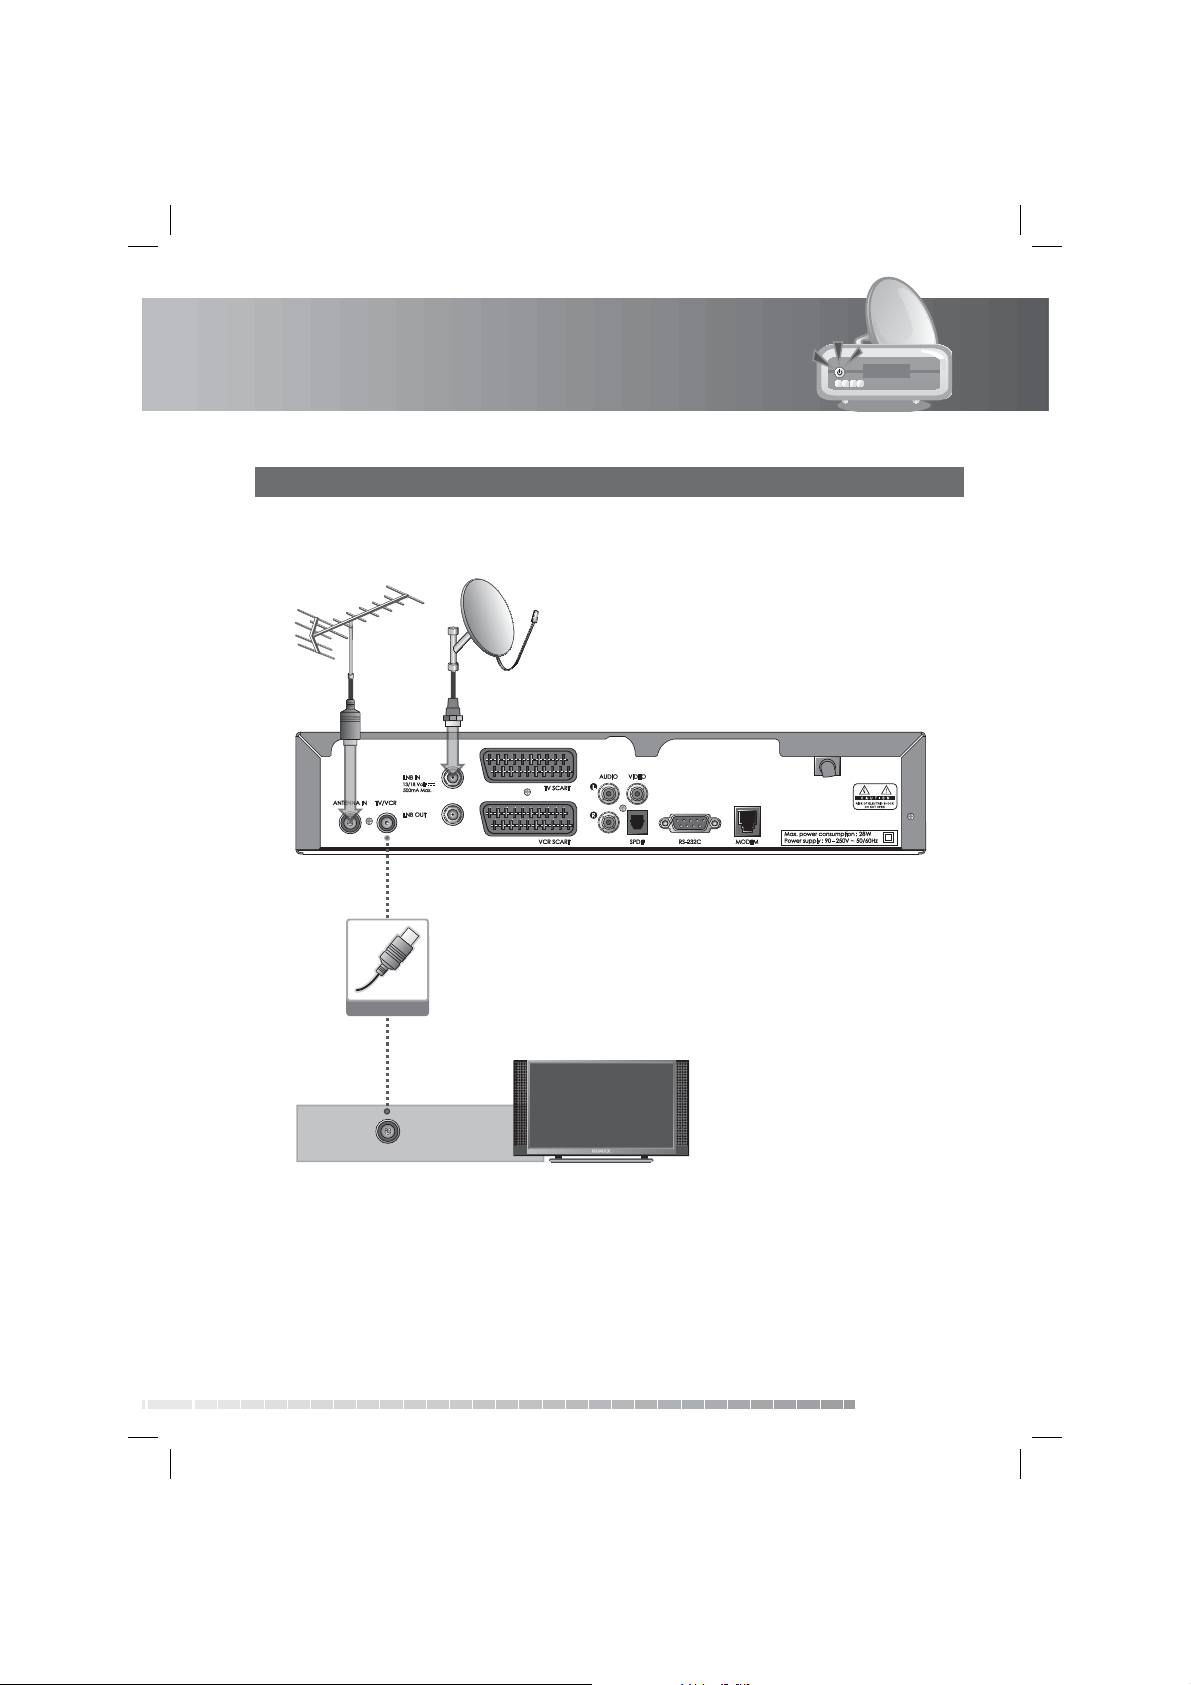
3. Using RF Cable
Connect the product and the TV using an RF cable to watch analogue terrestrial channels.
RF Cable
TV Antenna IN
GB19
User’s Manual
Page 21
2. Setup
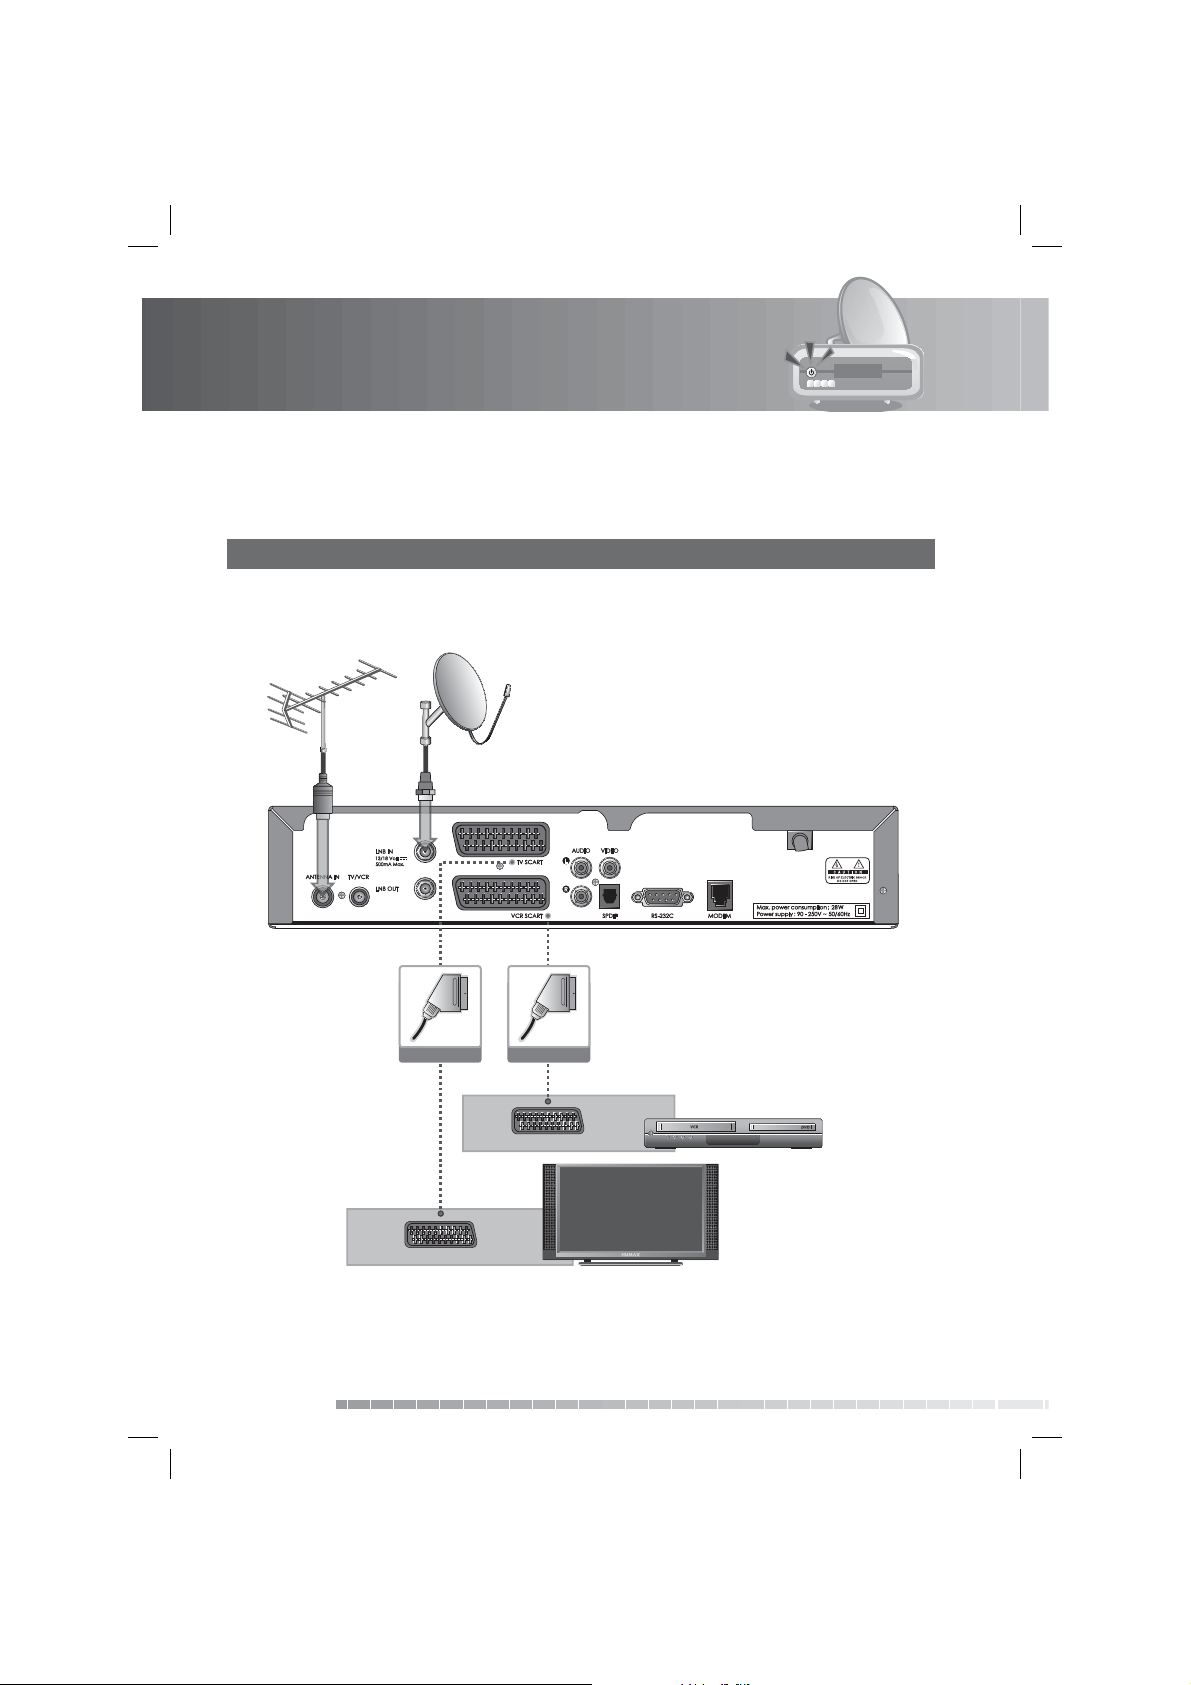
2.3 Connecting the TV and VCR
1. Using SCART Cable
Connect the product and the TV/VCR using a SCART cable.
GB20
User’s Manual
SCART Cable SCART Cable
VCR SCART
TV SCART
Page 22
2. Setup
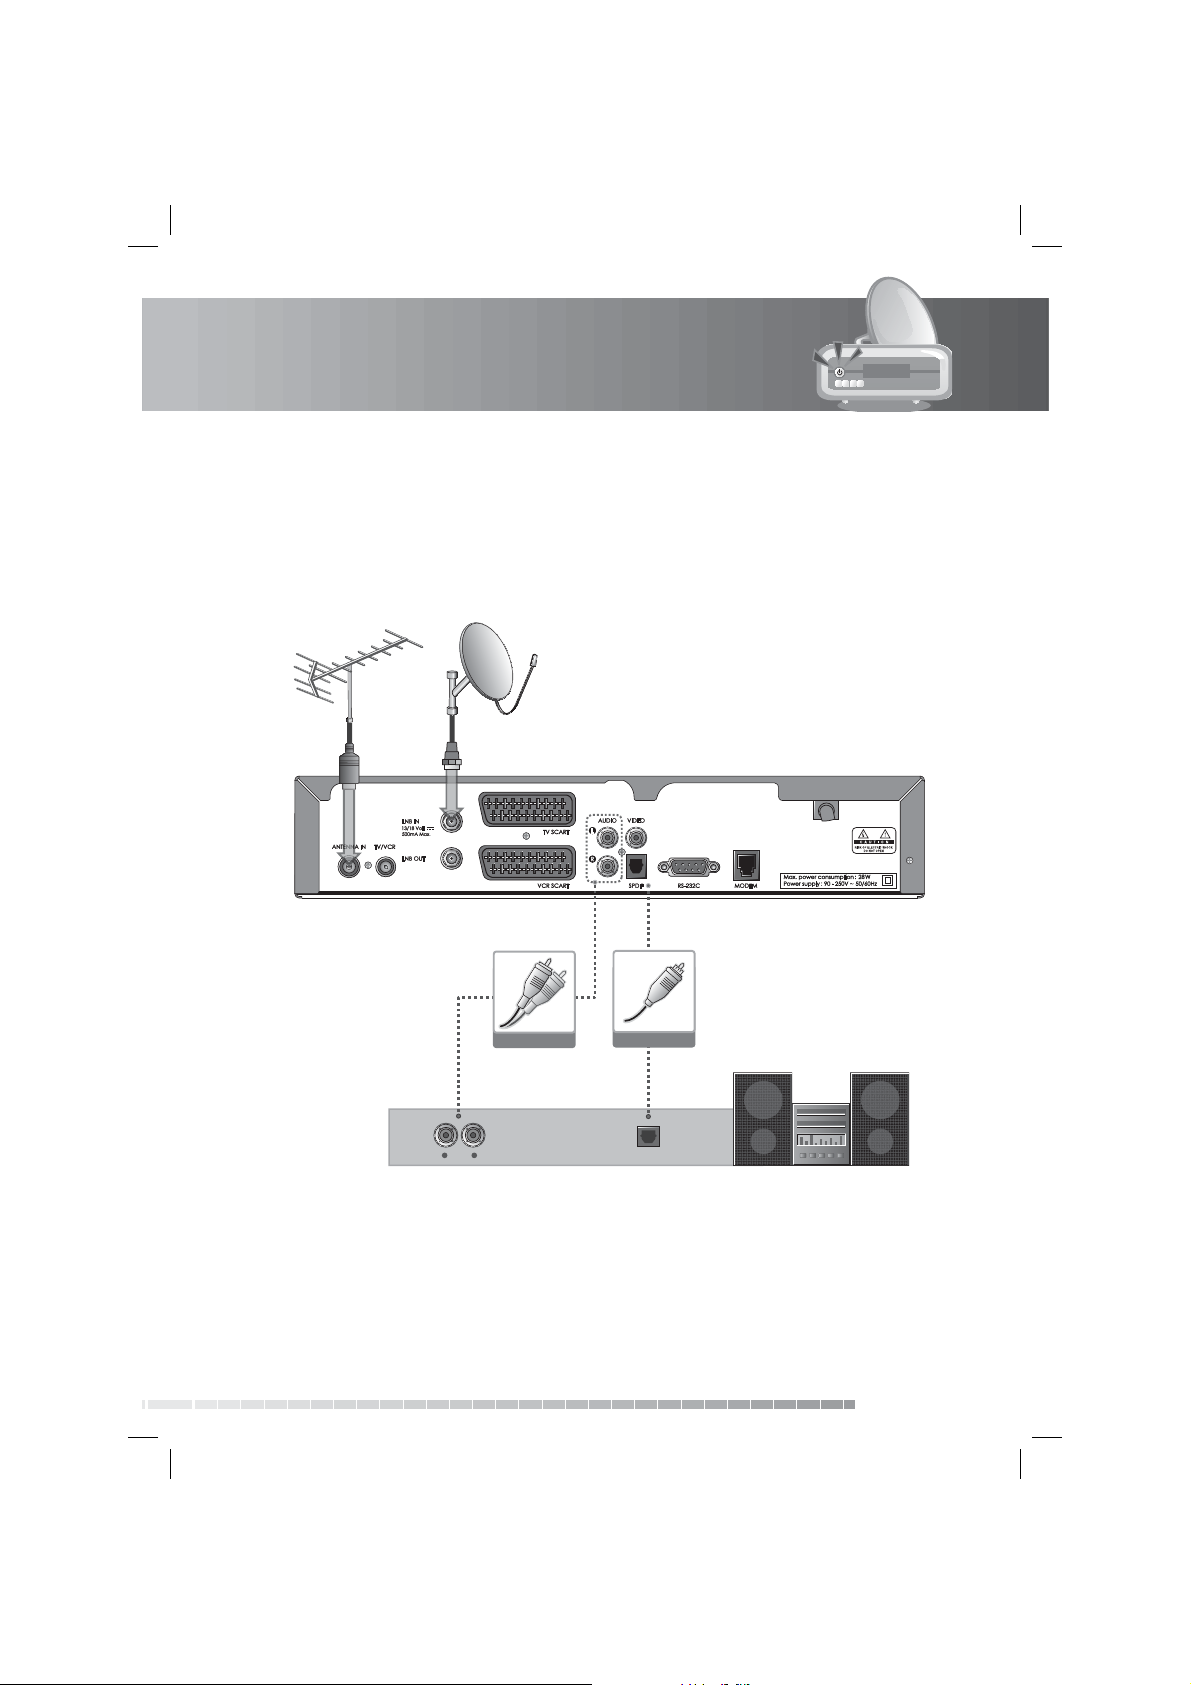
2.4 Connecting the Audio System
Select the most appropriate procedure for your convenience.
• Connect the product and the audio system using an RCA cable.
• Connect the product and the audio system for higher quality sound using an S/PDIF cable.
RCA Cable
LR
AUDIO S/PDIF
S/PDIF Cable
GB21
User’s Manual
Page 23
2. Setup
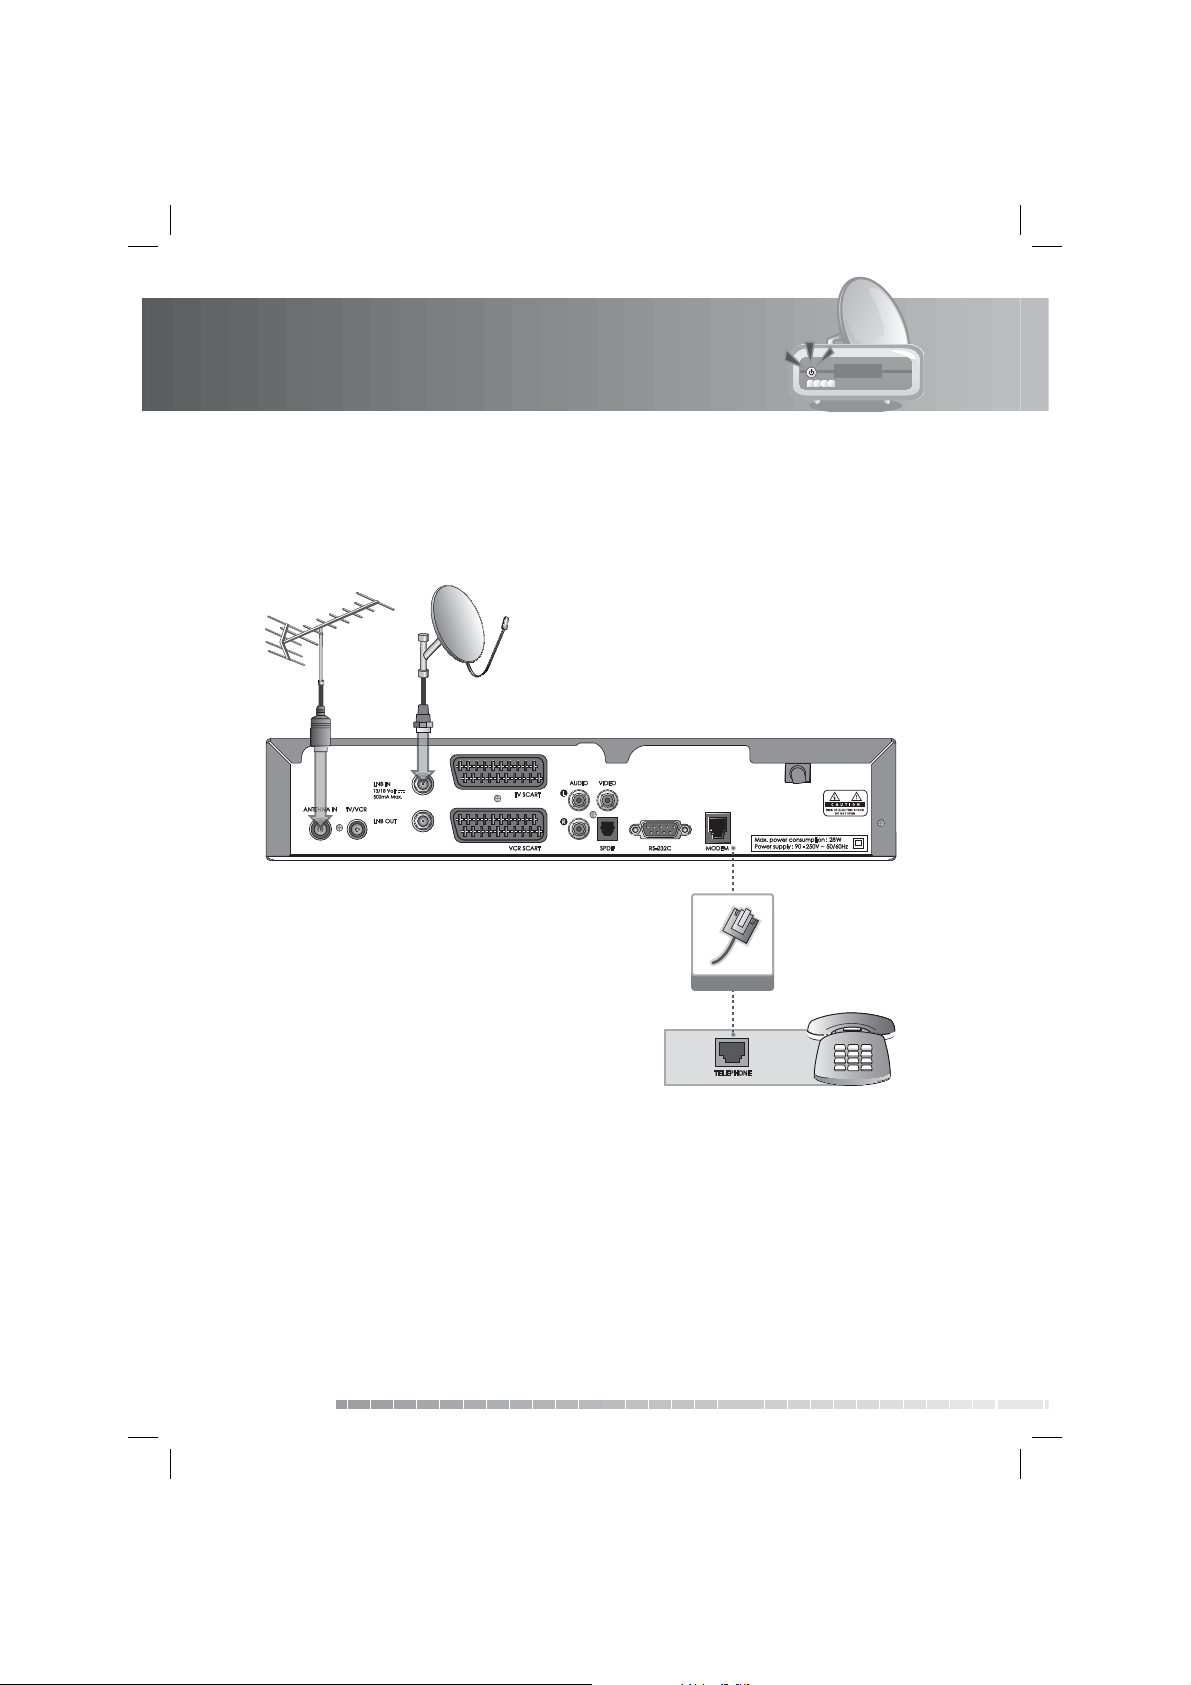
2.5 Connecting the Modem
Connect the product and the telephone using a telephone line.
GB22
User’s Manual
Modem Cable
Page 24
2. Setup
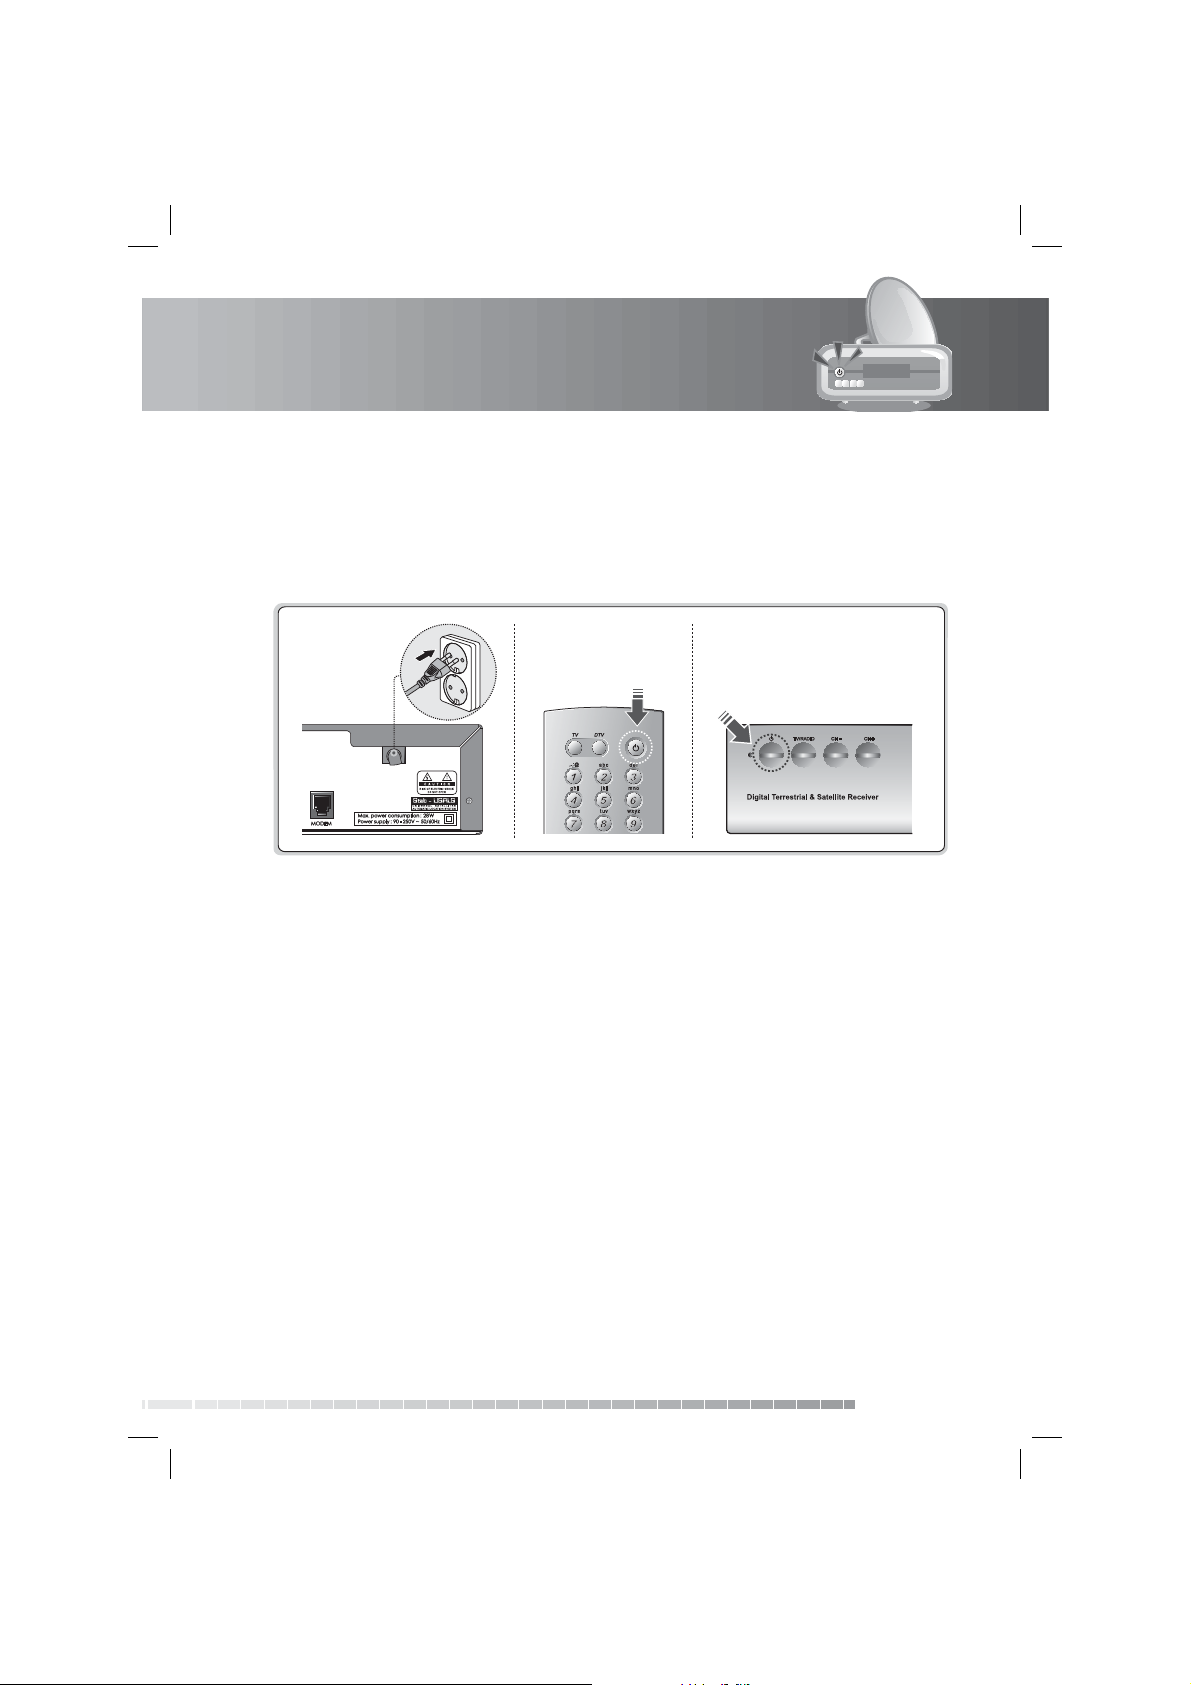
2.6 Powering On
1. Connect the power cord of the product to a wall outlet.
2. Power on by pressing the STANDBY button of the remote control or the STANDBY button
at the front of the product.
GB23
User’s Manual
Page 25
3. Installation Wizard
When powering on your product for the rst time after purchase, the installation wizard will operate
automatically.
Note: If you encounter any problems setting up your product, please contact your local product
distributor.
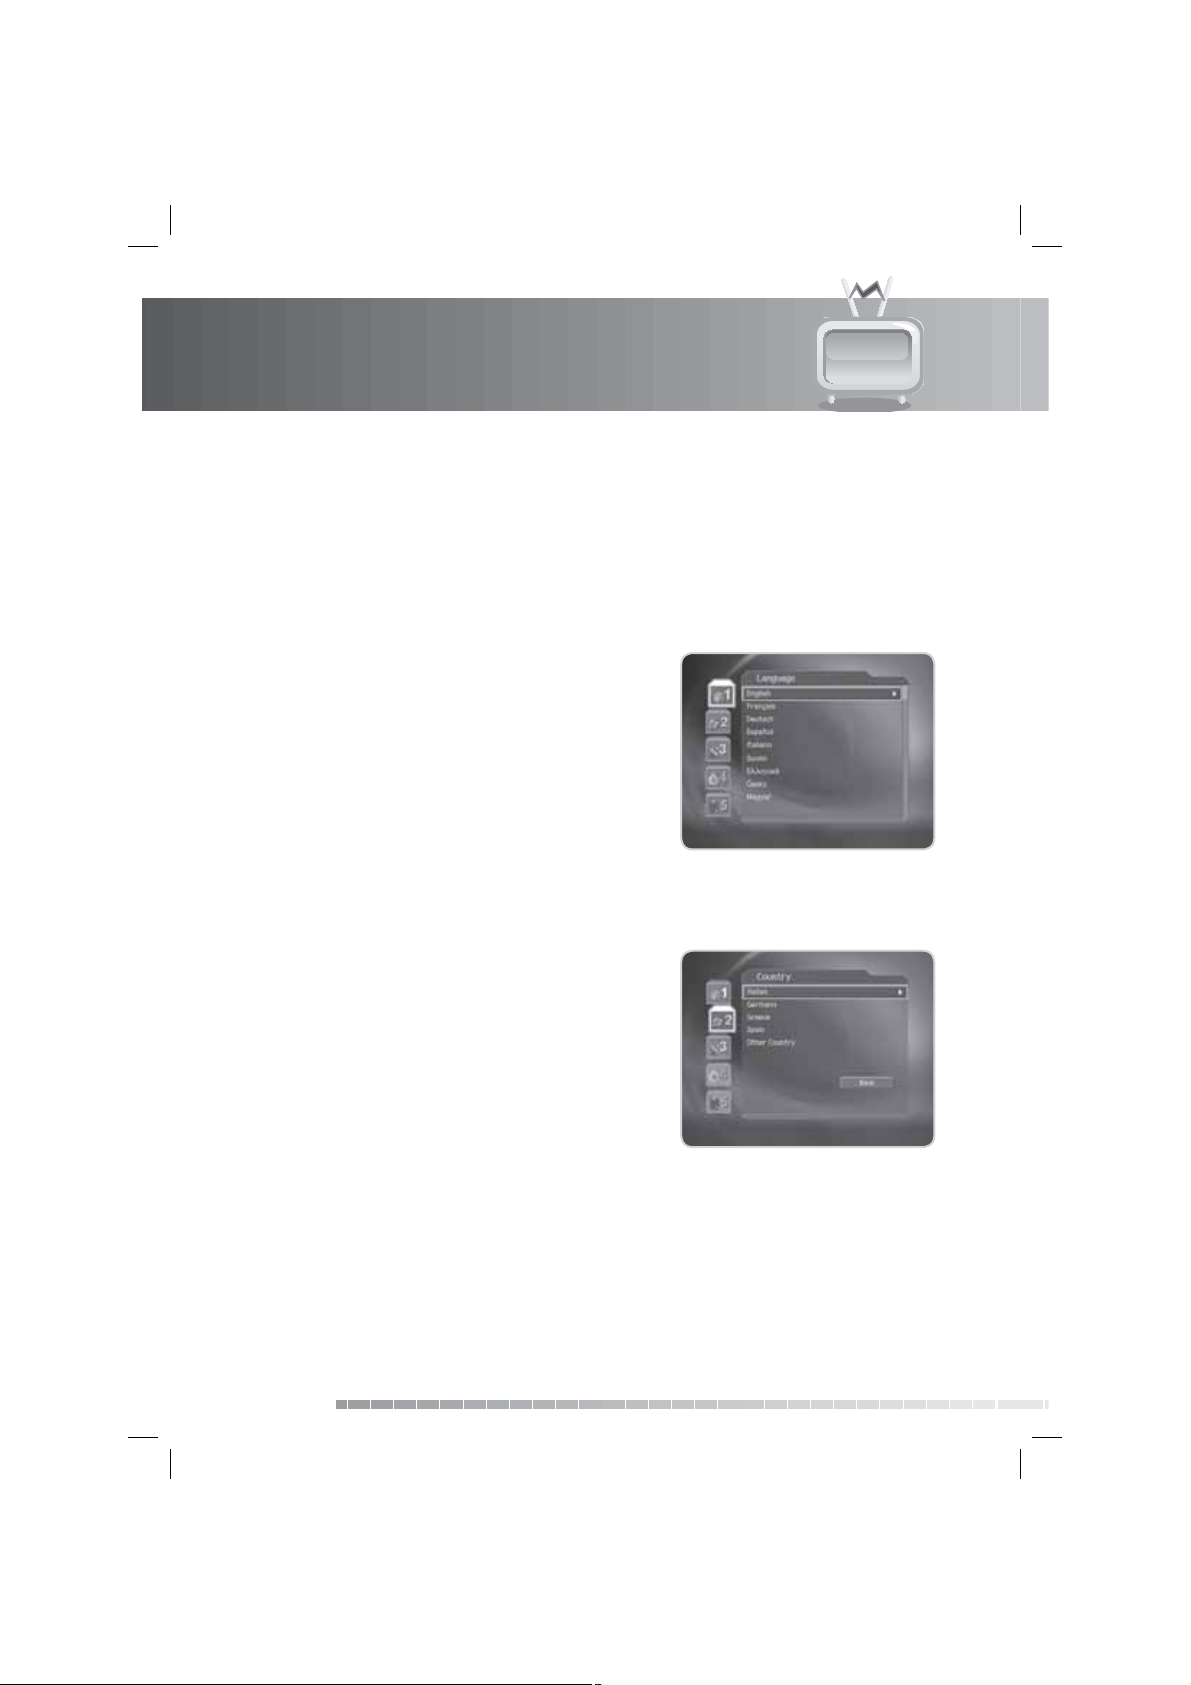
3.1 Language
You can select the main language.
Select the appropriate language from the list using the
button and press the OK or button to save the selected
language as a default language.
3.2 Country
/
You can select the country.
Select your country from the list using the
press the OK or button.
GB24
User’s Manual
/ button and
Page 26
3. Installation Wizard
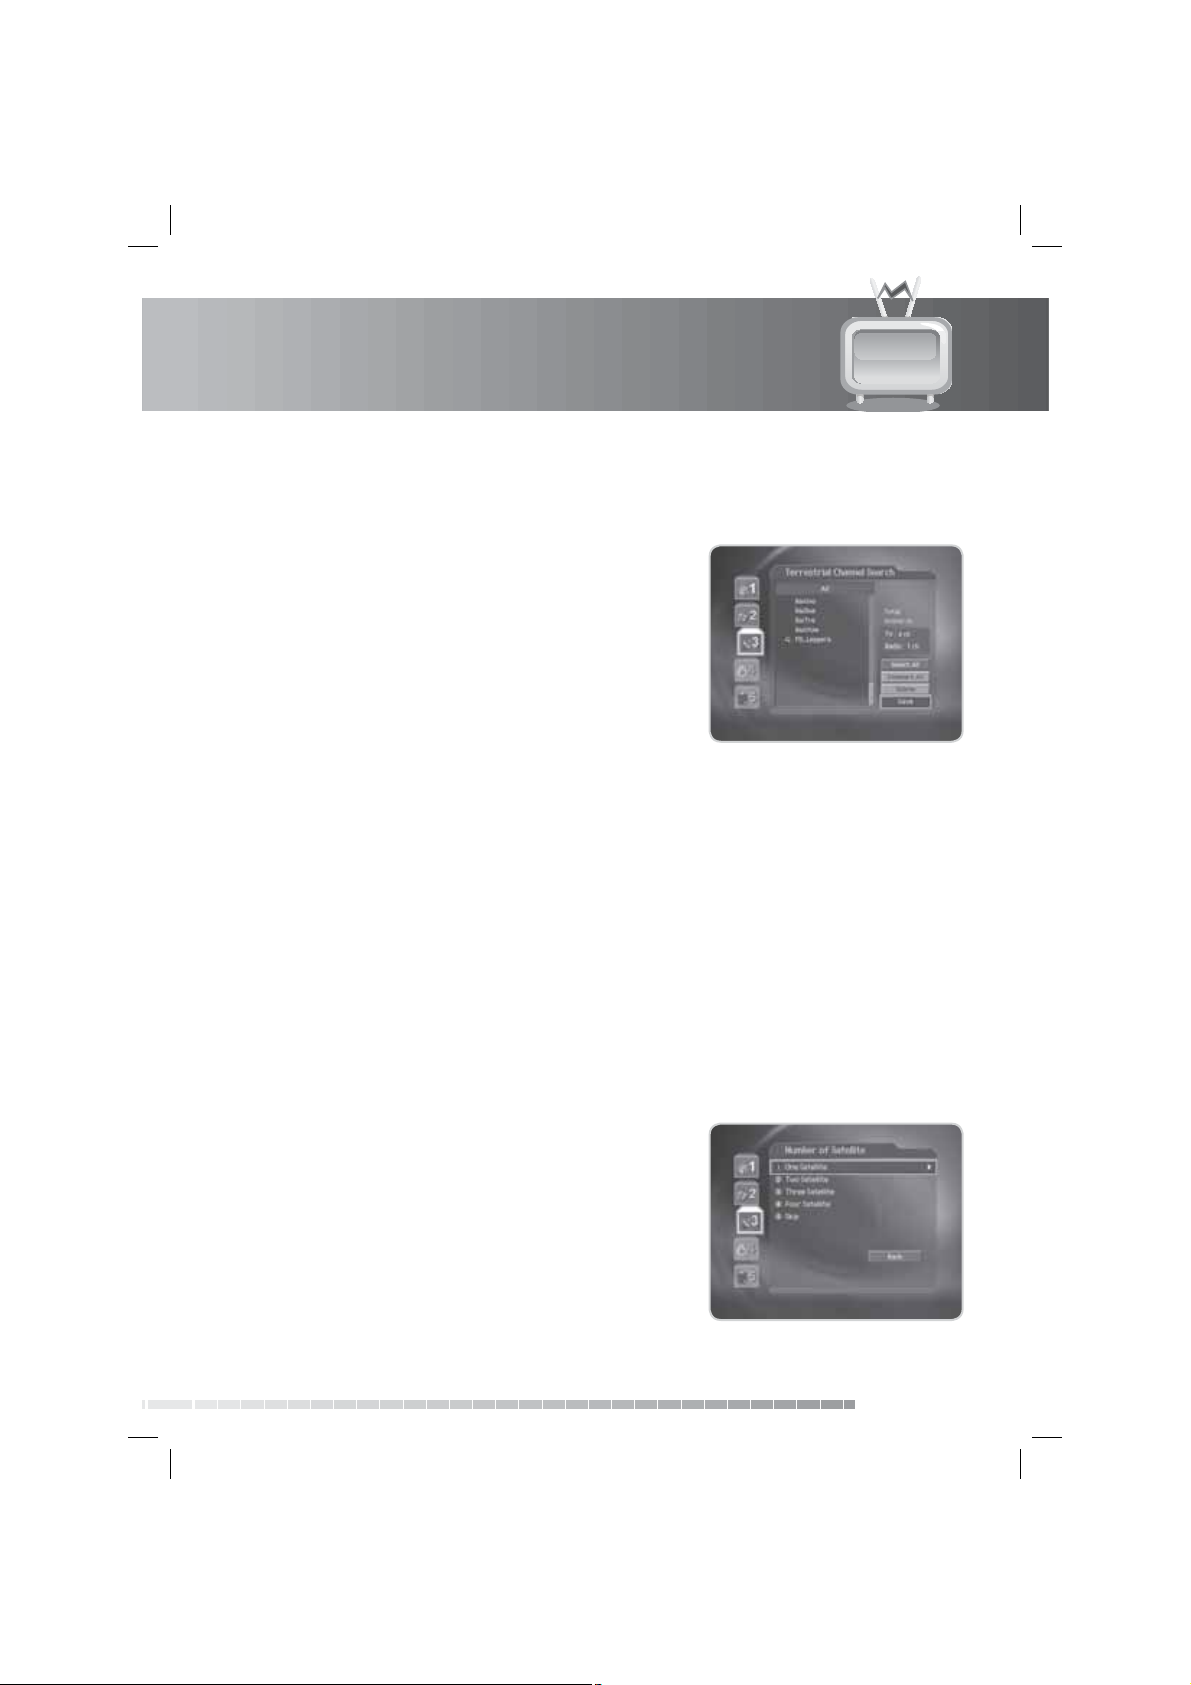
3.3 Terrestrial Channel Search
You can search the terrestrial channels.
1. Select Automatic Channel Numbering using the
button and press the OK or
Disable.
Select Next and press the OK button to search the
terrestrial channels
2. During the channel search, the cursor is located at Stop.
Therefore, if you press the OK button during the search, the
search will stop and the channels found until then will be
displayed.
3. If the search does not nd any channels, then press the OK
button to access the installation menu to search for the
channels again. Please make sure that you have connected your aerial correctly.
4. You can delete unwanted channels from the found channels. Select the channels to delete and press
the OK button. Then select Delete and press the OK button. To delete all channels, select Select All to
select all channels, select Delete and press the OK button.
5. After completing the channel search and deleting unwanted channels, select Save and press the OK
button to save the changes.
button to select Enable/
3.4 Default Channel List
/
Select Default Channel List using the / button and press the OK or button to store the default
satellite channels and move to the time setting screen.
3.5 Number of Satellite
You can select the number of satellite.
1. Select the number of satellite using the
press the OK or button.
2. Select Skip using / button and press the OK or
button to skip to the next.
/ button and
User’s Manual
GB25
Page 27

3. Installation Wizard
3.6 Antenna Setting
You can set the antenna and LNB information for channel search.
1. Select Satellite using the
button to select an option.
2. Select LNB Frequency using the / button and press
the OK or button to select an option. If the required
value does not exist, select User De ne and enter the LNB
frequency directly using the NUMERIC(0-9) buttons.
Note: If you select Universal, the 22kHz Tone value is set to
Disabled.
3. Select 22kHz Tone/DiSEqC Input using the
and press the OK or button to select an option.
3.7 Search Type
You can select the search type.
Select Scrambled Type/Channel Type using the
and press the OK or button to select an option.
/ button and press the OK or
/ button
/ button
GB26
User’s Manual
Page 28

3. Installation Wizard
3.8 Satellite Channel Search
You can search the satellite channels.
Please wait until the channel search is complete.
Satellite channel search is similar to that of the terrestrial
channel search. Please refer to 3.3 Terrestrial Channel Search.
3.9 Time Setting
You can set the GMT o set for current time and the daylight saving time.
1. Select GMT O set using the
or button. Select your GMT o set using the / button
and press the OK or
Note: The current time is set automatically whenever GMT
o set changes.
2. Select Daylight Saving Time using the
press the OK or
button to select Enable/Disable.
/ button and press the OK
button.
/ button and
3.10 Result
After all setting is complete, you can view the result screen.
Select Finish and press the OK button to complete the
installation wizard.
GB27
User’s Manual
Page 29

3. Installation Wizard
3.11 Installation Checklist
Before using the product, please make sure that you have completed the following steps.
Step Page Done?
Are the antennas connected correctly? GB16
Is the product connected to your TV? GB17
Is the power cord plugged in the wall outlet? GB23
Is the product in operation mode (not Standby mode)? GB23
Have you performed channel search in the installation wizard? GB24
Note: If you exit the install wizard without fully completing the channel searching procedure, you may
not have all of the channels available. In this case, you can use the installation menu to search for
more channels.
GB28
User’s Manual
Page 30

4. Basic Operation
4.1 Switching Channel
You can switch the current channel using one of the following methods.
1. Press the CH-/CH+ button.
2. Enter the channel number using the NUMERIC(0-9) buttons to move to the channel directly.
Note:
• The channel will be switched within the most recently watched channel group. Please refer to 4.7
Channel List.
• You can switch channels using the channel list or guide.
• To return to the previous channel, press the BACK button.
4.2 Volume Control
You can adjust the volume.
1. Press the V-/V+ button to adjust the audio volume.
2. Press the MUTE button to stop the audio temporarily.
Note: The mute function remains set while you switch
channels.
4.3 Audio/Subtitle/Teletext
1. Press the LANG button to display Audio list. Select the
audio language using the / button. Select the audio
direction (left, right, stereo) using the
/ button.
GB29
User’s Manual
Page 31

4. Basic Operation
2. Press the LANG button again to display Subtitle list. Select
the required subtitle language using the / button and
press the OK button. The subtitle will be displayed in the
selected language at the bottom of the screen.
Note: You can select a default subtitle language. Refer to
5.2.1 Subtitle Language.
3. Select Teletext using the
button while the subtitle list is displayed.
To display teletext menu, press the MENU button in
teletext mode. Select the teletext function you want using
the
/ button and press the OK button.
4.4 MHP Application
The MHP(Multimedia Home Platform) application makes it possible to access the EPG and various
information. (Sports, Movie, Multiview, advertisement, etc.)
1. Press the MHP button.
2. Select an application you want using the
Note: Please refer to the detailed information of each MHP application when operating the MHP
application.
/ button and press the OK
/ button and press the OK or button.
GB30
User’s Manual
Page 32

4. Basic Operation
4.5 Option List
You can view and con rm detailed information about the current channel and change the information if
necessary.
Tip:
• The default password is 0000.
• If you have forgotten your password, please contact your local product distributor.
1. Press the OPT+ button.
2. Select Favourite using the
or button. Select a favourite group using the / button
and press the OK button to register for favourite group.
Note: For detailed information about how to change
favourite group name and how to register favourite
channels from the complete channel list, please refer to
6.3 Edit Favourite Channels.
3. Select Lock/Unlock using the
OK or button. Select Lock or Unlock option using the
/ button and press the OK button.
Note: When switching to the locked channel, you must enter the password to view the channel.
4. Select Delete using the
message and press the OK button.
5. Select Information using the
/ button and press the OK
/ button and press the
/ button and press the OK or button. Select Ye s in the con rmation
/ button to display the channel information automatically.
GB31
User’s Manual
Page 33

4. Basic Operation
4.6 Programme Information
Programme information is always displayed for a certain period of time each time you switch channels.
You can view the programme information by pressing the i button while watching a programme. Press the
EXIT button to hide the i-plate.
1. General Information
The general information is displayed as the following.
2341
56 7 8 9
1. Channel number and name
2. Programme name
3. Icons
Displayed only when the channel is a satellite or terrestrial channel.
PKS
13
Displayed only when there is any MHP application.
Displayed only if the programme is reserved.
Represents parental level. Indicates the minimum level of age for viewing the
programme.
Displayed only when the channel is a locked channel.
Displayed only when subtitle information is available.
Displayed only when the channel is a scrambled channel.
Displayed only when there is any teletext information.
Displayed only when the programme is broadcast in Dolby Digital.
GB32
User’s Manual
Page 34

4. Basic Operation
4. Current time
5. Detailed programme information
6. Signal strength and quality
7. Current channel list icon
8. Programme broadcasting time and progress bar
9. Next programme Information
Note: If there is no programme information available, programme information is not displayed.
2. Detailed Programme Information
You can see the detailed information about the current
programme. Press the i button where the i-plate is displayed to
view detailed information.
Note:
• Press the i button again to hide the information box.
• If the detailed programme information is more than one
page, use the
page.
/ button to move to the previous/next
GB33
User’s Manual
Page 35

4. Basic Operation
4.7 Channel List
Six types of channel lists are provided for quick and easy channel search.
TV The list of all TV channels
Radio The list of all radio channels
Favourite The list of favourite channels in ve subgroups according to your private taste
Terrestrial The lists of channels classi ed by terrestrial channels
Satellite The lists of channels classi ed by satellites
Scramble The lists of channels classi ed by CAS types
You can display the channel list and switch to another channel on the channel list.
1. Press the LIST button while watching a programme to
display the channel list.
2. Select a channel using the
button to change the channel.
3. Enter the channel number directly using the NUMERIC(0-
9) buttons to move the cursor to the channel you want.
And then press the OK button to change to the selected
channel.
4. Press the
view the group list. Select a channel group using the /
button and press the OK or
using the / button and press the OK button. The
channel list for the selected subgroup is displayed.
Note:
• You can also display the channel list by pressing the OK
button.
• Press the PAGE-/PAGE+ button to move to the previous/
next page.
• To display scramble icon in the channel list, select On in
MENU
CH List.
button while the channel list is displayed to
PreferencesMiscellaneous SettingsOption in
/ button and press the OK
button. Select a sub-group
GB34
User’s Manual
Page 36

4. Basic Operation
4.8 Guide
The programme guide displays the detailed programme information of each channel, in time and date
order. You can customize your own programme guide to list the channels or programmes of interest to you
and schedule your viewing using the programme information.
You can view programme information for all channels.
1. Press the GUIDE button.
2. Move to previous /next programme within the same
channel using the / button.
3. Move to another channel using the / button. If there are
more than one channel, use the PAGE-/PAGE+ button to
move to channels by page. Also, you can enter the channel
number using the NUMERIC(0-9) buttons on the remote
control to move to the channel directly.
4. Select a programme and press the OK button. Then you can
watch the programme if it is on air or reserve it if it is the
future programme.
5. Press the i button in the selected programme to view the detailed information (if available) of the
selected programme.
1. Reserving a Programme
You can make reservations for the future programmes you wish to watch automatically.
1. Select a future programme and press the OK button to reserve.
2. Select Ye s and press the OK button. When a reservation has been completed, the reservation icon is
displayed on the reserved programme.
3. Press the OK button again to cancel the reservation. Select Ye s and press the OK button.
2. Selecting Channel Group
You can view programme information of the selected channel list by groups.
1. Press the RED button to display the channel group list.
2. Select a channel group using the
3. Press the
4. Select a sub group using the / button and press the OK
button.
button to move the cursor to the sub group.
/ button.
GB35
User’s Manual
Page 37

4. Basic Operation
3. Using Time Bar
You can quickly search the time zone using the time bar.
1. Press the GREEN button to display the time bar.
2. Select the each button using the
OK button to move the time bar.
If you press the button repeatedly, the same operation is
repeated.
3. Each button functions as follows.
Exits the time bar.
Moves to the current programme where the
Now
cursor is located.
Moves back to the previous programme or 30 minutes before.
Move forwards to the next programme or 30 minutes ahead.
Moves back to 2 hours before.
Moves forwards to 2 hours ahead.
Day Moves back to one day before.
Day Moves forwards to one day ahead.
/ button and press the
4. Schedule
You can add and edit the reserved programme using the schedule list. Press the YELLOW button to display
the schedule list.
Adding a Reservation
1. Select a blank space using the / button and press the
OK button to add a new reservation.
2. Select Channel No. using the
NUMERIC(0-9) buttons to enter the channel.
3. Select Start/End Time using the / button and press the
NUMERIC(0-9) buttons to change the time.
4. Select Repea t using the / button and press the /
button to change the repeat frequency.
5. Select Save and press the OK button to save the changes.
/ button and press the
GB36
User’s Manual
Page 38

4. Basic Operation
Note:
• If the channel is locked, you will be prompted to enter the password to complete the reservation.
• If the reserved programme is overlapped with other programme, adjust the reservation appropriately.
Editing a Reserved Programme
1. Select a programme you want to edit using the / button and press the OK button.
2. Select Delete using the / button and press the OK button to delete the reserved programme. A
pop-up will appear. Select OK and press the OK button.
3. Select Edit using the
information about how to edit the information, refer to Adding a Reservation.
5. Finding Programmes
You can nd the programme you want by entering the name and genre of the programme.
1. Press the BLUE button to display the keyboard.
2. Enter the programme name on the keyboard screen.
3. Select Previous/Next and press the OK button to switch
the keyboard layout.
4. Select Find and press the OK button.
5. Select a programme and press the OK button to watch or
reserve it.
Note: If you want to nd the programme by genre, select By
Genre and press the OK button. Select the genre and
press the OK button to nd.
/ button and press the OK button to edit the reserved programme. For more
4.9 MyEPG
MyEPG is a TV guide supported by MHP application.
You can view the detailed programme information of each
channel and nd programmes you want.
Press the MyEPG button.
GB37
User’s Manual
Page 39

4. Basic Operation
4.10 MEDIASET Premium PPV (MEDIASET Smartcard Users Only)
You can use Mediaset Premium PPV services only when you tune to a Mediaset Pay TV channel. You can
purchase a programme when you have the authority to buy it.
1. Switch to the Mediaset PPV channels using the CH-/CH+
button. When you are allowed to buy a PPV programme, a
banner pops up. The banner provides general information
on the programme that can be purchased. Press the GREEN
button to view a brief description of the programme.
2. Press the OK button to choose it. The purchase
con rmation screen will appear. The screen informs you
on the ongoing purchasing programme. Press the BLUE
button to view the terms and conditions of purchase.
3. Press the OK button to con rm the selection.
A con rmation message will appear.
Note:
• When you cannot purchase a PPV programme, make sure
the Mediaset Premium Smartcard is inserted into the
product.
• When you change channels and then come back to
the previous one where you have purchased the PPV
programme, the native i-plate will be shown.
GB38
User’s Manual
Page 40

5. Preferences
5.1 Parental Control
Tip:
• The default password is 0000.
• If you have forgotten your password, please contact your local product distributor.
1. Press the MENU button.
2. Select Preferences using the
or button.
3. Select Parental Control using the
the OK or
button.
/ button and press the OK
/ button and press
1. Censorship Classi cation
Censorship Classi cation allows you to block programmes according to the age level you have set.
1. Select Censorship Classi cation using the
press the OK or button.
2. Select the age level using the
OK button.
Note: You have to enter the password to watch the
programme which is blocked by the age level.
/ button and press the
/ button and
2. Change Password
You can change the current password.
1. Select Change Password using the
2. Enter New Password using the NUMERIC(0-9) buttons and press the OK button.
3. Enter the new password again to con rm Verify Password and press the OK button.
/ button and press the OK or button.
GB39
User’s Manual
Page 41

5. Preferences
5.2 Language Setting
1. Press the MENU button.
2. Select Preferences using the
button.
or
3. Select Language Setting using the
the OK or button.
1. Menu/Audio/Subtitle Language
1. Select Menu/Audio/Subtitle Language using the / button and press the OK or button.
2. Select the language using the / button and press the OK or button.
2. Subtitle Display
1. Select Subtitle Display using the / button.
2. Select from Auto and Manual using the OK or button.
/ button and press the OK
/ button and press
Auto Subtitles are displayed automatically in the prede ned subtitle language.
Manual Subtitles are displayed in the language when you select the subtitle language.
3. Subtitle Font
You can select the subtitle font.
1. Select Subtitle Font using the
2. Select from Variable and Fixed using the OK or button.
Variable Uses the horizontally variable subtitle font.
Fixed Uses the xed subtitle font.
/ button.
GB40
User’s Manual
Page 42

5. Preferences
5.3 Time Setting
1. Press the MENU button.
2. Select Preferences using the
button.
or
3. Select Time Setting using th
or button.
1. GMT O set
You can set the GMT o set for current time.
1. Select GMT O set using the
2. Select your GMT o set using the
Note:
• The current time is set automatically whenever GMT o set changes.
• When GMT O set is set to Auto, you have to tune the terrestrial channel for a certain period of time to
set the time automatically.
/ button and press the OK
/ button and press the OK
/ button and press the OK or button.
/ button and press the OK or button.
2. Daylight Saving Time
You can turn on/o the daylight- saving time. Select Daylight Saving Time using the / button and
press the OK or button to select Enable/Disable.
3. Power ON/OFF
You can set the time you want the product to be automatically turned on/o .
1. Select Power ON/OFF using the
2. Press the OK or
3. When you select Enable, enter the Channel No. or Time using the NUMERIC(0-9) buttons, select OK
and press the OK button.
Note: Once Power On/O has been set, it is repeated everyday.
button to select Enable/Disable.
/ button.
GB41
User’s Manual
Page 43

5. Preferences
5.4 Schedule
1. Press the MENU button.
2. Select Preferences using the / button and press the OK
or
button.
3. Select Schedule using the / button and press the OK or
button.
Note: For more information about Schedule, refer to 4.8.4
Schedule.
5.5 A/V Control
1. Press the MENU button.
2. Select Preferences using the / button and press the OK
or button.
3. Select A/V Control using the
or button.
/ button and press the OK
1. TV-SCART
1. Select TV-SCART using the / button and press the OK or button.
2. Select an option among CVBS, RGB and S-Video using the / button and press the OK or button.
2. VCR-SCART
Select VCR-SCART using the / button and press the OK or button to select from CVBS and S-Video.
GB42
User’s Manual
Page 44

5. Preferences
3. Audio Output
Select Audio Output using the / button and press the OK or button to select from Stereo and Mono.
4. Dolby Digital Output
Select Dolby Digital Output using the / button and press the OK or button to select On/O .
4. Dolby Digital Output
Select Dolby Digital Output using the / button and press the OK or button to select On/O .
5. Screen Ratio
You can set the aspect ratio of your TV.
1. Select Screen Ratio using the
2. Select from 4:3 and 16:9 using the OK or button.
6. Display Format
You can select the display format according to the TV screen ratio.
1. Select Display Format using the
2. If the screen ratio is set to 4:3, you can select an option among Auto, Letter Box and Center Mode
using the
3. If the screen ratio is set to 16:9, you can select an option among Auto, Pillar Box and Full Mode using
the / button and press the OK button.
/ button and press the OK button.
/ button.
/ button and press the OK or button.
GB43
User’s Manual
Page 45

5. Preferences
5.6 Miscellaneous Settings
1. Press the MENU button.
2. Select Preferences using the / button and press the OK
or
button.
3. Select Miscellaneous Settings using the / button and
press the OK or button.
1. i Display Time
You can set the automatic display time of the information box when the channel is switched.
1. Select i Display Time using the
2. Select a value between 1~20 seconds using the
Note: When it is set to Disable, the i-plate will not be displayed when the channel is switched.
2. OSD Transparency
/ button and press the OK or button.
/ button and press the OK or button.
You can set the transparency of On Screen Display (OSD).
1. Select OSD Transparency using the
2. Select an option among Disable, 25, 50 and 75 using the / button and press the OK or button.
Auto Subtitles are displayed automatically in the prede ned subtitle language.
Manual Subtitles are displayed in the language when you select the subtitle language.
/ button and press the OK or button.
3. Option in CH List
You can set whether or not the scramble icon is displayed.
1. Select Option in CH List using the
2. Press the OK or button to select On/O .
/ button.
GB44
User’s Manual
Page 46

5. Preferences
4. MyEPG
You can set whether or not to use the MyEPG.
1. Select MyEPG using the
2. Press the OK or
Note:
• MyEPG will be automatically updated in the standby mode when MyEPG is set to On.
• The product is automatically powered o and on again whenever MyEPG setting changes.
5.7 MHP Settings
1. Press the MENU button.
2. Select Preferences using the / button and press the OK
or button.
3. Select MHP Settings using the / button and press the
OK or button.
/ button.
button to select On/O .
1. i Display by MHP App.
1. Select i Display by MHP App. using the / button.
2. Press the OK or button to select Enable/Disable.
2. Show MHP logo
1. Select Show MHP logo using the / button.
2. Press the OK or button to select Enable/Disable.
GB45
User’s Manual
Page 47

6. Edit Channels
6.1 Edit Terrestrial Channel Lists
Tip:
• The default password is 0000.
• If you have forgotten your password, please contact your local product distributor.
You can edit the terrestrial channels.
1. Press the MENU button.
2. Select Edit Channels using the
OK or button.
3. Select Edit Terrestrial Channel Lists using the / button
and press the OK or button.
4. Press the OK or button in Group to select the group of
channel list. Select the group using the / button and
press the OK button.
5. Select a channel using the
button. Select Renumber using the / button and press
the OK button. Press the NUMERIC(0-9) buttons to enter
the channel number.
6. Select a channel using the
button. You can select more than one channel. Select Move
using the / button and press the OK button. Move the
cursor to the destination using the / button and press
the OK button.
7. Select a channel using the
OK button. You can select one channel at a time. Select
Rename using the / button and press the OK button.
Enter a channel name directly using the keyboard displayed
on the screen. When entering channel name is complete,
select OK and press the OK button. .
8. Select a channel using the
channel. Select Delete/Lock using the / button and press the OK button.
9. Select Select All/Unselect All using the / button and press the OK button to select/unselect all
channels.
Note:
• When the locked channel(s) is selected or all channels are locked, Lock is switched to Unlock. When
you select Unlock and press the OK button, locked channel is switched to an unlocked channel.
• Select Trash in Group to restore the deleted channels.
/ button and press the
/ button and press the OK
/ button and press the OK
/ button and press the
/ button and press the OK button. You can select more than one
GB46
User’s Manual
Page 48

6. Edit Channels
6.2 Edit Satellite Channel Lists
You can edit the satellite channels.
1. Press the MENU button.
2. Select Edit Channels using the
OK or
3. Select Edit Satellite Channel Lists using the / button
Note: For more information about how to edit the satellite
button.
and press the OK or
channels, refer to 6.1 Edit Terrestrial Channel Lists.
button.
6.3 Edit Favourite Channels
You can edit the favourite channels.
1. Press the MENU button.
2. Select Edit Channels using the
OK or button.
3. Select Edit Favourite Channels using the / button and
press the OK or button.
4. You will be prompted to select a favourite group. Select a
favourite group to edit using the
OK button.
/ button and press the
/ button and press the
/ button and press the
The icons for editing the favourite channel list are described in the following table.
Add Adds to the favourite group.
Remove Removes from the favourite group.
Channel Group Selects a channel group.
Fav.Group Changes the favourite group.
Move Changes the order of channels within the favourite group.
Rename Renames the name of favourite group.
Sort Sorts channels by number or name in all TV/radio channel list.
Unselect All Unselects all selected channels.
GB47
User’s Manual
Page 49

6. Edit Channels
6.4 Automatic Channel Numbering
You can set whether or not the channels are numbered automatically by broadcaster.
1. Press the MENU button.
2. Select Edit Channels using the
3. Select Automatic Channel Numbering using the
Enable/Disable.
Note:
• When changing from Enable to Disable or vice versa, the terrestrial channels will be searched again
and the product will reboot automatically.
• When Automatic Channel Numbering is set to Disable, Edit Terrestrial Channel Lists menu and Edit
Satellite Channel Lists menu turn into a single menu; Edit Channel Lists.
6.5 Renew Channel Numbers
You can renew the channel numbers you edit.
1. Press the MENU button.
2. Select Edit Channels using the
3. Select Renew Channel Numbers using the / button and press the OK or button.
4. Select OK and press the OK button to renew the channel number you edit.
/ button and press the OK or button.
/ button and press the OK or button to select
/ button and press the OK or button.
6.6 Import/Export Channels
You can transfer and edit the channel data and menu by connecting the PC to the receiver.
1. Download the Uniformula programme for this product into
your computer (http://www.humaxdigital.com) and install
the Uniformula.
2. Connect your product and PC using the RS-232C cable.
3. Press the MENU button.
4. Select Edit Channels using the
OK or
5. Select Import/Export Channels using the / button and
6. Select Download Channels from PC/Upload Channels to
Note: For more information about how to use the Uniformula, refer to the Help>Contents menu in the
button.
press the OK or
PC using the / button and press the OK or button.
Uniformula.
button.
GB48
User’s Manual
/ button and press the
Page 50

7. Installation
7.1 Terrestrial Channel Search
Tip:
• The default password is 0000.
• If you have forgotten your password, please contact your local product distributor.
You can search the terrestrial channels.
1. Press the MENU button.
2. Select Installation using the
or button.
3. Select Terrestrial Channel Search using the / button
and press the OK or button.
1. Automatic Search
If your product is connected to the aerial and television, you can automatically search channels without
entering any other information.
1. Select Automatic Search using the
the OK or
2. Wait while channel search continues. This may take a few
minutes.
3. While operating search, the cursor is located at Stop.
Therefore, if you press the OK button during searching, the
operation is stopped and the channels found until then will
be displayed.
4. If search operation is successfully completed and the
channel does not exist, press the OK button and try to reset
the search operation again if necessary.
5. You can delete unnecessary channels from the searched channels. Select the channels to delete and
press the OK button. Then select Delete and press the OK button. To delete all channels, select Select
All to select all channels, select Delete and press the OK button.
6. When completing channel search and deleting unnecessary channels, select Save and press the OK
button to save the changes.
button.
/ button and press the OK
/ button and press
GB49
User’s Manual
Page 51

7. Installation
2. Manual Search
You can search channels manually by searching parameters, using the MUX information.
1. Select Manual Search using the
OK or
2. Select Channel using the / button and press the
3. Select Frequency using the
4. Select Band Width using the / button and press the OK or button to select from 7 and 8MHz.
5. Select Network Search using the
6. Select Search using the
button.
button. Select one of channels using the /
OK or
button and press the OK button. When entering channel
value, the appropriate frequency value is displayed.
OK or
button. Enter the frequency using the
NUMERIC(0-9) buttons and press the OK button. When
entering frequency, the appropriate channel for the
entered frequency is automatically displayed on channel.
3. Antenna Power
Make sure to set the Antenna Power to On when you connect an active antenna to the ANTENNA IN
connector on the rear of the product. Select Antenna Power using the / button and press the OK or
button to select On/O .
/ button and press the
/ button and press the
/ button and press the OK or button to select Enable/Disable.
/ button and press the OK button. Channel search will activate.
Antenna Power On
In case you are using an active antenna that has its power supplied by the aerial, the antenna power
should be set to On.
• Active antenna
Power supply from external power adaptor is not necessary. (ex. Indoor Antenna)
Antenna Power O
In case you are using a passive antenna or an active antenna with its own power source, the antenna
power should be set to O . (The default value is O .)
Caution: Be sure to turn o the antenna power when using an active antenna with its own power
source. Damage may occur to the antenna if left on.
GB50
User’s Manual
Page 52

7. Installation
4. Invisible Channel Search
Select Invisible Channel Search using the / button and press the OK or button to select Enable/
Disable.
Note: If you set Invisible Channel Search to Enable, search channel again to view the invisible channels.
7.2 Satellite Channel Search
Tip:
• The default password is 0000.
• If you have forgotten your password, please contact your local product distributor.
You can search the satellite channels.
1. Press the MENU button.
2. Select Installation using the
OK or button.
3. Select Satellite Channel Search using the / button and
press the OK or
button.
/ button and press the
1. Antenna Setting (Fixed Antenna)
You can set the antenna and LNB information for channel search. If the antenna is not properly set, channel
search cannot be activated which means you cannot watch any of the programmes on air.
1. Select Antenna Setting using the
the OK or button.
2. Select Satellite using the / button and press the
OK or
button. Select the satellite the antenna is pointing
to using the / button and press the OK or button.
If the required satellite is not available in the list, select
User De ne.
3. Select Satellite Alternative using the / button and
press the OK or button to add the satellite you set. If
there is no satellite that the satellite alternative is set to
Enable, channel search is not available.
/ button and press
GB51
User’s Manual
Page 53

7. Installation
4. Select LNB Frequency using the / button and press the OK or button to select an option. If
the required value does not exist, select User De ne and enter the LNB frequency directly using the
NUMERIC(0-9) buttons.
Note: If you select Universal, the 22kHz Tone value is set to Disable.
5. Select 22kHz Tone using the / button and press the OK or button to select Enable/Disable.
Enable Dual LNB is used or two antennas are connected to the 22KHz tone switch box.
Disable 22KHz is not in use.
6. Select DiSEqC Input using the
7. Select SCD Setting using the / button and press the OK or button. Select Single Cable System
using the / button and press the OK or button to select a user band you want to use. Select
Band Frequency using the
required value does not exist, select User De ne and enter the band frequency directly using the
NUMERIC(0-9) button.
8. Select Satellite Position using the / button and press the OK or button to select an option.
Note: When only the satellite antenna you have supports the single cable system, set the single cable
system and band frequency. For more information about the single cable system, refer to the
satellite antenna manual.
/ button and press the OK or button to select an option.
/ button and press the OK or button to select an option. If the
GB52
User’s Manual
Page 54

7. Installation
2. Antenna Setting (Motor Antenna)
When using a motor antenna, press the OPT+ button in antenna setting menu.
Motor Typ e
1. Select Motor Type using the / button and press the
OK or button.
2. Select LNB Frequency using the
the OK or
value does not exist, select User De ne and enter the LNB
frequency directly using the NUMERIC(0-9) buttons.
3. Select Motor Kind using the
or
DiSEqC1.2 General motor antenna using DiSEqC1.2
USALS Motor antenna using USALS
Note: When Motor Kind is set as DiSEqC 1.2, both My Longitude and My Latitude are set to Disabled.
4. Select My Longitude using the
using the NUMERIC(0-9) buttons. Select from East/West using the / button and press the OK
button to complete.
5. Select My Latitude using the / button and press the OK or button. Enter my latitude value using
the NUMERIC(0-9) buttons. Select from North/South using the
to complete.
button to select an option. If the required
button to select an option.
/ button and press
/ button and press the OK
/ button and press the OK or button. Enter my longitude value
/ button and press the OK button
Edit Satellite Data
1. Select Edit Satellite Data using the / button and press
the OK or
2. Select Satellite using the / button and press the
OK or button. Select a satellite to edit using the OK or
button.
3. Select Satellite Alternative using the / button and
press the OK or
4. Select Satellite Longitude using the / button and press
the OK or button. Enter my longitude value using the
NUMERIC(0-9) buttons. Select from East/West using the
/ button and press the OK button to complete.
5. Select Save using the
Note: Satellite Longitude is editable for User De ne Satellite only.
button.
button to add the satellite you set.
/ button and press the OK button.
GB53
User’s Manual
Page 55

7. Installation
Motor Setting
1. Select Motor Setting using the / button and press the
OK or button.
2. Select Satellite using the / button and press the OK
or button. Select the satellite the antenna is pointing to
from the options using the
or button.
3. Select Transponder using the
4. Select Driving Mode using the / button and press the OK or button to select an option.
5. Select Go to Stored Position using the
6. Select Store Current Position using the
Note: You can set the antenna position by repeating the procedure above.
7. Select Recalculate using the
Note: When Motor Kind is set as USALS, Driving Mode, Store Current Position, Recalculate is set to
button. Select an option for transponder using
OK or
the
/ button and press the OK or button. To add
another transponder, select User De ne from the list.
Add transponder screen will appear. Enter the values for
Frequency, Polarization, Symbol Rate and FEC. Select Done and press the OK button to complete.
When motor driving is set as Step or Time, a pop up will appear to set the driving size. Select the
driving size using the
Continuous Motor moves continuously.
Step Motor moves by speci ed unit.
Time Motor moves during speci ed time.
to the position of the selected satellite. Wait till the antenna moves to the position of the satellite.
Con rm signal strength and quality level and ne-tune the antenna direction.
position of the satellite. The position of the antenna headed for the certain satellite will be saved.
all satellites based on one satellite. Adjust the antenna position of a certain satellite. To readjust all
positions, select OK and press the OK button.
Disabled.
/ button and press the OK
/ button and press the
/ button. Select OK and press the OK button.
/ button and press the / button to move the antenna
/ button and press the OK button to save the adjusted
/ button and press the OK button to recalculate the position of
GB54
User’s Manual
Page 56

7. Installation
Installer Menu
1. Select Installer Menu using the / button and press the
OK or button to set default setting and operation limit
for motor antenna.
2. Select Motor Limit using the / button and press the OK
or
button to select Enable/Disable. To save the present
location, change the Motor Limit to Enable.
Enable
Disable Setting is released.
Note:
• When Motor Limit is set to Enable, Limit Position and Set Limits are set to Disabled.
• When setting new motor limit, set to Disable.
3. Select Limit Position using the
4. Select Set Limit using the / button and press the / button to move the antenna to the limit
position.
Note: When limit is set, Motor Limit is automatically set to Enable.
5. Select Reset Positions using the
motor antenna to the factory default. A pop-up will appear. Select OK and press the OK button. Please
wait while the motor antenna is restored.
Note: Reset may not be activated depending on the condition of the antenna. Repeat the procedure
above if necessary.
Motor limit is set. motor does not exceed
the limit.
/ button and press the OK or button to select East/West.
/ button and press the OK button to restore the position saved at
GB55
User’s Manual
Page 57

7. Installation
3. Automatic Search
If the product is connected to the antenna and TV, you can automatically search satellites and channels
without entering any other information.
1. Select Automatic Search using the
the OK or button.
2. Select Satellite using the
button to select the satellite.
3. Select Search Type using the / button and press the OK
or button. Select an option among All, FTA and CAS and
press the OK or
All Searches all channels.
FTA Searches only free channels.
CAS Searches channels for selected CAS.
4. Select Channel Type using the
TV and Radio and press the OK or button.
5. Select Search using the / button and press the OK button. Channel search will activate. Select
Select All/ Unselect All using the
Select a channel using the / button and press the OK button. Select Delete and press the OK
button. To save search results, select Save and press the OK button.
Note:
• When you select Stop during channel search, the search will be discontinued and the accumulated
search results will show.
• If there are no channels available, a message indicating the result will pop up.
button.
/ button and press the OK or
/ button and press
/ button and press the OK or button. Select an option among All,
/ button and press the OK button to select/unselect all channels.
GB56
User’s Manual
Page 58

7. Installation
4. Manual Search
1. Select Manual Search using the / button and press the
OK or button.
2. Select Satellite using the / button and press the OK or
button to select the satellite.
3. Select Transponder using the
the OK or button. Select a transponder using the
/ button and press the OK or button. To add
another transponder, select User De ne from the list.
Add transponder screen will appear. Enter the values for
Frequency, Polarization, Symbol Rate and FEC. Select
Done and press the OK button to complete.
4. Select Network Search using the / button and press the OK or button to select Enable/Disable.
5. Select Search Type using the / button and press the OK or button.
Select an option among All, FTA and CAS and press the OK or button.
6. Select Channel Type using the
Select an option among All, TV and Radio and press the OK or button.
7. Select Search using the / button and press the OK button. Channel search will activate.
5. Other Search
1. Select Other Search using the / button and press the
OK or button.
2. Select Advanced Search using the / button and
press the OK or
Transponder, Video PID, Audio PID and PCR PID. Select
Search using the / button and press the OK button.
Channel search will activate.
3. Select SMATV Search using the / button and press
the OK or
Polarization, Symbol Rate and FEC. Select Search using
the / button and press the OK button. Channel search
will activate.
4. Select Multiple Manual Search using the / button and press the OK or button. Enter the values
for Satellite, Edit TP List, Search Type and Channel Type. Select Search using the / button and
press the OK button. Channel search will activate.
Note: You can edit transponders in the Edit TP List.
button. Enter the values for Satellite,
button. Enter the values for Frequency,
/ button and press
/ button and press the OK or button.
GB57
User’s Manual
Page 59

7. Installation
7.3 Software Update
In order to maintain proper performance of the product, it is essential to have the most up-to-date
software. Visit the Humax website to check the latest news and newly released software versions.
– http://www.humaxdigital.com.
It is recommended that you periodically check for the availability of software update.
1. Press the MENU button.
2. Select Installation using the
or
button.
3. Select Software Update using the / button and press
the OK or button.
1. OTA (Over The Air)
OTA, an abbreviation of Over–the-Air, is a standard for the transmission of software through a
broadcast system. OTA is simply an alternative method for downloading software versions. However, the
manufacturers reserve the right for deciding the release of the software for their products by beaming the
latest version of software over the air via aerial. The software update via aerial will only occur under the
following circumstances.
1. The equipment should have the appropriate loader software.
Caution: Please note that if the normal loader software is not equipped, the product may not be
2. The manufacturer decides to release the software via a designated channel.
3. The equipment must be tuned properly to the same aerial equivalent to that of the manufacturer.
4. Update software when the signal strength and quality is high. If the signal strength and quality are not
Caution:
• Please be careful to keep the power on and the power cord plugged in during software update. If the
• Please be careful not to pull out the signal line (co-axial cable) during software update. Update may be
updated or operate properly after software update.
recommendable, perform the software update later.
power is o during software update, fatal damage may be caused to the product.
interrupted and the product may not operate.
/ button and press the OK
GB58
User’s Manual
Page 60

7. Installation
Note:
• It may take 5~10 minutes to update software.
• Other functions will not activate while software update takes place.
• You cannot schedule programmes during software update.
2. Automatic Update
You can set the product to nd HUMAX software update site and update software automatically.
1. Select Automatic Update using the
2. Automatically search for new software. Select Cancel and press the OK button to nish search.
3. When detecting software update, the following result is displayed. If new software is not found by
automatic update, use manual update.
4. Select Ye s and press the OK button to start updating. Select No and press the OK button to return to
the previous menu without updating.
5. When completing the software update, the product is automatically powered o and on again.
3. Manual Update
You can perform manual update using know MUX information.
1. Select Manual Update using the
2. Select Channel using the / button and press the OK or button. Select the channel number using
the / button and press the OK or button.
3. Select Frequency using the / button and press the OK or button. Enter the frequency using the
NUMERIC(0-9) buttons.
4. Select Search and press the OK button to search software. Existing new software will show. If new
software does not exist, press the OK button to return to the manual update menu.
5. Select Ye s and press the OK button to start updating. Select No and press the OK button to return to
the previous menu. Performs software update. Please wait until it is completed.
6. When completing the software update, the product is automatically powered o and on again.
/ button and press the OK or button.
/ button and press the OK or button.
GB59
User’s Manual
Page 61

7. Installation
4. Software Update from PC
You can connect the product to your PC and update the software directly by transferring the latest
software from the PC. Follow the steps below to download the latest software over the internet.
1. Download the latest software from the website (http://www.humaxdigital.com).
2. Download and install the download tool.
3. Connect your PC to the product with an RS-232C serial cable.
4. Execute the installed download tool and follow the instructions provided.
5. Power On/O to start operating.
RS-232C Cable
GB60
User’s Manual
RS-232C
Page 62

7. Installation
7.4 Regular Auto Update
You can update the channel and software and specify the update option.
1. Press the MENU button.
2. Select Installation using the
OK or
3. Select Regular Auto Update using the / button and
4. Select Update Target using the
5. Select Auto Search in Standby/Operate using the /
6. Select Search Time using the
7. Select Frequency using the / button and press the OK or button to select from Daily and
button.
press the OK or
OK or
button. Select an option from the list using the
/ button and press the OK or button.
button and press the OK or button to select Enable/
Disable.
OK or button. When selecting Enable, set Search Time using the NUMERIC(0-9) buttons and select
OK and press the OK button.
Weekly.
button.
/ button and press the
/ button and press the
/ button and press the
GB61
User’s Manual
Page 63

7. Installation
7.5 Default Setting
Tip:
• The default password is 0000.
• If you have forgotten your password, please contact your local product distributor.
Default Setting enables you to restore the product to the factory default.
Warning: Please note that once you perform Default Setting, all data such as antenna setting
1. Press the MENU button.
2. Select Installation using the
3. Select Default Setting using the / button and press the
4. Select Ye s and press the OK button to restore all setting to
5. You will be prompted to enter your password again before
6. When default setting is completed, installation wizard pops up automatically. For detailed information
information, channel list, and all user con gured data will be deleted.
/ button and press the OK
or button.
OK or button.
factory default. To return to the previous menu, select No
and press the OK or EXIT button.
starting to load default setting. Enter the password to
proceed.
about installation wizard, refer to Chapter 3. Installation Wizard.
GB62
User’s Manual
Page 64

8. System
8.1 Status
You can view system information.
1. Press the MENU button.
2. Select System using the
button.
3. Select Status using the
button.
Note: DTT version in the status menu may be requested
when contacting the call center.
8.2 Signal Detection
You can view the signal strength and signal quality of the channel that is currently on AV.
1. Press the MENU button.
2. Select System using the
3. Select Signal Detection using the / button and press the OK or button.
/ button and press the OK or
/ button and press the OK or
/ button and press the OK or button.
8.3 Common Interface
You can view the current status of the CI-Module.
1. Press the MENU button.
2. Select System using the
3. Select Common Interface using the / button and press the OK or button.
Note: The displayed information about a Common Interface may di er depending on Common
Interface type.
/ button and press the OK or button.
User’s Manual
GB63
Page 65

8. System
8.4 Modem Setup
You can set the modem information appropriate for your modem and test the modem.
1. Press the MENU button.
2. Select System using the
3. Select Modem Setup using the
4. Con gure and test the modem.
This equipment has been approved [Council Decision 98/482/EC - “TBR 21”] for single terminal connection
to the Public Switched Telephone Network (PSTN). However, due to di erences between the individual
PSTNs provided in di erent countries, the approval does not, of itself, give an unconditional assurance of
successful operation on every PSTN termination point. In the event of problems, you should contact your
equipment supplier in the rst instance.
/ button and press the OK or button.
/ button and press the OK or button.
GB64
User’s Manual
Page 66

9. Pay per View services
9.1 MEDIASET PREMIUM
You can view the information on the card and the list of purchased programmes.
1. Press the MENU button.
2. Select Pay per View services using the
press the OK button.
3. Select MEDIASET PREMIUM using the
press the OK button.
4. Select CARD INFORMATION using the / button and
press the OK button to view the information on the card.
5. Select SELECTED PROGRMS using the
and press the OK button to view the list of purchased
programmes.
9.2 Irdeto/Conax Conditional Access
You can view the current status of the Conditional Access.
1. Press the MENU button.
2. Select Pay per View services using the
3. Select Irdeto/Conax Conditional Access using the / button and press the OK button.
4. Check the information of the Conditional Access.
/ button and
/ button and
/ button
/ button and press the OK button.
9.3 PANGEA
1. Press the MENU button.
2. Select Pay per View services using the / button and press the OK button.
3. Select PANGEA using the / button and press the OK button. For more information about PANGEA,
refer to the 9.1 MEDIASET PREMIUM.
GB65
User’s Manual
Page 67

10. Appendix
10.1 Menu Map
Preferences
1. Parental Control
2. Language Setting
3. Time Setting
4. Schedule
5. A/V Control
6. Miscellaneous Settings
7. MHP Settings
1. Edit Terrestrial Channel Lists
2. Edit Satellite Channel Lists
3. Edit Favourite Channels
4. Automatic Channel Numbering
5. Renew Channel Numbers
Edit Channels
Installation
System
Pay per View services
6. Import/Export Channels
1. Terrestrial Channel Search
2. Satellite Channel Search
3. Software Update
4. Regular Auto Update
5. Default Setting
1. Status
2. Signal Detection
3. Common Interface
4. Modem Setup
1. MEDIASET PREMIUM
2. Irdeto Conditional Access
3. Conax Conditional Access
4. PANGEA
GB66
User’s Manual
Page 68

10. Appendix
10.2 Universal Remote Control
1. Using the Universal Remote Control
You can manipulate the TV using the remote control provided by Humax.
Note:
• This function may not be supported depending on the TV model.
• The listed TV codes may di er from the TV codes set to the remote control.
1. Point the remote control towards the remote control sensor of the TV.
2. Press the TV button, and the TV button LED will blink once.
3. Keep pressing the TV button for 3 seconds; then the TV button LED will turn on.
4. Press the 3 digit number of the TV code using the NUMERIC(0-9) buttons. Refer to the following
TV Code List.
5. The TV button LED will blink twice when you detach your nger from the TV button.
6. The TV power will turn on or o when the setting is completed.
TV Code List
BrandCode
A MARK 002
ABEX 016
ACCENT 004
ACTION 110, 124
ACURA 004
ADMIRAL 030, 042, 076, 099, 123, 159, 160
ADVENTURA 177
ADYSON 016, 063
AIKO 029
AKAI 015, 099, 109, 124, 161, 172, 177
AKURA 064, 071, 161
ALARON 051, 062
ALBA 004, 017, 018, 064, 123, 117
ALBIRAL 157, 158
ALLORGAN 118
ALLSTAR 161
AMBASSADOR 049
AMPLIVISION 063
AMSTRAD 004, 018, 047, 049, 145
AMWAY 161
ANAM 003, 004, 052
BrandCode
ANAM NATIONAL 024
ANITECH 004, 071, 161
ANSONIC 127
AOC 002, 009, 015, 056
ARC EN CIEL 171
ARCAM 061, 063
ARCHER 002
ASA 159, 160, 161
ASBERG 158
ASUKA 064, 071
ATLANTIC 098
AUDINAC 081
AUDIOSONIC 018, 071
AUDIOVOX 002, 029, 052, 084
AUMARK 026
AUTOV OX 068, 076, 097, 160
BANG & OLUFSEN 160
BARCO 086
BASIC LINE 004, 064
BAUR
018, 087, 097, 099, 102, 108, 175,
176, 177, 178, 181, 185
GB67
User’s Manual
Page 69

10. Appendix
BrandCode
BAYSONIC 052
BEAUMARK 050
BEC 099, 110, 124
BECRESE 040, 099, 108, 109, 110, 172, 177
BEKO 161, 162, 163, 164, 165
BELCOR 009
BELL & HOWELL 006, 038, 106
BEON 018
BINATONE 063
BLACK PANTHER 158
BLACKSTRIPE 040, 106, 108, 172
BLAUPUNKT 059, 060, 061
BLUE SKY 064
BLUE STAR 075
BOOTS 063
BOSCH-BAUER 098
BPL 075
BRANDT
ELECTRONIQUE
BRADFORD 052
BRINKMANN 123
BRITANNIA 062
BRIONVEGA 159
BROCKWOOD 009, 172, 177
BROKSONIC 002, 067, 085, 172, 177
BROTHER 071
BRUNS 126, 158, 159, 160
BSR 093, 118
BTC 064
BUSH
CAMPLE 172, 177
CANDLE 015, 025, 057
CAPEHART 124, 172
CAPSONIC 071
CARNIVALE 015
CARREFOUR 017
CARVER 023, 046
171
004, 017, 018, 064, 075, 093, 099,
117, 172
BrandCode
CASCADE 004
CATHAY 018
CCE 063, 018, 078
CCI 115
CENTURION 018
CENTURY 059, 160
CGE 101, 123
CIE 133, 161
CIMLINE 004, 117
CINERAL 029, 084, 172
CIRCUIT CITY 177
CITIZEN 015,019,025,026,029,040,057,074
CLAIRTONE 056
CLARIVOX 018, 125, 168
CLATRONIC 098, 127, 158, 161
CME
CONCERTO 025
CONDOR 098, 158, 161
CONIC 110, 172
CONTEC 004, 017, 052, 056, 062, 172
CONTINETAL
EDISON
COSMOS 161
CRAIG 052
CRIPTOVISION 105
CROSLEY 023, 110, 159, 160, 172, 177
CROWN 004, 018, 019, 052, 127, 158, 161
CS ELECTRONICS 062
CTC 098, 158
CURTIS MATHES
CXC 052
CYBERTRON 064
DAEWOO
DAINICHI 064
DANSAI 018
004, 005, 017, 018, 028, 042, 049,
063, 065, 066, 068, 076, 079, 087
141, 171
006, 015, 019, 020, 021, 023, 026,
030, 035, 038, 025, 040, 044, 084,
106, 172
004, 009, 018, 019, 029, 084, 133,
161
GB68
User’s Manual
Page 70

10. Appendix
BrandCode
DAYTON 004, 009, 019, 108
DE GRAAF 066, 097, 161
DECCA 018, 028, 129, 161
DECCAV IDEO 161
DENON 035
DESMET 098
DIXI 003, 004, 018, 126
DUAL 097
DUAL TEC 063
DUMINT 127
DUMONT 007, 009, 158, 159, 160, 172, 177
DYNATECH 063, 172, 177
EB TELECOM 105
ECR 172
ECTEC 081
ELBE 116, 168
ELBIT 160, 177
ELECTROBAND 056, 177
ELECTROHOME 080, 106, 110, 172, 177
ELECTROVENDA 161
ELEKTA 071
ELEKTRONIKA 161
ELIN 017, 161
ELITE 040, 064, 098, 106, 172
ELMAN 127, 158, 163
ELTA 004
MERSON
E
EON 172
ENVISION 015
ERRES 018
ESC 161
EURO-FEEL 071
EUROMANN 071
EUROPHON 127, 158
FERGUSON 018, 163, 166, 167, 168, 169
FIDELITY 062, 097, 104
009, 019, 038, 049, 050, 051, 051,
053, 054, 056, 067, 072, 074, 075,
085, 158, 159, 161, 172, 177
BrandCode
FINLADIA 106
FINLUX
FIRST LINE 118, 004, 062, 063
FISHER
FORMENTI 018, 098, 103, 160, 161
FORTRESS 160, 172
FRABA 161
FRONTECH 042, 071, 099
FUJITSU 028, 051, 124, 172, 177
FUNAI 047, 051, 052, 071, 118, 172, 177
FUTURETECH 052
GALAXIS 123, 142, 158, 161
GALAXY 158
GBC 099
GE
GEC 018, 028, 063, 095, 110, 129, 161
GELOSO 004, 009
GENEXXA 042, 064
GIBRALTER 007, 009, 015
GO VIDEO 026
GOLDSTAR
GOODMANS 017, 018, 028, 051, 063, 133, 161
GPM 064
GRADIENTE 022, 025, 046, 082
GRADIN 098
GRAETZ 042, 099
GRANADA 018, 028, 063, 097, 109, 124, 161
GRANDIN 075
GRUNDIG 018, 059, 060, 068, 137
GRUNPY 051, 052
HALIEAX 071
HALLMARK 050, 172, 177
HANSEATIC 018, 089, 097, 098, 099, 118, 119
HARLEY DAVIDSON 051, 172, 177
018, 028, 051, 093, 129, 158, 160,
161
038, 041, 063, 097, 106, 108, 126,
160, 172
011, 013, 020, 021, 024, 030, 034,
050, 075, 084
156, 001, 009, 015, 016, 018, 019,
025, 033, 050, 063, 071, 093, 110,
124, 140, 161
GB69
User’s Manual
Page 71

10. Appendix
BrandCode
HARMAN KARDON 023
HARRAD 172, 177
HARVARD 052, 172, 177
HCM 004, 071, 075, 161
HEATHKIT 177
HEMMERMANN 097
HIFIVOX 171
HINARI 004, 017, 018, 051, 064, 161 172
HISAWA 075, 159
016, 017, 025, 031, 032, 035, 037,
HITACHI
HUANYU 062
HUMAX 151, 152, 153
HUSPI ELEKTRONIK 123
HYPERVISION 134
HYPSON 018, 071, 075
ICE 063, 071, 161
ICES 064
IMA 172, 077
IMPERIAL 092, 099, 101, 123, 161
INDESIT 068
INDIANA 018
ITY 023
INFIN
INGEKEN 139
INGELEN 042, 164
INNOHIT 028, 124
INNOVA 018
INTEQ 007
ISKRA 158
INTERBUY 071
INTERFUNK
INTERVISION 018, 063, 071, 127, 144, 158, 161
ISUKAI 064
ITT 042, 099, 108
JACSON 129
042, 048, 063, 094, 095, 096, 097,
099, 102, 108, 109, 110, 111, 112,
113, 114, 124, 148, 172, 177
018, 042, 095, 097, 099, 159, 160,
161
BrandCode
JBL 023
JCB 137, 177
JVC 017, 022, 045, 054, 172
JEC 040
KAISUI 004, 062, 063, 064, 075
KAMP 062
KAPSCH 042, 095, 099
KARCHER 161
KATHREIN 089
KAWASHO 062, 077
KEC 052
KENDO 018, 099, 117, 119, 127, 158, 161
KENWOOD 009, 015
KINGSLEY 062
KLH 124, 172, 177
KLOSS 012
KNEISSEL 161
KMC 033
KOLSTER 158
KONIG 004, 005, 017, 018, 042, 061, 068
KORPEL 018
KORTING 098, 160
KOYODA 004
KTV
KUBA ELECTRONIC 097
KURA 097
LENCO
LG 025, 154, 161
IESENK & TTER 018, 161
L
LIFETEC 071, 161
LINITRON 172
LLOYD 177
LLOYTRON 016, 172
LOEW E 159, 160
LOGIK 156, 006
LUMA 099
015, 019, 052, 056, 063, 074, 172,
177
071, 133, 146, 018, 028, 071, 118,
124, 158, 161
GB70
User’s Manual
Page 72

10. Appendix
BrandCode
LUXMAN 025
LUXOR 068, 094, 097, 099, 102, 124
LXI 007, 020, 023, 038, 040, 050, 106
M ELECTRONIC
MAGNADYNE 158, 159, 160
MACYS 172
MAGNAFON 127, 158, 167
MAGNASONIC 106, 161
MAGNAVOX
MAJESTIC 006
MANDOR 071
MANESTH 063, 071, 098, 117
MARANTZ 015, 018, 023, 089, 161
MARCY´S 172
MARELLI 160
MARK 018
MATSUI
MATSUSHITA 021, 070
MC MICHAEL 110
MEDIATO R 018
MEGATRON
MEI 056
MEMOREX
MEMPHIS 124
METZ 059, 160, 161
MGA 009, 015, 036, 039, 050
MIDLAND 007, 016, 019, 020, 021, 034
MINERVA 068
MINUTZ 011
MITSUBISHI
MIVAR 062
MOTOROLA 024, 030
MTC 009, 015, 025, 026, 056, 062, 097
MULTISTANDARD 127
004, 018, 042, 063, 097, 127, 163,
172
010, 012, 014, 015, 017, 023, 051,
057, 058, 110, 172
004, 005, 018, 049, 063, 092, 097,
117, 161
002, 035, 050, 109
004, 006, 025, 026, 033, 036, 038,
050, 070, 071, 106
009, 017, 030, 036, 039, 050, 068,
159, 160, 172
BrandCode
MULTITECH
MUTIMEDIA 132
NAD 040, 044, 050, 172
NAONIS 099
NATIONAL 068
NEC 009, 015, 017, 025, 046, 172
NECKERMANN
NEI 018, 161
NESCO 051
NETSAT 018
NIKKAI
NIKKO
NISATO 081
NOBLEX 083
NOBLIKO 158
NOGAMATIC 171
NOKIA
NORDMENDE 160, 163, 171
NORMN 161
NOSHI 008
NTC 029
OCEANIC 042, 099, 106, 118
OKANO 161
ONWA 052
OPTIMUS 038, 044, 070
OPTONICA 030, 043
ORAVA 161
ORION
OSAKI 016, 028, 063, 064, 071, 124,
OSO 064
OSUME 016, 028, 124
004, 052, 062, 063, 099, 127, 158,
172, 177
018, 059, 087, 089, 097, 099, 102,
159, 160, 161, 177, 185, 189
016, 018, 028, 040, 062, 064, 071,
124
007, 015, 020, 029, 038, 040, 050,
161
071, 094, 095, 096, 097, 099, 106,
108, 143, 161
018,049,051,067,085,097,098,118,
117,161,172,177
GB71
User’s Manual
Page 73

10. Appendix
BrandCode
017, 018, 059, 063, 087, 089, 093,
OTTO VERSAND
PALLADIUM 099, 160
PANAMA 063, 071
PANASONIC
PATHE CINEMA 062, 098
PATHE MARCONI 171
PAUSA 004
PCE/PEC 040, 106, 108, 172
PENNEY
PERFORMANCE 172, 177
PHASE 016
PHILCO
PHILIPS
PHOENIX 160
PHONOLA 018, 098, 160
PILOT 009, 015, 019
PIONEER 042, 044
POLICOM 068, 158
POLYRON 071
PORTLAND 009, 019, 029, 177
PRANONI PR
PRIMA 040, 106, 172
PRINZ 124
PRISM 021
PRO VISION 161
PROFEX 004, 161
PROFITRONIC 158, 161
PROLINE 119
PROSCAN 015, 020
097, 098, 099, 102, 108, 117, 118,
161, 163, 172, 175, 176, 177, 178,
181, 182, 185, 186, 189
156, 020, 021, 022, 023, 024, 026,
030, 035, 036, 038, 040, 042, 043,
050, 065, 068, 070, 079, 099
001, 102, 008, 009, 011, 013, 015,
016, 019, 020, 021, 025, 026, 034,
040, 050
009, 010, 012, 014, 015, 023, 035,
057, 058, 085, 123, 159, 160, 161,
172
007, 008, 009, 010, 011, 012, 013,
014, 018, 019, 023, 089, 110, 124,
138, 160, 161, 172, 177
INCE 099, 158
GB72
User’s Manual
BrandCode
PROTEC 099, 127
PROTECH 004, 018, 063, 071
PROTON 002, 050
PULSAR 007, 009, 110, 124
QUASAR 021, 024, 043, 070, 158
QUELLE
QUESTA 017, 172
RADIO SHACK
RADIOLA 018, 161
RADIOMARELLI 160
RADIOTONE 071, 161
RADIX 108
RANK ARENA 017
RCA 008, 009, 020, 021, 030, 034
REALISTIC
REKORD 149
REVOX 018
REX 042, 071, 076, 099
RFT 088, 126, 160
RHAPSODY 056, 062
R-LINE 018
RM-U301 174
ROADSTAR 044, 064, 071, 161
ROYAL LUX 131
RTF 018
RUNCO 007, 015
SABA 042, 095, 099, 163, 170, 171
SAGEM 139
SAISHO 004, 005, 049, 071, 117
SAKIO 071
SALORA 042, 094, 097, 099, 102, 106, 124
SAMBERS 127, 158
SAMPO 015, 016, 019
SAMSUNG
005, 018, 087, 093, 097, 099, 108,
117, 118, 172, 175, 176, 177, 178,
181, 185, 186, 189, 192, 193
009, 015, 016, 019, 020, 025, 038,
043, 050, 052, 106
009, 015, 016, 019, 025, 038, 043,
050, 052, 106
004, 009, 015, 016, 018, 019, 025,
026, 050, 063, 071, 078, 089, 124,
137, 161
Page 74

10. Appendix
BrandCode
SAMSUX 019
SANDRA 062
SANSEI 084
SANSUI 085
SANYO
SBR 018
SCHAUB LORENZ 099
SCHNEIDER
SCIMITSU 009
SCOTCH 050
SCOTT 009, 050, 051, 052, 067, 172, 177
SEARS
SEG
SEI 049
SEI-SINUDYNE
SELECO 042, 076, 099, 100, 119, 120, 122
SEMIVOX 052
SEMP 040
SENTRA 040
SHARP 017, 019, 030, 043, 172
SHINTOM 161, 177
SHINTOSHI 161
SHIVAK I 161
SHOGUN 009
SHORAI 118
SIAREM 127, 158, 159, 160
SICATEL 121
SIEMENS 018, 059, 060, 061, 161
SIGNATURE 006, 040, 177
SILVER 017, 172
SIMPSON 057, 058
SINGER 127, 159, 160, 161
SINUDYNE 049
SKANTIC 099
005, 017, 028, 038, 041, 106, 107,
108, 124, 129, 172
018, 064, 071, 097, 136, 143, 147,
161
020, 023, 025, 038, 040, 041, 047,
050, 051, 106
017, 063, 071, 126, 127, 158, 161,
172, 193
097, 099, 117, 118, 127, 158, 159,
160, 161, 177, 181
BrandCode
SKY 018
SOGERA 098
SOLAVOX 016, 042
SONITRON 108
SONOKO 004, 018, 071
SONOLOR 042
SONTEC 018, 161
005, 017, 039, 087, 172, 173, 174,
SONY
SOUND&VISION 127
SOUNDESIGN 050, 051, 052, 057, 172, 177
SOUNDWAVE 018
SPECTRA 133
SPECTRICON 002
SQUAREVIEW 047
SR2000 106
SSS 009, 052
STANDARD 004, 063, 064, 098
STARLITE 052, 161
STERN 042, 076, 099
SUNKAI 117, 118
SUNSTAR 161
SUPERTECH 097, 161
SUPRA 025
SUSUMU
SUPREMACY 172
SUPREME 177
SULVANIA
SYMPHONIC 047, 172, 177
SYSLINE 018
TAD ISTAR 161
TADNDY 124
TANDY 028, 030, 042, 063, 064
TASHIKO 110, 161, 172
TASHKO 017, 063
TATUNG 002, 018, 024, 028, 063, 124
175, 176, 177, 178, 179, 180, 181,
182, 183, 184, 185, 186, 187, 188,
189, 190, 191, 192, 193, 194
064
010, 012, 014, 015, 023, 057, 058,
080
GB73
User’s Manual
Page 75

10. Appendix
BrandCode
TEC 063, 133, 161
TECHLINE 127, 158
TECHNEMA 098
TECHNICS 007, 020, 021, 070
TECHNISAT 130, 161
TECHNOL ACE 151
TECHWOOD 002, 021, 025, 177
TECNISON 161
TEKNIKA
TELEAVIA 171
TELECO 135
TELEFUNKEN 025, 163
TELEMEISTER 098
TELETECH 004
TELETON 017, 057, 063, 097, 099
TELEVIDEON 098
TENSAI 064, 093, 098, 118, 158, 161
TESLA 135
TEXET 062, 064
THOMAS 110, 124, 177
THOMSON 068, 155, 163, 170, 171
THORN
TMK 025, 049, 050
TOKA I 124
TOMASHI 075
TOSHIBA
TOSONIC 056
TOTEVISION 019
TOWADA 099, 127, 158
TRIUMPH 049, 069
TV TEXT 089
UHER 098, 127, 158, 161, 173
ULTRA 081, 124
ULTRAVOX 127, 158, 159, 160, 161
UNIVERSAL 011, 013
006, 009, 019, 023, 025, 026, 029,
036, 051, 052, 057
018, 028, 040, 087, 107, 108, 110,
112, 128, 129, 161, 163, 165, 168,
172, 177
017, 026, 038, 040, 069, 106, 108,
172
BrandCode
UNIVERSUM 018, 071
UNIVOX 159
URANYA 158
VECTOR RESEARCH 015
VESTEL 018, 161
VICTOR 022
VIDEOTECHNIC 063
VIDEOTON 094
VIDIKRON 023
VIDTECH 009, 017, 050
VISA 004, 005, 017, 018, 042, 068
VISION 098, 161
VOXSON 042, 099, 159, 160
VTQ 126
WALTHAM 063, 094, 099
WARDS
WATSON 018, 098, 161
WATT RA DIO 097, 127, 158
WEGA 017, 160, 172
WHITE
WESTINGHOUSE
WORLD-TECH
YAMAHA 009, 015
YOKO 018, 063, 071, 133, 161
YORK 108
ZANUSSI 076, 199
ZENITH 006, 007, 029, 177
ZONDA 002
006, 009, 010, 011, 013, 014, 015,
023, 025, 034, 040, 043, 050, 051,
058
018, 062, 098, 106, 158, 161
133
UDB1.2
GB74
User’s Manual
Page 76

10. Appendix
10.3 Multi Custom Code
If you are using more than two receivers that have the same custom code, reset the custom code of the
remote control as the following.
1. If you have other HUMAX receivers supporting the multi custom code, turn them o to prevent
change of the custom code.
2. Point the remote control towards the remote control sensor of the receiver.
3. Press the 0 and OK button for 5 seconds.
4. Press the NUMERIC button (from 1 to 6) to select the mode.
5. The multi custom code setting is completed.
Note: If the receiver does not operate, reset the custom code to another number (from 1 to 6).
.
GB75
User’s Manual
Page 77

10. Appendix
10.4 Trouble Shooting
Before contacting your local service centre, please read the tips below carefully. If the problem persists
after completing the following procedure, please contact your local product distributor or service centre
for further instructions.
1. No message displayed on the front panel. (The product will not switch on.)
• Check the main power cable and make sure it is plugged into a suitable power outlet.
• Check that the mains supply is switched on.
• Connect the power cable to a di erent power outlet.
2. No picture on TV set
• Make sure that the product is powered on and in operation mode. (Press the STANDBY button)
• Make sure that the AV cable is rmly connected to the TV.
• Make sure that the antenna cable is properly connected to the product.
• Make sure that the antenna setting in the menu is correct.
• Check the brightness level of the TV.
• Check if the channel is currently on air. Contact the broadcaster to ensure that the channel is running.
• Press the SOURCE button if the product is in external input mode.
3. Poor picture/sound quality
• Install the antenna in an obstacle-free place.
• Make sure there is no mobile phone or microwave oven near the product.
• Keep the power and the antenna cable for the satellite apart from each other.
• Adjust the antenna direction to get the better picture.
• Set the antenna power in menu to On, if you use the active antenna to improve the reception.
• Check the signal levels and adjust your antenna if the level is too low. The signal level may be a ected
by weather conditions.
Note: If the antenna is covered with snow or the RF is weakened by heavy rain, the condition of the
sound and picture may temporarily be poor. However, the poor sound and picture quality due to
weather conditions cannot be accepted as a malfunction of product.
• Check that your dish alignment is correct.
• Change the satellite dish for a larger one as this will increase the signal levels received.
• Replace the LNB with a lower noise factor in cases where the noise factor is too high.
• Replace the LNB with a new one in case it is damaged or out of order.
4. No or poor sound
• Check that your AV cable is connected correctly.
• Check the volume levels of your TV set and the product.
• Check if the product or TV is on mute.
• Check audio type or soundtrack option in the AV menu.
GB76
User’s Manual
Page 78

10. Appendix
5. Remote control does not operate.
• To control the product, the top end of the remote control should point directly towards the receiving
part of the product.
• Remove and reinsert the batteries in the remote control.
• Replace the batteries in the remote control for a new set.
6. Cannot make reservations.
• Check that no previous reservations are con icting with the new reservation.
• Check that the product is switched on at the time of the reservation.
7. No password information is given.
• The default password is always 0000.
8. Channel search does not work.
• Make sure that the antenna setting in the menu is correct.
• Use the appropriate antenna capable of receiving VHF or UHF channels for your area.
9. Cannot update new software.
• You can get an update. If the product does not show a message requesting update, that means no
software is available.
10. Cannot watch scrambled c
• Check that you have the appropriate Smartcard or CI-Module. Reinsert the Smartcard or CI-Module
and make sure it initializes correctly.
• Check in the menu that the product is detecting the Smartcard or CI-Module.
• Check in the menu that you have a valid and working subscription to the channels you wish to view.
• Ensure that the Smartcard or CI-Module is not damaged.
11. Cannot watch pay channels.
• Check in the menu that you have a valid and working subscription to the channels you wish to view.
• Contact your network operator for more information.
hannels.
GB77
User’s Manual
Page 79

10. Appendix
10.5 Error Message
Error message Possible causesWhat to do
No or bad signal
The channel is
scrambled or not
available.
Audio not
available
The satellite dish is not pointing at the
satellite.
Signal is too weak. Connect a signal ampli er.
Satellite dish is too small. Change to a larger dish.
Problem with LNB. Change the LNB.
The aerial is not pointing properly.
The channel has a signal, but no audio
or video is provided.
The channel has not been deleted by
broadcasting company.
The channel is for data broadcasting.
Smartcard is not plugged in. Insert Smartcard.
Wrong Smartcard is in use.
Smartcard is not plugged in correctly.
Smartcard is damaged.
The channel has a video signal, but no
audio is provided.
Adjust dish alignment.
Adjust aerial.
Check the cable from the aerial. If you
cannot resolve the problem, you may
need to have your aerial and installation
tested by a professional.
Con rm if the channel is currently on
air.
Remove the channel from the channel
list and check for new transponder
details.
The channel cannot be viewed with the
appropriate model that supports data
channels.
Insert the appropriate Smartcard for the
channel(s) you wish to view.
Reinsert Smartcard; ensure that it is
inserted correctly.
Contact your Smartcard retailer or
channel broadcaster for a Smartcard
replacement.
Press the audio button on your remote
control to con rm that the channel has
audio options.
GB78
User’s Manual
Page 80

10. Appendix
Error message Possible causesWhat to do
CI module is not installed. Insert CI module.
CI module not
installed.
Invalid CI module
Short LNB
CI module is not inserted correctly Reinsert CI module.
CI module is not recognized.
Wrong CI module. Insert the correct CI module.
CI module is not inserted correctly. Remove and reinsert the CI module.
CI module is damaged Replace CI module.
LNB cable is short. Replace LNB Cable.
LNB is internally short. Replace LNB.
Alien substance is inserted in LNB IN
port and port may be damaged.
Insert a di erent CI module to check if
your existing module is working.
Remove the alien substance and
contact local service center in case
damaged has occurred.
GB79
User’s Manual
Page 81

10. Appendix
10.6 Speci cation
Terrestrial Tuner & Channel
Input Connector IEC 169-2 Female
Frequency Range
Signal Level -10 to -70 dBm
Demodulation OFDM
Mode 2K, 8K
FEC Mode 1/2, 2/3, 3/4, 5/6 and 7/8
Guard Intervals 1/4, 1/8, 1/16 and 1/32
Satellite Tuner & Channel
Input Connector IEC 169-24 (F-Type)
Frequency Range 950MHz to 2150 MHz
S
ignal Level -25 to -70 dBm
LNB Power & Polarisation 18V/13Vdc, Current : Max. 500mA, overcurrent Protection
22kHz Tone 22kHz ± 4kHz Tone on/o
DiSEqC Control Version 1.0/1.2/2.0 Compatible, USALS, SCD
FEC Mode 1/2, 2/3, 3/4, 5/6 and 7/8
Demodulation QPSK
Input Symbol Rate 2 to 45 MS/s
MPEG Transport Stream A/V Decoding
Transport Stream MPEG-2 ISO/IEC 13818
Pro le Level MPEG2 MP@ML
Input Rate 15 Mbit/s Max
Aspect Ratio 4:3, 16:9
Video Re
Audio Decoding MPEG-2 Audio/MusiCam Layer I & II
Audio Mode Single/Dual/Joint stereo/Stereo
solution 720 x 576
177.5MHz to 226.5MHz (VHF)
470MHz to 862MHz (UHF)
GB80
User’s Manual
Page 82

10. Appendix
Memory
Flash Memory 8 Mbytes
Graphic (MPEG)/System DRAM 64 Mbytes
A/V & Data In/Out
Video RCA/TV SCART/VCR SCART Video Output (CVBS, S-Video, RGB)
Audio
RS-232C 9 pin Socket type
Power Supply
Input Voltage
Typ e SMPS
Power Consumption
Protection Separate internal fuse & Lightning protection
Physical Speci cations
Size 310 x 60 x 237 mm
Weight (Net) 1.8 Kg
Operating Temp 0 °C to +45 °C
Storage Temperature -10 °C to +70 °C
RCA/TV SCART/VCR SCART Volume and Mute Control
(Resolution:20bits DAC, MAX. 2Vrms)
90-250V a.c., 50/60Hz
Operation: Max. 28W
Standby: Max. 10W
GB81
User’s Manual
Page 83

10. Appendix
10.7 Glossary
• DiSEqC (Digital Satellite Equipment Control)
A DiSEqC compatible receiver relies on a switching box which detects the 22kHz tone pulsing rapidly
on and o . In this way, a specially designed receiver can control numerous LNBs through a DiSEqC
switching box.
• Dolby Digital
An encoding system that digitally compresses up to 5.1 discrete channels of audio (left front, centre,
right front, left surround, right surround) into a single Bitstream. A low frequency e ect (LFE) channel
is included providing the sound needed for special e ects.
• EPG (Electronic Programme Guide)
An electronic equivalent to a printed television listings magazine; it is an application used with
digital set-top boxes and digital television sets to list current and scheduled programs that are or
will be available on each channel, including a short summary or commentary for each program. The
information supplied in the EPG is sent and updated by the channel broadcaster.
• FEC (Forward Error Correction)
A technique for error control of data transmission.
• Frequency
The property of a signal measured in cycles per second (=Hz).
• FTA (Free- To-Air)
An unscrambled broadcaster allowing customers to view channels or services without paying any
subscription.
• Hi-Fi (High Fidelity)
The characteristics of audio devices that can play back all the audio frequencies a person can detect,
which is the range of 16Hz~20KHz. Sometimes it is used to indicate good quality of audio devices such
as stereo tape recorders.
• LNB (Low Noise Block)
A device that is mounted on an arm facing your satellite dish, focusing on satellite signals. A LNB
converts signals received from satellite to a lower frequency and sends them to a satellite receiver via
coaxial cable.
• OSD (On
OSD displays the basic information necessary for the users to con gure monitor or TV settings. OSD
information may include brightness, contrast, tuning, RGB adjustment, and screen size and position.
• OTA (Over the Air)
A standard for the transmission of software for equipment, through a broadcast system. Manufacturers
reserve the right for deciding the release of the software for their products.
• Polarization
The direction of the electrical and magnetic elds of a signal. Satellites use both vertical and horizontal
polarisation. Means that a frequency can be used twice.
Screen Display)
GB82
User’s Manual
Page 84

10. Appendix
• RF (Radio Frequenc y)
Television signals are modulated onto RF signals and are then demodulated by your television’s or
STB’s tuner.
• RS-232C
A connection to allow you to connect to a PC to update receiver’s software.
• SCART
A 21-pin connector standard to connect two pieces of Audio-Visual equipment such as a TV and a VCR.
Each device will have a 21-pin female connection; a cable with male connection at both ends is used
for connecting the devices.
• Smartcard
A credit card sized card that contains updateable chip memory. It is used for accessing Pay TV
(encrypted) channel or services when inserted into an appropriate receiver.
• S/PDIF (Sony/Philips Digital Interface format)
A standard format for the transfer of digital audio signals. It allows the transfer of digital audio
between two devices without any conversion to and from analogue, which could degrade the signal
quality.
• Transponder
A satellite is divided up in parts called transponders. A transponder is one distribution section of the
satellite. Each transponder can be used for distribution of several channels or services.
GB83
User’s Manual
Page 85

10. Appendix
10.8 Service and Support
You can receive information such as a troubleshooting guide, software upgrades and product support
guide from the following web sites and call center (Hotline).
Please try to contact to your local dealers rst when you have any problem.
Call Center
Service customers
Modernizations generic and technical software, information
http://www.mediasat.com (technical area) Italiano
Technical Hotline: 899 100080
This service is charged with a cost per minute of 1.€+VAT.
The service is not enabled for Omnitel users.
GB84
User’s Manual
Page 86

 Loading...