

Page 1
Digi-tv-vastaanotin maanpäällisille lähetyksille
Mottagare för marksänd digital-TV
Set-Top-Box for terrestrial reception
Suomi-
Käyttöopas
Svensk-
Bruksanvisning
English-
User manual
CI-5100T
Page 2

Contents
Safety............................................................... .............. EN2
Copyright....................................................................... EN3
Glossary........................................................................ EN3
Reference...................................................................... EN4
Front Panel & Connections
Front panel....................................................... .............. EN5
Connectors on the rear panel......................................... EN6
Connect
General............................................................. .............. EN7
TV & other equipment...................................... .............. EN8 - EN9
Remote Control Unit ...................................... .............. EN10 - EN11
Daily Use
Changing channel .......................................................... EN12
Channel list....................................................... .............. EN12
Volume adjustment......................................................... EN13
Soundtrack ....................................................... .............. EN13
Subtitling........................................................... .............. EN13
Teletext........................................................................... EN13
Information box (i-plate) ................................... .............. EN14
Settings & Functions
Main menu........................................................ .............. EN15
1. Select service (the different channel lists).. .............. EN16 - EN17
2. TV- and Radio guide (EPG)....................................... EN18 - EN19
3. Parental control ......................................................... EN20
4. Installation................................................................. EN20
4.1 System settings .................................................. EN20 - EN24
4.2 Organise services/channels.................. .............. EN25 - EN28
4.3 Service searching................................. .............. EN29 - EN31
4.4 Status (STB status)............................................. EN32
4.5 CA-module (CAM) .............................................. EN33
5. Utility.......................................................................... EN33
Menu Map ........................................................ .............. EN34 - EN35
Troubleshooting Guide .................................. .............. EN36
Specifications............................................................... EN37 - EN38
English
Page 3
Safety
This STB has been manufactured to satisfy the international safety standards.
Please read the following safety precautions carefully.
MAINS SUPPLY : 190 - 250V AC 50/60Hz
OVERLOADING : Do not overload a wall outlet, extension cord or adapter as this may
result in fire electric shock.
LIQUIDS :
CLEANING : Disconnect the STB from the wall outlet before cleaning. Use a light
VENTILATION : The slots on top of the STB must be left uncovered to allow proper air-
ATTACHMENTS : Do not use any unrecommended attachments as these may cause
CONNECTION TO THE ANTENNA
:
CONNECTION TO THE TV
:
EARTHING :
LOCATION :
The STB shall not be exposed to dripping or splashing and that no
objects filled with liquids, such as base, shall be placed on the apparatus.
damp cloth(no solvents) to dust the STB.
flow to the unit.
Do not stand the STB on soft furnishings or carpets.
Do not expose the STB to direct sunlight or do not place it near a heater.
Do not stack electronic equipments on top of the STB.
hazard or damage the STB.
Disconnect the STB from the mains before connecting or disconnecting the cable from the antenna.
FAILURE TO DO SO CAN DAMAGE THE ANTENNA.
Disconnect the STB from the mains before connecting or disconnecting the cable from the antenna.
F AILURE TO DO SO CAN DAMAGE THE TV.
The antenna cable MUST BE EARTHED to the system earth for the
antenna. The earthing system must comply with SABS 061.
Place the STB indoor in order not to expose to lightening, rain or sunlight.
EN2
TO REDUCE THE RISK OF ELECTRIC SHOCK, DO NOT
REMOVE COVER (OR BACK). NO USER SERVICEABLE
RISK OF ELECTRIC SHOCK
DO NOT OPEN
This symbol indicates "dangerous
voltage" inside the product that
presents a risk of electric shock
or personal injury.
Please do not insert metal or alien substance into the slots for the
Modules and Smart Cards. In doing so can cause damage to the STB
PARTS INSIDE. REFER SERVICING TO QUALIFIED
SERVICE PERSONNEL.
This symbol indicates
important instructions
accompanying the
product.
Varning!
and reduce its life span.
Page 4

Copyright & Glossary
Trademark
• VIACCESS™ is a trademark of France Telecom.
• CryptoWorks™ is a trademark of Philips Electronics N.V.
• Irdeto is a trademark of Mindport BV.
• Nagravision is a registered trademark of KUNDELSKI S.A.
• Conax is a trademark of Telenor Conax AS.
• “Dolby” and the double-D symbol are trademarks of Dolby Laboratories.
Warning
HUMAX cannot be held responsible for any kind of problems caused by the use of unofficial
softeware. The use of software versions other than HUMAX official software will void the
manufacturer’s warranty.
It is advised that only the formal software released from HUMAX should be used in all HUMAX
product range.
Glossary
• STB
Your Set Top Box (Digital-TV-Receiver).
• Antenna
A device that collects and amplifies elctromagnetic waves.
• Coaxial cable
A specially designed and shielded cable that can transport signals with high frequency.
• CAM
Also called CA-module (CA=Conditional Access) or CI-module (CI=Common Interface).
Is used together with a Smart Card to decode and view the content of sertain programme
providers. Can be purchased from your dealer or from the programme provider/operator.
• FEC (Forward Error Correction)
A system of error control for data transmission.
• Frequency
The number of cycles or events per one second, which is expressed in the unit of Hertz(Hz).
• IF (Intermediate Frequency)
A frequency to which a carrier frequency is shifted as an intermediate step in transmission or reception.
• MUX
The transmitter/frequency/channel where the programme provider/operator transmit a package of digital channels/services. Usually there are several MUX frequencies with different
or same content.
• Network
The collection of channels/services that a programme provider/operator offer. These services may be transmitted from one or several MUXes. In the transmitted data stream the
operator may transmit a service information table (network information) that is infor ming the
set-top-box about all available services in the network.
English
EN3
Page 5

Software
Software Upgrade
Humax digital set-top box is a highly sophisticated product - incorporating one of the best
software applications avalable. Whenever a problem is found with this software or, in fact,
extra functions or enhanced applications are added, the software in the equipment has
to be upgraded.
In order to maintain proper performance of the product, it is essential to have the most
up to date software.
The latest news and release of software versions may be found at Humax website http://www.humaxdigital.com.
It is recommended that users register to HCSA (Humax Customer Service Area) and
periodically check for the availability of software upgrade.
There are three methods to upgrade the software :
set-top box to set-top box download (copies the software of the main unit into slave unit);
(a)
(b) pc to set-top box download (downloads the software directly from pc to the model
requiring upgrade);
(c) OTA over-the-air (downloads the software where the manufacturer reserves the right to
decide when and where to release over the air).
Over The Air (OTA) is simply another alternative for downloading software versions.
However, the manufacturer reserves the right to decide when and where this software
upgrade can take place by "beaming" latest software versions over the air.
SUSS (TM) is an official trademark and logo for Humax loader software to perform OTA.
The software upgrade will only occur under the following circumstances:
1) the equipment should have appropriate loader software;
2) the manufacturer decides to release software downloading;
3) the equipment must be "tuned" properly to the OTA channel that the manufacturer uses.
(Se also page EN32)
EN4
Page 6
Front & Rear Panel
Front Panel
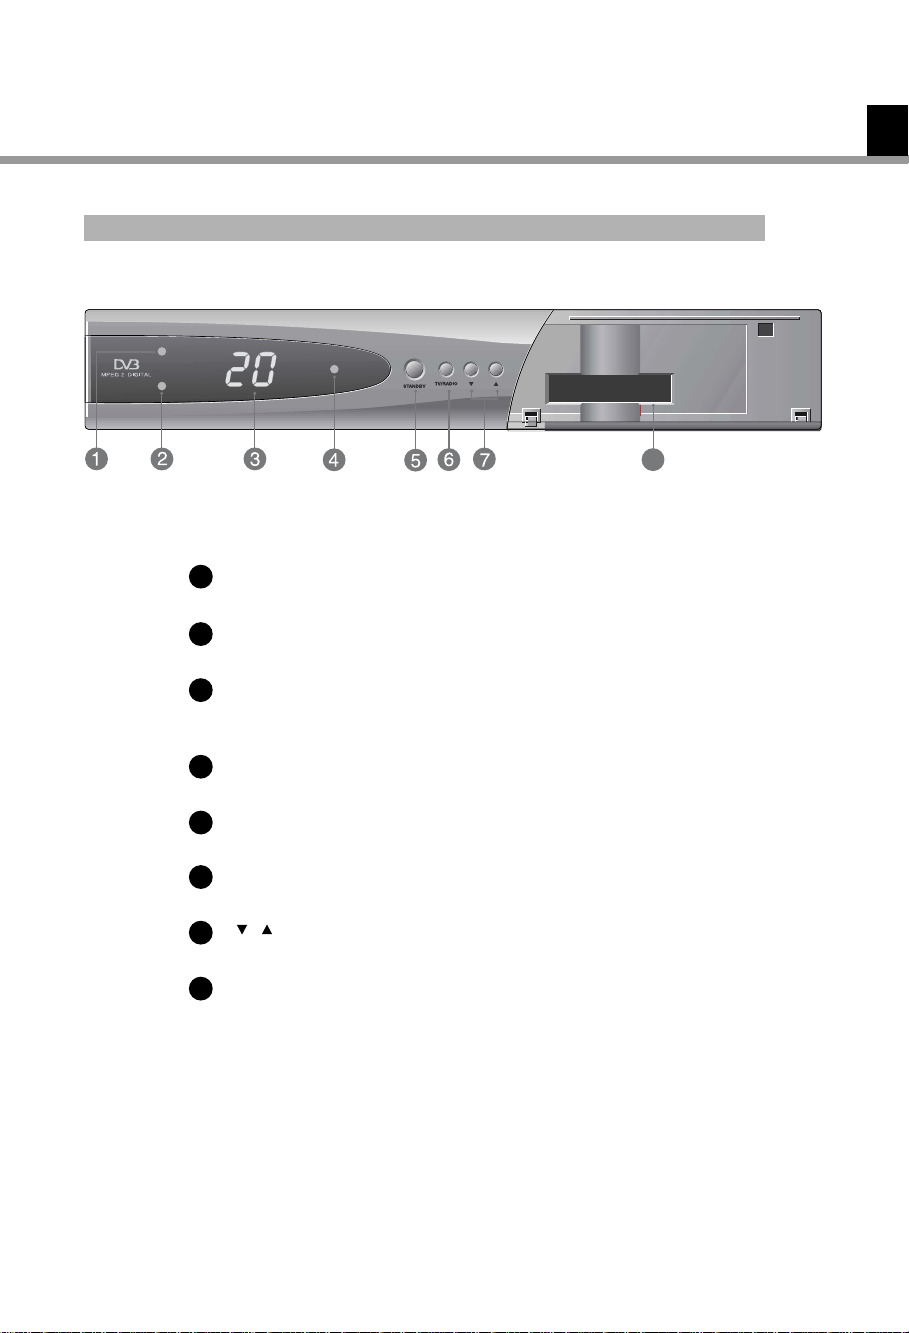
1
TV INDICATOR (GREEN)
The indicator lights on in TV mode.
RADIO INDICATOR (GREEN)
2
The indicator lights on in radio mode.
DISPLAY
3
Shows service number, error messages, RCU commands and
time in Standby mode.
STANDBY INDICATOR (RED)
4
Indicates that the STB is under standby.
STANDBY
5
Press to switch between Operation and Standby modes.
English
8
TV/RADIO
6
Press to switch between TV and Radio modes.
7
Use to change services down/up.
COMMON INTERFACE SLOTS (CI)
8
2 slots for external Conditional Access (CA)-modules.
EN5
Page 7
Front & Rear Panel
Connectors on the rear panel
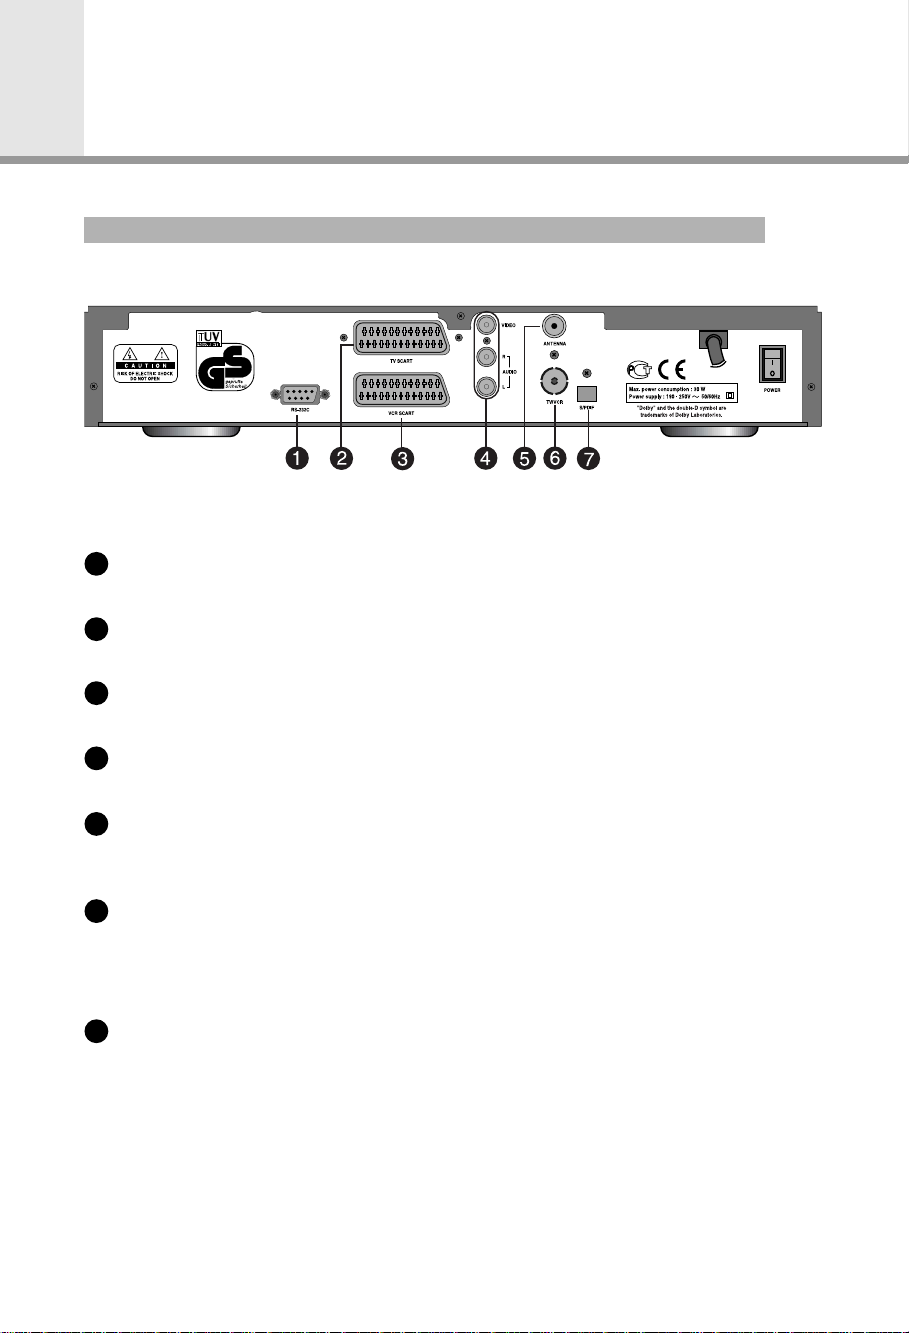
RS-232C
1
Use it when connecting to your PC.
TV SCART
2
For the audio/video input of the TV.
VCR SCART
3
For the VCR.
AUDIO L/R + VIDEO
4
Audio/video signal from your STB to Audio system, VCR or TV.
ANTENNA
5
Use to connect a general Aerial Antenna and CABLE jacks to a ANTENNA input jack
on the STB.
TV/VCR
6
Use to connect a RF signal from your STB to RF(ANT) input jack on your TV or VCR .
(Se also page EN24)
S/PDIF
7
Output for connection to a digital amplifier.
EN6
Page 8

Connect
General
Picture and sound
Digital TV is a transmission technology that replaces the traditional analogue technique.
This means that several TV channels, radio channels and other digital services can be
transmitted on the same space as just one channel took up before. As a consumer you
get access to many more channels and services than before at the same time as they are
received with perfect picture and audio quality
The digital-TV-receiver (Set-Top-Box) converts the digital signal into a format that is suitable
for your TV and sound system.
Connecting your Set-Top-Box is just as simple as connecting for example a video recorder.
You get the best picture quality by using a SCART-cable for connection to your TV-set. The
best audio experience is obtained by connecting an optical cable to your sound system.
Scrambled transmissions
The content or some parts of the content transmitted in the terrestrial network may be
scrambled. For this your Set-Top-Box is equipped with two slots for the possibility to connect
two separate de-scrambling modules (Conditional Access Modules). Module, smart-card
and subscription may be obtained from your local dealer or directly from the service
provider.
Coverage
Before buying this product it is anticipated that you have made sure that there are digital
transmissions covering your region.
English
Antenna / Signal source
Depending on the reception your Set-Top-Box may be connected to a simple indoor antenna
or to an existing outdoor antenna system. If you live in a flat you should make sure that
the digital terrestrial signals are distributed to your wall antenna outlet. If you have your own
antenna system you must make sure that it is equipped with antennas, filter and/or amplifier
that can handle those frequencies that the digital channels are transmitted on.
Cable-TV
Please observe that this Set-Top-Box is not designed for the reception of regular digital
cable-TV signals (QAM-signal). Despite this, operators of smaller cable networks may have
chosen to distribute the digital terrestrial signals (COFDM-signal) in the network. In this case
this Set-Top-Box may well be used.
Check with your landlord if you are insecure about what type of TV-signal that is provided
in the wall antenna outlet
Connecting more receivers to the same antenna
If you have another analogue or digital STB and you wish to use the same RF Signal. In this
case you can connect it via the loop through. Connect one end of a RF cable to the TV/VCR
on the STB and connect the other end to the RF (ANT) on your second STB.
EN7
Page 9
Connect
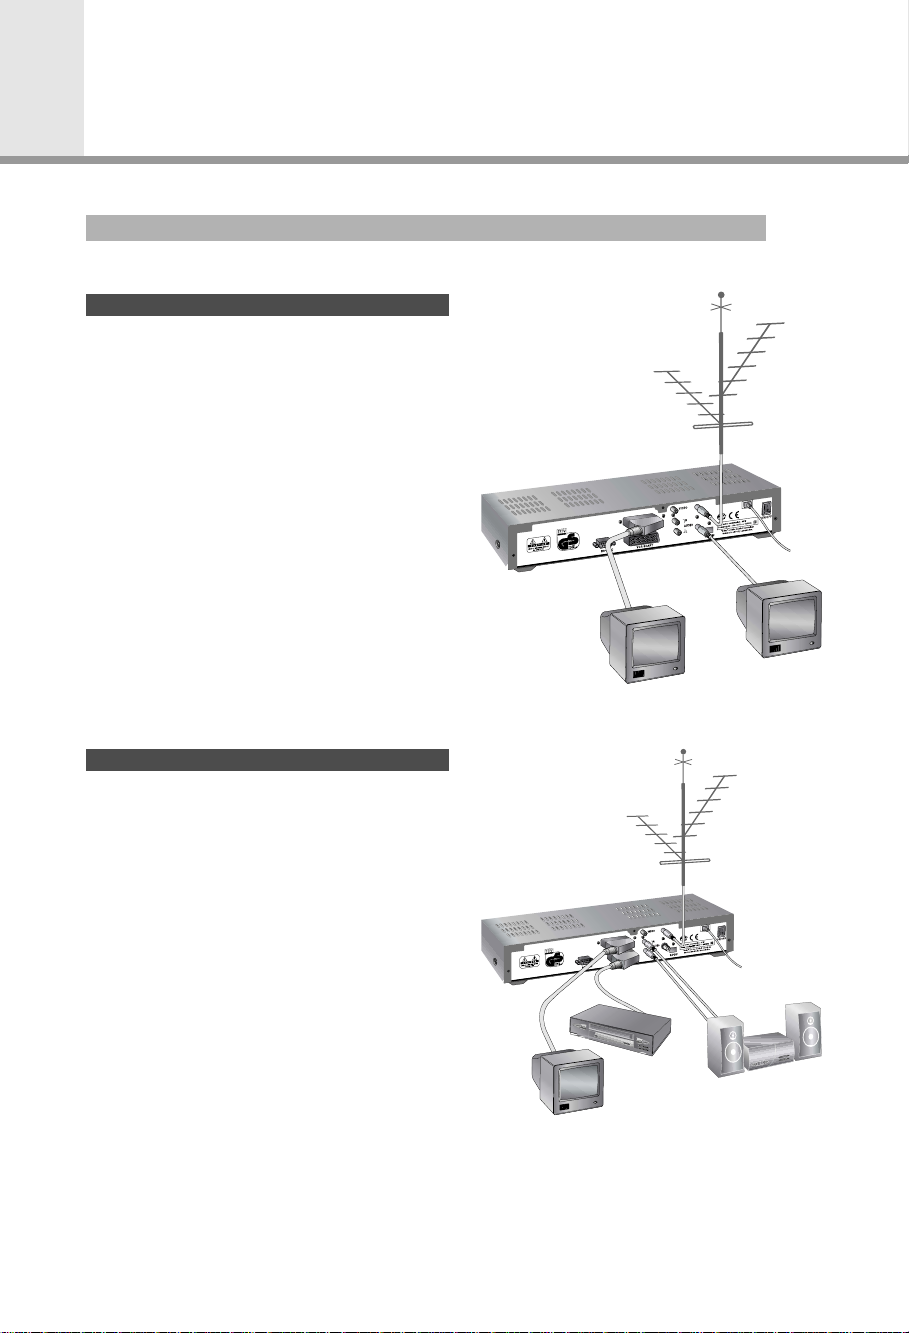
TV & other equipment
Example 1
In this example a TV set is connected to the digital
receiver. If possible the TV should be connected
with the digital receiver through a Scart cable.
If the TV doesn’t have a Scart connection
or if you want to connect a second TV to
the digital receiver, the UHF output of the
modulator may be used.
(Se also page EN6 and EN24)
A
N
N
E
T
N
A
R
C
/V
V
T
Example 2
In example 2 a VCR and a hifi stereo components system are connected to the digital
receiver in addition to the TV. The VCR
should be connected through a Scart cable.
In this example the hifi stereo components
system is connected with the digital receiver
through the analogue Cinch connections.
S/PDIF Fiber-Optic Connection
(Dolby Digital AC3)
If you have a digital audio set with a fiber
optic S/PDIF input, you will be able to enjoy
the high quality hifi sound with your receiver.
The digital amplifier or the pc card should be
connected with the receiver through a fiber
optic cable. Please be aware of the fact that
this output is fully suitable for Dolby Digital
5.1 (AC3) and that you can take advantage of
all of the home cinema’s possibilities.
EN8
A
N
N
E
T
N
A
R
C
/V
V
T
Page 10

Example 3
In this example the terrestrial digital receiver is
operated together with the satellite receiver. Both
of the receivers should be connected through a
Scart cable. Plug the Scart cable of the satellite
receiver into the VCR Scar t of the DVB-T receiver.
As soon as the satellite receiver is turned on, its
audio and video signals will be looped through the
terrestrial digital receiver.
English
A
NN
E
NT
A
R
C
TV/V
Example 4
This pattern corresponds to example 3 (see
above). A VCR is connected additionally to
the configuration. Connect the VCR with the
satellite receiver through a Scart cable. Plug
the Scart cable of the VCR into the VCR
or video Scart (if available) of the satellite
receiver.
A
N
N
E
T
N
A
R
C
/V
V
T
EN9
Page 11
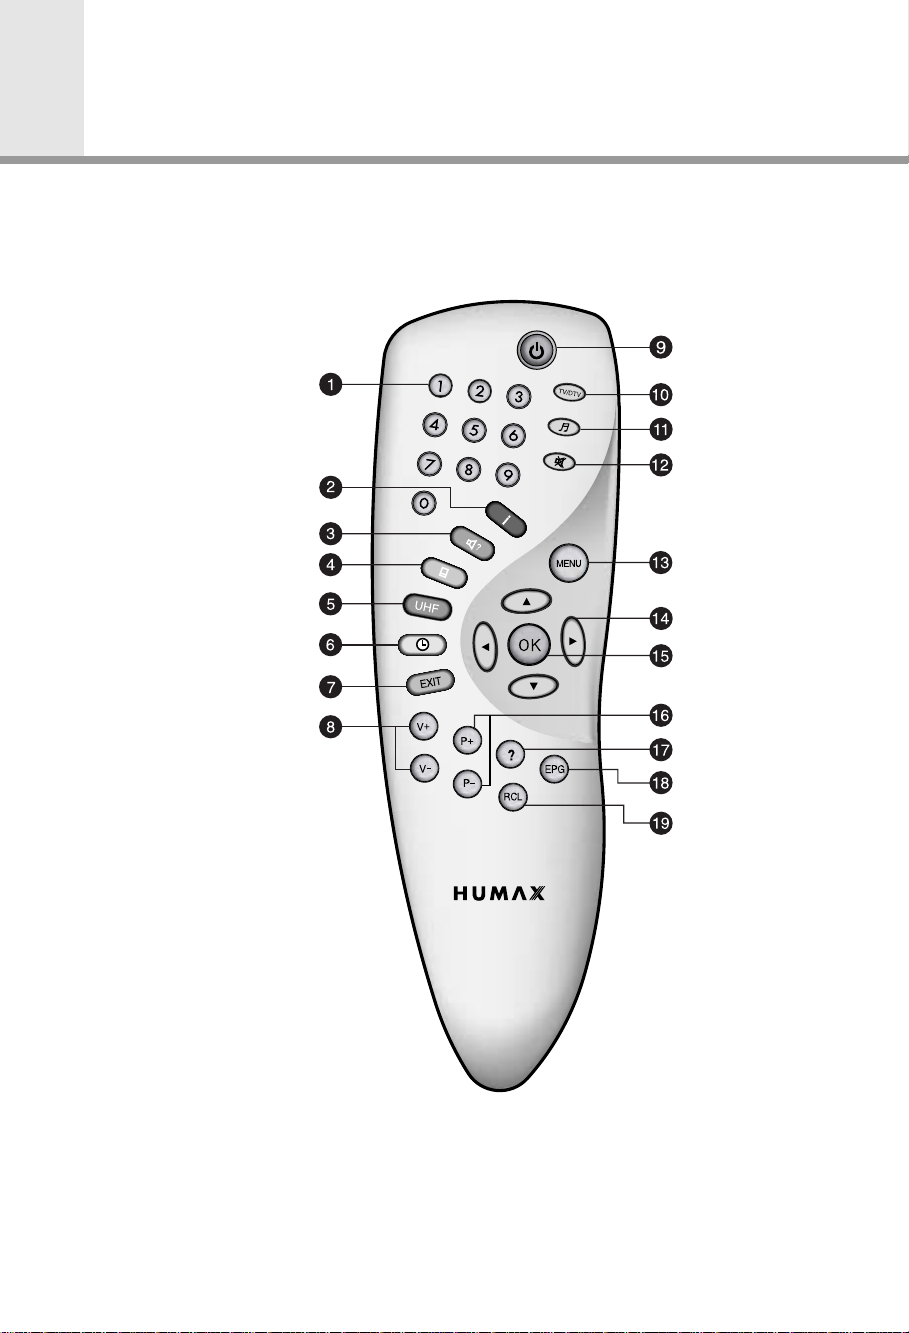
Remote Control Unit
STANDBY
NUMERIC BUTTONS
INFORMATION (RED)
SOUNDTRACK (GREEN)
SUBTITLE (YELLOW)
UHF (BLUE)
TIME (WHITE)
EXIT
V+/V-
TV/DTV
TV/RADIO
MUTE
MENU
CURSOR
OK
P+/PHELP
EPG
RCL (Recall)
EN10
Page 12

English
NUMERIC BUTTONS
1
Press to select a service, enter your PIN Code or
numeric on the menu.
INFORMATION (RED)
2
Press to display the programme information box
on the screen. And this button functions same as
the RED button on the menus.
SOUNDTRACK (GREEN)
3
Press to display the soundtrack list for the current
service. And this button functions same as the
GREEN button on the menus.
SUBTITLE (YELLOW)
4
Press to display the subtitle language list for the
current service. And this button functions same as
the YELLOW button on the menus.
UHF (BLUE)
5
Press to set the UHF menu. This button functions
same as the BLUE button on the menus.
TIME (WHITE)
6
Press to display the current time on the screen.
Press to reserve services on the Informaion box
or EPG. And this button functions same as the
WHITE button on the menus.
EXIT
7
Press to return to the previous menu and screen.
V+/V-
8
Volume up/down buttons. Press to increase or
decrease the volume.
STANDBY
9
Press to switch between Operation and Standby
modes.
10
TV/DTV
Press to select the TV/DTV mode.
TV/RADIO
11
Press to select the TV/RADIO mode.
MUTE
12
Press to temporarily cut off the sound.
MENU
13
Press to display the Main Menu on the screen
or return to the screen from a sub menu screen.
CURSOR
14
Press to move the highlight bar for selecting
options on the menus. And this button is used
to change services (up/down) and increase or
decrease the audio volume.
OK
15
Press to display the service list. This button is
used to select the item on the menus.
P+/P-
16
Programme up/down buttons. Press to tune to the
next or previous service. Press to move up or
down pages on the menus.
HELP
17
Press to display the help box on the screen.
EPG
18
Electronic Programme Guide button displays the
TV/Radio programme guide.
RCL (Recall)
19
Press to select the service that was previously
viewed.
• Please note :
The design of Remote Control Unit may be changed without notice in advance.
EN11
Page 13

Daily Use
All
6 TV4
7 CNN
8 Mediteve
9 Boxer
10 Canal+
11 Canal+ Gul
12 Canal+ Blå
13 MTV Nordic
14 DTU7
15 Kanal 5
Favourite
SVT1
SVT2
SVT24
SVT Extra
Skånekanalen
TV4
CNN
Mediteve
Boxer
Canal+
All
Network Genre
11
Canal+ Gul
12
Canal+ Blå
13
MTV Nordic
14
DTU7
15
Kanal 5
Alphabet
Service Configuration
MTV Nordic
etc
Etc
Favourites
A B C D
Lock
Skip
Delete
MTV Europe
CH 64 FFT:8K FFT GI:1/4
All
1
2
3
4
5
6
7
8
9
10
13 MTV Nordic etc
6 TV4
7 CNN
8 Mediteve
9 Boxer
10 Canal+
11 Canal+ Gul
12 Canal+ Blå
13 MTV Nordic
14 DTU7
15 Kanal 5
Changing channel
You can select channel in the following way:
(0~9) : Select desired channel directly using the numeric keys.
: Select channels step by step, up or down.
: Select channels step by step, up or down. (only func
tional in picture mode without menus on the screen)
: Jump between present and previously viewed channel.
: Select a channel via the electronic programme guide.
: Select mode for TV- or radio channels.
Channel / Service list
The channel list shows a selected list of channels. (Se also p. EN 16)
: Press OK to display the channel list.
:
:
: Press YELLOW key for a list of channels by network.
:
:
, : Use these keys to select desired channel.
Advaced Service List
In the main menu and on the option Select Service you may
select if a Simple or an Advanced service list should be displayed
on the screen. The advanced service list is similar to the Simple
service list except that it shows thirty services (Network and
Genre list will only display twenty services). Each channel that is
scrambled is in the advanced list is indicated with the icon (
Service Configuration
With the service list displayed you may reach the Service Configuration
menu. In this menu you can change the attributes of a service
1. Use the buttons to move a service you want to
change in the Service List.
2. Press the Menu button ( ).
3.
Use the buttons to move to an item (such as genre, favourite,
lock, skip, delete) you want on the Service Configuration screen.
4.
Use the buttons to select. Press the button to complete.
Press RED key to display a list of all available channels.
Press GREEN key to display a list of own favourite channels.
Press BLUE key to display a list of channels sorted by genre.
Press WHITE key to display all channels in alphabetical order.
).
EN12
Favourite lists
If you want to add a channel to one of the favourite lists you
do this quickly by using the Service Configuration menu above.
You can also add channels and organise favourite- and genre lists
by entering Main Menu > Installation > Service Organising.
Page 14

Soundtrack
L TR1 R
Volyme Control
Use the volume keys to adjust the volume level.
Optional keys to adjust volume level (is only working in
pure picture mode without any menus on the screen).
To temporarily stop the volume, press the Mute button. To
cancel mute, press the Mute button again or press any of the
volume buttons.
Soundtrack
When you want to change the audio language of current
service, press the Green button firstly.
The on-screen menu is displayed on the top to left side of the screen.
Use to select the audio on the left, right or both.
Use to select the audio language you want.
When this button is pressed, the Soundtrack OSD will disappear keeping the selected Soundtrack language constant.
Press EXIT to cancel.
When the current service is switched, the audio language returns
to the audio language that was selected in previous service. lf the
returned audio language is invalid, the audio language that you
selected from the audio language menu has the priority of playback.
Soundtracks broadcast in Dolby Digital are indicated by Dolby Digital
symbols either side of the respective language selection in the
menu. By selecting such a soundtrack the Dolby Digital audio will be
output by the optical S/PDIF on the STB. This can be decoded by an
external Dolby Digital television or amplifier, for example.
English
Subtitling
When the current broadcasting programme provides sub-
title, press the YELLOW Subtitle button to see the current
subtitle language list.
Use the up/down buttons to select a Subtitle language you want
Press the OK button and the selected language is high-
lighted and then the Subtitle Language you want is displayed on the screen.
Press the EXIT button to cancel the Subtitle mode.
Teletext
Use your TV Remote Control Unit to control the Teletext service.
The teletext button doesn’t exist on the STB Remote Control
Unit. When the service suppor ts Teletext, the Teletext icon (
displayed on the i-plate.
) is
.
EN13
Page 15

Daily Use
Nyheter från SVT24 (12:10 - 16:00)
14:48
i
SVT24
5
Help
5 SVT24
Nyheter från SVT24.
Sveriges Television
CH 22 FFT:8K FFT GI:1/4
Scrambled
Nyheter från SVT24 (12:10 - 16:00)
14:48
i
SVT24
5
Information box (i-plate)
The details of service part and event part are automatically displayed on the I-Plate when pressing the i button ( ) or changing services.
i-Plate is divided into service part and event part.
SERVICE-PART (Left side of the box)
SERVICE PART consists of the following items:
• i-Plate icon, Current time and Dolby Digital symbol.
• Service name, Service number, (
• Subtitle, Teletext, Scrambling service symbol.
(These are automatically displayed when the broadcasting station
provides appropriate information.)
• Signal quality bar.
EVENT-PART (Right side of the box)
EVENT PART consists of the following items:
• Event name, Event duration time
• Description text of event, State of reserved event
Event Part shows the current and next event information.
: Use to move from the current event information to the
next event information.
: Use to move from the next event information to the
current event information.
EXIT
?
When the Help ( ) button is pressed under i-Plate display and
there are no detailed event informations in the i-Plate, the Help
window will appear on the screen. The Help window shows the
current Network information, including: Nework, Channel, Mode,
Guard Interval...
The detailed information for the event can be displayed by pressing
the Help ( ) button in the i-Plate with event data displaying mode.
You can reser ve the programme in the event data display mode
by using the White ( ) button.
You can reset timer programme Once, Daily or Weekly mode.
When you release the timer programme mode, then you will be
asked to confirm the action.
) icons.
EN14
Page 16

Settings & Functions
English
Main Menu
Select Service
TV Guide
Parental Control
Installation
Utility
Main Menu
The Main Menu consists of the bellow grouped function setting
options. Detailed description of each function is descr ibed on the
following pages: EN16 till EN33.
1. Select Service
The select service displays the required service list which can be viewed
in Simple or Advanced mode.
(Se page EN 16 and also page EN 12)
2. TV Guide
Your STB has an Electronic Programme Guide (EPG) to help you
navigate through all the possible viewing options.
The TV Guide supplies information such as programme listings and
start and end times for all available services.
In addition, detailed information about the programme listings and start
and end times for all available services.
In addition, detailed information about the programme is often available
in the EPG (the availability and amount of these programme details will
vary, depending on the particular broadcaster).
(Se page EN18)
3. Parental Control
Access to services and programmes is controlled by a PIN Code
(i.e., a 4-digit secret code that is defined by the user).
The very first time you attempt to lock all services (or lock
programmes by ratings), the on-screen menu will instruct you to
assign a PIN Code (Later on, if necessary, you can change it).
(Se page EN20)
4. Installation
The Installation mode allows you to have the information of setting services and newly set services (language, time, organise,
search,..). Furthermore, you can recognize the states of hardware
and software versions and signals from your STB.
(Se page EN20)
5. Utility
This menu provides Calendar and Biorhythm.
(Se page EN33)
EN15
Page 17

Settings & Functions
All
6 TV4
7 CNN
8 Mediteve
9 Boxer
10 Canal+
11 Canal+ Gul
12 Canal+ Blå
13 MTV Nordic
14 DTU7
15 Kanal 5
Favourite
SVT1
SVT2
SVT24
SVT Extra
Skånekanalen
TV4
CNN
Mediteve
Boxer
Canal+
Network Genre
11
Canal+ Gul
12
Canal+ Blå
13
MTV Nordic
14
DTU7
15
Kanal 5
Alphabet
All
1
2
3
4
5
6
7
8
9
10
13 MTV Nordic etc
1. Select Service
To select the desired in the service list, you should firstly display
the service list using
service and press
service directly in the service list.
The contents of service list are as follows:
Simple Service List
1.
Select “Select Service” from the Main Menu and press the button.
2. Select “Simple” and press the button.
Then the simple service list (max. 10 services) will appear on the screen.
3.
Advanced Service List
The advanced service list shows thirty services. This list is similar
to the Simple service list except that it shows thirty services and is
apart from the Network and Genre list that displays twenty services.
Use the following colour buttons to list various service lists:
• RED ( ) - Service list All
• GREEN ( ) - Favourite
• YELLOOW ( ) - Network
• BLUE ( ) - Genre
• WHITE ( ) - Service list by Alphabetical order
Service All
1. To display the Service All, press the button. Use Red ( )
button to select the service All list.
2. Select the desired service by using the buttons.
3. Press the
button to view the selected service.
The service list provides you the Simple mode and Advanced mode.
The right side scroll-bar of the screen displays the location of the
selected service in relation to All services.
Press the Red ( ) button to toggle between Simple mode and
Advanced mode.
button. Use buttons to select a
button. Also use buttons to select a
Favourite
1
SVT1
2
SVT2
3
SVT24
4
SVT Extra
5
Skånekanalen
6
TV4
7
CNN
8
Mediteve
9
Boxer
Canal+
Network Genre
All
A
B
C
D
10
1 SVT1 etc
EN16
Alphabet
Service Favourite
1. Press the Green (
) button on the remote control unit to
select the Favourite ser vice list.
Note : The groups are labeled in four different alphabet
characters (A,B,C,D).
2. Use the
buttons to select a favourite group that you want.
3. Press the Green( )button to toggle group and service list.
Page 18

Favourite
Adult
etc
Favourite
Network Genre
1
SVT1
2
SVT2
3
SVT24
4
SVT Extra
Network
1
SVT1
2
SVT2
3
SVT24
4
SVT Extra
Genre
Alphabet
Alphabet
All
Sveriges T..
TV4 AB
Cell ICD AB
Boxer TV A..
Canal+ Tele..
Kanal 5 AB
1 SVT1 etc
All
User A
User B
User C
User D
1 SVT1 etc
Service Network
1. Press the Yellow (
) button on the remote control unit to
select the Network service list.
Press the Yellow ( ) button to toggle provider and service list.
2.
Note : 1.
The provider name is displayed on the left window and the
provider’s services are displayed on the right window.
2. The scroll bar on left of the screen shows the loca
tion of the cursor in the Network. The scroll bar on
right of the screen shows the location of the service
from the selected Network.
Service Genre
1. Press the Blue (
) button on the remote control unit to
select the Genre service list.
2. Press the Blue (
) button to toggle Genre and service list.
Note : The scroll bar on left of the screen shows the location of
the cursor in the selected Genre. The scroll bar on right
of the screen shows the location of the service.
(Se also page EN14, Service Configuration.)
English
Favourite
9
Boxer
10
Canal+
12
Canal+ Blå
11
Canal+ Gul
7
CNN
14
DTU7
15
Kanal 5
8
Mediteve
13
MTV Nordic
5
Skånekanalen
Network Genre
4
SVT Extra
1
SVT 1
2
SVT 2
3
SVT 24
6
TV4
Alphabet
All
All
A
B
C
D
E
F
G
H
I
1 SVT1 etc
Service Genre
1. Press the White (
) button on the remote control unit to
select the Alphabet service list.
Press the White ( ) button to toggle Alphabet and service list.
2.
Note : The scroll bar on left of the screen shows the location of
the cursor in the Alphabet. The scroll bar on right side of
the screen shows the location of the selected Alphabet
service.
EN17
Page 19

Settings & Functions
TV Guide - Now
11 Canal+ Gul
(14:30 - 15:30)
Fotboll: Elitserien
12 Canal+ Blå
(15:00 - 15:30)
Short Cuts
13 MTV Nordic
(15:30 - 16:00)
Spring Break
14 Nickelodeon
(14:00 - 16:00)
Digimon
15 Kanal 5
(14:50 - 16:15)
Tredje skiiftet
Next
Weekly
17 MTV Nordic
Spring Break
Reserved
15:35
Wed 26 JUN
Quick
2. TV- and Radio guide (EPG)
You can watch a programme being shown and reserve it in the TV
Guide mode.
To enter the TV Guide mode
Press the EPG (
TV Guide on the Main Menu.
To select the TV/Radio Guide
Press the (
will be switched to the Radio Guide.
TV Guide mode includes four different modes.
To select each mode, use the following buttons:
• Red ( ) : Use to display the current and next prog ramme list.
• Green (
• Y ello w (
• Blue (
Reservere a programme:
• To be able to reserve a programme, first highlight it using
the buttons
Then select if the programme should be reserved just once,
daily or weekly. Press the yellow button ( ) to get a list of
all your reservations.
) button on the remote control unit or select the
) button on the remote control unit and TV Guide
) : Use to display the programme list for one-week.
) : Use to display the reserved programme list.
) :
Use to display the simple TV Guide list. (Quick mode)
or . Then press the white button ( ).
TV Guide - Now
11 Canal+ Gul
(14:30 - 15:30)
Fotboll: Elitserien
12 Canal+ Blå
(15:00 - 15:30)
Short Cuts
13 MTV Nordic
(15:30 - 16:00)
Spring Break
14 Nickelodeon
(14:00 - 16:00)
Digimon
15 Kanal 5
(14:50 - 16:15)
Tredje skiiftet
Next
EN18
Weekly
17 MTV Nordic
Spring Break
Reserved
15:35
Wed 26 JUN
Quick
NOW / NEXT mode
Show the informations of the programmes that are played now or
will be played next time. This mode consists of the ser vice name,
event name, event duration time, current time and on-screendisplay window.
To watch a programme you want through the display window :
• Use the buttons to select a programme you want. The
selected service will appear on the right display window.
• Use the
then press the
buttons to select a programme you want. And
button on the remote control unit.
The selected service will appear on the right display window.
The selected OSD will be highlighted every time the cursor moves.
To reserve a programme you want :
• Select a programme you want by using the buttons
buttons. And then press the White ( ) button.
or
Press the buttons to watch the programme of previous
page or the programme of next page. Press the Yellow ( )
button to watch the Reserved programme list.
Page 20

English
TV Guide - Weekly
Today Thu Fri Sat Sun Mon Tue Wed
13 MTV Nordic
15:00 - 15:30 Spring Break
13 MTV Nordic
Spring Break
Now
Weekly
Reserved
TV Guide - Reserved
SVT24
06:30 - 9:30 (03:00)
Now
TV Guide - Quick
CNN
Kanal 5
DR1
DR2
Now
Weekly
28/06/2002 Fri
Weekly
CNN News
Every
Reserved
10:10
Reserved
15:37
Wed 26 JUN
Weekly mode
Shows the information of programmes that will be played for a
week. Select a day you want using the
buttons.
To watch and reserve a programme you want, do the same steps
as with the NOW/NEXT mode.
Quick
12:16
Wed 26 JUN
SVT Morgon
day
Reserved mode
Shows the programme lists that you have already reserved on the
TV Guide or Information box. Maximum eight programmes can
be reserved.
This programme list includes service name, date, duration time,
reservation mode and event name.
Quick
To cancel the Reserved service, select a programme you want to
cancel using the buttons and then press the White (
) button.
Quick mode
Shows a simple TV Guide like an Information box.
This mode shows in the A/V playback mode.
•
Quick
TV4 AB
(06:00 - 06:00)
Red vertical line
• Black/white bar : Shows the proceeding state of programme.
•
Time range of bar
: Indicates the current time.
: This consists of three 30 minute blocks.
EN19
Page 21

Settings & Functions
Main Menu
Select Service
TV Guide
Parental Control
Installation
Utility
Parental Control
Censorship classification
Change PIN
Old PIN Code
New PIN Code
Verify Changed PIN Code
Installation
System Setting
Service Organising
Service Searching
Status
Common Interface
PIN code
_ _ _ _
No block
* * * *
* * * *
* * * *
3. Parental Control
You can set a parental guidance rating to each programme in
this mode.
1. When the button is pressed after selecting the highlighted
parental control on the initial menu screen, a display window
for entering the PIN Code will appear on the centre of screen.
** The default PIN Code is
0000
.
2. Enter the PIN Code on the display window.
(If any problem occurs when entering a PIN Code, you cannot
switch to the next mode.)
3. Set the parental guidance rating of highlighted censorship
classification.
The parental level is given as age-based numbers : no block,
6, 10, 14, 18 and total block. Enter the PIN Code to unlock
or lock programmes.
4. To change your PIN Code:
• Select the highlighted Old Pin Code using the
?
and then enter your Old PIN Code.
• Enter a New PIN Code in the highlighted New PIN Code
using the
buttons.
• To verify the New PIN Code, re-enter a New PIN Code in
the highlighted Ver ify Changed PIN Code.
5. When the entered PIN Code is correct, then all settings are
completed. (If the PIN Code is wrong, the message “PIN Code
mismatch” will be displayed on the display window. When the
button is pressed at this time, the Old PIN Code is valid
and the cursor is located in the first position of this menu.)
4. Installation
This mode allows you to customise, add a new service and
displays the state of the STB. Enter the submenus after selecting
the Installation mode in the Main Menu.
buttons
EN20
4-1. System Setting
?
The System Setting mode supports the STB internal settings
according to the connection of the receiver and external units.
This mode includes Language Setting, Time Setting, A/V Output
Setting, UHF Tuning and Other Settings.
Page 22

English
System Setting
Language Setting
Time Setting
A/V Output Setting
UHF Tuning
Other Setting
Language Setting
Menu Language
Audio Language
Subtitle Language
Language Setting
Menu Language
Audio Language
Subtitle Language
English
Czech
Danish
English
Finnish
French
English
English
Czech
Svenska
Danish
Dutch
English
Finnish
Language Setting
Select the language for menu, audio or subtitle.
1. Select the highlighted language setting using the buttons
in the system setting mode and then press the
Select the highlighted Menu(or Audio, Subtitle) Language and
2.
press the buttons and the language list will be displayed.
?
3. Use the buttons to move to a language you want and then
press the button to finish.
Menu Language
Select a language for the menu or banner OSD in this mode.
You can choose the language from a selection of Czech,
Danish, English, French, German, Hungarian, Italian, Portuguese,
Swedish and more.
When a broadcasting information (event) is transmitted, the
selected Menu Language will be applied.
?
Audio Language
Select the default language for audio when changing services.
If you change the current service, your STB will initially select the
previously memorised Audio Language. If the Audio Language of
current service is not provided, at this time, you should reselect a
language on the Audio Language menu.
Languages provided:
?
Czech, Danish, Dutch, English, Finnish, French, German,
Hungarian, Italian, Norwegian, Portuguese, Rumanian, Russian,
Spanish, Swedish, Turkish and more.
If no language is provided, then the default language of current
service will be automatically selected.
button.
Language Setting
Menu Language
Audio Language
Subtitle Language
English
English
English
Danish
English
Finnish
French
German
Subtitle Language
Select the default language for subtitle when changing services.
Language provided: Danish, English, Finnish, French, German,
Hungarian, Italian, Norwegian, Portuguese, Spanish, Swedish
and more.
?
EN21
Page 23

Settings & Functions
Time Setting
Currrent Time 09:09
Time Offset : GMT +00:00
Timer Disabled
Timer Mode Once
Wakeup Time Disabled
Wakeup Service No. TV 20
Service Name : MTV ..
Sleep Time Disabled
Klocka & Timer
Currrent Time 09:09
Time Offset : GMT +00:00
Timer Disabled
Timer Mode Once
Wakeup Time Disabled
Wakeup Service No. TV 20
Service Name : MTV ..
Sleep Time Disabled
Time Setting
You can set the Current Time and Wakeup Time in this mode.
Furthermore, the Ser vice Number in the Wakeup mode and Sleep
Time (standby mode) can be set. When a VCR is connected, recording
can be automatically done according to Wakeup/Sleep Time Setting.
Current Time
?
To set the Current Time, enter the Offset value using the standardised information of current service area.
The time setting will be used as the standardised time for the I-Plate,
TV Guide, Wakeup and Sleep Timer.
Time Offset
Current Time is based on TDT (Time and Data Table) at the
stream of the current service.
Timer
You can select nine kinds of Timer like 1,2.......8 and Disabled.
If you select “Disabled”, then the other timers will not work. Press
the button at timer option to display the Timer table. The Timer
determines the on/off time and can also be used for VCR recording.
Timer Mode
?
Wakeup/Sleep timer determines the Timer Mode.
• Once : The timer programming is applied only once.
• Daily : The timer recording is applied everyday repeatedly
• Weekly : The timer recording is applied weekly.
(Set one day in a week).
Use the
buttons to select the type of timer programming.
EN22
Wakeup Time
Select the time when STB is turned on.
Use the numeric buttons (0-9) on the remote control unit to enter
your Wak eup Time .
Wakeup Service No.
Use the buttons to set the service number provided for the
set Wakeup Time . Use the TV/Radio button on the remote
control unit to toggle TV/Radio.
Service Name
The Service Name that has been determined by the Wakeup
Service No. will be shown.
Sleep Time
Depending on Time Setting, select the time when STB is turned off.
Page 24

English
A/V Output Setting
Video Output RGB
Audio Output STEREO
Dolby Digital OFF
Screen Mode 4:3
Display Format Letter-box
A/V Output Setting
Video Output (CVBS/S-Video/RGB)
Select one of the following options:
RGB - if you have connected a scart cable to a standard TV.
CVBS - if you have connected a scart cable to an old TV that
?
do not have RGB-input.
S-Video - if you have connected to the S-video (SVHS) input on
your TV or VCR.
Audio Output
Set the audio mode which is output from the TV SCART and
RCA/Cinch Jack. (Stereo/Mono)
Dolby Digital
lf Dolby Digital option is ON and the broadcaster provides the
Dolby Digital stream, the Dolby Digital audio language is firstly
selected when changing the service.
Screen Mode
Set the screen format of your TV (4:3 or 16:9).
4:3 - Standard TV
16:9 - Wide screen TV
Display Format
Select in witch format the picture should be dislayed on your TV.
If your TV screen format is 4:3 and you view a 16:9 transmission,
Letter-box - the whole picture in its original format will be dis-
played with a black filling on the top and bottom of
the TV -screen.
Center - the sides of the movie will be cut off and the central
part will be shown on the entire TV-screen.
Auto - your TV-set is in control of the picture display format.
If your TV screen format is 16:9 and you view a 4:3 transmission,
Pillar-box - the whole picture in its original format will be dis-
played with black bars filling out the TV-screen on
both sides of the picture.
Full - the picture is expanded so that it covers the whole
TV-screen. (Creates a slightly deformed appearance)
Auto - your TV-set is in control of the picture display format.
EN23
Page 25

Settings & Functions
UHF Tuning
Channel 43
PAL Standard PAL-G
Offset 0
?
PAL I or G for Europe : CH 21 - 69
PAL B for Europe/Australia : CH 28 - 69
PAL D for China : CH 13 - 62
PAL K for Russia : CH 21 - 69
Other Setting
OSD Transparency 60%
Info Box Display Time 5
Menu Background Bild 1
Changing to Reserved Service
Auto
?
UHF Tuning
How to set the UHF-modulator if your receiver is connected to the TV with
a TV cord.
Channel
Select a proper output channel that will not be interfered by other
TV-transmissions or other surrounding equipment that make use
of a UHF-modulator (VCR, DVD, TV-game etc.)
The range of channels and frequency value are different for each
PAL Standard.
PAL-standard
Select transmission (modulation) standard for the UHF-modulator.
Standard for the Nordic countries is PAL G.
Others, se picture.
Offset
Adjust the fine tuning value. The Offset ranges from -4 to +4 and
each Offset represents 1MHz.
Other Setting
Select the OSD Transparency, Information Box Display Time etc.
OSD Transparency
Select the OSD Transparent type. It affects Information box,
Soundtrack, Subtitle, Service list, Time and Quick mode of TV
Guide. Use the
buttons to toggle transparent, opaque, 20%,
40%, 60% and 80%.
EN24
Info.Box Display Time
Set the display duration of Information box displayed on the screen
after changing services. The time ranges from 0 to 20 seconds.
Menu Background
Set the type of background for the menu to be displayed on.
Changing to Reserved Service
Select Auto Mode if the receiver should automatically change
channel when a reserved event starts. Select Manual Mode if you
want to receive a message on the screen saying that the reserved
event has started, and then yourself chose to change channel.
Page 26

4-2. Service Organising
This menu gives users access to options that allow them to
organise their TV Services, Radio Services and Networks.
** The default PIN Code is
0000
.
English
Service Organising
Organise TV Services
Organise Radio Services
Organise Networks
Organise TV Services
Organise All Services
Organise Favourite A-D
Organise Service Genre
Organise TV Services
1 SVT1
Scrambled
Delete
SVT1
1
SVT2
2
SVT24
3
SVT Extra
4
TV4
5
CNN
6
eTV
7
DTU 7
8
Mediteve
9
Boxer
10
Move Lock
Services
Canal+
11
Canal+ Gul
12
Canal+ Blå
13
Kanal 5
14
DR1
15
DR2
16
MTV Nor..
17
VH-1
18
Nickelod..
19
Discovery
20
Sveriges Television
Skip
Rename
Organise TV Services
Organise All Services
This mode allows users to Delete, Move, Lock, Skip and Rename
TV Services.
- Use the arrow buttons to move around and select
?
channels in the list.
- Use the OK button to confirm.
- Use the EXIT button to cancel.
Delete
• Press the Red (
) button to delete unwanted services.
Move
• Press the Green (
?
you want to locate. Then, the icon will be displayed in front
) button to move the service to where
of the service number.
• Use the ( ) buttons to select a new location.
Lock
• Press the Yellow (
symbol “
“ will be displayed at the right side of the service
) button to lock services. Then, the
name.
- Repeat above procedure to remove the ser vice lock.
?
Skip
• Press the Blue (
) button to skip services. Then, the symbol
“ “ will be displayed at the right side of the service name.
• Use Numeric buttons(0~9), service list or
button to view the
skipped services when selecting channels.
You can’t view the skipped services by using buttons.
Note :
EN25
Page 27

Settings & Functions
Rename
• Press the White ( ) button to change the service name. Then, the
keyboard image will be displayed on the screen.
: Use the arrow buttons to select characters on the keyboard.
: Use the OK button to confirm selected character.
: RED button for "standard"-keyboard.
:
GREEN key for an extended keyboard.
: YELLOW key to save the new name.
: BLUE key to erase characters.
Organise Favourite TV Services
Gr.
Favourites A
SVT1
1
A
SVT2
2
B
Kanal 5
14
C
D
1 SVT1
Scrambled
Delete Move Lock
Services
SVT24
etc
3
SVT Extra
etc
4
TV4
etc
5
CNN
etc
6
eTV
etc
7
DTU 7
etc
8
Mediteve
etc
9
Boxer
etc
10
Canal+
etc
11
Canal+ Gul
etc
12
Sveriges Television
Skip
Rename
Organise Favourite A-D
Each of TV and Radio has four Favourite groups. Each Favoruite
group contains up to 100 services.
Delete, Move, Lock, Skip or Rename each TV service in a Favourite
TV group and re-group them into your Favourite TV group.
This mode has the same operating methods as “organise all services”.
?
•
When you delete a service in the Favourite group, it will be
available again on the All TV service list. This allows the
service to be removed from the Favourite group.
• You can move the service only within the Favourite group.
• Coloured keys are available when the cursor is located in the middle
window. (Except when the middle window is disabled(grey).)
To select the Favourite group;
1. Use the button to move the cursor to “Gr.”-plate(left).
2. Select the wanted favourite group.
To group the services into Favourites;
1. Use the
button to move the cursor to “Services”-plate (r ight).
2. Select the service you want to group into Favourites.
3. Press the
button.
4. Use the button to move the cursor to “Favourites”-plate(left).
5. Press the button to save the selected group.
EN26
Note : 1. Use the
2.
Use the buttons to select the previous or next page.
buttons to move the cursor.
Page 28

English
Organise Genre of TV Services
Movie
Canal+
10
Canal+ Gul
11
Canal+ Blå
12
Delete
Services
etc
SVT24
3
etc
SVT Extra
4
etc
Skånekanalen
5
etc
TV4
6
etc
CNN
7
etc
Mediteve
8
etc
Boxer
9
etc
MTV Nordic
13
etc
DTU7
14
etc
Kanal 5
15
Skip
Lock
Rename
Organise Service Genre
The Organise Service Genre feature allows the user to Delete/
Lock/Skip/Rename a service in the selected Genre.
Available genre: Movie, News, Show, Sports, Children,
Music, Art, Education, etc.
The colour buttons function same as ones for Organise All services except the following differences:
?
When you delete a service in the selected genre, it will be available again on the All TV services list at the right side. At that time,
the genre for the deleted service becomes “etc”.
You can move the service only in the selected genre.
Coloured buttons are available when the cursor is located in the
middle window.
To select the Genre;
1. Use the
button to move the cursor to “Gr.”-plate(left).
2. Select the wanted genre.
To group the services into a Genre;
1. Use the
button to move the cursor to “Services”- plate(r ight).
2. Select the service you want to group into Genre.
3. Press the button.
4. Use the
button to move the cursor to “Genre”-plate(left).
5. Press the button to save the selected group.
Note : 1. Use the
2.
Use the buttons to select the previous or next page.
buttons to move the cursor.
EN27
Page 29

Settings & Functions
Organise Radio Services
Organise All Services
Organise Favourite A-D
Organise Service Genre
Organisera Radio Services
1 YLE PEILI
Clear
Delete Move Lock
Organise Favourite Radio Services
Gr.
A
B
C
D
2 YLE AINO
Clear
Delete
YLE PEILI
1
YLE AINO
2
YLEN K..
3
YLE VE..
4
Favourites A
YLE AINO
1
Move Lock
Services
Skip
Services
2
3
4
Skip
Rename
YLE PEILI
YLEN K..
YLE VE..
Rename
Organise Radio Services
The Organise Radio Services functions same as TV Services
except that it uses Radio Services.
You can delete or move Radio Services and change the attributes
of them.
?
Organise All Services
The Organise All Services lets the user Delete, Move, Lock, Skip
or Rename Radio services on the All Radio services list.
Organise Favourite A-D
The Organise Favourite A-D lets the user Delete, Move, Lock,
YLE
Skip or Rename Radio Services from the Favourite Radio
Services and group into a new Favourite Radio Ser vices.
?
The Radio Services are grouped into a Favourite in the same way
as the TV Services.
(Se page EN25)
Organise Service Genre
The Organise Service Genre lets the user Delete, Lock, Skip or
YLE
Rename Radio Services and group into Radio Service Genres.
?
Radio Genres include:
Pop, Rock, Country, Classic, Jazz, Folk,
News, Show, Sports, Education, User A-D, etc.
The Radio Services are grouped into a Genre in the same way
as the TV Services.
(Se page EN27)
Organise Networks
Networks
Sveriges Television
TV4 AB
Boxer TV Access AB
Canal+ Television
Kanal 5 AB
MTV Europe
Discovery Communic
Eurosport Television
Move
Delete
EN28
Services
SVT1
1
SVT2
2
SVT24
3
SVT Extra
6
Rename
Organise Networks
You can edit ser vices using the network unit.
• The provider names are displayed on the left side of screen,
and the TV/Radio Services included in the highlighted
Network are displayed on the right side of screen. Only the
Delete, Move, Rename Function can be used in this mode.
?
• When TV/Radio Services are too many to be displayed, use
the
button to move the cursor to the right window and
use the and buttons to move the cursor to the
next list.
When the number of services is under 10, the scroll bar is not displayed.
In Radio Service icon is marked in front of service number.
Page 30

English
Service Searching
Easy Search
Custom Search
Automatic Search
Default Search
?
Easy Search
Channel CH 22
Mode 8K FFT
Guard Intervall
Hierarchy None
Network Search No
Common values for the Swedish network:
(September 2002)
Channel: 21 to 69
(At the moment there
are 5 MUXes with dif-
depending on region)
Mode: 8K FFT
Guard Intreval: Auto (Value vary)
Hierarchy: NONE
Network search: No
channel separately)
For channel info se: www.teracom.se
Common values for the Finnish network:
(September 2002)
Channel: 21 to 69
(At the moment there
are 3 MUXes with dif-
depending on region)
Mode: 8K FFT
Guard Intreval: Auto (Value vary)
Hierarchy: NONE
Network search: No
channel separately)
For channel info se: www.digita.fi
ferent channel numbers
ferent channel numbers
0..9
AUTO
?
(Search each MUX/
(Search each MUX/
4-3. Service Searching
A service is transmitted in a transport stream. To watch the
service, all services in the transpor t stream should be searched
and stored in this menu. The proper information to search the
stream is provided by the network operator. Please contact your
installer or the network operator.
** The default PIN code is
Easy Search
The services can be searched with minimal information in this
menu, “Easy Search”. But it takes more time, if the parameters
are set as “Auto”. To search the services quickly, please give
proper information for each items.
Channel
Select the number of UHF channel, in which the transport stream
is transmitted, within K21 to K69 by using the buttons or the
numeric buttons. If the number is not correct, STB will fail to search
any service.
Mode
Select the proper item within “2K FFT”, “8K FFT” and “Auto” by using
the buttons. If the information is not known, then “Auto” can be
selected. But this takes slightly longer time if “Auto” is selected.
Guard Interval
Select the proper item within “1/4”, “1/8”, “1/16”, “1/32” and “Auto” by
using the buttons. If the information is not known, then “Auto”
can be selected. But this takes slightly longer time.
Hierarchy
Select the proper item within “None”, “alpha=1”, “alpha=2”,
“alpha=4” and “auto” by using the buttons. If the information is
not know, then “Auto” can be selected. But this takes longer time.
Network Search
Select the option “YES” to search all services in the network.
Then, after STB succeeds to lock to the signal, STB will get
proper information on the services in the other UHF channels
and stores the information automatically. If the network operator
does not transmit proper information in the default channel, STB
can not search all services. It is required to search for all UHF
channels manually.
0000
.
EN29
Page 31

Settings & Functions
Service Searching
Easy Search
Custom Search
Automatic Search
Default Search
Custom Search
Frequency 818.0
Mode 8K FFT
Guard Interval
Hierarchy NONE
Constellation 64-QAM
Stream HP
Code Rate 3/4
Frequency Offset
Network Search No
AUTO
No Offset
Custom Search
The menu, “Custom Search” operates similar as the menu “Easy
Search”, however more parameters are required to search the services. Select proper items as follows. To get proper information,
please contact your installer or the network operator.
Frequency
Select the proper item within “2K FFT”, “8K FFT” and “Auto” by using
?
the
buttons. If the information is not known, then “Auto” can be
selected. But this takes slightly longer time if “Auto” is selected
Mode
Select the proper item within “1/4”, “1/8”, “1/16”, “1/32” and “Auto” by
0..9
can be selected. But this takes slightly longer time.
using the
buttons. If the information is not known, then “Auto”
Guard Interval
Select the proper item within “1/4”, “1/8”, “1/16”, “1/32” and “Auto” by
using the buttons. If the information is not known, then “Auto”
can be selected. But this takes slightly longer time.
?
Hierarchy
Select the proper item within “None”, “alpha=1”, “alpha=2”, “alpha=4”
and “auto” by using the
buttons. If the information is not know,
then “Auto” can be selected. But this takes longer time.
Constellation
Select the proper item within “QPSK”, “16-QAM”, “64-QAM” and
“Auto” by using the
buttons.
Stream
Select the proper item within “HP”, “LP” and “Auto”. This item is
deactivated when Hierarchy is “Auto” or “None”.
Code Rate
Select the proper item within “1/2”, “2/3”, “3/4”, “5/6”, “7/8” and “Auto”
by using the
buttons. “Auto” is recommended, if Hierarchy is
set as “Auto”.
Frequency Offset
Select the proper item within “No offset”, “+1/6 MHz”, “-1/6 MHz” and
“Auto” by using the
buttons. “Auto” is recommended.
Network Search
Select the option “YES” to search all services in the network.
Then, after STB succeeds to lock to the signal, STB will get
proper information on the services in the other UHF channels
and stores the information automatically. If the network operator
does not transmit proper information in the default channel, STB
can not search all services. It is required to search for all UHF
channels manually.
EN30
Page 32

English
Automatic Search
Start Channel CH 21
End Channel CH 69
Automatic Search
CH 21 8K FFT
Automatic Search
The menu “Automatic Search” is the easiest method to store new
stations. Proceed as follows in order to start the Automatic Search:
Start Channel
Set the lowest UHF channel in your area by using the
?
Press the
button to start the search.
End Channel
Enter the highest UHF channel by using the
Press the
EXIT
button to start the search.
buttons.
Default Search
The function is not activated on this model.
buttons.
EN31
Page 33

Settings & Functions
4-4. Status
STB Status
STB Status
H/W Version OAK 1.1
S/W Version HTCI 1.05.03
Device Driver Version HTCI 1.05.03
S/W Last Update 10 MAY 2002
Loader Version L 9.01
System ID 001B.0110
Current Service MTV Nordic
CI SLOT 1 Viaccess
CI SLOT 2
CI module is not installed
Displays the information of H/W Version, S/W Version, Loader
Version and CI CAM of STB and so on.
?
Signal Detection
CH 44
Signal Level (39%)
Signal Quality (100%)
Teracom_Sverige
STB Upgrade
Channel CH 21
Mode 2K FFT
Guard Interval 1/32
Hierarchy NONE
0..9
Signal Detection
Shows the Signal Level (AGC level) and Signal Quality(BER) of
the current service and is help to the initial antenna setting.
?
STB Upgrade
You can download and upgrade the software of this STB via
Transmitting station when the software of new version is released.
Do not turn off the STB during downloading. If the power is
accidentally switched OFF, turn on the STB and the process will
be continued.
?
(Se page EN4)
EN32
Page 34

English
Common Interface
Slot 1. Viaccess
Slot 2. CI module is not installed
MON
SUN
123
9
8
7
15
16
14
22
21
29
282330
10
17 18
24
31
2002July
FRITHUWEDTUE
5
4
11 12 13
19
25 26
4-5. Common Interface
You can enjoy not only scrambled services using the Conditional
Access Modules (CAM), but also Free-To-Air services.
This STB currently supports six kinds of CAM (VIACCESS™,
Nagravision, CONAX, CryptoWorks(TM), Irdeto or Mediaguard).
Common Interface module and Smart Card depend on the service provider. If you need CAM, contact your service provider or
?
distributor.
Note : If CAM is not used, then only Free-To-Air services are
available.
5. Utllity
SAT
6
20
27
STB supports additional functions such as Calendar and Biorythm.
Biorythm
Physical
Your Birthday
Emotion
Intellect
Idag
At the Biorhythm use the buttons to adjust your birth
year and date to see your current biorhythm status.
Inspiration
EN33
Page 35

Menu Map
EN34
Page 36

English
EN35
Page 37

T roubleshooting Guide
•
If you can't solve the problem referring to this Troubleshooting Guide, contact us via our homepage:
http://www.humaxdigital.com
EN36
Page 38

Specifications
Conditional Access Interface
PCMCIA
Tuner & Channel
Input Connector
Input Impedance
Input Channel
Input RF Power Level
Demodulation
Mode
FEC Decode
Guard Interval
MPEG Transport Stream A/V Decoding
Transport Stream
Profile Level
Input Rate
Aspect Ratio
Video Resolution
Audio Decoding
Audio Mode
Sampling
2 Slot Common Interface
IEC 169-2, Female
75Ω
CH21 ~ CH69
-70dBm ~ -20dBm
OFDM
2K, 8K and Auto
1/2, 2/3, 3/4, 5/6, 7/8 and Auto
1/4, 1/8, 1/16, 1/32 and Auto
MPEG-2 ISO/IEC 13818
Transport stream Specification
MPEG-2 MP@ML
60 Mbit/s Max
4:3, 16:9
720 x 576
MPEG/MusiCam Layer I & II
Single channel / Dual channel Joint stereo / Stereo
32, 44.1 and 48KHz
English
Memory
Main Processor
Flash Memory
Graphic(MPEG) &System
DRAM
• Data rate decides the picture quality of digital TV programmes. Data rate of about
5-6 Mbit/s coincides with the picture quality of a analog TV programme.
TMIPS R3930(81MHz)
2Mbyte
4Mbyte
EN37
Page 39

Specifications
A/V & Data In/Out
TV SCART
VCR SCART
VIDEO
AUDIO R/L
S/PDIF
RS-232C
RF(UHF)-modulator
Connector
Frequency
Output Channel
TV Standard
Preset Channel
Video Output (CVBS, S-Video, RGB)
Audio Output (Resolution : 20 bits DAC, Max. 2 Vrms)
Video Output(CVBS)Video Input(CVBS, S-Video, RGB)Audio
Output(Resolution : 20 bits DAC,
Max. 1 Vrms(fixed)
RCA/Cinch, Video Output(CVBS)
RCA/Cinch Volume and Mute Control
(Resolution : 20 bits DAC, Max. 2 Vrms)
Digital Audio Output, Fiber-Optic (Resolution : 20 bits)
Transfer rate Max. 115Kbps, 9pin D-sub Type
75Ω IEC, 169-2, male/female
4470 - 862 MHz
CH21-69, CH28-69 or CH13-62 for the Re modulator
PAL I/G/B/D/K selectable by Menu setting
CH36. Software changeable by Menu
Power Supply
Input V oltage
Type
Power Consumption
Standby Power
Protection
Physical Specification
Size (W x H x D)
Weight (Net)
Operating Temp
Storage Temp
Storage Humidity
• Please note :
EN38
190 - 250V AC, 50/60 Hz
Switch mode
Max. 30 W
≤ 11
W
Separate internal fuse. The input shall have lightening Protection
370 x 60 x 280 mm (Excluding the Foot) Foot height is 8 mm
Around 2.8 kg
0°C to + 45°C
-10°C to + 70°C
5% ~ 95% RH (Non-Condensing)
The specification of the STB may be changed without notice in advance.
CI5100T_content_Eng.indd Rev.2 030125
Page 40

020911CI5100T_Fi_Sw_En
 Loading...