

HumanTechnik DS-1 Operating Instructions Manual

D
Bedienungsanleitung
Digitalwecker DS-1
Seite 2
GB
Operating Instructions
Alarm clock DS-1
Page 8
F
Mode d’emploi
Réveil digital DS-1
Page 14
NL
Gebruiksaanwijzing
Digitale wekker DS-1
Pagina 20
I
Istruzioni per l’uso
Sveglia digitale DS-1
Pagina 26
E
Instrucciones de servicio
Despertador digital DS-1
Página 32
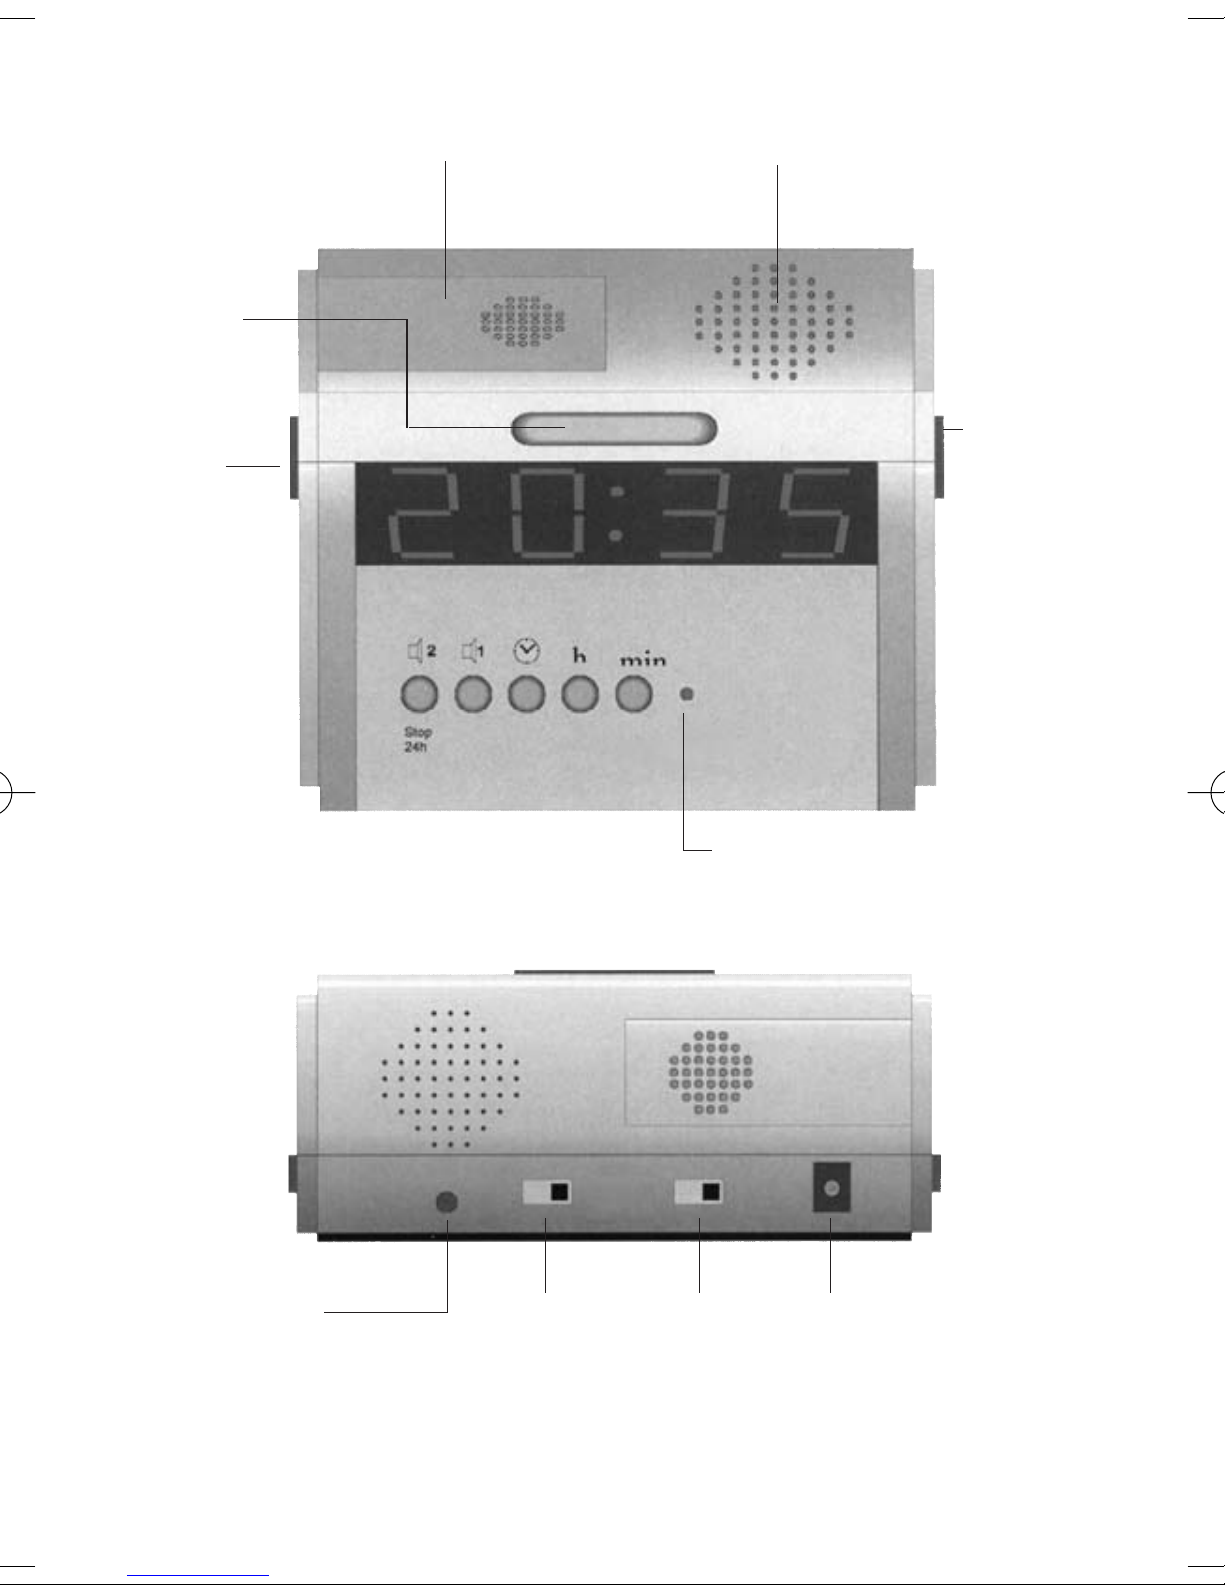
DS-1

Batteriefach Lautsprecher
WeckwiederholungsTaste
(Snooze)
Drehregler
Tonfrequenz
Drehregler
Lautstärke
Anschluss für
Vibrationskissen
oder
Erweiterungsmodule
Alarm
Ein / Aus
12/24 Std 12 V-
Anschlussbuchse
Alarm
Ein/Aus Anzeige
PM
DS-1
2 Deutsch

Wir beglückwünschen Sie zum
Erwerb Ihres
DS-1
Weckers und hoffen, dass Sie lange Zeit daran Freude haben. Sie haben sich dabei für
ein modernes und zuverlässiges
System entschieden.
Bitte lesen Sie diese Bedienungsanleitung aufmerksam durch, um die
Anlage richtig in Betrieb nehmen zu
können und mit allen Möglichkeiten
des Systems vertraut zu werden.
Lieferumfang
Überprüfen Sie bitte, ob alle nachfolgend aufgeführten Teile enthalten sind:
-
DS-1
- 12 V Steckernetzteil
- Bedienungsanleitung
- Garantiekarte
Sollten Teile fehlen, wenden Sie sich
bitte an den Fachhändler oder direkt
an den Hersteller.
Funktionsprinzip
Der Wecker
DS-1
ist eine elektroni sche Uhr mit digitaler Zeitanzeige.
Er weckt mit akustischem Signal, das
in der Tonfrequenz und in der Lautstärke geändert werden kann.
Zusätzlich kann folgendes Sonderzubehör an den Wecker angeschlossen
werden:
- Vibrationskissen
- Blitzmodul
- Schaltmodul
- Akustikmodul
Deutsch 3
Inbetriebnahme
Verbinden Sie das Steckernetzteil mit
der 12 V-Anschlussbuchse des
Weckers. Die Anzeige blinkt als Zeichen dafür, dass die Uhrzeit nicht
eingestellt ist. Das Blinken verschwindet, sobald die Uhrzeit eingestellt ist.
Uhrzeit einstellen
Taste und gleichzeitig Taste h
oder min gedrückt halten, um die
gewünschte Uhrzeit einzustellen.
Anmerkung
Die Uhrzeit kann im 12- oder 24Stundenmodus angezeigt werden.
Die Einstellung erfolgt über einen
Schiebeschalter auf der Rückseite
des Weckers.
Weckzeiten einstellen
Der Wecker besitzt zwei voneinander
unabhängig einstellbare Weckzeiten.
Weckzeit 1
Taste 1 und gleichzeitig Taste h
oder min gedrückt halten, um die
gewünschte Weckzeit einzustellen
(Wecksignaldauer 3 min).
Weckzeit 2
Taste 2/Stop 24 h und gleichzei-
tig Taste h oder min gedrückt halten,
um die gewünschte Weckzeit einzustellen (Wecksignaldauer 3 min).

4 Deutsch
Anmerkung
Bei der ersten Inbetriebnahme des
Weckers ist nur Weckalarm 1 aktiv.
Sie können die beiden Weckzeiten
unabhängig voneinander aktivieren.
Halten Sie die beiden Tasten 1
und 2/Stop 24 h gedrückt und
betätigen Sie die Weckwiederholungs-Taste. Mit jedem Druck der
Weckwiederholungs-Taste wird eine
der drei möglichen Einstellungen im
Display des Weckers angezeigt.
Sie können unter folgenden Einstellungen wählen:
Weckalarm 1 aktiv:
Displayanzeige: AL 1
Weckalarm 2 aktiv:
Displayanzeige: AL 2
Weckalarm 1 und Weckalarm 2 aktiv:
Displayanzeige: AL 1 2
Zusätzlich zur Displayanzeige sehen
Sie die Alarm LED nach folgendem
Verlauf blinken:
Weckalarm 1 aktiv:
LED an
LED aus
Weckalarm 2 aktiv:
LED an
LED aus
Weckalarm 1 und Weckalarm 2 aktiv:
LED leuchtet durchgehend
Alarmfunktion ein/ausschalten
Alarmfunktion mit dem EIN/AUSSchalter einschalten.
Steht der Schalter auf AUS sind
beide Alarmzeiten deaktiviert.
Einstellung der Tonfrequenz
Die Tonfrequenz des Wecksignals
kann mit dem Drehregler auf der linken Seite des Weckers verändert
werden. Drehen Sie den Drehregler
nach links um die Tonfrequenz zu
erhöhen oder drehen Sie ihn nach
rechts um eine tiefe Tonfrequenz zu
erhalten.
Anmerkung
Wird der Drehregler ganz nach links
gedreht (linker Anschlag des Drehreglers) ist der Weckton ausgeschaltet.
Einstellung der Lautstärke
Die Lautstärke des Wecksignals können Sie mit dem Drehregler auf der
rechten Seite verändern. Wird der
Drehregler nach links gedreht, so
wird der Ton leiser, dreht man den
Drehregler nach rechts, wird der Ton
lauter.

Deutsch 5
Weckwiederholung (Snooze-Funktion)
Durch Druck auf die Weckwiederholungs-Taste wird ein anstehender
Weck-Alarm unterbrochen. Der
Weckalarm wird nach ca. 5 Minuten
wiederholt.
Besonderheiten
- Wird ein Wecksignal nicht durch
die Weckwiederholungs-Taste oder
die Taste Stop 24 h unterbrochen,
wiederholt sich das Wecksignal
nach 4 Minuten (Autosnooze).
- Durch den Anschluss einer 9 V-
Blockbatterie im Batteriefach auf
der Rückseite des Weckers arbeitet dieser auch bei einem Stromausfall weiter. Es wird lediglich die
Anzeige des Weckers ausgeschaltet. Anstehende Wecksignale werden ausgelöst.
- Durch Druck auf die Weckwieder-
holungs-Taste kann eine eingelegte 9 V-Blockbatterie überprüft
werden.
Wird „LO“ im Display des Weckers
angezeigt, muss die eingelegte
Batterie ausgetauscht werden, da
ansonsten die Stromausfallüberbrückung nicht garantiert werden
kann.
Wartung und Pflege
Der
DS-1
ist wartungsfrei. Bei Verschmutzung sollten Sie das Gerät
gelegentlich mit einem weichen,
angefeuchteten Tuch reinigen.
Verwenden Sie niemals Alkohol, Verdünner oder andere organische
Lösungsmittel. Das Gerät sollte nicht
über längere Zeit direkter Sonneneinstrahlung ausgesetzt werden und
darüber hinaus vor großer Hitze,
Feuchtigkeit oder starker mechanischer Erschütterung geschützt werden.
Achtung: Das Gerät ist nicht gegen
Spritzwasser geschützt. Stellen Sie
keine mit Flüssigkeit gefüllten Gegenstände, z.B. Vasen, auf das Gerät.
Ebenfalls dürfen keine offenen
Brandquellen, wie z.B. brennende
Kerzen, auf das Gerät gestellt werden.
Bitte achten Sie darauf, dass die Batterien keiner übermäßigen Wärmequelle wie Sonneneinstrahlung, Feuer
oder dergleichen ausgesetzt werden.

Garantie
Der
DS-1
weist eine hohe Betriebssicherheit auf. Sollten trotz sachgerechter Montage und Bedienung
Störungen auftreten, setzen Sie sich
bitte mit Ihrem Fachhändler in Ver bindung oder wenden Sie sich direkt
an den Hersteller.
Die Garantieleistung umfasst die
kostenlose Reparatur sowie den
kostenlosen Rückversand. Voraussetzung dafür ist das Einsenden in der
Originalverpackung, werfen Sie diese
also nicht weg.
Die Garantie verfällt bei Schäden, die
durch unsachgemäße Behandlung
oder Reparaturversuchen von nicht
autorisierten Personen (Zerstörung
des Gerätesiegels) herbeigeführt
wurden.
Garantiereparaturen werden nur bei
Einsendung der ausgefüllten Garan tie karte und einer Kopie der Rechnung/Kassenbeleg des Fachhändlers
durchgeführt.
Die Gerätenummer muss in jedem
Fall mit angegeben werde n.
6 Deutsch
Entsorgung von gebrauch ten
elektrischen und elektronischen
Gerä ten (anzuwenden in den Ländern der Europäischen Union und
anderen europäischen Ländern mit
einem se paraten Sammel system für
diese Ge räte).
Das Symbol auf dem Pro dukt oder
seiner Verpa ckung weist darauf hin,
dass dieses Produkt nicht als
normaler Haushalts abfall zu behandeln ist, sondern an einer Annahme stelle für das Recycling von elektrischen und elektronischen Geräten
abgegeben werden muss. Durch
Ihren Beitrag zum korrekten Ent sor gen dieses Produkts schützen Sie
die Umwelt und die Ge sundheit Ihrer
Mitmenschen. Umwelt und Gesund heit werden durch falsches Ent sor gen gefährdet. Materialrecycling hilft
den Verbrauch von Roh stoffen zu
verringern. Weitere Informationen
über das Re cycling dieses Produkts
erhalten Sie von Ihrer Gemeinde, den
kommunalen Entsor gungs betrieben
oder dem Geschäft, in welchem Sie
das Produkt gekauft haben.
Technische Daten
Stromversorgung: über 12 V-Steckernetzteil an 230 V, 50 Hz
Stromausfallüberbrückung: über 9 V-Blockbatterie
Leistungsaufnahme: ca. 2,5 Watt
Höhe: 65 mm
Breite: 152 mm
Tiefe: 134 mm
Gewicht: 375 g
Dieses Gerät erfüllt die Anforderungen folgender EU-Richtlinie:
- 2002/95/EG RoHS-Richtlinie - 2004/108/EG EMV-Richtlinie
- 2002/96/EG WEEE-Richtlinie - 2006/95/EG Niederspannungsrichtlinie
Die Konformität mit den o. a. Richtlinien wird durch das CE-Zeichen auf dem
Gerät bestätigt. CE Konformitätserklärungen stehen im Internet unter
www.humantechnik.com zur Verfügung.
Technische Änderungen vorbehalten.
Deutsch 7
DS-1
Battery compartment Loud speaker
Snooze
button
Audio
frequency
control
Volume
control
Connector for
vibrating pillow
or modules
Alarm
On/Off
12/24 h 12 V connector socket
Alarm
On/Off indicator
8 English
PM
Congratulations on purchasing your
alarm clock
DS-1
. We hope it will provide you with many years of ser vice.
You have chosen a modern and reliable system.
Please read through the operating
instructions carefully to be able to
start the unit correctly and to familiarise yourself with all of the systems
features.
Standard components
Please check if all following components are included:
-
DS-1
- 12 V power supply unit
- Operating instructions
- Warranty card
If any parts are missing please immediately contact your dealer or the
manufacturer directly.
Functional principle
The alarm clock
DS-1
is an electro nic
clock with a digital time display.
It wakes you up with an acoustic signal which is adjustable in audio frequency and volume. The following
accessories can be connected to the
alarm clock:
- Vibrating pillow
- Flash module
- Switch module
- Acoustic module
English 9
Installation
Connect the power supply unit to the
12 V connector socket of the alarm
clock and plug it into a 230 V power
outlet. The display flashes as a sign
that the time has not yet been set.
The flashing disappears as soon as
the time is set.
Time setting
Press and h or min simultaneously to set the time.
Note
The time can be displayed in a 12 or
24 hour modus. The setting can be
changed at the 12/24 h switch at the
back of the alarm clock.
Setting the alarm time
The alarm clock has two alarm times
that can be set separately.
Alarm time 1
Press 1 and h or min simulta-
neously to set the desired alarm time
(Duration of alarm signal 3 min).
Alarm time 2
Press 2/Stop 24 h and h or min
simultaneously to set the desired
alarm time. (Duration of alarm signal
3 min).
Note
After the installation only alarm time 1
is active.

10 English
Both alarm times can be activated
separately. Press 1 and 2/Stop
24 h
simultaneously and push the
snooze button. With every push of
the snooze button one of the three
possible settings is shown on the display.
You can choose between the following settings:
Alarm time 1 active:
Display indication: AL 1
Alarm time 2 active:
Display indication: AL 2
Alarm time 1 and 2 active:
Display indication: AL 1 2
In addition to the display indication
the LED flashes as follows:
Alarm time 1 active:
LED on
LED off
Alarm time 2 active:
LED on
LED off
Alarm time 1 and alarm time 2 active:
LED lights continuously
Switching the alarm on/off
Activate/deactivate the alarm with the
alarm on/off switch at the back of the
DS-1
. If the switch is in the OFF-positi-
on, both alarm times are deactivated.
Setting of the audio frequency
The audio frequency of the alarm signal can be adjusted with the audio
frequency control on the left side of
the alarm clock. The audio frequency
increases if the control is turned to
the left and decreases if the control is
turned to the right.
Note
The alarm tone is turned off if the
audio frequency control is turned
completely to the left.
Setting of the volume
The volume of the alarm signal can
be changed with the volume control
on the right side of the alarm clock.
The volume decreases if the control
is turned to the left, the volume
increases if the control is turned to
the right.

Maintenance and care
The
DS-1
does not require any maintenance. If the unit does become
dirty, simply wipe it clean with a soft,
damp cloth. Never use spirits, thinners or other organic solvents.
Do not set up the unit where it will be
exposed to full sunlight for long periods. In addition it must be protected
against excessive heat, moisture and
severe mechanical shocks.
Note: This product is not protected
against splash water. Do not place
any container s filled with water, such
as flower vases, or anything with an
open flame, such as a lit candle, on
or near the product.
Please make sure that the batteries
are not exposed to excessive heat
from such as sunlight, fire or anything
similar.
English 11
Snooze function
Pressing the snooze button interrupts
the alarm. The alarm starts again
after approx. 5 minutes.
Special features
- The alarm signal is repeated after 4
minutes (auto snooze) unless you
press the snooze button or the Stop
24 h button.
- If a 9 V battery is inserted into the
battery compartment the alarm
clock operates even in case of a
power failure. The display of the
alarm clock turns off but the alarm
signals are triggered.
- The inserted 9 V battery can be
checked by pressing the snooze
button. If “LO” is indicated on the
display of the alarm clock, the battery has to be changed as otherwise the power failure back-up cannot be guaranteed.

Warranty
The
DS-1
is a very reliable product.
Should a malfunction occur despite
the unit having been set up and operated correctly, please contact your
dealer. This warranty covers the
repair of the product and returning it
to you free of charge. It is essential
that you send in the product in its original packaging, so do not throw the
packaging away.
The warranty does not apply to
damage caused by incorrect handling or attempts to repair the unit by
people who are not authorised to do
so (destruction of the seal on the
unit). Repairs under warranty are only
carried out providing you have filled
in and returned the enclosed warranty card from the dealer.
Always specify the product number in any event.
12 English
Disposal of used electric and
electronic units (applicable in
the countries of the Euro pean Union
and other European countries with a
separate collection system). The
symbol on the product or the packaging indicates that this product is not
to be handled as ordinary household
waste but has to be returned to a
collecting point for the recycling of
electric and electronic units. You protect the environment and health of
your fellow men by the correct disposal of this products. Environment and
health are endangered by a faulty
disposal. Material recycling helps to
reduce the consump tion of raw material. You will receive further
information on the recyc ling of this
product from your local community,
your communal disposal company or
your local dealer.
 Loading...