

Page 1
Page 2

Copyright 2005 Hughes Network Systems, LLC.
All rights reserved. This publication and its contents are proprietary to Hughes
Network Systems, LLC. No part of this publication may be reproduced in any
form or by any means without the written permission of Hughes Network Systems,
LLC., 11717 Exploration Lane, Germantown, Maryland 20876.
Hughes Network Systems, LLC., has made every effort to ensure the correctness
and completeness of the material in this document. Hughes Network Systems,
LLC., shall not be liable for errors contained herein. The information in this
document is subject to change without notice. Hughes Network Systems, LLC.
makes no warranty of any kind with regard to this material, including, but not
limited to, the implied warranties of merchantability and fitness for a particular
purpose.
Trademarks
All trademarks, marks, names, or product names referenced in this publication
are the property of their respective owners, and Hughes Network Systems, LLC.
neither endorses nor otherwise sponsors any such products or services referred to
herein.
HUGHES and Hughes Network Systems are trademarks of Hughes Network
Systems, LLC.
INMARSAT is a trademark of the International Mobile Satellite Organization. The
Inmarsat LOGO and the trademark BGAN are trademarks of Inmarsat (IP)
Company Limited. All trademarks are licensed to Inmarsat Limited.
Page 3
SAFETY INFORMATION
For your safety and protection, read this entire user manual before you
attempt to use the Broadband Global Area Network (BGAN) Satellite
Terminal. In particular, read this safety section carefully. Keep this safety
information where you can refer to it if necessary.
WARNING SYMBOLS USED IN THIS MANUAL
WARNING
Potential radio Frequency (RF) hazard. Where you see this
alert symbol and WARNING heading, strictly follow the
warning instructions to avoid injury to eyes or other
personal injury.
WARNING
Where you see this alert symbol and WARNING heading,
strictly follow the warning instructions to avoid personal
injury.
DANGER
Electric shock hazard: Where you see this alert symbol and
DANGER heading, strictly follow the warning instructions to
avoid electric shock injury or death.
WARNINGS FOR SATELLITE TERMINAL
DO NOT STAND IN FRONT OF THE ANTENNA
This device emits radio frequency energy when in the
transmit mode. To avoid injury, do not place head or other
body parts in front of the satellite antenna when system is
operational. Maintain a distance of two meters away from
the front of the Satellite Terminal antenna.
BGAN Terminal User's Guide i
Page 4

PROPERLY GROUND THE ANTENNA
Failure to properly ground the optional external antenna
may result in severe personal injury or death. Do not
attempt to ground the optional external antenna unless
you have the skills to do so in accordance with local
electrical codes.
DO NOT OPERATE DURING ELECTRICAL STORMS
Operation of the Satellite Terminal during electrical storms
may result in severe personal injury or death. Disconnect
the Terminal from the computer and store the unit indoors
if lightning is anticipated in the area of operation.
GENERAL
Handle your Satellite Terminal with care. The enclosure is
weather resistant per IEC 60529 IP55; however, do not
submerge the unit or expose it to severe rain storms. Avoid
exposing your Satellite Terminal to extreme hot or cold
Terminal is -25ºC to +60ºC.
Avoid placing the Terminal close to cigarettes, open
flames or any source of heat.
Changes or modifications to the Terminal not expressly
approved by Hughes Network Systems could void your
authority to operate this equipment.
Only use a soft damp cloth to clean the Terminal.
To avoid impaired Terminal performance, please ensure
the unit’s antenna is not damaged or covered with foreign
material like paint or labeling.
When inserting the USIM/SIM, do not bend the it or
damage the contacts in any way. When connecting the
interface cables, do not use excessive force.
IN THE VICINITY OF BLASTING WORK AND IN EXPLOSIVE
ENVIRONMENTS
Never use the Satellite Terminal where blasting work is in
ii BGAN Terminal User's Guide
Page 5

progress. Observe all restrictions and follow any regulations
or rules. Areas with a potentially explosive environment are
often, but not always, clearly marked. Do not use the
Terminal while at a petrol filling station. Do not use near
fuel or chemicals.
QUALIFIED SERVICE
Do not attempt to disassemble your Satellite Terminal. The
unit does not contain consumer-serviceable components.
Only qualified service personnel may install or repair
equipment.
BATTERIES AND ACCESSORIES
Use approved batteries (HNS P/N 3003702-0001) and
accessories only. Use of non-approved accessories may
result in loss of performance, damage to the Satellite
Terminal, fire, electric shock or injury.
AC Mains power adapter (HNS P/N 3003727-0001) is for
indoor use only. It has an indoor operating temperature
range of 0ºC to +40ºC and provides an output voltage of
20 VDC.
The storage capability of the battery decreases when
operated.
Battery charging should only be attempted when the
temperature is within the range of 0 to 45 degrees C.
CONNECTING DEVICES
Never connect incompatible products. When connecting
the Satellite Terminal to any other device, read the
device’s User Manual for detailed safety instructions.
BGAN Terminal User's Guide iii
Page 6

PACEMAKERS
The various brands and models of cardiac pacemakers
available exhibit a wide range of immunity levels to radio
signals. Therefore, people who wear a cardiac pacemaker
and who want to use a Satellite Terminal should seek the
advice of their cardiologist. If, as a pacemaker user, you
are still concerned about interaction with the Satellite
Terminal, we suggest you follow these guidelines:
Maintain a distance of 30 cm between the Terminal
and your pacemaker;
Maintain a distance of two meters from the front of
the unit’s antenna;
Refer to your pacemaker product literature for
information on your particular device.
If you have any reason to suspect that interference is
taking place, turn off your Satellite Terminal immediately!
iv BGAN Terminal User's Guide
Page 7

HEARING AIDS
Most new models of hearing aids are immune to radio
frequency interference from Satellite Terminals that are
more than 2 meters away. Many types of older hearing
aids may be susceptible to interference, making it very
difficult to use them near a Terminal. Should interference
be experienced, maintain additional separation between
you and the unit.
BGAN Terminal User's Guide v
Page 8

CONTENTS
SAFETY INFORMATION _______________________________________I
Warning Symbols Used in this Manual ............................................. i
Warnings for Satellite Terminal .......................................................... i
CONTENTS _____________________________________________ VI
INTRODUCTION ___________________________________________1
Coverage............................................................................................ 2
CONTENTS ______________________________________________ 4
MINIMUM SYSTEM REQUIREMENTS _____________________________ 6
SOFTWARE INSTALLATION ___________________________________ 7
Supported Operating Systems......................................................... 7
Installation CD and Installation Wizard........................................... 7
QUICK START USER GUIDE __________________________________ 9
FIRST TIME SETUP _________________________________________ 10
Portable Setup.................................................................................. 10
USIM/SIM .....................................................................................10
Power .......................................................................................... 13
Terminal Stand Positioning ....................................................... 17
Connecting Satellite Terminal to Terminal Equipment (TE).22
Obtaining GPS Fix...................................................................... 26
Antenna Pointing ......................................................................28
Connecting to the Network ....................................................32
Fixed/Semi-Fixed Installation ..........................................................37
TERMINAL OVERVIEW _____________________________________ 38
Size and Weight................................................................................ 38
Terminal Interfaces Available ........................................................ 38
Interface Overview and Defaults........................................... 38
vi BGAN Terminal User's Guide
Page 9

Establishing Computer <-> Satellite Terminal Communications
...................................................................................................... 41
Terminal Features .............................................................................43
USIM/SIM Card ........................................................................... 43
Battery......................................................................................... 44
Buttons ........................................................................................ 44
Indicator Lights (LEDs) and Audio Buzzer............................... 45
Compass..................................................................................... 51
Solar Panel Compatibility......................................................... 51
Terminal Accessories .......................................................................52
DC Power Adapter ...................................................................52
Extended Battery....................................................................... 53
AC Mains Power Adapter (w/30mm Cable) ........................ 53
Cables......................................................................................... 54
Compatible Devices................................................................. 54
Fixed Installation Kit................................................................... 55
MAN-MACHINE INTERFACE (MMI) OVERVIEW__________________ 56
PIN Code entry................................................................................. 56
Personalization.................................................................................. 56
Pointing.............................................................................................. 56
Main Display ..................................................................................... 56
Configurability .................................................................................. 56
Multiple Users ....................................................................................58
Software Download/Upgrade....................................................... 58
Connecting Terminal to PC and Other Devices......................... 59
BGAN SERVICES ________________________________________60
Voice Telephony Services............................................................... 60
Supplementary Services .................................................................60
Messaging Services.......................................................................... 64
Short Message Service (SMS) via MMI.................................... 64
Data Services.................................................................................... 64
BGAN Terminal User's Guide vii
Page 10

Default Connections ................................................................ 64
Dedicated Streaming Connections ....................................... 65
ISDN Data ................................................................................... 67
SERVICE FEATURES________________________________________68
Automatic Mode ............................................................................. 68
Auto “On” Mode....................................................................... 68
LED On/Off Mode...................................................................... 68
Antenna Pointing Bypass .........................................................69
Automatic Context Activation................................................ 69
Phonebook .......................................................................................69
Emergency Calls ..............................................................................69
Personalization Services .................................................................. 71
LAN Access Point Setup.................................................................. 72
PDP Contexts – Primary and Secondary................................ 72
IP Addressing.............................................................................. 73
Firewall and DMZ Host .............................................................. 73
Multiple User Scenarios.................................................................... 74
Managing Contacts........................................................................ 75
TCP PEP SOFTWARE.......................................................................... 76
Exit, Reset And Restart Features.....................................................76
Exiting LaunchPad..................................................................... 76
Resetting the Terminal ..............................................................77
Restarting the Terminal ............................................................. 78
GETTING HELP.................................................................................... 78
Time Zone Customization................................................................ 78
BGAN User Profile Maker................................................................. 80
Security .............................................................................................. 80
Software Upgrade ........................................................................... 80
Log Files .............................................................................................80
Turning Logging On and Off.................................................... 81
Emailing Log Files....................................................................... 84
viii BGAN Terminal User's Guide
Page 11

Printing Log Files......................................................................... 86
Saving Log Files to Disk ............................................................. 87
Deleting or Clearing Log Files.................................................. 88
POWER-ON SELF-TEST_____________________________________90
Satellite Terminal Boot Behavior .................................................... 90
Software Initialization....................................................................... 92
Digital Signal Processing (DSP) Download ................................... 92
Parameter Access ...........................................................................92
SIM Access ........................................................................................ 92
TROUBLESHOOTING _______________________________________ 93
TECHNOLOGY OVERVIEWS _________________________________ 93
TECHNICAL SPECIFICATIONS ________________________________ 94
DECLARATION OF CONFORMITY _____________________________95
EU WEEE (Waste Electrical and Electronic Equipment) directives96
GLOSSARY OF TERMS _____________________________________ 97
ERROR CODES _________________________________________101
BGAN Terminal User's Guide ix
Page 12

Page 13

INTRODUCTION
The Hughes Network System (HNS) 9201 Broadband Satellite Terminal
and Wi-Fi Access Point is your gateway to global communication.
The 9201 allows you to simultaneously send and receive IP packet
and circuit-switched data via Universal Serial Bus (USB), Ethernet,
Integrated Services Digital Network (ISDN), and Wi-Fi interfaces over
the Inmarsat BGAN satellite network. The unit offers you the following
features and benefits:
432 kbps IP data (transmit and receive)
Speech (4Kbps)
ISDN voice (3.1KHz audio)
ISDN data (64kbps)
Wi-Fi access point
Multi-user capability for sharing a single unit
Selectable Quality-of-Service (QoS)
Full IP compatibility for Email, file transfer (FTP), browsing, VPN,
etc.
Cost-effective “always-on” access – charges only for data
sent and received
UMTS IP-based services
Wi-Fi, FCC, UL, CE, and GMPCS certified
Subscriber Identification Module (SIM) card security
LED indicators and audio pointing aids for obtaining an
Inmarsat satellite signal
GPS status light
The unit is easy to install and connects in minutes. It is built for use in
fixed, semi-fixed, and portable environments. The rugged design
allows the unit to be installed outside in extreme weather conditions
for extended periods of time, and the small size and weight lets you
easily move it from site to site.
BGAN Terminal User's Guide 1
Page 14
In this document, the following names and abbreviations are used
to identify the Satellite Terminal, your computer, and the linked
Satellite Terminal and computer:
Term Definition
Terminal Satellite Terminal
TE Terminal Equipment (your computer)
UT User Terminal Station (Terminal + TE)
MMI Man-Machine Interface on the TE
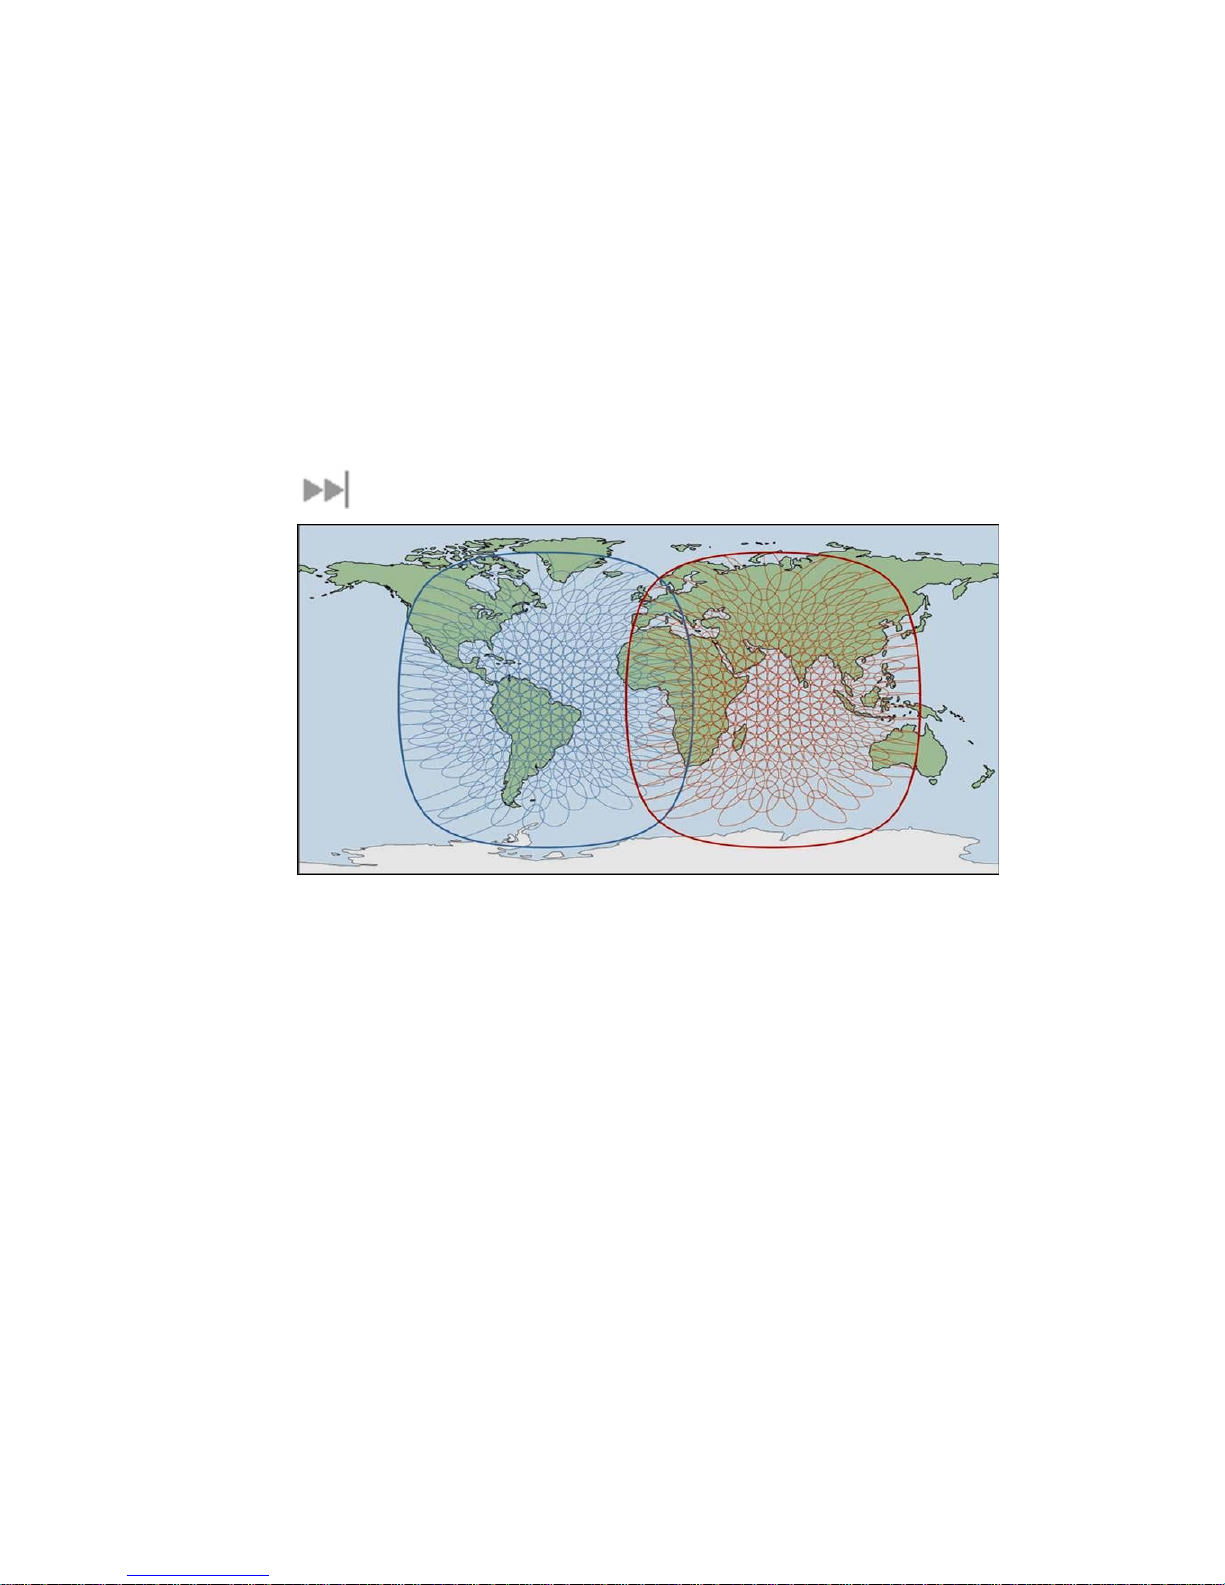
COVERAGE
The coverage map shows the globally-available satellite coverage.
You are able to access multiple satellites around the world. The
BGAN Radio Access Network (RAN) includes the BGAN Radio
Network Controller (RNC) and BGAN RF Subsystem. It handles all
radio-related aspects of the BGAN ground system network
infrastructure. The RF subsystem provides communication to and
from the User Equipment community via the Inmarsat 4 satellite
2 BGAN Terminal User's Guide
Page 15

constellation. The RNC interfaces to the Core Network (CN) for
switching and routing calls and data connections to and from the
external networks.
BGAN Terminal User's Guide 3
Page 16

CONTENTS
When you unpack the Satellite Terminal package, you will find these
standard components:
BGAN 9201 Broadband Satellite Terminal and Wi-Fi Access
Point
Rechargeable lithium ion battery pack
AC Mains Power Adapter and cable (100 – 240 VAC)
USB cable
Ethernet cable
ISDN cable
User Guide (this document)
Installation CD
These are optional accessories you may choose to include in the
package:
Extra standard lithium ion battery pack
Extended lithium ion battery pack
Standard AC Mains power adapter (100 – 240 VAC)
Fixed installation kit
Vehicular Power Adapter
4 BGAN Terminal User's Guide
Page 17

Your Service Provider will supply a Subscriber Identification Module
(SIM) and Satellite Terminal configuration instructions – you will need
these to access the network.
BGAN Terminal User's Guide 5
Page 18

MINIMUM SYSTEM
REQUIREMENTS
These are the minimum computer system requirements for successful
interface with the Satellite Terminal:
CD-ROM (for installation CD)
Internet Browser: Microsoft Internet Explorer version 5.5 or
later; Netscape Communicator version 7.0 or later (Java must
be active).
PC Support for at least one of these interfaces – USB, Ethernet,
ISDN or WiFi.
Intel Pentium III CPU, or equivalent.
100 MB of free hard disk space.
128 MB of RAM.
6 BGAN Terminal User's Guide
Page 19

SOFTWARE INSTALLATION
e
o
N
SUPPORTED OPERATING SYSTEMS
The Satellite Terminal supports the following Laptop/PC operating
systems:
Microsoft Windows® XP
Linux Red Hat 9 - KDE 3.1.10 (Kernel Version 20.4.20-8)
Mac 10.x
Mac 9.2 (Classic)
You must disconnect any existing LAN connections on your PC
;
Note
before proceeding with installation. This avoids any conflict
with the network configuration that you are setting up for the
Satellite Terminal.
You must verify that the proxy server settings in your browser
are disabled. For Microsoft Internet Explorer, select Tools /
Internet Options / Connections / LAN Settings and uncheck th
box labeled ‘Use a proxy server for your LAN’. For Netscape,
go to Advanced Preferences and select ‘Direct connection t
the Internet’. When complete please close your browser. DO
NOT FORGET YOU MAY NEED TO RECHECK THIS BOX ON RETUR
TO YOUR OTHER INTERNET CONNECTION.
INSTALLATION CD AND INSTALLATION WIZARD
Insert the installation CD into your computer’s CD-ROM drive to
initiate the software installation. If the Installation Wizard, the
program which guides you through the installation process, does not
automatically begin, use your Windows® Explorer utility or Mac OS X
Finder utility to find setup.exe on the installation CD; then, doubleclick that program to start the Installation Wizard. Follow the steps in
the Installation Wizard
BGAN Terminal User's Guide 7
[GLC1].
Page 20

8 BGAN Terminal User's Guide
Page 21

QUICK START USER GUIDE
BGAN Terminal User's Guide 9
Page 22

FIRST TIME SETUP
PORTABLE SETUP
USIM/SIM
Your Service Provider will supply you with a Subscriber Identification
Module (SIM). The SIM is either a Universal Mobile
Telecommunications System (UMTS) Subscriber Identification Module
(USIM) or a Global System for Mobile (GSM) SIM.
A USIM/SIM is a card commonly used in a GSM phone. The card
holds a microchip that stores information and encrypts voice and
data transmissions, making it close to impossible to listen in on calls.
The SIM card also stores data that identifies the caller to the network
service provider.
Installation Instructions
1. Position the MT so that the Satellite Terminal battery door is
facing you.
2. Open the battery door. If you have already installed the battery,
release and then remove it.
10 BGAN Terminal User's Guide
Page 23
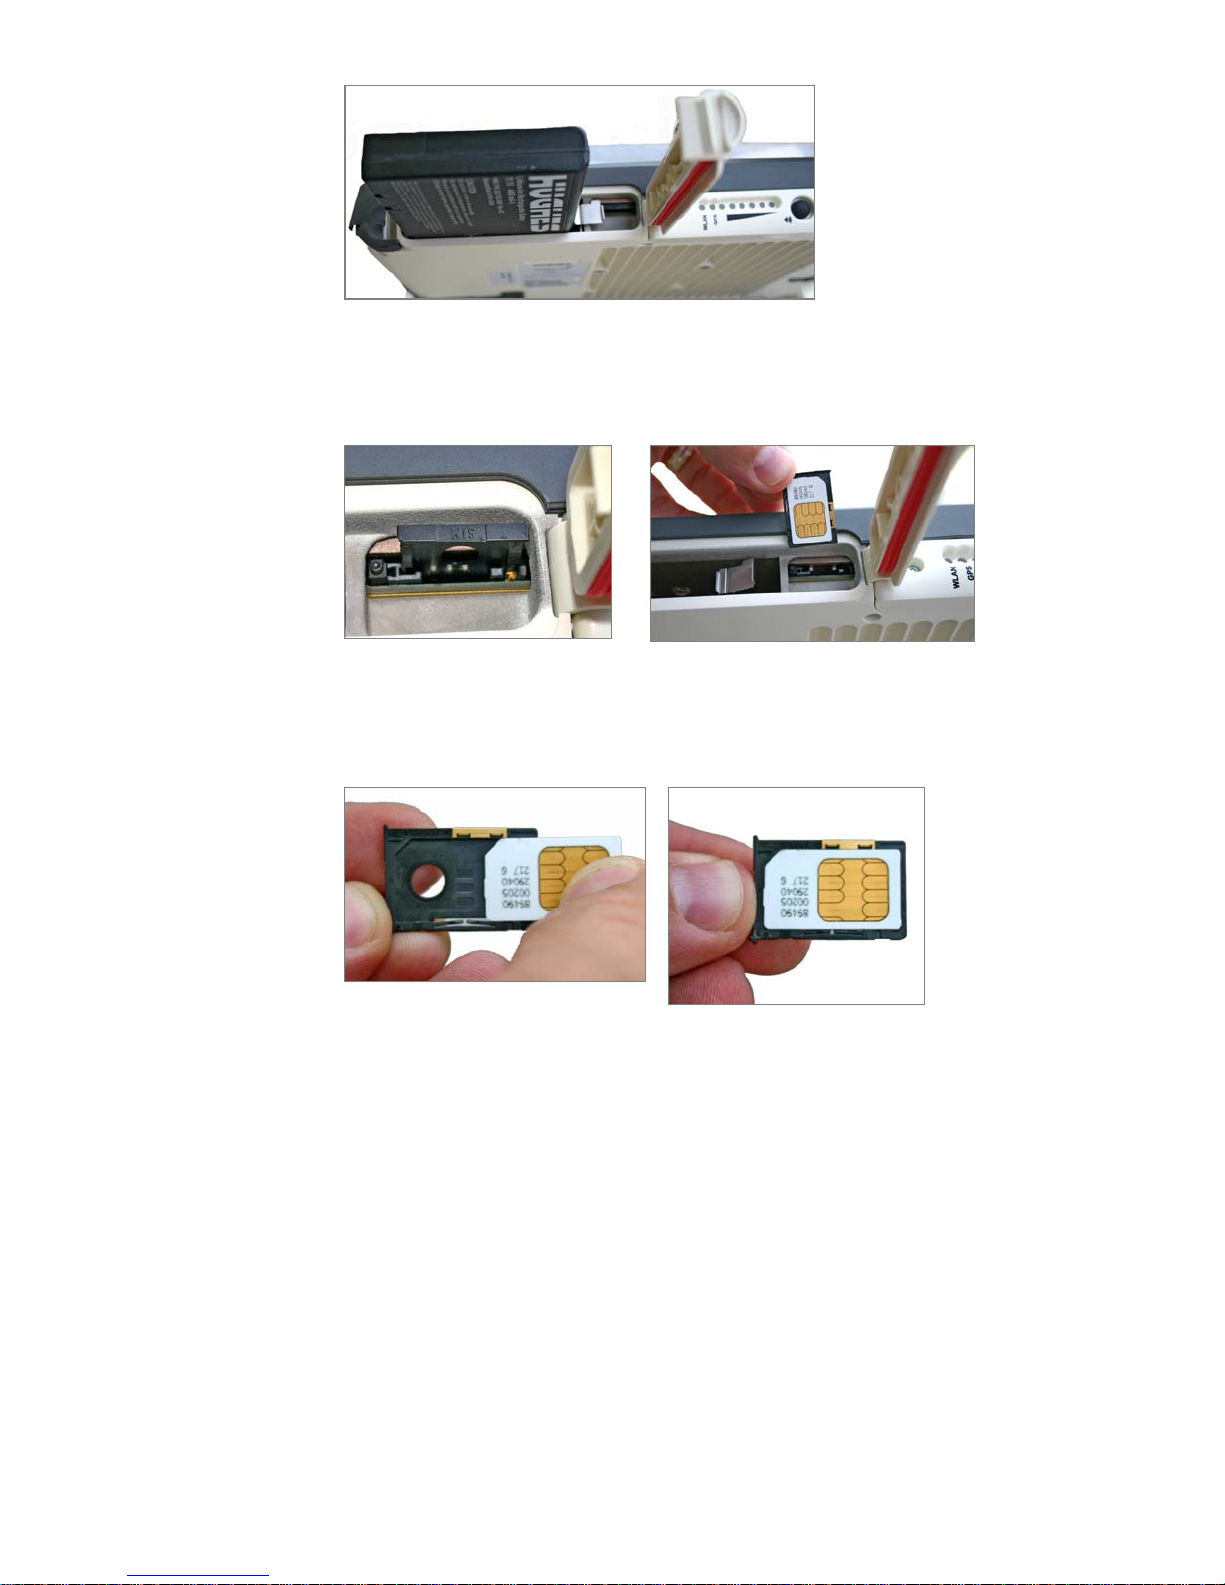
3. Push the button on the left-hand side of the USIM/SIM card
holder. This releases the holder from its slot.
4. Install the USIM/SIM card in the card holder with the gold shield
facing up. Snap the card into place in the holder.
5. With the card in place, orient the holder with the card’s gold
shield facing down. Place the holder back in its slot in the MT.
BGAN Terminal User's Guide 11
Page 24

12 BGAN Terminal User's Guide
Page 25

6. Put the battery into its slot (positioned as shown below) in the MT
and lock it in place. Then close and lock the battery door.
When you start the MMI application on your computer (TE) and
connect to the Terminal, the Terminal will query the current USIM/SIM
card to see if the Personal Identification Number (PIN) is enabled. If
the PIN is enabled, the MMI displays a PIN window and requires you
to enter a valid SIM PIN before service is enabled. If the SIM PIN is
disabled then the MMI bypasses this display.
POWER
Battery Charging
Battery charging can take place as long as the following conditions
are satisfied:
The Satellite Terminal is connected to an external power
source.
The battery is less than fully charged.
BGAN Terminal User's Guide 13
Page 26
The temperature of the battery is within 0 to 45 degrees C.
The battery has not been found by software to be defective.
The Satellite Terminal contains battery charging circuitry that will
automatically charge the battery whenever the Terminal is plugged
into DC power.
Insert the battery as shown in the previous section. Battery
installation should be coordinated with USIM/SIM installation
(see USIM/SIM installation instructions previously detailed in this
section).
Plug in the Power Cable and charge the battery for three
hours.
;
Note
You can run the User Terminal Station (UT) while the
battery is charging.
14 BGAN Terminal User's Guide
Page 27
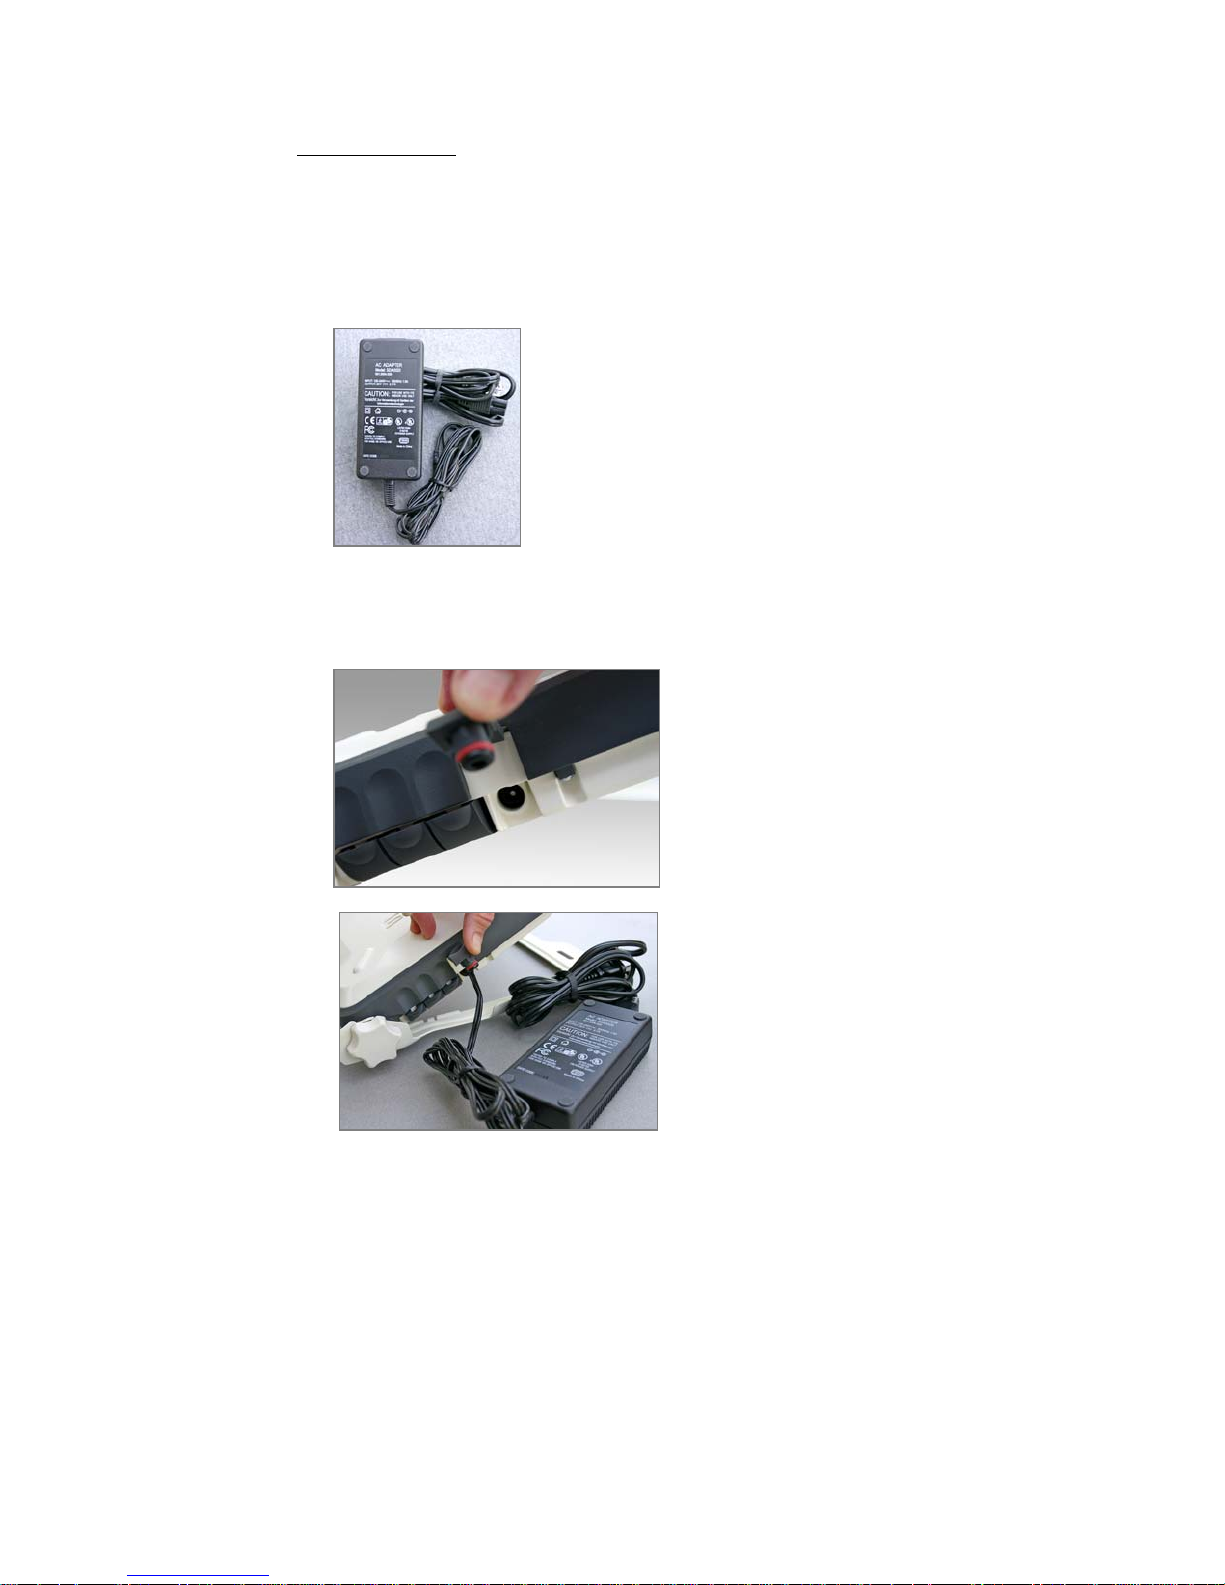
AC/DC Adapter
The AC Mains power adapter (HNS P/N 3003727-0002) is for indoor
use only. It has an indoor operating temperature range of -10ºC to
+55ºC and provides an output voltage of 20 VDC.
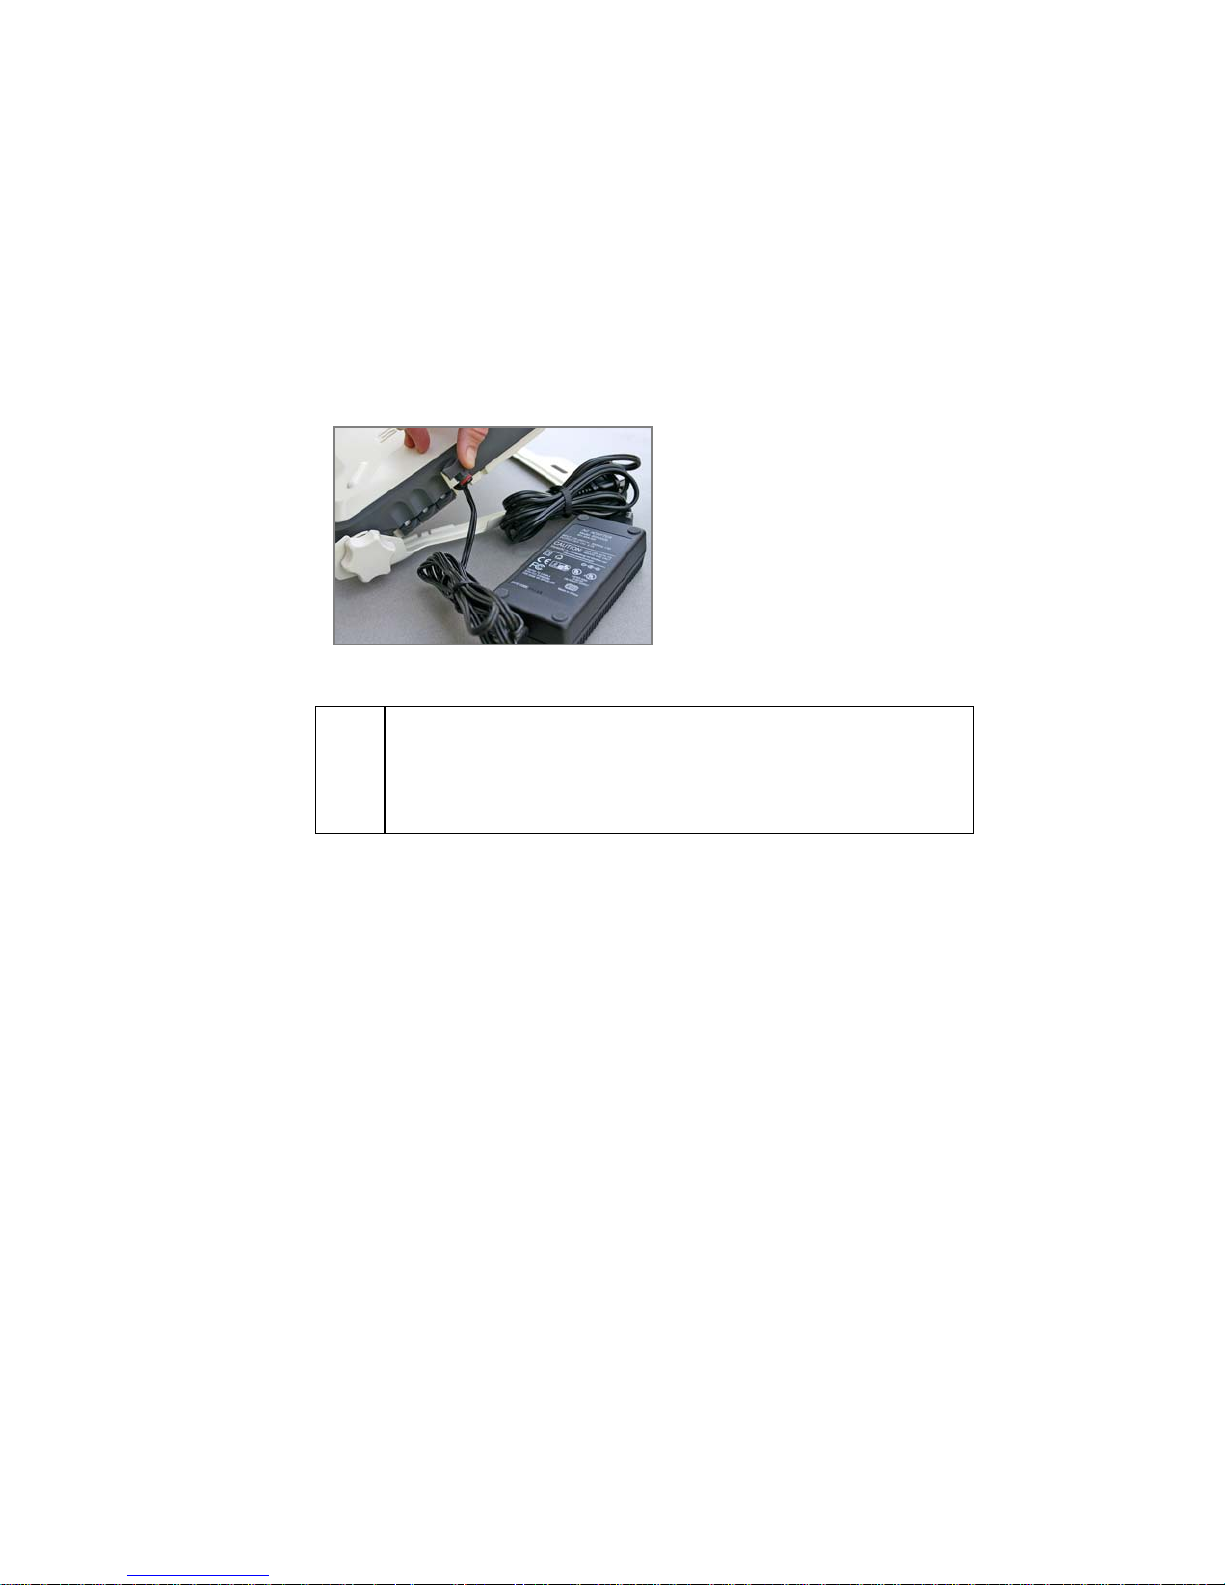
1. Remove the power adapter from the Satellite Terminal box.
2. Insert the power adapter output connector to the DC Power
Input Jack on the back of the Terminal. Insert the plug end into
any AC outlet between 100 and 240 VAC.
BGAN Terminal User's Guide 15
Page 28

16 BGAN Terminal User's Guide
Page 29
TERMINAL STAND POSITIONING
The positioning of the Satellite Terminal stand at an appropriate
angle is very important as a prerequisite for getting a fix on the
satellite. The Terminal elements used in this process are the knobs,
protractor, and compass.
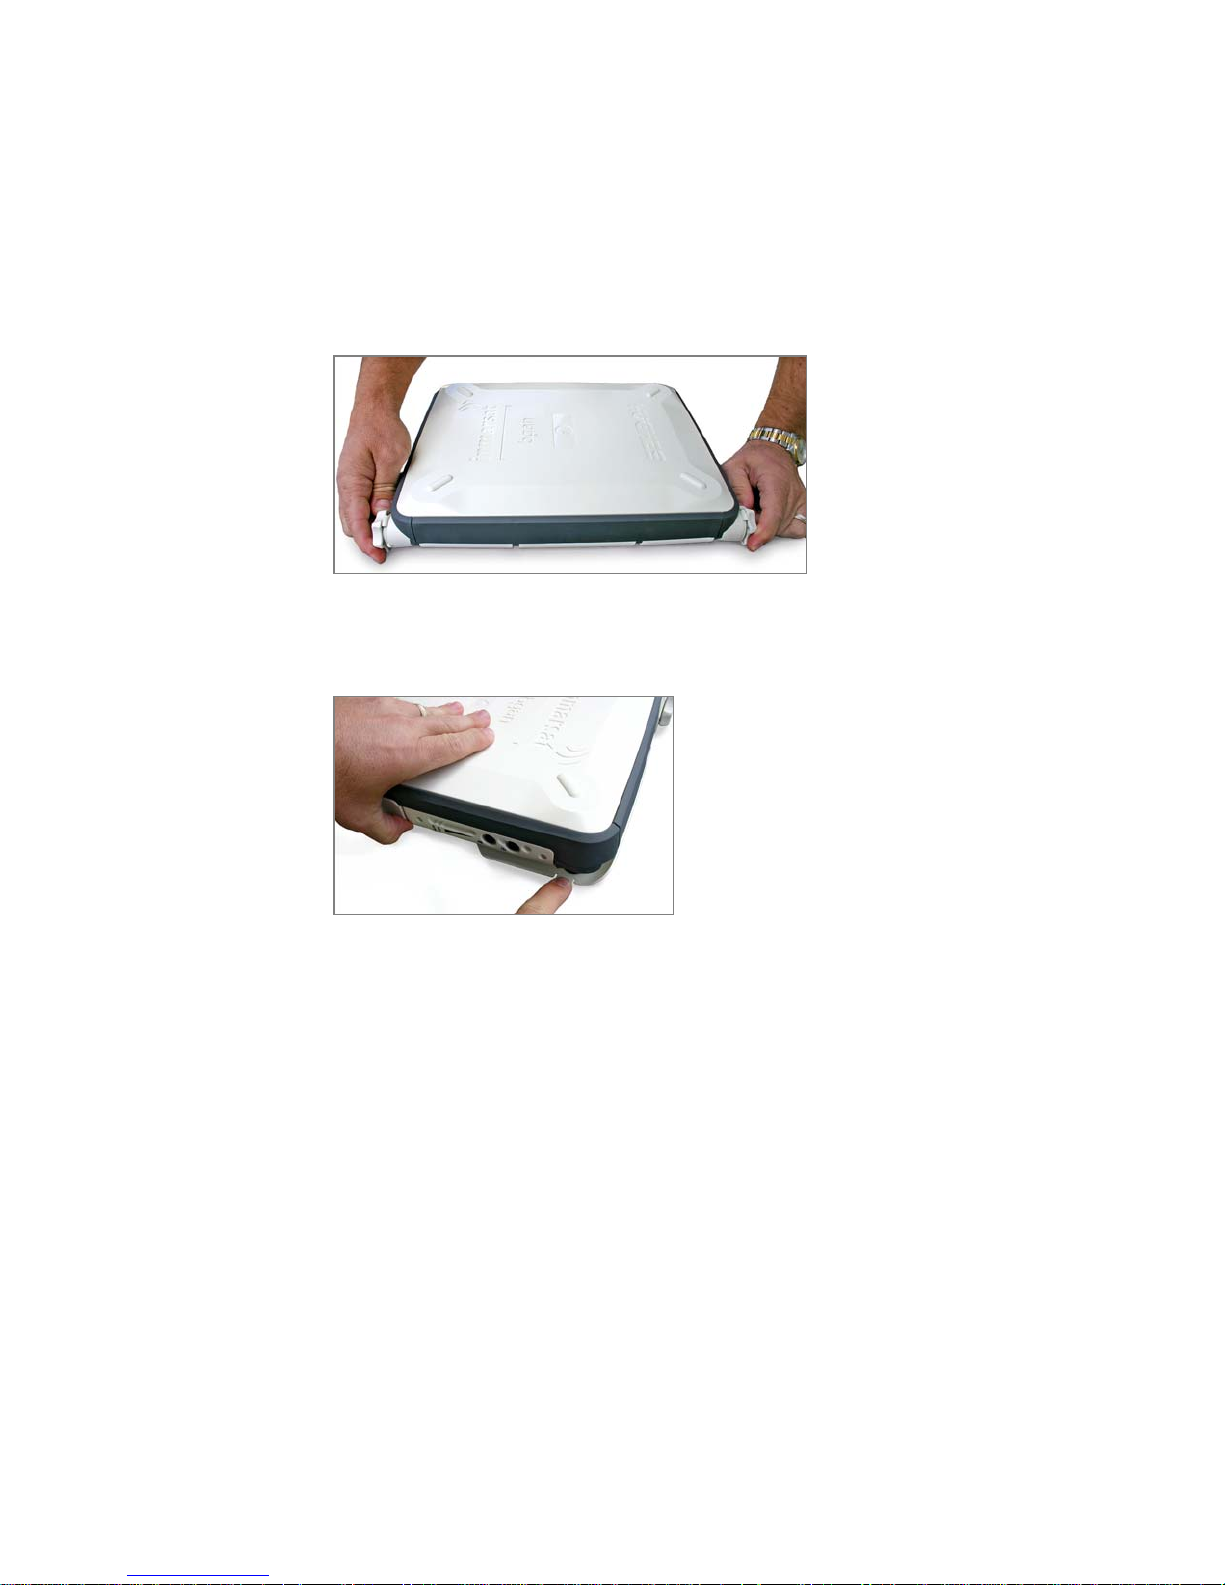
1. Place the Satellite Terminal on a flat table. Locate the knobs on
one end of the unit. Loosen the knobs by turning them counterclockwise.
2. To prepare to lift the Terminal, place a finger in the lower right
hand corner of the unit and place your other hand in the middle
of the unit.
3. Pull out the front stabilizer. Lay the Terminal back on the table.
BGAN Terminal User's Guide 17
Page 30

18 BGAN Terminal User's Guide
Page 31

4. Lift up the Terminal while referring to the protractor on the righthand side. The protractor gives you the angle at which the unit is
positioned. Note that an angle of zero to 45 degrees is displayed
on the inside portion of the protractor, while a 46 to 90 degree
angle is displayed on the outside portion. The desirable angle is
between 15 and 30 degrees.
5. After you have positioned the Terminal at the desired angle,
tighten the knobs by turning them clockwise. Tighten them so
that they are firm and hold the angle but are still movable in
case further adjustments are needed.
BGAN Terminal User's Guide 19
Page 32

20 BGAN Terminal User's Guide
Page 33

6. You can now view the compass to prepare for pointing the
antenna. Refer to the Antenna Pointing section for further
instructions.
BGAN Terminal User's Guide 21
Page 34

CONNECTING SATELLITE TERMINAL TO TERMINAL EQUIPMENT (TE)
INTERFACE CONNECTION PROCEDURES
1. Choose one of the following interface options to connect your
TE to the Satellite Terminal:
USB
Ethernet
Integrated Services Digital Network (ISDN)
Wi-Fi
2. Proceed by following the appropriate set of instructions detailed
below for the interface you have chosen.
;
22 BGAN Terminal User's Guide
There is no need to check the active interface. All
interfaces can be used simultaneously to
Page 35

Note
USB
Connect the USB cable to your computer’s USB serial port, and insert
the other end of the connector into the Terminal’s USB port.
3. At the Terminal connection point, slide the cable through the
rubber door slot in order to secure and protect the connection.
accommodate multiple users.
;
Note
BGAN Terminal User's Guide 23
When plugging in the USB cable for the first time, you will
see Windows installing a new driver for the device.
Page 36

THERNET
E
1. Connect the Ethernet cable to your computer’s Ethernet port,
and insert the other end of the connector into the Terminal’s
Ethernet port.
2. At the Terminal connection point, slide the cable through the
rubber door slot in order to secure and protect the connection.
24 BGAN Terminal User's Guide
Page 37

ISDN
1. Connect the ISDN cable (use the provided Ethernet cable – it is
a dual-use cable for both Ethernet and ISDN) to your computer’s
or phone’s ISDN port, and insert the other end of the connector
into the Terminal’s ISDN port.
2. At the Terminal connection point, slide the cable through the
rubber door slot in order to secure and protect the connection.
WI-FI
When the Satellite Terminal is turned on, note that the Wi-Fi LED is
green when the Wireless LAN is connected and active.
BGAN Terminal User's Guide 25
Page 38

OBTAINING GPS FIX
Your Satellite Terminal contains an integrated Global Positioning
System (GPS) receiver that is used to provide location information to
the BGAN system. GPS location information is required for system
access and the reception of a new GPS location is attempted
automatically every time the Terminal is powered up.
The GPS antenna is located in the main Antenna. For optimum GPS
signal reception, make sure the Terminal is placed in a horizontal
position pointed towards the satellite. Since GPS receivers must
“see” a large part of the sky without obstructions from buildings,
mountains or trees, it is necessary to take your Satellite Terminal out
to a clear space to obtain a new GPS location. It may be possible to
obtain a new GPS location in a less favorable circumstance, but the
time to completion may be longer.
Once the GPS position is updated, the Satellite Terminal
“remembers” your location so the unit can be relocated to a more
convenient working area, such as inside a building by a window
facing the satellite.
ENERAL INSTRUCTIONS
G
1. Take the Satellite Terminal outside and lay it down flat. Verify that
the unit has an open view of the sky to get a GPS fix.
2. Power up the Terminal. The GPS LED will start to flash green unless
a GPS hardware failure is detected.
3. Monitor either the MMI GPS indicator or the Terminal’s GPS LED
for the quality of the GPS fix.
26 BGAN Terminal User's Guide
Page 39

GETTING THE GPS FIX USING THE LED
The following is the progression of the GPS LED display as you try to
obtain the GPS fix:
Getting a fix: The LED flashing green (½ duty cycle, 1 second
period) indicates a 3D GPS fix has not been made since the
unit was powered on. The current fix may be acceptable in
which case the Satellite Terminal may register but the LED will
continue to flash indicating the MT is still trying to get a 3D fix.
Needs a fix: The LED changes to flashing red (½ duty cycle, 1
second period) indicating that the GPS fix was rejected by
network or the system determined that a new or more
accurate fix is needed based on the broadcast GPS Policy
Info.
Got a fix: The LED changes to solid green when a new 3D GPS
fix is obtained. The LED will remain on until the unit registers
with the network and the fix is accepted. (Note that once the
fix is obtained, the GPS unit will be turned off unless it is still
getting almanac data.)
Complete: The LED turns off when the unit successfully
registers with the network and the GPS unit has been turned
off either because a 3D fix was obtained, or the GPS unit
timed out.
GPS Failure: The LED will be solid red if the Terminal detects a
hardware fault with the GPS module.
SING THE MMI
U
Here is how to use the MMI to obtain the GPS fix
[GLC5].
To be provided by Inmarsat.
BGAN Terminal User's Guide 27
Page 40

ANTENNA POINTING
Do not stand in front of the Antenna
;
The Satellite Terminal emits radio frequency energy when
Note
Establishing a new connection requires the careful orientation of the
Satellite Terminal towards the BGAN Satellite. The more precise this
alignment, the faster your data will be able to travel over the
network.
The goal of pointing is to maximize the received signal. The Terminal
provides you with information on the received signal via the audio
pointing aid and LEDs on the unit and the MMI application on your
computer. These displays work simultaneously, and the user can use
either of them. The MMI can also provide azimuth and elevation
information for use with the compass and protractor integrated on
the MT.
Pointing Using LEDs and Audio Indicator
1. Manipulate the angle and position of the Satellite Terminal by
checking the compass and the protractor angle. The optimum
compass position is S -> SE.
in the transmit mode. To avoid injury, do not place head
or other body parts in front of the antenna when system is
operational.
28 BGAN Terminal User's Guide
Page 41

BGAN Terminal User's Guide 29
Page 42

2. Note the Pointing LEDs as you adjust the unit to acquire a signal.
3. Below is a summary table outlining the progressive behavior of
the LEDs (going right to left) as you try to acquire a satellite signal
during Pointing. The optimum signal is 58dB and above.
No Signal
|
|
|
|
|
|
|
|
|
|
|
Best Signal
30 BGAN Terminal User's Guide
Page 43

4. If the Audio buzzer is on, the tones act like those of a Geiger
counter: a long time between tones if the signal is weak and a
faster rate of tones as the signal is acquired.
The audio buzzer will always default to off when the unit
;
Note
POINTING USING THE MMI[GLC6]
To be provided by Inmarsat.
powers on. When the unit is In pointing mode, pressing
the Audio button located in the front of the terminal
turns the buzzer on. Pressing it again turns the buzzer off.
Once pointing is exited, the buzzer will turn off. If the
Audio button is pressed when the unit is not in pointing
mode, it will have no effect.
BGAN Terminal User's Guide 31
Page 44

CONNECTING TO THE NETWORK
Establishing a connection with the network requires the careful
orientation of the BGAN Terminal towards the Satellite, a process
called pointing. The more precise the pointing, the faster your data
can travel over the network. When pointing is complete, you can
register the Terminal with the BGAN network.
To register with the network:
1. Use the LaunchPad Pointing Wizard to step through the process
of pointing your Terminal, and register with the network. Follow
the on-screen instructions for details.
2. When you are registered with the network, the LaunchPad
window displays, containing the following:
Launch Bar − click on any icon to display the associated tab,
where you can perform LaunchPad functions.
The Launch Bar options include:
− Data Connections − connecting to the Internet to browse
Web sites and send and receive emails, and also using
advanced applications such as video and FTP. Refer to
About Data for details.
− Text Message Options − sending and receiving text
messages. Refer to About Text for details.
− Phone Options − monitoring call records. Refer to About
Phone for details.
− Usage information − providing data usage and call
duration information. Refer to Monitoring Usage for
details.
− Services information − listing Service Provider support
options. Refer to Using Services for details.
32 BGAN Terminal User's Guide
Page 45

− Support information − listing LaunchPad help and Service
Provider contact details. Refer to Using Support for
details.
BGAN Terminal User's Guide 33
Page 46

Registration status – displays the connection date and time,
location information and other registration information, as
shown below:
Connected to status, Terminal Status and Signal strength – all
shown on the status bar, as shown below:
Launch Bar − click on any icon to display the associated tab,
where you can perform LaunchPad functions.
− Refer to Monitoring Alarm Status for details on the
Connected to information.
− Refer to Monitoring Terminal Status for details on the
Status information.
− Refer to Monitoring Signal Strength for details on the
Signal strength information.
Inmarsat recommends that you use LaunchPad’s Pointing Wizard to
point your Terminal to the satellite. You can also point your Terminal
using the Terminal’s indicator lights and audio indicator. To do this,
refer to the following section.
34 BGAN Terminal User's Guide
Page 47

USING THE TERMINAL TO REGISTER WITH THE NETWORK
WARNING: Do not stand in front of the antenna. The BGAN Terminal
emits radio frequency energy when in transmit mode. To avoid
injury, do not place head or other body parts in front of the antenna
when system is operational.
You can point the Terminal using the indicator lights on the Terminal,
and using the audio buzzer.
SING THE INDICATOR LIGHTS
U
To point the antenna using the Terminal indicator lights:
1. Set the angle and position of the BGAN Terminal using the
compass and the graduated scale.
2. Monitor the Pointing indicator lights as you adjust the azimuth
and elevation. The following is a summary table outlining the
progressive behavior of the indicator lights (going right to left) as
you try to acquire a satellite signal during pointing.
SING THE AUDIO BUZZER
U
You can also monitor the signal strength using the audio buzzer. By
default the audio buzzer is switched off. To use the buzzer when the
Terminal is in pointing mode:
1. Press the audio button on turn the buzzer on.
2. Monitor the signal strength using the buzzer. The shorter the
interval between tones, the stronger the signal.
3. When you register with the network, the buzzer turns off
automatically.
Note: If the audio button is pressed when the unit is not in
pointing mode, it will have no effect.
Once the terminal has been pointed to the satellite using the MMI,
the indicator lights or the buzzer, then a suitable handset needs to
be connected to the terminal for voice calls to be made. Any ISDN
BGAN Terminal User's Guide 35
Page 48

handset can be used by connecting it to the ISDN port, using the
supplied ISDN cable. Alternatively, analog handsets can be used
with a suitable ISDN Terminal Adaptor. To ensure that calls can also
be made to the terminal’s handset, ensure that the ISDN handset, or
the ISDN Terminal Adaptor, is programmed with an MSN of 1. The
instruction manual supplied with this equipment will describe how to
do this.
Data Session
[GLC7]
36 BGAN Terminal User's Guide
Page 49

FIXED/SEMI-FIXED INSTALLATION
The satellite terminal can be mounted to a pole or flat surface (such
as a wall our roof) using the Fixed Installation Accessory Kit. This kit
includes all the installation brackets, mounting hardware, tools and
instructions to complete the installation, including mounting the
terminal so that it is always correctly pointed at the satellite. The
terminal can then be left alone for an extended period of time
without having to be re-pointed or set-up. The Fixed Installation
Accessory Kit can be re-used to install the terminal is different
locations.
When mounted in a location where access to the terminal may not
be straightforward (for example, mounted high on a wall), you may
want the terminal to recover automatically after a power outage.
To permit this, the following automatic mode settings are
recommended (see the Automatic Mode section for more details):
Auto “on” mode is enabled
LED off mode is enabled
Antenna pointing bypass is enabled
Automatic context activation is enabled
SIM PIN entry is disabled
In addition, it is recommended that the battery be removed to
prevent it being damaged at extreme temperatures.
BGAN Terminal User's Guide 37
Page 50

TERMINAL OVERVIEW
SIZE AND WEIGHT
The Satellite Terminal is 27.5 cm x 34.5 cm x 5.0 cm. Its weight is 2.5
kg (including the battery).
The small size and weight allows you to easily move it from site to
site, and it can be connected at a new site in minutes.
TERMINAL INTERFACES AVAILABLE
I
NTERFACE OVERVIEW AND DEFAULTS
The Satellite Terminal includes four interfaces for connecting to your
computer.
Ethernet
USB
ISDN (for voice and data)
Wi-Fi (IEEE 802.11)
By default the ISDN, USB and Ethernet interfaces are active when the
unit is turned on. The 802.11 Wireless LAN (Wi-Fi) interface is disabled
by factory default, but by using the MMI you can configure the Wi-Fi
to be on at startup.
When the Terminal is connected to a DC power source, such as
mains, the ISDN interface remains on at all times. When running from
the battery, the ISDN interface will turn off 5 minutes after pointing is
completed if no ISDN device is connected. You can re-enable the
ISDN interface from the MMI if you subsequently need to connect an
ISDN device. This saves power and maximizes operating times
because the power sourcing circuitry draws significant current even
if no device is connected. If an ISDN device is connected at power
up and then disconnected before the timer expires, the ISDN port
will power off.
38 BGAN Terminal User's Guide
Page 51

You can configure the Wi-Fi interface to be on, off or auto-detect for
T minutes. It behaves the same on DC power and battery, since
turning off is for security as well as power savings. After time T, the
WLAN interface can be reactivated by changing the interface to
“On” in the MMI.
BGAN Terminal User's Guide 39
Page 52

The following table summarizes the interface on/off behavior during
battery and DC Power operation.
Interface Battery Operation
USB On On
Ethernet On On
ISDN On.
On
Note: After 5
minutes if no ISDN
device detected,
turn off.
Wi-Fi
Configuration
Off
(default)
Off Off
Options
Once
On On
Enabled
Auto
On.
On.
(time T)
Note: After T
minutes if no
WLAN device
detected, turn
Default
5 mins.
Note: After T
minutes if no WLAN
device detected,
turn off.
off.
DC Power
Operation
40 BGAN Terminal User's Guide
Page 53

ESTABLISHING COMPUTER <-> SATELLITE TERMINAL COMMUNICATIONS
ETHERNET
Ethernet communications are established by connecting your
computer Ethernet LAN port directly to the Satellite Terminal LAN
port via the supplied Ethernet cable and monitoring the MMI for the
connection.
USB
USB communications are established by connecting your computer
USB port directly to the Satellite Terminal LAN port via the supplied
USB cable and monitoring the MMI for the connection.
ISDN
ISDN communications are established by connecting your computer
ISDN port directly to the Satellite Terminal LAN port via the supplied
ISDN cable (same as the Ethernet cable) and monitoring the MMI for
the connection.
With the ISDN interface you can make voice or data calls and can
perform limited MMI functions. Only one terminal at a time may
make a call since only one B channel is supported per Terminal in
the BGAN system. However, up to four ISDN phones may be utilized
with the one ISDN connection. Note that this limit is imposed by the
current limit function in order to protect Ethernet devices in case
they are accidentally connected to the ISDN port.
I-FI
W
The Wi-Fi function is used in access point mode. You can use the
MMI to configure (at least) the following parameters:
Wireless LAN interface on/off. The default is off.
Network name. The default is “BGAN” but the user can
change it.
Channel number. This controls the channel number (1-14)
used by the access point. Depending on the country only
certain subsets of these channels may be used (4 options:
BGAN Terminal User's Guide 41
Page 54

FCC, ETSI, France or Japan). Channel 11 is common to almost
all regulatory options and so it is used as the default.
Encryption
Up to ten Wi-Fi users can utilize the Satellite Terminal simultaneously.
However, for added security you can invoke a single user option in
the MMI, ensuring that no one else can use Wi-Fi while you are
connected. Monitor the MMI for the connection.
42 BGAN Terminal User's Guide
Page 55

TERMINAL FEATURES
USIM/SIM C
The USIM contains an identity that unambiguously identifies a
subscriber. The USIM provides storage for subscription and subscriber
related information.
The User-to-USIM authentication feature restricts access to the USIM
until the USIM has authenticated the user. Thus, access to the USIM
can be restricted to an authorized user or number of users. Your USIM
Personal Identification Number (PIN) is stored securely in the USIM.
The entry of a correct PIN opens access to the USIM.
The USIM-Terminal Link authentication feature ensures that access to
a terminal or other user equipment can be restricted to an
authorized USIM. The USIM and the terminal share a code stored
securely in the USIM and the terminal. If a USIM fails to prove its
knowledge of the code, it is denied access to the terminal.
ARD
If the USIM is removed during operation, the terminal will deactivate
any active PDP contexts, detach from the network, and enter a "NO
SIM" operational mode. If the USIM is reinserted while the MT is still on,
the MT must be restarted to detect the new or replaced USIM.
BGAN Terminal User's Guide 43
Page 56

BATTERY
Hughes Network Systems Part Number 300-3702-0001
The standard battery is a rechargeable lithium ion battery pack. An
optional extended lithium ion battery pack (same form factor) is also
available for purchase.
Battery charging can take place as long as the following conditions
are satisfied:
The Satellite Terminal is connected to an external power
source.
The battery is less than fully charged.
The temperature of the battery is within 0 to 45 degrees C.
The battery has not been found by software to be defective.
The Satellite Terminal contains battery charging circuitry that will
automatically charge the battery whenever the unit is plugged into
DC power.
BUTTONS
The Satellite Terminal has two buttons:
44 BGAN Terminal User's Guide
Page 57

The Power button is used for turning the unit on or off. A
“long” press of the button when the unit is off turns it on, and
a long press of the button when the unit is on turns it off.
The Audio button is used for switching the audio tones on and
off. These tones are useful during pointing mode (see
description later in the Guide). A “short” press of the button
accomplishes this.
INDICATOR LIGHTS (LEDS) AND AUDIO BUZZER
The LEDs and Audio Buzzer serve as indicators for the status of the
Satellite Terminal. The figures below illustrate where the LEDs are
located on the MT and the functions of each.
OWER LED
P
The Power LED indicates power status.
Light Status
BGAN Terminal User's Guide 45
Page 58

Off Terminal is turned off.
Green Terminal is powered on.
Flashing
Red
Flashing
Green
Fault detected.
Operating on battery power. Also when Power button is
pressed to turn unit off and it is being powered down.
46 BGAN Terminal User's Guide
Page 59

BATTERY LED
The Battery LED indicates battery status. The indicators are different
when the Terminal is on DC power as opposed to on battery power.
Light DC Power -- Status
Off No battery.
Green Battery fully charged.
Flashing
Battery charging.
Green
Flashing
Battery Fault – not charging
Red
Light Battery Power -- Status
Off Unit is off.
Green Terminal on, in pointing mode.
Flashing
Terminal on, pointing completed.
Green
Flashing
Terminal on, battery low (Power LED is green)
Red
(fast)
Flashing
Red
Terminal on, battery fault detected (Power LED is also
flashing red)
(slow)
BGAN Terminal User's Guide 47
Page 60

48 BGAN Terminal User's Guide
Page 61

POINTING LEDS
These six, two-color LEDs have significance for two events: System
Power-Up/Boot-Up and Antenna Pointing.
Initially, all LEDs are off. On power on, the power LED turns green. As
the Satellite Terminal progresses through the boot sequence,
pointing LEDs 2 through 6 (right to left progression) turn green.
If the boot completes successfully, the LEDs turn off and resume their
normal function.
These LEDs also indicate the signal quality during antenna pointing.
The LEDs are intended only as a guide for accuracy – the audio
tones or MMI application must be used for full accuracy (see the
Antenna Pointing section in the First Time Setup chapter). During the
Terminal power-up and boot, the six pointing LEDs on the unit
indicate boot progress. Upon successful boot-up, the LEDs switch to
indicate antenna pointing status or turn off if pointing is bypassed.
The first (rightmost) pointing LED is not used during this process to
avoid confusion with pointing displays.
IRELESS LAN LED
W
BGAN Terminal User's Guide 49
Page 62

This LED is not lit during Power-Up or if the Wireless LAN card is
turned off.
It is green if Wireless LAN is on and Wireless Encryption Protocol
(WEP) is enabled (encryption).
It is red if Wireless LAN is on and WEP is disabled.
If Wireless LAN is enabled and the MT is operating off battery
power, the LED flashes at 1/8 duty cycle 1-second period to
save power, after the unit exits pointing.
GPS LED
The GPS unit in the Satellite Terminal will attempt to get a 3D fix each
time the unit powers up. The GPS LED indicates the state of the GPS
fix. See Obtaining a GPS Fix section.
UDIO BUZZER
A
An audio buzzer is used to indicate the signal quality during antenna
pointing. If the Audio buzzer is on, the tones act like those of a
Geiger counter: a long time between tones if the signal is weak and
a faster rate of tones as the signal is acquired.
The buzzer will always default to off when the unit powers on.
Pressing the Audio button in pointing mode turns the buzzer on.
Pressing it again turns the buzzer off. Once you exit pointing, the
buzzer will turn off. If the Audio button is pressed when the unit is not
in pointing mode, it will have no effect.
50 BGAN Terminal User's Guide
Page 63

COMPASS
Reference the compass during the Antenna Pointing process to get
the correct Compass Direction needed for the antenna. During this
process, the MMI instructs you in which direction to point the
antenna.
;
Note
The compass can be affected when close to magnetic
fields or metallic objects.
SOLAR PANEL COMPATIBILITY
The terminal is compatible with solar panels. The easiest way to
interface to a solar panel is through the HNS supplied DC Power
Adapter (HNS P/N 3004065-0001). The output of the DC power
adapter is plugged into the terminal, with the input (cigarette lighter
adaptor) connected to the output of the solar panel.
The terminal has been tested to work with the following solar panels:
IDG T-60 (3 panels) form IDG Europe (60W max, 3.3A at max
power)
SunCatcher F0001 (2 panels) from Powerline Electronics
Accessories (14.5W max)
BGAN Terminal User's Guide 51
Page 64

TERMINAL ACCESSORIES
Terminal accessories include:
DC Power Adapter
Extended Battery
AC Mains Power Adapter (w/30mm Cable)
Cables
Compatible Devices
Fixed Installation Kit
Each is described in this section.
DC POWER ADAPTER[GLC10]
Solar Panel, etc.
52 BGAN Terminal User's Guide
Page 65

EXTENDED BATTERY
The Extended lithium ion battery pack (HNS P/N 300-3702-0002) can
be purchased through Hughes Network Systems. The Extended
battery pack has the same form factor as the standard battery
pack, with 33% more capacity.
AC MAINS POWER ADAPTER (W/30MM CABLE)
AC Mains power adapter (HNS P/N 300-3727-0001) is for indoor use
only. It has an indoor operating temperature range of 0ºC to +40ºC
and provides an output voltage of 20 VDC.
When the Satellite Terminal is first connected to AC Mains power, the
unit powers on immediately. Note that when the Terminal is
attached to AC Mains power, the unit still supports battery charging
while it is turned off.
BGAN Terminal User's Guide 53
Page 66

CABLES
The Satellite Terminal package comes with a USB cable and cables
that serve both Ethernet and ISDN connections.
USB cable (HNS P/N 300-3027-0001)
Ethernet/ISDN 10 meter cable (HNS P/N 300-3692-0001)
When the Terminal is connected to a PC or laptop it uses a regular
Ethernet cable. If the Terminal is connected to a LAN hub, a
"switchover" LAN cable is required.
COMPATIBLE DEVICES
The terminal has been successfully tested with the following
commercial ISDN handsets:
ASCOM Eurit 33 plus
SwissVoice Eurit 25
ISDN handset supplied with the NERA BGAN terminal
Siemens Gigaset SX255
54 BGAN Terminal User's Guide
Page 67

FIXED INSTALLATION KIT
The following items are found in the fixed installation kit. Note that
you are responsible for mounting the hardware at a fixed site.
Fixed Mount Screws (Theft-Proof)
Photo of screws here.
30-Meter Cord for AC Mains
Ethernet/ISDN 30 meter cable (HNS P/N 300-3692-0002)
BGAN Terminal User's Guide 55
Page 68

MAN-MACHINE INTERFACE
(MMI) OVERVIEW
The BGAN Man-Machine Interface (MMI) allows you to view and
manage Satellite IP Modem operations and status via a user-friendly
set of tools installed on your computer.
PIN CODE ENTRY
When the MMI application is started and connects to the Satellite
Modem, the modem queries the current SIM card to see if the SIM
PIN is enabled. If the SIM PIN is enabled, the MMI displays a SIM PIN
window and requires you to enter a valid SIM PIN before service is
enabled. If the SIM PIN is disabled then the MMI will bypass this
display.
PERSONALIZATION
After the PIN check, if Personalization is enabled and any checks fail,
the MMI displays the Security window and requires you to enter a
valid depersonalization code before access to further functions is
allowed. If all Personalization checks pass, the modem will bypass
the Security window.
POINTING
After the PIN and Personalization checks, the pointing screen is
displayed. Once you have completed pointing, click the Connect
button to exit pointing and connect to the network.
MAIN DISPLAY
Once all the initial checks have been completed, the main MMI
page is displayed, showing progress towards acquiring the network.
CONFIGURABILITY
Use the MMI application to make all configuration changes on the
Satellite IP modem.
56 BGAN Terminal User's Guide
Page 69

BGAN Terminal User's Guide 57
Page 70

MULTIPLE USERS
Up to 10 users attached to the LAN Access Point interfaces
(Ethernet, USB and Wireless LAN) can access the MMI at the same
time. Each user establishes a TCP connection to the Satellite IP
modem.
In a multi-user scenario, it is advisable to have one user do all MT
configuration changes to avoid confusion; other users could use an
MMI profile that prevents configuration changes.
SOFTWARE DOWNLOAD/UPGRADE
Upgrading MT software is a two-phase process controlled by an
“Upgrader” function in the MMI. The Upgrader is accessed from a
drop down menu on the MMI application
In the first phase, the software is downloaded from a common
Network location (i.e., an Internet HTTP/FTP server) to your computer.
The computer may utilize the BGAN network or any other accessible
network to obtain the new software image.
In the second phase, the Upgrader copies the current software
image from your computer, stores it in the modem, and then installs
it on the modem. If the upgrade fails, the old software is available
on your computer and can be re-downloaded to the modem.
58 BGAN Terminal User's Guide
Page 71

CONNECTING TERMINAL TO PC AND OTHER DEVICES
The MT provides a Wi-Fi interface to any terminal which operates in
the same frequency band.
When the MT is operating on main power, the Wi-Fi interface
will always be activated.
When the MT is operating on battery, the Wi-Fi interface will
be turned off after five minutes of inactivity.
The Wi-Fi interface is configurable via the MMI, as follows:
Parameter Description Default AT-Command
Wireless access
Network Name
(SSID)
Region
Channel
WEP Security
WEP Keys [1-4]
Key Selection
Turn on/off WiFi Interface
Sets the SSID
Region of
Operation
Wireless
Channel of
Operation
Turn on/off
WEP Security
Four 26
character WEP
Keys
Selects the
WEP Key
Disabled (0)
BGAN
Rest of the
world (2)
11
Off (0)
None
0
AT_INIS
AT_IHWLAN
AT_IHWLAN
AT_IHWLAN
AT_IHWLAN
AT_IHWLAN
The MT does not provide MAC Filtering as a security option.
BGAN Terminal User's Guide 59
Page 72

BGAN SERVICES
VOICE TELEPHONY SERVICES
You can make and receive voice calls using the BGAN Satellite IP
Terminal. To do this, you have to connect a phone handset. You can
use two general types of phone handsets; either an ISDN handset, or
a 2-wire analog handset with an ISDN terminal adaptor (see page
12 for details of how to connect these devices).
Before you can use your handset for voice services, you have to
program its MSN (mobile subscriber number) to 1. This identifies the
handset to the BGAN Satellite IP Terminal. The handset’s instruction
manual will explain how to do this. Note: you can make emergency
calls without the correct MSN programmed into the handset.
SUPPLEMENTARY SERVICES
You can also access supplementary services via the handset. The
services are controlled by key-presses on the phone handset. The
key-presses consist of the following format:
A one or two digit activation code
A two or three digit service code
Optional parameters preceded by a * keypress
The following tables show the key-presses for each supplementary
service.
Key-press Activation Code
** Registration
*Activation
60 BGAN Terminal User's Guide
Page 73

#Deactivation
*# Interrogation
## Erasure
BGAN Terminal User's Guide 61
Page 74

Service
Code
Supplementary Service Key-press
30 CLIP – Called Line Identification
Presentation
31 CLIR – Called Line Identification
Restriction
76 COLP – Connected Line
Identification Presentation
77 COLR – Connected Line
Identification Restriction
21 CFU – Call Forwarding
Unconditional
67 CFB – Call Forwarding on Mobile
Busy
61 CFNRy – Call Forwarding on
Mobile No Reply
62 CFNRc – Call Forwarding on
Mobile Not Reachable
none
none
none
none
*DN*BS
*DN*BS
*DN*BS*T
*DN*BS
43 WAIT – Call Waiting
33 BAOC – Call Barring, All
*BS
*PW*BS
Outgoing Calls
331 BAOIC – Call Barring, All
*PW*BS
Outgoing International Calls
332 BAOICexHC – Call Barring, All
*PW*BS
Outgoing International Calls
except Home Country
35 BAIC – Call Barring, All Incoming
*PW*BS
62 BGAN Terminal User's Guide
Page 75

Service
Code
Supplementary Service Key-press
Calls
351 BAICroam – Call Barring, All
*PW*BS
Incoming Calls when Roaming
outside Home Country
96 ECT – Explicit Call Transfer
Parameter Description
*DN Directory Number
*BS Basic Service
*T Timeout (5-30
seconds)
*PW Password
Example:
If you want to Call Forward all incoming calls to a number
(00018584529550 in this example), you must activate the Call
Forwarding, Unconditional supplementary service.
Key-presses *21*DN*BS#
Key-presses *21*00018584529550*#
If you want to cancel Call Forwarding, you must deactivate this
supplementary service.
Key-presses #21*DN*BS#
Key-presses #21**#
BGAN Terminal User's Guide 63
Page 76

MESSAGING SERVICES
HORT MESSAGE SERVICE (SMS) VIA MMI
S
The BGAN Satellite IP Modem supports Short Message Service (SMS)
capabilities. The Short Message Service handles point-to-point
messages and comprises two basic services:
SM MT (Short Message Mobile Terminated)
SM MO (Short Message Mobile Originated).
The text messages to be transferred by SM MT or SM MO can contain
up to 140 octets. The number of bytes actually transmitted within an
SMS message is dependent on the message size.
;
Note
SMS Messages can be read, edited, created, and sent
via the SMS Application in the MMI. You cannot access
SMS from an ISDN Handset or any other ISDN equipment.
DATA SERVICES[GLC16]
LaunchPad provides a variety of connection options to help ensure
that all your data requirements are met. LaunchPad is configured
with five connections by default. You can edit these default
connections or add to them by setting up any number of
customized connections, called dedicated connections, using a
simple to use configuration tool.
DEFAULT CONNECTIONS
Of the five default types of data connections available from the
launch bar, there are one standard and four streaming.
Standard: A standard connection is charged per Mb. You are
charged only for the transmitted data. The bandwidth you
are allocated depends on terminal type and network
availability, but is always ‘best effort’, that is, you are
allocated bandwidth depending on your requirements and
the requirements of other users of the BGAN network, or
64 BGAN Terminal User's Guide
Page 77

BGAN Terminal. This connection class is suitable for most data
types, other than multimedia.
Streaming: A streaming connection is charged by time. You
are charged for the amount of time the connection is active.
Streaming enables multimedia data, such as video, to be sent
in a continuous data stream and converted into sound and
pictures. The bandwidth required for a streaming connection
is difficult to predict, and depends on factors such as length
of connection and number of receivers.
The standard connection is suitable for most basic data
requirements, and is charged by the amount of data sent. If you
require a guaranteed data rate for your connection, to eliminate
delay for example, you can connect using one of the four streaming
connections, at the following data rates:
32 kbps streaming
64 kbps streaming
128 kbps streaming
256 kbps streaming
Each streaming class connection is charged by the length of time
that the connection is live.
The standard connection and four streaming connections are
primary connections and are alternatives to each other, that is only
one can be open at a time. You must close one connection before
you can open another.
DEDICATED STREAMING CONNECTIONS
If required, you can set up one or more dedicated streaming
connections for applications such as live video and FTP. A
dedicated streaming connection ensures that a selected
application does not have to share the connection with any other
traffic. The Terminal supports up to ten dedicated connections
alongside the primary connection. A dedicated streaming
connection is charged by the length of time that the connection is
live.
BGAN Terminal User's Guide 65
Page 78

LaunchPad displays an information note if you are about to open a
streaming connection, or open two or more connections at the
same time. Refer to About PDP Contexts for details on how
LaunchPad manages data connections
[GLC17].
66 BGAN Terminal User's Guide
Page 79

ISDN DATA
Data can be sent and received via the ISDN interface on the BGAN
IP Terminal. To make use of this service, you will need to connect a
piece of ISDN terminal equipment. Examples of ISDN equipment are
ISDN cards in PCs or MACs, ISDN AudioVideo cameras and videoconferencing systems, ISDN group 4 fax machines.
To use the ISDN equipment with the BGAN IP Terminal, you first have
to program 1 of 3 MSNs (mobile subscriber numbers) into the
equipment.
The number you program depends on the capability of your ISDN
equipment:
For equipment that sends and receives data as 3.1 KHz audio,
such as group 3 fax machines, use program 2.
For equipment that sends and receives data either as
Unrestricted Digital Information (UDI), or Restricted Digital
Information (RDI). use program 3.
Refer to the instructions supplied with the ISDN equipment for
information on the equipment capability and how to program the
appropriate MSN.
When you have completed the programming, you can then
connect the ISDN equipment to the ISDN jack on the BGAN IP
Terminal, which is shown on page TBD. You
[GLC19] are then ready to
use ISDN Data Services from the ISDN equipment.
BGAN Terminal User's Guide 67
Page 80

SERVICE FEATURES
AUTOMATIC MODE
The Satellite IP modem includes four automatic options: auto power
on, LED on/off, antenna pointing bypass, and automatic context
activation. You can set all of these options with the MMI.
AUTO “ON” MODE
When the Satellite IP modem is mounted on a pole, the power
switch may be inaccessible; this can be a problem if there is a
power failure since the unit will turn off and will not turn back on
when power is applied. You could use the unit with a battery to
provide battery backup in case of power failure. However, in
extreme weather conditions a battery could be damaged and
should not be used.
To handle pole mount or other fixed installation, you can activate an
auto on configuration feature. With auto on enabled, if DC power is
applied, the unit turns on as if the power key was pressed. If the
power key is pressed while the unit is on with this feature enabled, it
will still power off. To power back on, you can use the power key, or
you can disconnect and reconnect DC power to create a rising
edge on the power input. The default configuration of the Satellite IP
Modem is for auto on to be disabled.
The auto on feature can be used in conjunction with antenna
pointing bypass to allow the modem to automatically recover from
a power outage (assuming PIN, etc are disabled).
LED ON/OFF MODE
In a semi-fixed installation, you can use this option to operate with all
LEDs off to make your unit and operation less conspicuous.
68 BGAN Terminal User's Guide
Page 81

ANTENNA POINTING BYPASS
You can configure a pointing bypass option that causes the unit to
skip the pointing phase. The unit then performs spot beam selection,
registration and network connection. This option should only be used
for fixed installations where pointing is not required on subsequent
power ups. With this option active, if the unit is moved or the signal
attenuated, the unit will remain in global beam scan until the
problem is fixed and the global beam acquired. After acquiring the
global beam the modem automatically continues with PSAB
acquisition.
AUTOMATIC CONTEXT ACTIVATION
If you have enabled automatic context activation, the Satellite IP
modem automatically activates a PDP context when it sees data
destined for the network from a local IP address for which there is no
context.
The “context create” request uses the default Access Point Name
(APN), username and password stored in the modem. You can
modify these parameters using the MMI. “Subscribed” QoS is
requested and a dynamic network assigned IP address requested
(“global” address).
PHONEBOOK
BGAN supports a phonebook feature to facilitate the management
of phone numbers.
There are 3 phonebooks: a phonebook stored on your computer
(with 250 entries), the USIM global phonebook, and the USIM
application local phonebook. You can work with any of the three
phonebooks. The active phonebook can be saved as a file on the
TE. Files on the TE can be read into the application and then written
back to the USIM.
EMERGENCY CALLS
BGAN Terminal User's Guide 69
Page 82

If you want to make an emergency call from the ISDN handset (or
analog handset plus ISDN terminal adaptor) and you do not know
the PIN code, you can point the terminal using the audio tones or
LEDs and then enter the connect command #1# from the handset.
This causes the modem to exit pointing, but not to register with the
network. When you enter a recognized emergency number, the
modem then makes an emergency call without having to register
with the network. If the modem is configured for pointing bypass,
you do not have to enter the connect command; instead, simply
enter the emergency number from the handset.
70 BGAN Terminal User's Guide
Page 83

PERSONALIZATION SERVICES
The personalization features store information in your computer and
check this information against the SIM/USIM whenever the Satellite IP
Modem is powered up or a SIM/USIM is inserted. If a check fails, the
modem enters the "limited service state" in which only emergency
calls can be attempted. You can enter depersonalization codes to
deactivate these checks and progress to normal mode.
The modem performs personalization checks after completion of
initialization and checking for the SIM PIN. The following types of
personalization services are available:
Network Personalization: Allows the network operator to
personalize a modem so that it can only be used with that
particular network operator's SIM/USIMs;
Network Subset Personalization: A refinement of network
personalization, which allows network operators to limit the
usage of a modem to a subset of SIM/USIMs;
Service Provider (SP) Personalization: Allows the service
provider to personalize a modem so that it can only be used
with that particular service provider's SIM/USIMs;
Corporate Personalization: Allows a corporate customer to
personalize modems that it provides for its employees or
customers use so that they can only be used with the
company's own SIM/USIMs;
SIM/USIM Personalization: Enables a user to personalize a
piece of mobile equipment so that it may only be used with
particular SIM/USIM(s).
BGAN Terminal User's Guide 71
Page 84

LAN ACCESS POINT SETUP
PDP C
Resource management for BGAN is based on PDP contexts, or
connections. This means that in congested networks each user
needs his or her own context to ensure a fair allocation of
bandwidth from the network. Therefore, the Satellite IP modem
creates a PDP context for each TE/user. The multiple contexts can
be primary or secondary, but there are benefits to using primary
contexts.
You can configure the modem to enable or disable automatic
context activation. Even if automatic context activation is used, you
can still manually control contexts for flexibility and exception
conditions.
Primary Context
The modem creates a primary context with the entered information.
If a primary context already exists for your local IP address, the
current context is deleted before creating the new one. This could
happen if a context was created automatically and the user wants
to change to a different APN or QoS. Your MMI indicates whether
the context is successfully created or displays any errors.
ONTEXTS – PRIMARY AND SECONDARY
Primary contexts can connect to different APNs each with an
individual username and password. This is useful because
each APN will only support a single set of subscribed Quality
of Service (QoS) values.
Primary contexts each get their own global IP address, which
means each TE can be a server/host.
A disconnect option is also provided to allow you to tear down their
context. This is useful if a streaming context was created, or to free
contexts if other users need to connect. If a user with an
automatically created context disconnects from the MMI, his or her
context is deleted. When the MMI application is shut down, all
contexts are deleted.
72 BGAN Terminal User's Guide
Page 85

If multiple users are connected to a router with DHCP and a NAT
(e.g. a Linksys) that is connected to the MT, all the users appear as a
single user and share a single PDP context. This gives users flexibility in
case charges are by IP address/PDP context.
Secondary Context
Secondary contexts can be set-up from the MMI, and are
associated with a primary context. Secondary contexts might be
used, for example, when multiple applications on one TE are started,
and the TE’s primary context has already been set-up.
Each secondary contexts requires a Traffic Flow Template to be
configured, which defines how the data for the secondary context
should be routed. This is done through the MMI.
IP ADDRESSING
Connections between each TE and the terminal are achieved with
private IP addresses, and between the terminal and the BGAN
network with global addresses.
Private addresses can be dynamically assigned by the DHCP server
in the terminal, starting from192.168.128.100. They can also be
statically configured from the TE (via the MMI), in which case
addresses in the range 192.168.128.2 through 192.168.128.100 should
be used.
The global address of the terminal is assigned by the Network
Service Provider, and can be either static or dynamic. Dynamic
global address configuration is automatically carried out by the
mechanism in the terminal that activates contexts. Static global
address configuration is carried out by the user via the MMI on the
TE, by entering a static address provided by the Network Service
Provider.
FIREWALL AND DMZ HOST
The terminal will operate as a firewall and block all IP connections
that are initiated from the BGAN network or internet. However, it can
be configured to forward network initiated connections to one or
more local TEs, eg. for FTP or HTTP data transfers. This is called “DMZ
host”, and is configured on the MMI.
BGAN Terminal User's Guide 73
Page 86

More details about secondary PDP contexts, IP addressing and DMZ
hosting can be found at www.hns.com and www.inamrsat.com
(TBD)
USING BGAN IN A GROUP
[GLC20]
MULTIPLE USER SCENARIOS[GLC23]
74 BGAN Terminal User's Guide
Page 87

MANAGING CONTACTS[GLC25]
The Contacts window enables you to manage your Phone and Text
contacts. You can add a new contact, edit or delete an existing
contact. In addition, you can exported a contact to a file on your
computer, or import a contact from any file on the computer.
The Contacts screen shown below displays when you click on the
Phone icon or the Text icon on the launch bar.
Contacts displayed in this window are stored either in the BGAN SIM
or on the BGAN Terminal. You can also select the All tab to view all
contact names.
From this window you can
[GLC26]:
Add a Contact
Edit a Contact
Export a Contact to a File
Export a Contact to an Address Book
Import a Contact from a File
Click on a contact name in the Contacts column to display the
details of the contact alongside.
BGAN Terminal User's Guide 75
Page 88

You can also search for a contact by typing in the first few letters of
the contact name in the Search text box. The Contacts list scrolls
down to the closest matching name as you type.
TCP PEP SOFTWARE[GLC27]
Transmission Control Protocol (TCP) enables two hosts, usually
computers to establish a connection and exchange data. It
improves the efficiency of data transfer by dividing the data into
packets, then delivering the packets in the same order that they
were sent. TCP with Performance Enhancing Proxies (TCP PEP)
enhances the performance of TCP over a satellite network such as
the BGAN network by providing:
Fast start − useful for transferring small amounts of data, since
traditional TCP is often slow with smaller data transfers.
Increased window size − improves TCP performance in larger
bandwidth applications
Delay based congestion control − ensures high transfer rates
and less delay.
TCP PEP is automatically installed during the Standard installation of
LaunchPad, or you can install TCP PEP separately from the
installation CD. By default, TCP PEP is enabled in the BGAN Terminal.
EXIT, RESET AND RESTART FEATURES[GLC28]
EXITING LAUNCHPAD
Before you can exit LaunchPad, you must close all currently active
connections. Refer to Closing a Data Connection or Closing a
Connection in Multi-User Mode for details.
Once you have closed all connections, you can exit LaunchPad as
follows:
76 BGAN Terminal User's Guide
Page 89

1. Click File > Exit. The Shutdown Confirmation dialog box displays:
2. Click Yes to confirm shutdown, or No to cancel.
RESETTING THE TERMINAL
If you have the required access privileges, you can reset all the
configuration settings of the Terminal to the factory default. Note
that your current settings are lost during the reset.
To reset the terminal to factory default:
1. Select the File > Reset to Factory Default option on LaunchPad
main menu. The Reset to Factory Default dialog box displays, as
shown below:
2. Enter the security code in the Security Code text box.
3. Click on OK to reset the terminal, or click on Cancel to exit
without resetting.
BGAN Terminal User's Guide 77
Page 90

RESTARTING THE TERMINAL
You may want to restart the terminal if an error occurs with the
Terminal or ... (ANY OTHER REASONS?)
To restart the terminal:
1. Select File > Restart Terminal from the LaunchPad main menu.
The Restart BGAN Terminal dialog box displays, as shown below:
2. Click on OK to restart the terminal, or click on Cancel to exit
without restarting.
GETTING HELP[GLC29]
Support for the BGAN Satellite Modem is provided via the following
help options:
Using Services
Using Support
Using Diagnostics
Using LaunchPad Help
Viewing Properties
TIME ZONE CUSTOMIZATION[GLC30]
You can choose which time zones to display on the LaunchPad
menu. To do this:
1. Select Settings > Time Display from the LaunchPad main menu.
The Time Display dialog box displays, as shown below:
78 BGAN Terminal User's Guide
Page 91

2. Choose up to four locations from the City drop-down lists, and
click on OK. The chosen cities and their local time display in the
LaunchPad display area, alongside the satellite coverage map.
BGAN Terminal User's Guide 79
Page 92

BGAN USER PROFILE MAKER[GLC31]
SECURITY[GLC32]
SOFTWARE UPGRADE[GLC33]
Inmarsat to do…
LOG FILES[GLC34]
LaunchPad maintains log files that detail the commands sent to the
Terminal, and the responses obtained from the terminal. LaunchPad
also records any unsolicited events reported by the terminal.
LaunchPad maintains three types of log file:
Event log file – reports details of all command and responses
exchanged between the LaunchPad and the Terminal.
Network log file – reports network activity-related
information, such as network usage, QoS information, and
unsolicited alerts reported by the network.
BGAN log file – generated by the terminal, and can be
accessed from LaunchPad.
You can do the following for any of these log files:
Delete or Clear a Log File
Display a Log File
Email a Log File
80 BGAN Terminal User's Guide
Page 93

Print a Log File
Save a Log File
In addition, for event logs and network logs you can:
Turn Logging On and Off
TURNING LOGGING ON AND OFF
You can turn event logging or network logging on or off from
LaunchPad main menu.
E
VENT LOGGING
To turn event logging on or off, do the following from LaunchPad
main menu:
1. Select File > Log Files > Event Log. The Log File Management
Dialog box displays, as shown below:
2. Check the Turn Logging On/Off check box to turn logging on, or
uncheck the check box to turn logging off.
BGAN Terminal User's Guide 81
Page 94

3. Click OK to save the change.
82 BGAN Terminal User's Guide
Page 95

NETWORK LOGGING
To turn network logging on or off, do the following from LaunchPad
main menu:
1. Select File > Log Files > Network Log. The Log File Management
Dialog box displays, as shown below:
2. Check the Turn Logging On/Off check box to turn logging on, or
uncheck the check box to turn logging off.
3. Click OK to save the change.
ISPLAYING EVENT AND NETWORK LOG FILES
D
You can display the event log file, the network log file or the BGAN
log file from LaunchPad main menu.
To display event logging, do the following from LaunchPad main
menu:
BGAN Terminal User's Guide 83
Page 96

1. Select File > Log Files > Event Log or Network Log. The Log File
Management Dialog box displays.
2. Click Display. The Log Display Dialog displays.
3. Check the Turn Logging On/Off check box to turn logging on, or
uncheck the check box to turn logging off.
4. Click OK to save the change.
BGAN L
OGGING
When displaying the log file contents of the terminal log file, you
have the option to view full log file contents or only specific number
of lines. To display terminal logging, from the LaunchPad main
menu:
1. Select File > Log Files > BGAN Log. The BGAN Log File
Management Dialog box displays, as shown below:
GRAPHIC NOT YET AVAILABLE
2. Click on Display. The Log Display Dialog displays, as shown
below:
GRAPHIC NOT YET AVAILABLE
3. Either:
If you want to display all the lines in the log file, check the
Retrieve all lines of log file check box. Or,
If you want to display selected lines in the log file, uncheck
Retrieve all lines of log file check box, and enter the number
of lines you want to retrieve in the Number of lines to
retrieve/n from User Terminal text box.
4. Click OK to save the change.
EMAILING LOG FILES
You can email the event log file, the network log file or the BGAN
log file from LaunchPad main menu.
84 BGAN Terminal User's Guide
Page 97

EVENT LOGGING
To email the event log file, do the following from LaunchPad main
menu:
1. Select File > Log Files > Event Log. The Log File Management
Dialog box displays, as shown below:
Insert Graphic from Help file
2. Select the file to email from the Select Log File: drop down list.
3. Click on Email to open a new message in your Email application,
addressed to your support contact and with the log file
attached. You can type in a message, if required.
ETWORK LOGGING
N
To email the network log file, do the following from LaunchPad main
menu:
1. Select File > Log Files > Network Log. The Network Log File
Management Dialog box displays, as shown below:
Insert Graphic from Help file
2. Select the file to email from the Select Network Log File: drop
down list.
3. Click on Email to open a new message in your Email application,
addressed to your support contact and with the log file
attached. You can type in a message, if required.
BGAN L
OGGING
When displaying the log file contents of the terminal log file, you
have the option to view full log file contents or only specific number
of lines. To display terminal logging, from the LaunchPad main
menu:
1. Select File > Log Files > BGAN Log. The BGAN Log File
Management Dialog box displays, as shown below:
GRAPHIC NOT YET AVAILABLE
BGAN Terminal User's Guide 85
Page 98

2. Select the file to email from the Select BGAN Log File: drop down
list.
3. Click on Email to open a new message in your Email application,
addressed to your support contact and with the log file
attached. You can type in a message, if required.
PRINTING LOG FILES
You can print an event log file, a network log file or a BGAN log file
from LaunchPad main menu.
VENT LOGGING
E
To print an event log file from your computer, do the following from
LaunchPad main menu:
1. Select File > Log Files > Event Log. The Log File Management
Dialog box displays, as shown below:
Insert Graphic from Help file
2. Select a log file from the Select Log File drop-down list.
3. Click on Print to open your operating system's print dialog box,
and print the log file.
ETWORK LOGGING
N
To print a network log file from your computer, do the following from
LaunchPad main menu:
1. Select File > Log Files > Network Log. The Network Log File
Management Dialog box displays, as shown below:
Insert Graphic from Help file
2. Select a log file from the Select Network Log File drop-down list.
3. Click on Print to open your operating system's print dialog box,
and print the log file.
86 BGAN Terminal User's Guide
Page 99

BGAN LOGGING
To print a BGAN log file from your computer, do the following from
LaunchPad main menu:
1. Select File > Log Files > BGAN Log. The BGAN Log File
Management Dialog box displays, as shown below:
Insert Graphic from Help file
2. Select a log file from the Select BGAN Log File drop-down list.
3. Click on Print to open your operating system's print dialog box,
and print the log file.
SAVING LOG FILES TO DISK
You can save an event log file, a network log file or a BGAN log file
to a file on your computer from LaunchPad main menu.
VENT LOGGING
E
To save an event log file, do the following from LaunchPad main
menu:
1. Select File > Log Files > Event Log. The Log File Management
Dialog box displays, as shown below:
Insert Graphic from Help file
2. Select a log file from the Select Log File drop-down list.
3. Click on Save. The directory folder for your operating system
opens.
4. Navigate through to the required directory, and save the log file
under the selected name.
ETWORK LOGGING
N
To print a network log file from your computer, do the following from
LaunchPad main menu:
1. Select File > Log Files > Network Log. The Network Log File
Management Dialog box displays, as shown below:
BGAN Terminal User's Guide 87
Page 100

Insert Graphic from Help file
2. Select a log file from the Select Network Log File drop-down list.
3. Click on Save. The directory folder for your operating system
opens.
4. Navigate through to the required directory, and save the log file
under the selected name.
BGAN L
OGGING
To print a BGAN log file from your computer, do the following from
LaunchPad main menu:
1. Select File > Log Files > BGAN Log. The BGAN Log File
Management Dialog box displays, as shown below:
GRAPHIC NOT YET AVAILABLE
2. Select a log file from the Select BGAN Log File drop-down list.
3. Click on Save. The directory folder for your operating system
opens.
4. Navigate through to the required directory, and save the log file
under the selected name.
DELETING OR CLEARING LOG FILES
You can delete an event log file or a network log file, and clear a
BGAN log file from LaunchPad main menu.
VENT LOGGING
E
To delete an event log file from your computer, do the following
from LaunchPad main menu:
1. Select File > Log Files > Event Log. The Log File Management
Dialog box displays, as shown below:
Insert Graphic from Help file
2. Select a log file from the Select Log File drop-down list.
88 BGAN Terminal User's Guide
 Loading...