

Page 1
Inground System
Owners Manual
ustomer Service Center
• N53 W24700 South Corporate Circle • Sussex, WI 53089 • USA.
C
ENGLISH
FRANÇAIS
DEUTSCH
ESPAÑOL
ITALIANO
WARNING!
AVERTISSEMENT !
ACHTUNG!
¡ADVERTENCIA!
AVVERTENZA!
LISEZ LE MODE D'EMPLOI
AVANT D'UTILISER CE SYSTÈME
SOUS PEINE D'ENCOURIR DES BLESSURES
OU DES DÉGÂTS MATÉRIELS.
READ AND UNDERSTAND
OPERATOR'S MANUAL BEFORE USING
THIS UNIT.
FAILURE TO FOLLOW OPERATING
INSTRUCTIONS COULD RESULT IN INJURY
OR DAMAGE TO PROPERTY.
Système de fixation au sol
Manuel d'utilisation
Service clientèle
N53 W24700 South Corporate Circle • Sussex, WI 53089 É.-U.
Im Boden verankertes System
Gebrauchsanleitung
Kundendienstzentrale
• N53 W24700 South Corporate Circle • Sussex, WI 53089 • U.S.A.
Sistema de fijación en el piso
Manual del propietario
Centro de Servicio al Cliente
• N53 W24700 South Corporate Circle • Sussex, WI 53089 • EE.UU.
Manuale delle istruzioni del sistema
di palo quadrato
Centro assistenza alla clientela
• N53 W24700 South Corporate Circle • Sussex, WI 53089 • U.S.A.
Toll-Free Customer Service Number for U.S.: 1-800-558-5234, For Canada: 1-800-284-8339,
For Europe: 00 800 555 85234 (Sweden: 009 555 85234), For Australia: 1-800-333 061
Internet Address: http://www.huffysports.com
DAS BENUTZERHANDBUCH VOR
GEBRAUCH DIESES PRODUKTS
SORGFÄLTIG DURCHLESEN.
EIN MISSACHTEN DIESER
BETRIEBSANLEITUNG KANN
VERLETZUNGEN ODER
SACHSCHÄDEN ZUR FOLGE
HABEN.
LEA Y ENTIENDA EL MANUAL DEL
OPERADOR ANTES DE USAR ESTA UNIDAD.
SI NO SE SIGUEN LAS
INSTRUCCIONES DE OPERACIÓN SE
PODRÍA OCASIONAR UNA LESIÓN O DAÑOS
A LA PROPIEDAD.OR DAMAGE TO
PROPERTY.
PRIMA DI USARE IL SISTEMA, LEGGERE IL
MANUALE DI ISTRUZIONI FINO A
COMPRENDERLO A FONDO.
L'INOSSERVANZA DELLE ISTRUZIONI
POTREBBE TRADURSI IN GRAVI INFORTUNI
E/O DANNI ALLE COSE.
Numéro sans frais du service clientèle (États-Unis) : 1-800-558-5234 ; Canada : 1-800-284-8339 ; Europe : 00 800 555 85234 (Suède : 009 555 85234), Pour
Gebührenfreie Kundendienstnummer für Anrufer in den USA: 1-800-558-5234 Für Anrufer in Kanada: 1-800-284-8339 Für Anrufer in Europa: 00 800 555
85234 (Schweden: 009 555 85234) Für Australien: 1-800-333.061 - Internet-Adresse: http://www.huffysports.com
Número telefónico gratuito de servicio al cliente en EE. UU.: 1-800-558-5234, para Canadá: 1-800-284-8339, para Europa: 00 800 555 85234 (Suecia: 009 555
85234), para Australia: 1-800-333 061 - Dirección en Internet: http://www.huffysports.com
Numero verde per chi chiama dagli U.S.A.: 1-800-558-5234 Dal Canada: 1-800-284-8339
Per l'Europa: 00 800 555 85234 (Svezia: 009 555 85234) Per l'Australia: 1-800-333 061
l'Australie : 1-800-333 061 - Site Internet : http://www.huffysports.com
Sito Web: http://www.huffysports.com
1
07/05 P/N 21500701
Page 2
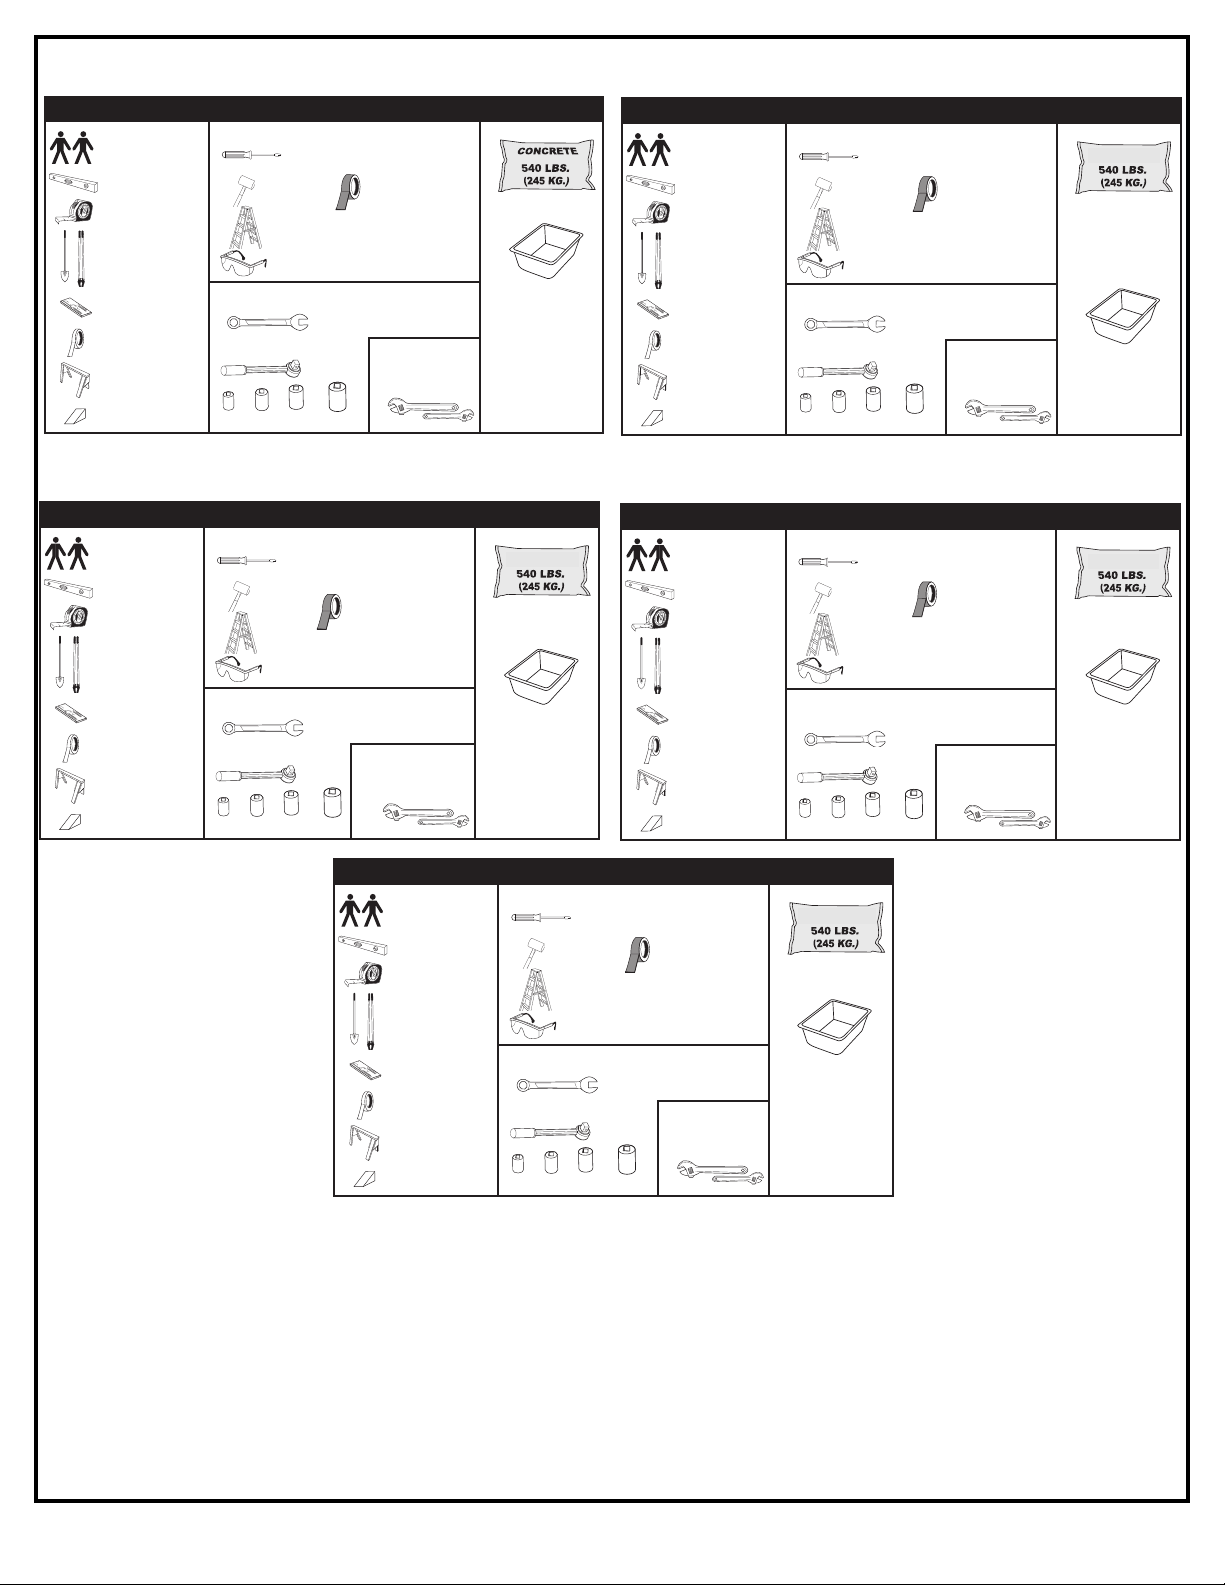
REQUIRED TOOLS AND MATERIALS:
• 2 People
• Carpenter’s Level
• 15’ Tape Measure
• Shovel & Post Hole
Digger
• Wood Board (scrap)
• Tape
• Sawhorse or
Support Table
• Wedge
• Phillips Screwdriver
• Hammer
Stepladder 8 ft. (2.4 m)
•
• Safety Goggles
• (2 each) Wrenches and/or Socket Wrenches and
Sockets (Deep-Well Sockets are Recommended).
1/2"7/16" 9/16" 3/4"
1/2" 9/16" 3/4"
7/16"
Heavy Duty Tape
•
• Optional: Large &
Small Adjustable
Wrenches
•
•
Container to Mix
O
• Deux personnes
•
Niveau à bulle
• Mètre de 4,5 m
• Pelle et bêche
tarière
• Planche en bois
chute)
(
Ruban
•
• Chevalet de sciage
ou table
• Cale
UTILS ET MATÉRIEL REQUIS :
• Tournevis cruciforme
• Marteau
Escabeau de 2,4 m
•
• Lunettes de sécurité
• Deux clés et/ou clés à douilles et deux douilles
(douilles longues recommandées).
1/2"7/16" 9/16" 3/4"
1/2" 9/16" 3/4"
7/16"
Ruban extra-fort
•
• Facultatif : petites
et grandes clés
anglaises
ÉTON
B
•
• Récipient pour
mélanger
BENÖTIGTE WERKZEUGE UND MATERIALIEN:
• 2 Personen
• Wasserwaage
• 38,1-cm-Maßband
• Schaufel und
Pfahlbohrer
• Holzstück
• Klebeband
• Sägebock oder
Stütztisch
• Keil
• Kreuzschlitzschraubenzieher
• Hammer
• Stufenleiter, 2,4 m (8 Fuß)
• Schutzbrille
• (je 2) Schrauben- und/oder Steckschlüssel (tiefe
Einsätze empfohlen).
1/2"7/16" 9/16" 3/4"
1/2" 9/16"
7/16"
• Hochstrapazierfähiges
Klebeband
• Optional: Große und
kleine verstellbare
Schraubenschlüssel
3/4"
ATTREZZI E MATERIALI NECESSARI
• Due persone
• Livella a bolla
• Metro da 4,5 m
(15 piedi)
• Badile e piantapali
• Tavoletta di legno
HERRAMIENTAS Y MATERIALES REQUERIDOS:
ZEMENT
•
• Behälter zum
Mischen
• Cacciavite a stella
• Martello
• Scala a pioli da 2.4 m
(8 piedi)
• Occhiali di protezione
• (2 di ciascuno) chiavi e/o chiavi a bussola e bussole
(si consigliano bussole a incasso profondo)
• 2 personas
• Nivel de carpintero
• Cinta de medir de
15' (4.57 m)
• Pala y excavador del
orificio para el poste
• Tabla de madera
(un trozo)
• Cinta adhesiva
• Caballete o mesa
de apoyo
• Cuña
• Nastro adesivo
per applicazioni
pesanti
• Destornillador Phillips
• Martillo
• Escalera de 8 pies (2.4 m)
• Gafas de seguridad
• (2 de cada una) llaves de tuercas y/o llaves de
tuercas de boca tubular y casquillos (se
recomiendan casquillos profundos).
1/2"7/16"
9/16"
1/2" 9/16"
7/16"
CALCESTRUZZO
•
• Contenitore per
la miscela
• Cinta adhesiva
resistente
3/4"
• Opcional: llaves de
tuercas ajustables
grandes y pequeñas
3/4"
CONCRETO
•
• Recipiente
para mezclar
P/N 21500701 07/05
• Nastro adesivo
• Cavalletto o tavolo
di appoggio
• Cuneo
7/16"
1/2"7/16" 9/16" 3/4"
1/2" 9/16"
2
3/4"
• Facoltativamente:
chiavi inglesi
grande e piccola
Page 3
B
Questions or Missing Parts
Call TOLL-FREE Customer Service
Number listed on the front page!
Des questions ou des
pièces manquantes ?
NE RETOURNEZ PAS au magasin !
Appelez le numéro du service clientèle
(NUMÉRO GRATUIT) qui figure en première page
Fragen oder fehlende Teile?
Gehen Sie NICHT zum Laden zurück!
R
ufen Sie die GEBÜHRENFREIE Telefonnummer
(in den USA und Kanada) auf der Vorderseite an!
HALT!HALT!
¿Tiene preguntas o le faltan piezas?
¡
NO regrese a la tienda!
¡
Llame al número telefónico GRATUITO de Servicio
al Cliente que se indica en la primera página!
¡¡ALTO!ALTO!
Domande o componenti mancanti?
N
ON è necessario tornare al negozio!
Chiamare il NUMERO VERDE per l'assistenza
alla clientela indicato in copertina!
S
ize = 4" x 3"
C
orner Radius = 3/8"
D
ie Cut Label
3.25 Mil Vinyl
All Temp. Permanent Adhesive
1
Mil. Polypropolyne Overlaminate
Illustrator 8.0 = EPS
B
acking + 1/16 Circumference
Rolls of 500
2
2
1
3
201251 2/99
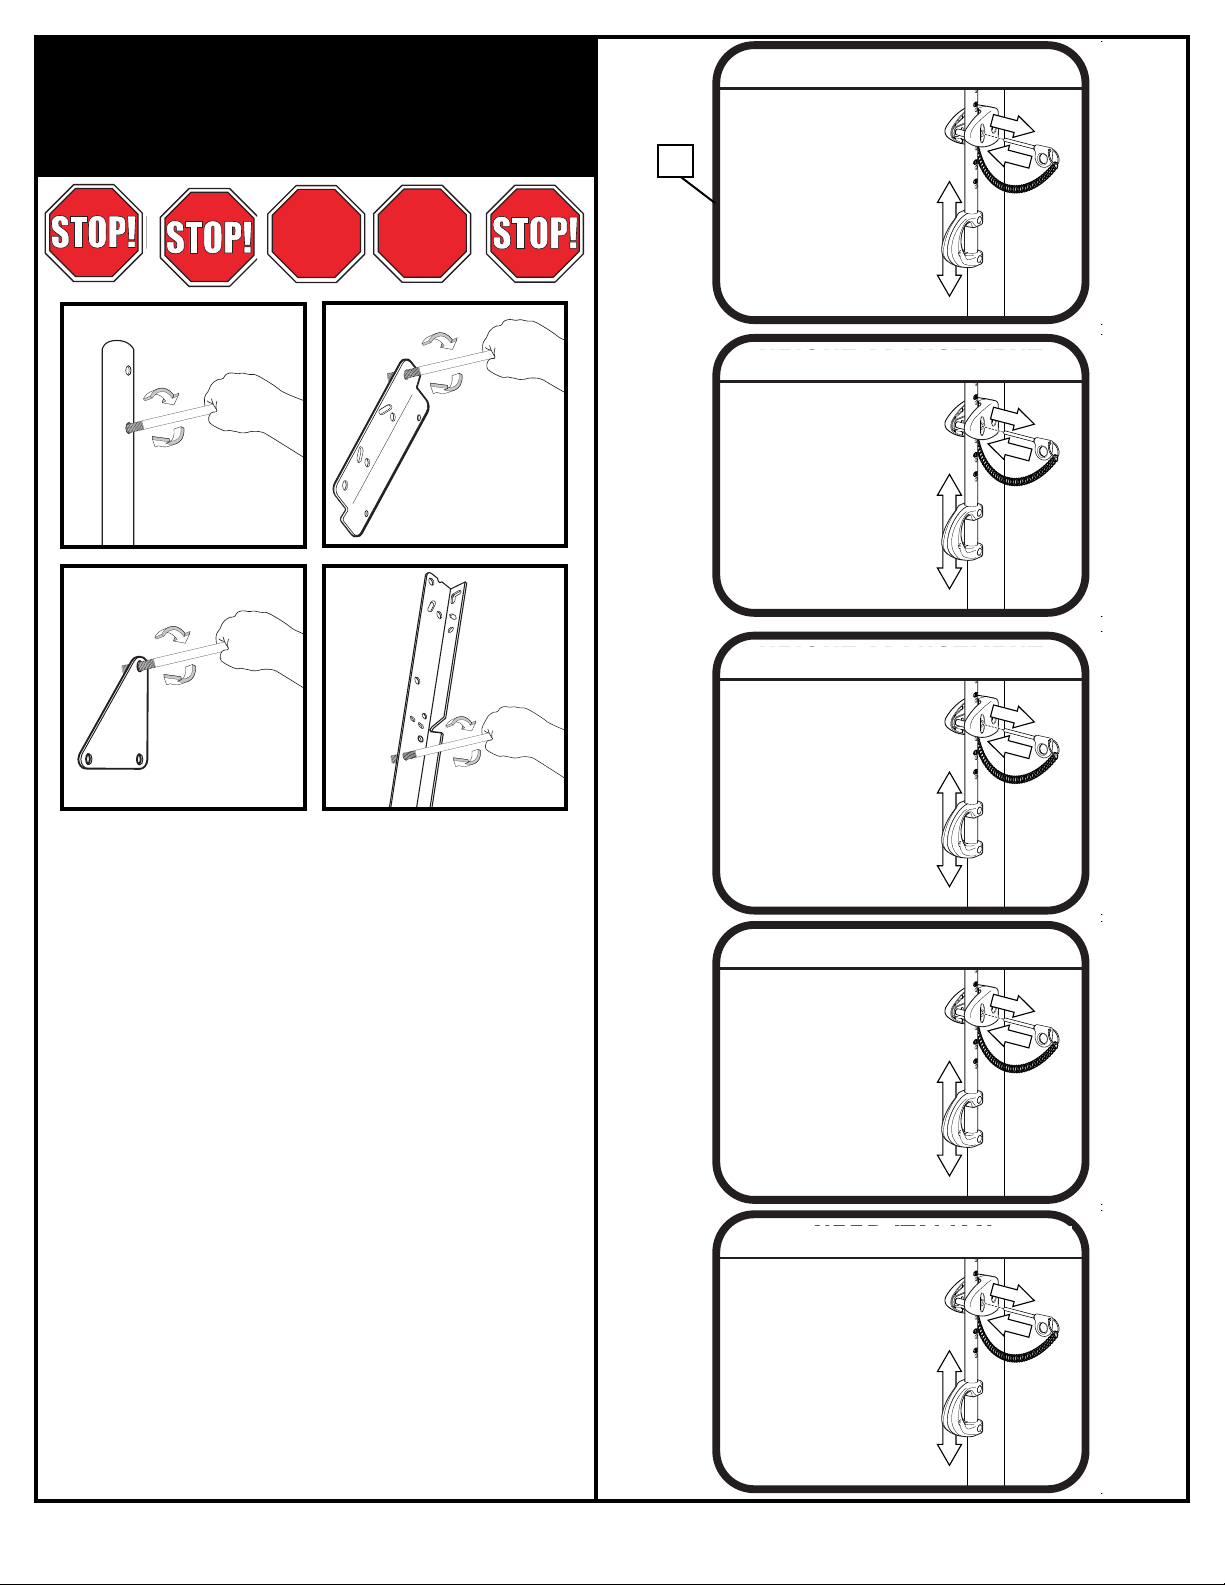
HEIGHT ADJUSTMENT
TO ADJUST BACKBOARD:
1. While holding handle, remove pin.
2. Move elevator up or down to
desired height.
3. Replace pin full length to lock
s
ystem at desired height.
Size = 4" x 3"
Corner Radius = 3/8"
Die Cut Label
3.25 Mil Vinyl
All Temp. Permanent Adhesive
1 Mil. Polypropolyne Overlaminate
I
llustrator 8.0 = EPS
Backing + 1/16 Circumference
R
olls of 500
2
2
1
3
201251 2/99
HEIGHT ADJUSTMENT
T
O ADJUST BACKBOARD:
1. While holding handle, remove pin.
2. Move elevator up or down to
desired height.
3. Replace pin full length to lock
system at desired height.
Size = 4" x 3"
Corner Radius = 3/8"
Die Cut Label
3.25 Mil Vinyl
All Temp. Permanent Adhesive
1
Mil. Polypropolyne Overlaminate
Illustrator 8.0 = EPS
Backing + 1/16 Circumference
Rolls of 500
2
2
1
3
201251 2/99
HEIGHT ADJUSTMENT
TO ADJUST BACKBOARD:
1. While holding handle, remove pin.
2. Move elevator up or down to
desired height.
3. Replace pin full length to lock
system at desired height.
Size = 4" x 3"
Corner Radius = 3/8"
Die Cut Label
3.25 Mil Vinyl
All Temp. Permanent Adhesive
1 Mil. Polypropolyne Overlaminate
Illustrator 8.0 = EPS
Backing + 1/16 Circumference
Rolls of 500
2
2
1
3
201251 2/99
HEIGHT ADJUSTMENT
TO ADJUST BACKBOARD:
1. While holding handle, remove pin.
2. Move elevator up or down to
desired height.
3. Replace pin full length to lock
system at desired height.
EFORE YOU START!
AVANT DE COMMENCER !
VORBEREITENDE MASSNAHMEN
¡ANTES DE COMENZAR!
PRIMA DI COMINCIARE!
35
RÉGLAGE DE LA HAUTEUR
POUR AJUSTER LE PANNEAU :
1. Tout en tenant la poignée, retirez la
g
oupille.
2. Montez ou abaissez le système
élévateur jusqu'à la hauteur voulue.
3. Remettez la goupille à sa place en
l'enfonçant à fond, pour bloquer le
s
ystème à la hauteur désirée.
To ensure optimal playability of backboard system, a close tolerance fit between the
elevator components and hardware is required. Test-fit large bolts into large holes of
elevator tubes, backboard brackets, and triangle plates. Carefully rock them in a
circular motion to ream out any excess paint from holes if necessary.
Not all items pictured are included with every model.
Pour garantir l'utilisation optimale du panneau, les composants du système élévateur
et la visserie doivent être bien ajustés (serrés). À titre d'essai, insérez les gros
boulons dans les gros trous des tubes du système élévateur, des supports du
panneau et des plaques triangulaires. Basculez-les avec précaution en imprimant un
mouvement circulaire pour éliminer l'excédent de peinture des trous, si nécessaire.
Les composants illustrés ici ne sont pas tous fournis avec chaque modèle.
Um sicherzustellen, dass das Korbwandsystem optimal für den Spielbetrieb geeignet
ist, müssen die Komponenten der Verlängerungsvorrichtung und die verschiedenen
Befestigungsteile fest miteinander verschraubt werden. Große Schrauben zur Probe
in die großen Löcher der Verlängerungsrohre, Korbwandklammern und
Dreiecksplatte stecken und diese vorsichtig in einer Kreisbewegung hin- und
herbewegen, um eventuelle Farbrückstände aus den Bohrungen zu entfernen.
Nicht jedem Modell sind alle abgebildeten Teile beigepackt.
Para asegurar el óptimo rendimiento del sistema del respaldo en el juego, se
requiere un ajuste de tolerancia estrecha entre los componentes del elevador y el
herraje. Pruebe el ajuste de los pernos grandes en los orificios grandes de los tubos
elevadores, soportes del respaldo y placas triangulares. Cuidadosamente muévalos
en círculos para eliminar cualquier exceso de pintura de los orificios, si es necesario.
No todos los artículos ilustrados se incluyen con cada modelo.
Per ottenere le migliori prestazioni dal tabellone, è necessario rispettare rigorose
tolleranze tra i componenti del sistema sollevatore (di regolazione dell'altezza) e gli
elementi di fissaggio. A titolo di prova, inserire i bulloni grandi nei fori grandi dei tubi
sollevatori, delle staffe del tabellone e delle piastre triangolari. Ruotare con
attenzione gli elementi di fissaggio nei fori, per rimuovere eventuale vernice in
eccesso dai fori stessi.
Non tutti gli articoli raffigurati sono inclusi con tutti i modelli.
3
HÖHENVERSTELLUNG
VERFAHREN ZUR
K
ORBWANDEINSTELLUNG:
1. Bei festgehaltenem Griff den Stift
herausziehen.
2. Die Verlängerungsvorrichtung bis zur
g
ewünschten Höhe nach oben oder
unten verschieben.
3. Den Stift zum Verriegeln des
Systems auf der gewünschten Höhe
ganz hineinschieben.
AJUSTE DE LA ALTURA
PARA AJUSTAR EL RESPALDO:
1. Mientras sujeta la manija, quite el
pasador.
2. Mueva el elevador hacia arriba o
hacia abajo a la altura deseada.
3. Vuelva a colocar el pasador a toda
su longitud para fijar el sistema a la
altura deseada.
REGOLAZIONE DELL'AL
PARA AJUSTAR EL RESPALDO:
1. Rimuovere il perno, trattenendo la
maniglia.
1. Mientras sujeta la manija, quite el
2. Spostare il sistema di regolazione
pasador.
dell'altezza verso l'alto o verso il
2. Mueva el elevador hacia arriba o
basso fino a raggiungere l'altezza
hacia abajo a la altura deseada.
desiderata.
3. Vuelva a colocar el pasador a toda
3. Rimontare fino in fondo il perno per
su longitud para fijar el sistema a la
bloccare il sistema in corrispondenza
altura deseada.
dell'altezza desiderata.
NEED ITALIAN
07/05 P/N 21500701
TEZZA
Page 4
VOID WARRANTY.
SAFETY INSTRUCTIONS
CONSIGNES DE SÉCURITÉ
for safe operation of the system.
FAILURE TO FOLLOW THESE SAFETY INSTRUCTIONS MAY
RESULT IN SERIOUS INJURY, PROPERTY DAMAGE AND WILL
Owner must ensure that all players know and follow these rules
To ensure safety, do not attempt to assemble this system
without following the instructions carefully. Proper and complete
assembly, use and supervision is essential for proper operation
and to reduce the risk of accident or injury. A high probability of
MATÉRIELS ET L'ANNULATION DE LA GARANTIE.
PROVOQUER DES BLESSURES GRAVES, DES DÉGÂTS
SUIVEZ CES CONSIGNES DE SÉCURITÉ SOUS PEINE DE
et suivent ces règles d'utilisation sûre du système.
Le propriétaire doit s'assurer que tous les joueurs connaissent
Par mesure de sécurité, n'essayez pas de monter ce système
risques d'accident ou de blessure. Il existe un haut risque de
indispensables à un bon fonctionnement et à la réduction des
utilisation et une supervision corrects et complets sont
sans suivre scrupuleusement les instructions. Un montage, une
beginning assembly, read the instructions and identify parts
serious injury exists if this system is not installed, maintained,
blessures graves si ce système n'est pas correctement installé,
using the hardware identifier and parts list in this document.
and operated properly. Check entire box and inside all packing
material for parts and/or additional instructional material. Before
instructions. Avant de commencer le montage, lisez les
entretenu et utilisé. Vérifiez bien le carton et tout le matériel
d'emballage pour y trouver toutes les pièces et/ou d'autres
instructions et identifiez les pièces à l'aide de la liste
d'identification et de la liste des pièces de ce document.
extrêmement prudent.
o Il est recommandé de s'y prendre à deux (2) pour réaliser cette
o Si vous utilisez une échelle en cours de montage, soyez
the pole sections to separate during play.
• Before digging, contact utility company to locate underground
• Seat the pole sections properly. Failure to do so could allow
• Two (2) people are reccomended for this operation.
• If using a ladder during assembly, use extreme caution.
sinon de se déboîter en cours de jeu.
opération.
et eau pour situer les câbles d'alimentation et les conduites de
o Avant de creuser, contactez les fournisseurs d'électricité, gaz
o Emboîtez correctement les sections de poteau. Elles risquent
system failure.
overhead power lines within 20 ft. (7 m) radius of pole location.
power cables, gas, and water lines. Ensure there are no
gaz et d'eau enfouis. Assurez-vous qu'aucune ligne aérienne
• If technical assistance is required, contact Huffy Sports.
• Climate, corrosion, excessive use, or misuse could result in
excessive ou une mauvaise utilisation risquent de provoquer
d'électricité ne se trouve dans un rayon de 7 m de
l'emplacement du poteau.
o Les conditions climatiques, la corrosion, une utilisation
NOT
excessive competitive play.
backboard.
• Minimum operational height is 6'6" (1.98 m) to the bottom of
la panne du système.
o Pour toute assistance technique, contactez Huffy Sports.
• Read and understand the warning label affixed to pole. Label
• This equipment is intended for home recreational use only and
base du panneau.
PAS à un jeu extrêmement compétitif.
o La hauteur minimale d'utilisation est de 1,98 m (6'6") jusqu'à la
o Ce matériel est réservé à un but récréatif à domicile et NON
exposure to corrosives such as pesticides, herbicides, or salts
The climate, placement of the pole, the location of the pole,
is shown below
• The life of your basketball pole depends on many conditions.
Elle apparaît ci-dessous.
des facteurs. Le climat, la position du poteau, son
o Lisez et comprenez l'étiquette d'avertissement fixée au poteau.
o La durée de vie de votre poteau de basket-ball dépend de bien
backboard, net, or rim.
are all important.
• Serious injury could occur if teeth/face come in contact with
• Adult supervision is recommended when adjusting height.
de la hauteur.
des pesticides, des herbicides ou des sels sont tous des
facteurs importants.
emplacement, son exposition à des agents corrosifs tels que
heurter le panneau, le cerceau ou le filet.
o Risque de blessures graves si les dents ou le visage viennent
o La supervision d'un adulte est recommandée pour le réglage
Use caution when using this system.
Most injuries are caused by misuse and/or not following instructions.
et/ou le non-respect des instructions.
Soyez prudent lorsque vous utilisez ce système.
La plupart des blessures sont causées par une utilisation impropre
SICHERHEITSHINWEISE
FÜHREN UND MACHT DIE GARANTIE UNWIRKSAM.
SCHWEREN VERLETZUNGEN UND/ODER SACHSCHÄDEN
EIN MISSACHTEN DIESER SICHERHEITSHINWEISE KANN ZU
Der Eigentümer muss sicherstellen, dass alle Spieler diese
P/N 21500701 07/05
befolgen.
Missachten der Anleitungen verursacht.
Regeln für einen sicheren Betrieb des Systems kennen und
Aus Sicherheitsgründen darf dieses System nur unter
sorgfältiger Beachtung der Anleitung zusammengebaut werden.
einer unsachgemäßen Installation und Wartung und bei einem
des Unfall- oder Verletzungsrisikos absolut erforderlich. Bei
und Aufsicht ist für den richtigen Betrieb und zur Reduzierung
Eine ordnungsgemäße und vollständige Montage, Verwendung
zusätzliche Anleitungen inspizieren. Vor Beginn des
befindlichen Verpackungsmaterialien auf Bauteile und/oder
falschen Betrieb dieses Systems besteht ein hohes Risiko
schwerer Verletzungen. Den ganzen Karton und alle darin
Zusammenbaus die Anleitung durchlesen und anhand des
Schlüssels zur Identifizierung der Befestigungsteile und der
Teileliste in diesem Dokument die einzelnen Bauteile bestimmen.
vorsichtig vorgehen.
Trennung der Stangenteile voneinander beim Spielbetrieb zu
o Diese Arbeit sollte von zwei (2) Personen ausgeführt werden.
o Die einzelnen Stangenteile richtig zusammenfügen, um eine
o Bei Gebrauch einer Leiter während des Zusammenbaus extrem
Verlauf unterirdischer Strom-, Gas- und Wasserleitungen
Versorgungsunternehmen verständigen, um sich über den
vermeiden.
informieren zu lassen. Sicherstellen, dass in einem 7 m (20 Fuß)-
Radius vom Aufstellort der Stange keine Oberleitungen
o Vor irgendwelchen Grabungen die entsprechenden
verlaufen.
angefordert werden.
oder Fehlgebrauch kann zu Systemstörungen führen.
o Klimatische Bedingungen, Korrosion, übermäßiger Gebrauch
Rand der Korbwand.
o Technische Unterstützung kann direkt von Huffy Sports
o Die Mindestspielhöhe beträgt 1,98 m (6,6 Fuß) bis zum unteren
o Diese Vorrichtung ist nur für den Freizeitgebrauch zu Hause,
lesen. Dieser Aufkleber ist unten abgebildet.
NICHT aber für ein übermäßig wettkampfbetontes Spiel
vorgesehen.
o Den an der Stange angebrachten Warnaufkleber aufmerksam
Aufstellort der Stange, Angriffe durch korrodierende Substanzen
äußeren Umständen ab. Klimabedingungen, Platzierung und
wie Ungeziefer- und Pflanzenvernichtungsmittel oder Salz - all
o Die Nutzungsdauer Ihrer Basketballstange hängt von zahlreichen
das sind wichtige Faktoren.
o Alle Höhenverstellungen sollten von Erwachsenen beaufsichtigt
haben.
Korbrand oder dem Netz kann schwere Verletzungen zur Folge
werden.
o Der Kontakt von Zähnen/Gesicht mit der Korbwand, dem
Bei der Verwendung dieses Systems vorsichtig vorgehen.
Die meisten Verletzungen werden durch einen Fehlgebrauch bzw. ein
4
Page 5
sistema.
Tenga cuidado cuando use este sistema.
por el incumplimiento de las instrucciones.
INSTRUCCIONES DE SEGURIDAD
ISTRUZIONI PER LA SICUREZZA
EL INCUMPLIMIENTO DE ESTAS INSTRUCCIONES DE
SEGURIDAD PUEDE DAR COMO RESULTADO LESIONES
GARANZIA DEL PRODOTTO.
GRAVI INFORTUNI E DANNI ALLE COSE ED ANNULLERÀ LA
L'INOSSERVANZA DI QUESTE ISTRUZIONI PUÒ TRADURSI IN
sepan y sigan estas reglas para la operación segura del
El propietario debe asegurarse de que todos los jugadores
GRAVES, DAÑOS MATERIALES Y ANULARÁ LA GARANTÍA.
Per garantire il funzionamento sicuro del sistema, il
proprietario deve accertarsi che tutti i giocatori siano a
conoscenza di queste regole di sicurezza e le rispettino.
completo, y el uso y la supervisión adecuados para la operación
correcta del sistema y para reducir el riesgo de accidentes o
Por su seguridad, no intente montar este sistema sin seguir
sistema senza seguire attentamente le istruzioni. Il montaggio
Per garantire la sicurezza, non provare a montare questo
lesiones. Existe una alta probabilidad de sufrir lesiones graves
cuidadosamente las instrucciones. Es esencial el montaje
completo e corretto, l'impiego appropriato e la supervisione
si este sistema no se instala, mantiene y opera adecuadamente.
sottoposto a manutenzione e impiegato nel modo giusto, è molto
incidenti o infortuni. Se il sistema non viene installato,
funzionamento e per ridurre al minimo il rischio di eventuali
dell'uso del sistema sono essenziali per assicurarne il corretto
e identifique las piezas usando el identificador de herraje y la
Revise toda la caja y el interior de todo el material de embalaje
probabile che si verifichino gravi infortuni. Controllare
lista de piezas contenidos en este documento.
para encontrar todas las piezas y/o material instructivo
adicional. Antes de comenzar el montaje, lea las instrucciones
accuratamente l'intera scatola e il contenuto di tutto il materiale
di spedizione che potrebbe includere parti e/o istruzioni
aggiuntive. Prima di iniziare il montaggio, leggere le istruzioni ed
identificare le parti usando il relativo foglio di identificazione e
l'elenco dei pezzi inclusi nel presente documento.
o Si utiliza una escalera de mano durante el montaje, tenga
si usa una scala.
o Per il completamento di questa operazione si raccomanda di
o Prestare particolare attenzione se per il montaggio del sistema
las secciones del poste podrían separarse durante el juego.
mucho cuidado.
impiegare due (2) persone.
Antes de excavar, comuníquese con las compañías de servicios
o Asiente correctamente las secciones del poste. Si no lo hace,
o Se recomienda que dos (2) personas realicen esta operación.
istruzione può causare la separazione delle stesse durante il
gioco.
o Bloccare bene le sezioni del palo. L'inosservanza di tale
o Prima di scavare, contattare l'azienda di servizi pubblici locale,
ubicación del poste.
eléctricas suspendidas en un radio de 20 pies (7 m) de la
gas y de agua subterráneos. Asegúrese de que no haya líneas
públicos para ubicar los cables eléctricos y las tuberías de
per individuare cavi elettrici e tubature del gas e dell'acqua
presenti sotto terra. Accertarsi che non siano presenti cavi
El clima, la corrosión, el uso excesivo y el mal uso podrían
aerei di corrente nel raggio di 7 m (20 piedi) dal punto in cui si
installa il palo.
o Le condizioni climatiche, la corrosione, l'uso eccessivo e
m) hasta la parte inferior del respaldo.
ocasionar la falla del sistema.
o La altura mínima de operación es de 6 pies y 6 pulgadas (1.98
o Si requiere asistencia técnica, comuníquese con Huffy Sports.
guasti al sistema.
Sports.
anche l'uso non appropriato del palo potrebbero provocare
o Se si necessita di assistenza tecnica, contattare la Huffy
La etiqueta se muestra abajo.
el hogar y NO para juego competitivo excesivo.
o Lea y entienda la etiqueta de advertencia adherida en el poste.
o Este equipo está diseñado únicamente para uso recreativo en
esclusivamente a scopo di ricreazione domestica e NON per
basso del tabellone.
o Il presente dispositivo è stato progettato per essere impiegato
o L'altezza minima d'impiego è di 1,98 m (6,6 piedi) dal punto più
pesticidas, herbicidas o sales son factores importantes.
poste, la exposición a sustancias corrosivas tales como
condiciones. El clima, la colocación del poste, la ubicación del
o La vida útil de su poste de baloncesto depende de muchas
affissa al palo. L'etichetta è mostrata di seguito.
partite agonistiche.
o Leggere e comprendere la targhetta di avvertimento che è
o La durata del palo dipende da svariate condizioni. Il clima, la
red o el borde, se puede sufrir una lesión grave.
supervisión de un adulto.
Si los dientes o la cara entran en contacto con el respaldo, la
o Se recomienda que el ajuste de la altura se realice bajo la
posizione del palo, il modo in cui il palo è stato montato, la
sali, sono tutti importanti ai fini della durata.
sua esposizione ad agenti corrosivi, come pesticidi, erbicidi e
da parte di adulti.
o Quando si regola l'altezza del palo, si consiglia la supervisione
o Il contatto dei denti o del volto con il tabellone, il cerchio o la
La mayoría de las lesiones son causadas por el uso inadecuado y/o
di inosservanza delle istruzioni.
rete potrebbe provocare gravi infortuni.
Prestare particolare attenzione durante l'impiego di questo sistema.
La maggior parte degli infortuni avviene a causa di uso improprio e/o
NOTICE TO ASSEMBLERS
ALL Huffy Sports basketball Systems, including those used for DISPLAYS, MUST be assembled and ballasted with sand or water according to instructions.
Failure to follow instructions could result in SERIOUS INJURY. It is NOT acceptable to devise a makeshift weight system.
TOUS les systèmes de basket-ball Huffy Sports, y compris ceux utilisés en EXPOSITION, DOIVENT être assemblés et lestés de sable ou d'eau, selon les
AVIS AUX PERSONNES CHARGÉES DU MONTAGE
instructions. Suivez ces instructions sous peine d'encourir des BLESSURES GRAVES. Il est INACCEPTABLE de composer un système de lestage de fortune.
HINWEIS FÜR DIE PERSONEN, DIE DEN ZUSAMMENBAU DURCHFÜHREN
ALLE Basketballsysteme von Huffy Sports, einschließlich der zu Demonstrationszwecken benutzten Systeme, müssen gemäß der Montageanleitung
zusammengebaut und mit Sand oder Wasser beschwert werden. Ein Missachten dieser Anleitungen kann SCHWERE VERLETZUNGEN zur Folge haben. Zum
Beschweren darf NICHT zu irgendwelchen Notbehelfsmaßnahmen gegriffen werden.
AVISO PARA LAS PERSONAS QUE REALIZAN EL MONTAJE
TODOS los sistemas de baloncesto de Huffy Sports, inclusive los usados para EXHIBICIÓN, DEBEN estar montados y equilibrados con arena o agua, de
acuerdo con las instrucciones. Si se ignoran estas instrucciones se podría ocasionar una LESIÓN GRAVE. NO es aceptable improvisar un sistema de pesas
provisional.
AVVISO A CHI MONTA IL SISTEMA
TUTTI i sistemi da pallacanestro Huffy Sports, compresi quelli impiegati a scopo ESPOSITIVO, DEVONO essere montati e bilanciati con sabbia o acqua, a
seconda delle istruzioni. La mancata osservanza delle istruzioni può tradursi in GRAVI LESIONI. La messa in opera di un sistema di bilanciamento alternativo è
INACCETTABILE.
5
07/05 P/N 21500701
Page 6
IMPORTANT!
Questions or Missing Parts
Call TOLL-FREE Customer Service
N
umber listed on the front page!
Des questions ou des
pièces manquantes ?
NE RETOURNEZ PAS au magasin !
A
ppelez le numéro du service clientèle
(NUMÉRO GRATUIT) qui figure en première page
!
Fragen oder fehlende Teile?
Gehen Sie NICHT zum Laden zurück!
Rufen Sie die GEBÜHRENFREIE Telefonnummer
(in den USA und Kanada) auf der Vorderseite an!
HALT!HALT!
¿Tiene preguntas o le faltan piezas?
¡NO regrese a la tienda!
¡Llame al número telefónico GRATUITO de Servicio
al Cliente que se indica en la primera página!
¡¡ALTO!ALTO!
Domande o componenti mancanti?
N
ON è necessario tornare al negozio!
Chiamare il NUMERO VERDE per l'assistenza
alla clientela indicato in copertina!
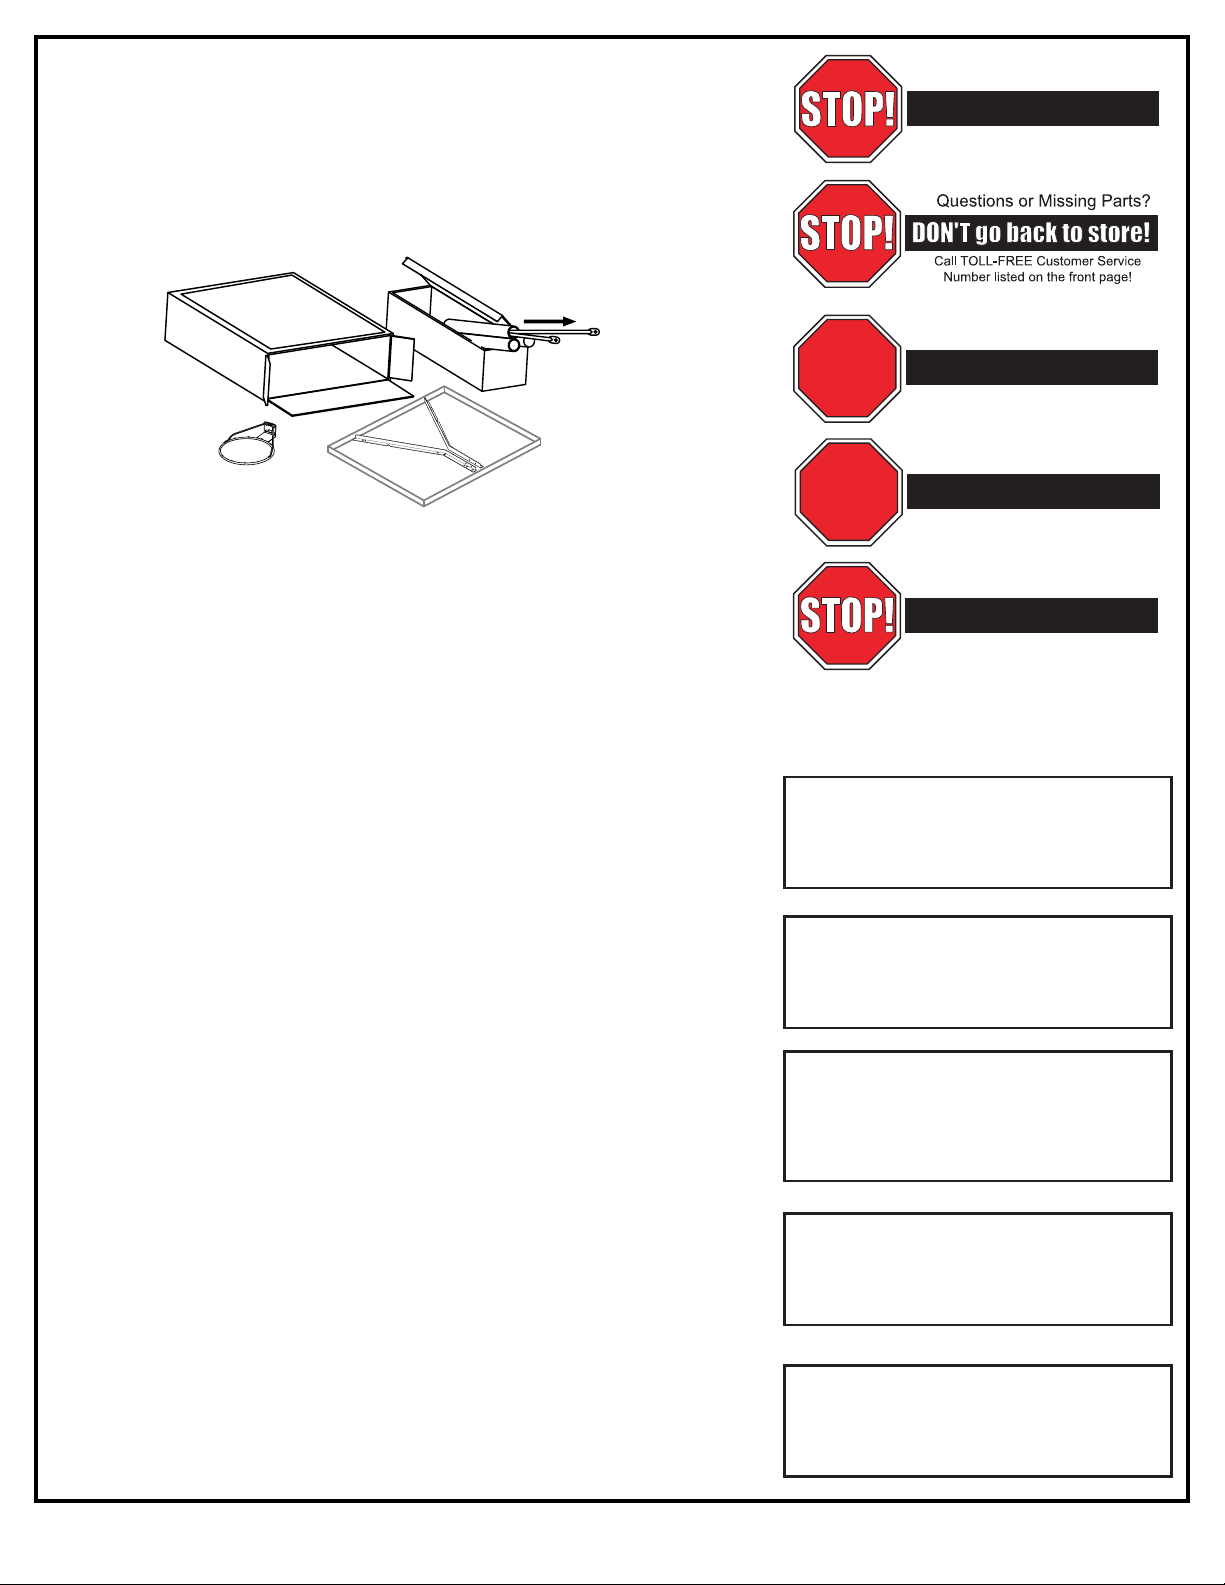
Remove all contents from boxes.
Be sure to check inside pole sections,
hardware and additional parts are packed inside.
IMPORTANT!
Videz entièrement les boîtes.
Veillez à vérifier l'intérieur des sections de poteau.
La quincaillerie et des pièces supplémentaires sont emballées à
l'intérieur.
WICHTIG!
Die Kartons vollständig auspacken.
Den Hohlraum in den Stangenteilen inspizieren.
Dort sind Befestigungs- und andere Kleinteile verpackt.
¡IMPORTANTE!
Saque todo el contenido de las cajas.
Asegúrese de revisar el interior de las secciones del poste.
Ahí se han empacado herraje y piezas adicionales.
IMPORTANTE!
Rimuovere il contenuto dalle scatole. Controllare le sezioni del
palo: gli elementi di fissaggio ed altri componenti sono
confezionati al loro interno.
WARRANTY CARD:
Please remember to complete your product
registration form either on-line at:
www.huffysports.com/warrantycard ou par
courrier sur la carte ci-jointe.
CARTE DE GARANTIE :
N'oubliez pas de remplir la carte d'enregistrement
de votre produit en ligne à :
www.huffysports.com/warrantycard or mail-in
the enclosed postcard.
GARANTIEKARTE:
Bitte nicht vergessen, das
Produktregistrierungsformular online unter der
Adresse
www.huffysports.com/warrantycard auszufüllen
oder die beiliegende Postkarte einzusenden.
P/N 21500701 07/05
6
TARJETA DE GARANTÍA:
Por favor recuerde completar su formulario de
registro del producto, ya sea en línea en:
www.huffysports.com/warrantycard o por
correo en la tarjeta postal adjunta.
GARANZIA
Non dimenticare di completare la scheda di
registrazione del prodotto in linea, al sito
www.huffysports.com/warrantycard, o per
posta, servendosi della cartolina allegata.
Page 7
Owner must ensure that all players know and follow these rules
f
or safe operation of the system.
WARNING
•
DO NOT HANG on the rim or any part of the system including
backboard, support braces or net.
•
During play, especially when performing dunk type activities,
k
eep player's face away from the backboard, rim and net.
Serious injury could occur if teeth/face come in contact with
backboard, rim or net.
•
Do not slide, climb, shake or play on base and/or pole.
•
When adjusting height or moving system, keep hands and
fingers away from moving parts.
•
Do not allow children to move or adjust system.
•
During play, do not wear jewelry (rings, watches, necklaces,
etc.). Objects may entangle in net.
•
Keep organic material away from pole base. Grass, litter, etc.
could cause corrosion and/or deterioration.
•
Check pole system for signs of corrosion (rust, pitting,
chipping) and repaint with exterior enamel paint. If rust has
penetrated through the steel anywhere, replace pole
immediately.
•
Check system before each use for proper ballast, loose
hardware, excessive wear and signs corrosion and repair
before use.
•
Check system before each use for instability.
•
Never play on damaged equipment.
•
Keep pole top covered with cap at all times.
•
See instruction manual for proper installation and
maintenance.
R
ead and understand warnings listed
below before using this product
.
F
ailure to follow these warnings may
result in serious injury and/or
property damage
.
I
D#: 588000 05/05
M
UNSELL NOTATION
H
ue Value Chroma
5.0 YR 6.0/15
Equiv. CIE Data
(
Y%) x y
3
0.05 0.5510 0.4214
Approx. PMS Color
13 parts yellow
3 parts Warm Red
1/4 part Black
Warning Area = Orange
Size = 4" x 6.5"
Corner Radius = 3/8"
Die Cut Label
3.25 Mil Vinyl
All Temp. Permanent Adhesive
1 Mil. Polypropolyne Overlaminate
Illustrator 8.0 = EPS
Backing + 1/16 Circumference
Rolls of 500
I
n the U.S.: 1-888-713-5488
In the U.S.: 1-800-558-5234
I
n Canada: 1-800-284-8339
I
n the U.S.: 1-800-334-9111
I
n the U.S.: 1-800-558-5234
In Canada: 1-800-284-8339
ID#: GE588000 05/05
MUNSELL NOTATION
Hue Value Chroma
5.0 YR 6.0/15
Equiv. CIE Data
(Y%) x y
30.05 0.5510 0.4214
Approx. PMS Color
13 parts yellow
3 parts Warm Red
1/4 part Black
Warning Area = Orange
Size = 4" x 6.5"
Corner Radius = 3/8"
Die Cut Label
3.25 Mil Vinyl
All Temp. Permanent Adhesive
1 Mil. Polypropolyne Overlaminate
Illustrator 8.0 = EPS
Backing + 1/16 Circumference
Rolls of 500
ACHTUNG
Vor Gebrauch dieses Produkts die
nachstehenden Warnhinweise lesen und
beachten.
E
in Missachten dieser Warnung kann zu
schweren Verletzungen und/oder Sachschäden
führe
In den USA: 1-888-713-5488
In den USA: 1-800-558-5234
Kanada: 1-800-284-8339
In den USA: 1-800-334-9111
In den USA: 1-800-772-5346
Kanada: 1-800-284-8339
Der Eigentümer muss sicherstellen, dass alle Spieler diese
Regeln für einen sicheren Betrieb des Systems kennen und
befolgen.
o NICHT am Korbrand oder irgendeinem anderen Teil des
Systems, einschl. Korbwand, Stützstreben oder Netz HÄNGEN.
o Während des Spielbetriebs, besonders bei Slam-Dunk-
Manövern, müssen die Spieler ihr Gesicht von Korbwand,
Korbrand und Netz fernhalten. Der Kontakt von Zähnen/Gesicht
mit der Korbwand, dem Korbrand oder dem Netz kann schwere
Verletzungen zur Folge haben.
o Nicht auf der Stange entlang rutschen, klettern, daran rütteln
oder damit spielen.
o Beim Einstellen der Höhe Hände und Finger von beweglichen
Teilen fernhalten.
o Kindern sollte das Verschieben oder Einstellen des Systems
nicht gestattet werden.
o Beim Spielen keinen Schmuck (Ringe, Armbanduhren,
Halsketten usw.) tragen. Gegenstände dieser Art können sich im
Netz verfangen.
o Organische Materialien vom Stangensockel fernhalten. Gras,
Abfälle usw. können Korrosion und/oder Abbauerscheinungen
verursachen.
o Das Stangensystem auf Anzeichen von Korrosion (Rost,
Narbenbildung, Abblättern) untersuchen und mit
Emailaußenfarbe neu lackieren. Wenn sich Rost an irgendeiner
Stelle durch den Stahl durchgefressen hat, ist die Stange sofort
auszutauschen.
o Das System vor jedem Gebrauch auf den richtigen Ballast, lose
Befestigungsteile, übermäßige Abnutzungserscheinungen und
Anzeichen von Korrosion untersuchen; vor jedem Einsatz
entsprechende Korrekturmaßnahmen bzw. Reparaturen
durchführen.
o Die Stabilität des Systems muss vor jedem Gebrauch überprüft
werden.
o Niemals an bzw. mit einer beschädigten Ausrüstung spielen.
o Das obere Stangenende muss jederzeit mit einer Kappe
abgedeckt sein.
o Hinweise zur ordnungsgemäßen Installation sind dem
Gebrauchshandbuch zu entnehmen.
I
D#: FR588000 05/05
MUNSELL NOTATION
Hue Value Chroma
5
.0 YR 6.0/15
Equiv. CIE Data
(Y%) x y
30.05 0.5510 0.4214
Approx. PMS Color
13 parts yellow
3 parts Warm Red
1/4 part Black
Warning Area = Orange
Size = 4" x 6.5"
Corner Radius = 3/8"
Die Cut Label
3.25 Mil Vinyl
All Temp. Permanent Adhesive
1 Mil. Polypropolyne Overlaminate
Illustrator 8.0 = EPS
Backing + 1/16 Circumference
Rolls of 500
AVERTISSEMENT
Lisez les avertissements indiqués cid
essous avant d'utiliser ce produit.
sous peine d'encourir des blessures
g
raves et/ou des dégâts matériels.
Aux États-Unis : 1-888-713-5488
Aux États-Unis : 1-800-334-9111
A
ux États-Unis: 1-800-558-5234
A
u Canada: 1-800-284-8339
Aux États-Unis: 1-800-558-5234
Au Canada: 1-800-284-8339
Le propriétaire du système doit s’assurer que tous les joueurs
connaissent et suivent ces
consignes d’utilisation sûre du système.
• NE VOUS SUSPENDEZ PAS sur le cerceau ou sur toute autre
partie du système, y compris le panneau, les supports ou le filet.
• Durant le jeu, en particulier lorsque vous faites des smash,
gardez le visage à l’écart du panneau, du cerceau et du filet.
Des blessures graves sont possibles si les dents ou le visage
venaient à entrer en contact avec le panneau, le cerceau ou le
filet.
• Ne glissez et ne montez pas sur le poteau, ne le secouez pas et
ne jouez pas dessus.
• Lorsque vous réglez la hauteur ou que vous déplacez le
système, gardez les mains et les doigts à l’écart des pièces en
mouvement.
• Ne laissez pas des enfants déplacer ou régler le système.
• Avant le jeu, retirez vos bijoux (bagues, montres, colliers, etc.).
Ces objets risquent de se prendre dans le filet.
• Maintenez les substances organiques à l’écart du socle du
poteau. L’herbe, les déchets, etc. risquent de causer la corrosion
et/ou la détérioration du système.
• Vérifiez l’état du système (signes de corrosion comme rouille,
piqûres, écaillage) et repeignez avec de la peinture émail pour
extérieur. Si la rouille a pénétré en tout point de l’acier,
remplacez immédiatement le poteau.
• Vérifiez le système avant chaque utilisation (lest, visserie mal
serrée, usure excessive et signes de corrosion) et réparez avant
utilisation.
• Vérifiez la stabilité du système avant chaque utilisation.
• Ne jouez jamais sur du matériel abîmé.
• Maintenez le poteau bouché à tout moment.
• Pour les instructions d’installation et d’entretien, reportez-vous
au guide fourni.
MUNSELL NOTATION
Hue Value Chroma
5.0 YR 6.0/15
Equiv. CIE Data
(Y%) x y
30.05 0.5510 0.4214
Approx. PMS Color
13 parts yellow
3 parts Warm Red
1/4 part Black
Warning Area = Orange
Size = 4" x 6.5"
Corner Radius = 3/8"
Die Cut Label
3.25 Mil Vinyl
All Temp. Permanent Adhesive
1 Mil. Polypropolyne Overlaminate
Illustrator 8.0 = EPS
Backing + 1/16 Circumference
Rolls of 500
El propietario debe asegurarse de que todos los jugadores conozcan y
obedezcan estas reglas para la operación segura del sistema.
•
NO SE CUELGUE del borde ni de ninguna parte del sistema, inclusive el
respaldo, las abrazaderas de apoyo y la red.
•
Durante el juego, especialmente cuando se realizan actividades de tipo clavada
(dunk), el jugador debe mantener la cara alejada del respaldo, el borde y la red.
Si los dientes o la cara entran en contacto con el respaldo, el borde o la red, se
puede sufrir una lesión grave.
•
Durante el juego, especialmente cuando se realizan actividades de tipo clavada
(dunk), el jugador debe mantener la cara alejada del respaldo, el borde y la red.
Si los dientes o la cara entran en contacto con el respaldo, el borde o la red, se
puede sufrir una lesión grave.
•
No se deslice, suba, sacuda ni juegue en el poste.
•
Al ajustar la altura mantenga las manos y los dedos alejados de las partes
movibles.
•
No permita que los niños muevan o ajusten el sistema.
•
Durante el juego, no use joyería (anillos, relojes, collares, etc.) Estos objetos se
podrían atorar en la red.
•
Mantenga los materiales orgánicos alejados de la base del poste. El césped, la
basura, etc. podrían causar corrosión y/o deterioro de la base del poste.
•
Revise que el sistema del poste no tenga señales de corrosión (oxidación,
picaduras, desconchaduras) y si las tiene vuelva a pintarlo con pintura de
esmalte para exteriores. Si la corrosión penetró a través del acero en cualquier
área, reemplace inmediatamente el poste.
•
Antes de cada uso revise el sistema para verificar que esté adecuadamente
equilibrado, que no tenga herraje suelto, desgaste excesivo ni signos de
corrosión, y repárelo si es necesario.
•
Verifique la estabilidad del sistema antes de cada uso.
•
Nunca juegue en equipo dañado.
•
Siempre mantenga la parte superior del poste cubierta con las tapas.
ADVERTENCIA
Lea y
entienda las advertencias que se
encuentran a continuación antes de
usar este producto
.
S
i no se observan estas advertencias se
podrían causar lesiones graves y/o
daños materiales
.
N/P: 588000 05/05
En EE.UU.: 1-888-713-5488
En EE.UU.: 1-800-558-5234
En Canadá: 1-800-284-8339
En EE.UU.: 1-800-334-9111
En EE.UU.: 1-800-772-5346
I
D#: IT588000 05/05
MUNSELL NOTATION
Hue Value Chroma
5.0 YR 6.0/15
Equiv. CIE Data
(Y%) x y
30.05 0.5510 0.4214
Approx. PMS Color
13 parts yellow
3 parts Warm Red
1/4 part Black
Warning Area = Orange
Size = 4" x 6.5"
Corner Radius = 3/8"
Die Cut Label
3.25 Mil Vinyl
All Temp. Permanent Adhesive
1 Mil. Polypropolyne Overlaminate
Illustrator 8.0 = EPS
Backing + 1/16 Circumference
Rolls of 500
Prima di usare questo prodotto, leggere le
avvertenze elencante di seguito fino a
c
omprenderle a fondo.
L'inosservanza di queste avvertenze può
tradursi in gravi infortuni e/o danni alle
cose.
N
egli U.S.A.: 1-888-713-5488
Negli U.S.A.: 1-800-558-5234
Nel Canada:1-800-284-8339
N
egli U.S.A.: 1-800-334-9111
INegli U.S.A.: 1-800-558-5234
Nel Canada: 1-800-284-8339
AVVERTENZA
Per garantire il funzionamento in sicurezza del sistema, il
proprietario deve accertarsi che tutti i giocatori siano a
conoscenza di queste regole e le rispettino.
• NON AGGRAPPARSI al cerchio o a qualsiasi parte del sistema
compreso il tabellone, le staffe di sostegno e la rete.
• Durante il gioco, in particolare quando vengono eseguite delle
attività di schiacciata della palla, il giocatore deve tenere il volto
lontano dal tabellone, dal cerchio e dalla rete. Il contatto dei
denti o del volto con il tabellone, con il cerchio o con la rete
potrebbe tradursi in gravi infortuni.
• Non scivolare, salire, scuotere né giocare sulla base e/o sul
palo.
• Mentre il sistema viene regolato in altezza, tenere le mani e le
dita lontano dalle parti in movimento.
• Non permettere ai bambini di spostare né di regolare il sistema.
• Durante il gioco, non indossare gioielli (anelli, orologi, catene,
ecc.); tali oggetti potrebbero impigliarsi nella rete.
• Tenere lontano dalla base del palo materiali organici, come erba,
spazzatura, ecc., che potrebbero causare corrosione e/o
deterioramento.
• Controllare il sistema del palo per eventuali segni di corrosione
(ruggine, screpolature, scheggiature) e riverniciarlo con smalto
da esterni. Nel caso in cui la ruggine fosse penetrata in qualsiasi
punto all'interno dell'acciaio, sarà necessario sostituire
immediatamente il palo.
• Prima di ogni impiego, controllare che il sistema sia in equilibrio,
non presenti elementi di fissaggio allentati, usura eccessiva e
segni di corrosione; riparare il sistema prima di usarlo.
• Controllare la stabilità del sistema prima di utilizzarlo.
• Non giocare mai con un sistema danneggiato.
• Tenere sempre la parte più alta del palo coperta con il tappo.
• Per l'installazione appropriata, consultare il manuale delle
istruzioni.
7
07/05 P/N 21500701
Page 8
Item Qty. Part No. Description
Item Qty. Part No. Description
11FR908123 Top Pole Section
2 1 FR918125 Middle Pole Section
3 1 FR908124 Bottom Pole Section
4 2 202800 Ground Sleeve
5 1 202801 Ground Sleeve Cap
6 1 204832 Bracket, Pole Mount
7 2 203053 Carriage Bolt, 5/16-18 x 4 Long
8 9* 203100 Hex Flange Nut, 5/16-18
9 4 206360 Bolt, Hex Head, 3/8-16 x 2-5/8 Long
10 4 203232 Washer, Metal, 3/4” O.D.
11 4 203063 Nut, Nylock, Hex Head, 3/8-16
12 2 204858 Spacer, Biscuit, Plastic
13 2 204857 Spacer, Metal 1/2” O.D. x 1.44 Long
14 2 204859 Cover, Spring
15 1* 203038 Carriage Bolt, 5/16-18 x 2-3/4 Long
16 1 204850 Pin, Locking
17 1 204853 Lanyard, Black Coil
18 1 908152 Height Adjustment Rod
19 1 204872 Label, Height Indicator
20 2 203103 Carriage Bolt, 5/16-18 x 2 Long
21 1 204803 Screw, Phillips Head
22 4 202862 Spacer, .563 ID x 1.190 Long
23 4 206311 Spacer, .53 I.D. x .65 O.D. x .5 Long
24 6 206340 Lock Nut,1/2-13
25 2 900964 Board Bracket
26 1 207103 Cap,Pole, 3.5" X .75"
27 6 206244 Bolt, Hex Head 1/2-13 x 8 Long
28 2 900183 Elevator Tube, Lower-Long
29 1 204838 Spring, Silver
30 2 904807 Elevator Tube, Upper-Short
31 2 200874 Spacer, Metal .402 I.D. x .50 O.D. x 1.5
32 1 Rim
33 12* 201219 Smart Clip
34 1 Net
35 1 201251 Label, Height Adjustment
36 1 203279 Anti-Skid Tape
37 1 204855 Handle, Left
38 1 204856 Handle, Right
39 2 201683 Spacer, Black, 1.5 Long
40 1 206990 Bracket Reinforcement
41 1 908099 Plate, 4-1/2 x 5"
42 1 203274 Foam, 5 x 5"
43 1 201240 Warning Label
1 FR201240 Warning Label, French
44 1 903601 Rebar
45 2 204159 Rebar Centering Spacer
46 4 205528 Bolt, Hex-Flange 5/16-18 x 1" Long
47 1 204837 Spring, Black
* YOU MAY HAVE EXTRA PARTS WITH THIS MODEL.
Légende Qté No. de réf.
1 1 FR908123 Section de poteau supérieure
2 1 FR918125 Section de poteau centrale
3 1 FR908124 Section de poteau inférieure
4 2 202800 Manchon de fixation au sol
5 1 202801 Capuchon du manchon de fixation au sol
6 1 204832 Support de poteau
7 2 203053 Boulon ordinaire, 5/16-18 x 10 cm (long.)
8 9* 203100 Écrou à bride à 6 pans, 5/16-18
9 4 206360 Boulon, tête à six pans, 3/8-16 x
10
11 4 203063 Contre-écrou, Nylock, six pans, 3/8-16
12 2 204858 Entretoise, plastique
13
14 2 204859 Gaine, ressort
15 1* 203038 Boulon ordinaire, 5/16-18 x 6,9 cm (long.)
16 1 204850 Goupille de blocage
17 1 204853 Cordon spiralé noir
18 1 908152 Tige de réglage de la hauteur
19 1 204872 Étiquette, indication de hauteur
20 2 203103 Boulon ordinaire, 5/16-18 x 5 cm (long.)
21
22 4 202862 Entretoise, D.I. 1,43 cm x 3 cm (long.)
23 4 206311 Entretoise, D.I. 1,34 cm x D.E. 1,65 cm x
24 6 206340 Contre-écrou, 1/2-13
4 203232 Rondelle, métallique, D.E. 1,9 cm
204857 Entretoise métallique, D.E. 1,2 cm x
2
204803
1
Description
6,6 cm (long.)
3,6 cm (long.)
Vis cruciforme
1,2 cm (long.)
Légende
25 2 900846 Support de panneau
26 1 207103 Capuchon, poteau, 8,9 cm x 1,9 cm
27 6 206244 Boulon, 6 pans, 1/2-13 x 20 cm (long.)
28 2 900183 Tube du système élévateur, inférieur, long
29 1 204838 Ressort, Argent
30 2 904807 Tube du système élévateur,
31 2 200874 Entretoise, métallique, D.I. 1 cm x
32
33 12* 201219 Smart Clip
34 1 Filet
35
36
37 1 204855 Poignée gauche
38 1 204856 Poignée droite
39 2 201683 Entretoise, noire, 3,8 cm long.
40 1 206990 Support de renforcement
41 1 908099 Plaque, 11,4 x 12,7 cm
42 1 203274 Mousse, 12,7 cm x 12,7 cm
43 1 201240 Étiquette d'avertissement
44 1 903601 Barre d'armature
45 2 204159 Entretoise de centrage de barre d'armature
46 4 205528 Boulon, six pans 5/16-18 x 7,6 cm (long.)
47 1 204837 Ressort, Noir
Qté No. de réf.
1 Cerceau
201251 Étiquette, réglage de hauteur
1
1 203279 Ruban antidérapant
FR201240
1
Description
supérieur, court
D.E. 1,2 cm x 3,8 cm
Étiquette d'avertissement, français
P/N 21500701 07/05
* IL EST POSSIBLE QUE VOUS AYEZ D'AUTRES PIÈCES AVEC CE
MODÈLE.
8
Page 9

Nr. Anz. Teile-Nr. Beschreibung
1 1 FR908123 Oberes Stangenteil
2 1 FR918125 Mittleres Stangenteil
3 1 FR908124 Unteres Stangenteil
4 2 202800 Bodenmuffe
5 1 202801 Bodenmuffenabdeckung
6 1 204832 Stangenmontageklammer
7 2 203053 Schlossschraube, 5/16-18 x 4 Länge
8 9* 203100 Sechskant-Flanschmutter, 5/16-18
9 4 206360 Sechskantkopfschraube, 3/8-16 x 2-5/8 Länge
10 4 203232 Unterlegscheibe, Metall, 3/4 Zoll AD
11 4 203063 Sechskant-Nylock-Gegenmutter, 3/8-16
12 2 204858 Abstandsstück, rund, Plastik
13 2 204857 Abstandsstück, Metall, 1/2 Zoll AD x
1,44 Zoll Länge
14 2 204859 Federabdeckung
15 1* 203038 Schlossschraube, 5/16-18 x 2-3/4 Länge
16 1 204850 Verriegelungsstift
17 1 204853 Abzugsleine, schwarze Rolle
18 1 908152 Höheneinstellstange
19 1 204872 Höhenanzeigeaufkleber
20 2 203103 Schlossschraube, 5/16-18 x 2 Länge
21 1 204803 Kreuzschlitzschraube
22 4 202862 Abstandsstück, 0,563 ID X 1,190 Länge
23 4 206311 Abstandsstück, 0,53 ID x 0,65 AD x 0,5 Länge
24 6 206340 Gegenmutter, ½-13
Anz. Teile-Nr. Beschreibung
Nr.
25 2 900964 Korbwandklammer
26 1 207103 Stangenkappe, 3,5 Zoll x 0,75 Zoll
27 6 206244 Sechskantkopfschraube, 1/2-13 x 8 Länge
28 2 900183 Unteres langes Verlängerungsrohr
29 1 204838 Feder, Silber
30 2 904807 Oberes kurzes Verlängerungsrohr
31 2 200874 Abstandsstück, Metall, 0,402 ID x 0,50 AD
x 1,5 Länge
32 1 Korbrand
33 12* 201219 Smart Clip
34 1 Netz
35 1 201251 Höhenverstellungsaufkleber
36 1 203279 Fixierband
37 1 204855 Griff, links
38 1 204856 Griff, rechts
39 2 201683 Abstandsstück, schwarz, 1,5 Länge
40 1 206990 Verstärkungshalterung
41 1 908099 Platte, 4-1/2 x 5"
42 1 203274 Schaumstoff, 5 x 5"
43 1 201240 Warnaufkleber
1 FR201240 Warnaufkleber, französisch
44 1 903601 Versteifungsstange
45 2 204159 Versteifungsstangen-Zentrierungsabstandsstück
46 4 205528 Sechskant-Flanschschraube, 5/16-18 x 1" Länge
47 1 204837 Feder, Schwarz
Artículo Cant. Pieza N.º Descripción
1 1 FR908123 Sección superior del poste
2 1 FR918125 Sección media del poste
3 1 FR908124 Sección inferior del poste
4 2 202800 Manga del piso
5 1 202801 Tapa de la manga del piso
6 1 204832 Soporte, montaje del poste
7 2 203053 Perno cabeza de carro, 5/16-18 x 4 de longitud
8 9* 203100 Tuerca, brida hexagonal, 5/16-18
9 4 206360 Perno, cabeza hexagonal, 3/8-16
x 2-5/8 de longitud
10 4 203232 Arandela de metal, ¾" D.E.
11 4 203063 Tuerca, Nylock, cabeza hexagonal, 3/8-16
12 2 204858 Espaciador, oblongo, plástico
13 2 204857 Espaciador, de metal, ½" de D.E.
x 1.44 de largo
204859
14
15
16 1 204850 Perno de fijación
17
18
19 1 204872 Etiqueta, indicadora de altura
20 2 203103 Perno cabeza de carro, 5/16-18 x 2 de longitud
21 1 204803 Tornillo, cabeza Phillips
22
23 4 206311 Espaciador, acero, 0.53 D.I. x 0.65 D.E.
24 6 206340 Contratuerca, 1/2-13
2
1* 203038 Perno cabeza de carro, 5/16-18
204853 Acollador, espiral negro
1
1 908152 Varilla de ajuste de la altura
202862
4
Cubierta, resorte
x 2 -3/4 de longitud
Espaciador 0.563 D.I. x 1.190 de longitud
x 0.5 de longitud
* DIESEM MODELL KÖNNEN ZUSÄTZLICHE TEILE BEIGEPACKT SEIN.
Artículo
25 2 900964 Soporte del tablero
26 1 207103 Tapa, poste, 3.5" X 0.75"
27 6 206244 Perno, cabeza hexagonal 1/2-13
28 2 900183 Tubo elevador, inferior (largo)
29 1 204838 Resorte, Plata
30 2 904807 Tubo elevador, superior (corto)
31 2 200874 Espaciador, metal, 0.402 D.I. x 0.50 D.E. x 1.5
32 1 Borde
33 12* 201219 Sujetador Smart Clip
34 1 Red
35 1 201251 Etiqueta, ajuste de la altura
36 1 203279 Cinta antiderrapante
37 1 204855 Manija izquierda
38 1 204856 Manija derecha
39
40
41 1 908099 Placa, 4-1/2 x 5"
42 1 203274 Espuma, 5 x 5"
43
44 1 903601 Barra de refuerzo
45 2 204159 Separador de centramiento de
46
47 1 204837 Resorte, Negro
Cant. Pieza N.º Descripción
x 8 de longitud
201683
2
1 206990 Soporte de refuerzo
201240 Etiqueta de advertencia
1
FR201240 Etiqueta de advertencia, francés
1
205528
4
Espaciador, negro, 1.5 de longitud
la barra de refuerzo
Perno, brida hexagonal, 5/16-18
x 1" de longitud
* PUEDE HABER PIEZAS ADICIONALES EN ESTE MODELO.
9
07/05 P/N 21500701
Page 10
ELENCO DEI PEZZI - (vedere il foglio di identificazione dei pezzi)
Art. Quantità N. pezzo Descrizione
Quantità N. pezzo Descrizione
Art.
1 1 FR908123 Sezione superiore del palo
2 1 FR918125 Sezione centrale del palo
3 1 FR908124 Sezione inferiore del palo
4 2 202800 Manicotto di fissaggio al suolo
5 1 202801 Cappuccio del manicotto di fissaggio al suolo
6 1 204832 Staffa, montaggio del palo
7 2 203053 Bullone a legno, 5/16-18 x 4 di lunghezza
8 9* 203100 Dado esagonale flangiato da 5/16-18
9 4 206360 Bullone a testa esagonale, 3/8-16
x 2-5/8 di lunghezza
10 4 203232 Rondella di metallo, diam. esterno 3/4"
11 4 203063 Dado Nylock a testa esagonale, 3/8-16
12 2 204858 Distanziatore, biscotto di plastica
13 2 204857 Distanziatore di metallo, diam. esterno 1/2"
x 1,44 di lunghezza
14 2 204859 Cappuccio della molla
15 1* 203038 Bullone a legno, 5/16-18 x 2-3/4 di lunghezza
16 1 204850 Perno di bloccaggio
17 1 204853 Cordoncino nero
18 1 908152 Barra di regolazione dell'altezza
19 1 204872 Etichetta di indicazione dell'altezza
20 2 203103 Bullone a legno, 5/16-18 x 2 di lunghezza
21 1 204803 Vite con intaglio a croce
22 4 202862 Distanziatore, diam. interno 0,563
x 1,190 di lunghezza
23 4 206311 Distanziatore, diam. interno 0,53 x
diam. esterno 0,65 x 0,5 di lunghezza
24 6 206340 Dado di bloccaggio da 1/2-13
25 2 900964 Staffa del tabellone
26 1 207103 Cappuccio del palo, 3,5" x 0,75"
27 6 206244 Bullone esagonale, 1/2-13 x 8 di lunghezza
28 2 900183 Tubo inferiore di regolazione
dell'altezza - Lungo
29 1 204838 Molla, Argento
30 2 904807 Tubo superiore di regolazione
dell'altezza - Corto
31 2 200874 Distanziatore di metallo, diam. interno 0,402
x diam. esterno 0,50 x 1,5 di lunghezza
32 1 Cerchio
33 12* 201219 Smart Clip
34 1 Rete
35 1 201251 Targhetta di regolazione dell'altezza
36 1 203279 Nastro antiscivolo
37 1 204855 Maniglia sinistra
38 1 204856 Maniglia destra
39 2 201683 Distanziatore nero, 1,5 di lunghezza
40 1 206990 Rinforzo della staffa
41 1 908099 Piastra 4/-12 x 5"
42 1 203274 Cuscinetto in espanso, 5/-12 x 5"
43 1 201240 Etichetta di avvertenza
1 FR201240 Etichetta di avvertenza in francese
44 1 903601 Barra di rinforzo
45 2 204159 Distanziatore di centraggio
46 4 205528 Bullone esagonale flangiato, 5/16-18
x 1" di lunghezza
47 1 204837 Molla, Annerire
* CON QUESTO MODELLO POTREBBERO ESSERE STATI
FORNITI ULTERIORI PEZZI.
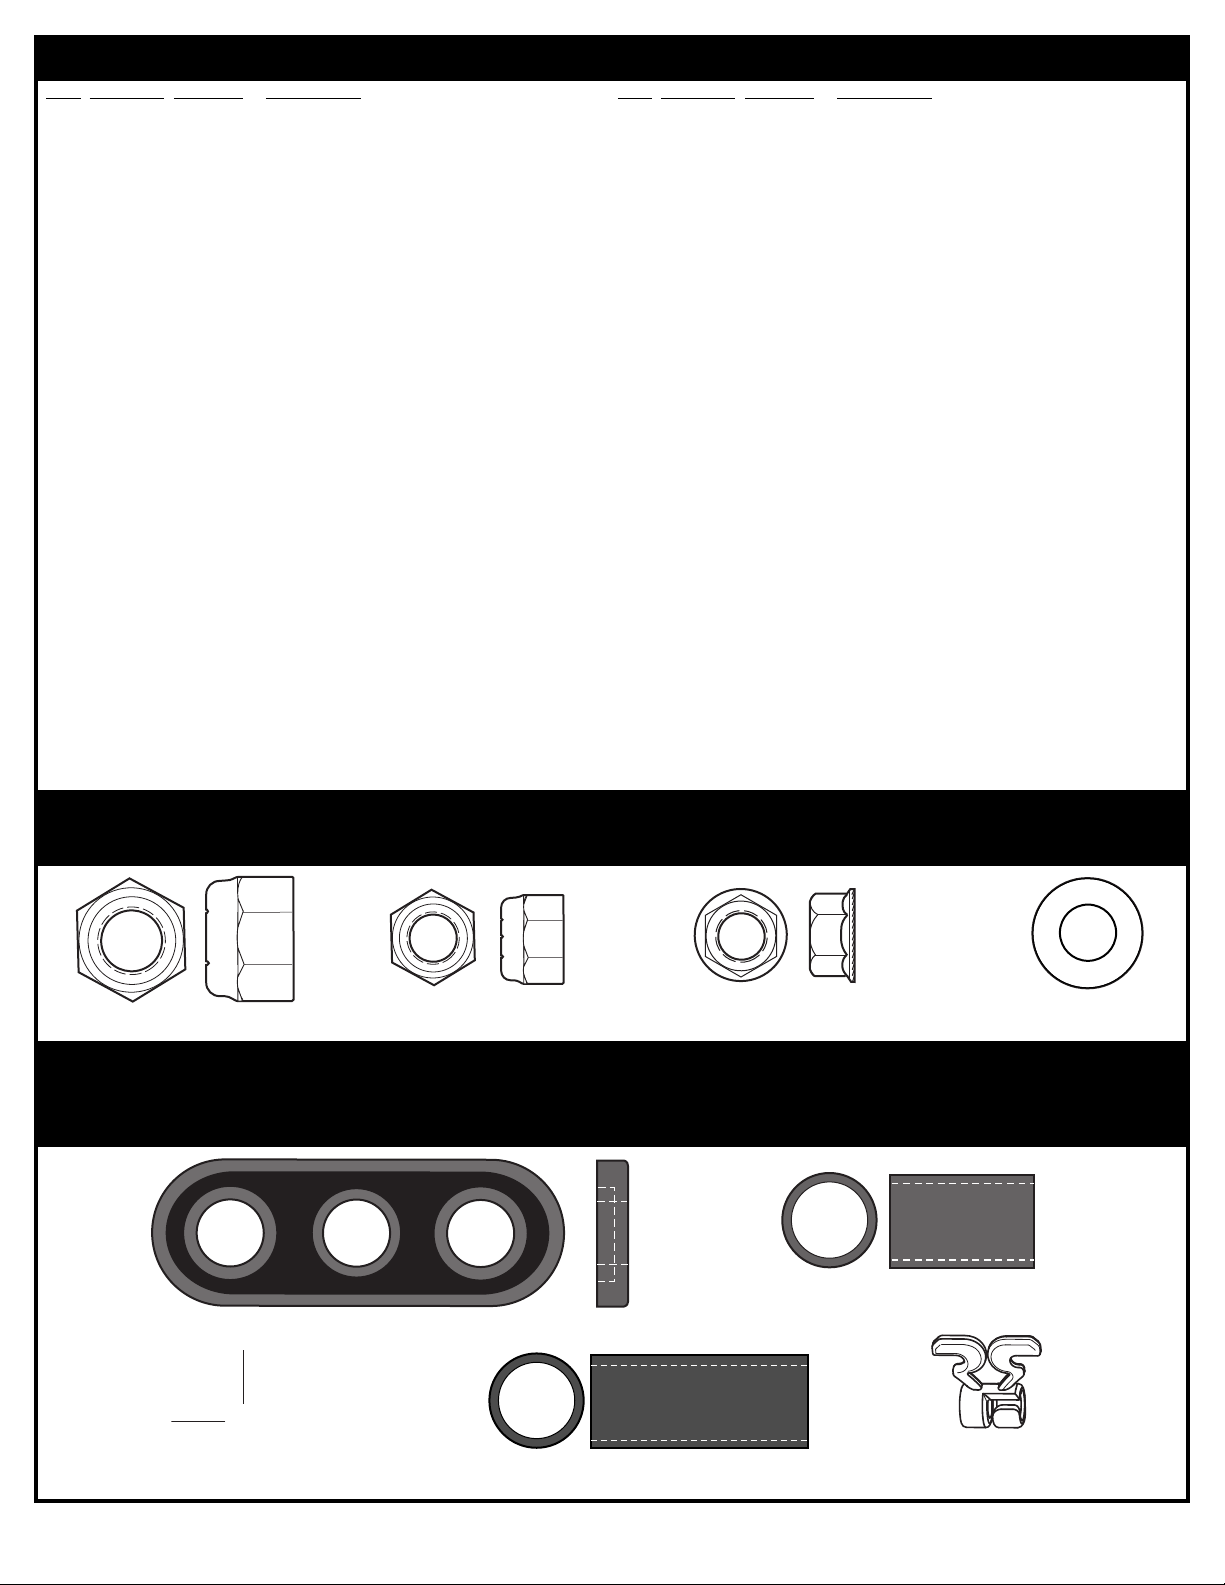
HARDWARE IDENTIFIER (NUTS & WASHERS) / IDENTIFICATION DES PIÈCES (ÉCROUS & RONDELLES) /
BEFESTIGUNGSTEILESCHLÜSSEL (MUTTERN UND UNTERLEGSCHEIBEN) /
IDENTIFICADOR DE HERRAJE (TUERCAS Y ARANDELAS) / FOGLIO DI IDENTIFICAZIONE DEI PEZZI (DADI E RONDELLE)
#24 (6)
HARDWARE IDENTIFIER (PLASTIC SPACERS & CLIPS) / IDENTIFICATION DES PIÈCES (ENTRETOISES & PINCES EN PLASTIQUE) /
BEFESTIGUNGSTEILESCHLÜSSEL (ABSTANDSSTÜCKE UND CLIPS AUS KUNSTSTOFF) /
(SEPARADORES Y SUJETADORES DE PLÁSTICO) / FOGLIO DI IDENTIFICAZIONE DEI PEZZI (DISTANZIATORI E FERMAGLI IN
#11 (4)
PLASTICA)
#8 (9)*
#10 (4)
IDENTIFICADORES DE HERRAJE
#22 (4)
P/N 21500701 07/05
#23 (4)
#12 (2)
#39 (2)
10
#33 (12)*
Page 11
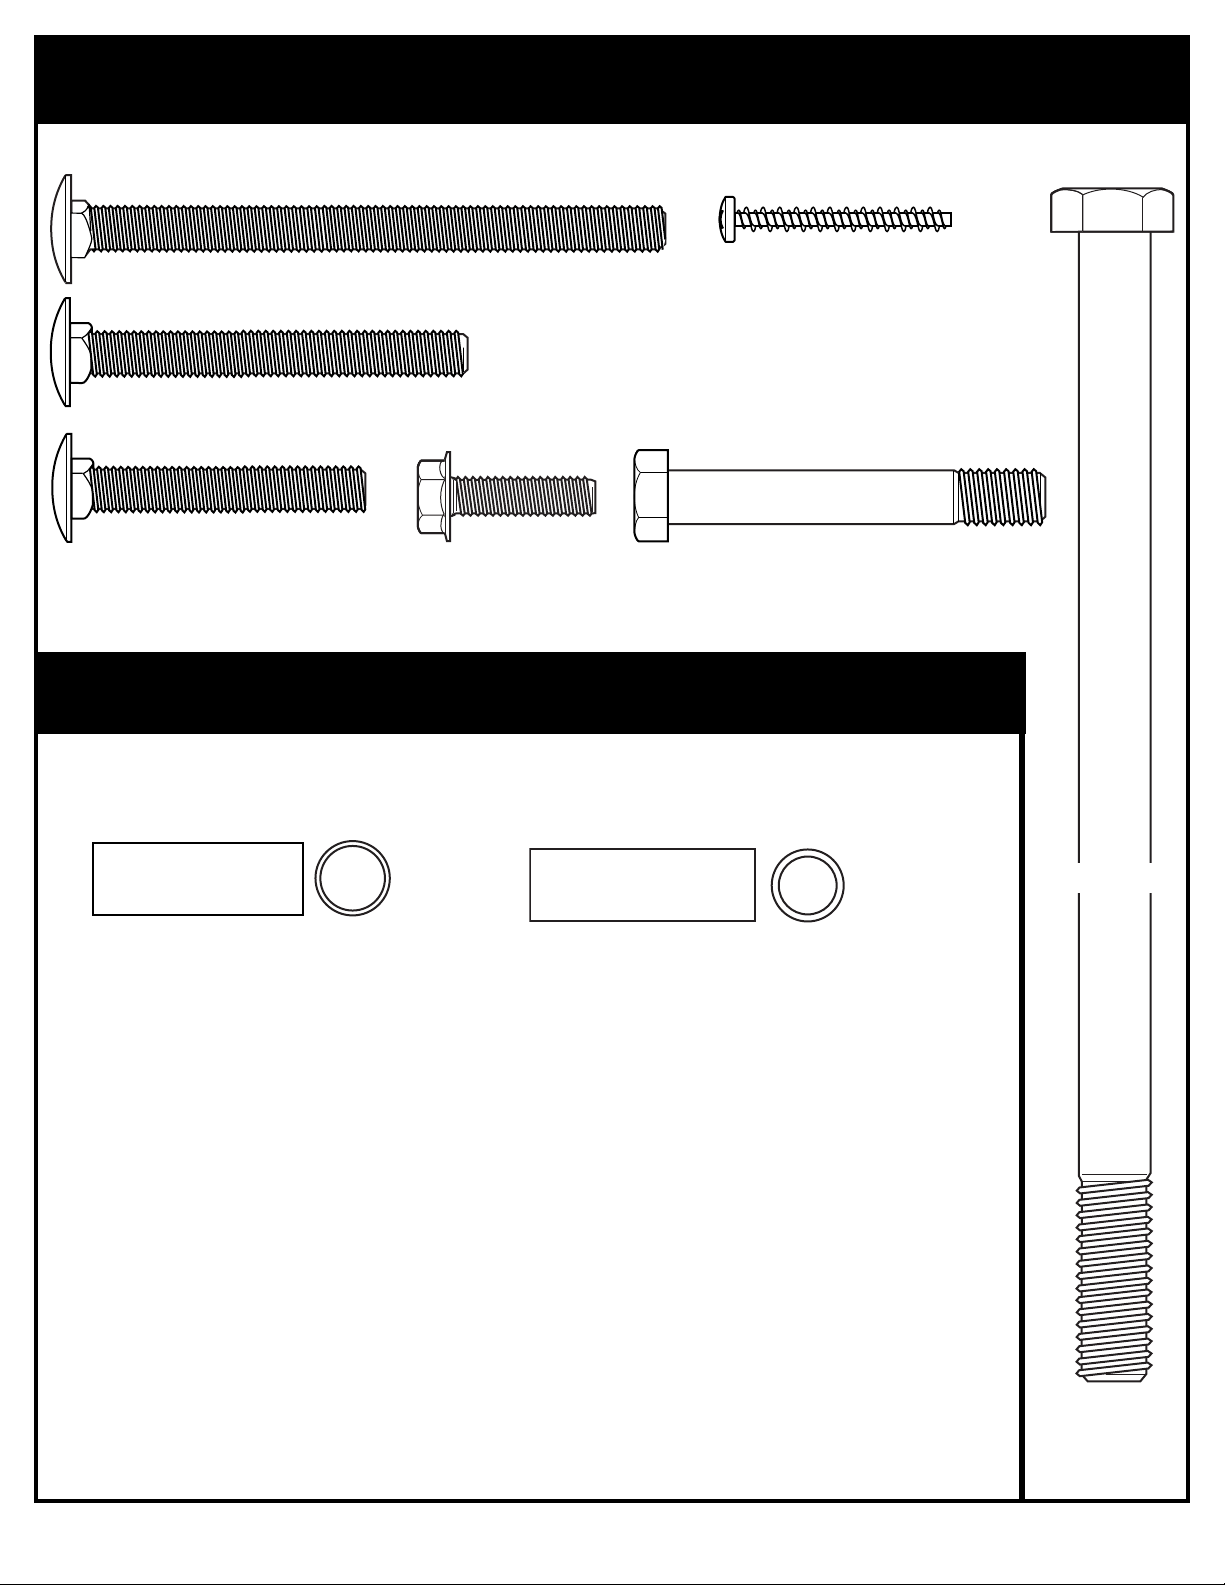
HARDWARE IDENTIFIER (BOLTS & SCREWS) / IDENTIFICATION DES PIÈCES (BOULONS & VIS) /
EFESTIGUNGSTEILESCHLÜSSEL (BOLZEN UND SCHRAUBEN) / IDENTIFICADOR DE HERRAJE (PERNOS Y TORNILLOS) / FOGLIO
B
DI IDENTIFICAZIONE DEI PEZZI (BULLONI E VITI)
#7 (2)
#21 (1)
#15 (1)*
#20 (2)
#46 (4)
HARDWARE IDENTIFIER (METAL SPACERS) / IDENTIFICATION DES PIÈCES / (ENTRETOISES EN ACIER)
BEFESTIGUNGSTEILESCHLÜSSEL (ABSTANDSSTÜCKE AUS METALL) / IDENTIFICADOR DE HERRAJE
(SEPARADORES DE METAL) / FOGLIO DI IDENTIFICAZIONE DEI PEZZI (DISTANZIATORI IN METALLO)
#9 (4)
#13 (2)
#27 (6)
#31 (2)
* You may have extra parts with this model.
* Des pièces supplémentaires sont peut-être fournies avec ce modèle.
* Diesem Modell können zusätzliche Teile beigepackt sein.
* Puede haber piezas adicionales en este modelo.
* Con questo modello potrebbero essere stati forniti ulteriori pezzi.
11
07/05 P/N 21500701
Page 12

SECTION A: ASSEMBLE THE POLE
C
ONCRETE
SECTION A : ASSEMBLAGE DU POTEAU
BAUABSCHNITT A: ZUSAMMENBAU DER STANGE
SECCIÓN A: MONTAJE DEL POSTE
S
EZIONE A - MONTAGGIO DEL PALO
This is what your system will look like when you’ve finished this section:
Voici à quoi ressemblera votre système lorsque vous en aurez fini avec cette
ection.
s
So sieht das System aus, wenn Sie mit diesem Bauabschnitt fertig sind.
Así es como se verá su sistema cuando haya terminado esta sección.
Una volta finita questa sezione, il sistema avrà l'aspetto illustrato qui accanto.
TOOLS REQUIRED FOR THIS SECTION / OUTILS REQUIS POUR CETTE SECTION / FÜR DIESEN BAUABSCHNITT BENÖTIGTES
WERKZEUG / HERRAMIENTAS REQUERIDAS PARA ESTA SECCIÓN / ATTREZZI NECESSARI PER QUESTA SEZIONE
(2) 1/2” and (2) 9/16" Wrenches
Shovel and Post Hole
Digger
Pelle et bêche tarière
Schaufel und
Erdlochbohrer
Pala y excavador del
orificio para el poste
Badile e piantapali
Carpenter's Level
Niveau à bulle
Wasserwaage
Nivel de
carpinteroLivella a bolla
Tape
Ruban
Klebeband
Cinta adhesiva
Nastro
Phillips-Head Screwdriver
Tournevis cruciforme
Kreuzschlitzschraubenziehe
Destornillador Phillips
Cacciavite a stella
(2) ½- und (2) 9/16-Zoll-Schraubenschlüssel
BÉTON
BETON
CONCRETO
CALCESTRUZZO
Container to Mix
Récipient pour mélanger
Behälter zum Mischen
Recipiente para mezclar
Contenitore per miscelare
(2) clés 1/2" et (2) clés 9/16"
(2) Llaves de 1/2", y (2) de 9/16"
Due (2) chiavi da 1/2" e (2) da 9/16"
AND/OR
ET/OU
UND/ODER
Y/O
E/O
(2) Socket Wrenches and Sockets
(2) clés à douille et douilles
(2) Steckschlüssel und Einsätze
(2) Llaves de tuercas de boca tubular y
casquillos de
Due (2) chiavi a bussola e bussole
Mark pole sections with tape (not supplied) at indicated
distances from ends as shown.
1.
Placez des repères sur les sections de poteau avec du
ruban adhésif (non fourni) aux distances indiquées,
comme illustré.
Die Stangenteile an den zur Angabe der Entfernung vom
Stangenende markierten Stellen wie gezeigt mit
Klebeband (nicht im Lieferumfang enthalten) umwickeln.
Marque con cinta las secciones del poste (no se
suministran) a las distancias indicadas de los extremos,
como se muestra.
Con del nastro (non fornito) contrassegnare le sezioni di
palo alle distanze indicate, come mostrato.
P/N 21500701 07/05
12
1/2”
1
TOP / SUPÉRIEURE / OBEN / SUPERIOR / SEZIONE SUPERIORE
2
MIDDLE / CENTRALE / MITTE / MEDIA / SEZIONE INTERMEDIA
Tape (Not Supplied) / Ruban adhésif (non fourni) /
Klebeband (nicht im Lieferumfang enthalten) /
Cinta (No se suministra) / Nastro (non fornito)
BOTTOM / INFÉRIEURE / UNTEN / SECCIÓN
INFERIOR / SEZIONE INFERIORE
9/16”
3
Page 13

18" (42.7 cm)
6" (15.2 cm)
24" (61 cm)
Ensure ground is level with playing surface, then dig pole hole.
ssurez-vous que le sol est au niveau de la surface de jeu, puis creusez le trou pour le poteau.
A
2.
Sicherstellen, dass der Boden auf gleicher Höhe mit der Spielfläche ist und ein Loch für die Stange graben.
Asegúrese de que el piso esté nivelado con la superficie de juego y luego haga el orificio para el poste.
Verificare che il suolo sia allo stesso piano della superficie di gioco, quindi scavare la buca per il palo.
IMPORTANT!:
IMPORTANT !
WICHTIG!
¡IMPORTANTE!:
WARNING!
AVERTISSEMENT !
ACHTUNG!
¡ADVERTENCIA!
AVVERTENZA!
Maximum distance from edge of hole to edge of
"Important !: Distance maximum du bord du trou
au bord de la surface de jeu : 15,2 cm."
"Wichtig!: Der maximale Abstand vom Rand des
Lochs zum Rand der Spielfläche beträgt 15,2 cm
IMPORTANTE!
playing surface 6”
(15.2 cm).
(6")."
CONTACT UTILITIES BEFORE DIGGING.
CONTACTEZ LES RÉSEAUX LOCAUX (GAZ,
ÉLECTRICITÉ...) AVANT DE CREUSER.
VOR DEM GRABEN ENTSPRECHENDE
INFORMATIONEN VON DEN ZUSTÄNDIGEN
VERSORGUNGSWERKEN EINHOLEN.
COMUNÍQUESE CON LAS COMPAÑÍAS DE
SERVICIO ANTES DE EXCAVAR.
PRIMA DI PROCEDERE ALLO SCAVO,
CONTATTARE LE AZIENDE DI UTENZA.
GROUND SURFACE
SURFACE DU SOL
BODENFLÄCHE
SUPERFICIE DEL PISO
SUPERFICIE DEL SUOLO
"¡Importante!: La distancia máxima desde el
borde del orificio hasta el borde de la superficie
de juego debe ser de 6"
(15.2 cm)."
La distanza massima tra il margine della buca al
bordo della superficie di gioco è di 15,2 cm (6").
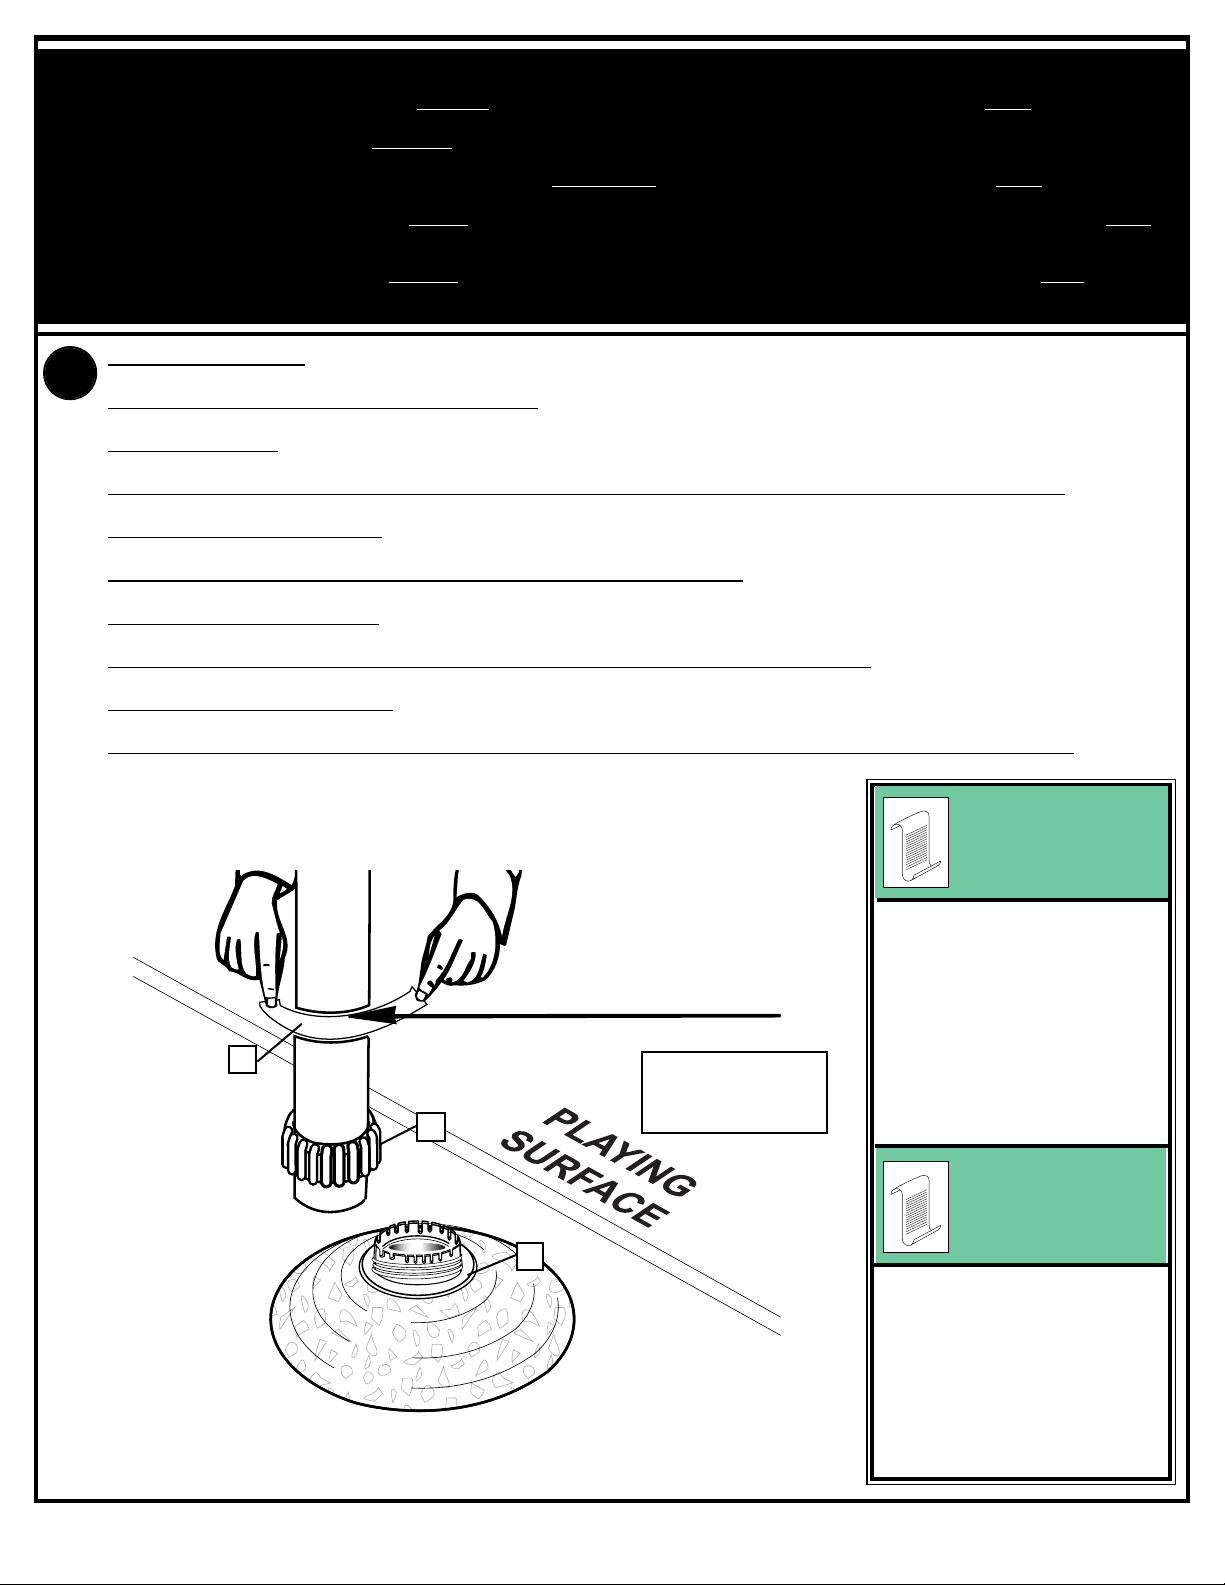
PLAYING SURFACE
SURFACE DE JEU
SPIELFLÄCHE
SUPERFICIE DE JUEGO
SUPERFICIE DI GIOCO
13
07/05 P/N 21500701
Page 14

Snap two halves of ground sleeve (4) together.
3.
Insert and secure bottom pole section (3) into ground sleeve (4) by tightening ground sleeve cap (5).
NOTE: Flared end goes inside ground sleeve.
Enclenchez les deux moitiés du manchon de fixation au sol (4) l'une dans l'autre.
Insérez et fixez la section de poteau inférieure (3) dans le manchon de fixation au sol (4) en serrant le capuchon du
manchon de fixation au sol (5).
REMARQUE : L'extrémité évasée rentre dans le manchon de fixation au sol.
Die beiden Hälften der Bodenmuffe (4) zusammendrücken, bis sie ineinander einrasten.
Das untere Stangenteil (3) in die Bodenmuffe (4) stecken und durch Festdrehen der Bodenmuffenabdeckung (5) gut
sichern.
HINWEIS: Das konisch erweiterte Ende wird in die Bodenmuffe gesteckt.
Conecte las dos mitades de la manga del piso (4).
Introduzca y fije la sección inferior del poste (3) en la manga del piso (4) apretando la tapa de la manga del piso (5).
NOTA: El extremo abocinado debe quedar dentro de la manga del piso.
Far scattare l'una control l'altra le due metà del manicotto (4) di fissaggio al suolo. Inserire la sezione inferiore (3) del
palo nel manicotto (4) e fissarvelo serrando il cappuccio (5) del manicotto stesso.
NOTA - L'estremità svasata va nel manicotto.
4
3
5
P/N 21500701 07/05
4
14
Page 15
1" (2.54 cm)
1" (2.54 cm)
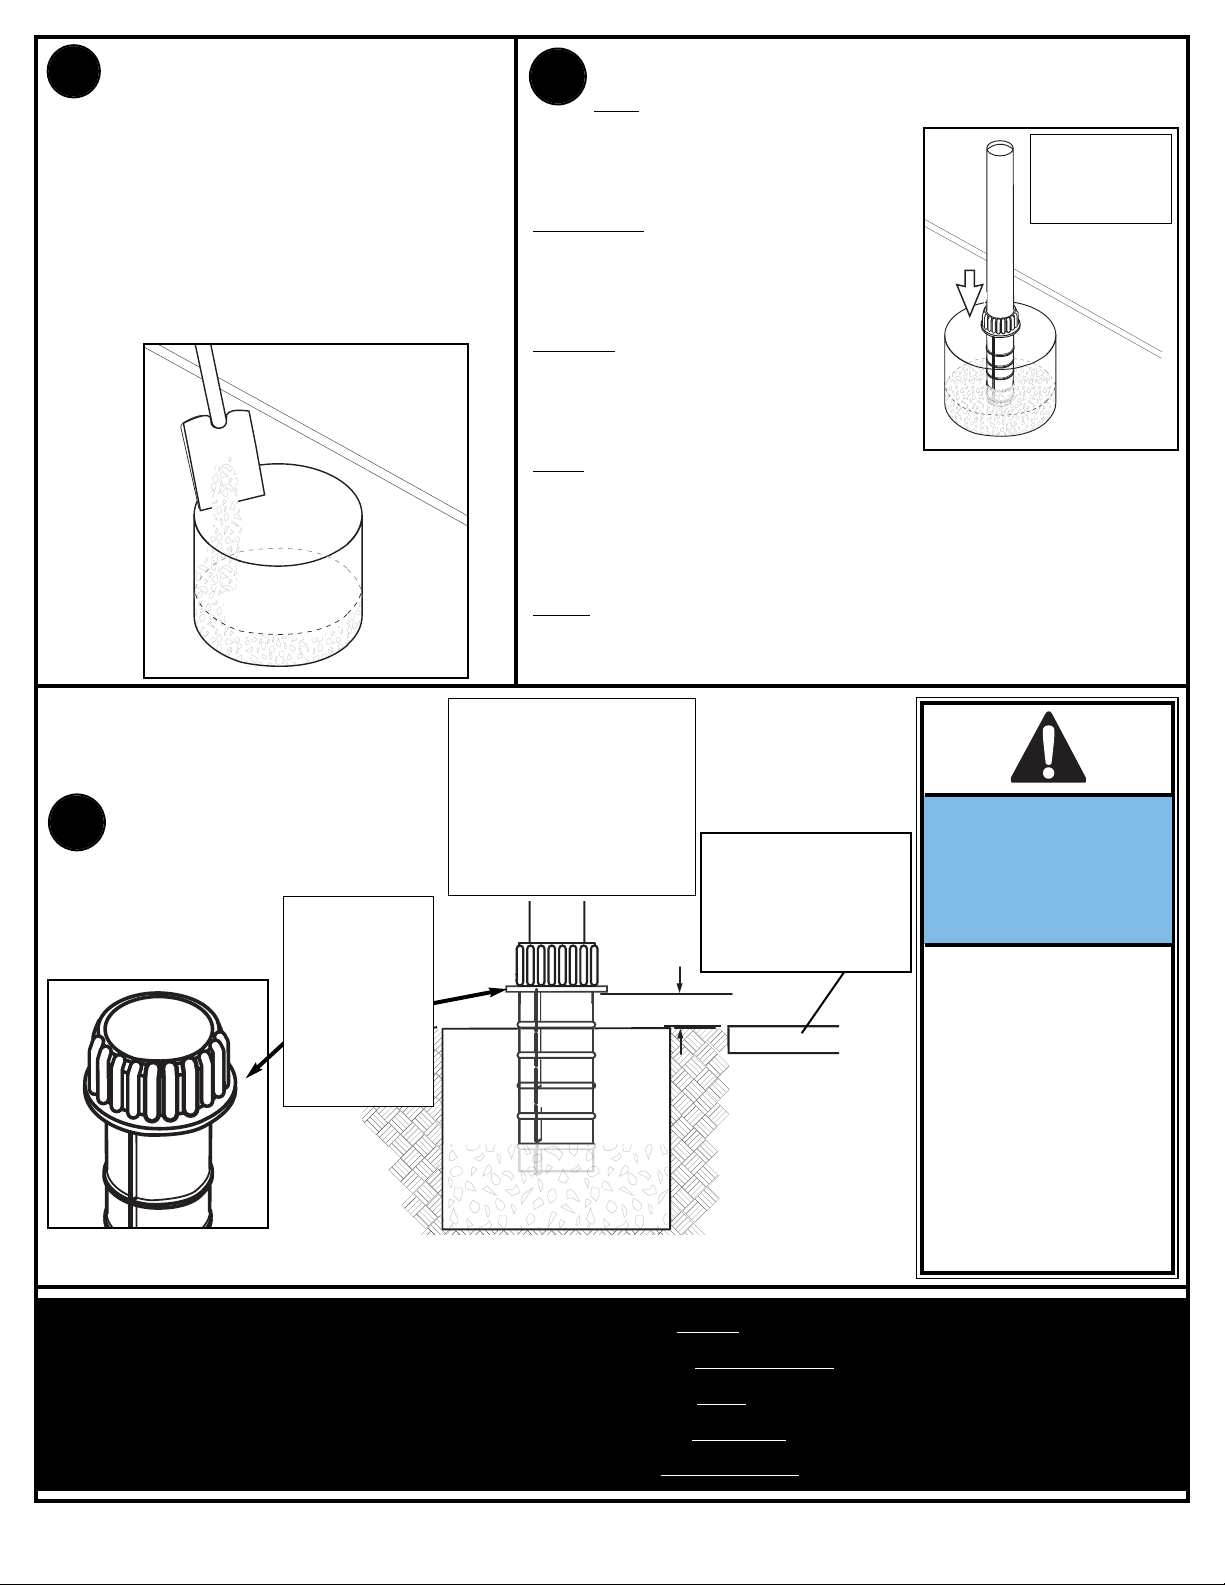
Fill hole approximately 1/3 full with mixed
4.
concrete.
Remplissez le trou de béton, au tiers environ.
Insert ground sleeve assembly and
5A.
exposed for drainage hill.
center in hole (FIG. A).
Note: Leave 1" below flange
Das Loch zu etwa 1/3 mit gemischtem Beton füllen.
Llene aproximadamente una tercera parte del
orificio con concreto mezclado.
Riempire la buca per circa un terzo di miscela di
calcestruzzo.
VUE DE CÔTÉ
SEITENANSICHT
5B.
VISTA LATERAL
VISTA LATERALE
FLANGE
BRIDE
FLANSCH
BRIDA
FLANGIA
Insérez le manchon de fixation au sol en
le centrant dans le trou (FIG. A).
Remarque :
la bride pour la butte de drainage.
Die Bodenmuffenbaugruppe in das Loch
stecken und darin zentrieren (ABB. A).
Hinweis:
für einen Entwässerungshügel frei lassen.
Introduzca y centre el conjunto de la
manga del piso en el orificio (FIG. A).
Nota:
expuesta para la pendiente de drenaje.
Inserire il gruppo del manicotto di
fissaggio al suolo, centrandolo nella buca
(FIG. A).
Nota -
di tubo al di sotto della flangia, per la
pendenza di drenaggio.
Laissez 2,5 cm exposés sous
Unter dem Flansch ca. 2,5 cm
Deje 1" debajo de la pestaña
Lasciare esposti circa 2,5 cm (1")
SIDE VIEW
PLAYING SURFACE
SURFACE DE JEU
SPIELFLÄCHE
SUPERFICIE DE JUEGO
SUPERFICIE DI GIOCO
FIG. A
(ABB. A).
IMPORTANT!:
IMPORTANT !
WICHTIG!
¡IMPORTANTE!:
IMPORTANTE!
NOTE POSITION OF
FLANGE
NOTEZ LA POSITION DE
LA BRIDE
FLANSCHPOSITION
BEACHTEN
IMPORTANT!:
IMPORTANT ! :
WICHTIG!
GLEICH MIT DEM NÄCHSTEN SCHRITT FORTFAHREN.
¡IMPORTANTE!:
IMPORTANTE!:
NOTE LA POSICIÓN DE
LA BRIDA
OSSERVARE LA
POSIZIONE DELLA
FLANGIA.
CONTINUE ON TO NEXT STEP.
PASSEZ À L'ÉTAPE SUIVANTE.
CONTINÚE CON EL SIGUIENTE PASO.
PASSARE SUBITO AL PROSSIMO PUNTO. NON ATTENDERE CHE IL CALCESTRUZZO SI INDURISCA.
DO NOT
15
WAIT FOR CONCRETE TO CURE.
N'ATTENDEZ PAS
WARTEN, BIS DER BETON GETROCKNET IST.
NICHT
NO ESPERE
LA PRISE DU BÉTON.
A QUE EL CONCRETO ENDUREZCA.
07/05 P/N 21500701
Page 16
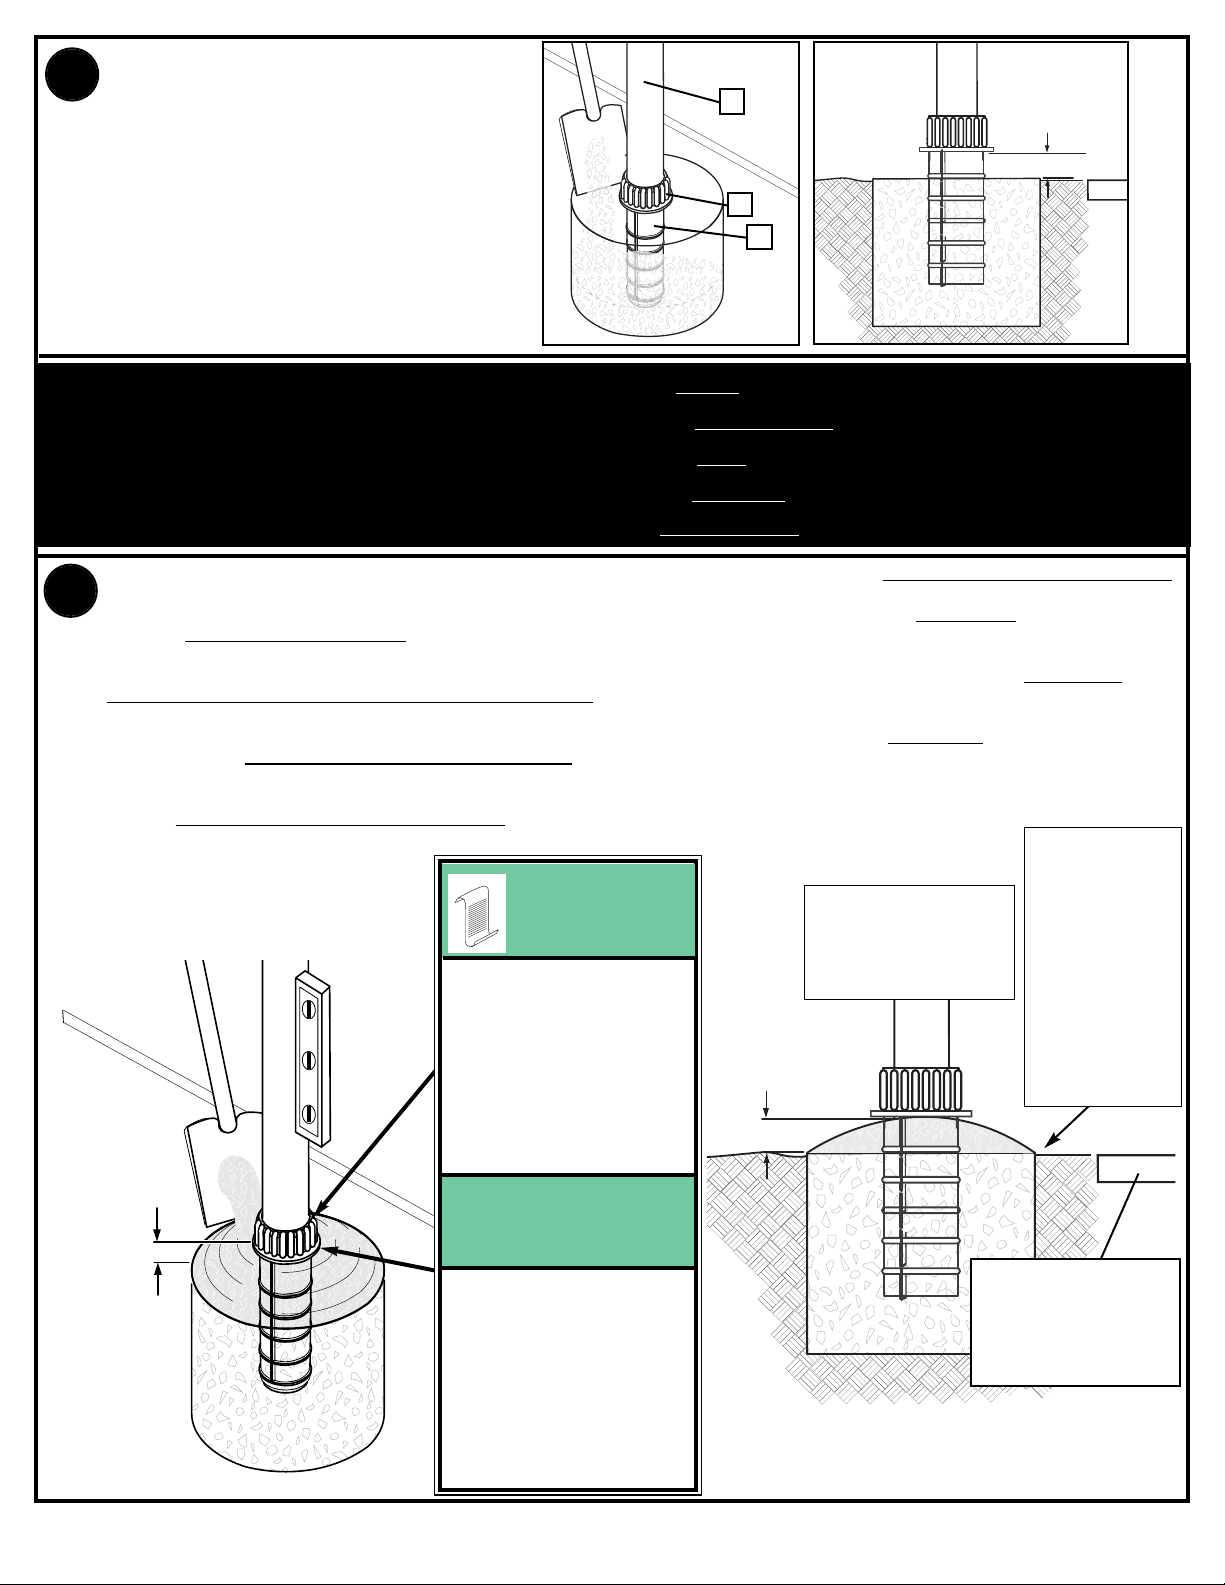
Fill hole completely with concrete.
1" (2.54 cm)
1" (2.54 cm)
1" (2.54 cm)
1" (2.54 cm)
6.
Remplissez complètement le trou de
béton.
Das Loch vollständig mit Beton füllen.
Llene el orificio completamente con
concreto.
Riempire completamente la buca di
calcestruzzo.
IMPORTANT!: CONTINUE ON TO NEXT STEP. DO NOT WAIT FOR CONCRETE TO CURE.
IMPORTANT ! :PASSEZ À L'ÉTAPE SUIVANTE. N'ATTENDEZ PAS LA PRISE DU BÉTON.
WICHTIG!GLEICH MIT DEM NÄCHSTEN SCHRITT FORTFAHREN. NICHT WARTEN, BIS DER BETON GETROCKNET IST.
¡IMPORTANTE!:CONTINÚE CON EL SIGUIENTE PASO. NO ESPERE A QUE EL CONCRETO ENDUREZCA.
IMPORTANTE!:PASSARE SUBITO AL PROSSIMO PUNTO. NON ATTENDERE CHE IL CALCESTRUZZO SI INDURISCA.
Tamp down concrete to release air pockets and build drainage hill. Level pole section in all directions several times while concrete is curing.
3
5
4
7.
Tassez le béton pour éliminer les poches d'air et formez une butte de drainage. Mettez le poteau à niveau plusieurs fois dans toutes les
directions pendant le séchage du béton
.
Den Beton feststampfen, um Lufteinschlüsse zu beseitigen, und ein Gefälle zur Wasserableitung bilden. Das Stangenteil während des
Trocknens des Betons mehrmals in alle Richtungen begradigen.
Apisone el concreto para eliminar las bolsas de aire y construya una pendiente para el drenaje. Nivele varias veces la sección del poste en
todas direcciones mientras el concreto se está endureciendo.
Pressare il calcestruzzo in modo da eliminare eventuali bolle d'aria e creare la pendenza di drenaggio. Livellare la sezione di palo in tutte le
direzioni più volte mentre il calcestruzzo si indurisce.
NOTE A
REMARQUE A
HINWEIS A
NOTA A:
NOTA A
Make a reference mark here for anti-skid
Marquez ce point en prévision de
l'application de ruban adhésif.
Hier eine Bezugsmarkierung für das
Haga una marca de referencia aquí para la
Lasciare qui un contrassegno di riferimento,
Keep flange pushed down to concrete and
Maintenez la bride enfoncée jusqu'au béton
Den Flansch am Beton angedrückt lassen
Mantenga la brida presionada hacia el
Tenere la flangia premuta verso il basso sul
calcestruzzo, e ben livellata.
tape.
Fixierband anbringen.
cinta antiderrapante.
per il nastro antiscivolo.
NOTE B
REMARQUE B
HINWEIS B
NOTA B:
NOTA B
leveled.
et à niveau.
und nivellieren.
concreto y nivelada.
SIDE VIEW
VUE DE CÔTÉ
SEITENANSICHT
VISTA LATERAL
VISTA LATERALE
DRAINAGE HILL
INCLINAISON DE
DRAINAGE
GEFÄLLE ZUR
WASSERABLEITUN
PENDIENTE DE
DRENAJE
PENDENZA DI
DRENAGGIO
PLAYING SURFACE
SURFACE DE JEU
SPIELFLÄCHE
SUPERFICIE DE JUEGO
SUPERFICIE DI GIOCO
P/N 21500701 07/05
16
Page 17
IMPORTANT!: WAIT A MINIMUM OF 24 HOURS BEFORE GOING ON TO NEXT STEP. CONCRETE MUST CURE.
IMPORTANT ! :ATTENDEZ AU MOINS 24 HEURES AVANT DE PASSER À L'ÉTAPE SUIVANTE. LE BÉTON DOIT FINIR DE PRENDRE.
WICHTIG!VOR DEM NÄCHSTEN ARBEITSSCHRITT MINDESTENS 24 STUNDEN LANG WARTEN. DER BETON MUSS TROCKNEN.
¡IMPORTANTE!:ESPERE UN MÍNIMO DE 24 HORAS ANTES DE CONTINUAR CON EL PASO SIGUIENTE. EL CONCRETO DEBE
ENDURECERSE.
IMPORTANTE!: ATTENDERE ALMENO 24 ORE PRIMA DI PASSARE AL PUNTO SUCCESSIVO. IL CALCESTRUZZO DEVE INDURIRSI.
After concrete has cured, remove bottom pole section from ground sleeve (4). Place anti-skid tape (6) around the bottom area of
8.
bottom pole (see note A).
KEEP GROUND SLEEVE CAP ON BOTTOM POLE.
Une fois le béton sec, retirez la section de poteau inférieure du manchon de fixation au sol (4). Placez du ruban antidérapant (36)
autour de la base du poteau (cf. remarque A).
MAINTENEZ LE CAPUCHON DU MANCHON DE FIXATION AU SOL SUR LA SECTION DE POTEAU INFÉRIEURE.
Nachdem der Beton getrocknet ist, das untere Stangenteil aus der Bodenmuffe (4) herausziehen. Fixierband (36) um das untere
Ende der unteren Stange wickeln (siehe Hinweis A).
DIE BODENMUFFENABDECKUNG AUF DER UNTEREN STANGE LASSEN.
Cuando se endurezca el concreto, separe la sección inferior del poste de la manga del piso (4). Coloque la cinta antiderrapante (36)
alrededor del área inferior de la sección inferior del poste (vea la nota A).
MANTENGA LA TAPA DE LA MANGA DEL PISO EN LA SECCIÓN INFERIOR DEL POSTE.
Dopo l'indurimento del calcestruzzo, rimuovere dal manicotto (4) di fissaggio al suolo la sezione inferiore del palo. Applicare il nastro
antiscivolo (6) attorno alla parte più bassa della sezione inferiore del palo (vedere la Nota A).
LASCIARE SULLA SEZIONE INFERIORE DEL PALO IL CAPPUCCIO DEL MANICOTTO DI FISSAGGIO AL SUOLO.
NOTE A
REMARQUE A
HINWEIS A
NOTA A:
NOTA A
36
Place top edge of anti-skid tape on mark
antidérapant sur le repère posé à l'étape 7.
Die obere Kante des Fixierbands auf der in
Schritt 7 angebrachten Markierung ankleben.
Coloque el borde superior de la cinta
antiderrapante en la marca que hizo en el
SURFACE DE JEU
SPIELFLÄCHE
SUPERFICIE DE JUEGO
5
SUPERFICIE DI GIOCO
Appoggiare il bordo superiore del nastro
antiscivolo sul contrassegno lasciato al punto
4
Tape prevents the pole from rotating during
Le ruban empêche la rotation du poteau
Das Fixierband verhindert, dass sich die
Stange während des Spielbetriebs dreht.
La cinta evita que el poste gire durante el
Il nastro impedisce che il palo ruoti quando si
made in step 7.
Placez le bord supérieur du ruban
paso 7.
7.
NOTE B
REMARQUE B
HINWEIS B
NOTA B:
NOTA B
play.
durant le jeu.
juego.
gioca.
17
07/05 P/N 21500701
Page 18
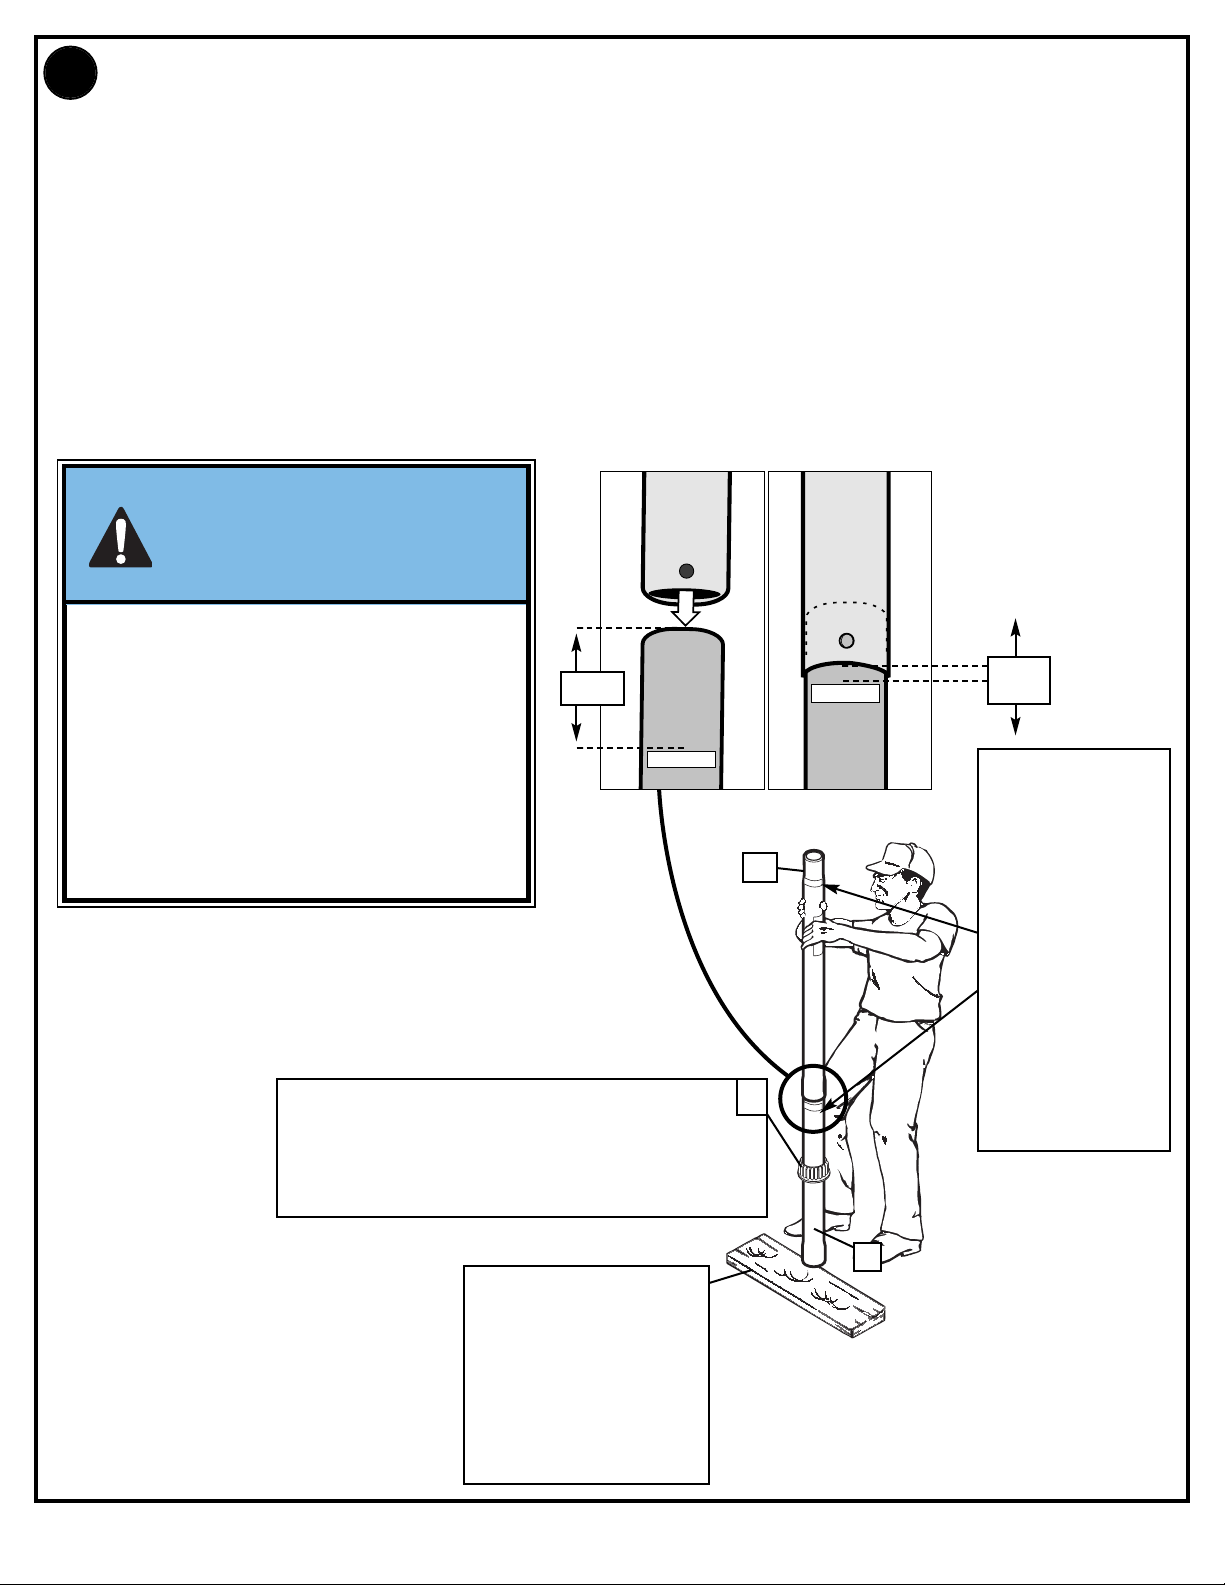
Stack and bounce bottom (3) and middle (2) pole sections together. Bounce pole sections together until middle
9.
section no longer moves toward taped reference mark on bottom pole.
Empilez et entrechoquez les sections de poteau centrale (2) et inférieure (3). Entrechoquez-les jusqu'à ce que la
section centrale ne bouge plus vers la marque de référence (ruban) de la section inférieure.
Das untere (3) und mittlere Stangenteil (2) aufeinander stellen und zusammenstauchen. Die Stangenteile
zusammenstauchen, bis sich die mittlere Stange nicht mehr auf die mit Klebeband markierte Stelle auf dem unteren
tangenteil zu bewegt.
S
Apile y golpee entre sí las secciones inferior (3) y media (2) del poste. Golpee entre sí las secciones del poste hasta
que la sección media ya no se mueva hacia la marca de referencia con cinta que se encuentra en la sección inferior
del poste.
Mettere insieme la sezione inferiore (3) e quella centrale (2) del palo, facendole oscillare l'una contro l'altra finché
quella centrale non si sposta più verso il contrassegno apposto con il nastro sulla sezione inferiore.
IMPORTANT!
IMPORTANT!
WICHTIG!
¡IMPORTANTE!
IMPORTANTE!
POLE SECTIONS SHOULD HAVE A 3-1/2" (9 CM) MINIMUM
OVERLAP.
LES SECTIONS DE POTEAU DOIVENT SE CHEVAUCHER
DE 9 CM MINIMUM.
5"
(12.7 cm)
1-1/2"
(3.81 cm)
LAS SECCIONES DEL POSTE SE DEBEN TRASLAPAR UN
MÍNIMO DE 3-1/2" (9 CM).
DIE STANGENTEILE MÜSSEN EINANDER UM
MINDESTENS 9 CM (3 ½ ZOLL) ÜBERLAPPEN.
LE SEZIONI DI PALO DEVONO SOVRAPPORSI DI ALMENO
9 CM (3-1/2").
IMPORTANT: Keep on Bottom Pole 5
IMPORTANT: Maintenez sur la section de poteau inférieure
WICHTIG: Am unteren Stangenteil lassen
IMPORTANTE: Mantenga en la sección inferior del poste
IMPORTANTE! Lasciare sulla sezione inferiore del palo.
Chute de bois (NON FOURNIE)
LIEFERUMFANG ENTHALTEN)
Tavoletta di legno (NON FORNITA)
Wood Scrap
(NOT SUPPLIED)
Holzstück (NICHT IM
Trozo de madera (NO SE
SUMINISTRA)
Taped reference marks
2
Repères marqués d'un
ruban adhésif
Mit Klebeband
gekennzeichnete
Bezugsmarkierungen
Marcas de cinta de
referencia
Contrassegni apposti
con il nastro
3
P/N 21500701 07/05
18
Page 19
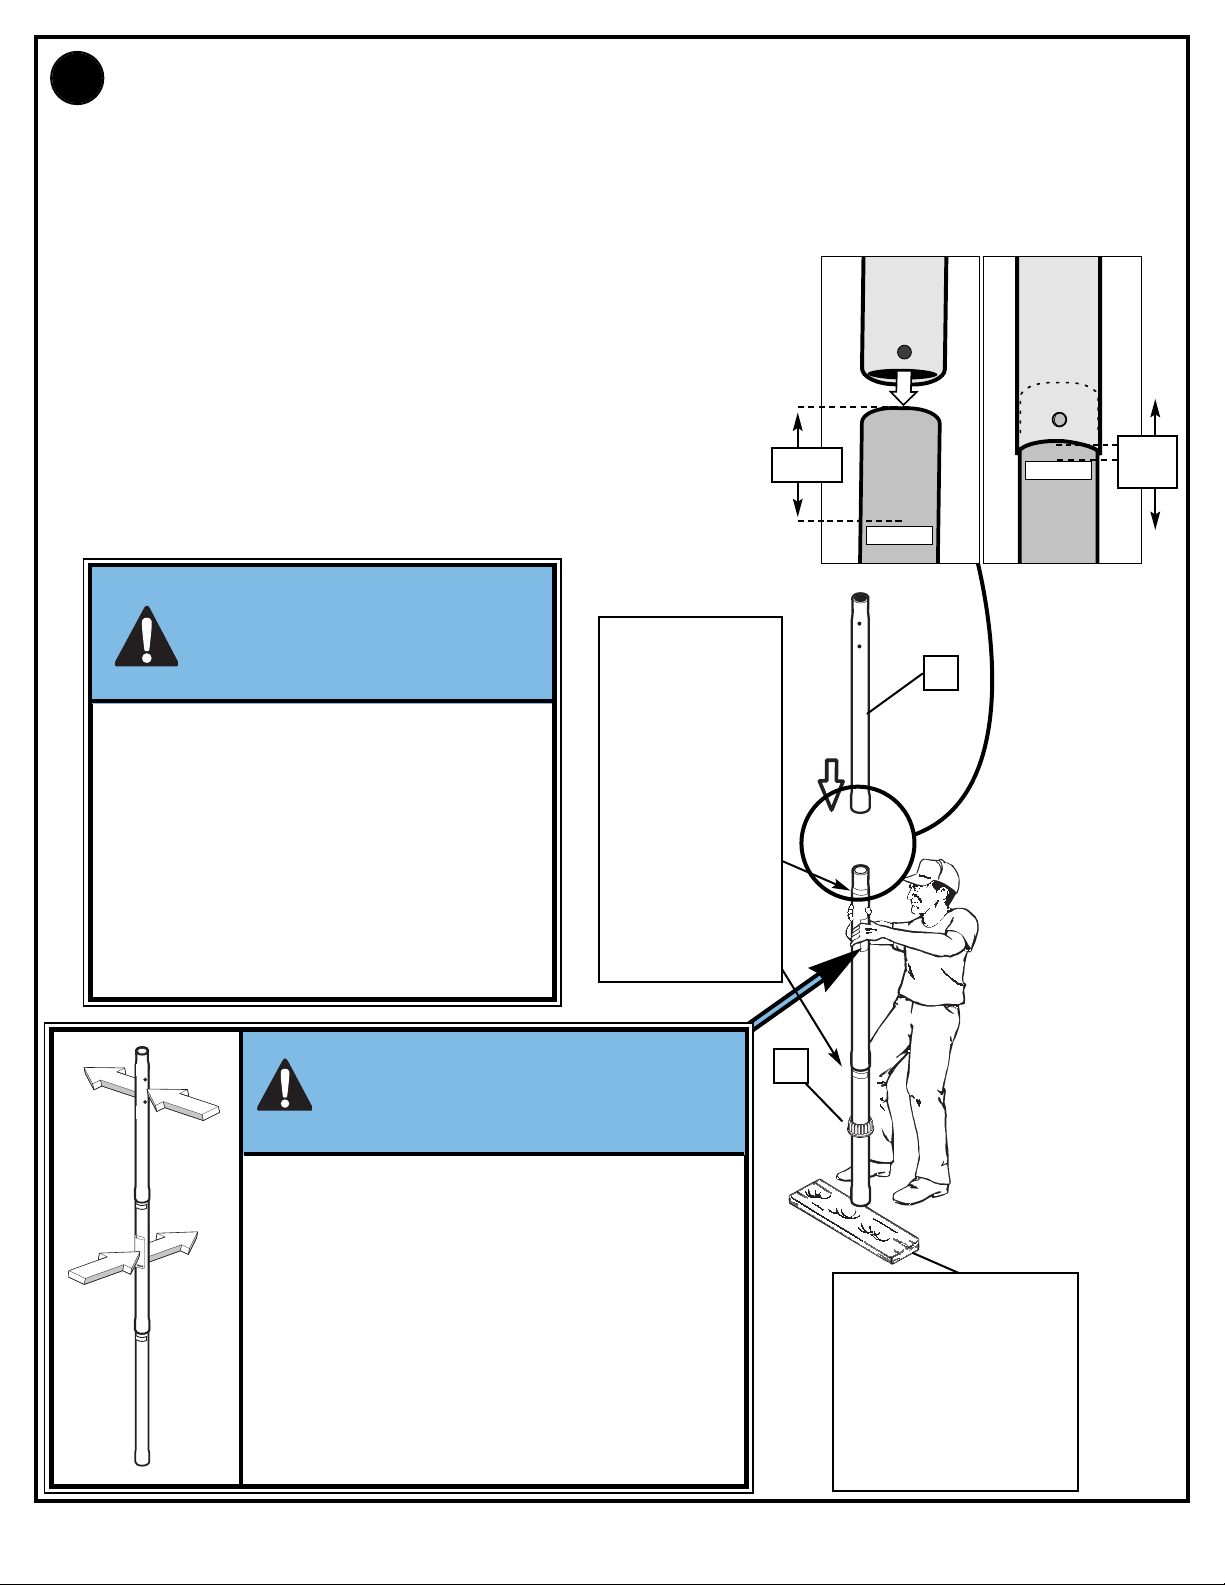
10.
W
A
R
N
I
N
G
F
A
I
L
U
R
E
T
O
F
O
L
L
O
W
T
H
ESE
W
A
R
N
I
N
G
S
M
A
Y
R
ESU
L
T
I
N
SER
I
O
U
S
I
N
J
U
R
Y
A
N
D
/
O
R
PR
O
PER
T
Y
D
A
M
A
G
E.
O
w
n
e
r
m
u
s
t
e
n
s
u
r
e
t
h
a
t
a
l
l
p
l
a
y
e
r
s
k
n
o
w
a
n
d
f
o
l
l
o
w
t
h
e
s
e
r
u
l
e
s
f
o
r
s
a
f
e
o
p
e
r
a
t
i
o
n
o
f
t
h
e
s
y
s
t
e
m
.
•
D
O
N
O
T
H
A
N
G
o
n
t
h
e
r
i
m
o
r
a
n
y
p
a
r
t
o
f
t
h
e
s
y
s
t
e
m
i
n
c
l
u
d
i
n
g
b
a
c
k
b
o
a
r
d
,
s
u
p
p
o
r
t
b
r
a
c
e
s
o
r
n
e
t
.
•
D
u
r
i
n
g
p
l
a
y
,
e
s
p
e
c
i
a
l
l
y
w
h
e
n
p
e
r
f
o
r
m
i
n
g
d
u
n
k
t
y
p
e
a
c
t
i
v
i
t
i
e
s
,
k
e
e
p
p
l
a
y
e
r
'
s
f
a
c
e
a
w
a
y
f
r
o
m
t
h
e
b
a
c
k
b
o
a
r
d
,
r
i
m
a
n
d
n
e
t
.
Se
r
i
o
u
s
i
n
j
u
r
y
c
o
u
l
d
o
c
c
u
r
i
f
t
e
e
t
h
/
f
a
c
e
c
o
m
e
i
n
c
o
n
t
a
c
t
w
i
t
h
b
a
c
k
b
o
a
r
d
,
r
i
m
o
r
n
e
t
.
•
D
o
n
o
t
s
l
i
d
e
,
c
l
i
m
b
,
s
h
a
k
e
o
r
p
l
a
y
o
n
b
a
s
e
a
n
d
/
o
r
p
o
l
e
.
•
A
f
t
e
r
a
s
s
e
m
b
l
y
i
s
c
o
m
p
l
e
t
e
,
f
i
l
l
s
y
s
t
e
m
c
o
m
p
l
e
t
e
l
y
w
i
t
h
w
a
t
e
r
o
r
s
a
n
d
a
n
d
s
t
a
k
e
t
o
t
h
e
g
r
o
u
n
d
.
N
e
v
e
r
l
e
a
v
e
s
y
s
t
e
m
i
n
a
n
u
p
r
i
g
h
t
p
o
s
i
t
i
o
n
w
i
t
h
o
u
t
f
i
l
l
i
n
g
b
a
s
e
w
i
t
h
w
e
i
g
h
t
,
a
s
s
y
s
t
e
m
m
a
y
t
i
p
o
v
e
r
c
a
u
s
i
n
g
i
n
j
u
r
i
e
s
.
•
W
h
e
n
a
d
j
u
s
t
i
n
g
h
e
i
g
h
t
o
r
m
o
v
i
n
g
s
y
s
t
e
m
,
k
e
e
p
h
a
n
d
s
a
n
d
f
i
n
g
e
r
s
a
w
a
y
f
r
o
m
m
o
v
i
n
g
p
a
r
t
s
.
•
D
o
n
o
t
a
l
l
o
w
c
h
i
l
d
r
e
n
t
o
m
o
v
e
o
r
a
d
j
u
s
t
s
y
s
t
e
m
.
•
D
u
r
i
n
g
p
l
a
y
,
d
o
n
o
t
w
e
a
r
j
e
w
e
l
r
y
(
r
i
n
g
s
,
w
a
t
c
h
e
s
,
n
e
c
k
l
a
c
e
s
,
e
t
c
.
)
.
O
b
j
e
c
t
s
m
a
y
e
n
t
a
n
g
l
e
i
n
n
e
t
.
•
Su
r
f
a
c
e
b
e
n
e
a
t
h
t
h
e
b
a
s
e
m
u
s
t
b
e
s
m
o
o
t
h
a
n
d
f
r
e
e
o
f
g
r
a
v
e
l
o
r
o
t
h
e
r
s
h
a
r
p
o
b
j
e
c
t
s
.
Pu
n
c
t
u
r
e
s
c
a
u
s
e
l
e
a
k
a
g
e
a
n
d
c
o
u
l
d
c
a
u
s
e
s
y
s
t
e
m
t
o
t
i
p
o
v
e
r
.
•
Keep
o
r
g
a
n
i
c
m
a
t
e
r
i
a
l
a
w
a
y
f
r
o
m
p
o
l
e
b
a
s
e
.
G
r
a
s
s
,
l
i
t
t
e
r
,
e
t
c
.
c
o
u
l
d
c
a
u
s
e
c
o
r
r
o
s
i
o
n
a
n
d
/
o
r
d
e
t
e
r
i
o
r
a
t
i
o
n
.
•
C
h
e
c
k
p
o
l
e
s
y
s
t
e
m
f
o
r
s
i
g
n
s
o
f
c
o
r
r
o
s
i
o
n
(
r
u
s
t
,
p
i
t
t
i
n
g
,
c
h
i
p
p
i
n
g
)
a
n
d
r
e
p
a
i
n
t
w
i
t
h
e
xt
e
r
i
o
r
e
n
a
m
e
l
p
a
i
n
t
.
I
f
r
u
s
t
h
a
s
p
e
n
e
t
r
a
t
e
d
t
h
r
o
u
g
h
t
h
e
s
t
e
e
l
a
n
y
w
h
e
r
e
,
r
e
p
l
a
c
e
p
o
l
e
i
m
m
e
d
i
a
t
e
l
y
.
•
C
h
e
c
k
s
y
s
t
e
m
b
e
f
o
r
e
e
a
c
h
u
s
e
f
o
r
p
r
o
p
e
r
b
a
l
l
a
s
t
,
l
o
o
s
e
h
a
r
d
w
a
r
e
,
e
xc
e
s
s
i
v
e
w
e
a
r
a
n
d
s
i
g
n
s
c
o
r
r
o
s
i
o
n
a
n
d
r
e
p
a
i
r
b
e
f
o
r
e
u
s
e
.
•
C
h
e
c
k
s
y
s
t
e
m
b
e
f
o
r
e
e
a
c
h
u
s
e
f
o
r
i
n
s
t
a
b
i
l
i
t
y
.
•
D
o
n
o
t
u
s
e
s
y
s
t
e
m
d
u
r
i
n
g
w
i
n
d
y
a
n
d
/
o
r
s
e
v
e
r
e
w
e
a
t
h
e
r
c
o
n
d
i
t
i
o
n
s
;
s
y
s
t
e
m
m
a
y
t
i
p
o
v
e
r
.
Pl
a
c
e
s
y
s
t
e
m
i
n
t
h
e
s
t
o
r
a
g
e
p
o
s
i
t
i
o
n
a
n
d
/
o
r
i
n
a
n
a
r
e
a
p
r
o
t
e
c
t
e
d
f
r
o
m
t
h
e
w
i
n
d
a
n
d
f
r
e
e
f
r
o
m
p
e
r
s
o
n
a
l
p
r
o
p
e
r
t
y
a
n
d
/
o
r
o
v
e
r
h
e
a
d
w
i
r
e
s
.
•
N
e
v
e
r
p
l
a
y
o
n
d
a
m
a
g
e
d
e
q
u
i
p
m
e
n
t
.
•
Se
e
i
n
s
t
r
u
c
t
i
o
n
m
a
n
u
a
l
f
o
r
p
r
o
p
e
r
i
n
s
t
a
l
l
a
t
i
o
n
a
n
d
m
a
i
n
t
e
n
a
n
c
e
.
•
W
h
e
n
m
o
v
i
n
g
s
y
s
t
e
m
,
u
s
e
c
a
u
t
i
o
n
t
o
k
e
e
p
m
e
c
h
a
n
i
s
m
f
r
o
m
s
h
i
f
t
i
n
g
.
•
Keep
p
o
l
e
t
o
p
c
o
v
e
r
e
d
w
i
t
h
c
a
p
a
t
a
l
l
t
i
m
e
s
.
•
D
o
n
o
t
a
l
l
o
w
w
a
t
e
r
i
n
t
a
n
k
t
o
f
r
e
e
ze
.
D
u
r
i
n
g
s
u
b
-
f
r
e
e
z
i
n
g
w
e
a
t
h
e
r
a
d
d
n
o
n
-
t
o
x
i
c
a
n
t
i
f
r
e
e
z
e
,
s
a
n
d
o
r
e
m
p
t
y
t
a
n
k
c
o
m
p
l
e
t
e
l
y
a
n
d
s
t
o
r
e
.
(
D
o
n
o
t
u
s
e
s
a
l
t
.
)
•
U
s
e
e
xt
r
e
m
e
c
a
u
t
i
o
n
i
f
p
l
a
c
i
n
g
s
y
s
t
e
m
o
n
s
l
o
p
e
d
s
u
r
f
a
c
e
.
Sy
s
t
e
m
m
a
y
t
i
p
o
v
e
r
m
o
r
e
e
a
s
i
l
y
.
2
0
1
2
4
1
2
/
9
9
I
n
t
h
e
U
.
S
.
:
1-
800-
55
8-
5234
an
d
C
an
ad
a:
1-
800-
284-
83
3
9
W
ARNI
NG
F
A
IL
U
R
E
T
O
F
O
L
L
O
W
T
H
ESE
W
A
R
N
IN
G
S
M
A
Y
R
ESU
L
T
IN
SER
IO
U
S
IN
J
U
R
Y
A
N
D
/O
R
PR
O
PER
T
Y
D
A
M
A
G
E.
O
w
n
e
r
m
u
s
t
e
n
s
u
r
e
t
h
a
t
a
ll
p
la
y
e
r
s
k
n
o
w
a
n
d
f
o
llo
w
t
h
e
s
e
r
u
le
s
f
o
r
s
a
f
e
o
p
e
r
a
t
io
n
o
f
t
h
e
s
y
s
t
e
m
.
•
D
O
N
O
T
H
A
N
G
o
n
t
h
e
r
im
o
r
a
n
y
p
a
r
t
o
f
t
h
e
s
y
s
t
e
m
in
c
lu
d
in
g
b
a
ck
b
o
a
r
d
,
s
u
p
p
o
r
t
b
r
a
c
e
s
o
r
n
e
t
.
•
D
u
r
in
g
p
la
y
,
e
s
p
e
c
ia
ll
y
w
h
e
n
p
e
r
f
o
r
m
in
g
d
u
n
k
t
y
p
e
a
c
t
iv
it
ie
s
,
k
e
e
p
p
la
y
e
r
'
s
f
a
c
e
a
w
a
y
f
r
o
m
t
h
e
b
a
ck
b
o
a
r
d
,
r
im
a
n
d
n
e
t
.
Se
r
io
u
s
in
ju
r
y
c
o
u
ld
o
c
c
u
r
if
t
e
e
t
h
/f
a
c
e
c
o
m
e
in
c
o
n
t
a
c
t
w
it
h
b
a
ck
b
o
a
r
d
,
r
im
o
r
n
e
t
.
•
D
o
n
o
t
s
lid
e
,
c
li
m
b
,
s
h
a
k
e
o
r
p
la
y
o
n
b
a
s
e
a
n
d
/o
r
p
o
le.
•
A
f
t
e
r
a
s
s
e
m
b
l
y
is
c
o
m
p
le
t
e
,
f
ill
s
y
s
t
e
m
c
o
m
p
le
t
e
l
y
w
it
h
w
a
t
e
r
o
r
s
a
n
d
a
n
d
s
t
a
k
e
t
o
t
h
e
g
r
o
u
n
d
.
N
e
v
e
r
le
a
v
e
s
y
s
t
e
m
in
a
n
u
p
r
ig
h
t
p
o
s
it
io
n
w
it
h
o
u
t
f
illin
g
b
a
s
e
w
it
h
w
e
ig
h
t
,
a
s
s
y
s
t
e
m
m
a
y
t
ip
o
v
e
r
c
a
u
s
in
g
in
ju
r
ie
s
.
•
W
h
e
n
a
d
ju
s
t
in
g
h
e
ig
h
t
o
r
m
o
v
in
g
s
y
s
t
e
m
,
k
e
e
p
h
a
n
d
s
a
n
d
f
in
g
e
r
s
a
w
a
y
f
r
o
m
m
o
v
in
g
p
a
r
t
s
.
•
D
o
n
o
t
a
llo
w
c
h
i
ld
r
e
n
t
o
m
o
v
e
o
r
a
d
ju
s
t
s
y
s
t
e
m
.
•
D
u
r
in
g
p
la
y
,
d
o
n
o
t
w
e
a
r
je
w
e
lr
y
(
r
in
g
s
,
w
a
t
c
h
e
s
,
n
e
ck
la
c
e
s
,
e
t
c
.)
.
O
b
je
c
t
s
m
a
y
e
n
t
a
n
g
le
in
n
e
t
.
•
Su
r
f
a
c
e
b
e
n
e
a
t
h
t
h
e
b
a
s
e
m
u
s
t
b
e
s
m
o
o
t
h
a
n
d
f
r
e
e
o
f
g
r
a
v
e
l
o
r
o
t
h
e
r
s
h
a
r
p
o
b
je
c
t
s
.
Pu
n
c
t
u
r
e
s
c
a
u
s
e
le
a
k
a
g
e
a
n
d
c
o
u
ld
c
a
u
s
e
s
y
s
t
e
m
t
o
t
ip
o
v
e
r
.
•
Keep
o
r
g
a
n
ic
m
a
t
e
r
ia
l
a
w
a
y
f
r
o
m
p
o
le
b
a
s
e.
G
r
a
s
s
,
lit
t
e
r
,
e
t
c
.
c
o
u
ld
c
a
u
s
e
c
o
r
r
o
s
io
n
a
n
d
/o
r
d
e
t
e
r
io
r
a
t
io
n
.
•
C
h
e
ck
p
o
le
s
y
s
t
e
m
f
o
r
s
ig
n
s
o
f
c
o
r
r
o
s
io
n
(
r
u
s
t
,
p
it
t
in
g
,
c
h
i
p
p
in
g
)
a
n
d
r
e
p
a
in
t
w
it
h
e
xt
e
r
io
r
e
n
a
m
e
l
p
a
in
t
.
If
r
u
s
t
h
a
s
p
e
n
e
t
r
a
t
e
d
t
h
r
o
u
g
h
t
h
e
s
t
e
e
l
a
n
y
w
h
e
r
e
,
r
e
p
la
c
e
p
o
le
im
m
e
d
ia
t
e
l
y
.
•
C
h
e
ck
s
y
s
t
e
m
b
e
f
o
r
e
e
a
c
h
u
s
e
f
o
r
p
r
o
p
e
r
b
a
lla
s
t
,
lo
o
s
e
h
a
r
d
w
a
r
e
,
e
xc
e
s
s
iv
e
w
e
a
r
a
n
d
s
ig
n
s
c
o
r
r
o
s
io
n
a
n
d
r
e
p
a
ir
b
e
f
o
r
e
u
s
e
.
•
C
h
e
ck
s
y
s
t
e
m
b
e
f
o
r
e
e
a
c
h
u
s
e
f
o
r
in
s
t
a
b
ilit
y
.
•
D
o
n
o
t
u
s
e
s
y
s
t
e
m
d
u
r
in
g
w
in
d
y
a
n
d
/o
r
s
e
v
e
r
e
w
e
a
t
h
e
r
c
o
n
d
it
io
n
s
;
s
y
s
t
e
m
m
a
y
t
ip
o
v
e
r
.
Pla
c
e
s
y
s
t
e
m
in
t
h
e
s
t
o
r
a
g
e
p
o
s
it
io
n
a
n
d
/o
r
in
a
n
a
r
e
a
p
r
o
t
e
c
t
e
d
f
r
o
m
t
h
e
w
in
d
a
n
d
f
r
e
e
f
r
o
m
p
e
r
s
o
n
a
l
p
r
o
p
e
r
t
y
a
n
d
/o
r
o
v
e
r
h
e
a
d
w
ir
e
s
.
•
N
e
v
e
r
p
la
y
o
n
d
a
m
a
g
e
d
e
q
u
ip
m
e
n
t
.
•
Se
e
in
s
t
r
u
c
t
io
n
m
a
n
u
a
l
f
o
r
p
r
o
p
e
r
in
s
t
a
lla
t
io
n
a
n
d
m
a
in
t
e
n
a
n
c
e
.
•
W
h
e
n
m
o
v
in
g
s
y
s
t
e
m
,
u
s
e
c
a
u
t
io
n
t
o
k
e
e
p
m
e
c
h
a
n
is
m
f
r
o
m
s
h
if
t
in
g
.
•
Keep
p
o
le
t
o
p
c
o
v
e
r
e
d
w
it
h
c
a
p
a
t
a
ll
t
im
e
s
.
•
D
o
n
o
t
a
llo
w
w
a
t
e
r
in
t
a
n
k
t
o
f
r
e
e
ze
.
D
u
r
in
g
s
u
b
f
r
e
e
z
in
g
w
e
a
t
h
e
r
a
d
d
n
o
n
t
o
x
ic
a
n
t
if
r
e
e
z
e
,
s
a
n
d
o
r
e
m
p
t
y
t
a
n
k
c
o
m
p
le
t
e
l
y
a
n
d
s
t
o
r
e
.
(
D
o
n
o
t
u
s
e
s
a
lt
.)
•
U
s
e
e
xt
r
e
m
e
c
a
u
t
io
n
if
p
la
c
in
g
s
y
s
t
e
m
o
n
s
lo
p
e
d
s
u
r
f
a
c
e
.
Sy
s
t
e
m
m
a
y
t
ip
o
v
e
r
m
o
r
e
e
a
s
il
y
.
2
0
1
2
4
1
2
/
9
9
In
t
h
e
U
.S
.:
1800-
55
85234
an
d
C
an
ad
a:
1800-
28483
3
9
tack upper pole section (1) to bottom and middle pole assembly and continue bouncing until top pole (1) no longer
S
moves toward taped reference mark on middle pole.
Empilez la section de poteau supérieure (1) sur l'ensemble des sections de poteau inférieure et centrale, puis
continuez à entrechoquer jusqu'à ce que la section supérieure (1) ne bouge plus vers la marque de référence (ruban)
de la section centrale.
Das obere Stangenteil (1) auf den aus dem unteren und mittleren Stangenteil bestehenden Aufbau aufsetzen und
eiter so lange zusammenstauchen, bis sich das obere Teil (1) nicht mehr auf
w
die mit Klebeband markierte Stelle am mittleren Teil zu bewegt.
Apile la sección superior del poste (1) con el conjunto de las secciones inferior
y media del poste y continúe golpeando hasta que la sección superior del
poste (1) ya no se mueva hacia la marca de referencia con cinta de la sección
media del poste.
Allineare la sezione superiore (1) del palo al gruppo composto da quella
centrale e quella inferiore, facendo poi oscillare i due gruppi l'uno contro
l'altro finché la sezione superiore non si muove più verso il contrassegno
apposto con il nastro sulla sezione centrale.
IMPORTANT!
IMPORTANT!
WICHTIG!
¡IMPORTANTE!
Taped reference
IMPORTANTE!
POLE SECTIONS SHOULD HAVE A 3-1/2" (9 CM) MINIMUM
OVERLAP.
LES SECTIONS DE POTEAU DOIVENT SE CHEVAUCHER
DE 9 CM MINIMUM.
LAS SECCIONES DEL POSTE SE DEBEN TRASLAPAR UN
MÍNIMO DE 3-1/2" (9 CM).
DIE STANGENTEILE MÜSSEN EINANDER UM
MINDESTENS 9 CM (3 ½ ZOLL) ÜBERLAPPEN.
LE SEZIONI DI PALO DEVONO SOVRAPPORSI DI ALMENO
9 CM (3-1/2").
Repères marqués d'un
ruban adhésif
Mit Klebeband
gekennzeichnete
Bezugsmarkierungen
Marcas de cinta de
Contrassegni apposti
con il nastro
marks
referencia
5"
(12.7 cm)
1-1/2"
(3.81 cm)
1
IMPORTANT!
IMPORTANT!
5
WICHTIG!
¡IMPORTANTE!
IMPORTANTE!
The warning label should be 90 degees from uppermost holes on
top pole (1) - see Illustration.
L'étiquette d'avertissement doit se trouver à 90 degrés des trous
situés en haut de la section de poteau supérieure (1) - voir
l'illustration.
Der Warnaufkleber muss um 90 Grad von den obersten Löchern
im oberen Stangenteil (1) versetzt sein - siehe Abbildung.
La etiqueta de advertencia debe quedar a 90 grados de los
orificios más superiores de la sección superior del poste (1); vea la
ilustración.
Chute de bois (NON FOURNIE)
LIEFERUMFANG ENTHALTEN)
L'etichetta di avvertenza deve essere a 90° dai fori superiori sulla
sezione superiore (1) del palo. Vedere l'illustrazione.
Tavoletta di legno (NON FORNITA)
19
Wood Scrap
(NOT SUPPLIED)
Holzstück (NICHT IM
Trozo de madera (NO SE
SUMINISTRA)
07/05 P/N 21500701
Page 20
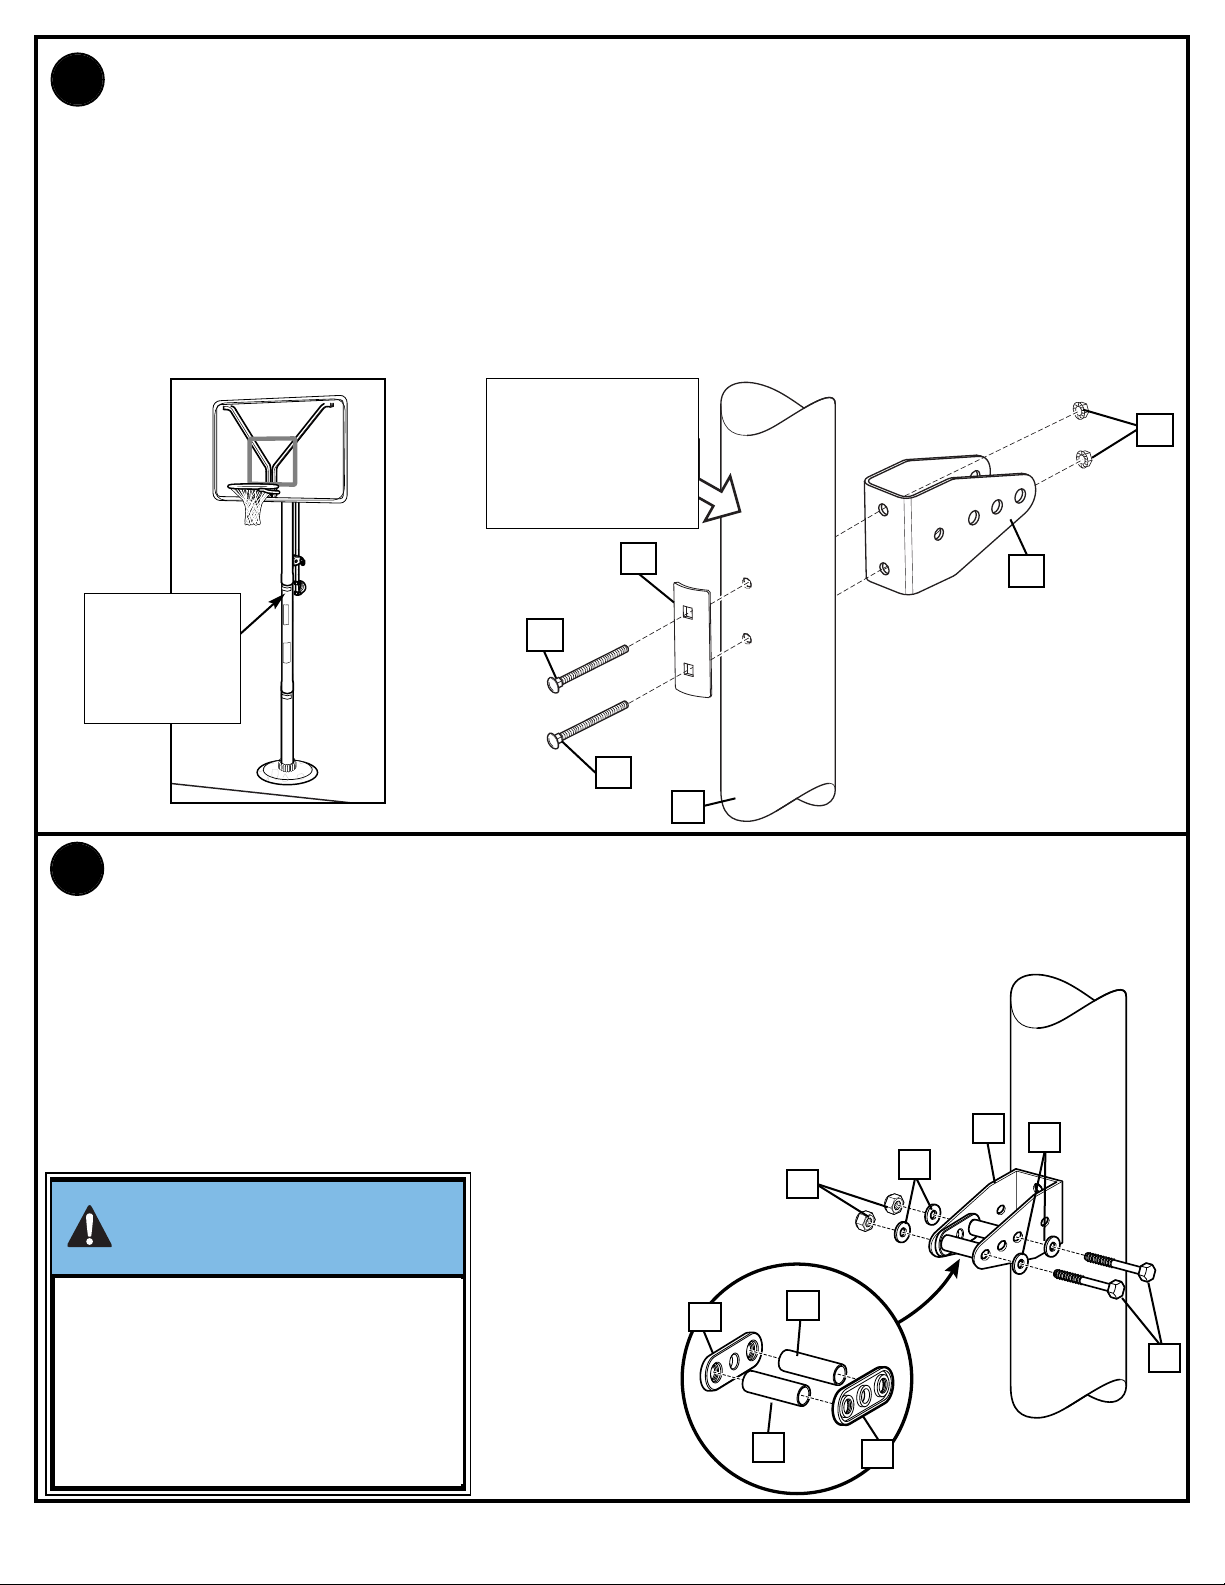
11.
Install pole mount bracket (6) and bracket reinforcement (40) with carriage bolts (7) as shown.
Tighten flange nuts (8) completely.
Installez le support du poteau (6) et le support de renforcement (40) à l'aide des boulons ordinaires (7), comme illustré.
Serrez à fond les écrous à bride (8).
Die Stangenmontagehalterung (6) und die Verstärkungshalterung (40) wie gezeigt mit Schlossschrauben (7) befestigen.
Die Flanschmuttern (8) fest anziehen.
Instale el soporte de montaje del poste (6) y el soporte de refuerzo (40) con los pernos cabeza de carro (7) como se
muestra. Apriete completamente las tuercas de brida (8).
Installare la staffa di montaggio (6) del palo e il rinforzo della staffa (40) con i bulloni a legno (7), come illustrato. Serrare
fino in fondo i dadi flangiati (8).
FRONT SIDE
AVANT
VORDERSEITE
LADO FRONTAL
VISTA ANTERIORE
8
FRONT SIDE
AVANT
VORDERSEITE
LADO FRONTAL
VISTA ANTERIORE
Attach spacers (12, 13) to pole mount bracket (6) with bolts (9), washers (10), and nuts (11) as
12.
shown.
Attachez les entretoises (12, 13) au support de poteau (6) avec les boulons (9), les rondelles (10) et
les écrous (11), comme illustré.
Die Abstandsstücke (12, 13) wie gezeigt mit Schrauben (9), Unterlegscheiben (10) und Muttern (11)
an der Stangenmontagehalterung (6) befestigen.
Conecte los separadores (12, 13) en el soporte de montaje del poste (6) usando pernos (9),
arandelas (10) y tuercas (11) como se muestra.
Fissare i distanziatori (12, 13) alla staffa di montaggio (6) del palo servendosi dei bulloni (9), delle
rondelle (10) e dei dadi (11), come mostrato.
IMPORTANT!
IMPORTANT!
WICHTIG!
¡IMPORTANTE!
IMPORTANTE!
Tighten just until washers (10) stop moving.
Serrez juste jusqu'à ce que les rondelles (10) cessent de
tourner.
Nur so weit anziehen, bis sich die Unterlegscheiben (10) nicht
mehr bewegen.
Apriete lo suficiente para que las arandelas (10) no se muevan.
STRINGERE FINO A QUANDO LE RONDELLE (10) NON
SMETTONO DI MUOVERSI.
40
6
7
7
1
6
10
10
9
12
12
11
13
13
P/N 21500701 07/05
20
Page 21

13.
IMPORTANT!
IMPORTANT!
WICHTIG!
¡IMPORTANTE!
IMPORTANTE!
Loop end of pin lanyard (17) over carriage bolt (15)
as it passes through the pole mount bracket (6)
during this assembly.
Assemble lanyard (17) to locking pin (16) as shown. Attach covers (14)
onto pole mount bracket (6) with carriage bolt (15) and nut (8) as shown.
NOT OVERTIGHTEN
DO
Assemblez le cordon (17) et la goupille de blocage (16), comme illustré.
Attachez les protections (14) sur le support de poteau (6) à l'aide du
boulon ordinaire (15) et de l'écrou (8), comme illustré.
NE SERREZ PAS TROP.
Die Abzugsleine (17) wie gezeigt am Verriegelungsstift (16) befestigen.
Die Abdeckungen (14) mit der Schlossschraube (15) und Mutter (8) wie
gezeigt an der Stangenmontagehalterung (6) befestigen.
NICHT ZU FEST ANZIEHEN.
Monte el acollador (17) en el perno de fijación (16) como se muestra.
Coloque las cubiertas (14) en el soporte de montaje del poste (6) con un
perno cabeza de carro (15) y una tuerca (8) como se muestra.
NO APRIETE EXCESIVAMENTE
Montare il cordoncino (17) sul perno di bloccaggio (16) come mostrato in
figura. Fissare i cappucci sulla staffa di montaggio (6) del palo con il
bullone a legno (15) e il dado (8), come mostrato.
NON STRINGERE TROPPO.
Durant ce montage, enroulez l'extrémité du cordon
de la goupille de blocage (17) sur le boulon
ordinaire (15) lors de son insertion à travers le
support du poteau (6).
Während dieses Montageschritts das Ende der
Stiftleine (17) über die Schlossschraube (15)
schlingen, wenn diese durch die
Stangenmontagehalterung (6) geschoben wird.
Inserte el extremo del acollador del pasador (17)
sobre el perno cabeza de carro (15) conforme pasa
a través del soporte del montaje del poste (6)
durante este montaje.
In questa fase di montaggio, far passare l'estremità
del cordoncino (17) del perno sopra il bullone a
legno (15), mentre passa per la staffa di montaggio
(6) del palo.
6
6
14
15
14
6
14
8
15
17
14
8
17
16
21
07/05 P/N 21500701
Page 22
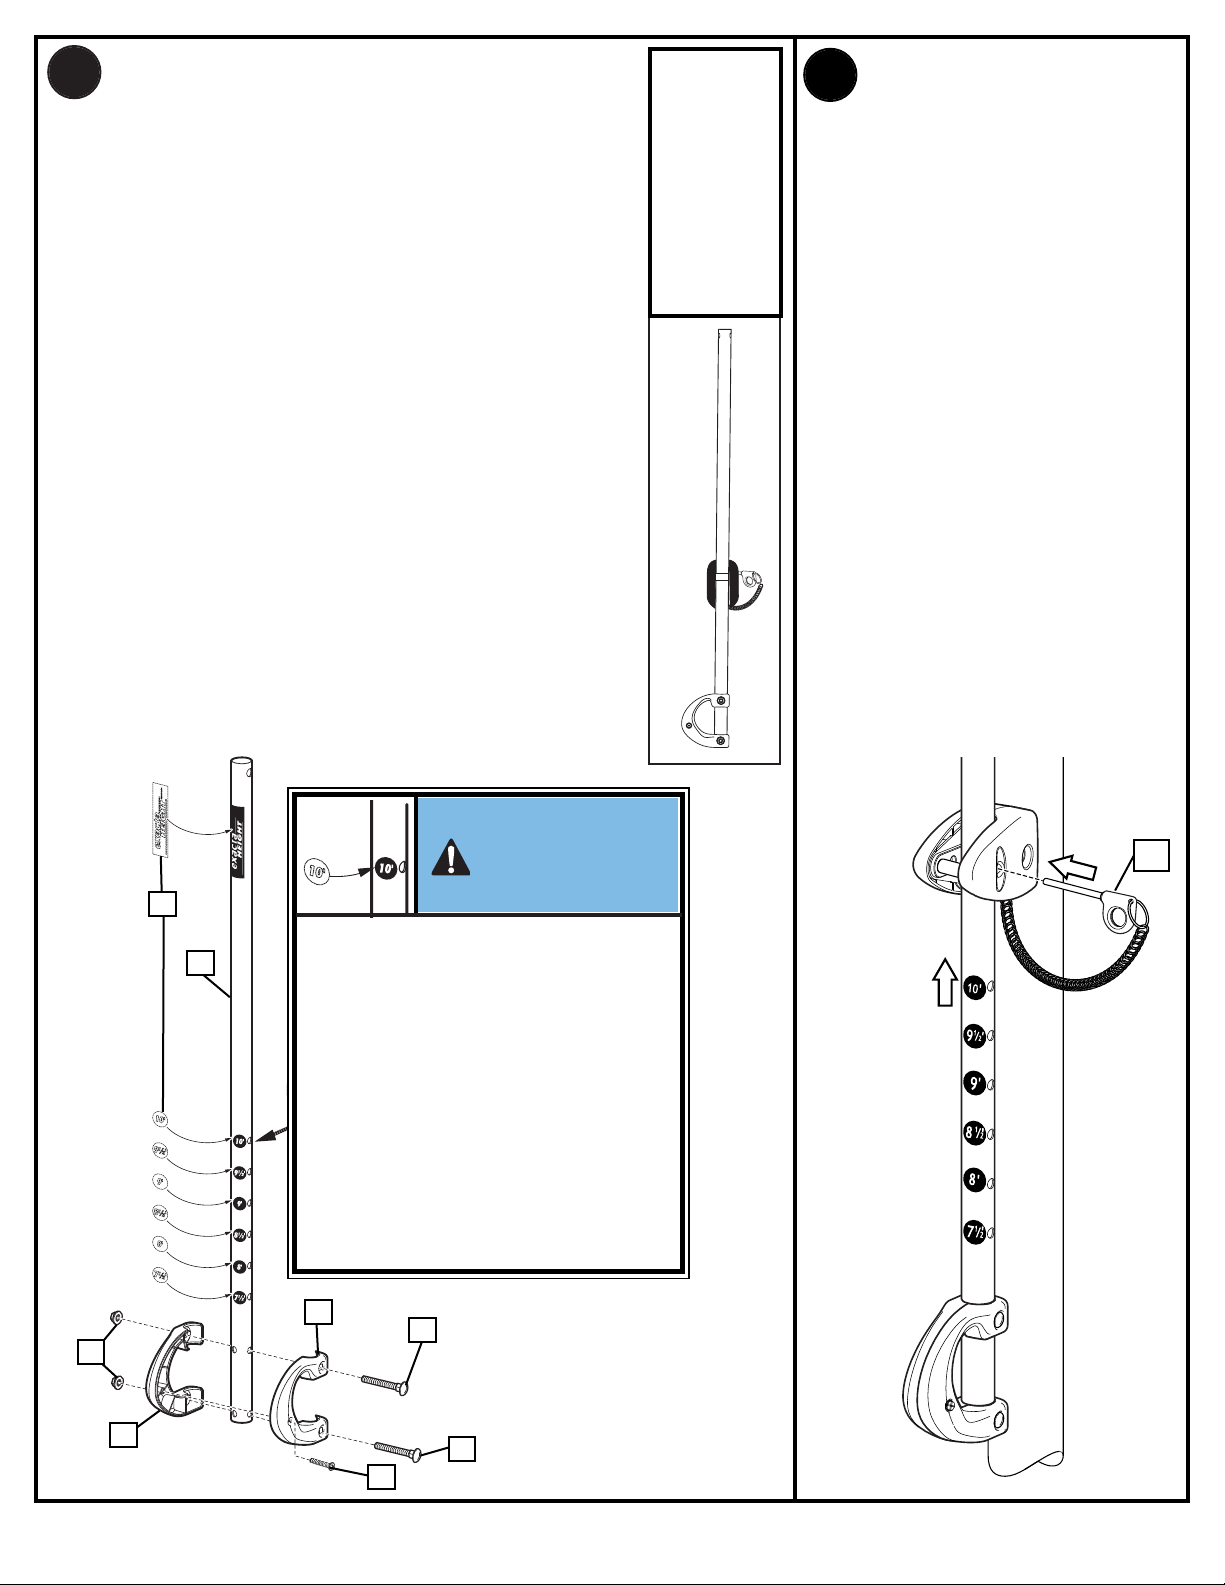
Apply logo and height indicator labels (19) to adjustment rod (18)
14.
as shown. Attach handle parts (37, 38) to adjustment rod with
screw (21), carriage bolt (20), and flange nut (8) as shown.
NOTE: Holes in adjustment rod allow for either rear access or side
access.
Collez le logo et l'étiquette d'échelle de hauteur (19) sur la tige
d'ajustement (18), comme illustré. Attachez les pièces des poignées (37,
38) sur la tige d'ajustement à l'aide de la vis (21), du boulon ordinaire (20)
et de l'écrou à bride (8), comme illustré.
REMARQUE : Les trous de la tige d'ajustement permettent un accès par
l'arrière ou le côté.
Das Logo und die Höhenanzeigeaufkleber (19) wie gezeigt an der
Einstellstange (18) befestigen. Die Griffteile (37, 38) mit Schraube (21),
Schlossschraube (20) und Flanschmutter (8) wie gezeigt an der
Einstellstange befestigen.
HINWEIS: Mehrere Bohrungen in der Einstellstange ermöglichen eine
Montage von hinten oder von der Seite.
SIDE
ACCESS
ACCÈS PAR LE
CÔTÉ
SEITLICHER
ZUGANG
ACCESO
LATERAL
ACCESSO
LATERALE
15.
nsert handle assembly through pole
I
mount assembly as shown.
Lock pole assembly in place at the
10’ (3.05 m) mark with pin (16).
Insérez l'ensemble des barres dans
e support de poteau, comme
l
illustré.
Bloquez le poteau en position au
repère 3,05 m à l'aide de la goupille
(16).
Die Griffbaugruppe wie gezeigt
durch die Stangenmontageeinheit
schieben.
Den Stangenaufbau mit dem Stift
(16) an der 3,05-m- (10-Fuß-)
Markierung sichern.
Aplique el logotipo y las etiquetas indicadoras de altura (19) en la varilla
de ajuste (18) como se muestra. Conecte las piezas de la manija (37, 38)
a la varilla de ajuste con un tornillo (21), perno cabeza de carro (20) y
tuerca de brida (8) como se muestra.
NOTA: Los orificios en la varilla de ajuste permiten el acceso posterior o
el acceso lateral.
Applicare le etichette (19) con il marchio e l'indicazione dell'altezza alla
barra di regolazione (18), come illustrato. Fissare le parti (37, 38) delle
maniglie all'asta di regolazione servendosi della vite (21), del bullone a
legno (20) e del dado flangiato (8), come illustrato.
NOTA - I fori dell'asta di regolazione consentono l'accesso sia posteriore
che laterale.
IMPORTANT!
IMPORTANT!
WICHTIG!
¡IMPORTANTE!
19
18
Indicator labels should be applied as close to holes as
possible to prevent labels from being damaged during
height adjustment.
Les étiquettes doivent être appliquées le plus près
possible des trous pour empêcher leur
endommagement durant le réglage de la hauteur.
Die Anzeigeaufkleber sollten so nahe wie möglich an
den Öffnungen angebracht werden, um eine
Beschädigung der Aufkleber während der
Höhenverstellung zu vermeiden.
Las etiquetas indicadoras se deben aplicar tan cerca
de los orificios como sea posible para evitar que
sufran daños durante los ajustes de altura.
Le etichette di indicazione vanno applicate quanto più
vicino ai fori possibile, onde evitare che possano
subire danni quando si regola l'altezza del canestro.
IMPORTANTE!
Introduzca el conjunto de la manija
a través del conjunto de montaje del
poste, como se muestra.
Fije el conjunto del poste en su
lugar en la marca de los 10' (3.05
m) con el pasador (16).
Inserire il gruppo delle maniglie nel
gruppo dell'asta come mostrato.
Bloccare il gruppo dell'asta
all'altezza del contrassegno di 3,05
m (10 piedi) con il perno (16).
16
8
37
P/N 21500701 07/05
38
20
20
21
22
Page 23
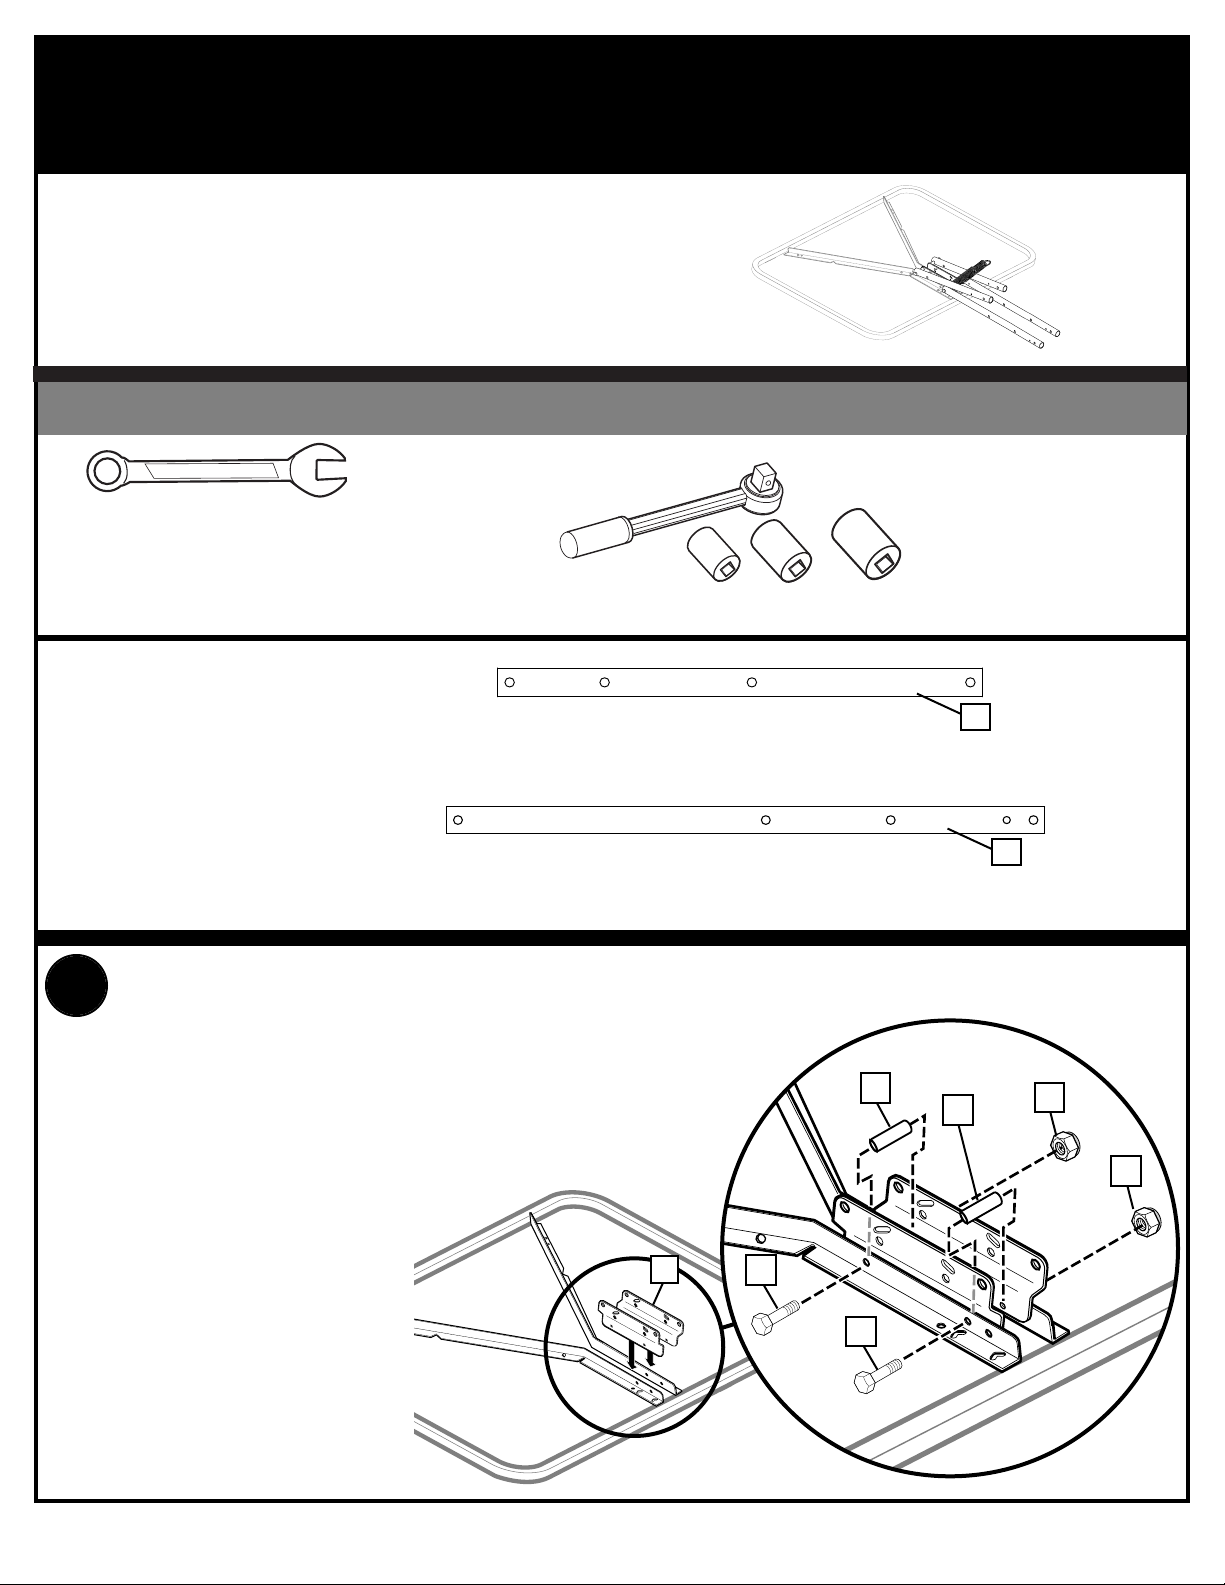
SECTION B: ASSEMBLE THE ELEVATOR TUBES TO BACKBOARD
SECTION B : MONTAGE DES TUBES DU SYSTÈME ÉLÉVATEUR SUR LE PANNEAU
BAUABSCHNITT B: MONTAGE DER VERLÄNGERUNGSROHRE AN DER KORBWAND
SECCIÓN B: MONTE LOS TUBOS ELEVADORES EN EL RESPALDO
S
EZIONE B - MONTAGGIO DEI TUBI DEL SISTEMA DI REGOLAZIONE DELL'ALTEZZAAL TABELLONE
This is what your system will look like when you’ve finished this section:
Voici à quoi ressemblera votre système lorsque vous en aurez fini avec cette section.
So sieht das System aus, wenn Sie mit diesem Bauabschnitt fertig sind.
Así es como se verá su sistema cuando haya terminado esta sección.
Una volta finita questa sezione, il sistema avrà l'aspetto illustrato qui accanto.
TOOLS REQUIRED FOR THIS SECTION / OUTILS REQUIS POUR CETTE SECTION / FÜR DIESEN BAUABSCHNITT BENÖTIGTES
WERKZEUG / HERRAMIENTAS REQUERIDAS PARA ESTA SECCIÓN / ATTREZZI NECESSARI PER QUESTA SEZIONE
(2) Wrenches 1/2", 9/16" and (2) ¾"
(2) clés 1/2", 9/16" et (2) ¾"
Je (1) 1/2-, 9/16- und (2) 3/4-Zoll-
Schraubenschlüssel
(2) Llaves de 1/2", 9/16"y ¾"
Due (2) chiavi da 1/2", 9/16" e due (2) da 3/4"
Identify elevator tubes (28 &
30).
Repérez les tubes du
système élévateur (28 et 30).
Die Verlängerungsrohre (28
u. 30) zurecht legen.
Identifique los tubos
elevadores (28 y 30).
Trovare i tubi di regolazione
dell'altezza (28 e 30).
Toward Board
Vers le panneau
Zur Korbwand
hin
Hacia el tablero
Verso il
tabellone
Attach backboard support
brackets (25) to the backboard
1.
frame using bolts (9), spacers
(31), and nuts (11) as shown.
AND/OR
ET/OU
UND/ODER
Y/O
E/O
Upper Elevator tube / Tube supérieur du système
élévateur / Oberes Verlängerungsrohr / Tubo elevador
superior / Tubo superiore di regolazione dell'altezza
Lower Elevator tube
Tube inférieur du système élévateur / Unteres Verlängerungsrohr /
Tubo elevador inferior / Tubo inferiore di regolazione dell'altezza
1/2”
9/16”
3/4”
(2) Socket Wrenches and
Sockets
(2) clés à douille et douilles
(2) Steckschlüssel und
Einsätze
(2) Llaves de tuercas de boca
tubular y casquillos de
Due (2) chiavi a bussola e
bussole
Toward Pole
30
28
Vers le poteau
Zur Stange hin
Hacia el poste
Verso il palo
Attachez les supports de panneau (25) au
cadre du panneau à l'aide des boulons
(9), des entretoises (31) et des écrous
(11), comme illustré.
Die Korbwand-Tragehalterungen (25) wie
gezeigt mit Schrauben (9),
Abstandsstücken (31) und Muttern (11)
am Korbwandrahmen befestigen.
Conecte los soportes del respaldo (25) en
el bastidor del respaldo usando pernos
(9), espaciadores (31) y tuercas (11)
como se muestra.
Fissare le staffe (25) di supporto del
tabellone al telaio del tabellone
servendosi dei bulloni (9), dei distanziatori
(31) e dei dadi (11), come mostrato.
23
25
31
31
11
11
9
9
07/05 P/N 21500701
Page 24
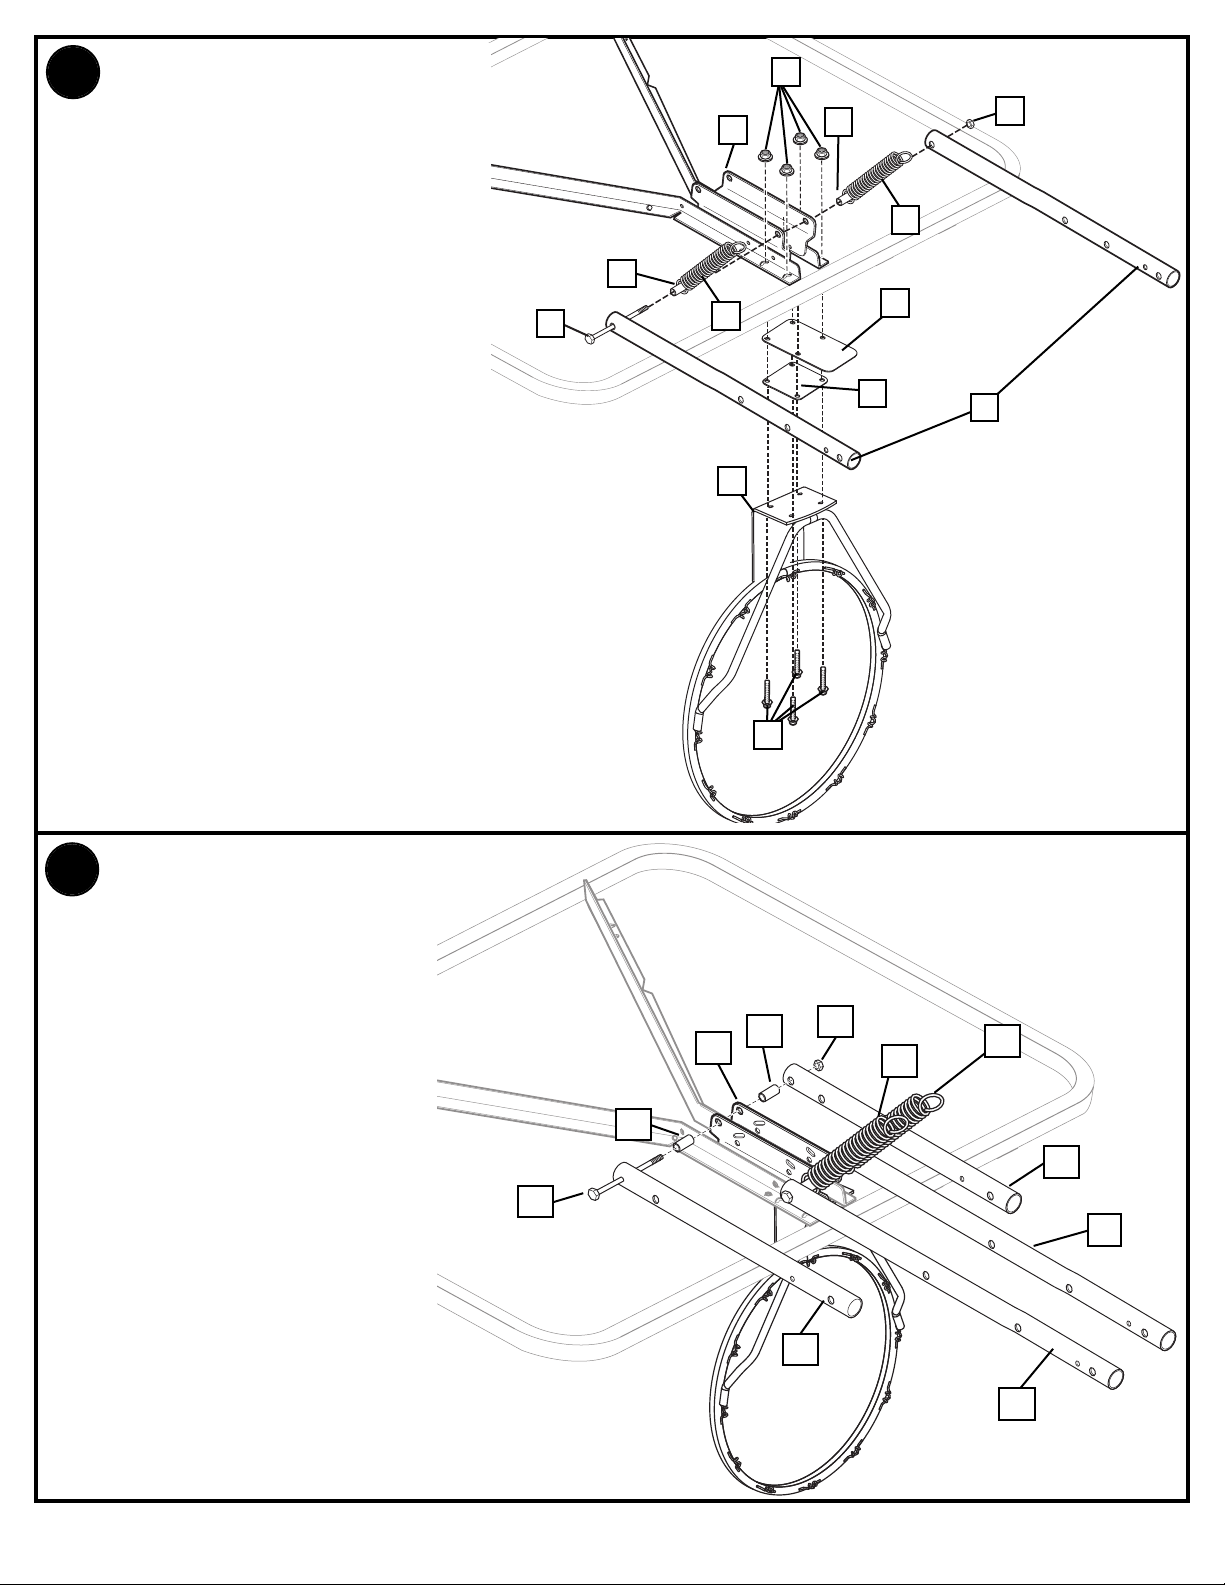
ttach lower elevator tubes (28) and springs
A
(29, 47) to backboard support brackets (25)
2.
using spacers (22), bolt (27), and nut (24) as
shown.
Using bolts (46) and nuts (8) attach rim (32) and rim
spacers (41 & 42) to board.
ttachez les tubes inférieurs du système élévateur
A
(28) et les ressorts (29, 47) aux équerres du support
du panneau (25) à l'aide des entretoises (22), du
boulon (27) et de l'écrou (24), comme illustré.
À l'aide des boulons (46) et des écrous (8), attachez le
cerceau (32) et les entretoises de cerceau (41 & 42)
ur le panneau.
s
27
22
47
25
8
22
24
29
41
Die unteren Verlängerungsrohre (28) und die Federn
(29, 47) wie gezeigt mit Abstandsstücken (25),
Schraube (27) und Mutter (24) an den
Korbwandstützklammern (22) befestigen.
Den Korbrand (32) und die Korbrand-Abstandsstücke
(41 u. 42) mit Schrauben (46) und Muttern (8) an der
Korbwand befestigen.
Conecte los tubos elevadores inferiores (28) y los
resortes (29, 47) en los soportes del respaldo (25)
usando espaciadores (22), pernos (27) y tuercas (24)
como se muestra.
Usando los pernos (46) y tuercas (8), conecte el borde
(32) y espaciadores del borde (41 y 42) al tablero.
Fissare i tubi (28) inferiori di regolazione dell'altezza e
le molle (29, 47) alle staffe (25) di sostegno del
tabellone con i distanziatori (22), il bullone (27) e il
dado (24), come mostrato.
Con i bulloni (46) e i dadi (8), fissare al tabellone il
cerchio (32) e i relativi distanziatori (41 e 42).
3.
Attach upper elevator tubes (30) to
backboard support brackets (25) using
spacers (22), bolt (27), and nut (24) as
shown.
32
46
42
28
Fixez les tubes supérieurs du système
élévateur (30) sur les supports du panneau
(25) à l'aide des entretoises (22), du boulon
(27) et de l'écrou (24), comme illustré.
Die oberen Verlängerungsrohre (30) wie
gezeigt mit Abstandsstücken (22),
Schraube (27) und Mutter (24) an den
Korbwandklammern (25) befestigen.
Conecte los tubos elevadores superiores
(30) en los soportes del respaldo (25)
usando separadores (22), pernos (27) y
tuercas (24) como se muestra.
Fissare i tubi (30) superiori di regolazione
dell'altezza alle staffe (25) di sostegno del
tabellone con i distanziatori (22), il bullone
(27) e il dado (24), come mostrato.
P/N 21500701 07/05
27
24
22
25
22
24
29
47
30
28
30
28
Page 25
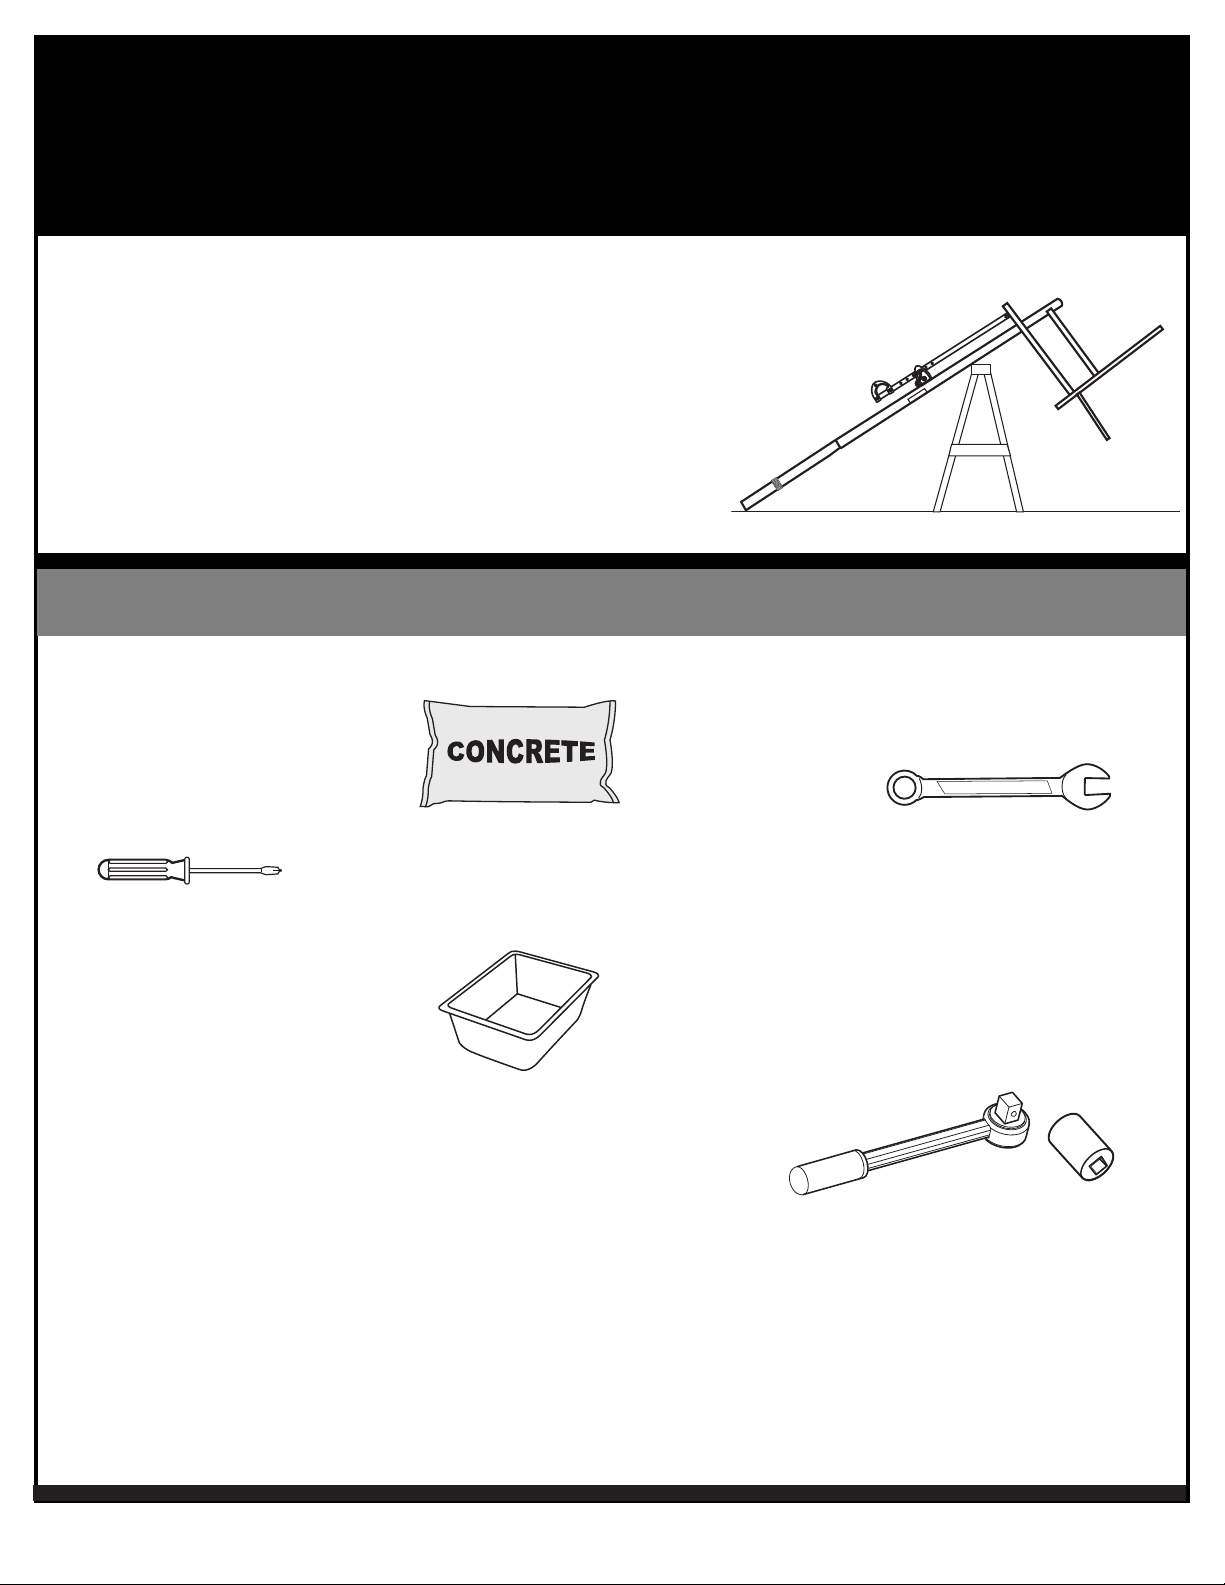
SECTION C: ATTACH THE BACKBOARD & ELEVATOR ASSEMBLY
CONCRETE
T
O POLE SYSTEM
SECTION C : FIXATION DU PANNEAU ET DU SYSTÈME ÉLÉVATEUR AU POTEAU
B
AUABSCHNITT C: BEFESTIGUNG DER KORBWAND- UND VERLÄNGERUNGSBAUGRUPPE AM
STANGENSYSTEM
SECCIÓN C: MONTE EL CONJUNTO DEL RESPALDO Y EL ELEVADOR AL SISTEMA DEL POSTE
SEZIONE C - FISSAGGIO DEL TABELLONE E DEL GRUPPO DI REGOLAZIONE DELL'ALTEZZA AL GRUPPO
This is what your system will look like when you’ve finished this section:
Voici à quoi ressemblera votre système lorsque vous en aurez fini avec cette
section.
So sieht das System aus, wenn Sie mit diesem Bauabschnitt fertig sind.
Así es como se verá su sistema cuando haya terminado esta sección.
Una volta finita questa sezione, il sistema avrà l'aspetto illustrato qui
accanto.
TOOLS REQUIRED FOR THIS SECTION / OUTILS REQUIS POUR CETTE SECTION / FÜR DIESEN BAUABSCHNITT BENÖTIGTES
WERKZEUG / HERRAMIENTAS REQUERIDAS PARA ESTA SECCIÓN / ATTREZZI NECESSARI PER QUESTA SEZIONE
Phillips-Head Screwdriver
Tournevis cruciforme
Kreuzschlitzschraubenziehe
Destornillador Phillips
Cacciavite a stella
BÉTON
BETON
CONCRETO
CALCESTRUZZO
Container to Mix
Récipient pour mélanger
Behälter zum Mischen
Recipiente para mezclar
Contenitore per miscelare
(2) 3/4" Wrenches
(2) clés 3/4"
(2) ¾-Zoll-Schraubenschlüssel
(2) Llaves de ¾"
Due (2) chiavi da 3/4"
AND/OR
ET/OU
UND/ODER
Y/O
E/O
(2) Socket Wrenches and Sockets
(2) clés à douille et douilles
(2) Steckschlüssel und Einsätze
(2) Llaves de tuercas de boca tubular y
casquillos de
Due (2) chiavi a bussola e bussole
3/4”
25
07/05 P/N 21500701
Page 26

Support pole on sawhorse. Attach backboard assembly to top pole section
1.
(1).
24
24
Appuyez le poteau sur le banc de sciage. Attachez le panneau à la section
de poteau supérieure (1).
Die Stange auf einen Sägebock legen. Die Korbwandbaugruppe am
oberen Stangenteil (1) befestigen.
Apoye el poste en un caballete de aserrar. Conecte el conjunto del
respaldo en la sección superior del poste (1).
Appoggiare il palo al cavalletto di supporto. Fissare il gruppo del tabellone
alla sezione superiore (1) del palo.
W
ARNING!
AVERTISSEMENT !
WARNUNG!
¡ADVERTENCIA!
AVVERTENZA!
SE CAUTION; ELEVATOR ASSEMBLY IS HEAVY.
U
TWO PEOPLE REQUIRED FOR THIS PROCEDURE. FAILURE TO
FOLLOW THIS WARNING COULD RESULT IN SERIOUS INJURY
AND/OR PROPERTY DAMAGE.
SOYEZ PRUDENT, CAR LE SYSTÈME ÉLÉVATEUR EST LOURD. IL
FAUT S'Y PRENDRE À DEUX POUR RÉALISER CETTE
ROCÉDURE. SUIVEZ CET AVERTISSEMENT SOUS PEINE
P
D'ENCOURIR DES BLESSURES GRAVES ET/OU DES DÉGÂTS
MATÉRIELS.
BITTE VORSICHTIG ZU WERKE GEHEN; DIE
VERLÄNGERUNGSBAUGRUPPE IST SEHR SCHWER. DIESER
VERFAHRENSSCHRITT MUSS VON ZWEI PERSONEN
USGEFÜHRT WERDEN. EIN MISSACHTEN DIESER WARNUNG
A
KANN ZU SCHWEREN VERLETZUNGEN UND/ODER
SACHSCHÄDEN FÜHREN.
TENGA CUIDADO; EL CONJUNTO DEL ELEVADOR ES PESADO.
SE REQUIEREN DOS PERSONAS PARA REALIZAR ESTE
PROCEDIMIENTO. SI NO SE OBSERVA ESTA ADVERTENCIA SE
PODRÍA OCASIONAR UNA LESIÓN GRAVE Y/O DAÑOS A LA
PROPIEDAD.
FARE ATTENZIONE: IL SISTEMA DI REGOLAZIONE
DELL'ALTEZZA È PESANTE.
PER COMPLETARE QUESTA OPERAZIONE, BISOGNA ESSERE IN
DUE. L'INOSSERVANZA DI QUESTA AVVERTENZA PUÒ
RISULTARE IN GRAVI INFORTUNI E/O DANNI ALLE COSE.
NOTE / REMARQUE /
1
HINWEIS / NOTA /
NOTA:
28
23
23
28
27
Before going on to next step, set
adjustable system assembly to the 10’
(3.05 m) setting.
Avant de passer à l'étape suivante,
réglez le système réglable à 3,05 m.
Bevor zum nächsten Schritt
übergegangen wird, ist das
Einstellsystem auf die 3,05-m- (10Fuß)-Markierung einzustellen.
Antes de continuar con el siguiente
paso, coloque el conjunto del sistema
ajustable a una altura de 3,05 m (10').
30
23
23
30
27
2.
Install handle assembly to long elevator tubes (28) using bolt
(27), spacers (39), and nut (24) as shown.
Installez la poignée sur les tubes inférieurs du système
élévateur (28) en utilisant le boulon (27), les entretoises (39) et
l'écrou (24), comme illustré.
Die Griffeinheit wie gezeigt mit Schraube (27),
Abstandsstücken (39) und Mutter (24) an den langen
Verlängerungsrohren (28) anbringen.
Instale el conjunto de la manija en los tubos elevadores largos
(28) usando el perno (27), separadores (39) y la tuerca (24)
como se muestra.
Installare il gruppo della maniglia sui tubi di regolazione
dell'altezza (28) più lunghi, adoperando il bullone (27), i
distanziatori (39) e il dado (24), come mostrato nella figura.
P/N 21500701 07/05
26
39
27
Prima di passare al punto successivo,
impostare il sistema di regolazione
dell'altezza su 3,05 m (10 piedi).
39
24
28
28
Page 27
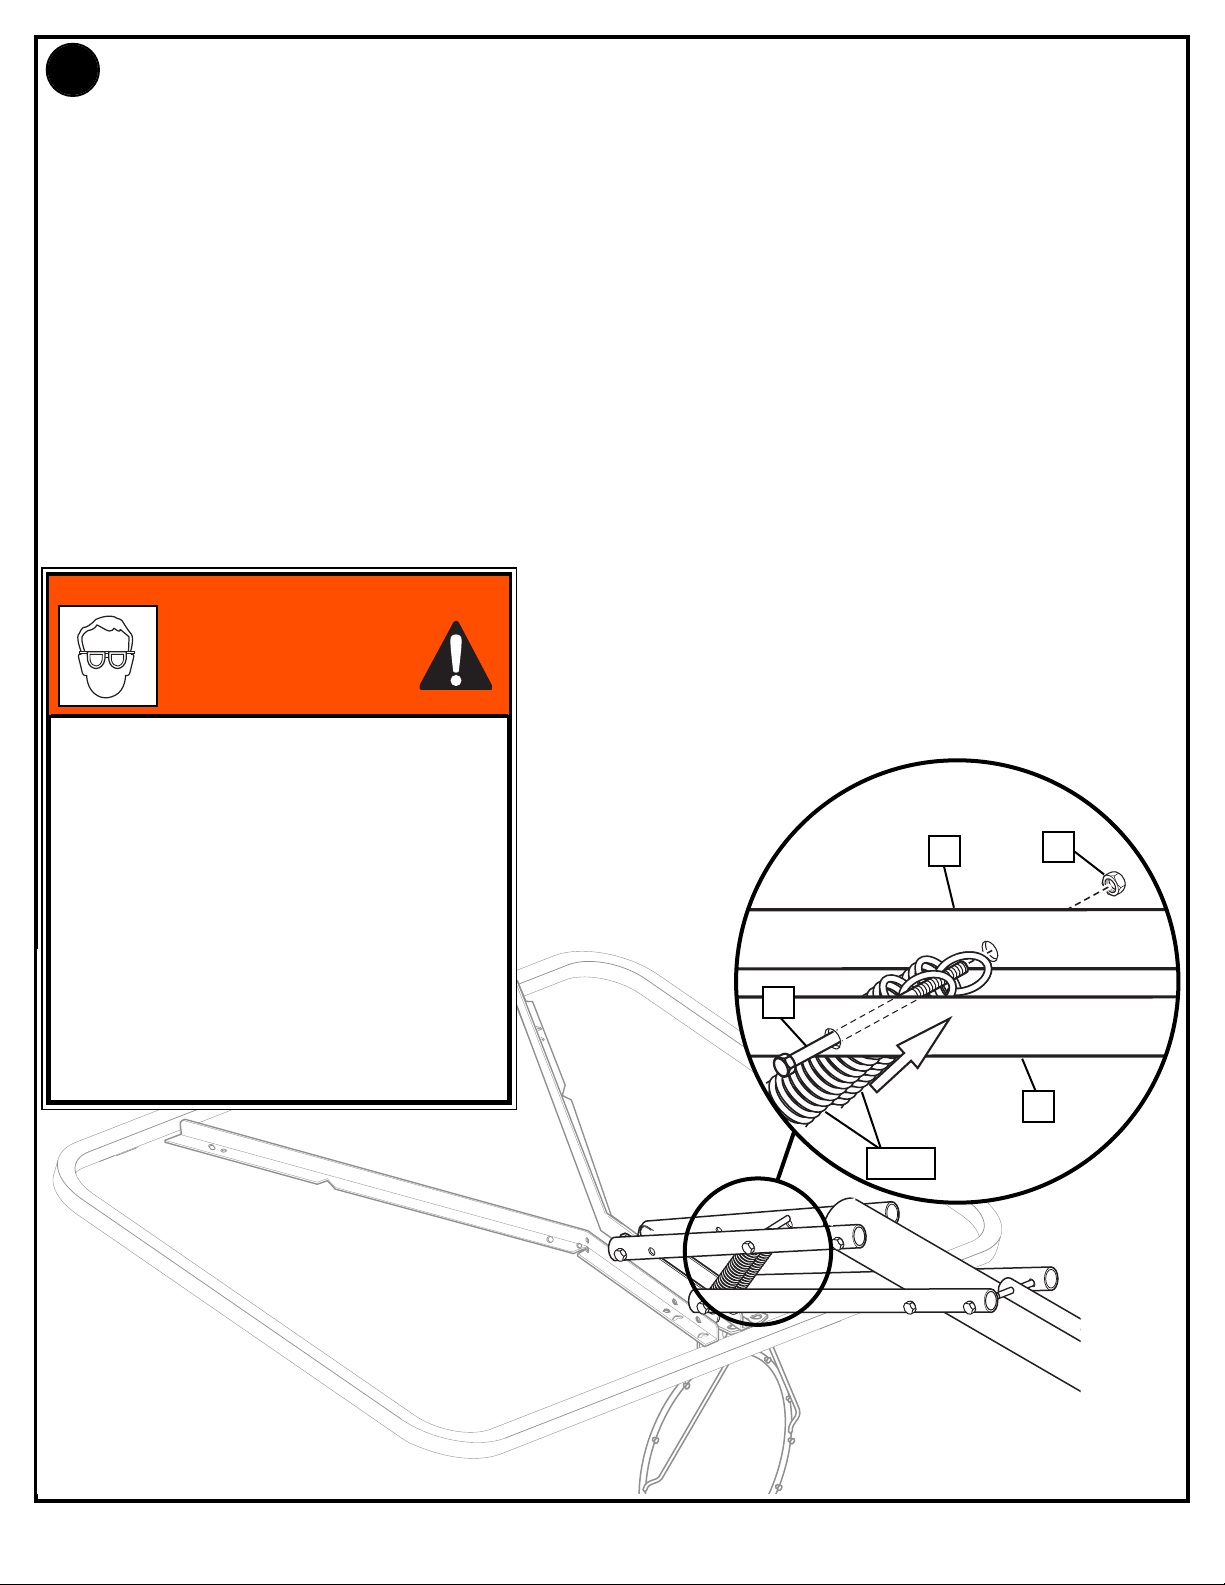
3.
Insert bolt (27) through left side of short elevator tube (30), then stretch spring or springs (29, 47) onto bolt (27).
Insert bolt (27) through right of side short elevator tube (30) and secure with nut (24).
Enfilez le boulon (27) dans le côté gauche du tube court du système élévateur (30), puis tendez le ou les ressorts
(29, 47) sur le boulon (27).
Enfilez le boulon (27) dans le côté droit du tube court du système élévateur (30), puis fixez avec l'écrou (24).
Die Schraube (27) durch das linke kurze Verlängerungsrohr (30) schieben und die Feder bzw. Federn (29, 47) über
die Schraube (27) strecken.
Die Schraube (27) durch die rechte Seite des kurzen Verlängerungsrohrs (30) schieben und mit der Mutter (24)
sichern.
Introduzca el perno (27) a través del lado izquierdo del tubo elevador corto (30), luego estire el resorte o los
resortes (29, 47) hasta el perno (27).
Introduzca el perno (27) a través del lado derecho del tubo elevador corto (30) y asegure con la tuerca (24).
Inserire il bullone (27) attraverso il lato sinistro del tubo (30) di regolazione dell'altezza più corto e allungare quindi la
molla (29, 47) (o le molle) sul bullone (27).
Inserire il bullone (27) nel lato destro del tubo (30) di regolazione dell'altezza più corto e fissarlo poi con il dado (24).
WARNING!
AVERTISSEMENT !
WARNUNG!
¡ADVERTENCIA!
AVVERTENZA!
USE EYE PROTECTION WHEN INSTALLING
SPRINGS.
PROTÉGEZ-VOUS LES YEUX LORSQUE
VOUS INSTALLEZ DES RESSORTS.
BEIM ANBRINGEN DER FEDERN
AUGENSCHUTZ TRAGEN!
CUANDO INSTALE LOS RESORTES UTILICE
PROTECTORES OCULARES.
DURANTE IL MONTAGGIO DELLE MOLLE
USARE DELLE PROTEZIONI PER GLI OCCHI.
27
47, 29
30
24
30
27
07/05 P/N 21500701
Page 28

Assemble rebar centering spacers (45) near
4.
op and bottom of rebar (44) as shown.
t
Assemblez les entretoises de centrage de la
barre d'armature (45) près du haut et du bas
de la barre (44), comme illustré.
Die zur Zentrierung der Versteifungsstange
(45) dienenden Abstandsstücke wie gezeigt
in der Nähe des oberen und unteren Endes
der Stange (44) anbringen.
Monte los separadores de centramiento de
la barra de refuerzo (45) cerca de las partes
superior e inferior de la barra de refuerzo
(44) como se muestra.
Montare i distanziatori (45) di centraggio
vicino ai lati superiore e inferiore della barra
di rinforzo (44), come illustrato.
lace rebar with spacers into bottom pole section (3) as shown.
P
5.
Placez une barre d'armature dans la section de poteau inférieure
(3) comme illustré.
Die Versteifungsstange wie gezeigt in das untere Stangenteil (3)
schieben.
Coloque la barra de refuerzo con los separadores en la sección
inferior del poste (3) como se muestra.
Collocare la barra di rinforzo con i distanziatori nella sezione
inferiore (3) del palo, come da illustrazione.
45
45
3
2"
44
45
Reinforcement Bar
44
Barre d'armature
Versteifungsstange
Barra de refuerzo
Barra di rinforzo
3"
P/N 21500701 07/05
28
Page 29

Seal hole at the bottom of the bottom pole with heavy-duty tape (not
included) to retain rebar and concrete inside.
6.
Bouchez le trou en bas de la section de poteau inférieure avec du
ruban adhésif extra-fort (non fourni) pour retenir la barre d'armature et
le béton à l'intérieur.
Das Loch am unteren Ende des unteren Stangenteils mit
hochstrapazierfähigem Klebeband (nicht im Lieferumfang enthalten)
abdichten, um die Versteifungsstange und den Beton im Innern der
Stange zu sichern.
Selle el orificio que se encuentra en la parte inferior de la sección
inferior del poste con cinta para uso pesado (no se incluye) a fin de
fijar en el interior la barra de refuerzo y el concreto.
Sigillare il foro in fondo alla sezione inferiore del palo con del nastro
per servizio pesante (non incluso), per bloccare la barra di rinforzo ed il
calcestruzzo all'interno.
Fill pole with concrete to approximately 1” (2.54 cm) below bottom elevator
hole as shown.
7.
Remplissez le poteau de béton jusqu'à environ 2,54 cm en dessous du trou
inférieur du système élévateur, comme illustré.
Die Stange wie gezeigt bis zu ca. 2,54 cm (1 Zoll) unter dem unteren Loch der
Verlängerungsstangenvorrichtung mit Beton füllen.
Heavy-Duty Tape (Not Included)
uban extra-fort (non fourni)
R
Hochstrapazierfähiges Klebeband (nicht im
Nastro per applicazioni pesanti (non compreso)
ieferumfang enthalten)
L
inta para uso pesado (No se incluye)
C
44
Llene con concreto aproximadamente 1" (2.54 cm) del poste debajo del
orificio elevador inferior como se muestra.
Riempire il palo con calcestruzzo fino a circa 2,5 cm (1") al di sotto del foro
più basso del sistema di regolazione dell'altezza.
IMPORTANT!
IMPORTANT!
WICHTIG!
¡IMPORTANTE!
IMPORTANTE!
MAKE SURE THAT CONCRETE DOES NOT BULGE
FROM THE END OF POLE ASSEMBLY. ALLOW
CONCRETE TO COMPLETELY CURE.
ASSUREZ-VOUS QUE LE BÉTON NE DÉBORDE
PAS DE L'EXTRÉMITÉ DU POTEAU. LAISSEZ
COMPLÈTEMENT SÉCHER LE BÉTON.
SICHERSTELLEN, DASS SICH DER BETON VOM
ENDE DES STANGENAUFBAUS HER NICHT
AUSBEULT. DEN BETON VOLLSTÄNDIG
TROCKNEN LASSEN.
ASEGÚRESE DE QUE EL CONCRETO NO SE
SALGA DEL EXTREMO DEL CONJUNTO DEL
POSTE. PERMITA QUE EL CONCRETO SE
ENDUREZCA COMPLETAMENTE.
ACCERTARSI CHE IL CALCESTRUZZO NON
FUORIESCA DALL'ESTREMITÀ DEL PALO.
LASCIAR INDURIRE COMPLETAMENTE IL
CALCESTRUZZO.
FAILURE TO FILL YOUR POLE COMPLETELY WITH CONCRETE AS
DESCRIBED IN THESE INSTRUCTIONS WILL VOID ALL WARRANTIES
WRITTEN AND IMPLIED.
REMPLISSEZ COMPLÈTEMENT LE POTEAU DE BÉTON COMME INDIQUÉ ICI
SOUS PEINE D'ANNULER TOUTES LES GARANTIES ÉCRITES ET TACITES.
WENN SIE DIE STANGE NICHT GEMÄSS DER BESCHREIBUNG IN DIESER
ANLEITUNG GANZ MIT BETON FÜLLEN, WERDEN ALLE SCHRIFTLICHEN
UND STILLSCHWEIGENDEN GARANTIEN UNWIRKSAM.
SI NO LLENA COMPLETAMENTE EL POSTE CON CONCRETO COMO SE
DESCRIBE EN ESTAS INSTRUCCIONES SE ANULARÁN TODAS LAS
GARANTÍAS ESCRITAS E IMPLÍCITAS.
IL MANCATO RIEMPIMENTO COMPLETO DEL PALO CON CALCESTRUZZO
COME DA QUESTE ISTRUZIONI INVALIDA TUTTE LE GARANZIE, ESPLICITE E
IMPLICITE, DI QUESTO PRODOTTO.
IMPORTANT! / IMPORTANT! / WICHTIG!
¡IMPORTANTE! / IMPORTANTE!
1
IMPORT
WAIT A MINIMUM OF 24 HOURS BEFORE GOING ON TO NEXT STEP. CONCRETE MUST CURE.
ANT!:
IMPORTANT !:
ATTENDEZ AU MOINS 24 HEURES AVANT DE PASSER À L'ÉTAPE SUIVANTE. LE BÉTON DOIT FINIR DE PRENDRE.
WICHTIG!:
VOR DEM NÄCHSTEN ARBEITSSCHRITT
MINDESTENS
24 STUNDEN LANG WARTEN. DER ZEMENT MUSS TROCKNEN.
¡IMPORTANTE!:
ESESPERE UN MÍNIMO DE 24 HORAS ANTES DE CONTINUAR CON EL PASO SIGUIENTE. EL CONCRETO DEBE ENDURECERSE.
IMPORT
ATTENDERE ALMENO 24 ORE PRIMA DI PASSARE AL PUNTO SUCCESSIVO. IL CALCESTRUZZO DEVE INDURIRSI.
ANTE!:
29
07/05 P/N 21500701
Page 30

8.
Install Clips
Installez les pinces.
Netzhalteklammern (Clips) anbringen.
Instale los sujetadores.
Installazione dei fermi
Insert one “arm” of clip into ram as shown. Twist “body” of clip slightly so that second “arm” slides over
t
he top of the first “arm” as shown.
Push in direction indicated by arrows.
Insérez un " bras " de la pince dans l'éperon, comme illustré. Tournez légèrement le corps de la pince
de sorte que le second bras glisse par-dessus le premier, comme illustré. Poussez dans le sens des
flèches.
Einen Arm des Clips wie gezeigt in die Spirale einsetzen. Den Hauptteil des Clips etwas drehen,
sodass der zweite Arm wie gezeigt oben über den ersten Arm geschoben werden kann. In die durch
die Pfeile angezeigte Richtung schieben.
Introduzca un "brazo" del sujetador en el accionador como se muestra. Tuerza ligeramente el "cuerpo"
del sujetador de manera que el segundo "brazo" se deslice sobre el primer "brazo" como se muestra.
Empuje hacia la dirección que indican las flechas.
Inserire un "braccio" del fermo nel cerchio, come mostrato. Girare lievemente il "corpo" del fermo in
modo che il secondo "braccio" scorra sopra il primo, come illustrato.
Spingere nel senso indicato dalle frecce.
Push second “arm” back and into ram as shown.
Rétractez le second " bras " dans l'éperon, comme illustré.
Den zweiten Arm wie gezeigt nach innen drücken und in die Spirale stecken.
Empuje el segundo "brazo" hacia atrás y hacia el accionador como se muestra.
Spingere il secondo "braccio" all'indietro nel cerchio, come mostrato.
33
32
A
A
B
B
C
LIP "ARM"
" BRAS " DE LA PINCE
CLIP-ARM
"BRAZO" DEL SUJETADOR
"BRACCIO" DEL FERMO
CLIP "BODY"
" CORPS " DE LA PINCE
CLIP-HAUPTTEIL
"CUERPO" DEL SUJETADOR
"CORPO" DEL FERMO
WARNING!
AVERTISSEMENT !
WARNUNG!
¡ADVERTENCIA!
AVVERTENZA!
USE OF THIS PRODUCT WITHOUT PROPER
INSTALLATION OF SMART CLIPS
A
LL SMART CLIPS
RESULT IN BODILY HARM. BE SURE TO
F
OLLOW DIRECTIONS CAREFULLY.
L'UTILISATION DE CE PRODUIT SANS
L'INSTALLATION CORRECTE DES SMART CLIPS®
OU EN L'ABSENCE DE CERTAINES SMART
C
LIPS® EXPOSE LES JOUEURS À DES
BLESSURES. VEILLEZ À SUIVRE
S
CRUPULEUSEMENT CES INSTRUCTIONS.
EIN GEBRAUCH DIESES PRODUKTS OHNE
O
RDNUNGSGEMÄSS ANGEBRACHTE SMART
CLIPS® BZW. MIT FEHLENDEN SMART CLIPS®
K
ANN VERLETZUNGEN NACH SICH ZIEHEN. DIE
ANLEITUNG GENAU BEFOLGEN.
EL USO DE ESTE PRODUCTO SIN LA
INSTALACIÓN ADECUADA DE LOS
S
UJETADORES SMART CLIP®, O LA FALTA DE
ELLOS PUEDE DAR COMO RESULTADO DAÑOS
C
ORPORALES. ASEGÚRESE DE SEGUIR
CUIDADOSAMENTE LAS INSTRUCCIONES.
L
'IMPIEGO DI QUESTO PRODOTTO SENZA AVER
CORRETTAMENTE INSTALLATO I FERMI SMART
C
LIPS® O CON TALI FERMI MANCANTI PUÒ
CAUSARE INFORTUNI. ACCERTARSI DI AVER
S
EGUITO CON CURA TUTTE LE ISTRUZIONI.
®
A
RE NOT PRESENT COULD
®
, OR WHEN
Twist “body” of clip slightly again to spread “arms” of clip.
Clip “arms” must be flat and touching edge to edge as shown, not overlapping.
Tournez légèrement le corps de la pince une nouvelle fois pour en étaler les bras. Les bras doivent être à plat et se toucher bord à bord, comme illustré, sans
se chevaucher.
Den Hauptteil des Clips noch einmal leicht drehen, um die Arme des Clips zu spreizen. Die Arme des Clips müssen flach liegen und sich wie gezeigt an den
Kanten berühren, ohne einander zu überlappen.
Otra vez tuerza ligeramente el "cuerpo" del sujetador para abrir los "brazos" del sujetador. Los "brazos" del sujetador deben quedar planos y tocándose de
C
C
borde a borde, sin traslaparse, como se muestra.
Ruotare lievemente il "corpo" del fermo una seconda volta per separare i "bracci".
I "bracci" devono giacere nello stesso piano ed i bordi devono toccarsi come illustrato, senza sovrapporsi.
NET INSTALLATION / INSTALLATION DU FILET / ANBRINGUNG DES NETZES / INSTALACIÓN DE LA RED / INSTALLAZIONE DELLA RETE
SIDE VIEW
9.
32
33
34
Insert net into bottom of clip as shown.
Insérez le filet dans la base de la pince, comme
illustré.
Das Netz wie gezeigt unten in den Clip stecken.
Introduzca la red en la parte inferior del sujetador
como se muestra.
Inserire la rete nella parte inferiore del fermo, come
mostrato.
P/N 21500701 07/05
Twist net until it snaps into position. Net must be centered
through clip.
Tournez le filet jusqu'à ce qu'il s'enclenche en position. Le filet
doit être centré dans la pince.
Das Netz drehen, bis es einschnappt. Das Netz muss im Clip
zentriert werden.
Tuerza la red hasta que quede conectada en su posición. La
red debe quedar centrada a través del sujetador.
Ruotare la rete finché non scatta in sito. Dev'essere centrata
attraverso il fermo.
30
VUE DE CÔTÉ
SEITENANSICHT
VISTA LATERAL
VISTA LATERALE
NETZHALTEKLAMMER (CLIP)
NET
FILET
NETZ
RED
RETE
NET
FILET
NETZ
RED
RETE
NET CLIP
PINCE DE FILET
SUJETADOR DE LA RED
FERMO DELLA RETE
NETZHALTEKLAMMER (CLIP)
SUJETADOR DE LA RED
NET CLIP
PINCE DE FILET
FERMO DELLA RETE
Page 31

10ft
(3.05 m)
10ft
(3.05 m)
S
ECTION D: UPRIGHT, SECURE AND USE POLE SYSTEM
SECTION D : REDRESSEMENT, FIXATION ET UTILISATION DU POTEAU
BAUABSCHNITT D: AUFRICHTEN, SICHERN UND VERWENDEN DES STANGENSYSTEMS
SECCIÓN D: LEVANTE, ASEGURE Y USE EL SISTEMA DEL POSTE
SEZIONE D - INNALZAMENTO, FISSAGGIO ED IMPIEGO DEL GRUPPO DEL PALO
This is what your system will look like when you’ve finished this section:
Voici à quoi ressemblera votre système lorsque vous en aurez fini avec cette section.
So sieht das System aus, wenn Sie mit diesem Bauabschnitt fertig sind.
Así es como se verá su sistema cuando haya terminado esta sección.
Una volta finita questa sezione, il sistema avrà l'aspetto illustrato qui accanto.
TOOLS REQUIRED FOR THIS SECTION / OUTILS REQUIS POUR CETTE SECTION / FÜR DIESEN BAUABSCHNITT BENÖTIGTES
WERKZEUG / HERRAMIENTAS REQUERIDAS PARA ESTA SECCIÓN / ATTREZZI NECESSARI PER QUESTA SEZIONE
Wedge
Cale
Keil
Cuña
Cuneo
After concrete has cured, remove tape, install pole cap (26), fit pole
1.
assembly into sleeve (4).
Une fois que le béton a pris, retirez le ruban, installez le capuchon du
poteau (26), puis calez le poteau dans son manchon (4).
Nach dem Trocknen des Zements das Klebeband entfernen, die
Stangenkappe (26) aufsetzen, und den Stangenaufbau in die Muffe (4)
einsetzen.
Después de que el concreto se haya endurecido, quite la cinta, instale la
tapa del poste (26), coloque el conjunto del poste en la manga (4).
Dopo l'indurimento del calcestruzzo
, rimuovere il nastro, inserire il
cappuccio del palo (26) e inserire il gruppo del palo nel manicotto (4).
WARNING!
AVERTISSEMENT !
WARNUNG!
¡ADVERTENCIA!
AVVERTENZA!
USE CAUTION; ELEVATOR ASSEMBLY IS HEAVY.
TWO PEOPLE REQUIRED FOR THIS PROCEDURE. FAILURE TO
FOLLOW THIS WARNING COULD RESULT IN SERIOUS INJURY
AND/OR PROPERTY DAMAGE.
Hammer
Marteau
Hammer
Martillo
Martello
2.
Use wedge to gently tap cap of ground
sleeve until tight.
Utilisez la cale pour tapoter sur le
capuchon du manchon (5) jusqu'à ce qu'il
soit bien fixé.
Mit einem Keil leicht gegen die Abdeckung
der Bodenmuffe (5) klopfen, bis diese fest
sitzt.
Use la cuña para golpear suavemente la
tapa de la manga del piso (5) hasta que
quede ajustada.
Con il cuneo, picchiettare delicatamente il
cappuccio del manicotto finché non è ben
fisso.
26
SOYEZ PRUDENT, CAR LE SYSTÈME ÉLÉVATEUR EST LOURD. IL
FAUT S'Y PRENDRE À DEUX POUR RÉALISER CETTE
PROCÉDURE. SUIVEZ CET AVERTISSEMENT SOUS PEINE
D'ENCOURIR DES BLESSURES GRAVES ET/OU DES DÉGÂTS
MATÉRIELS.
BITTE VORSICHTIG ZU WERKE GEHEN; DIE
VERLÄNGERUNGSBAUGRUPPE IST SEHR SCHWER. DIESER
VERFAHRENSSCHRITT MUSS VON ZWEI PERSONEN
AUSGEFÜHRT WERDEN. EIN MISSACHTEN DIESER WARNUNG
KANN ZU SCHWEREN VERLETZUNGEN UND/ODER
SACHSCHÄDEN FÜHREN.
TENGA CUIDADO; EL CONJUNTO DEL ELEVADOR ES PESADO.
SE REQUIEREN DOS PERSONAS PARA REALIZAR ESTE
PROCEDIMIENTO. SI NO SE OBSERVA ESTA ADVERTENCIA SE
PODRÍA OCASIONAR UNA LESIÓN GRAVE Y/O DAÑOS A LA
PROPIEDAD.
FARE ATTENZIONE: IL SISTEMA DI REGOLAZIONE
DELL'ALTEZZA È PESANTE.
PER COMPLETARE QUESTA OPERAZIONE, BISOGNA ESSERE IN
DUE. L'INOSSERVANZA DI QUESTA AVVERTENZA PUÒ
RISULTARE IN GRAVI INFORTUNI E/O DANNI ALLE COSE.
4
PLAYING SURFACE
SURFACE DE JEU
SPIELFLÄCHE
SUPERFICIE DE JUEGO
SUPERFICIE DI GIOCO
31
5
07/05 P/N 21500701
Page 32
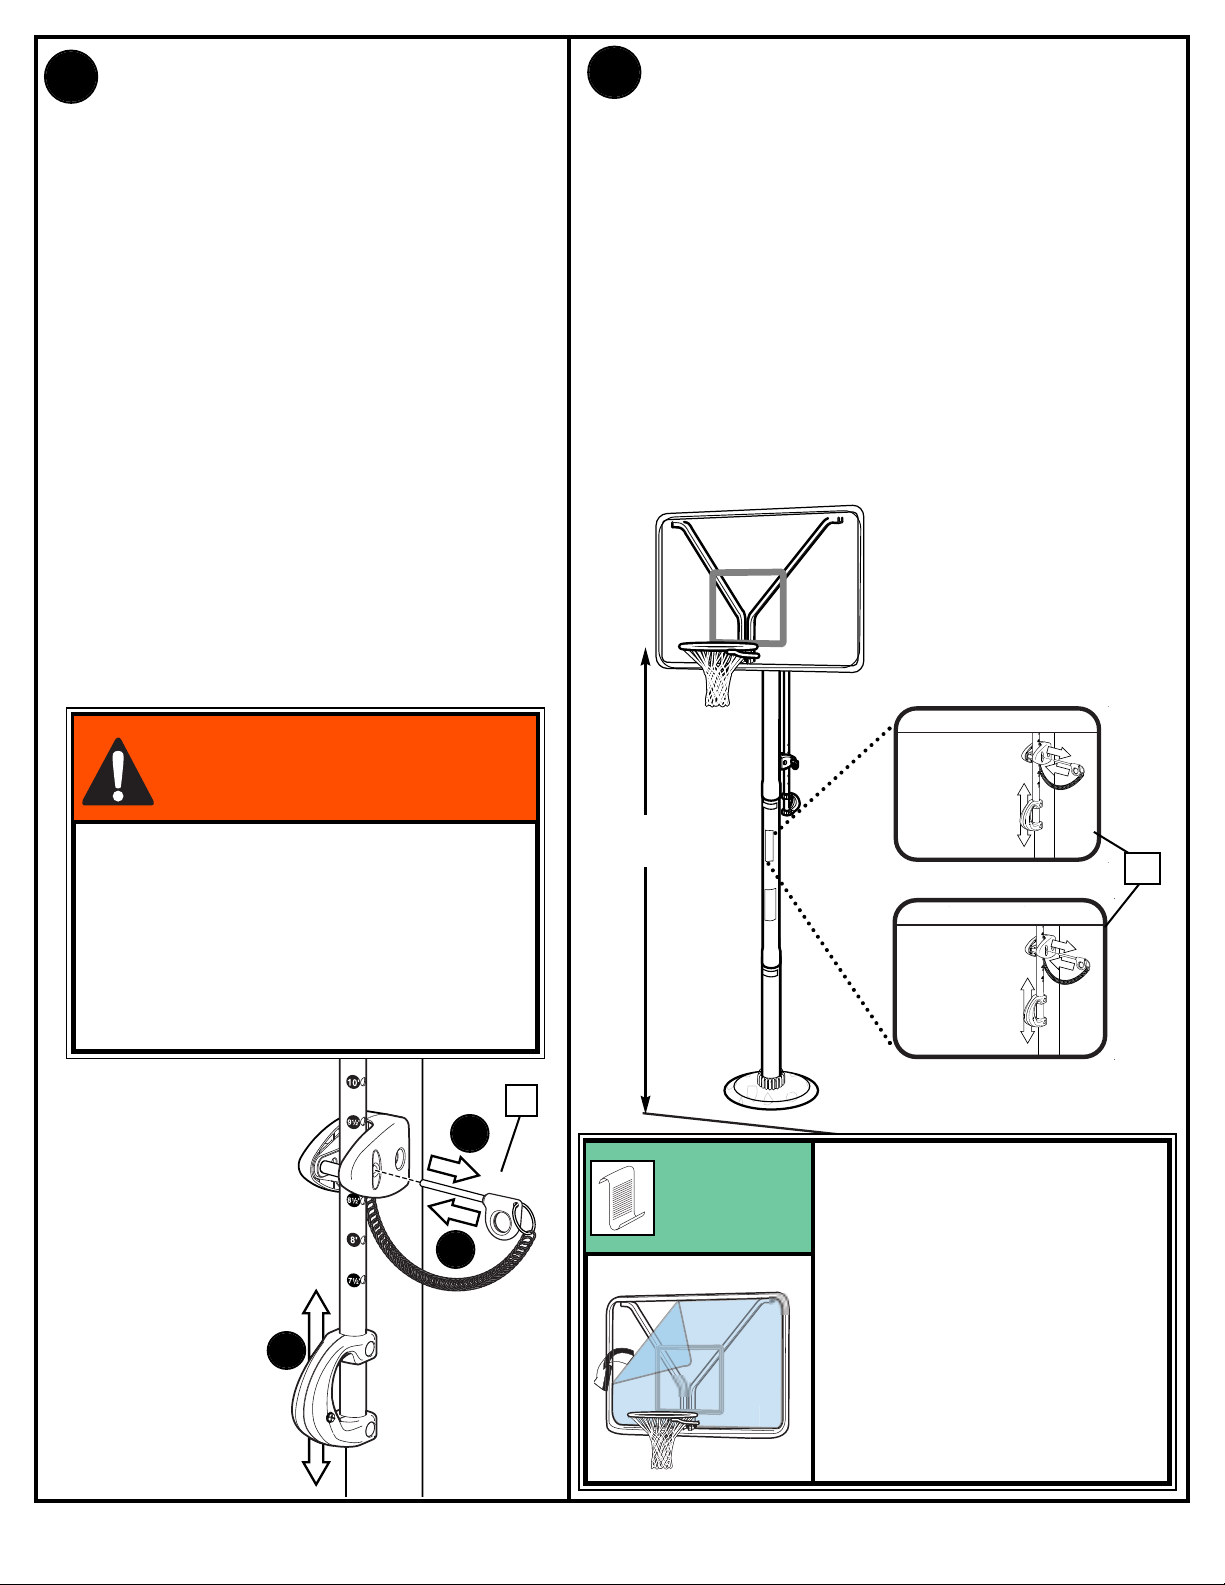
A. While holding handle, remove pin (16).
Size = 4" x 3"
Corner Radius = 3/8"
Die Cut Label
3.25 Mil Vinyl
A
ll Temp. Permanent Adhesive
1 Mil. Polypropolyne Overlaminate
Illustrator 8.0 = EPS
Backing + 1/16 Circumference
Rolls of 500
2
2
1
3
201251 2/99
HEIGHT ADJUSTMENT
TO ADJUST BACKBOARD:
1. While holding handle, remove pin.
2. Move elevator up or down to
d
esired height.
3
. Replace pin full length to lock
s
ystem at desired height.
S
ize = 4" x 3"
Corner Radius = 3/8"
Die Cut Label
3.25 Mil Vinyl
All Temp. Permanent Adhesive
1
Mil. Polypropolyne Overlaminate
Illustrator 8.0 = EPS
Backing + 1/16 Circumference
Rolls of 500
2
2
1
3
2
01251 2/99
HEIGHT ADJUSTMENT
TO ADJUST BACKBOARD:
1. While holding handle, remove pin.
2. Move elevator up or down to
desired height.
3. Replace pin full length to lock
system at desired height.
. Move elevator up or down to desired
B
3.
height.
C. Replace pin (16) full length to lock
system at desired height.
A. Tout en tenant la poignée, retirez la goupille (16).
B. Montez ou abaissez le système élévateur jusqu'à la
hauteur voulue.
C. Remettez la goupille (16) à sa place en l'enfonçant à
fond pour bloquer le système à la hauteur désirée.
A. Den Griff festhalten und den Stift (16) herausziehen.
B. Die Verlängerungsvorrichtung bis zur gewünschten
öhe nach oben oder unten verschieben.
H
C. Den Stift (16) zum Verriegeln des Systems auf der
gewünschten Höhe ganz hineinschieben.
A. Mientras sujeta la manija, quite el pasador (16).
B. Mueva el elevador hacia arriba o hacia abajo a la
altura deseada.
C. Vuelva a colocar el pasador (16) a toda su longitud
para fijar el sistema a la altura deseada.
A. Rimuovere il perno (16), trattenendo la maniglia.
B. Spostare il sistema di regolazione dell'altezza verso
l'alto o verso il basso fino a raggiungere l'altezza
desiderata.
C. Rimontare il perno (16) per bloccare il sistema in
corrispondenza dell'altezza desiderata.
Apply height adjustment label (35) to front of pole as
4.
s
hown.
Regulation rim height is 10 feet (3.05 m).
Collez l'étiquette de réglage de la hauteur (35) à l'avant du poteau,
c
omme illustré. La hauteur réglementaire du cerceau est de 3,05
m (10 pieds).
Den Höheneinstellaufkleber (35) wie gezeigt an der Vorderseite
d
er Stange anbringen. Der Korbrand wird den offiziellen Regeln
gemäß in einer Höhe von 3,05 m (10 Fuß) angebracht.
Aplique la calcomanía de ajuste de la altura (35) en la parte frontal
del poste como se muestra. La altura reglamentaria del borde es
de 10 pies (3.05 m).
Affiggere la targhetta di indicazione dell'altezza (35) al palo, come
mostrato. L'altezza regolamentare del cerchio è di 3,05 m (10
piedi).
WARNING!
AVERTISSEMENT !
WARNUNG!
¡ADVERTENCIA!
AVVERTENZA!
DO NOT ALLOW CHILDREN TO ADJUST HEIGHT.
INTERDISEZ À UN ENFANT DE RÉGLER LA HAUTEUR.
KINDERN DARF DAS VERSTELLEN DER HÖHE NICHT
GESTATTET WERDEN.
NO PERMITA QUE LOS NIÑOS AJUSTEN LA ALTURA.
NON PERMETTERE AI BAMBINI DI REGOLARE
L'ALTEZZA.
B.
C.
16
10 ft.
(3.05 m)
NOTE:
REMARQUE:
HINWEIS:
NOTA:
NOTA -
RÉGLAGE DE LA HAUTEUR
POUR AJUSTER LE PANNEAU :
1. Tout en tenant la poignée, retirez la
goupille.
2. Montez ou abaissez le système
élévateur jusqu'à la hauteur
voulue.
3. Remettez la goupille à sa place en
l'enfonçant à fond, pour bloquer le
système à la hauteur désirée.
Peel protective film from surface of acrylic
backboard prior
to use.
Décollez le film de protection de la surface
du panneau en acrylique avant usage.
Vor Gebrauch die Schutzfolie von der
Oberfläche der Akryl-Korbwand abziehen.
35
P/N 21500701 07/05
A.
Desprenda la película protectora de la
superficie del respaldo de acrílico antes de
usarlo.
Prima dell'uso, rimuovere dalla superficie dal
tabellone in acrilico la pellicola protettiva.
32
 Loading...