

HuddleCamHD HuddleView, SimplTrack2 Installation & Operation Manual
Ver. 1.1 – 4-19
Page1
HuddleCamHD
HuddleView
Auto Framing Camera
Installation & Operation Manual

Ver. 1.1 – 4-19
Page2
Table of Contents .
Precautions.…………………..………………………………………………….………..……………..………..………………
Page 3
Safety Tips…………………..……………..……………..……………..……………..……………..……………...........
Page 3
What’s in the Box……………..……………..………..…..……………..……………..……………..………………………
Page 3
Physical Descriptions.…………………..………………………………………………….………..……………..………….
Page 4
Front View of Camera……………..……………..……………..……………..……………..………………………….
Page 4
Rear View of Camera……………..………………....……………..……………..……………..………………………
Page 5
Basic Connection Instructions.…………………..………………………………………………….………..……………
Page 6
Network setup……………..……………..……………..……………..……………..……………..……………..….…..
Page 6
SDI Connections……………..……………..……………..……………..……………..……………..………………..…
Page 6
USB Connection……………..……………..……………..……………..……………..……………..………………...…
Page 6
DVI Connection.…………………..………………………………………………….………..……………..………..……
Page 6
Interface Descriptions.…………………..………………………………………………….………..……………..………..
Page 7
Tracking Software.…………………..………………………………………………….………..……………..…………
Page 7
Device Management Interface……………..……………..……………..……………..……………..……….
Page 7
Connect Camera……………..……………..……………..……………..………………………..………..………..
Page 9
Network Configuration……………..………………..……………..……………..……………..………………..
Page 10
Remote Configuration……………..……………..………………………..………………..………………………
Page 10
Remove Camera……………..……………..……………..……………..………………………..………..…………
Page 13
Configure Video Settings……………..……………..……………..……………..………………………..……..
Page 14
On Screen Display (OSD)
Page 17
Video……………..……………..………..……………..……………..……………..……………..…………..………..
Page 17
Exposure……………..……..……………..……………..………….……..……………..……………..…….………..
Page 17
White Balance……………..……..…………….…..……………..……………..……………..……………………..
Page 18
Pan Tilt Zoom……………..………..……………..……………..……………..……………..…………………..…..
Page 18
Systems……………..…………..…………..……………..……………..……………..……………..………………..
Page 19
Status……………..……………..………..……………..……………..……………..……………..……………….…..
Page 19
Restore Defaults……………..……………..………..……………..……………..…………………..……………..
Page 19
Using the IR Remote.…………………..………………………………………………….………..……………..…………..
Page 20
VISCA Commands.…………………..………………………………………………….………..……………..………..…….
Page 22
ACK / Completion……………..……………..……………..……………..……………..……………..………..……….
Page 22
Error Messages……………..……………..……………..……………..……………..……………..……………..……..
Page 22
Commands……………..……………..……………..……………..……………..……………..……………………..……
Page 23
Inquiry Commands……………..……………..……………..……………..……………..……………..…..…………..
Page 26
Tips & Tricks……………..………..…..……………..……………..……………..……………..…………………………...…
Page 28
Care of the Unit……………..……………..…………....……………..……………..……………..……………………..….
Page 28
Troubleshooting……………..……………..……………..……………..……………..……………..…………………..……
Page 29
Notes……………………………………………………………………………………………………………..……………………..
Page 30

Ver. 1.1 – 4-19
Page3
Precautions .
Safety Tips .
• Please read this manual carefully before using the camera.
• Avoid damage from stress, violent vibration or liquid intrusion during
transportation, storage, or installation.
• Take care of the camera during installation to prevent damage to the camera
case, ports, lens, or PTZ mechanism.
• Do not apply excessive voltage, use only the specified voltage. Otherwise, you
may experience an electrical shock.
• Keep the camera away from strong electromagnetic sources.
• Do not aim the camera at bright light sources (e.g. bright lights, the sun, etc.) for
extended periods of time.
• Do not clean the camera with any active chemicals or corrosive detergents.
• Do not disassemble the camera or any of the camera's components. If problems
arise, please contact your authorized dealer.
• After long term operation, moving components can wear down. Contact your
authorized dealer for repair.
What’s in the Box .
Supplied Hardware .
• 12X HuddleView Camera
• Power Supply
• 3m / 9.8’ USB 3.0 A-B Cable
• User Manual
• IR Remote
• RS-232 control cable
• Software Installation Disk
Ver. 1.1 – 4-19
Page4
Physical Descriptions .
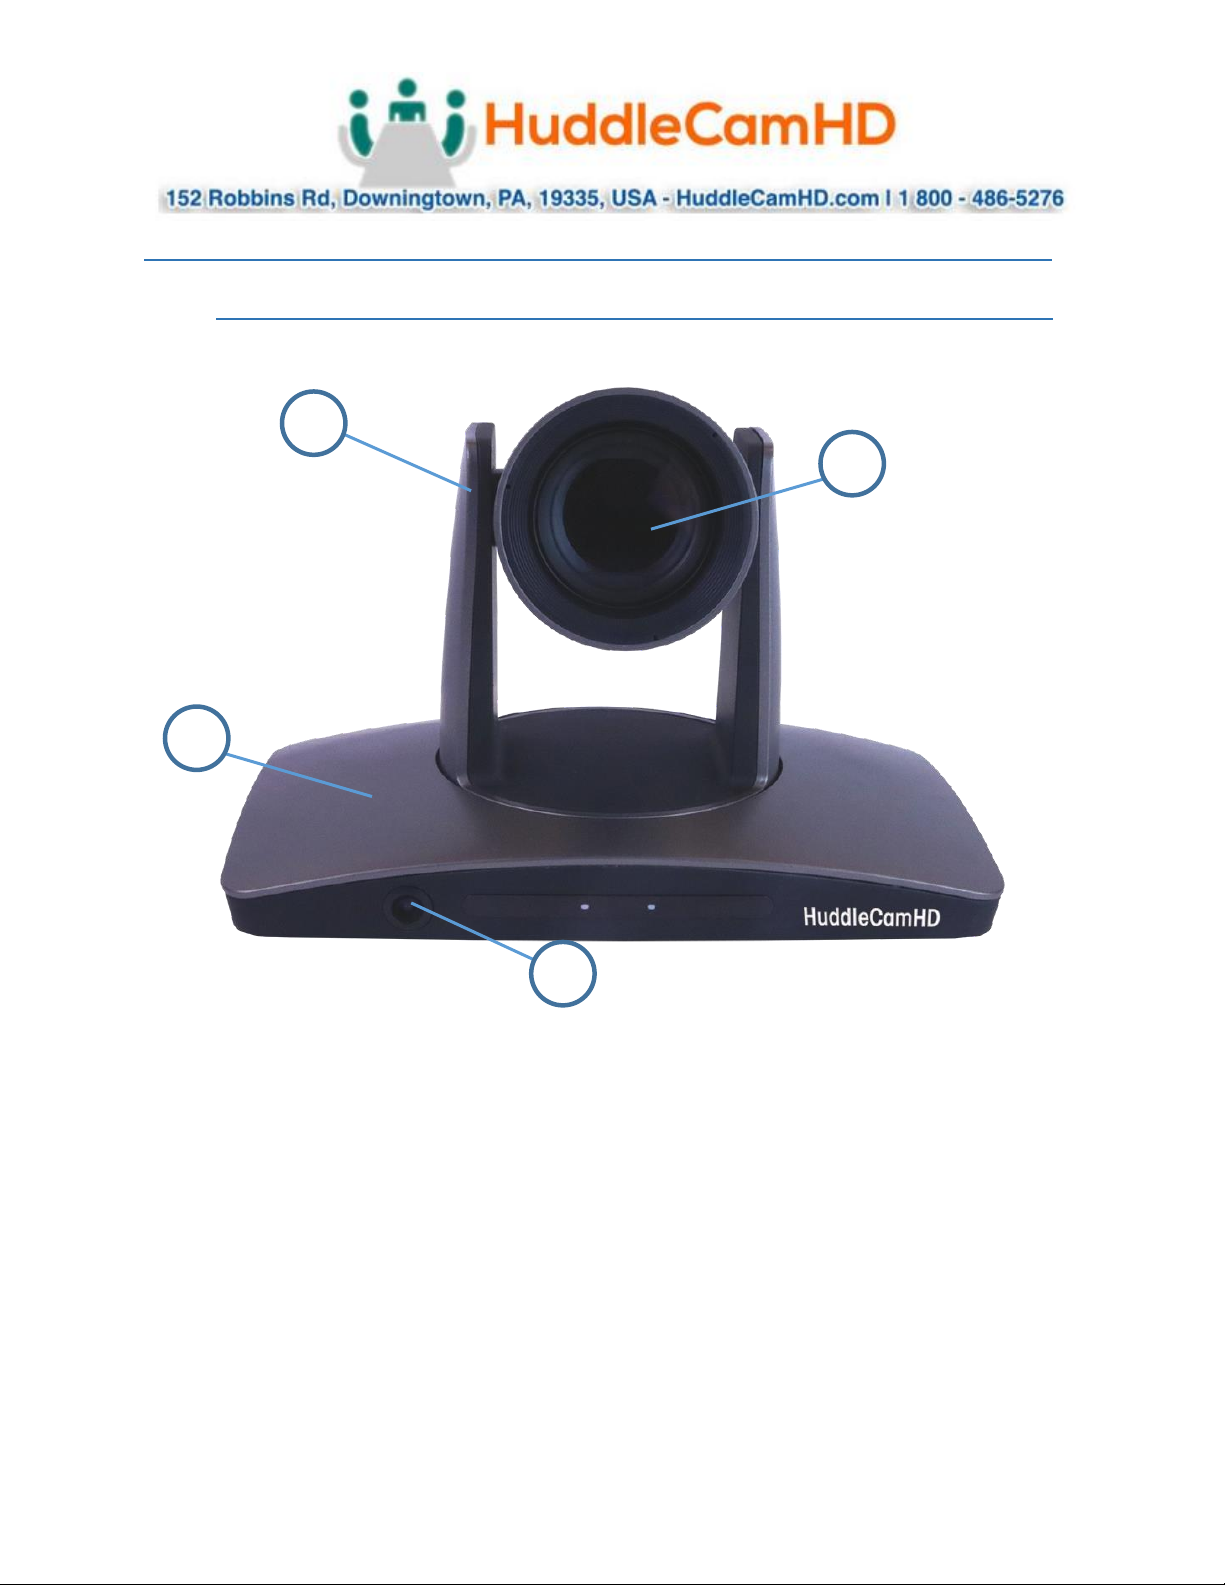
Front View of Camera .
1. Tracking Camera Head
2. Tracking Camera Lens
12X Optical Zoom
Field of View: 6.3°(Tele) ~ 72.5° (Wide)
3. Reference Camera Body
4. Reference Camera Lens
Fixed 2.4mm Lens
Field of View: 86° (Horizontal) / 52° (Vertical)
1
2
3
4
Ver. 1.1 – 4-19
Page5
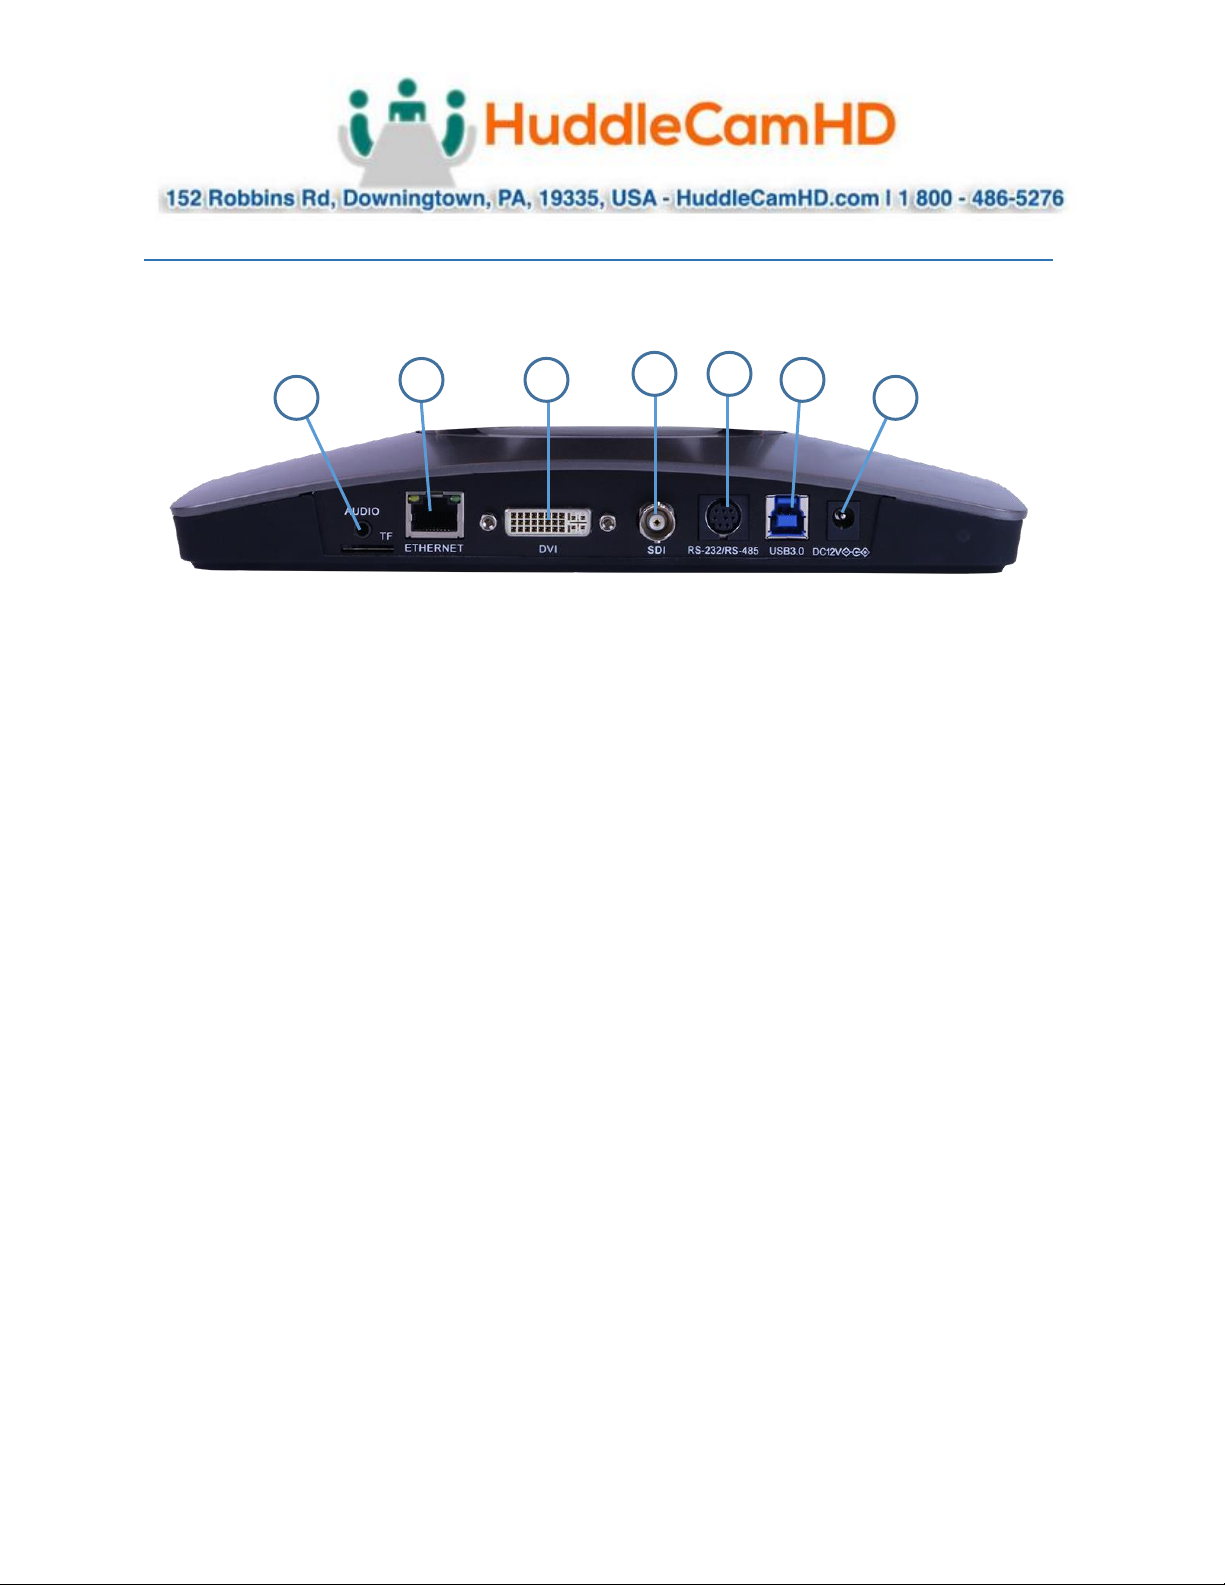
Back of the Camera .
1. Audio Line in
a. Embeds over IP Stream
2. Network Connection
a. Allows for software connection & RTSP/RTMP Streaming
3. DVI-D Connection
4. 3G-SDI Connection
5. VISCA Connection
a. Allows for joystick control of camera
6. USB 3.0 Connection
a. Note: IP Stream, DVI-D, 3G-SDI, & USB 3.0 connections are all simultaneous
7. DC12V Power Connection
3
5
6

Ver. 1.1 – 4-19
Page6
Basic Connection Instructions .
To Configure the Camera .
1. Connect a live network connection, from a network with a DHCP server, to the camera.
2. Connect the included Power Supply to the camera.
3. Wait for camera to come to Home Position.
4. Install the HuddleView software on your Windows PC on the same network as the camera
5. Open the HuddleView software to connect to your camera
Note: To pull the main RTSP stream please use the following URL
rtsp://<camera ip>:<rtsp port>/main.h264
(example: rtsp://192.168.111.85:3750/main.h264)
Note: To pull the sub RTSP stream please use the following URL
rtsp://<camera ip>:<rtsp port>/sub.h264
(example: rtsp://192.168.111.85:3750/sub.h264)
Note: To pull the low quality 3rd or 4th RTSP stream please use the following URL
rtsp://<camera ip>:<rtsp port>/<3 or 4>.h264
(example: rtsp://192.168.111.85:3750/<3 or 4>.h264)
SDI Connection .
1. Connect an SDI cable to the SDI output on the camera.
2. Connect the SDI cable to your equipment with an available SDI input.
a. Camera will auto adjust frame rate & resolution upon connecting to a video
software
USB Connection .
1. Connect a USB 3.0 cable to the USB output on the camera.
2. Connect the USB 3.0 output to an available USB 3.0 port on your PC
a. Camera will auto adjust frame rate & resolution upon connecting to a video
software
DVI Connection .
1. Connect a DVI cable to the DVI output of the camera.
2. Connect the DVI cable to your equipment with an available DVI input.
a. Camera will auto adjust frame rate & resolution upon connecting to a video
software
NOTE: Failure to follow these sequences may result in no connection.
Ver. 1.1 – 4-19
Page7
Interface Descriptions .
Tracking Software .
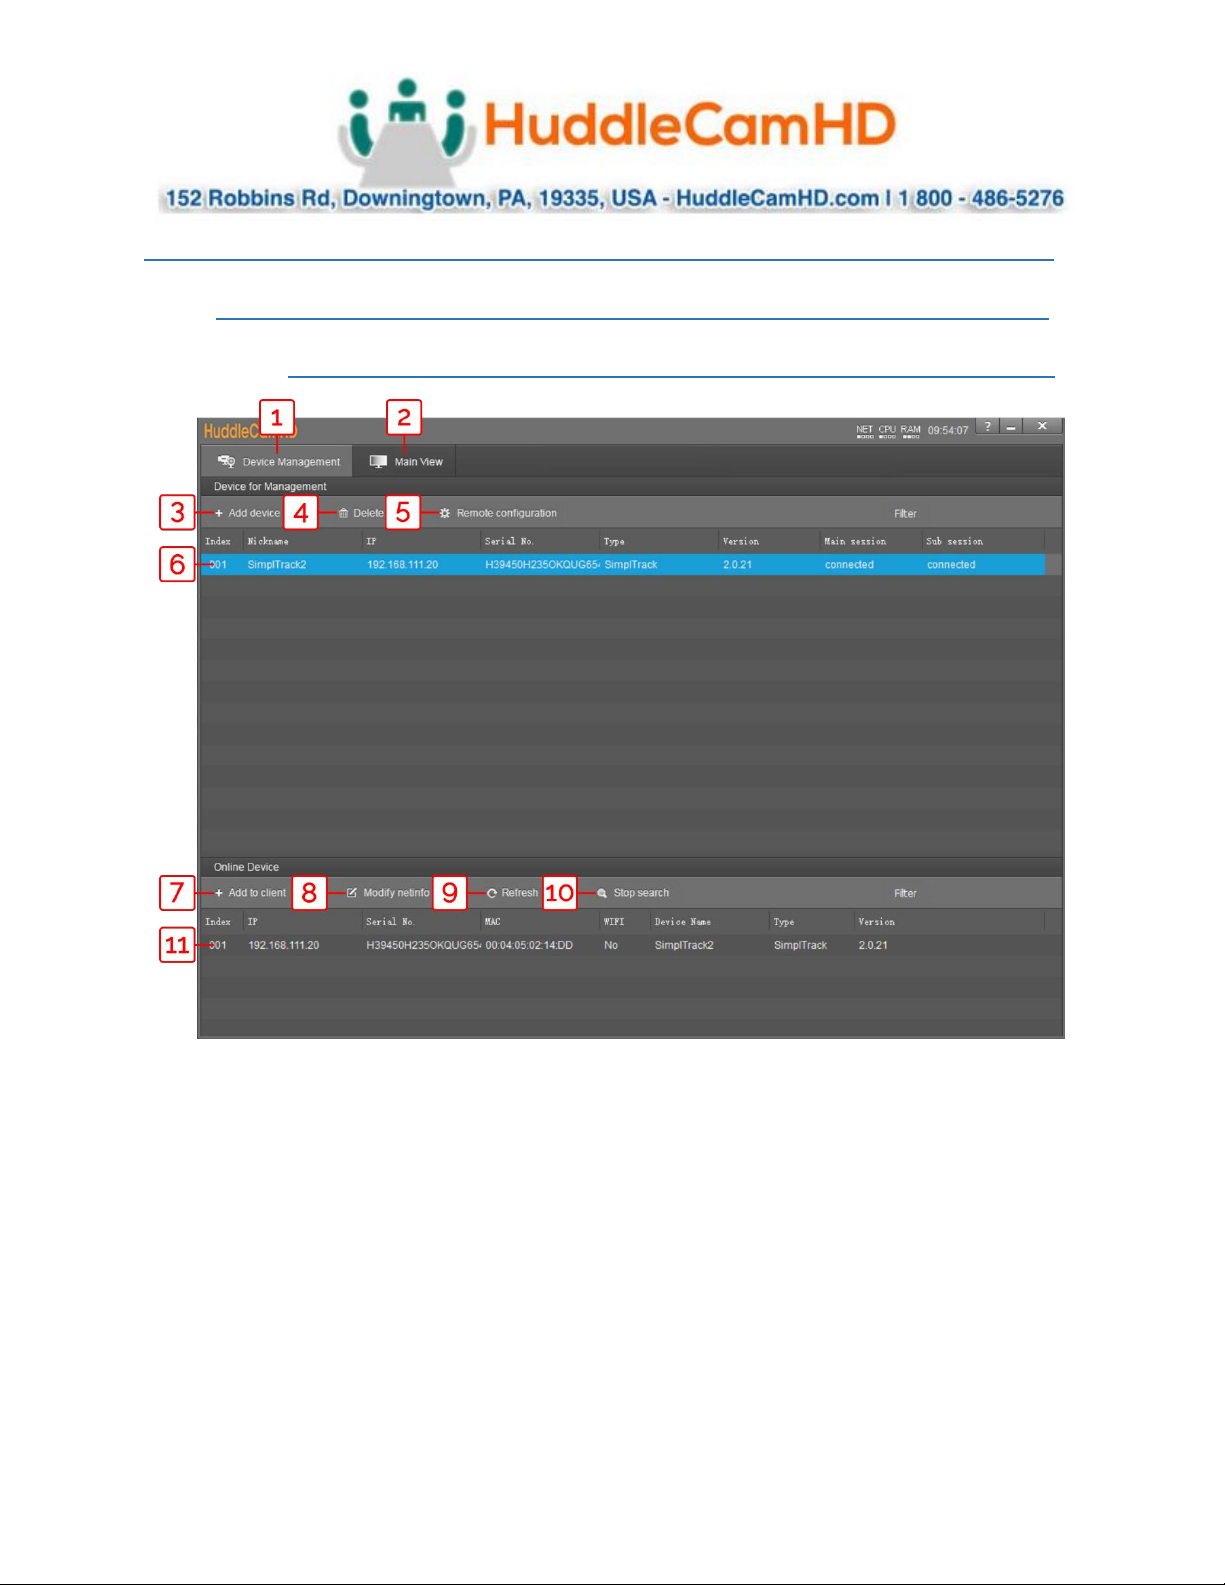
Device Management Interface .
1
Device Management interface
7
Add selected camera from Online Device
section
2
Video configuration interface
8
Modify network settings of selected Online
Device
3
Manually add device using IP address, Port
number, Username & Password
9
Refresh Online Device list
4
Delete selected device from Device
Management list
10
Start/Stop searching for Online Devices
5
Configure network settings of camera
11
*Unselected* device from Online Device
section
6
*Selected* device within Device
Management
Ver. 1.1 – 4-19
Page8
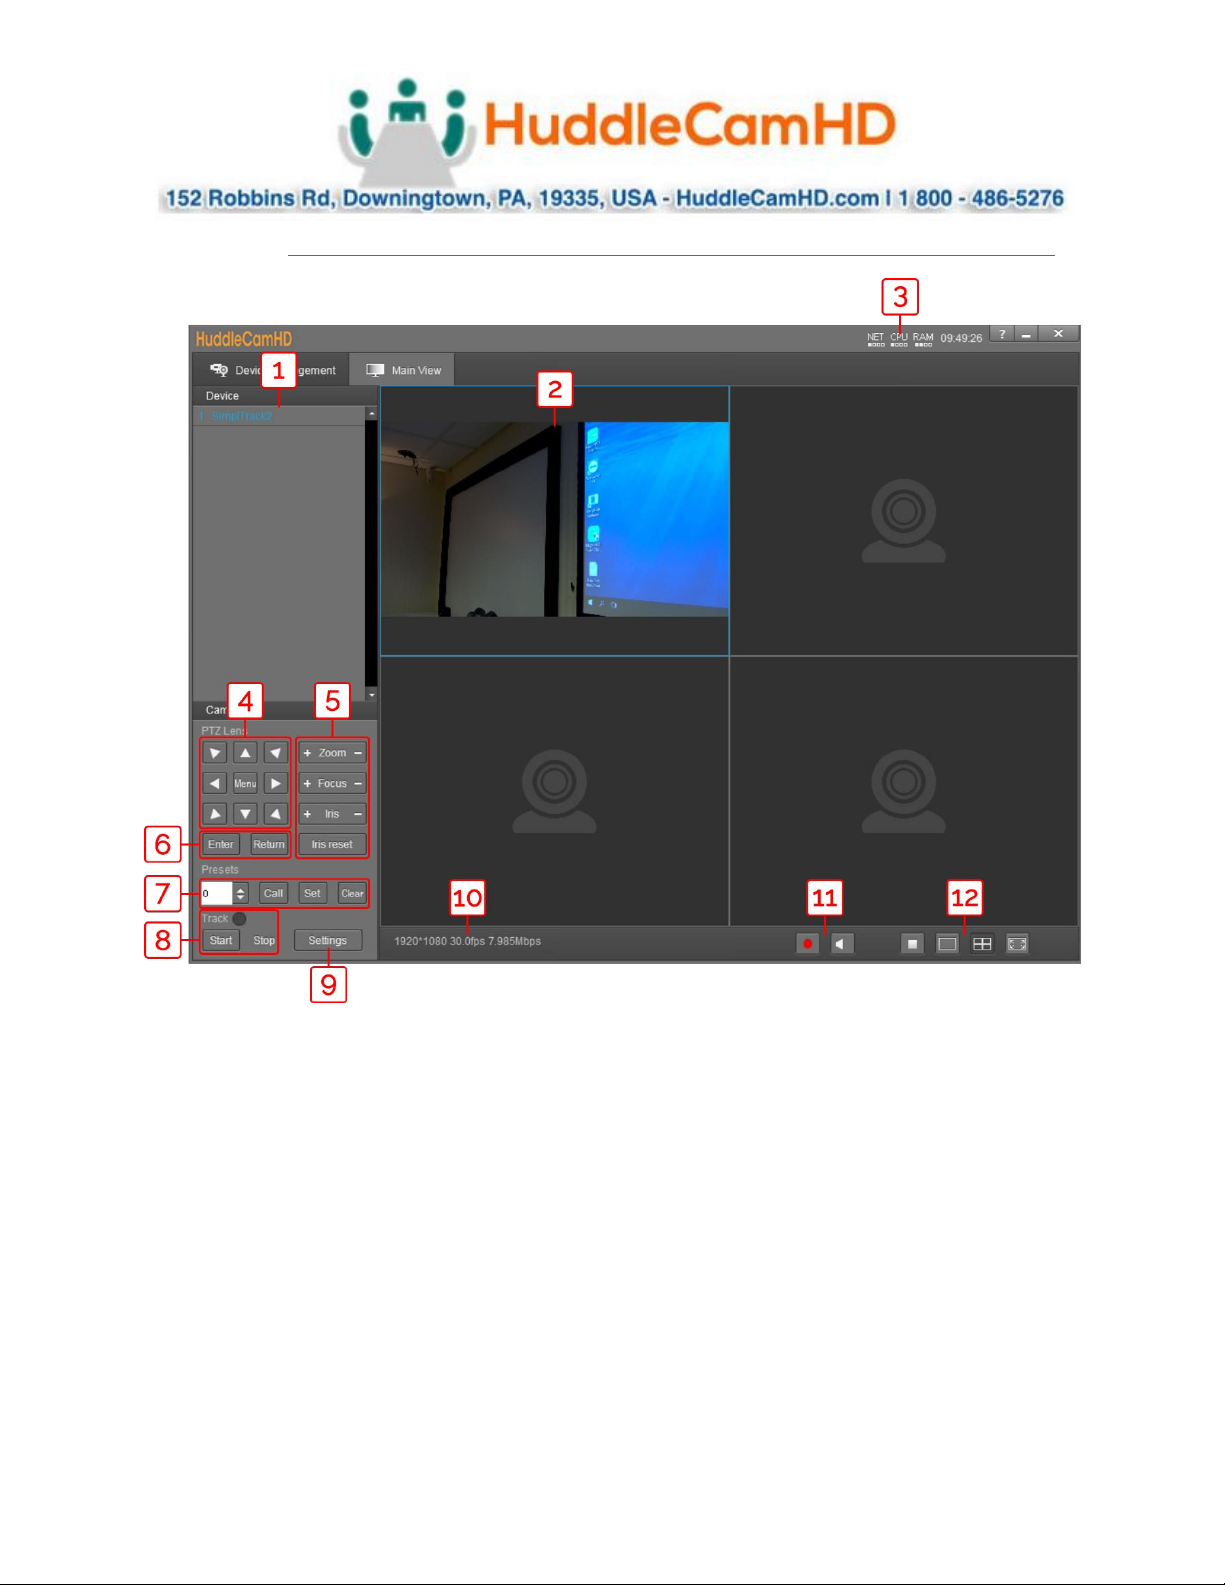
Video Configuration Interface .
1
Cameras connected to Device Management
7
Preset control
2
Camera video feed
8
Enable/Disable tracking
3
PC performance & time
9
Open tracking settings
4
Pan, Tilt, & OSD Menu control
10
Connected camera resolution & frame rate
5
Lens control
11
Enable/Disable recording
6
OSD Menu enter/return
12
Stop video, full screen, and gallery view
Ver. 1.1 – 4-19
Page9
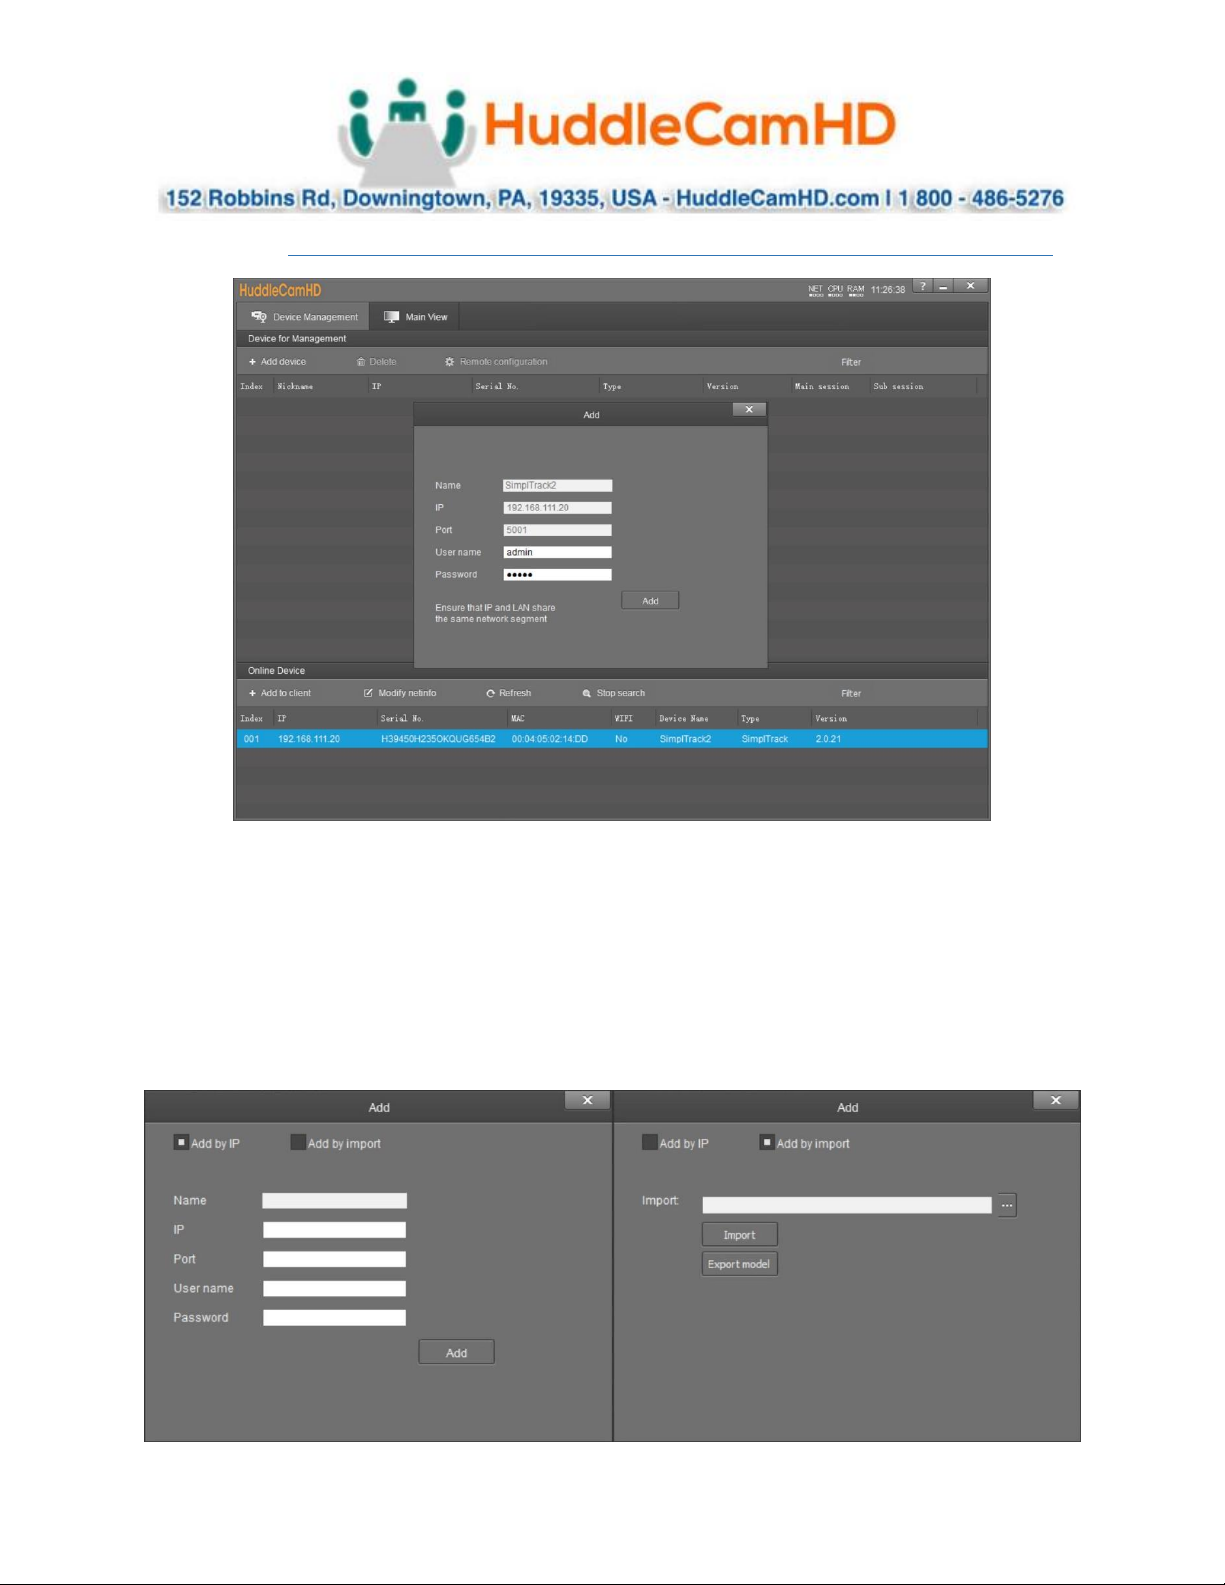
Connect Camera .
To add a camera to the Device Management list, you can go about this by searching in the Online
Device section, or by using the + Add Device button in the Device Management section.
When utilizing the Online Device section, you can simply click Search, and the Tracking Software will
automatically search your network for any HuddleView & SimplTrack2 cameras. Select the camera and
click + Add to Client to add it to the Device Management list.
When utilizing the + Add Device button within the Device Management section, you can connect your
camera through it’s IP address, Port number, Username & Password; or you can Import a *.csv file.
 Loading...