

Page 1

Page 2
Ver 1.2 1/26/15
Precautions………………………………………………………………………………………….
Safety Tips…………………………………………………………………………………………….
• Please read this manual carefully before using the camera.
• Avoid damage from stress, violent vibration or liquid intrusion during
transportation, storage or installation.
• Take care of the camera during installation to prevent damage to the
camera case, ports, lens or PTZ mechanism.
• Do not apply excessive voltage. (Use only the specified voltage.)
Otherwise, you may experience electrical shock.
• Keep the camera away from strong electromagnetic sources.
• Do not aim the camera at bright light sources (e.g. bright lights, the sun,
etc.) for extended periods of time.
• Do not clean the camera with any active chemicals or corrosive detergents.
• Do not disassemble the camera or any of the camera's components. If
problems arise, please contact your authorized dealer.
• After long term operation, moving components can wear down. Contact
your authorized dealer for repair.
Supplied Accessories…………………………………………………………………………….
• HD Color Video Camera (1)
• 12V/2.5A DC Power Adapter (1)
• Rubber Feet (4)
• DVI-HDMI Adapter (1)
• USB 3.0 A-B Cable (2m), Serial Control cable,
• IR Remote Controller (1)
Page 3
Ver 1.2 1/26/15
• User Manual (1)
Rear Board Connectors…………………………………………………………………………
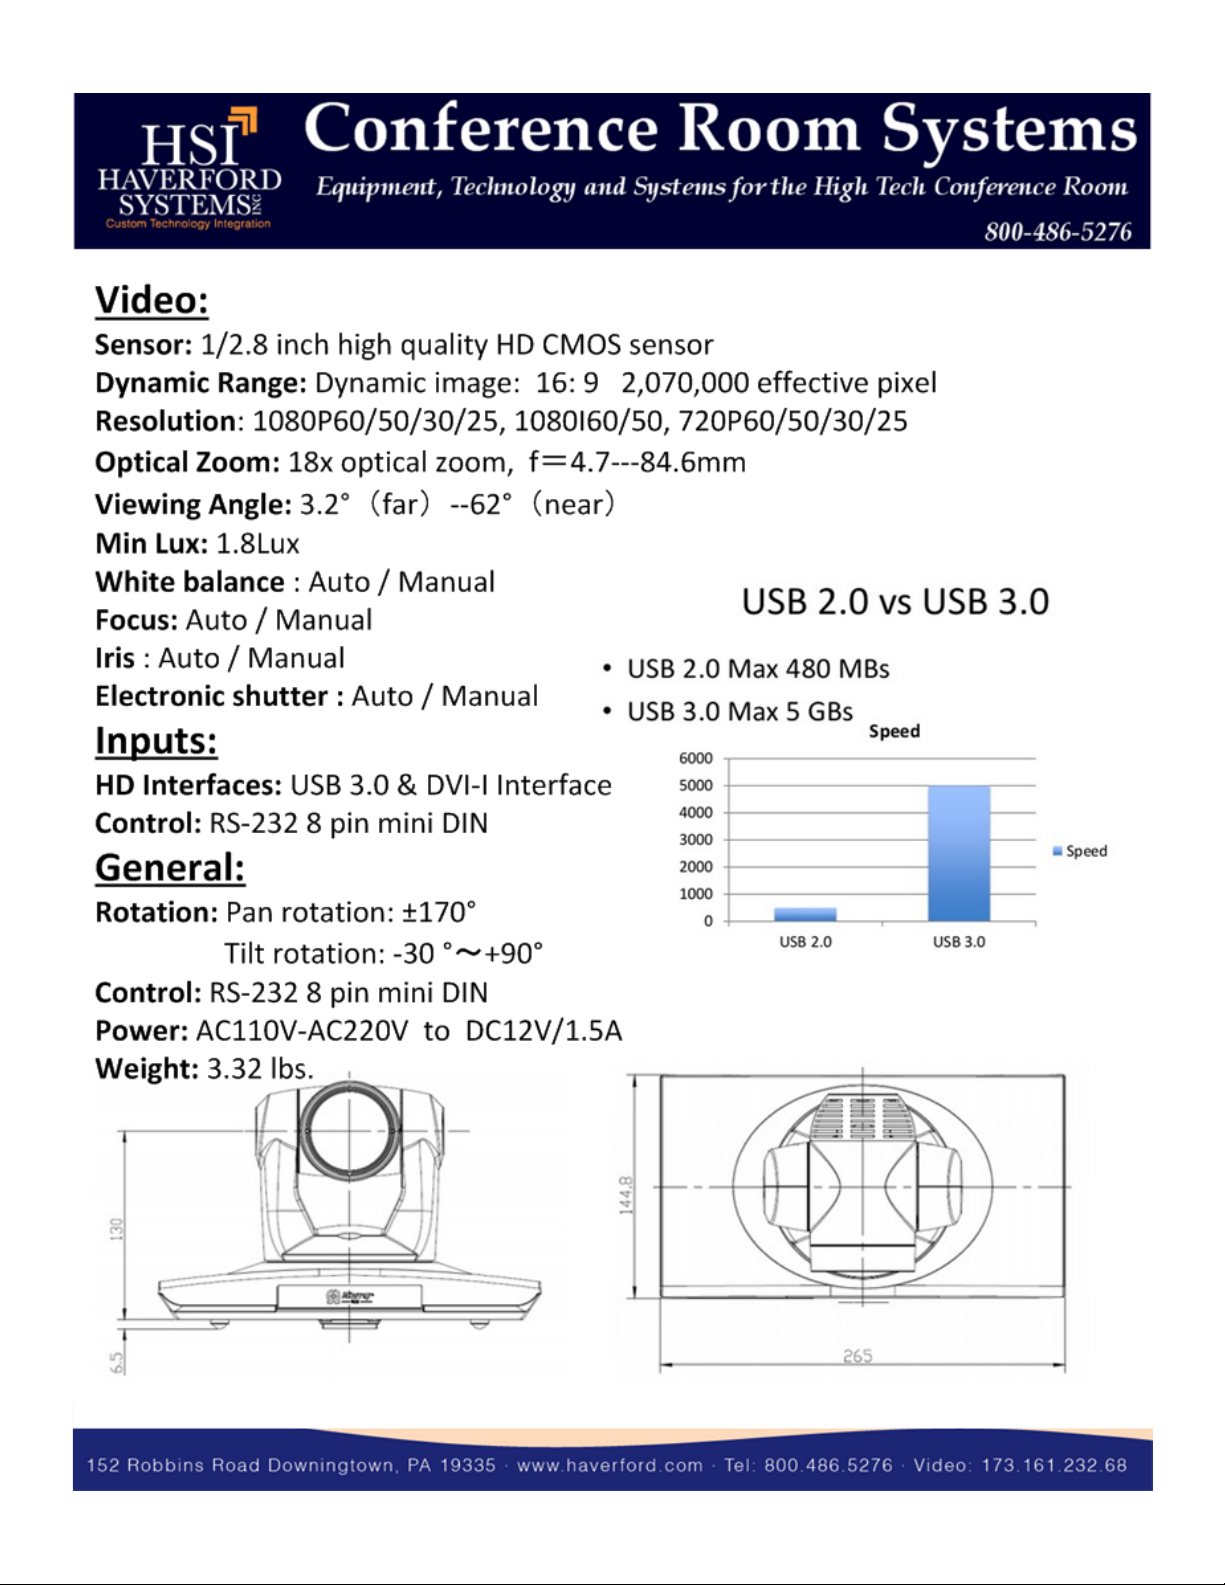
High Definition Interface: USB 3.0 B
Control Signal Interface: Mini DIN-8 (VISCA IN/RS232)
Control Signal Configuration: Dip-Switch Pin 7/TTL Signal; Baud Rate: 9600bps
Power Supply Interface: DC 12V Socket
Electrical……….…………………………………………………………………………………….
Power Supply Adapter: 12V DC/2A
Input Voltage: 12V DC (10.5-14V DC)
Input Power: 24W (MAX)
Structure……………………………………………………………………………………………….
Material: Aluminum, Plastic
Dimensions (W x H x D): 10.44 in. (265.176mm) x 6.75 in. (171.45mm)
x 5.81 in. (147.574mm)
Mass: 3.32 lbs. (1.51 kg.)
Working Environment: Indoor
Operating Temperature: 32ºF (-0ºC) to 113ºF (+45ºC)
Storage Temperature: -14ºF (-10ºC) to 140ºF (+60ºC)
Color: Silver Gray
Page 4
Ver 1.2 1/26/15
Rear Board & Function………………………………………………………………………..
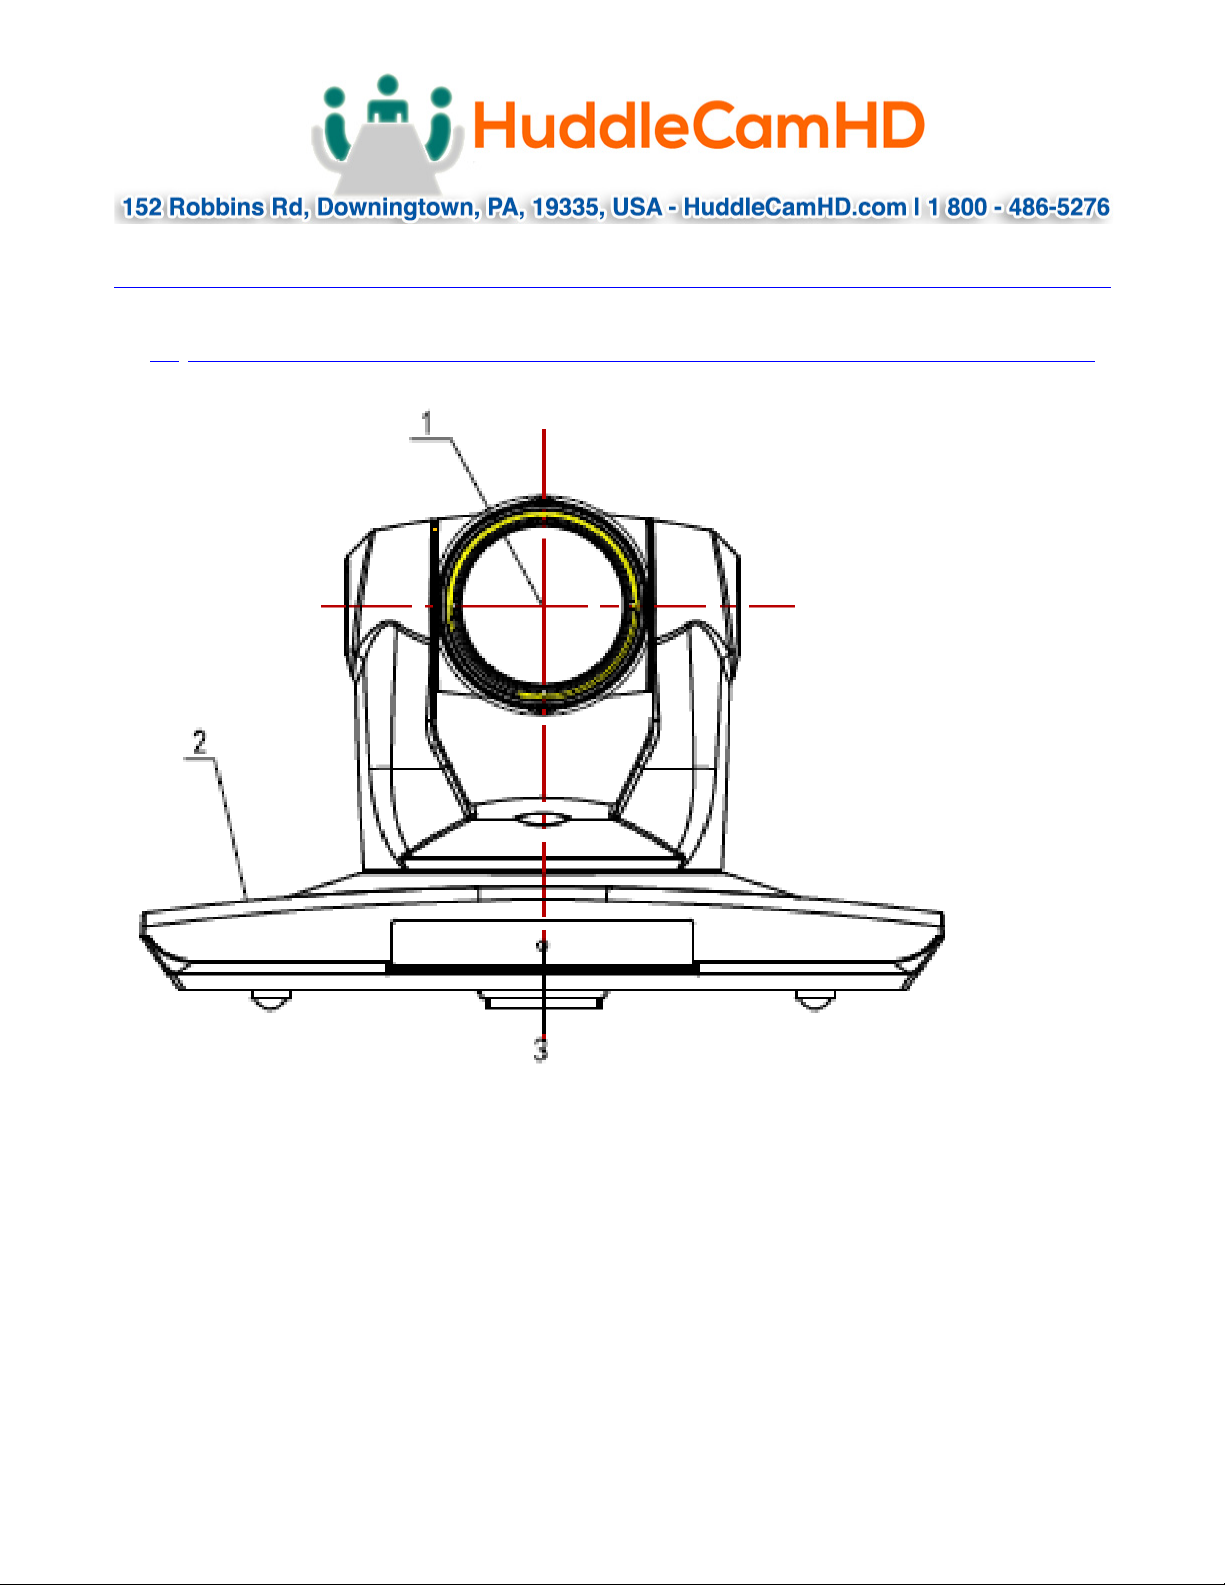
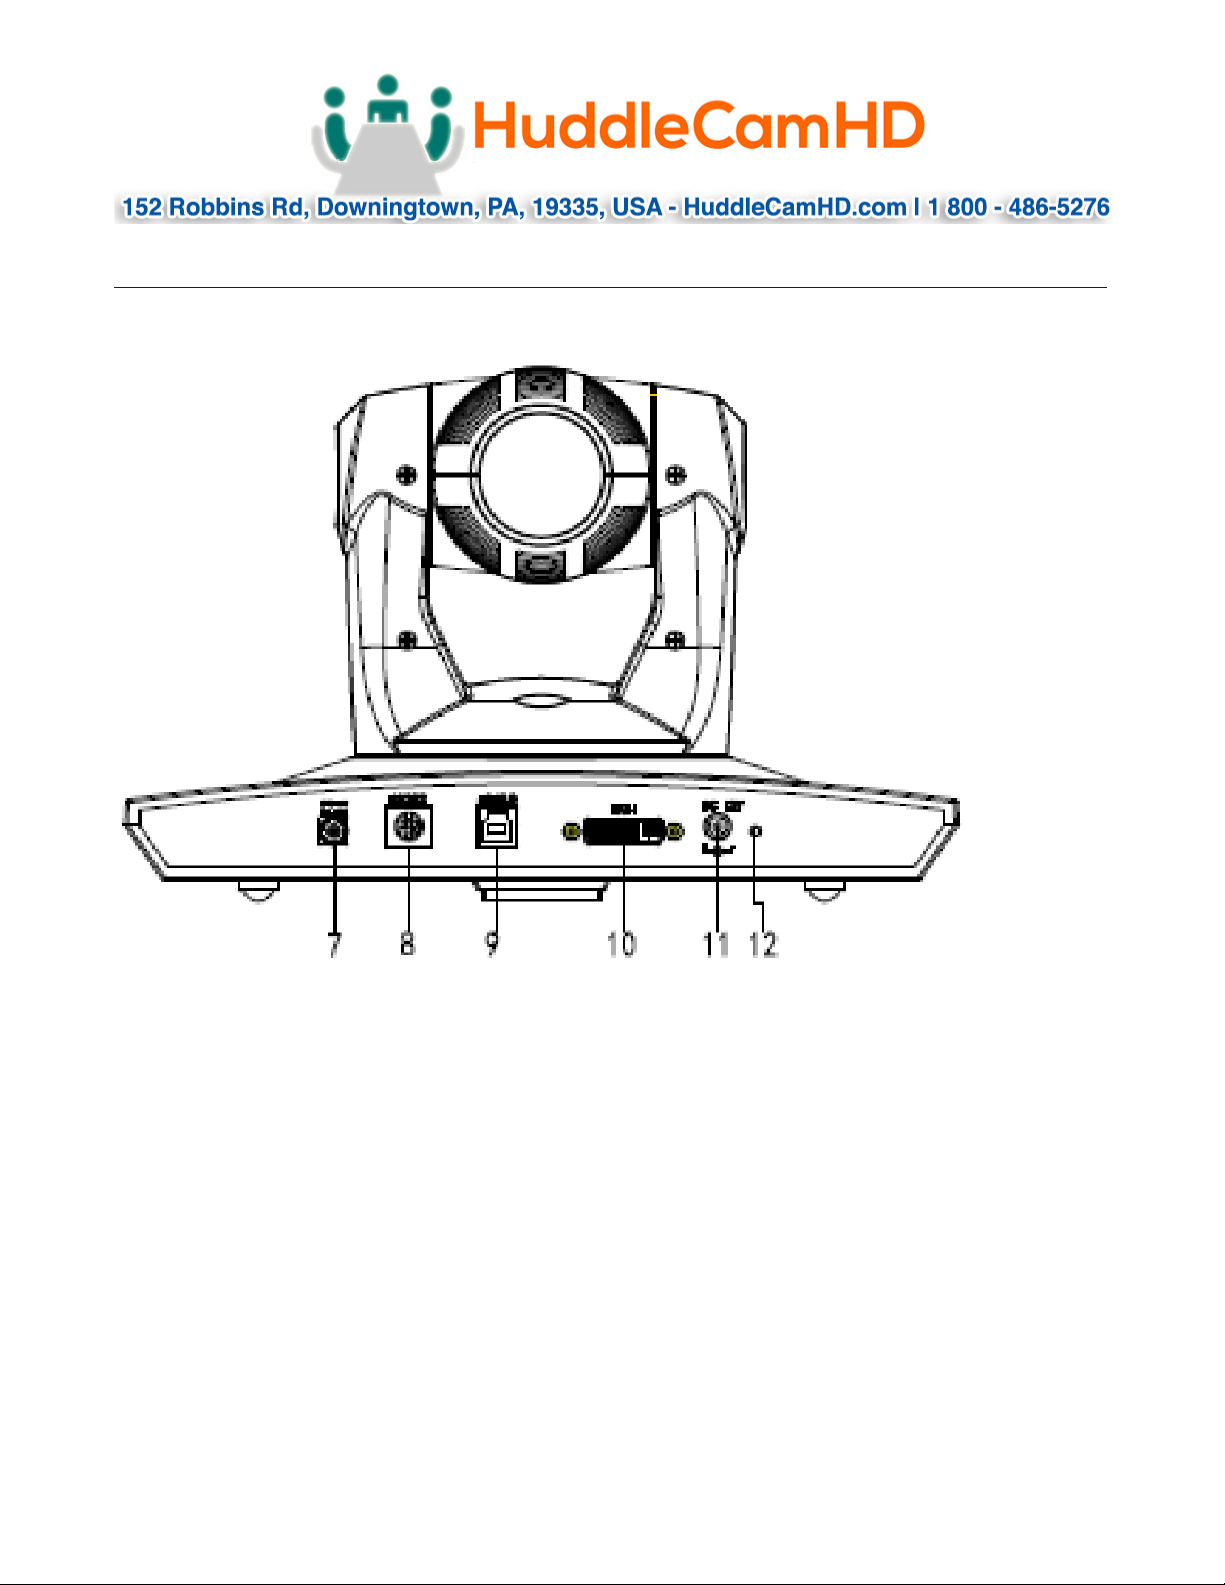
1. Front View…………………………………………………………………………………..
1. Lens
18x Optical Zoom.
2. Camera Base
To receive IR remote controller signal.
3. Power Indicator Light
Blue LED blinks when unit is powered.
Page 5
Ver 1.2 1/26/15
Page 6
Ver 1.2 1/26/15
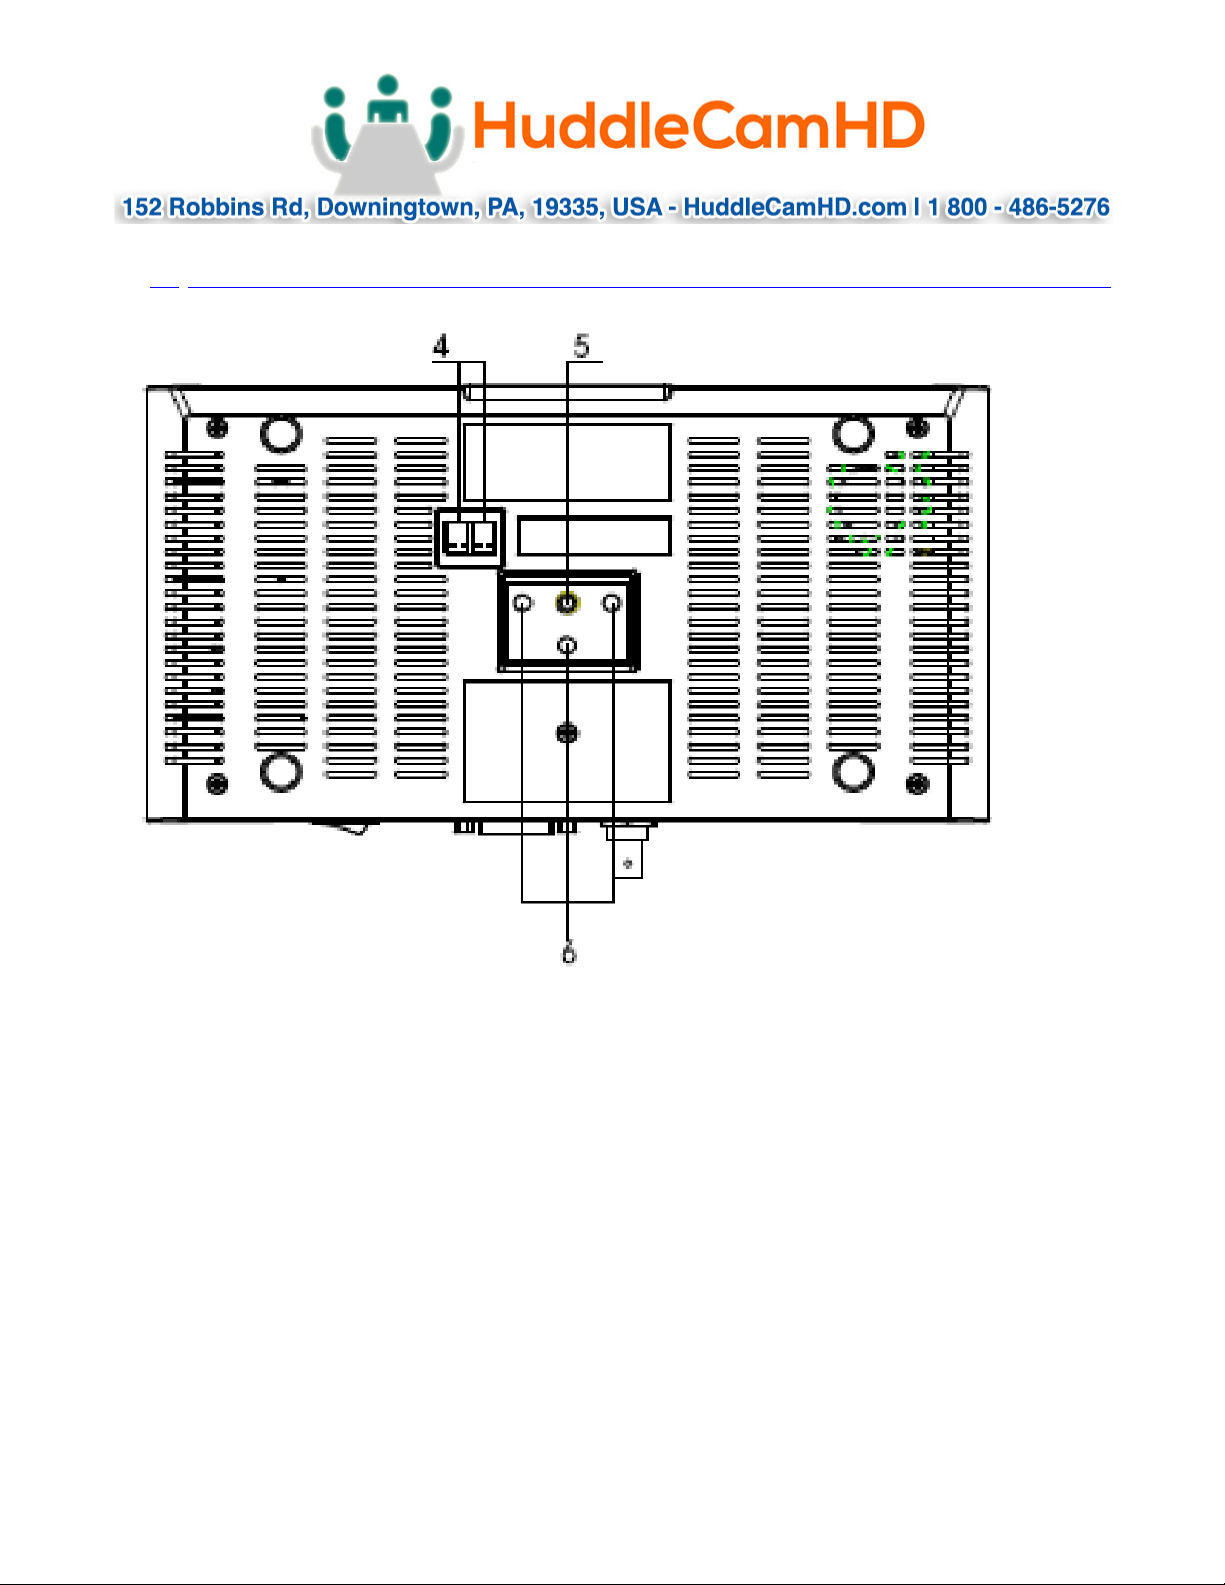
2. Rear View………………………………………………………………………………………….
7. RS232 Control Interface
Power On/Off button.
8. USB 3.0 B Male Interface
Only use the Power Adapter supplied with this camera.
9. 12VDC Input Power Supply Jack
To receive IR remote controller signals.
Page 7
Ver 1.2 1/26/15
2. Bottom View………………………………………………………………………………….
4. IR Receiver
Will accept 1/4-20 bolt from 3rd party tripod, wall or ceiling mount.
5. Tripod Screw Hole
Used for selecting baud rate and the remote signal output switch.
6. Installation Hole
Used for selecting baud rate and the remote signal output switch.
Page 8
Ver 1.2 1/26/15
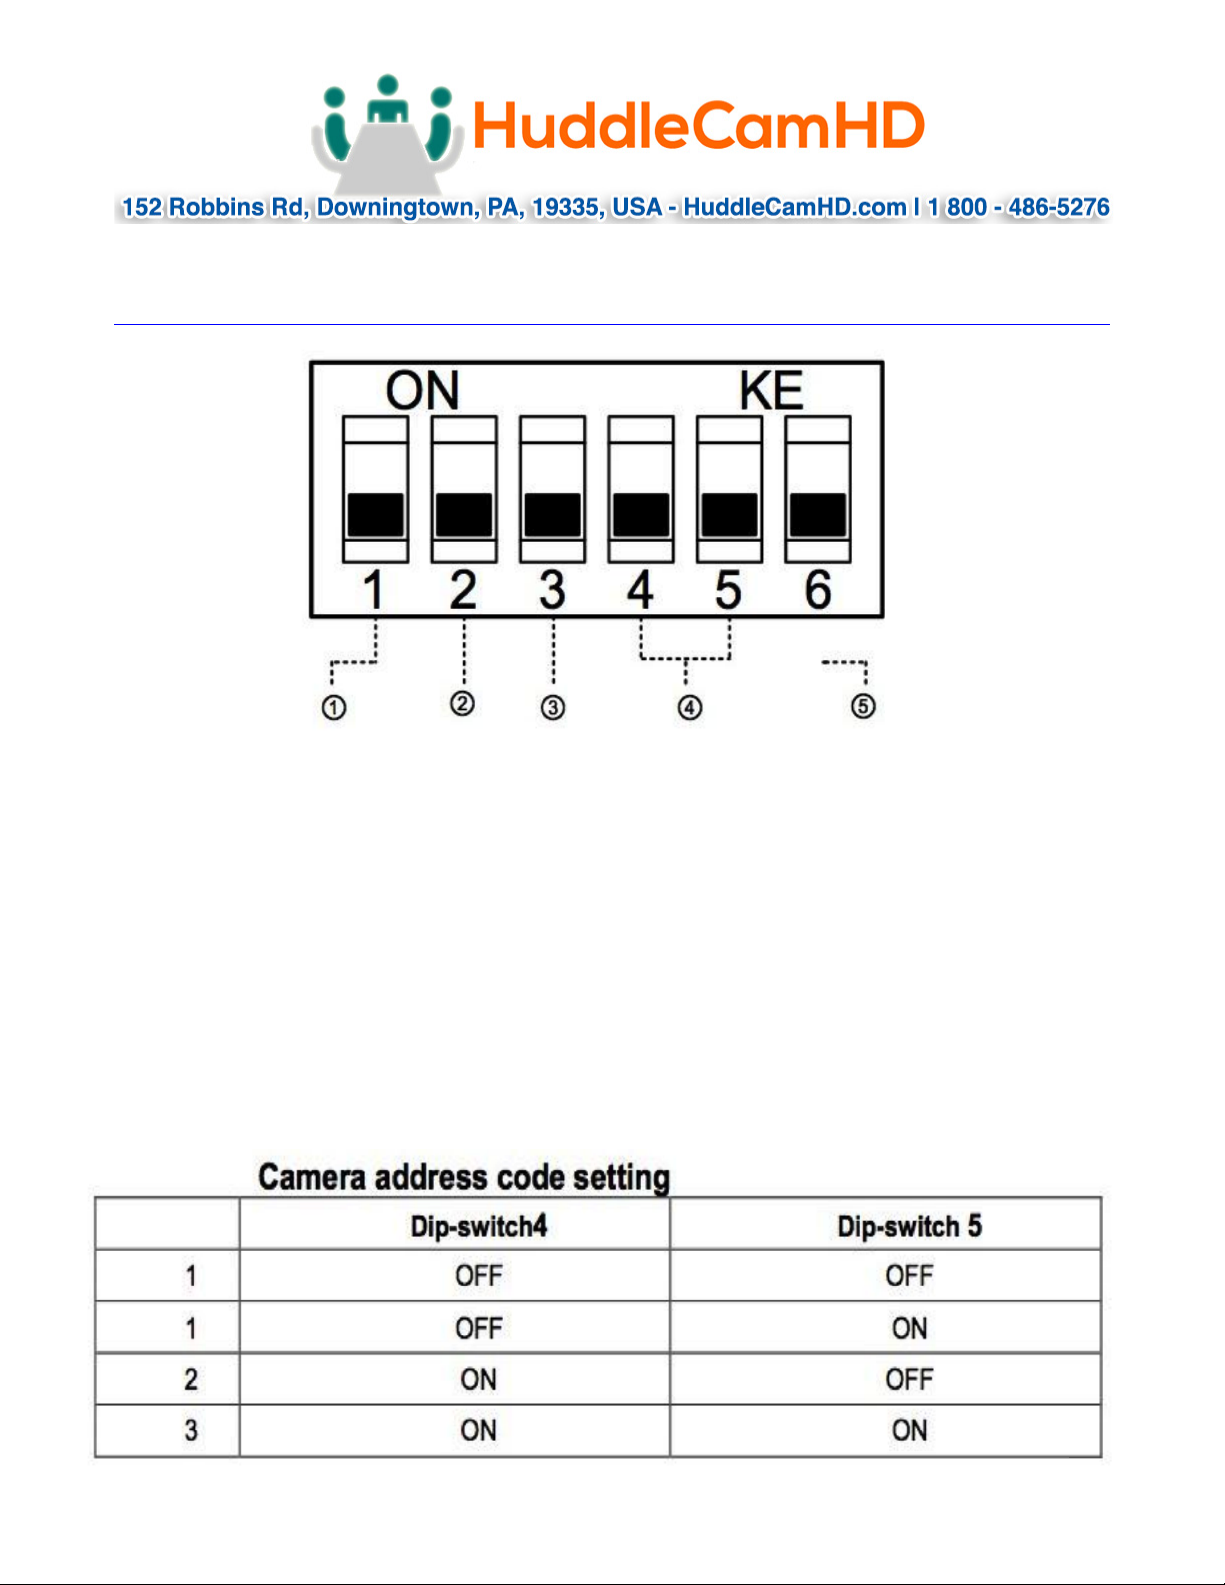
4. Dip-Switch Settings…………………………………………………………………………..
Note: When changing Dip-Switch settings, make all changes with camera powered
off.
Dip-Switch 1 - (To set communication baud rate).
Dip-Switch 2 - (To set control protocol).
Dip-Switch 3 - (Set only for firmware upgrading).
Dip Switch 4 & 5 - (To set camera’s RS232/RS485 ID number – for daisy chain wired
control).
Page 9
Ver 1.2 1/26/15
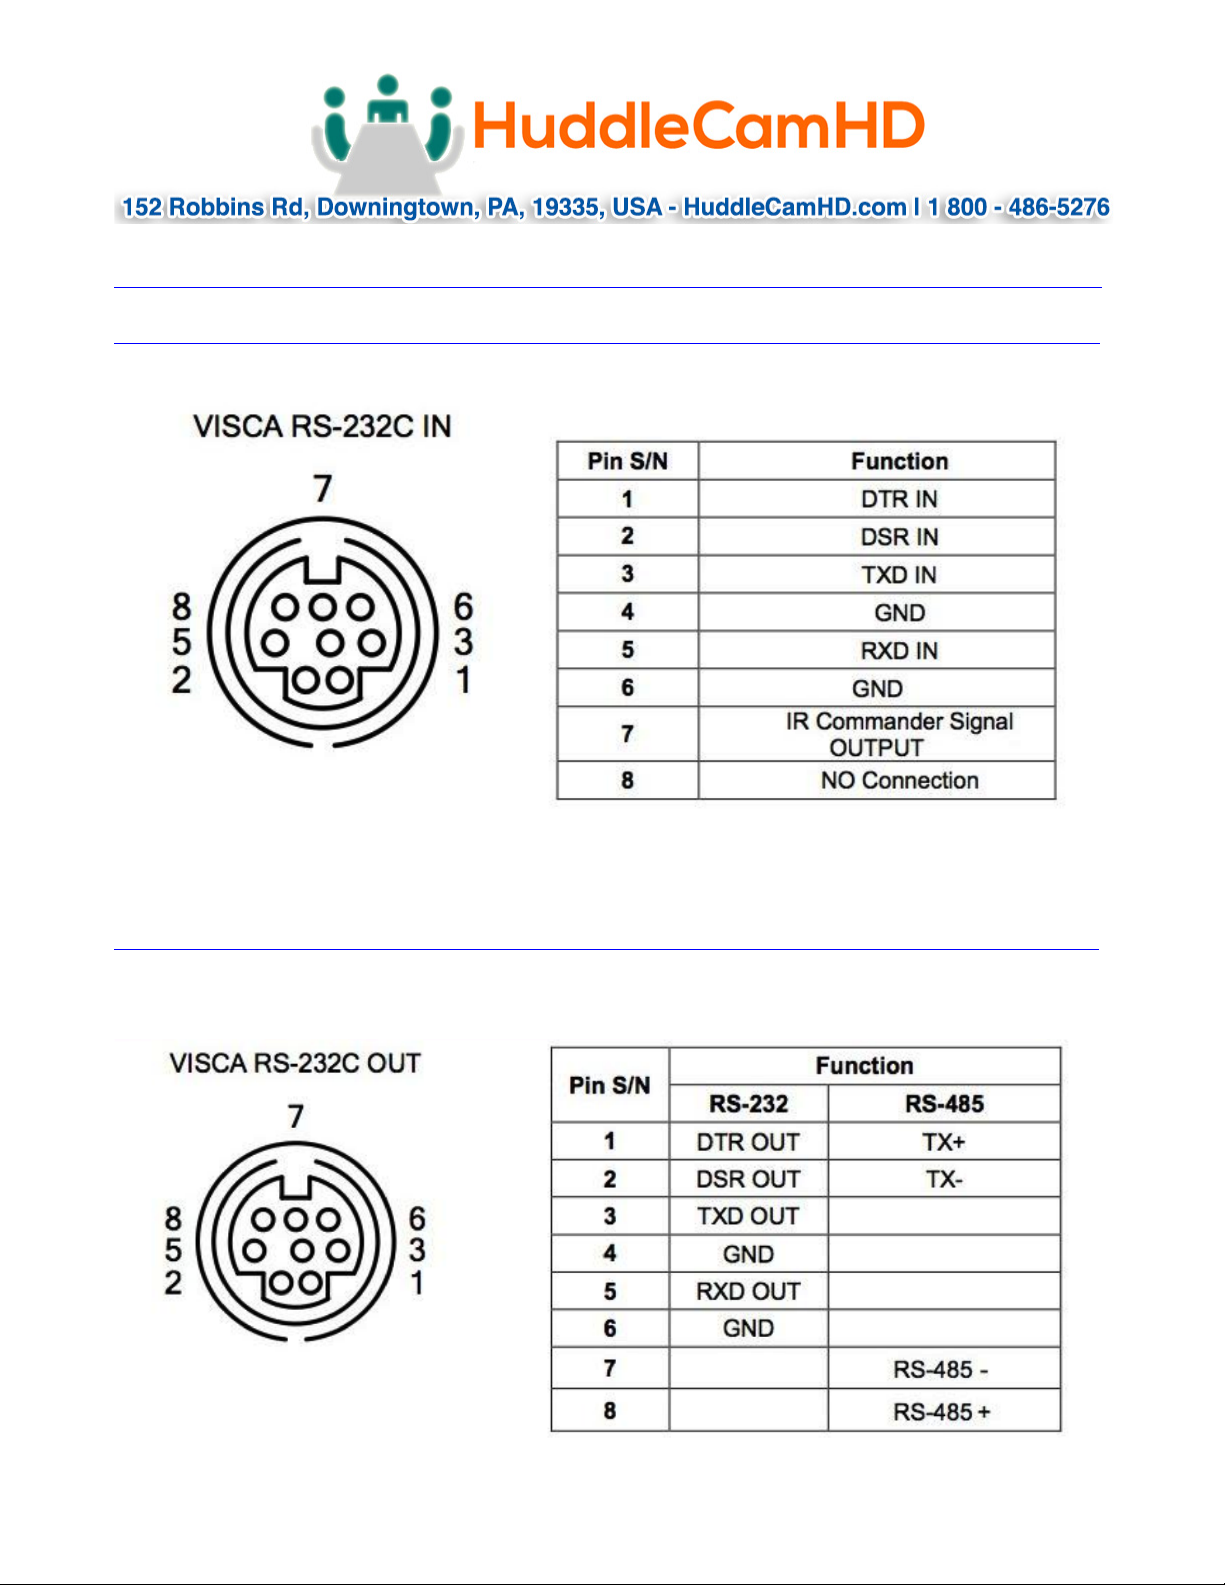
Cable Connection Info…………………………………………………………………………
VISCA RS-232C - IN Reference………………………………………………………………
VISCA RS-232C - Out Reference……………………………………………………………
Page 10
Ver 1.2 1/26/15
OSD MENU……………………………………………………………………………………………..
On Screen Display Menu - Use the OSD menu to access and change the
camera’s settings.
Note: You cannot manually move the camera (pan/tilt) when the OSD menu is
visible on the screen.
The Dome OSD Menu is as follows:
• Pan Speed Default Value: 20
Set speed of Pan motor - Range = 1 - 63
• Tilt Speed Default Value: 20
Set speed of Pan motor - Range = 1 – 63
• Scan Speed (Auto Pan Mode) Default Value: 6
Set speed of boundary scan - Range = 1 – 63
• Tour Path (uses presets) Default Value: 1
Select desired tour path - Range = 1 – 4
• Tour Dwell Default Value: 5
Set duration to dwell on each preset - Range = 1 – 60
• Proportion Default Value: On
Set Proportion - Range = On – Off
• Auto Rev Default Value: P
Set camera mounting orientation – N for inverted ceiling mount
• Frame Default Value: 60Hz
Set Refresh Rate - Range = 50Hz or 60 Hz
Page 11
Ver 1.2 1/26/15
The Lens OSD Menu is as follows:
• WDR Default Value: Off
Wide Dynamic Range = On or Off
• BACKLIGHT Default Value: OFF
ON/OFF
• NR (Noise Reduction) Default Value: 3
Adjustable Value: 0-5
• WB (White Balance) Default Value: Auto
Auto/Manual/Outdoor/Indoor/One Push/ATW
(Manual Settings):
◦ R GAIN (Red Gain) Default Value: 64
Adjustable Scope: 0-255
◦ B GAIN (Blue Gain) Default Value: 84
Adjustable Scope: 0-255
• AE (Auto Exposure) Default Value: Auto
Auto/Manual
(Manual Settings):
◦ SHUTTER Default Value: 1/1
Shutter Speed Range: 1/1-1/10000
◦ IRIS Default Value: Close
Close/F1.4-f22
◦ BRIGHT Default Value: 0
Set Brightness 0 - 31
Page 12
Ver 1.2 1/26/15
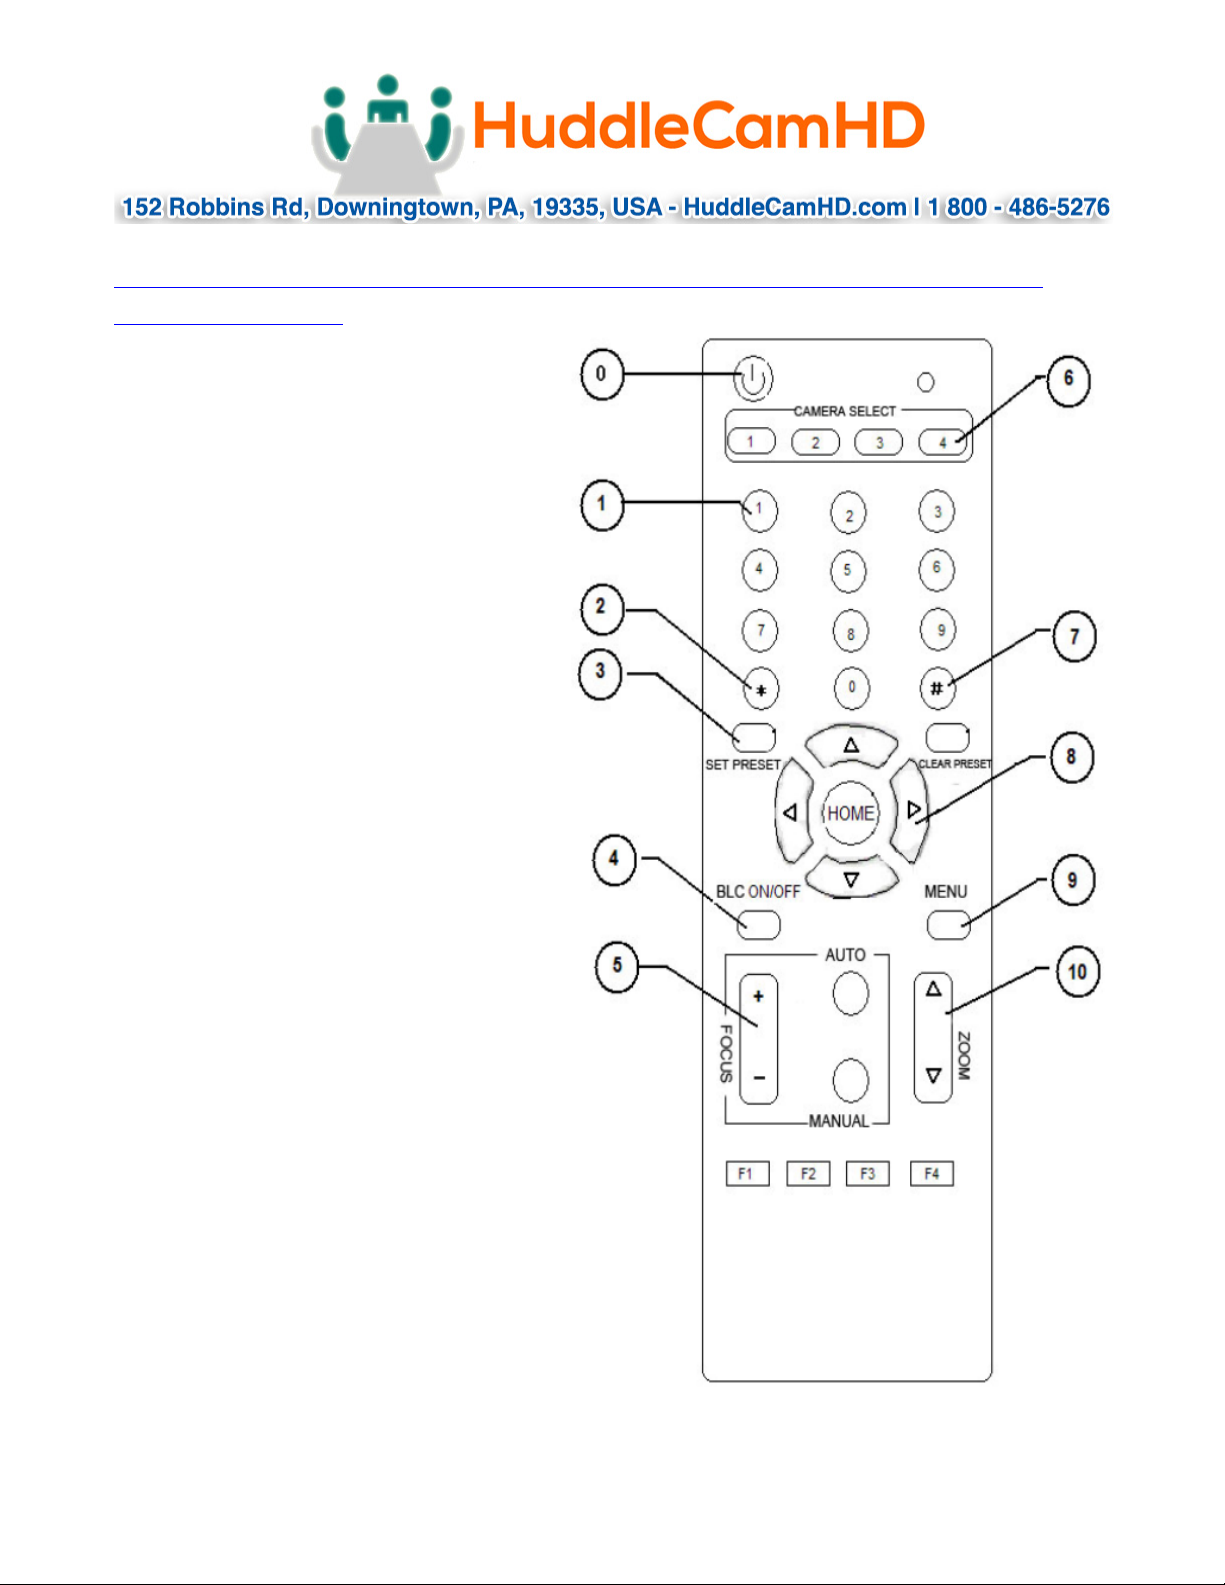
IR Remote Controller (Note: Some buttons do not operate for all
camera models)
1. 0ǃStandby key
After pressing the standby key,
the camera will step into standby
mode.Press again,the camera will open again.
(Note: Standby
mode power consumption is about
half of the normal mode)
2. Number key
Setting or locating presets
1. key
Key combination use
3. Set preset key:
Set preset˖
Set preset key + 0-9 number key˖
Clear preset key˖
Clear preset key + 0-9 number key
or˖ʿ+ʿ+ʿ˖clear all the presets
4. BLC control key
BLC ON˖open black light
compensation˄only work when exposure
mode setting is Auto˅
BLC OFF˖close black light compensation˄Only
available in the
exposure mode effective for Auto˅
5. Focus control key
Focusˇ˖focus length far from near
Focusˉ˖focus length near from far
Auto focus˖the camera focus mode is auto
Manual focus˖the camera focus mode is manual
6. Camera address selection
Select the camera which you
want to be controlled
7. # key
Key combination use
8. pan/tilt control key
Press key ˖up
Press key ˖down
Press key ˖left
Press key ˖right
“HOME” key: Return to the middle position
9. Menu setting
Open or close the OSD menu
Zoom Control key
Zoom ˖lens near
Zoom ˖lens far
10. Camera IR remote control address selection
11. Ǐ*ǐ+Ǐʿǐ+ǏF1ǐ˖Camera Address No.1
12. Ǐ*ǐ+Ǐʿǐ+ǏF2ǐ˖Camera Address No. 2
13. Ǐ*ǐ+Ǐʿǐ+ǏF3ǐ˖Camera Address No. 3
14. Ǐ*ǐ+Ǐʿǐ+ǏF4ǐ˖Camera Address No. 4
Page 13
Ver 1.2 1/26/15
Connection Instructions………………………………………………………………………
1. Connect included Power Supply to the camera.
2. Wait for camera to come to Home Position.
3. Connect included USB 3.0 cable to camera and USB 3.0 port of PC.
4. Select and configure camera in your software of choice.
NOTE: Failure to follow this sequence may result in no connection to PC.
Care Of The Unit………………………………………………………………………………….
Remove dust or dirt on the surface of the lens with a blower (commercially
available).
Page 14
Ver 1.2 1/26/15
Installation Instructions………………………………………………………………………
Desktop Installation………………………………………………………………………………
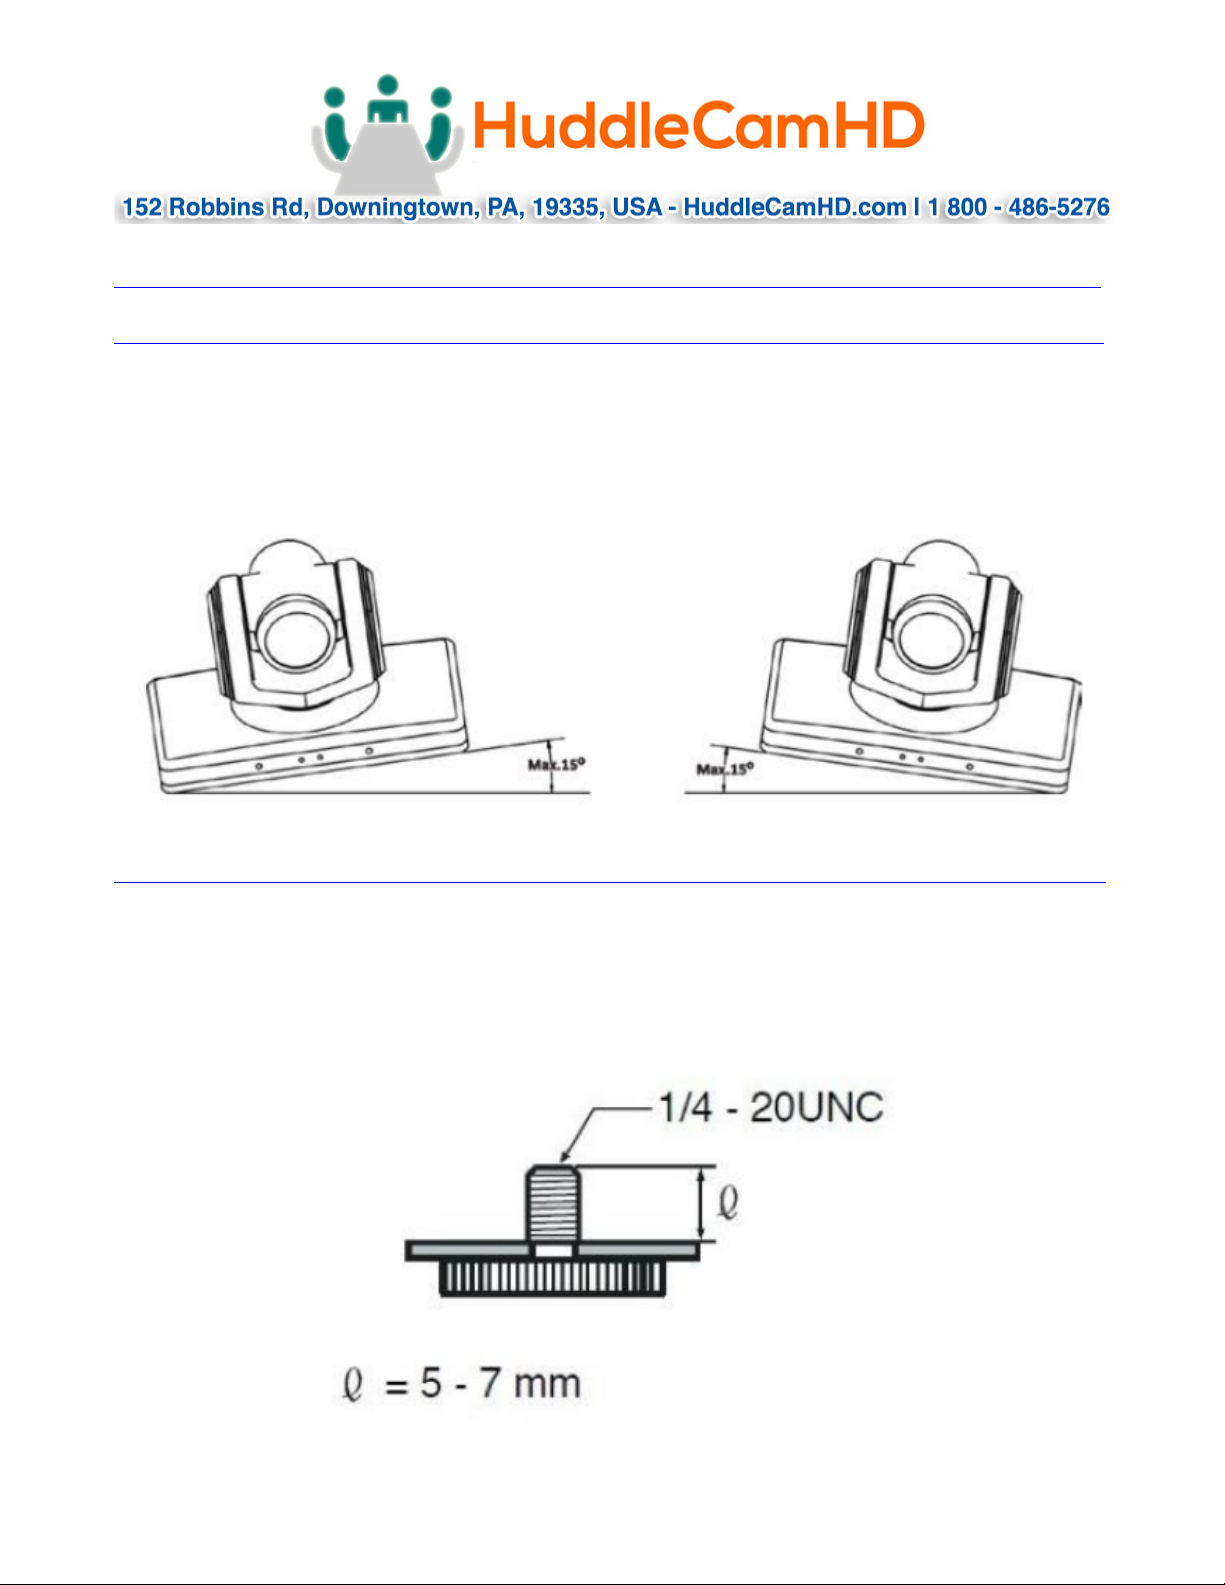
When using the HuddleCam on a desk, Make sure that it will stand level. If you
want to use the camera on an incline, make sure the angle is less than 15
degrees to ensure that the camera’s pan and tilt mechanism operates normally.
Tripod Installation…………………………………………………………………………………
When using the HuddleCam with a tripod, screw the tripod to the bottom of the
camera. The tripod screw must fit below specifications:
Note: Tripod must stand on a level surface.
Page 15
Ver 1.2 1/26/15
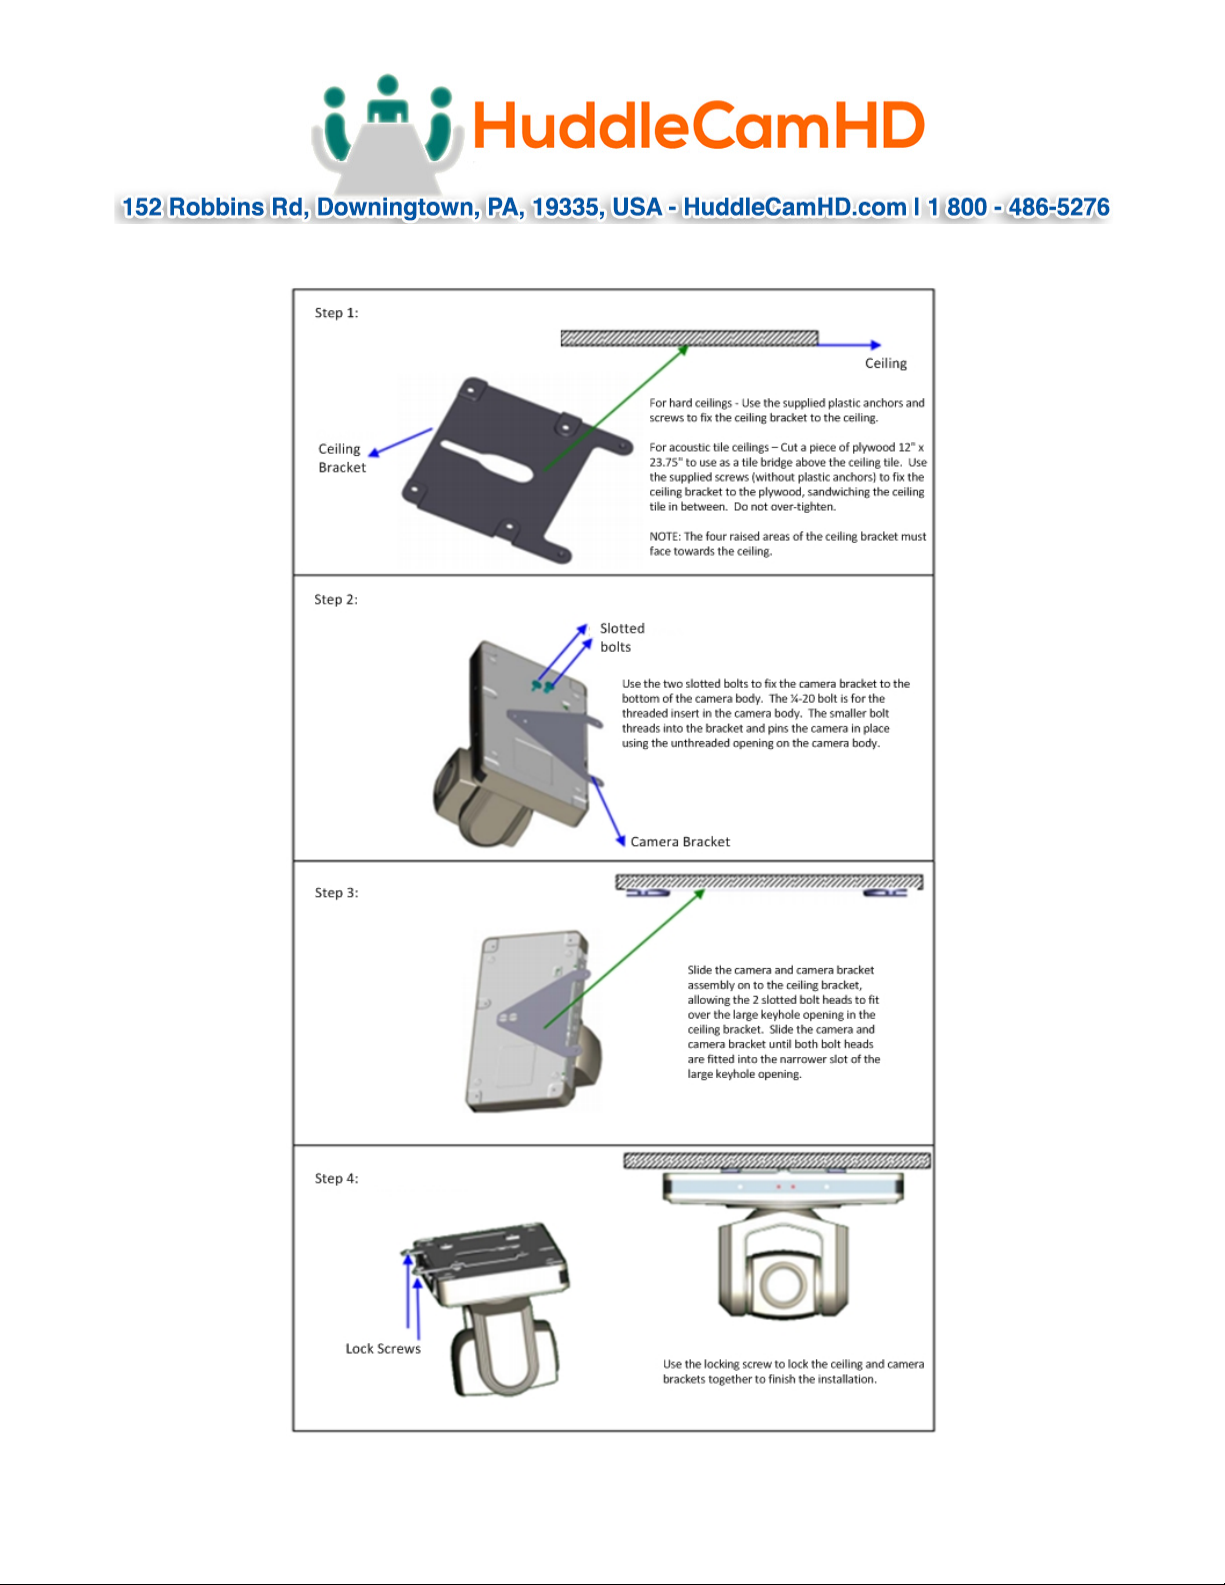
Ceiling Mount…………………………………………………………………………………………
Page 16
Ver 1.2 1/26/15
Page 17
Ver 1.2 1/26/15
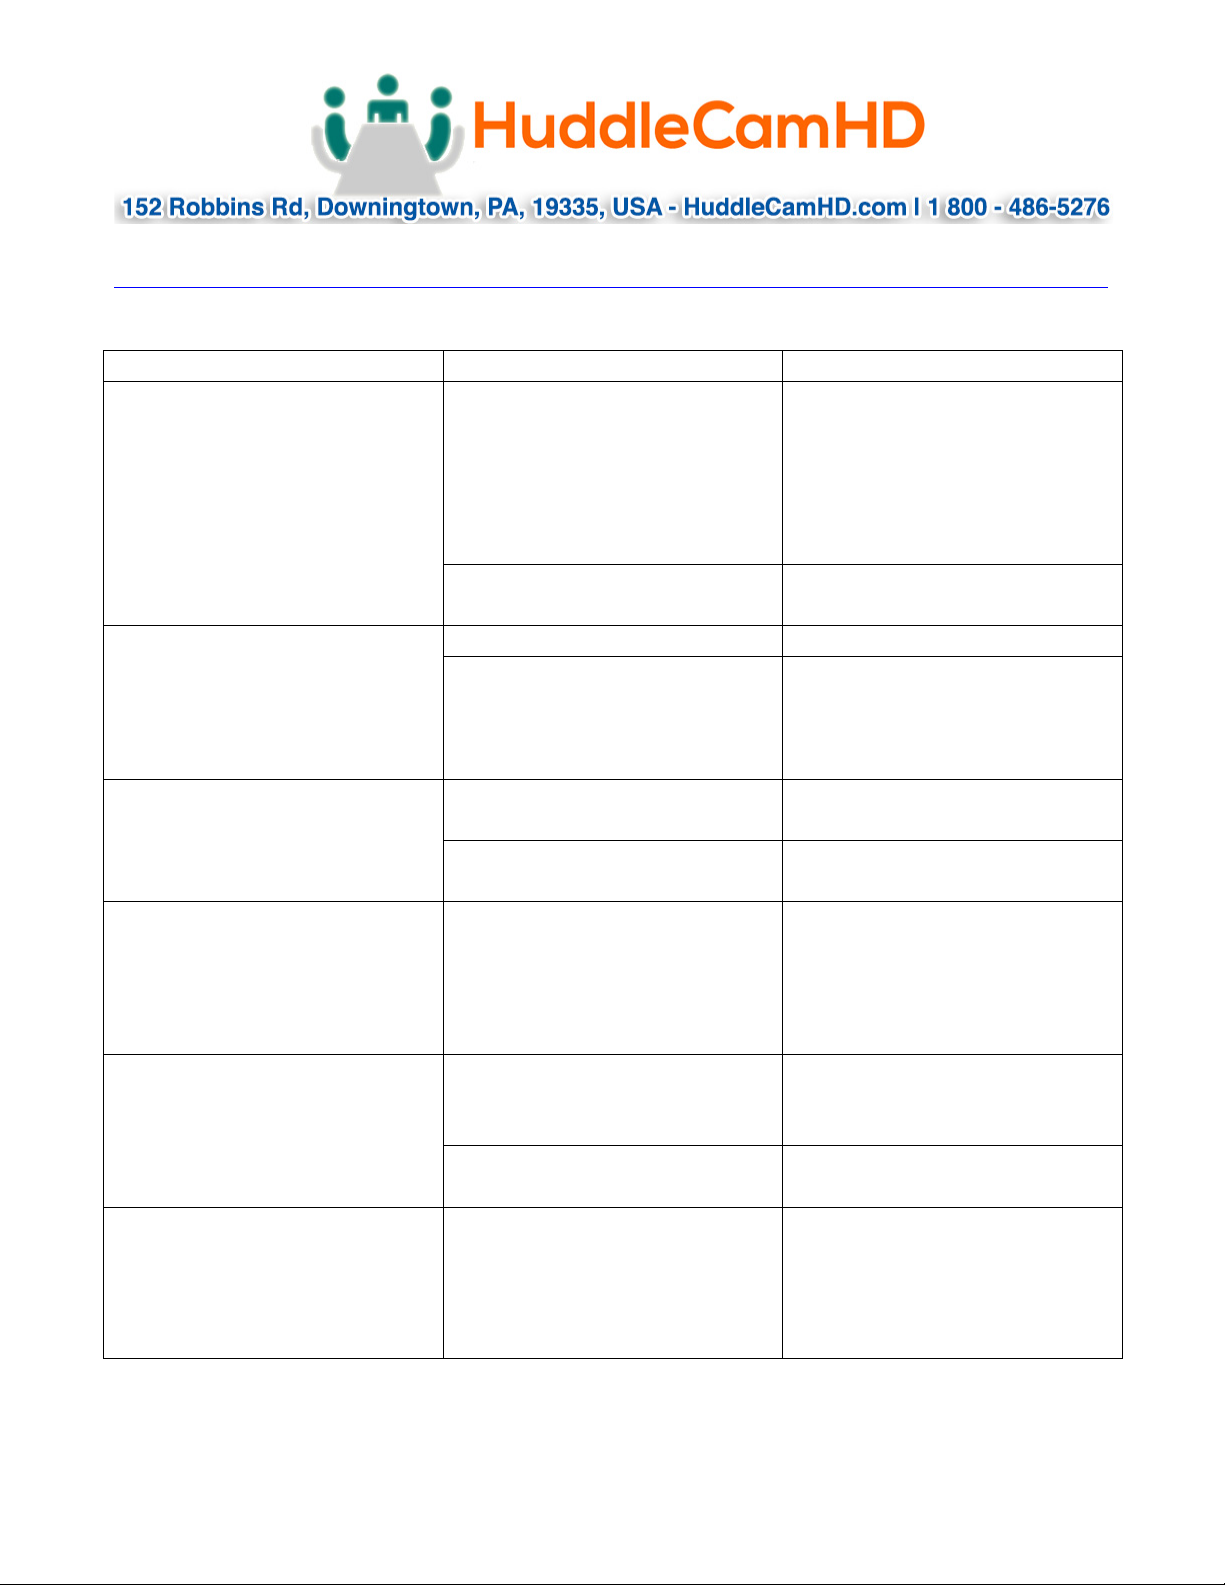
Troubleshooting………….…………………………………………………………………………
Problem
Cause
Resolution
There is no power to the
camera.
Power adapter is
disconnected from mains
or from camera.
Check the connections
between the camera,
power adapter and mains.
If anything is
disconnected, reconnect
it.
Power switch is set to OFF.
Set the power switch to
ON.
Camera will not connect to
the PC via USB.
USB cable is bad.
Try new USB Cable
Camera connects
sometimes.
Connect USB only after
camera has completely
booted.
Camera unable to pan,
tilt, and/or zoom.
Menu is currently
displayed on the screen.
Retry after exiting the
menu.
Pan, tilt or zoom range
limit was reached.
Try to pan/tilt/zoom in
the other direction.
Remote control not
working.
The “camera select”
button on the remote
control is not set to match
the “IR select” switch
number set on the camera.
Choose the correct “IR
select” number to match
camera settings.
Camera cannot be
controlled via VISCA.
The connection between
the PC and camera is
incorrect.
Refer to Cable Connection
Info section of this
manual.
Commands being sent are
incorrect.
Refer to VISCA manual.
The Camera is not working
at all.
No response or image from
camera.
Disconnect power, and
wait a few minutes, then
connect the power again.
(Did you try turning it off
and on Again) Retry.
Page 18
Page 19
Page 20

 Loading...