

Page 1

WS329 300Mbps Wireless Router
User Guide
HUAWEI TECHNOLOGIES CO., LTD.
Page 2

Product Overview . . . . . . . . . . . . . . . . . . . . . . . . . . . . . . . . . . . . . . 1
Supported Features . . . . . . . . . . . . . . . . . . . . . . . . . . . . . . . . . . . . . . . . . . . . . . . . 1
Ports and Buttons . . . . . . . . . . . . . . . . . . . . . . . . . . . . . . . . . . . . . . . . . . . . . . . . . . 2
Indicators. . . . . . . . . . . . . . . . . . . . . . . . . . . . . . . . . . . . . . . . . . . . . . . . . . . . . . . . . 3
Hardware Installation . . . . . . . . . . . . . . . . . . . . . . . . . . . . . . . . . . . 5
Selecting an Installation Location . . . . . . . . . . . . . . . . . . . . . . . . . . . . . . . . . . . . . . 5
Connecting the Cables . . . . . . . . . . . . . . . . . . . . . . . . . . . . . . . . . . . . . . . . . . . . . . 5
Connecting a Computer or Other Devices . . . . . . . . . . . . . . . . . . . . . . . . . . . . . . . 6
Powering On . . . . . . . . . . . . . . . . . . . . . . . . . . . . . . . . . . . . . . . . . . . . . . . . . . . . . . 7
Setting Network Parameters . . . . . . . . . . . . . . . . . . . . . . . . . . . . . 9
Setting the Computer IP Address . . . . . . . . . . . . . . . . . . . . . . . . . . . . . . . . . . . . . . 9
Logging In to the Web Management Page . . . . . . . . . . . . . . . . . . . . . . . . . . . . . . 12
Configuring the Internet Connection . . . . . . . . . . . . . . . . . . . . . . . . . . . . . . . . . . . 13
Setting Dial-Up Connection Parameters . . . . . . . . . . . . . . . . . . . . . . . . . . . . . . . . 15
Wireless Connection Setup . . . . . . . . . . . . . . . . . . . . . . . . . . . . . 22
Setting Up a Wireless Connection Using the WPS Button . . . . . . . . . . . . . . . . . . 22
Manually Setting Up a Wireless Connection . . . . . . . . . . . . . . . . . . . . . . . . . . . . . 22
Network Security . . . . . . . . . . . . . . . . . . . . . . . . . . . . . . . . . . . . . . 25
Improving WLAN Security . . . . . . . . . . . . . . . . . . . . . . . . . . . . . . . . . . . . . . . . . . . 25
Controlling Computer Internet Access . . . . . . . . . . . . . . . . . . . . . . . . . . . . . . . . . 28
Filtering Out Inappropriate Websites. . . . . . . . . . . . . . . . . . . . . . . . . . . . . . . . . . . 29
Controlling Computer Bandwidth . . . . . . . . . . . . . . . . . . . . . . . . . . . . . . . . . . . . . 30
Configure the Firewall to Prevent Attacks on the Internet. . . . . . . . . . . . . . . . . . . 31
Enabling and Disabling the WLAN on the WS329 . . . . . . . . . . . 33
Using the WLAN Button . . . . . . . . . . . . . . . . . . . . . . . . . . . . . . . . . . . . . . . . . . . . 33
Using the Web Management Page . . . . . . . . . . . . . . . . . . . . . . . . . . . . . . . . . . . . 33
Expanding WLAN Coverage . . . . . . . . . . . . . . . . . . . . . . . . . . . . . 34
Maintenance Guide . . . . . . . . . . . . . . . . . . . . . . . . . . . . . . . . . . . . 37
Changing the IP Address Used to Log In to the Web Management Page . . . . . . 37
Changing the Web Management Page User Name and Password . . . . . . . . . . . 37
Configuration Backup . . . . . . . . . . . . . . . . . . . . . . . . . . . . . . . . . . . . . . . . . . . . . . 38
I
Page 3

Restoring Default Settings . . . . . . . . . . . . . . . . . . . . . . . . . . . . . . . . . . . . . . . . . . 39
Upgrading Firmware . . . . . . . . . . . . . . . . . . . . . . . . . . . . . . . . . . . . . . . . . . . . . . . 41
Reference Operations . . . . . . . . . . . . . . . . . . . . . . . . . . . . . . . . . . 43
Enabling Wireless Configuration on Windows . . . . . . . . . . . . . . . . . . . . . . . . . . . 43
Checking the Computer MAC Address . . . . . . . . . . . . . . . . . . . . . . . . . . . . . . . . . 43
FAQs . . . . . . . . . . . . . . . . . . . . . . . . . . . . . . . . . . . . . . . . . . . . . . . . 47
What Can I Do If I Cannot Open the Web Management Page? . . . . . . . . . . . . . . 47
What Can I Do If the WS329 Cannot Access the Internet through a Wireless Network
Adapter Sometimes or If the WLAN Connection Is Unsteady?. . . . . . . . . . . . . . . 47
How Can I Restrict My Computer to Specified Websites? . . . . . . . . . . . . . . . . . . 47
I Often Need to Restart the WS329 to Display Web Pages. What Can I Do? . . . 47
Can I Change the WLAN Password? . . . . . . . . . . . . . . . . . . . . . . . . . . . . . . . . . . 48
Appendix . . . . . . . . . . . . . . . . . . . . . . . . . . . . . . . . . . . . . . . . . . . . 49
Technical Specifications . . . . . . . . . . . . . . . . . . . . . . . . . . . . . . . . . . . . . . . . . . . . 49
Default Settings. . . . . . . . . . . . . . . . . . . . . . . . . . . . . . . . . . . . . . . . . . . . . . . . . . . 49
II
Page 4

1 Product Overview
Supported Features
The WS329 300Mbps Wireless Router (WS329 for short) is a high-speed wireless router designed for
home and small office use. This chapter describes the features supported by the WS329.
> Ethernet provides rugged stability, and with the WPS button, zero configuration is required
for connections to multiple devices.
> Network range allows any device in a home to be connected with a transmission rate of up to
300Mbps.
> A powerful firewall is provided with a flexible network configuration and quality of service
(QoS) strategy, enabling different home devices to enjoy high-speed and high-quality
broadband services.
High-Speed Ethernet Connectivity
The WS329 provides WAN ports for Ethernet-enabled devices to access the Internet at high speeds.
Routing
The WS329 supports routing. It can obtain an IP address through PPP dial-up or Dynamic Host
Configuration Protocol (DHCP), which provides simultaneous access for multiple devices.
WLAN
The WS329 supports multiple WLAN protocols, including 802.11b/g/n (2.4 GHz). Adopting 802.11n
multiple-input multiple-output antennas (MIMO) technology, the WS329 delivers a wireless
transmission rate of up to 300Mbps with its dual antennas. In addition, the WS329 supports multiple
wireless encryption modes to provide a secure, reliable, and high-speed WLAN.
Bandwidth Control
The WS329 supports bandwidth control and allocates bandwidth to different computers within your
home based on Internet access requirements. Your family can then access the Internet, play online
games, and watch videos without interfering with each other.
WDS Wireless Bridging and Repeating
The wireless distribution system (WDS) function in wireless bridging or wireless repeating mode
enables you to set up wireless connections between wireless routers to implement large-scale WLAN
coverage.
Firewall
The powerful built-in firewall effectively protects against viruses and malicious attacks.
Parental Controls
Parents can control their children's computer usage by placing time limits on usage duration or
forbidding access to certain websites.
1
Page 5
Easy Configuration and Management
The WS329 provides password-protected web-based management pages to protect your personal
data.
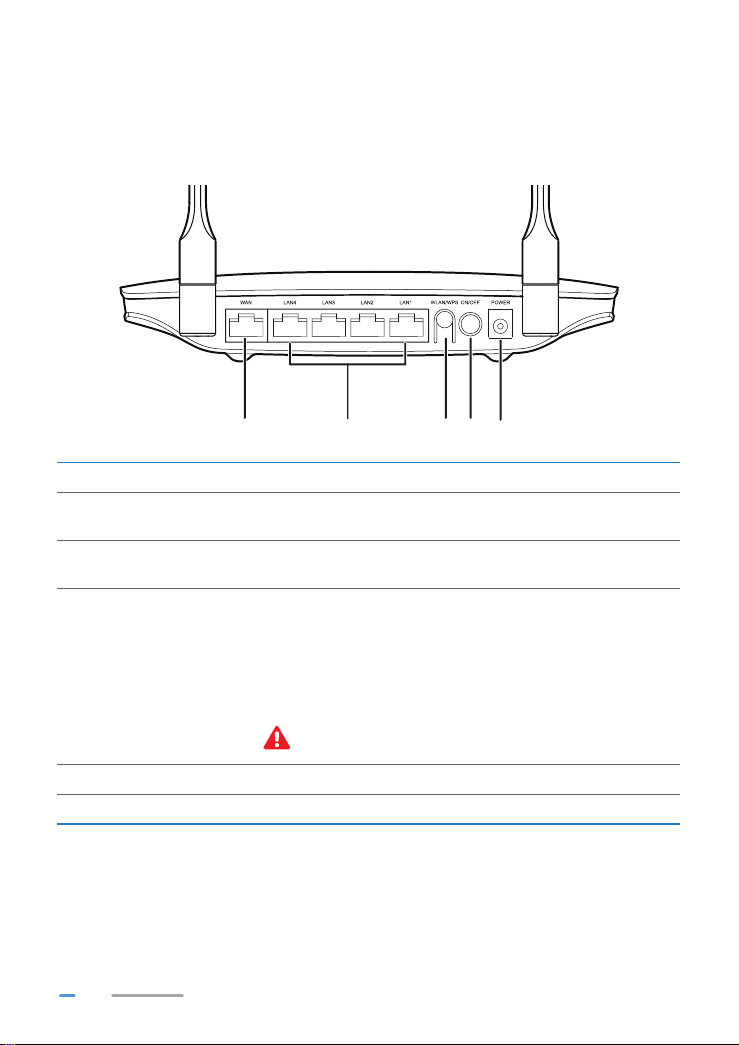
Ports and Buttons
No. Item Description
1 WAN
2 LAN1–LAN4
3 WLAN/WPS
4 ON/OFF Powers the WS329 on or off.
5 POWER Connects to a power adapter.
Connects to an Ethernet device that provides Internet access, such
as a modem or switch.
Connects to Ethernet devices, such as computers, set-top boxes
(STBs), and Ethernet switches.
> WPS button: Press the WPS button (less than 3 seconds) to start
Wi-Fi protected setup (WPS) negotiation while the WS329 is
powered on.
> WLAN button:Press the WLAN button (more than 3 seconds) to
enable or disable WLAN while the WS329 is powered on.
> Reset button: Press Reset button (more than 20 seconds) to
restore to its default settings while the WS329 is powered on.
A reset will result in all custom data and settings being lost.
Use with caution.
2
Page 6
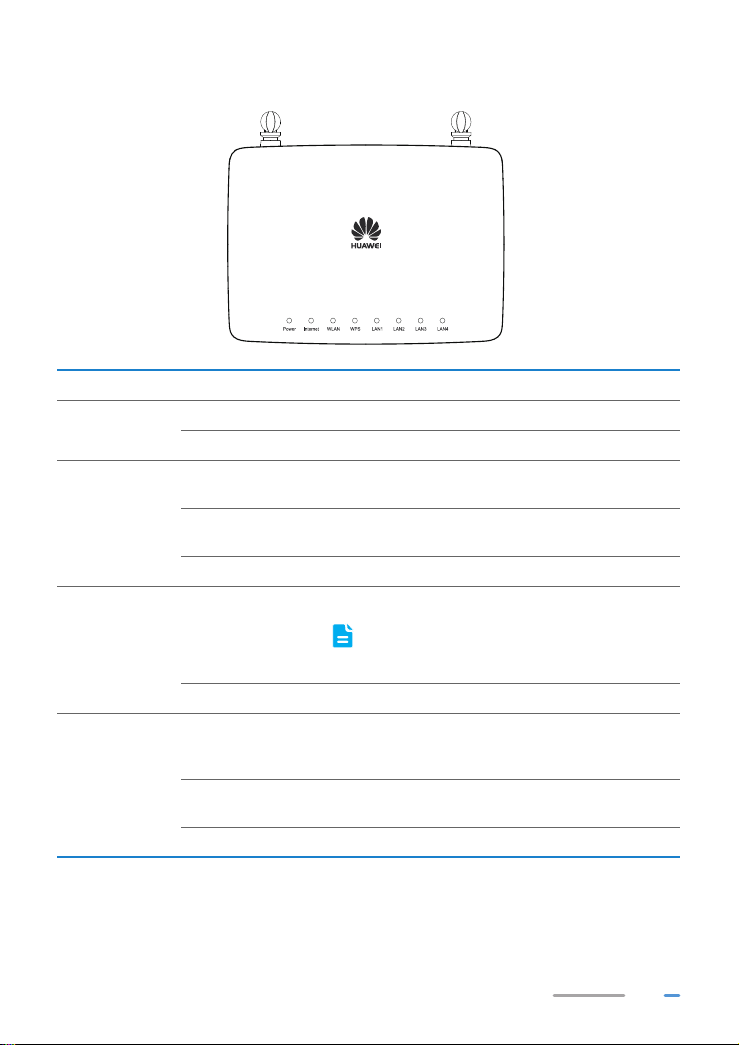
Indicators
Indicator Status Description
Power
Internet
WLAN
WPS
Steady on The WS329 is powered on.
Off The WS329 is powered off.
Steady on
Blinking
The WS329 is connected to the Internet in router mode,
but no data is being transmitted.
The WS329 is connected to the Internet in router mode,
and data is being transmitted.
Off The WS329 WAN port is not connected to any device.
WS329 has WLAN enabled.
Steady on
Off WLAN is disabled.
The WS329 is connected to a wireless client, such as a
Steady on
computer with a wireless network adapter, over the WLAN
using the Wi-Fi Protected Setup (WPS) function.
Blinking
The WS329 is attempting to connect to a wireless client
over the WLAN using the WPS function.
Off WPS is disabled.
The WS329 has WLAN enabled by default, so the
WLAN LED is steady on while the WS329 is
powered on.
3
Page 7

Indicator Status Description
The LAN port is connected to an Ethernet device (such as
Steady on
LAN1–LAN4
Blinking
Off The LAN port is not connected to any Ethernet device.
a computer) with a network cable, but no data is being
transmitted.
The LAN port is connected to an Ethernet device (such as
a computer) with a network cable, and data is being
transmitted.
4
Page 8

2 Hardware Installation
POWER
LAN
RESET
ADSL
Modem
Telephone
wall jack
Telephone
Splitter
WS329
4
1
2 3
Selecting an Installation Location
Place the WS329 on a well-ventilated even surface without exposure to direct sunlight. For the best
possible performance, take note of the following:
> Make sure there are no obstacles, such as concrete or wooden walls, between the computer
and WS329.
> Ensure that the computer and WS329 are far from electric appliances that generate strong
magnetic or electric fields, such as microwave ovens.
Connecting the Cables
Connecting the WS329 on a DSL Broadband Network
If you have subscribed to digital subscriber line (DSL) broadband, you can connect the WS329 to a
telephone port for Internet access, so that multiple computers could access the Internet.
Connecting the WS329 on an Ethernet Broadband Network
If you have subscribed to the Ethernet Broadband, you can connect the WS329 to an Ethernet port, so
that multiple computers could access the Internet.
5
Page 9
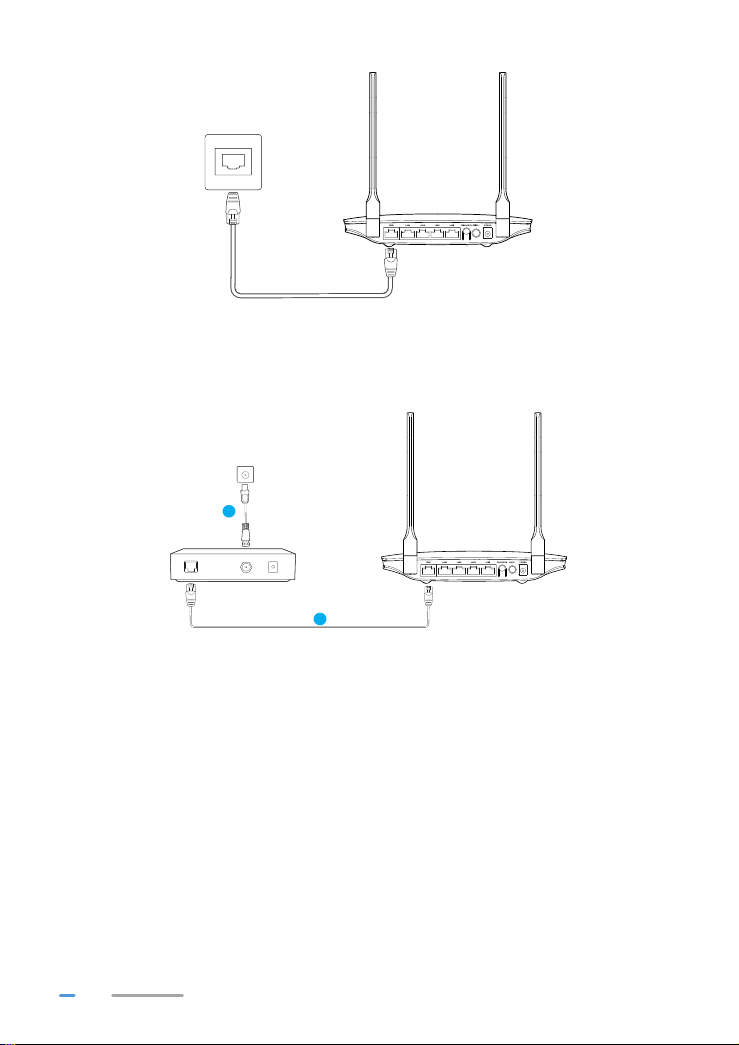
Installing the WS329 on a Cable Broadband Network
Network Interface
WS329
If you have subscribed to the cable broadband network, you can connect the WS329 to an Ethernet
port of an Cable Modem, so that multiple computers could access the Internet.
Network Interface
of an Cable
1
WS329
Cable Modem
2
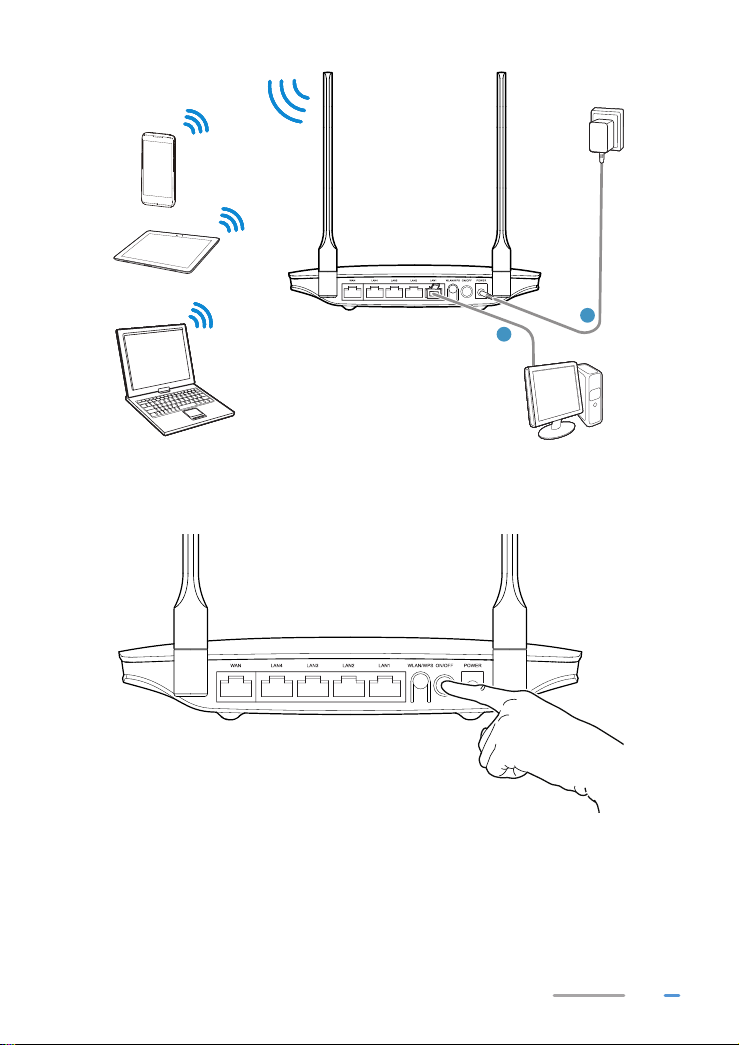
Connecting a Computer or Other Devices
When the WS329 had been accessed to the network normal, you can add the Laptop computer,
desktop computer, set-top box, pad, smart phone and other devices to the network.
6
Page 10
Powering On
1
2
WS329
Smart phone
Pad
Laptop computer
Desktop computer
To power on the WS329, press its power button.
After the WS329 is powered on, the WS329 indicator turns on. The following table lists how the
indicators behave when the WS329 is operating correctly. If the indicators do not behave as expected,
ensure that everything is plugged in correctly.
7
Page 11

Indicator Expected State
Internet Steady on
LAN Steady on
Power Steady on
WLAN Steady on
WPS Steady off
8
Page 12
3 Setting Network Parameters
Setting the Computer IP Address
Before logging in to the WS329 web management page, set the IP address of the computer that will
be used for the login.
On Windows 7
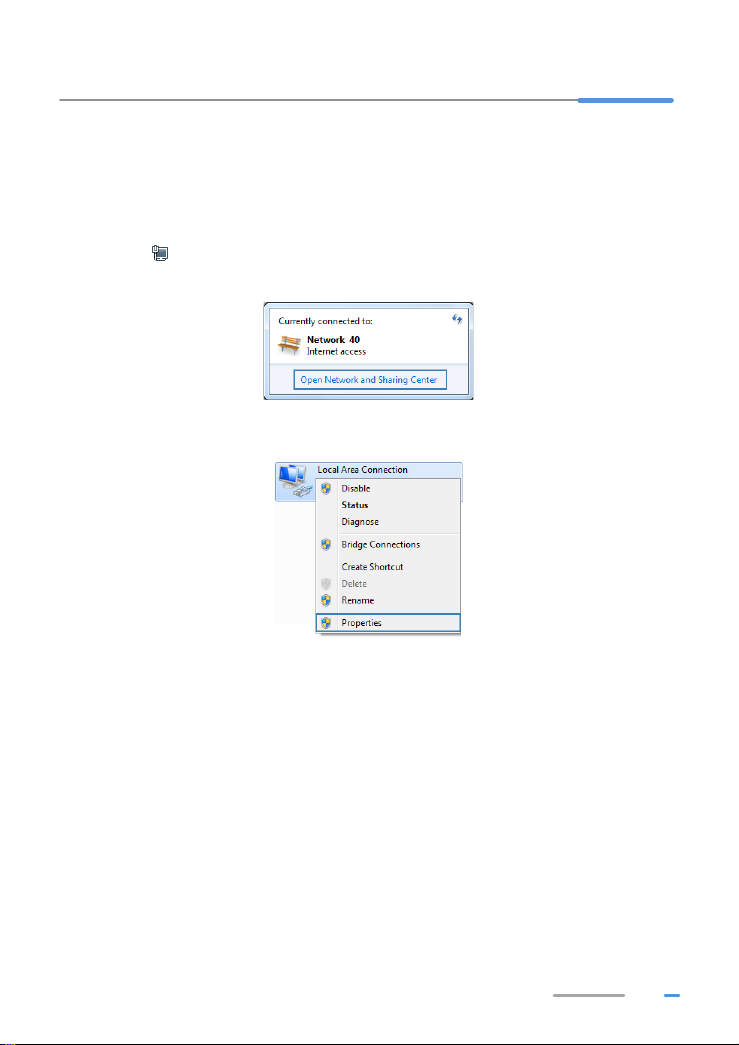
1. Click in the lower right corner of your desktop. Choose Open Network and Sharing
Center.
2. Choose Change adapter settings. Right-click Local Area Connection and choose
Properties.
9
Page 13
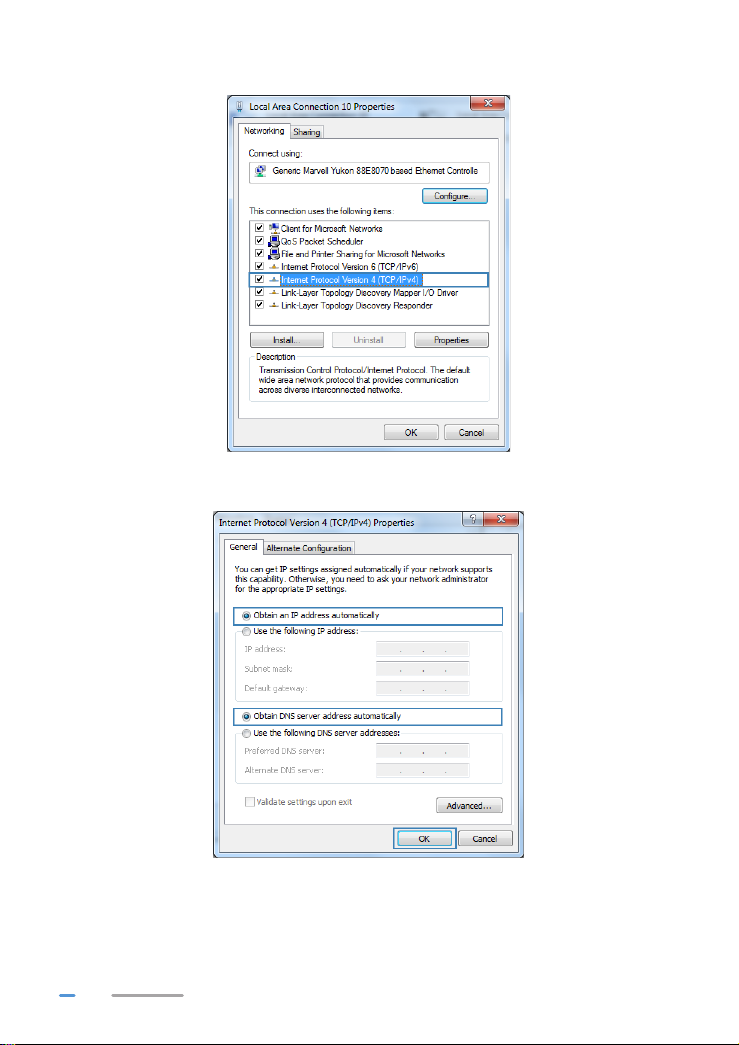
3. Double-click Internet Protocol Version 4 (TCP/IPv4).
4. Select Obtain an IP address automatically and Obtain DNS server address
automatically. Click OK.
10
Page 14
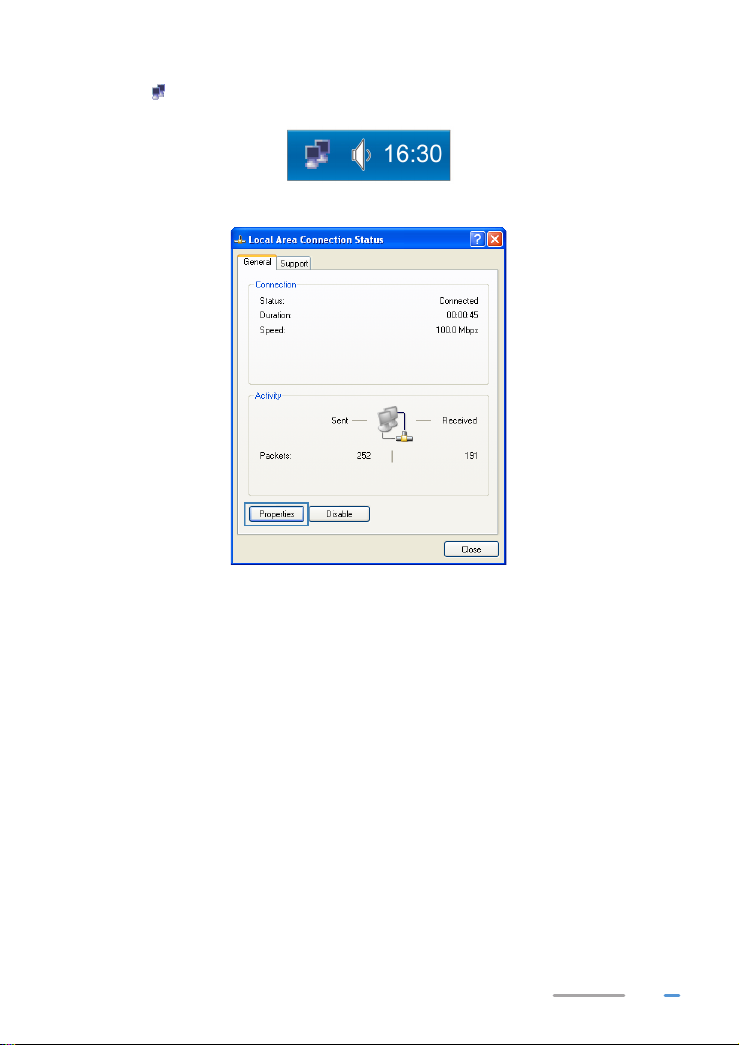
On Windows XP
1. Click in the lower right corner of your desktop.
2. In the displayed dialog box, click Properties.
11
Page 15
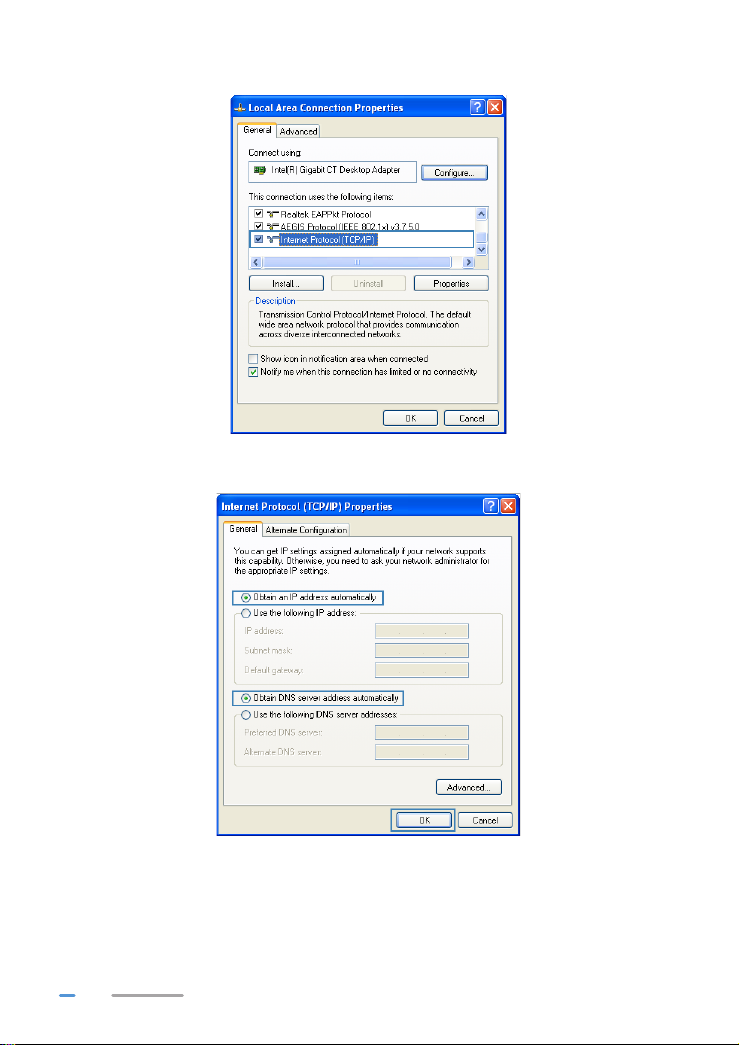
3. Double-click Internet Protocol (TCP/IP).
4. Select Obtain an IP address automatically and Obtain DNS server address
automatically. Click OK.
Logging In to the Web Management Page
The WS329 provides an intuitive web management page where you can view or set the WS329
parameters.
12
Page 16
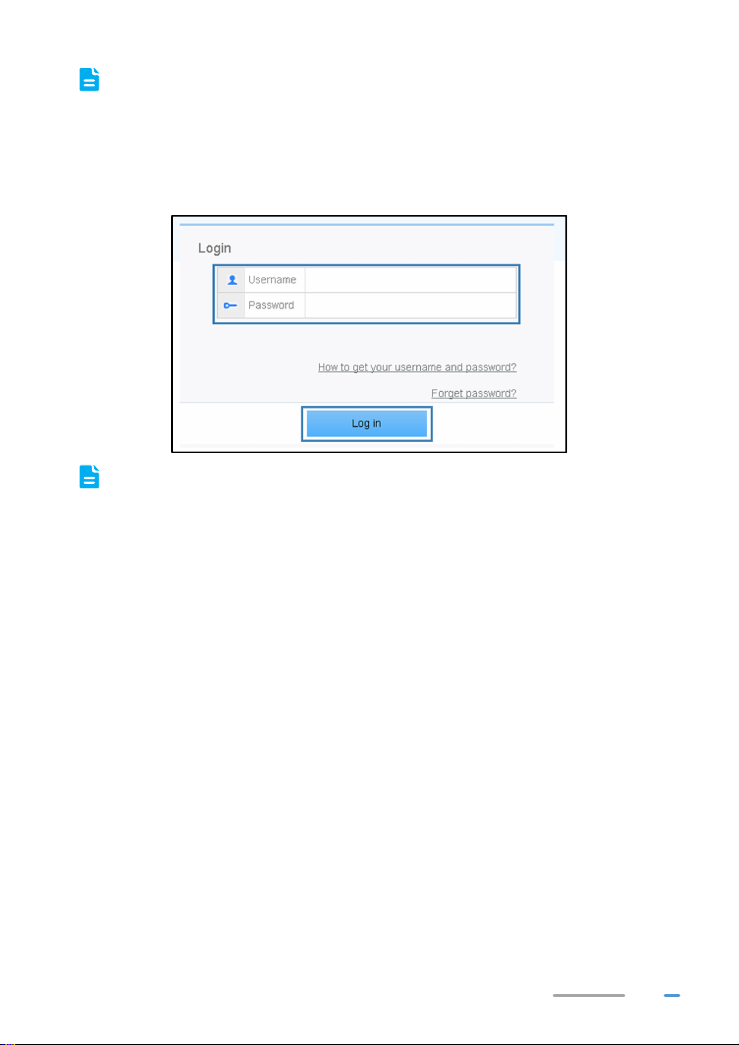
Before you log in to the WS329 web management page, ensure that the computer used for
the login is connected to the WS329 and has been configured to automatically obtain an IP
address or assigned with a static IP address.
1. Open a browser. In the address box, enter 192.168.3.1. Press Enter.
2. Enter the login user name (admin by default) and password (admin by default). Click Log
in.
To protect against unauthorized access, change the user name and password after the first
login.
Configuring the Internet Connection
When you install the WS329 for the first time, you need to configure the WS329.
Using the Web-Based Configuration Utility page
The WS329 supports quick configuration page. You can quickly configure the network connection
parameters through the quick configuration page.
When you configure the WS329 for the first time, you can see the setup wizard page after logging in to
the utility. To configure the WS329 through the setup wizard.
Do as follows:
1. Log in to the web management page.
13
Page 17
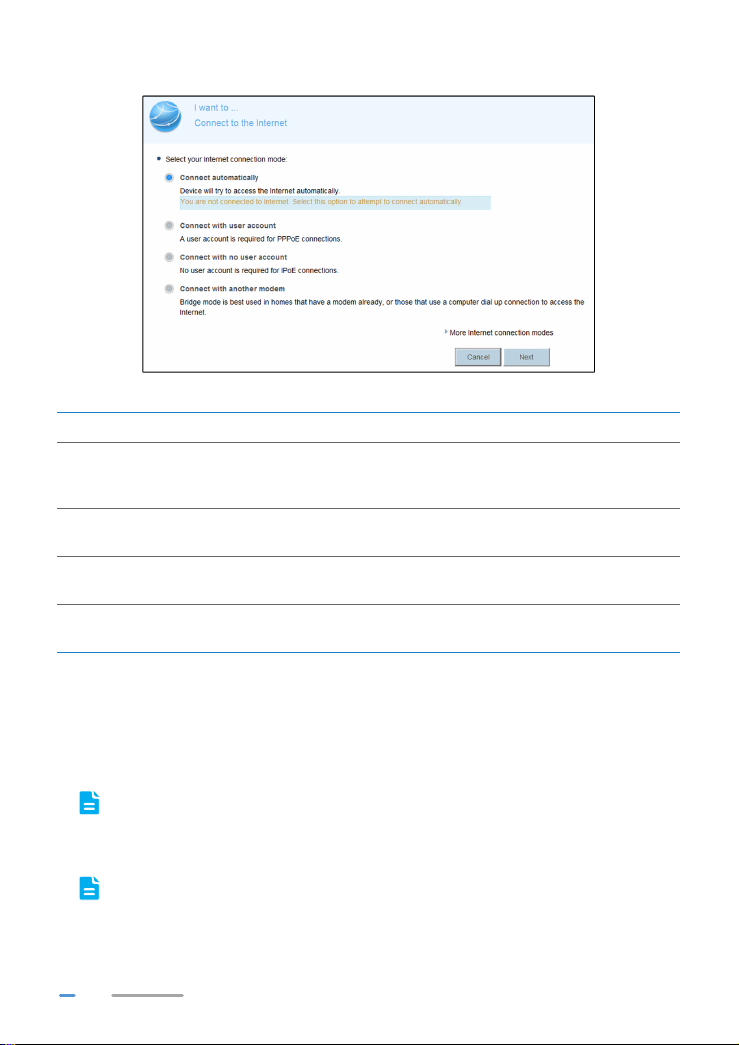
2. Choose Home tab, click Connect to the Internet. Select your Internet connection mode.
Refer to the following table to configure the network connection.
Scenario Connection Type
When you are unsure of the network connection you subscribed to,
you can select this mode that the device will detect the network
connection automatically.
The account name and password are provided by your Internet
Service Provider (ISP).
No parameter is provided by your ISP. The IP address is
automatically assigned by the ISP.
The user name and password are provided by Internet Service
Provider (ISP). Set up a dial-up connection on one computer only.
Connect automatically
Connect with user account
Connect with no user
account
Connect with another
modem
3. Set WLAN parameters.
> If you selected Connect with user account, enter the parameters provided by your
Internet Service Provider (ISP) and click Next.
> If you selected Connect with no user account or Connect with another modem, click
Next.
If you selected Connect with user account or Connect with no user account, the
computer automatically connects to the Internet as long as the router is working properly.
+
4. Choose Home tab, click Set Up WLAN, set WLAN parameters, click Save.
To obtain the default SSID and key, check the label on the rear panel. To better secure your
WLAN, promptly change the SSID and key.
14
Page 18

Setting Dial-Up Connection Parameters
When the WS329 works in Bridge mode you need to perform this operation. Otherwise you do not need
to perform this operation.
Before setting dial-up connection parameters, verify that the WS329 is correctly connected to your
computer and you have the dial-up connection account name and password provided by your Internet
service provider (ISP). This section demonstrates how to set up a Point-to-Point Protocol over Ethernet
(PPPoE) connection on Windows.
On Windows 7
1. Choose Start > Control Panel > Network and Internet > Network and Sharing Center.
2. Under Change your networking settings, click Set up a new connection or network.
3. In the Set Up a Connection or Network window, select Connect to the Internet and click
Next.
15
Page 19
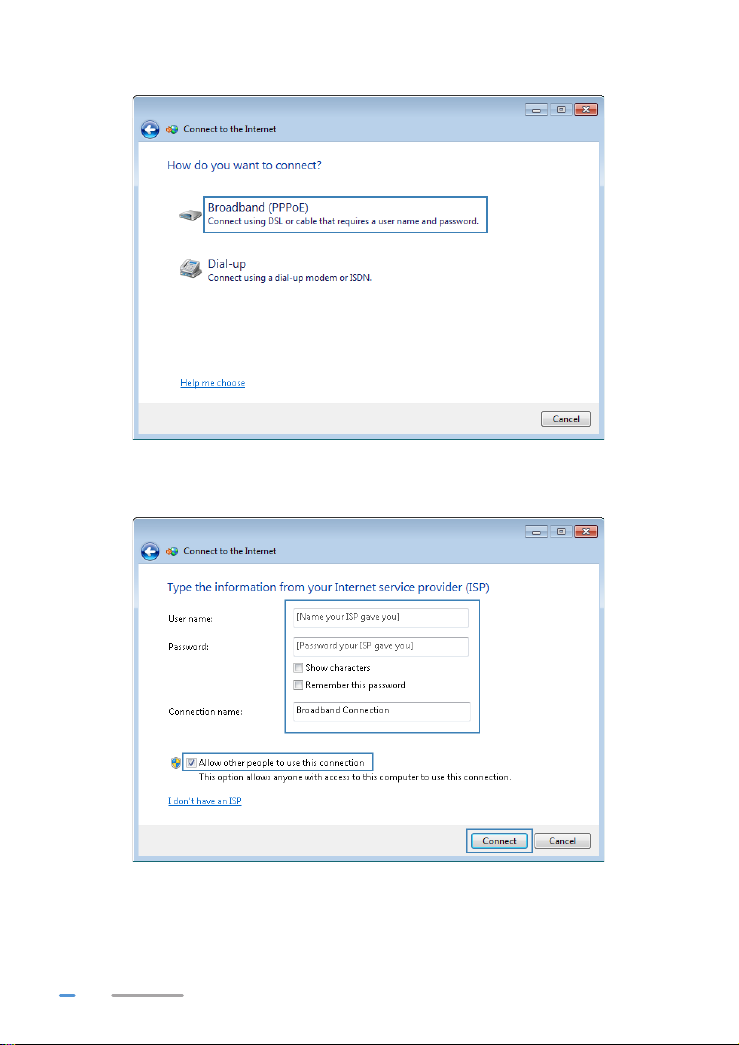
4. Click Broadband (PPPoE).
5. In User name and Password, enter the dial-up connection account name and password
provided by your ISP. In Connection name, name the dial-up connection. Select or deselect
Allow other people to use this connection. Then click Connect.
16
Page 20
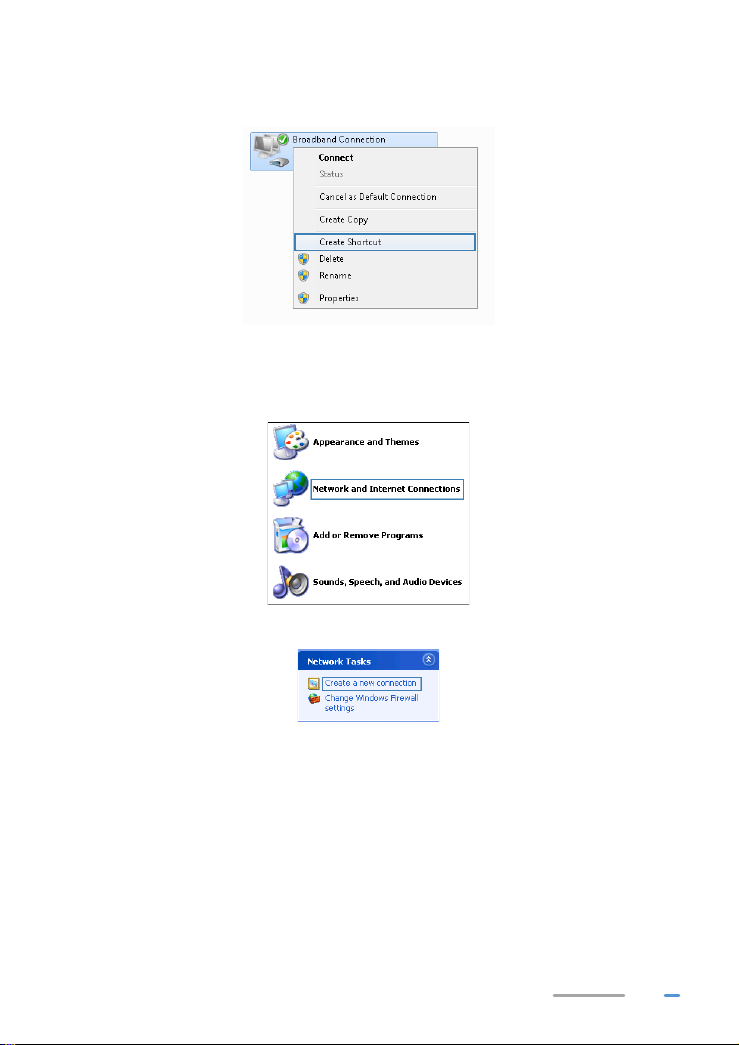
6. Return to the Network and Sharing Center page. Click Change adapter settings. Right-
click the icon for the dial-up connection you just set up and choose Create Shortcut from the
shortcut menu. In the displayed dialog box, click Yes.
On Windows XP
1. Choose Start > Control Panel > Network and Internet Connections > Network
Connections.
2. Under Network Tasks, click Create a new Connection.
17
Page 21
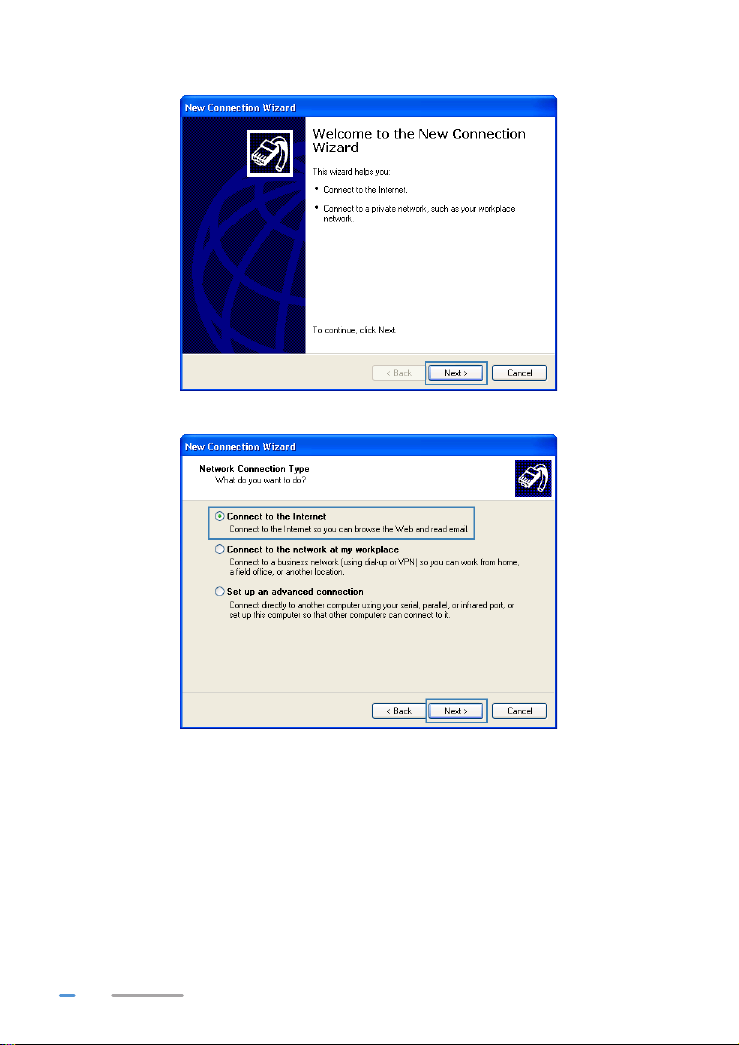
3. In the New Connection Wizard dialog box, click Next.
4. Select Connect to the Internet and click Next.
18
Page 22
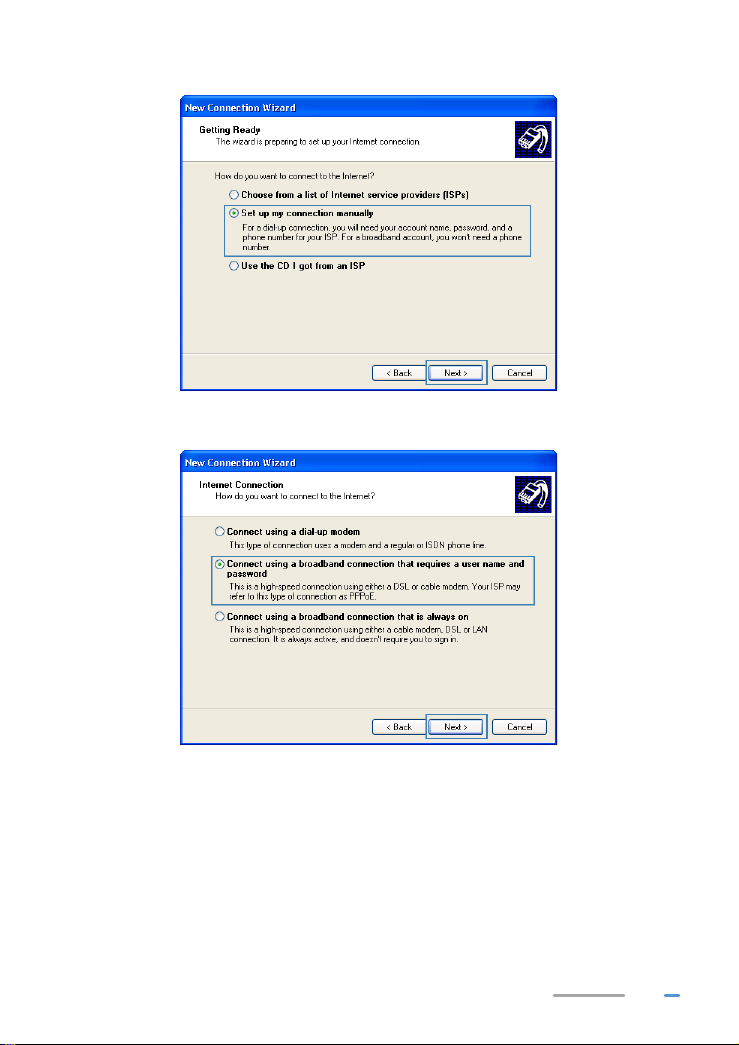
5. Select Set up my connection manually and click Next.
6. Select Connect using a broadband connection that requires a user name and
password and click Next.
19
Page 23
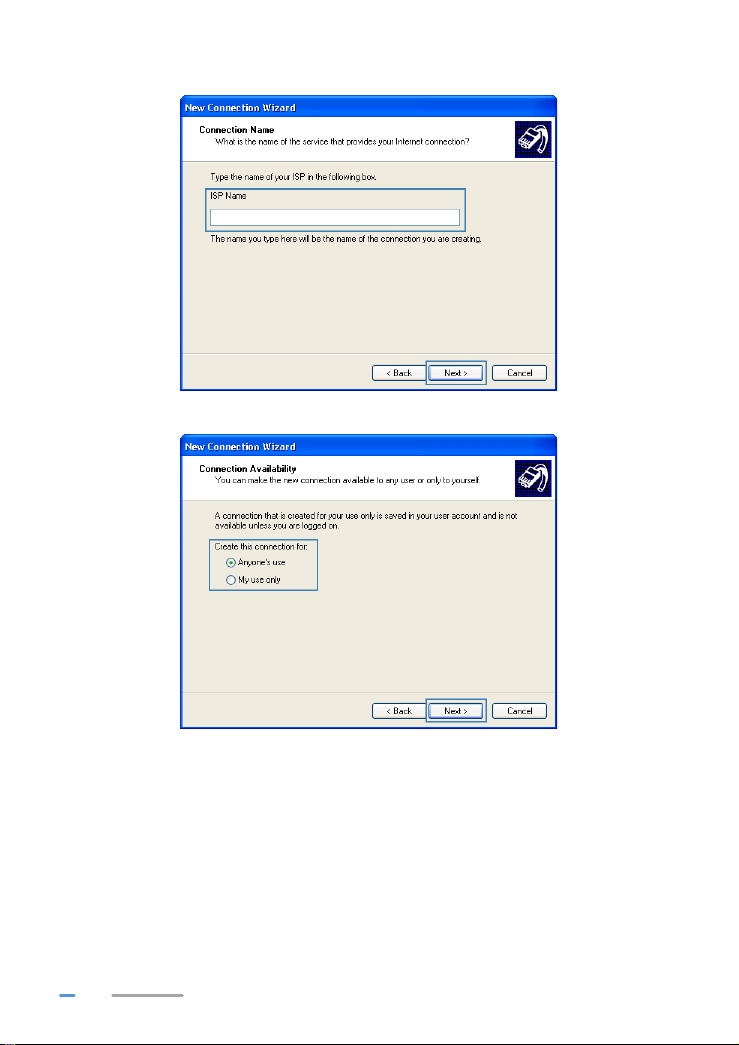
7. In ISP Name, name the dial-up connection. Click Next.
8. Select Anyone's use or My use only and click Next.
20
Page 24
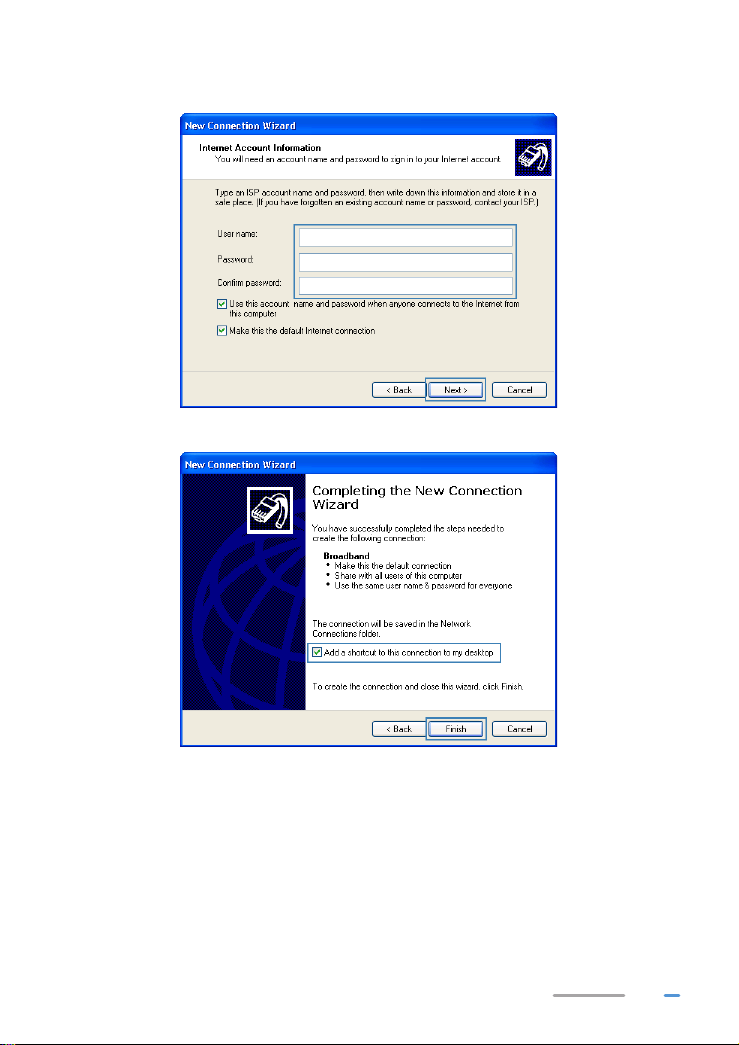
9. Enter the dial-up connection account name and password provided by your ISP and click
Next.
10. Select Add a shortcut to this connection to my desktop and click Finish.
After you successfully set up a PPPoE connection, a dial-up connection icon is displayed on your
computer desktop.
To connect to the Internet, double-click the dial-up connection icon. In the displayed dialog box, click
Connect.
21
Page 25
4 Wireless Connection Setup
Setting Up a Wireless Connection Using the WPS Button
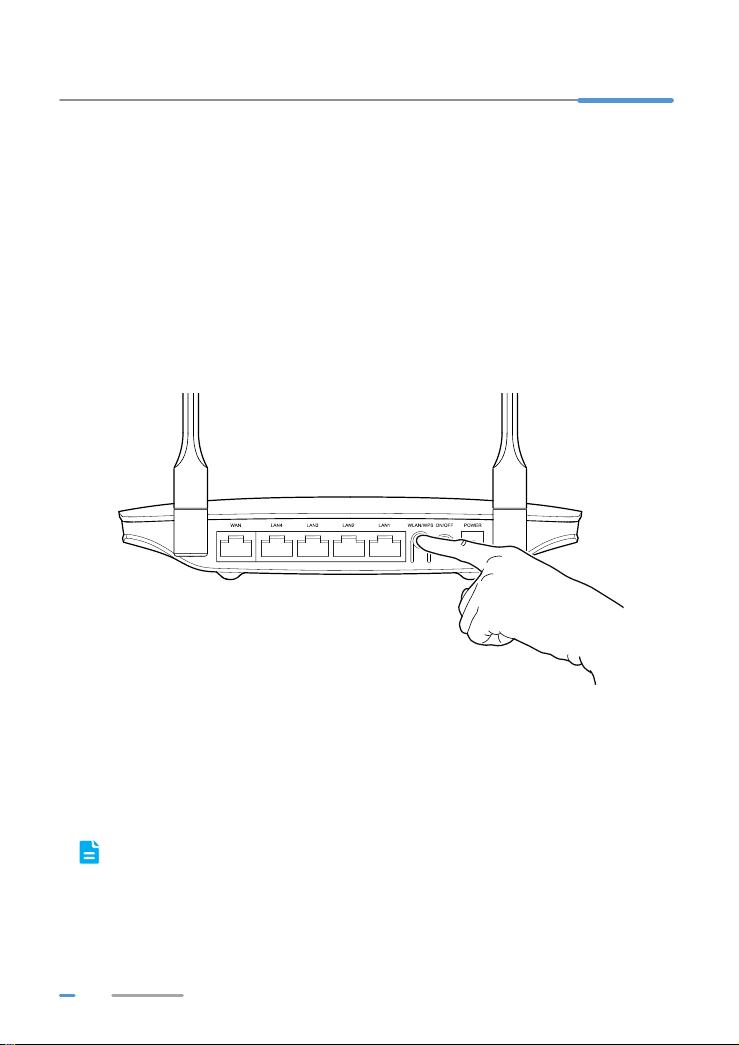
Push the WPS button once to quickly set up a wireless connection between the WS329 and any WPScapable device.
Before you set up a wireless connection using the WPS button, verify the following:
> The wireless network security mode of the WS329 is WPA2-PSK or WPA-PSK/WPA2–PSK.
> The wireless device (laptop, tablet, or mobile phone) to connect to the WS329 is WPS-
capable.
1. Press the WPS button on the wireless device to start WPS negotiation. For details, see the
user guide for the wireless device.
2. Within 2 minutes, press and hold the WPS button on the WS329 for 1 second or more. The
WPS indicator blinks.
When the WPS indicator on the WS329 is steady on, a connection between the WS329 and wireless
device is set up. The WPS indicator is on for 300 seconds.
Manually Setting Up a Wireless Connection
The wireless configuration software provided by Windows is used as an example to describe how to
set up a wireless connection.
You can also use the tool built into the network adapter to set up a wireless connection. For
details, see the network adapter's user guide.
Before setting up a wireless connection, record the WLAN name and password of the WS329. The
default WLAN name and password are printed on the WS329 cover label.
22
Page 26
Before setting up a wireless connection, record the WLAN name and password of the WS329.
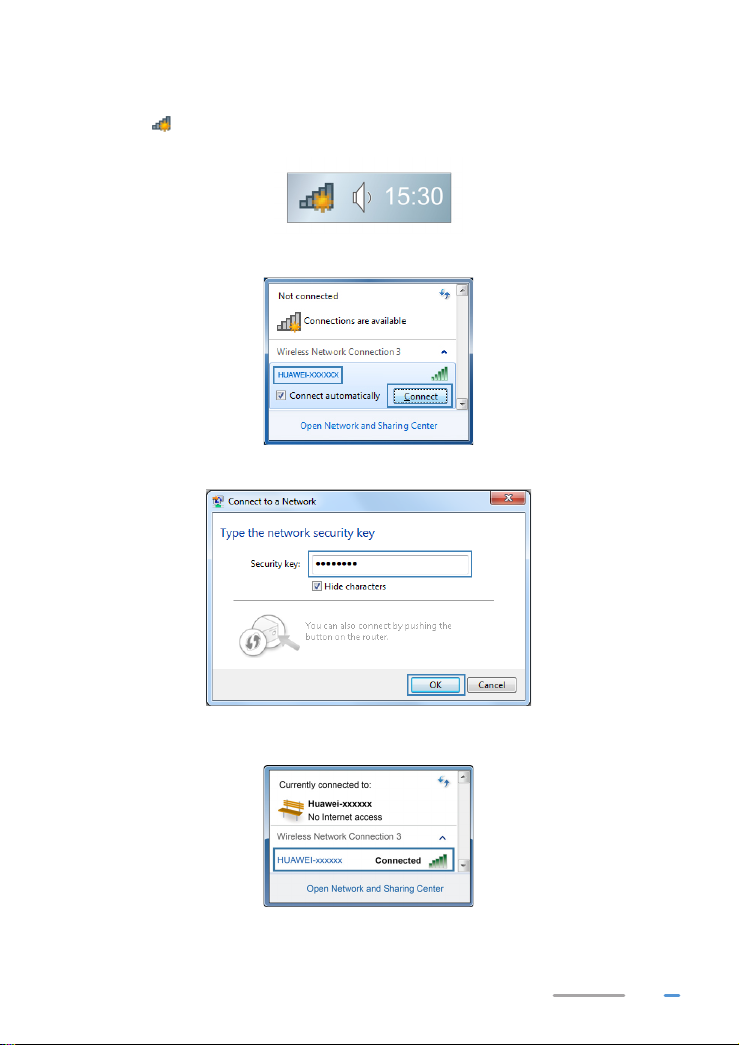
On Windows 7
1. Click in the lower right corner of your desktop.
2. From the wireless network list, select the WLAN provided by the WS329. Click Connect.
3. In the displayed dialog box, enter the WLAN password and click OK.
4. In the wireless network list, check the WLAN connection status. If the status is Connected,
the computer is wirelessly connected to the WS329.
23
Page 27
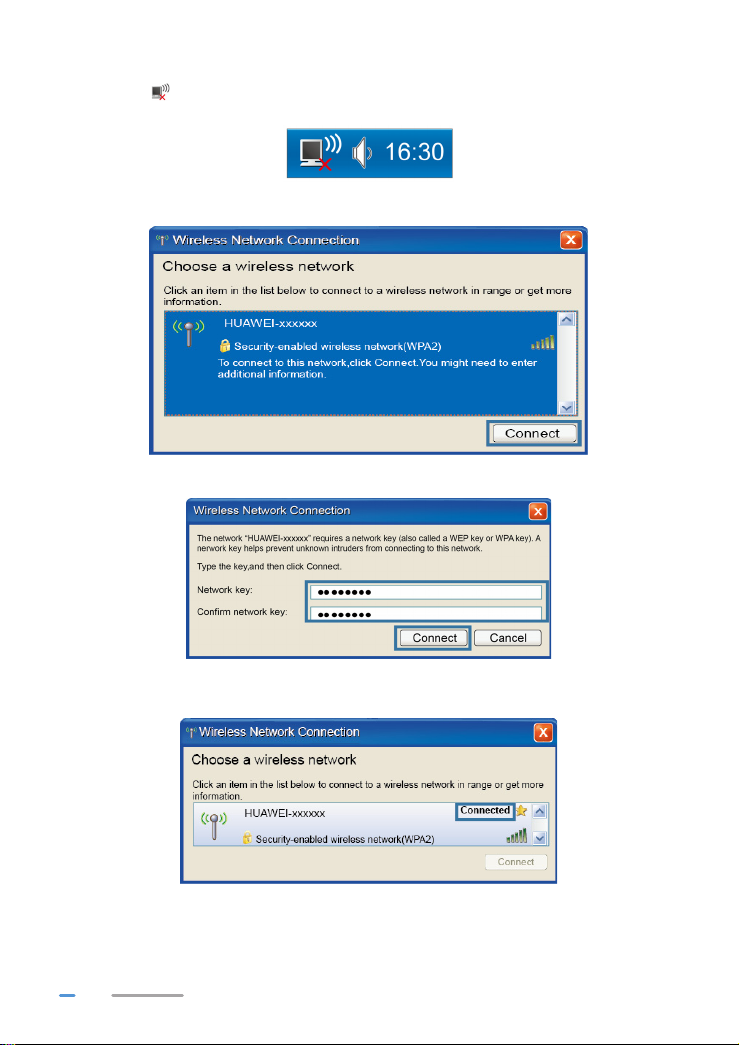
On Windows XP
1. Click in the lower right corner of your desktop.
2. From the wireless network list, select the WLAN provided by the WS329. Click Connect.
3. In the displayed dialog box, enter the WLAN password and click Connect.
4. In the wireless network list, check the WLAN connection status. If the status is Connected,
the computer is wirelessly connected to the WS329.
24
Page 28
5 Network Security
Improving WLAN Security
Hiding the WLAN Name
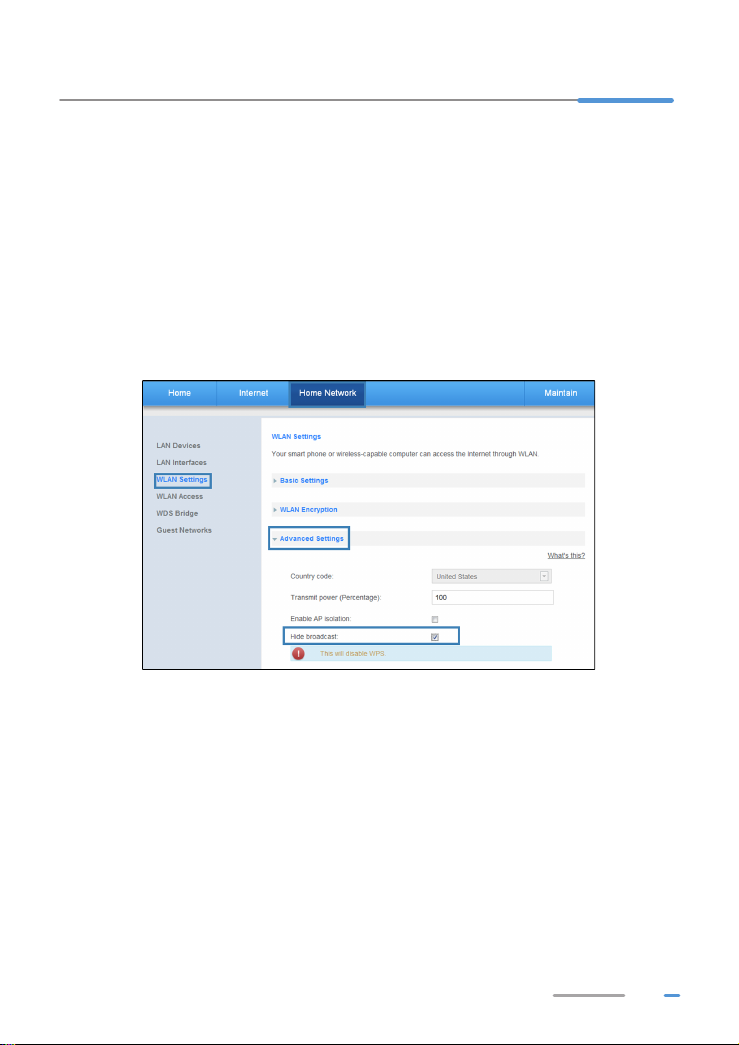
After you hide the WLAN name, anyone who wishes to connect to the WLAN must enter the correct
WLAN name. This measure helps improve WLAN security.
1. Log in to the web management page.
2. Choose Home Network tab.
3. In the navigation tree, choose WLAN Settings.
4. Select Advanced Settings configuration page.
5. Set Hide Broadcast to Enable.
6. Click Save.
Changing Your WLAN Name and Password
WLAN access requires the WLAN name and password. To improve your WLAN security, regularly
change your WLAN name and password.
1. Log in to the web management page.
2. Choose Home Network tab.
3. In the navigation tree, choose WLAN Settings.
4. Select WLAN Encryption configuration page.
5. In SSID, enter a new WLAN name.
6. In WPA pre-shared key, enter a new WLAN password.
25
Page 29
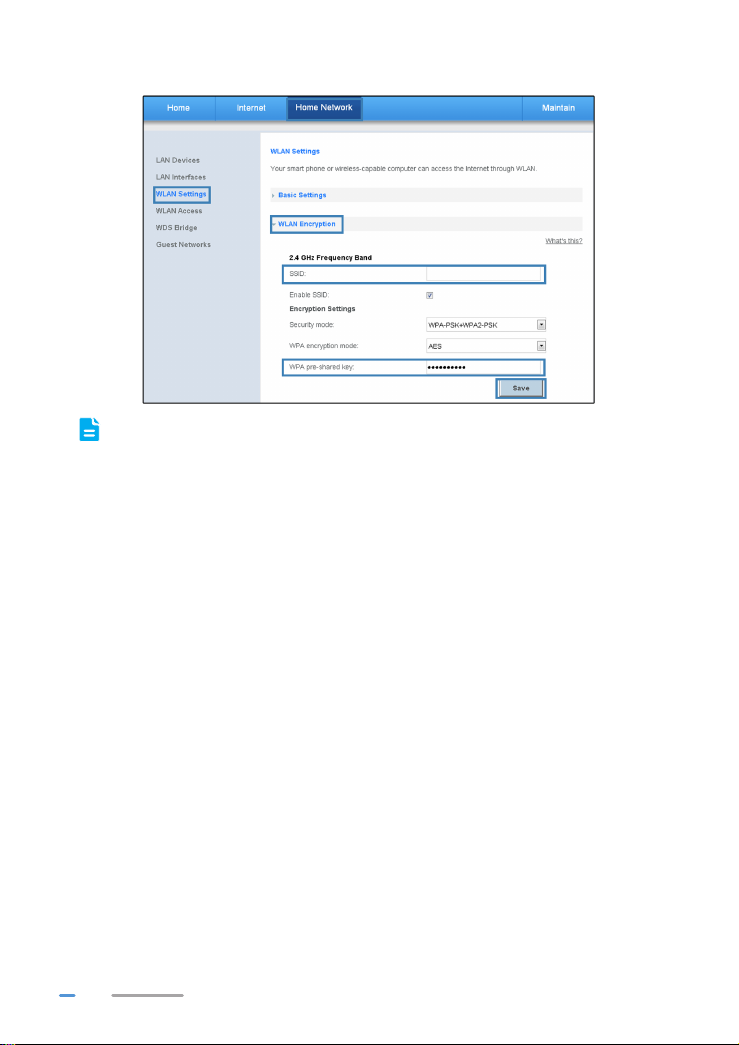
7. Click Save.
After the SSID and key had been changed, your computer should use the new ones to
establish a wireless connection to the WS329.
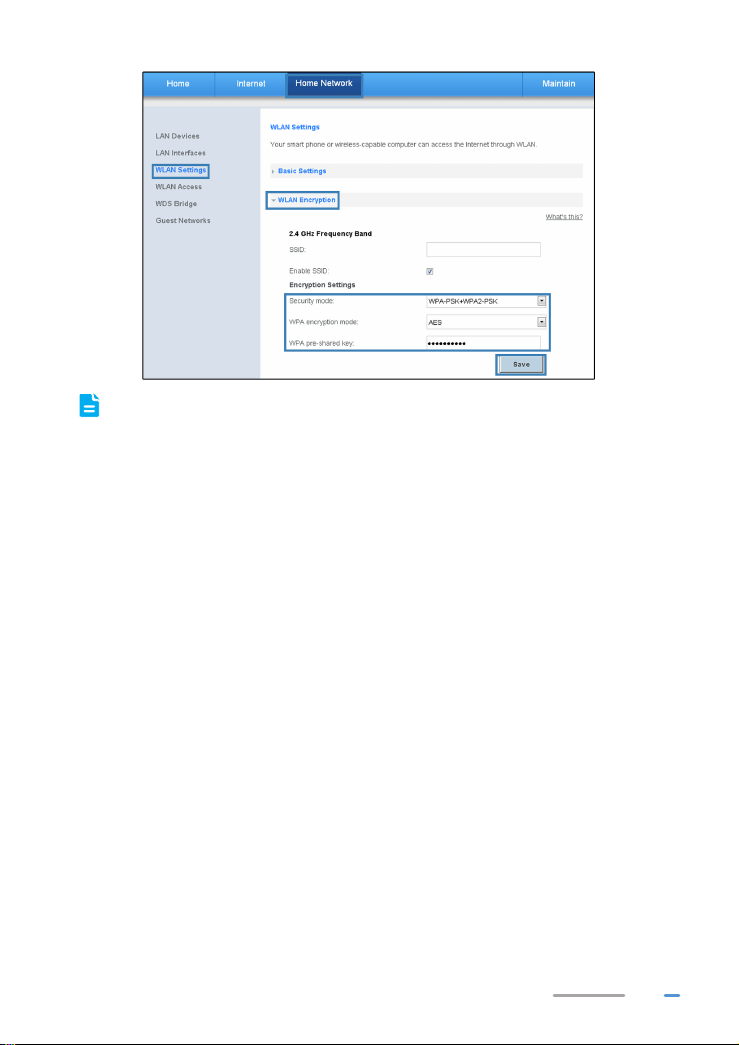
Using High Security Encryption Modes
Adopting high security encryption modes protects against unauthorized access as well as data
interception on networks.
To improve WLAN security without sacrificing working efficiency, use WPA-PSK/WPA2–PSK and
AES. This step also prevents WLAN unavailability caused by network adapters' incompatibility with the
selected security mode.
1. Log in to the web management page.
2. Choose Home Network tab.
3. In the navigation tree, choose WLAN Settings.
4. Select WLAN Encryption > Encryption Settings configuration page.
5. Select Security mode for you wanted.
6. Select WPA encryption mode for you wanted.
7. In WPA pre-shared key, enter the WLAN password you specified.
8. Click Save.
26
Page 30
After the password used for accessing a WLAN is changed, you need to enter the new
password when connecting a PC to the WLAN.
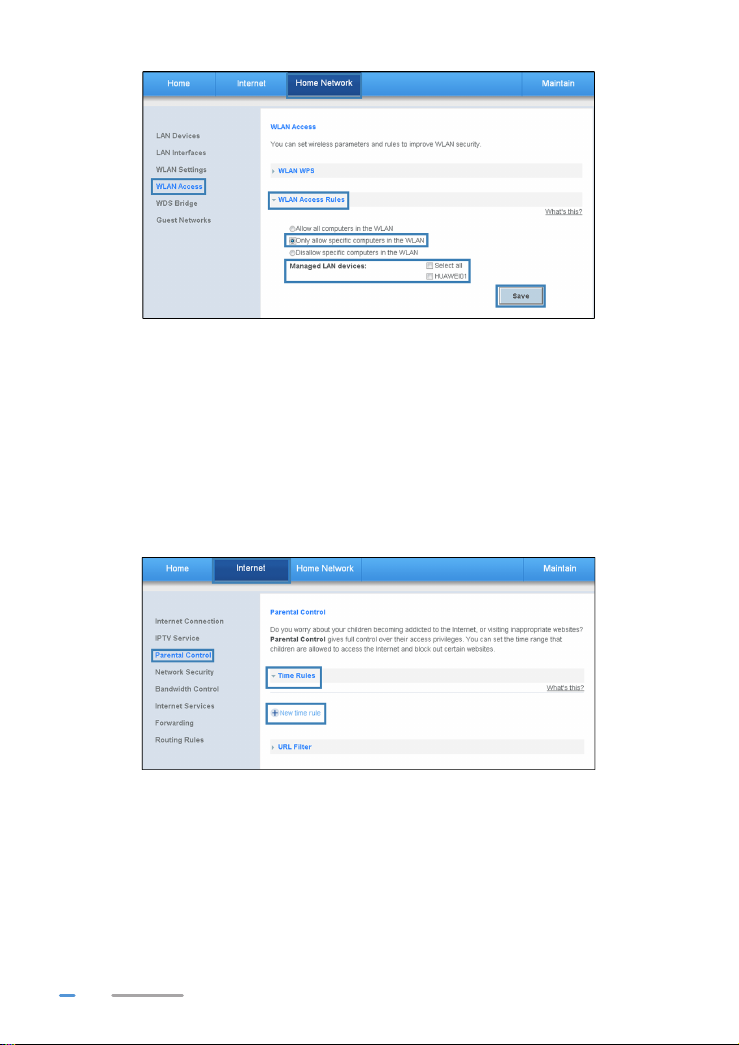
Allowing Only Specified Computers to Access Your WLAN
To prevent unauthorized access to your WLAN, you can specify which devices are allowed to access
your WLAN.
1. Connect a computer and the WS329 via wireless.
2. Log in to the web management page.
3. Choose Home Network tab.
4. In the navigation tree, choose WLAN Access.
5. Select WLAN Access Rules configuration page.
6. Set Only allow specific computers in the WLAN to Enable.
7. In Managed LAN devices, select the computer name for you wanted.
8. Click Save.
27
Page 31
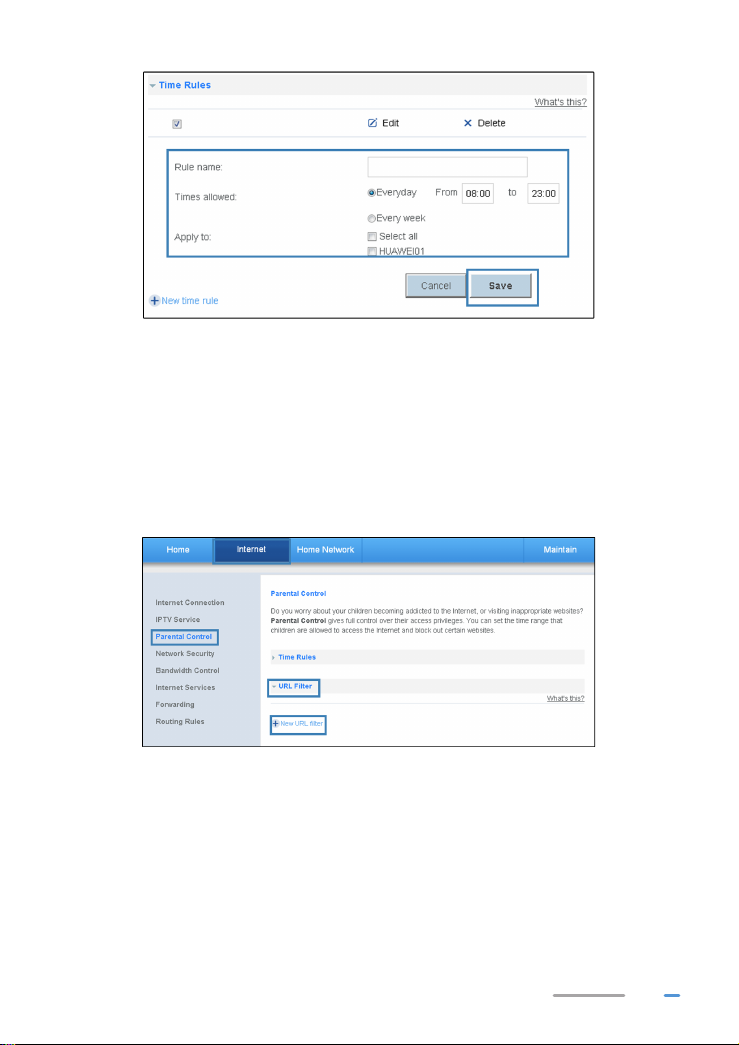
Controlling Computer Internet Access
You can prohibit certain PCs from accessing the Internet or allow only certain PCs to access the
Internet. In addition, you can set the period during which the PCs are not allowed to access the Internet.
1. Log in to the web management page.
2. Choose Internet tab.
3. In the navigation tree, choose Parental Control.
4. Select Time Rules configuration page.
5. Click New time rule.
6. In Rule name, enter a filtering rule name you specified.
7. In Times allowed, enter a time zone you specified.
8. In Apply to, select the computer name for you wanted.
9. Click Save.
28
Page 32
Filtering Out Inappropriate Websites
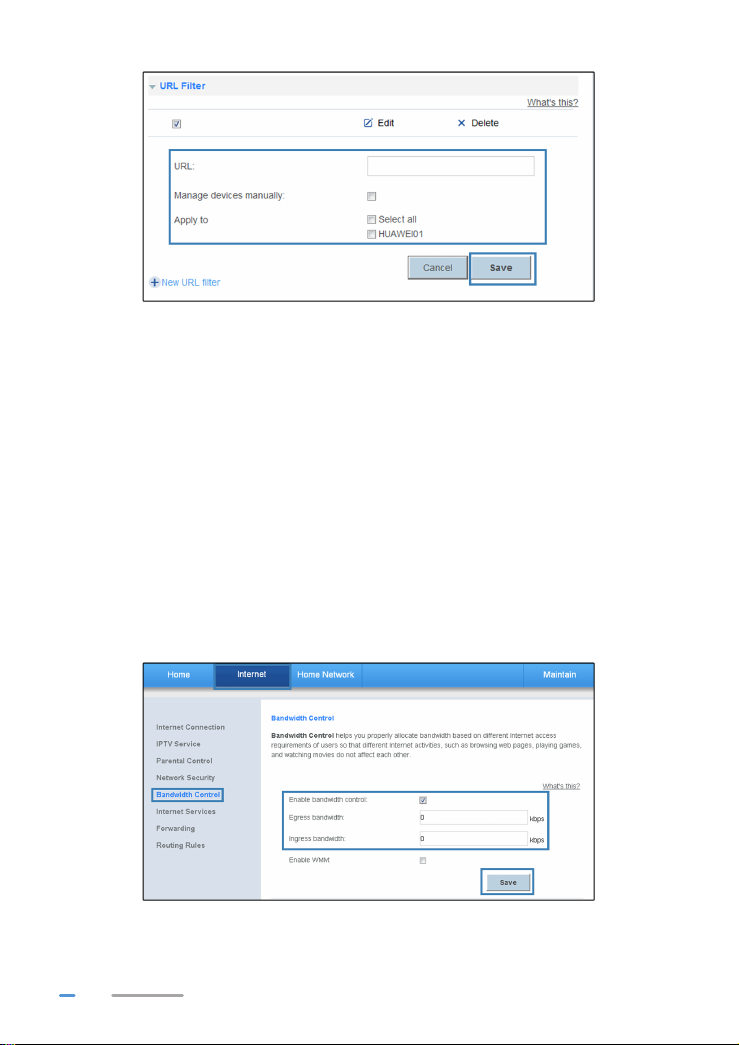
Use URL filtering to prevent certain websites from being accessed.
1. Log in to the web management page.
2. Choose Internet tab.
3. In the navigation tree, choose Parental Control.
4. Select URL Filter configuration page.
5. Click New URL filter.
6. In URL, enter the Web site address you specify.
7. Set Manage devices manually to Enable.
8. In Apply to, select the computer name for you wanted.
9. Click Save.
29
Page 33
Controlling Computer Bandwidth
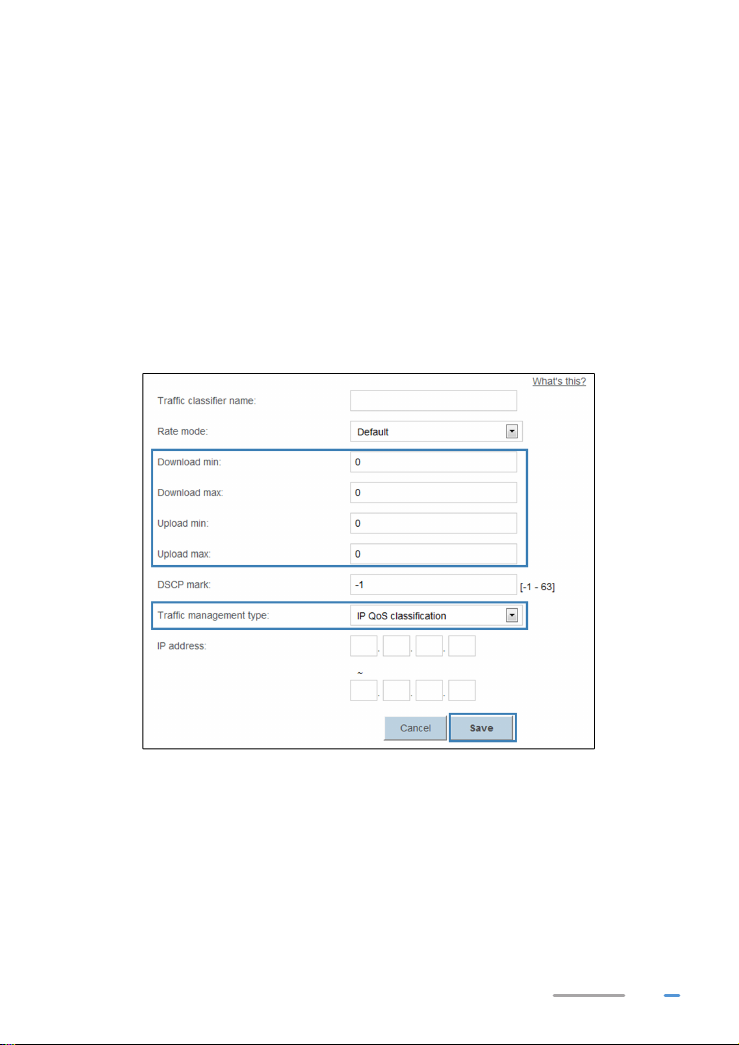
By configuring bandwidth control policies, you can control the bandwidth of computers connected to
the WS329 in the following ways:
> Determine the minimum bandwidth allocated to specific computers to help ensure the Internet
access speed for those computers.
> Determine the maximum bandwidth certain computers can occupy so that bandwidth remains
available to other computers.
1. Log in to the web management page.
2. Choose Internet tab.
3. In the navigation tree, choose Bandwidth Control.
4. Select Bandwidth Control configuration page.
5. Set Enable bandwidth control to Enable.
6. In Egress bandwidth and Ingress bandwidth, enter the rate value you specified.
7. Click Save.
You can configure different bandwidth control policies for different computers.
30
Page 34
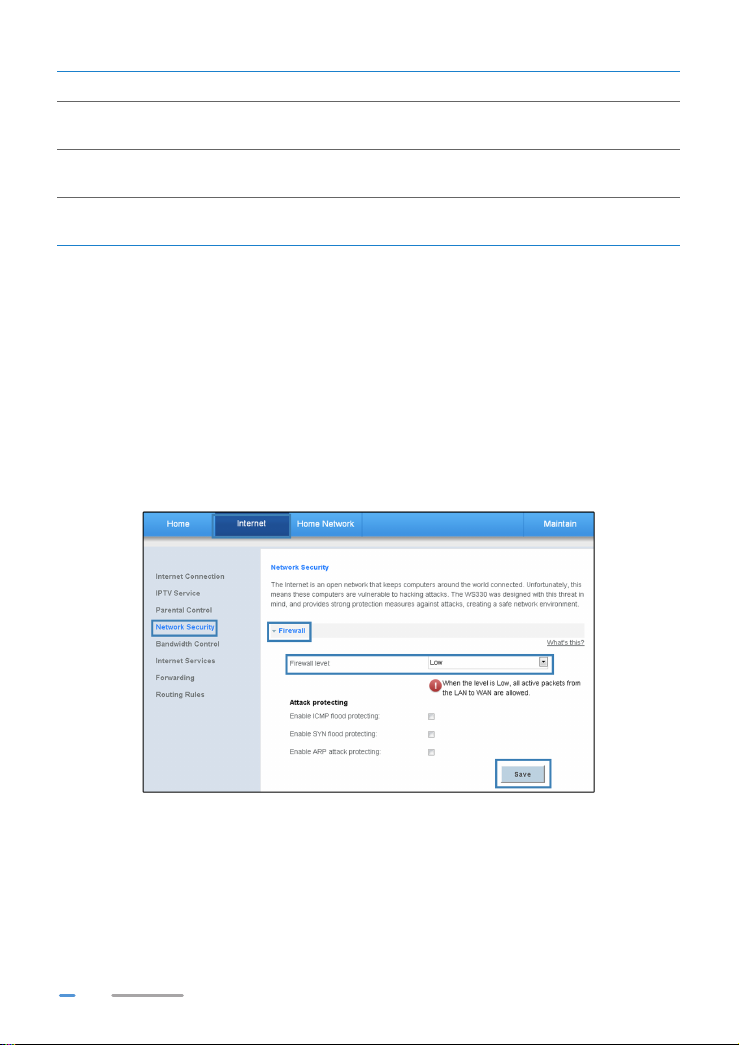
The configuration procedure is as follows:
1. Click New.
2. In Rate mode, select the rate mode you specified.
3. In Download min, Download max, Upload min and Upload max, enter the rate value you
specified.
4. In Traffic management type, select the traffic management type you specified.
> When the Traffic management type is IP QoS Classification, enter the IP address
of the computers you want to control in
> When the Traffic management type is MAC QoS Classification, select the MAC
address of the computer you want to control in
> When the Traffic management type is LAN QoS Classification, select the interface
of the computer you want to control in
> When the Traffic management type is Application QoS classification, enter the
Application name you specified in
IP address.
MAC address.
LAN interface.
Application.
5. Click Save.
Configure the Firewall to Prevent Attacks on the Internet
The Description of Firewall Level
The preset protective levels of the firewall are as follows:
31
Page 35
Level Description
High
Low
Disable
When you set the firewall level of the router to High, only the FTP / DNS /
HTTP packet is allowed to pass through.
When you set the firewall level of the router to Low, the packets from the LAN
to the WAN are allowed to pass through.
When you set the firewall level of the router to Disable, all data packets are
allowed to pass through.
Configuring the Firewall
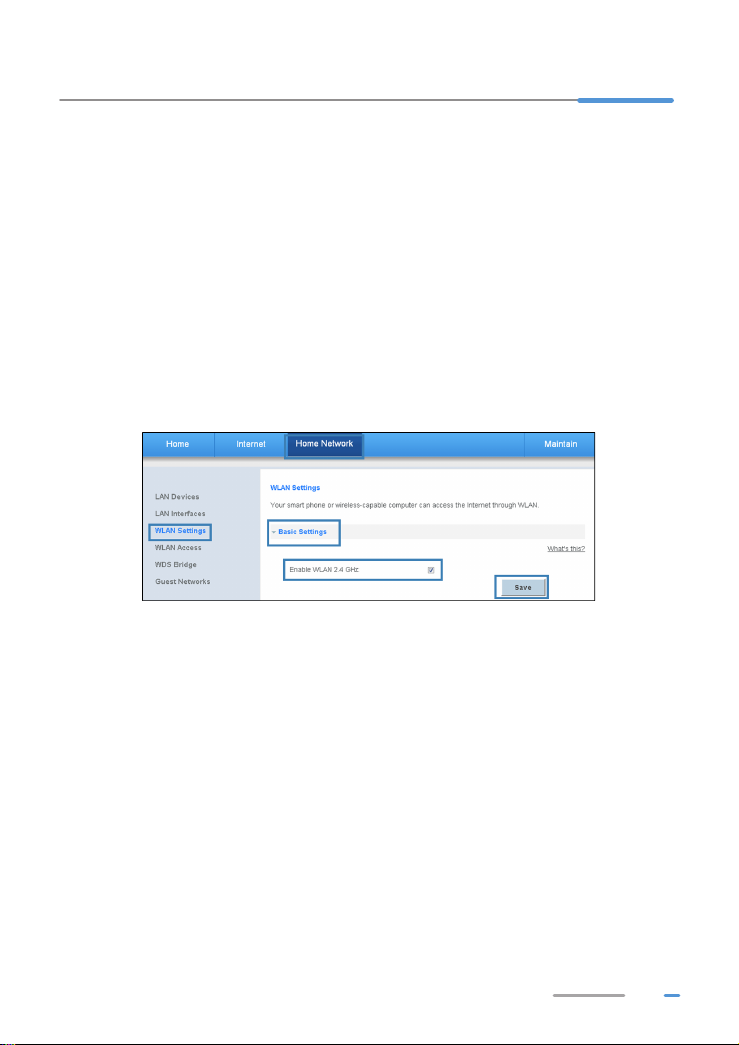
The WS329 provides a firewall to help secure its WLAN and any devices connected to it. Set the
firewall level based on site requirements to quickly configure the firewall.
1. Log in to the web management page.
2. Choose Internet tab.
3. In the navigation tree, choose Network Security.
4. Select Firewall configuration page.
5. In Firewall level, select the firewall level you specified.
6. Click Save.
32
Page 36
6 Enabling and Disabling the WLAN on the WS329
The following two methods are available to enable and disable the WLAN on the WS329.
Using the WLAN Button
Press the WLAN button in the WS329 to enable or disable the WLAN. To ascertain whether the WLAN
is enabled, view the WLAN indicator.
Using the Web Management Page
1. Log in to the web management page.
2. Choose Home Network tab.
3. In the navigation tree, choose WLAN Settings.
4. Select Basic Settings configuration page.
5. Set Enable WLAN 2.4 GHz to Enable.
6. Click Save.
33
Page 37
7 Expanding WLAN Coverage
To expand WLAN coverage, use the wireless distribution system (WDS) to set up a wireless
connection between two WS329 devices.
For example, if your house is too large to be fully covered by the WLAN provided by one WS329
device, add another WS329 device and set up a wireless connection between these two devices using
the WDS. The WLAN coverage is then expanded.
While setting up the wireless connection between the two WS329 devices, configure the devices to use
the same radio channel, WLAN name, encryption method, and encryption key.
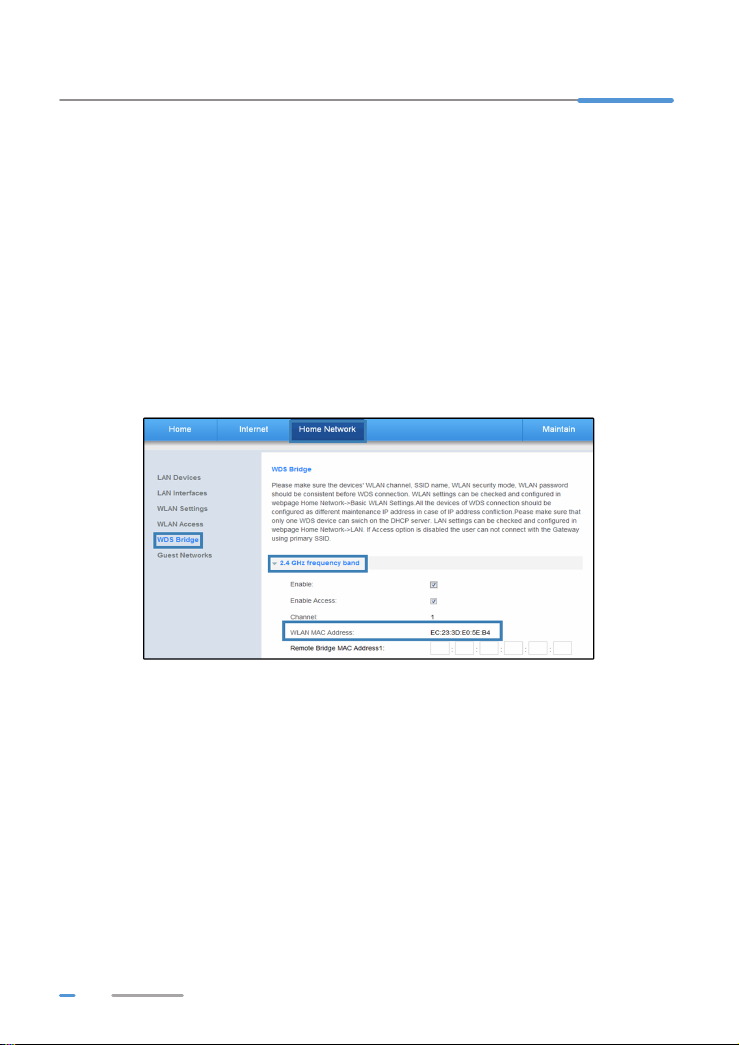
1. Find and record the wireless MAC addresses of the two WS329.
a. Log in to the web management page.
b. Choose Home Network tab.
c. In the navigation tree, choose WDS Bridge.
d. Select 2.4GHz frequency band configuration page.
e. Under WLAN MAC Address, find a character string that is similar to
EC:23:3D:E0:5E:B4. This value is the wireless MAC address of the WS329.
2. Set the WLAN parameters of the two WS329.
a. Log in to the web management page.
b. Choose Home Network tab.
c. In the navigation tree, choose WLAN Settings.
d. Select WLAN Encryption configuration page. Set the same value for the SSID, WPA
encryption and WPA pre-shared key about the two WS329.
34
Page 38
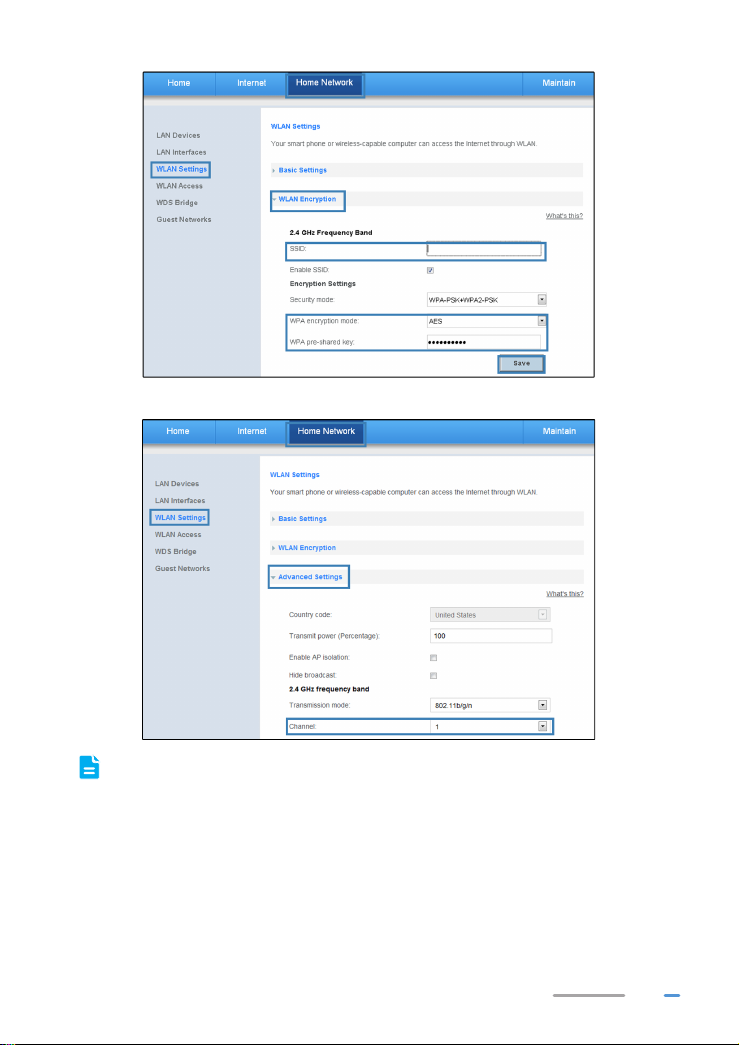
e. Select Advanced Settings configuration page. Set the same Channel.
Please select the same non-adaptive channel for Channel.
35
Page 39
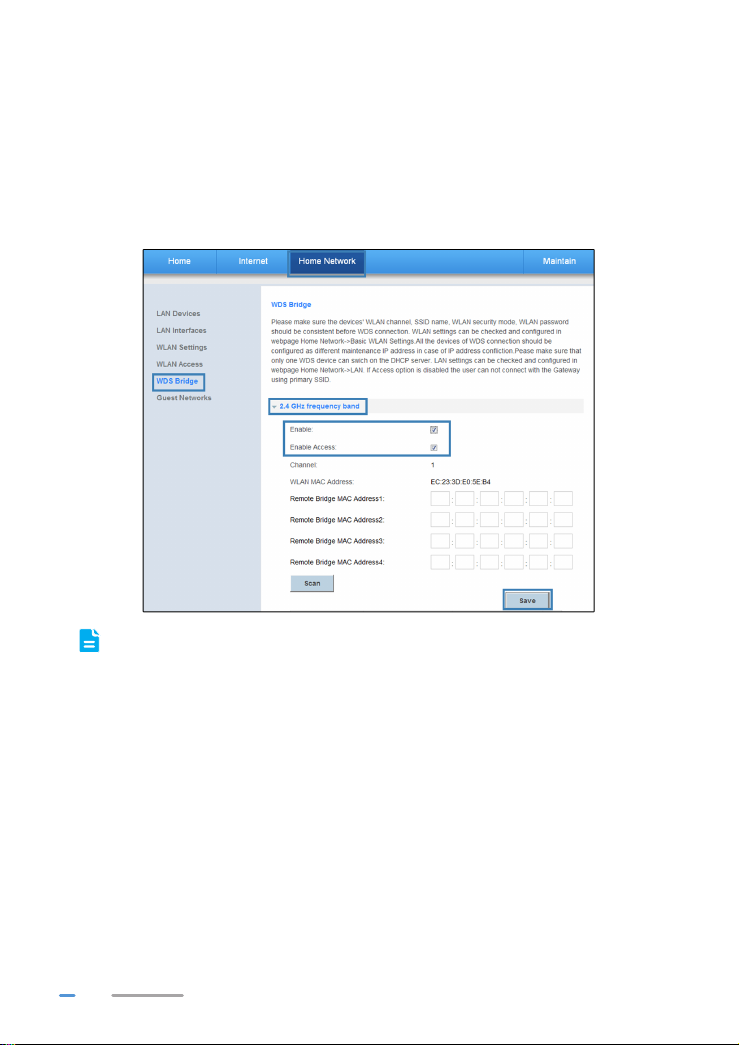
3. Configure the WDS function of the two WS329.
a. Log in to the web management page.
b. Choose Home Network tab.
c. In the navigation tree, choose WDS Bridge.
d. Select 2.4G frequency band configuration page.
e. Set Enable to Enable.
f. In Remote bridge MAC address 1, enter the wireless MAC address of other WS329.
g. Click Save.
You can also click Scan, then the wireless MAC address in the list of scanned wireless LAN,
and then add it.
36
Page 40
8 Maintenance Guide
Changing the IP Address Used to Log In to the Web Management Page
The IP address used to log in to the WS329 web management page is the WS329 IP address. For
security or other purposes (for instance, if the default WS329 IP address conflicts with that of another
device on the same network), you can change the WS329 IP address.
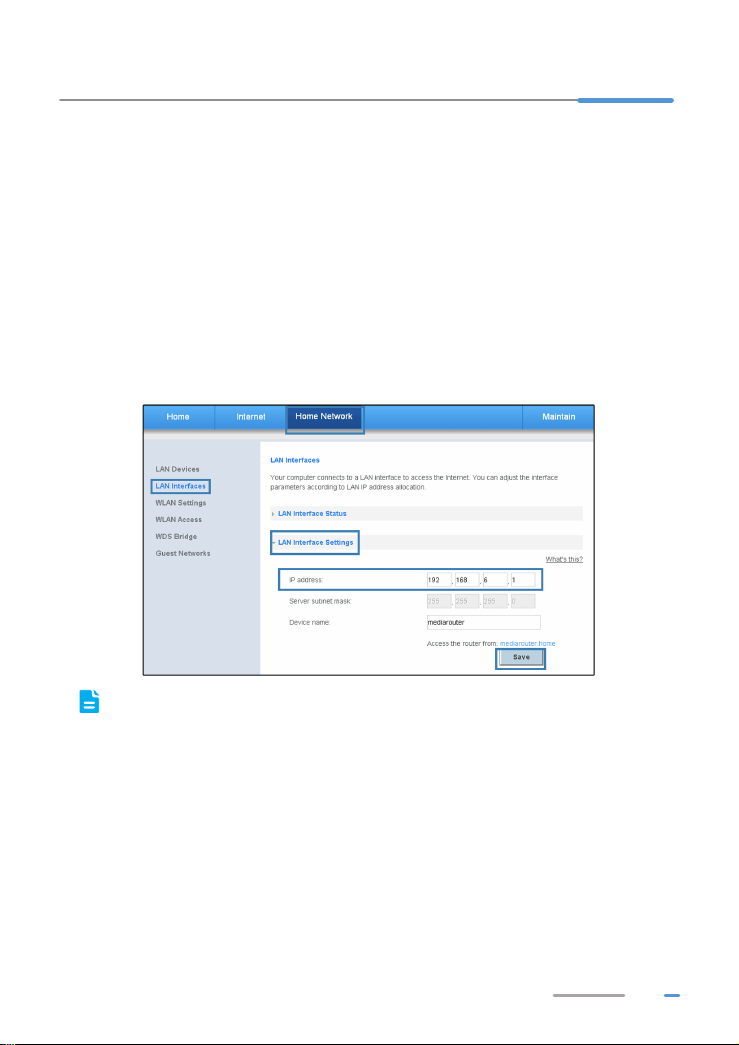
1. Log in to the web management page.
2. Choose Home Network tab.
3. In the navigation tree, choose LAN Interface.
4. Select LAN Interface Settings configuration page.
5. In IP address, enter a new IP address (Such as: 192.168.6.1).
6. Click Save.
"192.168.2.1" can not be used to configure the IP address.
After changing the WS329's IP address, you need to reconnect your PC for new IP address. Use the
new IP address to log in to the web management page. Use the new IP address to log in to the web
management page.
Changing the Web Management Page User Name and Password
The correct user name and password are required to log in to the web management page. Regular
changes to the web management page user name and password can effectively prevent unauthorized
users from logging in and modifying important parameters.
1. Log in to the web management page.
2. Choose Maintain tab.
37
Page 41
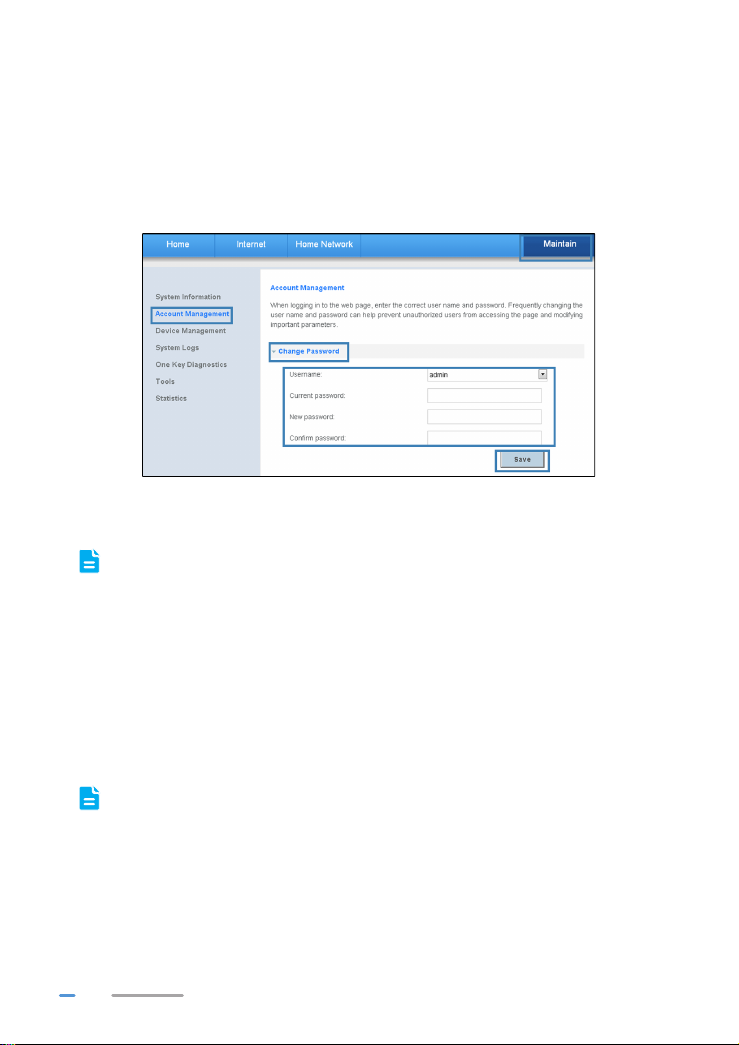
3. In the navigation tree, choose Account Management.
4. Select Change Password configuration page.
5. In Username, Select the user account you want to modify.
6. In Current password, enter the currently used password.
7. In New password, enter a new password, in Confirm password, enter the new password
again.
8. Click Save.
After the user name and password are changed, the login page is displayed. Enter your new
user name and password to log in.
If you forget the password, you can restore the default settings by pressing and holding the
WLAN/WPS button on the rear panel of the WS329 for over 20 seconds. The user name and
password used for logging in to the web management page are then restored to their default
values. After the WS329 is restored to its default settings, all user customized data will be
lost. Perform this operation with caution.
Configuration Backup
WS329 's backup configuration function is applicable to the following scenario: When updating the
configuration parameters fails or when you want to quickly restore the router to the familiar
configuration state. It is recommended that you regularly back up WS329 's configuration file to help
you quickly restore the desired configuration parameters.
Before modifying WS329's configuration parameters for another time, backup its
configuration file.
1. Log in to the web management page.
2. Choose Maintain tab.
3. In the navigation tree, choose Device Management.
38
Page 42
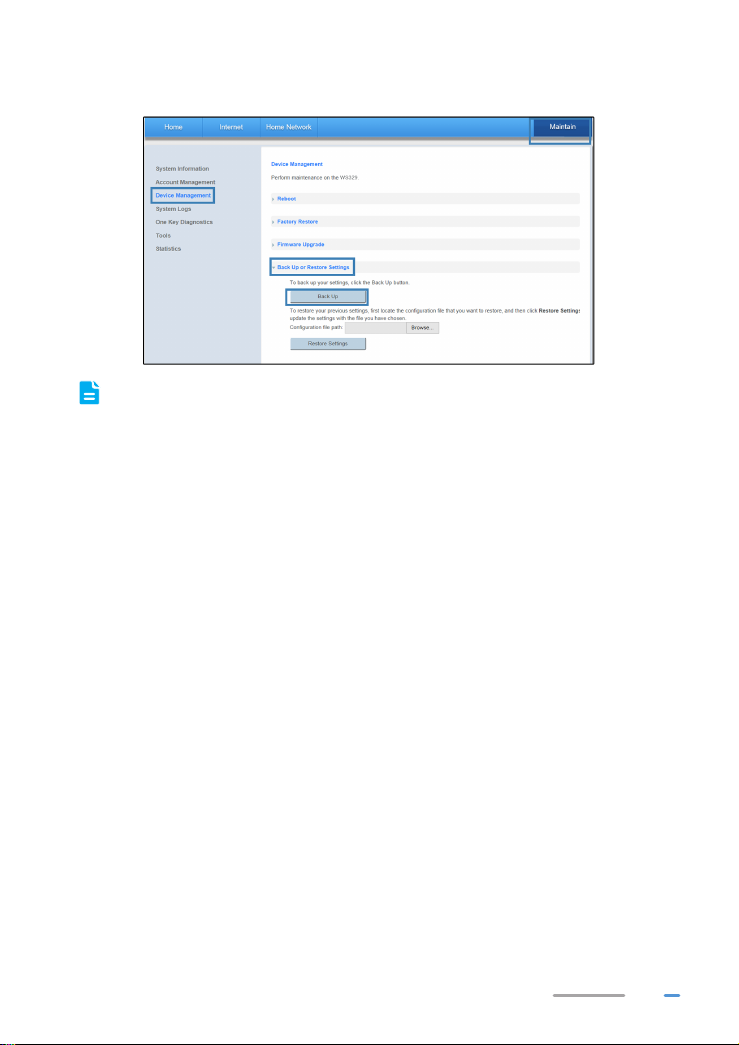
4. Select Device Management > Back Up or Restore Settings configuration page.
5. Click Back Up, in the displayed dialog box, set the name and storage location of the
configuration file. Then click OK.
Please save the WS329's configuration file and remember its storage location for necessary.
For example, if you need to use the WS329 in different network environments always, you can
configure the relevant parameters in these network environments and back up them carefully.
If you want to change the network environment later, you can import the configuration file directly to
restore the default configuration without any configuration again.
Restoring Default Settings
Using the Configuration Tool
If the WS329 parameter settings were configured incorrectly, log in to the web management page to
reload the default configuration file and restore the WS329 to its default settings. Perform this operation
with caution. After the WS329 is restored to its default settings, all custom data and settings will be lost,
and the password will be restored to admin.
1. Log in to the web management page.
2. Choose Maintain tab.
3. In the navigation tree, choose Device Management.
4. Select Factory Restore configuration page.
5. Click Reset.
39
Page 43
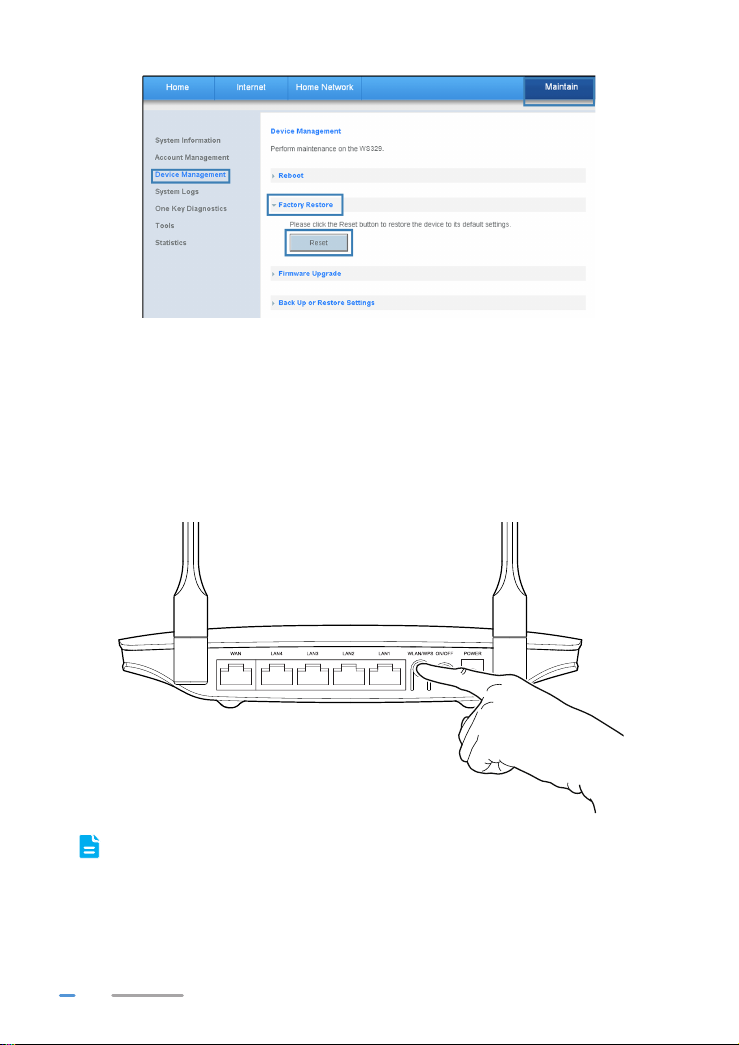
6. In the displayed dialog box, click OK.
Using the Reset Button
If you forget the login password to the web management page or could not access the web
management page, use the reset button on the WS329 rear panel to restore the WS329 to its default
settings. Perform this operation with caution. After the WS329 is restored to its default settings, all
custom data and settings will be lost, and the password will be restored to admin.
1. Press the WS329 power button to power the WS329 on.
2. Press and hold WLAN/WPS button (more than 20 seconds).
The WS329 will restart, which will cause temporary network interruptions.
After the WS329 is restored to its default settings, change the computer IP address so that it
is in the same network segment as the 192.168.3.1 default IP address.
40
Page 44
Restoring Configuration by Importing Backup File
If your operations fail after multiple configurations or you want to quickly restore the WS329 to the
familiar configuration state, you can upload the backup configuration file to restore the configuration.
Please regularly back up WS329's configuration file to your computer. For example, back up WS329's
configuration file before updating its configuration parameters or before restoring it to the factory
default settings.
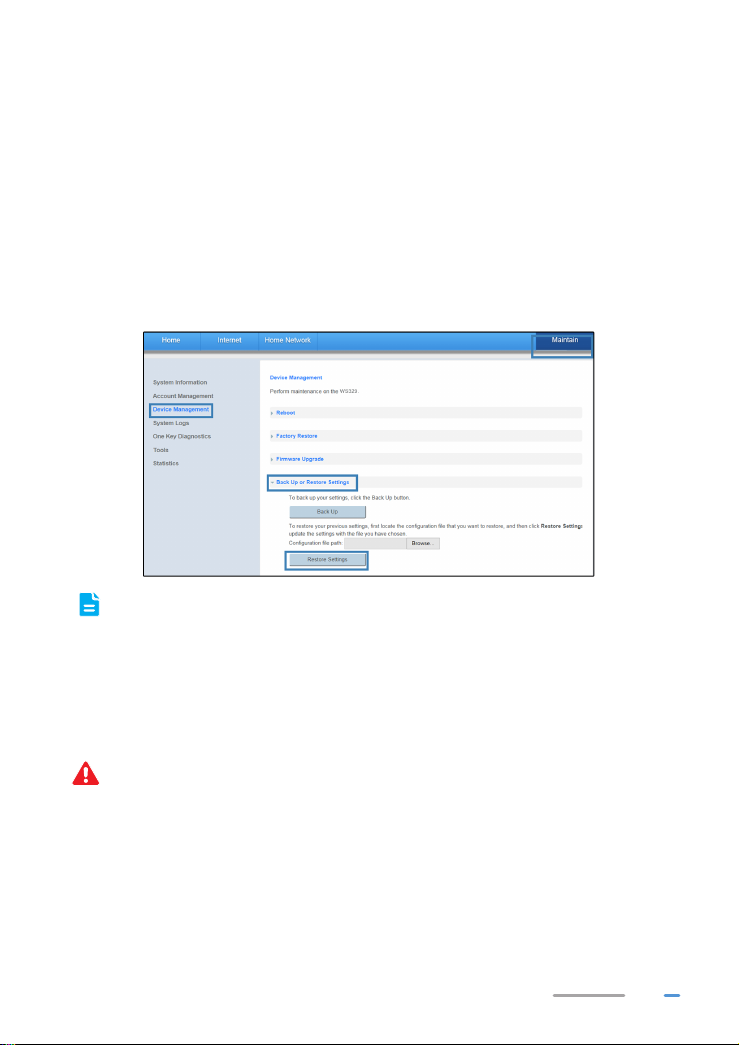
1. Log in to the web management page.
2. Choose Maintain tab.
3. In the navigation tree, choose Device Management.
4. Select Device Management > Back Up or Restore Settings configuration page.
5. Click Browse..., In the displayed dialog box, select the backup configuration file.
6. Click Restore Settings.
During importing the configuration file, do not power off the WS329; otherwise, the restoring
of the WS329 to the normal state may fail.
7. Then the WS329 automatically restarts to make the new configuration file useful.
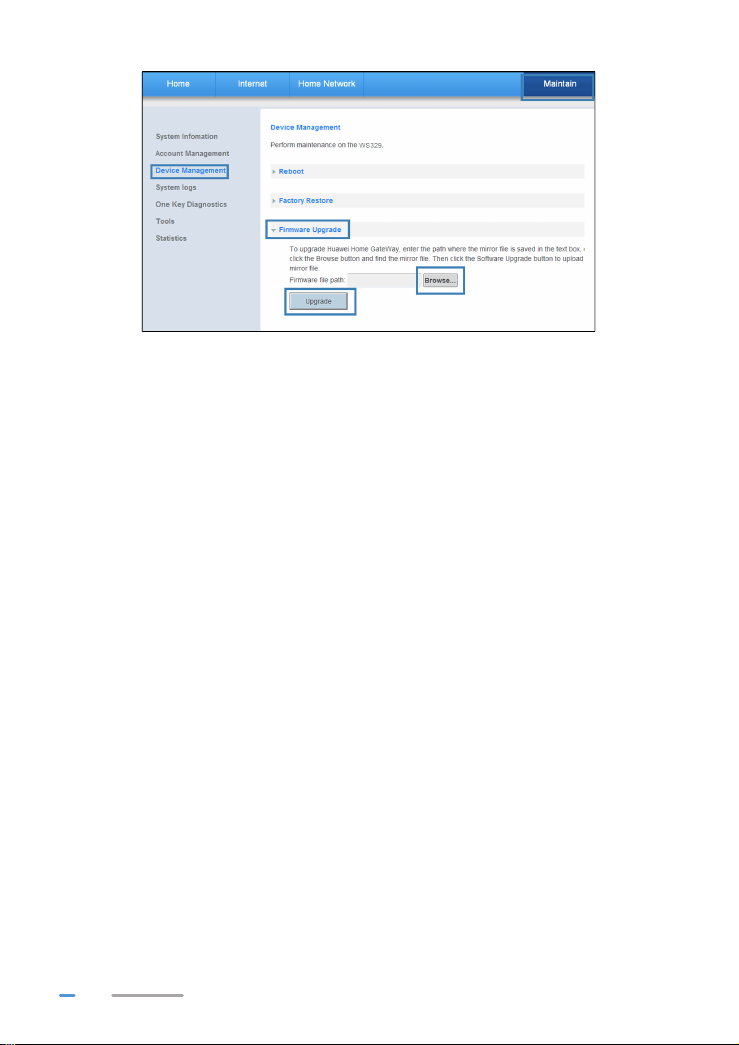
Upgrading Firmware
The WS329 supports upgrade firmware through the web management page. Before upgrading the
firmware, please download the latest firmware of the WS329 at the Huawei's official website.
To avoid any damage to the WS329, do not power off the WS329 when it is being upgraded.
1. Log in to the web management page.
2. Choose Maintain tab.
3. In the navigation tree, choose Device Management.
4. Select Firmware Upgrade configuration page.
5. Click Browse..., and select the latest firmware you download at the Huawei's official website.
6. Click Upgrade.
41
Page 45
42
Page 46

9 Reference Operations
Enabling Wireless Configuration on Windows
On Windows XP
1. Right-click My Computer and choose Manage from the shortcut menu.
2. In the left pane of the Computer Management window, choose Computer Management
(Local) > Services and Applications > Services.
3. In the right pane of the Computer Management window, right-click Wireless Zero
Configuration and choose Properties from the shortcut menu.
4. In the displayed dialog box, check that Service status is Started.
5. Click OK to close the dialog box. Then close the Computer Management window.
On Windows 7 or Windows Vista
1. Right-click Computer and choose Manage from the shortcut menu.
2. In the left pane of the Computer Management window, choose Computer Management
(Local) > Services and Applications > Services.
3. In the right pane of the Computer Management window, right-click WLAN AutoConfig and
choose Properties from the shortcut menu.
4. In the displayed dialog box, check that Service status is Started.
5. Click OK to close the dialog box. Then close the Computer Management window.
Checking the Computer MAC Address
The MAC address, also known as the physical address, is a unique identifier assigned to a network
adapter. A MAC address contains six groups of two hexadecimal digits, such as 2C-41–38–8D-75–8D.
This section demonstrates how to check your computer's MAC address.
43
Page 47
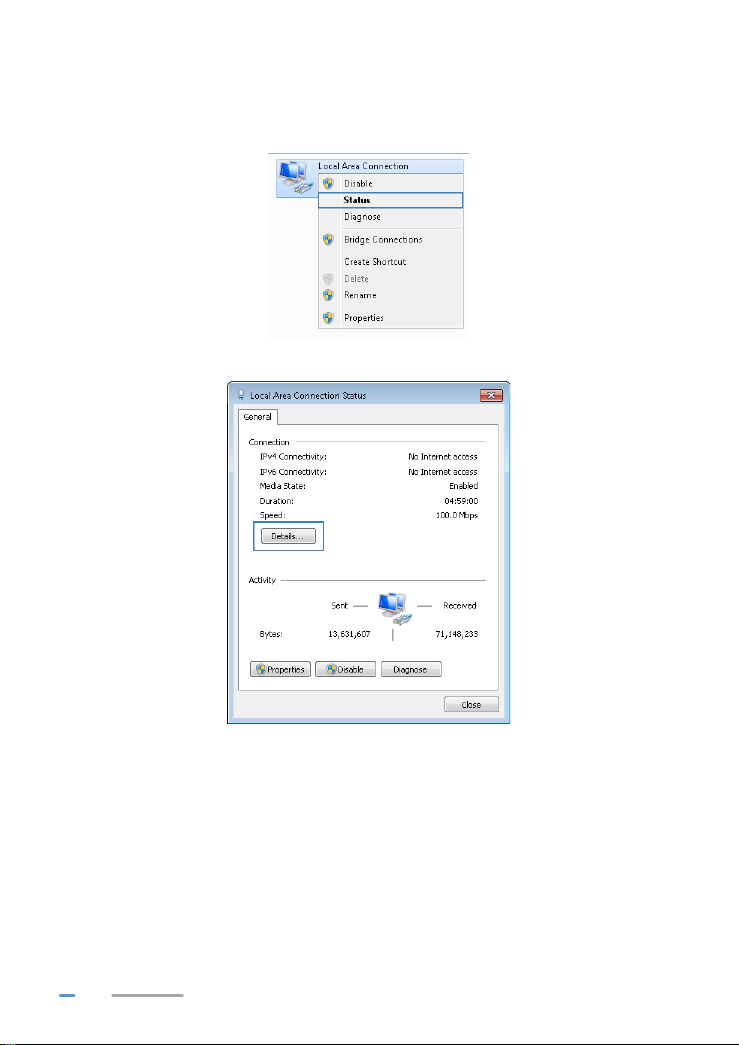
On Windows 7
1. Choose Start > Control Panel > Network and Internet > Network and Sharing Center >
Change adapter settings. Right-click Local Area Connection and choose Status from the
shortcut menu.
2. Click Details.
44
Page 48
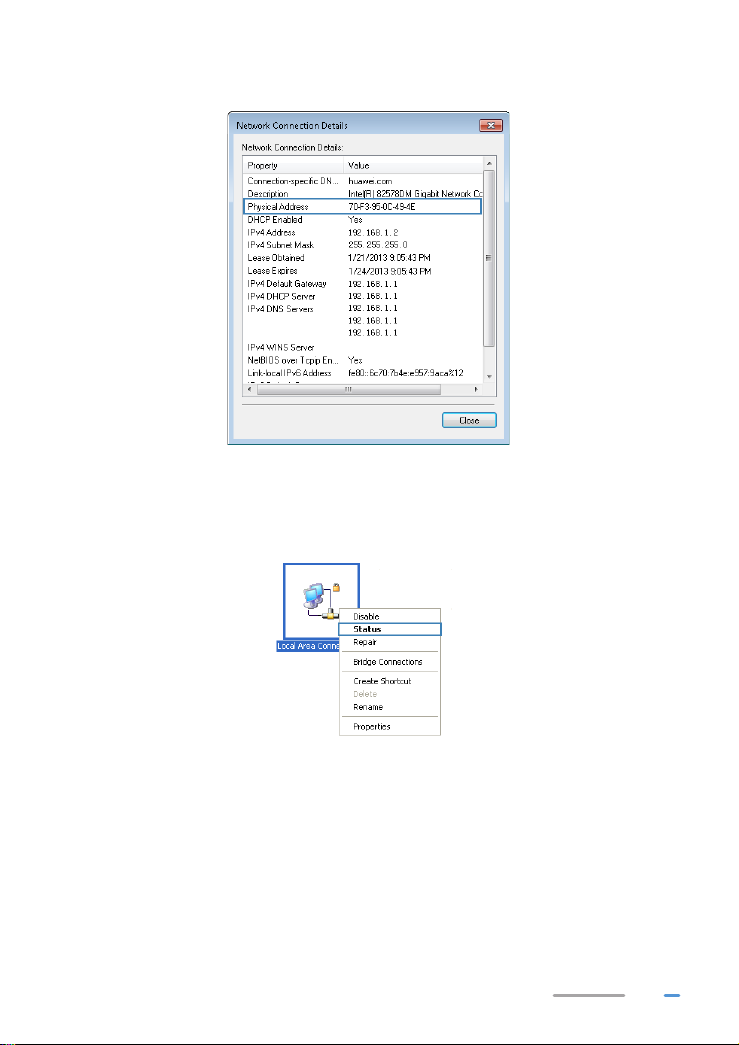
3. In Network Connection Details, find the line similar to Physical Address 70-F3–95–0C-
49–4E. The 70-F3–95–0C-49–4E string is your computer's MAC address.
On Windows XP
1. Choose Start > Control Panel > Network and Internet Connections > Network
Connections. Right-click Local Area Connection and choose Status from the shortcut
menu.
45
Page 49
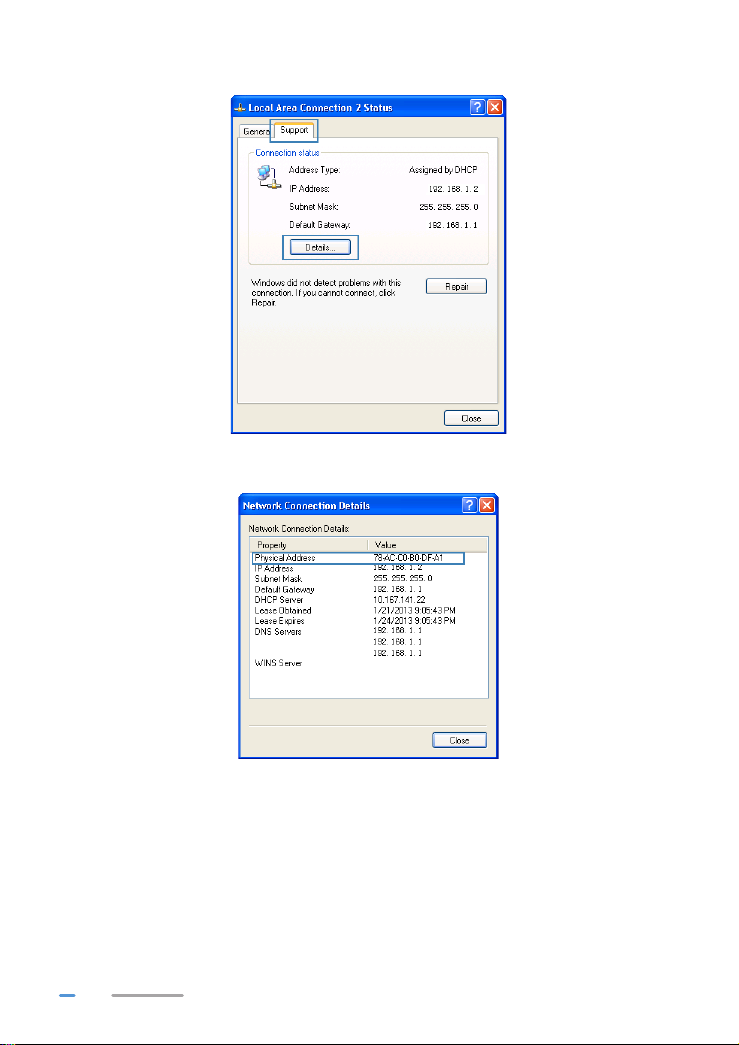
2. Click the Support tab. Under Connection status, click Details.
3. In Network Connection Details, find the line similar to Physical Address 78–AC–C0–B0–
DF-A1. The 78–AC–C0–B0–DF-A1 string is your computer's MAC address.
46
Page 50

10 FAQs
What Can I Do If I Cannot Open the Web Management Page?
1. Open Internet Explorer. Choose Tools > Internet Options > Connections > LAN settings,
and ensure that all check boxes are deselected.
2. Check that the computer IP address is 192.168.3.*. (* is any integer from 2 to 254.)
3. Check that the cables are securely connected to the WS329 and that the LAN port's indicator
is on.
4. Ensure that the user name and password are correct.
If the problem persists, restore the WS329 to its default settings.
What Can I Do If the WS329 Cannot Access the Internet through a Wireless Network Adapter Sometimes or If the WLAN Connection Is Unsteady?
This is probably because the WS329 has its cables connected loosely, is placed too close to electronic
appliances with intensive interference, or is too far from the computer. Verify that:
1. The power and telephone cables are correctly connected to the WS329.
2. Your computer and the WS329 are far from electric appliances that generate strong
magnetic or electric fields, such as microwave ovens, refrigerators, and cordless telephones.
3. The WS329 is in an open area, and there are no obstacles, such as concrete or wooden
walls, between the WS329 and computer.
4. The WS329 is close to the computer.
5. The angle between the WS329 and computer is appropriate.
Do not use the WS329 during thunderstorms, as the signal strength may be unsteady and the
WS329 itself may be damaged due to lightning strikes.
How Can I Restrict My Computer to Specified Websites?
On the web management page, enable URL filtering and set up a URL whitelist. Your computer can
then access only the websites specified in the URL whitelist.
I Often Need to Restart the WS329 to Display Web Pages. What Can I Do?
Verify the following:
1. Cables are securely connected to WS329 ports. Otherwise, network stability may suffer.
2. Your computer and the WS329 are far from electric appliances that generate strong
magnetic or electric fields, such as microwave ovens, refrigerators, and cordless telephones.
If the problem persists, contact your Internet Service Provider.
47
Page 51

Can I Change the WLAN Password?
Yes. To improve your WLAN security, regularly change your WLAN password.
48
Page 52

11 Appendix
Technical Specifications
Item Specifications
Power supply 12 V DC, 0.5 A
Power consumption < 6 W
Ambient operating
temperature
Ambient humidity 5% to 95% RH (non-condensing)
Dimensions (H x W x D)
Weight About 200 g
WLAN standard 802.11b, 802.11g, 802.11n (2.4GHz)
Wireless transmission
rate(2.4G)
Default Settings
0°C to 40°C
32 mm x 180 mm x 126 mm (1.26 in. x 7.09 in. x 4.96 in.), antenna
excluded
802.11b Up to 11 Mbit/s
802.11g Up to 54 Mbit/s
802.11n (2T2R
antenna
technology)
Up to 300 Mbit/s
Parameter Default Value
LAN port IP address 192.168.3.1
LAN port subnet mask 255.255.255.0
User name to log in to the web
configuration page
Password to log in to the web
configuration page
WLAN name Labeled on the product cover
WLAN password Labeled on the product cover
admin
admin
49
Page 53

Parameter Default Value
Dynamic Host Configuration
Protocol (DHCP) server
WLAN Enabled
Enabled
50
Page 54

12 For More Help
Please visit www.huaweidevice.com/worldwide/support/hotline for recently updated hotline and email
address in your country or region.
51
Page 55
13 Legal Notice
Copyright © Huawei Technologies Co., Ltd. 2013. All rights reserved.
No part of this manual may be reproduced or transmitted in any form or by any means without prior
written consent of Huawei Technologies Co., Ltd. and its affiliates ("Huawei").
The product described in this manual may include copyrighted software of Huawei and possible
licensors. Customers shall not in any manner reproduce, distribute, modify, decompile, disassemble,
decrypt, extract, reverse engineer, lease, assign, or sublicense the said software, unless such
restrictions are prohibited by applicable laws or such actions are approved by respective copyright
holders.
Trademarks and Permissions
, , and are trademarks or registered trademarks of Huawei Technologies Co.,
Ltd.
Other trademarks, product, service and company names mentioned may be the property of their
respective owners.
Notice
Some features of the product and its accessories described herein rely on the software installed,
capacities and settings of local network, and therefore may not be activated or may be limited by local
network operators or network service providers.
Thus, the descriptions herein may not exactly match the product or its accessories which you
purchase.
Huawei reserves the right to change or modify any information or specifications contained in this
manual without prior notice and without any liability.
DISCLAIMER
ALL CONTENTS OF THIS MANUAL ARE PROVIDED “AS IS”. EXCEPT AS REQUIRED BY
APPLICABLE LAWS, NO WARRANTIES OF ANY KIND, EITHER EXPRESS OR IMPLIED,
INCLUDING BUT NOT LIMITED TO, THE IMPLIED WARRANTIES OF MERCHANTABILITY AND
FITNESS FOR A PARTICULAR PURPOSE, ARE MADE IN RELATION TO THE ACCURACY,
RELIABILITY OR CONTENTS OF THIS MANUAL.
TO THE MAXIMUM EXTENT PERMITTED BY APPLICABLE LAW, IN NO EVENT SHALL HUAWEI
BE LIABLE FOR ANY SPECIAL, INCIDENTAL, INDIRECT, OR CONSEQUENTIAL DAMAGES, OR
LOSS OF PROFITS, BUSINESS, REVENUE, DATA, GOODWILL SAVINGS OR ANTICIPATED
SAVINGS REGARDLESS OF WHETHER SUCH LOSSES ARE FORSEEABLE OR NOT.
THE MAXIMUM LIABILITY (THIS LIMITATION SHALL NOT APPLY TO LIABILITY FOR PERSONAL
INJURY TO THE EXTENT APPLICABLE LAW PROHIBITS SUCH A LIMITATION) OF HUAWEI
ARISING FROM THE USE OF THE PRODUCT DESCRIBED IN THIS MANUAL SHALL BE LIMITED
TO THE AMOUNT PAID BY CUSTOMERS FOR THE PURCHASE OF THIS PRODUCT.
52
Page 56

Import and Export Regulations
Customers shall comply with all applicable export or import laws and regulations and be responsible to
obtain all necessary governmental permits and licenses in order to export, re-export or import the
product mentioned in this manual including the software and technical data therein.
Privacy Policy
To better understand how we protect your personal information, please see the privacy policy at
http://consumer.huawei.com/en/privacy-policy/index.htm.
53
Page 57

202588_01
 Loading...