

Page 1

HUAWEI WS320
Wireless Repeater
User Guide
Page 2

HUAWEI WS320 Wireless Repeater
User Guide
Issue 01
Date 2010-07-01
Part Number 202302
Page 3

Huawei Technologies Co., Ltd. provides customers with
comprehensive technical support and service. Please feel free to
contact our local office or company headquarters.
Huawei Technologies Co., Ltd.
Address: Huawei Industrial Base
Website:
Email: [email protected]
Bantian, Longgang
Shenzhen 518129
People's Republic of China
http://www.huawei.com
Page 4
Copyright © Huawei Technologies Co., Ltd. 2010. All
rights reserved.
No part of this document may be reproduced or transmitted in any form
or by any means without prior written consent of Huawei Technologies
Co., Ltd.
The product described in this manual may include copyrighted
software of Huawei Technologies Co., Ltd and possible licensors.
Customers shall not in any manner reproduce, distribute, modify,
decompile, disassemble, decrypt, extract, reverse engineer, lease,
assign, or sublicense the said software, unless such restrictions are
prohibited by applicable laws or such actions are approved by
respective copyright holders under licenses.
Trademarks and Permissions
, , and
trademarks of Huawei Technologies Co., Ltd.
Other trademarks, product, service and company names mentioned
are the property of their respective owners.
are trademarks or registered
Notice
Some features of the product and its accessories described herein rely
on the software installed, capacities and settings of local network, and
may not be activated or may be limited by local network operators or
network service providers. Thus the descriptions herein may not
Page 5

exactly match the product or its accessories you purchase.
Huawei Technologies Co., Ltd reserves the right to change or modify
any information or specifications contained in this manual without prior
notice or obligation.
NO WARRANTY
THE CONTENTS OF THIS MANUAL ARE PROVIDED “AS IS”.
EXCEPT AS REQUIRED BY APPLICABLE LAWS, NO
WARRANTIES OF ANY KIND, EITHER EXPRESS OR IMPLIED,
INCLUDING BUT NOT LIMITED TO, THE IMPLIED WARRANTIES
OF MERCHANTABILITY AND FITNESS FOR A PARTICULAR
PURPOSE, ARE MADE IN RELATION TO THE ACCURACY,
RELIABILITY OR CONTENTS OF THIS MANUAL.
TO THE MAXIMUM EXTENT PERMITTED BY APPLICABLE LAW, IN
NO CASE SHALL HUAWEI TECHNOLOGIES CO., LTD BE LIABLE
FOR ANY SPECIAL, INCIDENTAL, INDIRECT, OR
CONSEQUENTIAL DAMAGES, OR LOST PROFITS, BUSINESS,
REVENUE, DATA, GOODWILL OR ANTICIPATED SAVINGS.
Import and Export Regulations
Customers shall comply with all applicable export or import laws and
regulations and will obtain all necessary governmental permits and
licenses in order to export, re-export or import the product mentioned
in this manual including the software and technical data therein.
Page 6

Contents
1 Warnings and Precautions ...................................................... 1
2 Function Overview.................................................................. 8
3 Setting Up a Wireless Connection ............................................ 9
Setting Up a Wireless Connection Through the WPS Button ................ 10
Setting Up a Wireless Connection Through the Web-Based Configuration
Utility ......................................................................................................17
4 Maintaining the WS320......................................................... 27
Logging In to the Advanced Configuration Webpage ............................27
Connecting to a New Wireless Network................................................. 28
Changing the IP address of the LAN Interface ....................................... 29
Restoring Default Settings ......................................................................30
5 FAQs .................................................................................... 30
6 Appendix.............................................................................. 34
Hardware Features .................................................................................. 34
Default Settings....................................................................................... 36
Technical Specifications .........................................................................37
i
Page 7

1 Warnings and Precautions
Basic Requirements
z During storage, transportation, and operation of the device, keep it dry and
prevent it from colliding with other objects.
z Do not dismantle the device. In case of any fault, contact an authorized service
center for assistance or repair.
z Without authorization, no organization or individual can change the
mechanical, safety, or performance design of the device.
z When using the device, observe all applicable laws and regulations and respect
the legal rights of other people.
Environmental Requirements for Using the Device
z Keep the device far from sources of heat and fire, such as a heater or a candle.
z Keep the device far from electronic appliances that generate strong magnetic or
electric fields, such as a microwave oven or a refrigerator.
z Place the device in a cool and well-ventilated indoor area. Do not expose the
device to direct sunlight.
z Do not block the openings on the device with any object. Reserve a minimum
space of 10 cm around the device for heat dissipation.
z Do not place any object (such as a candle or a water container) on the device. If
any foreign object or liquid enters the device, stop using the device
immediately, power it off, remove all the cables connected to it, and then
contact an authorized service center.
z During thunderstorms, power off the device, and then remove all the cables
connected to it to prevent it from getting damaged due to lightning strikes.
1
Page 8

Precautions for Using Wireless Devices
z When using the device, ensure that the antenna of the device is at least 20 cm
away from all persons.
z Do not use the device where using wireless devices is prohibited or may cause
interference or danger.
z The radio waves generated by the device may interfere with the operation of
electronic medical devices. If you are using any electrical medical device,
contact its manufacturer for the restrictions on the use of the device.
z Do not take the device into operating rooms, intensive care units (ICUs), or
coronary care units (CCUs).
Areas with Inflammables and Explosives
z Do not use the device where inflammables or explosives are stored, for
example, in a gas station, oil depot, or chemical plant. Otherwise, explosions or
fires may occur. In addition, follow the instructions indicated in text or
symbols.
z Do not store or transport the device in the same box as inflammable liquids,
gases, or explosives.
Safety of Children
Keep the device and its accessories out of the reach of children. Otherwise, they
may damage the device and its accessories by mistake, or they may swallow the
small components of the device, causing suffocation or other dangerous situations.
Maintenance
z If the device is not used for a long time, power it off, and then remove all the
cables connected to it.
2
Page 9

z If any exception occurs, for example, if the device emits any smoke or unusual
sound or smell, stop using the device immediately, power it off, remove all the
cables connected to it, and then contact an authorized service center.
z Before cleaning the device, stop using it, power it off, and then remove all the
cables connected to it.
z Use a clean, soft, and dry cloth to clean the device shell. Do not use any
cleaning agent or spray to clean the device shell.
Disposal and Recycling Information
This symbol on the device (and any included batteries) indicates
that the device (and any included batteries) should not be disposed
of as normal household garbage. Do not dispose of your device or
batteries as unsorted municipal waste. The device (and any
batteries) should be handed over to a certified collection point for
For more detailed information about the recycling of the device or batteries,
contact your local city office, the household waste disposal service, or the retail
store where you purchased this device.
The disposal of this device is subject to the Waste from Electrical and Electronic
Equipment (WEEE) Directive of the European Union. The purpose for separating
WEEE and batteries from other waste is to minimize any environmental impact
and health hazard due to the presence of hazardous substances.
recycling or proper disposal at the end of its life.
Reduction of Hazardous Substances
This device is compliant with the EU Registration, Evaluation, Authorisation and
Restriction of Chemicals (REACH) Regulation (Regulation No 1907/2006/EC of
the European Parliament and of the Council) and the EU Restriction of Hazardous
Substances (RoHS) Directive (Directive 2002/95/EC of the European Parliament
3
Page 10

and of the Council). For more information about the REACH compliance of the
device, visit the Web site www.huaweidevice.com/certification. You are
recommended to visit the Web site regularly for up-to-date information.
EU Regulatory Conformance
This device should be installed and operated with a minimum distance of 20 cm
between the antenna and all persons.
Български: С настоящето Huawei Technologies Co., Ltd. декларира, че този
уред съответства на основните изисквания и другите разпоредби на
Директива 1999/5/EC.
Česky: Huawei Technologies Co., Ltd., tímto prohlašuje, že toto zařízení je ve
shodě se základními požadavky a dalšími souvisejícími opatřeními směrnice
1999/5/EC.
Dansk: Huawei Technologies Co., Ltd. erklærer hermed at denne enhed er i
overensstemmelse med de obligatoriske krav og andre relevante bestemmelser i
direktiv 1999/5/EF.
Nederlands: Hierbij verklaart Huawei Technologies Co., Ltd. dat dit apparaat in
overeenstemming is met de essentiële eisen en de andere relevante bepalingen van
richtlijn 1999/5/EC.
English: Hereby, Huawei Technologies Co., Ltd. declares that this device is in
compliance with the essential requirements and other relevant provisions of
Directive 1999/5/EC.
Eesti: Käesolevaga kinnitab Huawei Technologies Co., Ltd., et see seade vastab
Direktiivi 1999/5/EÜ põhinõudmistele ja teistele asjakohastele määrustele.
Suomi: Huawei Technologies Co., Ltd. vakuuttaa täten, että tämä laite on
yhdenmukainen direktiivin 1999/5/EY olennaisten vaatimusten ja direktiivin
muiden asiaankuuluvien lausumien kanssa.
4
Page 11

Français (Européen) : Le fabricant déclare que ce produit est conforme aux
exigences essentielles et aux autres dispositions pertinentes de la directive
1999/5/CE.
Deutsch: Huawei Technologies Co., Ltd. erklärt hiermit, dass dieses Produkt die
erforderlichen Bestimmungen und andere relevante Verordnungen der Richtlinie
1999/5/EG einhält.
Ελληνικά: Δια της παρούσης η Huawei Technologies Co., Ltd. δηλώνει ότι αυτή
η συσκευή συμμορφώνεται με τις βασικές απαιτήσεις και άλλες σχετικές
διατάξεις της οδηγίας 1999/5/Ε.Κ.
Magyar: Jelen nyilatkozaton keresztül a Huawei Technologies Co., Ltd. kijelenti,
hogy a készülék megfelel az EC/5/1999 Irányelv összes lényeges
követelményének és vonatkozó előírásának.
Gaeilge: Fograíonn Huawei Technologies Co., Ltd leis seo go bhf uil an fheiste seo
i gcomhlíonadh leis na fíor-riachtanais agus na forálacha eile maidir le Treoir
1999/5/AE.
Italiano: Col presente documento, Huawei Technologies Co., Ltd. dichiara che
questo dispositivo è conforme ai requisiti essenziali e alle altre disposizioni
applicabili della Direttiva 1999/5/CE.
Latviski: Ar šo Huawei Technologies Co., Ltd. paziņo, ka šī ierīce atbilst
Direktīvas 1999/5/EC pamatprasībām un piemērojamajiem nosacījumiem.
Lietuviškai: Šiuo Huawei Technologies Co., Ltd. praneša, kad šis įtaisas atitinka
Direktyvos 1999/5/EC pagrindinius reikalavimus ir taikomas sąlygas.
Malti: Hawnhekk, Huawei Technologies Co., Ltd. tiddikjara li dan it-tagħmir hu
konformi mal-ħtiġijiet essenzjali u provvedimenti rilevanti oħrajn ta’ Direttiva
1999/5/KE.
5
Page 12

Polski: Wymieniona w tym dokumencie firma Huawei Technologies Co., Ltd.
deklaruje, że niniejsze urządzenie spełnia zasadnicze wymagania w zakresie
zgodności oraz inne odnośne postanowienia Dyrektywy 1999/5/EC.
Português (Europeu) : Deste modo, a Huawei Technologies Co., Ltd. declara que
este dispositivo está em conformidade com os requisitos essenciais e outras
provisões relevantes da Directiva 1999/5/CE.
Română: Prin prezenta Huawei Technologies Co., Ltd. declară că acest dispozitiv
este conform cu cerinţele esenţiale şi alte prevederi relevante ale directivei
1999/5/CE.
Slovenčina: Huawei Technologies Co., Ltd. týmto vyhlasuje, že zariadenie je v
súlade so základnými požiadavkami a inými relevantnými predpismi Smernice
1999/5/ES.
Slovenščina: Huawei Technologies Co., Ltd. izjavlja, da je ta naprava v skladu z
bistvenimi zahtevami in drugimi ustreznimi določbami Direktive 1999/5/ES.
Español (Europeo) : Con el presente documento, Huawei Technologies Co., Ltd.
declara que este dispositivo cumple con los requisitos esenciales y con las demás
disposiciones correspondientes de la Directiva 1999/5/CE.
Svenska: Huawei Technologies Co., Ltd. förklarar härmed att denna produkt
överensstämmer med de grundläggande kraven och andra relevanta föreskrifter i
direktiv 1999/5/EG.
For the declaration of conformity, visit the Web site
www.huaweidevice.com/certification.
6
Page 13

Notice: Observe the national local regulations in the location where the device is to
be used. This device may be restricted for use in some or all member states of the
European Union (EU).
Notice: This device may be operated in all member states of the EU.
France: Outdoor use limited to 10 mW e.i.r.p. within the band 2454-2483.5 MHz.
Italy: For private use, a general authorisation is required if WAS/RLAN's are used
outside own premises. For public use, a general authorisation is required.
Luxembourg: General authorisation required for network and service supply.
Norway: This subsection does not apply for the geographical area within a radius
of 20 km from the centre of Ny-Ålesund.
Federal Communications Commission (FCC) Statement
This device complies with part 15 of the FCC Rules. Operation is subject to the
following two conditions: (1) This device may not cause harmful interference, and
(2) this device must accept any interference received, including interference that
may cause undesired operation.
This device should be installed and operated with a minimum distance of 20 cm
between the antenna and all persons.
Note: This equipment has been tested and found to comply with the limits for a
Class B digital device, pursuant to part 15 of the FCC Rules. These limits are
designed to provide reasonable protection against harmful interference in a
residential installation. This equipment generates, uses and can radiate radio
frequency energy and, if not installed and used in accordance with the instructions,
may cause harmful interference to radio communications. However, there is no
guarantee that interference will not occur in a particular installation. If this
equipment does cause harmful interference to radio or television reception, which
7
Page 14

can be determined by turning the equipment off and on, the user is encouraged to
try to correct the interference by one or more of the following measures:
z Reorient or relocate the receiving antenna.
z Increase the separation between the equipment and receiver.
z Connect the equipment into an outlet on a circuit different from that to which
the receiver is connected.
z Consult the dealer or an experienced radio/TV technician for help.
Warning: Changes or modifications made to this device not expressly approved by
Huawei Technologies Co., Ltd. may void the FCC authorization to operate this
device.
2
Function Overview
HUAWEI WS320 Wireless Repeater (hereinafter referred to as the WS320) is a
wireless signal repeater that can work with a wireless router to extend the wireless
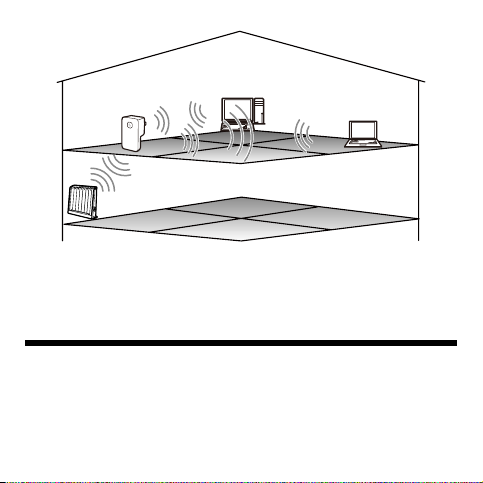
network coverage.The following figure shows the network connection between
the WS30 and other related devices.The PC in Room C on the second floor is some
distance from the wireless router in Room A on the first floor. The WS320 is used
to process the wireless signals transmitted between the PC and the wireless router.
Thus, a wireless network can be established.
8
Page 15
B
2
A
1
1 Wireless router 2 WS320
3 and 4 PCs installed with a wireless adapter
3
C
4
Setting Up a Wireless Connection 3
When using the WS320, you need to set up a wireless connection between the
WS320 and the wireless router only. Then the PC can connect to the wireless
network extended by the WS320 as it connects to the wireless network
implemented by the wireless router.You only need to connect the WS320 to the
wireless network once. Then when you restart the WS320 again, the WS320 will
automatically connect to the wireless network that it connected to last time.
9
Page 16

The WS320 support two methods of setting up a wireless connection.You can
choose one of the following configuration methods based on your installation
environment and operation habit.
Setting Up a Wireless Connection Through the WPS Button
If your wireless router supports the Wi-Fi Protected Setup (WPS) function
implemented through Push Button Configuration (PBC), you can quickly set up a
wireless connection between the WS320 and the wireless router by pressing the
WPS button.
Wi-Fi Protected Setup, abbreviated to WPS, is a standard used for
simplifying the security settings of a wireless network.Through the
WPS function, you can securely connect your wireless terminal to a
wireless network without entering the name and password of the
network.
10
Page 17
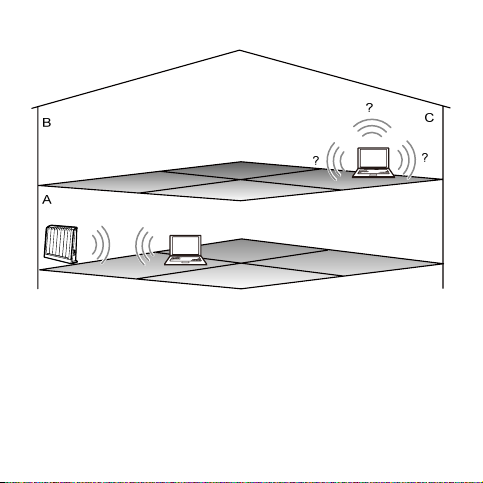
Suppose that you are in the network environment as shown in the following figure.
Your PC is placed in Room A and it is connected to a wireless network.Because
Room C is far from the wireless router and wireless signals are blocked by several
walls, the PC in Room C cannot connect to the wireless network.Room B is
between Room A and Room C.
Now you want the PC in Room C to connect to the wireless network also. To set up
the wireless connection, do as follows:
11
Page 18
Step 1
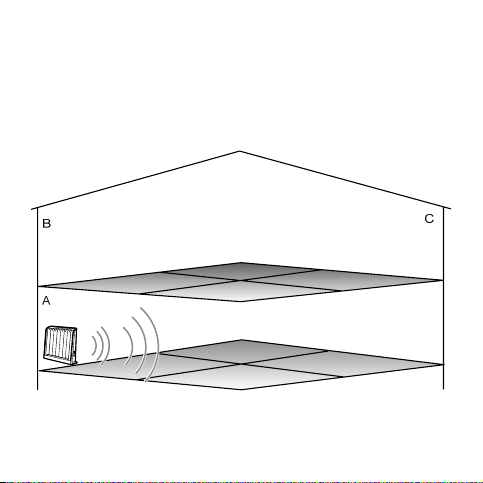
Power on the wireless router in Room A. On the wireless router, ensure
that the wireless network function and the WPS function implemented
through PBC are enabled.
The method of configuring a wireless network on a router varies with the
routers produced by different manufacturers.For details about the
configuration method, see the wireless router operation guide provided b y
the manufacturer.
12
Page 19
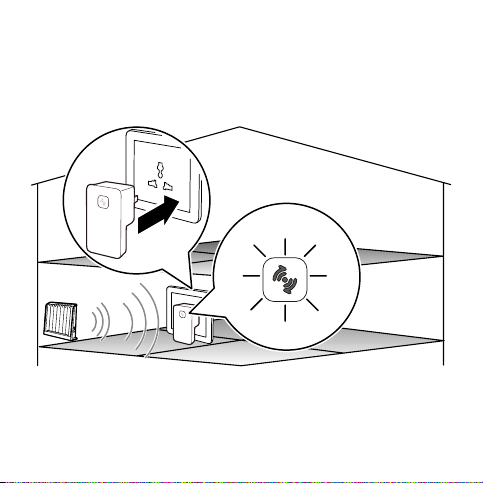
Step 2
In Room A, connect the WS320 to a power socket near the wireless
router.
After the WS320 is powered on, the indicator on the panel turns on in red,
indicating that the WS320 is being started.Wait for about one minute.
Then the indicator on the WS320 turns solid yellow, indicating that the
WS320 has been started but not connected to the wireless router.
B
A
C
13
Page 20
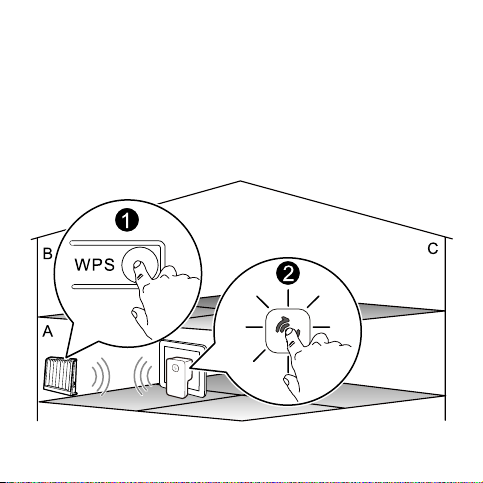
Step 3
Press the WPS button on the wireless router to start the WPS negotiation
of the router.Press and hold the WPS button of the WS320 for over 1s
within two minutes, and then release the button.
At this time, the indicator of the WS320 blinks in yellow, indicating that
the WS320 is trying to connect to the wireless router through the WPS
function.Wait for a moment (generally about 10s and less than 120s).
When the indicator of the WS320 turns solid green, it indicates that the
WS320 successfully connects to the wireless router through the wireless
network.
14
Page 21

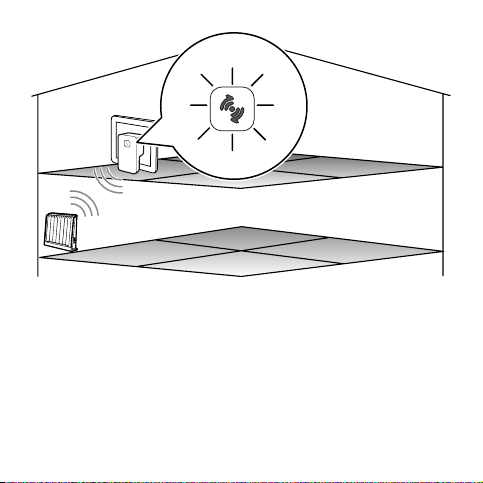
Step 4
Unplug the WS320 in Room A, and then plug it into the power socket in
Room B.
After the WS320 is powered on, the indicator on the panel turns on in red,
indicating that the WS320 is being started.Wait for about one minute.
Then the indicator of the WS320 blinks in yellow, indicating that the
WS320 is trying to connect to the wireless network.When it successfully
connects to the wireless network, the indicator of the WS320 turns solid
green.
If the indicator turns solid yellow after it blinks in yellow, it indicates that
the WS320 cannot connect to the wireless network.In this case, adjust the
position of the WS320, placing the WS320 near the wireless router.
15
Page 22
B
A
C
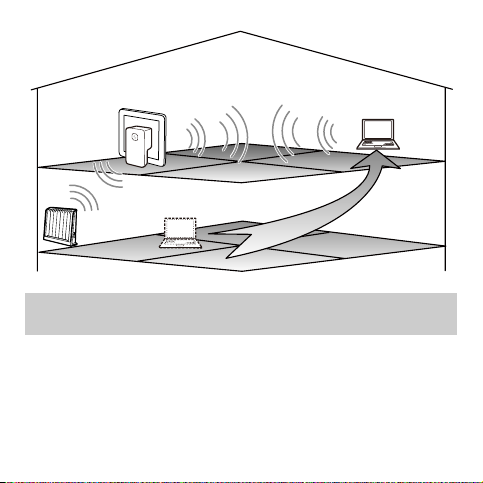
Step 5
Place the PC in Room C.After being started, the PC automatically
connects to the wireless network extended by the WS320.At this moment,
the extended network can be used the same as that implemented in Room
A.
16
Page 23
B
A
C
Setting Up a Wireless Connection Through the Web-Based Configuration Utility
If the wireless router does not support the WPS function, you can manually
connect the WS320 to the wireless router by using the Web-based configuration
utility.
You need to access the Web-based configuration utility through the wireless
network of the WS320.By default, an unencrypted wireless network has been
configured on the WS320.The service set identifier (SSID) of the wireless network
is Repeater.When you use the WS320 for the first time, you can connect to the
17
Page 24
default wireless network to access the Web-based configuration utility of the
WS320.
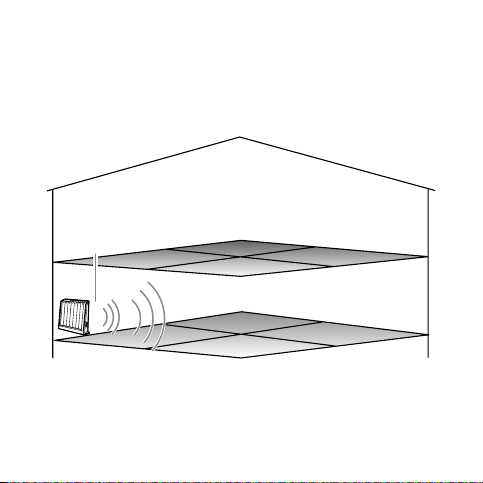
Suppose that the wireless SSID of the wireless router is AP. To perform the
configuration, do as follows:
Step 1
Power on the wireless router in Room A. Ensure that the wireless network
function of the wireless router is enabled.
B
SSID: AP
A
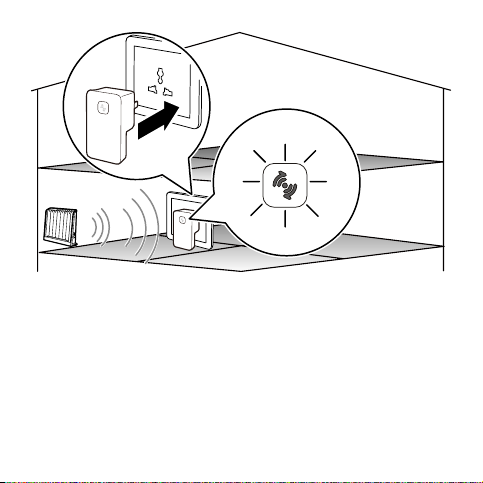
Step 2
In Room A, connect the WS320 to a power socket near the wireless
router.Wait for about one minute until the WS320 is started.
18
C
Page 25
B
A
C
19
Page 26
Step 3
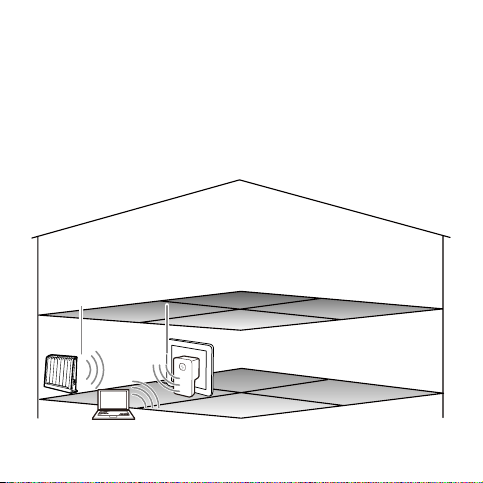
In Room A, log in to the quick configuration webpage of the WS320 on
the PC.
1.
Set up a wireless connection between the PC and the WS320.The
SSID of the wireless network to be connected is Repeater.
Configure the network connection of the PC and ensure that the PC
2.
obtains an IP address automatically.
Launch the browser on the PC, and then access any Web address (such
3.
as http://ws320) on the browser. The quick configuration webpage of
the WS320 is displayed.
B
SSID: AP
A
SSID: Repeater
SSID: Repeater
C
20
Page 27

Step 4
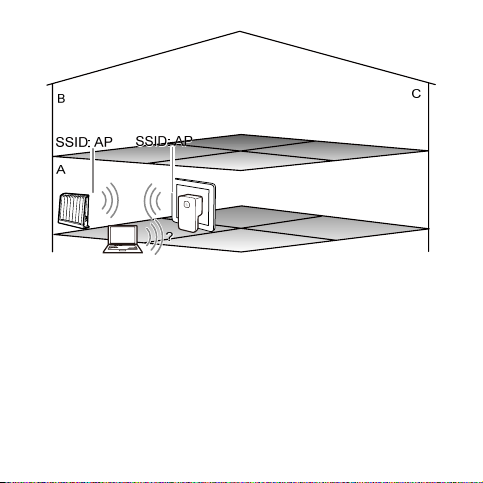
On the quick configuration webpage of the WS320, set up a connection
between the WS320 and the wireless router.
1.
Click Manual Connecting.
The WS320 searches for wireless network signals.Wait patiently until the
browser displays a wireless network list.
2.
In the wireless network list, click the row of the wireless network
whose SSID is AP.
In the lower text box, enter the password of the wireless network.
3.
4.
Click Connect to connect the WS320 to the wireless network with the
SSID of AP.
Wait for a moment (about 30 seconds). When the indicator of the WS320
turns solid green after it blinks in yellow, it indicates that the WS320
successfully connects to the wireless router through the wireless network.
21
Page 28
22
Page 29

z
If the indicator turns solid yellow after it blinks in
yellow, it indicates that the WS320 cannot connect to
the wireless network.At this moment, try to connect to
the wireless network again on the quick configuration
webpage.
z If the indicator turns solid yellow and the quick
configuration webpage cannot be displayed by using
the browser, press the reset button on the panel of the
WS320 to restore the WS320 to the default settings.
Then log in to the quick configuration webpage of the
WS320 again.
Step 5
Configure the wireless connection of the PC again, which will connect to
the wireless network with the SSID of AP.
23
Page 30
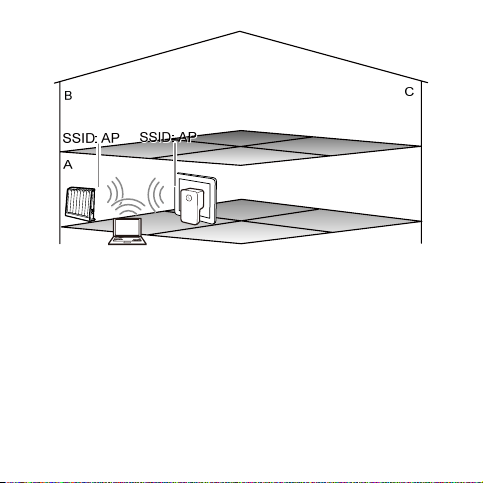
Step 6
Unplug the WS320 in Room A, and then plug it into the power socket in
Room B.
24
Page 31
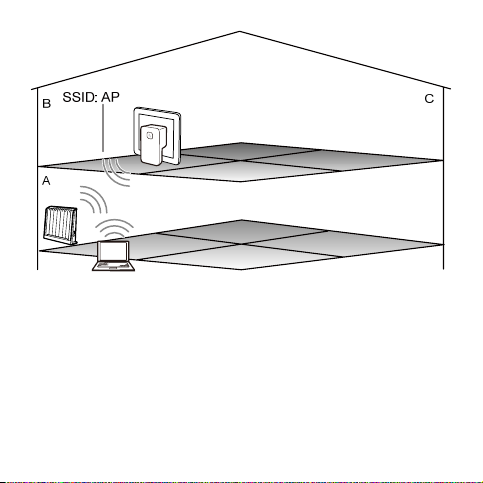
25
Page 32
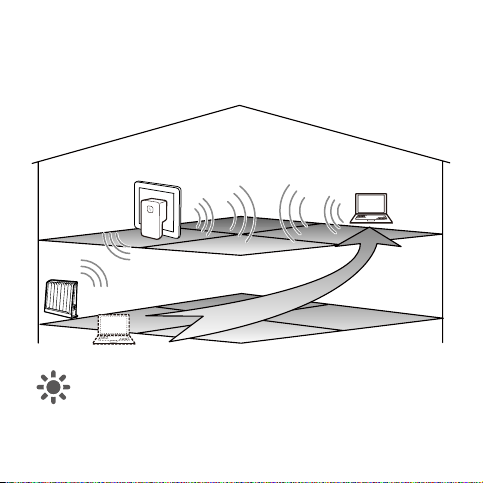
Step 7
Place the PC in Room C.After being started, the PC automatically
connects to the wireless network extended by the WS320.At this moment,
the extended network can be used the same as that implemented in Room
A.
B
A
If you want to enable the SSID named Repeater again, you can press
the reset button of the WS320 to restore the WS320 to the default
settings.
26
C
Page 33

4 Maintaining the WS320
Logging In to the Advanced Configuration Webpage
By default, most parameters are preset on the WS320 for supporting the network
applications in general conditions.To view the working status or to change the
parameters of the WS320, you can log in to the advanced configuration webpage.
You need to access the advanced configuration webpage through the wireless
network of the WS320.The method of accessing the advanced configuration
webpage varies with the wireless network status of the WS320 and the wireless
router.
When the WS320 Is Not Connected to the Wireless Router
Step 1
Set up a wireless connection between the PC and the WS320.The SSID of
the wireless network to be connected is
Step 2
Configure the network connection of the PC and ensure that the PC
obtains an IP address automatically.
Step 3
Launch the browser on the PC and then access any Web address (such as
http://ws320)
Step 4
In the upper right corner of the quick configuration webpage, click
Advanced
Step 5
In the login dialog box, enter the user name (
password (
verified, you can access the advanced configuration webpage.
on the browser.
.
by default), and then click
admin
27
Repeater
admin
Login
.
by default) and the
.After the password is
Page 34

When the WS320 Is Connected to the Wireless Router
Step 1
Set up a wireless connection between the PC and the WS320.The SSID of
the wireless network that your PC is connected to is the same as that of the
wireless network of the wireless router.
Step 2
Set the network connection of the PC and ensure that the IP address is in
the same network segment as the IP address of the WS320 LAN interface.
By default, the IP address of the WS320 LAN interface is 192.168.1.254
and the subnet mask is 255.255.255.0.If the IP address is not changed,
you can set the IP address to 192.168.1.101 and the subnet mask to
255.255.255.0 on the PC.
Step 3
Launch the browser on the PC. Enter
bar, and then press
Step 4
In the upper right corner of the quick configuration webpage, click
Step 5
.
Advanced
In the login dialog box, enter the user name (
password (
admin
verified, you can access the advanced configuration webpage.
.
Enter
by default), and then click
http://192.168.1.254
admin
Login
in the address
by default) and the
.After the password is
Connecting to a New Wireless Network
After the WS320 is connected to the wireless network of a wireless router, if you
want to connect the WS320 to another wireless router, you can press the WPS
button.
You can also do as follows by using the Web-based configuration utility:
Step 1
Log in to the advanced configuration webpage of the WS320.
28
Page 35

Step 2
In the navigation tree, choose
configuration page.
Step 3
On the configuration page, click
Step 4
Select the wireless network to be connected from the
Step 5
In the
network.
Step 6
In the lower right corner, click
When the connection is set up successfully, Connection Status under
Connection Status at bottom of the page is displayed as
Connected.When powered in the future, the WS320 will automatically
connect to the wireless network you set.
After the WS320 is connected to a new wireless network, you need to
configure the wireless connection of your PC again and then connect the
PC to the new wireless network.
area, set the connection parameters of the wireless
Settings
Settings
Client
Connect
>
Repeater
.
.
to display the
WLAN AP List
list.
Changing the IP address of the LAN Interface
The IP address of the LAN interface is the IP address entered in the address bar of
the browser before you log in to the Web-based configuration utility.To change the
IP address, do as follows after you log in to the Web-based configuration utility:
Step 1
Log in to the advanced configuration webpage of the WS320.
Step 2
In the navigation tree, choose
configuration page.
Step 3
In the
IP address
Step 4
In the
Subnet mask
text box, enter the new IP address.
text box, enter the subnet mask.
Settings
29
>
DHCP
to display the DHCP
Page 36
Step 5
Click
When changing the IP address of the WS320 LAN interface, ensure
that the new IP address does not conflict with the IP address of another
device that is connected to the WS320.
Submit
.
Restoring Default Settings
After you restore the default settings, your customized data will be
lost. Therefore, use this function with caution.
When the WS320 is powered on, press and hold the Reset button of the WS320 for
over 1s by using an object with a sharp point (such as a pin), and then release it.
Then the WS320 automatically restarts and the default settings are restored.After
you release the Reset button, the indicator of the WS320 turns off and then
changes to solid red, indicating that the WS320 is restarted after the default
settings are restored.
To restore the default settings, you can also do as follows after logging in to the
advanced configuration webpage:
Step 1
In the navigation tree, choose
reboot page.
Step 2
Click
Restore Default Settings
Maintenance
.
>
to display the system
Reset
FAQs 5
Can I set up a wireless connection between my PC and the WS320 by pressing
the WPS button of the WS320?
No, you cannot.The WPS button of the WS320 can be used only for setting up
30
Page 37

a connection between the WS320 and a wireless router.
When my PC has connected to the wireless network of the WS320 and when
the PC has automatically obtained an IP address, is the IP address allocated by
the WS320 or the wireless router?
If the WS320 has set up a wireless connection with the wireless router, the IP
address is allocated by the WS320; otherwise, the IP address is allocated by
the wireless router.
How can I configure a wireless connection on the PC to be connected to a
wireless network?
You can configure a wireless network connection by using the software
delivered with the wireless network adapter.If a Windows OS is installed on
your PC, you can use the wireless connection configuration software provided
by the Window OS.The following contents take Windows XP as an example
and describes how to configure a wireless connection.
Step 1
Enable the wireless configuration service supported by Window XP.
1.
1. Right-click My Computer, and then choose Manage from
the shortcut menu.
In the Computer Management window, choose Computer
2.
Management (Local) > Services and Applications >Services.
From the services listed in the right pane of the Computer
3.
Management window, right-click Wireless Zero Configuration,
and then choose Properties from the shortcut menu.
In the Wireless Zero Configuration Properties (Local
4.
Computer) dialog box, check whether Service status is Started.If
not, click the Start button.
31
Page 38

5.
Click OK to close the dialog box. Then, close the Computer
Management window.
Step 2
Configure the wireless network connection on your PC.
1.
Choose Start > All Programs > Accessories > Communications
> Network Connections.
In the Network Connections window, right-click Wireless
2.
Network Connection, and then choose Properties from the shortcut
menu.
In the Wireless Network Connection Properties dialog box,
3.
click Wireless Networks.
Select Use Windows to configure my wireless network
4.
settings.
Click View Wireless Networks.
5.
In the 无线网络连接 dialog box, select the wireless network to be
6.
connected to from the wireless network list, and then click Connect in
the lower right corner of the dialog box.
In the displayed dialog box, enter the network access password,
7.
and then click Connect.
After the password is verified, Connected appears on the icon of the
wireless network in the wireless network list, which indicates that
your PC is connected to the wireless network.
Close the Wireless Network Connection dialog box.
8.
In the Wireless Network Connection Properties dialog box,
9.
click OK.
How can I quickly restore the WS320 to the default settings?
When the WS320 is powered on, press and hold the Reset button of the
32
Page 39

WS320 for over 1s by using an object with a sharp point (such as a pin), and
then release it. Then the WS320 automatically restarts and the default settings
are restored.
Does the WPS function have any special requirement on the wireless
encryption settings of a wireless router?
The WPS function has no special requirement on the wireless encryption
settings;however, it is recommended that you use the Wi-Fi Protected Access
2–Pre-shared key (WPA2-PSK) security mode together with the Advanced
Encryption Standard (AES) encryption rather than the Wired Equivalent
Privacy (WEP) encryption method for accessing a wireless network.The
reasons are as follows: If a wireless network is not encrypted or encrypted by
using WEP, the security performance is poor. In addition, on some wireless
routers, the WPS function is forcibly disabled when the WEP encryption is
used for accessing a wireless network.
If several SSIDs are enabled on my wireless router, when the WS320 tries to
connect to a wireless network by using the WPS function, which wireless
network does the WS320 connect to?
By using the WPS function, the WS320 tries to connect to the wireless
network with the SSID numbered 1.
If my wireless router does not support the WPS function, how can I set up a
connection between the WS320 and the router?
You can manually connect the WS320 to the wireless network of the wireless
router by using the Web-based configuration utility of the WS320.
If the WS320 fails to connect to the wireless network of a wireless router after
33
Page 40

I press and hold the WPS button, what should I do?
Step 3
Ensure that only one wireless router has started the WPS negotiation
at a particular moment.
Step 4
Ensure that only one WS320 is trying to connect to the wireless router
through the WPS function at a particular moment.
Step 5
On the wireless router, ensure that the wireless network function and
the WPS function implemented through PBC are enabled.Note that
on some wireless routers, the WPS function is forcibly disabled when
the WEP encryption is used for accessing a wireless network.
Step 6
Check the positions of the wireless router and the WS320. Ensure that
they are far from the electric appliances, such as microwave ovens,
refrigerators, or cordless telephones, which generate strong magnetic
or electric fields.
Step 7
It is recommended that you place the wireless router and the WS320
in an open space.Although radio signals can pass through obstacles,
passing through too many obstacles such as cement or wooden walls
can affect the transmission of wireless signals of a wireless network.
6 Appendix
Hardware Features
The following figure shows the positions of the interface, buttons, and indicator on
the WS320.
34
Page 41
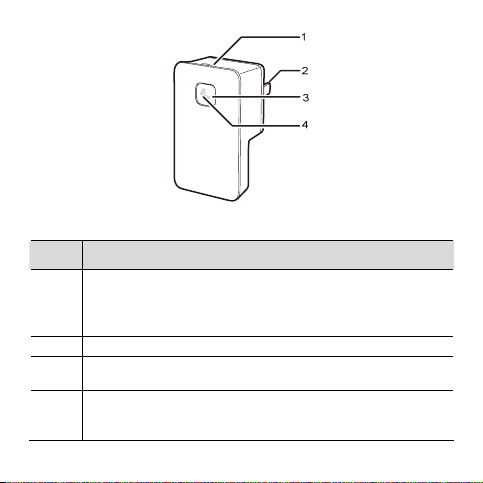
The following table describes the interface, buttons, and indicator of the WS320.
No. Description
1 Reset button: used to restore the default settings of the WS320.
When the WS320 is powered on, press and hold the Reset button of
the WS320 for over 1s, and then release it. Then the WS320
automatically restarts and the default settings are restored.
2 Power plug: used to connect to the power socket.
3
WPS button: used to start the WPS negotiation of the WS320 to set
up a wireless connection between the WS320 and a wireless router.
4
Status indicator: located in the middle of the WPS button and used to
indicate the working status of the WS320.For details about the status
indicator, see the following table.
35
Page 42
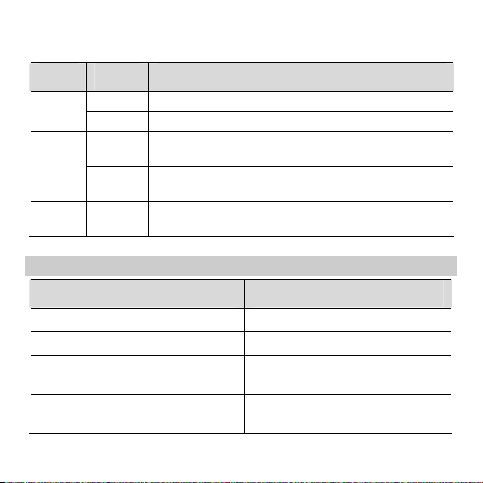
The following table describes the functions of the indicator.
Color Status Description
Solid on The WS320 is being started. Red
Blinking The WS320 is updating software.
Solid on
Yellow
Blinking
Green Solid on
The WS320 has been started but not connected to a
wireless router.
The WS310 is trying to set up a wireless connection
with a wireless router.
The WS311 has set up a wireless connection with a
wireless router.
Default Settings
Parameter Default Value
IP address of the LAN interface 192.168.1.254
Subnet mask of the LAN interface 255.255.255.0
User name used to log in to the
Web-based configuration utility
Password used to log in to the
Web-based configuration utility
admin
admin
36
Page 43
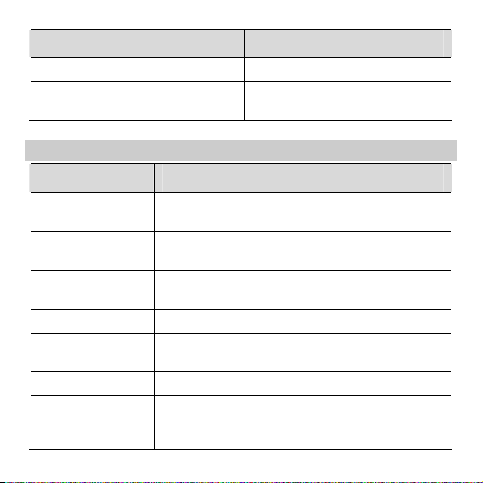
Parameter Default Value
Wireless network name (SSID) Repeater
Wireless network password
None.No password required for
connection
Technical Specifications
Item Specification
Entire-device power
supply
Entire-device power
consumption
Working
temperature
Working humidity 5% to 95% (non-condensing)
Dimensions (L × W
× H)
Weight About 61 g
Wireless
networking
standards
100–240 V AC
< 5 W
0°C to 40°C (32°F to 104°F)
76 mm
× 42 mm × 59 mm
802.11b, 802.11g, and 802.11n (2.4–2.4835 GHz)
37
Page 44

Item Specification
Wireless network
coverage
Wireless data rates
Maximum distance of 150 m from the WS320 to a
wireless router (with no obstacle and interference
between)
802.11b
802.11g
802.11n (a 1T
× 1R antenna
used)
1Mbit/s, 2Mbit/s, 5.5Mbit/s, and
11Mbit/s
6Mbit/s, 9Mbit/s, 12Mbit/s,
18Mbit/s, 24Mbit/s, 36Mbit/s,
48Mbit/s, and 54Mbit/s
6Mbit/s, 6.5Mbit/s, 13.0Mbit/s,
13.5Mbit/s, 19.5Mbit/s, 26.0Mbit/s,
27.0Mbit/s, 39.0Mbit/s, 40.5Mbit/s,
52.0Mbit/s, 54.0Mbit/s, 58.5Mbit/s,
65.0Mbit/s, 81.0Mbit/s,
108.0Mbit/s, 121.5Mbit/s, and
135.0Mbit/s
38
Page 45

HUAWEI TECHNOLOGIES CO., LTD.
Huawei Industrial Base
Bantian, Longgang
Shenzhen 518129
People's Republic of China
www.huawei.com
Part Number: 202302
 Loading...