

Huawei Vodafone 858 User Guide

User guide
Vodafone 858 Smart

Contents
1 Safety precautions.............. ............................................................. ..............1
1.1 Legal notice ..............................................................................................................................2
2 Getting to know your phone ......................................................... ..............5
2.1 Phone overview....................................................................................................................... 5
2.2 Installing your phoneSetting up your phone..............................................................7
2.3 Turn your phone on or off................................................................................................ 10
2.4 Using the touchscreen......................................................................................................11
2.5 Locking and unlocking the screen...............................................................................11
2.6 The Home screen................................................................................................................12
2.7 Using a microSD card......................................................................................................... 15
3 Calling..... ............................................................. ........................................... 17
3.1 Making a call..........................................................................................................................17
3.2 Answering or rejecting a call...........................................................................................18
3.3 Other operations during a call........................................................................................19
3.4 Using the Call log.................................................................................................................20
3.5 Using Airplane mode..........................................................................................................21
4 Contacts ......................................... ................................................................ 22
4.1 Opening the Contacts application................................................................................ 22
4.2 Importing contacts from a SIM card ............................................................................ 22
4.3 Adding a contact.................................................................................................................. 22
4.4 Searching for a contact..................................................................................................... 23
4.5 Editing a contact.................................................................................................................. 23
4.6 Communicating with your contacts............................................................................ 23
4.7 Deleting a contact............................................................................................................... 24
4.8 Managing groups................................................................................................................. 24
5 Using the onscreen keyboard ................................................ ................. 26
5.1 Displaying the keyboard panel ...................................................................................... 26
5.2 Customizing keyboard settings.....................................................................................28
6 Messaging............... ............................................................. .......................... 29
i

6.1 SMS and MMS........................................................................................................................29
6.2 Email......................................................................................................................................... 31
7 Getting connected .................................. .................................................... 34
7.1 GPRS/3G................................................................................................................................. 34
7.2 Wi-Fi........................................................................................................................................... 34
7.3 Sharing your phone’s data connection ...................................................................... 35
7.4 Browser.................................................................................................................................... 37
7.5 Bluetooth................................................................................................................................38
8 Entertainment............. ............................................................. .................... 41
8.1 Taking photos and recording videos ........................................................................... 41
8.2 Using the Gallery..................................................................................................................43
8.3 Enjoying music .....................................................................................................................44
8.4 Listening to FM Radio.........................................................................................................46
9 Google services ...................... ............................................................. ........ 47
9.1 Creating a Google account ..............................................................................................47
9.2 Using Gmail............................................................................................................................48
9.3 Using Talk............................................................................................................................... 49
9.4 Using Maps ............................................................................................................................. 51
9.5 Using YouTube ..................................................................................................................... 52
9.6 Using Market.......................................................................................................................... 53
10 Synchronizing information ...................................... ............................. 56
10.1 Managing your accounts............................................................................................... 56
10.2 Customizing your account synchronization ......................................................... 58
11 Using other applications ............................................................. ........... 60
11.1 Using the Calendar........................................................................................................... 60
11.2 Using the Clock.................................................................................................................. 63
11.3 Using the Calculator........................................................................................................ 64
11.4 Using the Notepad...........................................................................................................64
12 Managing your phone............................. ................................................. 65
12.1 Setting the date and time..............................................................................................65
12.2 Setting the display............................................................................................................66
ii

12.3 Setting ringers.................................................................................................................... 66
12.4 Setting phone services................................................................................................... 67
12.5 Setting text-to-speech....................................................................................................68
12.6 Protecting your phone....................................................................................................69
12.7 Managing applications....................................................................................................70
12.8 Resetting your phone.....................................................................................................71
13 Appendix...... .............................................................. .................................. 72
13.1 FAQs........................................................................................................................................ 72
iii
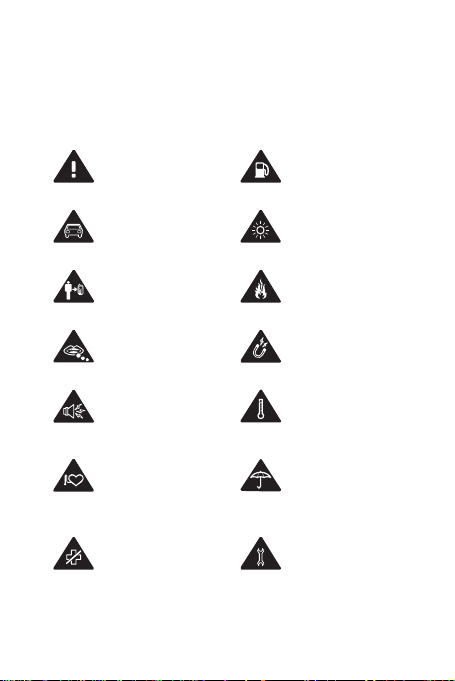
1 Safety precautions
Please read these safety precautions carefully before you start using
your phone.
Read the Safety
Information guide
that comes in the box
Do not use hand-held
while driving
For body-worn
operation maint ain a
separation of 1.5 cm
Small parts may
cause a choking
hazard
This device may
produce a loud
sound
Keep away from
pacemakers and
other personal
medical devices
Switch off when
instructed in
hospitals and
medical facilities
Do not use while refuelling
This device may
produce a bright or
flashing light
Do not dispose of in a
fire
Avoid contact with
magnetic media
Avoid extreme
temperatures
Avoid contact with
liquid, keep dry
Do not try and
disassemble
1

Switch off when
instructed in aircraft
and airports
Switch off in
explosive
environments
Please also read the Safety Information guide that is included in the
box.
Do not rely on this
device for emergency
communications
Only use approved
accessories
1.1 Legal notice
Copyright © Huawei Technologies Co., Ltd. 2011. All rights reserved.
No part of this document may be reproduced or transmitted in any
form or by any means without prior written consent of Huawei
Technologies Co., Ltd.
The product described in this manual may include copyrighted
software of Huawei Technologies Co., Ltd. and possible licensors.
Customers shall not in any manner reproduce, distribute, modify,
decompile, disassemble, decrypt, extract, reverse engineer, lea se,
assign, or sublicense the said softwar e, unless such restrictions are
prohibited by applicable laws or such actions are approved by
respective copyright holders under licenses.
Trademarks and permissions
, , and are trademarks or registered trademarks of
Huawei Technologies Co., Ltd.
Other trademarks and product, service and company names
mentioned are the property of their respective owners.
2

Notice
Some features of the product and its accessories describ ed herein rely
on the software installed, capacities and settings of local network, and
may not be activated or may be limited by local network operators or
network service providers. Thus the descriptions herein may not
exactly match the product or its accessor ies you purchase.
Huawei Technologies Co., Ltd. reserves the right to change or modify
any information or specifications contained in this manual without
prior notice or obligation.
Huawei Technologies Co., Ltd. is not responsible for the legitimacy
and quality of any products that you upload or download through this
phone, including but not limited to the text, pictures, music, movies,
and non-built-in software with copyright protection. Any
consequences arising from the installation or usage of the preceding
products on this phone shall be borne by yourself.
NO WARRANTY
THE CONTENTS OF THIS MANUAL ARE PROVIDED “AS IS”. EXCEPT AS
REQUIRED BY APPLICABLE LAWS, NO WARRANTIES OF ANY KIND,
EITHER EXPRESS OR IMPLIED, INCLUDING BUT NOT LIMITED TO, THE
IMPLIED WARRANTIES OF MERCHANTABILITY AND FITNESS FOR A
PARTICULA R PURPOSE, ARE MADE IN RELATION TO THE A CCURACY,
RELIABILITY OR CONTENTS OF THIS MANUAL.
TO THE MAXIMUM EXTENT PERMITTED BY APPLICABLE LAW, IN NO
CASE SHALL HUAWEI TECHNOLOGIES CO., LTD. BE LIABLE FOR ANY
SPECIAL, INCIDENTAL, INDIRECT, OR CONSEQUENTIAL DAMAGES, OR
LOST PROFITS, BUSINESS, REVENUE, DATA, GOODWILL OR
ANTICIPATED SAVINGS.
3

Import and export regulations
Customers shall comply with all applicable export or import laws and
regulations and will obtain all necessary governmental permits and
licenses in order to export, re-export or import the product mentioned
in this manual including the software and technical data therein.
4
2 Getting to know your phone
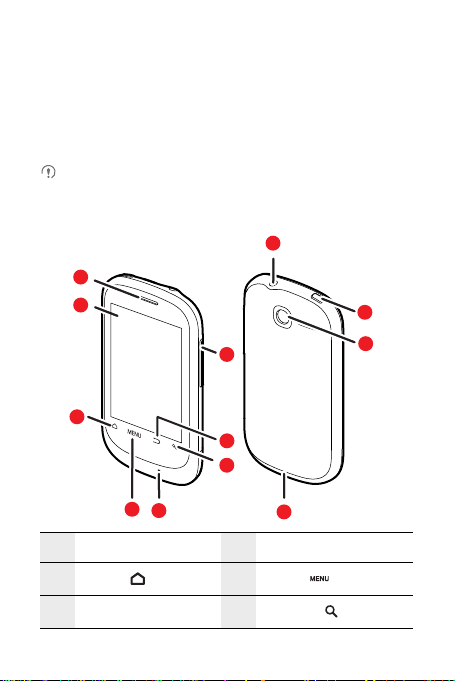
2.1 Phone overview
2.1.1 Using the phone
All the pictures in this guide are for your reference only. The
actual appearance and display features depend on the phone you
purchase.
9
1
2
8
3
7
6
4
5
1Earpiece 2Touchscreen
3
HOME
5Microphone 6
10
4
MENU
SEARCH
12
11
5
7
BACK
9Headset jack 10 Charge/Data port
11 Camera 12
8Volume key
Power button
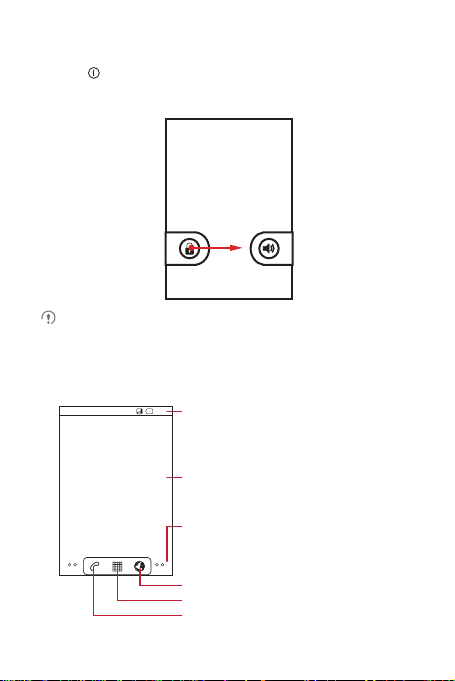
2.1.2 What the keys do
•Press to turn your phone on.
• Press and hold to open the Phone options menu.
• Press to lock the screen when your phone is active.
• Touch to return to the previous screen.
• Touch to exit any application you are running.
• Touch to hide the keyboard.
• Touch to open the menu on an active screen.
• Touch to return to the Home screen.
• Touch and hold to show the most recently used
applications.
• Touch to open Google Search for searching your phone
and the web.
• Touch and hold to open Google Search by voice.
6
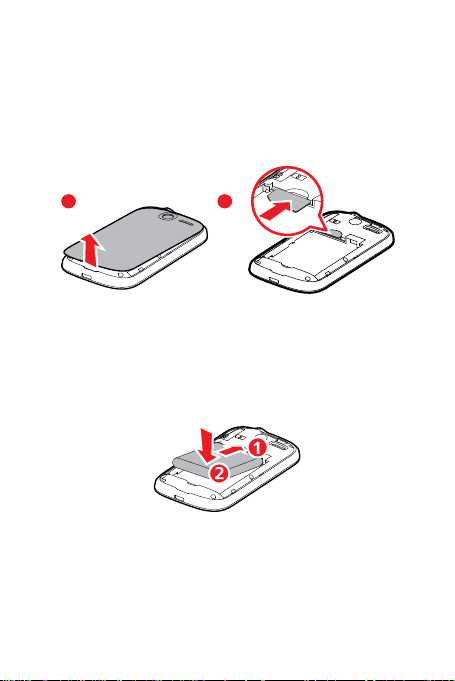
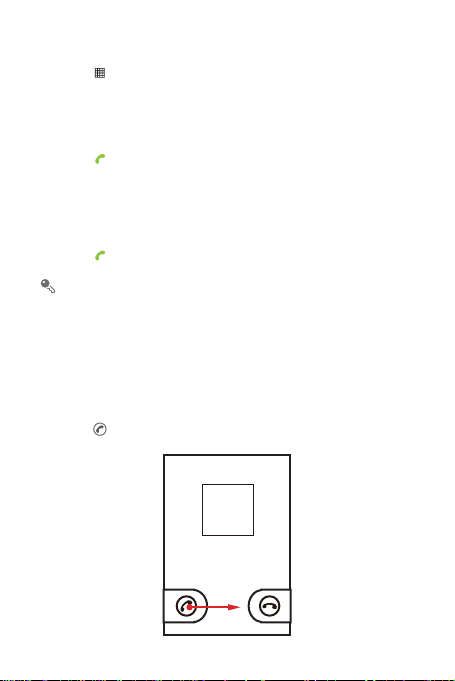
2.2 Installing your phoneSetting up
1 2
your phone
2.2.1 Installing the SIM card
There are two steps to install the SIM card:
1. Take the back cover off. You can lift it up using your fingernail in the
narrow opening at the bottom.
2. Insert your SIM card with the gold contacts facing down and the cutoff corner facing out.
2.2.2 Installing the battery
1. Insert the edge labelled a (with the contacts on it) into the top end
of the battery compartment.
2. Then push the edge labelled b down until the battery clicks firmly
into place.
7
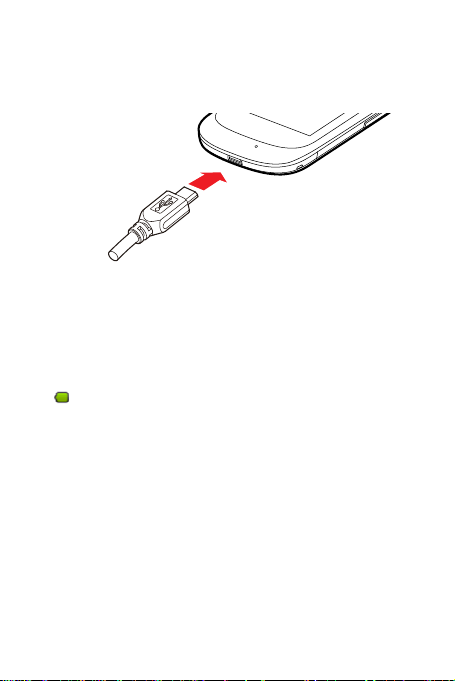
2.2.3 Charging the battery
Before charging the battery, make sure that it has been properly
inserted into your phone.
1. Take the USB cable that comes in the box and plug the smaller end
into the bottom of the phone.
2. Connect the other end of the USB cable to your charger, then plug
the charger into a power socket. Your phone will start charging.
When you first turn your phone on, the battery icon in the notification
bar may show that it has some charge already. When this icon changes
to , your phone is fully charged – this can take up to 4 hours.
2.2.4 Important information about the battery
• If the battery has not been used for a long period of time, you may
not be able to turn your phone on immediately after you begin
charging the battery. Allow the battery to charge for a few minutes
with the phone turned off before attempting to turn the ph one on.
• The battery will not always be able to hold a charge the way it did
when it was new. If the battery life becomes noticeably shorter than
usual after being charged properly, replace the battery with a new
one of the same type.
• Using data services increases demand on the battery and will
reduce the length of time it can hold a charge.
8

• The time required to charge the battery depends on the ambient
temperature and the age of the battery.
• When the battery is low on power, the phone plays an alert and
displays a prompt. When battery power is almost exhausted, your
phone will power off automatically.
2.2.5 Battery saving tips
How long the battery lasts depends on the network that you connect
to, and how you use your phone.
Try the following to conserve battery power:
• When you do not need 3G services, set your phone to connect to a
2G network.
• When your phone is not in use, switch off the screen.
• Reduce the time set for your screen light to switch off whe n you
leave your phone idle.
• Lower the screen brightness.
• Use the AC adapter to plug your phone into an external power
source whenever possible.
• Turn Bluetooth off when you are no t using it. Only make your phone
visible to other Bluetooth devices when you need to es tablish a
Bluetooth connection.
• Switch off Wi-Fi when you are not using it.
• Turn off your phone connection to GPS satellites when you are not
using it.
• Lower the volume.
• Close power-draining programs, when you do not need them.
• Turn off the data service if you do not need it.
9

2.3 Turn your phone on or off
2.3.1 Turning your phone on
Press to turn on your phone.
If personal identification number (PIN) protection is enabled on
your phone, you must enter your PIN before using the phone.
2.3.2 Setting up your phone
The first time you turn on your phone, the phone displays a setup
wizard to help you set up the phone.
Make sure you sign in to your Google account, so you can use Google
apps like Gmail/Google Mail and Android Market. If you do not have a
Google account you will be prompted to set one up. This is free, and
will only ta ke a minute or so to do .
You can also set up your other email accounts and favourite social
networks like Facebook™ and Twitter™.
The setup wizard helps you:
• Learn about your phone
• Create or sign into you r account
• Make some initial decisions about how you want to use your phone
2.3.3 Turning your phone off
1. Press and hold to open the Phone options menu.
2. Touch Power off.
3. Touch OK.
10

2.4 Using the touchscreen
2.4.1 Touchscreen actions
• Touch: Use the touch of your finger to select an item, co nfirm a
selection, or start an application.
• Touch and ho ld: Touch an item with your finger and continue to
press down until your phone responds. For example, to open the
options menu for the active screen, touch the screen and hold down
until the menu appears.
• Flick: Move your finger either vertically or horizontally across the
screen.
• Drag: Touch and hold the desired item wi th yo ur fi nger. To mo ve an
item, drag the item to any part of the screen. You can drag an icon to
move or delete it.
2.4.2 Rotating the screen
The orientation of most screens will rotate with the phone as you turn
it from upright to sideways and back again.
2.5 Locking and unlocking the screen
2.5.1 Locking the screen
• When your phone is on, press to lock the screen. When the
screen is locked, you can still receive messages and calls.
• If your phone is idle for a while, the screen will lock automatically.
11
2.5.2 Unlocking the screen
10:23
Touch to open the Dialler application.
Touch to view all your applications.
Touch to open the web browser.
Notifications bar:
Display area:
Screen switching dots:
Displays reminders and status indicators.
Flick down with your fingers to open the
notifications panel.
Shows the operation and display
areas of your phone.
These indicate the number of the screens
on the left or right. Touch the left or
right dots to switch between the screens.
1. Press to wake the screen up.
2. Drag the Lock icon from left to right to unlock the screen.
If you have set up a screen unlock pattern, you will be prompted
to draw the pattern on the screen to unlock it.
2.6 The Home screen
12
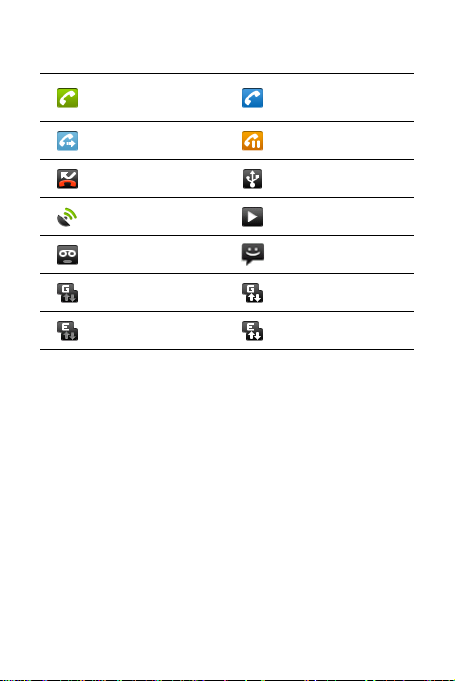
2.6.1 Notification and status icons
Call in progress
Call forwarding on Call on hold
Missed call Connected to a PC
GPS connected Music playing
New voicemail New message
GPRS connected GPRS in use
EDGE connected EDGE in use
Call in progress using a
Bluetooth device
2.6.2 Notification panel
Your phone will notify you when you receive a new message or there
is an incoming event. The notification panel also informs you about
alarms and settings -for example, when Call forwarding is activated.
Open the notification panel to see who the wireless network operator
is or to view a message, reminder, or event notification.
Opening the notification panel
1. When a new notification icon appears on the notification bar, touch
and hold the notification bar, and then flick down to open the
notification panel.
2. On the notification panel, you can do the following:
• Touch a notification to open the related application.
13

• Touch Clear to clear all notifications.
Closing the notification panel
Touch and hold the bottom of the panel. Then flick up to close it.
2.6.3 Viewing other parts of the Home screen
10:23
Flick your finger left
or right across the
Home screen to see
the alternate screens.
Touch a thumbnail
to open its screen.
Touch and hold the small dots to view
thumbnails of the screens.
2.6.4 Customizing the Home screen
Adding a new screen item
1. Touch and hold a blank area on the Home screen until the
Add to Home screen menu is displayed.
2. Se lect an item to add it t o the Ho me scre en.
Moving a screen item
1. Touch and hold an item on the Home screen until the item expands
in size and the phone vibrates.
2. Without lifting your finger, drag the item to the desired position on
the screen, and then release it.
14
Removing a screen item
1. Touch and hold an item on the Home screen until the item expands
and the phone vibrates.
2. Without lifting your finger, drag the item to the trash can. When the
item and the trash can turn red, the item is ready to be removed.
3. Release the item to remove it from the Home screen.
2.6.5 Changing the wallpaper
1. On the Home screen, touch > Wallpaper.
2. Do any of the following:
• Touch Pictures to select a picture and set it as the wallpaper.
• Touch Wallpapers to select a picture and set it as the wallpaper.
2.7 Using a microSD card
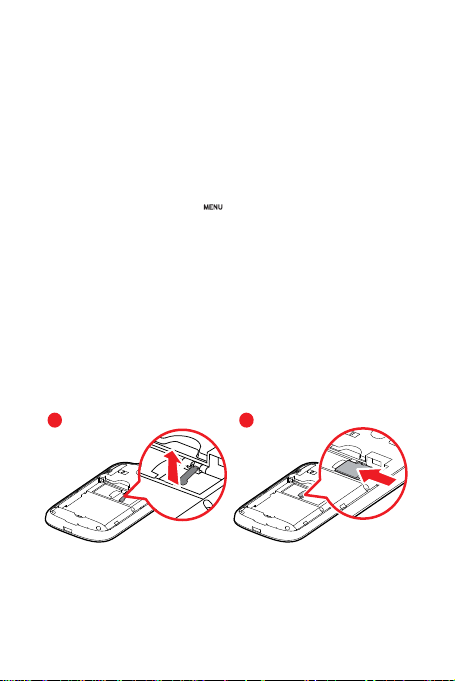
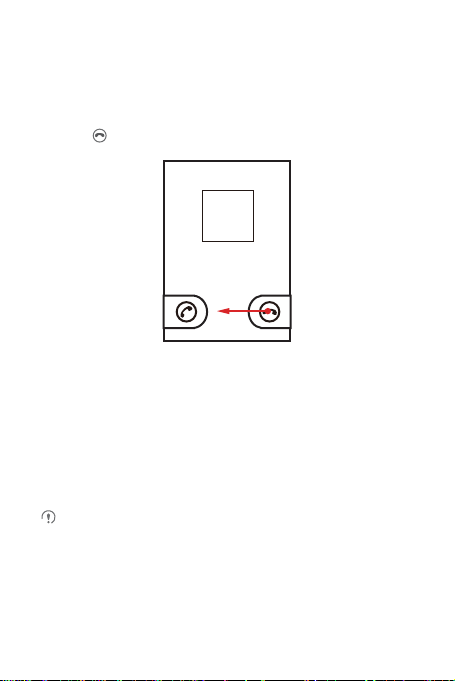
2.7.1 Installing the microSD card (optional)
If you want to expand your phone memory, you can insert a microSD
card.
1 2
Pull the microSD card handle (the blue flap) up. Then insert the
microSD card into the slot as shown, and put the ca rd handle back to
lock it in place.
15

1. Open the microSD card cover.
2. Insert the microSD card into the card slot as shown in the diagram .
2.7.2 Using the microSD card as USB mass storage
To transfe r all your favorite m usic and pictures fr om your PC to your
phone’s microSD card, set the microSD card as U SB mass storage.
1. Co nnect y our pho ne to yo ur PC wi th the U SB cabl e. You r PC wil l
detect the microSD card as a removable disk.
2. Touch the notification bar, flick downwards to open the
notifications panel, and then touch USB connected.
3. In the dialogue box, touch Turn on USB storage to confirm that
you want to transfer files.
You can now transfer files from your PC to your phone’s microSD card.
When your microSD card acts as USB mass storage, yo ur phone
will not use this memory space. Your PC will tell you how to safely
disconnect the USB mass storage device (your phone) when you
have finished transferring files.
2.7.3 Removing the microSD card
1. Touch > Settings.
2. Scroll down the screen, and then touch SD card & phone storage >
Unmount SD card.
3. Carefully remove the microSD card.
16

3 Calling
To make a phone call, you can dial a number or touch a number from
your contact list, on a Web page, or in a document. When you are on a
call, you can answer other incoming calls or send them to your
voicemail box. You can also set up conference calls with several
participants.
3.1 Making a call
To make a call, you can use the Dialer application, or select a number
from Contacts or Call log.
When you are on a call, you can tou ch to return to the H ome
screen and use other functions. To return to the calling screen, flick
the notification bar down and touch Current call.
Do not block the microphone at the bottom o f your phone if you
want your voice heard.
3.1.1 Making a call
1. Touch > Dialer to display the dialler.
If you are already working with Contacts or Call log, touch the
Dialer tab.
2. Touch the appropriate number keys to enter the phone number.
3. Touch to start the call.
During a call, flick up the Dialpad tab to enter other numbers on
the dialpad.
17
3.1.2 Making a call from Contacts
1. Touch > Contacts to display your contact list.
If you are already working with Dialer or Call log, touch the
Contacts tab.
2. In the list, touch the contact you want to call.
3. Touch to dial the phone number.
3.1.3 Making a call from Call log
1. If you are already working with Contacts or Dialer, touch the
Call log tab.
2. Touch to the right of the log entry to dial.
If you touch and hold a log entry, an options menu will open.
3.2 Answering or rejecting a call
3.2.1 Answering a call
When you receive a phone call, the incoming call screen opens with
the caller's name and number that you have entered in Contacts.
Drag the to the right to answer the call.
18
3.2.2 Ending a call
During a call, touch End to end the call.
3.2.3 Rejecting a call
Drag the to the left to reject the call.
3.3 Other operations during a call
3.3.1 Making a conference call
If you receive a new call while you are already on a call, you can
connect the second call to the call you are on. This feature is known as
conference calling. You can also set up a conference call with
multiple callers.
Contact your network operator to learn if conference calls are
supported and, if yes, how many can participate.
1. To initiate a conference call, dial the number of the first participant.
After you have connected to the first participant, keep the
connection open and touch Add call.
19

2. Enter the phone number of the next person you want to join the
conversation and touch , or select someone from your Call log
or Contacts. The first participant is automatically placed on hold
while you do this.
3. Once you have connected to the second person, touc h Merge calls
to begin the conference call.
4. To add more people, touch Add call, and then repeat steps 2 and 3.
5. To end the conference call and disconnect everyone, touch End.
3.3.2 Switching between calls
If you receive a new call while you are already on a call, you can switch
between the two calls.
1. While you are on the first call and the second call comes in, answer
the incoming call, and then touch Swap.
2. The current call is placed on hold and you are connected to the new
call.
3.4 Using the Call log
The Call log contains a list of calls that you have dialled, received, or
missed. You can use the call log to reference a recently c alled number
quickly or add an incoming number to your contact list.
3.4.1 Adding an entry to Contacts
1. If you are already working with Dialer or Contacts, touch the
Call log tab.
2. Touch and hold the entry you want to add.
3. Touch Add to contacts in the options menu.
4. Touch Create new contact or scroll through the contact list and
touch an existing contact name.
20
 Loading...