

Huawei U9510E Maintenance Manual
Prepared by
Xie Kaicheng
Date
2012-08-23
Reviewed by
Wei Baoquan
Date
2012-08-24
Approved by
Zhao Xianfeng
Date
2012-08-25
U9510E Maintenance Guide
V1.0
Huawei Technologies Co., Ltd.
All rights reserved

U9510E Maintenance Guide
Confidential
2012-12-05
Huawei Confidential
Page 2 of 76
Change History
Date
Version
Change Reason
Changed
Chapter
Change Description
Author
2012-09-18
V1.0
Image errors
existed.
1.1
Changed the U9510E's appearance
image.
Teng Zhihui
(employee ID:
t00104341)
2012-09-18
V1.0
A description error
existed.
1.2
Changed the uplink rate to 5.76
Mbit/s.
Teng Zhihui
(employee ID:
t00104341)
2012-09-18
V1.0
A description error
existed.
1.2
Deleted the sentence "Solder
different components as required
to combine frequency bands".
Teng Zhihui
(employee ID:
t00104341)

U9510E Maintenance Guide
Confidential
2012-12-05
Huawei Confidential
Page 3 of 76
Contents
1 Product Introduction .................................................................................................................... 5
1.1 Appearance ....................................................................................................................................................... 5
1.2 Features ............................................................................................................................................................ 6
2 Applicable Scope and Precautions ............................................................................................ 7
2.1 How to Use this Document .............................................................................................................................. 7
2.2 Precautions ....................................................................................................................................................... 7
2.3 How to Obtain Product and Repair Information .............................................................................................. 7
3 Exploded View............................................................................................................................... 8
3.1 Exploded View ................................................................................................................................................. 8
3.2 Component List ................................................................................................................................................ 9
4 Components on the PCBA ......................................................................................................... 11
4.1 Layout ............................................................................................................................................................ 11
4.2 Component List .............................................................................................................................................. 12
5 Software Upgrade ....................................................................................................................... 15
5.1 Upgrade Preparation ................................................................................................................................ ....... 15
5.2 Upgrade Using the microSD card .................................................................................................................. 15
5.2.1 Performing a Normal Upgrade .............................................................................................................. 15
5.2.2 Performing a Forcible Upgrade ............................................................................................................. 16
5.3 Troubleshooting .............................................................................................................................................. 16
6 Maintenance Tools ...................................................................................................................... 17
7 Disassembly Procedure .............................................................................................................. 19
8 Assembly Procedure ................................................................................................................... 25
9 Troubleshooting Common Faults ............................................................................................ 29
9.1 Principle ......................................................................................................................................................... 29
9.2 Startup Failure ................................................................................................................................................ 34
9.2.1 Excessive Current (DC Power Supply) ................................................................................................ . 34
9.2.2 Weak Current (DC Power Supply) ........................................................................................................ 36
9.2.3 No Current (DC Power Supply) ............................................................................................................ 38
9.3 No Charging ................................................................................................................................................... 39
9.4 Display Faults................................................................................................................................................. 41

U9510E Maintenance Guide
Confidential
2012-12-05
Huawei Confidential
Page 4 of 76
9.5 Vibrator Faults ................................................................................................................................................ 42
9.6 MicroSD Card Detection Faults ..................................................................................................................... 43
9.7 USIM Card Detection Faults .......................................................................................................................... 45
9.8 Touchscreen Faults ......................................................................................................................................... 46
9.9 Touch Key Faults ........................................................................................................................................... 48
9.10 Proximity Sensor and Automatic Light Sensor Faults .................................................................................. 49
9.11 Accelerometer Faults .................................................................................................................................... 49
9.12 Compass Sensor Faults................................................................................................................................. 51
9.13 Gyroscope Faults .......................................................................................................................................... 51
9.14 Camera Faults ............................................................................................................................................... 52
9.15 Audio Faults ................................................................................................................................................. 53
9.15.1 Ringtone Faults ................................................................................................................................... 53
9.15.2 Call Transmitting Faults ...................................................................................................................... 53
9.15.3 Call Receiving Faults .......................................................................................................................... 54
9.16 Headset Audio Faults ................................................................................................................................... 55
9.16.1 Headset silence fault ........................................................................................................................... 55
9.16.2 Headset Transmitting Fault ................................................................................................................. 56
9.17 Speaker Noise Faults .................................................................................................................................... 56
9.18 Wi-Fi/Bluetooth Faults ................................................................................................................................. 58
9.19 FM Faults ..................................................................................................................................................... 59
9.20 GPS Faults .................................................................................................................................................... 60
9.21 MHL Faults ................................................................ ................................................................ .................. 62
9.22 Card Detection Faults ................................................................................................................................... 63
9.23 RF Reception Faults-WCDMA .................................................................................................................... 64
9.24 RF Transmission Faults-WCDMA ............................................................................................................... 65
9.25 RF Signal Receiving Faults-GSM ................................................................................................................ 66
9.26 RF Signal Transmission Faults-GSM ........................................................................................................... 67
10 Function Tests ............................................................................................................................ 68
10.1 Keys ............................................................................................................................................................. 68
10.2 MMI Test ...................................................................................................................................................... 69
10.3 Wi-Fi Test ..................................................................................................................................................... 71
10.4 Voice Call Test .............................................................................................................................................. 71
11 Solder Points on the PCB and BGA Chip............................................................................. 72
12 Slot Layout .................................................................................................................................. 74
U9510E Maintenance Guide
Confidential
2012-12-05
Huawei Confidential
Page 5 of 76
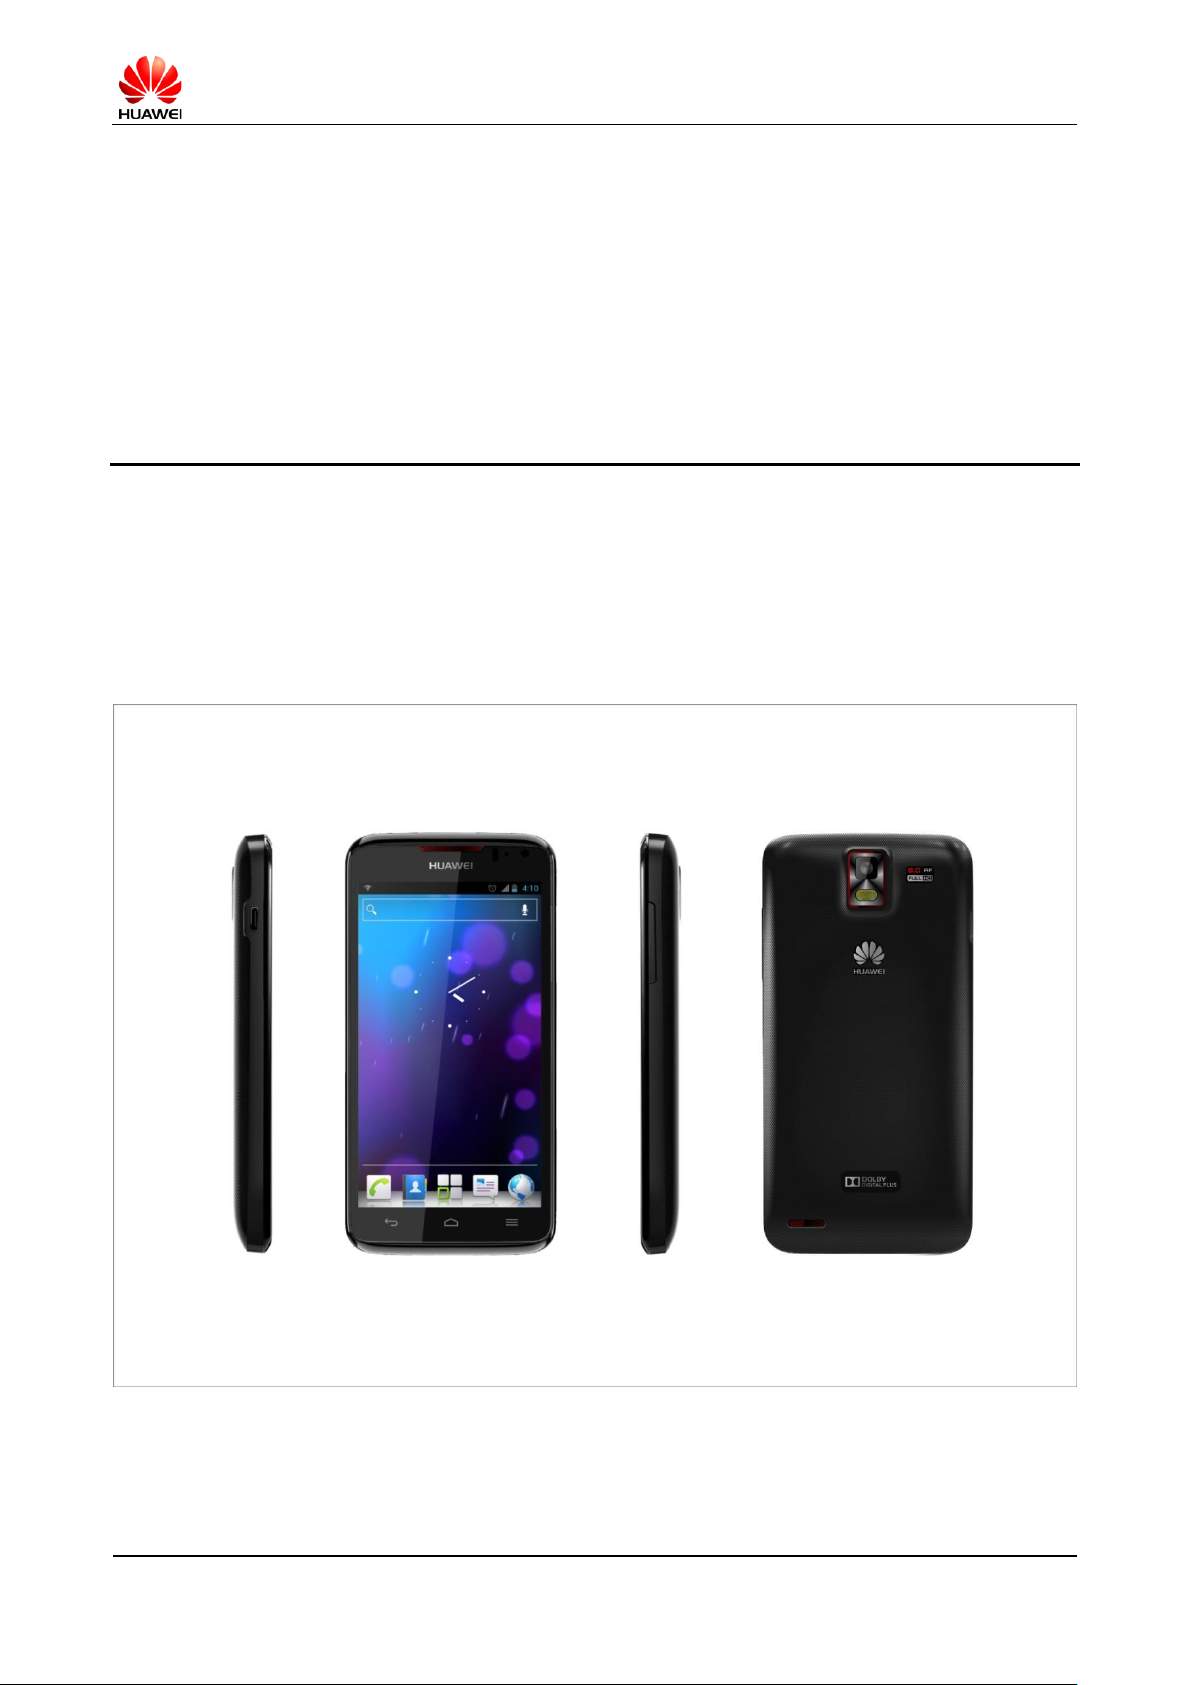
1.1 Appearance
Figure 1-1 错误!未指定书签。 shows the U9510E's appearance.
Figure 1-1 Appearance
1 Product Introduction
U9510E Maintenance Guide
Confidential
2012-12-05
Huawei Confidential
Page 6 of 76
1.2 Features
Item
Description
Type
Bar-type touchscreen smartphone
Dimensions (H x W x D)
10.9 mm x 129.9 mm x 64.9 mm
Frequency bands
GSM/GPRS/EDGE: 850/900/1800/1900 MHz
UMTS: 850/900/AWS/1900/2100 MHz
HSPA+: downlink 21 Mbit/s, uplink 5.76 Mbit/s
Weight
About 145 g
Description
WCDMA/GSM dual-mode phone
System and platform
K3V200 + X-Gold626, Android 4.0 operating system (OS)
Memory
AP: 1 GB DDR RAM, 8 GB EMMC
Modem: flashless, DDR
Ports
Micro USB (for charging and data connection); 3.5 mm headset jack; MHL
port
Battery
2600 mAh lithium ion polymer battery
Display
4.5-inch HD 1280 x 720 pixels, connected to the AP through the MIPI port
microSD card
Support a microSD card of up to 32 GB
Antenna
Built-in antenna
Camera
Rear camera: 8 megapixels (MP), with dual LED flash; Front camera: 1.30
MP
Bluetooth
Bluetooth module of the Broadcom4330 (Bluetooth 4.0 + HS)
Wi-Fi
802.11b/g/n
GPS
GPS, AGPS
FM
FM module of the BCM4430, with an external antenna (headset)
Outstanding features
WCDMA/GSM dual-mode, Android 4.0 OS
4.5-inch HD In-Plane Switching (IPS) capacitive touchscreen
2600 mAh battery
Rear camera of 8 MP, with dual LED flash and autofocus
Front camera of 1.3 MP
Gravity sensor, proximity sensor, light sensor, gyoscope, compass
Bluetooth, FM, and GPS/AGPS
High-speed WCDMA 3G/Wi-Fi
Huawei's application store: Hispace
Table 1-1 Product features
U9510E Maintenance Guide
Confidential
2012-12-05
Huawei Confidential
Page 7 of 76
2 Applicable Scope and Precautions
Electrostatic discharge (ESD) is a major cause for damage to sensitive electronic
components. Every service center must attach great importance to ESD protection
and meet ESD protection requirements specified in this document.
2.1 How to Use this Document
This document provides repair instructions for technicians at service sites authorized by
Huawei. This maintenance manual is confidential and accessible to authorized service centers
(ASCs) and authorized service providers (ASPs) only. While every effort has been made to
ensure the accuracy of this document, errors may still exist. If you find any mistake or have
any suggestion, contact Huawei's customer service.
2.2 Precautions
Only qualified technicians are allowed to perform repair and calibration.
Perform all operations in electrostatic discharge (ESD) rooms and wear ESD wrist straps
throughout the operations.
Ensure that all components, screws, and insulators are installed properly after repair and
calibration, and that all cables and wires are installed and connected correctly.
Ensure that the soldering is lead-free and compliant with eco-friendly requirements.
2.3 How to Obtain Product and Repair Information
To obtain product and maintenance information, visit Huawei website at:
http://www.huaweidevice.com/cn/technicaIndex.do

U9510E Maintenance Guide
Confidential
2012-12-05
Huawei Confidential
Page 8 of 76
3.1 Exploded View
Components in the following figure are structural parts of the phone, and cannot be used as reference
when requesting spare parts.
3 Exploded View
Figure 3-1 Exploded view
U9510E Maintenance Guide
Confidential
2012-12-05
Huawei Confidential
Page 9 of 76
3.2 Component List
No.
Part
Number
Description
Quantity
1
51151357
WCDMA Cellular Phone Host,HUAWEI U9510E ,WCDMA/GSM
Handset,Black,8G ROM/Chinese General Version
2
03021TXW
Manufactured Board,U9510E,HD1U9510EMA,U9510EHandset Main
Board(8G ROM/FM/GSM 4
Band,W2100/W1900/W1700/W900/W850),Terminal Dedicated,2*2
1.0 PCS
3
03021KXY
Manufactured Board,U9500-1,HD1FRONTR,U9500 Receiver FPC(GSM
4 band,W2100/W1900/W1700/W850W/W900),1*1
1.0 PCS
4
03021KXW
Manufactured Board,U9500,HD1FRONTFL,U9500 flash light
FPC(GSM 4 band,W2100/W1900/W1700/W850W/W900),1*1
1.0 PCS
5
03021TXY
Manufactured Board,U9510,HD1U9510L01,U9510 main FPC(GSM 4
band,W2100/W1900/W1700/W850W/W900),1*1
1.0 PCS
6
03021KXU
Manufactured Board,U9500-1,HD1FRONTA,U9500 antana board(GSM
4 band,W2100/W1900/W1700/W850W/W900),6*6
1.0 PCS
7
04050406
Out Sourcing Cable,RF Coaxing Cable,75.6mm,fit
14240433,0.0756,Terminal Dedicated
1.0 PCS
8
22020079
Speaker,8ohm,0.5w,11*15*3.5(Improved),Terminal Dedicated
1.0 PCS
9
22030044
Receiver,32ohm,6*15*2.0mm,wideband,Terminal Dedicated
1.0 PCS
10
23060074
Camera Module Group,CMOS,1.3M-FF-Front-HD-BTB
1.0 PCS
11
51669306
Rear Housing Assy,Black,No Painting-U9510E
1.0 PCS
12
51611378
Volume Key,Black,PC-DKBA8.001.1650-U9500
1.0 PCS
13
51633671
DKBA8.092.8353-Sensor Rubber
1.0 PCS
14
51667937
DKBA4.140.7419-Rcv Fpc Frame Assy
1.0 PCS
15
51623280
RF Shielding Cover Asm
1.0 PCS
16
51623437
Screw-M1.4*1.8
5.0 PCS
17
51621203
DKBA8.900.0510,T5 pan head tapping
screw,ST1.4*4.0*D2.6*0.8,Plated with black zinc,,Unitary(priority)
4.0 PCS
18
51620751
DKBA8.900.0404,Cross recessed pan head mechanical
screw,M1.4*2.5*D2.5*0.5,Plated with black zinc,Unitary(priority)
2.0 PCS
19
51633672
DKBA8.092.8485-Lens Film
1.0 PCS
20
51633673
DKBA8.092.8515-TP-BTB Sponge
1.0 PCS
21
51633674
DKBA8.092.8562-Camera Sponge
1.0 PCS
Table 3-1 Component list
U9510E Maintenance Guide
Confidential
2012-12-05
Huawei Confidential
Page 10 of 76
No.
Part
Number
Description
Quantity
22
51633840
Tri-Colored-Mylar Tri-Colored-Mylar
1.0 PCS
23
51652322
DKBA8.818.2190-Waterproof Label-D3.0mm-Universal
1.0 PCS
24
51650888
DKBA8.817.7194,warranty label,2.5mm,General
1.0 PCS
25
24021105
Rechargeable Battery,Li-Polymer
Battery,HB5Q1HV,3.75V,2.6Ah,Single Cell,Max 6.1*56.5*58.0mm,No
Replaceable,4.30V High Voltage,Terminal Dedicated
1.0 PCS
26
27161024
Terminal Antenna,824MHz-960MHz/1710MHz-2170MHz,Better Than
-3dBi/Better Than -3dBi,Isotropic,line polarization,better than
3,4W,U9510E Main Antenna Fpc SAA
1.0 PCS
27
51633937
DKBA80931314,Front Housing Protect Film,U9500
1.0 PCS
28
02230NFA
U9510E,Black A_Cover+LCD+TouchLens
1.0 PCS
29
23060091
Camera Module Group,CMOS,8M-MIPI 4
lane-AF-BTB+FPC-8.5*8.5*6.0-5P Lens
1.0 PCS
The preceding component list is provided for reference only. It is subject to changes without
any notices. The latest component list is available in Huawei's ITEM information system. If
you have any question, contact your local technical support center.

U9510E Maintenance Guide
Confidential
2012-12-05
Huawei Confidential
Page 11 of 76
4 Components on the PCBA
U1601 LCD drive IC
Faults caused if damaged:
LCD display failure
U4801 RF DCDC
Faults caused if damaged:
Call failure
Z3599 Wi-Fi/Bluetooth filtering
Faults caused if damaged:
Wi-Fi/Bluetooth failure
X2601 RF32.768K crystal oscillator
Faults caused if damaged:
RF failure
U1800 RF chip
Faults caused if damaged:
Call failure
U3601 GPS chip
Faults caused if damaged:
GPS failure
U2801
Faults caused if damaged:
Call silence and Bluetooth/Wi-Fi
silence
U301/U301_POP and
AP+DDR2
Faults caused if
damaged:
Startup failure
J3602/J3603 antenna shrapnel
Faults caused if damaged:
Poor GPS signals
J1102 EMMC
Faults caused if damaged:
Startup failure
Secondary microphone
Faults caused if damaged:
Failure to record voices by using
the secondary microphone
U900 power management chip
Faults caused if damaged:
Startup failure
Upper FPC connector
Faults caused if damaged:
Touchscreen failure, light sensor failure, startup
failure, receiver silence, and distance sensor failure
J1800 camera connector
Faults caused if
damaged:
Failure of the main camera
U1001 SPK PA
Faults caused if damaged:
Speaker silence
U3104 level conversion chip
Faults caused if damaged:
MHL failure
U3501 WIFI/Bluetooth switch
Faults caused if damaged:
Wi-Fi/Bluetooth failure
U3401 WIFI/Bluetooth/FM chip
Faults caused if damaged:
Wi-Fi/Bluetooth/FM failure
U1301 battery meter
Faults caused if damaged:
Startup failure and charging failure
J2203 lower FPC connector
Faults caused if damaged:
Silence and voice recording failure
J1601 LCM connector
Faults caused if damaged:
J1301 battery connector
Faults caused if damaged:
Startup failure
U1501 headset PA
Faults caused if damaged:
Headset silence and startup failure
Bluetooth/Wi-Fi antenna
Faults caused if damaged:
Bluetooth/Wi-Fi failure and
startup failure
U4703 RF switch
Faults caused if damaged:
Call failure
U4701, U4702, U4703, and U4704
Faults caused if damaged:
Call failure
microSD card connector
Faults caused if damaged:
microSD card failure
Camera flash connector
Faults caused if damaged:
Poor performance of the camera flash
J1500 headset connector
Faults caused if
damaged:
Headset failure
U2005 compass chip
Faults caused if damaged:
Compass failure
U3801 modem chip
Faults caused if damaged:
2G/3G failure
Standby camera connector of
J1801
Faults caused if damaged:
Errors in the secondary camera
U2003 gyroscope chip
Faults caused if
damaged:
Gyroscope failure
U2004 accelerometer chip
Faults caused if damaged:
Accelerometer failure
U1901 charging chip
Faults caused if damaged:
Charging failure and Wi-Fi/Bluetooth
failure
U1600 LCD backlight chip
Faults caused if damaged:
LCD backlight failure
U1103 EMMC power supply
Faults caused if damaged:
Startup failure
U3101MHL conversion chip
Faults caused if damaged:
MHL failure
U3105 1.2V LDO
Faults caused if damaged:
MHL failure
U1905 MHL conversion chip
Faults caused if damaged:
MHL failure
Q1901 BAT switch
Faults caused if damaged:
Startup failure
RF connector
Faults caused if damaged:
Call failure
4.1 Layout
Figure 4-1 Layout of PCBA components (without the shielding can and frame)
U9510E Maintenance Guide
Confidential
2012-12-05
Huawei Confidential
Page 12 of 76
4.2 Component List
No.
Part
Number
Description
Quantity
Position
1
03021TXW
Manufactured
Board,U9510E,HD1U9510EMA,U9510EHandset Main
Board(8G ROM/FM/GSM 4
Band,W2100/W1900/W1700/W900/W850),Terminal
Dedicated,2*2
2
03010LFA
Manufactured Board,U9510,HD1U9510MT,U9510
Handset Main Board,2*2
1.0 PCS
44
40020172
DDR2 DRAM,8Gb
LPDDR2,533MHz,32bit,1.8V/1.2V,216BALL
FBGA(POP),Terminal Dedicated
1.0 PCS
U300_POP
45
39080180
Operation Amplifier,Audio Power
Amplifier,2.5V~5.5V,Differencial,Micro SMD
16pin(WLCSP),Teminal Dedicated
1.0 PCS
U1001
46
40060331
MCP,8GB(8Gbx8)
EMMC,52MHz,3.3/1.8V,FBGA169,512Mb(32Mbx16)
LPDDR,Terminal Dedicated
1.0 PCS
U1102
47
38020065
Analog Switch,one input one output load
switch,1.2V~4.0V,150mohm,WLCSP
3.0 PCS
U1103,
U2201, U3207
48
39070073
-0.3~2.75V,Battery Gauge,SON,Terminal Dedicated
1.0 PCS
U1301
49
39080124
Operation Amplifier,Headphone Audio Power
Amplifier,2.3 V to 5.5 V,differential AB
Amplifier,QFN,Terminal Dedicated
1.0 PCS
U1501
50
39110626
Switching
Regulators,Vin~38V,0.02A,QFN-2*2,SMT,2*2,10 LED
Driver,Terminal Dedicated
1.0 PCS
U1600
51
39110636
SwitchingRegulators,0~5.5V0~-7V,1%,0.08A,ThinQFN,
SMT,3mm*3mm,LCD Driver,Terminal Dedicated
1.0 PCS
U1601
52
39110620
Power Driver,1.5A LED flash driver IC,CSP,Terminal
Dedicated
1.0 PCS
U1800
53
38020063
Analog Switch,triple throw (DP3T)
multiplexer,2.5V~5.5V,Ron(max)<10ohm,1800MHz,QF
N,2.0 x 1.7 x 0.5 mm
1.0 PCS
U1905
54
38140020
Semiconductor Sensor,three-axis gyroscope,SMT
1.0 PCS
U2003
55
38140064
Semiconductor
Sensor,Accelerometer,LGA,3axis,Terminal Dedicated
1.0 PCS
U2004
Table 4-1 List of components on the PCBA
U9510E Maintenance Guide
Confidential
2012-12-05
Huawei Confidential
Page 13 of 76
No.
Part
Number
Description
Quantity
Position
56
38140024
Semiconductor
Sensor,E-Compass,WL-CSP(Pb-free),3axis,Terminal
Dedicated
1.0 PCS
U2005
57
43110067
AUDIO Chip,BGA32,2 Digital Microphones Noise
Cancelation/4 Digital Audio Ports (PCM/I2S)/Voice
Equalization,Terminal Dedicated
1.0 PCS
U2801
58
43090124
VIDEO Chip,49 VFBGA,1.2V/1.8V/3.3V,HDMI&USB
2in1,1080p/30Hz, Terminal Dedicated
1.0 PCS
U3101
59
39110548
LDO,3.3V,2%,0.15A,SC70-5,Terminal Dedicated
1.0 PCS
U3104
60
39110566
Switching Regulators,1~4V,1.5A,SMT,Terminal
Dedicated
1.0 PCS
U3105
61
39110670
Power Driver,BOOST DCDC,6-WCSP,OTG 5V Power
Supply,Terminal Dedicated
1.0 PCS
U3220
62
39210010
Terminal Baseband process IC,Single Band 2.4GHz
WLAN/Bluetooth 2.1/FM Single
chip-BCM4330,2.3~5.5V,WLBGA133(Pb-free)
1.0 PCS
U3401
63
47140049
RF Switch,0.5~3.0
GHz,SP3T,0.45dB,1.22,20dB,TSON,200~260V(HBM),T
erminal Dedicated
1.0 PCS
U3501
64
39210036
Terminal Baseband Peripheral IC,GPS Receiver,support
GLONESS,2.3~5.5V-WLBGA42(Pb-free),Terminal
Dedicated
1.0 PCS
U3601
65
47090053
RF LNA,1575MHz,14dB min.,1.6dB
max.,SOT886,Terminal Dedicated
1.0 PCS
U3699
66
39200240
Terminal Baseband process IC,WCDMA/GSM
Dual,mode Baseband
Processor-XMM6260(PMB9811),3.05V-4.8V,PG-VF2B
GA-221-1
1.0 PCS
U3801
67
39200241
Terminal Baseband process IC,WCDMA/GSM Dual
Mode, RF Transceiver
SMartUE2(PMB5712),2.5V/1.8V,PG-WFWLB-138-2,Te
rminal Dedicated
1.0 PCS
U4701
68
13080147
Duplexer,RX:1805-1880MHz/TX :1920-1980MHz/RX:2
110-2170MHz/TX:1710-1755MHz/RX:2110-2155MHz/
TX:1850-1910MHz/RX:1930-1990MHz/TX:824-849MH
z/869-894MHz/TX:880-915MHz/RX:925-960MHz,3dB.,
3.95dB.,47dB,SMT,Terminal Dedicated
1.0 PCS
U4702
69
47140075
RF Switch,824~2170MHz-SP8T
ASM,1.30dB(Max.),25dB,LGA,1000V,Terminal
Dedicated
1.0 PCS
U4703
U9510E Maintenance Guide
Confidential
2012-12-05
Huawei Confidential
Page 14 of 76
No.
Part
Number
Description
Quantity
Position
70
47100541
RF Power Amplifying
Module,1710~1785MHz/1850~1910MHz/1920~1980MH
z/824~849MHz/880~915MHz,35.7dB
max.,35dBm,MCM,Terminal Dedicated,New Version
Part,47100455 is old version.
1.0 PCS
U4704
71
12070027
Temperature Compensated
Oscillator,26MHz,+/-2.5ppm,1.8v-2.9v,+/-2.5ppm,30deg
C,85degC,Terminal Dedicated
1.0 PCS
U4708
72
39070119
Power Management IC,2.9~5.1V,PUMP-BUCK DCDC
0-5V,auxiliary charge pump 4V 10mA,WLCSP,Terminal
Dedicated
1.0 PCS
U4801
73
39070116
Power Management IC,2.9~5.1V,3bucks(1.2V 3A;1.8V
3A;2.85V 3A),1 LDO 2.65V,compatiable with infineon
transceiver PMB5712,16-BUMP WLCSP,Terminal
Dedicated
1.0 PCS
U4802
76
13010264
SAW Filter,1590.16MHz,1.8dB,50V,1411,Terminal
Dedicated
2.0 PCS
Z3601, Z3602
79
13030067
Ceramic Filter,2450MHz,1.8dB,20125,Terminal
Dedicated
1.0 PCS
Z3599
81
39070150
Battery Management IC, 4.2V,18V,Charger with separate
Power Path Control,WCSP,SMT,Terminal Dedicated
1.0 PCS
U1901
The preceding component list is provided for reference only. It is subject to changes without
any notices. The latest component list is available in Huawei's ITEM information system. If
you have any question, contact your local technical support center.
U9510E Maintenance Guide
Confidential
2012-12-05
Huawei Confidential
Page 15 of 76
5.1 Upgrade Preparation
Category
Item
Remarks
Upgrade
environment
Computer
OS: Windows 2000, Windows XP, or
Windows 7
microSD card
Available space > 512 MB
Battery
Remaining power > 20%
Upgrade file
update.app
This version is provided for reference only.
Please download the latest version when
upgrading the software.
Using the microSD card
Normal upgrade
Forcible upgrade
Table 5-1 Software upgrade method
5 Software Upgrade
5.2 Upgrade Using the microSD card
5.2.1 Performing a Normal Upgrade
1. Create a dload folder under the microSD card's root directory.
2. Copy the update.app file to the dload folder.
3. Install the microSD card to the phone and power the phone on.
4. Enter *#*#2846579#*#* on the dial pad.
5. Choose ProjectMenu > Upgrade > SD card upgrade, and click Confirm.
6. The upgrade progress is displayed on the LCD.
7. After the upgrade is complete, the phone automatically restarts.
8. If the upgrade fails, the upgrade page remains to be displayed, and an upgrade failure
message is displayed.
U9510E Maintenance Guide
Confidential
2012-12-05
Huawei Confidential
Page 16 of 76
5.2.2 Performing a Forcible Upgrade
Failure
Solution
Fail to upgrade the
phone using the
microSD card.
1. Check that the upgrade file is correct.
2. Check that the upgrade file is stored in the right directory.
3. Check that the upgrade method is correct.
4. Check that the microSD card functions properly.
5. Perform the upgrade again.
If your phone cannot be properly powered on, perform a forcible upgrade as follows:
1. Create a dload folder under the microSD card's root directory.
2. Copy the update.app file to the dload folder.
3. Install the microSD card to the phone.
4. When the phone is powered off, press the volume up, volume down, and power keys
together for at least 3 seconds.
5. The phone enters the upgrade state. The upgrade progress is displayed on the screen.
6. After the upgrade is complete, the phone automatically restarts.
7. If the upgrade fails, the upgrade page remains to be displayed, and an upgrade failure
message is displayed.
5.3 Troubleshooting
Table 5-2 Troubleshooting process
U9510E Maintenance Guide
Confidential
2012-12-05
Huawei Confidential
Page 17 of 76
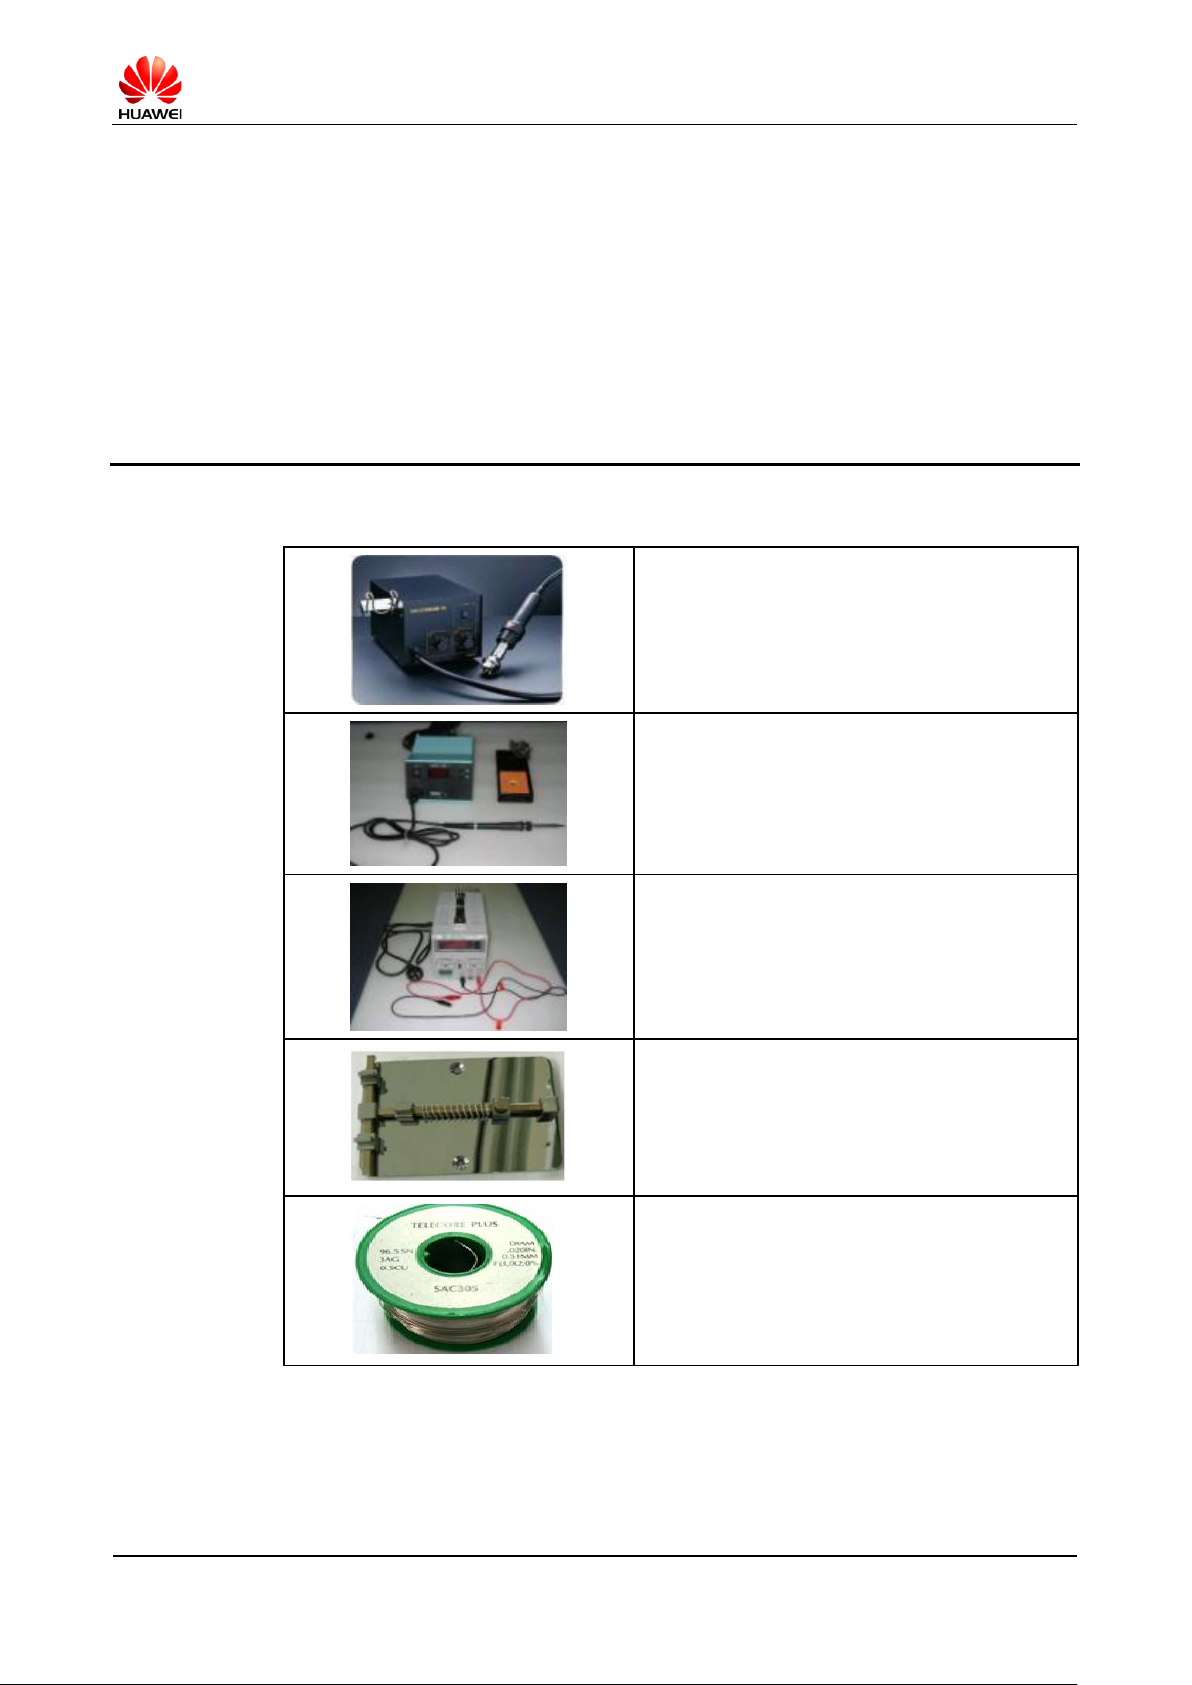
6 Maintenance Tools
Name: constant-temperature heat gun
Usage: to heat components
Name: soldering iron
Usage: to maintain and solder components
Name: DC power supply
Usage: to supply DC current
Name: soldering table
Usage: to secure the PCBA
Name: lead-free solder wire
Usage: for soldering
U9510E Maintenance Guide
Confidential
2012-12-05
Huawei Confidential
Page 18 of 76
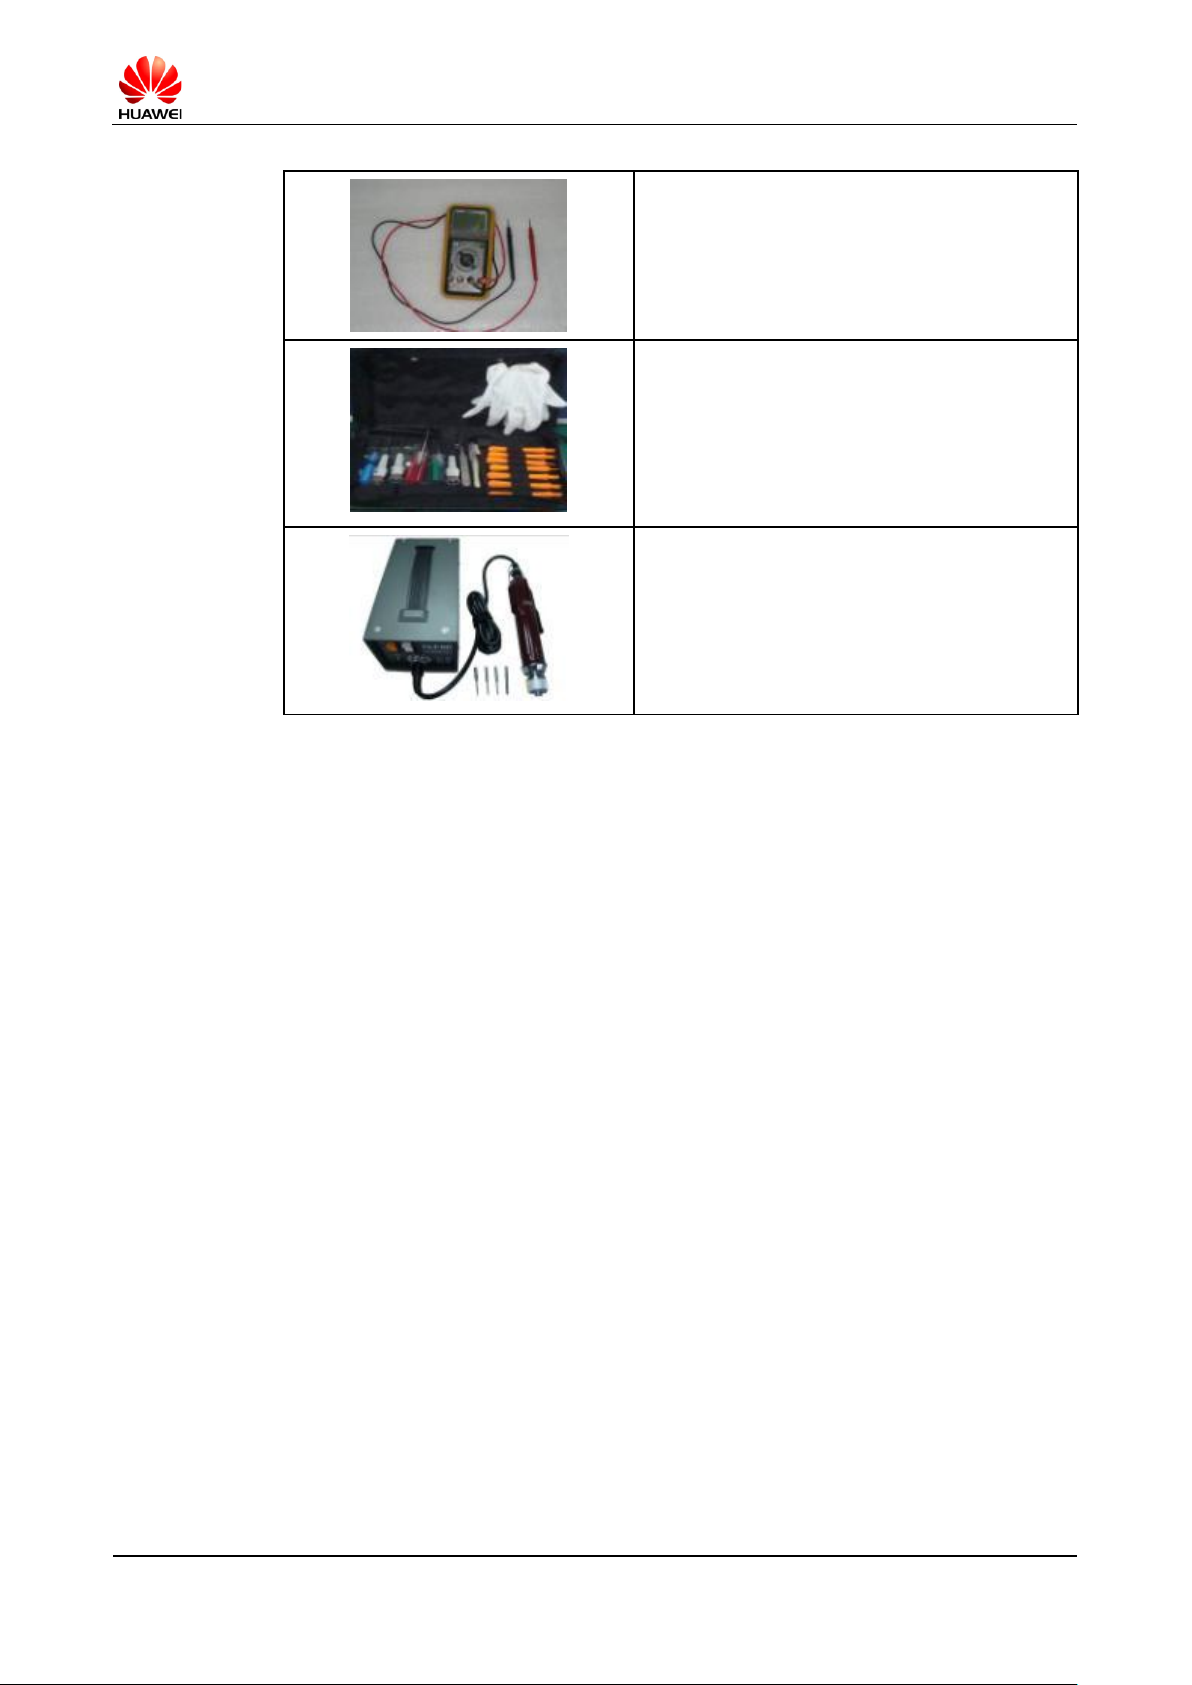
Name: digital multimeter
Usage: to measure during repair
Name: toolkit
Usage: to assemble and disassemble components
Name: electric screwdriver
Usage: to fasten and remove screws

U9510E Maintenance Guide
Confidential
2012-12-05
Huawei Confidential
Page 19 of 76
7 Disassembly Procedure
4. Remove the square screws from the middle.
3. Remove the hexagon screws from the four corners.
2. Remove the battery cover.
1. Prepare for the disassembly.
Pry bar
U9510E
Tweezers
Square
screwdriver
Hexagon
screwdriver

U9510E Maintenance Guide
Confidential
2012-12-05
Huawei Confidential
Page 20 of 76
10. Remove the dome.
9. Remove the volume key.
8. Remove the rear cover.
7. Stick the pry bar into the bottom of the rear cover to pry up the
rear cover.
6. Remove the two square screws from the other side.
5. Remove the two square screws from one side.
U9510E Maintenance Guide
Confidential
2012-12-05
Huawei Confidential
Page 21 of 76
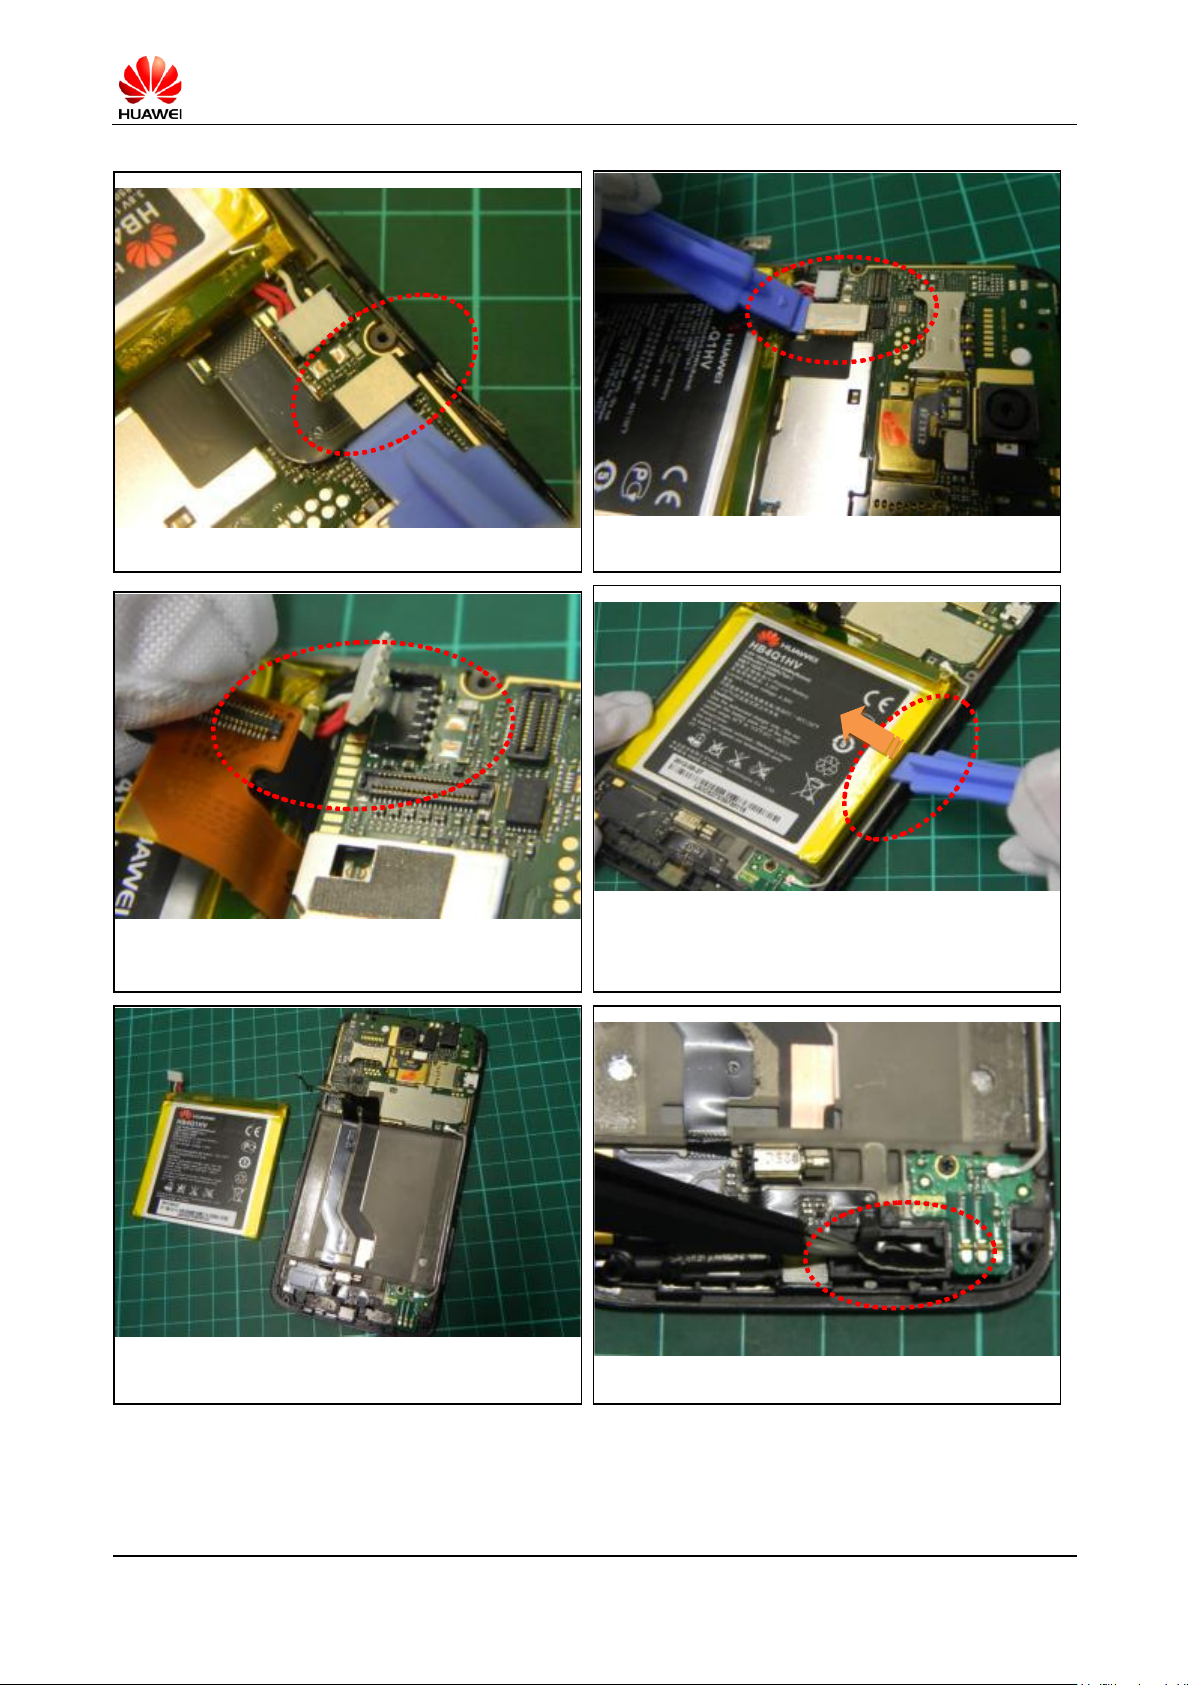
16. Remove the key backlight.
15. The battery is removed.
14. Remove the battery with caution. Do not poke the
double-sided tapes attached between front cover brackets. The
battery backside is covered by aluminum. The battery cannot be
reused after being removed.
13. Remove the battery connector.
12. Remove the LCD FPC BTB.
11. Remove the main FPC BTB.

U9510E Maintenance Guide
Confidential
2012-12-05
Huawei Confidential
Page 22 of 76
22. Hold the PCBA and pull it downwards to remove it.
20. Remove the screws from the antenna panel and then remove
the antenna panel.
18. Remove the main FPC.
21. Remove the bracket BTB from the magnesium alloy card hook
on the PCBA.
19. Remove the coaxial cable.
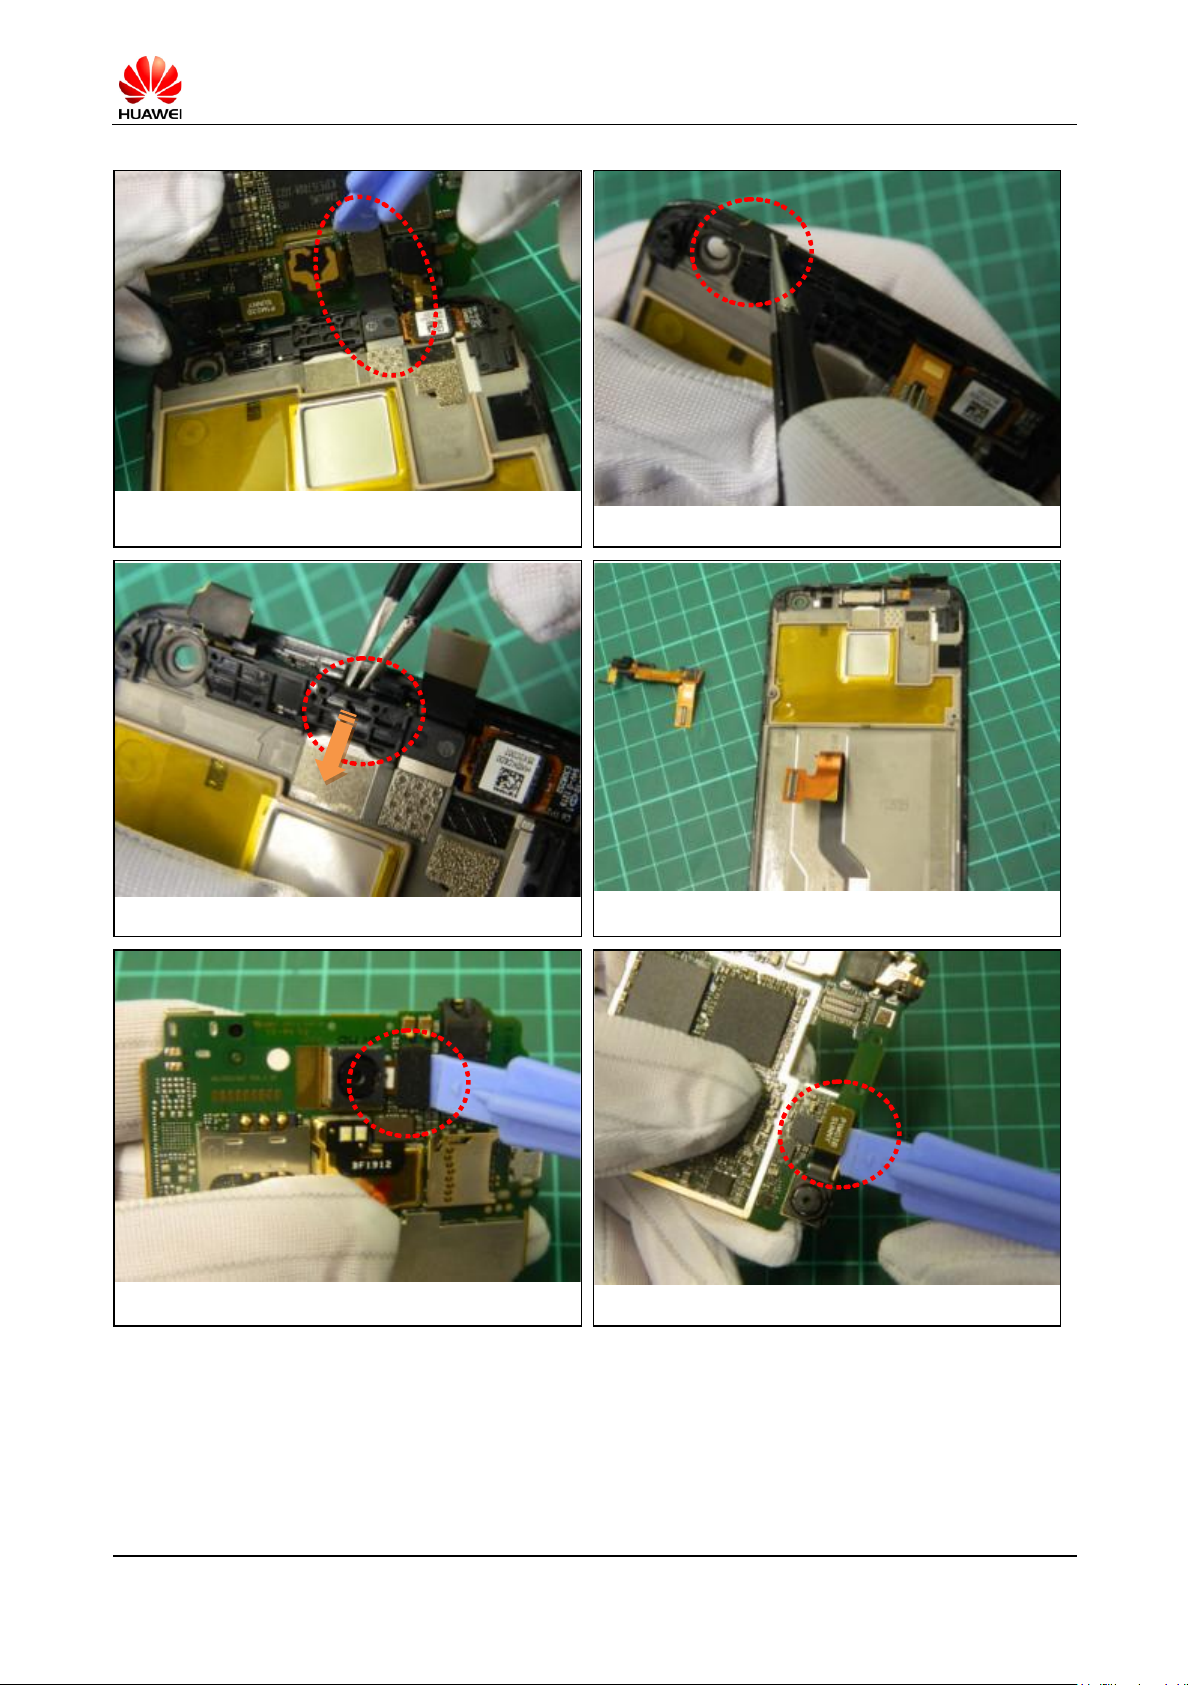
17. Remove the main microphone.
U9510E Maintenance Guide
Confidential
2012-12-05
Huawei Confidential
Page 23 of 76
28. Remove the secondary camera.
26. Take out the receiver bracket.
24. Use tweezers to pry up the dome of the power key.
27. Remove the main camera.
25. Use tweezers to pry up the receiver bracket.
23. Remove the receiver FPC BTB.
 Loading...